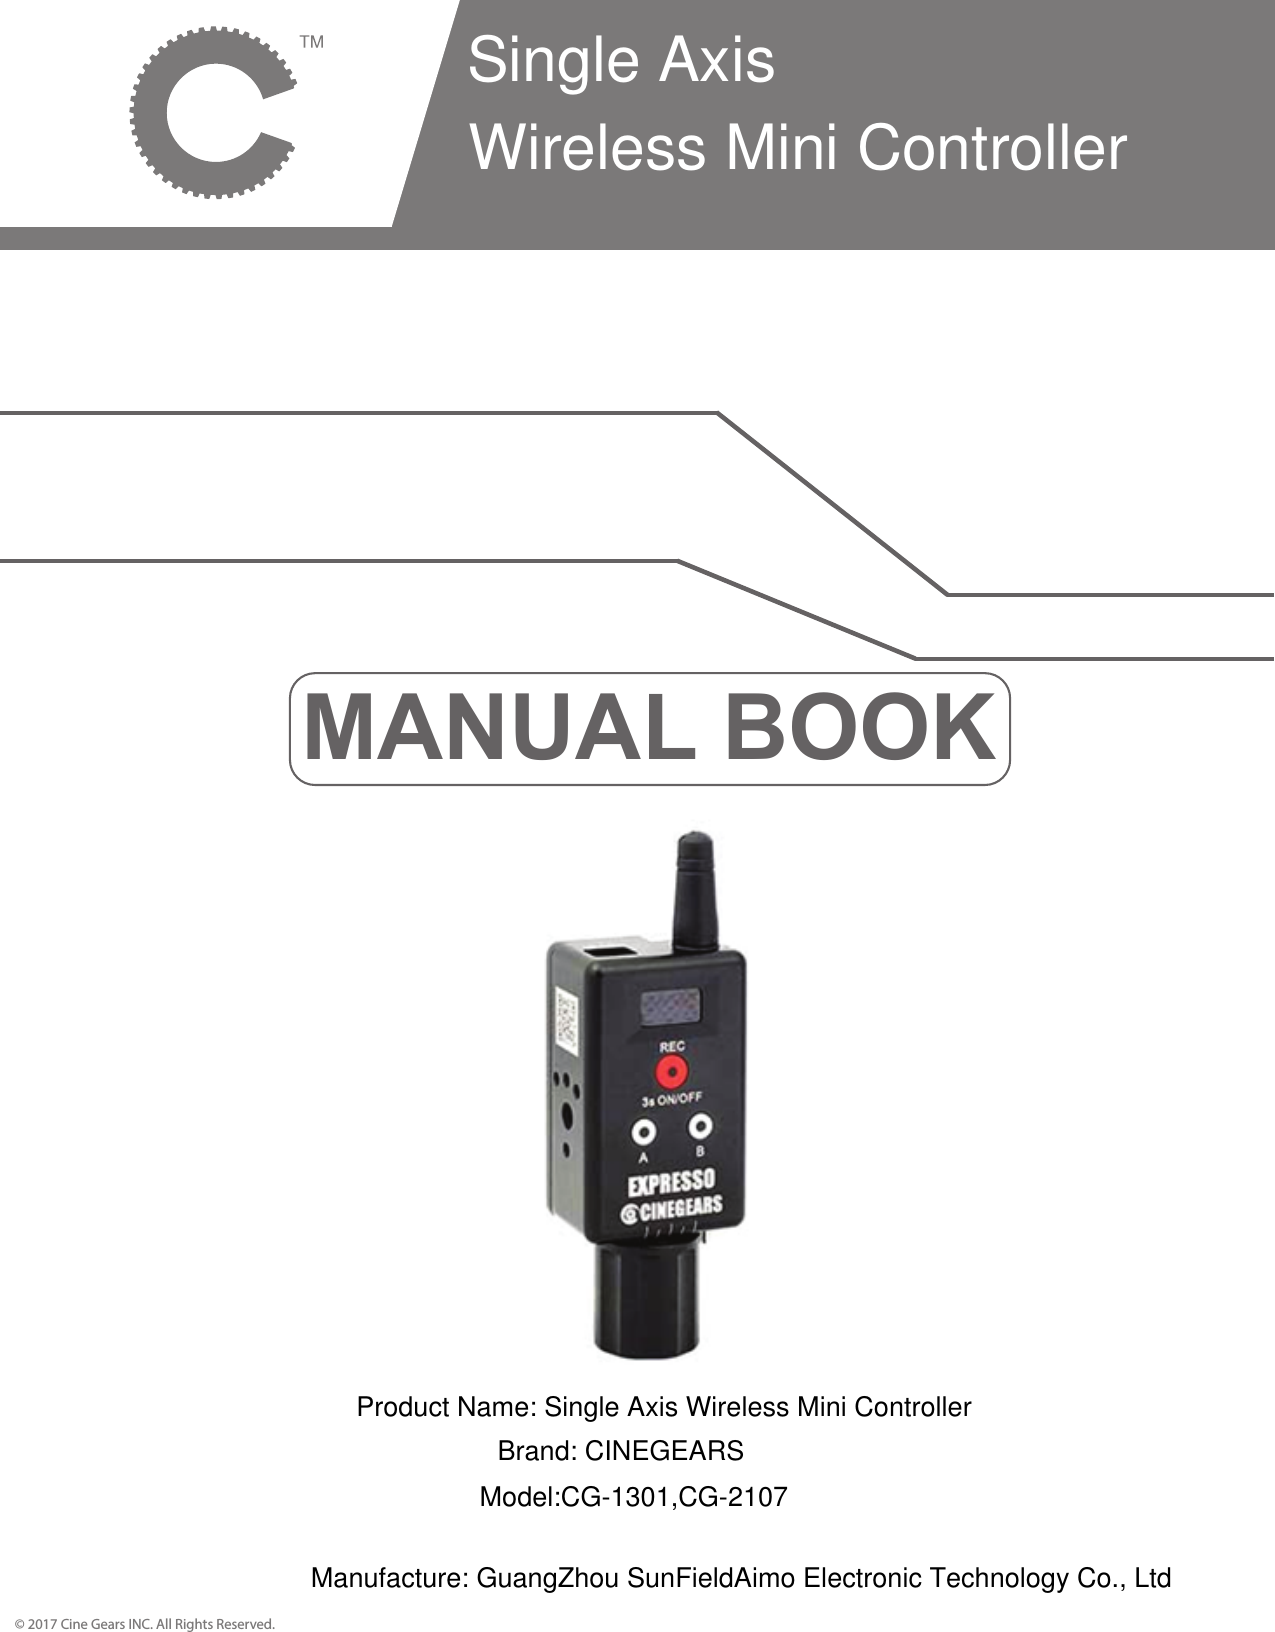
GuangZhou SunFieldAimo Electronic Technology CG-1301 Single Axis Wireless Mini Controller User Manual Mini Fingerwheel Controller Manual

GuangZhou SunFieldAimo Electronic Technology Co., Ltd Single Axis Wireless Mini Controller Mini Fingerwheel Controller Manual

User Manual

MANUAL BOOK© 2017 Cine Gears INC. All Rights Reserved.Single Axis Wireless Mini ControllerProduct Name: Single Axis Wireless Mini ControllerBrand: CINEGEARSModel:CG-1301,CG-2107Manufacture: GuangZhou SunFieldAimo Electronic Technology Co., Ltd
InstructionsTurn On/Off the Fingerwheel ControllerHold the (REC) button for three seconds to turn the Fingerwheel Controller On/Off. Hold the (REC) button on your Fingerwheel controller for three seconds to turn it on. When your Fingerwheel Controller is on, hold the (REC) button for three seconds to turn it off. The number that shows up on your Fingerwheel controller when you turn it on will show the Fingerwheel controller’s battery percentage. Synchronize the Fingerwheel ControllerHold the button on the motor for three seconds then hold all three buttons on the Fingerwheel switch controller for three seconds. Hold the button on your motor for three seconds, when it changes from flashing blue to green, press and hold all three buttons, (REC), (A) and (B) on your Fingerwheel controller for three seconds. In this way, it synchronizes both the Fingerwheel controller and motor together. Automatic Lens Calibration Hold the (REC) and (A) button for three seconds. After your Fingerwheel controller and motor are synchronized, press and hold (REC) and (A) button on your Fingerwheel controller at the same time for three seconds, this activates the automatic lens calibration. This option is for the camera lens that has the hard stops. For the camera lens that does not have the hard stops, read the following manual lens calibration below.Manual Lens CalibrationHold the (REC) and (B) button for three seconds. Press the (A) button to rotate the lens clockwise, and then press the (A) button again to stop the rotation and press the (REC) button to set the start point. Press the (B) button to rotate counter clockwise and press the (B) button again to stop the rotation, and then press the (REC) button to choose the end point. After your Fingerwheel controller and motor are synchronized, press and hold the (REC) and the (B) button on your Fingerwheel Controller at the same time for three seconds until S-1 flashes.Then press and hold the (A) button for three seconds until the gear rotates. When your camera lens reaches the minimum focus distance, press on the (A) button again which makes the gear stop rotating. Then press the (REC) button to set your camera minimum focus distance point. After you set the minimum focus distance point, S-2 should be flashing. Then press and hold the (B) button for three seconds, the gear will then rotate to the opposite direction. When it reaches your camera’s maximum focus distance point, you have to press the (B) button again to stop the rotation of the gear. Then press the (REC) button to set the camera’s maximum focus distance. Remember, you can always press on the (A) button or the (B) button for the micro adjustments when it passes the camera’s focus distance.Setting up Two Preset PointsPush the switch, press and hold (A) and (B) button for three seconds Push the Fingerwheel switch on your Fingerwheel controller to a lens focus distance point, then press and hold the (A) button for three seconds to record that point. Then move on to the next lens focus distance point, press and hold the (B) button for three seconds to record your second lens focus distance point. © 2017 Cine Gears INC. All Rights Reserved. 1
Instructions© 2017 Cine Gears INC. All Rights Reserved. 2Setting up a PresetHold the (A) and (B) button for three seconds to get the accessibility to the espresso function manual. F01 is the motor rotating speed option. F03 is the manual lens calibration option. F05 is the recalibrating focus controller option. When you press and hold the (A) and (B) button on your Fingerwheel controller for three seconds, this gives you the accessibility to your espresso controller’s function manual. To enter each function you can just simply press the (REC) button. The F01 Function is the speed control which makes the gear rotate at a different range of speeds. Press on the (A) button or (B) button to change the number, the larger the number goes, the faster the gear rotates. After you choose a speed number, press the (REC) button again to let your Fingerwheel controller to record that number.Recalibrating the Focus ControllerAfter you get to your Fingerwheel controller function manual, go to the F05 function. Push your Fingerwheel switch to the beginning point then press the (REC) button.  Push your Fingerwheel switch again to a distance that you want then press the (REC) button again. First, go to your Fingerwheel function manual by pressing and holding the (A) and (B) button for three seconds at the same time. Then, go to the F05 function by pressing the (B) button for four times and press the (REC) button to enter that function. Push your Fingerwheel switch to beginning point and hold the (REC) button to record that rotation angle. Then push the switch again to your designated rotation angle, and hold the (REC) button again to record your second rotation angle. This sets up your full camera lens traveling distance to the angle you have set. In other words, the rotating distances of your camera lens will length while the distance of the controller will shorten.Manual Function ControlsTo access the function menu, hold down the A and B buttons for 3 seconds. You can navigate between functions with the A (Back) and B (Forward) buttons. Select function to adjust with REC button. Some functions are adjusted with the A (Reduce) and B (Increase) buttons, while others are adjusted with the Fingerwheel Switch itself.F01 – Speed Adjustment setting. Choose from 1 -15 using the A and B buttons, 1 being the slowest speed and 15 being the fastest.F02 – Automatic Motor Calibration. Yields the same result as holding down REC, A and B for 3 seconds.F03 – Manual lens Calibration. Allows you to manually set the maximum and minimum motor positions.F04 – EXIT. This function exits the menu without any changes.F05 – Manual Range. This will allow you to set the effective range of your Fingerwheel Switch.F06 – Reverse Spin Direction. Determines which way the motor will spin, it yields the same result as the button on the motor itself.F07 – Flip the LED display. This function flips the LED display upside-down, for those who prefer to use the Fingerwheel Switch in different ways.
FCC Caution.  This  device  complies  with  part  15  of the  FCC Rules.  Operation  is  subject  to  the  following  two conditions:   (1) This device may not cause harmful interference, and   (2)  this  device  must  accept  any  interference  received,  including  interference  that  may  cause undesired operation.  Any  Changes or modifications  not expressly  approved by the party responsible  for  compliance could void the user's authority to operate the equipment.  Note: This equipment has been tested and found to comply with the limits for a Class B digital device, pursuant to part  15  of  the  FCC Rules.  These  limits are  designed  to  provide reasonable protection  against  harmful  interference  in  a  residential  installation.  This  equipment  generates uses and can radiate radio frequency energy and, if not installed and used in accordance with the instructions,  may  cause  harmful  interference  to  radio  communications.  However,  there  is  no guarantee  that  interference  will  not  occur  in  a  particular  installation.  If  this  equipment  does cause harmful interference to radio or television reception, which can be determined by turning the equipment  off and on, the user  is  encouraged to try  to correct the  interference by one or more of the following measures: -Reorient or relocate the receiving antenna. -Increase the separation between the equipment and receiver. -Connect the equipment into an outlet on a circuit different from that to which the  receiver is connected. -Consult the dealer or an experienced radio/TV technician for help.
IC Warning  This device complies with Industry Canada licence-exempt RSS standard(s). Operation is subject tothe following two conditions:(1) This device may not cause interference, and (2) This device must accept any interference, including interference that may cause undesiredoperation of the device.  Le présent appareil est conforme aux CNR d'Industrie Canada applicables aux appareils radio exemptsde licence. L'exploitation est autorisée aux deux conditions suivantes: (1) l'appareil ne doit pas produire de brouillage, et  (2) l'utilisateur de l'appareil doit accepter tout brouillage radioélectrique subi, même si lebrouillage est susceptible d'en compromettre le fonctionnement

Navigation menu