Gustav Magenwirth and KG ELECT Seatpost, Rearshock, Fork User Manual User Instructions Rear Shock TS RL RC
Gustav Magenwirth GmbH & Co.KG Seatpost, Rearshock, Fork User Instructions Rear Shock TS RL RC
Contents
- 1. UserManual_Fork.pdf
- 2. UserManual_Rearshock.pdf
- 3. UserManual_Seatpost.pdf
UserManual_Rearshock.pdf
THE PASSION PEOPLE
www.magura.com
User instrUctions
TS RL · TS RC
TS R eLeCT
THE PASSION PEOPLE
www.magura.com
1×
TS RC TS RL TS RL & RCL² TS R eLECT
sag ~25 %
100 %
17 bar (247 psi) max.
5 bar (73 psi) min.
A
1×
TS RC TS RL TS RL & RCL² TS R eLECT
B
132
4
ENGLISH
TS 165 TS 190 TS 200 TS 215
165 mm
6.5 in
190 mm
7.5 in
200 mm
7.9 in
215 mm
8.5 in
100 %
38 mm
1.5 in
51 mm
2.0 in
56 mm
2.2 in
63 mm
2.5 in
sag ~25 %
~
10 mm
0.39 in
~
13 mm
0.51 in
~
14 mm
0.55 in
~
16 mm
0.63 in
min.– max. ~ 9 clics
D
E
5
2 N·m (18 lbf·in) max.
2,5 mm
F
6
7
3 – 30 s
3 – 30 s
1. 8 s min. 2. 1×
3. 3 s min.
C
THE PASSION PEOPLE
www.magura.com
Welcome to the PASSION PEOPLE!
Your new mountain bike comes with the versatile, adjustable MAGURA TS
rear shock.
Please read these user instructions carefully before you use your MAGURA
product. Read and follow all the instructions in the manual provided by the
manufacturer of your mountain bike.
The following instructions (SetUp) for adjusting your rear shock are basic
and are designed to help you understand the process. The detailed
instructions in the user instructions provided by the manufacturer of your
mountain bike should be followed.
Remember that the MAGURA rear shock of your new mountain bike is
designed and sized exclusively for its frame. Never install this rear shock
on a different frame – we cannot guarantee its correct function and its
safety in that case.
If you have purchased your MAGURA rear shock separately for tuning or
retrofitting, please follow the included installation instructions.
Never overestimate your technical capabilities. Commission a specialist
workshop for bicycles or an authorized MAGURA service centre with all
installation and maintenance work. This is the only way to ensure that
work is conducted in a professional manner.
Failure to observe the instructions in these user instructions can lead to
serious or fatal accidents.
Keep these user instructions for other users of your MAGURA product.
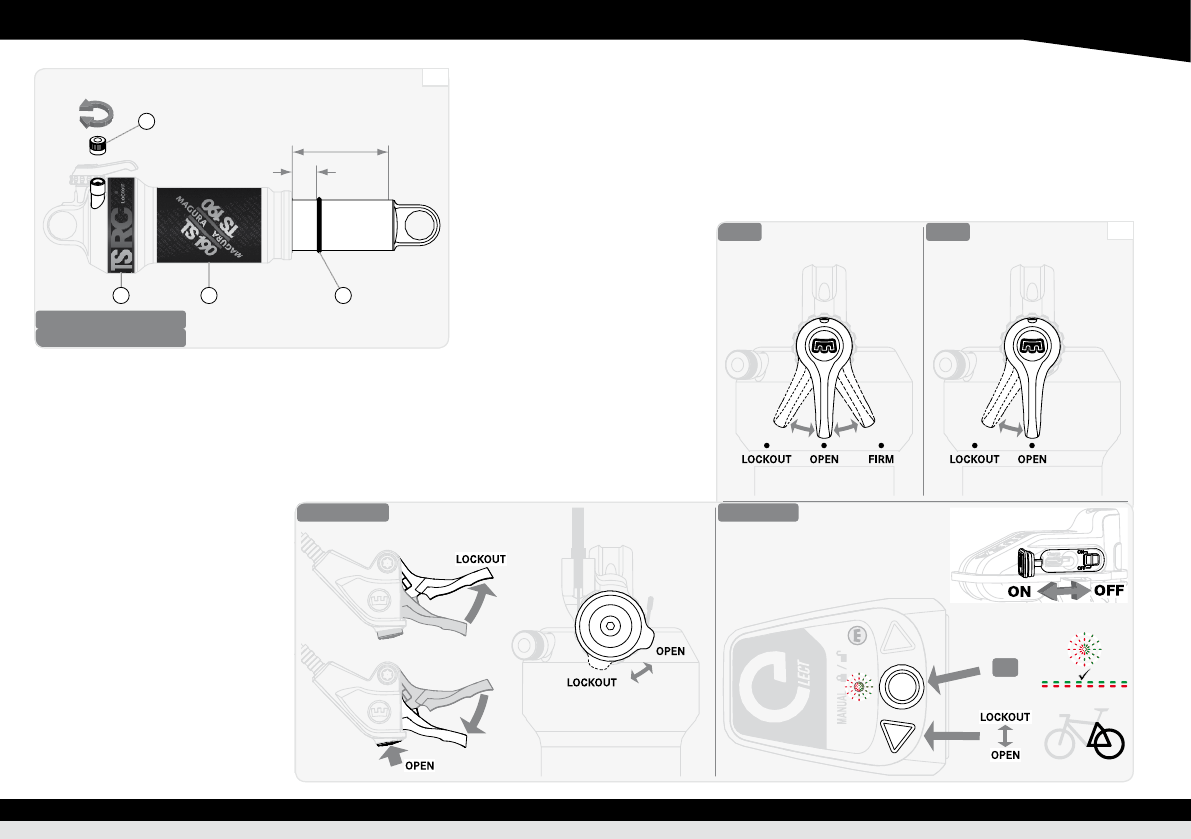
The type name
(1) and variant
(2) of your MAGURA rear shock can be found
on the air canister
[A].
Visit www.magura.com for more tips and information on your MAGURA
product. You can also exchange experiences, ask questions and generally
“talk shop” with many PASSION PEOPLE members on the MAGURA Forum.
We wish you great success and a great ride
Your MAGURA Team
Legend
)The pointing finger prompts you to perform an action.
ÎÎThe arrow shows results or requirements.
This notice gives you additional information or tips.
This notice warns you about a dangerous situation which can lead to
serious or fatal injury if not avoided.
This notice warns you about the risk of material damage.
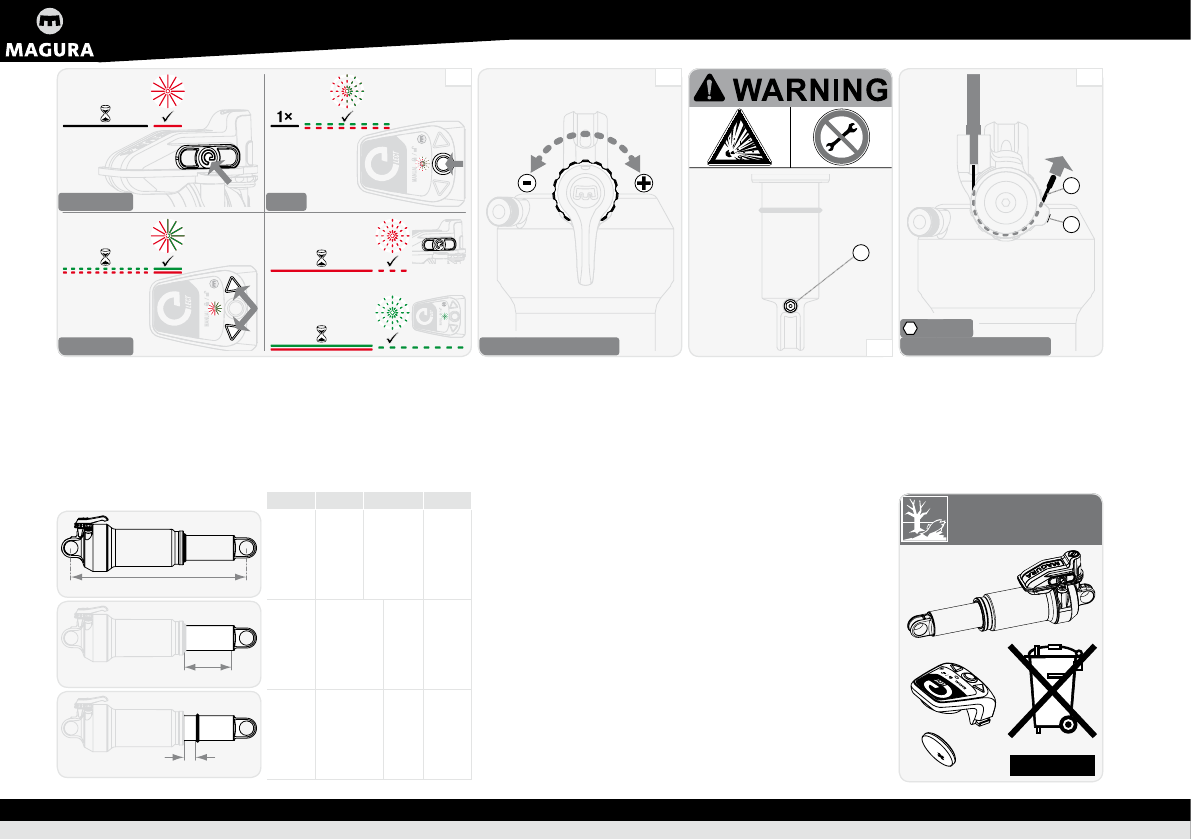
The following instructions only describe the SetUp of your eLECT rear
shock. You will need to download the „Suspension Forks“ owner‘s manual
(from the 2015 model year) with all other information on eLECT
(Basic safety instructions, Taking eLECT into operation, automatic/
manual mode, Exchanging the battery/rechargeable battery, Rectifying
eLECT faults, Performing an eLECT reset) in PDF format from
www.magura.com, if you have an older version or no manual!
The eLECT remote control and the eLECT unit must be synchronised
(paired) when used for the first time and after replacing the battery
[C].
ENGLISH
setUp – negative sUspension stroke (sag)
[A]
The sag designates the distance by which your rear shock drops if you
apply your own bodyweight to it; this gives you some initial feedback as
to whether the air pressure setting is in the right range.
If your rear shock frequently bottoms out in spite of the correct setting
of the negative suspension stroke (sag), the air volume must be
reduced with the MAGURA rear shock spacer kit.
This is generally the case if the rear triangle of your bicycle has highly
degressive lever kinematics.
The installation of the correct spacers increases the progression of the
rear shock under the same air pressure, i. e. the last part of the
suspension travel requires greater force.
For more information see www.magura.com.
)Set the compression lever to the OPEN position
[B].
)Slide the O-ring
(3) on the piston forward.
)Mount your bike carefully – don’t bob up and down.
)Measure the distance between the rubber ring and the scraper.
ÎÎsag > 25 % – increase air pressure.
sag < 25 % – reduce air pressure.
adjUsting the sUspension (air pressUre)
[A]
The air suspension on your MAGURA rear shock helps to compensate
for uneven terrain and keeps your rear wheel in contact with the ground
at all times.
Insufficient air pressure causes a pronounced drop, frequent bottoming
out and a spongy ride.
Excessive air pressure reduces the maximum suspension travel and
provokes a hard response from your rear shock.
As a general rule, the higher your weight and speed, and the rougher
the terrain, the higher the air pressure will need to be.
Material damage due to severe bottoming out caused by insufficient air
pressure.
Ζ Never use your rear shock if there is insufficient or no air pressure.
Material damage due to excessive air pressure.
Ζ Never exceed the maximum permissible air pressure of 17 bar (247 psi).
Air leaking due to incorrect fitting of the valve cover.
Ζ Never use the rear shock without a valve cover
(4).
Ζ Always keep the valve cover seals clean.
Ζ Always firmly close the valve cover.
)Set damping (compression damper) to OPEN
[B].
)Adjust the air pressure if necessary – use a suitable pump
(e. g. MAGURA suspension pump).
THE PASSION PEOPLE
www.magura.com
setUp – damping (reboUnd damper)
[D]
The rebound damping defines the speed at which your rear shock
decompresses.
A high rebound damping setting (+) causes slower decompression thus
reducing ground contact and possibly impairing traction and control.
Lower rebound damping setting (-) causes faster decompression which
causes the rear wheel to jump and can thus also impair traction and
control.
As a general rule, the higher your bodyweight and speed, and the
rougher the terrain, the higher the rebound damping will need to be.
)Set damping (compression damper) to OPEN
[B].
)First, turn the red adjusting dial counter-clockwise (-) to the stop.
)Turn the red adjusting dial 4–5 clicks clockwise (+).
ÎÎThis sets the rebound damping to an average value.
)Gradually increase (+) the rebound damping by 1 click – if the rear
triangle rebounds more than 1 or 2 times.
)Gradually reduce (-) the rebound damping by 1 click – if your rear shock
decompresses too slowly.
setUp – damping (compression damper)
[B]
You can set the damping of the compression damper of your rear shock
to suit your own needs with the compression lever, with the RCL² remote
control lever or with the eLECT remote control.
)OPEN – rear shock is fully active.
ÎÎSensitivity (compression behaviour) fully present.
)FIRM (TS RC) – rear shock is less active.
ÎÎThis favours an aggressive riding style.
ÎÎSensitivity (compression behaviour) is reduced.
ÎÎBottoming behaviour is reduced.
ÎÎFeedback from the ground is greater.
)LOCKOUT (TS RC) – rear shock is very hard on compression.
ÎÎSensitivity (compression behaviour) is greatly reduced.
ÎÎUphill riding is favoured.
)LOCKOUT (TS RL & TS R eLECT) – rear shock is very hard on
compression.
ÎÎRear shock is completely blocked.
ÎÎUphill riding is favoured.
Heavy loads are also absorbed by your rear shock in LOCKOUT mode
(blow-off) to prevent damage to the damping system.
maintenance
[E]
Danger of accident due to pressurised parts.
Ζ Never unscrew the screw plug
(5) at the bottom end of the piston.
Loss of oil and irreparable damage to the damping system.
Ζ Never remove the rear shock screws.
Damage to material due to faulty installation work.
Ζ The rechargeable battery of the TS R eLECT rear shock must exclusively
be exchanged directly at MAGURA.
Never dispose of batteries, rechargeable batteries and electronic devices
with normal domestic waste; instead, always take them to a specified
collecting facility.
ENGLISH
after each trip
)Clean the piston with a clean dry cloth.
Increased seal wear.
Ζ Do not apply lubricants to the piston.
Perform the following maintenance steps more frequently if you use
your bicycle in extreme conditions (rain, dirt, high mileage, etc.).
Corrosion and material damage.
Ζ Never use a pressure or steam cleaner to clean your rear shock.
)Clean the rear shock with water, detergent and a brush.
)Set damping (compression damper) to OPEN
[B].
)Compress the rear shock several times.
)Make sure that the rear shock responds perfectly and with sufficient
sensitivity.
)Check the air pressure.
)Check the tension and ease of operation of the RCL² inner cable –
make sure that the corresponding dial immediately responds to your
actuating the RCL² or adjust it if necessary.
MAGURA rear shocks have internal permanent lubrication and excellent
sealing material so that very little maintenance work is required for the
internal components. Once a year, you will need to have your MAGURA
rear shock serviced in a professional bicycle workshop or by an autho-
rised MAGURA service centre.
If you are a frequent user, also consider the fact that this exposes your
rear shock to more wear and thus requires more frequent maintenance
intervals and checks.
tensioning rcL² inner cabLe
[F]
)Set the RCL² to the OPEN position
[B].
)Loosen the clamping screw
(6) by 2–3 turns.
)Tension inner cable
(7).
)Make sure that the outer sleeve of the Bowden cable is tightly seated in
the stops on the RCL² and rear shock.
)Tighten clamping screw to a tightening torque of max.2 N·m
(18 lbf·in).
decLaration of conformity
The eLECT system for electronic control of the compression stage damp-
ing (suspension fork, rear shock) and height regulation (seat post)
conforms to the requirements of EU Directives 2014/53/EU (radio equip-
ment and telecommunications terminal equipment) and 2014/30/EU
(electromagnetic compatibility).
FCC ID: 2AF4AELECT
IC: 20786-ELECT
MODEL: REARSHOCK
This device complies with Part 15 of the FCC Rules and with Industry
Canada licence-exempt RSS standard(s). Operation is subject to the fol-
lowing two conditions:
1. This device may not cause harmful interference.
2. This device must accept any interference received, including interfer-
ence that may cause undesired operation.
The detailed original declarations of conformity can be requested at
www.magura.com

THE PASSION PEOPLE
www.magura.com
Unsere weltweiten Handelspartner und Service Center finden Sie unter www.magura.com
Check out our worldwide partners and service centers at www.magura.com
© MAGURA 2016
All rights reserved
Printed in Germany
2 600 139 – 02-2016
Umschlag & Inhalt:
www.technische-redaktion.de
Deutschland
MAGURA Bike Parts GmbH & Co. KG
Eckisstraße 6
D-72574 Bad Urach
phone +49 71 25 96 94 6-0
fax +49 71 25 96 94 6-17
info@magura.de
Asia
MAGURA Asia Limited Co.
No. 9, Industrial Park, 10th Road
Taichung City
40755 Taichung City, Taiwan
phone +886 4 23 59 85 55
fax +886 4 23 59 99 10
info@magura.com.tw
USA
MAGURA USA
724 West Clem
62450 Olney, Illinois
phone +1 618 395-2200
fax +1 618 395-4711
magura@magurausa.com