HARRIS TR-413-A2 cellular/pcs portable terminal User Manual exhibit 8b
HARRIS CORPORATION cellular/pcs portable terminal exhibit 8b
HARRIS >
Contents
- 1. exhibit 8a
- 2. exhibit 8b
- 3. accessories and SAR performance
exhibit 8b
T60c User’s Guide
Para obtener una copia en español de esta Guía del
Usuario, visite nuestra página Web en www.ericsson.com/
phones o, si se encuentra en Estados Unidos, también
puede llamar al 1-800-374-2776
.
Register your new phone, purchase Ericsson original
accessories, and see the latest in products by visiting us at:
www.ericsson.com/phones
This manual is published by Ericsson Inc., without
any warranty. Improvements and changes to this
manual necessitated by typographical errors,
inaccuracies of current information, or improvements
to programs and/or equipment, may be made by
Ericsson Inc., at any time and without notice. Such
changes will, however, be incorporated into new
editions of this manual.
Trademarks referred to herein are trademarks of their
respective companies.
"Ericsson", “” and “ERICSSON
ORIGINAL ACCESSORIES” are each registered U.S.
Trademarks owned by Telefonaktiebolaget LM
Ericsson of Sweden.
T9 Text Input is licensed under one or more of the
following: U.S. Pat. Nos. 5,818,437, 5,953,541,
5,187,480, 5,945,928, and 6,011,554; Canadian Pat.
No. 1,331,057; United Kingdom Pat. No.2238414B;
Hong Kong Standard Pat. No. HK0940329; Republic
of Singapore Pat. No. 51383; Euro.Pat. No. 0 842 463
(96927260.8) DE/DK, FI, FR, IT,NL,PT.ES,SE,GB;
and additional patents are pending worldwide.
“Microsoft”, “Windows” and the design plus words
“Microsoft Windows” are each either registered and/or
pending U.S. Trademarks owned by Microsoft
Corporation of Redmond, Washington, U.S.A.
The BLUETOOTH trademarks are owned by
Bluetooth SIG, Inc., U.S.A.
© 2001, Ericsson Inc. All rights reserved.
Publication Number: AE/LZT 123 6540 R1
8/01 PBM Printed in USA
Some menus/features are operator dependent.
Understanding This User’s Guide
• A Menu Diagram is located on the inside front
cover of this User’s Guide. It gives a quick overview
of the menus in the T60c.
• A portable Quick Reference Card is included in
user documentation. It provides overview of key
icons and functions.
• Menu names are shown in the following
typeface: MENUS.
• Submenu names are shown in the following type-
face:
Submenu Names
.
• Key names are shown in the following typeface:
&/5.
• Text that is seen in the phone’s display is shown in
the following typeface:
Displays.
• When this guide instructs you to press a key, press
and release the key.
• When this guide instructs you to press and hold a
key, press and hold the key for one to two seconds.
• When this guide instructs you to press the left soft-
key, in most instances you can also press down on
the center of the joystick.
Table of Contents
Guidelines for Safe and Efficient Use ........ 1
Product Care and Maintenance ............... 1
Antenna Care .......................................... 1
Efficient Use............................................ 2
Radio Frequency (RF) Exposure and SAR 2
Driving.................................................... 4
Electronic Devices ................................... 4
Aircraft .................................................... 5
Blasting Areas .......................................... 5
Explosive Atmospheres ............................ 6
Power Supply .......................................... 6
Children .................................................. 6
Disposing of the Product......................... 7
Emergency Calls ...................................... 7
Battery Information................................. 7
Getting to Know Your Phone.................... 9
Diagrams................................................. 9
Standby Screen Icons............................... 10
Key Functions ......................................... 11
Getting Started ......................................... 13
Assembly ................................................. 13
Turning Your Phone On and Off............ 15
Making and Receiving Calls .................... 15
Changing Front Covers ........................... 17
Using Menus ............................................ 19
Accessing Menus ..................................... 19
Phonebook Menu.................................... 20
Messages Menu ....................................... 22
Call Info Menu ....................................... 23
Ongoing Call Menu ................................ 23
Settings Menu ......................................... 24
Extras Menu............................................ 31
WAP Services........................................... 33
My Shortcuts ........................................... 34
Using the Phonebook ............................... 35
Options .................................................. 35
Adding Contacts...................................... 36
Calling a Contact..................................... 36
Editing the Phonebook ............................ 37
Groups..................................................... 39
Touch Tone Service................................. 40
Checking the Memory ............................. 40
Using the Messages Menu......................... 42
Options .................................................. 42
EMail....................................................... 43
SMS......................................................... 43
SMS Templates........................................ 45
Using Voice Commands ........................... 47
Before Voice Dialing................................ 47
Voice Dialing........................................... 48
Voice Answering ...................................... 49
Recording Voice Memos.......................... 49
The Magic word ...................................... 50
Editing Your Voice Commands ............... 51
Voice Command Train Over................... 51
Inputting Text .......................................... 53
Options .................................................. 53
Input Methods......................................... 54
Multitap Text Input ................................ 54
T9 Text Input.......................................... 55
Using the Calendar ................................... 57
Appointments and Tasks ......................... 57
Viewing Your Calendar............................ 59
Editing..................................................... 59
Calendar Settings..................................... 60
WAP Browsing ......................................... 61
Browser Features...................................... 61
Launching Your WAP Browser................ 62
Exiting Your WAP Browser ..................... 62
Your WAP Browser Display..................... 62
Browser Options Menu ........................... 63
Browser Key Functions............................ 64
Text Entry ............................................... 66
Making Data and Fax Calls ....................... 69
Differences Between Data, Fax, and Internet
Calls....................................................... 69
Before You Start ...................................... 70
Setting Up Your Computer ..................... 71
Initial Setup............................................. 71
Operation................................................ 72
Achieving Best Performance .................... 74
Installing the Modem Driver (INF File) .. 75
Troubleshooting...................................... 78
Troubleshooting........................................ 81
Error Messages......................................... 83
Accessories, Accessibility, and Internet..... 83
Limited Warranty...................................... 85
Our Warranty.......................................... 85
What We Will Do................................... 85
Conditions .............................................. 86
International Service................................ 87
Index ........................................................ 89

Guidelines for Safe and Efficient Use 1
Guidelines for Safe and Efficient Use
Please read this information before using your mobile
phone.
Your mobile phone is a highly sophisticated electronic
device. To get the most out of your mobile phone, please
read this text about product care, and safe and efficient
use.
Product Care and Maintenance
Do not expose your product to liquid or moisture or to
humidity.
Do not expose your product to extreme high or low
temperatures.
Do not expose your product to lit candles, cigarettes, or
cigars, or to open flames etc.
Do not drop, throw or try to bend the product as rough
treatment could damage it.
Do not paint your product as the paint could obstruct
the earpiece, microphone or any moveable parts and
prevent normal use.
Do not attempt to disassemble your product. The
product does not contain consumer serviceable
components. Only Ericsson Service Points or Certified
Service Centers should perform service.
Do not use any accessories other than Ericsson originals.
Use of non-Ericsson original accessories may result in
loss of performance, damage to the product, fire, electric
shock or injury. The warranty does not cover product
failures which have been caused by use of non-Ericsson
original accessories.
Treat your product with care, keep it in a clean and
dust-free place.
Antenna Care
Your phone is equipped with either an internal or
external antenna. To avoid impaired performance, please
ensure that your mobile phone’s antenna is not damaged.

2Guidelines for Safe and Efficient Use
Do not remove the antenna yourself. If your mobile
phone’s antenna is damaged, please take the product to
an Ericsson Service Point or Certified Service Center.
Only use an antenna that has been specifically designed
for your mobile phone. Use of unauthorized antennas,
modifications, or attachments could damage the mobile
phone and may violate the appropriate regulations,
causing loss of performance and SAR levels above the
recommended limits (see below).
Efficient Use
For optimum performance with minimum power
consumption please:
•Hold the mobile phone as you would any other
telephone. While speaking directly into the mouth-
piece, angle the antenna in a direction up and over
your shoulder.
•Do not touch the antenna when the mobile phone
is in use. Touching the antenna affects call quality,
may cause the mobile phone to operate at a higher
power level than needed and may shorten talk and
standby times.
•Do not use the product when the front and/or back
cover is removed from the unit.
•If your mobile phone is equipped with an infrared
eye, never direct the infrared ray at anyone’s eye and
make sure that it does not disturb any other infra-
red units.
Radio Frequency (RF) Exposure and
SAR
Your mobile phone is a low-power radio transmitter and
receiver. When it is turned on, it emits low levels of radio
frequency energy (also known as radio waves or radio
frequency fields).
Governments around the world have adopted
comprehensive international safety guidelines, developed
by scientific organizations*, e.g. ICNIRP (International
Commission on Non-Ionizing Radiation Protection),
through periodic and thorough evaluation of scientific
studies. These guidelines establish permitted levels of
radio wave exposure for the general population. All
Ericsson mobile phone models are designed to operate
within these stringent levels. The levels include a safety
margin designed to assure the safety of all persons,

Guidelines for Safe and Efficient Use 3
regardless of age and health, and to account for any
variations in measurements.
Specific Absorption Rate (SAR) is the unit of
measurement for the amount of radio frequency energy
absorbed by the body when using a mobile phone. The
SAR value is determined at the highest certified power
level in laboratory conditions, but the actual SAR level of
the phone while operating can be well below this value.
This is because the phone is designed to use the
minimum power required to reach the network.
Therefore, the closer you are to a base station, the more
likely it is that the actual SAR level will decrease.
Variations in SAR below the radio frequency exposure
guidelines do not mean that there are variations in safety.
While there may be differences in SAR levels among
mobile phone models, all mobile phone models must be
designed to meet radio frequency exposure guidelines.
More information on radio frequency exposure and SAR
can be found on: www.ericsson.com/health.
* Examples of radio-frequency exposure guidelines and
standards that Ericsson mobile phone models are
designed to conform to:
•International Commission on Non-Ionizing Radia-
tion Protection (ICNIRP), “Guidelines for limiting
exposure to time-varying electric, magnetic, and
electromagnetic fields (up to 300 GHz)”, Health
Physics, vol. 74, pp 494-522, April 1998.
•99/519/EC, “Council Recommendation of 12 July
1999 on the limitation of exposure of the general
public to electromagnetic fields (0 Hz to 300
GHz)”, Official Journal of the European Commu-
nities, 1999.
•IEEE C95.1-1991, “Safety levels with respect to
human exposure to radio frequency electromag-
netic fields, 3 kHz to 300 GHz”, The Institute of
Electrical and Electronics Engineers Inc. (IEEE).
•FCC Report and Order, ET Docket 93-62, FCC
96-326, Federal Communications Commission
(FCC), August 1996.
•Radiocommunications (Electromagnetic Radiation
Human Exposure) Standard 1999, Australian
Communications Authority (ACA), May 1999.

4Guidelines for Safe and Efficient Use
Driving
Please check if local laws and/or regulations, in the
country/state where you are, restrict the use of mobile
phones while driving.
Law in many countries/states requires drivers to use a
Hands Free solution. If so, it is recommended that you
use Ericsson Hands Free solutions only with this Ericsson
mobile phone model.
Ericsson is concerned about your safety. Always give full
attention to driving and pull off the road and park before
making or answering a call if driving conditions so
require.
RF energy may affect some electronic systems in motor
vehicles such as car stereo, safety equipment etc. In
addition, some vehicle manufacturers do not allow use of
mobile phones in their vehicles, unless a Hands Free kit
with an external antenna supports the installation. Check
with your vehicle manufacturer’s representative to be sure
that your mobile phone will not affect the electronic
systems in your vehicle.
Vehicles Equipped with an Air Bag
An air bag inflates with great force. Do not place objects,
including either installed or portable wireless equipment,
in the area over the air bag or in the air bag deployment
area. If in-vehicle wireless equipment is improperly
installed and the air bag inflates, serious injury could
result.
Electronic Devices
Most modern electronic equipment is shielded from RF
signals. However, certain electronic equipment may not
be shielded against the RF signals from your mobile
phone, therefore:
Pacemakers
The Health Industry Manufacturers Association
recommends that a minimum separation of six (6”)
inches (15 cm) be maintained between a handheld
wireless phone and a pacemaker to avoid potential
interference with the pacemaker. These
recommendations are consistent with the independent
research by and recommendations of Wireless
Tec hn o lo gy Re se ar ch .

Guidelines for Safe and Efficient Use 5
Persons with pacemakers:
•Should ALWAYS keep the phone more than six
inches from their pacemaker when the phone is
turned ON;
•Should not carry the phone in a breast pocket;
•Should use the ear opposite the pacemaker to mini-
mize the potential for interference.
•If you have any reason to suspect that interference
is taking place, turn your phone OFF immediately.
Hearing Aids
Some digital wireless phones may interfere with some
hearing aids. In the event of such interference, you may
want to consult your service provider or call your local
Certified Call Center to discuss alternatives.
Other Medical Devices
If you use any other personal medical device, consult the
manufacturer of your device to determine if they are
adequately shielded from external RF energy. Your
physician may be able to assist you in obtaining this
information.
•Turn your phone OFF in health care facilities when
any regulations posted in these areas instruct you to
do so. Hospitals or health care facilities may be
using equipment that could be sensitive to external
RF energy.
•Turn your phone OFF in any facility where posted
notices so require.
Aircraft
•Turn off your mobile phone before boarding any
aircraft.
•To prevent interference with communication sys-
tems, you must not use your mobile phone while
the plane is in the air.
•Do not use it on the ground without permission
from the crew.
Blasting Areas
Turn off your mobile phone when in a blasting area or in
areas posted “turn off two-way radio” to avoid interfering
with blasting operations. Construction crews often use

6Guidelines for Safe and Efficient Use
remote control RF devices to set off explosives.
Explosive Atmospheres
Turn off your mobile phone when in any area with a
potentially explosive atmosphere. It is rare, but your
mobile phone or its accessories could generate sparks.
Sparks in such areas could cause an explosion or fire
resulting in bodily injury or even death.
Areas with a potentially explosive atmosphere are often,
but not always, clearly marked. They include fuelling
areas, such as petrol stations, below deck on boats, fuel or
chemical transfer or storage facilities, and areas where the
air contains chemicals or particles, such as grain, dust, or
metal powders.
Do not transport or store flammable gas, liquid, or
explosives in the same compartment of your vehicle that
contains your mobile phone and accessories.
Power Supply
Connect the AC power adapter only to designated power
sources as marked on the product.
To reduce risk of damage to the electric cord, remove it
from the outlet by holding onto the AC adapter rather
than the cord.
Make sure the cord is positioned so that it will not be
stepped on, tripped over or otherwise subjected to
damage or stress.
To reduce risk of electric shock, unplug the unit from
any power source before attempting to clean it.
The AC power adapter must not be used outdoors or in
damp areas.
DANGER - Never alter the AC cord or plug. If the plug
will not fit into the outlet, have a proper outlet installed
by a qualified electrician. Improper connection can result
in risk of electric chock.
Children
DO NOT ALLOW CHILDREN TO PLAY WITH
YOUR MOBILE PHONE OR ITS ACCESSORIES.
THEY COULD HURT THEMSELVES OR
OTHERS, OR COULD ACCIDENTALLY DAMAGE
THE MOBILE PHONE OR ACCESSORY. YOUR
MOBILE PHONE OR ITS ACCESSORY MAY

Guidelines for Safe and Efficient Use 7
CONTAIN SMALL PARTS THAT COULD BE
DETACHED AND CREATE A CHOKING
HAZARD.
Disposing of the Product
The product should never be placed in municipal waste.
Please check local regulations for disposal of electronic
products.
Emergency Calls
IMPORTANT!
This mobile phone, like any mobile phone, operates
using radio signals, cellular and landline networks as well
as user-programmed functions, which cannot guarantee
connection under all conditions. Therefore you should
never rely solely upon any mobile phone for essential
communications (e.g. medical emergencies).
Remember, in order to make or receive calls, the mobile
phone must be switched on and in a service area with
adequate cellular signal strength. Emergency calls may
not be possible on all cellular phone networks or when
certain network services and/or mobile phone features
are in use. Check with your local service provider.
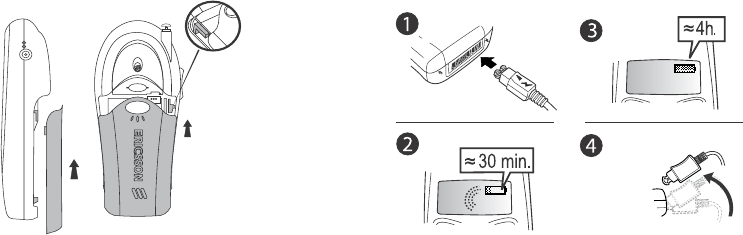
Battery Information
Charging the Battery
The battery delivered with your phone is not fully
charged. We recommend that you charge the battery for
4 hours before you use the phone for the first time. If you
are charging a new battery, or a battery that has run out
completely, it may take a while (up to 30 minutes) before
you get any indication (the battery meter appears in the
display) that the battery is being charged.
Please note that you cannot turn on the phone before the
indicator lights up and the battery meter appears in the
display.
The battery can only be charged in temperatures between
+5°C (+41°F) and +45°C (+113°F).
Battery Use and Care
A rechargeable battery has a long service life if treated
properly. A new battery or one that has not been used for
a long time could have reduced capacity the first few
8Guidelines for Safe and Efficient Use
times it is used.
The talk and standby times depend on the actual
transmission conditions when using the phone. If the
phone is used near a base station, less power is required
and talk and standby times are prolonged.
Use only Ericsson original batteries and chargers. Using
other batteries and chargers could be dangerous, and the
warranty does not cover product failures which have been
caused by use of non-Ericsson original batteries and
chargers.
•Do not expose the battery to extreme temperatures,
never above +60°C (+140°F). For maximum bat-
tery capacity, use the battery in room temperature.
If the battery is used in low temperatures, the bat-
tery capacity will be reduced.
•Turn off your phone before removing the battery.
•Use the battery for the intended purpose only.
•Do not attempt to take the battery apart.
•Do not let the metal contacts on the battery touch
another metal object. This could short-circuit and
damage the battery.
•Do not expose the battery to open flames. This
could cause the battery to explode.
•Do not expose the battery to liquid.
•Do not allow the battery to be put into the mouth.
Battery electrolytes may be toxic if swallowed.
Disposing of the Battery
The battery should never be placed in municipal waste.
Please check local regulations for disposal of batteries or
call your local Certified Call Center for information.

Getting to Know Your Phone 9
Getting to Know Your Phone
Diagrams
The following diagrams illustrate the front, back, and
bottom views of your T60.
Note! Always retract the antenna when the phone is used
with body-worn accessories, such as a holster.
1 Antenna
2 Earpiece
3 Side Volume Keys
4 Display
5 Left Softkey
6 Keypad
7 Headset Jack
8 Joystick
(4-way navigation with
center select key)
9 Right Softkey
10 Power (On/Off) Key
11 External Antenna
Connector
12 Guide for Attaching Back
Cover
13 Back Cover Latch
14 Battery Connector
15 Accessory Connector
(Handsfree, Charger, FM
radio, MP3, Chatboard, etc.)

10 Getting to Know Your Phone
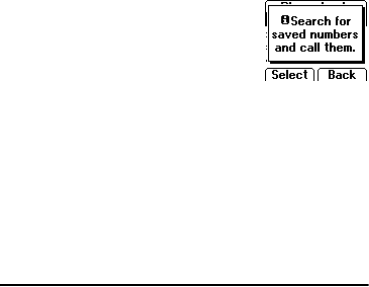
Standby Screen Icons
Every time you power on your phone, you will see the
Standby screen. You will also see the standby screen when
you exit the menu system. This image illustrates all of the
icons that could appear on your standby screen.
1
Alarm
( ) - indicates the alarm is set.
2
Time
(01:10) - shows the time.
3
Signal Strength
( ) - shows the relative signal strength
from the wireless system. More bars indicate a stronger
signal (maximum of five bars).
4
Analog/Digital Channel Indicator -
shows your phone’s
mode: Analog (A), Digital (D), Voice Privacy (P), or
No Network ( ).
5
Roaming
(5) - indicates if you are roaming. If a preferred
network is found, an 5 will appear. If the roaming net-
work is not preferred, an R will appear.
6
Battery Strength
( ) - shows the relative strength of
your battery. A full icon indicates a fully-charged bat-
tery. If the phone is connected to external power and
the battery is charging, the battery icon will continu-
ously fill and empty until the battery is fully charged.
7
Banner
- displays the network name or a display message
such as
Searching
.
8
Silent Mode
( ) - indicates that your phone will not
make any sounds.
9
Profile
( ) - indicates which profile is currently active
(for instance, the Outdoor profile icon).
10
Call List
( ) - indicates missed calls.
11
Keypad Lock
( ) - indicates that pressing the keys has
no effect. The keypad is locked to prevent inadvertent
key presses. Press to turn on Keypad Lock. Press
&/5 to unlock.
12
Accept Calls
( ) - indicates that you have activated
call screening which allows you to reject certain incom-
ing calls.
13
Message
( ) - indicates that you have received an
email message, voicemail message, text message, or a
browser alert. The number beside the icon indicates the
number of messages you have waiting.
?
Getting to Know Your Phone 11
14
Magic Word
( ) - indicates that the magic word fea-
ture is active.
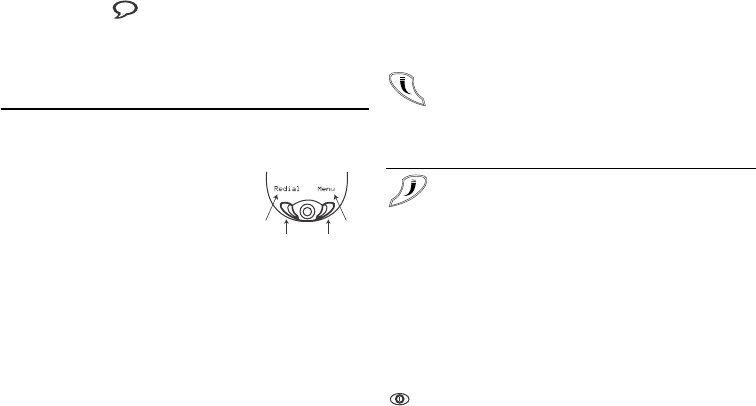
Key Functions
Soft Keys
Your phone is equipped with soft
keys. The soft key labels are
displayed on the bottom of your
display. To use the soft key
functions, press the left or right key
that is under the text label on the screen. The labels are
context sensitive and will change depending on the
feature you are using. The soft keys on your phone’s
screen override the key names. For example, press the left
key to
Redial
or press the right key to select the
Menu.
Note! In most instances, pressing down on the center of
the joystick will perform the same action as the left
softkey.
Keypad Keys
The key functionality varies when you are using the WAP
browser. For more information on browsing and the use of
the keys, see “Browser Key Functions” on page 64.
left
softkey
label left
softkey
right
softkey
right
softkey
label
............... ...............
/HIW6RIW.H\
• Press to select the menu, feature, or setting selected. In
most cases, pressing the center of the joystick will per-
form the same action as the left soft key.
• From standby, press to view the Call list (incoming
and outgoing calls).
5LJKW6RIW.H\
• Press to cancel action or move back in the menu sys-
tem.
• Press and hold to return to standby mode.
• Press to end a call.
• Press to quiet the ringer.
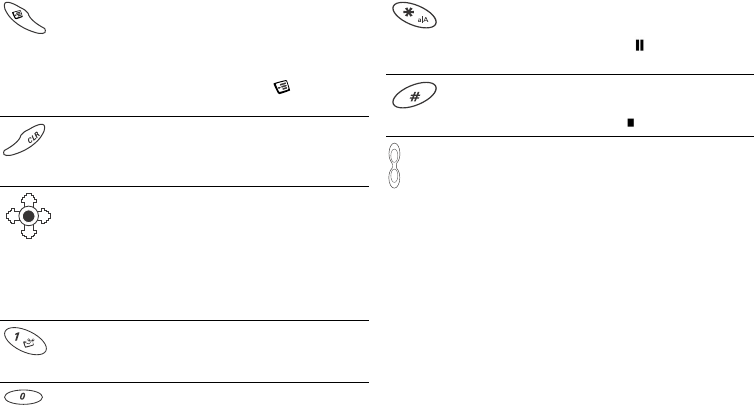
3RZHU.H\
• Press and hold to power the phone On and Off.
12 Getting to Know Your Phone
2SWLRQV.H\
• Enter a menu with options. The options vary depend-
ing on what function you are currently using.
• Press to set the phone to silent or turn on keylock,
(from standby mode).
Throughout this User’s Guide, this icon ( ) will be
shown when you should use the Options key.
&OHDU&/5.H\
• Delete numbers and letters from the display.
• Delete an item from a list.
• Press and hold to mute the microphone during a call.
-R\VWLFN
• Move through menu, lists, or text. Tilt up, down, left,
or right to scroll.
• Press down on the joystick to select (same function as
left softkey in most instances).
• Tilt down to access the top of your contact list (con-
tact names beginning with A,B,C ...).
• Tilt up to access the bottom of your contact list.
.H\9RLFHPDLO$FFHVV
• Press and hold to access Voicemail.
.H\
• Press and hold to enter the international prefix (+).
$VWHULVN.H\
•Enter *.
• Press and hold to enter a pause ( ).
• Shift between capital and lower-case letters.
P
RXQG.H\
• Enter #.
• Press and hold to enter a stop ( )
6LGH9ROXPH.H\V
• Increase or decrease the volume of the earpiece or
handsfree loudspeaker during a call.
• Enter the Status menu by pressing the key briefly.
• A long press will activate voice dialing/automatic
speech recognition.
• Press once to silence the ringer.

Getting Started 13
Getting Started
Assembly
Before you use your phone, you need to:
1 Attach the Battery
2 Attach the Back Cover
3 Charge the Battery
Step 1: Attach the Battery
1 Locate the connector at the
end of the blue, red, and
black wires.
2 Insert the plug as shown in
the diagram. The cable will
only properly fit one way -
do not force it.
14 Getting Started
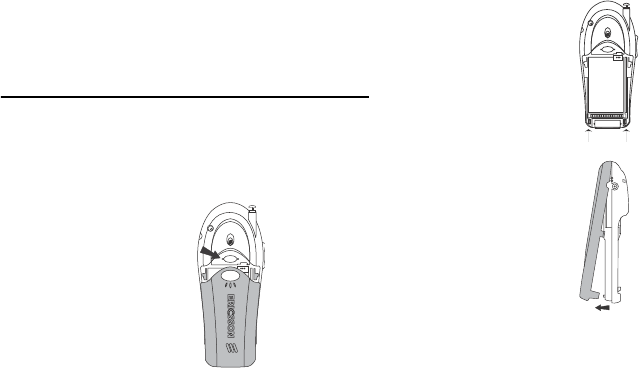
Step 2: Attach the Back Cover
Step 3: Charge the Battery
For detailed information on safely handling your battery,
see “Battery Information” on page 7.
1 Locate the
notches along
each side of the
back of the
phone.
2 Using the
notches as a
guide, slide the
back cover
upward until it
clicks in place.
Note! Never use your phone with the front or back
cover removed. For more information on chang-
ing covers, see “Changing Front Covers” on
page 17.
* It may take up to 30 minutes for a new or fully
discharged battery to indicate charging. It takes about 4
hours to fully charge a battery for the first time.
For optimal performance, do not allow your battery to
completely discharge.
*
*

Getting Started 15
Knowing When to Charge
•The battery meter icon ( ) on your standby
screen will begin to empty.
• Attention Battery Low will appear in the display
and you will hear a short beep.
Charging Indictors
• Charging Battery will appear in the display
(charges very slowly).
•The battery meter icon will fill and empty until the
phone is completely charged. Once completely
charged, the icon will appear full ( ).
Note! The amount of battery power indicated by your
battery icon is an estimate that may vary depend-
ing on your charging and use patterns. To ensure
adequate power supply, keep your battery fully
charged or carry additional charged batteries.
Removing Your Charger
Lift the connector upwards and pull it out.
Turning Your Phone On and Off
Turn your phone On by pressing and holding the power
key until your phone turns on. The phone will beep
(unless silent mode is activated). Turn your phone Off by
pressing and holding the power key until your phone
turns off. You must return to Standby mode to turn off
your phone.
Making and Receiving Calls
Making Calls
1 Press the numeric keys to enter the phone number
you want to call. The number is shown in the dis-
play.
Note! You can press &/5to erase one or more digits in
the display, or press and hold &/5 to erase all dig-
its.

16 Getting Started
2 Press the left softkey.
Calling
, along with the num-
ber you are dialing, is shown in the display while
your phone accesses the wireless network.
3 When the call is connected, a call timer is shown in
your display. The phone number that you dialed
will remain on your screen.
4 To end the call, press (1'
Making Emergency Calls
Enter
the local emergency number
and press the left
softkey.
If your keypad is locked and you attempt to make an
emergency call, the phone will recognize it as an
emergency number and will temporarily disable keypad
lock.
Making International Calls
1 Press and hold the key until a sign appears. The
sign replaces the international prefix number of
the country from which you are calling.
2 Enter the country code, area code (without the
leading zero) and phone number.
3 Press
&$//.
Receiving Calls
When your phone receives a call, the ringer sounds,
,QFRPLQJ&DOO appears in the display, and the display
and keypad backlight illuminate. You can temporarily
silence the ringer by pressing the right softkeyor the
upper or lower side keys, and still answer the call by
pressing $16:(5. If you have Caller Number
Identification (Caller ID) service from your service
provider, the caller’s phone number is shown in the
display. The caller’s name will also appear if the phone
number is found in your phonebook. The voice label will
also be played if you have one recorded for that caller.
Changing the Earpiece Volume
During a call, you can change the earpiece volume
by pressing either side volume key.
•Press upper side key to increase the volume.
•Press lower side key to decrease the volume.
Muting the Microphone
During a call, you can turn off the microphone.
•Press and hold &/5 until 0XWHG appears in the
display.
Getting Started 17
•Press and hold &/5again to resume the conversa-
tion.
Changing Front Covers
Your phone is equipped with a replaceable front cover.
you may purchase additional front covers at http://
www.ericsson.com/phones. Never use your phone with
the front cover removed.
1 Remove the back cover.
Use one hand to press
down on the back cover
latch and the other
hand to slide the cover
off the phone.
2 Locate the latches at the
bottom of your phone.
3 Press down on the
latches while lifting the
front cover away from
the phone (remove
from the bottom).
18 Getting Started

Using Menus 19
Using Menus
The main menu has seven icons that display the top-level
menus. The corresponding title of the selected option is
displayed below the menu tabs when highlighted. Each
menu is represented by an icon. A menu diagram is
located on the inside front cover of this user’s guide.
The following menus will appear in your phone:
1 Phonebook
2 Messages
3 Call info
4 Settings
5 Extras
6 WAP browser
7 My shortcuts
Note! The WAP Browser menu is operator dependent
and may not be available in your phone.
Note! For quick access to a menu or submenu, press the
number next to the menu name. For instance,
press from standby to access the PHONEBOOK
menu.
Accessing Menus
-R\VWLFN&HQWHU3XVK
• Use the joystick to navigate through the menu system.
• Press down on the center ( ) to select a menu, sub-
menu, or setting.
/HIW6RIWNH\
•Press to
select the menu, function, or setting. Pressing
down on the center of the joystick will typically per-
form the same function as the left softkey.
5LJKW6RIWNH\
• Press to cancel your action or to go back one level in
the menu system.
20 Using Menus
Menu help
To help you use the menus and
functions, your phone has pop-up help
texts that explain the menus. These
help texts are set to On when you buy
your phone, but you can turn them off
at any time.
Note! Press any key to clear the
Menu help
from the
screen.
1 Scroll to SETTINGS, 6(/(&7,
Display
, 6(/(&7,
Menu help
, 6(/(&7
2 Select On or Off and press 6(/(&7.
Phonebook Menu
For more information on using the phonebook, see
“Using the Phonebook” on page 35.
Call contact
The
Call
contact
submenu displays phonebook entries in
their position order or in alphabetical order. Select an
entry or type in the position number and press 6(/(&7
to call.
Add contact
The $GGFRQWDFWsubmenu allows you to store a phone
number and an accompanying name in your phonebook.
Edit contact
The (GLWFRQWDFWsubmenu allows you to change your
phonebook entries. These entries are also listed in their
location order.
My numbers
This submenu displays your phone number or phone
numbers (if your subscription includes two numbers).
Groups
This submenu displays a list of all groups. Use this
submenu to manage groups. For more information on
using groups, see “Groups” on page 39.
Callings Cards
The &DOOLQJFDUGV submenu allows you to store calling
card numbers. The two options for the &DOOLQJFDUGV

Using Menus 21
submenu are
Card setup
and
Set calling cards
. You can
store up to three calling cards.
You will be prompted to enter your PIN to enter the
&DOOLQJFDUGVsubmenu. The default PIN is 0000.
&DUGVHWXS
To set up your calling cards, make sure you have the
calling card access numbers (numbers provided by your
long distance carrier) and the verification numbers
(numbers you must enter to allow the calling card call to
be completed).
When you enter the Card setup submenu, you are
prompted for the following information: Your PIN; the
Name of your calling card; the Access number; the
Dialing delay; Code first or Number first; Verification
number; and Dialing delay again.
6HWFDOOLQJFDUGV
The
Set calling cards
submenu allows you to select which
calling card to use for a particular call. You can select a
specific calling card or none by scrolling until the calling
card you want to use is highlighted. Press left softkeyto
choose the highlighted selection.
Note! Only cards that have been set up will appear as
options for
Default card
.
0DNLQJD&DOOLQJ&DUG&DOO
1 Enter or recall the phone number you want to call.
2 Press and hold the left softkey. The calling card
number and the active calling card are shown in the
display.
3 Release the key after the number has been displayed.
If you are using stops between numbers, you must press
<(6 to send the next sequence of numbers. If you use
pauses, the numbers are sent automatically after the
specified length of time chosen for the dialing delay.
Memory status
This submenu tells you how many positions you have
used in contacts, email addresses, and voice labels.
Options
Phonebook options
will appear when you are in the
PHONEBOOK menu. To see the PHONEBOOK options,

22 Using Menus
press the 237,216 key. For more information on using
the options, see “Options” on page 35.
Phonebook options include:
Position list
,
Sort order
,
Long
press
,
Ask to save
, and
Delete all
.
Messages Menu
For details on sending and receiving messages, see “Using
the Messages Menu” on page 42.
Voicemail
The
Voice mai l
submenu allows you to enter and access
your voicemail access number if you have voicemail
service from your service provider.
Email
The
Email
allows you to use your phone to access an
email account from another device (such as your PC).
Submenus include
Send & receive
,
Inbox
,
Compose
,
Outbox
,
Drafts
,
Archive
, and
Options
.
SMS
The SMS submenu contains the following submenus:
Received mail
,
Send new
,
Unsent mail
,
Tem pl at es
, and
Sent
mail
. For more information on sending and receiving text
messages, see “Using the Messages Menu” on page 42.
Browser alert
The Browser alert submenu is used to let you know when
you have received a new alert in your inbox (such as stock
quotes).
Options
Message options
will appear when you are in the
MESSAGES menu. To see the Message options, press the
237,216 key. For more information on using the
options, see “Options” on page 42.
Options may include:
Message alert
,
Voicemail no.
, A
rea
info
,
Cell information
,
Message type
,
Val idity period
,
Reply
request
,
Status request
, and
Long messages
.

Using Menus 23
Call Info Menu
The CALL INFO menu allows you to view information
and establish dialing and answering preferences for your
phone (some selections available in this menu are
dependent on your service provider). It also enables you
to view and edit system options and call statistics. When
you engaged in a call, the menu name will change to
ONGOING CALL. The following icons will appear next to
numbers in the call list.
Missed calls
Press 6(/(&7 from the
Missed calls
submenu to view the
last 50 received, missed, or sent calls.
From this list you may
view details
,
call
,
add the number to
your phonebook
, or
delete the number
.
Call list
The
Call list
contains a list of outgoing, incoming, and
missed calls.
Note! You can quickly access the
Call list
, from Standby,
by pressing the left softkey.
Call timers
Use this submenu to check the duration of your
Last Call
,
Total calls
,
Outgoing time
, and
Incoming time
; view the
SMS counter
;
clear counters
; and
set the Minute Minder
.
Clear Call List
Use
Clear call list
to delete the entire call log.
Ongoing Call Menu
The ONGOING CALL menu only appears when you are
engaged in a call. The following submenus will appear:
Turn on/off tones
,
Hold call
,
Switch calls
,
Retrieve call
,
Release active
, and
Call Info
.
Missed Call
Answered Call
Outgoing Call
?

24 Using Menus
Settings Menu
Sounds & Alerts
5LQJYROXPH
The 5LQJ9ROXPH submenu allows you to set the level
of the ring volume. The volumes range from Off to
High. You can scroll through the list using the joystick.
Then press 6(/(&7 to confirm your selection.
Note! You can quickly activate silent mode from standby
( )by pressing .
,QFUHDVLQJULQJ
When you select
Increasing Ring
, the ring volume will
continue to increase until it has reached the maximum
volume or you answer or reject the call.
9LEUDWLQJDOHUW
Your phone has a built-in vibrator so you can receive calls
or messages silently. Options are
On
,
On if Silent
, and
Off
.
5LQJVRXQGV
The 5LQJ6RXQG submenu allows you to choose the type
of sound or melody for the ringer. Each sound or melody
is demonstrated as you scroll through the selections.
There are 30 ring sounds, four of which you can create
yourself.
$ODUPVRXQG
You can select different types of melodies or signals to
hear when your alarm sounds.
0HVVDJHDOHUW
Choose which type of sound you will hear when you
receive an incoming SMS or voicemail message. The
options are:
tone
,
click
, or
silent
.
0\PHORGLHV
Use this submenu to edit your melodies.
•Press &/5 to delete the location.
•Press and hold &/5 to delete multiple notes.
•You can compose and work with ring melodies at
http://mobileinternet.ericsson.com.

Using Menus 25
,QIRYROXPH
Shows the current volume setting.
.H\VRXQG
Choose which type of sound you will hear when you
press a key. The options are:
tone
,
click
, or
off
.
0LQXWHPLQGHU
Minute Minder notifies you when each minute passes
while you are engaged in a call. Settings are
On
and
Off
.
9RLFHSULYDF\
Submenus include:
On with tone
,
On with no tone
, and
Off.
Profiles
Your phone includes a number of pre-programmed
profiles. A profile is a group of settings which suit a
certain environment. Some phone accessories select a
profile automatically. For example, when you place your
phone in a car handsfree unit, the Car profile is chosen.
When you buy your phone, it is set to the
Normal
profile.
If you select a profile other than
Normal
, the name of the
profile is shown in standby. A profile with no accessories
associated, such as
Meeting
or
Normal,
must be chosen
manually.
There are seven pre-programmed profiles:
•Normal (no icon appears)
•Meeting
•Car
•Outdoors
•Port h-free (portable handsfree)
•Home
•Work
Submenus include
Select profile
,
View profile
,
Edit profile
,
and
Reset profile
.
6HOHFWSURILOH
Use this submenu to select a profile.
9LHZSURILOH
Select to view the current profile.The settings for the
profile in use appear.
))
26 Using Menus
(GLWSURILOH
You cannot create more profiles, but you can edit the
settings for the current profile. Use the
View profile
function to see what settings are included in that certain
profile.
5HVHWSURILOH
Use this submenu to reset the profile settings to defaults.
Call options
Use the
Call options
submenu to:
Accept calls, Forward
calls, Restrict calls, Call waiting, Auto area code, Auto prefix,
Answering mode
, and
Voice privacy
.
$FFHSWFDOOV
Accept calls
allows you to reject certain incoming calls.
When activated, only the callers specified will be able to
reach you. The other calls will be rejected and you will
not hear a ring tone. The rejected calls will be stored in
the Missed Calls list. The choices for
Accept calls
are
Accept options
and
Accepted list.
)RUZDUGFDOOV
If you cannot answer an incoming voice, fax, or data call,
you can forward it to another number. The options for
Forward calls
are
Activate
,
Deactivate
, and
Setup.
Note! To activate
Forward call
s, you will need separate
codes from your service provider.
Once you have entered those codes, select
Activate
and
then enter the number to which you want your calls
forwarded. Your phone will send the necessary
information to your service provider to set up the
Forward call.
5HVWULFWFDOOV
The Restrict calls service allows you to restrict certain
types of calls from being made and received. Options
include
Outgoing calls
and
Incoming calls
. If you forward
incoming calls, you cannot activate some
Restrict calls
options. Likewise, if you restrict calls, you cannot
activate some
Forward calls
options.
Note!
Restrict calls
is disabled when an emergency call is
made.
Using Menus 27
&DOOZDLWLQJ
If you wish to be able to receive a second call while
another call is in progress, you must turn on the
Call
waiting
service. Options include
Activate,
Deactivate
, and
Setup
.
To activate
Call waiting
, you will need separate codes
from your service provider. Once you enter those codes,
select
Activate
or
Deactivate
.
Note! If you are engaged in a data call, all other incom-
ing calls are rejected.
$XWRDUHDFRGH
The
Auto area code
submenu allows you to store an area
code that will automatically be added to the 7-digit
number you have dialed. The options for
Auto Area Code
are
On
and
Off
. When you select
On
, you will be
prompted to indicate which area code to use.
$XWRSUHIL[
The
Auto prefix
submenu allows you to store a 1- to 12-
digit prefix. For instance, you can store the prefix to your
office. When you dial a 4- or 5-digit phone number, the
auto prefix is automatically added at the beginning of the
number.
The options for auto prefix are
On
and
Off
. The auto
prefix is not added for phone numbers longer than five
digits.
$QVZHULQJ0RGH
The
Answering mode
submenu allows you to specify how
you want to answer calls. The three options are:
Normal
,
Any Key
, and
Auto
. Selecting
Normal
indicates that
pressing the left softkey will answer a call.
Any Key
indicates that you can answer the call by pressing any key
except the right softkey.
Auto
indicates that the call will
be answered automatically if connected to an accessory.
9RLFHSULYDF\
The
Voice privacy
submenu allows you to block others
from eavesdropping on your telephone calls. The three
options for the
Voice p ri v a cy
submenu are
On with tone,
On without tone
, and
Off
. When
Voice privacy
is enabled,
you will see the voice privacy icon (
P
) on your phone’s
display during a call.
28 Using Menus
Display
The display submenu is used to change the
Light,
Display
sleep
,
Background
,
Tex t s i z e
,
User greeting
, and to activate/
deactivate
Menu Help
.
/LJKW
Use the light submenu to set the display and keypad
backlighting to stay
Off
or to automatically turn
On
for
30 seconds when a call is received or a key is pressed.
'LVSOD\VOHHS
Use
Display sleep
to save battery power. The text in
standby mode is reduced to one row at the top of the
display a few minutes after you have pressed the last key.
%DFNJURXQG
You can select an image to display on the background of
your standby screen. For instructions on inserting
background pictures, see “Pictures” on page 32.
7H[WVL]H
Select the size of the font to appear in your display. The
options include small (five lines of text), medium (four
lines), and large (three lines).
8VHUJUHHWLQJ
Use the
Greeting
submenu to alter the information that is
displayed when your phone powers on. Options include:
Ericsson Movie,
My Greeting
,
My Animation
, and,
Off
.
With
My Greeting
, you can enter whatever message you
would like to see (up to one line of text). You can also
choose to add a movie to the greeting. The default movie
is an Ericsson animation. You can also turn off the
greeting.
0HQXKHOS
Activate
or
Deactivate
pop-up Menu Help. For more
information on Menu Help, see “Menu help” on
page 20.
Language
The
Language
submenu allows you to select the language
used in the phone display. The languages vary between
markets. Your mobile phone may support
American
English
,
Canadian French
,
Latin American Spanish,
and
Brazilian Portuguese
.
You can also use this submenu to change input languages
and to activate/deactivate T9 Predictive text input.

Using Menus 29
Time and date
Submenus include
Local time
,
Time settings
,
Set date
, and
Date format
. The time is always displayed in standby
mode.
/RFDO7LPH
Use this submenu to set the local time.
7LPH6HWWLQJV
This submenu contains the
Time format
,
Time zone
,
Daylight savings
, and
Auto time zone
settings.
6HWGDWH
Use this submenu to set the date.
'DWHIRUPDW
Use this submenu to choose how the date will appear on
your screen.
Locks
The Locks submenu contains Phone lock and Auto
keylock options.
Phone lock
prohibits the phone from making calls except
emergency calls. To set phone lock, you will be prompted
to enter a security code. Options are
Protection
and
On/
Off
.
Auto keylock
(keypad lock) allows you to prohibit your
phone from keypad presses.
Auto keylock
activates after
30 seconds of inactivity from the Standby screen. The
two options for
Auto keylock
are
On
and
Off
. The keypad
remains locked until you remove and replace the battery
or receive a call (after the call is completed, the keypad is
returned to the locked state).
The keypad lock feature allows emergency number access
even if the keypad is locked. To unlock your keypad,
press CLR then select unlock with the left softkey.
Note! You can quickly turn on keypad lock( ) from
standby mode by pressing .
Voice control
The Voice control contains
Voice settings
and
Voic e
command
. Use the Voice settings submenu to activate/
deactivate
Voice dialing
,
Voice answer
,
Caller name
,
Voic e
memo
, and
Magic Word
. Use the
Voice co mman d
submenu
to setup
Magic word
,
Voice dialing
,
Voice answer
,
Voice la bel
(for contact names), and
Voice memo
.
30 Using Menus
System select
This submenu allows you to view and modify network
settings. You will be prompted to enter your PIN to
make any modifications.
Note! It is typically not necessary to make network
changes. You should contact your service provider
before making any network changes.
•
Standard/Automatic-
The phone will attempt to use
the digital network first. If not available, it will
switch to analog. If neither the digital nor analog
home systems are available, the phone will select
the digital non-home system, or the analog non-
home system.
•
Home Only
- The phone will stay on the home sys-
tem.
• Analog Only - The phone will operate only in ana-
log mode.
•
A Only
- The phone is forced to use A side operators
only (digital first, analog if digital is not available).
•
B Only
- The phone is forced to use Analog B side
operators only (digital first, analog if digital is not
available).
•
Auto A -
The phone will automatically select Auto A
if the system identification is odd .
•
Auto B -
The phone will automatically select Auto B
if the system identification is even.
Note! The list of available networks will vary depending
on your service provider.
Data settings
The available Data settings is Data Fax Mode. For more
information on data settings, see “Making Data and Fax
Calls” on page 69.
Accessory settings
This submenu allows you to set the
Answering mode
,
Handsfree mode
, or to activate
TTY Mode
.
Reset settings
Select this submenu to reset all settings to default. You
will be required to enter your phonelock code.

Using Menus 31
Extras Menu
Voice memo
Submenus include:
Record
,
Memo list
,
Erase all voice
,
Set
view
,
Set quality
, and
During calls
.
Calendar
Your calendar can store many events and tasks. For more
information, see “Using the Calendar” on page 57.
Time
$ODUPFORFN
The phone has an alarm clock which rings at the time
set, even if the phone is turned off. The alarm rings for
60 seconds and is repeated every nine minutes for 60
minutes if you do not turn it off. You also have the
option to use
Recurrent alarm
which sets the alarm to go
off at the same scheduled time each day.
Turning the Alarm Off
•Press any key to turn the alarm off when it rings.
•If you do not want the alarm to be repeated, press
6(/(&7.
Canceling the Alarm
1 Scroll to EXTRAS,6(/(&7,
Time,
6(/(&7
Alarm
Clock
, 6(/(&7.
2 Choose Cancel and press 6(/(&7.
7LPHU
The phone has a built-in 24-hour timer. You set the time
you want and when that time is up, the phone beeps.
1 Scroll to EXTRAS,6(/(&7,
Time,
6(/(&7
Timer
,
6(/(&7.
2 Enter the time and press 6(/(&7 to start the timer.
3 When the alert sounds, press any key to turn it off.
6WRS:DWFK
The phone has a built-in stopwatch.
Scroll to EXTRAS,6(/(&7,
Time,
6(/(&7
Stopwatch
,
6(/(&7.
•Press the left softkey to start the stopwatch.
•Press the left softkey to pause it.
•Press the right softkey to reset the stopwatch (if in
pause mode).
•Press the right softkey to start the LAP timer.

32 Using Menus
Calculator
The phone has a built-in calculator,
which can add, subtract, multiply, and
divide.
•Press the digit keys to enter the
numbers you want to calculate.
•Tilt the joystick right or left to highlight an opera-
tion (+, -, x, /).
•Press the left softkey to perform the operation.
•Press the right softkey to cancel the operation.
•Press * to enter a decimal point.
Code Memo
The submenu allows you to store passwords and codes in
a password protected location.
Accessories
The accessories submenu allows you to work with the
accessories currently connected to your phone.
Pictures
Your phone comes with a number of pictures and
animations. These animations are stored in
Pictures
. You
can use these pictures and animations in the background,
start-up/shut-down show, or send them along with text
messages. For more information on enhancing your text
messages, see “Enhancing your Messages” on page 44.
You can add, edit, or delete pictures and animations from
My Pictures
. The number of pictures that can be saved
depends on the size of the pictures. File types supported
are GIF and JPEG. The pictures are shown in
thumbnails. To get a full view, press select. To get a list
view, showing name and size, press and select
View
List
.
6HOHFWLQJD3LFWXUHDV%DFNJURXQG
1 SETTINGS, 6(/(&7,
Display
, 6(/(&7,
Background
,
6(/(&7.
2 Choose
Select Picture
, 6(/(&7.
3 Choose a picture, 6(/(&7.
Note! You can select a background by pressing when
viewing your pictures.
(GLWLQJDQG6DYLQJ3LFWXUHV
Use the following table when editing pictures.
1 EXTRAS, 6(/(&7,
My Pictures
, 6(/(&7.
2 Select a picture
,
6(/(&7.

Using Menus 33
3 Press , select
Edit
. You can now start to edit the
picture.
4 Press , select
Save.
The picture is saved in
My Pic-
tures.
Games
Your phone has several games. Use the joystick to move
up, down, left or right and to select an item, or use the
keys as follows:
WAP Services
For more information on WAP, see “WAP Browsing” on
page 61.
3UHVV 7R
move the cursor up and left.
move the cursor up.
move the cursor up and right.
move the cursor left.
lift up or put down the pen.
Press and hold to switch between zoom
and full size view.
move the cursor right.
move the cursor down and left.
move the cursor down.
move the cursor down and right.
switch line thickness.
view the Options menu.
&$1&(/ exit the picture editor.
&/5 press and hold to clear the picture.
move the cursor 1, 5 or 10 spaces.
switch between black and white pen
colour.
= up = select/deselect
= left = right
&/5= pause = down

34 Using Menus
Launch Browser
Your service provider chooses the default homepage. You
can change the homepage if you like.
Browser help
The
Browser help
submenu gives you hints about using
your browser. Browser help screens will scroll across your
display. Press the right softkey to return to the WAP
menu.
Active gateways
The
Active gateways
submenu allows you to choose
between to two active gateway numbers used for
browsing.
My Shortcuts
A quicker way to move through the menus is to use the
MY SHORTCUTS. When you buy your phone, MY
SHORTCUTS contains a few menus/settings which you
can remove if you wish. You can also add a setting from
another menu to MY SHORTCUTS. In this way, you can
reach the settings you use most, quickly and easily.
Edit shortcuts
The (GLWVKRUWFXWVsubmenu allows you to set up easy
access for frequently used menu items. You can
customize the items that will be included in your
Shortcuts list. Use the center of the joystick to check
(select) or uncheck (deselect) items that you want to
appear in your shortcuts list. When you check an item,
you will be prompted for a position number.
Note! Tilt and hold the joystick to the left to quickly
enter the MY SHORTCUTS.

Using the Phonebook 35
Using the Phonebook
Note! For phonebook synchronization software, visit:
http://mobileinternet.ericsson.com.
You can create your personal phonebook by saving
information about your friends and colleagues as a
contact. Within a contact, you can save details such as
name, title, phone numbers, and email address – all in
one place. You can store up to 500 contacts (depending
on size of contact information).
Options
Phonebook options
will appear when you are in the
PHONEBOOK menu. To see the PHONEBOOK options,
press the 237,216 key.
Options may include:
Position list
,
Sort order
,
Long press
,
Ask to save
, and
Delete all
.
Position list
The Position list shows your contacts and which position
in the list of contacts they occupy. Use this list to change
the position number for a particular contact.
Sort order
Determine how contacts will appear in your phonebook.
Options include
by first name
or
by last name
.
Long press
Determine the action of a long press of a key. Options
include
Super Spd.dial, Phb. shortcut
, and
Off.
Ask to save
Prompts you to save names and numbers in your
phonebook when the phone does not recognize the
number of the most recent call.
Delete all
Use this submenu to delete all phonebook entries.

36 Using the Phonebook
Adding Contacts
For each contact, you can fill in the following
information: first name, last name, company, title, home
phone number, work phone number, mobile phone
number, other phone number, and email address. The
contacts are saved in the phone.
1 Scroll to
PHONEBOOK, 6(/(&7,
Add contact
,
6(/(&7.
2 Press
(',7 and enter a first name. Press 2. and
enter a last name, and so on.
Note! At anytime, you can press (;,7 to save and exit the
contact.
3 When you have filled in the information you want,
scroll to
Save and exit
and press 6(/(&7.
If voice dialing is on, you are asked if you want to
save a voice command for the contact.
Note! Each phone number saved occupies one position
in the memory.You can save around 500 positions
in the phone. See “The Speed dial feature is always
active on your phone. This feature allows you to
call contacts in position numbers 1-99 by simply
pressing the position number and then pressing
the left softkey.” on page 37.
Calling a Contact
To call a phone number saved in a contact, use the
Call
contact
function. You can find the contact by searching
for either first or last name, depending on which sort
order you have set.
Selecting a Sort Order
1 Scroll to PHONEBOOK, 6(/(&7,
Options
, 6(/(&7,
Sort order,
6(/(&7.
2 Select a sort order and press 6(/(&7.
Calling Contacts
1 Scroll to PHONEBOOK, 6(/(&7,
Call contact
,
6(/(&7.
2 Enter the first letter of the contact name and press
6(/(&7.
3 Press
6(/(&7 to call the number that appears. You
can store several numbers for a single contact. To

Using the Phonebook 37
choose which number appears first, see “Setting
Default Numbers” on page 38. You can see the con-
tact’s other numbers by pressing and holding
6(/(&7. Use the joystick to move through the list
of numbers.
Shortcuts to Contacts
You can quickly access your contact list from standby by
pressing up or down on the joystick. Pressing down will
take you to the top of the list (names beginning with A)
and pressing up will take you to the bottom of the list.
Speed dial
The Speed dial feature is always active on your phone.
This feature allows you to call contacts in position
numbers 1-99 by simply pressing the position number
and then pressing the left softkey.
Note! Position 1 is always reserved for voicemail.
SuperSpd dial
The
SuperSpd dia
l submenu allows you to more quickly
call contacts in position numbers 1-99. You must activate
SuperSpd dial
under the
Long press
submenu before using
SuperSpd dial. If the Long press submenu is set to
another option, SuperSpd dial will not work.
Note! Position 1 is always reserved for voicemail and can
be accessed with a long press of the key regard-
less of the long press setting.
Activating SuperSpd dial
PHONEBOOK, 6(/(&7
Options,
6(/(&7
Long press,
6(/(&7
SuperSpd dial,
2..
Editing the Phonebook
You can edit a contact in the phonebook with the E
dit
contact
function.
1 Scroll to
PHONEBOOK, 6(/(&7,
Edit Contact,
6(/(&7.
2 Enter the first letter of the contact you want to edit.
Press (',7.
Note! At anytime, you can press (;,7 to save and exit the
contact.
3 When you have filled in the information you want,
scroll to
Save and exit
and press 6(/(&7.
38 Using the Phonebook
Setting Default Numbers
When you set up your phonebook, you may have several
entries for one individual. For instance, you could have
home, work, mobile, and fax number for the same
contact. One of these will be the default number, that is,
the number that is the first to appear when search for
that contact in your phonebook.
1 Scroll to
PHONEBOOK, 6(/(&7,
Edit Contact
,
6(/(&7.
2 Enter the first letter of the contact you want to edit.
Press 6(/(&7.
3 Press
6(/(&7 to select a contact.
4 Select
Default number
and press 6(/(&7.
5 Select the number you want as the default phone
number. Press 6(/(&7.
Deleting Contacts
1 Scroll to PHONEBOOK, 6(/(&7,
Edit Contact
,
6(/(&7.
2 Enter the first letter of the contact you want to
delete.
3 Press
&/5 to delete the contact.
4 Press
6(/(&7 to confirm.
To delete all contacts select PHONEBOOK, 6(/(&7,
Options
, 6(/(&7,
Delete all
, 6(/(&7.
You can organize your phonebook so that the phone
numbers you use most frequently are easily available. You
can, for example, have certain numbers saved in positions
1-9 to be able to speed dial them.
Changing Position Numbers
1 Scroll to PHONEBOOK, 6(/(&7,
Options
, 6(/(&7,
Position list
, 6(/(&7.
2 Scroll to the phone number you want to move,
press 6(/(&7.
3 Scroll to the position to which you want to move
the phone number and press select. The phone
numbers switch positions.
4 When you have finished, pressleft softkey to con-
firm or the right softkey to exit.

Using the Phonebook 39
Groups
You can create groups of contacts. In this way you can
send a text message to several recipients at the same time.
You can have as many as 10 groups with up to 15
participants in each group. See “EMail” on page 43.
Creating New Groups
1 Scroll to PHONEBOOK, 6(/(&7,
Groups
, 6(/(&7.
2 Select
Add group
and press 6(/(&7.
3 Enter a name for the group and press 6(/(&7.
4 Scroll to
Add member
, 6(/(&7.
5 Enter the first letter of the contact you want to add.
Press 6(/(&7.
If the contact shown is not the one you want, scroll
until you find the correct contact. Press 6(/(&7.
6 Select a number and press 6(/(&7.
7 To add the next member, scroll back to
Add member
and press 6(/(&7.
Adding New Members to Existing Groups
1 Scroll to PHONEBOOK, 6(/(&7,
Groups
, 6(/(&7.
2 Select the group that you want to edit and press
6(/(&7.
3 Scroll to
Edit
, 6(/(&7,
Add new member,
6(/(&7.
Continue the same way as when you add a new
member to a new group (see above).
Editing Group Names
1 Scroll to PHONEBOOK, 6(/(&7,
Groups,
6(/(&7.
2 Select the group name that you want to edit and
press 6(/(&7.
3 Select
Edit group name
and press 6(/(&7.
4 Enter the new name of the group and press
6(/(&7.
Deleting Group Members
1 Scroll to PHONEBOOK, 6(/(&7,
Groups,
6(/(&7.
2 Select the group that you want to edit and press
6(/(&7.
3 Select
Edit
and press 6(/(&7.
4 Scroll to the member that you want to delete and
press &/5.
5 Press
6(/(&7 to confirm your choice.

40 Using the Phonebook
Deleting Groups
1 Scroll to PHONEBOOK, 6(/(&7,
Groups
, 6(/(&7.
2 Select the group that you want to delete and press
6(/(&7.
3 Select
Delete group
and press 6(/(&7.
4 Press
6$9( to confirm your choice.
Touch Tone Service
You can save a phone number together with tone signals
and codes in your phonebook. When you call this entry,
the phone number and all the tone signal codes are then
dialed automatically. This could be useful, for example,
when accessing an answering machine or when using
telephone banking services.
Note! Saving personal codes in the phonebook involves a
risk if your phone is stolen. It is safer to save per-
sonal codes in the Code memo. See “Code Memo”
on page 32.
1 Scroll to
PHONEBOOK, 6(/(&7,
Add Contact
,
6(/(&7.
2 Press
6(/(&7 and enter the name that you want to
associate with the phone number and code. Press
6(/(&7.
3 Scroll to
Other
and press 6(/(&7.
4 Enter the phone number. Press and hold * until the
pause character ( )appears in the display. Enter
the code, if needed, enter another pause, another
code and so on. Press 6(/(&7. You can also press
and hold # to enter the stop character ( ).
Note! A stop will cause the phone to stop transmitting
numbers until you press the left softkey. A pause
will temporarily suspend transmitting numbers for
approximately two seconds before sending the
next series.
5 Choose to
Save and Exit
and press 6(/(&7.
Checking the Memory
With the Memory status function in your phonebook,
you can check how many positions you have left in your
memory.
Using the Phonebook 41
Checking the Phonebook Memory Status
1 Scroll to PHONEBOOK, 6(/(&7,
Memory status
,
6(/(&7.
2 Use the joystick to scroll through the list.

42 Using the Messages Menu
8VLQJWKH0HVVDJHV0HQX
You can check your voicemail, check and send email,
send and receive text messages, and receive browser alerts
from within the MESSAGES menu. For more information
on Browser alert, see “WAP Browsing” on page 61.
Options
Message options
will appear when you are in the
MESSAGES menu. To see the MESSAGE options, press the
237,216 key.
Options may include:
Message alert
,
Voice mai l no
.,
Area
info
,
Cell information,
Message type
,
Val idity period
,
Reply
request
,
Status request
, and
Long messages
.
Message Alert
You can choose the signal you want to hear when you
receive a message. You can choose between
click
,
tone,
or
silent
.
Voicemail no.
Use this submenu to set your voicemail access number
(provided by your service provider).
Area info
Area info
is another type of text message which is sent to
all subscribers in a certain network area. The information
may be a local road report or a phone number to a local
taxi.
Cell information
Cell information
is network specific information. Contact
your service provider for more information.
Message type
You can select how you want your text message to be
interpreted by the recipient, for example, as a text
message, or as a fax or email message.

Using the Messages Menu 43
Validity period
If your message cannot be delivered because the recipient
has turned off the phone, your service center can save the
message to send it later, within a certain time period.
Reply request
If you want the recipient of your message to reply, you
can turn on the
Reply request
option. You are usually
charged for the reply. Please contact your network
operator for details. When you send a message, you are
asked whether you want the recipient to reply or not.
Status request
With this option on, you can view the status of a sent
message.
Long messages
If you are sending, or expecting to receive, a long SMS
message, you can select
Long messages
to have the
message split into several shorter messages.
EMail
Options
EMail options will appear when you are using the EMail
submenu. Options include:
Send now
,
Send now with
attachment
,
Save to outbox
, and
Save to drafts
.
Submenus
Submenus are:
Send & receive
,
Inbox
,
Compose
,
Outbox
,
Drafts
, and
Archive
.
SMS
Sending Text Messages
Note! You cannot send SMS messages in analog mode. If
you attempt to send a message, the message will go

44 Using the Messages Menu
to the Unsent box. You will need to resend the
message once you are in digital mode.
You can use either the keypad or the Chatboard accessory
to enter the message you want to send. You can enter up
to 160 characters per message.
1 Scroll to
MESSAGES, 6(/(&7,
SMS
, 6(/(&7
Send
new
, 6(/(&7.
2 Enter your message and press 6(/(&7.
3 Enter the recipient’s number or tilt the joystick left
to retrieve the number from the phonebook or the
group.
4 Press
6(/(&7 to send the message.
If you press &$1&(/ the message will be saved to
your
Unsent
box so you can send it later.
Sending msg
appears in the display followed by
Mes-
sage has been sent
.
You can reach the options list in the
Unsent
box by
pressing after selecting a message.
Note! If the recipient’s phone does not support long mes-
sages, the messages are sent in segments.
Note! You can send your message to one person or to a
pre-defined group, specified and saved in the
phonebook. For more information on how to cre-
ate groups, see “Groups” on page 39. When you
send text messages to a group, you are charged for
each member included in the group.
Enhancing your Messages
Tex t e nt r y
options will appear when you are entering
text. Options include:
Symbols
,
Insert object
,
Te xt f or ma t
,
Caps lock
,
Language
,
Input method
, and
Help
. For more
information on these options and text entry, see
“Options” on page 53.
Receiving Messages
When you receive a message, the phone beeps (see “SMS
Templates” on page 45), the message
New message Read
now?
appears in the display.
Reading Messages
1 Press <(6when you see the question
New message.
Read now?
Press NO to save the message to read
later. The message will be saved in
Received mail
in
the 606 menu.
Note! If you have received several messages, and you
press 6(/(&7 at the question above, you enter the

Using the Messages Menu 45
5HFHLYHGPDLO
submenu. Select the message that
you want to read and press 6(/(&7.
2 Scroll through the message by using the joystick.
An arrow in the bottom right-hand corner of the
display indicates that there is more text in the mes-
sage.
All parts of a long message may not be received at
the same time ...
indicates that part of the message
has yet to be received.
Note! If the sender of the message wants you to reply, the
display shows
Reply requested.Reply?
when you
press <(6 at the end of the message. Press <(6
again to reply. If you do not want to reply, press
12.
3 When you have read the text message, press &$1
&(/ to close the message or press 6(/(&7 to choose
one of the following options:
Delete
,
Reply
,
Forward
,
Call
,
Mail,
Save
, or
Read Next
.
Saving Objects from a Text Message
When the email address, phone number, Internet
address, picture, animation, or melody is highlighted,
press 6(/(&7. Then select to save the item and press
6(/(&7.
• A picture or animation is stored in
My Pictures
(press when sending a text message to see the
list). Once the list is full, you will be prompted to
overwrite another picture or animation.
• A melody is saved under ring tones in SETTINGS.
• An email address or phone number is saved in the
PHONEBOOK.
• An Internet address is saved in
Bookmarks
.
Note! If you exit the message without saving the picture,
the picture will be deleted.
Inbox Icons
These icons will appear next to messages in your Inbox.
indicates an unread message.
indicates that the message is saved.
SMS Templates
If you have one or more standard messages that you often
use, you can save these as templates in your phone. You
46 Using the Messages Menu
can save up to ten templates consisting of up to 50
characters each.
1 Scroll to
MESSAGES, 6(/(&7,
SMS,
6(/(&7
, Tem-
plates
, 6(/(&7,
Add new?
, 6(/(&7.
2 Enter the message and press 6(/(&7.
3 To send the message now, press 6(/(&7 when
Send
message now?
appears in the display, and proceed as
described in “EMail” on page 43. The message is
saved in the list of templates.
4 If you do not want to send the message now, press
12. The message is saved as a template for later use.

Using Voice Commands 47
Using Voice Commands
With your phone, you can:
•voice dial - call someone by saying the name and
number type (such as John or Nancy)
•answer and reject calls with your voice when using a
handsfree kit
•record or listen to voice memos by using voice com-
mands
•activate the voice control by saying a “magic word”
You can save voice commands (such as call, busy, or
answer) and voice tags (names) of 1-2 seconds each.
When recording voice commands, make sure you are in a
quiet environment.
Before Voice Dialing
Before you can start dialing by voice, you may need to
turn on the voice dialing function and record your voice
commands (if you want your commands in a language
other than English).
Activating Voice Dialing
1 Scroll to SETTINGS, 6(/(&7,
Voice control
,
6(/(&7,
Voice settings
, 6(/(&7,
Voice dialing
,
6(/(&7,
2 Select
On
and press 6(/(&7.
Note! You also need to record voice labels for each con-
tact name, for example “John”. Both “John” and
“John Alexander Doe” can be recorded fully, but
using only John will require less memory.
Recording a Contact Name
1 Scroll to SETTINGS, 6(/(&7,
Voice control
,
6(/(&7,
Voice co mman ds
, 6(/(&7,
Contacts
,
6(/(&7,
Add voice
, 6(/(&7.
2 Enter the first letter of the contact name and press
6(/(&7.
3 Select a contact and press 6(/(&7.
4 Follow the instructions in the display.

48 Using Voice Commands
Note! An icon appears next to the contact names which
have a voice label.
Voice Caller ID
You can choose whether you want to hear the recorded
voice command for a name when you receive an
incoming call.
1 Scroll to
SETTINGS, 6(/(&7,
Voice control
,
6(/(&7,
Voice settings
, 6(/(&7,
Caller name
,
6(/(&7.
2 Select
On
or
Off.
Voice Dialing
Voice Activated Dialing
1 From standby, press and hold 6(/(&7 until you
hear a tone.
2 Release
6(/(&7, lift the phone to your ear and say
“Call”, then say a name, for example “John”. The
name is played back to you.
3 If you have saved several numbers for that contact:
Say the number type that you have recorded earlier
for example “home” (the phone will show you the
number types available for that contact). The call is
connected.
Note! Only the number types available for that contact
are played to you. Other and Fax number types are
not available for voice dialing.
From standby, you can also initiate voice dialing and
voice control of voice memos by:
•pressing and holding either side volume key.
•pressing and holding the handsfree button (when
using a portable handsfree or a Bluetooth headset).
•saying the magic word. See “The Magic word” on
page 50.
Voice Digit Dialing
It is possible to dial a phone number by speaking the
digits with a short pause between each digit.
Settings include
Echo
and
Tone.
Echo feedback will echo
the accepted digit while tone dialing will give a quick
click or tone to indicate the digit was accepted. Echo
is
the default.From standby, press and hold 6(/(&7 until
you hear a tone.

Using Voice Commands 49
1 Release 6(/(&7, lift the phone to your ear and say
“Dial”.
2 Say the number to dial. The call is connected.
Voice Answering
You can answer or reject incoming calls by using your
voice, when using a portable handsfree, a car handsfree
kit, or the speakerphone.
Activating Voice Answering
1 Scroll to SETTINGS, 6(/(&7,
Voice control
,
6(/(&7,
Voice Settings
, 6(/(&7,
Voice answer
, select
On
or
Off.
2 Select the accessories you want to be able to use
with voice answering by pressing.
3 Press
6$9( to continue.
Answering Incoming Calls Using Voice Com-
mands
When the phone rings, say the word you recorded (for
instance,
Answer.
)
Answer
is played back to you and the call is connected.
Rejecting Incoming Calls Using Voice Com-
mands
When the phone rings, say “stop” or “cancel”. The caller
hears a busy tone.
Recording Voice Memos
You can record voice commands to start a voice memo
recording or to listen to voice memos.
1 Scroll to
SETTINGS, 6(/(&7,
Voice control
6(/(&7,
Voice settings,
6(/(&7,
Voice me mo
, 6(/(&7
2 Select
On
and press 6$9(.

50 Using Voice Commands
Starting a Voice Memo Recording Using a
Voice Command
1 From standby, press and hold the left softkeyuntil
you hear a tone.
2 Release
6(/(&7, lift the phone to your ear and say
“Record”. The voice command is played back to
you and a tone indicates that the recording has
begun.
3 To end the recording, press 6(/(&7.
Listening to Voice Memo Recordings Using a
Voice Command
1 From standby, press and hold 6(/(&7 until you
hear a tone.
2 Release
6(/(&7, lift the phone to your ear and say
“Play”. The voice command is played back to you.
3 Listen to your voice memo recordings. Press 12 to
stop.
The Magic word
You can record a
Magic word
and use it as a voice
command to allow totally handsfree access to voice
control. Instead of pressing and holding6(/(&7, you say
the magic word and then one of your recorded voice
commands. The Magic word is especially suitable when
driving a car with a car handsfree kit installed, because
you use external power instead of the battery power of
your phone. You can also use the Magic word when the
phone is connected to a portable handsfree or when the
speakerphone is activated.
Note! Choose a long, unusual word which can easily be
distinguished from ordinary background speech.
1 Scroll to
SETTINGS, 6(/(&7,
Voice control
6(/(&7,
Voi ce s ett ing s
, 6(/(&7,
Magic word
,,
choose
On
or
Off.
When set to On, the Magic
Word icon ( )will appear.
2 Select the accessories you want to be able to use
with the Magic word by pressing Press 6$9(.
Turn off the Magic word when you no longer need
totally handsfree access, in order to save battery power.

Using Voice Commands 51
Editing Your Voice Commands
In
Voice co mman ds
you find all your voice commands.
You can keep them up to date by re-recording them or
deleting the ones you do not use.
Re-recording a Voice Command
1 Scroll to SETTINGS, 6(/(&7,
Voice Control
6(/(&7,
Voice c omma nd s
, 6(/(&7.
2 Select the type of voice command and press
6(/(&7.
3 Select a voice command and press 6(/(&7.
4 Select
Replace voice
and press 6(/(&7.
5 Lift the phone to your ear, wait for the tone and say
the command.
You can also edit the voice label for a contact name in
Find and Edit Contact
in the PHONEBOOK menu.
Problems when Recording
If your phone cannot detect speech, one of the following
might have happened:
•you spoke too softly – try speaking more loudly
•you held the phone too far away – hold it as you do
during a call
•the voice command was too short – it should be
around one second long
•you spoke too late or too soon – speak immediately
after the tone
Voice Command Train Over
You have the option to select a list of some voice
commands and train over the commands. This will result
in over-writing the template or default commands. You
will be prompted to speak the new word and then repeat
it for confirmation.
If you have selected a language other than English from
the Language submenu, you will be prompted to train
voice commands when you attempt to initiate voice
control activation.
52 Using Voice Commands

Inputting Text 53
Inputting Text
You can enter letters, for example, when you add names
to the phonebook, write text messages, or enter Internet
addresses.
Apart from the way you normally enter letters in your
phone, using multitap text input, you can use
T9 Text
Input
for entering text messages and email, for example,
if the input language you select supports this. T9 Text
Input is a predictive input method and is a quicker way
to write texts.
Options
Te xt e nt r y
options will appear when you are entering text.
Options include:
Symbols
,
Insert object
,
Te xt f or ma t
,
Caps
lock,
Language
,
Input method
, and
Help
.
•Symbols- Symbols and punctuation marks such as ?
and , are shown. Move between the symbols by
using the arrow keys. Press 6(/(&7 to select a sym-
bol.
•
Insert Object
- Insert a picture, sound, melody, or
animation into your message.
•
Te xt f or ma t
- Set the text style, text size, alignment,
and paragraph formatting.
•Caps lock
• Language- A list of the input languages that you
selected earlier is shown. If you want to change the
input language for the text you are writing, scroll to
a language and press 6(/(&7.
•Input method- A list of input methods is shown. If
you want to change the input method for the text
you are writing, scroll to an input method and press
6(/(&7.
•Help

54 Inputting Text
Input Methods
Before you start entering letters, you need to select the
input methods that you want to use when writing.
The available input methods are:
•Multitap
•T9 Text Input
1 Scroll to
SETTINGS, 6(/(&7,
Language
, 6(/(&7,
choose
Input language
or
T9 Predictive,
6(/(&7.
2 Scroll to the language that you want to use for
entering letters and press .
3 Press6(/(&7 to exit the menu.
Multitap Text Input
When saving names in the phonebook or when writing
Internet addresses, you enter letters using multitap text
input. You press each key as many times as needed to
show the letter you want.
In the following example, we are going to write a name:
1 Scroll to
PHONEBOOK, 6(/(&7,
Add Contact
,
6(/(&7. Press 6(/(&7 again.
2 Press the appropriate key, -, , or , repeatedly
until the character you want appears in the display.
See the table of the Latin alphabet below:
Example:
•To enter an ‘
A
’, press once.
•To enter a ‘
B
’, quickly press twice.
•To shift between capital and lower-case letters, press
, then enter the letter.
•Press &/5 to delete letters, characters, or numbers.
Note! You can also use the volume key as a shortcut to
certain letters: To enter a ‘
B
’, press the upper side
volume key and press . To enter a ‘
C
’, press the
lower side volume key and press .
Press To Get ...
Space - ? ! ‚ . : ; " ’ < = > ( ) _ 1
A B C Å Ä Æ à Ç 2 Γ
D E F è É 3 ∆ Φ
G H I ì 4

Inputting Text 55
Note! Press and hold and to enter stops and pauses.
Press and hold a digit key to enter the digit
directly.
T9 Text Input
You can use T9 Text Input when entering texts such as
text messages. The T9 Text Input method uses a built-in
dictionary to recognize the most commonly used word
for every sequence of key presses. This way, you press
each key only once, even if the letter you want is not the
first letter on the key.
When you press the keys, different words are suggested.
If the word you want is not suggested, you can edit the
word. The word is then added to the dictionary so that it
is suggested the next time you use T9.
In the following example, we will start writing a text
message:
1 Scroll to
MESSAGES, 6(/(&7,
Send new
, 6(/(&7.
2 For example, if you want to write the word “How”,
press ,, .
The word “How” appears.
3 If the word shown is the one you want:
•press 1 to accept and add a space.
(To accept a word without adding a space, tilt the
joystick right.)
If the word shown is not the one you want:
•press repeatedly to view alternative words (candi-
dates). Accept a word and add a space by pressing
.
If you do not find the word you want by pressing :
•Select
Edit word
, 6(/(&7.
J K L 5 Λ
M N O Ñ Ö Ø ò 6
P Q R S ß 7 Π Σ
T U V Ü ù 8
W X Y Z 9
+ & @ / ¤ % $ £ ¥ \ § ¿ ¡ 0 Θ Ξ Ψ Ω
# * ↵
Press To Get ...
56 Inputting Text
•Delete the entire word by pressing &/5, or delete
one letter at a time by tilting the joystick right and
then pressing &/5 repeatedly.
•Write the new word using multitap text input and
press 6(/(&7.
The word is added to the dictionary. The next time
you enter , , , the word you just added to the
dictionary will appear as one of the alternative
words.
Note! Press * to enter a full stop. To enter other punctua-
tion marks, press *and then repeatedly. Accept
by pressing . Press and hold to select an input
method.
7XUQLQJ2IIWKH77H[W,QSXW
If you wish, you can turn off the T9 Text Input. This
setting is valid for all input of texts – not only for the text
you are currently entering.
1 Scroll to
SETTINGS, 6(/(&7,
Language
, 6(/(&7,
T9 Predictive
, 6(/(&7.
2 Select
On
or
Off
.

Using the Calendar 57
Using the Calendar
Note! For calendar synchronization software, visit:
http://mobileinternet.ericsson.com.
You can use the calendar to keep track of important
meetings that you need to attend, phone calls that you
need to make or tasks that you need to do.
Appointments and Tasks
You can save many appointments and tasks in your
calendar, depending on the size of each item. You can
choose to add a new appointment or task, or use an old
appointment or task as a template by copying and editing
it.
•
Appointments:
meetings, vacation, phone call, etc.
•
Tas ks :
make a phone call, send a message, pay bills
etc.
You can fill in different types of information about the
appointments or task.
Adding Events or Appointments
1 Scroll to EXTRAS, 6(/(&7,
Calendar
, 6(/(&7,
Add
appointm.,
6(/(&7.
2 Choose the type of event or appointment and press
6(/(&7.
3 Press
6(/(&7 and enter a subject.
4 Scroll to
Location
, press 6(/(&7, enter a location,
and so on.
5 Scroll to
Proceed?
and press 6$9(.
6 Press
6(/(&7 and enter a start date. Scroll to
Time
,
press 6(/(&7, enter a start time, and so on.
7 Scroll to
Proceed?
and press 6$9(.
58 Using the Calendar
8 Select the reminder interval you want, for example
5 min before
, and press 2..
If you choose
Oth. reminder,
enter a reminder date and
press 6(/(&7. Enter a reminder time and press 6(/(&7.
9 A list of options appears.
If the appointment is recurrent:
•Choose
Recurrent app
and press 6(/(&7.
•Choose the recurrence you want and press 6(/(&7.
•If you want to set an end date, select
Set end date
and press 6(/(&7. Enter a date and press 6(/(&7.
If you want to change the class for your appointment:
•Choose
Class
and press 6(/(&7.
•Choose the class you want and press 6(/(&7.
If you want to set the time zone for a meeting:
•Choose
Time zone
and press 6(/(&7.
•Choose a time zone and press 6(/(&7. Your meet-
ing time will be adjusted automatically according to
the time zone you are in.
10 Confirm with
Save and close,
6(/(&7.
Adding New Tasks
1 Scroll to EXTRAS, 6(/(&7,
Calendar
, 6(/(&7,
Add
task
, 6(/(&7.
2 Choose a task and press 2..
If you choose phone call, enter a number and press
6(/(&7.
If you choose message, select a type of message and
press 6(/(&7.
If you choose miscellaneous, select a type and press
6(/(&7.
3 Press
6(/(&7 and enter a subject. Scroll to
Descr
,
press 6(/(&7 and enter a description.
4 Scroll to
Proceed?
and press 6$9(.
5 If you want to set a reminder, scroll to
Set reminder
and press 2.. Enter a reminder date and press 2..
6 A list of options appears. Confirm with
Save and
close
, 6(/(&7.

Using the Calendar 59
Viewing Your Calendar
To view your calendar content, scroll to EXTRAS,
6(/(&7,
Calendar
, 6(/(&7 and then select one of the
following:
•
View today
. This shows all the appointments for the
current day and the Tasks that have not been com-
pleted. An icon appears next to those appointments
that cover the whole day.
•
View all Tasks
. This shows all your entered Tasks.
Scroll to the task you want to view and press
6(/(&7.
•
Month View
. This shows a whole month, with the
current day in a square. Move within and among
the weeks by using the arrow keys. Press 6(/(&7 to
enter a certain day. Days on which you have
appointments are marked in bold.
•
Week View
. This shows a whole week. All your
appointments and Tasks are shown as grey boxes.
You enter a certain day by pressing 6(/(&7 when
that day is highlighted.
Editing
You may wish to edit an appointment or a task, for
example, by changing the date or location.
Editing or Deleting Appointments
1 In the calendar, scroll to the day of the appoint-
ment you want to edit and press 6(/(&7.
If you want to delete the appointment, press &/5.
Delete?
appears, press 6(/(&7.
2 To edit, press .
3 Choose
Edit
and press 6(/(&7.
4 Proceed as described in “Adding Events or Appoint-
ments” on page 57.
5 When you have finished, scroll to
Save
and press
6(/(&7.
Editing or Deleting Tasks
1 Scroll to EXTRAS, 6(/(&7,
Calendar
, 6(/(&7,
View
all tasks
, 6(/(&7.
2 Choose a task.
Press to view the list of options. Options

60 Using the Calendar
include: Mark “Done”, Edit, Delete, Copy, and
Call.
3 When you have finished, scroll to
Save
and press
6(/(&7.
Calendar Settings
To view your calendar options, scroll to EXTRAS,
6(/(&7,
Calendar
, 6(/(&7,
Options
, 6(/(&7, and then
select one of the following:
•
Status.
Use this to check when you last synchro-
nized your calendar, how much space is left for new
appointments and Tasks.
•
Set Class view
. You can choose whether to see only
the private calendar entries, only the public ones or
both.
•
Delete all
. Deletes all appointments and Tasks in the
calendar.
•
Wake on Reminder
. Turn on this function if you
want your phone to remind you even though the
phone is turned off.

WAP Browsing 61
WAP Browsing
Your phone includes a built-in browser that allows you to
access Internet content designed specifically for mobile
devices. WAP (Wireless Application Protocol) is a global
standard for advanced mobile service. WAP allows you to
access certain services on the Internet from your mobile
phone. This content typically includes Email, Calendar,
Contacts, Internet communication, e-commerce and
telephony services. Surfing the web with your Ericsson
mobile phone is quick and easy.
When you launch your browser, your phone
automatically places a data call to establish a connection
to the Internet. While you are connected, you will see a
globe icon ( ) on the bottom row of your display.
Note! While your browser is active and the globe icon is
displayed, you cannot make or receive calls. If you
need to make a call, press and hold the right soft-
key to return to the WAP BROWSER menu. Press
and hold the right softkey again to return to the
Standby screen and then dial the number.
After a period of inactivity (new content is not sent or
received), the phone call placed to establish your WAP
connection automatically ends and the globe icon
disappears.
Browser Features
Your WAP Browser gives you the following features
(depending on your service provider):
Microbrowser for sending/receiving email and for
Internet access
Support for Phonebook download
Bookmark creation
Image support
Automatic time out which disconnects data calls
after periods of inactivity.

62 WAP Browsing
Launching Your WAP Browser
Scroll until the WAP BROWSER menu is highlighted, then
press the left softkey to select it. Press the left softkey
again to launch your browser (Launch browser will
already be selected).
Exiting Your WAP Browser
There are two easy ways to exit your WAP browser:
To make a call, press and hold the right softkeyto
return to the WAP BROWSER menu. Press and hold
the right softkeyagain to return to the Standby
screen.
or
Press to enter the %URZVHURSWLRQVmenu. Scroll
to ([LWEURZVHU and then press the left softkey.
Your WAP Browser Display
The display is separated into
two areas, the content window
and the status row. The content
window is the top area of the
screen and the status row is the
bottom line of the screen.
Content Window
When you browse the web, you can view different web
pages in your content window. If a page contains more
than one screen of text, there will be a scrollbar on the
right side of the content window. You can scroll
through each line with the joystick or view one page at
a time by pressing the up or down side volume keys.
Connection Status
Connection status is displayed when you are operating
the browser and at various times during operation.
Connection status includes the following:
&RQQHFWLQJ
6HQGLQJ
content
window
status
row
left soft key right soft key
scrollbar
Sites
2 Weather
3 Sports
1 News
OK Done
............... ...............
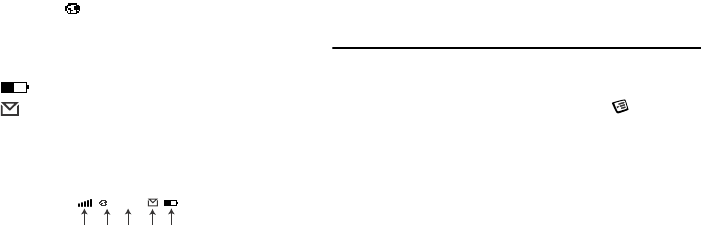
WAP Browsing 63
5HFHLYLQJ
:RUNLQJ
Soft Keys
The globe icon ( ), located between the soft keys on the
status row of your display, indicates a connection to the
data network. In some instances, other icons alternate
with the globe icon during a WAP session.
indicates low battery power.
indicates an incoming message.
Icons
1 6LJQDOVWUHQJWKLFRQ shows the relative signal
strength from the wireless system. More bars indi-
cate a stronger signal.
2 *OREHLFRQ indicates that you have established a
connection with the data network.
3 7LPH.
4 %URZVHU$OHUW indicates that you have received
new content.
5 %DWWHU\LFRQshows the relative strength of your
battery. A full icon indicates a fully-charged battery.
Browser Options Menu
While you are browsing, you can reach different
browsing options by pressing and holding . These
options can include:
Reload
Select 5HORDG to refresh a page.
Home
Select +RPHto return to your Home Page.
Bookmarks
Select %RRNPDUNV to see the list of bookmarks that you
have set.
Mark site
Select 0DUNVLWH to set your bookmarks.
12345
01:01p

64 WAP Browsing
Show URL
Select 6KRZ85/ to display the URL current page.
About Openwave
Select $ERXW2SHQZDYH to display version information
about the browser.
Advanced
2IIOLQH6HUYLFHV - shows WAP content stored in the
cache, but not subject to the normal cache reclaiming
mechanism.
2XWER[ - Allows standard WAP transaction requests
(such as fetch new mail, send an instant message, add an
appointment) to be queued and handled as one batch
when service is available.
5HVWDUW%URZVHU - Clears the cache and attempts to
connect to your Home Page.
(QFU\SWLRQ - A security code computed by your browser
for authentication. You can verify your encryption with
the 9HULI\.H\submenu. You can also select a new
encryption key by selecting 1HZ.H\ You should
contact your content provider prior to making any
encryption changes.
Help
Select +HOS if you need assistance with the current page
(if available).
Exit Browser
Select ([LW%URZVHU if you want to end your Browser
session and return to the WAP BROWSER menu.
Browser Key Functions
Use the following table to help you with the different
ways to navigate through the pages that appear in your
content window. Some keys operate differently when you
are navigating a page and when you are entering text (see
“Text Entry” on page 66).

WAP Browsing 65
Page Navigation Text Input
Press to select the menu,
feature, or setting
selected. In most cases,
pressing the center of the
joystick will perform the
same action as the left
soft key.
Press to select the menu,
feature, or setting
selected. In most cases,
pressing the center of the
joystick will perform the
same action as the left
soft key.
Press to cancel action or
move back in the menu
system.
Press to cancel action or
move back in the menu
system.
Access OpenWave menu. Press to enter special
Options menu.
Go Back. Delete last character/let-
ter entered.
• Move through menu,
lists, or text. Tilt up or
down to go the pervious
or next row. Tilt right or
left to navigate through
tables.
• Press down on the joy-
stick to select (same func-
tion as left softkey in
most instances).
Move through characters/
letters.
Display standby screen. Toggle capitalization.
Enter Bookmarks. Enter characters.
Select Options.
Move up or down
through pages.
Page Navigation Text Input

66 WAP Browsing
Text Entry
You can enter characters in four different modes. The
active format is displayed in the right soft key position.
Change the format in which characters are entered by
pressing the right soft key.
1 mode allows you to enter alphabetic text.
Press the appropriate key, 0-9, or # repeatedly until
the desired letter, character, or digit appears in the
display. For example, to enter an a, press the
numeric key 2 once. To enter a b, press the numeric
key 2 twice.
2 mode allows you to select symbols and
punctuation from a list. You can switch to symbol
entry by pressing the right soft key until SYM is in
the right soft key position. There are four screens of
symbols. Press the left soft key to switch between
each screen. Press the digit key corresponding to the
symbol that you want to enter. Your phone auto-
matically switches back to the previously-used
method of text entry after you enter one symbol.
Press To Get ...
SPACE . , : ; ? ! ¿ ¡ _ " ’ « » ( ) 1
A B C 2 À Á Â Ã Ç
D E F 3 È É Ê Ë
G H I 4 Í Î Ï
J K L 5
M N O 6 Ñ Ó Ô Õ
P Q R S 7
T U V 8 Ù Ú Û Ü
W X Y Z 9
/ * - + = < > 0
# @ $ ^
SYM1 . ? ! , ; : ‘ ’ "
SYM2 . @ \ / | _ ~ $ ^
SYM3 + - * / < > = % #
SYM4 { } [ ] ( ) < > &
Press To Get ...

WAP Browsing 67
3 mode allows you to enter numbers by
pressing the digit key corresponding to the number
that you want to enter.
4 mode allows you to use Tegic T9 predic-
tive text input. Predictive text input software allows
you to quickly and easily enter words or entire sen-
tences with just one key press per letter. Predictive
text entry software uses the phone’s internal dictio-
nary to quickly scan possible variations to deter-
mine the correct word.
If you enter all your letters and the word that you
want does not appear, press to view other matches
in your phone’s dictionary. Keep pressing until
your word appears.
For example, to enter the word “ball”, press , , ,
. After the first 2, your screen displays “c”. After
the second 2, your screen displays “ca”. After the
first 5, your screen displays “call”. After the second
5, your screen displays “call”. Press the key until
the word “ball” is displayed.
Note! You will know that there is no word match in the
T9 dictionary when your key presses are no longer
recognized by T9 text entry mode.
If your word does not appear, you can add it into
your phone’s dictionary by doing the following:
Type the text that you want to enter into your
phone’s dictionary by using any of the non-T9 text
entry modes.
With the cursor to the right of the last character
(without pressing a space) reselect T9 mode by
pressing the right soft key until T9 appears in the
right soft key position.
Tilt down to enter a space. Your word is added to
your phone’s dictionary when your phone is prop-
erly powered down.
Note! It may be helpful not to look at the screen until
you are finished entering the characters of the
word you are trying to type as a new word match
may occur with each new character entered.
68 WAP Browsing

Making Data and Fax Calls 69
Making Data and Fax Calls
You can use your phone in Wireless Modem Operation
when it is powered on with the proper cable attached
from your phone to your computer. An Ericsson
accessory kit may be required to use your phone in
Wireless Modem Operation.
Your Ericsson mobile phone contains a modem similar to
the modems you use to connect your computer to your
home or office telephone service. Rather than connecting
to standard telephone lines, however, the modem in your
mobile phone allows you to connect your computer to
the mobile telephone system. In places where mobile
network operators provide the necessary support, you
can use your mobile phone to send or receive faxes,
upload or download data files, or access the Internet.
This chapter will assist you with setting up your
computer and phone to handle data, fax, and Internet
calls on the mobile network.
Note! If digital data/fax/Internet service is not available,
you can purchase an analog modem card that is
compatible with your Ericsson mobile phone and
use data/fax functions on the available analog sys-
tem.
Differences Between Data, Fax, and
Internet Calls
Your Ericsson mobile phone can handle data, fax, and
Internet calls, but each type of call requires
corresponding software that must be running on your
computer.
Data Calls
Data calls are placed to exchange computer files between
two computers. While the data connection is in place,
files can be transferred between the connected
computers, according to the capabilities of the software
in use. When a data call is made, the connection will
remain in place until it is closed by one of the computers
involved. To make or receive data calls with your
Ericsson mobile phone, you must have a properly

70 Making Data and Fax Calls
configured communications program running on your
computer.
Fax Calls
Fax calls are placed to send fax messages. When a fax
message has been sent, your fax software or the
originating fax machine will terminate the call. To make
or receive fax calls with your Ericsson mobile phone, you
must have a properly configured fax program running on
your computer.
Internet Calls
Internet calls are placed to Internet Service Providers
(ISP) when you want to use email or access websites on
the World Wide Web. To make Internet calls, you must
have an account with an ISP and a properly configured
Internet access program (browser) running on your
computer. When your software is installed and set up to
dial your ISP, calls can be made using the normal dialing
procedure. Once a connection to your ISP is established,
it will remain in place until you disconnect or until it is
automatically disconnected due to the degradation of
signal quality or due to inactivity.
Note! Throughout this chapter, references to data/fax/
internet will be referred to as data.
Quick Net Connect
Quick Net Connect
establishes an Internet connection
quickly, easily, and economically. The digital connection
bypasses the typically-used analog modems and connects
to the Internet in a matter of seconds. Contact your
service provider for more information.
Before You Start
Before setting up your phone for data operation, do the
following:
•You must have a serial interface cable to connect
your Ericsson mobile phone to your computer. The
cable is available in the Ericsson DA 18 Phonebook
Manager Accessory Kit or as a separate accessory.
You can purchase Ericsson accessories at http://
www.ericsson.com/phones.
•Confirm that your mobile service provider supports
digital data services in your planned usage area.
•Verify that you have the necessary subscription.

Making Data and Fax Calls 71
Note! The availability of digital mobile voice service does
not necessarily imply that your mobile service
operator supports digital data operation.
Setting Up Your Computer
To operate properly with the modem in your Ericsson
mobile phone, make sure that your computer has the
following hardware and software:
•A functional serial port
•An operating system that supports data access soft-
ware, such as Windows 95 or Windows 98
•Appropriate fax (class 2.0), Internet access, or file
transfer software
Note! Class “2.0” is different from Class “2”.
Initial Setup
Successful first-time setup of your phone and computer
for data operation involves the following steps:
1 Connect Your Computer to Your
Phone. Your Ericsson DA 18
Phonebook Manager Accessory
Kit contains a serial interface
cable (the cable can also be pur-
chased as a separate accessory).
The cable has a plug on one end that matches the
receptacle on the bottom of your Ericsson mobile
phone. The other end of the cable has a 9-pin
female connector that matches the standard 9-pin
serial interface port connector. Connect one end of
the cable to your Ericsson mobile phone and the
other end to the serial port on your computer.
Note! If you are trying to connect to a 25-pin serial
interface port on your computer, you will need an
adapter. You can purchase a 25-pin serial interface
port adapter at most computer supply stores.
2 Install Your Modem Control Software (driver)
The modem control software (driver) that you need
to use your Ericsson mobile phone is available at
http://mobileinternet.ericsson.com. Refer to the

72 Making Data and Fax Calls
“Installing the Modem Driver (INF File)” on
page 75 for help with installing drivers for some
operating systems. When the appropriate driver is
loaded, refer to the sections on making and receiv-
ing data and fax calls later in this chapter.
3 Set up your data access software according to the
instructions supplied with it. Look for Ericsson
CDMA Data Fax Modem in modem list when
configuring software which will access the handset
as a modem. Look for Ericsson CDMA Packet
Data Modem in the case of using Dial-Up Net-
working on a packet data network for internet
access.
Operation
Receiving Data and Fax Calls
Note! Prior to receiving a data call, you must configure
your phone manually to receive a data call. To
configure your phone manually, do the following:
Review the instructions from your mobile service
provider that describe the procedures and rules for
making and receiving data calls in your area.
1 Set up your phone and computer as described
above.
2 Press
0(18 from the Standby screen to access the
main menu.
3 Choose
Call Options
from the SETTINGS menu.
4 Press or until the 'DWD)D[ is highlighted.
5 Press
<(6 to open the 'DWD)D[. The current
selection is indicated by a filled radio button.
6 Press or until the call type for the next call
you will receive is highlighted. Call Types are: Off,
Next Call Fax, Fax On, Next Call Data, and Data
On.
Making Data and Fax Calls 73
Note! The Off setting is active until you choose a differ-
ent setting. Fax On and Data On apply until you
power off your phone.
7 Press
<(6 to select the highlighted call type.
8 'DWD)D[6HWWLQJ[[ appears in the display. Your
phone is now configured to a specific type for your
next incoming call.
Making Data and Fax Calls
When your phone and computer are properly set up, you
can send a fax, or initiate data calls, as with any other
modem.
Review the instructions from your mobile service
provider that describe the procedures and rules for
making and receiving data calls in your area.
Note! To avoid unnecessary airtime charges, terminate
your data calls as soon as you have finished trans-
ferring files by pressing the 12 key.
Making Voice Calls While Connected to
Your Computer
You can originate voice calls when you are not on a data
call. You can receive voice calls if 'DWD)D[is set to Off.
Your Ericsson mobile phone enables you to initiate voice
calls from Windows applications when connected to the
Ericsson Voice Call Dialer. This is particularly useful if
you have contact cards with phone numbers in a contact
management application. You can open a contact card,
click on the phone icon, and originate a call using your
Ericsson mobile phone. Then you simply pick up your
mobile phone and continue the call. The Ericsson Voice
Call Dialer is compatible with most contact manager
software packages. Refer to the “Installing the Modem
Driver (INF File)” section at the end of this chapter for
help with installing this driver for some operating
systems.
Disconnecting
Disconnect your Ericsson mobile phone from your
computer by disconnecting the cable from your phone
and the serial port from your computer.
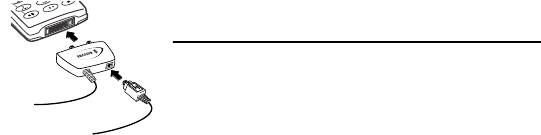
74 Making Data and Fax Calls
Use With Other Ericsson Accessories
Rapid or Travel Charger
To charge your phone’s battery with an Ericsson rapid or
travel charger during data operation, do the following:
1 Plug one end of the serial
interface cable into your
phone.
2 Plug the other end of the
serial interface cable into
the serial port on your
computer.
3 Plug the charger cable
into the bottom of the connector.
4 Plug the charger cable into the wall outlet.
Desktop Charger
To charge your phone’s battery with an Ericsson desktop
charger during data operation, do the following:
1 Plug one end of the serial interface cable into the
back of your desktop charger.
2 Plug the other end of the cable into the serial port
on your computer.
3 Plug the charger cable into the bottom of the con-
nector.
4 Plug your charger cable into the wall outlet.
5 Insert the phone into the front compartment of
your desktop charger.
Achieving Best Performance
Charging your Battery
Both your Ericsson mobile phone and your laptop
computer batteries should be well-charged before starting
data operation. This will help you avoid interruptions
due to loss of power.
You may charge your phone’s battery with an Ericsson
charger during data/fax operation as mentioned above.
Signal Strength
It is important to maintain a good signal path between
the phone and the mobile telephone system when
making data calls. Signals will generally be stronger when
the phone is in an upright position. If you are indoors,
your signal will generally be stronger when the phone is
near a window.

Making Data and Fax Calls 75
In a Vehicle
It is possible to receive data calls from your vehicle.
Operation from a moving vehicle may not be satisfactory
because data may be lost when your call is transferred
from one mobile base station to another. Be sure to give
full attention to driving and pull off the road and park
before making or receiving calls, if driving conditions so
require.
Transmission Disturbances
Brief interruptions of mobile telephone signals that
would not be bothersome during a voice call may cause
problems during data operation, depending upon the
error correction capabilities of the software being used.
Such interruptions are uncommon during stationary
operation, but can be caused by vehicles or people
passing nearby, especially in areas of low signal strength.
You can use the signal strength indicator on your phone
to verify that you have a good signal path.
Installing the Modem Driver (INF File)
Windows 95, Windows 98, and Windows
ME
1 Download the INF file from http://mobileinter-
net.ericsson.com.
2 Turn on your Ericsson mobile phone.
3 Connect one end of your serial cable to your Erics-
son mobile phone and the other end to your com-
puter’s serial port.
4 Go to
Start
>
Settings
>
Control Panel
.
5 Double click on
Modems
. If the
Modems
icon does
not appear, click on the blue underlined text
view all
Control Panel options
to the left of the icons.
6 If a window titled “
Install New Modem
” appears,
proceed to the next step. Otherwise, if a window
titled “
Modem Properties
” appears, then under the
General
tab, click the
Add
button.
7 If your computer has a PCMCIA slot a window
may appear asking, “
What type of modem do you
want to install?
” If you are asked this question, select

76 Making Data and Fax Calls
Other
, then click
Next
. If you are not asked this
question, proceed to the next step.
8 If you are running Windows 98 or ME, a message
beginning with “
There appears to be a new port or
modem adapter in the computer
” may appear. If it
does, check the box labeled
Don’t run the Hardware
Installation Wizard,
then click
Next
. If this message
does not appear, proceed to the next step.
9 Check the
Don’t detect my modem; I will select it from
a list
box. Click
Next
.
10 Click
Have disk
, then click
Browse
. Navigate to the
modem driver (INF file) you downloaded in step 1.
Click
OK.
Click
OK
again.
11 Select the modem you want to install, then click
Next.
Note! If you do not know which modem you need,
check with your mobile service provider to deter-
mine the data service you have.
12 Select the COM port to which you are connecting
the phone. Click
Next
.
13 A window may appear asking for location informa-
tion, such as the country you are in and your area
code. If it does appear, you must enter this informa-
tion before you can proceed. When finished, click
OK
. If this window does not appear, proceed to the
next step.
14 Click
Finish.
The A1228c is now installed on your
PC.
Windows 2000
1 You must be logged on with administrator privi-
leges before proceeding. Contact your network
administrator or help desk for more information.
2 Download the INF file from http://mobileinter-
net.ericsson.com.
3 Turn on your Ericsson mobile phone.
4 Connect one end of your serial cable to your Erics-
son mobile phone and the other end to your com-
puter’s serial port.
5 Navigate to
Start, Settings, Control Panel, Phone and
Modem Options.
6 A window may appear asking for location informa-
tion, such as the country you are in and your area
code. If it does appear, you must enter this informa-
tion before you can proceed. When finished, click

Making Data and Fax Calls 77
OK
. If this window does not appear, proceed to the
next step.
7 Select the
Modems
tab. Click the
Add
button.
8 Check the
Don’t detect my modem; I will select it from
a list
box. Click
Next
.
9 Click
Have Disk.
Click
Browse
. Navigate to the INF
file you downloaded in step 1. Click
Open.
Click
OK
.
10 Select the modem you want to install, then click
Next.
Note! If you do not know which modem you need,
check with your mobile service provider to deter-
mine the data service you have.
11 Select the COM port to which you are connecting
the phone. Click
Next
.
12 A message titled “
Digital Signature Not Found
” will
appear. Click
Yes
to proceed.
13 Click
Finish
. Click
OK
.
Windows NT
1 You must be logged on with administrator privi-
leges before proceeding. Contact your network
administrator or help desk for more information.
2 Download the INF file from http://mobileinter-
net.ericsson.com
3 Turn on your Ericsson mobile phone.
4 Connect one end of your serial cable to your Erics-
son mobile phone and the other end to your com-
puter’s serial port.
5 Go to
Start, Settings, Control Panel
and double click
on
Modems
.
6 If a window titled “
Install New Modem
” appears,
proceed to the next step. Otherwise, if a window
titled “
Modem Properties
” appears, then under the
General
tab, click the
Add
button.
7 Check the
Don’t detect my modem; I will select it from
a list
box. Click
Next.
8 Click
Have Disk
. Click
Browse
. Navigate to the file
you downloaded in step 1 and select it. Click
Open
,
then click
OK
.
9 Select the modem you want to install, then click
Next.

78 Making Data and Fax Calls
Note! If you do not know which modem you need,
check with your mobile service provider to deter-
mine the data service you have.
10 Select the COM port to which you are connecting
the phone. Click
Next.
11 Click
Finish.
Click
Close.
Troubleshooting
1 You cannot set up or maintain a data/fax session.
This will occur if you are inadvertently originating
a voice call when attempting a data/fax call. To cor-
rect the problem, do the following:
a From the Start menu on your Windows desktop,
click on Settings, then Control Panel.
b Double-click the Modems icon.
c Select the General tab.
d Select Ericsson CDMA Data/Fax Modem from
the pull-down list.
e Click Properties.
f Click General. Make sure that the maximum
speed is set to 19200.
g Select the Connection tab.
h Click Advanced.
i In the Extra settings box, type the following:
&C1+CRM=0;
j Click OK to return to the Connection tab.
k Click OK to return to Modem Properties.
l Click Close.
Note! If you are using an application that supplies its
own box for entering extra settings, then type the
following command string into that box as well:
+COS=4,1,2,0; +ES=1,0,1; +DS=0,0,512,6;
2 You cannot originate a voice call.
a From the Start menu on your Windows desktop,
click on Settings, then Control Panel.
b Double-click the Modems icon.
c Select the General tab.
d Select Ericsson Voice Call Dialer from the pull-
down list.
e Click Properties.
f Select the Connection tab.
g Click Advanced.
Making Data and Fax Calls 79
h Type the following in the Extra Settings box of
the Advanced Connection Settings window:
*ERVNOK=1
i Click OK to return to the Connection tab.
j Click OK to return to Modem Properties.
k Click Close.
3 You are having trouble initiating data/fax calls
from your computer.
Check to see if your COM ports are occupied. If so,
you must temporarily disable the software applica-
tions that are using the COM ports.
80 Making Data and Fax Calls

Troubleshooting 81
Troubleshooting
0\SKRQH
GRHVQRW
WXUQ2Q
Recharge or replace the battery.
0\SKRQH
GRHVQRWULQJ
ZKHQDFDOO
LVUHFHLYHG
Check for Ringer Off () or Silent
Mode () icons on the Standby
screen. Press the Options key ( )
to turn off Silent Mode. Turn the
ringer off in the SETTINGS menu.
0\EDWWHU\
GRHVQRW
FKDUJHWRIXOO
FDSDFLW\
Your battery is fully charged when
the battery icon no longer fills and
empties. If you still experience prob-
lems, condition your battery by fully
discharging and charging it three
times. Or, if your phone came with a
desktop charger, use the condition-
ing function on the desktop charger
to condition the battery.
0\VLJQDO
VWUHQJWKYDU
LHV
This is a common occurrence. Trans-
mitters are set in geographic areas,
and coverage is not 100% all of the
time. Signal strength varies as you
travel between cells.

82 Troubleshooting
,FDQQRW
FRQQHFWWR
WKHPRGHP
If you cannot connect to the modem
in Wireless Modem Operation, make
sure that your serial interface cable is
connected to both your phone and
your computer. If the problem still
exists, consult your Ericsson CD or
your computer’s user’s guide.
,FDQQRW
UHFHLYHD
GDWDFDOO
If you are having trouble receiving a
data call, you may need to configure
your phone manually to receive a
data call. See “Receiving Data and
Fax Calls” on page 72.
,DPKDYLQJ
SUREOHPV
GRZQORDG
LQJLQIRUPD
WLRQ
If you are having problems down-
loading information from the Inter-
net during a wireless modem session,
make sure that your phone is still in
Wireless Modem Operation by
checking your phone’s display. If you
travel to a region with a weak signal,
the connection can be dropped. If
this happens, you will need to re-
establish a connection to the internet
once you have enough signal
strength.
,GRQRWVHH
WKH:$3
LFRQ
If you do not see the WAP icon, you
are not in an area with strong enough
service to establish a wireless modem
connection.

Troubleshooting 83
Error Messages
Accessories, Accessibility, and
Internet
7HFKQLFDO$VVLVWDQFH2UGHULQJ$FFHVVRULHV
•North America - 1-800 ERICSSON (1-800-374-
2776)
,FDQQRW
FRQQHFWWR
WKHPRGHP
If you cannot connect to the modem,
make sure that your serial interface
cable is connected to both your
phone and your computer. If the
problem still exists, consult your
Ericsson CD or your computer’s user’s
guide.
Low Battery
The battery power is low. When the
phone shuts itself off, replace the bat-
tery with a fully charged one, or use
an alternate power source, such as a
travel charger.
No memory
Delete message
Your text message memory is full.
Erase some stored messages before
you can receive more messages.
Network not
responding
Your data service is not active in your
network or you are out of signal
strength. Check your roaming map
or call Technical Support to load
your data service into the WAP net-
work.
Server not
responding
Your data service is not set up in the
gateway or the wrong gateway is
specified in your phone. Do one of
the following:
&RQILUPWKHFRUUHFWJDWHZD\DGGUHVVLV
HQWHUHGDQGDFWLYH
&DOOWRORDG\RXUGDWDVHUYLFHLQWKH
JDWHZD\

84 Troubleshooting
•Latin America - 305-755-6789
•Other countries - 919-472-7908
Note! See
Internet
address below for ordering accessories
online.
$FFHVVLEOH6ROXWLRQV6SHFLDO1HHGV
For information on Accessible Solutions for individuals
with special needs call the Ericsson Special Needs Center
at 877-878-1996 (TTY) or 877-207-2056 (voice), or
visit the Ericsson Special Needs Center at:
http://www.ericsson-snc.com
,QWHUQHW
Visit Ericsson on the internet at:
http://www.ericsson.com/phones
0RELOH,QWHUQHW
Visit the Ericsson Mobile Internet at:
http://mobileinternet.ericsson.com for online access to
synchronization software, customer services, user’s
guides, and other useful information.

Limited Warranty 85
Limited Warranty
Thank you for purchasing this Ericsson Product. To get
maximum use of your new Product, we recommend that
you follow a few simple steps:
•Read the Guidelines for Safe and Efficient Use.
•Read all the terms and conditions of your Ericsson
Warranty.
•Save your original receipt. You will need it for war-
ranty repair claims. Should your Ericsson Product
need warranty service, please return it to the dealer
from whom it was purchased, or contact your local
Ericsson Certified Call Center or visit www.erics-
son.com/consumers to get further information.
Our Warranty
Ericsson warrants this Product to be free from defects in
material and workmanship at the time of its original
purchase by a consumer, and for a subsequent period of
one (1) year.
Any Ericsson accessory is covered by a warranty period of
one (1) year from the date of its original purchase by a
consumer in accordance with the applicable terms and
conditions stipulated herein.
What We Will Do
If, during the warranty period, this Product fails to
operate under normal use and service, due to improper
materials or workmanship, Ericsson subsidiaries,
authorized distributors, Service Points or Certified
Service Centers will, at their option, either repair or
replace the Product in accordance with the terms and
conditions stipulated herein.

86 Limited Warranty
Conditions
1 The warranty is valid only if the original receipt issued to
the original purchaser by the dealer, specifying the date
of purchase and serial number, is presented with the
Product to be repaired or replaced. Ericsson reserves the
right to refuse warranty service if this information has
been removed or changed after the original purchase of
the Product from the dealer.
2 If Ericsson repairs or replaces the Product, the repaired or
replaced Product shall be warranted for the remaining
time of the original warranty period or for ninety (90)
days from the date of repair, whichever is longer. Repair
or replacement may involve the use of functionally equiv-
alent reconditioned units. Replaced faulty parts or com-
ponents will become the property of Ericsson.
3 This warranty does not cover any failure of the Product
due to normal wear and tear, or due to misuse, including
but not limited to use in other than the normal and cus-
tomary manner, in accordance with Ericsson’s instruc-
tions for use and maintenance of the Product. Nor does
this warranty cover any failure of the Product due to acci-
dent, modification or adjustment, acts of God, improper
ventilation or damages resulting from liquid.
4 Since the cellular system on which the product is to oper-
ate is provided by a carrier independent from Ericsson,
Ericsson will not be responsible for the operation, avail-
ability, coverage, services or range of that system.
5 This warranty does not cover Product failures due to
improper repair installations, modifications or service
performed by a non-Ericsson Service Point or Certified
Service Center or opening of the Product by non-Erics-
son certified persons.
6 The warranty does not cover Product failures which have
been caused by use of non-Ericsson original accessories.
7 Tampering with any of the seals on the Product will void
the warranty.
8 THERE ARE NO EXPRESS WARRANTIES,
WHETHER WRITTEN OR ORAL, OTHER THAN
THIS PRINTED LIMITED WARRANTY. ALL
IMPLIED WARRANTIES, INCLUDING WITHOUT
LIMITATION THE IMPLIED WARRANTIES OF
MERCHANTABILITY OR FITNESS FOR A PAR-
TICULAR PURPOSE, ARE LIMITED TO THE
DURATION OF THIS LIMITED WARRANTY. IN

Limited Warranty 87
NO EVENT SHALL ERICSSON BE LIABLE FOR
INCIDENTAL OR CONSEQUENTIAL DAMAGES
OF ANY NATURE WHATSOEVER, INCLUDING
BUT NOT LIMITED TO LOST PROFITS OR
COMMERCIAL LOSS, TO THE FULL EXTENT
THOSE DAMAGES CAN BE DISCLAIMED BY
LAW.
Some countries/states do not allow the exclusion or
limitation of incidental or consequential damage, or
limitation of the duration of implied warranties, so the
preceding limitations or exclusions may not apply to you.
This warranty gives you specific rights, and you may also
have other legal rights which may vary from country/
state to country/state.
International Service
You can have your Ericsson Product serviced within the
warranty period in any country where an identical
Product is sold by an authorized Ericsson distributor. To
find out if your Product is sold in the country you are in,
please call the local Call-Center. In order to be granted
service, you have to present your original receipt
specifying the date of purchase and serial number. Please
observe that certain services may not be possible
elsewhere than in the country of original purchase, for
example due to the fact that your Ericsson Product may
have an interior or exterior which is different from
equivalent models sold in other countries. It may not be
possible to repair SIM-locked Products.
88 Limited Warranty
Index 89
Index
$
Accessibility 83
Accessories 83
Air Bags 4
Aircraft 5
Alarm 31
Antenna Care 1
Assistance 83
%
Battery
charging 14
Battery Use 7
Blasting Areas 5
&
Calculator 32
Call Timer 23
Call Waiting 27
Calls
Forwarding 26
Restricting 26
Charging the Battery 7
Children 6
Clock 29
Code Memo 32
Contacting Ericsson 83
Contacts 35
Adding 36
Calling 36
Deleting 38
Editing 37
Shortcuts 37
'
Data Calls 69
Data/Fax/Internet Calls
Disturbances 75
In Vehicles 75
Initial Setup 71
Making 73
Operation 72
Performance 74
Receiving 72
Display
Font Size 28
Greeting 28
Light 28
Menu Help 28
Divert Calls 26
Driving 4
(
Emergency Calls 7
Error Messages 83
Low Battery 83
No Memory 83
No Response 83
90 Index
Extras Menu 31
)
Fax Calls 70
Font Size 28
Forward calls 26
*
Games 32
Greeting 28
Groups 39
+
Hearing Aids 5
,
Internet 83
Internet Calls 70
.
Keys 11
/
Language 28
Letters
Entering 53
Light 28
0
Main Menu 11
Menus
Accessing 19
Message Alert 24
Minute Minder 25
Missed Calls 23
Mobile Internet 84
Multitap 54
My Shortcuts 34
3
Pacemakers 4
Pause 40
Phonebook
Contacts 35
Deleting Entries 38
Editing Entries 37
Groups 39
Using 35
Position Numbers 38
Problem
Low Battery Power 83
Problems
Battery Will Not Charge 81
I Can’t Download 82
Modem Connection 82
Phone Does Not Ring 81
Phone Does Not Turn On 81
Signal Strength Varies 81
Problems You Can Solve 81
Product Care 1
Profiles 25
5
Radio Frequency (RF) 2
Restrict Calls 26
6
Safety Guidelines 1
SAR 2
Settings Menu 24
SMS
editing messages 44
message types 42
Index 91
reply requested 43
templates 45
Soft Keys 11
Sounds
Increasing Ring 24
Key 25
Message Alert 24
Minute Minder 25
Ring 24
Silent 24
Vibrator 24
Special Needs 84
Speed Dialing 37
StopWatch 31
7
T9 55
T9 text input 66
Technical Assistance 83
Technical Support 83
Text Input 53
Time
Alarm 31
Format 29
Stopwatch 31
Timer 31
Troubleshooting 81
TTY 84
TTY Phone Number 84
9
Vibrator 24
:
Warranty 85
92 Index
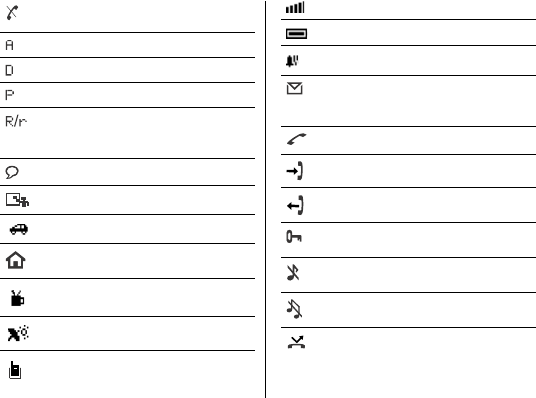
##
T60 Quick Card
No service is available.
Your phone is in Analog mode.
Your phone is in Digital mode.
Voice privacy is enabled.
Roaming Icons. 5 indicates preferred
roaming; U indicates non-preferred
roaming.
Magic word is active.
Meeting profile is active.
Car kit profile is active.
Home profile is active.
Work profile is active.
Outdoors profile is active.
Handsfree profile is active.
))
Shows current signal strength.
Shows current battery status.
Alarm is set.
You have a new message. The number
text to the envelope indicates how
many messages you have.
You have missed a call.
Indicates an incoming call in Call list.
Indicates an outgoing call in Call list.
Keypad is locked. Unlock by pressing
Options key.
Ringer is off. Turn On by pressing
Options key.
Silent mode is On.
Call screening is activated.
?
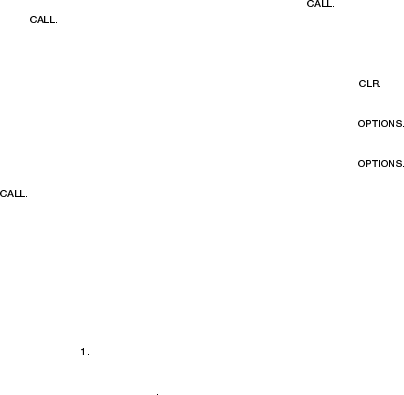
AE/LZT 123 6841 R1
(PHUJHQF\&DOOV
Enter your local emergency number and
press
6FUROO7KURXJK0HQXV
Tilt the joystick to the right.
6HOHFWD0HQXRU6DYHD6HWWLQJ
Press left softkey.
&DQFHO$FWLRQRU0RYH%DFNLQ0HQXV
Press right softkey.
6SHHG'LDO
Enter position number (2-9) and press
5HGLDO/DVW'LDOHG1XPEHU
Press left softkey from Standby
$QVZHU&DOO
Press the left softkey.
(QG&DOO
Press the right softkey.
&DOO9RLFHPDLO
Press and hold
7XUQ3KRQH2Q2II
Press and hold the power key
&DOO1XPEHU6KRZQLQ'LVSOD\
Press
&KDQJH(DU9ROXPH'XULQJ&DOO
Press upper or lower side key
0LFURSKRQH0XWH'XULQJ&DOO
Press and hold
.H\SDG/RFN
Press and hold
6LOHQW0RGH
Press and hold
:HEVLWH
http://www.ericsson.com/phones
7HFKQLFDO6XSSRUW
North America -1-800 ERICSSON
Latin America - 305-755-6789
Other Countries - 919-472-7908
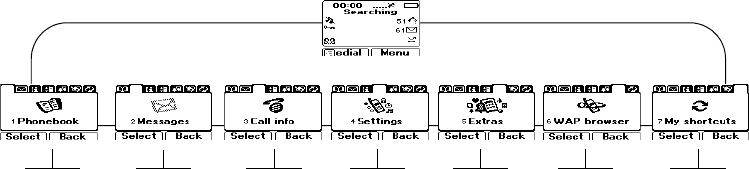
Some menus/features are operator dependent. The order of these menus and submenus may vary slightly.
*The Ongoing Call menu only appears when on an active call.
Call contact
Add contact
Edit contact
My numbers
Groups
Calling cards
Memory status
Voice mail
Email
SMS
Browser alert
Missed calls
Call list
Call timers
Options
Turn on/off tones
Hold call
Switch calls
Retrieve call
Release active
Call info
Sounds & Alerts
Profiles
Call options
Display
Language
Time and date
Locks
Voice control
Networks
Data settings
Accessory settings
Reset settings
Voice memo
Calendar
Time
Calculator
Code memo
Accessories
Pictures
Games
Launch browser
Browser help
Active gateways
Edit shortcuts