HTC VOYAGER SmartPhone User Manual voyager um aContents indd
HTC Corporation SmartPhone voyager um aContents indd
HTC >
Contents
- 1. User Manual Part I
- 2. User Manual Part II
- 3. Users Manual Part I
User Manual Part I

Smartphone
User Manual
(C) 2003 All rights reserved.
The names of actual companies and products mentioned herein
may be the trademarks of their respective owners.
Smartphone User Manual
Safeguard
2
Congratulations on the purchase of your new Windows(R) Powered
Smartphone 2003! Please read the following warnings before op er -
at ing your device.
Warnings! Please Read Before Operating your Device
THE DEVICE IS NOT CHARGED WHEN YOU TAKE
IT OUT OF THE BOX. (For information, see Step 2:
Charge the battery in Quick Start Guide)
TO TURN ON YOUR SMARTPHONE PRESS AND
HOLD THE POWER BUTTON FOR 3 SECONDS.
DO NOT REMOVE THE BATTERY PACK WHEN THE
DEVICE IS CHARGING.
WHEN INSERT YOUR SIM CARD, MAKE SURE
THE DEVICE IS POWER-OFF, THEN CLICKS IT
INTO PLACE. (For more information, see Step 1:
Insert the SIM card in Quick Start Guide)
YOUR WARRANTY IS INVALIDATED IF YOU OPEN
OR TAMPER WITH THE DEVICE’s OUTER CASING.
(For more information, see the enclosed warranty
card)

Smartphone User Manual
Contents
3
Contents
Chapter 1 Getting Started
1.1 Knowing your smartphone 6
1.2 Status indicators 9
1.3 Battery 10
1.4 Accessories 11
1.5 Navigating 13
1.6 Entering text and numbers 17
1.7 Securing your phone 20
Chapter 2 Using your phone
2.1 Making a call 24
2.2 Receiving a call 26
2.3 In-call options 27
2.4 Retrieving a voice mail message 28
2.5 Reviewing your calls 29
2.6 Shortcuts (speed dials) 30
2.7 Advanced dialing options 32
2.8 Switching to your Bluetooth headset 34
Chapter 3 Using your camera
3.1 Camera and Video Recorder 36
3.2 Album 42
Chapter 4 Personalizing your phone
4.1 Changing settings 48
4.2 Bluetooth 56
4.3 Data Connections 60
Table of contents to be updated
Table of contents to be updated

Smartphone User Manual
Contents
4
Chapter 5 Messaging features
5.1 Setting up accounts 64
5.2 Sending e-mail, MMS and SMS messages 66
5.3 Receiving e-mail, MMS and SMS messages 78
5.4 Viewing your message folders 83
5.5 Managing your Inbox 86
5.6 Instant messaging 90
Chapter 6 Contacts, Calendar, and Tasks
6.1 Using Contacts 96
6.2 Using Calendar 101
6.3 Using Tasks 105
6.4 Photo Contacts 109
Chapter 7 Synchronizing information
7.1 Understanding ActiveSync 116
7.2 Synchronizing with a desktop computer 117
7.3 Synchronizing with a server 119
7.4 Other synchronization information 124
Chapter 8 Internet, entertainment and more
8.1 Internet Explorer 128
8.2 Media Player 133
8.3 Calculator 139
8.4 Modem link 139
8.5 Games 141

Chapter 1
Getting Started
1.1 Knowing your smartphone
1.2 Status indicators
1.3 Battery
1.4 Accessories
1.5 Navigating
1.6 Entering text and numbers
1.7 Securing your phone
Smartphone User Manual
1. Getting
Started
6
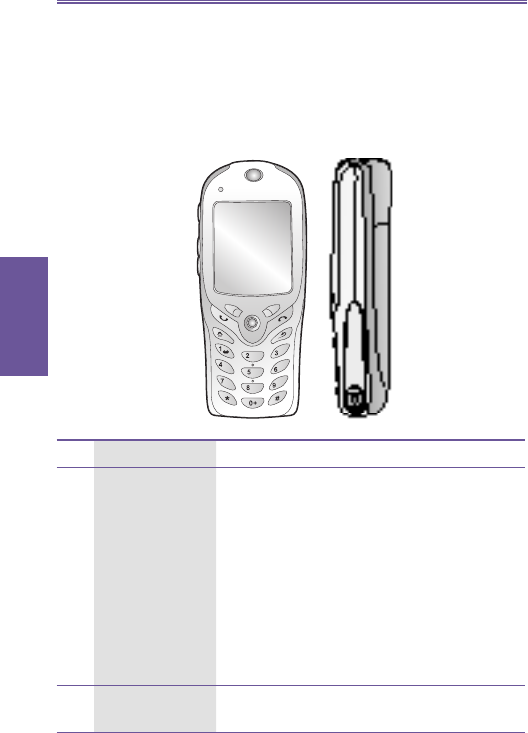
1.1 Knowing your smartphone
This chapter will help you set up your Smartphone, charge its
batteries, and fa mil iar ize yourself with its various hard ware
and software components.
Front, and right side view
Nr. Key Function description
1LED indicator Solid green: Battery is fully charged.
Solid red: Battery is empty.
Solid amber: Battery is charging.
Flashing green (blinking every second):
Notifi cation
Flashing green (blinking every 3 sec-
onds): Network is attached.
Flashing red: Battery is low.
Flashing blue: Bluetooth network is
at tached.
Dim: Network is disconnected.
2Speaker This outputs voice from calls or sound from
audio me dia.
abc
jkl
tuv
de
f
mo
n
wxyz
ghi
pqrs

Smartphone User Manual
1. Getting
Started
7
Nr. Key Function description
3Navigation stick Use to move left, right, up and down through
on-screen in for ma tion; press the center to
se lect.
4Right
soft key
This button selects the com mand shown on
the screen immediately above the key. The
com mand shown chang es in re sponse to
the pro gram you are us ing.
5End / Key lock Press once to end a call. Press and hold
to lock/unlock the key pad.
6Back Press to go back to the pre vi ous screen.
7Dialing keypad Press to enter numbers and characters.
8Earphone jack When you want to lis ten to music or talk
hands-free, insert the ear phone jack
here.
9Pound key Pressing and holding the pound key
dis plays a list of symbols.
10 Asterisk Pressing and hold ing the as ter isk key
switch es be tween text and nu mer ic
in put modes. You may also use this
key to change be tween up per case and
lowercase in text in put mode.
11 Home/Bluetooth Press to return to the Home screen.
Press and hold to turn on/off Bluetooth
headset
and disconnect GPRS.
and disconnect GPRS.
12 Send/Handsfree Press once to pick up or initiate a
call. Press and hold to turn on/off the
speak er phone.
13 Left soft key This button se lects the com mand shown
on the screen immediately above the
key.
14 Display The screen on your phone that displays
information. The top of the display
shows the title bar.
Smartphone User Manual
1. Getting
Started
8
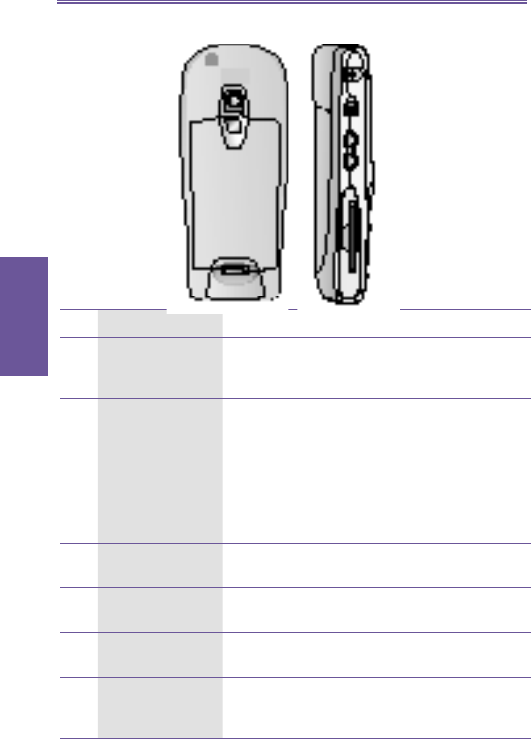
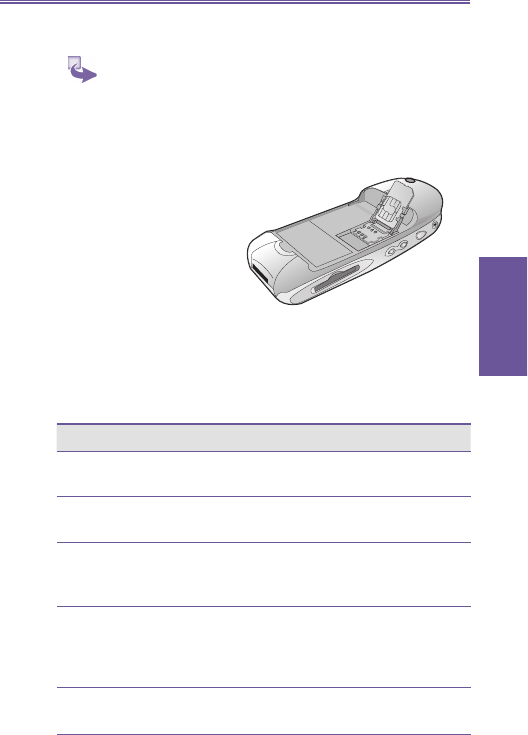
Rear, side and base view
Nr. Key Function description
1Car antenna
con nec tor
If your car supports, you can attach
your phone to the antenna and utilize its
su pe ri or re cep tion quality
2Power button When the phone is turned off, press the
Power button to turn on the phone.
When the phone is on:
Press the power button to ac cess the
Quick List.
Press and hold the power button to turn
off the phone.
3Camera
button
Press to launch the camera.
4Volume Press to adjust the volume of the earpiece
and headset.
5MMC card slot Insert SD or MMC cards here to in crease
the capacity of your device's memory.
6Universal
connector
Attach the USB/Serial cable here when
syncing with your desktop computer or
note book.
Smartphone User Manual
1. Getting
Started
9
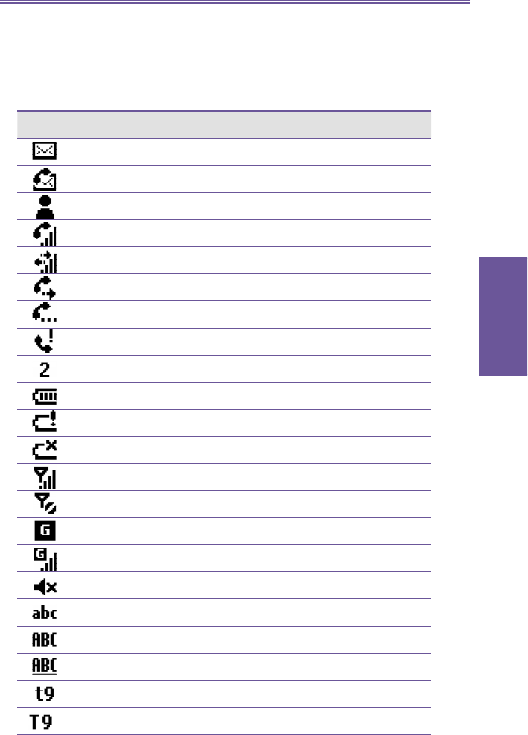
1.2 Status indicators
Status indicators are displayed in the title bar at the top of
the phone's display. The following table lists common sta tus
indicators and their meanings.
Indicator Meaning
New email
New voice mail
New instant message
Voice call active
Data call active
Call forwarding
Call on hold
Missed call
Line 2
Battery level
Low battery
No battery
Signal strength
Radio off
GPRS available
GPRS in use
Ringer off
Multipress text input mode, lowercase
Multipress text input mode, uppercase
Multipress text input mode, caps lock
T9 text input mode, lowercase
T9 text input mode, uppercase

Smartphone User Manual
1. Getting
Started
10
1.3 Battery
Your Smartphone has a removable, rechargeable Lithium
ion battery. With continual use and recharging, the battery
will become unusable after a matter of years and should be
changed through a service center. While you are using your
device, the amount of power consumed depends on wheth er
you are talking on the phone or on standby.
The estimates for battery life are based on you only using
this function. As you will be continually in ter chang ing
be tween these features and functions the es ti mates will
vary.
Your smartphone contains a lithium-ion battery pack.
There is a risk of fi re and burns if the battery pack is
handled improperly. Do not disassemble, crush, puncture,
short external contacts, or dispose of in fi re or water. Do
not attempt to open or service the battery pack. Replace
only with the battery pack designated for this product.
Dispose of batteries properly. Do not dispose with your
regular trash.
To recharge the battery
When the low-battery icon appears, save any unsaved data
you are working on, perform a synchronization with your PC,
then turn off your Smartphone. Do not try to restart your
Smartphone until you have connected to external pow er.
Mode Estimated battery life
Talk time 2~3 hours
GPRS 2 hours
Standby 100 hours
Smartphone User Manual
1. Getting
Started
11
You can recharge your smartphone
in any one of the fol low ing ways:
1 Place your Smartphone in
the cradle and connect the
cradle to an external power
source. The first time you
use it, charge for three to
four hours.
3 You can plug the AC
adapter into the optional DC
Converter and then connect
your Smartphone directly to
an external power source.
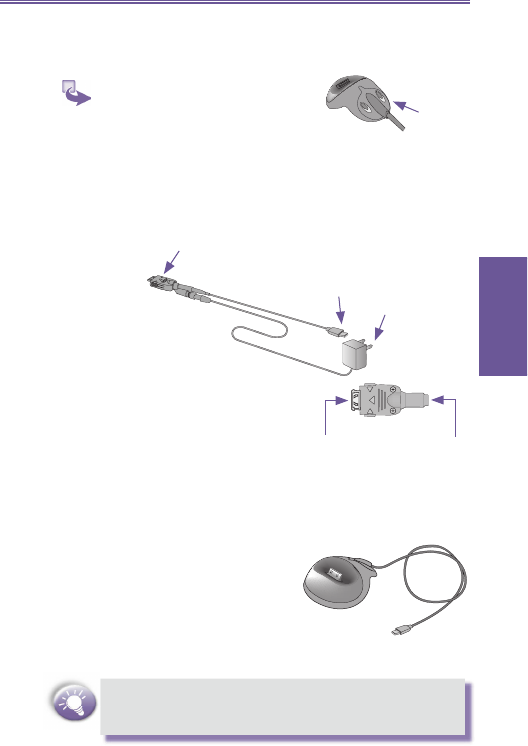
1.4 Accessories
USB cradle
Your smartphone comes with a
USB cradle. This allows you to
recharge your smartphone, as
well as syn chro nize information
between your smartphone and a
PC using ActiveSync.
To synchronize, the USB Cradle must be plugged into an
available USB port on your PC. GPRS will not work when
your device is plugged into the cradle.
AC Adapter
plugs into
the back of
the cradle
2 You can plug the AC adapter into the optional USB/Serial
cable head and then connect your Smartphone directly to
an external power source.
To your
SmartPhone
To AC
adapter
To your Smartphone
Plug the AC
adapter into a
socket
USB synchronization
cable, connect to
your PC
Smartphone User Manual
1. Getting
Started
12
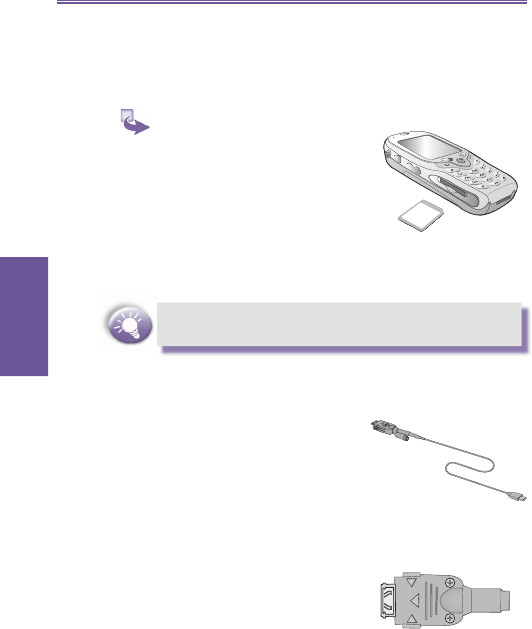
SD and MMC cards
Your device has an expansion slot compatible with a range
of SD and MMC Memory cards, which are primarily used to
backup fi les or store data.
When you receive your device there will be a piece of
plastic in the slot; remove as described in step 2 above.
USB cable
The USB cable allows you to syn-
chro nize with your desk top without
the cradle. The DC converter in the
head also allows you, in com bi na tion
with an AC adapter, to recharge your
device.
DC connector
The DC Connector in combination
with the AC adapter al lows you to
recharge your device without the
cra dle.
1 To insert a memory card: Push
the memory card into slot until
it clicks into place. The card is
secure when it is not protruding
from the base.
2 To remove the card: Push it in
and then release, letting the
card spring out.
Smartphone User Manual
1. Getting
Started
13
To insert the SIM card
1 Lift up the SIM card case and insert the SIM. Push it
forward and pull back to secure the SIM.
2 Replace the back panel by inserting the top fi rst.
3 Clip it into place it the bottom.
1.5 Navigating
Using the navigation stick
You can scroll by pressing the navigation stick to the di rec tion
as described in the table below:
Action Navigation
Press up Moves the selection focus upward on
the screen
Press down Moves the selection focus down ward on
the screen
Press right Moves the selection focus forward on
the screen, or moves the cursor for ward
through characters in a text fi eld
Press left Moves the selection focus back ward
on the screen, or moves the cursor
back ward through characters in a text
fi eld, without de let ing characters
Press center Confi rms your selection; serves as the
Action button
)
Smartphone User Manual
1. Getting
Started
14
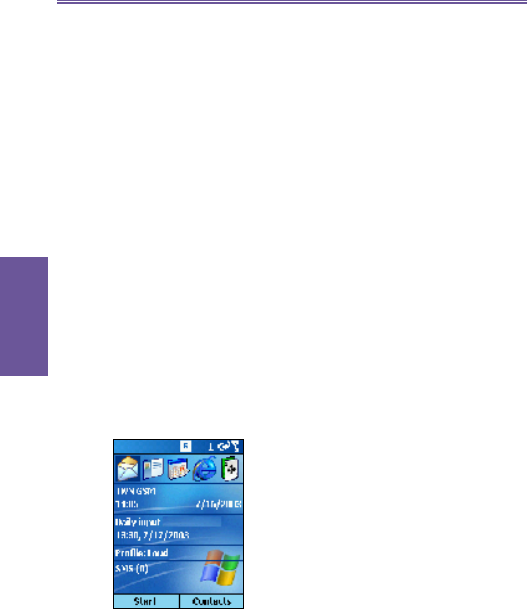
Using the Home screen
Pressing the Home key takes you to the Home screen.
You can gain access to all of the smartphone features and
pro grams from the Home screen.
The top of the Home screen displays icons for the fi ve pro-
grams that you have most recently used. The center of the
Home screen displays your next appointment, the number
of messages in Inbox, and your current profi le. When you
scroll to one of these items and press the navigation stick,
the as so ci at ed program opens.
On the bottom left side of the Home screen is the Programs
menu. Pressing the soft key for this menu takes you to the
list of installed programs. You can scroll to a program in the
list and press the navigation stick to open it. To the right of
the Pro grams menu is a variable menu. Pressing this soft
key opens the associated program.
The Home screen displays automatically when you turn on
the Smartphone or leave the Smartphone idle when it is on,
but you can go to it at any time by pressing the Home key.

Smartphone User Manual
1. Getting
Started
15
Using the Back key
Pressing the Back key takes you to the previous screen,
in a similar manner to the Back button on a browser. In a
text fi eld, pressing the Back key moves the cursor back to
de lete one or more characters. This is similar to pressing
the BACKSPACE key on a keyboard.
1 To backspace and remove one character: Press the
back key.
2 To remove the card: Push it in and then release, letting
the card spring out.
Using the soft keys
There are two soft keys on your phone, located directly be low
the display screen. Each soft key performs the com mand
displayed immediately above it on the screen, mak ing it
easy to navigate around your phone and to perform com-
mon commands.
Using menus
On many screens, the right soft key is labeled Menu. The
Menu soft key displays a list of menu options that are rel e vant
to the screen you are viewing. Selecting a menu op tion will
either perform the command or take you to another part of
the user interface where you can perform the com mand.
Smartphone User Manual
1. Getting
Started
16
Using the Start menu
Your phone comes pre-installed with many programs that
you can start using. To install additional programs on your
phone, refer to the Smartphone Companion CD that came
with your phone. To navigate to a program:
1 On the Home screen, press the Start soft key.
2 Select the program you want, and press the Action
button.
Using numbers
You can also use numbers to quickly navigate to programs
and settings on your phone. Just press the number on the
keypad that corresponds to the number shown next to the
program or setting you want.
For example, in Start menu, press 3 on the keypad to open
Cal en dar.
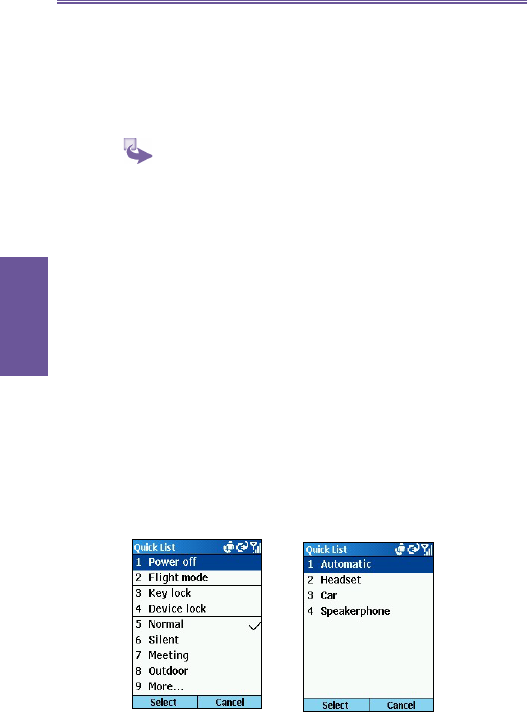
Using the Quick List
The Quick List displays a list of commands, such as locking
your phone, locking the phone's keypad, and turning off the
radio, as well as the list of available profi le types. To access
the Quick List, press the power button.

Smartphone User Manual
1. Getting
Started
17
1.6 Entering text and numbers
Your phone supports three input modes for en ter ing text and
numbers: Multipress, T9, and Numeric. The Multipress and
T9 modes are used for entering text, and the Numeric mode
for entering numbers. When you se lect a fi eld that requires
text or numeric entry, the phone will au to mat i cal ly select the
ap pro pri ate input mode. The status indicator on the title bar
shows the input mode you are cur rent ly us ing.
To switch input modes
Press and hold the Asterisk (*) key until the status indicator
for the input mode you want is displayed in the title bar.
The following table shows the complete list of input mode
status indicators.
Entering text in Multipress mode
When you are in Multipress mode, you can enter a letter
by pressing the number key on which the letter appears. To
enter the fi rst letter on the number key, press the key once,
to enter the second letter, press the key twice, and so on.
The letter entered most recently is underlined until you have
completed the keypresses for the letter and moved on to
the next letter.
For example: To enter the word "hat," press 44, 2, 8.
Indicator Mode
abc
ABC
ABC
t9
T9
T9
123
Multipress text input mode, lowercase
Multipress text input mode, uppercase
Multipress text input mode, caps lock
T9 text input mode, lowercase
T9 text input mode, uppercase
T9 text input mode, caps lock
Numeric input mode
Smartphone User Manual
1. Getting
Started
18
When you enter letters that are on the same number key,
you must pause after entering the fi rst letter and wait until
the underline disappears before entering the next letter so
your phone can process the fi rst letter. This pause is called
the Multipress time out, and you can adjust the length of the
pause between keypresses.
For example: To enter the word "cat," press 222, pause,
press 2, and then press 8.
To enter punctuation in Multipress mode, press 1 re peat ed ly
until you see the punctuation mark that you want.
To change the Multipress time out:
1 On the Home screen, select Start.
2 Select Settings and then Accessibility.
3 In Multipress time out, select the length of the pause
between keypresses.
Entering text in T9 mode
When you are in T9 mode, just press the number keys that
contain the letters you want to form a word. T9 will then ana-
lyze your keypresses and attempt to complete the word.
For example: To enter the word "shoe," press 7, 4, 6, 3.
1 Enter the numerical sequence that represents the word

Smartphone User Manual
1. Getting
Started
19
Having trouble entering a word in T9 mode? T9 cannot
always fi nd the word you want in the T9 dictionary; in
these cases, switch to Multipress mode. After you have
entered the word in Multipress mode, the word will be
added to the T9 dictionary.
Entering numbers in Numeric mode
When you are in Numeric mode, just press the number(s) you
want to enter on the keypad. If a fi eld permits a nu mer i cal
entry only, such as the Work phone fi eld in Contacts, the input
mode will automatically default to Numeric mode.
Miscellaneous input tasks
1 To enter a space: In Multipress or T9 mode, press the #
key.
2 To start a new line: Press the Action button.
3 To change between uppercase and lowercase in text
mode: Press the * key.
4 To lock caps: Press the * key twice. Press the * key again
to return to lowercase.
5 To enter a symbol: Press and hold the # key, select the
symbol you want, and then press the Done soft key.
6 To enter a number, an asterisk (*), or a pound sign (#):
Switch to Numeric mode, and press the corresponding
you want to form.
2 Press the # key to accept the word and enter a space after
it, or press 0 to scroll through the available words.
To enter punctuation in T9 mode: Press 1, and then 0 to
cycle through common punctuation.

Smartphone User Manual
1. Getting
Started
20
1.7 Securing your phone
You can customize the level of security you want to have on
your phone by locking the keypad, the entire phone, or the
SIM card.
Locking the keypad
The keypad lock turns off the keypad functionality. This is a
helpful feature if, for example, your phone is turned on and in
your pocket, and you want to prevent accidental keypresses
from dialing a number etc.
1 To lock your keypad: On the Home screen, press and
hold the End button. The left soft key will display Unlock,
indicating that your phone is locked.
2 To unlock your keypad: On the Home screen, press the
Unlock soft key, and press the # key.
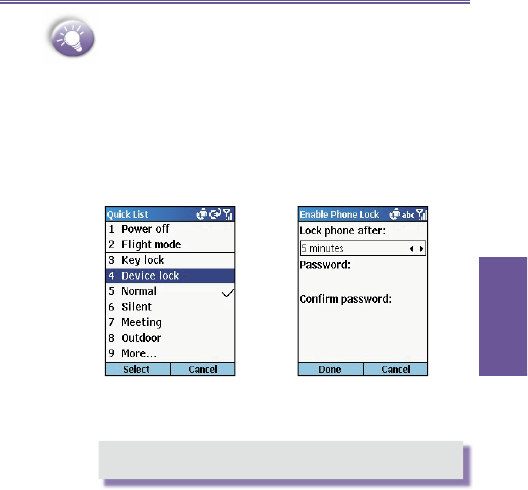
Locking your phone
Locking your phone prevents access to personal data. When
you enable this feature, your phone will au to mat i cal ly lock
after a specifi ed time of inactivity. A screen will be displayed
requiring your phone lock password before access is
granted.
1 To lock your phone:
key on the keypad.
7 To delete characters: Press the Back button to backspace
over a single characer. Press and hold the Back button to
backspace and delete an entire text fi eld.
8 To enter the plus (+) sign for international calls: Press
and hold 0.
Smartphone User Manual
1. Getting
Started
21
You can still receive calls and make emergency calls when
the phone is locked.
2 To unlock your phone: Press the Unlock soft key,
enter your password, and then press the Unlock soft key
again.
3 To turn off phone lock: On the Home screen, press
the Start soft key, select Settings, select More, select
Security, select Disable Phone Lock, and then press
the Done soft key.
Locking the SIM card
Locking your SIM (Subscriber Identity Module) card pre vents
you from us ing the phone, but you can still turn it on and
a. Press the Power button to display the Quick List, select
Device lock, and then press the OK soft key.
b. Under Lock phone after, select the amount of time
your phone is inactive before the phone automatically
locks.
c. Under Password, enter the password you want to use
to access your phone when it is locked.
d. Under Confi rm password, enter the password again,
and press the Done soft key.

Smartphone User Manual
1. Getting
Started
22
make emer gen cy calls. When you turn your phone on, you
will be prompted for your PIN1 password, which you must
enter correctly before you can use your phone.
1 To lock the SIM: On the Home screen, press the Start
soft key, select Settings, select More, select Security,
select Enable SIM Lock, and then press the Action key.
Enter your PIN1 password, and then press the Done soft
key.
2 To unlock the SIM: On the Home screen, press the Start
soft key, select Settings, select More, select Security,
select Disable SIM Lock, and then press the Action key.
Enter your PIN1 password, and then press the Done soft
key.

Chapter 2
Using your phone
2.1 Making a call
2.2 Re ceiv ing a call
2.3 In-call options
2.4 Re triev ing a voice mail message
2.5 Re view ing your calls
2.6 Short cuts (speed dials)
2.7 Ad vanced dialing options
2.8 Switching to your Bluetooth
headset
Smartphone User Manual
2. Using
your phone
24
2.1 Making a call
There are several ways to make a call.
Making a call from the Home screen
On the Home screen, press the numbers on the keypad to
enter the phone number, and then press the Talk button to
make the call.
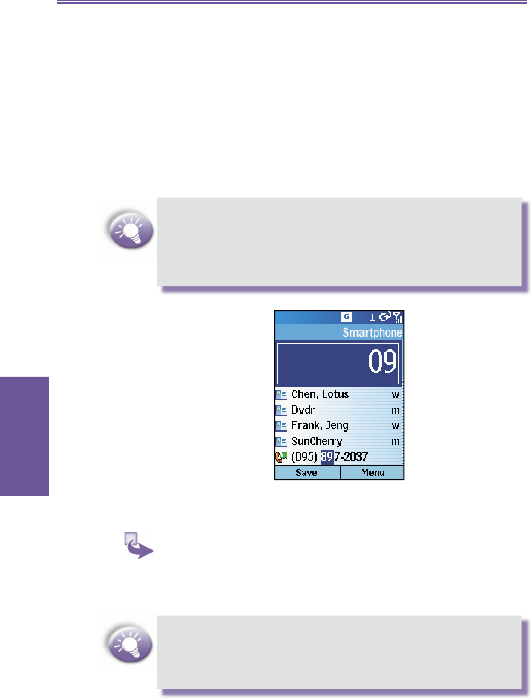
As you enter a phone number, your phone searches
Contacts, Call History, and Speed Dial lists, and your
SIM card to fi nd a matching number. When you see the
name of the person you want to call listed, select it, and
press the Talk button.
Making a call from Contacts
1 To make a call by contact name:
Press the Start soft key on the Home screen, select
Contacts, and then press the Action button. Select the
contact name to call and press the Talk button.
If you have a long list of contacts and you don't see the
contact you want on the screen, you can enter the fi rst few
letters of the contact's name, and the phone will search
through the entire Contacts list and display the name.
Smartphone User Manual
2. Using
your phone
25
2 To change the default number for a contact:
a. Press the Start soft key on the Home screen, select
Contacts, and then press the Action button.
b. Select the contact, and use the Navigation Stick to
press Left or Right to change the default number.
c. For example: If you change "w" to "m," the default
number changes from Work phone (w) to Mobile
phone (m).
3 To make a call from an open contact:
a. Press the Start soft key on the Home screen, select
Contacts, and then press the Action button.
b. Select the contact to call, and press hte Action
button.
c. Select the number you want to call, and press the Talk
button.
For more information about contact list abbreviations, see
Chapter 6 Contacts, Calendar and Tasks.
Making a call using a recently dialed
number
1 On the Home screen, press the Talk button to display a
list of recently-dialed phone numbers.
2 Select the number or entry for the person to call, and press
the Talk button again.
Making a call from the Call History list
1 On the Home screen, press the Start soft key. Select Call
History, and then press the Action button.
2 Select the number or entry for the person to call, and press
Smartphone User Manual
2. Using
your phone
26
Making a call from a hyperlink
When you see an underlined phone number presented as
a hyperlink in an e-mail message, just scroll to it, and press
the Ac tion button to make the call.
Making emergency calls
Calls to emergency service numbers can be made under
any circumstances, even if you have locked the SIM card
and/or your phone.
To place an emergency call: Dial the emergency number
appropriate for your location, and press the Talk button.
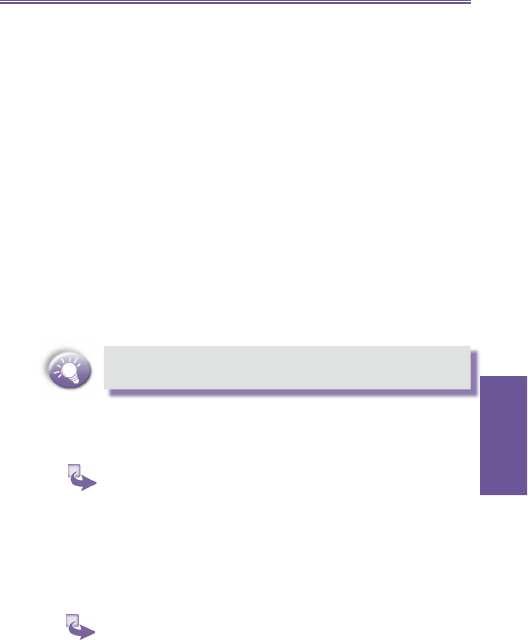
2.2 Receiving a call
When you receive a call, the name and number of the caller
are displayed on the screen. If the name of the caller is not
in your contact list, only the caller's phone number is dis-
played. You can answer a call by press ing the Talk but ton
or the Accept soft key. If don't want to take the call, press
the Reject soft key.
Selecting Reject will connect the caller to your voice mail
if you subscribe to this service.
Smartphone User Manual
2. Using
your phone
27
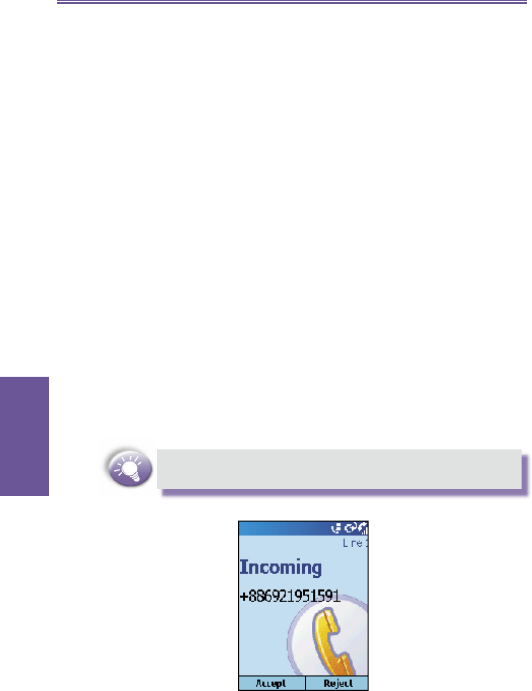
Answering a second call using Call
Waiting
If you are already talking on the phone when you receive a
call, press the Accept soft key or the Talk button to place
the fi rst call on hold, and answer the second call.
If you want to end the fi rst call before answering the in com ing
call, press the End button, and then press the Ac cept soft
key or the Talk button to accept the incoming call.
Rejecting a Call Waiting call
If you are already talking on the phone when you receive
a call and you don't want to answer it, press the Reject
soft key. This will keep your current call in progress, but
will connect the call waiting caller to your voice mail, if you
sub scribe to this service.
2.3 In-call options
The following table shows the menu options available
when a call is in progress. Some of these options are only
avail able when multiple calls are in progress or during a
con fer ence call.

Smartphone User Manual
2. Using
your phone
28
2.4
Retrieving a voice mail message
Calling your voice mail box
On the Home screen, press and hold 1 to call your voice mail-
box, and follow the prompts to retrieve your mes sag es.
Accessing voice mail from Inbox
1 On the Home screen, press the Start soft key. Select
Inbox, and press the Action button.
2 Select the voice-mail message and press the Voice Mail
soft key or the Talk button. Your voice mail system is then
dialed.
Menu option Function
End Disconnects the call.
Hold Places the active call on hold
Unhold Activates the call on hol
Swap Switches between two call
Save Contacts Creates a contact for the cal
Conference Joins together all existing calls, if you
have subscribed to this service.
Private Breaks one call out of a conference
and makes this call active while the rest
of the conference is on hold.
Speakerphone Increases the volume of the ear
Mute Mutes the microphone for the active
call. The other party will not hear
anything you say, but you can still
hear the other party.
Unmute Turns the microphone back on for the
active call.

Smartphone User Manual
2. Using
your phone
29
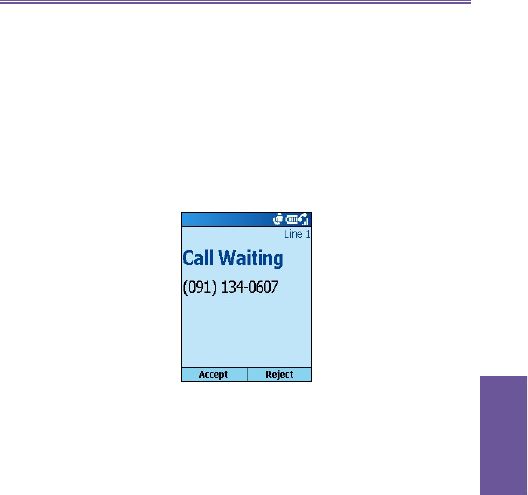
2.5 Reviewing your calls
Using Call History and Call Timers, you can view in for ma tion
about phone calls that you have made and received. For
example, you can see who has called you recently and
fi nd out how much time you have spent talking on the
Smartphone.
Call History
Call History displays the last 36 calls that you have made,
received, and missed. Each entry in Call History contains
the start time of the call, the duration, the caller's name,
if available, and the caller's number. The oldest calls are
au to mat i cal ly deleted from the list to make room for the
new est calls.
1 To view Call History: On the Home screen, press Start,
select Call History, and then press the Action button.
You can fi lter Missed Calls, Incoming Calls, and Outgoing
Calls. Press the Menu soft key, select Filter, press the
Action button, and select the fi lter you want.
2 To view contact information from Call History: Select
the entry for the contact, press the Menu soft key, select
Find Contact, and then press the Action button.
3 To send an e-mail message from Call History: Select
the contact, press the Menu soft key, select E-mail, and
then press the Action button.
4 To create a new contact from a number in Call History:
Select the contact, press the Menu soft key, select Save
to Contacts, and then press the Action button.
5 To remove an item from Call History: Select the item,
press the Menu soft key, select Delete, and then press
the Action button.
6 To remove all items in Call History: Press the Menu
soft key, select Delete List, and then press the Action
button.
Smartphone User Manual
2. Using
your phone
30
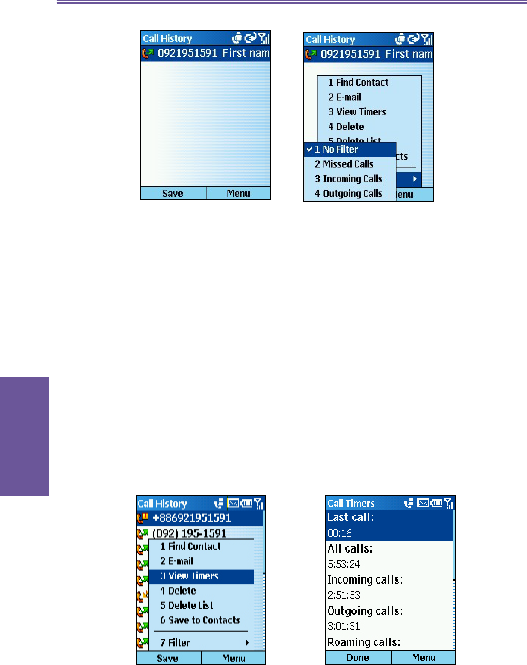
Call Timers
Call Timers gives you detailed information regarding the
length of your last call, the total number of calls made and
re ceived, calls by type (incoming, outgoing, roaming, and
data), and a lifetime counter.
Call Timers is useful for keep ing track of your calling pat terns,
for example to determine what type of calling plan you want.
It can also help you estimate your monthly billing. You can
reset Call Timers to zero (0), for example to start timing calls
for a new monthly billing cycle.
To view Call Timers: On the Home screen, press the Start
soft key, select Call History, press the Menu soft key, se lect
View Timers, and then press the Action button.
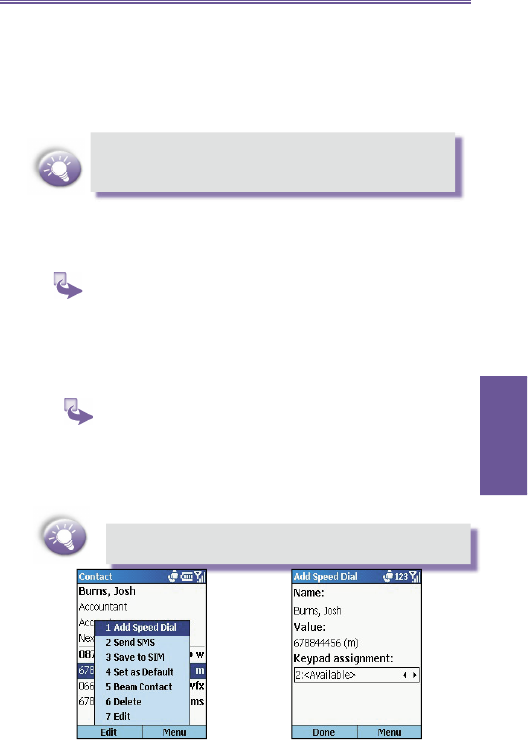
2.6 Shortcuts (speed dials)
Smartphone User Manual
2. Using
your phone
31
You can create speed dials to dial frequently-called phone
numbers by simply pressing and holding one or two keys.
You may choose speed dial entries from 2-99; speed dial 1 is
reserved for voice mail access and the number is con fi g ured
in your settings.
You can create a speed dial only for a phone number,
e-mail address, or Web page address that is stored in
Contacts.
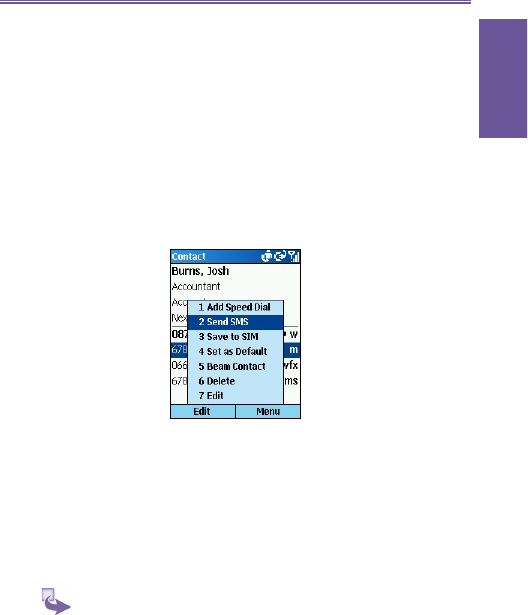
Creating a speed dial for a phone
number
1 On the Home screen, press the Start soft key, select
Contacts, and then press the Action button.
2 Select the phone number to set up as a speed dial, then
open it.
3 Press the Menu soft key, select Add Speed Dial, and then
press the Action button.
4 Under Keypad assignment, enter the speed dial number
to associate with the phone number, and press the Done
soft key.
You can also create speed dials for Web addresses and
e-mail addresses that are stored in Contacts.

Smartphone User Manual
2. Using
your phone
32
Making a call using a speed dial
On the Home screen, press and hold the number on the
keypad that you have assigned as a speed dial for a num ber.
If the keypad assignment is two digits, press the fi rst digit
and press and hold the second digit.
Viewing speed dials you have created
On the Home screen, press the Start soft key, select More,
select Shortcuts, and then press the Action button.
Deleting shortcuts
1 On the Home screen, press the Start soft key, select More,
select Shortcuts, and then press the Action button.
2 Select the shortcut to delete, press the Menu soft key,
select Delete, and then press the Action button.
2.7 Advanced dialing options
The following information covers advanced dialing options
that may be useful for phone numbers requiring special
dialing instructions.
Inserting an international country code
International calls require a country code to be included in the
phone number. A plus (+) sign must appear fi rst, fol lowed by
the country code and the rest of the phone num ber. To enter
the plus sign, press and hold 0 until + ap pears.
Inserting a three-second pause in a
dialing sequence
Some international calls require a three-second pause in the
dialing sequence for the call to process successfully.

Smartphone User Manual
2. Using
your phone
33
1 On the Home screen, press the Start soft key, select
Contacts, and then press the Action button.
2 Select the contact whose phone number you want to insert
a pause, and press the Action button.
3 Press the Edit soft key and press the navigation stick left
or right to move the cursor between the numbers where
you want to insert a three-second pause.
4 Press the Menu soft key, select Insert Pause, and then
press the Action button. The letter "p" will appear in the
number to show where the three-second pause will occur
in the dialing sequence.
5 Press the Done soft key.
Inserting a manual pause in a dialing
sequence
There may be phone numbers that require a pause longer
than three seconds in the dialing sequence. For these cas es,
you can pause as long as you want and manually continue
the dialing sequence using the Talk button.
1 On the Home screen, press the Start soft key, select
Contacts, and then press the Action button.
2 Select the contact whose phone number you want to insert
a pause, and press the Action button.
3 Press the Edit soft key and press the navigation stick left or
right to move the cursor between the numbers where you
want the dialing sequence to pause before proceeding.
4 Press the Menu soft key, select Insert Wait, and then
press the Action button. The letter "w" will appear in the
number to show where the pause will occur in the dialing
sequence.
Smartphone User Manual
2. Using
your phone
34
5 Press the Done soft key.
When you make a call using Insert Wait, press the Talk
button to continue the dialing sequence.
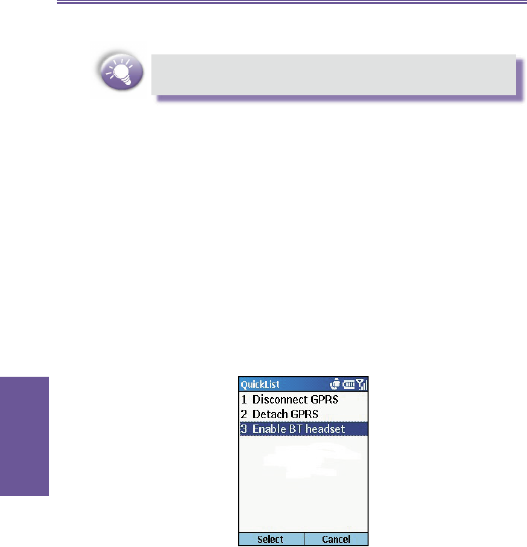
2.8 Switching to your Bluetooth
headset
You can switch between your Bluetooth headset and your
device during a call.
1 Press and hold the Home screen key, until a quick menu
appears.
2 Select Enable or Disable BT headset from the menu,
then Select.

Chapter 3
Using your camera
3.1 Camera and Video Recorder
3.2 Album

Smartphone User Manual
3.
Using your
camera
36
3.1 Camera and Video Recorder
When in Camera mode, you can capture still images, one
at a time. Or, switch to Video Capture mode and capture
“live” video streams (with audio if desired), then share them
with others or play them on your own Smartphone screen
whenever you want. You can even send the captured fi les via
E-mail or via MMS. Just “snap and send” a newly-captured
image, or “select and send” an existing image. And you
can set any image to be used as the background image for
your Home screen.
For still-image capture, you can specify a capture size, the
destination storage media for saved fi les, rename them after
capturing them, and an output quality (the output format for
image capture is JPEG). The number of images you can
still capture, according to available memory and your current
settings, is always displayed.
Opening Camera or Video Recorder
1. Press the hardware button on the side of the device.
By default, the fi rst time you go to Camera it will be in Image
mode. To change to Video, press the Menu, Capture
Mode, then 2 Video.
2. On the Home screen, if in the list of recently used programs,
press :
3. On the Home Screen, press Start key, More, then Video
Recorder or Camera.
Smartphone User Manual
4.
Using your
camera
37
Supported File Formats
˦̇˼˿˿ˀ˼̀˴˺˸ʳ˹̂̅̀˴̇̆ BMP, GIF, JPEG
Animation format Animated GIF
Video format ˠ̂̇˼̂́ˀ˝ˣ˘˚ʳ˔˩˜ʳʻˁ˴̉˼ʼ
ˠˣ˘˚ˀˇʳ˦˼̀̃˿˸ʳ̃̅̂˹˼˿˸ʳʻˁ̀̃ˇʼ
ˆ˚ˣˣʳΩʳ˛ˁ˅ˉˆʳ˵˴̆˸˿˼́˸ʳʻˁˆ˺̃ʼ
Audio formats ˠˣ˘˚ˀˇʳ˔˖˖ʳʻ˔˷̉˴́˶˸˷ʳ˔̈˷˼̂ʳ˖̂˷˼́˺ʼʳ˼́ʳˁˠˣˇʳ˹̂̅̀˴̇
˔ˠ˥ˀˡ˕ʳʻˡ˴̅̅̂̊ʳ˵˴́˷ʼʳ˼́ʳˁˠˣˇʳ˴́˷ʳˁˆ˚ˣʳ˹̂̅̀˴̇
˪˔˩
ˠ˜˗˜ʳʻ̆̇˴́˷˴̅˷ʳˠ˜˗˜ʳ̇̌̃˸ʳ˃ʿʳ˄ʿʳ˴́˷ʳ˦ˣˀˠ˜˗˜ʼ
Capturing a picture
1. Go to Camera.
2. Press Capture, the camera hardware button or Action.
3. The fi le is saved immediately in the JPEG fi le format, to
the storage media, fi lename convention, output quality,
and Capture Size that you have specifi ed in Options.
Capturing a video clip
1. Go to Video Recorder.
Smartphone User Manual
3.
Using your
camera
38
2. Press Capture, the camera hardware button or Action.
3. When fi nished press Stop.
Sending, deleting, saving as photo
contact and renaming immediately after
capture
1. Press Menu, then Options, General, and check Review
captured fi le.
2. Take a picture.
3. In the confi rmation screen, press Back to confi rm and
return to the camera. To delete, send, save as Photo
Contact or rename press Menu, then follow the options
there.
Reviewing after capturing doesn't include the option to
view properties, zoom or rotate. You must go to Album
Thumbnails to do that.
Going to the last captured fi le and
editing
1. In Camera press the # key.
Smartphone User Manual
4.
Using your
camera
39
2. Press Menu to perform an action, Camera to return to
camera, or Thumbnails to return to Album.
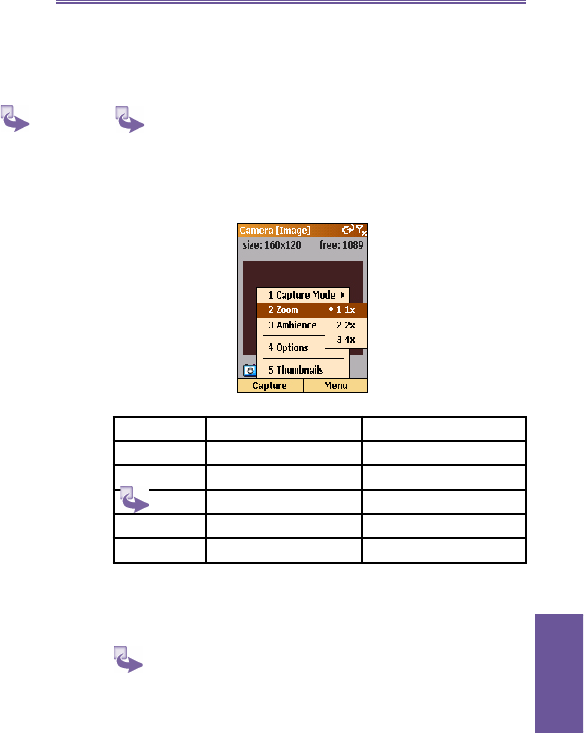
Zooming in and out
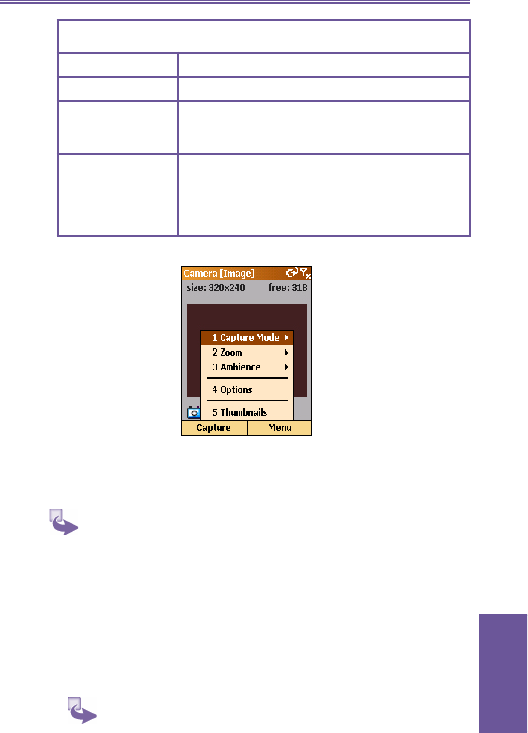
1. Go to Camera or Video Recorder, press Menu, then
Zoom. Select 1x, 2x or 3x, then press Action.
2. Go to Camera or Video Recorder, then press the
navigation stick up or down.
Submode Capture Size Setting Zoom
Video 176 x 144 1x, 3x
352 x 288 1x
Image 160 x 120 1x, 2x, 4x
320 x 240 1x, 2x
640 x 480 1x
Switching between camera and Video
Video Recorder mode
1. Go to Camera or Video Recorder, press Menu,, then
Capture Mode.
2. Select Image or Video, then press Action.
Smartphone User Manual
3.
Using your
camera
40
Adjusting the Hue, Saturation, Gamma
1. Go to Camera or Video Recorder, press Menu, then
Ambience and Adjust View.
2. To select one of the above options, for example Contrast,
press the navigation stick up or down until it appears below
the screen.
3. Press the navigation stick to the left or right to adjust the
level, then press the OK soft key.
Switching to Grayscale, Sepia, Cool
effects
1. Go to Camera or Video Recorder, press the Menu soft
key, then Ambience and Effects.
2. Again press the Menu soft key, then Ambience and this
time Adjust View, to see your effects' options.
3. Press the Menu soft key, select a style and then press
Action.
Changing the image capture size, turning
off the "Snap" sound, or changing the
Smartphone User Manual
4.
Using your
camera
41
Image fi lename prefi x
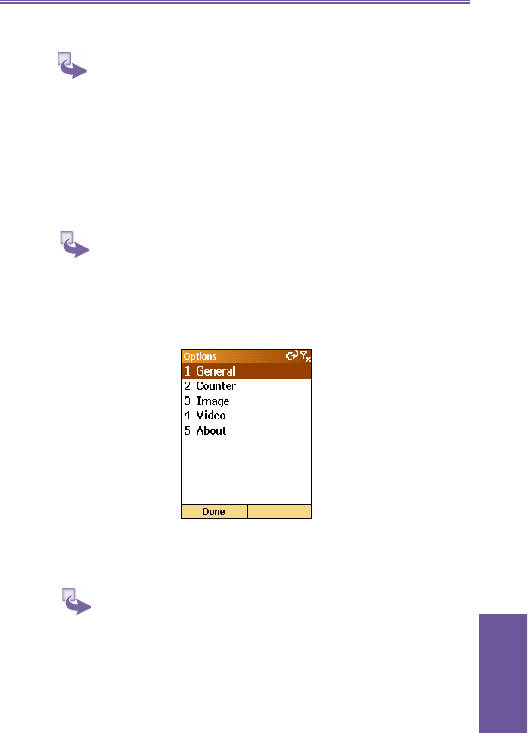
1. Go to Camera, press the Menu soft key, then Options.
2. In Options select Image, make an adjustment, then
Done.
Changing the video capture size, turning
off and on audio, or changing the Image
fi lename prefi x
1. Go to Camera or Video Recorder, press the Menu soft
key, then Options.
2. In Options select Image, make an adjustment, then
Done.
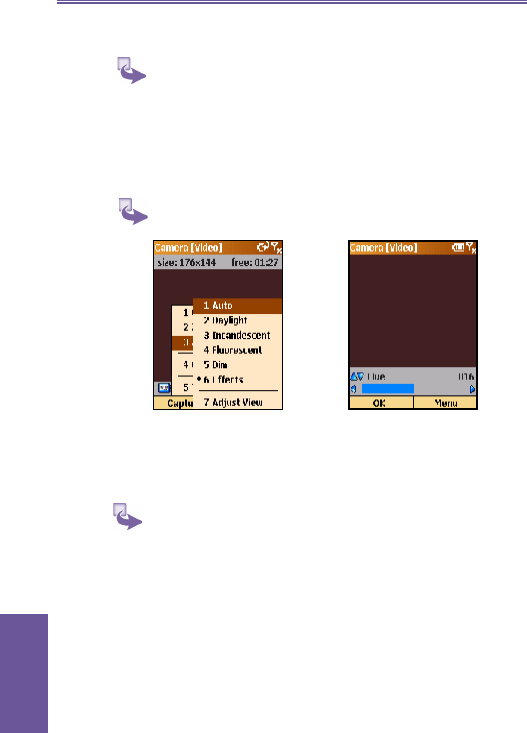
Adjusting for different light conditions
1. Go to Camera or Video Recorder, press the Menu soft
key, then Ambience.
2. Select from Auto, Daylight, Incandescent, Fluorescent
or Dim, then press Action.
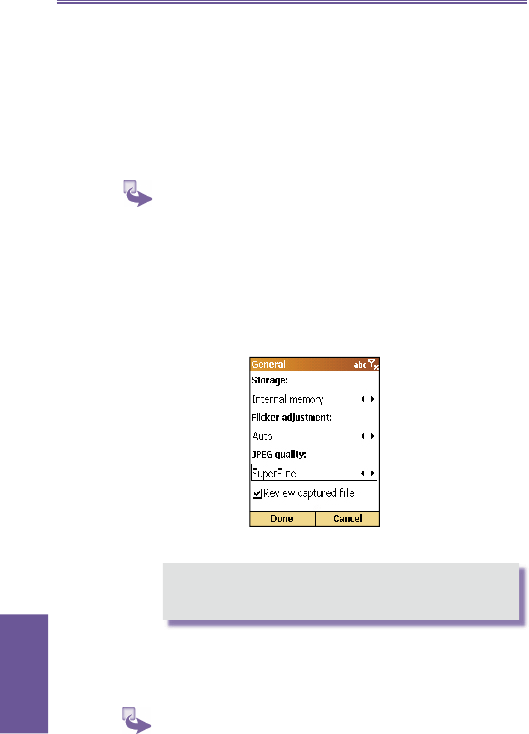
Specifying where to store pictures

Smartphone User Manual
3.
Using your
camera
42
1. Go to Camera or Video Recorder, press the Menu soft
key, then Options.
2. Select General, then Storage and Internal memory or
Storage Card.
3.2 Album
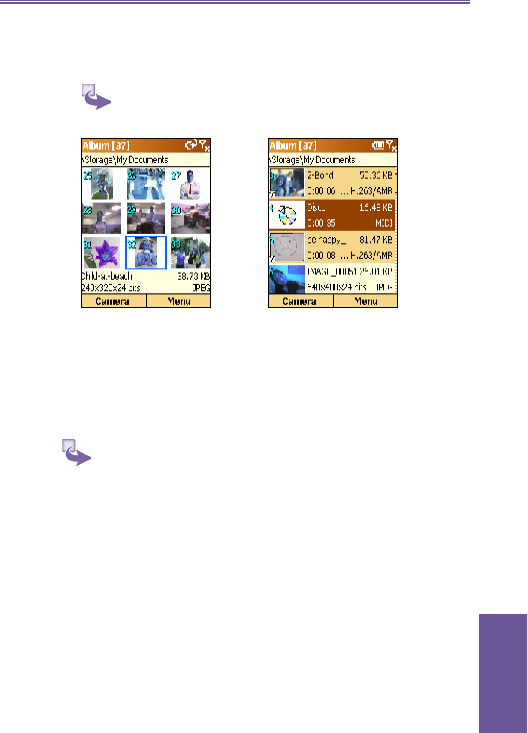
View images and thumbnails,view them in an enlarged
mode, Zoom in to see more detail, Zoom Out to reduce
them. Images that are too large to fi t into the viewing area
can be panned into view. Flip up/down, fl ip left/right, rotate
left, rotate right, view in actual one-to-one pixel size, or fi t-
to-window. For your convenience, many of the functions
can be activated using the Smartphone keypad/arrow keys,
as well as the menus. In addition, when Camera Wizard
searches for images, you can choose whether or not to show
thumbnails of the images that have been “burned into” ROM,
such as system icons.
Going to Album
1. Press Start, More, then Album.
2. In Camera, anytime you see the word Thumbnails, press
to go to Album.
Smartphone User Manual
4.
Using your
camera
43
Playing back audio and video fi les or
viewing captures
Go to Album, select a picture or audio/video fi le then press
the Action button.
Zooming or rotating
1. Go to Album, select a fi le and press Action to view or
play it back.
2. Press Menu, then View and Zoom In, Zoom Out or
Rotate - if it is a video fi le fi rst press Stop, make your
changes, then Play.
Viewing properties
1. In Thumbnail view press Menu and then Properties.
2. In Detailed view, press Menu, View, then Properties.
Sending, deleting, saving as photo
contacts and renaming in Album
In either Thumbnail or Detailed view press Menu, then
select an option and follow the instructions.
Smartphone User Manual
3.
Using your
camera
44
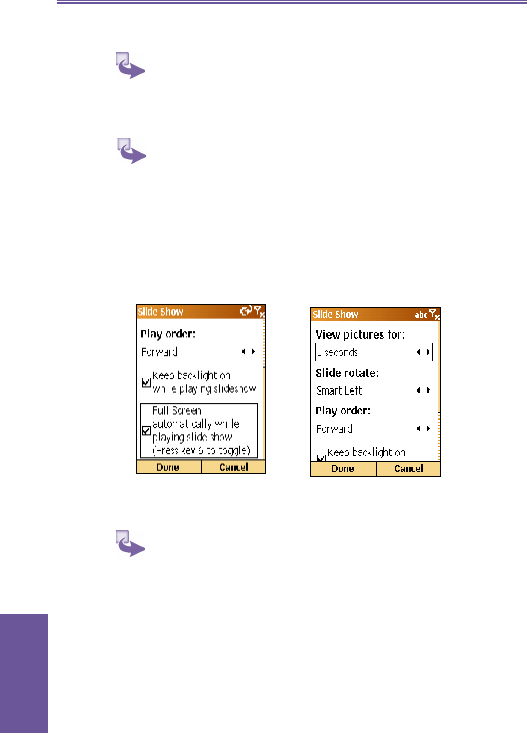
Viewing as a slideshow
In Thumbnail view, press Menu and then Slide Show.
Customizing the slideshow
In Thumbnail view, press Menu and then Slide Show
You are shown the following options:
a. Change the time for which each image is displayed.
b. Change the direction of rotation.
c. Change the order of play.
d. Opt to keep backlight on during the slide show.
e. Opt for full screen when playing the slide show.
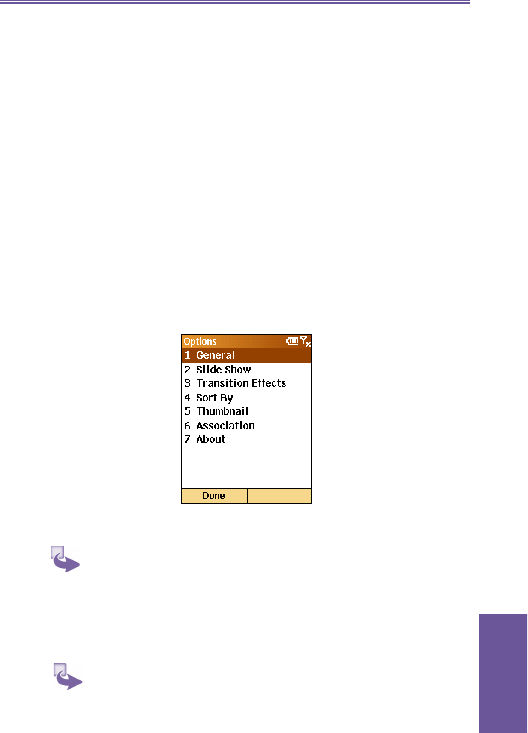
Viewing all your options
In Thumbnail view, press Menu, Options.
1. In General you have the following option choices:
a. To scan subfolder fi les.
b. Hide ROM fi les.
c. Keep backlight on while playing video.
d. Mute while playing video fi le.
e. Repeat while playing video, audio or GIF animation
fi les.
f. Show progress bar.
Smartphone User Manual
4.
Using your
camera
45
g. Select an auto rotate option.
2. In Transition Effects you have the following options:
a. Decide on an effect to move between slides of the slide
show.
b. Select a speed.
c. Sort by lets you sort the screen in the following ways:
d. Select between Date, Name, Size and Type.
e. Decide between Descending and Ascending.
3. Thumbnails has the following options:
a. Select a size for thumbnails.
b. Select to show index number or information.
c. Go to Association to select the type of fi les you want
to display.
Changing folders
a. Press Menu, then Change Folder.
b. Navigate through the folders to fi nd where your fi les are.
Viewing the full screen
1. During a slide show or while looking at a fi le in Detailed
view, press 6 to display the full screen.
2. Press 6 again to return the toolbars to the screen.

Smartphone User Manual
3.
Using your
camera
46

Chapter 4
Personalizing your
phone
4.1 Changing settings
4.2 Bluetooth
4.3 Data Connections
Smartphone User Manual
4.
Personalizing
48
4.1 Changing settings
You can easily view and change settings to personalize your
phone for the way you work. For example, you can use your
own sounds for ring tones, use your own image for the Home
screen back ground, set up Call For ward ing to manage your
calls more ef fi cient ly, and more.
Viewing Settings
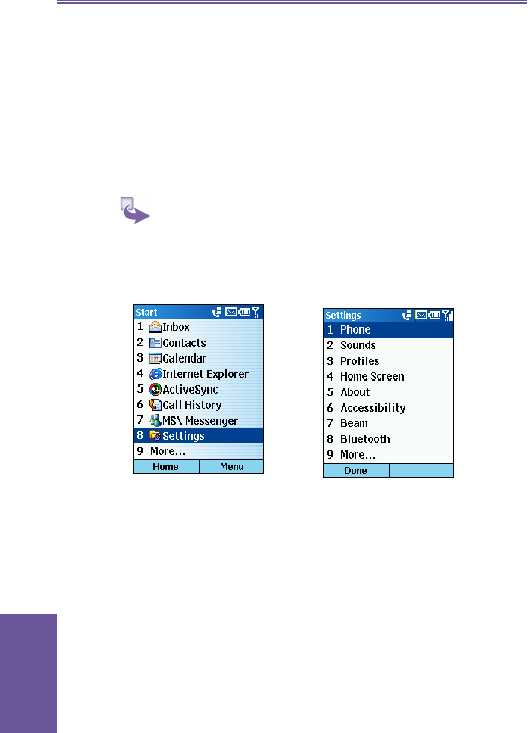
1 On the Home screen, press the Start soft key, select
Settings, and then press the Action button.
2 To view the remaining settings, select More and press the
Action button.
Telephony
Telephony settings are primarily used to set options for
calls you receive, such as Call Forwarding, Call Waiting,
and Caller ID.
To view telephony settings: Press the Start soft key on the
Home screen, se lect Settings, select Phone, and then press
the Ac tion but ton.

Smartphone User Manual
4.
Personalizing
49
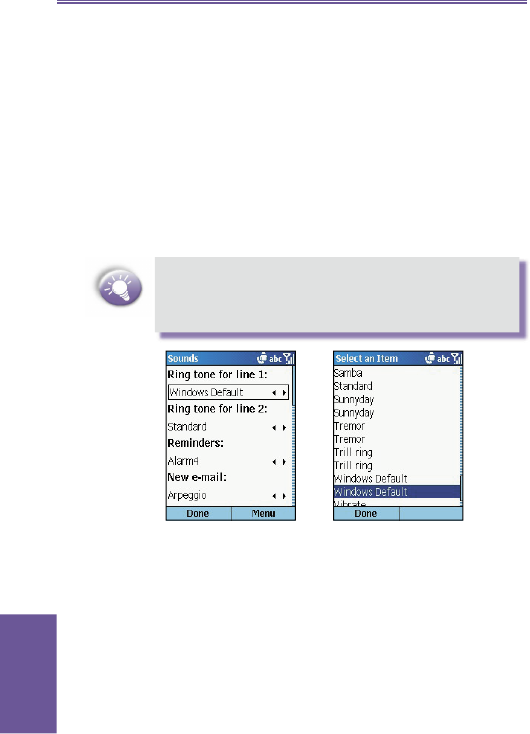
Sounds
Sounds settings are used to customize the sounds for ring
tones, notifi cations, and reminders.
1 To display Sounds settings: On the Home screen, press
the Start soft key, select Settings, select Sounds, and
then press the Action button.
Telephony setting Function
Call Barring Enables you to block incoming and/or
outgoing calls.
Call Forwarding Enables you to forward all or se lect ed
calls to another number.
Call Options Enables you to change phone
num bers, such as your voice mail and
SMS service cen ter, an swer in com ing
calls by pressing any key, and other
advanced call options.
Call Waiting Enables you to turn Call Waiting on
or off.
Caller ID Enables you to let your iden ti fi ca tion
be known to all callers, only your
contacts, or no callers.
Channels Enables you to configure cell
broad cast.
Fixed Dialing Enables you to limit your calling
area to one or more specifi c phone
num bers and/or area codes.
Networks Identifi es your current network and
changes your network se lec tion from
Automatic to Manua
The following table lists the telephony settings and their
functions.
Smartphone User Manual
4.
Personalizing
50
2 To use your own sound:
a. Go to where your sound fi le is stored on your desktop
computer and copy the fi le.
b. In ActiveSync on your desktop computer, click Explore,
double-click Application Data, double-click Sounds,
and then paste the sound fi le into the Sounds folder.
c. On the Home screen on your phone, press the Start
soft key, select Settings, select Sounds, and then
press the Action button.
d. Select the item to customize, press the navigation stick
left or right to select your sound, and then press the
Done soft key.
You can also select the sound to use by selecting the
item you want to customize, and then pressing the
Action button. This will show the complete list of sounds
to choose from.
Profi les
Profi les settings are used to confi gure how your phone noti-
fi es you of events such as an incoming call, an ap proach ing
appointment, or an arriving message. For ex am ple, when
you are attending a meeting, you can choose the Meeting
profi le, which silences the ring of your phone and provides
visual notifi cations only. When you are wait ing for an im-
portant call, you can choose the Loud profi le, which makes
Smartphone User Manual
4.
Personalizing
51
The following table shows the list of profi les that come with
your phone and their attributes.
your phone ring loudly.
1 To view Profi les settings:
On the Home screen, press the Start soft key, select
Settings, select Profi les, and then press the Action
button.
2 To use preset profi les:
a. On the Home screen, press the navigation stick down
to select Profi les: [Type], and then press the Action
button.
b. Select the profi le, press the Action button to set the
profi le, and then press the Done soft key.
You can also select a different profi le using the Quick
List. Press the Power button, select the profi le, and then
press the Action button.
Profi le
Name Ring
Type Ring
Volume Notification
Type Notification
Volume Feedback
Volume
Normal Ring 3 Play
sound 33
Silent Vibrate Off Vibrate Off Off
Meeting Vibrate 1 Sound 1 Off
Loud Ring Loud Sound Loud Loud
Automatic (Toggles between Normal & Meeting, based on Calendar)
Headset Ring 3 Sound 3 3
Car Ring 4 Sound 4 4
Ring Loud Sound Loud Loud

Smartphone User Manual
4.
Personalizing
52
3 To modify a profi le on the Settings menu:
a. On the Home screen, press the Start soft key, select
Settings, select Profi les, and then press the Action
button.
b. Select the profi le to modify, press the Menu soft key.
amd then select Edit.
c. Modify the settings, and then press the Done soft
key.
Home screen
Home screen settings are used to change the Home screen
layout, the color scheme, the background image, and the
time delay before the Home screen appears when your
phone is idle.
Viewing Home screen settings
On the Home screen, press the Start soft key, select
Settings, select Home Screen, and then press the
Action button.
Customizing the Home screen with your
own image
a. Go to where your image fi le is stored on your desktop
computer and copy the fi le.
b. In ActiveSync on your desktop computer, click Explore,
navigate to My Documents, and then paste the image
fi le into the My Documents folder.
c. On the Home screen on your phone, press the Start
soft key, select Settings, select Home Screen, and
then press the Action button.
d. Select Background image and press the navigation
stick left or right to select your image. Press the Done
soft key.
You can also select the image you want to use by se lect ing
Background image and pressing the Action button. This

Smartphone User Manual
4.
Personalizing
53
will show you the complete list of images to choose from.
Make sure that your phone is connected to your desktop
computer via USB or Serial before you open ActiveSync
to paste the image fi le. For best results, use images with
a 176 x 220 screen resolution to fi t on the screen.
About
The About screen displays information about your phone's
op er at ing system, including version numbers and copy right
in for ma tion.
To view About settings:
On the Home screen, press the Start soft key, select
Set tings, select About, and then press the Action
button.
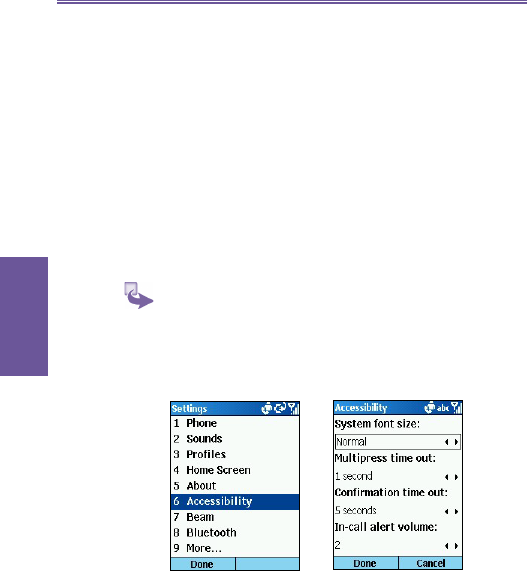
Accessibility
Accessibility settings are used to confi gure your system font
size, multipress time-out, confi rmation time-out, in-call alert
volume, and Smartdial setting.
To view Accessibility settings:
On the Home screen, press the Start soft key, select
Smartphone User Manual
4.
Personalizing
54
Set tings, select Accessibility, and then press the
Action button.
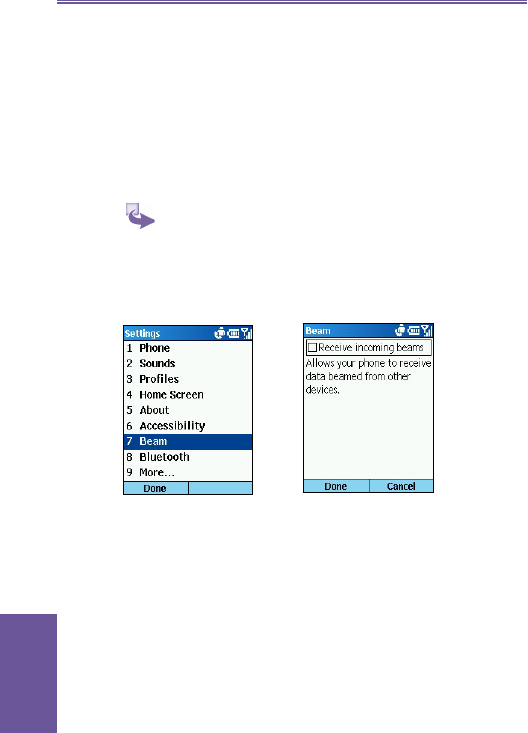
Beam
If you want to receive infrared or Bluetooth beams from other
devices, you must turn on the option to receive in com ing
beams.
To receive incoming beams:
1 On the Home screen, select Start.
2 Select Settings and then Beam.
3 Select Receive incoming beams. The Smartphone
re ceives all incoming beams from other devices until
you clear this option.
Certifi cates
On your Smartphone you can add and delete public key
certifi cates. These certifi cates help establish your identity
when you log on to a secure network, such as a corporate
network. Certifi cates also help establish the identity of oth er
computers, such as servers, with which you connect. This
helps prevent unauthorized users from accessing your de-
vice and its information.
You can store two types of certifi cates on your phone:

Smartphone User Manual
4.
Personalizing
55
personal certifi cates that establish your identity, and root
certifi cates that establish the identity of servers with which
you connect. Your device may include a set of preinstalled
certifi cates.
To view and delete certifi cates:
1 On the Home screen, select the Start soft key and then
Settings.
2 Select More and then Certifi cates.
3 To view the list of personal certificates, select
Personal.
4 To view the list of root certifi cates, select Root.
5 To delete a certifi cate, scroll to it in the list, select Menu,
and then select Delete.
6 To view details about a certifi cate, select it in the list.
Date and Time
Date and Time settings enable you to change your local time
zone and the current date and time, and to set the alarm.
To view Date and Time settings: On the Home screen, press
the Start soft key, select Settings, select More, select Date
and Time, and then press the Action button.
Owner Information
Owner Information settings are used to enter and display
personal information, such as your name, phone number,
and e-mail address. This is helpful, for example, in the event
that you lose your phone so that you can be con tact ed if it
is found.

Smartphone User Manual
4.
Personalizing
56
4.2 Bluetooth
Bluetooth is a short-range wireless communications tech-
nol o gy. Devices with Bluetooth capabilities can exchange
information over a distance of about 10 meters (30 feet)
without requiring a physical connection.
Unlike infrared, you don't need to line up the devices to
beam information with Bluetooth. The devices only need to
be within a range of about 10 meters. You can even beam
information to a device in a different room, as long as it's
within range.
The software included with your Smartphone allows you to
use Bluetooth to beam information, such as fi les, ap point -
ments, tasks, and contact cards, between devices that have
Bluetooth capabilities. For example, if you and a co-worker
each have a device with Bluetooth, you can beam items
between your devices, such as fi les, contact cards, appoint-
ments, tasks, and so forth.
Bluetooth modes
Bluetooth operates in three different modes:
1 On. The Bluetooth radio is turned on and you can use
Bluetooth features.
2 Off. The Bluetooth radio is turned off. In this mode,
you can neither send nor receive information by using
Bluetooth. You might want to turn the radio off at times to
conserve battery power, or in situations where radio use
is prohibited, for example on airplanes and in hospitals.
To turn your Bluetooth on or off:
a. On the Home screen, select Start and then
Settings.
b. Select Bluetooth.
c. Scroll to On or Off.
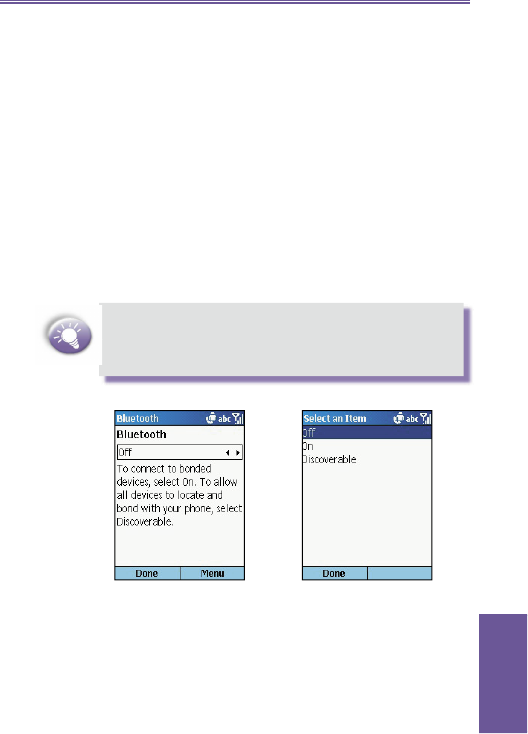
Smartphone User Manual
4.
Personalizing
57
d. Select Done.
3 Discoverable. The Bluetooth radio is turned on, and all of
the other Bluetooth devices within range (about 10 meters)
can detect your device and attempt to beam information
to it, establish a bond, or use a Bluetooth ser vice. In this
mode, other devices can detect your device whether or
not a bond has been created; however, in order to receive
a beam from another device, you must accept it on your
device. To make your device discoverable:
a. On the Home screen, select Start and then
Settings.
b. Select Bluetooth.
c. Scroll to Discoverable.
d. Select Done.
By default the Bluetooth radio is turned off. If you turn
it on, and then turn off your device, the Bluetooth radio
also turns off. When you turn on your device again, the
Bluetooth radio turns on automatically.
Bonds
A bond is a relationship that you create between your device
and another Bluetooth device in order to exchange informa-
tion more securely. Creating a bond involves en ter ing the
same personal identifi cation number ( PIN) on the two de-
vices you want to bond. Once a bond is created, the devices
recognize the bond and are able to ex change in for ma tion
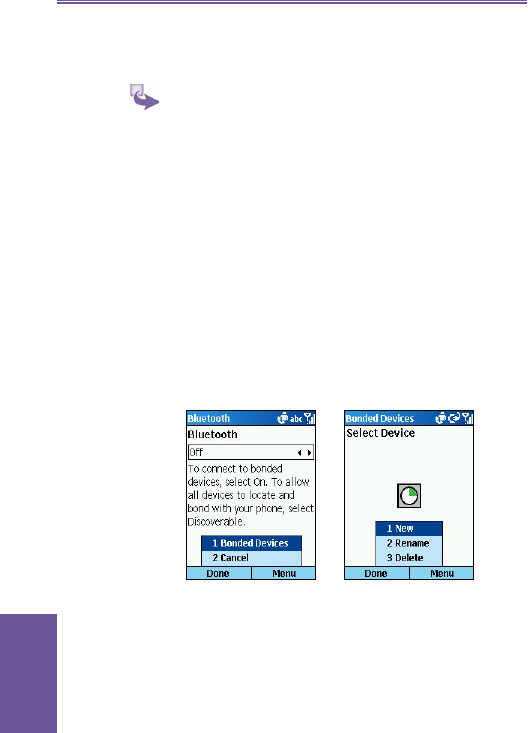
Smartphone User Manual
4.
Personalizing
58
without your entering a PIN again.
1 To create a bond:
a. Make sure that the two devices are within 10 meters of
each other and that Bluetooth is in discoverable mode
on both devices.
b. On the Home screen, select Start and then
Settings.
c. Select Bluetooth and then Menu.
d. Select Bonded Devices, Menu, and then New. Your
de vice searches for other Bluetooth devices and
displays them in the list.
e. Scroll to the device you want, and select Add.
f. In PIN, enter a PIN of between 1 and 16 characters
and select Done.
g. Enter the same PIN on the other device.
h. If you want, in Name, edit the name of the other device
and select Done.
2 To accept a bond:
a. Make sure that Bluetooth is turned on and in
dis cov er able mode.
b. When prompted to bond with the other device, select
Yes.
c. In PIN, enter a PIN of between 1 and 16 characters,
and select Done. You must enter the same PIN that

Smartphone User Manual
4.
Personalizing
59
was en tered on the device requesting the bond.
d. If you want, in Name, edit the name of the device
re quest ing the bond.
e. Select Done. The bond is created. You can now
ex change information with the other device.
3 To rename a bond:
a. Select Start, Settings, and then select Bluetooth.
b. Select Menu and then Bonded Devices.
c. Scroll to the bond to rename.
d. Select Menu and then Rename.
e. In Name, enter a new name for the bond and then
select Done.
4 To delete a bond:
a. Select Start, Settings, and then select Bluetooth.
b. Select Menu and then Bonded Devices.
c. Scroll to the bond to delete.
d. Select Menu and then Delete.

Smartphone User Manual
4.
Personalizing
60
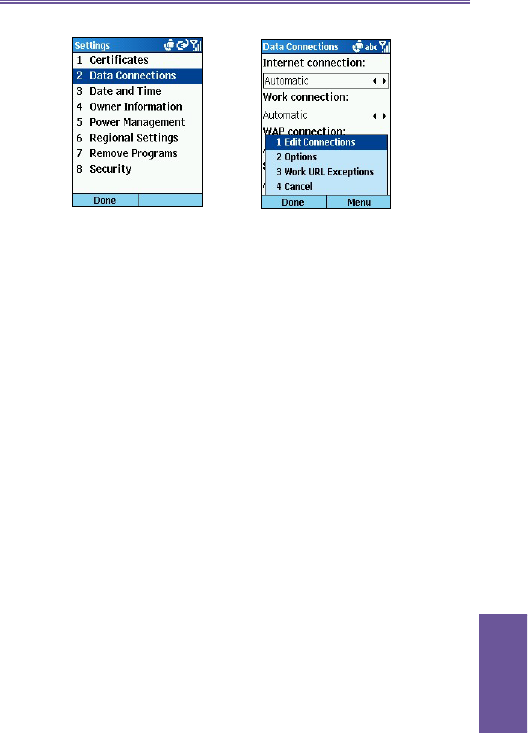
4.3 Data Connections
Data Connections settings enable you to set up Dial-up,
Virtual Private Network ( VPN), Proxy, and General Packet
Radio Service ( GPRS) connections so you can connect to
the Internet or your corporate network. With a data con-
nec tion, you can browse the Web, download e-mail, chat
using MSNR Messenger, or synchronize wirelessly with the
server. Check with your service provider to see if a data con-
nection has already been set up for you, and if over-the-air
confi guration is supported.
To view Data Connections settings: On the Home screen,
press the Start soft key, select Set tings, select Data Con-
nec tions, and then press the Action button.
Dial-up connection
You need to set up a Dial-up connection to connect directly
to the Internet or to your corporate network.
1 To create a dial-up connection to the Internet:
a. On the Home screen, press the Start soft key, select
Settings, select More, select Data Connections, and
then press the Action button.
b. Press the Menu soft key, select Edit Connections,
and then press the Action button.
c. Select Dial-up Connections, and press the Action
button.
d. Press the Menu soft key, select Add, and then press
the Action button.
e. Under Description, enter a name for the connection.
f. Under Connects to, press the navigation stick left or
right to select The Internet.
g. Enter the appropriate information for the remaining
fi elds, and press the Done soft key.
Smartphone User Manual
4.
Personalizing
61
2 To create a dial-up connection to your corporate
network:
a. On the Home screen, press the Start soft key, select
Settings, select Data Connections, and then press
the Action button.
b. Press the Menu soft key, select Edit Connections,
and then press the Action button.
c. Select Dial-up Connections, and press the Action
button.
d. Press the Menu soft key, select Add, and then press
the Action button.
e. Under Description, enter a name for the connection
a name.
f. Under Connects to, press the navigation stick left or
right to select Work.
g. Enter the appropriate information for the remaining
fi elds, and press the Done soft key.
VPN connection
A VPN connection is used to access your corporate net work
using an existing Internet connection.
Proxy connection

Smartphone User Manual
4.
Personalizing
62
A proxy connection is used to access the Internet using an
existing connection to your corporate or a WAP network.
GPRS connection
If there is GPRS coverage in your area, you can set up a
GPRS connection to access your corporate network or the
Internet, which is faster than a Dial-up connection.

Chapter 5
Messaging features
5.1 Setting up accounts
5.2 Sending e-mail, MMS and SMS
messages
5.3 Receiving e-mail, MMS and SMS
mes sag es
5.4 Viewing your message folders
5.5 Managing your Inbox
5.6 Instant messaging

5. Messaging
features
Smartphone User Manual
64
5.1 Setting up accounts
Your Smartphone is al ready set up for SMS text and voice
mail messaging, if your mobile phone service includes these
features. This section describes the steps required for setting
up the Smartphone to send and receive e-mail mes sag es.
You can use up to 8 different messaging ac counts with the
Smartphone.
Setting up e-mail
There are two ways to send and receive e-mail messages
with the Smartphone:
1 By synchronizing Inbox with Microsoft Outlook on your
desktop com put er or your Microsoft Ex change server.
(See Chapter 7 Synchronizing information.)
2 By con nect ing to a POP3 or IMAP4 e-mail serv er to send
and receive Internet e-mail messages. You may set up an
Internet e-mail account as follows:
a. On the Home screen, select Start and then Inbox.
b. Select Menu and then Options.
c. Select Account Setup, Menu, and then New.
d. In Your name, enter your display name for e-mail
messages.
e. In E-mail address, enter the e-mail address for this
account.
f. In Server type, scroll to select the type of e-mail server
that hosts your mailbox-IMAP4 or POP3-and select
Next.
g. In User name, enter your user name. This is usually
the fi rst part of your e-mail address, which appears
before the "at" sign (@).
h. In Password, enter your password.
i. In Domain, enter the domain name, if required.
j. To save your password, so that you do not need to
5. Messaging
features
Smartphone User Manual 65
enter it each time you connect to your e-mail server,
select Save password. Select Next.
k. In Account name, enter a name for this account. You
must use a different name for each account that you
set up.
l. In Network, scroll to the type of network that your e-mail
server runs on and select Next.
m. Enter information about your e-mail servers and select
Next. If you are not sure what to enter, ask your network
administrator.
n. Select message download options and select Next.
If you save your password and then lose your Smartphone,
someone fi nding your Smartphone might be able to gain
ac cess to your e-mail.

5. Messaging
features
Smartphone User Manual
66
Working with accounts
1 To view the list of accounts:
a. On the Home screen, select Start and then Inbox.
b. Select Menu and then Accounts/Folders. The list of
ac counts displays with the number of unread messages
in the Inbox of each account shown in parentheses. You
can switch to an account by selecting it in the list.
2 To quickly move between accounts:
a. On the Home screen, select Start and then Inbox. The
message list for the last account you used displays.
b. Scroll right or left to switch to the account you want.
3 To change e-mail account options:
a. On the Home screen, select Start and then Inbox.
b. If necessary, scroll right or left to switch to the account
you want.
c. Select Menu and then Options.
d. Select the type of options to change.
e. Change the options and press Done.
4 To delete an account:
a. On the Home screen, select Start and then Inbox.
b. Select Menu and then Options.
c. Select Account Setup.
d. Scroll to the account to delete.
e. Select Menu and then Delete.
5.2 Sending e-mail, MMS and
SMS messages
There are several ways to send MMS, e-mail and SMS
messages with your phone. The most common way to
5. Messaging
features
Smartphone User Manual 67
send messages is from Inbox; email can also be sent from
a contact card.
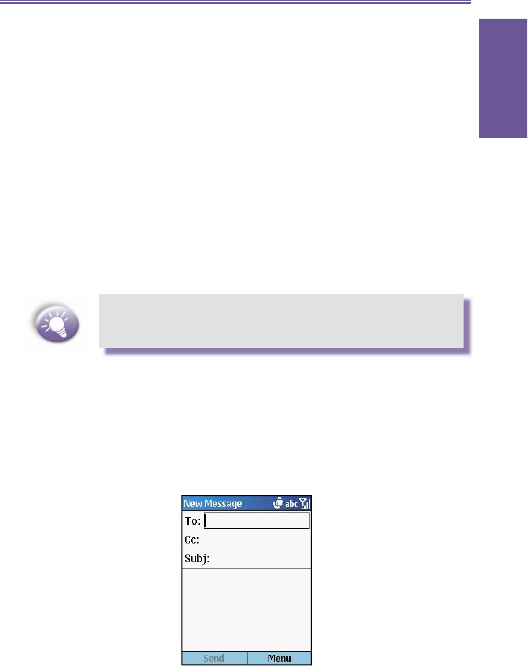
Sending SMS or e-mail messages from
Inbox
1 On the Home screen, select Start and then Inbox.
2 Select New, then SMS or Activesync (email).
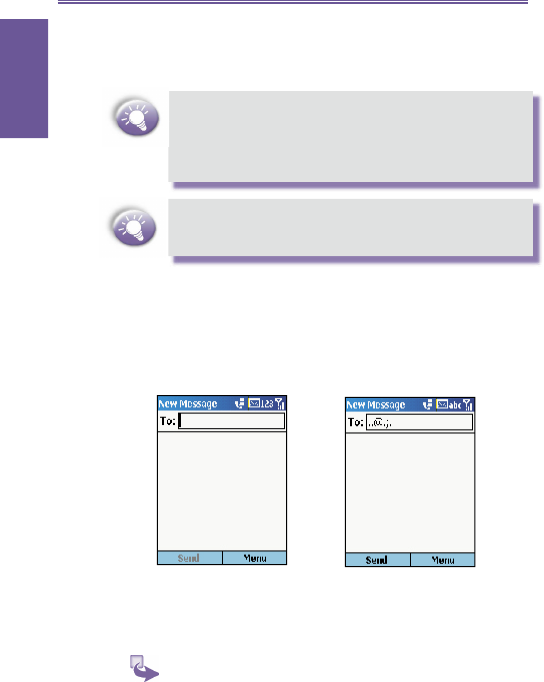
3 In To, enter recipient e-mail addresses or SMS numbers.
Insert a semicolon (;) between multiple addresses or SMS
numbers.
You can only enter SMS numbers in an SMS message,
and e-mail addresses in an e-mail message. Email is
accessed through Activesync not SMS.
4 In Cc, enter the e-mail addresses of persons to receive a
copy. This fi eld does not appear for SMS messages.
5 In Subj, enter a subject. This fi eld does not appear for
SMS messages.
5. Messaging
features
Smartphone User Manual
68
6 Enter a message and select Send. E-mail messages are
stored in Outbox and sent to recipients the next time you
synchronize or connect to your e-mail server and send
and receive mail. SMS messages are sent immediately.
You can send and receive SMS messages up to 160
char ac ters in size. If an SMS message is longer, it is
au to mat i cal ly sent in chunks as several small SMS
messages, and is then unifi ed as one SMS message after
all of the small SMS messages have been received.
You can quickly enter e-mail addresses or SMS numbers
from your contact cards. In To, press the Action key and
select a recipient from the list.
To insert punctuation such as the "at" sign (@), a period (.),
or a semicolon (;), repeatedly press the 1 key in Multipress
mode until the punctuation appears.
To cancel a message, select Menu and then Cancel Com-
pose.
Sending messages from a Contact
You can send a message quickly to a contact if you have an
e-mail address included in the contact.
1 On the Home screen, select the Contacts soft key.
2 Select the contact.
5. Messaging
features
Smartphone User Manual 69
3 Select the e-mail address or SMS number to use.
4 If you selected an e-mail address, select the e-mail account
to use.
5 In Subj, enter a subject. This fi eld does not appear for
SMS messages.
6 Enter a message and select Send. E-mail messages are
stored in Outbox and sent to recipients the next time you
synchronize or connect to your e-mail server and send
and receive mail. SMS messages are sent immediately.
Inserting predefi ned text into SMS and
e-mail messages
To save time entering text, you can insert predefi ned text
into messages. You can edit the predefi ned text included
with the Smartphone to create words or phrases that you
frequently use in messages.
1 To insert predefi ned text into a message:
a. On the Home screen, select Start and then Inbox.
b. Select New and then the account to use.
c. In Subj or the message area, select Menu.
d. Select Insert Text.
f. You can quickly insert text by entering its as so ci at ed
number. Scroll to the text and select Insert.

5. Messaging
features
Smartphone User Manual
70
2 To edit predefi ned text:
a. On the Home screen, select Start and then Inbox.
b. Select Menu and then Options.
c. Select Edit My Text.
d. Scroll to the text to edit.
e. Edit the text and select Done.
Inserting voice recordings into
messages
You can easily insert a voice recording into an e-mail
mes sage. Inserting a voice recording is useful when you
want to verbally explain information that is contained in
the mes sage.
1 In the message area of an e-mail message, select
Menu.
2 Select Insert Recording.
3 Select Record and start speaking into the Smartphone
microphone.
4 When fi nished speaking, select Stop. Select Done.
You can send only one voice recording in a message. If you
create a second voice recording in a mes sage, it re plac es
the fi rst recording.
Inserting signatures into messages
For each messaging account, you can specify a signature to
be automatically inserted into messages that you send.
1 To specify a signature to insert:
a. On the Home screen, select Start and then Inbox.
b. Select Menu and then Options.
c. Select Signatures.
d. Scroll right to switch to the account for which to
specify a signature.
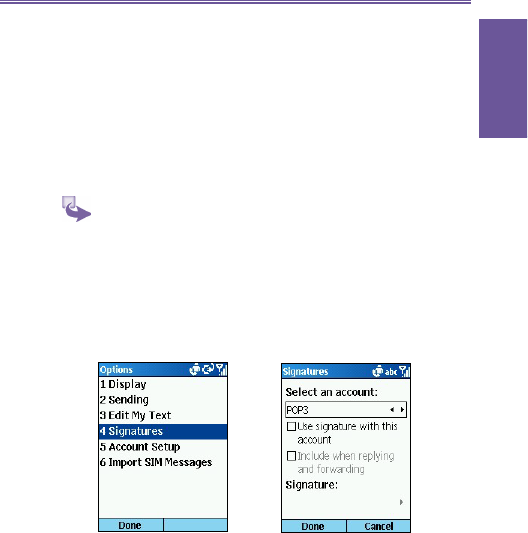
5. Messaging
features
Smartphone User Manual 71
e. Select Use signature with this account.
f. To insert a signature in every message you send, select
Include when replying and forwarding. Otherwise,
a sig na ture is inserted only in new messages.
g. Replace the text with in the Signature box with a
sig na ture to insert, and select Done. The signature
is inserted into messages that you send from this
account.
2 To stop inserting a signature:
a. On the Home screen, select Start and then Inbox.
b. Select Menu and then Options.
c. Select Signatures.
d. If necessary, scroll right or left to switch to the
account for which to stop inserting a signature into
messages.
e. Clear Use signature with this account and select
Done. A signature is no longer inserted in messages
that you send from this account.
Using a draft of a message
You can save a draft of a message that you are com pos ing
to fi nish and send later.
1 To save a draft of a message:
a. On the Home screen, select Start.
b. Select Inbox and then New.
c. Select the account to use.
d. Enter information in the message.

5. Messaging
features
Smartphone User Manual
72
e. Select Menu and then Postpone Message. A draft
of the message is stored in the Drafts folder of the
account.
2 To reopen and send a message draft:
a. On the Home screen, select Start and then Inbox.
b. Select Menu and then Accounts/Folders.
c. Scroll to the account whose folders you want to
view.
d. Select Folders.
e. Select Drafts and then the draft to open.
f. Edit the message and select Send. E-mail messages
are stored in Outbox and sent to recipients the next
time you synchronize or connect to your e-mail server
and send and receive mail. SMS messages are sent
immediately.
Requesting a delivery receipt
You can request a delivery receipt for an SMS message.
When you do this, you receive an SMS message to confi rm
that your message was delivered to the recipient's SMS
service.
1 Before sending an SMS message, select Menu.
2 Select Message Options.
3 Select Request SMS text message delivery
notifi cation.
4 Select Done. When your message is delivered, you
re ceive a receipt on the Smartphone.
Sending and receiving messages via
Internet
The Smartphone immediately sends SMS messages
when you select Send on the New Message screen.
The Smartphone automatically receives SMS messages
when ev er it is turned on. When you receive a message, the
new message icon appears at the top of the screen.
5. Messaging
features
Smartphone User Manual 73
For e-mail messages, you must use the Send/Receive
menu com mand from an Internet e-mail account to initiate
the transmission:
1 On the Home screen, select Start and then Inbox.
2 If necessary, scroll right or left to switch to the Internet
e-mail account for which you want to send and receive
messages.
3 Select Menu and then Send/Receive. The Smartphone
connects to your Internet e-mail server and sends and
receives your messages. To stop this process, select
Menu and then Stop Send/Receive.
Before you can send and receive e-mail messages, the
Smartphone must be properly confi gured, as described
earlier in 4.1 Setting up accounts.
5. Messaging
features
Smartphone User Manual
74
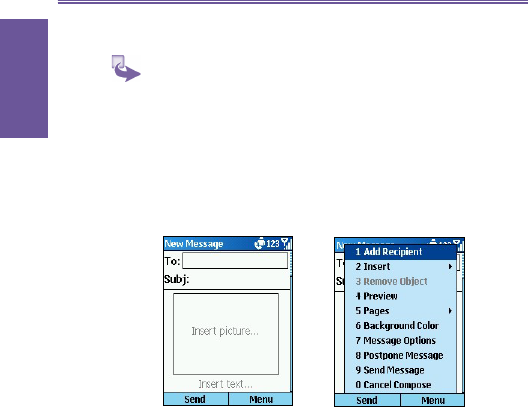
Composing an MMS message from Inbox
1. On the Home screen, press the Programs soft key,
select Inbox, and then press the Action button.
2. Press the New soft key, choose MMS from the new
menu.
3. Enter a SMS number in the To fi eld, or select a name from
Contacts by pressing Menu, then Add Recipient.
4. Press menu, then select an option from the pop-up menu
(Note: Each of the menu options in the menu will be
explained in detail below).
5. When you have composed your message press the Send
soft key.
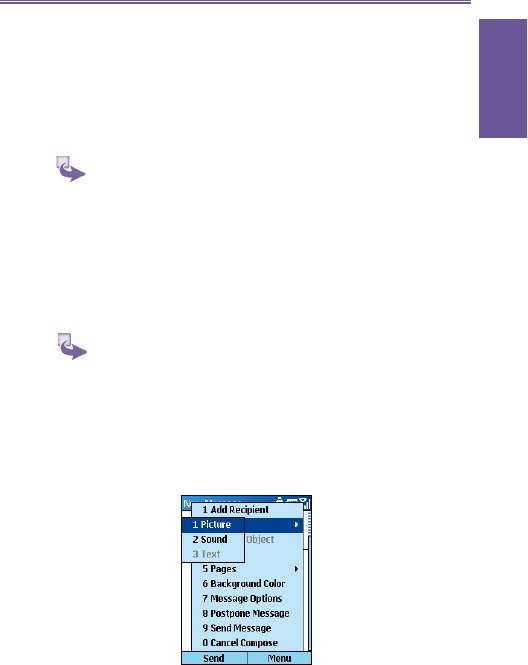
5. Messaging
features
Smartphone User Manual 75
Inserting pictures into MMS messages
You can choose to insert a picture already captured or
instantly capture and insert a picture. You can also choose
to draw and insert your own picture.
1. To insert a pre-captured picture:
a. On the Home screen, press the Programs soft key,
select Inbox, New, MMS and then press the Action
button.
b. Press Menu, Insert and then select Picture from the
pop-up menu.
c. Select an image from the list and then the Select soft
key.
2. To capture and insert a picture:
a. On the Home screen, press the Programs soft key,
select Inbox, New, MMS and then press the Action
button.
b. Press Menu, Insert and then select Picture from the
pop-up menu.
c. Select the camera icon, then press Select.
d. Select the picture you want to take, press the Action
key, then Select.

5. Messaging
features
Smartphone User Manual
76
Inserting sound into MMS messages
You can choose to insert a previously recorded clip from the
list, make a new recording or compose a new iMelody.
1. To insert a sound clip:
a. On the Home screen, press the Programs soft key,
select Inbox, New, MMS and then press the Action
button.
b. Press Menu, Insert and then select Sound from the
pop-up menu.
c. Select an recording from the list and then the Select
soft key.
2. To record and insert a sound clip:
a. On the Home screen, press the Programs soft key,
select Inbox, New, MMS and then press the Action
button.
b. Press Menu, Insert and then select Sound from the
pop-up menu.
c. Press the Menu soft key and then New Recording..The
sound clip will then appear in the list of images, and
you can select it and press Done.
Inserting background color into MMS
messages
You can choose a background color for your message.
1. On the Home screen, press the Programs soft key, select
Inbox, New, MMS and then press the Action button.
2. Press Menu, and then select Background Color from the
pop-up menu.
3. Use your navigation pad and Action key to select a color
and then press Select.

5. Messaging
features
Smartphone User Manual 77
Inserting text into MMS messages
You can choose to insert text into your message.
1. On the Home screen, press the Programs soft key, select
Inbox, New, MMS and then press the Action button.
2. Go to the text area at the bottom of the screen and add
text using any of the text input methods.
3. To insert predefined text go to the text area, press
the Menu soft key, insert then text. Select an item of
predefi ned text, and press insert.
Setting message options for MMS
messages
You can decide how long the message stays on the recipient’s
server before it is deleted, you can ask for confi rmation of
delivery, confi rmation of when the message is read, give the
message a type, such as Advertisement or Personal and
whether it should have High or Low priority.
1. On the Home screen, press the Programs soft key, select
Inbox, New, MMS and then press the Action button.
2. Press Menu, then select Message Options from the
pop-up menu.
3. In this screen select an appropriate option and then press
Done.
Adding and removing pages
1. On the Home screen, press the Programs soft key, select
Inbox, New, MMS and then press the Action button.
2. Press Menu, and then select Pages from the pop-up
menu. Then select to add or remove a page.