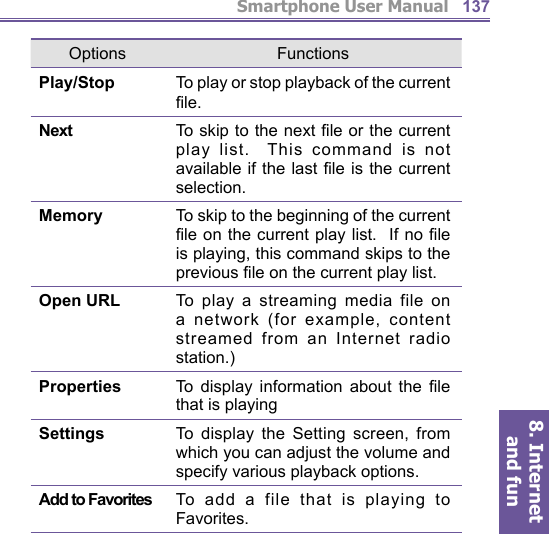
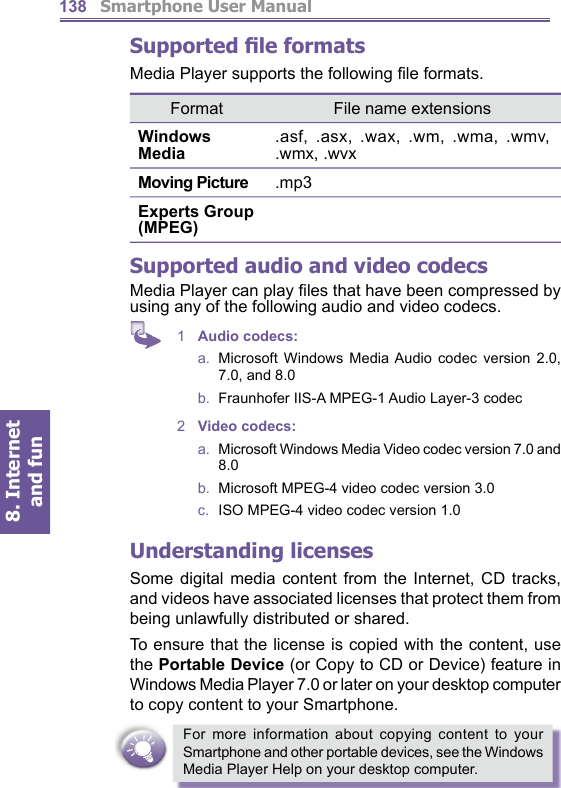
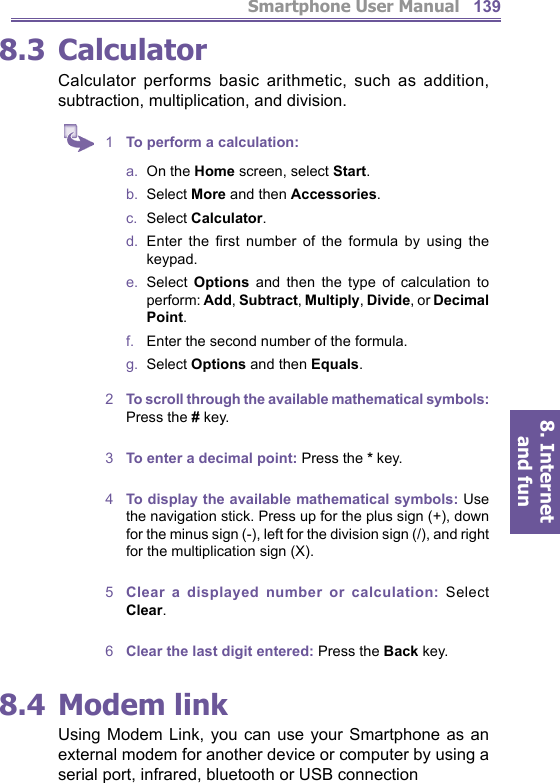
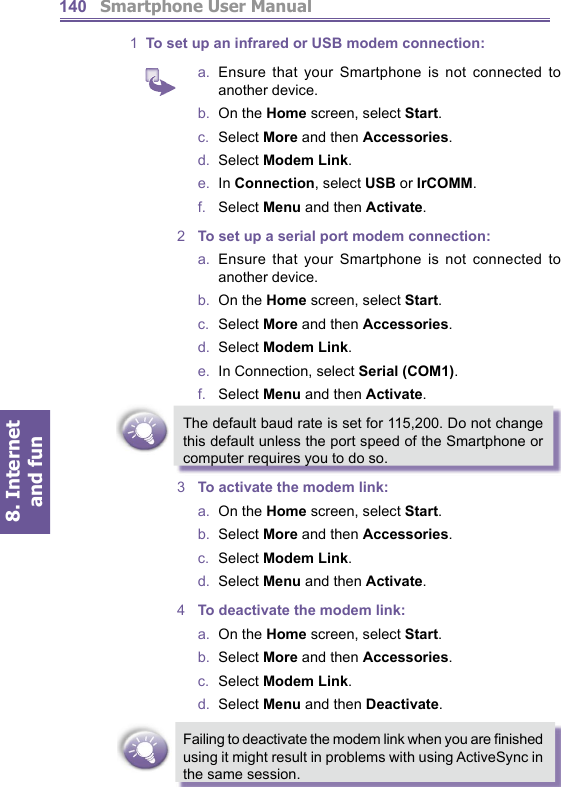
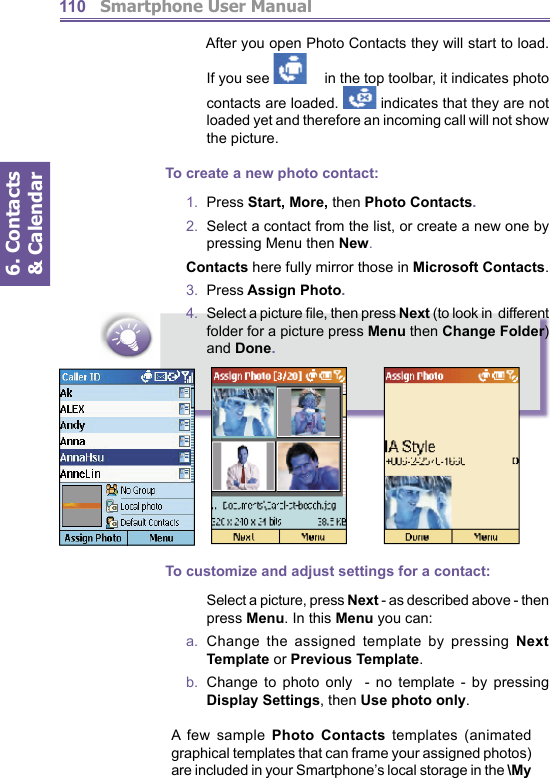
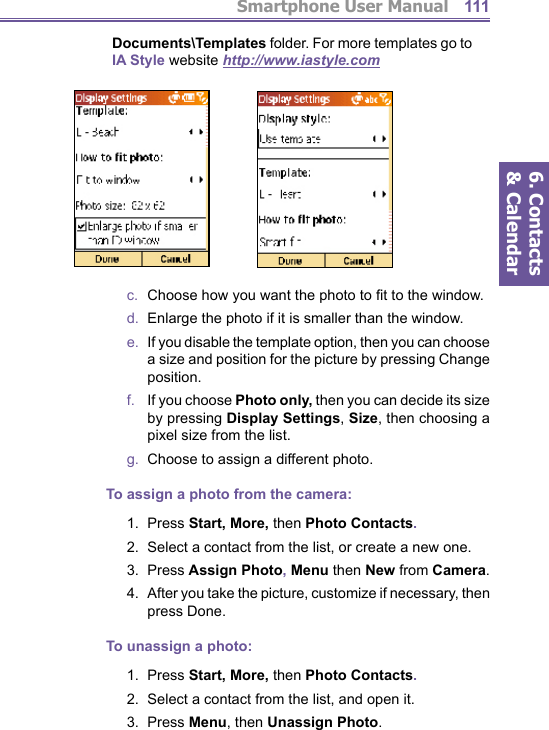
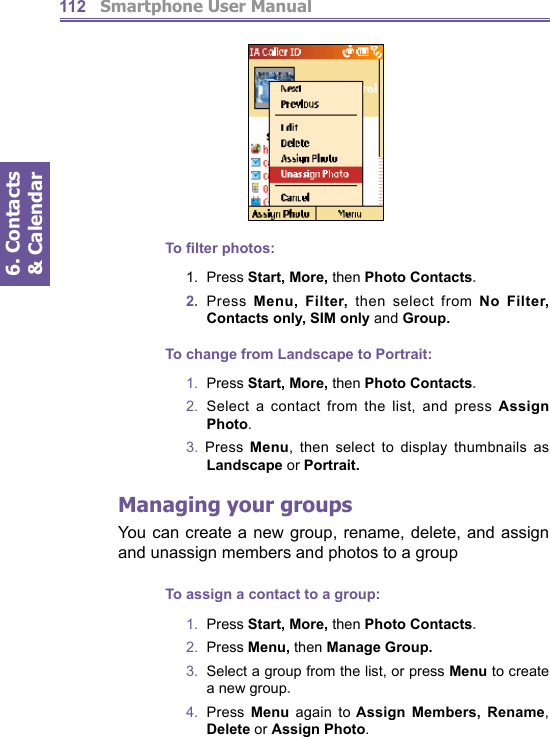
HTC VOYAGER SmartPhone User Manual voyager um aContents indd

HTC Corporation SmartPhone voyager um aContents indd

Contents

User Manual Part II

5. Messaging features         Smartphone User Manual78You must take additional steps to receive large messages and attachments, as described later in Working with large messages and attachments.5.3 Receiving e-mail, MMS and SMS messagesYou can receive MMS, e-mail and SMS messages through Inbox synchronization or by connecting to your e-mail serv er. You can then view all of the messages in your Inbox. When you connect to the e-mail server or syn chro nize your Inbox with your desktop computer, only the fi rst  0.5 KB of each new message are downloaded to Inbox on your phone by default. Only small attachments are down load ed and the original messages remain on the e-mail server or your desktop computer.When you receive an e-mail mes sage, the Smartphone plays a sound and displays an en ve lope icon at the top of the screen. By default, the Home screen also displays the number of unopened e-mail and SMS messages. To quickly view new messages, select the message notifi cation area on the Home screen.Working with the  message listReceived messages are stored in the Inbox folder of the appropriate account. They are displayed in the Inbox mes- sage list. 1  To view the Inbox mes sage list:a.  On the Home screen, select Start and then Inbox.b.  Scroll right or left, or press Menu then Accounts, to switch to the account for which to view messages. The Inbox message list dis plays your received messages.
5. Messaging featuresSmartphone User Manual 792  To change message list display options: By default, messages are displayed in the order received. You can change the order in which messages are dis played and show the date and time that messages were sent.a.  On the Home screen, select Start and then Inbox.b.  Select Menu and then Options.c.  Select Display.d.   Change the display options and select Done.3  To mark a message as Read or Unread: Messages that you have read are displayed in normal type with an open en ve lope icon. Messages that you have not read are displayed in bold type with a closed-envelope icon. You can change the status of a message by marking it as Read or Unread.a.  On the Home screen, select Start and then Inbox.b.   Scroll to the message to mark.d.  Select Menu.e.  Select Mark as Read or Mark as Unread. The message display is changed to refl ect its new status: normal text for read messages and bold text for unread messages. When you synchronize or send and receive e-mail, the message is displayed as Read or Unread in all locations.Working with messages
5. Messaging features         Smartphone User Manual80You can open messages by selecting them in the message list. Using Inbox menu commands, you can quickly reply to, forward, and delete messages. 1  To  open a message:a.  On the Home screen, select Start and then Inbox.b.   If necessary, scroll right or left to switch to the account you want.c.   Select the message to open.d.   To return to the message list, press the Back key.To open the next message in the list from with in an open message, scroll right; to open the previous mes sage in the list, scroll left. To create a contact card for the sender, select Menu and then Save Sender to Contacts.2  To specify the language for reading a message:a.  From an open message, select Menu and then Options.b.  In  E-mail message language, scroll to the language.c.  Select Done. The message is displayed using the ap pro pri ate characters for the selected language.3  To reply to a message:a.   From an open message, select Menu and then Reply or Reply All.b.   Enter a message in the message area.c.  Select Send. The message is stored in Outbox and sent to recipients the next time you synchronize or connect to your e-mail server. SMS messages are sent immediately.4  To forward a message:a.  From an open message, select Menu and then Forward.b.   Select the account to use.c.  In To, enter recipient e-mail addresses or SMS
5. Messaging featuresSmartphone User Manual 81numbers. Insert a semicolon (;) between multiple addresses or SMS numbers.d.   Optionally, you can enter an introductory message by scrolling to the message area, pressing the Action key to insert a blank line, and entering your text.e.  Select Send. SMS messages are sent immediately. E-mail messages are stored in Outbox and sent to recipients the next time you synchronize or connect to your e-mail server.5  To delete a message:a.  On the Home screen, select Start and then Inbox.b.   If necessary, scroll right or left to switch to the account in which to delete a message.c.   Scroll to the message to delete.d.  Select Menu and then Delete. For the ActiveSync ac count, the message is also deleted from Outlook on your desktop computer or Exchange Server the next time you synchronize.Working with large messages and  attachmentsWhen you receive large e-mail messages and at tach ments, the Smartphone downloads only a portion of them. You can view the partial message or attachment and decide if you want to download the rest of it.When you synchronize Inbox with your desktop computer or Exchange Server, the Smartphone downloads the fi rst 0.5 KB of each new e-mail message by default. When you con-nect to an Internet e-mail server, it downloads the amount (in KB) of each new message that you specifi ed when you set up the account. The message size includes its attach-ments. The original messages and attachments re main on the server or your desktop computer. On messages received from a POP3 e-mail server, the attachment size is omitted.
5. Messaging features         Smartphone User Manual82In the message list, messages with an attachment display an envelope icon with a paperclip. Within a message, at- tach ments are displayed as a list of hyperlinks at the bot- tom of the message, and are preceded by an attachment icon. The hyperlink includes the fi le name and size of the attachment.The attachment icon has the following three states:•  Not downloaded  •  Marked for download  •  Downloaded1  To download a complete e-mail message:a.  On the Home screen, select Start and then Inbox.b.   Scroll to the message to download.c.  Select Menu and then Mark for Download. The complete message is retrieved the next time you synchronize or connect to your e-mail server and send and receive e-mail.2  To download an attachment: In an open message with an attachment to download, select the attachment. The attachment is downloaded the next time you synchronize or connect to your e-mail server and send and receive e-mail. If there are multiple attachments in the message, all attachments are downloaded.3  To view an attachment: In an open message containing a downloaded attachment, select the attachment. Note that you can view attachments only for fi le types that are supported by the Smartphone.Accepting  meeting requestsYou can receive and respond to Outlook meeting requests on your Smartphone in a similar manner as you do in Out look on your desktop computer:1  On the Home screen, select Start and then Inbox.
5. Messaging featuresSmartphone User Manual 832   If necessary, scroll right or left to switch to the ActiveSync account.3  Select the meeting request and then respond to it as follows:a.    To accept the meeting request and insert the meeting into your calendar, select Menu and then Accept. b.   To decline the meeting request, select Menu and then Decline. c.   To tentatively accept the meeting request and insert a tentative meeting into your calendar, select Menu and then Tentative.Your response is sent back to the meeting organizer the next time that you synchronize.For more information about synchronizing, see Chapter 7 Synchronizing information.5.4 Viewing your message foldersEach messaging account has a set of folders in which the Smartphone stores messages for that account. The de fault folders are:•  Deleted Items contains messages that you delete until you empty this folder.•  Drafts contains messages that you save be fore send- ing.•  Inbox contains messages that you receive.•  Outbox for the ActiveSync account, con tains sent e-mail messages until you synchronize. For e-mail accounts, con tains sent e-mail messages until you con nect to your e-mail server. SMS messages are sent im me di ate ly over the net work and appear in your SMS Outbox folder only for
5. Messaging features         Smartphone User Manual84a few seconds.•  Sent Items contains copies of messages that you send.If you want, you can move a message to a different folder within the same account.When you synchronize or send and receive e-mail, the Smartphone synchronizes any additional e-mail folders that you have created in Outlook on your desktop computer or on your e-mail server. It also synchronizes the messages contained in those folders, if the folders are marked for synchronization. Viewing message folder contents1  On the Home screen, select Start and then Inbox.2  Select Menu and then Accounts/Folders.3  Scroll to the account for which to view the contents of a message folder.4  Select Folders and then the folder to view. To view all ActiveSync folders, even those not marked to syn chro nize, select Menu and then Show All Folders.5  To return to Inbox, press Back, select Menu and then Accounts/Fold ers.
5. Messaging featuresSmartphone User Manual 856  Scroll to the account.7  Select Folders and then Inbox.Marking a folder for synchronization1   You may synchronize Inbox with your desktop computer. This creates the same ActiveSync Inbox folders on your Smartphone as in Outlook on your desktop computer.2  On the Home screen, select Start and then Inbox.3  Select Menu and then Accounts/Folders.4  Scroll to ActiveSync and then select Folders.5  Select Menu and then Manage Folders.6  Scroll to a folder to synchronize.7  Select  Show and then Done. The next time you syn chro nize, the folder(s) that you marked on your Smartphone are synchronized with the corresponding folders in Out look on your desktop computer.Moving a message to a different folder1  On the Home screen, select Start and then Inbox.2  If necessary, scroll right or left to switch to the account in which to move a message.3  Scroll to the message to move.
5. Messaging features         Smartphone User Manual864  Select Menu and then Move.5  Select the folder into which to move the message.You can move an open message in the same manner, by selecting Menu and then Move.Emptying the Deleted Items folder1  On the Home screen, select Start and then Inbox.2  Select Menu and then Accounts/Folders.3   If necessary, scroll right or left to switch to the account for which to empty the Deleted Items folder.4  Select Folders and then Deleted Items.5  Select Menu and then Empty Folder.5.5 Managing your  InboxAll MMS, e-mail and SMS messages are stored in your In-box. By default, the most recently received messages are displayed at the top of the Inbox list. Using the menu options, you can customize your Inbox settings to control the way you send, receive, and view messages.
5. Messaging featuresSmartphone User Manual 87Using Inbox menu optionsIt is easy to accomplish common messaging tasks from your Inbox. Press the New soft key to compose a new message, or press the Menu soft key to forward, delete, and reply to messages, access Inbox options you can customize, and more.To view Inbox menu options: On the Home screen, press the Start soft key, select Inbox, and then press the Menu soft key.
5. Messaging features         Smartphone User Manual88Inbox menu option FunctionDelete Deletes the selected message.Reply  Replies to an open or selected mes sage.Reply All Replies to the sender and those who received a copy of the open or se lect ed mes sageForward Forwards the selected mMove    Enables you to move the open or selected message to another folderMark as Unread Displays the head er text of a mes sage in your Inbox in bold, in di cat ing that the mes sage has not been read.Mark as Read Displays the header text of a mes sage in your Inbox in lightface, in di cat ing that the message has been readMark for Download Retrieves the entire e-mail message from the e-mail server the next time you connect.Options Displays a list of Inbox options that you can customize (see the fol low ing table).Send/Receive Connects to your e-mail server to send and receive messages.Accounts/ Folders Displays all message folders.The following table lists Inbox menu options and their func- tions.
5. Messaging featuresSmartphone User Manual 89Customizing Inbox optionsYou can optimize your Inbox for the way you work. For example, you can change the way your messages are dis-played, specify how you want your messages to be sorted, specify the volume and limit the size of messages you want to automatically download, change your syn chro ni za tion schedule, and more.1  On the Home screen, press the Start soft key and then select Inbox.2  Press the Menu soft key, and then select Options.3  Select the option to customize.4  Modify the settings to change, and press Done.Inbox menu option FunctionDisplay Enables you to change the message information displayed in your inbox.Sending Enables you to specify whether you want to include an original copy of the message in your reply, save a copy of your sent message, or use Unicode for SMS messages.Editing My Text Enables you to edit the predefi ned text that you can insert in messages.Signatures Enables you to add a signature in messages.Account Setup Enables you to set up your accounts.Import SIM MessagesEnables you to import SMS messages from a SIM card to your inbox.  The messages are not removed from the SIM card after they are imported.The following table lists the Inbox options and their func- tions.
5. Messaging features         Smartphone User Manual905.6  Instant messagingYou can use MSN Messenger on your Smartphone to send and receive instant messages. MSN Messenger on your Smartphone provides the same chat environment as MSN Messenger on your desktop computer. Features of this environment include:•  Sending and receiving instant messages.•  Seeing the status of others in your Messenger contacts list, or changing your own status (e.g., available, busy, out to lunch).•  Inviting other people to a chat conversation.•  Blocking contacts from seeing your status or sending you messages.Setting up MSN MessengerBefore you can use MSN Messenger, you must take steps to set it up. First, you need either a Microsoft .NET Pass port account or a Hotmail account. To set up a Microsoft .NET Passport account, go to: http://www.passport.com. Once you have this account, you need to do the following:Create a connection on your Smartphone, such as a mo dem or wireless connection that allows you to connect to the Internet. For more information about creating con nec tions, see 3.3 Data connections.Using  MSN MessengerYou can sign in to MSN Messenger using your Hotmail credentials or your .NET Passport:1  To sign in to and sign out of MSN Messenger:a.  On the Home screen, select Start.b.  Select MSN Messenger.
5. Messaging featuresSmartphone User Manual 91c.  Select Sign In.d.  In Sign-in Name, enter the sign-in name that you use for Hotmail or your .NET Passport (Example: name_123@hotmail.com).e.  In Password, enter your Hotmail or .NET Passport pass word.f.    Select Remember my password if you don't want to en ter your password again in the future.g.  Select Sign In.h.  To sign out, press the Menu soft key and select Sign out.If you do not sign out of MSN Messenger, you will remain on a data connection. This may result in additional charges from your service provider.2  To add an MSN Messenger contact:a.   In the MSN Messenger contacts list, select Menu and then Add Contact.b.  Add the Hotmail or .NET Passport sign-in name of a person with whom you want to chat. Their sign-in name is added to the contacts list.
5. Messaging features         Smartphone User Manual923  To delete an MSN Messenger contact:a.  In the MSN Messenger contacts list, select the contact.b.  Select Menu and then Delete Contact. 4  To send an instant message:a.   Sign in to MSN Messenger.b.   Scroll to the contact with whom you want to chat.c.  Select Menu and then Send Message.d.  Enter your message and select Send. This starts a chat with the contact.To quickly add common messages, select Menu, select My Text, and then select the text to use. To edit this text, select Menu, select Options, and then select Edit My Text. Select the text, make any edits, and then select Done. 5  To reply to an instant message:a.  Select Menu and then Chats.b.  Select the name of the person sending the instant message. The message displays, along with a box for your reply. c.   Enter your reply and select Send.    If you want to be able to receive instant messages at any
5. Messaging featuresSmartphone User Manual 93time your Smartphone is connected to a network, select Menu and then Options. Select Passport Account, select Run this program when connection is available, and then select Done.6  To invite a contact to an ongoing chat: From a chat, select Menu, select Invite, and then select a contact. The contact receives an instant message and can join the chat.7  To change between chats:a.  Select Menu and then Chats.b.   In the list of ongoing chats, select the name of a contact with whom to chat.8  To return to the contacts list: From a chat, select Menu and then My Contacts.9  To end a chat: Select Menu and then End Chat.10 To see who is already chatting: Select Menu and then Chats.11  To block or unblock an MSN Messenger contact:a.   In the MSN Messenger contacts list, select the contact's name.b.  Select Menu and then Block. The contact will no longer be able to see your status or send you messages.c.  To unblock the contact, select Menu and then Unblock.12 To change your status:a.  In the MSN Messenger contacts list, select your name.b.   Select a status description, such as Away. This status is displayed next to your name in the contact lists of your contacts.
5. Messaging features         Smartphone User Manual9413 To change your display name:a.   In the MSN Messenger contacts list, select Menu.b.  Select Options and then Passport Account. c.  In My display name, enter your name as you want it to display in the contacts lists of your contacts.
Chapter 6Contacts, Calendar, and Tasks6.1 Using Contacts6.2 Using Calendar6.3 Using Tasks6.4 Using Photo Contacts
         Smartphone User Manual6. Contacts & Calendar966.1 Using ContactsYou can think of Contacts as an online address book, where you can store information about people and businesses you communicate with in contact cards. For example, you can store multiple phone numbers, e-mail and street ad dress es, Web pages, birthday, anniversary date, etc. You can use Contacts to dial phone numbers and compose e-mail and SMS messages directly from a contact card.The Contact listThe Contacts list displays the names of your contacts al pha bet i cal ly, along with an abbreviation for the default com mu ni ca tion method, such as the person's work phone num ber (w) or home phone number (h). This makes it easy to reach the contact using the method you prefer.If the contact card includes a work phone number, your phone will automatically set it as the default number.1  To access Contacts: On the Home screen, press the Contacts soft key.
Smartphone User Manual6. Contacts & Calendar972  To call a contact using the default number:a.  On the Home screen, select Contacts.b.   Select the contact to call.c.  Press the Talk button. The Smartphone dials the contact's default phone number. The abbreviation for this number appears to the right of the contact name.If you have a long list of contacts and you don't see the contact you want to call on the fi rst screen, enter the fi rst few letters of the contact's name; the phone will search through the entire Contacts list and display the name.The following table shows possible abbreviations that might be displayed in the Contacts list and their meanings.Abbreviation Meaningw Work phonew2 Second work phoneh Home phoneh2 Second home phonem Mobile phonepgr Pagercar Car phonesms SMS addresse E-mail addresse2 Second e-mail addresse3 Third e-mail addressweb Web page
         Smartphone User Manual6. Contacts & Calendar983  To call a contact using a number other than the default number:a.  On the Home screen, select Contacts.b.  Select the contact, scroll right or left to display the abbreviation for the number you want to use, and then press the Talk button.4  To fi nd a contact by entering a name:a.  On the Home screen, select Contacts.b.   Begin entering the name of the contact to fi nd until the name is displayed. For example, to fi nd "Sandra," enter 7, 2, 6, 3, 7, 2 because these numbers correspond to the letters for that name.5  To fi lter contacts:a.  On the Home screen, select Contacts.b.  Select Menu and then Filter.c.  Select a category to filter, such as Business, Miscellaneous, or Personal. The contacts assigned to the category you select are displayed in the list.6  To create a new contact:a.  On the Home screen, press the Contacts soft key, and press the New soft key.b.   Enter information for the new contact.c.  Select Done.7  To delete a contact:a.  On the Home screen, press the Contacts soft key.b.   Select the contact to delete, press the Menu soft key, select Delete, and then select Yes to confi rm.Contact cardsA contact card displays all of the information that you have entered for the contact, such as name of the person or busi-ness, phone numbers, e-mail addresses, and more. From a contact card, just select a phone number and press the Talk button to call the number. You can also select an e-mail address and press the Action button to begin com pos ing a message to the contact.
Smartphone User Manual6. Contacts & Calendar991  To view and edit a contact card:a.  On the Home screen, select Contacts.b.   Select the contact whose card you want to view.c.   To edit the card, select Edit.d.  When fi nished making changes, select Done.2  To call a contact from a contact card:a.  On the Home screen, select Contacts.b.   Select the contact, and press the Action button to open the contact card.c.   Select the number to use, and press the Talk button.3  To send an e-mail from a contact card:a.  On the Home screen, select Contacts.b.   Select the contact, and press the Action button to open the contact card.c.  Select the e-mail address, and press the Action button.d.  Select an account to use, and press the Action button.e.  Enter a subject, compose your message, and then select Send.SIM contactSIM contacts are stored on your SIM card. When you insert your SIM card into a different device, you can view and
         Smartphone User Manual6. Contacts & Calendar100use the SIM contact information on the new device. Unlike regular contact cards, you can store only 1 phone num ber for each SIM contact.To create a new SIM contact:1  On the Home screen, select Contacts and then Menu.2  Select New SIM Contact.3  Enter the contact's name and phone number.4  Select Done.The new contact appears in your contact list. A SIM icon appears to the right of the name, indicating that the contact is stored on your SIM card.Using contact card menu optionsUsing the contact card menu options, you can quickly ap ply a speed dial to the contact, beam the contact card to another mobile device or a desktop PC using infrared, etc.To view contact card menu options: On the Home screen, se lect Con tacts and then Menu.The following table lists the contact card menu options and their functions.
Smartphone User Manual6. Contacts & Calendar1016.2 Using CalendarCalendar is the scheduling program on your Smartphone, where you can create and view appointments and view your calendar by day, week, or month. When you create and edit appointments in Calendar, your changes are re fl ect ed in Outlook on your desktop computer when you synchronize.1  To open Calendar: On the Home screen, se lect Start and then Calendar.2  To create a new appointment:a.  On the Home screen, select the Start soft key.b.  Select Calendar.c.  Select Menu and then New.d.   Enter information about the appointment.e.  In Reminder, scroll to the amount of time before the Menu Options FunctionAdd Speed Dial Enables you to create a shortcut to a phone number, e-mail address, or Web URL by assigning one or two numbers as a speed dial.Add Voice Tag Enables you to create a shortcut to a phone number, e-mail addres, or Web URL by assigning one or two numbers as a recording.Set as Default Makes the selected phone number or e-mail address the default communication methode for the contact.Beam Contact Sends the contact card to another mobile device or a desktop PC using infrared.Delete Removes the contact card from the Contacts listEdit Enables you to modify information in the contact card.
         Smartphone User Manual6. Contacts & Calendar102ap point ment that you want to be reminded. If you don't want to be reminded, select None.When you create a new appointment on your Smartphone, you can synchronize Calendar with your desktop com put er or Exchange Server to keep your schedule in for ma tion up-to-date in all locations.The default reminder time is 15 minutes prior to an appointment. You can change this by selecting Menu and then Options from within Calendar.3  To edit an appointment:a.  On the Home screen, select Start.b.  Select Calendar.c.  Select the appointment, press the Action button and then select Edit.d.  If the appointment is recurring, select Yes to edit only the current occurrence, or select No to edit the series.e.   Make your changes and select Done.4  To delete an appointment:a.  On  the  Home screen, select Start and then Calendar.b.   Scroll to the appointment to delete.c.  Select Menu and then Delete.
Smartphone User Manual6. Contacts & Calendar103d.  If the appointment is recurring, select Yes to delete only the current occurrence, or select No to delete the series.Viewing your scheduleYou can view your schedule in three different views: Agen da, Week, and Month.1  Agenda view: Agenda view is the default view for calendar information. This view displays meetings and appointments scheduled for the current day. Appointments are shown in chronological order according to start time. All-day appointments are shown as a single line at the top of the Agenda view. a.  To view today's agenda: You may select your upcoming appointments on the Home screen, or you may select Menu from Week or Month view in Calendar,  and then Go to Today.To view previous or approaching dates, scroll left or right.b.  To view your agenda for a specifi c date: On the Home screen, select Start. Select Calendar. Select Menu and then Go to Date. Enter the date to view and select Done.2  Week view: Week view shows your schedule a week at a time. Week view gives you a quick indication of your free
         Smartphone User Manual6. Contacts & Calendar104and busy time, and allows you to create an appointment at a selected time easily.     By default, Week view displays the hours from 9:00 A.M. to 5:00 P.M. in one-hour increments on the left side of the screen. You can scroll up or down to show the hours before or after those displayed.    To view appointments for the week: On the Home screen, select Start. Select Calendar. Select Menu and then Week View. 3  Month view: Month view provides an overview of your schedule one month at a time. Arrows pointing upward represent morning appointments, and arrows pointing downward represent afternoon appointments. If you have both morning and afternoon appointments on the same day, the arrows form a colored box. All-day events are indicated by an empty box. If you have morning and afternoon appointments and an all-day event on the same day, an empty box surrounds a colored box.    To view appointments for the week: On the Home screen, select Start. Select Calendar. Select Menu and then Month View. Customizing the calendar viewYou can change viewing options for Cal en dar, such as specifying the fi rst day of the week and the number of days per week to display, as well as showing and hiding week numbers.1  On the Home screen, select Start.2  Select Calendar.3  Select Menu and then Options.
Smartphone User Manual6. Contacts & Calendar1056.3 Using TasksA task is a personal or work-related project, assignment, or errand to track through completion. A task can occur once, or it can recur. A recurring task can repeat at regular intervals or repeat based on the date you mark the task complete. For example, you might want to pay a bill on the last Friday of every month, or get a haircut when one month has passed since your last haircut.The task listThe task list is your "things to do" list. When you create or edit tasks with Outlook on your desktop computer and then synchronize with your Smartphone, additional task in for -ma tion may display. A task that has been marked as high priority is preceded by an exclamation mark, and one marked as low priority by a down arrow. On color devices, over due tasks are dis played bold and red.If you synchronize tasks with your desktop computer, com plet ed tasks are removed from your Smartphone during synchronization. They are then displayed in gray with a strikethrough on your desktop computer.4  Scroll to select the options you want and select Done.Importing calendar informationYou can import calendar information from another cal en dar program that uses the iCal or vCal format. You can import cal en dar information from attachments in e-mail messages, SMS messages, and links in Microsoft(R) Pock et Internet Explorer, or by beaming. When you import in for ma tion and then synchronize, the information is added to Out look on your desktop com put er.
         Smartphone User Manual6. Contacts & Calendar1061  To create a new task: On the Home screen, se lect Start, More and then Calendar. Enter the task and press the Action key.2  To mark a task as Complete: On the Home screen, se lect Start, More and then Calendar. Scroll to the task and select Complete.3  To change a completed task to incomplete: On the Home screen, se lect  Start, More and then Calendar. Scroll to the task and select Activate.4  To delete a task from the task list: On the Home screen, se lect Start, More and then Calendar. Scroll to the task and select Delete.Using voice notesYou can use Voice Notes to work with short voice re cord ings, or voice notes. Voice notes are included in the All Notes list and are named consecutively (Recording 1, Re cord ing 2, and so on).1  To create a voice note: a.   Hold the Smartphone microphone near your mouth.b.  Press the Record button, select the Record soft key, and speak your voice note.c.  Select Stop to stop recording a voice note. The voice note is recorded and appears in the All Notes list of Voice Notes.     To listen to a recording, select it in the All Notes list, select Menu, and then select Play.2  To rename a voice note: a.  On the Home screen, select Start.b.  Select More and then Voice Notes.
Smartphone User Manual6. Contacts & Calendar107c.   Scroll to the voice note to rename.d.  Select Menu and then Rename.e.  In Name, enter a new name.f.    Select Done.3  To delete a voice note:a.  On the Home screen, select Start.b.  Select More and then Voice Notes.c.   Scroll to the voice note to delete.d.  Select Menu and then Delete.e.  Select Yes.If you delete a voice note that has a default name, such as Voice Note 1, this name becomes available for a new voice note that you create. For example, if you have three voice notes, named Voice Note 1, Voice Note 2, and Voice Note 3, and you delete Voice Note 1, the next voice note you create will be named Voice Note 1. Beaming informationYou can use the Bluetooth or infrared port on your Smart-phone to send and receive (beam) calendar ap point ments and con tact cards between your Smartphone and another mobile de vice or a desktop computer that has Bluetooth or an in fra red port and supports vCards and vCal. Alternatively. However, you can not beam SIM con tacts.1  To beam a contact:a.  On the Home screen, select Contacts.b.   Select the contact to beam. c.  Select Menu and then Beam Contact. d.   Scroll to the device to which you want to beam. e.  To beam by infrared, make sure that the infrared ports are unobstructed and within close range of each other. f.   To beam by using Bluetooth, make sure that both
         Smartphone User Manual6. Contacts & Calendar108Bluetooth radios are turned on and that Bluetooth is discoverable on the receiving device.g.  Select Beam.    Status information will then be displayed, indicating the name of the de vice to which the Smartphone is beaming, and wheth er the beaming process is pending, fi nished, or has failed.2  To beam an appointment:a.  On the Home screen, select Start.b.  Select Calendar.c.   Select the appointment to beam.d.  Select Menu and then Beam Appointment.e.   Scroll to the device you want to beam to. f.   To beam by infrared, make sure that the infrared ports are unobstructed and within close range of each other. g.  To beam by using Bluetooth, make sure that both Bluetooth radios are turned on and that Bluetooth is discoverable on the receiving device.h.  Select Beam.    Status information displays, indicating the name of the de vice to which the Smartphone is beaming, and whether the beaming process is pending, fi nished, or has failed.3  To receive beamed information:
Smartphone User Manual6. Contacts & Calendar109a.  On the Home screen, select Start.b.  Select Settings and then Beam.c.  Select Receive incoming beams.d.   To receive by infrared, align the infrared ports so that they are unobstructed and within close range of each other. e.  To receive by using Bluetooth, make sure your Bluetooth radio is turned on and in discoverable mode.f.    Select Yes to receive the information.    Once you select Receive incoming beams, your device automatically receives beams until you clear this check box.Your Smartphone can receive beamed fi les of any type, but you may need to copy some fi les to your desktop computer for viewing.3.6 Photo ContactsPhoto Contacts makes using your Pocket PC more fun and practical than ever before.  It allows you to assign still or animated photos to the entries in your Contacts.  Then when a person calls you (for whom you have previously assigned a photo ID in Contacts), that photo ID will appear on your Pocket PC’s incoming call screen.  Use the rich set of features to get the photos displayed with the size, position, and animated ID template you want. To activate  Photo Contacts:Press Start, More, then Photo Contacts. Photo Contacts do not run automatically when you turn on your phone. You must turn them on.To Check if Photo Contacts are loaded:
         Smartphone User Manual6. Contacts & Calendar110    After you open Photo Contacts they will start to load. If you see     in the top toolbar, it indicates photo contacts are loaded.   indicates that they are not loaded yet and therefore an incoming call will not show the picture.To create a new photo contact:1.  Press Start, More, then Photo Contacts.2.  Select a contact from the list, or create a new one by pressing Menu then New. Contacts here fully mirror those in Microsoft Contacts.3.  Press Assign Photo. 4.   Select a picture fi le, then press Next (to look in  different folder for a picture press Menu then Change Folder) and Done.To customize and adjust settings for a contact:     Select a picture, press Next - as described above - then press Menu. In this Menu you can:a.   Change the assigned template by pressing Next Template or Previous  Template. b.   Change to photo only  - no template - by pressing Display Settings, then Use photo only.A few sample Photo Contacts templates (animated graphical templates that can frame your assigned photos) are included in your Smartphone’s local storage in the \My
Smartphone User Manual6. Contacts & Calendar111Documents\Templates folder. For more templates go to IA Style website http://www.iastyle.comc.   Choose how you want the photo to fi t to the window.d.   Enlarge the photo if it is smaller than the window.e.   If you disable the template option, then you can choose a size and position for the picture by pressing Change position.f.    If you choose Photo only, then you can decide its size by pressing  Display Settings, Size, then choosing a pixel size from the list.g.   Choose to assign a different photo.To assign a photo from the camera:1.  Press Start, More, then Photo Contacts.2.   Select a contact from the list, or create a new one. 3.  Press Assign Photo, Menu then New from Camera.4.   After you take the picture, customize if necessary, then press Done.To unassign a photo:1.  Press Start, More, then Photo Contacts.2.   Select a contact from the list, and open it. 3.  Press Menu, then Unassign Photo.
         Smartphone User Manual6. Contacts & Calendar112To fi lter photos:1.  Press Start, More, then Photo Contacts.2.   Press Menu, Filter, then select from No Filter, Contacts only, SIM only and Group.To change from Landscape to Portrait:1.  Press Start, More, then Photo Contacts.2.  Select a contact from the list, and press Assign Photo.3. Press Menu, then select to display thumbnails as  Landscape or  Portrait. Managing your groupsYou can create a new group, rename, delete, and assign and unassign members and photos to a groupTo assign a contact to a group:1.  Press Start, More, then Photo Contacts.2.  Press Menu, then  Manage Group.3.  Select a group from the list, or press Menu to create a new group.4.  Press Menu again to  Assign Members, Rename, Delete or Assign Photo.
Smartphone User Manual6. Contacts & Calendar113Set  Default PhotosThe Set Default Photos screen lets you assign, unassign, and preview default Photo IDs to appear for these three situations:Unknown photo This photo will display whenever the phone number of the incoming call is not known to Caller ID because no phone number was “passed in” to your Pocket PC.  This would occur if the person calling you has blocked their phone number from being displayed to the receiver, or has not enabled the broadcast of their Caller ID.Not-found photo This option in the Set Default Photos screen lets you assign a generic Photo ID to any incoming call from a person whose number is not found in your Contacts.  That is, the phone number of the incoming call is known, but has no matching entry in your Contacts.Default photo This photo will display when the incoming call is found to be from a matching entry in your Contacts database, but so far there is no individually-assigned  Photo ID for either that individual  Contact entry, or for the Group it belongs to.To set Default Photos:1.  Press Menu, Options then Set Default Photos.2.  Select Unknown photo, Not-found photo or Default photo.
         Smartphone User Manual6. Contacts & Calendar1143.   Select a picture, then assign settings.
Chapter 7Synchronizing information7.1 Understanding ActiveSync7.2 Synchronizing with a desktop computer7.3 Synchronizing with a server7.4 Other synchronization in for -ma tion
         Smartphone User Manual7. Synchronizing  1167.1 Understanding ActiveSyncActiveSync synchronizes information stored on your Smart-phone with Microsoft Outlook information on your desktop computer or Microsoft Exchange Server. It also allows you to share fi les between your phone and your desk top computer.When you synchronize, ActiveSync compares the in for -ma tion on your device with the information on your desk top computer and/or Exchange Server and updates all lo ca tions with the most recent information. With ActiveSync, you can:•  Synchronize Inbox, Contacts, Calendar, and Tasks in for -ma tion on your phone with your desktop com put er.•  Synchronize Inbox, Contacts, and Calendar on your phone with the Outlook information on a server run ning Microsoft Exchange Server so that you have the lat est information, even when your desktop computer is turned off. •  Copy (rather than synchronize) fi les between your phone and your desktop computer.•  Synchronize on a schedule to control when syn chro -ni za tion occurs.•  Select which types of information are syn chro nized and specify how much information is syn chro nized. For ex am ple, you can choose how many weeks of past ap point ments to synchronize.Using Server ActiveSync, you can synchronize information directly with a Microsoft Exchange Server if your company is running Microsoft Mobile Information Server.
Smartphone User Manual7. Synchronizing  1177.2 Synchronizing with a desktop computer Installing ActiveSyncBefore you can synchronize information with a desktop computer, you must fi rst install ActiveSync on your desk top computer and create a partnership between your Smart-phone and your desktop computer. You can install ActiveSync on the desktop computer from the Smartphone Companion CD. ActiveSync is already in stalled on your Smartphone.Creating a partnershipAs soon as ActiveSync installation completes, the New Part-nership wizard helps you set up a partnership be tween your Smartphone and your desktop computer. When you fi nish using the wizard, the fi rst syn chro ni za tion begins automatically. When synchronization com pletes, you will notice that the information from your desktop com put er that you selected now appears on your Smartphone.Before you begin setting up ActiveSync, you should get the information you will need and connect the device to your computer by a serial, USB, or infrared connection.
         Smartphone User Manual7. Synchronizing  118To prevent synchronization problems, select Synchronize with Microsoft Mobile Information Server and/or this desktop computer in the New Partnership wizard only if you are certain that your company is running Microsoft Mobile Information Server 2002 or later and you know the server name. Otherwise, select Synchronize with this desktop computer. For more information, contact your network administrator or service provider.Starting and stopping synchronizationThe fi rst syn chro ni za tion begins automatically after you fi nish using the New Partnership wizard. From then on, you may start and stop the synchronization in the fol low ing way:1  On  the  Home screen, select Start and then ActiveSync.2  To start synchronization, select Sync.3  To stop synchronizing, select Stop.Deciding which information to synchronizeBy default, ActiveSync does not automatically syn chro nize all types of Outlook information. You can use ActiveSync options to turn synchronization for specifi c information types on and off:1  On your desktop computer, open the Microsoft ActiveSync program. Click on Options.2  By default, Calendar, Contacts, Tasks, and Inbox are synchronized. Clear the check box for the item you do not want to synchronize.
Smartphone User Manual7. Synchronizing  1193  To adjust the settings for a particular type of information, click on the type and then select Settings.  For example, you may select which folders in Inbox to synchronize.     7.3 Synchronizing with a serverYou can use the New Partnership wizard when you are fi rst setting up a partnership with a desktop computer to syn-chronize with an Exchange server. In the New Part ner ship wizard, select Synchronize with Microsoft Mobile Infor-mation Server and/or this desktop com put er, instead of Synchronize with this desktop com put er.If at some later time you want to synchronize with a server when the device is connected to the desktop computer, you must then configure ActiveSync on the desktop computer as described in "Synchronize with a server" in ActiveSync Help on the desktop computer.
         Smartphone User Manual7. Synchronizing  1201  To configure an Exchange Server connection:a.  If the device is connected to your desktop computer, disconnect it. On the Smartphone Home screen, select Start.b.  Select ActiveSync.c.  Select Menu and then Options.d.  Select Server Settings.e.  Select Connection.f.    In  User name, enter your Microsoft Exchange user name.g.  In Password, enter your Microsoft Exchange pass word.h.  In Domain, enter the name of the domain of your Ex change server (if required).i.   If you want the device to save your password so that you need not enter it when connecting, select Save password.j.    If  confi guring  a  Server Name, enter name of your Exchange server.k.  Select Done. 2  To change Exchange server synchronization settings:a.  Before you change synchronization settings, disconnect the device from your desktop computer. On the Smartphone Home screen, select Start.b.  Select ActiveSync.c.  Select Menu and then Options.d.  Select Server Settings.e.   Select the synchronization settings to edit: Calendar, Contacts, or Inbox.To start synchronizing Calendar, Contacts, or Inbox information, select Sync [Information Type] with a server on the appropriate synchronization settings page.     To stop synchronizing Calendar, Contacts, or Inbox in for ma tion, clear the Sync [Information Type] with a server check box on the appropriate synchronization settings page.
Smartphone User Manual7. Synchronizing  121     Change the amount of information to be syn chro nized.Creating a  synchronization scheduleYou can create a schedule for automatically syn chro niz ing information on your Smartphone with your desktop computer or with Microsoft Exchange Server. To set up a synchroni-zation schedule with your desktop computer, you must use ActiveSync on the desktop computer. For in struc tions, see Change desktop synchronization sched ule in ActiveSync Help on the desktop computer. To set up a synchronization schedule with Exchange serv er, you must use ActiveSync on your Smartphone. You can schedule synchronization of your device on two separate schedules: •  Peak times schedule: To syn chro nize during work ing hours or other times you ex pe ri ence higher mail vol umes. •  Off-peak schedule: To synchronize during times when you experience lower mail volumes. When you are roam ing, you can synchronize manually to reduce roaming charg es, or you can syn chro nize using the mobile sched ules.1  To edit schedule settings, your Smartphone must be disconnected from your desktop computer. On the Smartphone Home screen, select Start.2  Select ActiveSync.3  Select Menu and then Options.4  Select Mobile Schedule.a.   Select how often to synchronize in the Peak time sync list.b.   Select how often to synchronize in the Off-peak time sync list.c.   Select whether or not to synchronize on a schedule in the Roaming sync list.d.  Select Sync outgoing items as they are sent to syn chro nize every time you send e-mail.5  Select Done.
         Smartphone User Manual7. Synchronizing  122If you create a schedule for synchronizing while con nect ed to a desktop computer as well as a schedule for syn chro -niz ing remotely (wirelessly), the Smartphone syn chro niz es according to both schedules.Synchronizing AutomaticallyWith ActiveSync you can schedule automatic syn chro ni z-a tion between your device and a server every time an item arrives or is changed at the server. Your device is informed of that event and synchronizes automatically to retrieve those items, making your device always up-to-date. You must syn-chronize your device at least once (such as after creating a partnership) before you can see and change the settings for synchronization as items ar rive.You can synchronize as items arrive only if your company or service provider is running Microsoft Exchange Server with Exchange ActiveSync.To set up a schedule to synchronize automatically:1   On the Smartphone Home screen, select Start.2   Select ActiveSync.3   Select Menu and then Options.4   Select Mobile Schedule.5   Set Peak time sync and/or Off-peak time sync to As items arrive.6   Select Done.To set up the device address:1   To edit settings on the Smartphone, dis con nect it from your desktop computer. On the Smartphone Home screen, select Start.
Smartphone User Manual7. Synchronizing  1232   Select ActiveSync.3   Select Menu and then Options.4   Select Server Settings.a.  Select Connection.b.  Scroll to Address device using.c.  Select the way you want your device to be notifi ed when items arrive.d.   If you select SMTP Address (direct ad dress ing), scroll to Device SMS Address and enter the address that identifi es your device on the network. This is the same address that other Internet users use to send SMS mes sag es to your device.e.  If you select Service Provider (a pre-defined ad dress ing profi le), scroll to Service Provider Name, and enter your device phone number, if necessary, in Device Phone Num ber. 5   Select Done twice.
         Smartphone User Manual7. Synchronizing  1247.4 Other synchronization information Remote synchronizationRemote synchronization is when your device is syn chro niz ing over a wireless connection instead of using a direct local con-nection to a desktop computer. Synchronizing re mote ly with your desktop computer may depend on your network confi gu-ration. For example, you may need to set up a virtual private network (VPN) connection to your net work.To synchronize remotely you need to set up a connection fi rst. For information about setting up a connection, see 3.3 Data Connections.Then confi gure your phone as de scribed in the following procedure:1  On the Home screen, select Start.2  Select ActiveSync.3  Select Menu and then Options.4  Select PC Settings.5  In Use, scroll to the computer name.6  Select or clear Use mobile schedule to sync with this PC.7  Select or clear Sync with this PC during manual sync.8  Select Done.To synchronize remotely with a desktop com put er, the desk top computer must be turned on.
Smartphone User Manual7. Synchronizing  125 Synchronizing InboxWhen you select Inbox for synchronization in ActiveSync, e-mail messages are synchronized as part of the general synchronization process. During synchronization, the fol- low ing events occur:1   Messages are copied from the Outlook Inbox folder on your desktop computer, or from Microsoft Ex change Serv er, to the Inbox folder on your Smartphone.2  By default, when synchronizing Inbox in for ma tion with your desktop computer or Microsoft Exchange Server, you receive only messages from the last 3 days and the fi rst 500 bytes of each new message.3   The messages on your Smartphone and on your desktop computer are linked. When you delete a mes sage on your Smartphone, it is deleted from your desktop computer the next time you synchronize, and vice versa.4  Messages in subfolders of other Outlook e-mail folders are synchronized only if the folders have been selected for synchronization in Inbox on your Smartphone.SMS messages are not received in Inbox through syn chro ni za tion. Instead, they are sent to your Smartphone by way of your service provider.Synchronizing CalendarWhen you select Calendar for synchronization in Active-Sync, by default Cal en dar items from the last 2 weeks are syn chro nized.Calendar items created on your Smartphone are copied to your desktop computer and/or server during syn chro ni za tion, and vice versa. Similarly, Calendar items that are de let ed from your Smartphone are deleted from your desktop com put er and/or server during synchronization, and vice versa.
         Smartphone User Manual7. Synchronizing  126Synchronizing ContactsWhen you select Contacts for synchronization in ActiveSync, by default all of your con tacts are syn chro nized.Contacts created on your Smartphone are copied to your desktop computer and/or server during synchronization, and vice versa. Similarly, contacts that are deleted from your Smartphone are deleted from your desktop computer and/or server during synchronization, and vice versa.Synchronizing TasksTask syn chro ni za tion is automatically selected in ActiveSync. By default, all of your incomplete tasks are synchronized.Tasks created on your Smartphone are copied to your desktop computer during synchronization, and vice versa. Similarly, tasks that are deleted from your Smartphone are deleted from your desktop computer during syn chro ni za tion, and vice versa.Tasks can be synchronized only with your desktop com put er; they cannot be synchronized with a server running Microsoft Exchange Server.ActiveSync error messagesIf your information cannot be successfully synchronized, you will see an error message on your Smartphone. To view more in for ma tion about the error, scroll to it and press the Action key.Some errors interfere with automatic syn chro ni za tion. If you suspect that a scheduled synchronization has not occurred, you should attempt to manually syn chro nize your informa-tion. Successfully completing man u al syn chro ni za tion re-sets automatic synchronization. For more in for ma tion, see "Synchronizing Information" in ActiveSync Help on your desktop computer.
Chapter 8Internet, entertainment and more8.1 Internet Explorer8.2 Media Player8.3 Calculator8.4 Modem link8.5 Games
         Smartphone User Manual8. Internet and fun1288.1  Internet ExplorerUsing Pocket Internet Explorer (IE), you can browse the Web on your Smartphone. Pocket IE supports HTML (Hypertext Markup Lan guage), cHTML (com pact Hypertext Markup Language), and WAP (Wireless Application Pro to col). It also supports JScript, ActiveX con trols, and CSS (cascading style sheets). The browser supports images and sounds, but it does not sup port frames on a Web page.Navigating in Pocket IE1  To open Internet Explorer: On the Home screen, select Start and then Internet Explorer.2  To disconnect from the Internet: Press the End key.3  To View a favorite:a.  On the Home screen, select Start.b.  Select Internet Explorer.c.  If the Favorites list does not appear, select Favorites.d.   Scroll to a favorite and select Go.4  To go to a link: Select the link. (Scroll vertically or horizontally to see all avail able links.)
Smartphone User Manual8. Internet and fun1295  To go to a Web page:a.  On the Home screen, select Start.b.  Select Internet Explorer.c.  Select Menu and then Address Bar.d.   Enter the Web address and select Go.6  To return to a Web page you visited in the same session: On a Web page, press the Back key re peat ed ly until the page appears.7  To view a list of recently-visited Web pages:a.  On the Home screen, select Start.b.  Select Internet Explorer.c.  Select Menu and then Address Bar.d.  Select View History.e.  To go to a Web page on the History list, scroll to the Web page address and select Go.While you are connected to the Internet, you can change between Pocket Internet Explorer and other programs on your Smartphone by pressing the Home key and nav i gat ing to the program you want. This does not close your Internet connection. To return to the Web page you were viewing, press the Back key.
         Smartphone User Manual8. Internet and fun130Using the Favorites listIf you see a Web page you want to visit another time, mark it as a favorite. The next time you want to visit that Web page, you can select it from your Favorites list.1  To add a Web page to the Favorites list:a.  On the Home screen, select Start.b.  Select Internet Explorer.c.  Select Menu and then Add Favorite.d.  In Name, enter a name for the Web site.e.  In Address, enter the Web page address.f.    In Folder, scroll to select a folder for this favorite.g.  Select Add.2  To edit a favorite:a.  On the Home screen, select Start.b.  Select Internet Explorer and then Favorites.c.   Scroll to the favorite to edit.d.  Select Menu and then Edit.e.   Make your changes and select Done.3  To delete a favorite:a.  On the Home screen, select Start.b.  Select Internet Explorer and then Favorites.
Smartphone User Manual8. Internet and fun131c.   Scroll to the favorite to delete.d.  Select Menu and then Delete.4  To create a new folder in Favorites:a.  On the Home screen, select Start.b.  Select Internet Explorer and then Favorites.c.  Select Menu and then Add Folder.d.  In Name, enter a name for the folder.e.  Select Add. Refreshing Web pagesThe Smartphone caches the Web pages that you view and stores them until the cache is full. It then replaces the oldest pages with new pages. If you go to a page that is cached on your Smartphone, you see the stored version unless you refresh the page to see the latest version.1   On the Home screen, select Start.2   Select Internet Explorer. 3  If you want to refresh a page other than the one displayed, in your Favorites or History list, scroll to the Web page and select Go. 4   Select Menu and then Refresh.Customizing Pocket Internet ExplorerYou can customize Web browsing options, change the net- work to connect to, and make more memory available on your Smartphone by clearing stored cookies and Web pag es.1  On the Home screen, select Start.2  Select Internet Explorer.3  Select Menu and then Options.
         Smartphone User Manual8. Internet and fun1324  Select General.5   Select the options you want, as described in the following table, and select Done.IE options FunctionsGeneral Enables you to change the way Web pages are downloaded and displayed. For example, you can choose to omit displaying images, turn off sound, fi t the Web page to the screen, request a warning before viewing unsecure Web pages, allow cookies, or change the language.Connections Enables you to change the network to connect to.  For example, change from "The Internet" to "Work".Memory Enables you to clear temporary Internet fi les cookies, and your Web history.
Smartphone User Manual8. Internet and fun133Disconnecting from the InternetTo stop downloading something:a.  On the Home screen, press and hold Home until the quick menu appears.b.  Select Disconnect GPRs, then press Select.c.   To reconnect press Connect GPRS, then Select.8.2  Media PlayerUsing Windows Media Player 7.0 or later, you can play Win dows Media audio and video fi les and MP3 audio fi les on your Smartphone. You can also copy digital music and video directly from your desktop computer to your Smart-phone by using either Windows Media Player or Microsoft ActiveSync. For more information about copying fi les by using Win dows Media Player, see Media Player Help on your desktop com- put er. For more information about copying fi les by us ing Ac-tiveSync, see ActiveSync Help on your desktop computer.Playing fi les1  To select and play a file: a.  On the Home screen, select Start.b.  Select More and then Windows Media.
         Smartphone User Manual8. Internet and fun134c.   Scroll to the fi le to play and select Play.2  To start and stop playing a file: Press the Action key.3  To adjust the volume of a playing file: Use the Volume control to increase or decrease the volume while a fi le is playing.4  To configure playback settings:a.  On the Home screen, select Start.b.  Select More and then Windows Media.c.  Select Menu and then Settings.d.  In Volume, scroll to select the default volume: 0 is silent and 10 is maximum volume.e.  To repeat fi les as soon as they fi nish playing, select Repeat.f.    To randomly shuffl e the fi les that play, select Shuffle.g.  To play files while using another program, select Background play.h.  Select Done.
Smartphone User Manual8. Internet and fun1355  To skip to the beginning of the current file: Press the left direction key.6  To skip to the beginning of the previous file in the Local Content list: Press the left direction key twice quickly.7  To skip to the next file in the Local Content list: Press the right direction key.8  To play a streaming media file on a network:a.  On the Home screen, select Start.b.  Select More and then Windows Media.c.  Select Menu and then Open URL.d.   Enter the Web page address and select Play.9  To play files randomly:a.  On the Home screen, select Start.b.  Select More and then Windows Media.c.  Select Menu and then Settings.d.  Select Shuffle and then Done.10 To play files repeatedly: a.  On the Home screen, select Start.b.  Select More and then Windows Media.c.  Select Menu and then Settings.d.  Select Repeat and then Done.
         Smartphone User Manual8. Internet and fun13611  To stop playback when using another program:a.  On the Home screen, select Start.b.  Select More and then Windows Media.c.  Select Menu and then Settings.d.  Select Background play and then Done.12 To return to a Web page you visited in the same session: On a Web page, press the Back key re peat ed ly until the page appears.13 To add a streaming media file to Favorites: a.  In Windows Media, select Open URL in Menu. b.   Enter the Web page address. Select Play. c.  Select Menu and then Add to Favorites.14 To play a Favorite: a.  In Windows Media, select Menu. b.  Select Favorites. c.   Scroll to a fi le, select Menu and then Play.15 To delete a Favorite: a.  In Windows Media, select Menu. b.  Select Favorites. c.   Scroll to a fi le, select Menu and then Delete.Menu options when playing a fi leWhile a fi le is playing, select Menu and then you may use the menu commands as described in the following table.
Smartphone User Manual8. Internet and fun137Options FunctionsPlay/Stop To play or stop playback of the current fi le.Next To skip to the next fi le or the current play list.  This command is not available if the last fi le is the current selection.Memory To skip to the beginning of the current fi le on the current play list.  If no fi le is playing, this command skips to the previous fi le on the current play list.Open URL To play a streaming media file on a network (for example, content streamed from an Internet radio station.)Properties To display information about the fi le that is playingSettings To display the Setting screen, from which you can adjust the volume and specify various playback options.Add to Favorites To add a file that is playing to Favorites.
         Smartphone User Manual8. Internet and fun138Supported fi le formatsMedia Player supports the following fi le formats.Supported audio and video codecsMedia Player can play fi les that have been compressed by using any of the following audio and video codecs.1  Audio codecs: a.  Microsoft Windows Media Audio codec ver sion 2.0, 7.0, and 8.0b.   Fraunhofer IIS-A MPEG-1 Audio Layer-3 codec 2  Video codecs:a.   Microsoft Windows Media Video codec ver sion 7.0 and 8.0b.   Microsoft MPEG-4 video codec version 3.0c.   ISO MPEG-4 video codec version 1.0Understanding licensesSome digital media content from the Internet, CD tracks, and videos have associated licenses that protect them from being unlawfully distributed or shared.To ensure that the license is copied with the content, use the Portable Device (or Copy to CD or Device) feature in Windows Media Player 7.0 or later on your desk top com put er to copy content to your Smartphone. For more information about copying content to your Smartphone and other portable devices, see the Windows Media Player Help on your desktop computer.Format File name extensionsWindows Media.asf, .asx, .wax, .wm, .wma, .wmv, .wmx, .wvxMoving Picture .mp3Experts Group (MPEG)
Smartphone User Manual8. Internet and fun1398.3  CalculatorCalculator performs basic arithmetic, such as addition, sub trac tion, multiplication, and division.1  To perform a calculation:a.  On the Home screen, select Start.b.  Select More and then Accessories.c.  Select Calculator.d.  Enter the fi rst number of the formula by using the key pad.e.  Select Options and then the type of calculation to per form: Add, Subtract, Multiply, Divide, or Decimal Point.f.    Enter the second number of the formula.g.  Select Options and then Equals.2  To scroll through the available mathematical symbols: Press the # key. 3  To enter a decimal point: Press the * key.4  To display the available mathematical symbols: Use the navigation stick. Press up for the plus sign (+), down for the minus sign (-), left for the division sign (/), and right for the mul ti pli ca tion sign (X).5  Clear a displayed number or calculation: Select Clear. 6  Clear the last digit entered: Press the Back key. 8.4  Modem linkUsing Modem Link, you can use your Smartphone as an external modem for another device or computer by using a serial port, infrared, bluetooth or USB connection
         Smartphone User Manual8. Internet and fun1401  To set up an infrared or USB modem connection:a.  Ensure that your Smartphone is not connected to an oth er device.b.  On the Home screen, select Start.c.  Select More and then Accessories.d.  Select Modem Link.e.  In Connection, select USB or IrCOMM.f.    Select Menu and then Activate.2  To set up a serial port modem connection:a.  Ensure that your Smartphone is not connected to an oth er device.b.  On the Home screen, select Start.c.  Select More and then Accessories.d.  Select Modem Link.e.   In Connection, select Serial (COM1).f.    Select Menu and then Activate.The default baud rate is set for 115,200. Do not change this default unless the port speed of the Smartphone or com put er requires you to do so.3  To activate the modem link:a.  On the Home screen, select Start.b.  Select More and then Accessories.c.  Select Modem Link.d.  Select Menu and then Activate.4  To deactivate the modem link:a.  On the Home screen, select Start.b.  Select More and then Accessories.c.  Select Modem Link.d.  Select Menu and then Deactivate.Failing to deactivate the modem link when you are fi nished using it might result in problems with using ActiveSync in the same session.
Smartphone User Manual8. Internet and fun1418.5  Games JawbreakerThe object of Jawbreaker is to clear out all the balls. The rule is that you may only clear out adjacent same-colored balls. The score depends on the number of the balls you clear out at every move. Score equation:   S = B * (B-1)   S: Score per move   B: Number of balls you clear outFor example, you score 30 points for clearing out 6 balls at one move.1  To start a game of Jawbreaker:a.  On the Home screen, select Start.b.  Select More, select Games, and then select Jawbreaker.2  To start a new game: In Jawbreaker, select the New soft key.3  To score: Navigate to the ball you want to clear and press the navigation stick.
         Smartphone User Manual8. Internet and fun142 SolitaireThe object of Solitaire is to use all the cards in the deck to build up the four suit stacks in ascending order, beginning with the aces. You win the game when all cards are on the suit stacks.1  To start a game of Solitaire:a.  On the Home screen, select Start.b.  Select More, select Games, and then select Solitaire.2  To start a new game: In Solitaire, select the Menu soft key and then select New Game.3  To move cards: A number or character is displayed above each card stack. On the keypad, press the number or character of the card to move, and then press the number or char ac ter of the stack to which you want to move the card.Pressing the up direction key moves a card to one of the four stacks in the upper right corner of the screen if it belongs there. For example, if an ace appears in one of the lower stacks, press the number above it, and then press the Up direction key.4  To play Solitaire:a.  Move any aces on the seven stacks to the four card spaces at the top of the screen, and then make any other available plays.b.  When you have made all available plays, press the Draw soft key to turn over cards.The card that is face up on the deck is always available for play.
AppendixRegulatory NoticesSpecifi cationsIndexIndex
         Smartphone User ManualAppendix  144Regulatory NoticesAgency Identifi cation NumbersFor regulatory identification purposes your product is assigned a model number SV10A.The following accessories have been evaluated for use with your device. Their assigned model numbers listed below can identify these approved accessories. To ensure continued reliable and safe operation of your Smartphone, use only the accessories listed below with your SV10A.This product is intended to be used with certifi ed class 2, limited power source, rated 5 V dc, minimum 1A power supply unit.European Union NoticeProducts with CE marking comply with the R&TTE Directive (99/5/EC), the EMC Directive (89/336/EEC) and the Low Voltage Directive (73/23/EEC) issued by the Commission of the European Community.Compliance with these directives implies conformity to the following European Norms (in brackets are the equivalent international standards):    EN 60950 (IEC 60950) - Safety of Information Technology EquipmentETSI EN 301 489-7 - Electromagnetic compatibility and Radio spectrum Matters (ERM); ElectroMagnetic Compatibility (EMC) for radio equipment and services; Paer 7: Specific conditions for mobile and portable radio and ancillary equipment of digital cellular radio
Smartphone User ManualAppendix145telecommunications systems (GSM and DCS)ETSI EN 301 511 – Global System for Mobile communications (GSM); Harmonized standard for mobile stations in the GSM 900 and DCS 1800 bands covering essential requirements under article 3.2 of the R&TTE directive (1999/5/EC)ANSI/IEEE C.95.1-1992- specifi c absorption rate in mobile phone emission condition for body healthFCC part 15 - Radio Frequency Devices and part 24 – Personal Communications ServicesEN 50360 - 2001– Product standard to demonstrate the compliance of mobile phones with the basic restrictions related to human exposure to electromagnetic fi elds (300 MHz – 3 GHz) SAR: 0.779mW/1gETSI EN 301 489-1 Electromagnetic compatibility and Radio spectrum Matters (ERM); ElectroMagnetic Compatibility (EMC) standard for radio equipment and services; Part 1: Common technical requirementsETSI EN 301 489-17 Electromagnetic compatibility and Radio spectrum Matters (ERM); ElectroMagnetic Compatibility (EMC) standard for radio equipment and services; Part 17: Specifi c conditions for 2.4 GHz wideband transmission systems and 5 GHz high performance RLAN equipmentETSI EN 300 328 Electromagnetic compatibility and Radio spectrum Matters (ERM); Wideband Transmission systems; data transmission equipment operating in the 2.4 GHz ISM band and using spread spectrum modulation techniques
         Smartphone User ManualAppendix  146Federal Communications Commission NoticeThis equipment has been tested and found to comply with the limits for a Class B digital device, pursuant to Part 15 of the FCC Rules. These limits are designed to provide reasonable protection against harmful interference in a residential installation. This equipment generates, uses, and can radiate radio frequency energy and, if not installed and used in accordance with the instructions, may cause harmful interference to radio communications. However, there is no guarantee that interference will not occur in a particular installation. If this equipment does cause harmful interference to radio or TV reception, which can be determined by turning the equipment on and off, the user is encouraged to try to correct the interference by one or more of the following measures:    Reorient or relocate the receiving antenna.     Increase the separation between the equipment and receiver.    Connect the equipment into an outlet on a circuit different from that to which the receiver is connected.    Consult the dealer or an experienced radio or television technician for help.Modifi cationsThe FCC requires the user to be notifi ed that any changes or modifi cations made to the device that are not expressly approved by High Tech Computer Corporation may void the Reference authority to operate the equipment.
Smartphone User ManualAppendix147Important Safety InformationRetain and follow all product safety and operating instructions. Observe all warnings on the product and in the operating instructions.To reduce the risk of bodily injury, electric shock, fire, and damage to the equipment observe the following precautions.Safety Precautions for RF ExposureTests for SAR are conducted using standard operating positions specifi ed by the FCC with the phone transmitting at its highest certifi ed power level in all tested frequency bands. Although the SAR is determined at the highest certifi ed power level, the actual SAR level of the phone while operation can be well below the maximum value. This is because the phone is designed to operate at multiple power levels so as to use only the power required to reach the network. In general, the closer you are to a wireless base station antenna, the lower the power output. Before a phone model is available for sale to the public, it must be tested and certifi ed to the FCC that it does not exceed the limit established by the government-adopted requirement for safe exposure. The tests are performed in positions and locations (e.g., at the ear and worn on the body) as required by the FCC for each model. (Body-worn measurements may differ among phone models, depending upon available accessories and FCC requirements). While there may be differences between the SAR levels of various phones and at various positions, they all meet the government requirement for safe exposure. For body worn operation, to maintain compliance with FCC RF exposure guidelines, use only High Tech Computer, Corp. approved accessories. When carrying the phone while it is on, use the specifi c High Tech Computer, Corp.-supplied or approved carrying case, holster, or other body-worn accessory.
         Smartphone User ManualAppendix  148    Use  of  non-High Tech Computer, Corp.-approved accessories may violate FCC RF exposure guidelines and should be avoided.    Heed service markings: Except as explained elsewhere in the Operating or Service documentation, do not service any product yourself. Service needed on components inside these compartments should be done by an authorized service technicians or provider.Damage requiring service: Unplug the product from the electrical outlet and refer servicing to an authorized service technicians or provider under the following conditions:Liquid has been spilled or an object has fallen into the product.The product has been exposed to rain or water.The product has been dropped or damaged.There are noticeable signs of overheating.The product does not operate normally when you follow the operating instructions.Avoid hot areas: The product should be placed away from heat sources such as radiators, heat registers, stoves, or other products (including amplifi ers) that produce heat.Avoid wet areas: Never use the product in a wet location.Avoid pushing objects into product: Never push objects
Smartphone User ManualAppendix149of any kind into cabinet slots or other openings in the product. Slots and openings are provided for ventilation. These openings must not be blocked or covered.Mounting Accessories: Do not use the product on an unstable table, cart, stand, tripod, or bracket. Any mounting of the product should follow the manufacturer’s instructions, and should use a mounting accessory recommended by the manufacturer.Avoid unstable mounting: Do not place the product with an unstable base. Use product with approved equipment: This product should be used only with personal computers and options identifi ed as suitable for use with your equipment.Adjust the volume: Turn down the volume before using headphones or other audio devices.Cleaning:  Unplug the product from the wall outlet before cleaning. Do not use liquid cleaners or aerosol cleaners. Use a damp cloth for cleaning, but NEVER use water to clean an LCD screen.
         Smartphone User ManualAppendix  150Safety Precautions for Power Supply UnitUse the correct external power source: A product should be operated only from the type of power source indicated on the electrical ratings label. If you are not sure of the type of power source required, consult your authorized service provider or local power company. For a product that operates from battery power or other sources, refer to the operating instructions that are included with the product. Handle battery packs carefully: This product contains a Lithium ion battery. There is a risk of fi re and burns if the battery pack is handled improperly. Do not attempt to open or service the battery pack. Do not disassemble, crush, puncture, short external contacts or circuits, dispose of in fi re or water, or expose a battery pack to temperatures higher than 60°C (140°F).Exposure to Radio Frequency (RF) SignalsYour wireless phone is a radio transmitter and receiver. It is designed and manufactured not to exceed the emission limits for exposure to radio frequency (RF) energy set by the Federal Communications Commission of the U.S. Government. These limits are part of comprehensive guidelines and establish permitted levels of RF energy for the general population. The guidelines are based on the safety standards previously set by both U.S. and international standards bodies: • American National Standards Institute (ANSI) IEEE. C95.1-1992• National Council on Radiation Protection and Measurement (NCRP). Report 86. 1986
Smartphone User ManualAppendix151• International Commission on Non-Ionizing Radiation Protection (ICNIRP) 1996• Ministry of Health (Canada), Safety Code 6. The standards include a substantial safety margin designed to assure the safety of all persons, regardless of age and health.The exposure standard for wireless mobile phones employs a unit of measurement known as the Specifi c Absorption Rate, or SAR. The SAR limit set by the FCC is 1.6W/kg *.     *In the U.S. and Canada, the SAR limit for mobile phones used by the public is 1.6 watts/kg (W/kg) averaged over one gram of tissue. The standard incorporates a substantial margin of safety to give additional protection for the public and to account for any variations in.    Your smartphone contains a lithium-ion battery pack. There is a risk of fi re and burns if the battery pack is handled improperly. Do not disassemble, crush, puncture, short external contacts, or dispose of in fi re or water. Do not attempt to open or service the battery pack. Replace only with the battery pack designated for this product. Dispose of batteries properly. Do not dispose with your regular trash.
         Smartphone User ManualAppendix  152Safety PrecautionsSAFETY IN AIRCRAFT: This product can cause interference to an aircraft's navigation system and network. In most countries it is against the law to use this product on board an airplane.ENVIRONMENTAL SAFETY: Do not use this product in gas stations, fuel stores, chemical plants and locations containing explosives.ROAD SAFETY: Vehicle drivers in motion are not permitted to use handheld telephony services, except in emergency. In some countries, using hands-free devices as an alternative  is allowed.MEDICAL EQUIPMENT SAFETY: This product may cause medical equipment malfunction. In most hospitals or medical centers use of this product is forbidden.Tips When UsingAvoid using the product near metal structures (for example, the steel frame of a building).Avoid using the product near strong electromagnetic sources, such as microwave ovens, sound speakers, TV and radio.Avoid using this product after a dramatic change in temperature.
Smartphone User ManualAppendix153Specifi cations          System InformationProcessor    TI Perseus 1, 132 MHzMemory   - ROM    32MB (Standard)     - RAM    32MB (Standard) SDRAM Operating System Microsoft  Pocket PC2003 phone       edition  DisplayType     Transfl ective 2.2 inchTFT-LCD Resolution    176 x 220 at  64K colorsGSM/GPRS Tri-Band ModuleGSM900    880 ~ 915, 925 ~960 MHzDCS1800    1710 ~ 1785, 1805 ~ 1880 MHzDCS1900    1850 ~ 1910, 1930 ~ 1990 MHzExpansion SlotsSD / MMC Slot    Supports SD and MMC, Input /       OutputConnectionInfrared  IrDA SIRI/O port    22-pin individual port for        signals (for USB, Serial, and power)
         Smartphone User ManualAppendix  154Audio     Stereo headphone jack (2.5£r)Bluetooth   Class 2 transmit powerControls and LightsNavigation    5-way navigation padButtons   2 Soft keys   Back   Home   Camera      2 phone function : Call, End      Volume control button (up, down)      Power on / off   One dialing keypadLights   Event notifi cation   Charge status   GSM/GPRS signals   Bluetooth connectionAudioMicrophone/Speaker  Built-in microphone and 3-in-1     speaker Headphone   MP3 stereoPower SupplyBattery   1,000mAh (typical) Lithium ion     removable, rechargeable
Smartphone User ManualAppendix155IndexAAccessibility  41ActiveSync  38,40alarm  42Album  40alert  41Ambience  39area codes  37Assign Members  89attachments  61Bbackground  39backlight  42battery  44battery level  43beam  41,45Bluetooth  44bond  45CCalculator  108Caller ID  36Call Forwarding  36Call Waiting  36Camera  36Capturing  37Car  39Certifi cates  41Cool effects  39currency formatting  43DDefault Photos  89Detailed view  41Dial-up  47display  43Display Settings  88Ee-mail  52e-mail address  42Ffont size  41GGames  110Gamma  39GPRS  47Grayscale  39HHome screen  39Hue  39Iimage capture size  39Image fi lename prefi x  40Inbox  66Inserting predefi ned text  54Inserting voice recordings  54Installing ActiveSync  89Instant messaging  69Internet Explorer  100JJawbreaker  110LLandscape  89language  43light conditions  40Loud  38MManage Group  89Media Player  104Meeting  38meeting requests  62message list  58Modem link  108MSN Messenger  69
         Smartphone User ManualAppendix  156multipress  41Oopen a message  59Owner Information  42Ppassword  43phone lock  43Photo Contacts  87picture  37PIN  45Portrait  89Power Management  42Profi les  38proxy connection  48RRefreshing Web pages  103Regional Settings  43Remote synchronization  96renaming  37ring tones  36,37rotating  41Sscreen background  36screen resolution  40Sepia  39Setting up e-mail  50SIM lock  43Slide Show  42Smartdial  41SMS  52Solitaire  110Sounds  37synchronization schedule  93Synchronizing Inbox  97TTemplate  88Thumbnails  41time-out  41time zone  42Vvideo clip  37VPN  47WWhite Balance  39ZZooming  38

Navigation menu