HWASUNG SYSTEM HP-500 Thermal Mobile Printer User Manual
HWASUNG SYSTEM CO., LTD Thermal Mobile Printer
UserManual.wiki
>
HWASUNG SYSTEM
>
HP 500 User Manual
User Manual
Navigation menu
Upload a User Manual
Namespaces
Wiki Guide
HTML
PDF
Info
Views
User Manual
Discussion / Help
Navigation
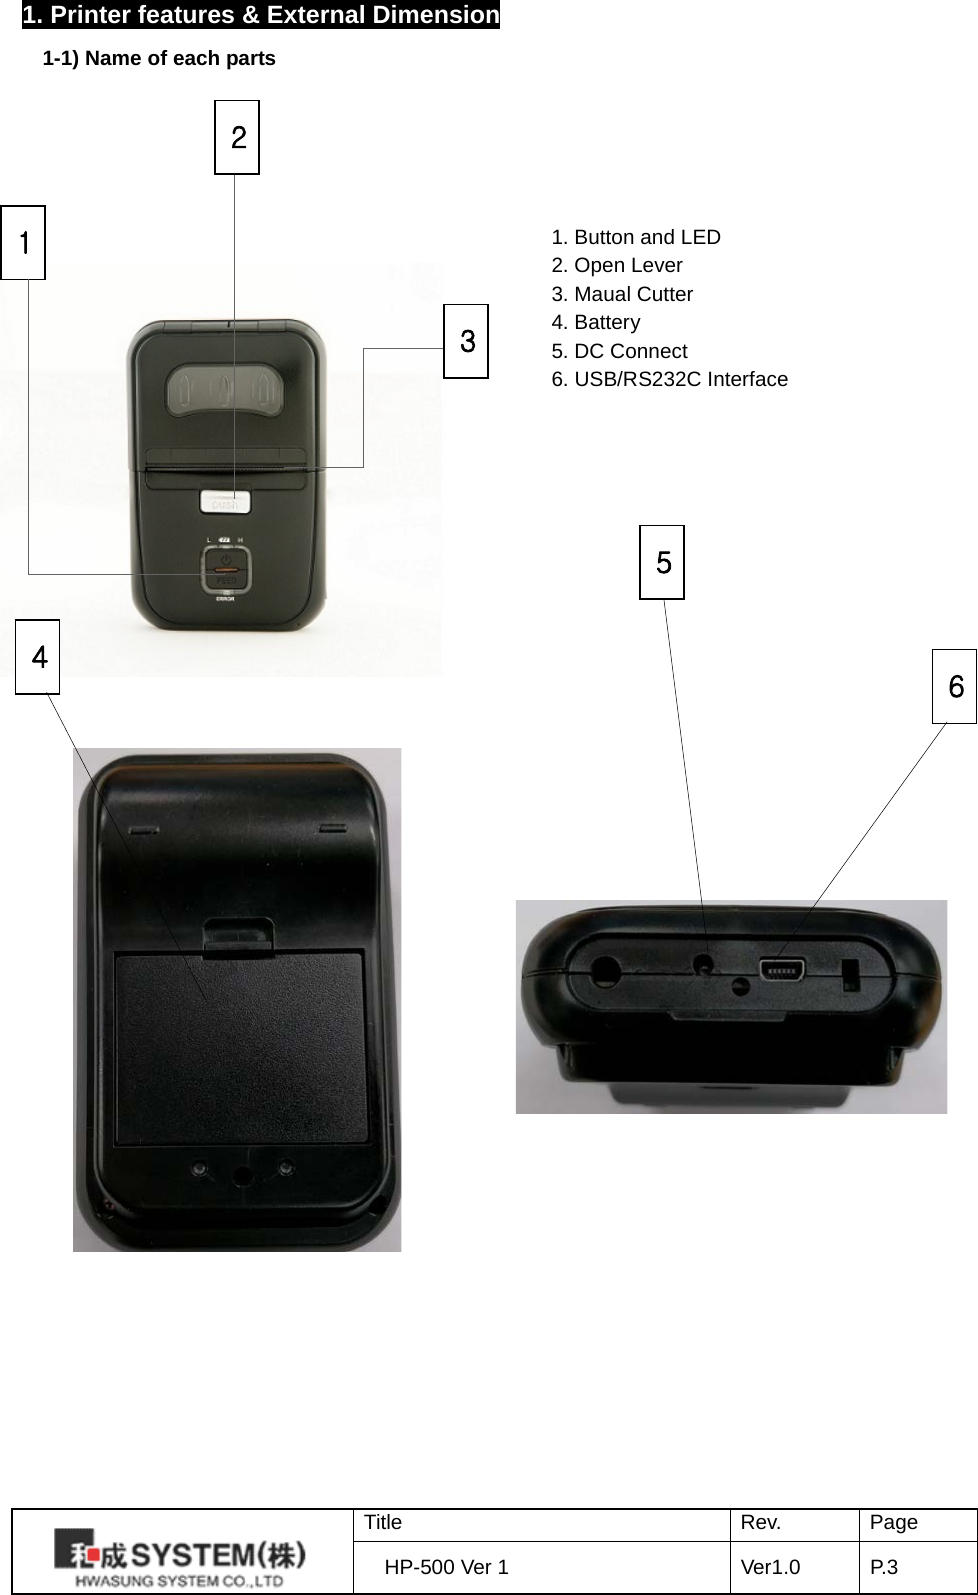
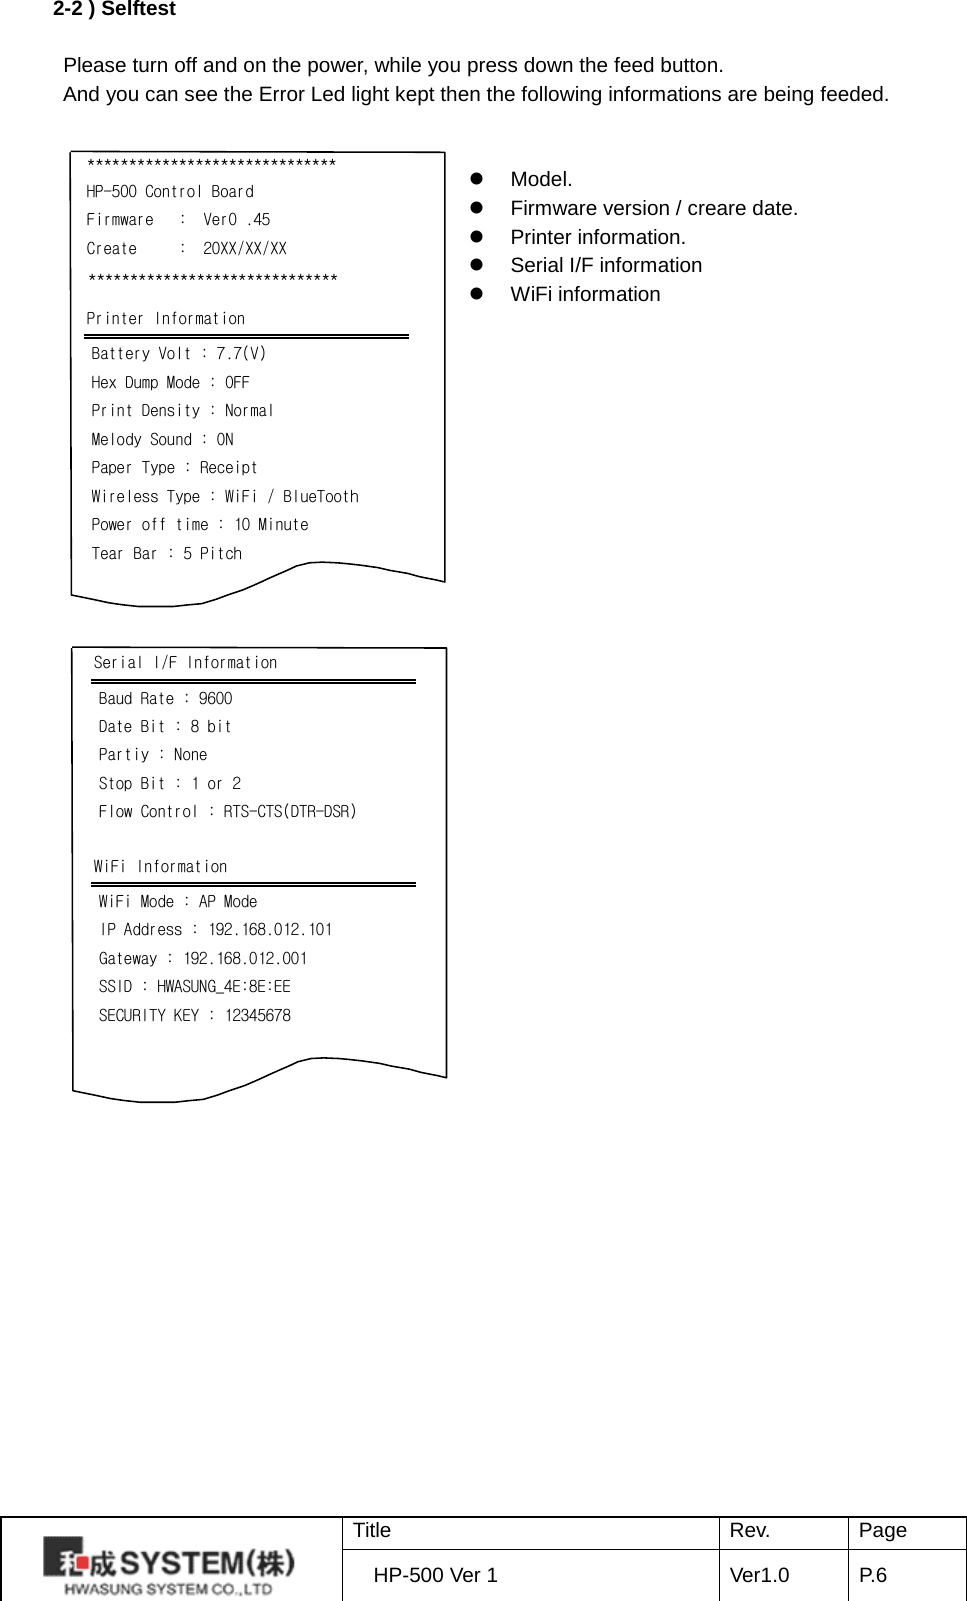
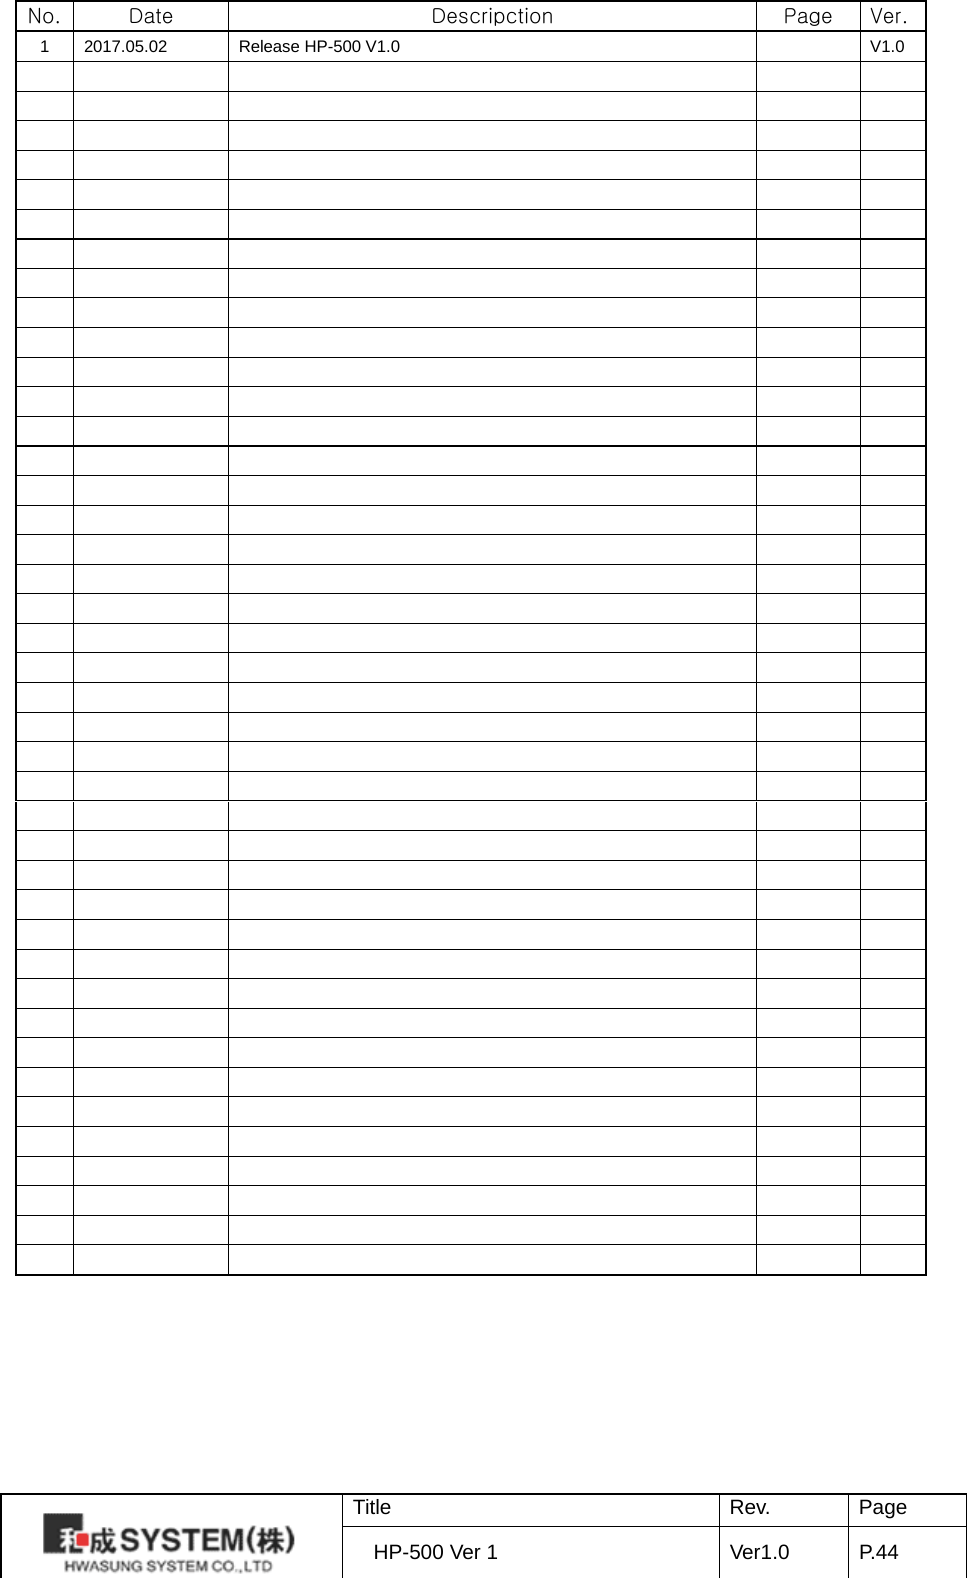
![2-3 ) Communication setting Set the printer function and communication condition between host by memory switch utility program. ※ Note : Setting ereases all contents in memory switch, so code page and print optionshall be set again. 1 ) Manual setting Turn on the printer at initial setting mode. ※ Method to go initial setting mode [ Press and hold FEED button and then turn on power pressing 2 or more seconds, then PE LED and ERROR LED blinks by turns and it is switched to initial setting mode (9600 BPS, PARITY NONE, HARDWARE HANDSHAKE).] In manual setting, considering of communication condition is not required. 2 ) After switched to initial setting mode, followings will be printed. . [Menu] 1.Print Density 2.Melody Sound 3.Paper Type 4.Hex Dump Mode 5.Wireless Type 6.WiFi Mode 7.IP Mode Select and then Enter... Enter : Press the feed button once for more than 1second. Select: Press the feed button many times less than 1second as menu number. Exit : Turn power off then on. Pressing FEED button for more than 1second, it is fixed(press enter), and less than 1 second, item is selected. For example, if you want to change the Wifi Mode of #6 menu, press #6 less than 1 second, and press more than 1 second. To exit, turn off the power and turn on again. 3) Successively, select from printed items and confirm. Ex) [Wireless Type] 1.WiFi -> 2.Bluetooth -> : Indicate current set status Select and then Enter... Ex) In here, arrow((->) indicates current settings. To change, select item and enter. TO move to Title Rev. Page HP-500 Ver 1 Ver1.0 P. 7](https://usermanual.wiki/HWASUNG-SYSTEM/HP-500/User-Guide-3507226-Page-8.png)
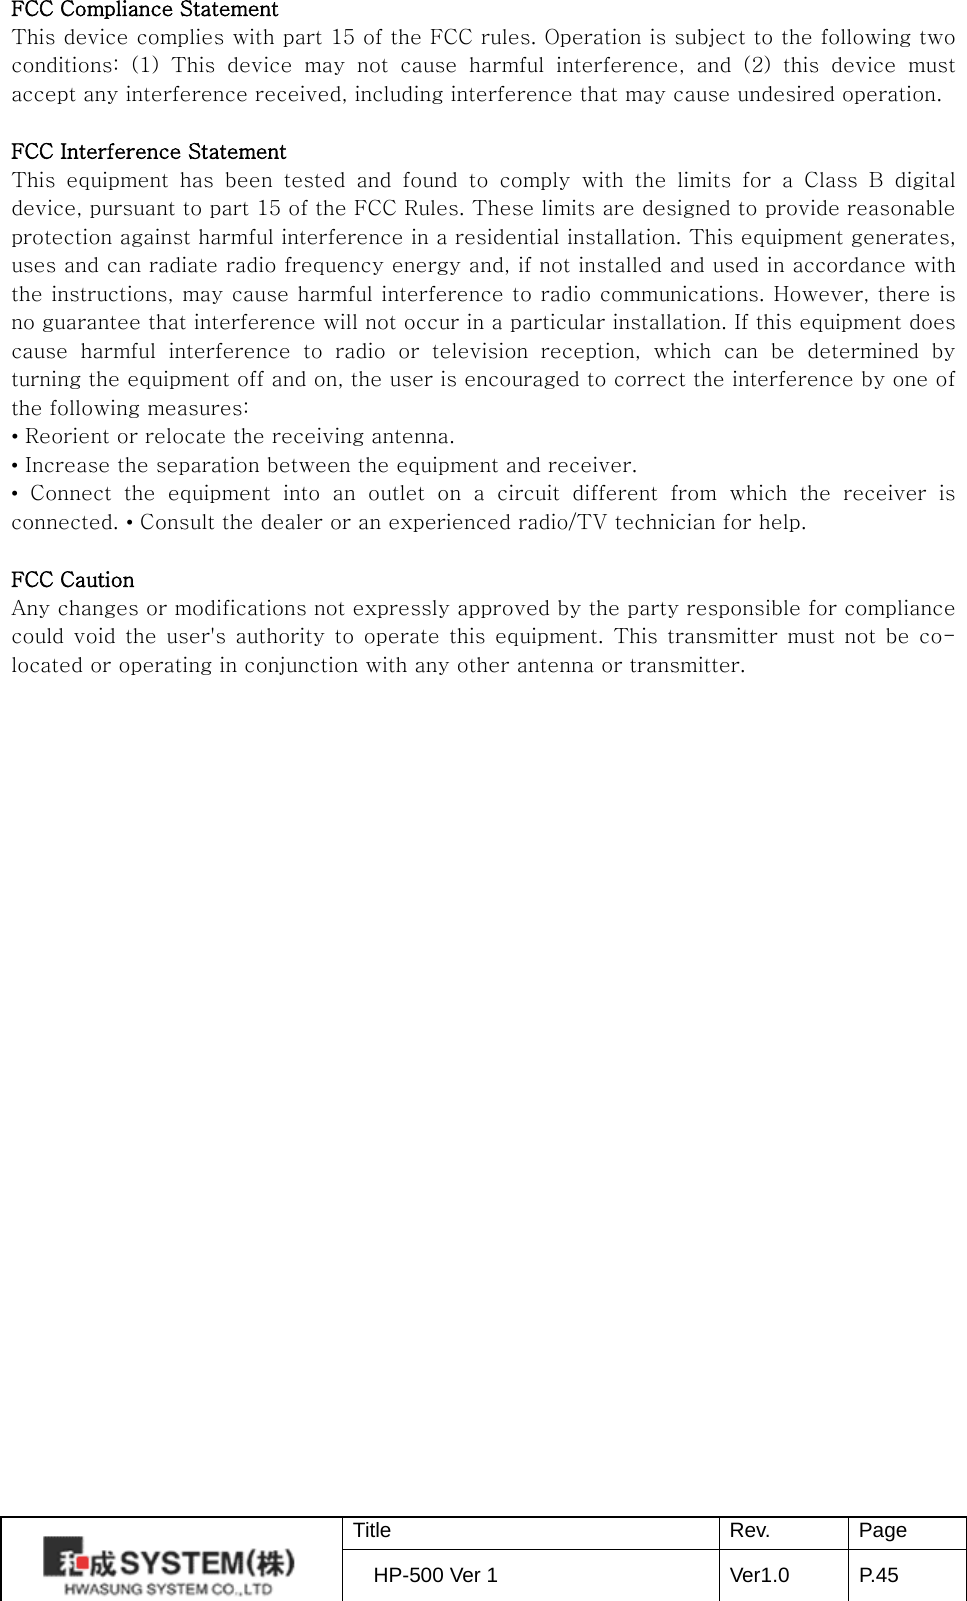
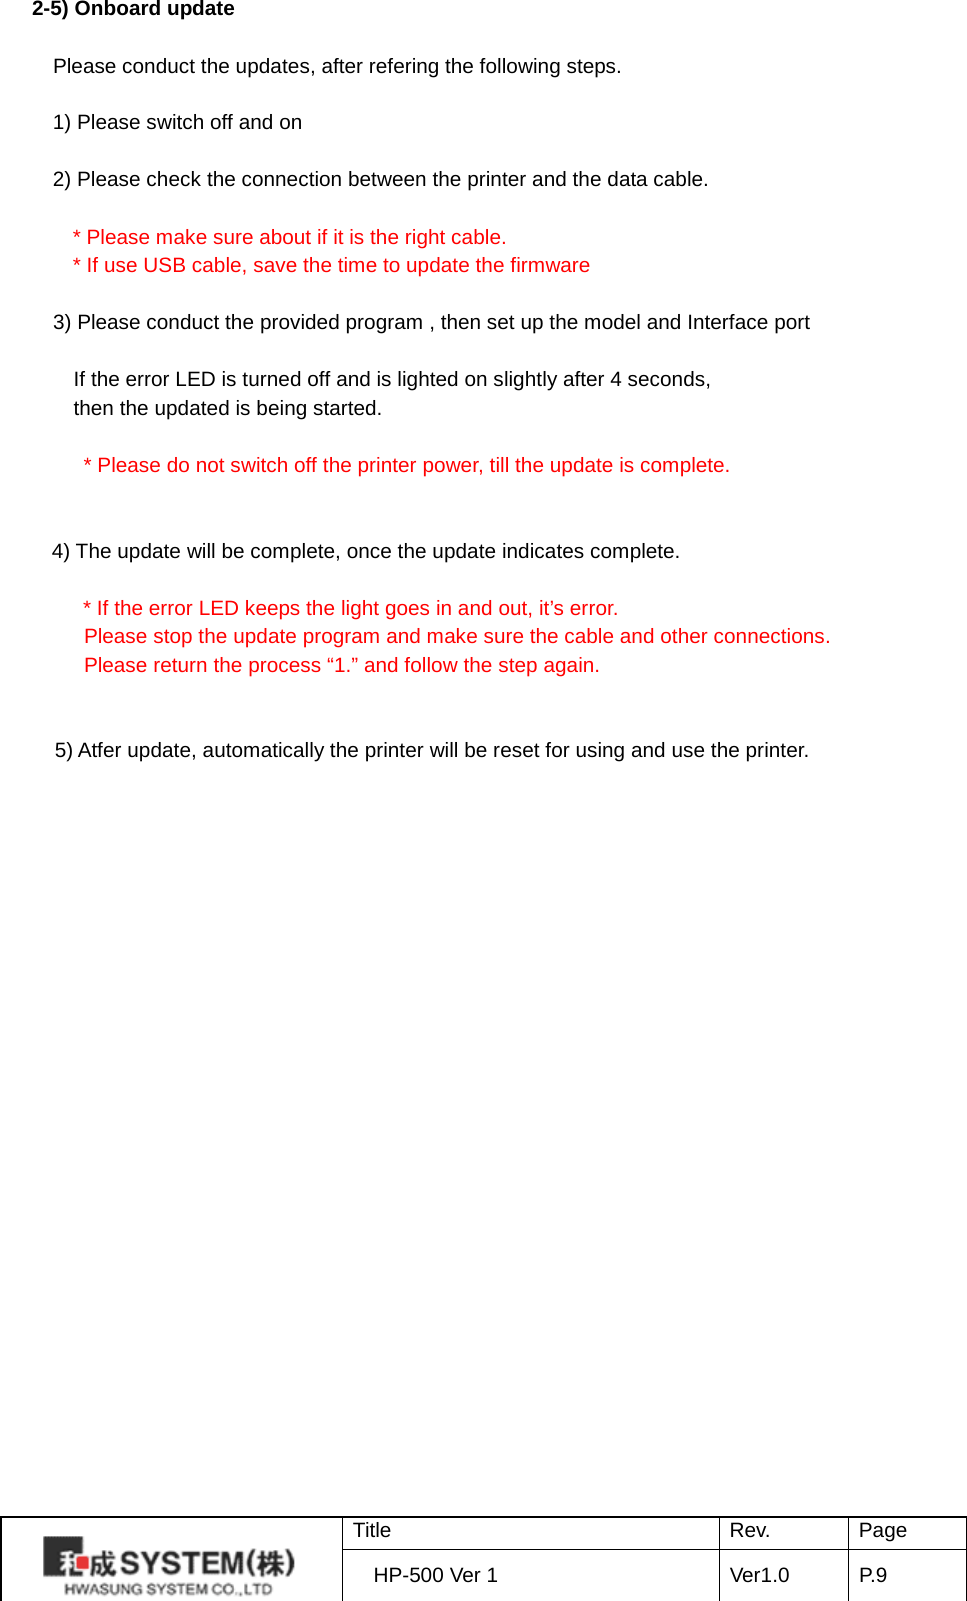
![next menu with no change, just enter without selecting item. 4) Successively, you will know the change result from the printed items. “ It was changed successfully!” This message means change was successful. “ The value is invalid, try again!” This message is shown when selected item is invalid or when you move to other menu without item change. 5) Setting result can be confirmed by printing test page or by the location of arrow(->) after selecting menu item in initial setting mode. 2-4) HEX Dump Setting up “Hex Dump Mode in Setting Mode. Then it prints all data in hex character (16 antilogarithm). You can see the status of receipt. . It will be useful for the appilcation you do. It prints the data, once it receives the data 12 digit. You can print the data less than 12 digit, when you press down the button of feed The control code ( 1F16 below) prints “.”. The 8016 above prints “^”. [Printing sample] 16 antilogarithm ASCII [HEX DUMP MODE] 41 42 43 44 45 46 47 47 49 A B C D E F G H I 30 31 32 33 34 35 36 37 38 0 1 2 3 4 5 6 7 8 FF 1B 69 ^ . i Title Rev. Page HP-500 Ver 1 Ver1.0 P. 8](https://usermanual.wiki/HWASUNG-SYSTEM/HP-500/User-Guide-3507226-Page-9.png)
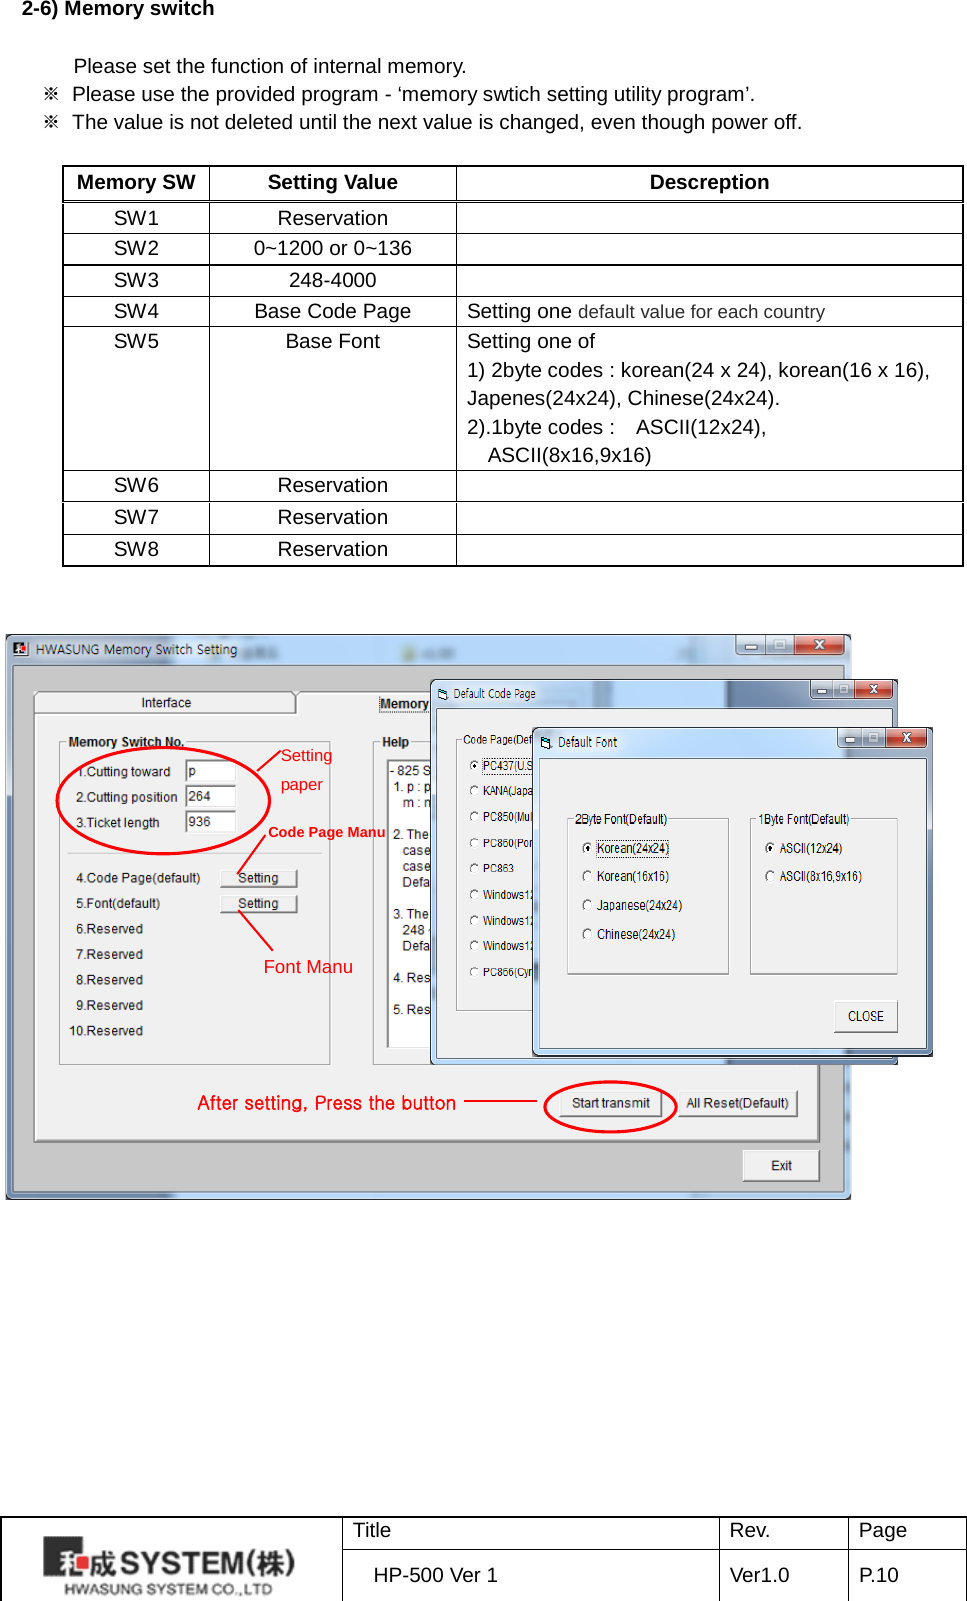
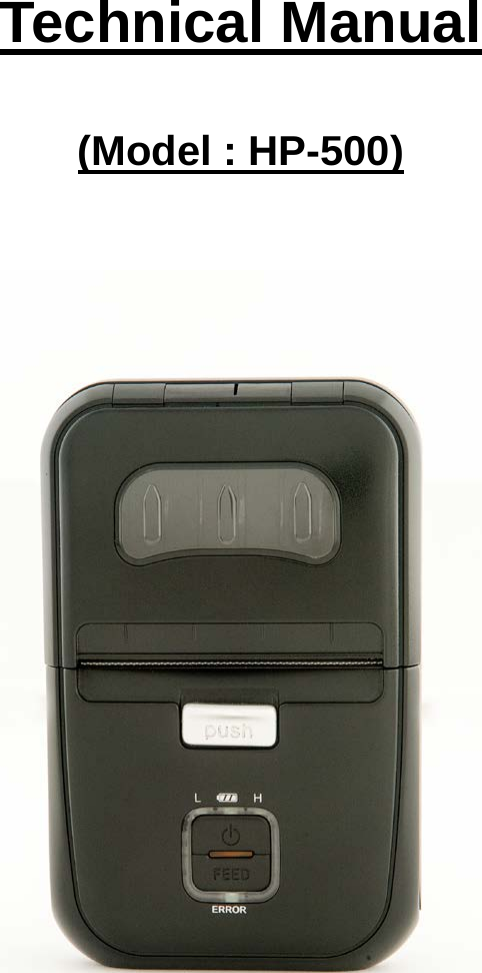
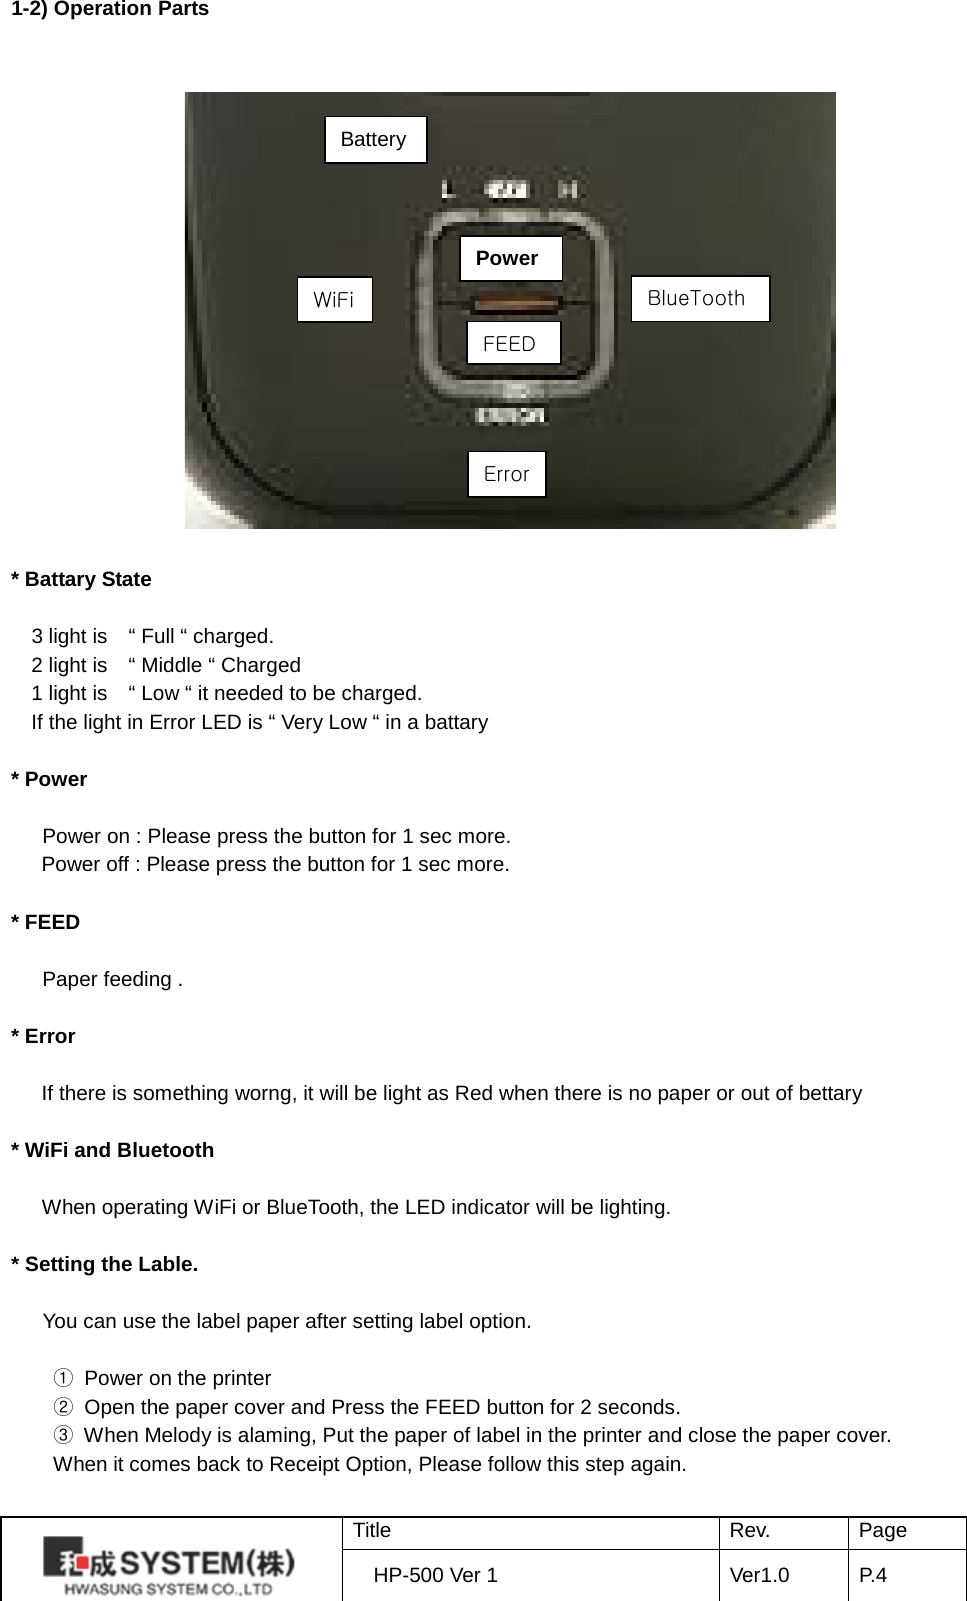
![[Memory Switch information] ================================ Code Page = PC437(U.S) 2Byte Font = Korean(24x24) 1Byte Font = ASCII(12x24) Mem1:FFh Mem2:FFh,FFh Mem3:FFh,FFh Mem4:00h Mem5:00h Mem6:FFh Mem7:FFh Mem8:FFh Mem9:FFh Mem10:FFh Mem11:40h Mem12:F9h (Ex) Sample of printing by selftest Title Rev. Page HP-500 Ver 1 Ver1.0 P. 11](https://usermanual.wiki/HWASUNG-SYSTEM/HP-500/User-Guide-3507226-Page-12.png)
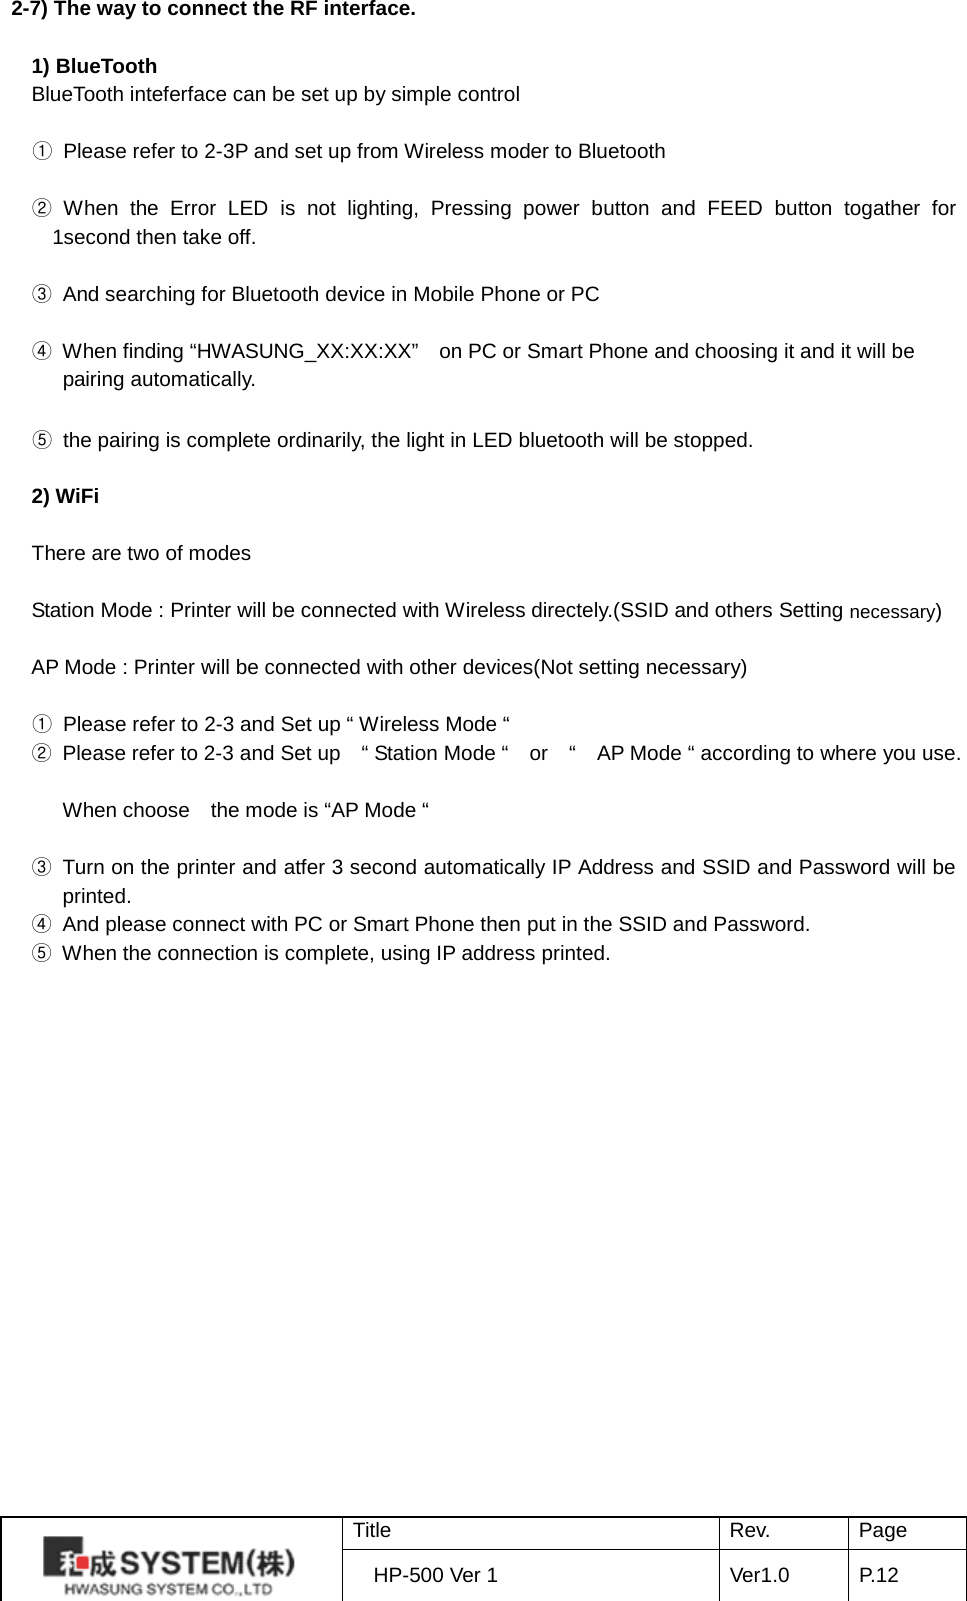

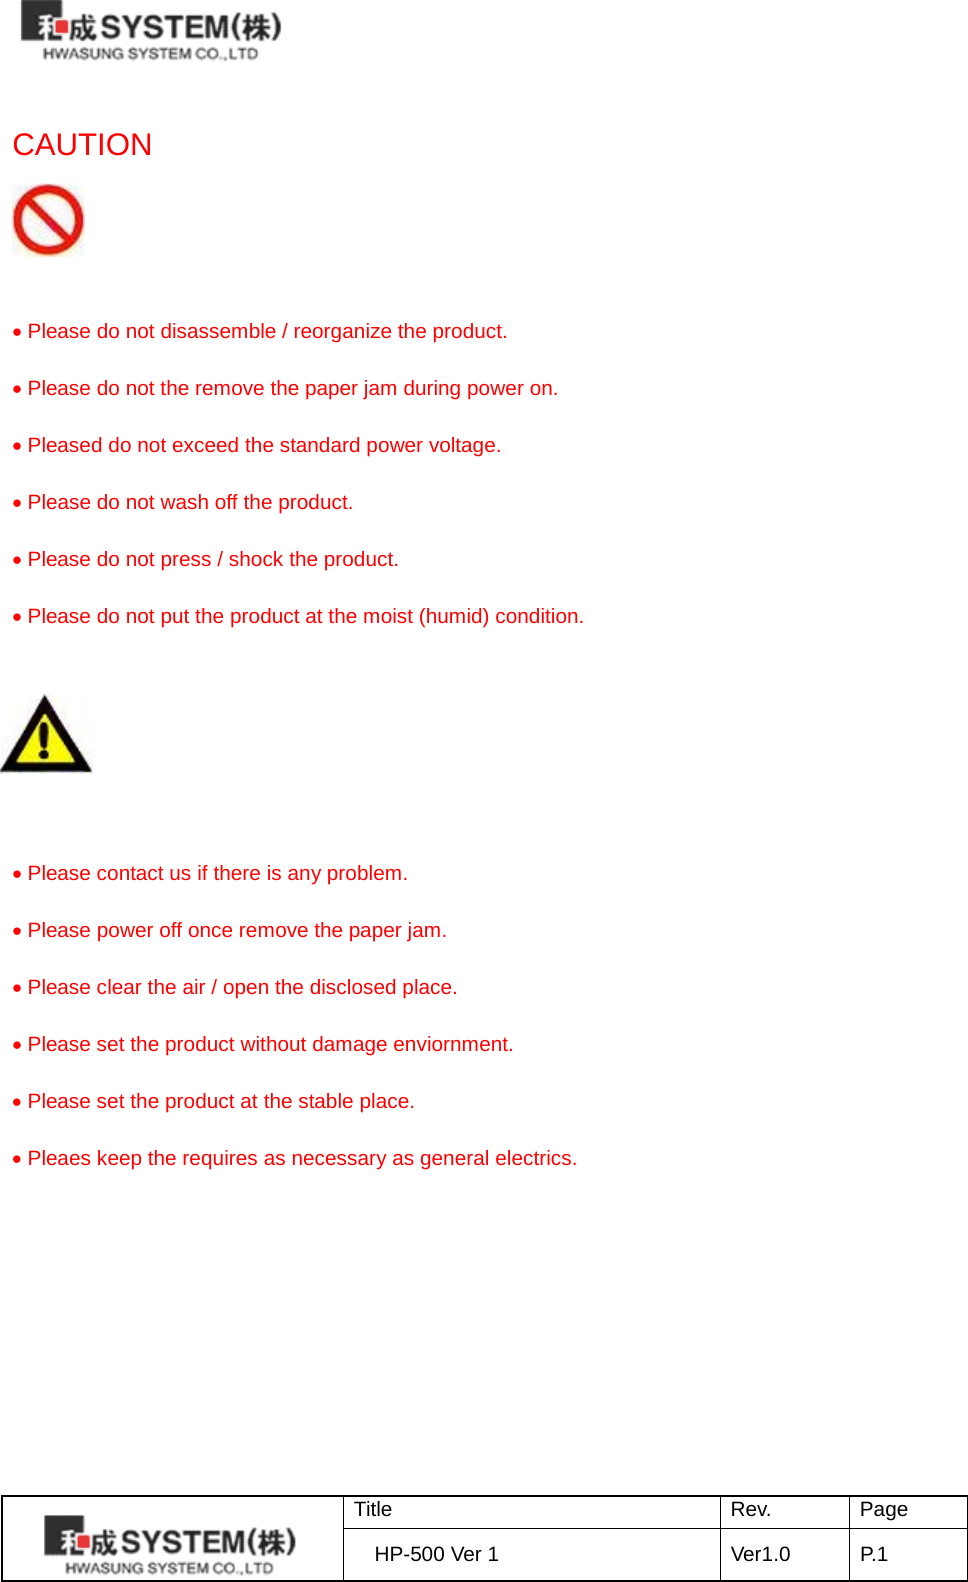
![CR [Name] Print and carriage return [Format] ASCII CR Hex 0Dh Decimal 13 [Range] - [Descript] equal LF LF [Name] Print and line feed [Format] ASCII LF Hex 0Ah Decimal 10 [Range] - [Descript] ① STANDARD MODE: After printing the data and go to return according as the fixed data. ② PAGE MODE: The fixed data can be only conduted, according as the fixed data. [Caution] The LF is ignored behind of CR CAN [Name] Cancel print data in page mode [Format] ASCII CAN Hex 18h Decimal 24 [Range] - [Dsecirpt] The data is deleted within the area of printing. HT [Name] Horizontal tab [Format] ASCII HT Hex 09h Decimal 9 [Range] - [Descript] Moves the print position to the next tab poisition [Caution] Horizontal tab position are to set in ESC+’D’+n. FF [Name] Print and return to standard mode in page mode [Format] ASCII FF Hex 0Ch Decimal 12 [Range] - [Descript] Print the data in the print buffer and returns to standard mode [Caution] Use the command ESC+FF , in order not to return the standard mode. The data is not deleted in the area of page. Title Rev. Page HP-500 Ver 1 Ver1.0 P. 17](https://usermanual.wiki/HWASUNG-SYSTEM/HP-500/User-Guide-3507226-Page-18.png)
![SUB+’x’+n [Name] Extension Graphic Mode, Korean Mode [Format] ASCII SUB x n Hex 1A 78h n Decimal 26 120 n [Range] 0≤n≤1 [Initial Value] n=0 [Descript] n=0 : Korean Mode, First code is A1h more, automatically transfer Korean in 2 bytes n=1 : Extension Graphic Mode, Every code is setting in 1 byte Extension Graphic font will be printed SUB+’p’+n [Name] Off line printing in paper detection [Format] ASCII SUB p n Hex 1A 70h n Decimal 26 112 n [Range] 0≤n≤1 [Initial Value] n=1 [Descript] n=0 : Not transition to offline once paper empty (data communication available) n=1 : Transition to offline once paper empty (data communication not avaiable) SUB+’R’+n [Name] Set the character outline [Format] ASCII SUB b n Hex 1A 52h n Decimal 26 82 n [Range] 0≤n≤1 [Descript] n=0 : cancel character outline (tetragon) n=1 : Set character outline (tetragon). [Caution] The horizontal extension is valid as eight times. The vertical extension is valid as two times SUB+’B’+n1+n2+n3+d1……dk [Name] 2D Barcode. [Format] ASCII SUB B n1 n2 n3 d1…………dk Hex 1A 42h n1 n2 n3 d1…………dk Decimal 26 66 n1 n2 n3 d1…………dk [Range] Please refer the table below. [Descript] Please choose the barcode by the data of barcode. n1 : two dimension of barcode n2 : the number of data of barcode n3 : size of barcode d1… dk : the data of barccode n1 Barcode 1 PDF417 2 QR code Title Rev. Page HP-500 Ver 1 Ver1.0 P. 18](https://usermanual.wiki/HWASUNG-SYSTEM/HP-500/User-Guide-3507226-Page-19.png)
![1) PDF417 2) QR code SUB+’1’ [Name] Line 1 (Vertical, Horizontal) [Format] ASCII SUB 1 Hex 1A 31h Decimal 26 49 [Description] Line of Vertical Horizontal. SUB+’2’ [Name] Line 2 (Vertical,Horizontal) [Format] ASCII SUB 1 Hex 1A 32h Decimal 26 50 [Description] Line of Vertical Horizontal SUB+’W’+nL+nH+kL+kH [Name] Write (line data) [Format] ASCII SUB W nL nH kL kH Hex 1A 57h nL nH kL kH Decimal 26 87 nL nH kL kH [Range] 0≤nL+(nH×256)≤512、(0≤nL≤255, 0≤nH≤3) 0≤kL+(kH×256)≤512、(0≤kL≤255, 0≤kH≤3) [Description] It writes 1 from nL+nH×256 to kL+kH×256. [Caution] It is not deleted, till you power off, or you clear the command. SUB+’C’ [Name] Clear (line data) [Format] ASCII SUB C Hex 1A 43h Decimal 26 67 [Description] It clears all of line zero (0). [Caution] Please use this command to write the line again. Please use the command line ON/ line OFF to write line 1 to speed up the progress. n2 Number of data 1 < n2 ≤ 255 n3 Size of data 3 Horizontal 3 4 Horizontal 4 5 Horizontal 5 6 Horizontal 6 7 Horizontal 7 8 Horizontal 8 9 Horizontal 9 ※ Vertica l is set autom atically. n2 Number of data n3=1 1 < n2 ≤ 17 n3=3 1 < n2 ≤ 53 n3=5 1 < n2 ≤ 106 n3=9 1 < n2 ≤ 230 n3 Size of data 1 Version 1 3 Version 3 5 Version 5 9 Version 9 Title Rev. Page HP-500 Ver 1 Ver1.0 P. 19](https://usermanual.wiki/HWASUNG-SYSTEM/HP-500/User-Guide-3507226-Page-20.png)
![SUB+’O’ [Name] Line ON [Format] ASCII SUB O Hex 1A 4Fh Decimal 26 79 [Description] The line data is valid ON. The line prints together, when you print the character. SUB+’F’ [Name] Line OFF [Format] ASCII SUB F Hex 1A 46h Decimal 26 70 [Description] The line is valid OFF. The line data is preserved. SUB+’P’ [Name] Print line 1 dot line (Vertical,Horizontal) [Format] ASCII SUB P Hex 1A 50h Decimal 26 80 [Description] It prints line 1 dot line. [Caution] Please do not use this command, when you print any character,or any graphic. Please use the command Line ON. Please use this command, when you print the line at the space. ESC+’D’+n1…nk+NUL [Name] Set the horizontal position [Format] ASCII ESC D n1…nk NUL Hex 1B 44h n1…nk 00 Decimal 27 68 n1…nk 0 [Range] 1≤n≤255, 0≤k≤32 [Descript] Set the horizontal tab position [Caution] n : Indicating the figures from the start poistion of line to set position K : indicating the total tabs a line ESC+SP+n [Name] Set the space amount on the right of ASCII character [Format] ASCII ESC SP n Hex 1B 20h n Decimal 27 32 n [Range] 0≤n≤255 [Initial Value] n=0 [Descript] Set in n x 0.125mm the space amount on the right of ASCII character [Caution] Set the Korean space in FS+’S+n Title Rev. Page HP-500 Ver 1 Ver1.0 P. 20](https://usermanual.wiki/HWASUNG-SYSTEM/HP-500/User-Guide-3507226-Page-21.png)
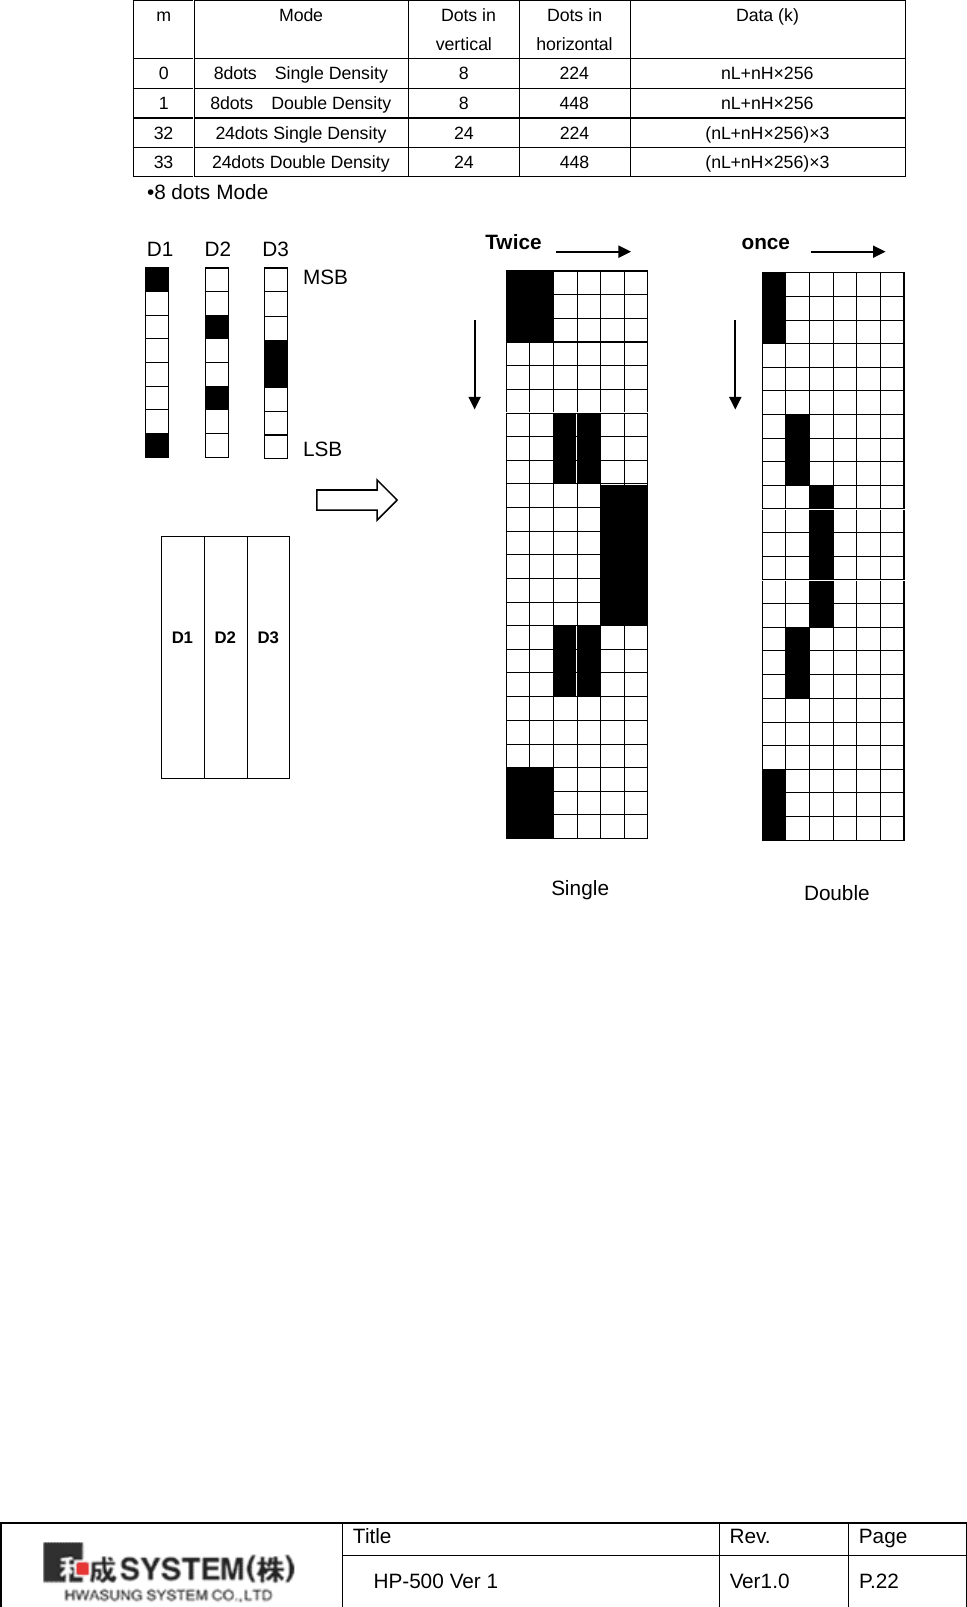
![ESC+’!’+n [Name] Font decoration [Format] ASCII ESC ! n Hex 1B 21h n Decimal 27 33 n [Range] 0≤n≤255 [Initial] n=0 [Description] It sets the font decoration in the same time. Bit Function Hex Decimal 0 0: Font 12x24, 24x24 00h 0 1: Font 8x16, 16x16 01h 1 1 - - - 2 - - - 3 0: Cancel the highlight 00h 0 1: Set the highlight 08h 8 4 0: Cancel the extension in Vertical 00h 0 1: Set the extension in Vertical 10h 16 5 0: Cancel the extension in Horizontal 00h 0 1: Set the extension in Horizontal 20h 32 6 - - - 7 0: Cancel the underline 00h 0 1: Set the underline 80h 128 ESC+’$’+nL+nH [Name] Set absolute poisition [Format] ASCII ESC $ nL nH Hex 1B 24h nL nH Decimal 27 36 nL nH [Range] 0≤nL+nH×256≤65535, 0≤nL≤255, 0≤nH≤255 [Initial Value] nL=0, nH=0 [Descript] Move the printing position from left ending space to (nL+nH×256)×0.125mm Move the printing position in left ending once printing position is over. ESC+’*’+m+nL+nH+d1+…+dk [Name] Set the bitmap image [Format] ASCII ESC * m nL nH d1…dk Hex 1B 2Ah m nL nH d1…dk Decimal 27 42 m nL nH d1…dk [Range] m=0,1,32,33 1≤nL+nH×256≤1023, 0≤nL≤255, 0≤nH≤3, 0≤d≤255 [Descirpt] Due to fixing nL+nHx256, Printing from bit data to graphic data in Mode m Title Rev. Page HP-500 Ver 1 Ver1.0 P. 21](https://usermanual.wiki/HWASUNG-SYSTEM/HP-500/User-Guide-3507226-Page-22.png)
![•24 dots Mode D1 D2 D3 D4 D5 D6 D7 D8 D9 MSB LSB ESC+’-’+n [Name] Set / Cancel underline [Format] ASCII ESC - n Hex 1B 2Dh n Decimal 27 45 n [Range] 0≤n≤255, [Invitial Value] n=0, [Descript] Set / Cancel underline n Function 0 Cancel underline 1 Set underline in thick 0.125mm 2 Set underline in thick 0.25mm 3 Set underline in thick 0.375mm 4 Set underline in thick 0.5mm 5 Set underline in thick 0.625mm 6 Set underline in thick 0.75mm 7 Set underline in thick 0.875mm ESC+’2’ [Name] Set the interval of initial line [Format] ASCII ESC 2 Hex 1B 32h Decimal 27 50 [Range] 0≤n≤255, [Initial Value] n=0 [Descirpt] Set the interval of initial value in 4mm D1 D4 D7 D2 D5 D8 D3 D6 D9 Once Twice Once Once Single Density Double Density Title Rev. Page HP-500 Ver 1 Ver1.0 P. 23](https://usermanual.wiki/HWASUNG-SYSTEM/HP-500/User-Guide-3507226-Page-24.png)
![ESC+’3’+n [Name] Set the interval of line [Format] ASCII ESC 3 n Hex 1B 33h n Decimal 27 51 n [Range] 0≤n≤255, [Initial Value] n=0 [Descript] Set the interval of line in n x 0.125mm ESC+’@’ [Name] Rest printer [Format] ASCII ESC @ Hex 1B 40h Decimal 27 64 [Range] 0≤n≤255, [Descript] Clear buffer & Initialize all parameter ESC+’E’+n [Name] Set the font in thick [Format] ASCII ESC E n Hex 1B 45h n Decimal 27 69 n [Range] 0≤n≤255, [Initial Value] n=0 [Descript] n=0, cancel the font in thick n=1, set the font in thick ESC+’G’+n Name] Set the printing double for font thickness [Format] ASCII ESC G n Hex 1B 47h n Decimal 27 71 n [Range] 0≤n≤255, [Initial Value] n=0. [Descript] n=0. cancel the printing twice for font thickness. n=1. set the printing twice for font thickeness. ESC+’J’+n [Name] Feeding [Format] ASCII ESC J n Hex 1B 4Ah n Decimal 27 74 n [Range] 0≤n≤255 [Descript] Printing the data inner buffer, feeding in n x 0.125mm ESC+’j’+n [Name] Back Feeding [Format] ASCII ESC j n Hex 1B 6Ah n Decimal 27 106 n [Range] 0≤n≤255 [Descript] Printing the data inner buffer and back feeding in n x 0.125mm Title Rev. Page HP-500 Ver 1 Ver1.0 P. 24](https://usermanual.wiki/HWASUNG-SYSTEM/HP-500/User-Guide-3507226-Page-25.png)
![ESC+’M’+n [Name] Select font [Format] ASCII ESC M n Hex 1B 4Dh n Decimal 27 77 n [Range] 0≤n≤2 [Initial Value] n=0 [Descript] Select printer font n Precedence 4bits(Korean fonts) Subordinate 4bits (ASCII) 0000 Korean 24x24 Gothic 0000 Korean 24x24 Gothic 0001 Korean 16 x 16 General 0001 Korean 16 x 16 General 0010 Japanese 24 x 24 Bodoni 0010 Japanese 24 x 24 Bodoni 0011 Chinese 24 x 24 Gothic 0011 Chinese 24 x 24 Gothic Notice : When you set up one of fonts, you can use “Memory Switch Setting program “ without commend. If you need any more information, please refer to How to use Memory Switch Setting Program. * Caution : In case of Big Font as 56x88, it would be possible to extend font size as much as Double(Width and Length) and other fonts would be possible to extend the font size as Octuple ESC+’R’+n [Name] Select the International character [Format] ASCII ESC R n Hex 1B 52h n Decimal 27 82 n [Range] 0≤n≤13 [Initial Value] n=13 [Descirpt] Select the international character as follows:- n Country Name 0 USA 1 France 2 Germany 3 England 4 Denmark1 5 Sweden 6 Italian 7 Spain1 8 Japanese 9 Norway 10 Denmark2 11 Spain2 12 Latin America 13 Korea Title Rev. Page HP-500 Ver 1 Ver1.0 P. 25](https://usermanual.wiki/HWASUNG-SYSTEM/HP-500/User-Guide-3507226-Page-26.png)
![ESC+’a’+n [Name] Align the printing [Format] ASCII ESC a n Hex 1B 61h n Decimal 27 97 n [Range] 0≤n≤2 [Initial Value] n=0 [Descript] Align the printing position n Printing Position 0 Left 1 Middle 2 Right ESC+’d’+n [Name] Printing and feeding ‘n’ line [Format] ASCII ESC d n Hex 1B 64h n Decimal 27 100 n [Range] 0≤n≤255 [Descript] Printing the date & feeding ‘n’ line ESC+’{’+n [Name] Turning 180° [Format] ASCII ESC d n Hex 1B 7Bh n Decimal 27 123 n [Range] 0≤n≤255 [Initial Value] n=0 [Descript] Set the reverse image [Caution] Move the standard from the left to the right n Function 0 Cancel 180° 1 Set 180° ESC+’t’+n [Name] International code page [Format] ASCII ESC t n Hex 1B 74h n Decimal 27 116 n [Range] 0≤n≤5 14≤n≤17 [Initial Value] n=0 [Descript] You can see the following table of the international code page. [Caution] It is valid, if you direct the command SUB+”x” for 1 byte. It is not valid, if you direct the command SUB+”x” for 2 bytes. Title Rev. Page HP-500 Ver 1 Ver1.0 P. 26](https://usermanual.wiki/HWASUNG-SYSTEM/HP-500/User-Guide-3507226-Page-27.png)
![n code page n code page 0 PC437(US) 6 PC850((Multilingual) 1 KANA(JAPAN) 7 PC860(Portugal) 2 GREEK 8 Windows1252 3 Windows1251 9 Iran System Encoding Standard 4 PC866(Cyrllic #2) 10 PC857(Turkish) 5 Windows1250 (Poland) ESC+’S’ [Name] Set the Standard mode [Format] ASCII ESC S Hex 1B 53h Decimal 27 83 [Descript] Swtiches from page mode to standard mode and the data is deleted at the page. ESC+’L’ [Name] Select page mode [Format] ASCII ESC L Hex 1B 4Ch Decimal 27 76 [Range] 0≤n≤255 [Initial Value] n=0 [Descript] Switches from standard mode to page mode ESC+FF [Name] Printing as the page mode [Format] ASCII ESC FF Hex 1B 0Ch Decimal 27 12 [Descript] It prints the data at the page mode. (The data is NOT deleted at the page.) Title Rev. Page HP-500 Ver 1 Ver1.0 P. 27](https://usermanual.wiki/HWASUNG-SYSTEM/HP-500/User-Guide-3507226-Page-28.png)
![ESC+’T’+n [Name] Select print direction in page mode [Format] ASCII ESC T n Hex 1B 54h n Decimal 27 84 n [Range] 0≤n≤3 [Initial Value] n=0 [Descript] Select the print direction & start position in page mode •n=0(Left→Right), •n=1(Bottom→Top), Feeding Feeding •n=2(Right→Left), •n=3(Top→Bottom), Feeding Feeding ABCD ABCD ABCD ABCD Title Rev. Page HP-500 Ver 1 Ver1.0 P. 28](https://usermanual.wiki/HWASUNG-SYSTEM/HP-500/User-Guide-3507226-Page-29.png)
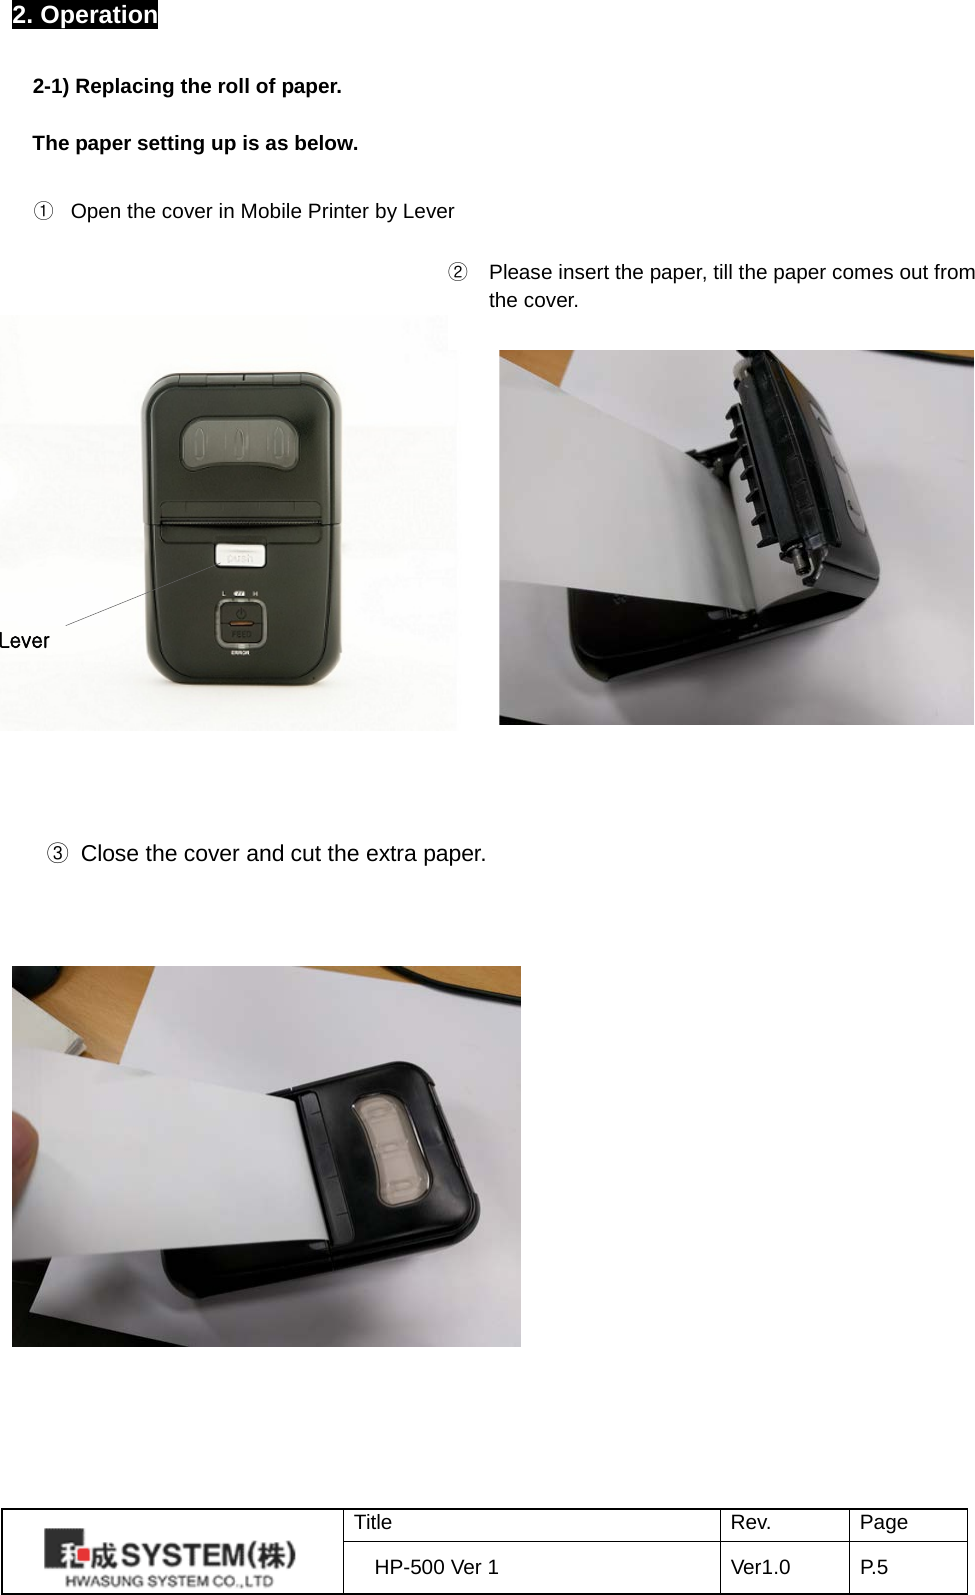
![ESC+’W’+xL+xH+yL+yH+dxL+dxH+dyL+dyH [Name] Set printing area in page mode [Format ] ASCII ESC W xL xH yL yH dxL dxH dyL dyH Hex 1B 57h xL xH yL yH dxL dxH dyL dyH Decimal 27 87 xL xH yL yH dxL dxH dyL dyH [Range] 0≤xL+xH×256≤65535 (0≤xL≤255, 0≤xL≤255) 0≤yL+yH×256≤65535 (0≤yL≤255, 0≤yL≤255) 1≤dxL+dxH×256≤65535 (0≤dxL≤255, 0≤dxL≤255) 1≤dyL+dyH×256≤65535 (0≤dyL≤255, 0≤dyL≤255) [Initial Value] (xL+xH×256)=0 (0mm, xL=0, xH=0) (yL+yH×256)=0 (0mm, yL=0, yH=0) (dxL+dxH×256)=448 (56mm, dxL=C0h, dxH=01h) (dyL+dyH×256)=1200 (150mm, dyL=B0h, dyH=04h) [Descript] Set printing area & starting point Horizontal starting point : (xL+xH×256) × 0.125mm Vertical starting point : (yL+yH×256) × 0.125mm Horizontal size : (dxL+dxH×256) × 0.125mm Vertical size : (dyL+dyH×256) × 0.125mm [Caution] The maximum page width is available 56mm The maximum page length is available 150mm Barcode & graphic data is executed as per standard line, If the size exceed the standard line, move the standardline by CR or LF. Paper (x,y) dx Printing Area dy (x+dx,y+dy) Paper EFGH ABCD Move the standard line by CR or LF EFGH Standard : Barcode or Graphic Printing before moving the standard line Printing after moving the standard line ABCD Title Rev. Page HP-500 Ver 1 Ver1.0 P. 29](https://usermanual.wiki/HWASUNG-SYSTEM/HP-500/User-Guide-3507226-Page-30.png)
![FS+’!’+n [Name] Set the printing mode in Korean [Format] ASCII FS ! n Hex 1C 21h n Decimal 28 33 n [Range] 0≤n≤255 [Initial Value] n=0 [Descript] Set the printing mode in Korean [Caution] Only valid in Koean FS+’&’ [Name] Set to print Korean mode (2bytes Mode) [Format] ASCII FS & Hex 1C 26h Decimal 28 38 [Descript] Set to print Korean mode (2bytes Mode) [Caution] Set to print Korean mode in extended graphic mode Appointment is not required in Korean mode, due to auto detection. (Ref.SUB+’x’+n command) FS+’.’ [Name] Cancel Korean mode (2Bytes mode) [Format] ASCII FS . Hex 1C 2Eh Decimal 28 46 [Descript] Cancel Korean mode (2Bytes mode) [Caution] In case of cancel 2 bytes mode in extended graphic mode Appointment is not required due to auto detection in Korean mode (Ref.SUB+’x’+n command) Bit Function Hex Decimal 0 - 00h 0 1 - 00h 0 2 Cancel the horizontal extension 00h 0 Set the horizontal extension 04h 4 3 Cancel the vertical extension 00h 0 Set the vertical extension 08h 8 4 - 00h 0 5 - 00h 0 6 - 00h 0 7 Cancel the underline 00h 0 Set the underline 80h 128 Title Rev. Page HP-500 Ver 1 Ver1.0 P. 30](https://usermanual.wiki/HWASUNG-SYSTEM/HP-500/User-Guide-3507226-Page-31.png)
![FS+’-’+n [Name] Set the underline of Korean [Format] ASCII FS - n Hex 1C 2Dh n Decimal 28 45 n [Range] 0≤n≤2 [Initial Value] n=0 [Descript] Set the underline of Korea n Function 0 Cancel the underline of Korean 1 Set the thickness of underline in 0.125mm 2 Set the thickness of underline in 0.25mm FS+’S’+n1+n2 [Name] Set the space between Korean characters [Format] ASCII FS S n1 n2 Hex 1C 53h n1 n2 Decimal 28 83 n1 n2 [Range] 0≤n1≤255, 0≤n2≤255 [Initial Value] n=0 [Descript] Set the space between Korean characters Set the left space in n1×0.125mm Set the right space in n2×0.125mm FS+’W’+n [Name] Set the font size in Korean [Format] ASCII FS W n Hex 1C 57h n Decimal 28 87 n [Range] 0≤n1≤255 [Initial Value] n=0 [Descript] Set the Korean font size twice (HorizontalxVertical) in Korean n=0, Cancel the font size two times n=1, Set the font size two times Title Rev. Page HP-500 Ver 1 Ver1.0 P. 31](https://usermanual.wiki/HWASUNG-SYSTEM/HP-500/User-Guide-3507226-Page-32.png)
![FS+’q’+n+(xL+xH+yL+yH+d1…dk)1……+(xL+xH+yL+yH+d1…dk)n [Name] Register logo (bitmap image) non volatilization [Format] ASCII FS q n (xL xH yL yH d1..dk)1…(xL xH yL yH d1..dk)n Hex 1C 71h n (xL xH yL yH d1..dk)1…(xL xH yL yH d1..dk)n Decimal 28 113 n (xL xH yL yH d1..dk)1…(xL xH yL yH d1..dk)n [Range] 1≤n≤255 0≤xL+xH×256≤65535 (0≤xL≤255, 0≤xH≤255) 0≤yL+yH×256≤65535 (0≤yL≤255, 0≤yH≤255) 0≤d≤255 k=(xL+xH×256)×(yL+yH×256)×8, Capable register : 64kbytes [Descript.] Register the logo non-volatilization n : Total unit of N/V logo xL,xH : Set the horizontal dot in (xL+xH×256)×8 yL,yH : Set the vertical dot in (xL+xH×256)×8 k : Bitmap image of a N/V logo [Caution] Register various as much as NV’s capa. Required to delete all if (it is) registered again. Renewable registeration / deletion at 100000 cycles, It’s not recommended frequent registeration / deletion, due to memory damage <Register Image > . . . . . . . . . . . . . . . FS+’p’+n+m [Name] Printing N/ V logo [Format] ASCII FS p n m Hex 1C 70h n m Decimal 28 112 n m [Range] 1≤n≤255, 0≤m≤3 [Initial Value] n=0 [Descript.] m : printing the registered N/V in ‘m’ mode n : indicating the regsitered logo in the ‘n’. m Printing mode 0 Standard 1 Horizontal extension 2 Vertical extension 3 Horizontal,vertical extension in the same time D1 Dy D(x×8-1)×y+1 D(x×8)×y MSB LSB Title Rev. Page HP-500 Ver 1 Ver1.0 P. 32](https://usermanual.wiki/HWASUNG-SYSTEM/HP-500/User-Guide-3507226-Page-33.png)
![GS+’!’+n [Name] Set the proportion of character extention [Format] ASCII GS ! n Hex 1D 21h n Decimal 29 33 n [Range] 0≤n1≤255 (horizontal / vertical portions is restricted maxim value 8) [Initial Value] n=0 [Descript.] Set the proportion of character extention [Caution] Caculate the numberic value, if vertical & horizontal is extended in the same time ex.) x3 (Horizontal Rate), x3(Vertical Rate) : n=32+2=34 Bit Function 0-3 Set the extension proportion in vertical 4-7 Set the extension proportion in horizontal Extension in Horizontal Extension in Vertica GS+’(’+’K’+pL+pH+fn+m (fn=49) [Name] Set the printing density [Format] ASCII GS ( K pL pH fn m Hex 1D 28h 4Bh pL pH fn m Decimal 29 40 75 pL pH fn m [Range] pL=2, pH=0, fn=49 1≤m≤30 [Initial Value] It set up automatically as per the voltage. (Ref.Table below) [Descript] Set the printing density Drive Voltage (Vp) m 5 ~ 5.4V 26 5.5 ~ 5.9V 16 6 ~ 6.4V 10 6.5 ~ 6.9V 8 7.0 ~ 7.4V 7 7.5 ~ 7.9V 6 8.0 ~ 8.3V 5 8.4V ~ 8.5V 4 ※ Once it is a power on reset, the density is set up automatically, You can choose the density as per the conditions, such as power,printing quality. n(Hex) n(Decimal) Rate 00h 0 x1 10h 16 x2 20h 32 x3 30h 48 x4 40h 64 x5 50h 80 x6 60h 96 x7 70h 112 X8 n(Hex) n(DecimaL) Rate 00h 0 x1 01h 1 x2 02h 2 x3 03h 3 x4 04h 4 x5 05h 5 x6 06h 6 x7 07h 7 X8 Title Rev. Page HP-500 Ver 1 Ver1.0 P. 33](https://usermanual.wiki/HWASUNG-SYSTEM/HP-500/User-Guide-3507226-Page-34.png)
![GS+’(’+’K’+pL+pH+fn+m (fn=97) [Name] Operating thermal head partially [Format] ASCII GS ( K pL pH fn m Hex 1D 28h 4Bh pL pH fn m Decimal 29 40 75 pL pH fn m [Range] pL=2, pH=0, fn=97 0≤m≤4 [Initial Value] m=2 (3 partiation) [Descript] Set the operation of partial thermal head [Caution] This function is effective in case of power capa is short. The current electric will be reduced as big as the partition. m Thermal Head Partition operation 0 First Partition 1 Second Partition 2 Third Partition 3 Fourth Partition 4 Fifth Partition GS+’B’+n [Name] Reverse printing in black [Format] ASCII GS B n Hex 1D 42h n Decimal 29 66 n [Range] 0≤n≤255 [Initial Value] n=0 [Descript] Reverse printing in black n=0, standard printing n=1, reverse printing in black GS+’H’+n [Name] Select the printing position of HRI characters (Barcode) [Format] ASCII GS H n Hex 1D 48h n Decimal 29 72 n [Range] 0≤n≤3 [Initial Value] n=0 [Descript] Select the printing positions of numerical value & characters n Printing Position 0 Non printing 1 Above the barcode 2 Below the barcode 3 Both above & below barcode Title Rev. Page HP-500 Ver 1 Ver1.0 P. 34](https://usermanual.wiki/HWASUNG-SYSTEM/HP-500/User-Guide-3507226-Page-35.png)
![GS+’L’+nL+nH [Name] Select the left margin [Format] ASCII GS L nL nH Hex 1D 4Ch nL nH Decimal 29 76 nL nH [Range] 0≤nL≤255, 0≤nH≤255 [Initial Value] nL+nH×256=0 (nL=0, nH=0) [Descript] The left margin is set in (nL+nH×256)×0.125mm. GS+’W’+nL+nH [Name] Set printing area width [Format] ASCII GS W nL nH Hex 1D 57h nL nH Decimal 29 87 nL nH [Range] 0≤nL≤255, 0≤nH≤255 [Initial Value] nL+nH×256=448 (56mm, nL=0, nH=0) [Descript] Set printing area width from the left margin in (nL+nH×256)×0.125mm GS+’h’+n [Name] Select barcode height [Format] ASCII GS h n Hex 1D 68h n Decimal 29 104 n [Range] 1≤n≤255 [Initial Value] n=162 (20.25mm) [Descript] Select barcode height by n×0.125mm GS+’k’+m+d1…dn+NUL [Name] Print barcode [Format] ASCII GS k m d1…dn NUL Hex 1D 6Bh m d1…dn 00h Decimal 29 107 m d1…dn 0 [Range] 1≤m≤7, n & d depend on barcode system used [Descript] Refer the table as below Printing area Left Margin Printing area width Title Rev. Page HP-500 Ver 1 Ver1.0 P. 35](https://usermanual.wiki/HWASUNG-SYSTEM/HP-500/User-Guide-3507226-Page-36.png)
![m Barcode system n (Barcode data numbers) d (barcode data ) 1 UPC-E n=7 (check digit is automatically added ) 48≤d≤57 2 EAN13 n=12 (check digit is automatically added) 48≤d≤57 3 EAN8 n=7 (check digit is automatically added) 48≤d≤57 4 CODE39 1≤n (Start & Stop characteres is automatically added 48≤d≤57, 65≤d≤90 d=32,36,37,43,45,46,47 5 ITF(I of 2/5) 1≤n (Only even number) 48≤d≤57 6 CODABAR 1≤n 48≤d≤57, 65≤d≤68 d=36,43,45,46,47,58 7 CODE128 2≤n≤255 (Check digit , Stop character Is automatically added) 0≤d≤127 [Caution] In CODE128, set additional “{“ in 2bytes when the special character as below Special character Barcode data ASCII Hex Decimal SHIFT {S 7Bh, 53h 123, 83 CODE A {A 7Bh, 41h 123, 65 CODE B {B 7Bh, 42h 123, 66 CODE C {C 7Bh, 43h 123, 67 FNC1 {1 7Bh, 31h 123, 49 FNC2 {2 7Bh, 32h 123, 50 FNC3 {3 7Bh, 33h 123, 51 FNC4 {4 7Bh, 34h 123, 52 “{“ {{ 7Bh, 7Bh 123, 123 GS+’w’+n [Name] Set the vertical size of barcode [Format] ASCII GS w n Hex 1D 77h n Decimal 29 119 n [Range] 1≤n≤4 [Initial Value] n=2 [Descript.] Set the horizontal size of barcode n Module barcode width Two level barcode Narrow Wide 1 0.25mm 0.125mm 0.375mm 2 0.375mm 0.25mm 0.625mm 3 0.5mm 0.375mm 1mm 4 0.625mm 0.5mm 1.25mm * Multi Level barcode : UPC-E, EAN13, EAN8 * 2 level barcode : CODE39, ITF, CODABAR Title Rev. Page HP-500 Ver 1 Ver1.0 P. 36](https://usermanual.wiki/HWASUNG-SYSTEM/HP-500/User-Guide-3507226-Page-37.png)
![GS+’r’+n [Name] Transmit status [Format] ASCII GS r n Hex 1D 72h n Decimal 29 114 n [Range] n=1 [Descript] Transmit current status of printer [Caution] The status is not ready till the printer is offline, The command is executed when the data in receive buffer is devloped Therefore automatic status function (GS+’a’+n) is to use better, It is used for re-confirm in on-line after automatic status is received GS+’a’+n [Name] Enable / Disable automatic status back (ASB) [Format] ASCII GS a n Hex 1D 61h n Decimal 29 97 n [Range] 0≤n≤1 [Initial Value] n=1 [Descript] Enable / Disable ASB If the status is changed after checking the printer status, the status is automatically executed. This command is executed to enable or disable. n Function 0 Disable automatic status back 1 Enable automatic status back <Status transmission data > Bit Satus Hex Decimal 0 0 : Paper 1 : No paper 00h 01h 0 1 1 0 : Printer head down 1 : Printer head up 00h 02h 0 2 2 0 : Paper w/o jamm 1 : Paper with jamm 00h 04h 0 4 3 0 : Paper enough 1 : Paper Near End 00h 08h 0 8 4 0 : Print complete 1 : Print or Feeding 00h 10h 0 16 5 0 00h 0 6 0 00h 0 7 0 00h 0 ※ the status of bit 4 is effective when the realtime conducts the command DLE + EOT + n, The others are fixed ‘0’. Title Rev. Page HP-500 Ver 1 Ver1.0 P. 37](https://usermanual.wiki/HWASUNG-SYSTEM/HP-500/User-Guide-3507226-Page-38.png)
![GS+’v’+’0’+m+xL+xH+yL+yH+d1+…+dk [Name] Laster bit image [Format] ASCII GS v 0 m xL xH yL yH d1..dk Hex 1D 76h 30h m xL xH yL yH d1..dk Decimal 28 118 48 m xL xH yL yH d1..dk [Range] 0≤m≤3 or 48≤m≤51, 1≤(xL+xH×256)≤150 (0≤xL≤150, xH=0) 1≤(yL+yH×256)≤436 (0≤yL≤255, 0≤yH≤1) 0≤d≤255 (yL+yH×256) K (All data) = (xL+xH×256) × (yL+yH×256) [Descript] The laster bit image will be recognized in mode ‘m’. xL,xH appoint the data (byte) of horizontal at image data. yL,yH appoint the dta (dot line) of vertical at image data. * d is a data for laster bit. m Mode Expansion 0, 48 Normal x1 1, 49 Horizontal expansion x2 2, 50 Vertical expansion x2 3, 51 Horizontal,Vertical expansion x2 (Horizontal & Vertical) Ex) Expansion image xL+xH×256 = 32 byte, 32 × 8 = 256 dot 1 2 3 …… 30 31 32 33 34 35 …… 62 63 64 …… …… …… …… …… …… …… k-31 k-30 k-29 …… k-2 k-1 k DLE+ENQ+n [Name] Realtime request the printer to be clear each buffer [Format] ASCII DLE ENQ n Hex 10h 05h n Decimal 16 5 n [Range] n=2 [Descript] The realtime clear each buffer as soon as this command receive. [Caution] It’s only valid as you switch up ‘1’ as ‘ON’. This command is only effective if the printer is off. This command is only effective if it receives the data as same command. This command is not effective if it’s online. yL+yH×256 dot line 7 6 5 4 3 2 1 0 MSB LSB Title Rev. Page HP-500 Ver 1 Ver1.0 P. 38](https://usermanual.wiki/HWASUNG-SYSTEM/HP-500/User-Guide-3507226-Page-39.png)
![DLE+EOT+n [Name] Realtime status transmission [Format] ASCII DLE EOT n Hex 10h 04h n Decimal 16 4 n [Range] n=2 [Descript] The real time transmits a byte as soon as this command receives. [Caution] It’s only valid as you switch up ‘1’as ‘ON’. Please refer status table at the page 29. If the command is received same data, it could be same operation (Bit image data,etc) Title Rev. Page HP-500 Ver 1 Ver1.0 P. 39](https://usermanual.wiki/HWASUNG-SYSTEM/HP-500/User-Guide-3507226-Page-40.png)