HYUNDAI MOBIS AC1A0A7AN CAR AUDIO User Manual 3
HYUNDAI MOBIS CO., LTD. CAR AUDIO 3
Contents
- 1. user manual -1
- 2. user manual -2
- 3. user manual -3
user manual -3
86 PART 3. PHONE FEATURES
PART 3 PHONE FEATURES
Switching the call
1. Switching the call between handsfree
and handset device
When… you… receive… an… incoming… call,… you…
have… the… option… of… using… the… handsfree… or…
talking… privately… by… using… the… handset…
device.…
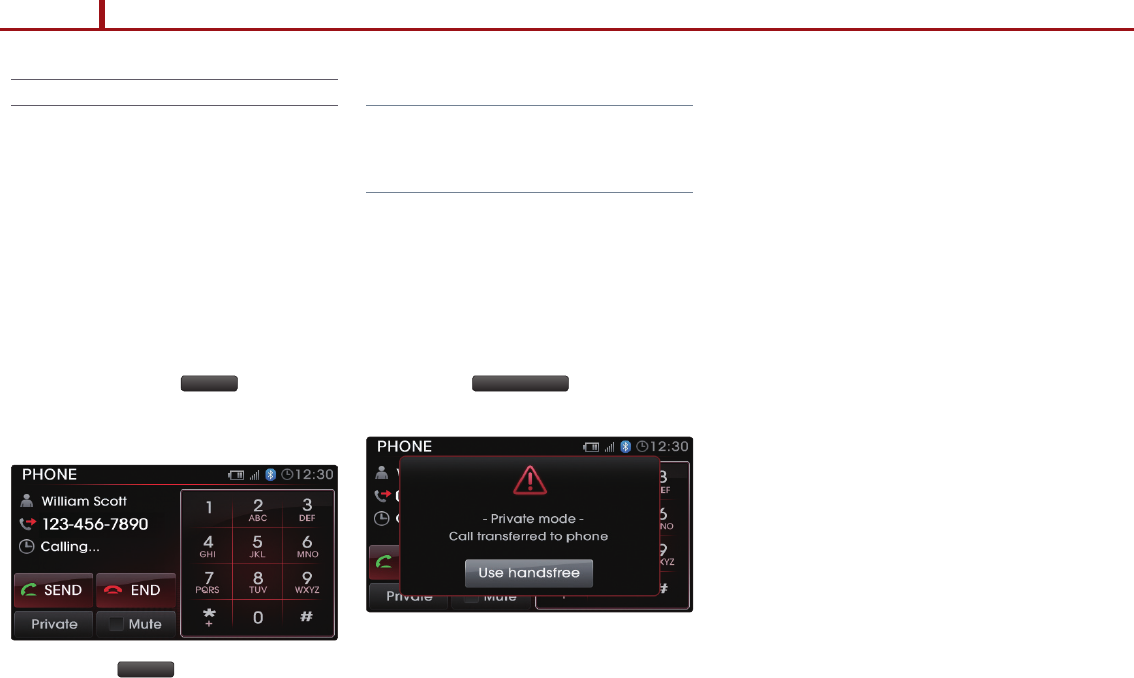
2. Transferring the handsfree call to your
Handset device
1. …After… pressing… the… Accept … button… for… an…
incoming…call,…the…following…screen…will…be…
displayed.
2. …Press…the… Private …button.…The…call…will…be…
transferred…to…the…handset…device.…
Note
●
Accepting…a…call…with…the…handset…device…will…
automatically… connect… the… call… in… Private…
mode.
3. Transferring a call on your Handset
device to handsfree
1. …If… an… incoming… call… is… accepted… with… the…
handset…device,…the…call…will…be…connected…
with… the… handset… device… while… the… UVO…
system…will…display…the…following…screen.…
2. …Press…the… Use handsfree …button…to…transfer…
the…call…to…the…handsfree.
PART 3. PHONE FEATURES 87
PART
3
PHONE FEATURES
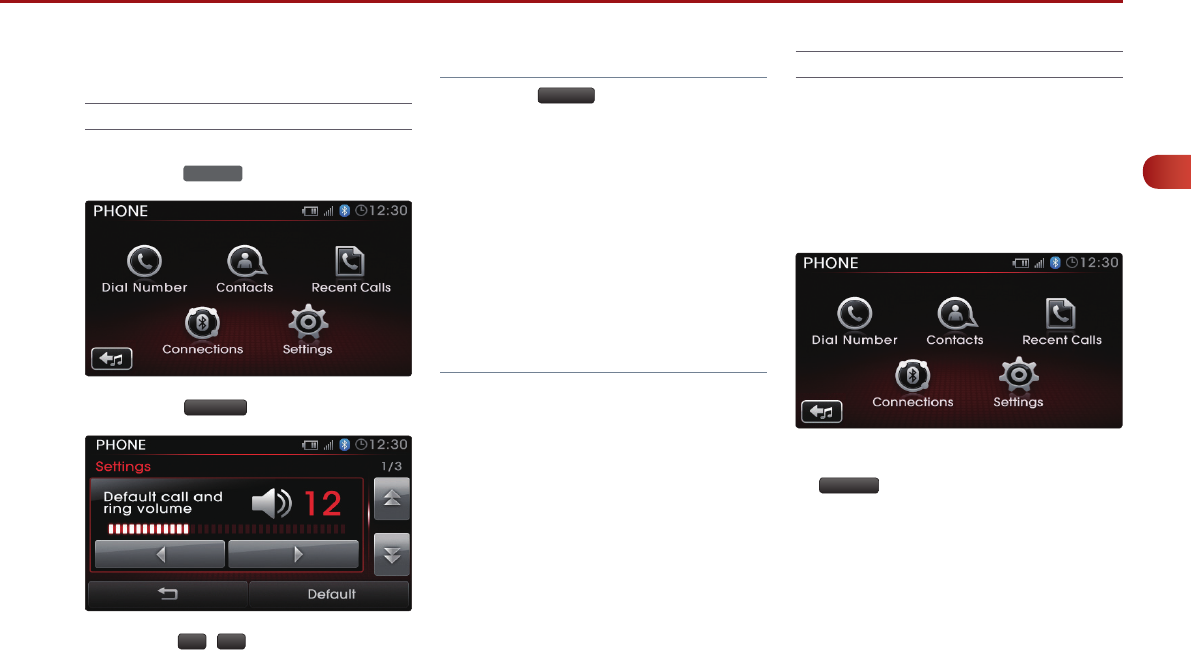
Phone settings
Setting Phone Volume
1. Press…the… PHONE …key.
2. Press…the… Settings …button.
3. …Use… the…
◀
,…
▶
… buttons… to… control… the…
volume…to…the…desired…level.…
Note
●
Press… the… Default … button… to… restore… the…
default…setting.
●
Although… the… call… volume… can… be… changed…
during…a…call,…the…volume…will…return…to…its…ini-
tial…level…as…saved…in…Setup.
●
Call… volume… can… be… operated… separately…
from… the… audio… volume,… allowing… you… to…
change…the…call…volume…without…changing…the…
audio…volume.
●
When…call…volume…is…changed,…ring…volume…is…
also…changed.
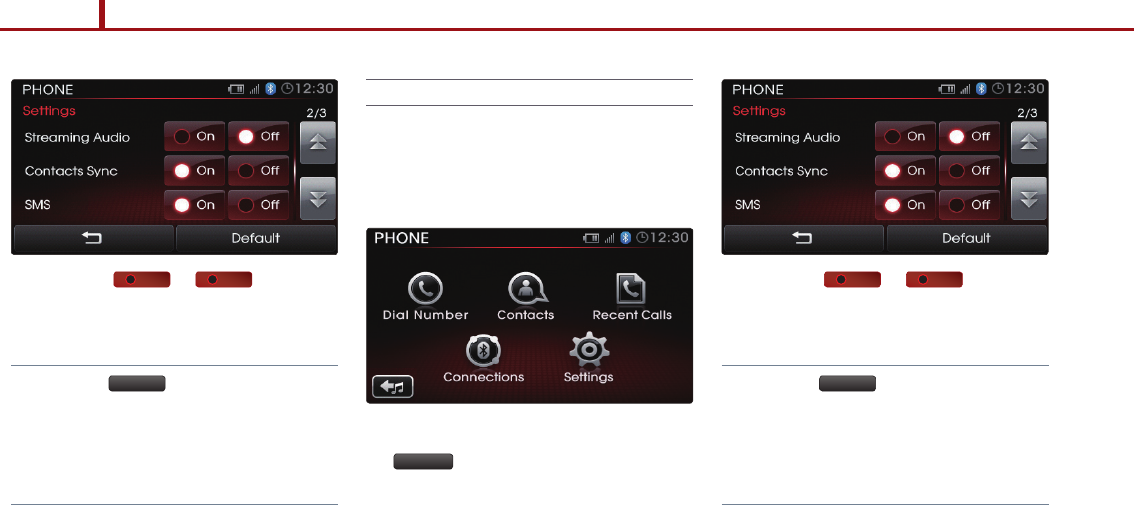
Turn Streaming Audio On and Off
Streaming…Audio…is…a…feature…which…turns…On/
Off…BT…Audio…Mode.…For…more…information…on…
BT… Audio,… refer… to… the… ‘BT… AUDIO… MODE’…
section…in…the…Audio…Features…chapter…of…the…
user's…manual.…
1.……While… in… Phone… Set tings,… pre s s… the…
Settings …button.…
…
88 PART 3. PHONE FEATURES
PART 3 PHONE FEATURES
2. …Press…the… On …or… Off …button…next…
to…the…Streaming…Audio…menu.
Note
●
Press… the… Default … button… to… restore… the…
default…setting.
●
Changes… are… saved… as… they… are… made.… In…
other…words,…once…you…change…a…setting,…the…
new…setting…will…become…saved.…
Contacts Sync
…
Contacts… Sync… is… a… feature… which… automati-
cally… downloads… contacts… when… pairing… a…
new…phone.…
1. …While… in… Phone… Set ting s,… press… the…
Settings …button.
2. …Press…the… On …or… Off …button…next…
to…the…Contacts…Sync…menu.
Note
●
Press… the… Default … button… to… restore… the…
default…setting.
●
Changes… are… saved… as… they… are… made.… In…
other…words,…once…you…change…a…setting,…the…
new…setting…will…become…saved.…
PART 3. PHONE FEATURES 89
PART
3
PHONE FEATURES
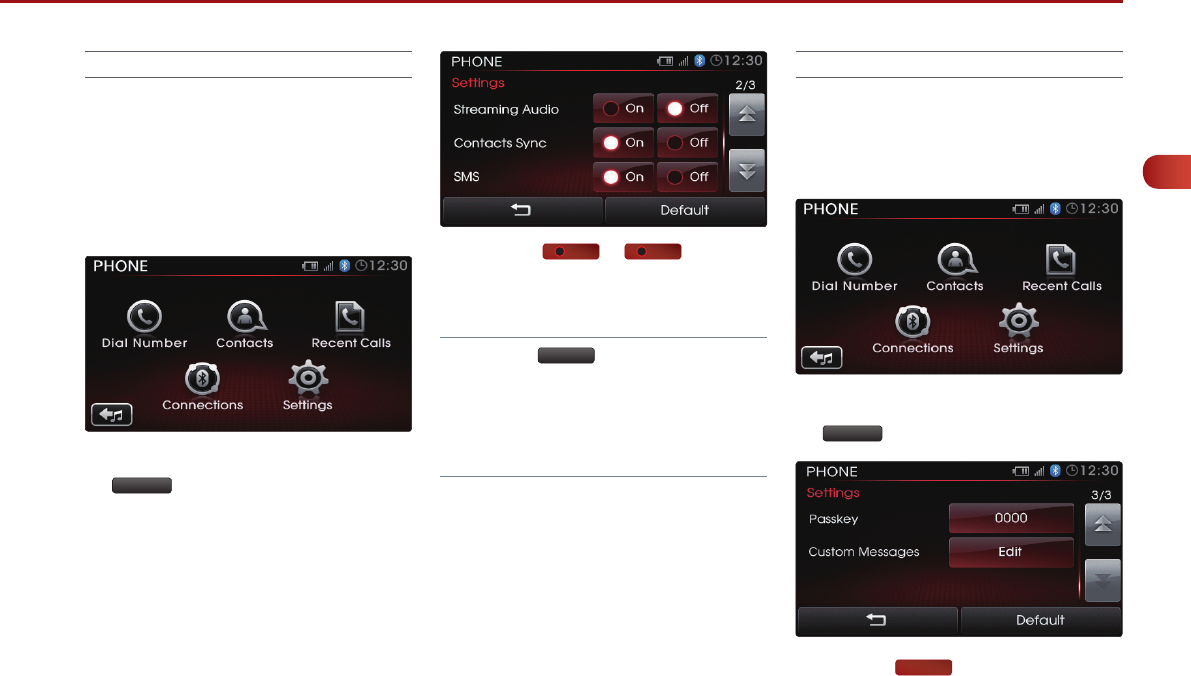
SMS
…
This…feature…allows…you…turn…the…SMS…feature…
on…or…off…within…the…system.…When…turned…on,…
the… SMS… feature… will… download… unread…
incoming… messages… to… provide… a… read… back…
of…new…messages.…
1. …While… in… Phone… Set ting s,… press… the…
Settings …button.…
2. …Press…the… On …or… Off …button…next…
to…the…SMS…menu.
Note
●
Press… the… Default … button… to… restore… the…
default…setting.
●
Changes… are… saved… as… they… are… made.… In…
other…words,…once…you…change…a…setting,…the…
new…setting…will…become…saved.
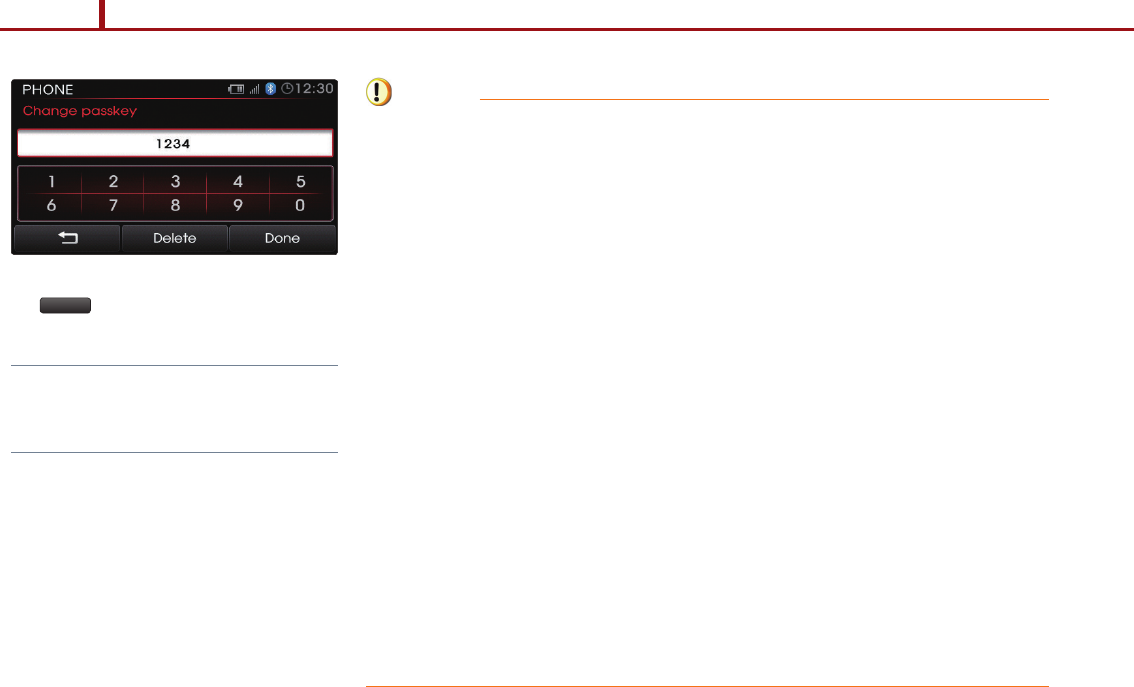
Changing passkey
…
The… passkey… is… the… authentication… code…
needed… whenever… you… pair… a… new… handset…
device.…
1. …While… in… Phone… Set ting s,… press… the…
Settings …button.…
2. …Press…the… 0000 …button…next…to…the…pass-
key…menu.
90 PART 3. PHONE FEATURES
PART 3 PHONE FEATURES
3. …Input… the… new… passkey… and… press… the…
Done …button…to…save.
Note
●
The…default…passkey…is…“0000”….…
●
The…passkey…can…be…set…only…when…the…vehi-
cle…is…parked.
Caution
Mobile Phone Compatibility
Depending…on…the…manufacturer,…product…and…product…specification,…some…mobile…phones…func-
tions… may… not… be… supported… or… may… not… operate… to… specification.… Carefully… read… the… cautions…
listed…below.
●
The…occurrence…of…problems…upon…using…mobile…phones…may…be…caused…by…the…mobile…phone…
and…not…by…the…Audio…unit.…
●
Even… mobile… phones… which… support… Bluetooth
Ⓡ
… wireless… technology… function… may… not… operate…
properly…if…the…mobile…phone…connection…has…been…locked.…Release…the…connection…lock…and…try…
connecting…the…mobile…phone…with…the…system…again.
●
The…Mobile…phone…battery…icon…and…signal…strength…icon…may…not…be…properly…displayed…depend-
ing…on…the…type…of…mobile…phone.
●
Call… waiting… is… supported… only… when… connected… mobile… phones… support… this… feature.… The… call…
waiting…pop-up…may…not…be…displayed…in…some…mobile…phones.
●
Audio…streaming…mode…will…operate…only…when…a…Bluetooth
Ⓡ
…wireless…technology…enabled…phone…
has… been… connected.… Connecting… or… disconnecting… a… Bluetooth
Ⓡ
… wireless… technology… enabled…
phone…while…audio…streaming…is…operating…will…stop…music…play.
●
The…audio…streaming…function…may…not…be…supported…in…some…mobile…phones.
●
The…phonebook…may…take…a…prolonged…period…of…time…to…download…or…may…not…operate…in…some…
mobile… phones.… The… quality… of… Bluetooth
Ⓡ
… wireless… technology… handsfree… calls… may… differ…
depending…on…the…mobile…phone.
●
The…SMS…function…may…not…be…supported…in…some…handset…devices.

VOICE COMMANDS
PART 4. Table of contents 91
contents
PART 4 Table of contents
PART 4 VOICE COMMANDS
Conditions for voice command system
92
Operating Voice Command
Using Voice Command
93
Voice Command Help
93
Turning Command Feedback On and Off
94
Adjusting Voice Command Volume
95
Speaker Adaptation
Creating a Voice Profile
96
Selecting a Previous Voice Profile
97
Deleting a Voice Profile
98
Voice Command List
Command List - General Commands
99
Command List - Audio Commands
100
1. FM/AM Radio
100
2. SIRIUS
100
3. MEDIA
101
4. JUKEBOX
102
Command List - Phone Commands
103

92 PART 4. VOICE COMMANDS
PART 4 VOICE COMMANDS
Conditions for voice command
system
The voice control system includes a special
handsfree microphone mounted above the
driver's seat of your car which blocks out
(filters out) ambient noise and allows you to
operate system features through voice
commands while maintaining proper posture.
There are still a few points you should
observe to make sure that you are properly
understood.
●
Keep doors, windows and the sunroof
closed to avoid noise interference from
o u t s i d e t h e c a r . V o i c e c o m m a n d
performance can be improved if the cabin
environment is quiet.
●
Press the voice recognition button and say
the voice command after the sound of the
beep.
●
Speak continuously and at normal volume,
avoiding unnatural emphasis and pauses
between words
●
Avoid causing background noise in the car
while you are speaking, and ask your
passengers not to speak while you are
giving voice commands.
●
As the handsfree microphone is positioned
to pick up the driver's voice, commands by
other occupants may be understood with
less accuracy, and passengers are advised
to use the handset when making calls.
PART 4. VOICE COMMANDS 93
PART
4
VOICE COMMANDS
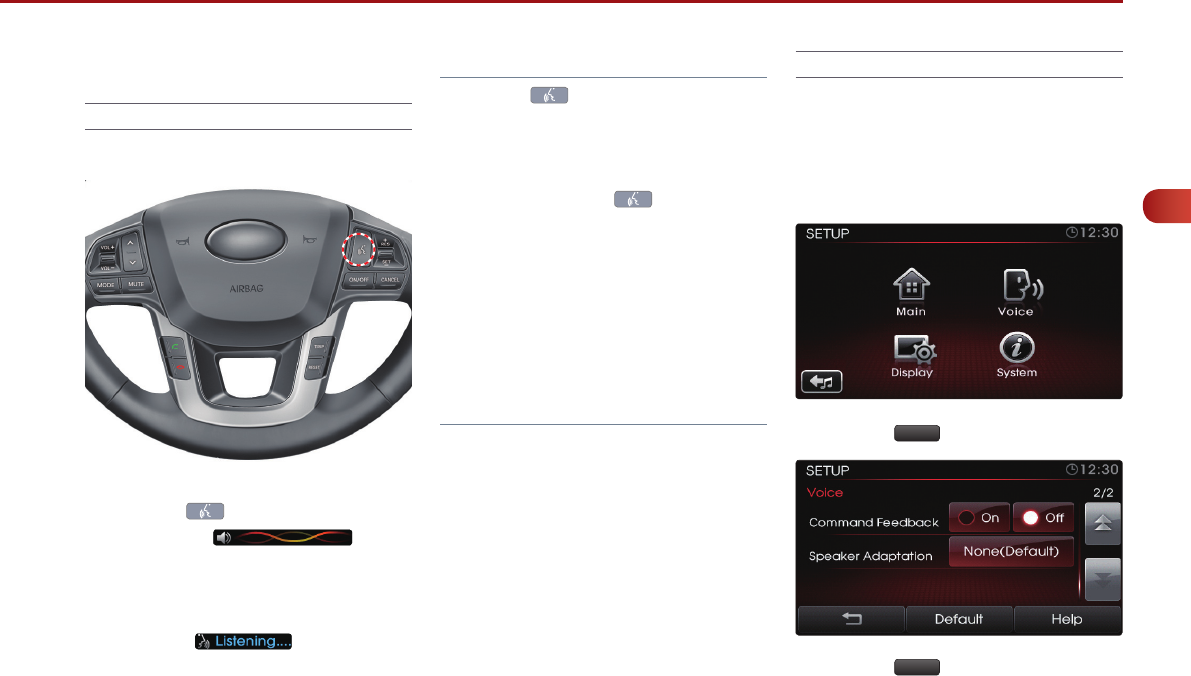
Operating Voice Command
Using Voice Command
1. Press the key on the steering wheel
controller. A display
will be shown at the top of the screen
followed by a “Please say a command”
system comment.
2. Once the icon becomes
displayed, say the desired voice command
(ex: “What's Playing”)
Note
●
Press the key shortly to interrupt the
system command feedback and enter a
voice command.
●
To terminate the voice control system, either
say “Exit” or press the key for over 0.8
second.
●
The system voice comment “Please say a
command” will not be stated when the
Command Feedback option is turned off.
●
For more information on the various voice
commands supported by the system, refer to
the “Command Help” or the “Voice
Command List” section.
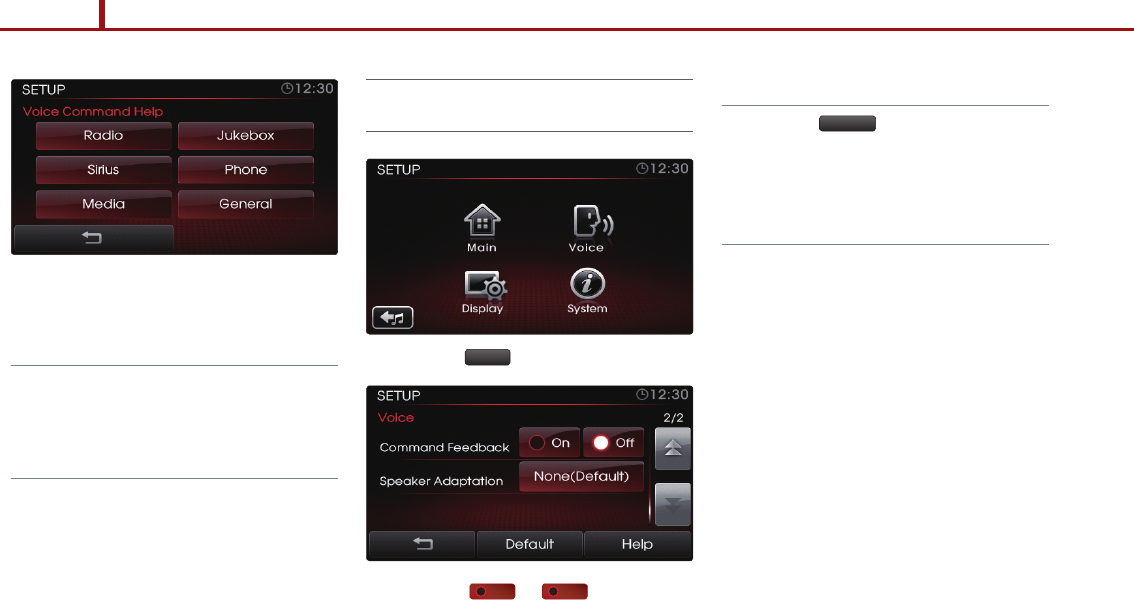
Voice Command Help
The Voice Command Help section provides
you with lists of commands that can be used
in each mode, adding ease and convenience
using voice commands.
1. Press the Voice button.
2. Press the Help button.
94 PART 4. VOICE COMMANDS
PART 4 VOICE COMMANDS
3. Press the mode to view a list of related
Voice Commands.
Note
●
The “help” command can be used even while
voice recognition dialogue is operating. At
such time, help instructions appropriate to
the state of the dialogue will be provided.
Turning Command Feedback On
and Off
1. Press the Voice button.
2. Press the On or Off button next to
the Command Feedback menu.
Note
●
Press the Default button to restore the
default setting.
●
Changes are saved as they are made. In
other words, once you change a setting, the
new setting will become saved.
PART 4. VOICE COMMANDS 95
PART
4
VOICE COMMANDS
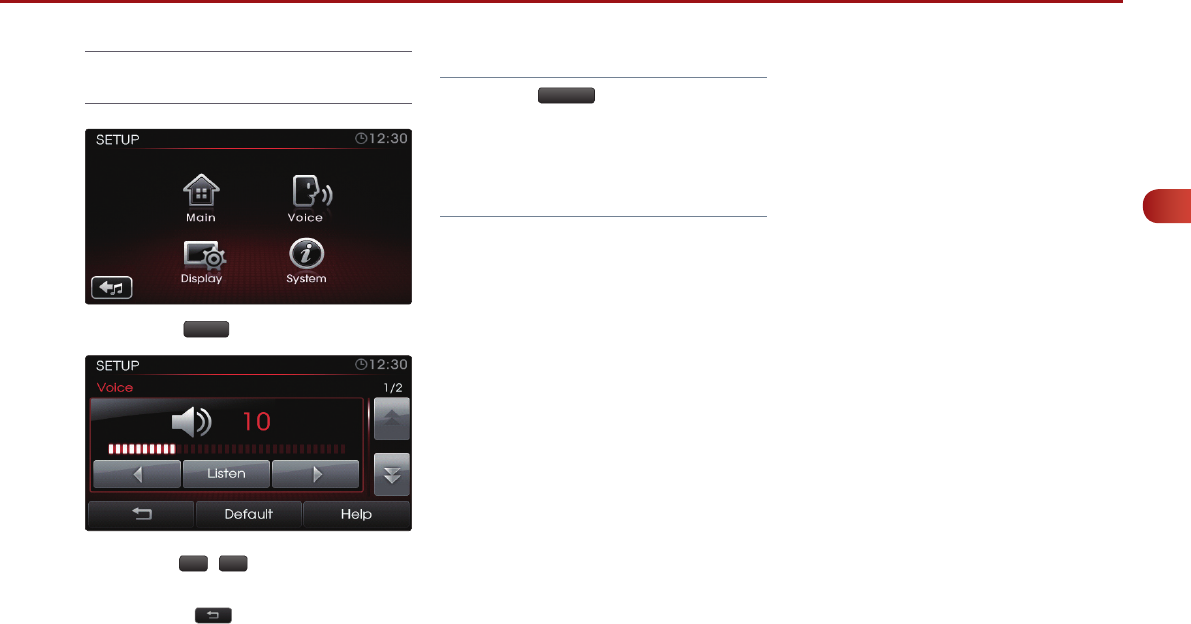
Adjusting Voice Command
Volume
1. Press the Voice button.
2. Use the
◀
,
▶
buttons to adjust the
voice command volume.
3. Press the button to return to the
Setup screen.
Note
●
Press the Default button to restore the
default setting.
●
Changes are saved as they are made. In
other words, once you change a setting, the
new setting will become saved.
96 PART 4. VOICE COMMANDS
PART 4 VOICE COMMANDS
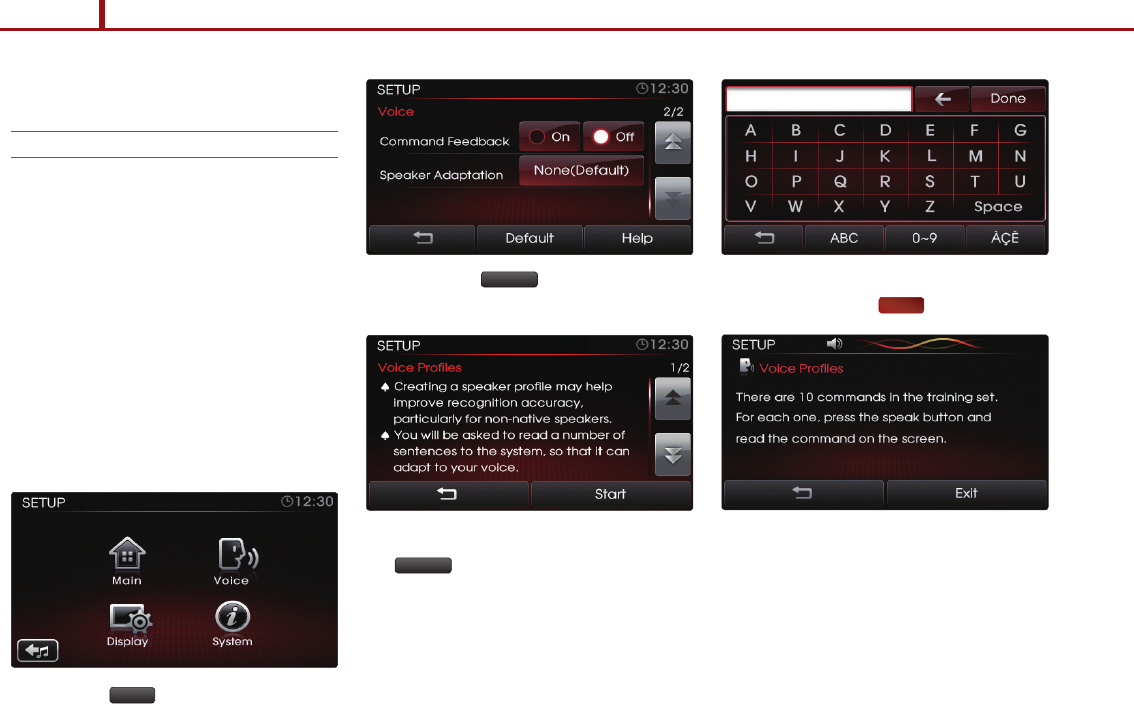
Speaker Adaptation
Creating a Voice Profile
The Voice Command feature in the UVO
system allows you to create speaker profiles
in order to maximize recognition accuracy.
You will be asked to read a number of
sentences to the system so that it can adapt
to your voice. Creating a profile takes
approximately several minutes and must be
done while the vehicle is parked. You can
quit/resume a reading session, but the
system cannot be interrupted while it is
creating the profile.
1. Press the Voice button.
2. Press the Default button next to the
Speaker Adaptation menu.
3. After reading the instructions, press the
Start
button.
4. Input the name of the profile you wish to
use and press the Done button.
5. Follow the training set as shown on the
screen.
PART 4. VOICE COMMANDS 97
PART
4
VOICE COMMANDS
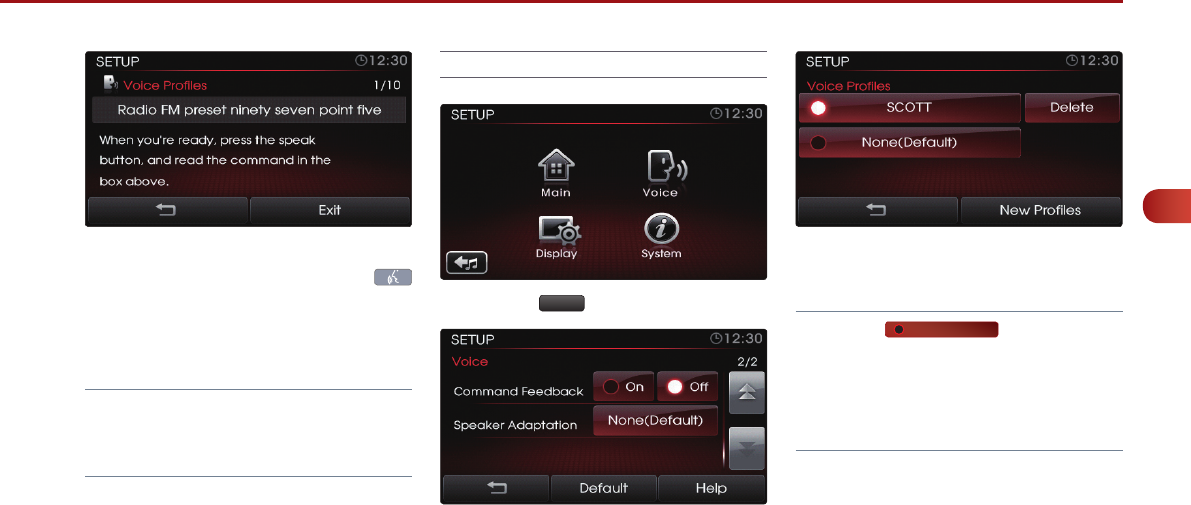
6. As each of the 10 commands become
displayed on the screen, press the
key then read the displayed sentence in
your natural tone.
Note
●
There are 10 commands in the training set.
For each one, press the speak button and
read the command on the screen.
Selecting a Previous Voice Profile
1. Press the Voice button.
2. Press the profile name button next to the
Speaker Adaptation menu.
3. Press the name of the profile.
Note
●
Press the None
(
Default
)
button to restore
the default profile.
●
Changes are saved as they are made. In
other words, once you change a setting, the
new setting will become saved.
98 PART 4. VOICE COMMANDS
PART 4 VOICE COMMANDS
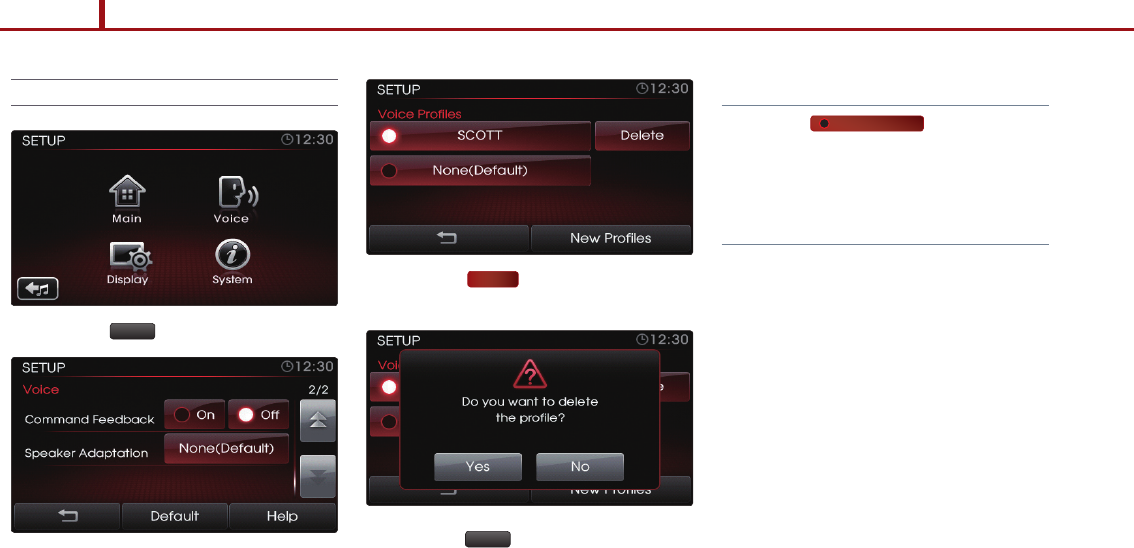
Deleting a Voice Profile
1. Press the Voice button.
2. Press the profile name button next to the
Speaker Adaptation menu.
3. Press the Delete button next to the name
of the profile.
4. Press the Yes button.
Note
●
Press the None
(
Default
)
button to restore
the default profile.
●
Changes are saved as they are made. In
other words, once you change a setting, the
new setting will become saved.

PART 4. VOICE COMMANDS 99
PART
4
VOICE COMMANDS
Voice Command List
The voice commands for this system are
divided into Global commands and Local
commands.
●
Global commands (
●
) : Commands that
operate in all modes.
●
Local commands (
○
) : Commands that
operate only in corresponding modes or
when screens of corresponding modes are
displayed.
Command List - General Commands
Command Operation
●
Exit / Quit / Cancel Terminate the voice control system
○
Go back Returns to the previous step.
●
Repeat Repeats the system prompt.
●
Help Provides instruction on the voice command
necessary for the current situation.
●
Voice command feedback {on, off} Turns command feedback on/off.

100 PART 4. VOICE COMMANDS
PART 4 VOICE COMMANDS
Command List - Audio Commands
1.FM/AMRadio
2.SIRIUS
Command Operation
●
Radio Plays the most recent frequency for the most recent band
●
Radio {FM, AM} Plays the most recent frequency for the corresponding Band.
●
Radio {87.5 - 107.9} FM Plays the selected FM band frequency.
●
Radio {530 - 1710} AM Plays the selected AM band frequency.
●
Radio FM preset {1 - 12} Plays the selected FM preset.
●
Radio AM preset {1 - 6} Plays the selected AM preset.
What's playing? Reads back Radio station information.
Command Operation
●
Sirius Plays the most recent SIRIUS channel.
●
Sirius preset {1 - 18} Plays the selected Sirius preset.
●
Sirius channel {0 - 223} Plays the selected Sirius channel.
What's playing? Reads back SIRIUS channel information.

PART 4. VOICE COMMANDS 101
PART
4
VOICE COMMANDS
3. MEDIA
Command Operation
●
Play {zune, iPod, USB, CD} Plays the selected media mode.
●
Play {Bluetooth
Ⓡ
audio, AUX} Plays the selected media mode.
●
Play artist {artist name} Plays songs of the selected artist.
●
Play album {album name} Plays songs of the selected album.
●
Play track {track name} Plays the selected track.
●
Play playlist {playlist name} Plays songs of the selected playlist.
●
Play genre {genre} Plays songs of the selected genre
●
Play audiobook {title} (iPod only) Plays the selected audiobook.
●
Play podcast {podcast} (iPod only) Plays the selected iPod podcast.
●
Play composer {composer} Plays songs for the selected composer.
What's playing? Reads back the current song information.
Repeat {on, off} Turns the repeat feature on or off.
Shuffle {on, off} Turns the shuffle feature on or off.
●
Play {CD, zune, iPod, USB} artist {name} Plays songs for the selected artist in the selected media mode.
●
Play {CD, zune, iPod, USB} album {name} Plays songs for the selected album in the selected media mode.
●
Play {CD, zune, iPod, USB} track {name} Plays the selected track in the selected media mode.
●
Play {CD, zune, iPod, USB} playlist {name} Plays the selected playlist in the selected media mode.
●
Play {CD, zune, iPod, USB} genre {genre} Plays songs for the selected genre in the selected media mode.
●
Play {CD, zune, iPod, USB} composer {name} Plays songs for the selected composer in the selected media mode.
●
Play iPod audiobook {title} (iPod only) Plays the selected iPod audiobook.
●
Play iPod podcast {podcast} (iPod only) Plays the selected iPod podcast.

102 PART 4. VOICE COMMANDS
PART 4 VOICE COMMANDS
4. JUKEBOX
Command Operation
●
Play JUKEBOX Plays the JUKEBOX mode.
●
Play JUKEBOX Favorites Plays songs of JUKEBOX Favorites
●
Play artist {artist name} Plays songs of the selected artist
●
Play album {album name} Plays songs of the selected album.
●
Play track {track name} Plays the selected track.
●
Play playlist {playlist name} Plays songs of the selected playlist.
●
Play genre {genre} Plays songs of the selected genre
●
Play composer {composer} Plays songs of the selected composer.
What's playing? Reads back the current song information.
Add to favorites Adds the current song to favorites.
Remove from favorites Removes the current song from favorites.
Repeat {on, off} Turns the repeat feature on or off.
Shuffle {on, off} Turns the shuffle feature on or off.
●
Play JUKEBOX artist {artist name} Plays songs of the selected JUKEBOX artist.
●
Play JUKEBOX album {album name} Plays songs of the selected JUKEBOX album.
●
Play JUKEBOX track {track name} Plays the selected JUKEBOX track.
●
Play JUKEBOX playlist {name} Plays the selected JUKEBOX playlist.
●
Play JUKEBOX genre {genre} Plays songs of the selected JUKEBOX genre.
●
Play JUKEBOX composer {name} Plays songs of the selected JUKEBOX composer.

PART 4. VOICE COMMANDS 103
PART
4
VOICE COMMANDS
Command List - Phone Commands
Command Operation
●
Call {name} Calls the desired name.
●
Dial {number} Dials the desired number.
●
Call {name} at home Calls the desired person at the home number.
●
Call {name} at office Calls the desires person at the office number.
●
Call {name} on mobile Calls the desires person on the mobile number.
●
Dial by number Starts dial by number operation.
●
Call a contact Starts call by name operation.
●
Phone Turns on Phone mode screen.
●
Dial international Starts international call operation.
●
Phone connections Turns on Phone connections screen.
●
Phone settings Turns on Phone settings screen.
●
SMS Reads back new SMS message
for Bluetooth
Ⓡ
wireless technology SMS capable phones.
●
Read SMS Reads back new SMS message
for Bluetooth
Ⓡ
wireless technology SMS capable phones.
●
Recent calls Turns on Recent Calls list screen.

MEMO

REAR VIEW CAMERA
contents
PART 5. Table of contents 105
PART 5 REAR VIEW CAMERA
About Rear View Camera
106
PART 5 Table of contents
106 PART 5. REAR VIEW CAMEARA
PART 5 REAR VIEW CAMERA
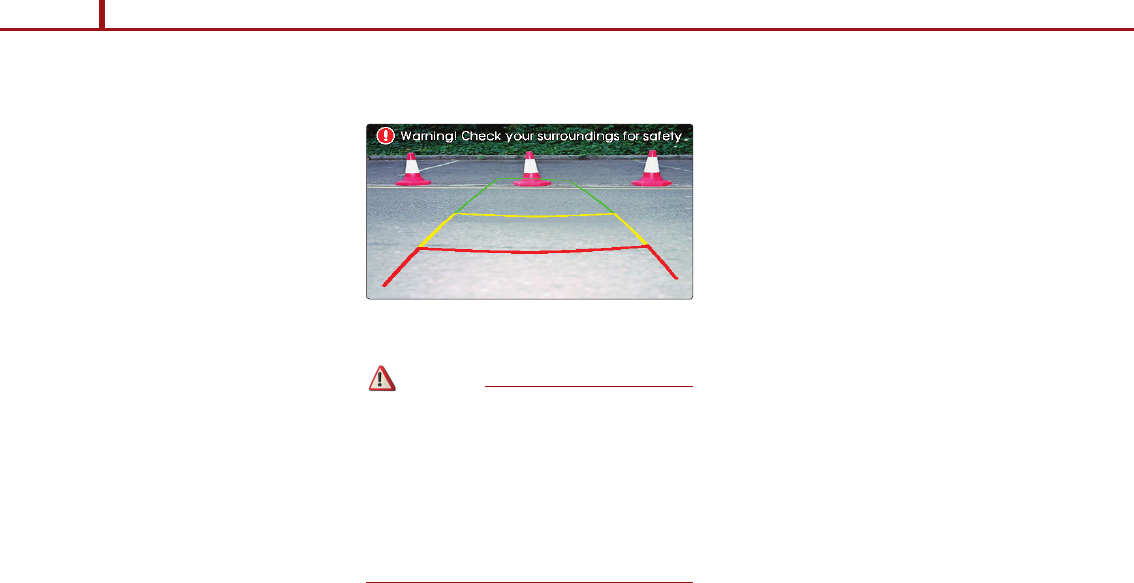
About Rear View Camera
●
The UVO system is connected with a rear
view camera.
●
The Rear View Camera System uses an
exterior camera integrated to the rear of the
vehicle that sends video feedback to the
UVO system.
●
Regardless of the mode you are in, placing
the transmission in “ R ” will automatically
display the rear view camera screen.
1. Place the transmission in Reverse “ R ”.
2. The rear view camera will activate.
Warning
Check your surroundings for safety.
●
The rear view camera is equipped with an
optical lens necessary to acquire a wider
field of vision and may result in a display
which differs from the actual distance.
Always check the rear and left/right
directions when driving in reverse.

Troubleshooting guide
PART 6. Table of contents 107
contents
PART 6 TROUBLESHOOTING GUIDE
Before thinking the product has
malfunctioned
108
Troubleshooting
…………………………………
109
PART 6 Table of contents

108 PART 6. Troubleshooting guide
PART 6 Troubleshooting guide
Troubleshooting guide
Before thinking the product has malfunctioned
1. Errors which occur during the operation or installation of the device may be mistaken as a malfunction of the actual device.
2. If you are having problems with the device, try the suggestions listed below.
3. If the problems persist, contact your point of purchase or the nearest service center.
Problem Function
There are small red, blue, or green dots on
the screen
Because the LCD is manufactured with technology requiring high point density, a pixel
deficiency or lighting may occur within 0.01% of total pixels.
The sound or image is not working
●
Has the Switch for the vehicle been turned to [ACC] or [ON]?
●
Has the SYSTEM been turned OFF?
The sound is not working
●
Has the volume been set to a low level?
●
Has the volume been set on mute?
When the power is turned on, the
corners of the screen are dark
●
The display looking somewhat darker after prolonged periods of use is a normal phenomenon
with LCD panels. It is not a malfunction.
●
If the screen is very dark, contact your point of purchase or the nearest service center.
Sound is working from only one speaker
●
Is the position of FAL/BAL sound controls or volume adjusted to only one side?
Sound does not work in AUX mode Is the audio connector jacks fully inserted into the AUX terminal?

PART 6. Troubleshooting guide 109
PART
6
Troubleshooting guide
Troubleshooting
Problem PossibleCause Solution
The power does not turn on. The fuse is disconnected. Replace with a suitable fuse. If the fuse is disconnected again,
please contact your point of purchase or service center.
Device is not properly connected. Check to see that the device has been properly connected.
The sound does not work.
●
The volume level is set the lowest level.
●
The connector is not properly connected.
●
The device is currently fast-forwarding,
rewinding, scanning, or playing in slow mode.
●
Adjust the volume level.
●
Check the connection state.
●
The sound will not work when the device is fast-forwarding,
rewinding, scanning, or playing in slow mode.
The sound quality is low.
●
The DISC is dirty or scratched.
●
Vibration is occurring from the position in which
the conversion switch has been installed.
●
Wipe off water or dirt from the DISC. Do not use a disc which
has been scratched.
●
The sound may be short-circuited and the image distorted if
the device begins to vibrate. The device will return to normal
operation once the vibration has stopped.

110 PART 6. Troubleshooting guide
PART 6 Troubleshooting guide
Problem PossibleCause Solution
The USB does not work.
●
USB memory is damaged.
●
USB memory has been contaminated.
●
A separately purchased USB HUB is being
used.
●
A USB extension cable is being used.
●
A USB which is not a Metal Cover Type USB
Memory is being used.
●
A HDD type, CF, SD Memory is being used.
●
There are no music files which can be played.
●
Please use after formatting the USB into FAT 12/16/32 format.
●
Remove any foreign substances on the contact surface of the
USB memory and multimedia terminal.
●
Directly connect the USB memory with the multimedia
terminal on the vehicle.
●
Directly connect the USB memory with the multimedia
terminal on the vehicle.
●
Use a standard USB Memory.
●
Use a standard USB Memory.
●
Only MP3,WMA file formats are supported. Please use only
the supported music file formats.
The iPod is not
recognized even though
it has been connected.
●
There are no titles which can be played.
●
The iPod firmware version has not been
properly updated.
●
The iPod device does not recognize
downloads.
●
Use iTunes to download and save MP3 files into the iPod.
●
Use iTunes to update the firmware version and reconnect the
iPod with the device.
●
Reset the iPod and reconnect with the device.

PART
7
INDEX
PART 7. Table of contents 111
PART 7 INDEX
INDEX
112
PART 7 Table of contents

112 PART 7. INDEX
PART 7 INDEX
INDEX
A
About iPod
52
About Rear View Camera
106
About zune
56
Adding Favorites
64
Adjusting Voice Command Volume
95
Answering an incoming call
78
AUDIO CD MODE
36
AUDIO CD Mode Screen and Features
38
Automatic Brightness Control
20
AUX MODE
59
AUX Mode Screen
59
B
Basic Features
14
Before thinking the product has
malfunctioned
108
BT AUDIO MODE
60
BT Mode Screen and Features
60
by Artists, Albums, Genres, Songs
Composers
42, 64
By Artists, Albums, Genres, Songs, Podcasts,
Composers, Audiobooks
54
By contact list
79
By dialing a number
79
by Folders, Artists, Albums, Genres Songs,
Composers
49
By name
82
By number
83
By recent calls
80
By Songs, Genres, Albums, Artists,
Playlists
58
C
Call waiting
78
Cautions upon handling Audio CDs
36
Cautions upon handling MP3 CD
40
Cautions upon handling USB MP3
45
Changing passkey
89
Checking an SMS message
85
Checking missed calls
84
Checking System Information
66
Command List - Audio Commands
100
Command List - General Commands
99
Command List - Phone Commands
103
Common Features
34
Conditions for voice command system
92
Connecting a handset device
74
Connecting an AUX media device
59
Connecting your iPod device
52
Connecting your USB device
47
Connecting your zune device
56
Contact list
81
Contacts Sync
88
Control Panel
10
Controls and Features
10
Copying songs into JUKEBOX
43, 50
Copying songs from list
44, 51
Copying the current song
43, 50
Creating a Voice Profile
96
D
Deleting a paired handset device
73
Deleting a Voice Profile
98
Deleting all files
67
Deleting JUKEBOX
66
Display Settings
20
Downloading contact list
(from mobile phone)
81, 85
Downloading SMS messages
(from mobile phone)
85

PART 7 . INDEX 113
PART
7
INDEX
E
Editing Custom Messages
85
Ejecting a Disc
38
Explore CD
43
Explore USB
49
F
FADER/BALANCE
17
FCC Information
7
first time
72
FM/AM MODE
26
FM/AM Mode Screens and Features
26
FM/AM Radio
100
I
INDEX
112
Initializing the system
16
Inserting a Disc
38
Inserting/Ejecting a Disc
38
iPod MODE
52
iPod Mode Screen and Features
53
J
JUKEBOX
102
JUKEBOX MODE
62
JUKEBOX Mode Screen and Features
62
Jump
35
L
Listening to an Audio CD
39
Listening to an MP3 CD
41
Listening to AUX media
59
Listening to JUKEBOX
63
Listening to music from your Bluetooth
Ⓡ
wireless technology enabled device
61
Listening to the FM/AM radio
27
Listening to the SIRIUS radio
30
Listening to USB music
48
Listening to your iPod
53
Listening to your zune
57
M
Manual Brightness Control
20
MEDIA
101
MEDIA MODE
34
Memory Management
66
MP3 CD MODE
40
MP3 CD Mode Screen and Features
41
O
Operating Voice Command
93
P
Pairing a Bluetooth
Ⓡ
wireless technology
enabled device for the first time
72
Pairing your handset device to the handsfree
system
72
Phone Mode Screens and Features
76
Phone settings
87
Placing a call
79
Play/Pause
34
Playing Favorites
65
Power Bass (Optional)
19
Precautions upon handling USB
46
Preset Scan
29
R
Rejecting an incoming call
78
Resetting and Initializing UVO system
15
Resetting the system
15
REW/FF
34
REW/FF a song
61

114 PART 7. INDEX
PART 7 INDEX
S
Safety Precautions
8
Safety Symbols
7
Scanning FM/AM broadcast frequencies
29
Searching your contacts
82
Select Display Language
15
Selecting a broadcast frequency
27
Selecting a CD track
39
Selecting a JUKEBOX song
63
Selecting a Previous Voice Profile
97
Selecting a SIRIUS channel
30
Selecting a song
61
Selecting an MP3 CD song
42
Selecting from MP3 list
42
Selecting from the playlist
49, 54, 57, 63
Selecting iPod music
54
Selecting through channel search
31
Selecting through manual search
28, 31, 39, 42, 48, 54, 57, 63
Selecting through preset
28, 31
Selecting through SEEK
27, 30
Selecting through SIRIUS category list
32
Selecting through song Up/Down
42, 48, 54, 57, 63
Selecting through Track Up/Down
39
Selecting USB music
48
Selecting zune music
57
Sending an SMS message (Custom
Messages)
85
Setting Brightness
20
Setting Phone Volume
87
Setting Priority
74
SIRIUS
100
SIRIUS MODE
30
SIRIUS Mode Screen and Features
30
Smart driving practices
71
SMS
85, 59
Sound and Display Settings
17
Sound Settings
17
Speaker Adaptation
96
Speed Dependent Volume Control
18
Steering Wheel
12
Storing preset
33
Storing presets
28
Switching the call between handsfree and
handset device
86
System Power
14
T
TONE
18
Touch Screen Beep
18
Trademark
52, 56
Transferring a call on your Handset device to
handsfree
86
Transferring the handsfree call to your Handset
device
86
Troubleshooting
109
Turn Streaming Audio On and Off
87
Turn Text Scroll On and Off
22, 93
Turning Command Feedback On and Off
94
Turning Display On and Off
21
Turning System Power Off
14
Turning System Power On
14
U
USB MODE
45
USB Mode Screen and Features
47
Using Repeat
35
Using Shuffle
35
Using Skip
32
Using the phone features
76
Using your Bluetooth
Ⓡ
wireless technology
Handsfree system
70

PART 7 . INDEX 115
PART
7
INDEX
V
Viewing SIRIUS channel information
33
Viewing song information
43, 50, 55, 58
Voice Command Help
93
Voice Command List
99
W
When a mobile phone is connected
76
When making a call
76
When on a call
77
When receiving an incoming call
77
Z
zune MODE
56
zune Mode Screen and Features
56

116 PART 7. INDEX
FCC Warning
This equipment has been tested and found to comply with the limits for a Class A digital device, pursuant to part 15 of the FCC Rules.
These limits are designed to provide reasonable protection against harmful interference in a residential installation. This equipment
generates, uses and can radiate radio frequency energy and, if not installed and used in accordance with the instructions, may cause
harmful interference to radio communications. However, there is no guarantee that interference will not occur in a particular
installation. If this equipment does cause harmful interference to radio or television reception, which can be determined by turning the
equipment off and on, the user is encouraged to try to correct the interference by one or more of the following measures:
•Reorient or relocate the receiving antenna.
•Increase the separation between the equipment and receiver.
•Connect the equipment into an outlet on a circuit different from that to which the receiver is connected.
•Consult the dealer or an experienced radio/TV technician for help.
Caution: Any changes or modifications to this device not explicitly approved by manufacturer could void your authority to operate this
equipment.
This device complies with part 15 of the FCC Rules. Operation is subject to the following two conditions: (1) This device may not
cause harmful interference, and (2) this device must accept any interference received, including interference that may cause undesired
operation.
This equipment complies with FCC radiation exposure set forth for an uncontrolled environment.
This equipment should be installed and operated with minimum 20 cm between the radiator and your body.
This transmitter must mot be collocated or operating in conjunction with any other antenna or transmitter unless authorized to do so by the FCC.

PART 7 . INDEX 117
IC Warning
PART
7
INDEX
This device complies with Industry Canada licence-exempt RSS standard(s).
Operation is subject to the following two conditions : (1) this device may not cause interference, and
(2) this device musrt accept any interference, including interference that may cause undesired operation of the device.
Le présent appareil est conforme aux CNR d′Industrie Canada applicables aux appareils radio exempts de licence.
L′exploitation est autorisée aux deux conditions suivantes : (1) l′appareil ne doit pas produire de brouillage, et
3RMS7B0001

3REND03