HYUNDAI MOBIS AN340ETAN CAR AVN User Manual 1
HYUNDAI MOBIS CO., LTD. CAR AVN 1
UserManual.wiki
>
HYUNDAI MOBIS
>
AN340ETAN User Manual
>
User manual -2
Contents
1.
User manual -1
2.
User manual -2
User manual -2
Navigation menu
Upload a User Manual
Namespaces
Wiki Guide
HTML
PDF
Info
Views
User Manual
Discussion / Help
Navigation
![While playing ▶Shortly push the controller left/right (under 0.8 seconds) or shortly press the [SEEK], [TRACK] key to select the previous/next song.Notice• The title/artist info may not be supported in some mobile phones.•Play/Pause, Previous/Next function may not be supported in some mobile phones.Selecting Bluetooth AudioBluetooth AudioBT Audio](https://usermanual.wiki/HYUNDAI-MOBIS/AN340ETAN.User-manual-2/User-Guide-1768222-Page-1.png)
![Auto Playlist mode can be exited by starting a different AV mode or by pressing [Exit Auto Playlist] within [MENU]. Press the [MENU] key ▶Select [Auto Playlist]The Auto Playlist feature is supported only within DISC CD, USB Audio, and Jukebox Audio modes.Notice• Auto Playlist is a Gracenote feature and will operate only after song information has been checked.List of songs similar with the current song is displayed.Once the desired song is selected, then Auto Playlist mode will operate.Press Back to cancel viewing Auto Playlist.Exiting Auto PlaylistAuto PlaylistAuto PlaylistAuto Playlist](https://usermanual.wiki/HYUNDAI-MOBIS/AN340ETAN.User-manual-2/User-Guide-1768222-Page-2.png)
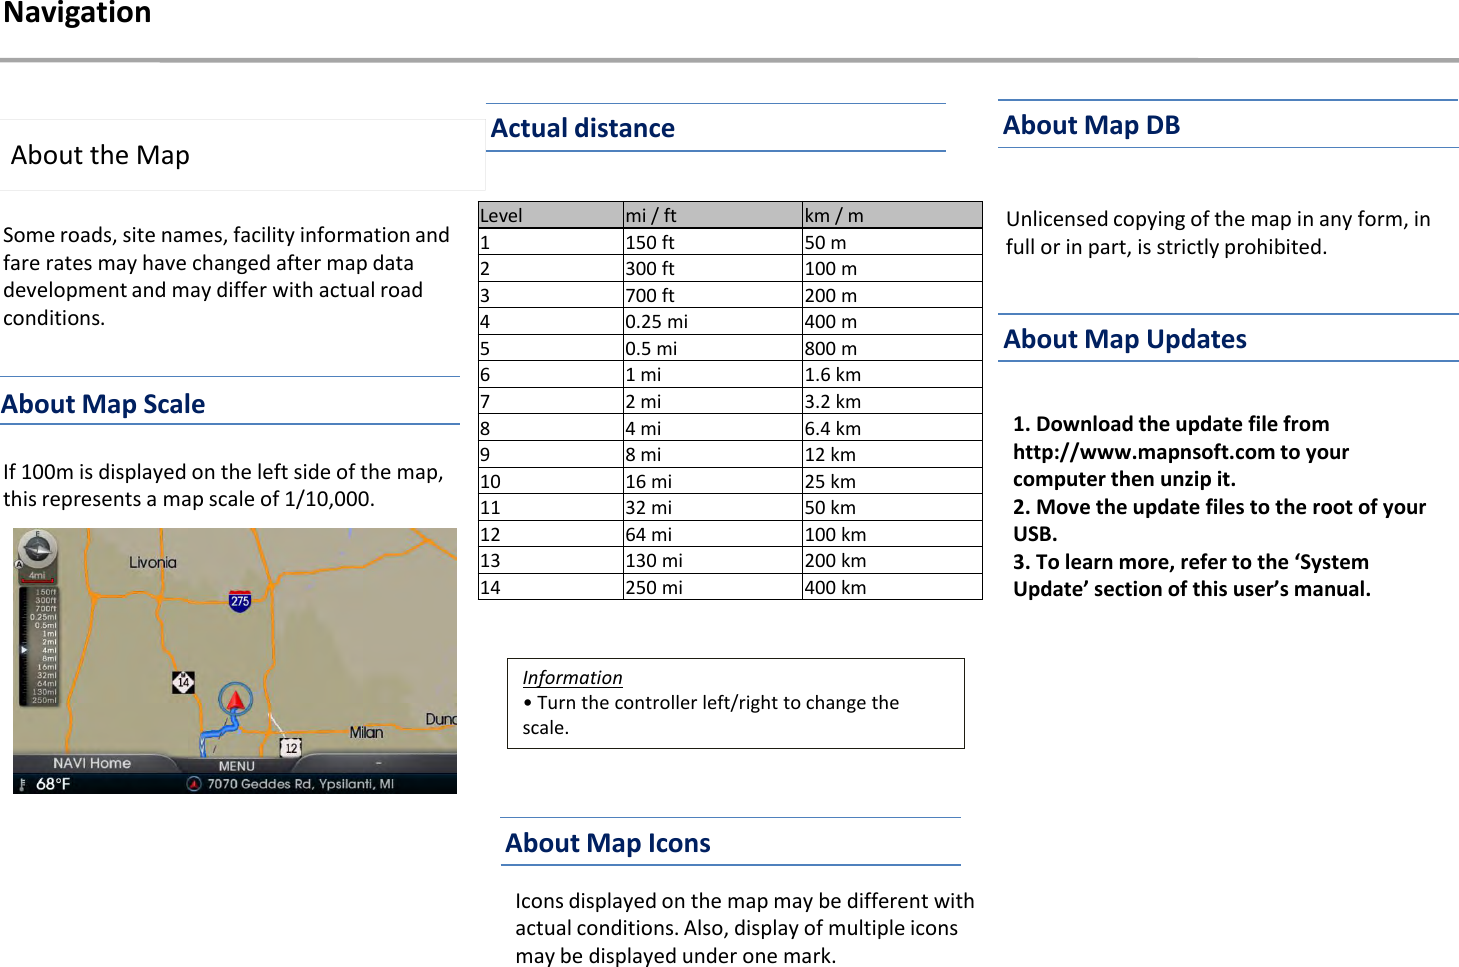
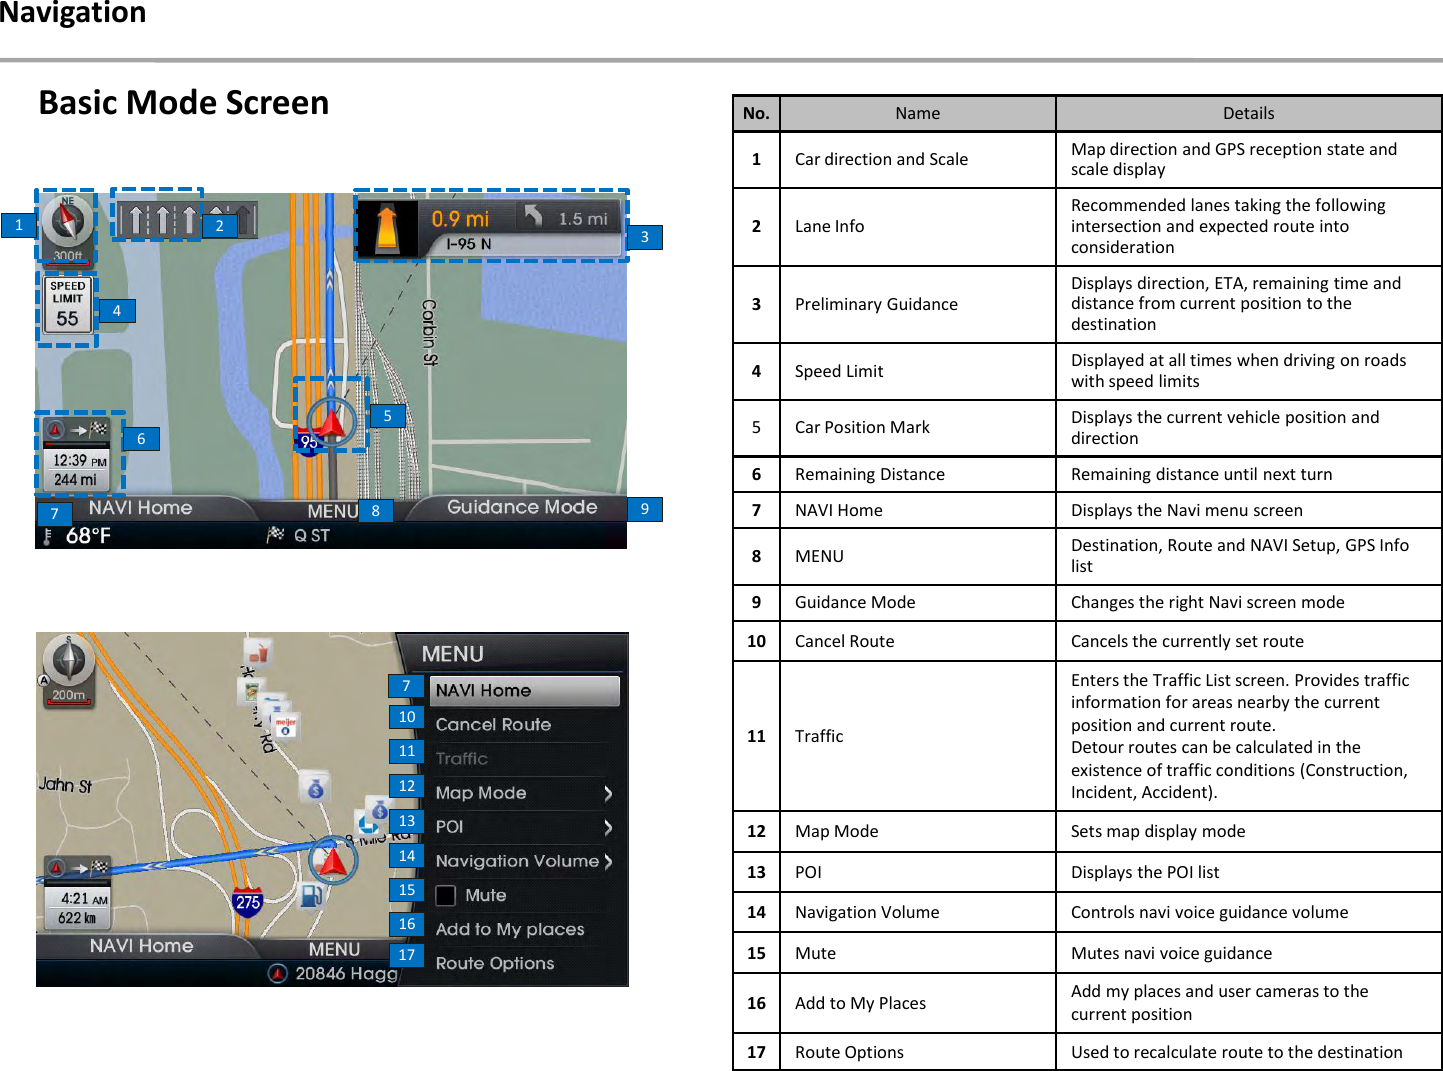
![Press the [MAP VOICE] key within any mode while using to system to display the current position, vicinity and the current position mark. Information• When riding in a new car or after replacing the battery terminal, the car position mark may appear at a location different from your actual current position.• Even if the car position mark on the map is different, map matching or GPS info are used to automatically update the current position.NavigationPress the [MAP VOICE] key or press the [HOME] key ▶Turn the controller left/right and select Navigation ▶Navigation mode will start.Starting NavigationInformation• If you turn on AV mode while the Navigation is operating, only voice guidance will be provided. Press the [MAP VOICE] key ▶Press [MENU] ▶Select [Map Mode]12No. Name Details1HeadingUp/NorthUpDisplays map in Vehicle TravelingDirection (Heading Up)or theNorth-Up direction2AutoZoomSets whether to automaticallyadjust the map scale when thevehicle is in motionDisplaying the Current PositionChanging the Map Mode](https://usermanual.wiki/HYUNDAI-MOBIS/AN340ETAN.User-manual-2/User-Guide-1768222-Page-8.png)
![Press the [MENU] key ▶Select [Add to My Places]This feature is used to save the current position or the scrolled position as a My Place.To save the position, press the controller after selecting the desired group.Information• My Places are saved without distinction for the driving state or the scrolled state.• To edit or delete registered mark, refer to the ‘My places’section.Information• If the map scale is above 16mi, the map display mode will be changed automatically to 2D North-Up.This feature is used to set map screen related options, such as Heading up/North up, Auto Zoom setting.Press the [MAP VOICE] key ▶Press [MENU] ▶Select [POI]Within the screen when the POI menus are displayed, pressing one of the 6 facility icon buttons will display the corresponding facilities.123No. Name Details1POI Icons Sets POI facilities2Edit POI IconSets the 6 POI icons to thedesired genre through userediting3Search by LocalPOIMoves to Search by POIscreenNavigationAdd to My PlacesPOI](https://usermanual.wiki/HYUNDAI-MOBIS/AN340ETAN.User-manual-2/User-Guide-1768222-Page-9.png)
![Press the [DEST] key ▶Press [LFT Quick Menu button.No. Name Details1 Quick Lists Registered Quick menu lists2Edit QuickMenu Add and delete Quick menu lists3 Menu Lists Editable Quick menu lists4 Deselect All Unmark all selected Quick menu5 Done Finishes editing Quick menuInformation• Among 11 quick menus, Up to 7 quick menu can be added to Quick menu.23412351These menus allow you to set frequently used menu to Quick List.To add or delete Quick list, select the [RHT] Edit Quick Menu button. Press the [DEST] key ▶Press [ ]Favorites button.This feature is used to register frequently visited positions to favorites.Select the [RHT] Edit Favorite Place to add or delete favorites.NavigationQuick Menu Favorites](https://usermanual.wiki/HYUNDAI-MOBIS/AN340ETAN.User-manual-2/User-Guide-1768222-Page-11.png)
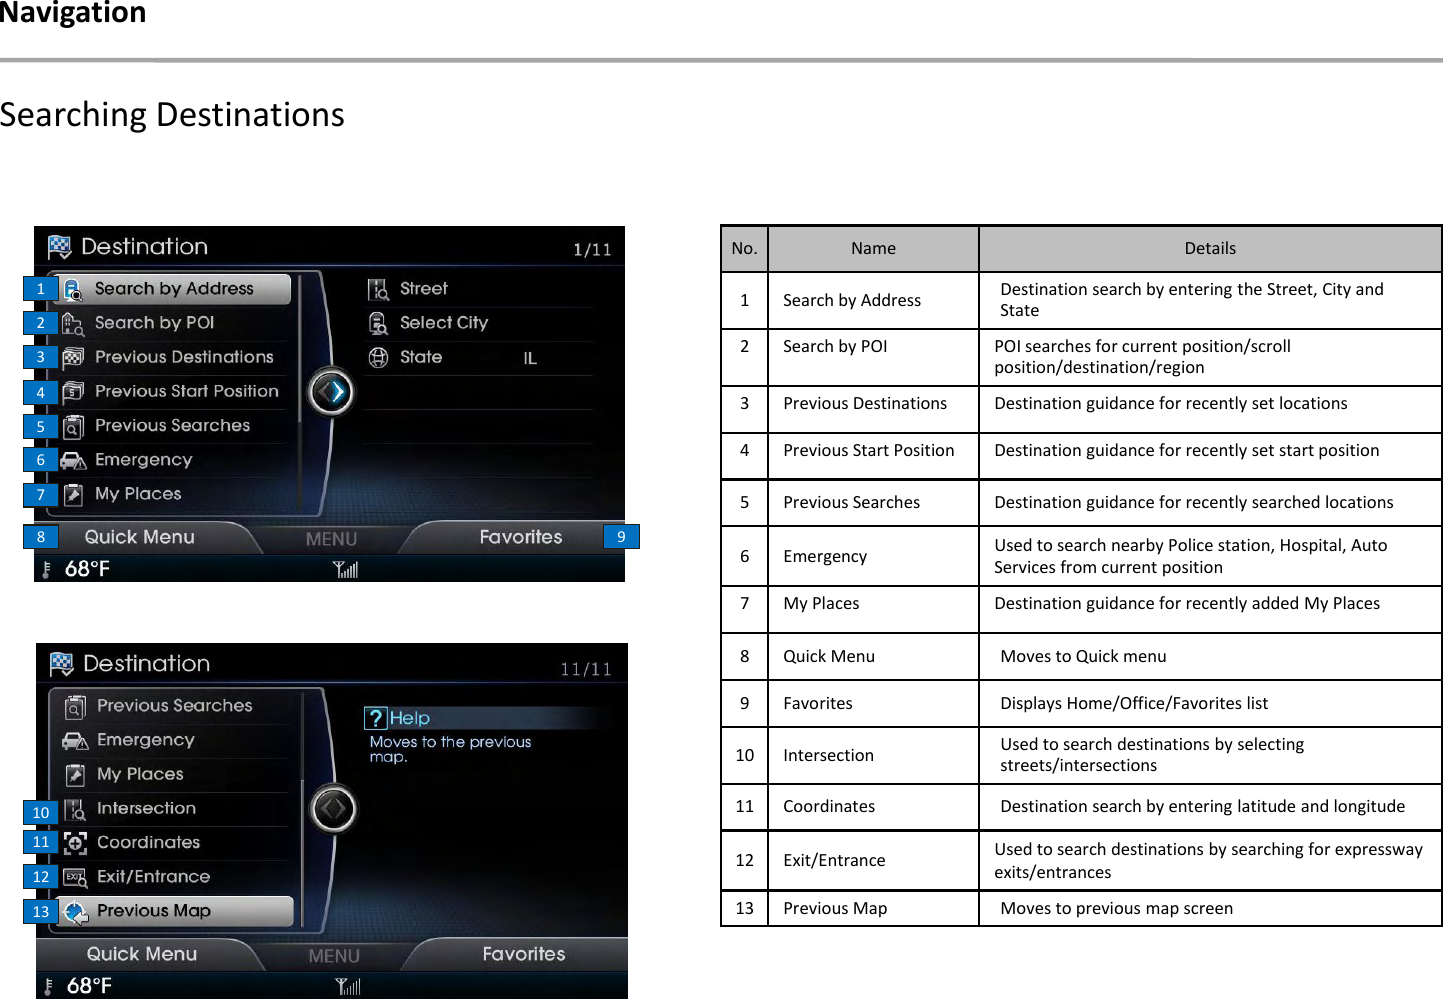
![Press the [DEST] key ▶Select [Search by Address] 123This search feature is used to search destinations by addresses through Street/City/State.No. Name Details1 Street Destination search by entering thestreet address2 Select City Destination search by entering thecity name3 State Selects statePress the [DEST] key ▶Select [Search by POI] ▶Select the desired CategoryNo. Name Details1 Favorites lists Registered Favorites lists2 Edit Favorites Add, edit, and delete Favorites3 Menu Lists Editable Quick Menu listsInformation• Up to 7 positions can be added to Favorites.NavigationNo. Name Details1 Category Search for POIs by selecting throughPOI categories2 ZAGATSearch for ZAGAT restaurant guidePOIs from among POIs within thevicinity3 Name Search POIs by name4PhoneNumberDestination search by entering thephone number5 State Selects stateAddress Search POI Search12345](https://usermanual.wiki/HYUNDAI-MOBIS/AN340ETAN.User-manual-2/User-Guide-1768222-Page-12.png)
![1234This search feature is used to search destinations by criteria (Near current position, Near scroll mark, Near destination)56No. Name Details1Nea r C ur r e ntPositionSearc hes POI around thevehicle's current position2 Near Scroll Mark searches facilities based on thecurrent scrolled position3NearDestinationsearches facilities based on thelocation of the destination4 Near city center searches facilities based on theselected location5 Category Selects POI categories6 POI Mark Selects POI marksThis feature is used to search the locations of POIs by entering the phone number of the facility you wish to search. When entering the phone number, the area code must be included.Press the [DEST] key ▶Select [Search by POI] ▶Select [Phone Number]Phone Number](https://usermanual.wiki/HYUNDAI-MOBIS/AN340ETAN.User-manual-2/User-Guide-1768222-Page-13.png)
![These search features allow you to search previous searches to use to set destinations or waypoints.Press the [DEST] key ▶Select [Previous Searches] Press the [DEST] key ▶Select [Emergency] This menu is used to search nearby police stations, hospitals, and dealerships.NavigationThese search features allow you to search previous start points to use to set destinations or waypoints.Press the [DEST] key ▶Select [Previous Start Position] Previous Start PositionInformation• The telephone number and location may not the same for some POIs. In addition, the following types of facilities may be more frequently located in other locations.• Locations of department stores, museums, and amusement parks may somewhat differ from the set destination. Check the exact address when trying to reach such destinations.• Within general information newspapers, there are cases when phone numbers of concert halls list the numbers of managing companies. In such cases, searches will be to the managing company. • The telephone number and addresses may change at any time.Previous DestinationsPress the [DEST] key ▶Select [Previous Destinations]These search features allow you to search previous routes to use to set destinations or waypoints.EmergencyPrevious Searches](https://usermanual.wiki/HYUNDAI-MOBIS/AN340ETAN.User-manual-2/User-Guide-1768222-Page-14.png)
![Press the [DEST] key ▶Select [My Places] This search feature is used to search destinations by selecting previously saved My Places from the list to set asDestinations.No. Name Details1 Sort Sort POIs and locations byname/symbol/date2 Add Adds a new place to My Placegroup3 Edit Edits selected place4 Delete Deletes selected place5 Delete All Deletes all registered places6E d i t g r o u pname Edits My Places group name12Press the [DEST] key ▶Select [Intersection]3456NavigationThis feature is used to set intersections as destinations by searching for the names of two streets and finding where they intersect. My Places Intersection](https://usermanual.wiki/HYUNDAI-MOBIS/AN340ETAN.User-manual-2/User-Guide-1768222-Page-15.png)
![Press the [DEST] key ▶Select [Coordinates]This feature is used to search the locations by entering longitude and latitude coordinate information.Press the [DEST] key ▶Select [Exit/Entrance] Information• When entering one digit number, 0(zero) should be entered first.NavigationExit/EntranceCoordinatesThis search feature is used to search destinations by entering the Exits and Entrances of corresponding expressways.Enter the name of the Freeway corresponding to the desired destination. Once search is complete, press the controller to select the desired location from the list.](https://usermanual.wiki/HYUNDAI-MOBIS/AN340ETAN.User-manual-2/User-Guide-1768222-Page-16.png)
![Press the [DEST] key ▶Select [Previous Map] NavigationN0. Name Details1Set asDestinationSets the facility or position wherethe cursor is positioned as the newdestination2AddWaypointSets the facility or position wherethe cursor is positioned as awaypoint3Add to MyPlacesAdds the facility or position wherethe cursor is positioned to MyPlaces4 POI Sets destination by searching POI5 CallMakes a all to the facility orposition where the cursor ispositionedThe previously displayed position is displayed by scrolling the map.23451After searching for the destination according to the map search method, select the desired destination from the list. (For more information on destination search methods, refer to the Destination Search section.)Press the [DEST] key ▶Search destination ▶Select [Set as Destination] Previous Map Set as DestinationAfter verifying the location of the searched position, select the [Set as Destination] button to calculate the route. The Route Overview or Multipath screen will be the displayed.](https://usermanual.wiki/HYUNDAI-MOBIS/AN340ETAN.User-manual-2/User-Guide-1768222-Page-17.png)
![<Alternative Route><Route Overview>Within the Route Overview or Alternative Route screen, press the [Map VOICE] key or select the [Start Guidance] button to begin guidance. To add a destination, select the [Add Waypoint] button.NavigationOnce route calculation is complete, select the [Simulation] button to view a demo of the route guidance.Information•The Alternative Route display can be turned off at [Navi Setup] ▶[Route Search] ▶Use Alternative Route Search• If you select the [Set as Destination] button while a previous destination has already been set, the pop-up ‘Do you want to change the destination?’is displayed.• If you select [Yes], then the previous destination is deleted and the new destination is set.• If you select [Add Waypoint], then a new waypoint is added.Information• To learn more about ‘Alternative Route’, ‘Route Overview’or ‘Detailed Route Settings’, refer to the ‘Route Menu’section.Simulation](https://usermanual.wiki/HYUNDAI-MOBIS/AN340ETAN.User-manual-2/User-Guide-1768222-Page-18.png)
![During Simulation, pressing the [Map] key will end the Simulation and display the current map position. If you start driving the vehicle while the simulation is in progress, simulation will end and route guidance will start.Information• Simulation will not operate after route guidance has begun. When wishing to use the simulation feature, do so after calculating the route but prior to receiving route guidance.NavigationSearching for the destination according to the map search method after searching for waypoints within the map screen, select the [Add Waypoint] button to add the waypoint to the current route.Information• For more information on Fastest, Shortest, and other calculating options, refer to the “Route Option”section.Selecting the [Route Options] will display a pop up that allows you to change route settings and conditions. Once the settings are changed, the route will be recalculated by reflecting the changes.In the map screen ▶Press the [MENU] key ▶Select [Add Waypoint] In the map screen ▶Press the [MENU] key ▶Select [Route Options] Route OptionsAdd Waypoint](https://usermanual.wiki/HYUNDAI-MOBIS/AN340ETAN.User-manual-2/User-Guide-1768222-Page-19.png)
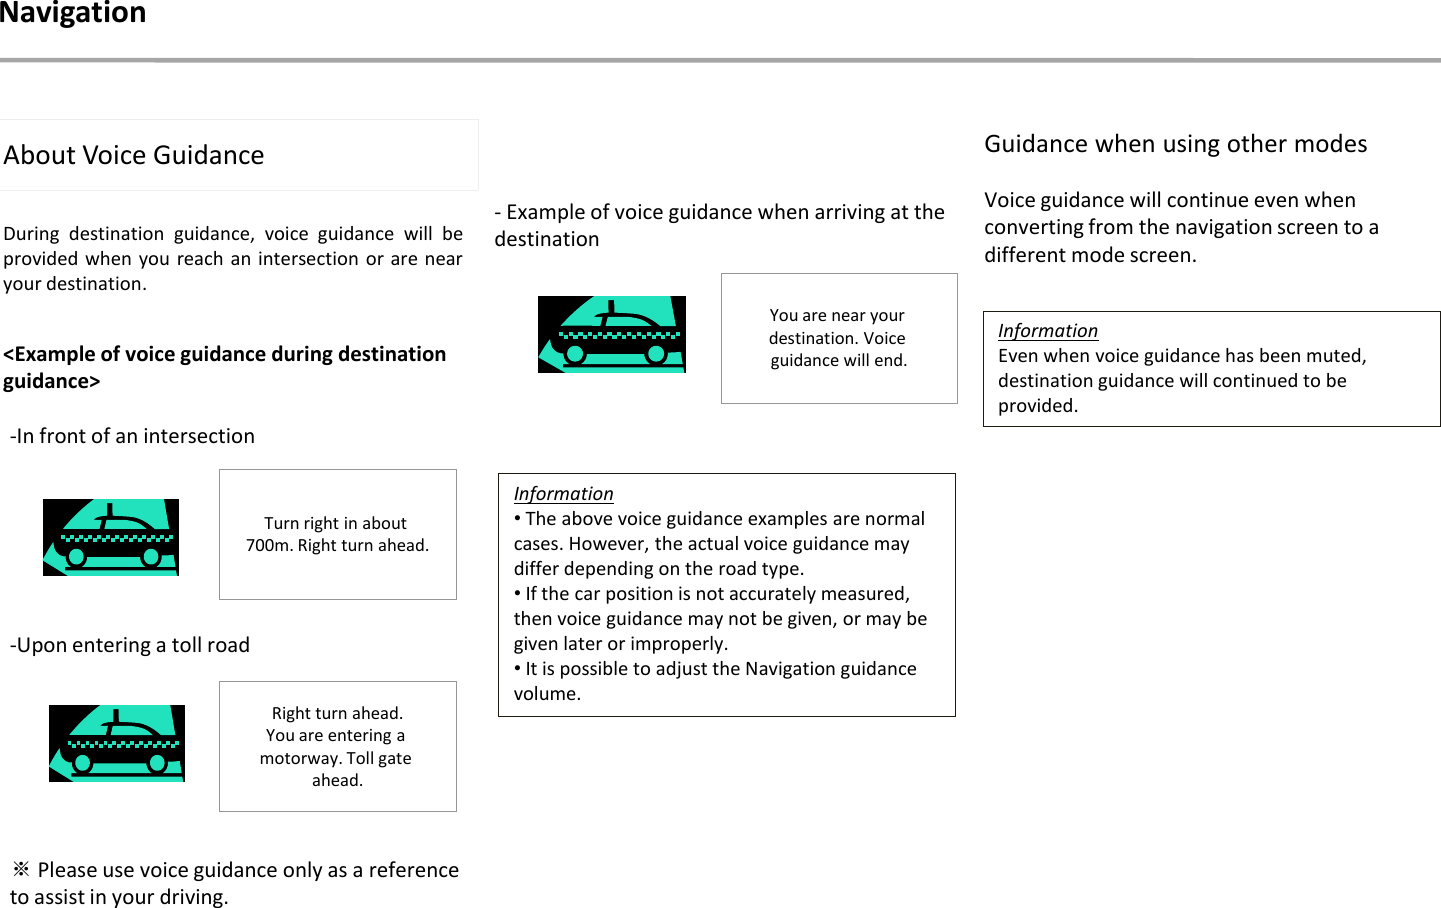
![The currently calculated route is canceled and deleted.NavigationIn the map screen ▶Press the [MENU] key ▶Select [Cancel Route] ▶Select [Yes]Within the destination guidance map screen, if the current position is on route, then intersection guidance will be provided when nearby an intersection. In addition, when nearby an intersection, the intersection zoom screen is displayed.The preliminary guidance, intersection guidance, turn list guidance, motorway mode screen are displayed depending on the current road condition.Information• Within all guidance mode screens, pressing [RHT] Guidance Mode button will change the route guidance mode.• Each time the [RHT] Guidance Mode button is selected, the guidance mode will change in order of single screen → motorway guidance → turn list mode.• Motorway and intersection zoom guidance are displayed on when receiving guidance at corresponding roads.At the top right side of the screen, the first and second turn info, remaining distance, direction and other information are displayed.Cancel Route Route GuidancePreliminary Guidance Mode](https://usermanual.wiki/HYUNDAI-MOBIS/AN340ETAN.User-manual-2/User-Guide-1768222-Page-20.png)
![This mode provides detailed guidance nearby intersections before an expected turn. This mode will start displaying before the intersection.This mode shows turn information for the current the route.Navigation<All><Summary>Upon entering a motorway during route guidance, the motorway mode will automatically be displayed. This mode is displayed when driving on an expected route and display mainly motorway related POIs.Information• Some POIs may not be displayed if seven(7) or more POIs exist within the position.Selecting [All], [Summary] at the bottom right side of the screen will change the route guidance mode.Press the controller left/right to switch display mode and check POI info list.Intersection Zoom ModeTurn List ModeMotorway Mode](https://usermanual.wiki/HYUNDAI-MOBIS/AN340ETAN.User-manual-2/User-Guide-1768222-Page-21.png)
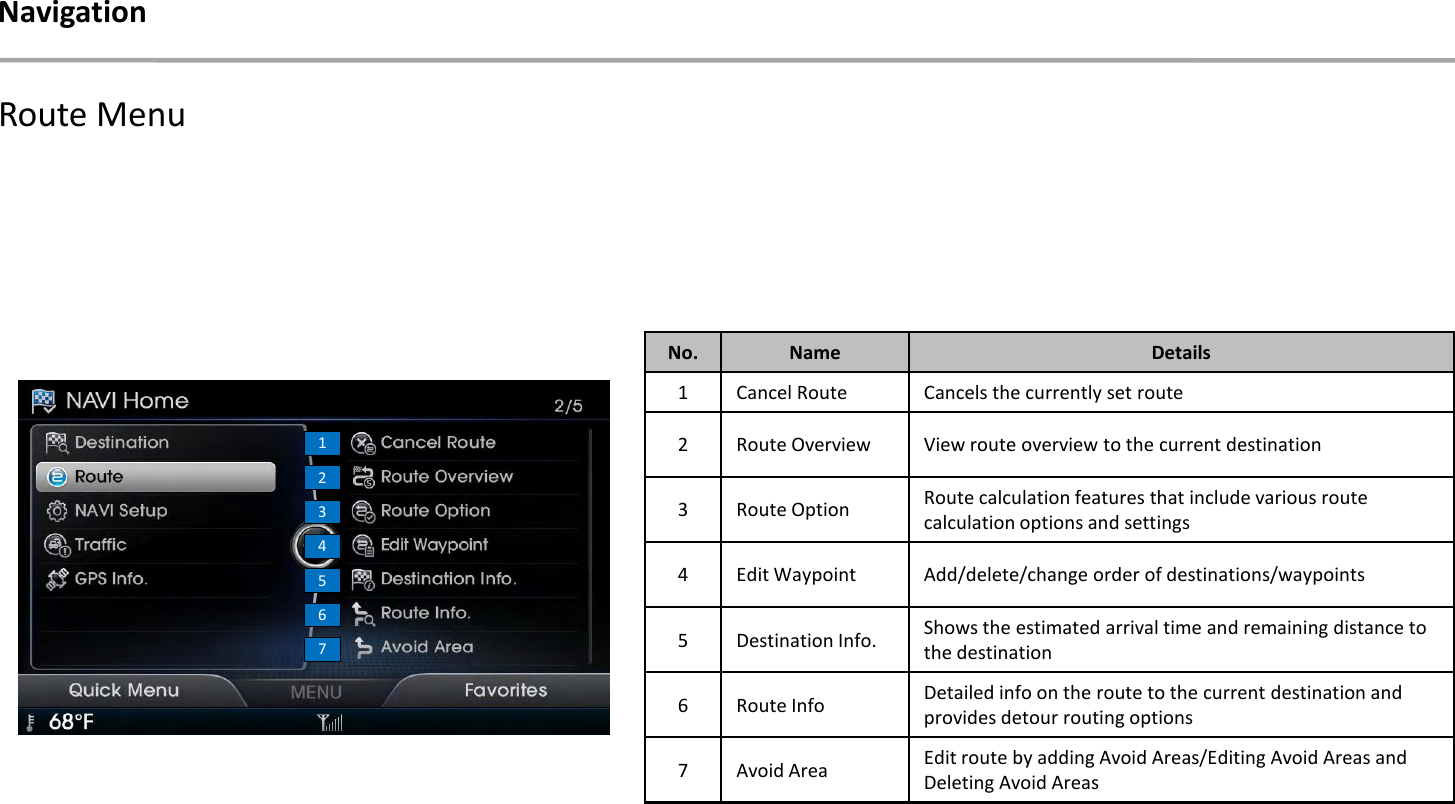
![12345Guidance to the current route is canceled.No. Name Details1StartGuidance Starts route guidance to the destination2 Edit Waypoint Add/delete/change order ofdestinations/waypoints3RouteInfo.Route guidance information to the setdestination and calculate detours4 Alt. RouteDisplays various alternative routeoptions to select the desired routecalculation method5 Simulation Route simulation to the set destinationWithin the Route Overview screen, selecting the [Alt. Route] button or setting ‘Calculate Alternative Routes upon Calculation’ within Navigation Setup will display alternative routes on the screen.No. Name Details1 Fastest Recommended route that reflectsdistance and traffic conditions2 Shortest The shortest distance from start pointto destination12NavigationIn the map screen ▶Press the [LFT] NAVI Home button ▶Select [Route] ▶Select [Cancel Route] ▶Select [Yes]In the map screen ▶Press the [LFT] NAVI Home button ▶Select [Route] ▶Select [Route Overview]Canceling the Route Route Overview](https://usermanual.wiki/HYUNDAI-MOBIS/AN340ETAN.User-manual-2/User-Guide-1768222-Page-23.png)
![This option provides calculates routes by reflecting the average speed of streets and roads to the destination.This option provides guidance by calculating the shortest distance route to the destination.Advanced settings allow you to set whether to include motorways, toll roads or ferries within route calculation.No. Name Details1MinimizeFreewayRoute calculation withminimal use of motorways2Minimize TollRoadsRoute calculation withminimal use of toll roads3 Use FerriesRoute calculation byincluding/not includingferries4Use HOV/CarPool lanesRoute calculation byincluding use of HOV lanes5 Use Toll pass Route calculation byincluding use of Easy Pass6 Traffic InfoRoute calculation byconsidering trafficinformationNavigationIn the map screen ▶Press the [LFT] NAVI Home button ▶Select [Route] ▶Select [Route Option]123456Route OptionFastestShortestAdvanced Settings](https://usermanual.wiki/HYUNDAI-MOBIS/AN340ETAN.User-manual-2/User-Guide-1768222-Page-24.png)
![This feature displays the start point, waypoints and thee destination in list format and is used to edit corresponding positions or edit the order of the destinations included within the route.In the map screen ▶Press the [LFT] NAVI Home button ▶Select [Route] ▶Select [Destination Info] This feature shows the estimated arrival time, remaining distance, waypoint information, and map of the destination.In the map screen ▶Press the [LFT] NAVI Home button ▶Select [Route] ▶Select [Route Info]This feature is used to check the key routes and re-set the route by setting detours for a fixed distance from the current positionNavigationIn the map screen ▶Press the [LFT] NAVI Home button ▶Select [Route] ▶Select [Edit Waypoint]Edit Waypoint Destination Info Route Info](https://usermanual.wiki/HYUNDAI-MOBIS/AN340ETAN.User-manual-2/User-Guide-1768222-Page-25.png)
![12345In the map screen ▶Press the [LFT] NAVI Home button ▶Select [Route] ▶Select [Avoid Area]It is possible to add/edit/delete avoid areas. Use the controller to set the range of the area you wish to avoid.No. Name Details 1Edit Name Edit name of Avoid Area2Edit Edit size and area of AvoidArea3Delete Delete set Avoid Area4Avoid Avoid the set area5Done Finalize settingNavigationIf you press the [Detour] button, you can set the size of the area to detour in 1/2/5/10 mile units. A route will be calculated by avoiding the set distance starting from the current position.Avoid Area](https://usermanual.wiki/HYUNDAI-MOBIS/AN340ETAN.User-manual-2/User-Guide-1768222-Page-26.png)
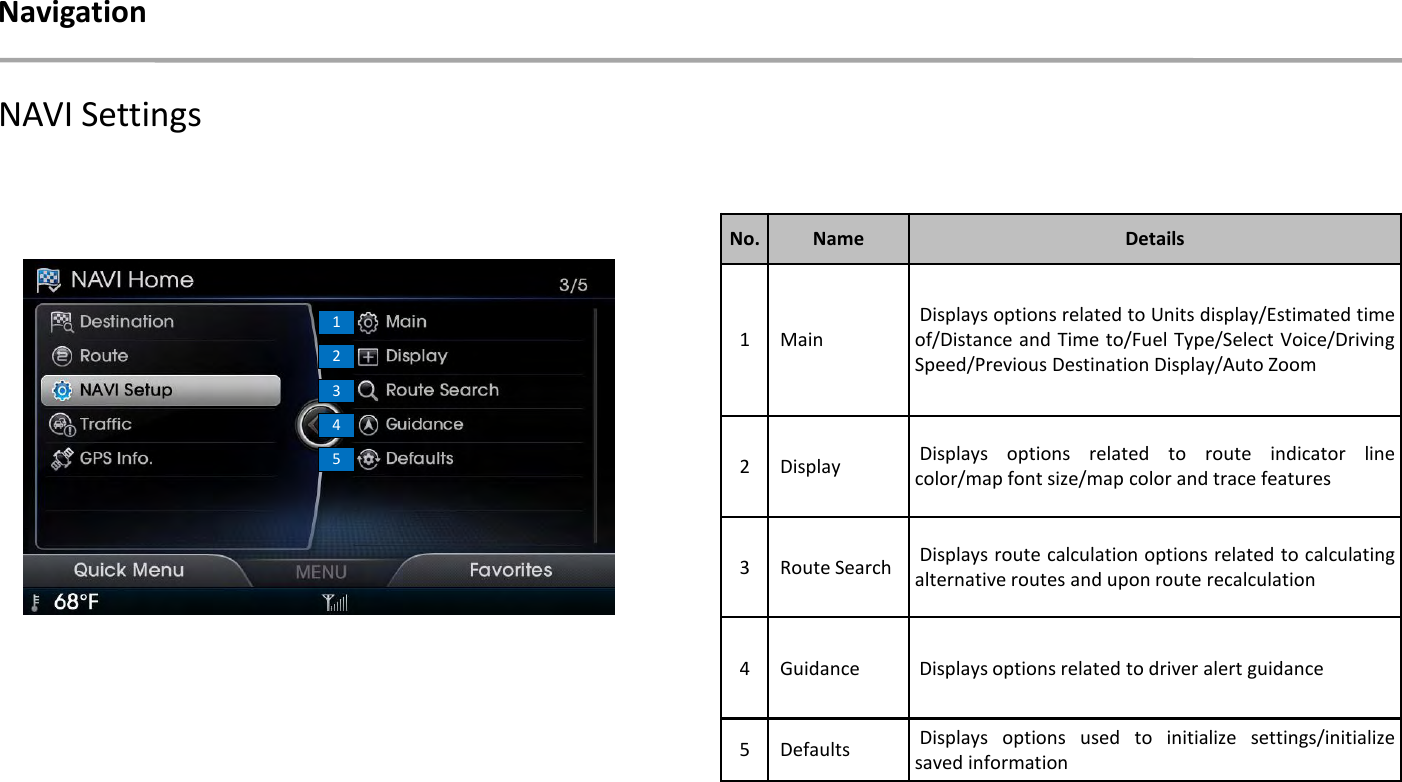
![In the map screen ▶Press the [LFT] NAVI Home button ▶Select [NAVI Setup]▶Select [Main]These menus are used to set general options related to Navigation mode.NavigationNoNameDetails1 Unit This option is used to set the unit when displaying the vehicle speed2Estimated Time ofThis option is used to set the estimated arrival time or the remaining time to the destination.3Distance and Time toThis option is used to set the distance and time to the destination or waypoint4Guidance PromptsThis option is used to set the navigation voice.5Driving Speed SettingThis option is used to set the estimated travel speeds within normal roads and motorways.6Display Previous Dest. Upon Start-upThis option is used to set whether to display previous destinations upon starting the Navigation7Time restricted roadThis option is used to calculate routes by considering for times of restricted roads.1234567Main](https://usermanual.wiki/HYUNDAI-MOBIS/AN340ETAN.User-manual-2/User-Guide-1768222-Page-28.png)
![Press the [ LFT] NAVI Home button ▶Select [NAVI Setup] ▶Select [Display]Navigation1234These menus are used to set options displayed within the Navigation screen.NoNameDetails1Route Indicator LineThis feature is used to set the color of the route indicator line.2 Map Font SizeThis option is used to set the size of the font shown in the map between 3 levels.3 Map DisplayThe map color can be set according to Day/Night/Auto modes.4 TraceThis option is used to set whether to display the trace on the mapPress the [LFT] NAVI Home button ▶Select [NAVI Setup] ▶Select [Route Search]12NoNameDetails1Use AlternativeRoute SearchSearch for alternative routes whencalculating routes2Upon Routerecalculation,displaysearch optionsSets whether to display routingoptions upon recalculating routesDisplay Route Search](https://usermanual.wiki/HYUNDAI-MOBIS/AN340ETAN.User-manual-2/User-Guide-1768222-Page-29.png)
![Press the [LFT] NAVI Home button ▶Select [NAVI Setup] ▶Select [Guidance]NavigationPress the [LFT] NAVI Home button ▶Select [NAVI Setup] ▶Select [Default]Press the [LFT] NAVI Home button ▶Select [NAVI Setup] ▶Select [Traffic]This menu is used to set options on driver alerts.NoNameDetails1Initialize Settingsused to initialize previous setnavigation settings back tothe default state2 Memory Pointsused to initialize all searched lists, memory points and saved navigation informationThis menu is used to reset saved changes and user preferences.GuidanceDefaultTraffic12123NoNameDetails1Display Traffic and Flow Data on MapSelect whether to displaytraffic information on themap2Voice Prompt for Traffic and Flow Warning Select whether to provide voice guidance in front of Traffic Information. (On route - 3mile) 3 Provide Traffic rerouting option Select whether to display Detour pop up in front of Traffic Information. (On route - 3mile)](https://usermanual.wiki/HYUNDAI-MOBIS/AN340ETAN.User-manual-2/User-Guide-1768222-Page-30.png)
![NavigationTraffic InformationIn the map screen ▶Press the [MENU] key ▶Select [Traffic]Traffic information will be shown on the map up until the scale is ~4mile.Displays the traffic information around vehicle for up to a radius of 50 miles.(Information exceeding 50 miles will not be displayed)The above list can be sorted by either Distance (Default) or Category.Selecting the list button will display the map of the corresponding point and a pop-up showing detailed traffic information is displayed on the right.Select the [RHT] Select a Category button to display the screen in which traffic information categories can be selected.After selecting the desired menu among the six menus, press the [RHT] Done button to save. Once returning to the previous List screen, the corresponding Category list will be shown and maintained until Category information is changed.Information• Traffic Flow InformationNormal, Free Flowing (46 mph ~)Moderate Congestion (26 ~ 45 mph)Heavy Traffic, Stop and Go (0 ~ 25 mph)Road ConstructionAccidentCongestion/Slow TrafficIncidentHazardous Road ConditionsTravel Information](https://usermanual.wiki/HYUNDAI-MOBIS/AN340ETAN.User-manual-2/User-Guide-1768222-Page-31.png)
![GPS InfoGPS information may not operate under the following conditions. - When buildings, tunnels, or other obstructions block satellite signals - When materials are placed above the GPS antenna and block satellite signals - When the satellite is not transmitting - When a digital cellular phone (1.5GHz) is placed near the GPS antennaThe navigation system uses GPS information, various sensors, road map data, and other related information to display the current position. Errors may occur if the satellite is transmitting inaccurate signals or if which can only two or less satellite signals can be received. Errors which occur in such conditions cannot be corrected.GPS (Global Positioning System) is a system developed and operated by the United States which determines the current location of the user (longitude · latitude, etc) by generally using 3 or more satellites. This system is used with related GPS information, various sensors, road map data, and other related information for the purposes of navigationInformation• For continued map updates, information collection and surveys are continuously being conducted to check for changes to roads and new road construction. Nonetheless, roads, facilities, and fares are under constant change. Consequently, it is impossible to completely delete any errors, including road updates, names, facilities, and fares. Keep such matters in mind when using GPS. • Roads with widths less than 3m are not included within the map data. Roads including sections with widths less than 3m may be deleted upon updating the map dataIn the map screen ▶Press the [LFT] NAVI Home button ▶Select [GPS Info] This option is used to display the GPS satellite reception state, car speed and position.NavigationWhen GPS information cannot be usedAbout GPSGPS InfoErrors unavoidable due to system characteristics](https://usermanual.wiki/HYUNDAI-MOBIS/AN340ETAN.User-manual-2/User-Guide-1768222-Page-32.png)
![Information• Press the [Help] button on the screen to view the help section with information related to pairing and connecting Bluetooth® devices, and using Handsfree related features.• To learn more about searching from Bluetooth® devices and pairing, refer tothe user's manual for your Bluetooth®device.•If the system becomes unstable or the authentication popup is not displayed due to some communication error, please wait or reset the Bluetooth® device and try again.Starting Bluetooth®Press the [PHONE] key Press the [LFT]Add New button ▶Enter passkey in Bluetooth® deviceWhen the „Search from Phone‟screen is displayed, search for the system on your mobile device and enter the passkey. The default passkey is set to „0000‟.Bluetooth®Pairing and Connecting a PhonePress the [PHONE] keyWhen no phones have been paired](https://usermanual.wiki/HYUNDAI-MOBIS/AN340ETAN.User-manual-2/User-Guide-1768222-Page-36.png)
![Information• Bluetooth® features supported within the vehicle are as follows. Some features may not be supported depending on your Bluetooth® device. - Outgoing/Incoming Handsfree calls - Operations during a call (Switch to Private, Switch to call waiting, MIC on/off) - Downloading Call History - Downloading Mobile Contacts - Downloading USIM Contacts - Bluetooth® device auto connection - Bluetooth® Audio Streaming • Up to five Bluetooth® devices can be paired to the Car Handsfree system. • Only one Bluetooth® device can be connected at a time. • Other devices cannot be paired while a Bluetooth® device is connected.• Bluetooth® device connection cannot be canceled while a device is being connected. • Only Bluetooth® Handsfree and Bluetooth® audio related features are supported.Information• Normal operations are possible only within devices that support Handsfree or audio features, such as a Bluetooth® mobile phone or a Bluetooth® audio device.• If a connected Bluetooth® device becomes disconnected due to being out of communication range, turning the device OFF, or a Bluetooth® communication error, corresponding Bluetooth® devices are automatically searched and connected. • If the system becomes unstable due to communication errors between the car Handsfree and the Bluetooth® device, reset the Bluetooth® and try again. Upon resetting Bluetooth®, the system is restored to its factory release state. Select the device you want to connect and press the [LFT] Connect button.If the phone you want to connect does not exist, press the [Add New] button to pair a new Bluetooth® device.ConnectBluetooth®When a phone is already pairedInformation• New devices cannot be paired while a Bluetooth® device is connected. To pair a new device, first disconnect the currently connected device.](https://usermanual.wiki/HYUNDAI-MOBIS/AN340ETAN.User-manual-2/User-Guide-1768222-Page-37.png)
![Information•If a paired phone is deleted, the call history and contacts will also be deleted. A device cannot be deleted when it is connected. To delete a paired device, first disconnect the Bluetooth® connection. Press [Delete All] to delete all paired Bluetooth® devices.Select the device you want to disconnect ▶Press the [RHT] Disconnect button.Press the [MENU] key▶Select [Delete]Disconnecting a DeviceThe currently connected Bluetooth® device is disconnected.Bluetooth®Delete a Device](https://usermanual.wiki/HYUNDAI-MOBIS/AN340ETAN.User-manual-2/User-Guide-1768222-Page-38.png)
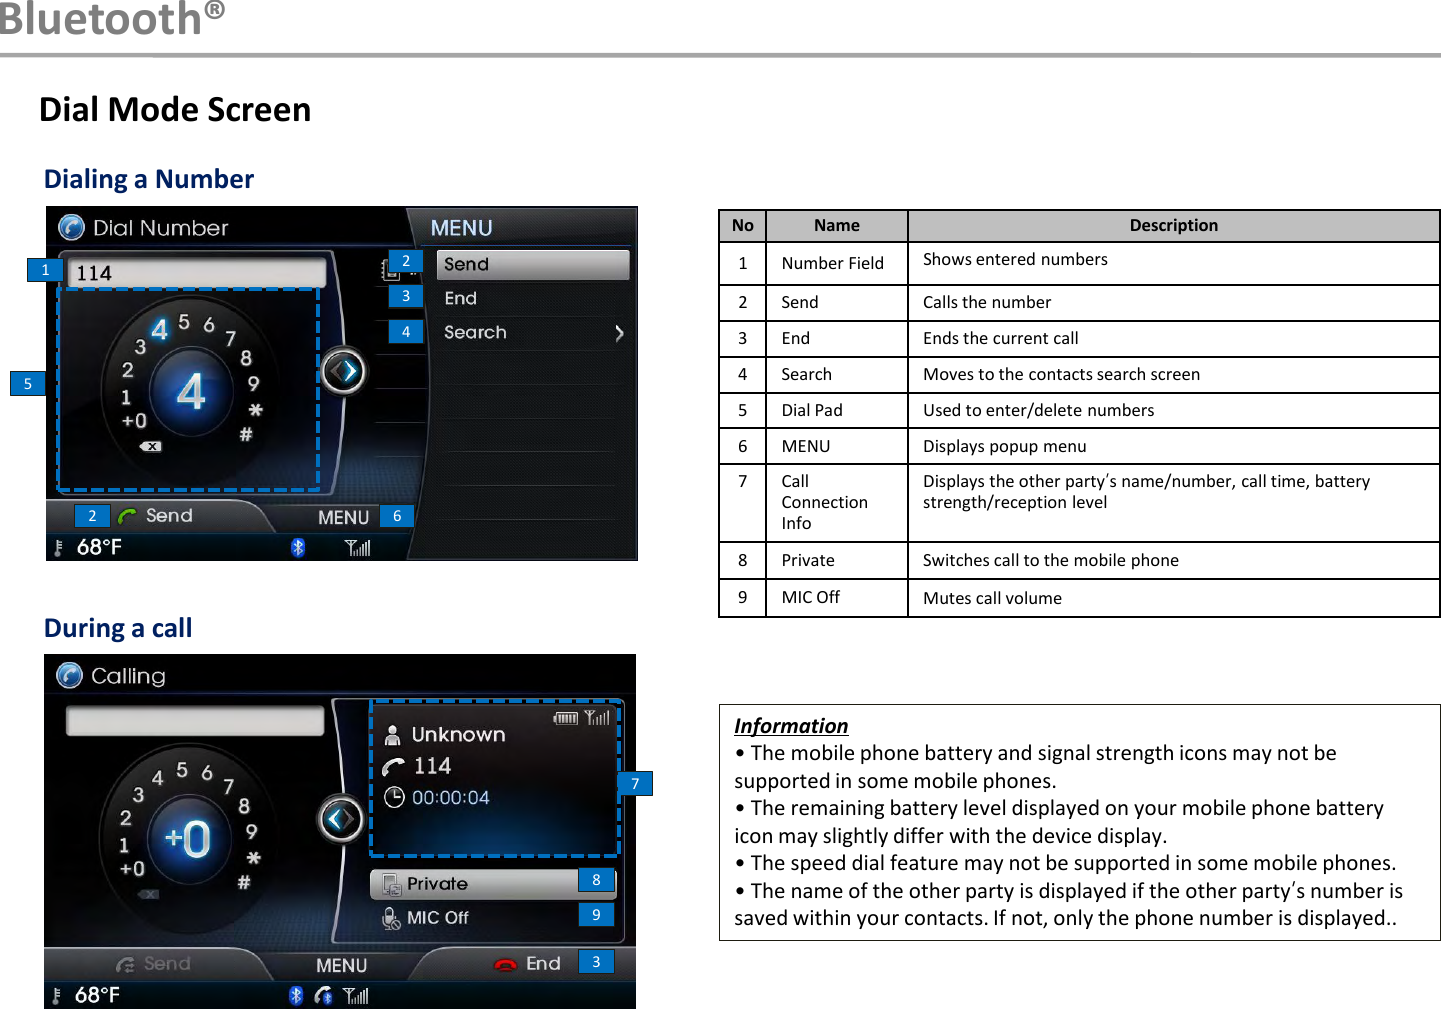
![InformationSome features will not operate during a Bluetooth® Handsfree call. Using Bluetooth®Turn the controller left/right to dial numbers ▶Press the [LFT] Send button.If you press the [LFT] Send button without entering a number, the Call History screen is displayed.Select the [←] button to delete dialed numbers. Press and hold the dial pad +0 (over 0.8 seconds) to enter a "+".Enter the 1 or 2 digit speed dial number with the Dial Pad (Press and hold the last number)Information• For speed dials saved within mobile phones, up to 2 digits are supported.•The speed dial feature may not be supported in some mobile phones.Press the hold (over 0.8 seconds) the [LFT] Send button or the [☎] key on the steering remote controller.Bluetooth®Making a CallMaking a Call from Speed Dial Calling through RedialA call is made to the most recently called number.Redialing is not possible when there is no call history or the Bluetooth® phone has not been connected.](https://usermanual.wiki/HYUNDAI-MOBIS/AN340ETAN.User-manual-2/User-Guide-1768222-Page-40.png)
![When a call is received on the connected phone, the bell will sound and the phone number of the other party will be displayed on the incoming call pop-up, as shown here.Information• When the incoming call pop-up is displayed, most functions within AV mode will not operate. Only the call volume and Navigation screens can be operated.• The telephone number may not be displayed in some mobile phones.Information• The reject call function may not be supported in some mobile phones.Incoming call notice ▶Press the [Accept] button or the [☎] key on the steering remote controller.Incoming call notice ▶Press the [Reject] button or press and hold the [☎] key(over 0.8 seconds) on the steering remote controller.Bluetooth®Answering a Call Rejecting a CallThe incoming call is rejected.](https://usermanual.wiki/HYUNDAI-MOBIS/AN340ETAN.User-manual-2/User-Guide-1768222-Page-41.png)
![Operating features during aCallDuring Handsfree call ▶Press the [Private] button or press the [☎] key on the steering remote controller.The call will be switched from the Handsfree to the Bluetooth® mobile phone.During call on mobile phone ▶Press the [Use Handsfree] button or press the [☎] key on the steering remote controller.The call will be switched from the Bluetooth® mobile phone to the car Handsree.While on a call▶Press the [RHT] End button or press the [☎] key (over 0.8 seconds) on the steering remote controller.The Bluetooth® Handsfree call will end.Bluetooth®Switching Call to Bluetooth® PhoneSwitching Call to the Handsfree End a Call](https://usermanual.wiki/HYUNDAI-MOBIS/AN340ETAN.User-manual-2/User-Guide-1768222-Page-42.png)
![Information• Call waiting is a feature that allows the caller to answer a second call while already on a call. When call waiting is used, the first call is placed on waiting mode.• The Call Waiting feature may not be supported in some mobile phones.If another person calls while you are already on a call, the current call must be placed on hold or ended to answer the new call.If there is waiting call, press the [MODE] key on the steering remote controller or press the [LFT] Switch button on the Phone screen.While on a call ▶Select [MIC Off]If you press the [MIC Off] button, The outgoing volume is muted and blocked to the other party.No Name Description1 Hold 1st call Places current call on callwaiting and answer new call2 End 1st call Ends current call and answernew call3 Reject Rejects new call and maintainscurrent call4 SwitchIf there is a call waiting,switches to the waiting callwaiting call1234Bluetooth®Switching to Call Waiting Turning MIC On/Off](https://usermanual.wiki/HYUNDAI-MOBIS/AN340ETAN.User-manual-2/User-Guide-1768222-Page-43.png)
![Press [PHONE] key▶Select Contacts button.Name Description1Send Call the corresponding number2 Search Search contacts by name ornumber3 Download D ownload contacts fromBluetooth® device4 Contacts List List of Downloaded Contacts5 MENU Displays popup menu123415Bluetooth®While on a call ▶Turn the [O] VOLUMEknob on the head unit or press the [+], [-] keys on the steering remote controller ▶Adjust the ring/call volumeAdjusting Ring/Call VolumeInformation• The call volume as heard by the other party may differ depending on your mobile phone.Contacts](https://usermanual.wiki/HYUNDAI-MOBIS/AN340ETAN.User-manual-2/User-Guide-1768222-Page-44.png)
![Press the [MENU] key▶Select [Download]Bluetooth®Information• Mobile phone contacts can only be searched when a Bluetooth® device is connected. • Up to 5,000 contacts saved in your Bluetooth® phone or USIM can be downloaded into the car contacts. Contacts that have been downloaded to the car cannot be edited or deleted. • Mobile phone contacts are managed separately for each paired Bluetooth® device (max 5 devices x 5,000 contacts each). Previously downloaded data is maintained even if the Bluetooth® device has been disconnected. (However, the contacts and call history saved to the phone will be deleted if a paired phone is deleted.)• It is possible to download contacts even during a call or during Bluetooth® streaming audio. • When downloading contacts, the icon will be displayed within the status bar. • It is not possible to commence download when the contacts download feature has been turned of within the Bluetooth® device. In addition, some devices may require device authorization upon attempting to download contacts. If downloading does not normally occur, check the Bluetooth® device settings or the screen state. • The download feature may not be supported in some mobile phones. Check to see that the Bluetooth® device supports the download feature. For more information of supported Bluetooth® devices and function support, visit www.hyundaiusa.com.Downloading Mobile ContactsContacts saved within the mobile phone can be downloaded to the car system.](https://usermanual.wiki/HYUNDAI-MOBIS/AN340ETAN.User-manual-2/User-Guide-1768222-Page-45.png)
![Select the [Search] button ▶Select [Search by Name]After inputting is complete, press the [LFT] Done button to search contacts.InformationUpon search, it is possible to search by entering a part of the name. Bluetooth®Information• Upon downloading mobile phone contacts,the previous corresponding data is deleted.• This feature may not be supported in some mobile phones.• Upon downloading, contacts saved in your USIM and mobile phone are simultaneously downloaded.• Voice Recognition may not operate for several moments while contacts are being downloaded.• When using Contacts Sync, the contactsand call histories within your mobile phone are automatically downloaded upon connecting Bluetooth®. If you do not wish to use this feature, turn Contacts Sync Setting off.Searching Contacts (By Name)](https://usermanual.wiki/HYUNDAI-MOBIS/AN340ETAN.User-manual-2/User-Guide-1768222-Page-46.png)
![Bluetooth®InformationWhen searching a number, it is possible to search by entering a part of the entire number. (ex: if you enter “1234”, all numbers with “1234”will be searched.Select the [Search] button ▶Select [Search by Number]After inputting is complete, press the [RHT] Done button to search saved numbers.Searching Contacts (By Number)Press the [PHONE] key ▶Select the Call History button.12345Call HistoryEntering Call History Screen](https://usermanual.wiki/HYUNDAI-MOBIS/AN340ETAN.User-manual-2/User-Guide-1768222-Page-47.png)
![4123This option is used to select ringtones for the connected phone.In the Settings screen ▶Select [Auto Connection]If auto connection is turned on, a Bluetooth®device will automatically be connected according to the selected setting.No Name Description1 Off Disables auto connection2 Previous PhoneAutomatically connects withthe previously connectedBluetooth® phone3User SelectedPhoneAutomatically connects to auser selected Bluetooth®®device4C o n n e c t byPriorityA u t o m a t i c a l l y c o n n e c t sa c c o r d i n g to t h e s e tBluetooth® phone priorityIn the Settings screen ▶Select [Ringtones]Bluetooth®Name Description1 Received Displays the incoming callhistory list2 Dialed Displays the outgoing callhistory list3 Missed Displays the missed callhistory list4Send Dial to selected number5 Delete All Delete entire call historyInformation• The call history may not be saved in the call history list in some mobile phones.• Calls received with hidden caller ID will not become saved in the call history list. • Calling through the call history is not possible when there is no call history or the Bluetooth® phone has not been connected.•Up to 20 received, dialed and missed calls are each saved.•The time of received/dialed calls and call time information are not saved.Auto ConnectionSettingsInformation•When set to [Mobile Ringtone], the ringtone set within the connected mobile phone will sound.•The Mobile Ringtone feature may not be supported in some mobile phones.•For mobile phones that do not support the Mobile Ringtone feature, the ring tone set within the system will sound.•For more information on mobile phones that support the Mobile Ringtone feature, visit www.hyundaiusa.com. Ringtones](https://usermanual.wiki/HYUNDAI-MOBIS/AN340ETAN.User-manual-2/User-Guide-1768222-Page-48.png)
![This option is used to check information about the handsfree device, such as device name, address, and type.Device InformationIn the Settings screen ▶Select [DeviceInformation]This option is used to change the passkey needed upon connecting a Bluetooth® phone. The default passkey is set to „0000‟.Change PasskeyIn the Settings screen ▶Select [Change Passkey]Bluetooth®Contacts SyncIn the Settings screen ▶Select [Contacts Sync]When connecting a Bluetooth® device, it is possible to automatically downloadcontacts.Bluetooth AudioIn the Settings screen ▶Select [BluetoothAudio]You can play music files saved in your Bluetooth® device from the car.](https://usermanual.wiki/HYUNDAI-MOBIS/AN340ETAN.User-manual-2/User-Guide-1768222-Page-49.png)
![NoName Description1Delete all callHistoriesDelete all dialed / received /missed call lists2Delete AllPhones Delete all registered phones3 Factory Defaults Reset Bluetooth® settings anddata to factory stateData InitializationIn the Settings screen ▶Select [Data Initialization]Data Initialization is used to delete all call histories/paired phones, or initialization information related to the Bluetooth® Handsfree.123Bluetooth®](https://usermanual.wiki/HYUNDAI-MOBIS/AN340ETAN.User-manual-2/User-Guide-1768222-Page-50.png)

![Using Voice RecognitionWhen using the voice recognition feature, only commands listed within the user's manual are supported. Be aware that during the operation of the voice recognition system, pressing any key other than the [■VR] key will terminate voice recognition mode. For superior voice recognition performance, position the microphone used for voice recognition above the head of the driver’s seat and maintain a proper position when saying commands. Within the following situations, voice recognition may not function properly due to external sound. • When the windows and sunroof are open • When the wind of the cooling / heating device is strong • When entering and passing through tunnels • When driving on rugged and uneven roads • During severe rain (heavy rains, windstorms)Using Voice RecognitionAfter downloading the Bluetooth® contacts, it takes some times to convert the contacts into voice information. During this time, voice recognition may not properly operate. Pronounce the voice commands naturally and clearly as if in a normal conversation. The system may slow down slightly when using the Navigation to calculate a new route or re-calculating an existing route. In such cases, use voice recognition features after waiting a few moments.Creating a suitable cabin environment](https://usermanual.wiki/HYUNDAI-MOBIS/AN340ETAN.User-manual-2/User-Guide-1768222-Page-52.png)
![Starting Voice RecognitionStarting Voice Recognition Shortly press the [■VR] key on the steering remote controller (under 0.8 seconds) ▶Say a commandOnce voice recognition starts, the voice command entry window and the six representative commands are displayed.• If voice recognition is in Normal Mode, then the system will say “Please say a command. (Beep)” • If voice recognition is in Expert Mode, then the system will only sound a beep tone.• For proper recognition, say the command after the voice instruction and beep tone.NoticeInformation• To change the Normal/Expert setting, refer to the Info/Settings section.Using Voice RecognitionScreen displayed when Voice Recognition is Normal Mode(Six commands are displayed on the screen)Screen displayed when Voice Recognition is Expert Mode.](https://usermanual.wiki/HYUNDAI-MOBIS/AN340ETAN.User-manual-2/User-Guide-1768222-Page-53.png)
![Using Voice RecognitionIllustration on Using Voice Recognition Shortly press the [■VR] key (under 0.8 seconds).Starting Voice Recognition Skipping PromptsShortly press the [■VR] key (under 0.8 seconds).Ending Voice RecognitionShortly press the [■VR] key (under 0.8 seconds).Please say a command(BEEP)HelpHelp.Please say a commandPlease say a command(BEEP)HelpHelp.Please say a commandPlease say a command(BEEP)HelpHelp.Please say a commandShortly press the [■VR] key (under 0.8 seconds).While prompt message is being statedPress and hold the [■VR] key (over 0.8 seconds) ▶Ends Voice Recognition.](https://usermanual.wiki/HYUNDAI-MOBIS/AN340ETAN.User-manual-2/User-Guide-1768222-Page-54.png)