HYUNDAI MOBIS AN340ETAN CAR AVN User Manual 1
HYUNDAI MOBIS CO., LTD. CAR AVN 1
Contents
- 1. User manual -1
- 2. User manual -2
User manual -2
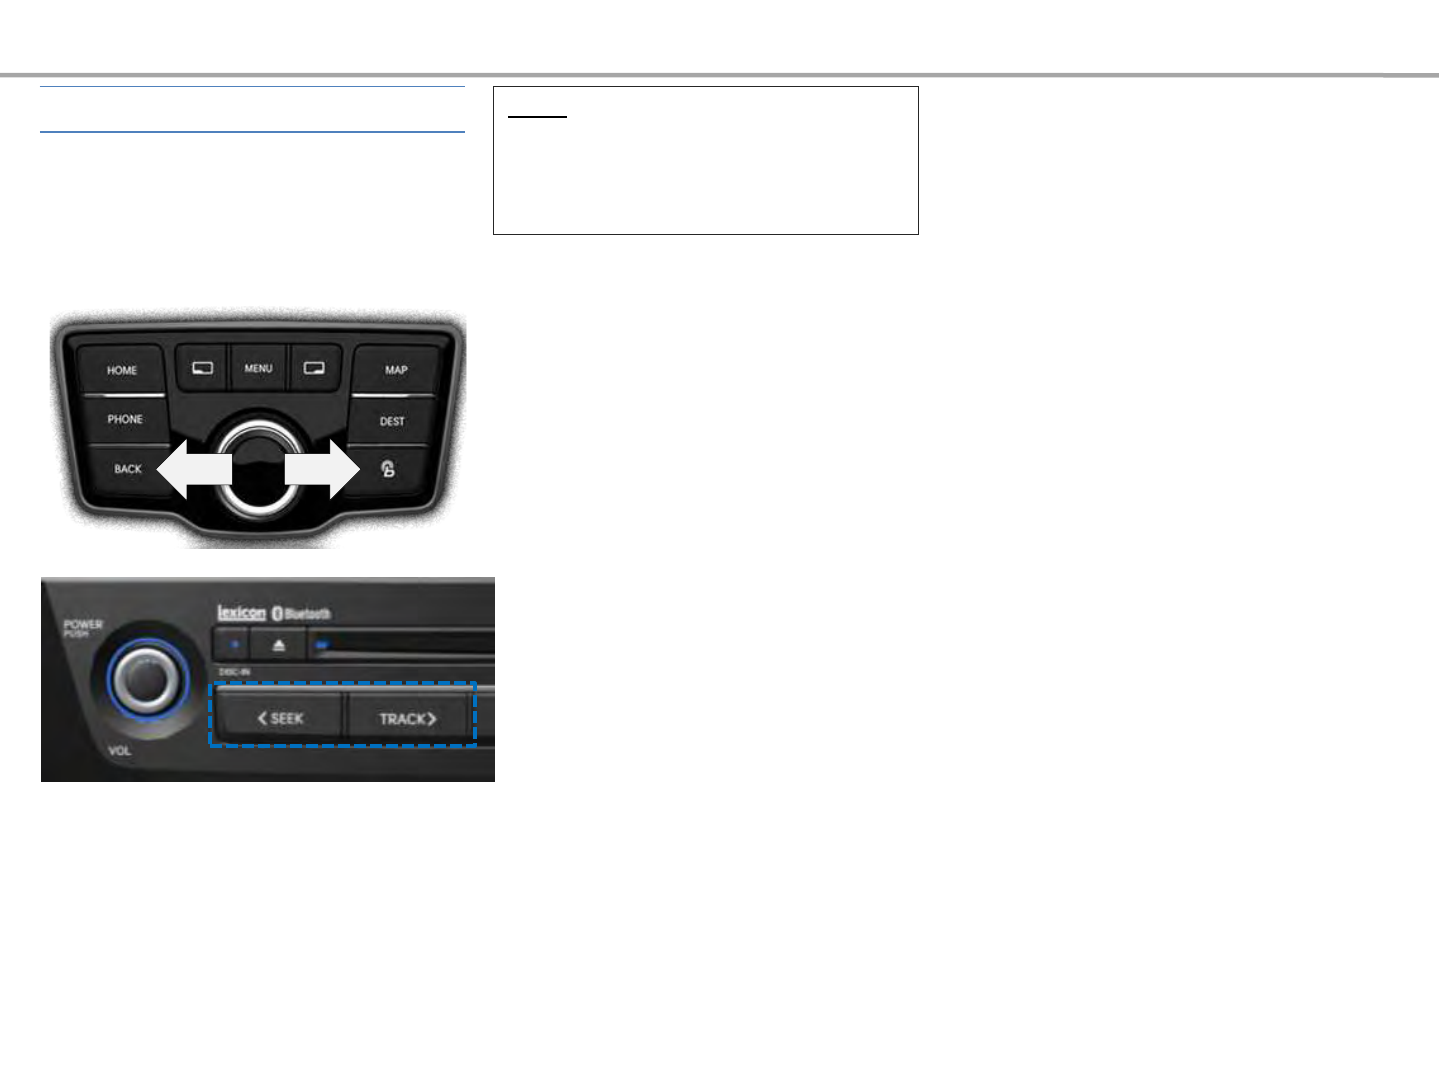
While playing ▶Shortly push the
controller left/right (under 0.8 seconds)
or shortly press the [SEEK], [TRACK] key
to select the previous/next song.
Notice
• The title/artist info may not be supported
in some mobile phones.
•Play/Pause, Previous/Next function may
not be supported in some mobile phones.
Selecting Bluetooth Audio
Bluetooth Audio
BT Audio
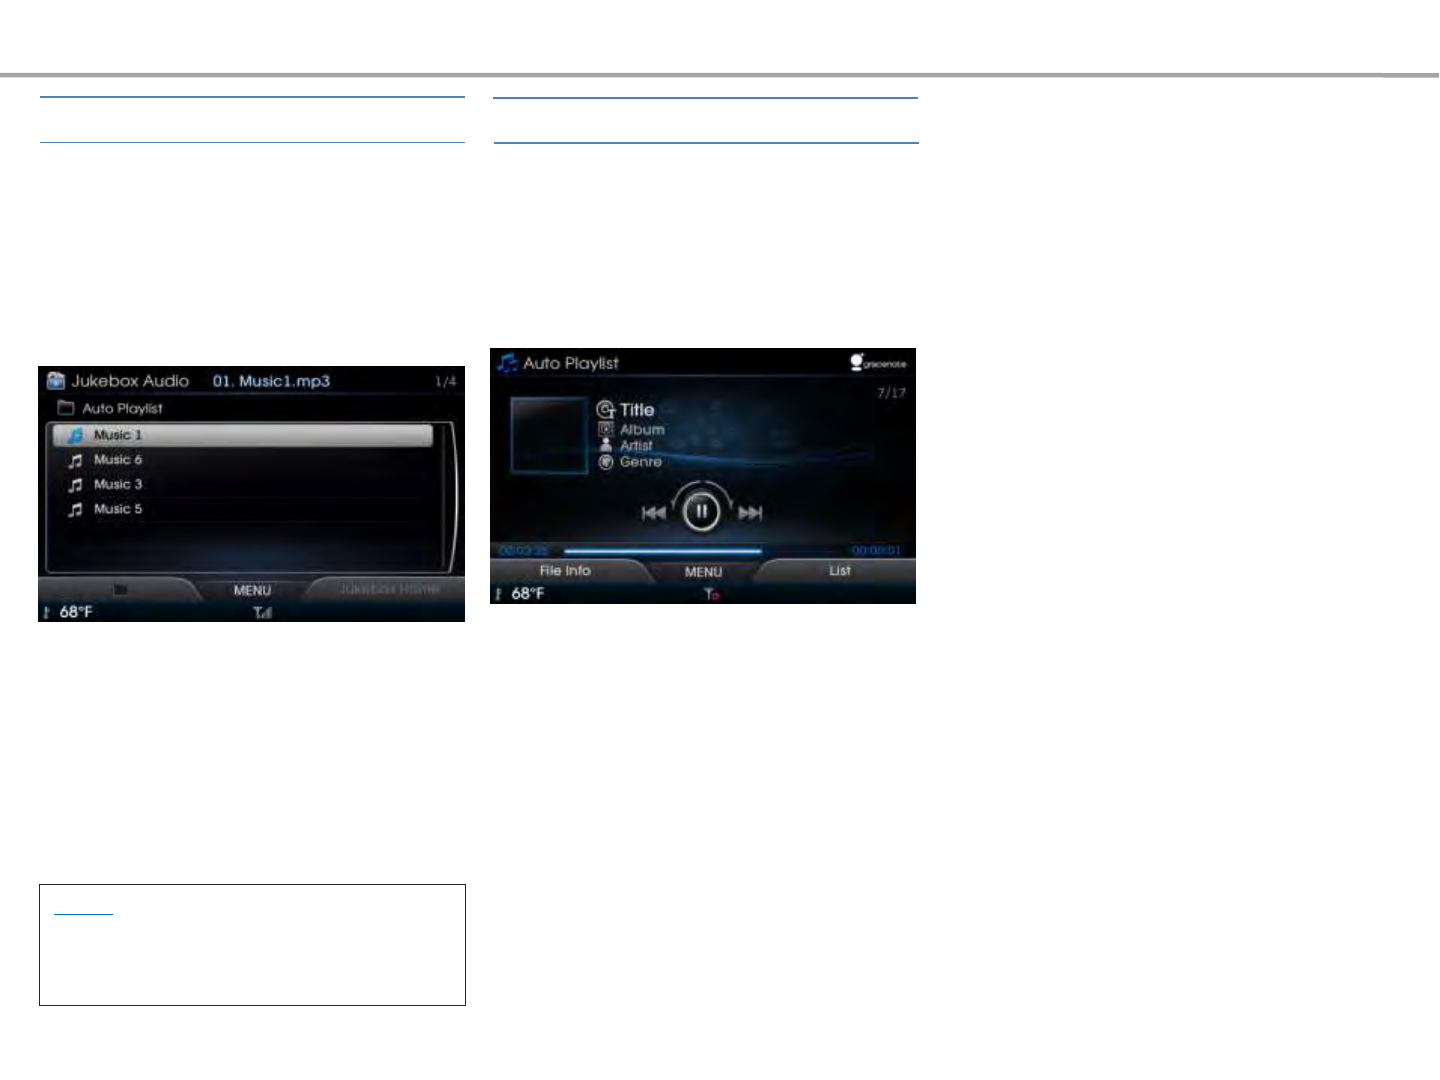
Auto Playlist mode can be exited by
starting a different AV mode or by
pressing [Exit Auto Playlist] within
[MENU].
Press the [MENU] key ▶Select [Auto
Playlist]
The Auto Playlist feature is supported
only within DISC CD, USB Audio, and
Jukebox Audio modes.
Notice
• Auto Playlist is a Gracenote feature and
will operate only after song information has
been checked.
List of songs similar with the current
song is displayed.
Once the desired song is selected, then
Auto Playlist mode will operate.
Press Back to cancel viewing Auto
Playlist.
Exiting Auto Playlist
Auto Playlist
Auto Playlist
Auto Playlist

3Navigation
Before Use
Starting Navigation
Searching Destinations
Route Menus
Navigation Settings
GPS Information

Safety Cautions
•For safety, some functions will be inactive while the vehicle is in motion.
Buttons that cannot be operated will be inactive.
•Roads names and POI information may not always be completely updated.
Some places may not include up-to-date information.
•The route displayed for destination guidance is a reference that will take
you to the vicinity of your destination.
•The navigation system uses GPS information, various sensors, road map
data, and other related information to display the current position. Errors
may occur if the satellite is transmitting inaccurate signals or if which can
only two or less satellite signals can be received. Errors which occur in such
conditions cannot be corrected.
•The current position may become displayed on at a place somewhat
different from your actual location. The car position mark may differ from
the actual location due to the state of the GPS satellites or the vehicle
(driving location and conditions). In addition, the car position mark can
become deleted from the actual position when driving on roads different
from the map data, such as newly constructed roads.
•Even if the car position mark on the map is different, map matching or GPS
info are used to automatically update the current position.
(In such cases, up to several minutes may be required.)
Before Use
Navigation
Some roads, site names, facility information and
fare rates may have changed after map data
development and may differ with actual road
conditions.
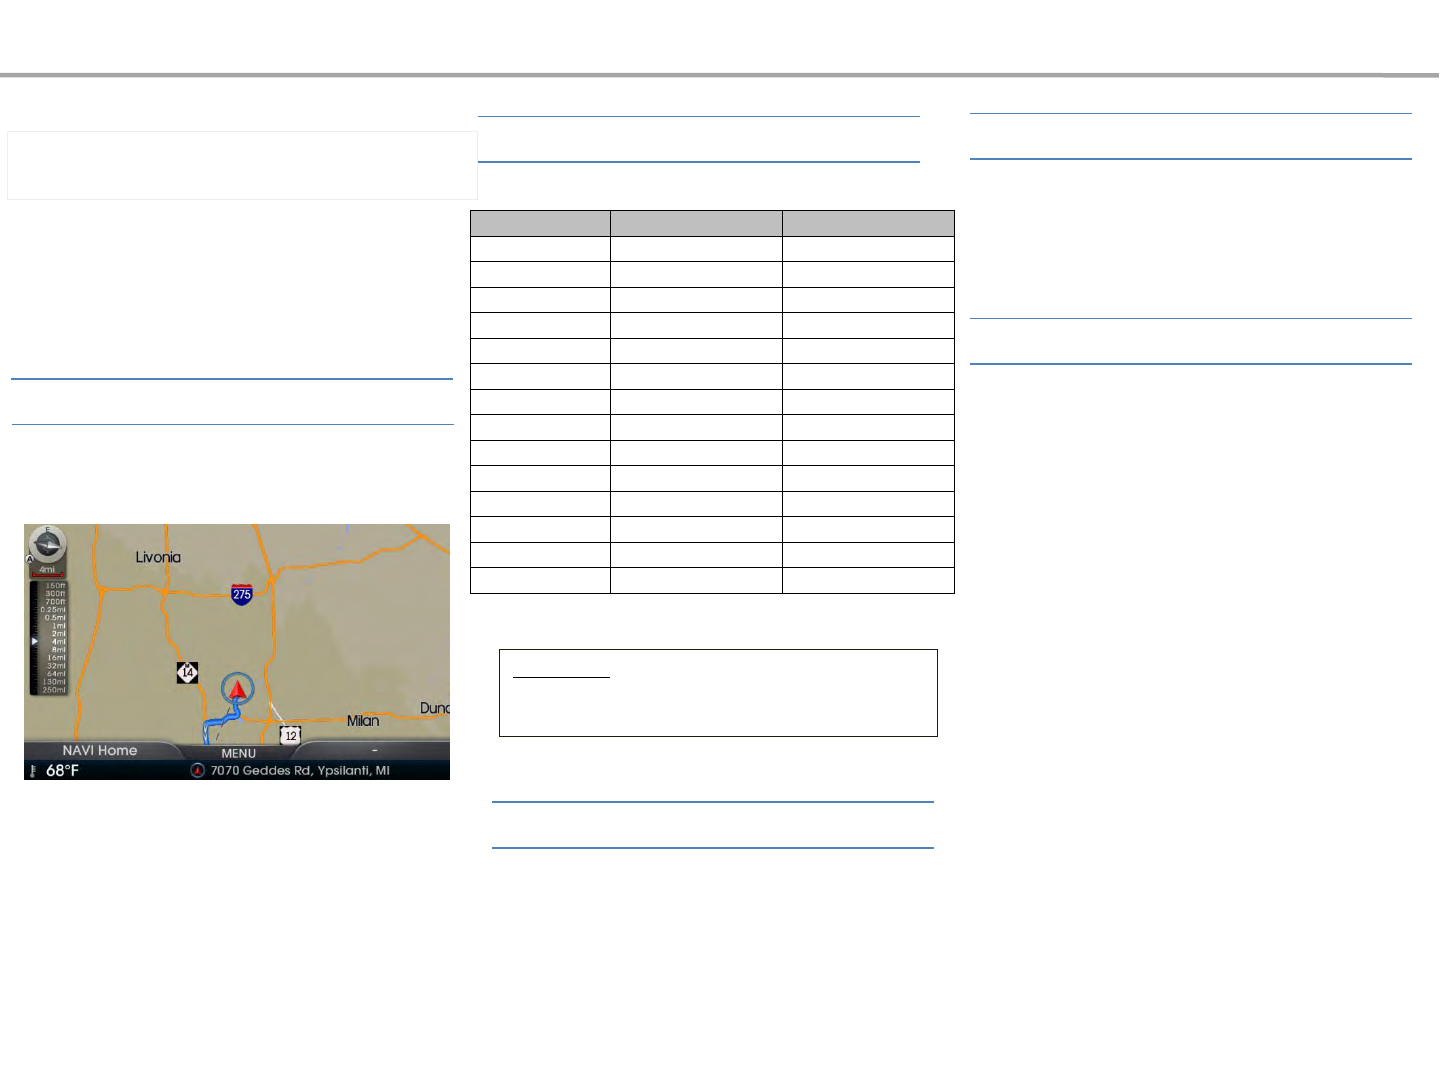
About the Map
If 100m is displayed on the left side of the map,
this represents a map scale of 1/10,000.
Icons displayed on the map may be different with
actual conditions. Also, display of multiple icons
may be displayed under one mark.
Unlicensed copying of the map in any form, in
full or in part, is strictly prohibited.
1. Download the update file from
http://www.mapnsoft.com to your
computer then unzip it.
2. Move the update files to the root of your
USB.
3. To learn more, refer to the ‘System
Update’ section of this user’s manual.
Information
• Turn the controller left/right to change the
scale.
Navigation
Level mi / ft km / m
1 150 ft 50 m
2 300 ft 100 m
3 700 ft 200 m
4 0.25 mi 400 m
5 0.5 mi 800 m
6 1 mi 1.6 km
7 2 mi 3.2 km
8 4 mi 6.4 km
9 8 mi 12 km
10 16 mi 25 km
11 32 mi 50 km
12 64 mi 100 km
13 130 mi 200 km
14 250 mi 400 km
About Map Scale
Actual distance
About Map Icons
About Map DB
About Map Updates
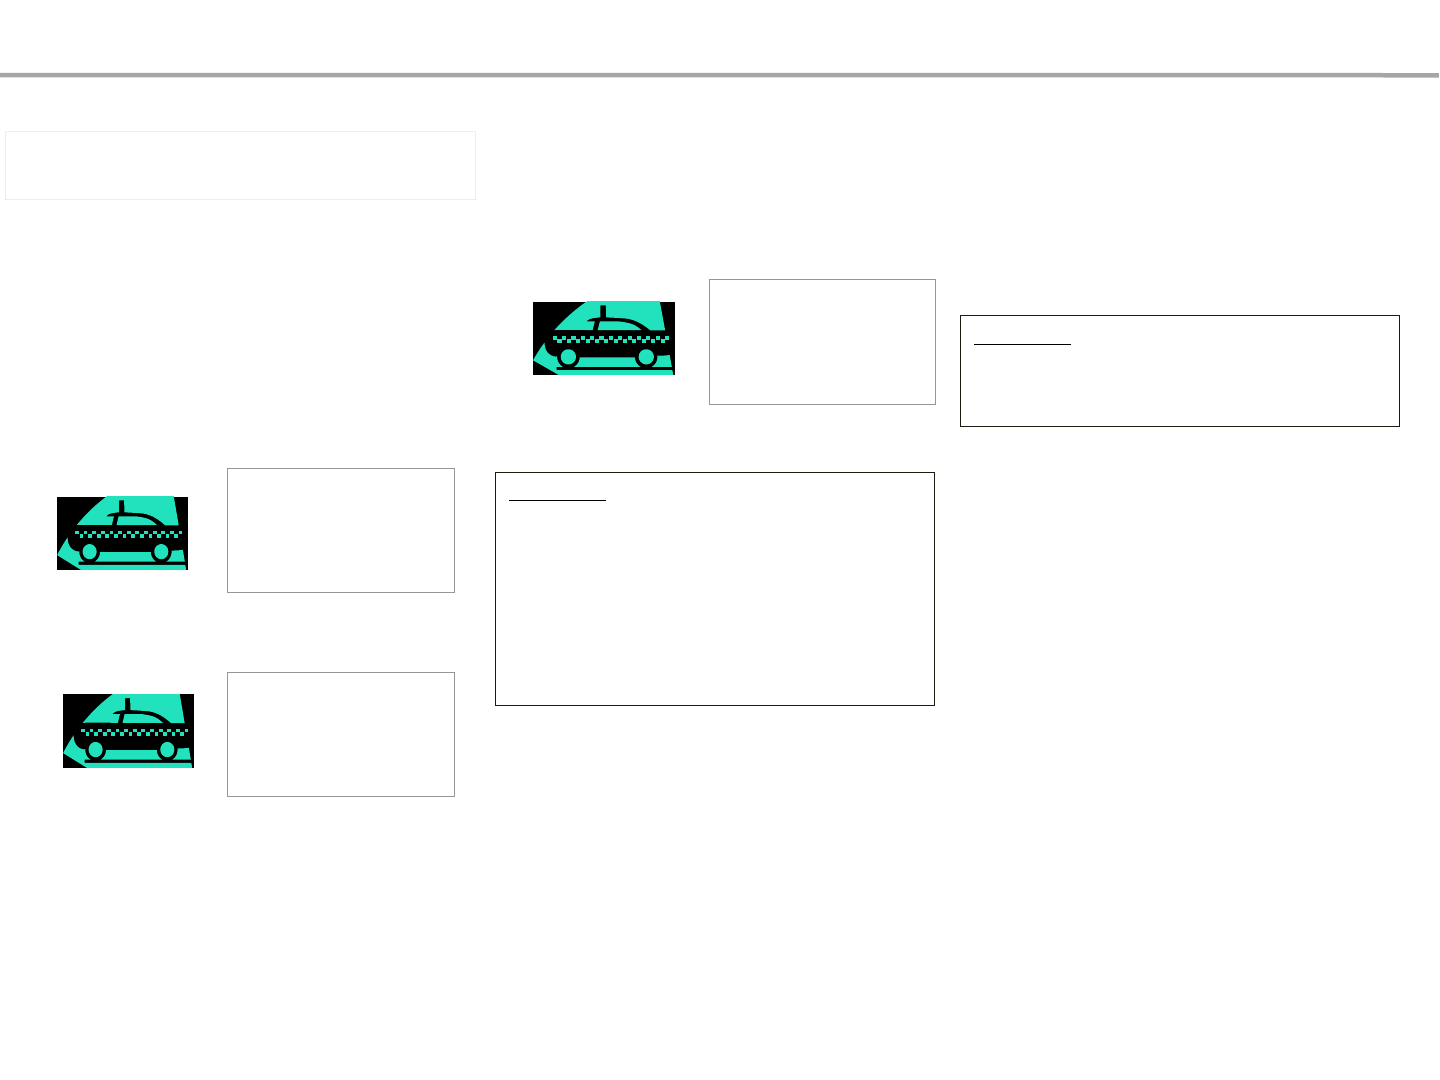
During destination guidance, voice guidance will be
provided when you reach an intersection or are near
your destination.
About Voice Guidance
<Example of voice guidance during destination
guidance>
- Example of voice guidance when arriving at the
destination
-In front of an intersection
-Upon entering a toll road
※Please use voice guidance only as a reference
to assist in your driving.
Information
•The above voice guidance examples are normal
cases. However, the actual voice guidance may
differ depending on the road type.
•If the car position is not accurately measured,
then voice guidance may not be given, or may be
given later or improperly.
•It is possible to adjust the Navigation guidance
volume.
Guidance when using other modes
Voice guidance will continue even when
converting from the navigation screen to a
different mode screen.
Information
Even when voice guidance has been muted,
destination guidance will continued to be
provided.
You are near your
destination. Voice
guidance will end.
Turn right in about
700m. Right turn ahead.
Right turn ahead.
You are entering a
motorway. Toll gate
ahead.
Navigation
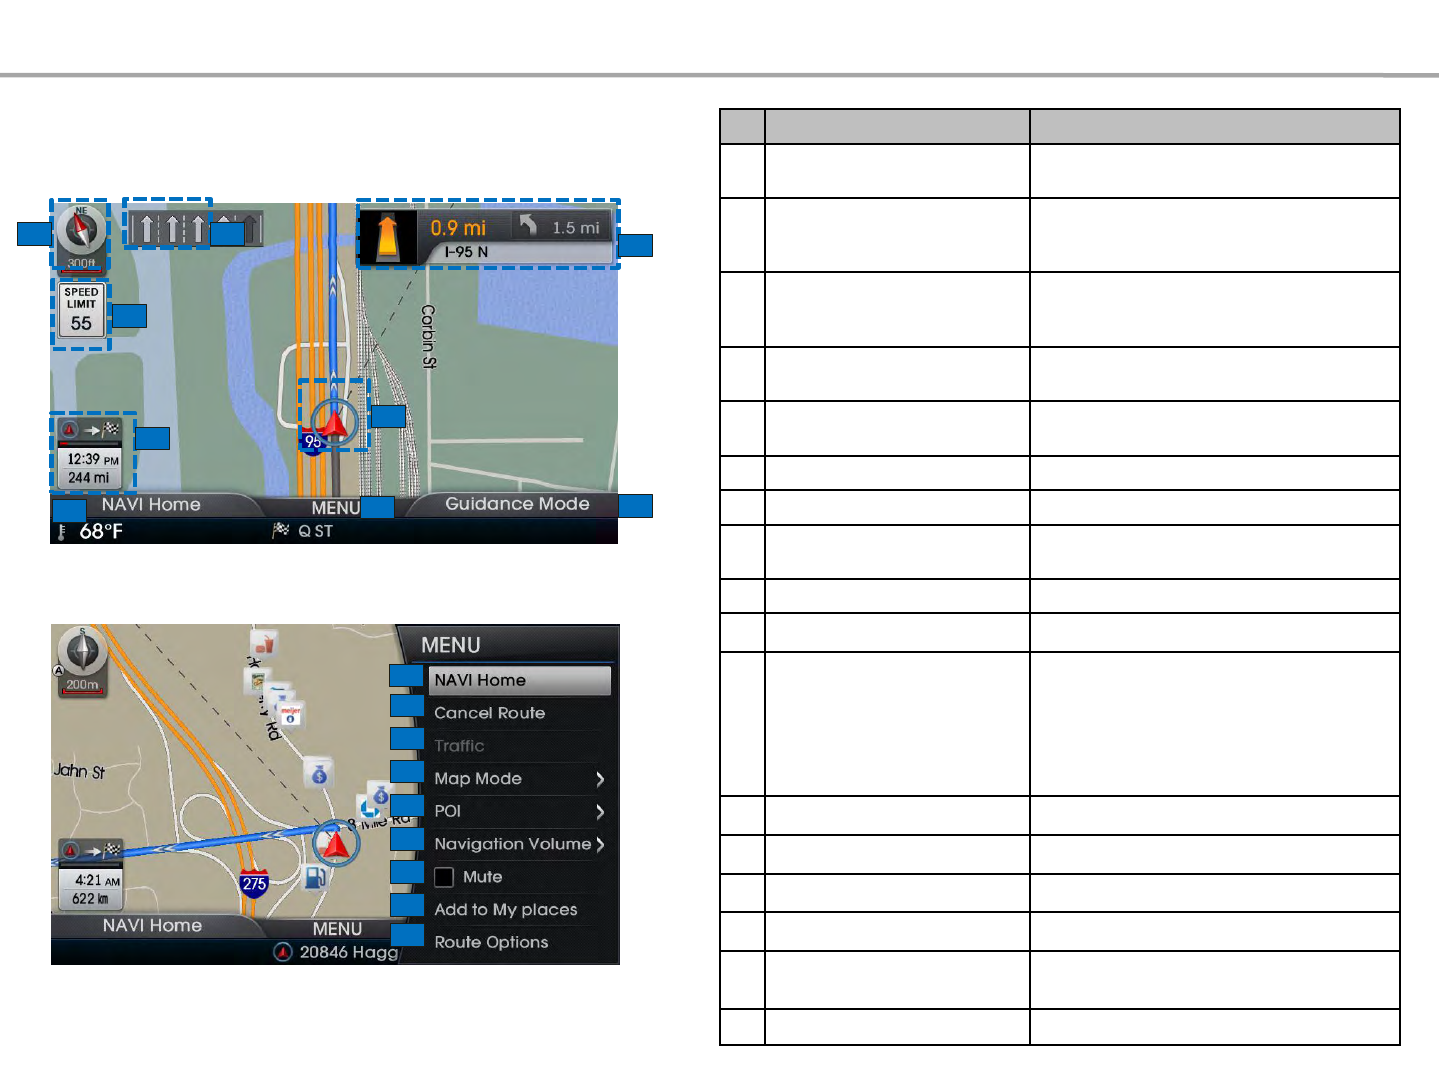
Basic Mode Screen
123
6
4
789
10
11
12
13
14
15
16
No. Name Details
1Car direction and Scale Map direction and GPS reception state and
scale display
2Lane Info
Recommended lanes taking the following
intersection and expected route into
consideration
3Preliminary Guidance
Displays direction, ETA, remaining time and
distance from current position to the
destination
4Speed Limit Displayed at all times when driving on roads
with speed limits
5 Car Position Mark Displays the current vehicle position and
direction
6Remaining Distance Remaining distance until next turn
7NAVI Home Displays the Navi menu screen
8MENU Destination, Route and NAVI Setup, GPS Info
list
9Guidance Mode Changes the right Navi screen mode
10 Cancel Route Cancels the currently set route
11 Traffic
Enters the Traffic List screen. Provides traffic
information for areas nearby the current
position and current route.
Detour routes can be calculated in the
existence of traffic conditions (Construction,
Incident, Accident).
12 Map Mode Sets map display mode
13 POI Displays the POI list
14 Navigation Volume Controls navi voice guidance volume
15 Mute Mutes navi voice guidance
16 Add to My Places Add my places and user cameras to the
current position
17 Route Options Used to recalculate route to the destination
17
Navigation
5
7

Press the [MAP VOICE] key within any mode
while using to system to display the current
position, vicinity and the current position
mark.
Information
• When riding in a new car or after replacing the
battery terminal, the car position mark may appear
at a location different from your actual current
position.
• Even if the car position mark on the map is
different, map matching or GPS info are used to
automatically update the current position.
Navigation
Press the [MAP VOICE] key or press the
[HOME] key ▶Turn the controller
left/right and select Navigation ▶
Navigation mode will start.
Starting Navigation
Information
• If you turn on AV mode while the
Navigation is operating, only voice
guidance will be provided.
Press the [MAP VOICE] key ▶Press [MENU] ▶
Select [Map Mode]
1
2
No. Name Details
1
Heading
Up/Nort
hUp
Displays map in Vehicle Traveling
Direction (Heading Up)or the
North-Up direction
2Auto
Zoom
Sets whether to automatically
adjust the map scale when the
vehicle is in motion
Displaying the Current Position
Changing the Map Mode
Press the [MENU] key ▶Select [Add to My
Places]
This feature is used to save the current position
or the scrolled position as a My Place.
To save the position, press the controller after
selecting the desired group.
Information
• My Places are saved without distinction for
the driving state or the scrolled state.
• To edit or delete registered mark, refer to the
‘My places’section.
Information
• If the map scale is above 16mi, the map display
mode will be changed automatically to 2D North-
Up.
This feature is used to set map screen
related options, such as Heading
up/North up, Auto Zoom setting.
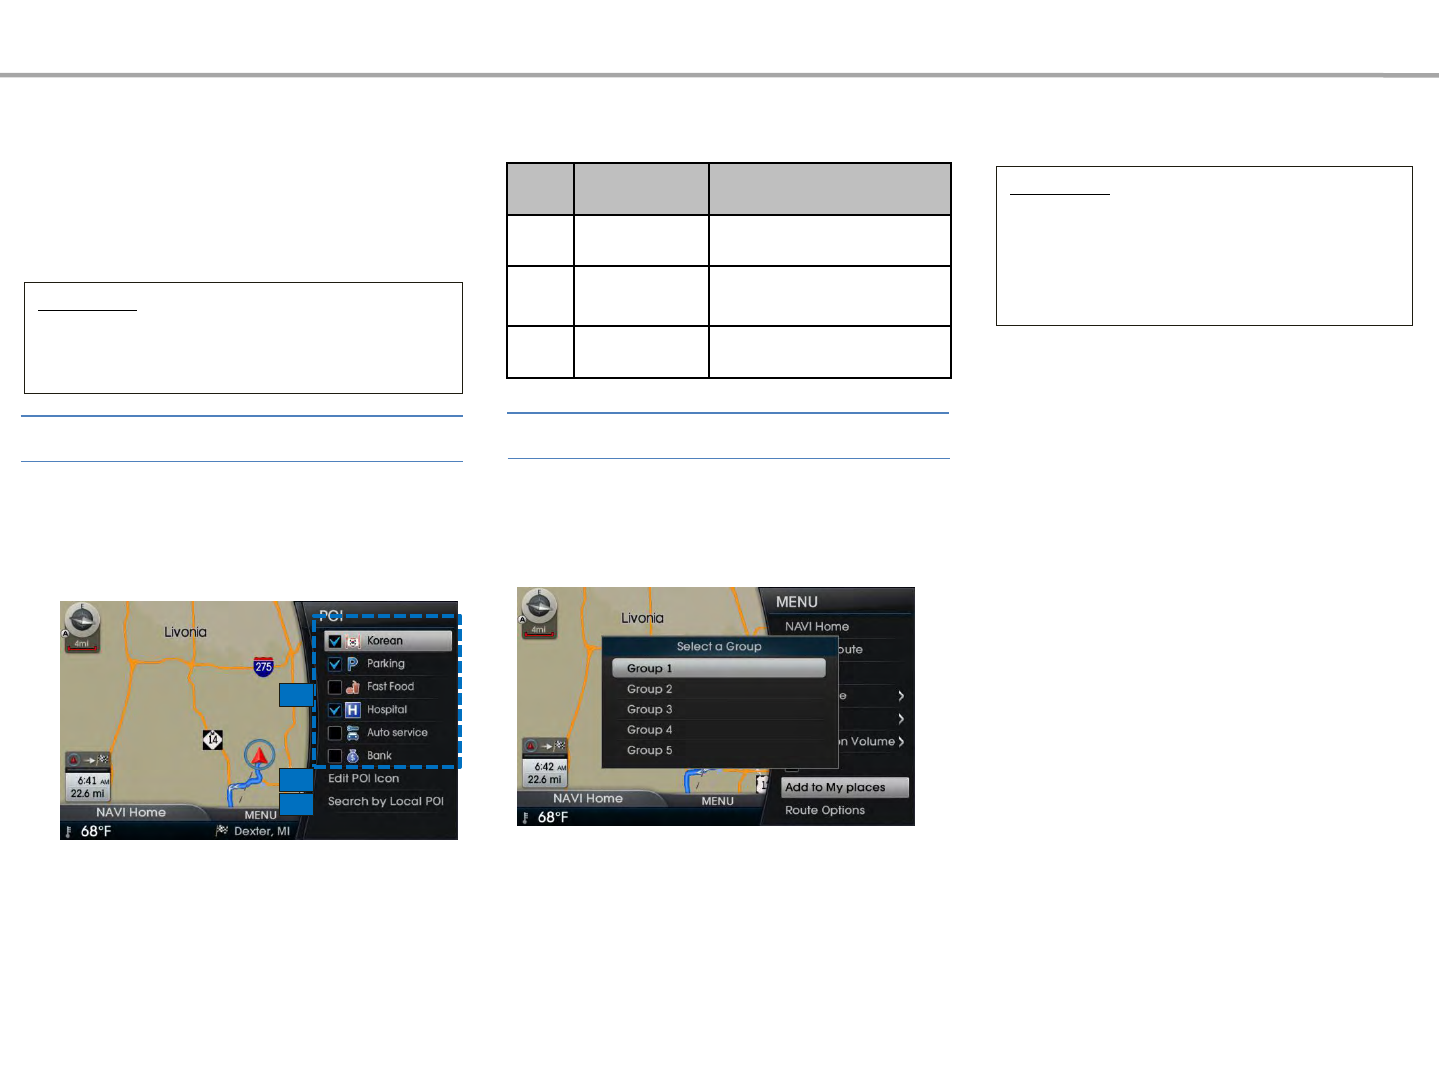
Press the [MAP VOICE] key ▶Press [MENU] ▶
Select [POI]
Within the screen when the POI menus are
displayed, pressing one of the 6 facility icon
buttons will display the corresponding
facilities.
1
2
3
No. Name Details
1POI Icons Sets POI facilities
2Edit POI Icon
Sets the 6 POI icons to the
desired genre through user
editing
3Search by Local
POI
Moves to Search by POI
screen
Navigation
Add to My Places
POI
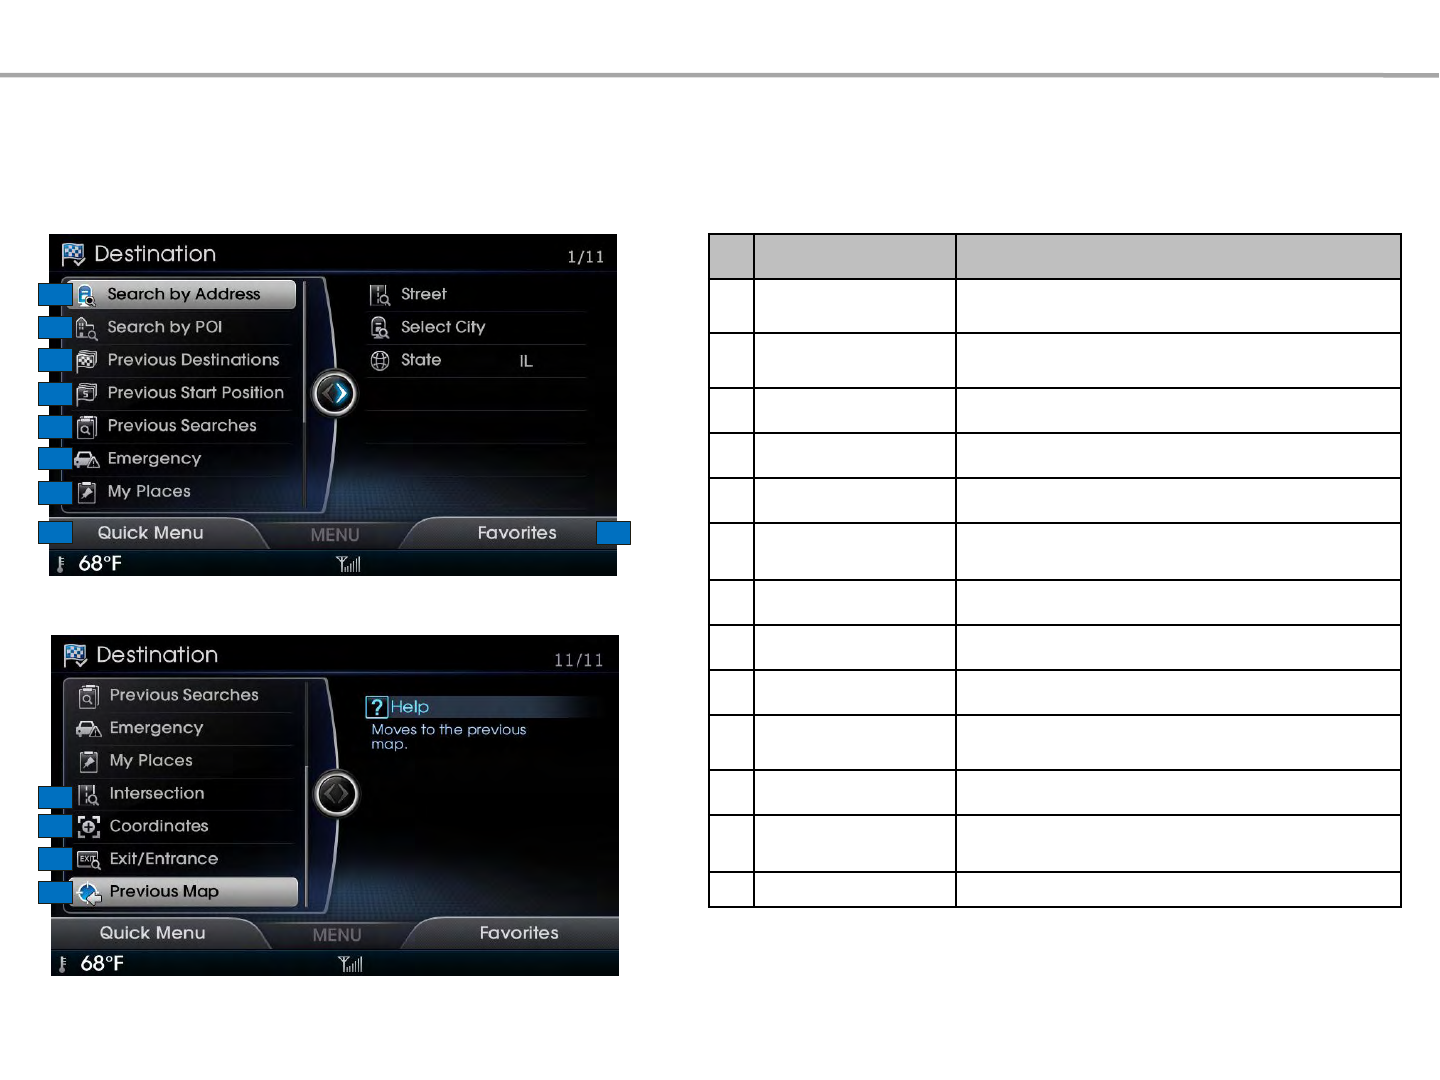
Searching Destinations
2
3
4
5
6
7
8
1
9
12
13
11
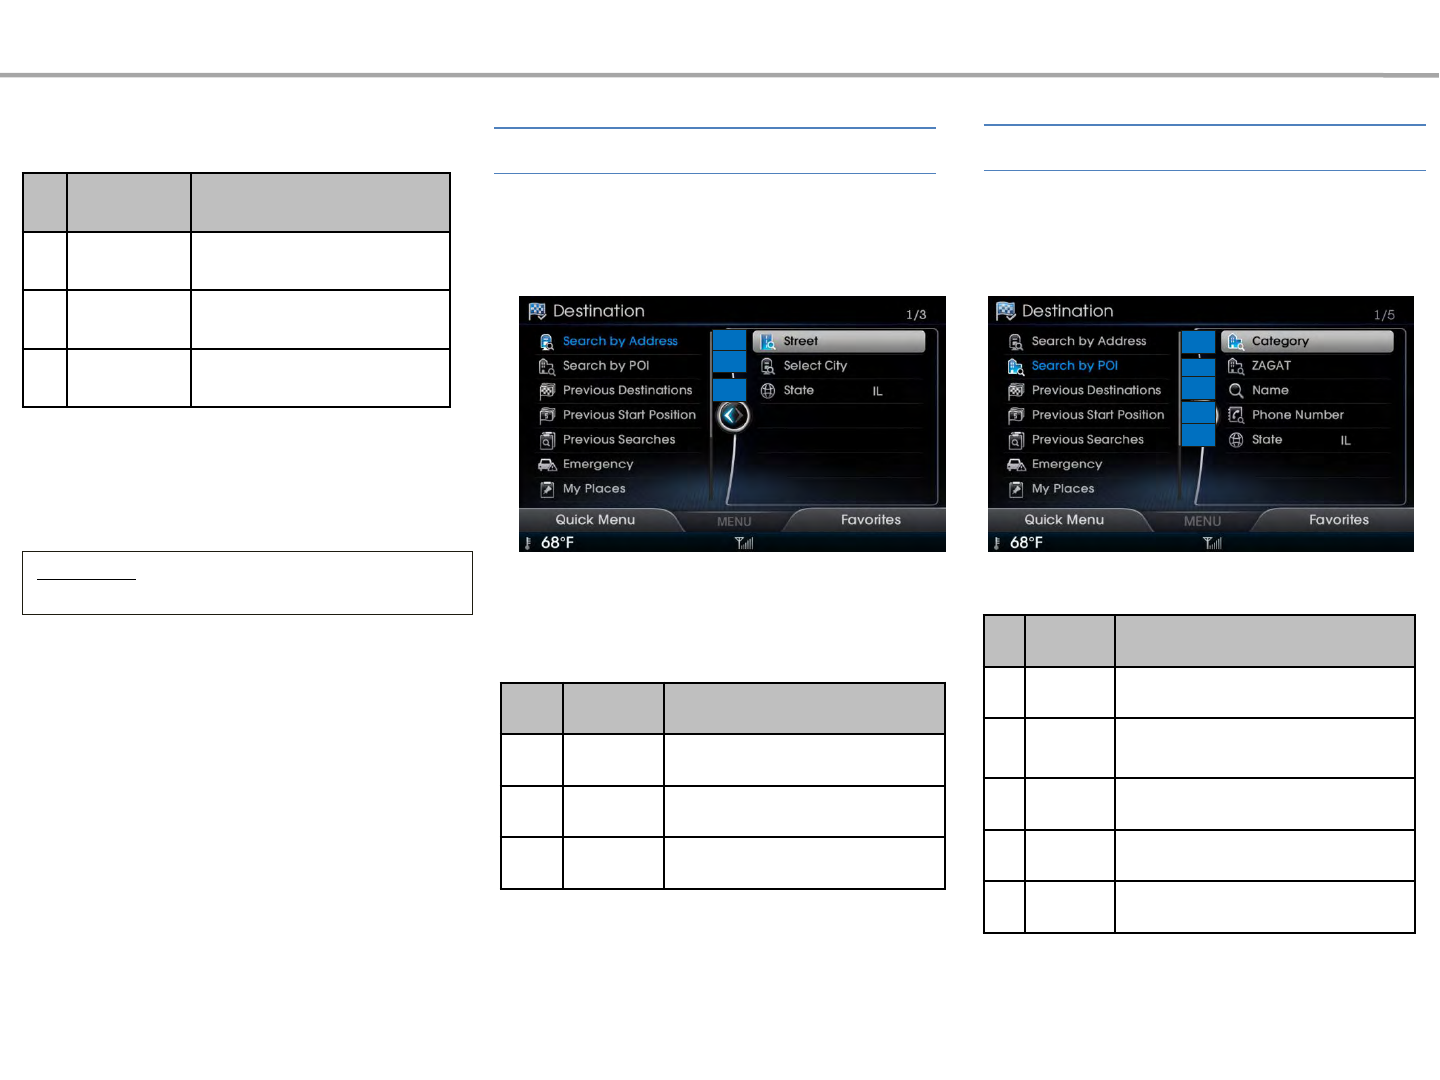
No. Name Details
1 Search by Address Destination search by entering the Street, City and
State
2 Search by POI POI searches for current position/scroll
position/destination/region
3 Previous Destinations Destination guidance for recently set locations
4 Previous Start Position Destination guidance for recently set start position
5 Previous Searches Destination guidance for recently searched locations
6 Emergency Used to search nearby Police station, Hospital, Auto
Services from current position
7 My Places Destination guidance for recently added My Places
8 Quick Menu Moves to Quick menu
9 Favorites Displays Home/Office/Favorites list
10 Intersection Used to search destinations by selecting
streets/intersections
11 Coordinates Destination search by entering latitude and longitude
12 Exit/Entrance Used to search destinations by searching for expressway
exits/entrances
13 Previous Map Moves to previous map screen
Navigation
10
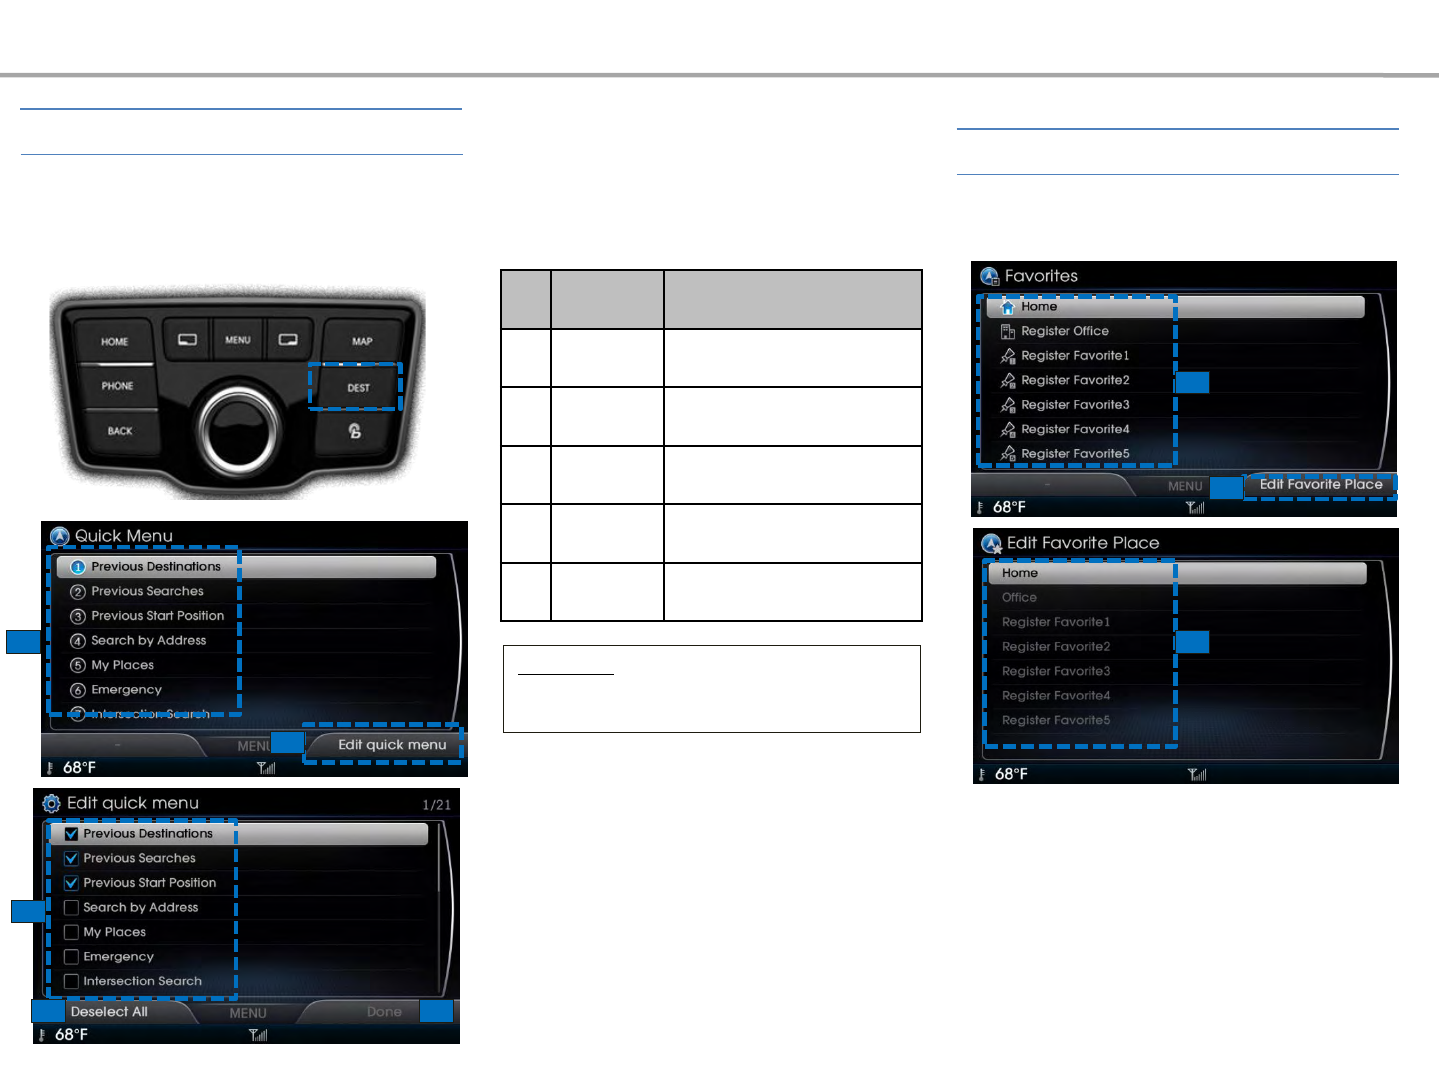
Press the [DEST] key ▶Press [LFT Quick
Menu button.
No. Name Details
1 Quick Lists Registered Quick menu lists
2Edit Quick
Menu Add and delete Quick menu lists
3 Menu Lists Editable Quick menu lists
4 Deselect All Unmark all selected Quick menu
5 Done Finishes editing Quick menu
Information
• Among 11 quick menus, Up to 7 quick menu
can be added to Quick menu.
2
3
4
1
2
3
5
1
These menus allow you to set frequently used
menu to Quick List.
To add or delete Quick list, select the [RHT] Edit
Quick Menu button. Press the [DEST] key ▶Press [ ]Favorites
button.
This feature is used to register frequently visited
positions to favorites.
Select the [RHT] Edit Favorite Place to add or
delete favorites.
Navigation
Quick Menu Favorites
Press the [DEST] key ▶Select [Search by
Address]
1
2
3
This search feature is used to search
destinations by addresses through
Street/City/State.
No. Name Details
1 Street Destination search by entering the
street address
2 Select City Destination search by entering the
city name
3 State Selects state
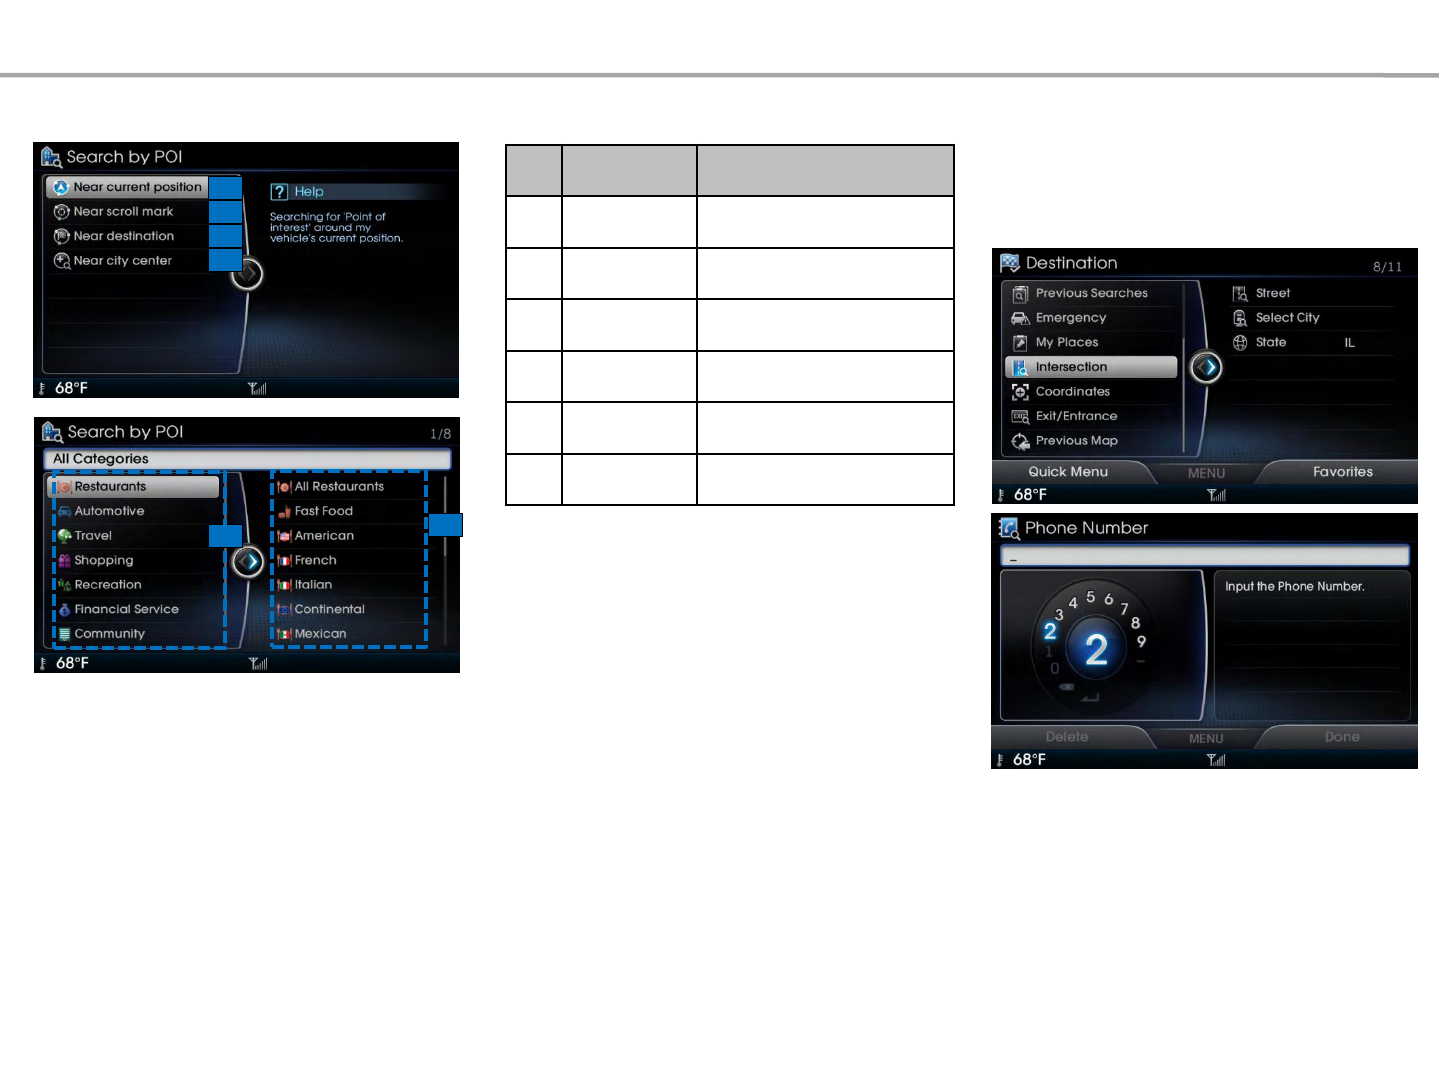
Press the [DEST] key ▶Select [Search by POI]
▶Select the desired Category
No. Name Details
1 Favorites lists Registered Favorites lists
2 Edit Favorites Add, edit, and delete Favorites
3 Menu Lists Editable Quick Menu lists
Information
• Up to 7 positions can be added to Favorites.
Navigation
No. Name Details
1 Category Search for POIs by selecting through
POI categories
2 ZAGAT
Search for ZAGAT restaurant guide
POIs from among POIs within the
vicinity
3 Name Search POIs by name
4Phone
Number
Destination search by entering the
phone number
5 State Selects state
Address Search POI Search
1
2
3
4
5
1
2
3
4
This search feature is used to search destinations
by criteria (Near current position, Near scroll
mark, Near destination)
56
No. Name Details
1Nea r C ur r e nt
Position
Searc hes POI around the
vehicle's current position
2 Near Scroll Mark searches facilities based on the
current scrolled position
3Near
Destination
searches facilities based on the
location of the destination
4 Near city center searches facilities based on the
selected location
5 Category Selects POI categories
6 POI Mark Selects POI marks
This feature is used to search the locations of
POIs by entering the phone number of the facility
you wish to search.
When entering the phone number, the area code
must be included.
Press the [DEST] key ▶Select [Search by
POI] ▶Select [Phone Number]
Phone Number
These search features allow you to search
previous searches to use to set destinations or
waypoints.
Press the [DEST] key ▶Select [Previous
Searches]
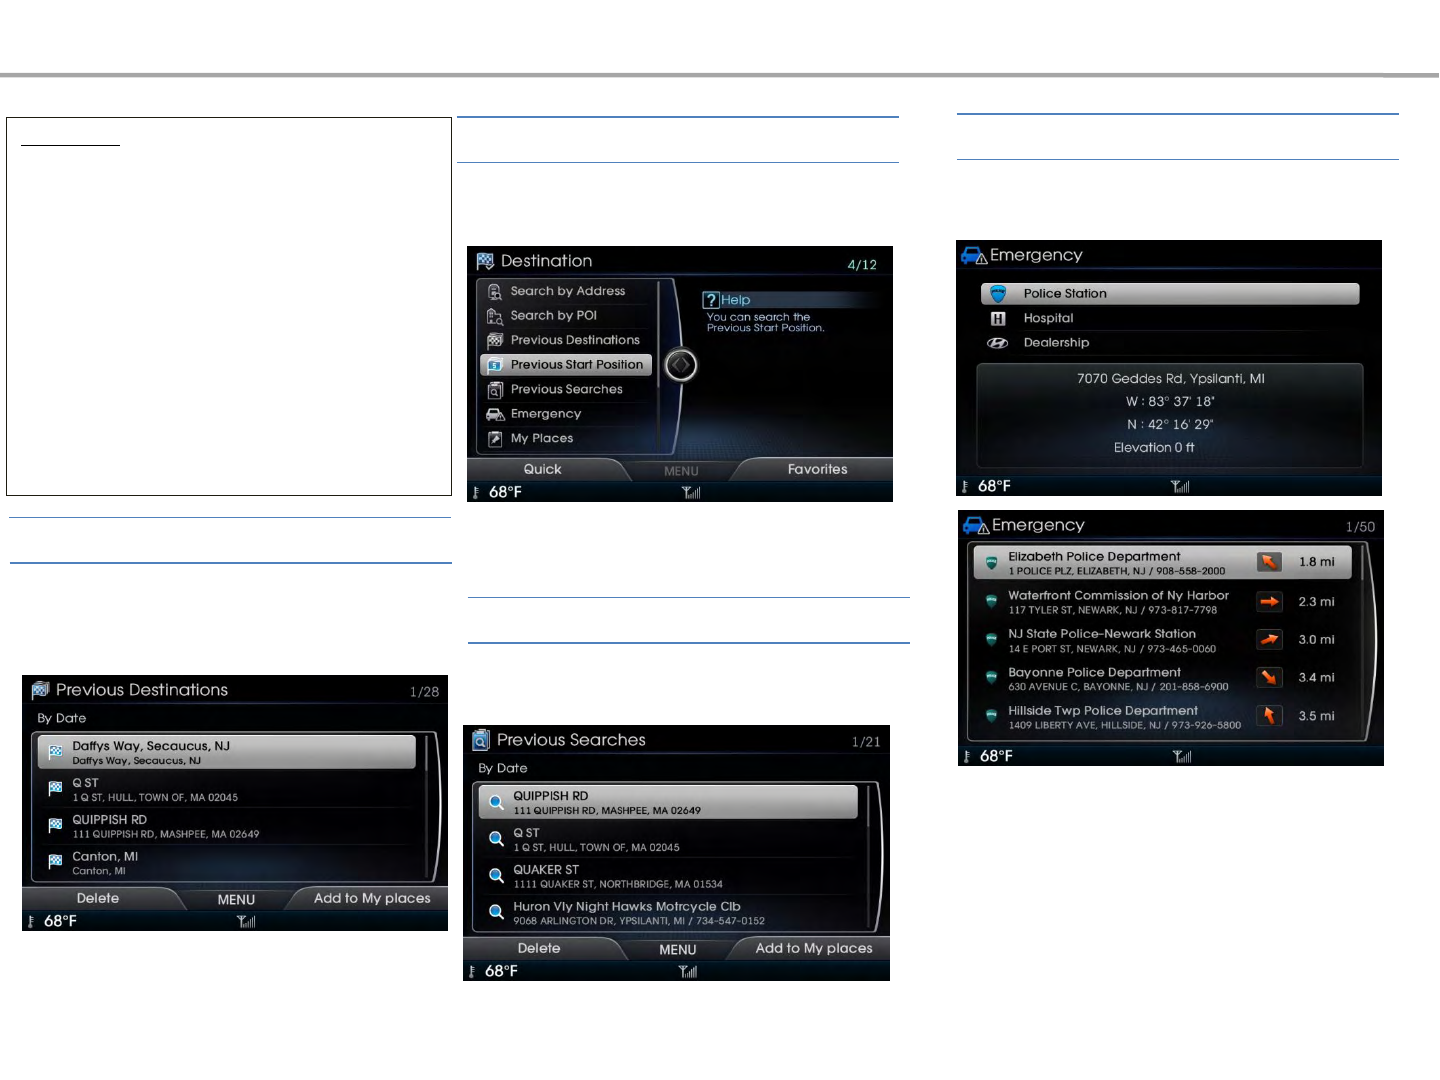
Press the [DEST] key ▶Select [Emergency]
This menu is used to search nearby police
stations, hospitals, and dealerships.
Navigation
These search features allow you to search
previous start points to use to set destinations or
waypoints.
Press the [DEST] key ▶Select [Previous Start
Position]
Previous Start Position
Information
• The telephone number and location may not the
same for some POIs. In addition, the following
types of facilities may be more frequently located
in other locations.
• Locations of department stores, museums, and
amusement parks may somewhat differ from the
set destination. Check the exact address when
trying to reach such destinations.
• Within general information newspapers, there
are cases when phone numbers of concert halls list
the numbers of managing companies. In such
cases, searches will be to the managing company.
• The telephone number and addresses may
change at any time.
Previous Destinations
Press the [DEST] key ▶Select [Previous
Destinations]
These search features allow you to search
previous routes to use to set destinations or
waypoints.
Emergency
Previous Searches
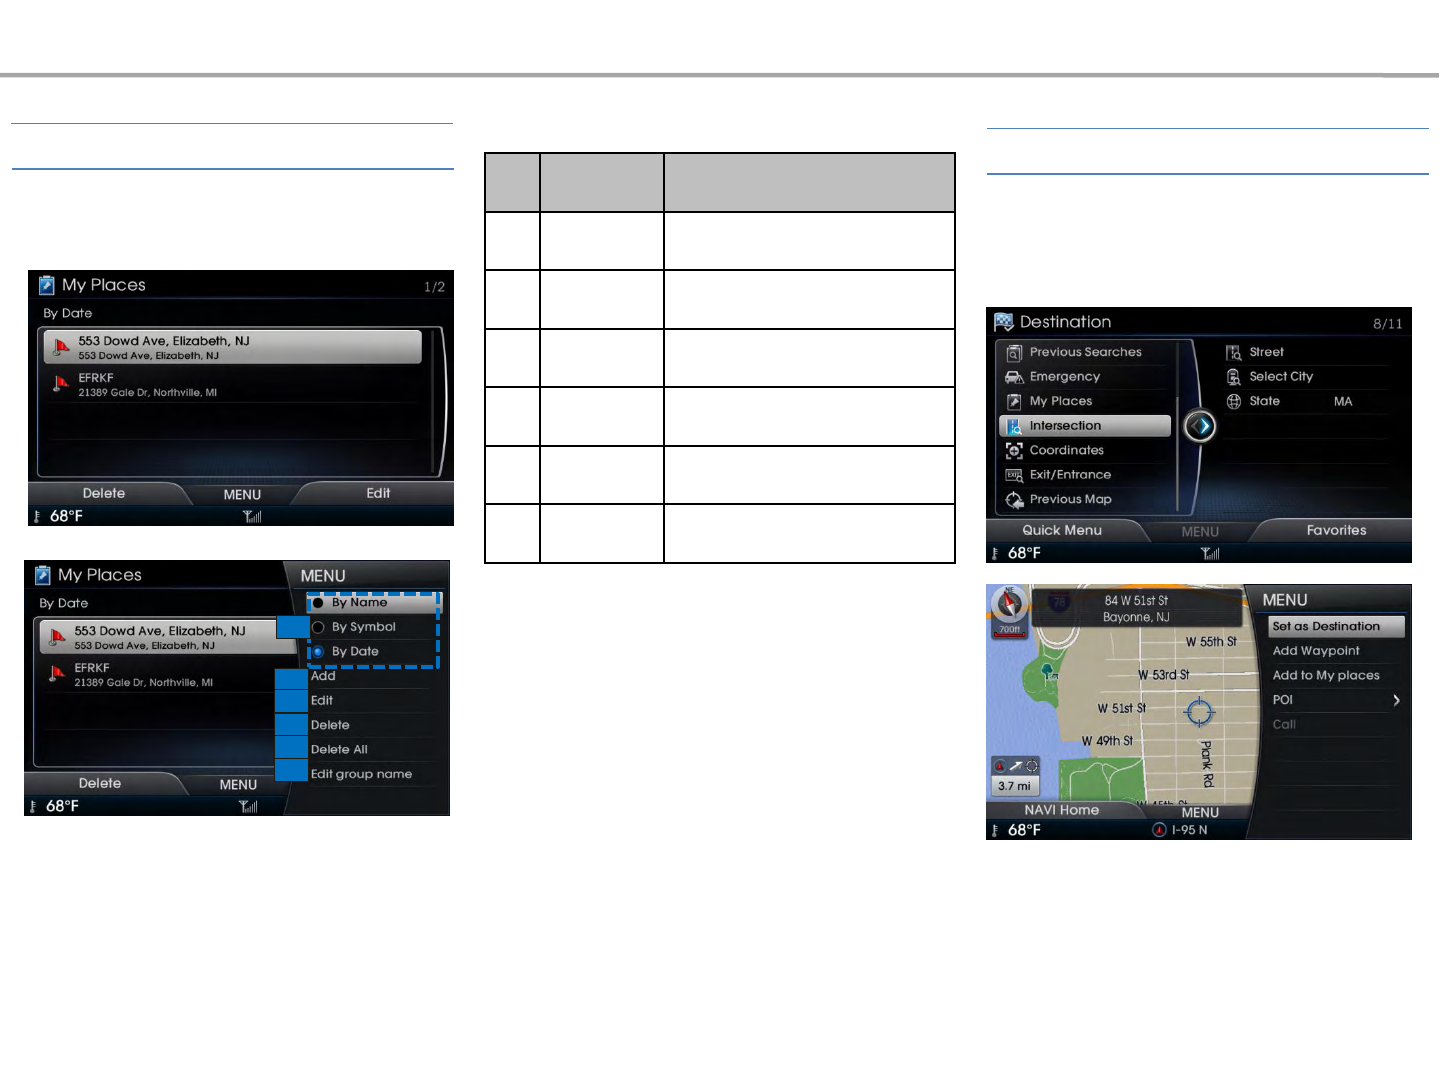
Press the [DEST] key ▶Select [My Places]
This search feature is used to search
destinations by selecting previously saved My
Places from the list to set as
Destinations.
No. Name Details
1 Sort Sort POIs and locations by
name/symbol/date
2 Add Adds a new place to My Place
group
3 Edit Edits selected place
4 Delete Deletes selected place
5 Delete All Deletes all registered places
6E d i t g r o u p
name Edits My Places group name
1
2
Press the [DEST] key ▶Select [Intersection]
3
4
5
6
Navigation
This feature is used to set intersections
as destinations by searching for the
names of two streets and finding where
they intersect.
My Places Intersection
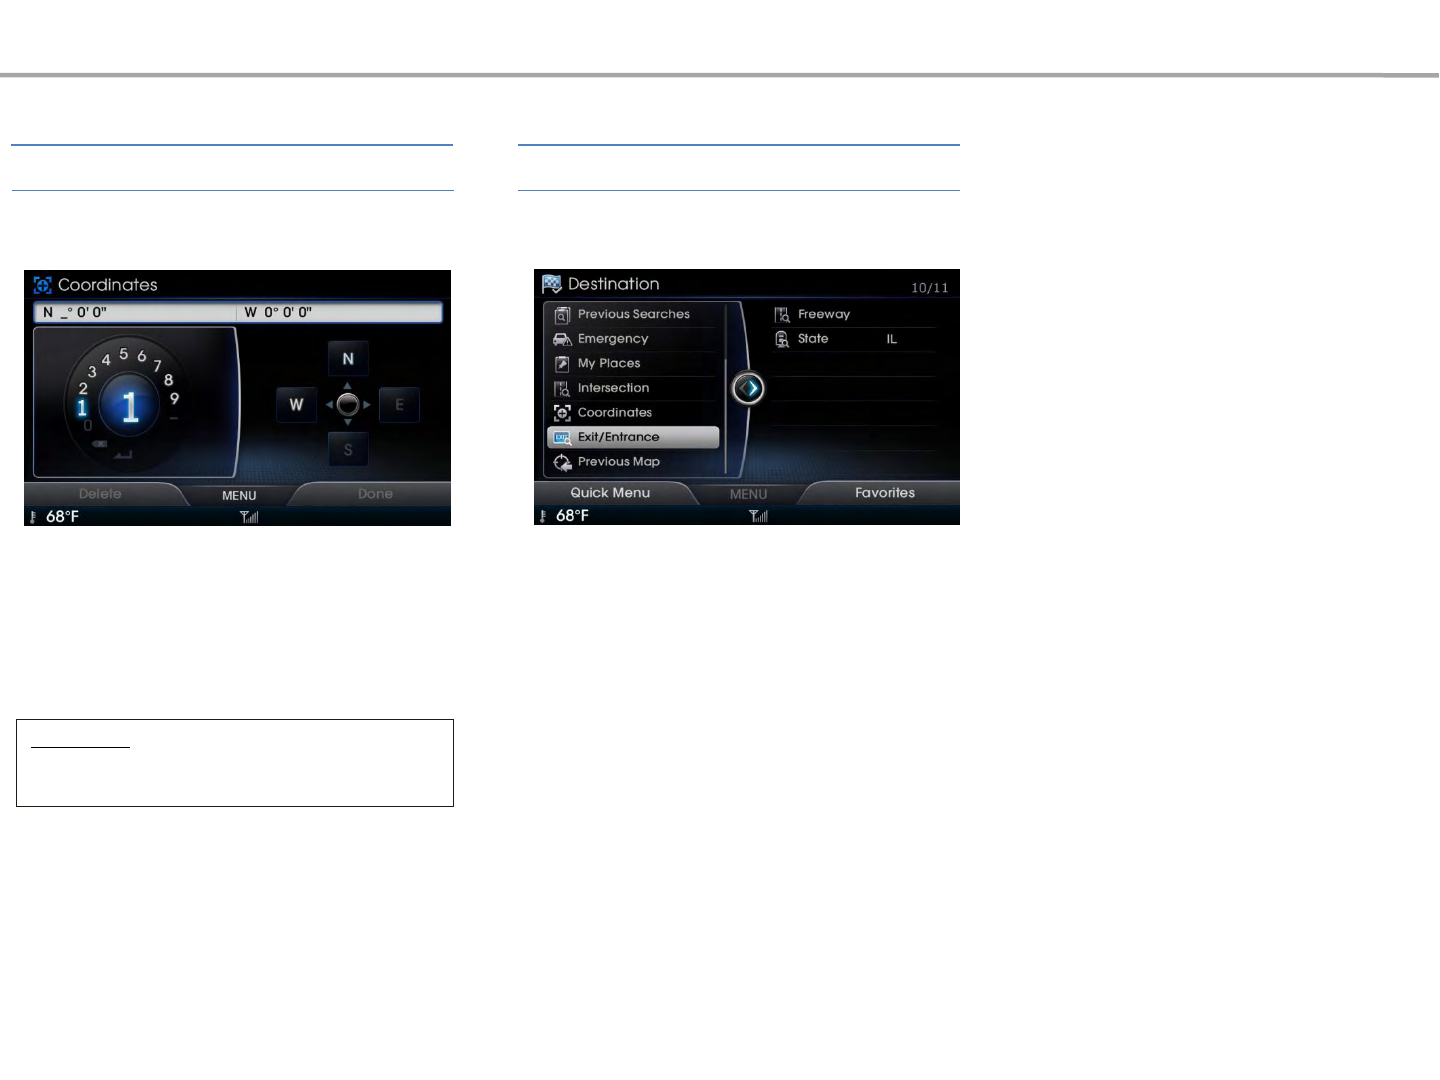
Press the [DEST] key ▶Select [Coordinates]
This feature is used to search the locations by
entering longitude and latitude coordinate
information.
Press the [DEST] key ▶Select [Exit/Entrance]
Information
• When entering one digit number, 0(zero) should
be entered first.
Navigation
Exit/EntranceCoordinates
This search feature is used to search
destinations by entering the Exits and Entrances
of corresponding expressways.
Enter the name of the Freeway corresponding
to the desired destination. Once search is
complete, press the controller to select the
desired location from the list.

Press the [DEST] key ▶Select [Previous Map]
Navigation
N0. Name Details
1Set as
Destination
Sets the facility or position where
the cursor is positioned as the new
destination
2Add
Waypoint
Sets the facility or position where
the cursor is positioned as a
waypoint
3Add to My
Places
Adds the facility or position where
the cursor is positioned to My
Places
4 POI Sets destination by searching POI
5 Call
Makes a all to the facility or
position where the cursor is
positioned
The previously displayed position is displayed
by scrolling the map.
2
3
4
5
1
After searching for the destination according to
the map search method, select the desired
destination from the list. (For more information
on destination search methods, refer to the
Destination Search section.)
Press the [DEST] key ▶Search destination ▶
Select [Set as Destination]
Previous Map Set as Destination
After verifying the location of the searched
position, select the [Set as Destination] button
to calculate the route. The Route Overview or
Multipath screen will be the displayed.

<Alternative Route>
<Route Overview>
Within the Route Overview or Alternative Route
screen, press the [Map VOICE] key or select the
[Start Guidance] button to begin guidance. To
add a destination, select the [Add Waypoint]
button.
Navigation
Once route calculation is complete, select the
[Simulation] button to view a demo of the route
guidance.
Information
•The Alternative Route display can be
turned off at [Navi Setup] ▶[Route Search]
▶Use Alternative Route Search
• If you select the [Set as Destination]
button while a previous destination has
already been set, the pop-up ‘Do you want
to change the destination?’is displayed.
• If you select [Yes], then the previous
destination is deleted and the new
destination is set.
• If you select [Add Waypoint], then a new
waypoint is added.
Information
• To learn more about ‘Alternative Route’,
‘Route Overview’or ‘Detailed Route
Settings’, refer to the ‘Route Menu’section.
Simulation
During Simulation, pressing the [Map] key will
end the Simulation and display the current map
position. If you start driving the vehicle while
the simulation is in progress, simulation will end
and route guidance will start.
Information
• Simulation will not operate after route guidance
has begun. When wishing to use the simulation
feature, do so after calculating the route but prior
to receiving route guidance.
Navigation
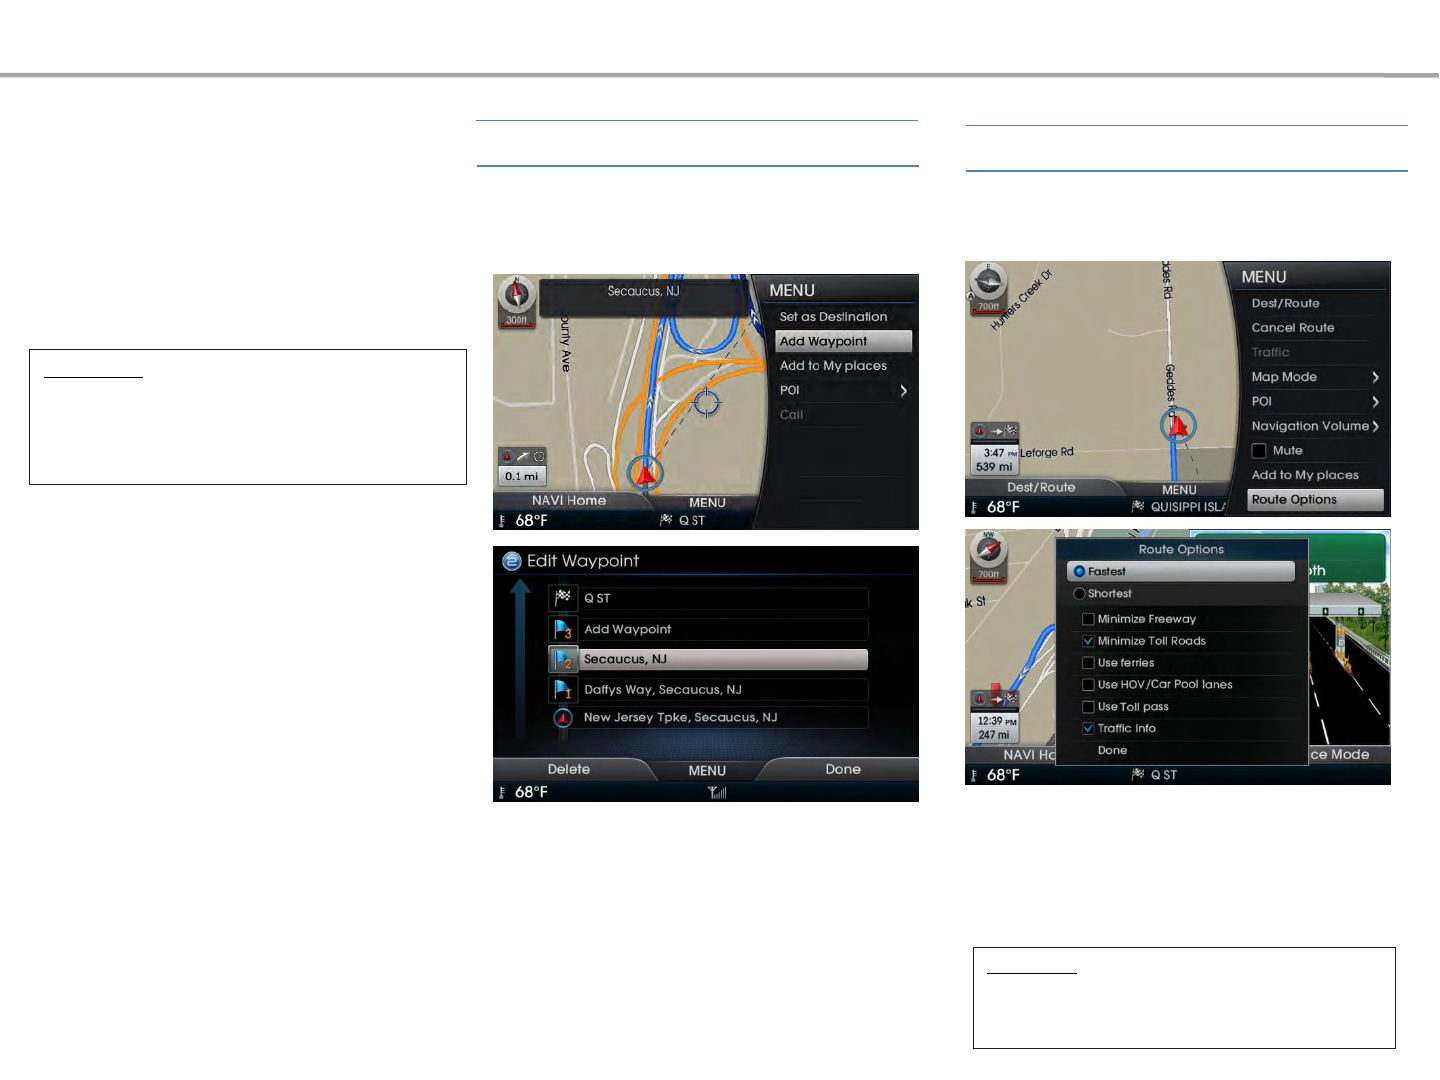
Searching for the destination according to
the map search method after searching for
waypoints within the map screen, select the
[Add Waypoint] button to add the waypoint
to the current route.
Information
• For more information on Fastest, Shortest, and
other calculating options, refer to the “Route
Option”section.
Selecting the [Route Options] will display a pop up
that allows you to change route settings and
conditions. Once the settings are changed, the route
will be recalculated by reflecting the changes.
In the map screen ▶Press the [MENU]
key ▶Select [Add Waypoint]
In the map screen ▶Press the [MENU]
key ▶Select [Route Options]
Route Options
Add Waypoint
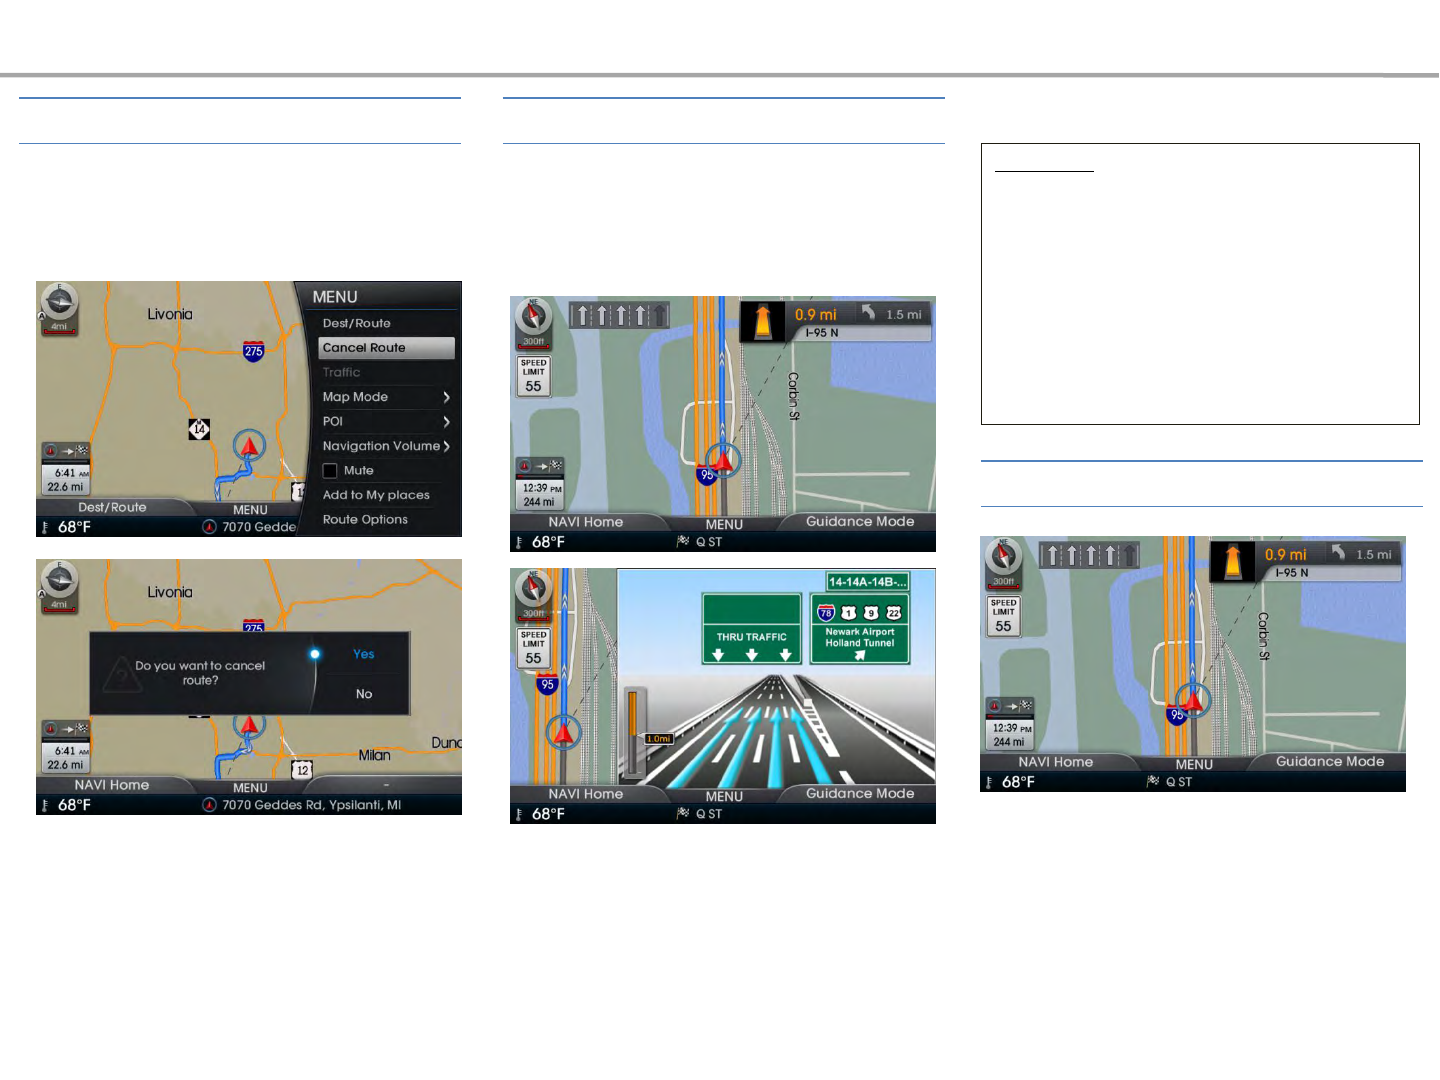
The currently calculated route is canceled and
deleted.
Navigation
In the map screen ▶Press the [MENU]
key ▶Select [Cancel Route] ▶Select
[Yes]
Within the destination guidance map screen, if
the current position is on route, then
intersection guidance will be provided when
nearby an intersection. In addition, when
nearby an intersection, the intersection zoom
screen is displayed.
The preliminary guidance, intersection
guidance, turn list guidance, motorway mode
screen are displayed depending on the current
road condition.
Information
• Within all guidance mode screens, pressing
[RHT] Guidance Mode button will change the
route guidance mode.
• Each time the [RHT] Guidance Mode button is
selected, the guidance mode will change in order
of single screen → motorway guidance → turn list
mode.
• Motorway and intersection zoom guidance are
displayed on when receiving guidance at
corresponding roads.
At the top right side of the screen, the first and
second turn info, remaining distance, direction
and other information are displayed.
Cancel Route Route Guidance
Preliminary Guidance Mode
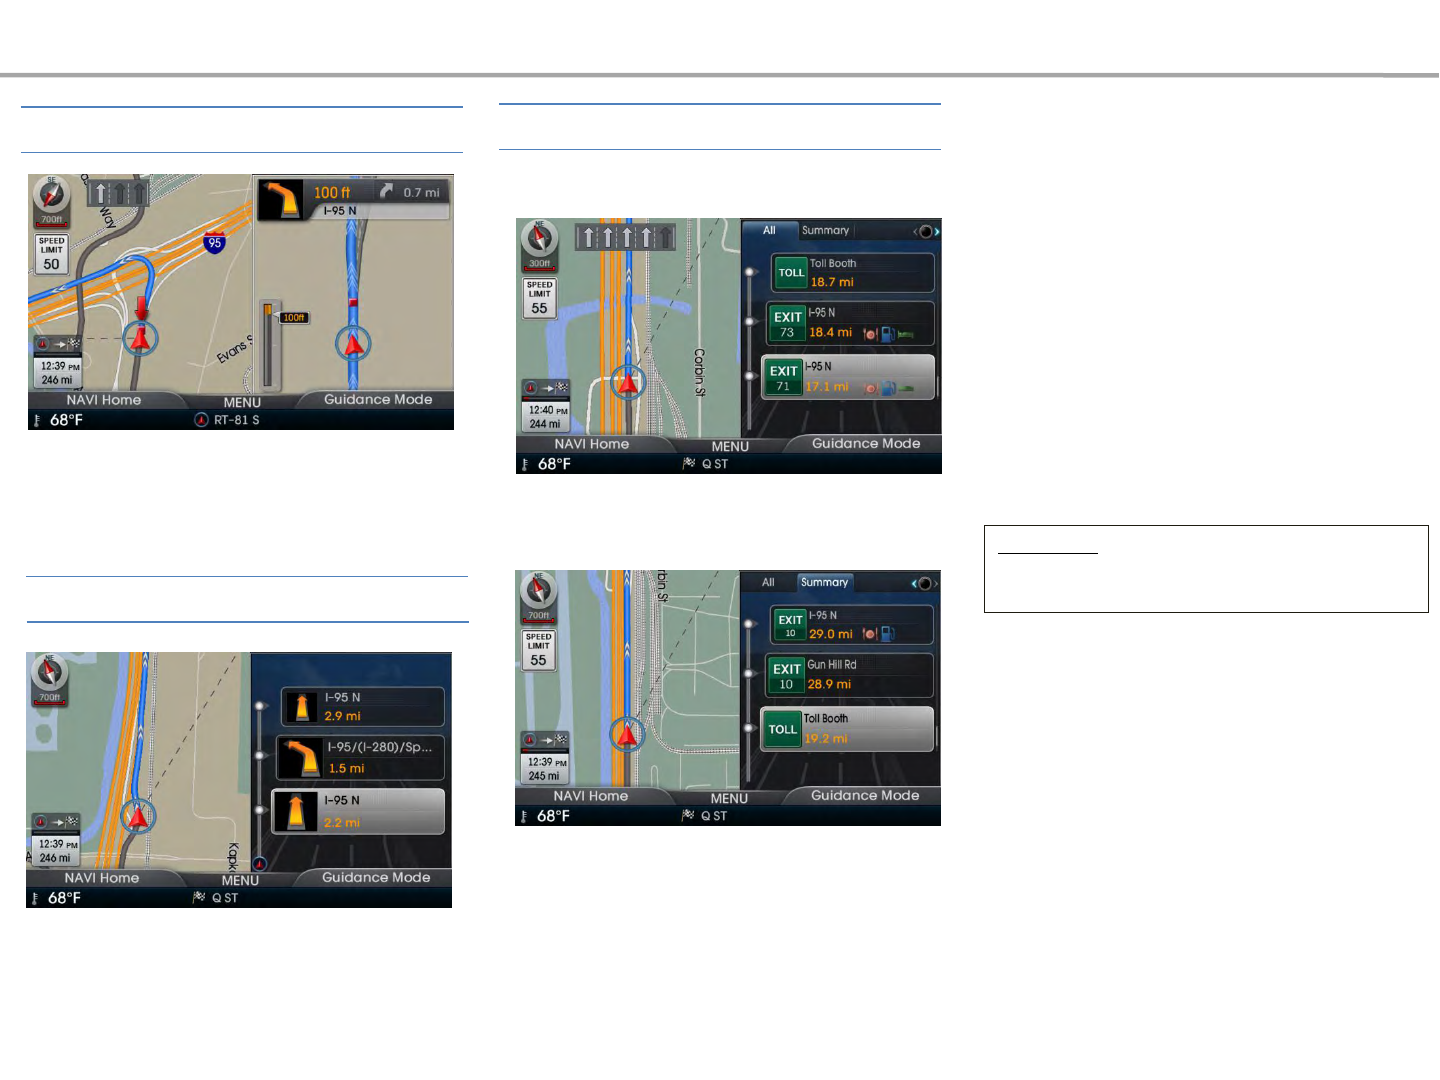
This mode provides detailed guidance nearby
intersections before an expected turn. This
mode will start displaying before the
intersection.
This mode shows turn information for the
current the route.
Navigation
<All>
<Summary>
Upon entering a motorway during route
guidance, the motorway mode will automatically
be displayed. This mode is displayed when
driving on an expected route and display mainly
motorway related POIs.
Information
• Some POIs may not be displayed if seven(7) or
more POIs exist within the position.
Selecting [All], [Summary] at the bottom right
side of the screen will change the route guidance
mode.
Press the controller left/right to switch display
mode and check POI info list.
Intersection Zoom Mode
Turn List Mode
Motorway Mode
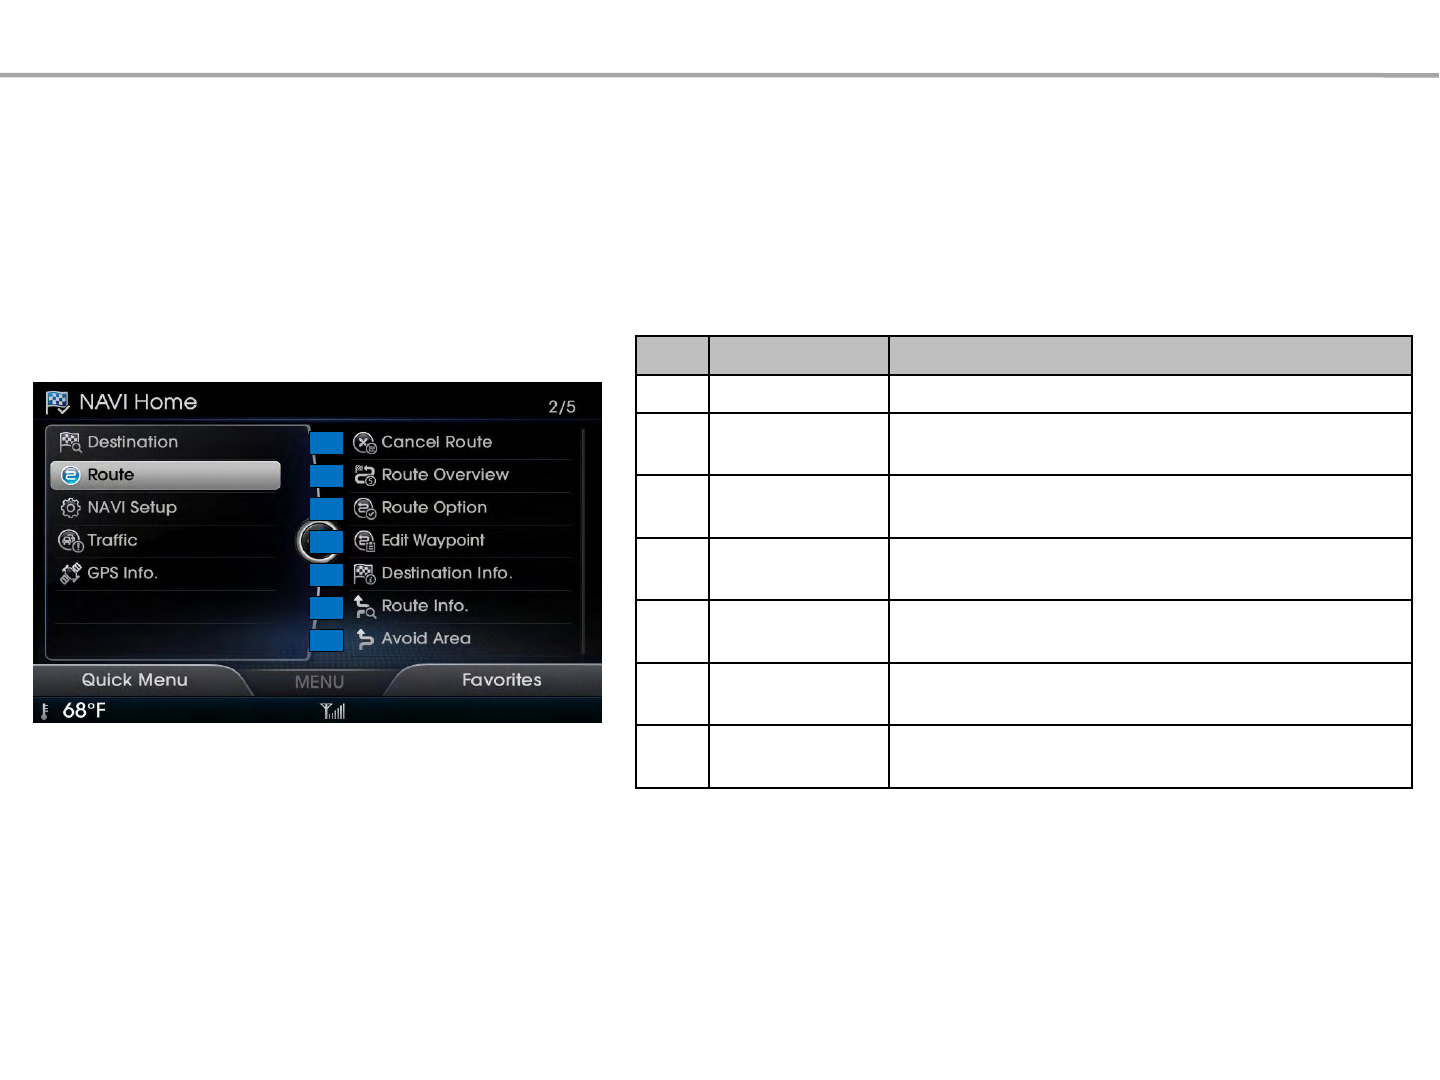
Route Menu
1
2
3
4
5
6
7
No. Name Details
1 Cancel Route Cancels the currently set route
2 Route Overview View route overview to the current destination
3 Route Option Route calculation features that include various route
calculation options and settings
4 Edit Waypoint Add/delete/change order of destinations/waypoints
5 Destination Info. Shows the estimated arrival time and remaining distance to
the destination
6 Route Info Detailed info on the route to the current destination and
provides detour routing options
7 Avoid Area Edit route by adding Avoid Areas/Editing Avoid Areas and
Deleting Avoid Areas
Navigation
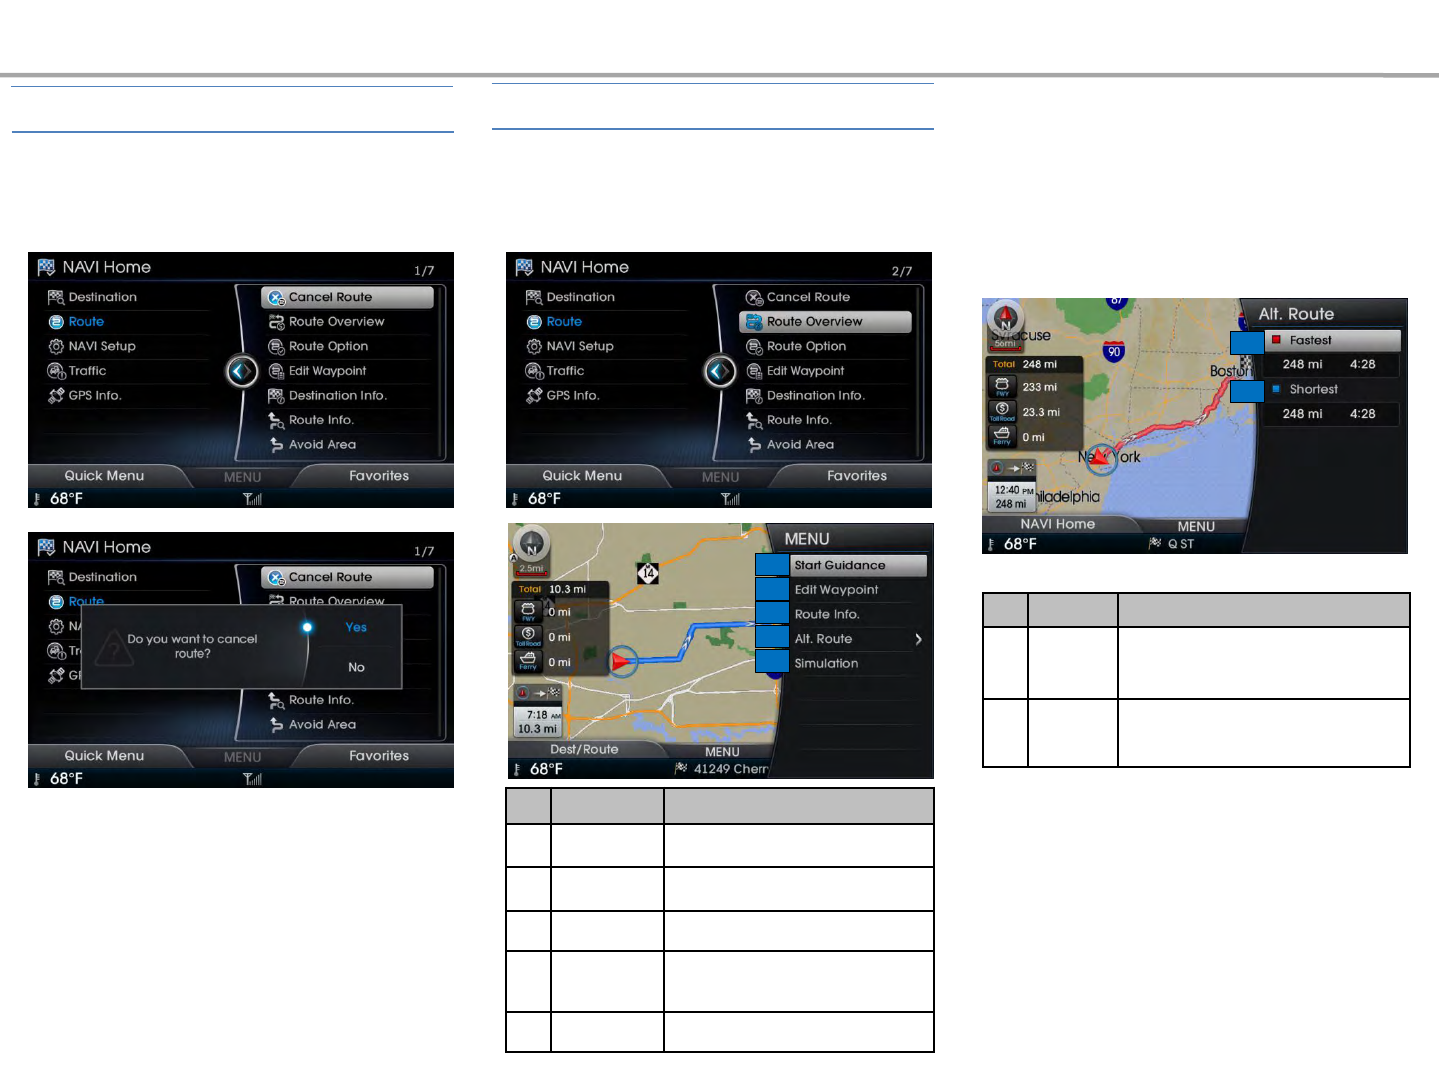
1
2
3
4
5
Guidance to the current route is canceled.
No. Name Details
1Start
Guidance Starts route guidance to the destination
2 Edit Waypoint Add/delete/change order of
destinations/waypoints
3Route
Info.
Route guidance information to the set
destination and calculate detours
4 Alt. Route
Displays various alternative route
options to select the desired route
calculation method
5 Simulation Route simulation to the set destination
Within the Route Overview screen, selecting
the [Alt. Route] button or setting ‘Calculate
Alternative Routes upon Calculation’ within
Navigation Setup will display alternative routes
on the screen.
No. Name Details
1 Fastest Recommended route that reflects
distance and traffic conditions
2 Shortest The shortest distance from start point
to destination
1
2
Navigation
In the map screen ▶Press the [LFT]
NAVI Home button ▶Select [Route] ▶
Select [Cancel Route] ▶Select [Yes]
In the map screen ▶Press the [LFT]
NAVI Home button ▶Select [Route]
▶Select [Route Overview]
Canceling the Route Route Overview
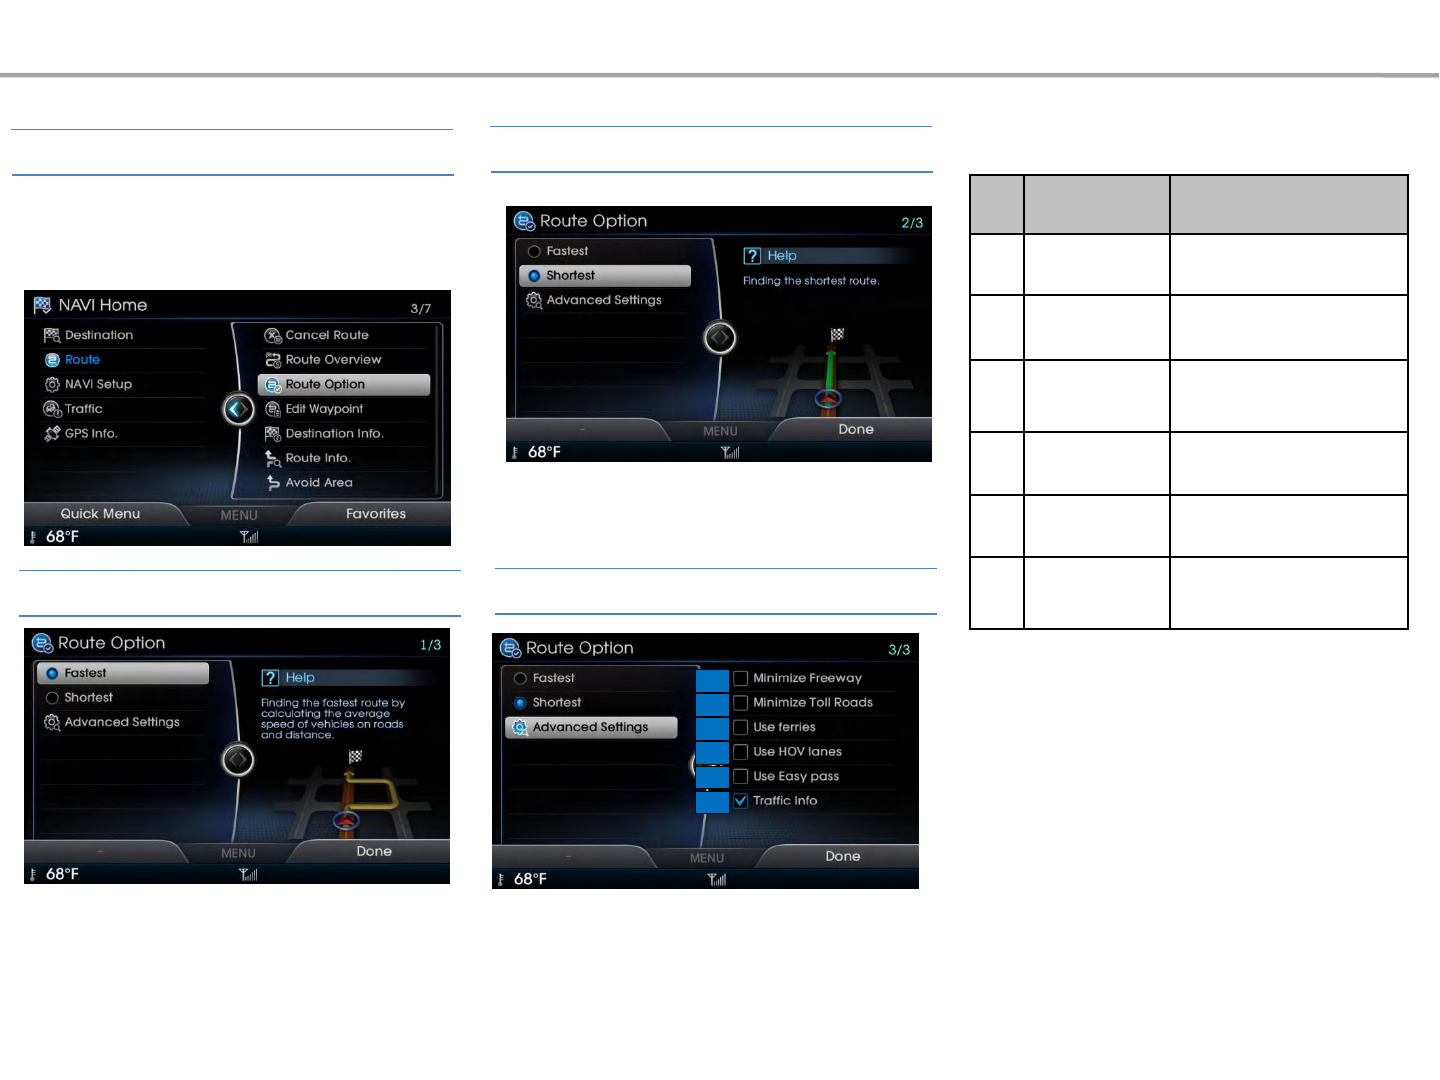
This option provides calculates routes by
reflecting the average speed of streets and
roads to the destination.
This option provides guidance by calculating the
shortest distance route to the destination.
Advanced settings allow you to set whether to
include motorways, toll roads or ferries within
route calculation.
No. Name Details
1Minimize
Freeway
Route calculation with
minimal use of motorways
2Minimize Toll
Roads
Route calculation with
minimal use of toll roads
3 Use Ferries
Route calculation by
including/not including
ferries
4Use HOV/Car
Pool lanes
Route calculation by
including use of HOV lanes
5 Use Toll pass Route calculation by
including use of Easy Pass
6 Traffic Info
Route calculation by
considering traffic
information
Navigation
In the map screen ▶Press the [LFT]
NAVI Home button ▶Select [Route] ▶
Select [Route Option]
1
2
3
4
5
6
Route Option
Fastest
Shortest
Advanced Settings
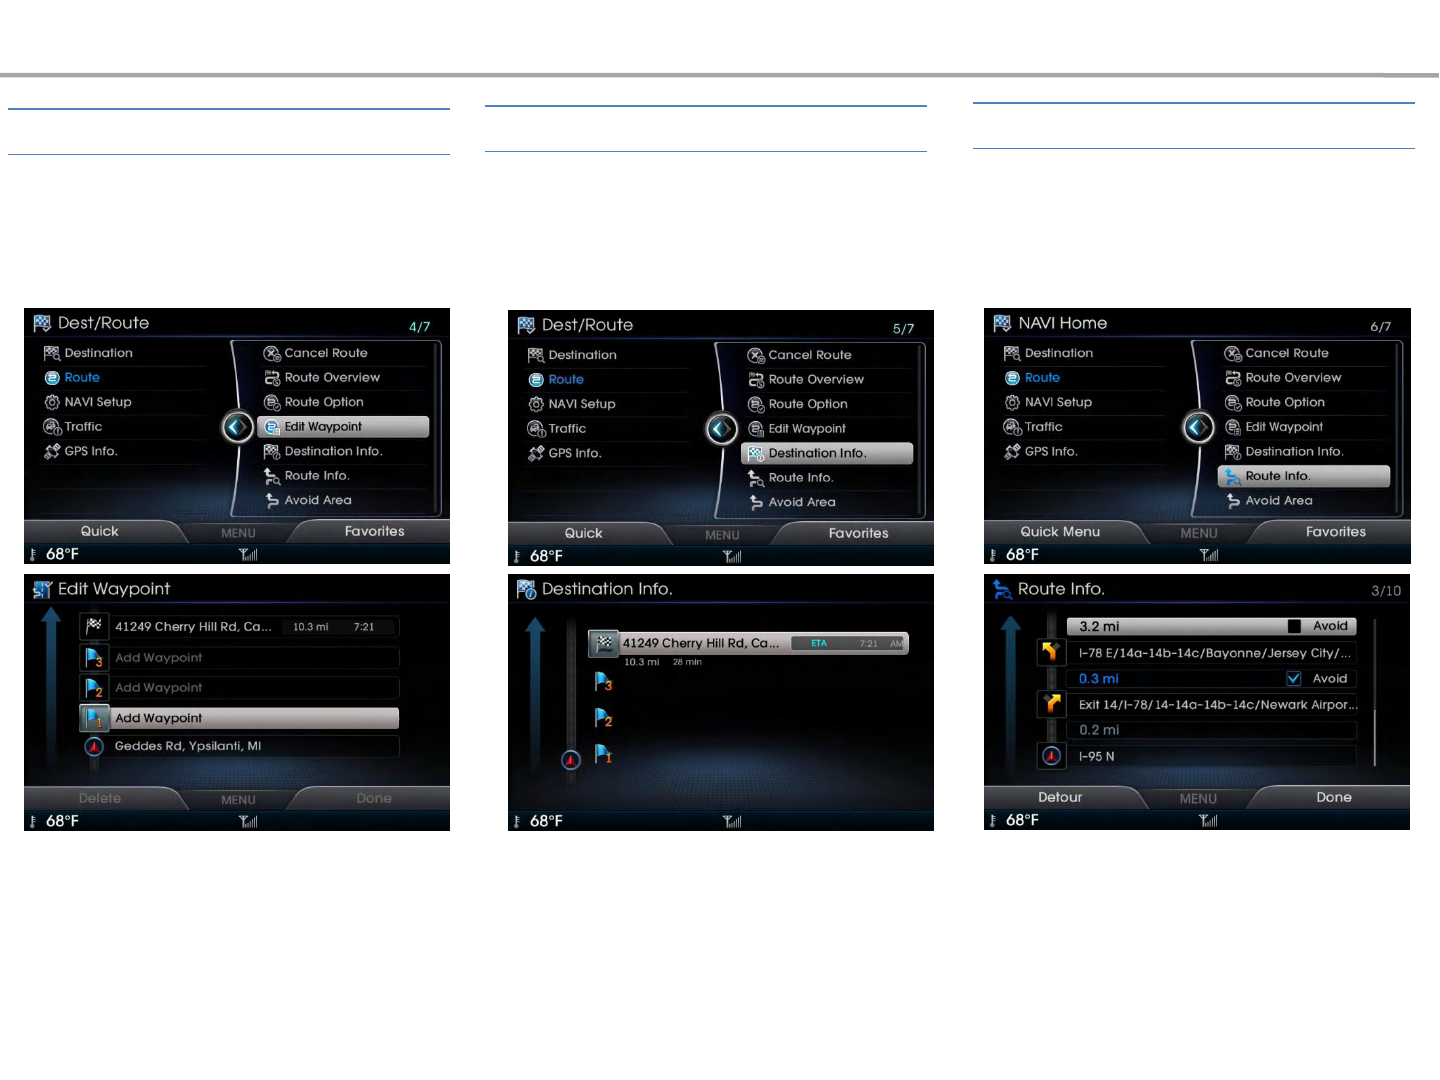
This feature displays the start point, waypoints
and thee destination in list format and is used
to edit corresponding positions or edit the
order of the destinations included within the
route.
In the map screen ▶Press the [LFT] NAVI
Home button ▶Select [Route] ▶Select
[Destination Info]
This feature shows the estimated arrival time,
remaining distance, waypoint information, and
map of the destination.
In the map screen ▶Press the [LFT] NAVI
Home button ▶Select [Route] ▶Select
[Route Info]
This feature is used to check the key routes and
re-set the route by setting detours for a fixed
distance from the current position
Navigation
In the map screen ▶Press the [LFT]
NAVI Home button ▶Select [Route] ▶
Select [Edit Waypoint]
Edit Waypoint Destination Info Route Info
1
2
3
4
5
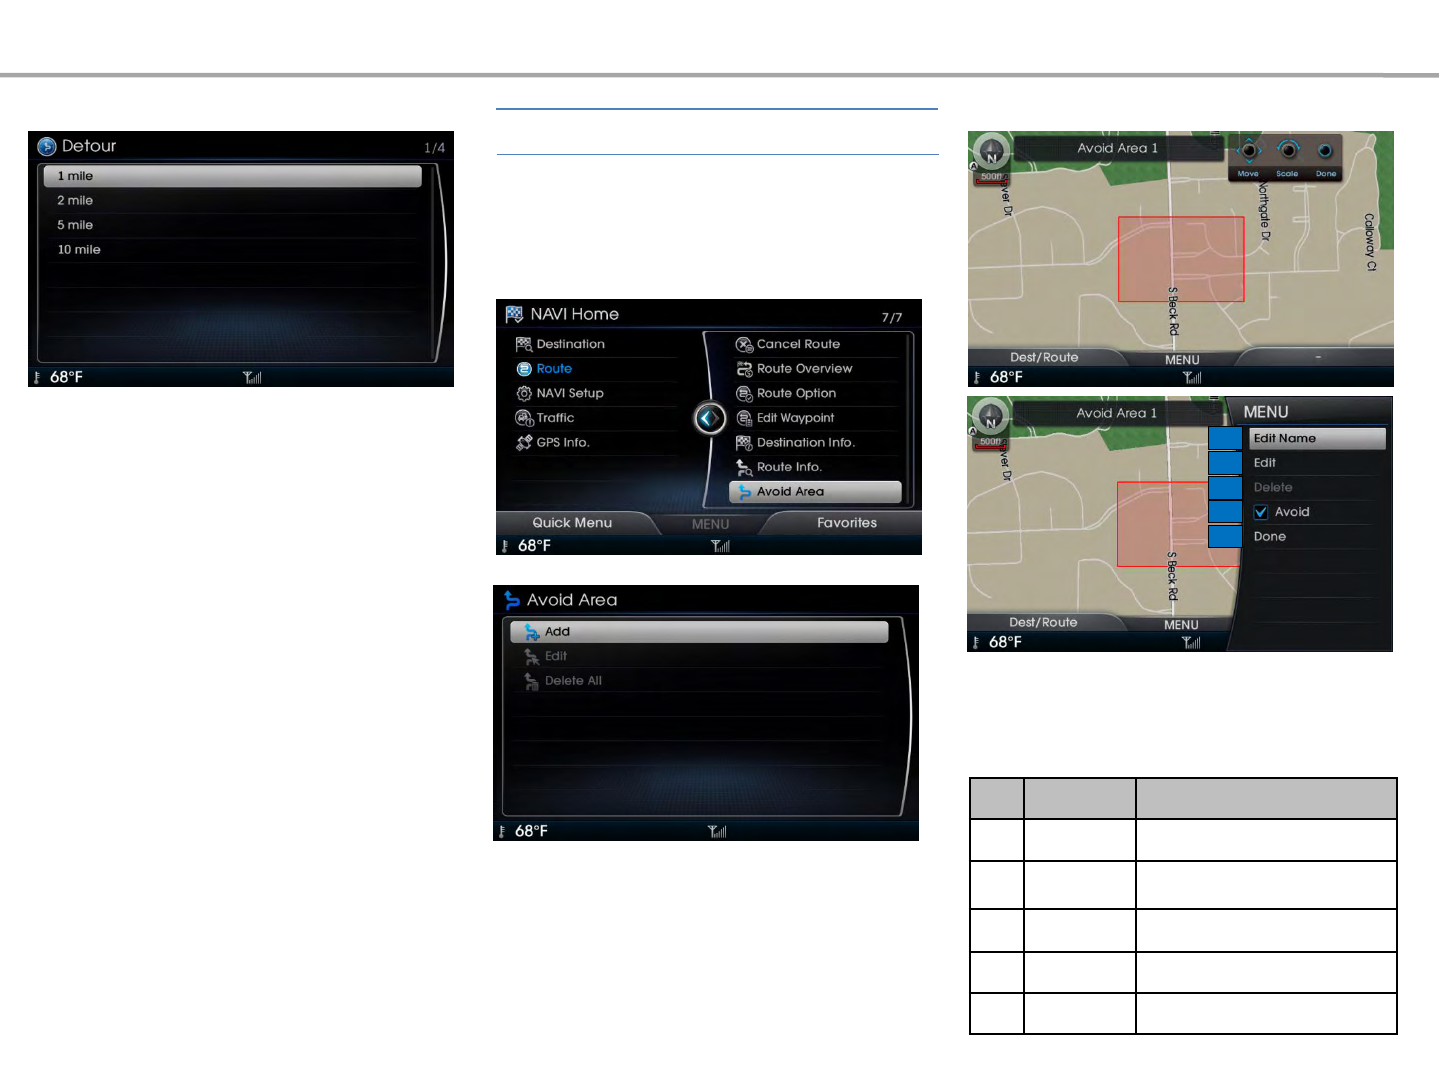
In the map screen ▶Press the [LFT] NAVI
Home button ▶Select [Route] ▶Select
[Avoid Area]
It is possible to add/edit/delete avoid areas. Use
the controller to set the range of the area you
wish to avoid.
No. Name Details
1Edit Name Edit name of Avoid Area
2Edit Edit size and area of Avoid
Area
3Delete Delete set Avoid Area
4Avoid Avoid the set area
5Done Finalize setting
Navigation
If you press the [Detour] button, you can
set the size of the area to detour in
1/2/5/10 mile units. A route will be
calculated by avoiding the set distance
starting from the current position.
Avoid Area
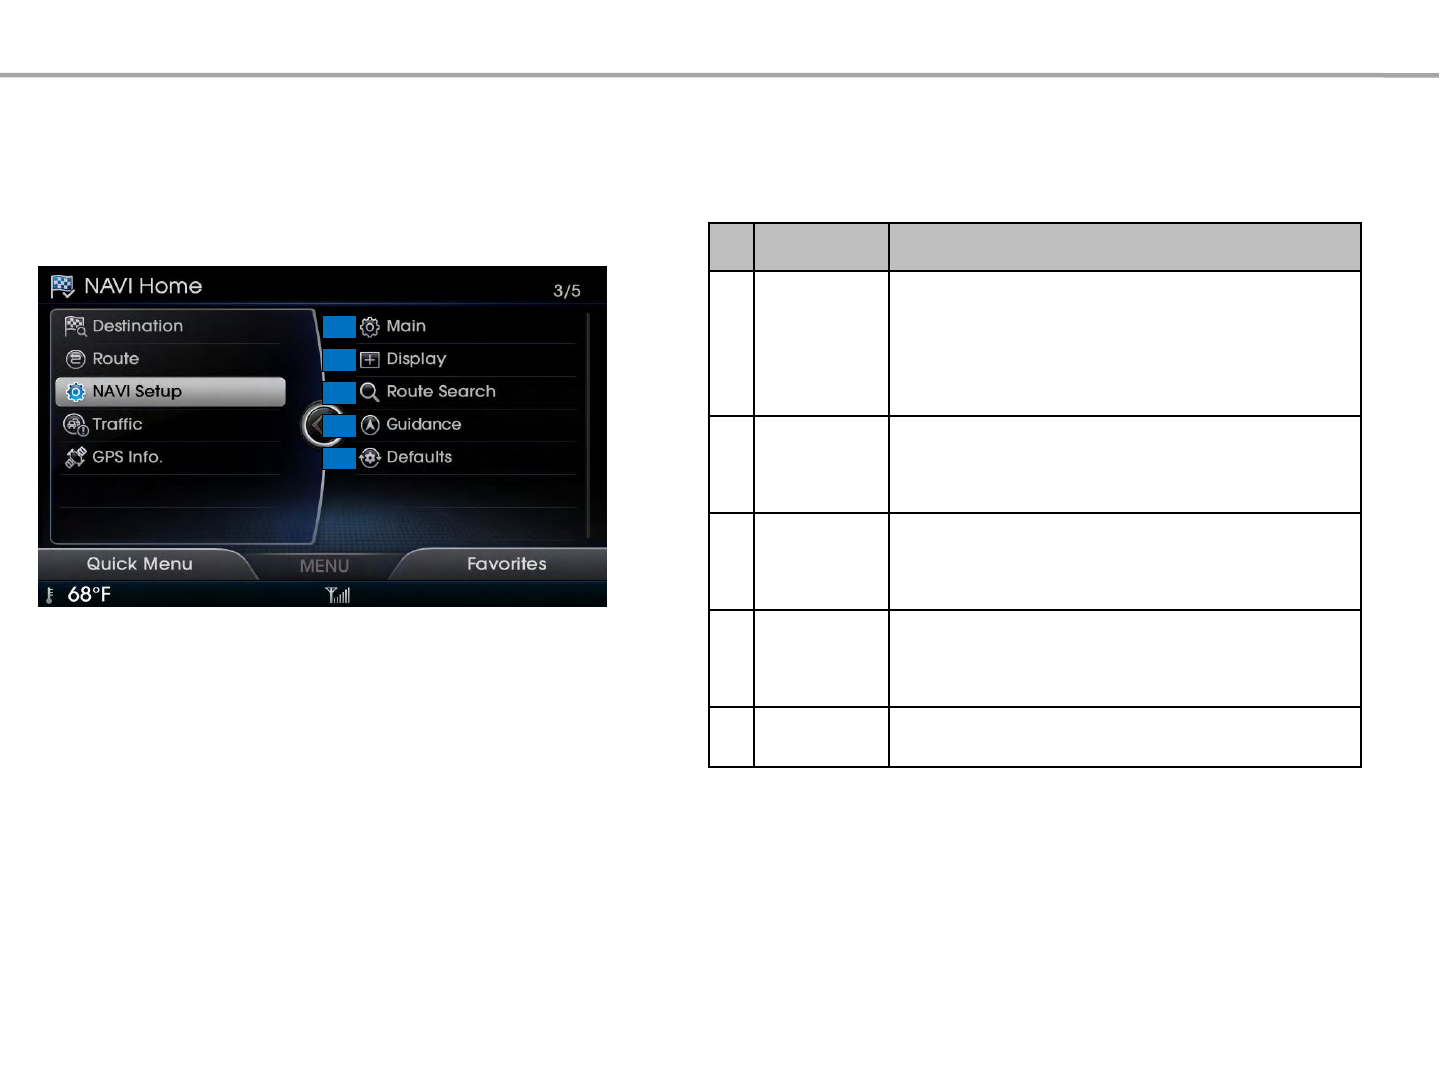
NAVI Settings
1
2
3
4
5
No. Name Details
1 Main
Displays options related to Units display/Estimated time
of/Distance and Time to/Fuel Type/Select Voice/Driving
Speed/Previous Destination Display/Auto Zoom
2 Display Displays options related to route indicator line
color/map font size/map color and trace features
3 Route Search Displays route calculation options related to calculating
alternative routes and upon route recalculation
4 Guidance Displays options related to driver alert guidance
5 Defaults Displays options used to initialize settings/initialize
saved information
Navigation
In the map screen ▶Press the [LFT] NAVI
Home button ▶Select [NAVI Setup]▶
Select [Main]
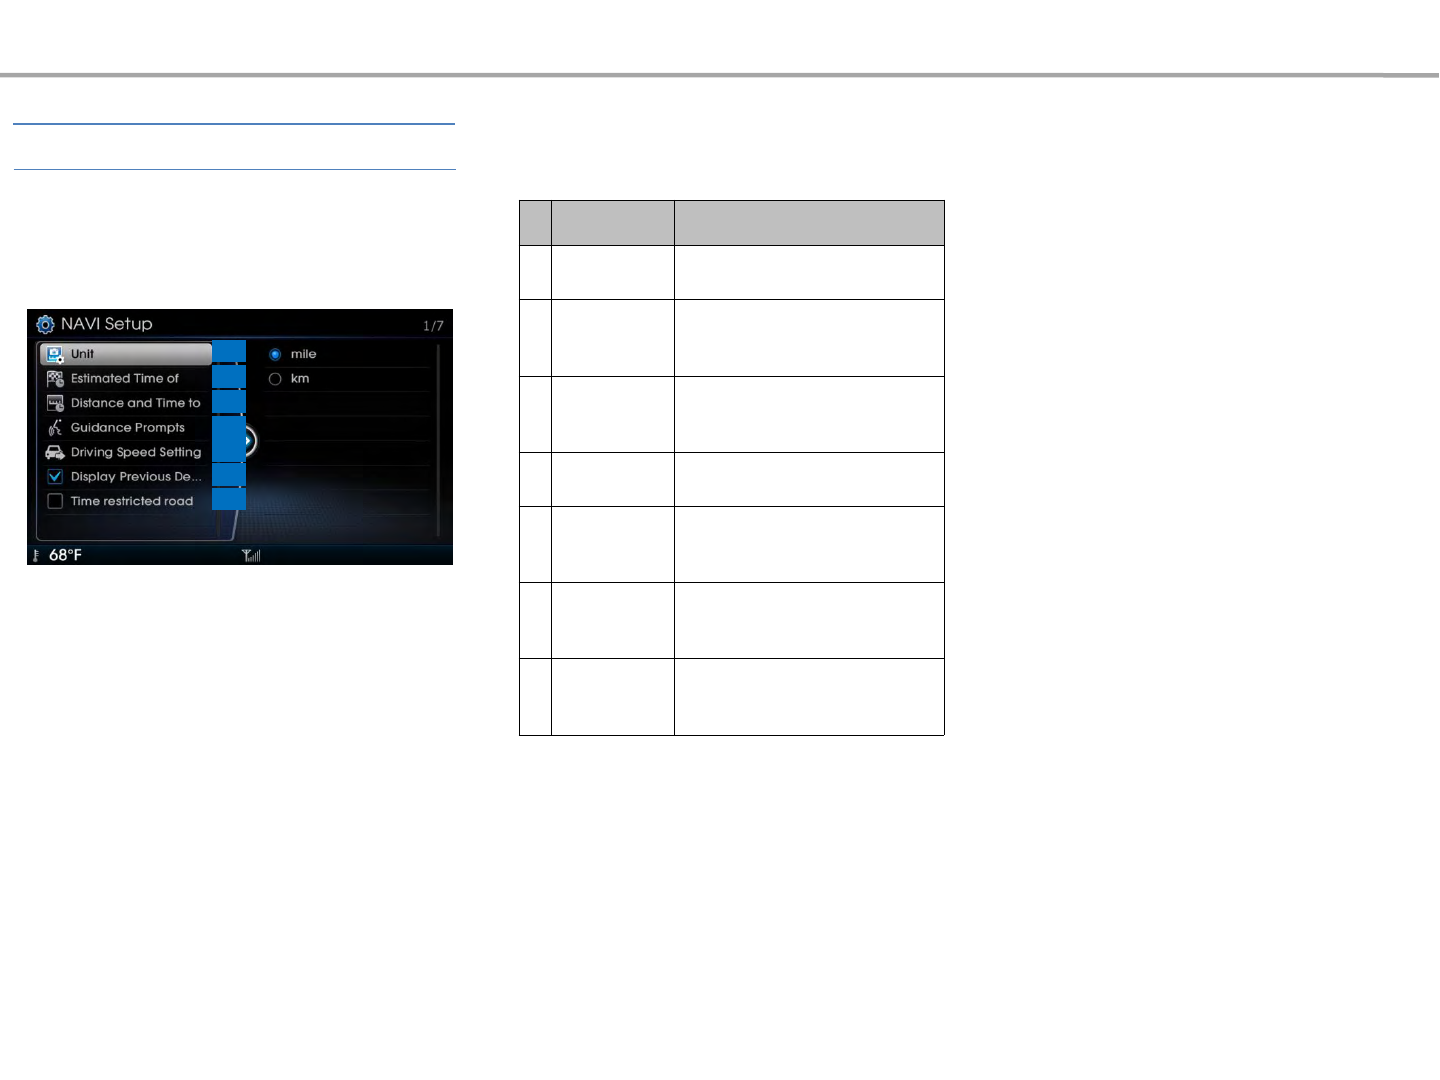
These menus are used to set general options
related to Navigation mode.
Navigation
No
Name
Details
1 Unit This option is used to set the unit
when displaying the vehicle speed
2Estimated
Time of
This option is used to set the
estimated arrival time or the
remaining time to the destination.
3Distance and
Time to
This option is used to set the
distance and time to the
destination or waypoint
4Guidance
Prompts
This option is used to set the
navigation voice.
5Driving Speed
Setting
This option is used to set the estim
ated travel speeds within normal r
oads and motorways.
6
Display
Previous Dest.
Upon Start-up
This option is used to set whether
to display previous destinations
upon starting the Navigation
7Time restricted
road
This option is used to calculate
routes by considering for times of
restricted roads.
1
2
3
4
5
6
7
Main
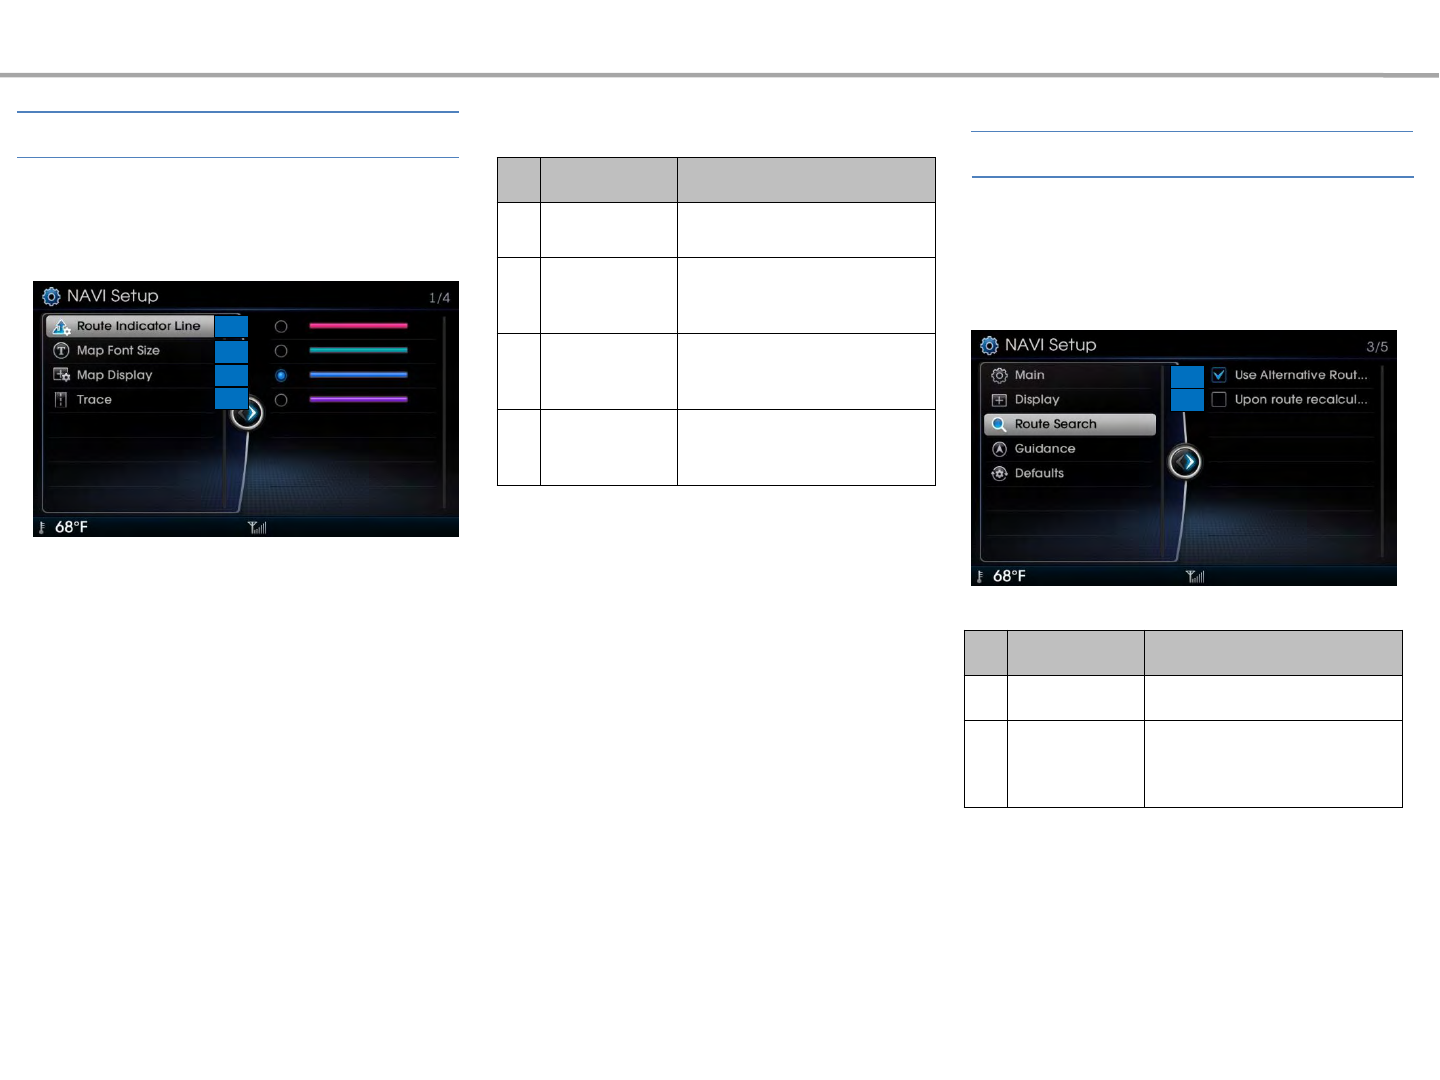
Press the [ LFT] NAVI Home button ▶Select
[NAVI Setup] ▶Select [Display]
Navigation
1
2
3
4
These menus are used to set options
displayed within the Navigation screen.
No
Name
Details
1Route Indicator
Line
This feature is used to set the
color of the route indicator line.
2 Map Font Size
This option is used to set the size
of the font shown in the map
between 3 levels.
3 Map Display
The map color can be set
according to Day/Night/Auto
modes.
4 Trace
This option is used to set
whether to display the trace on
the map
Press the [LFT] NAVI Home button ▶Select
[NAVI Setup] ▶Select [Route Search]
1
2
No
Name
Details
1Use Alternative
Route Search
Search for alternative routes when
calculating routes
2
Upon Route
recalculation,
display
search options
Sets whether to display routing
options upon recalculating routes
Display Route Search
Press the [LFT] NAVI Home button ▶Select
[NAVI Setup] ▶Select [Guidance]
Navigation
Press the [LFT] NAVI Home button ▶Select
[NAVI Setup] ▶Select [Default]
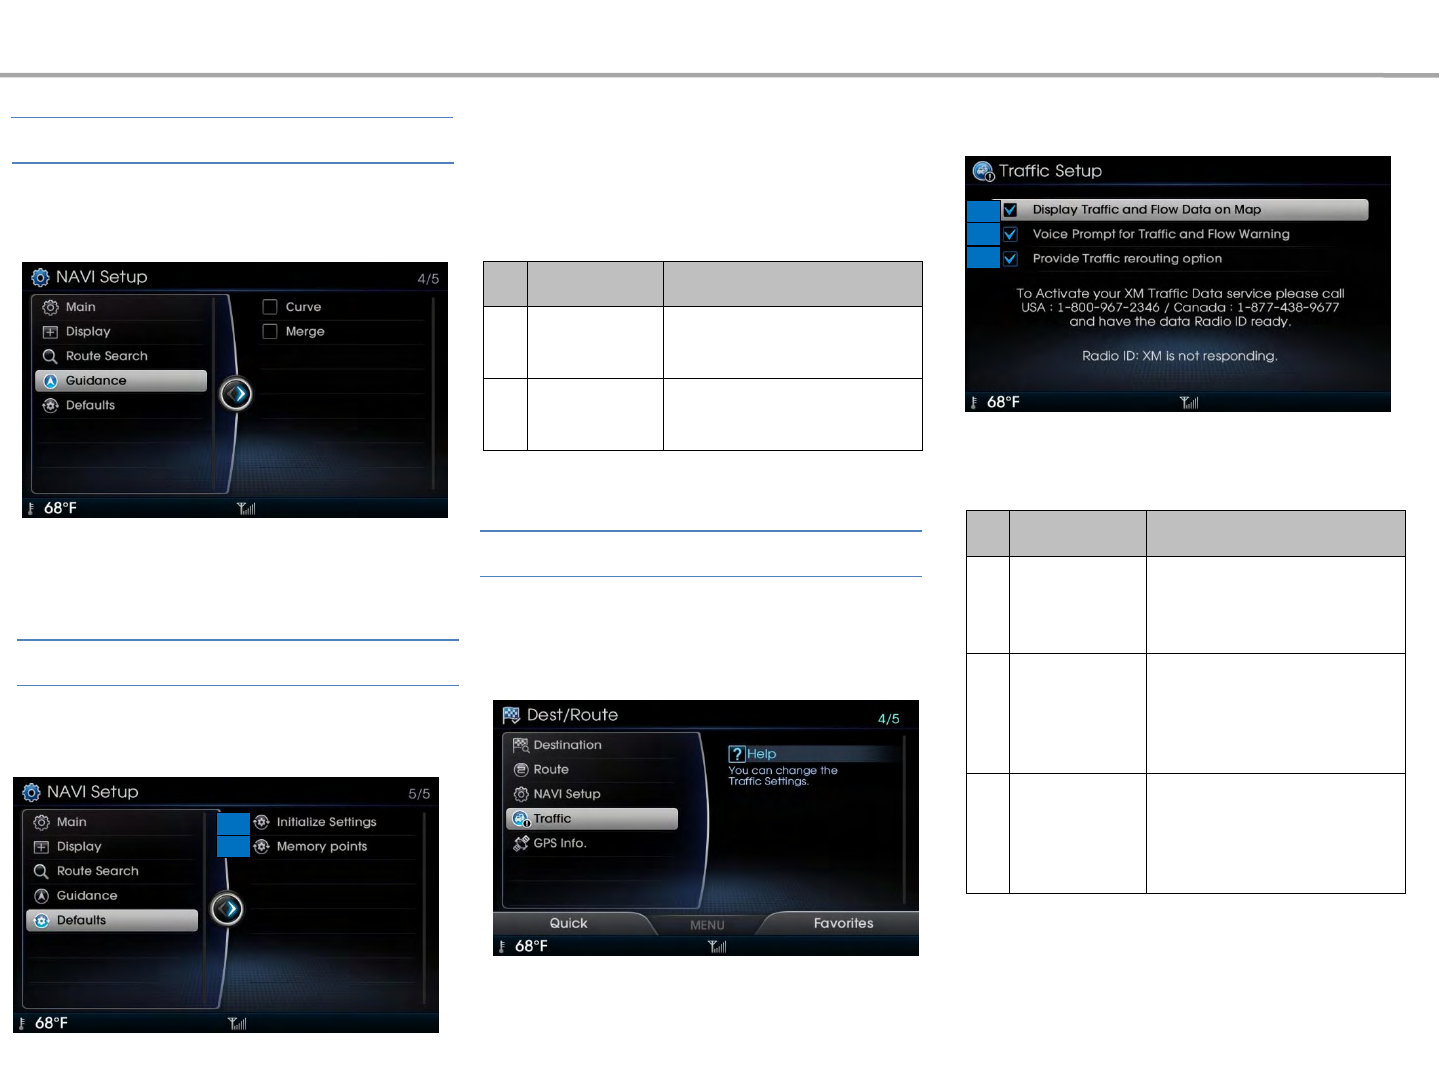
Press the [LFT] NAVI Home button ▶Select
[NAVI Setup] ▶Select [Traffic]
This menu is used to set options on driver
alerts.
No
Name
Details
1Initialize
Settings
used to initialize previous set
navigation settings back to
the default state
2 Memory Points
used to initialize all searched
lists, memory points and
saved navigation information
This menu is used to reset saved changes
and user preferences.
Guidance
Default
Traffic
1
2
1
2
3
No
Name
Details
1Display Traffic
and Flow Data
on Map
Select whether to display
traffic information on the
map
2Voice Prompt
for Traffic and
Flow Warning
Select whether to provide
voice guidance in front of
Traffic Information. (On
route - 3mile)
3 Provide Traffic
rerouting option
Select whether to display
Detour pop up in front of
Traffic Information. (On
route - 3mile)
Navigation
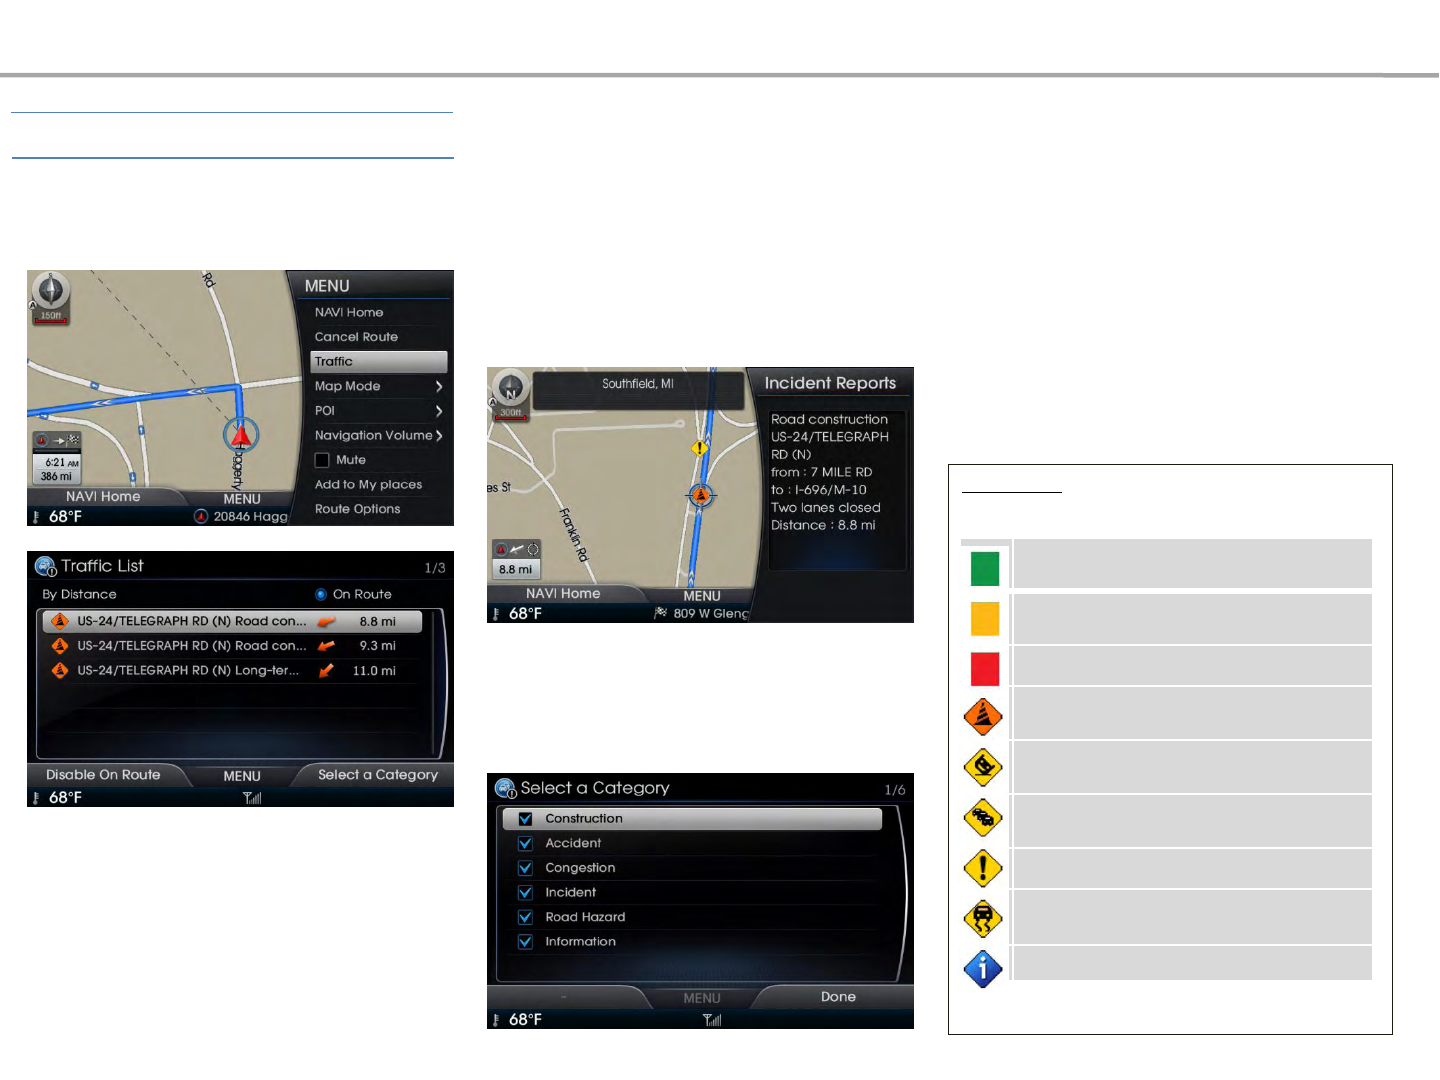
Traffic Information
In the map screen ▶Press the [MENU] key ▶
Select [Traffic]
Traffic information will be shown on the map
up until the scale is ~4mile.
Displays the traffic information around
vehicle for up to a radius of 50 miles.
(Information exceeding 50 miles will not be
displayed)
The above list can be sorted by either
Distance (Default) or Category.
Selecting the list button will display the map
of the corresponding point and a pop-up
showing detailed traffic information is
displayed on the right.
Select the [RHT] Select a Category button to
display the screen in which traffic information
categories can be selected.
After selecting the desired menu among the
six menus, press the [RHT] Done button to
save. Once returning to the previous List
screen, the corresponding Category list will be
shown and maintained until Category
information is changed.
Information
• Traffic Flow Information
Normal, Free Flowing (46 mph ~)
Moderate Congestion (26 ~ 45 mph)
Heavy Traffic, Stop and Go (0 ~ 25 mph)
Road Construction
Accident
Congestion/Slow Traffic
Incident
Hazardous Road Conditions
Travel Information
GPS Info
GPS information may not operate under the
following conditions.
- When buildings, tunnels, or other obstructions
block satellite signals
- When materials are placed above the GPS
antenna and block satellite signals
- When the satellite is not transmitting
- When a digital cellular phone (1.5GHz) is placed
near the GPS antenna
The navigation system uses GPS information,
various sensors, road map data, and other
related information to display the current
position.
Errors may occur if the satellite is transmitting
inaccurate signals or if which can only two or less
satellite signals can be received.
Errors which occur in such conditions cannot be
corrected.
GPS (Global Positioning System) is a system
developed and operated by the United States
which determines the current location of the
user (longitude · latitude, etc) by generally using
3 or more satellites.
This system is used with related GPS information,
various sensors, road map data, and other
related information for the purposes of
navigation
Information
• For continued map updates, information
collection and surveys are continuously being
conducted to check for changes to roads and
new road construction. Nonetheless, roads,
facilities, and fares are under constant change.
Consequently, it is impossible to completely
delete any errors, including road updates,
names, facilities, and fares. Keep such matters in
mind when using GPS.
• Roads with widths less than 3m are not
included within the map data. Roads including
sections with widths less than 3m may be
deleted upon updating the map data
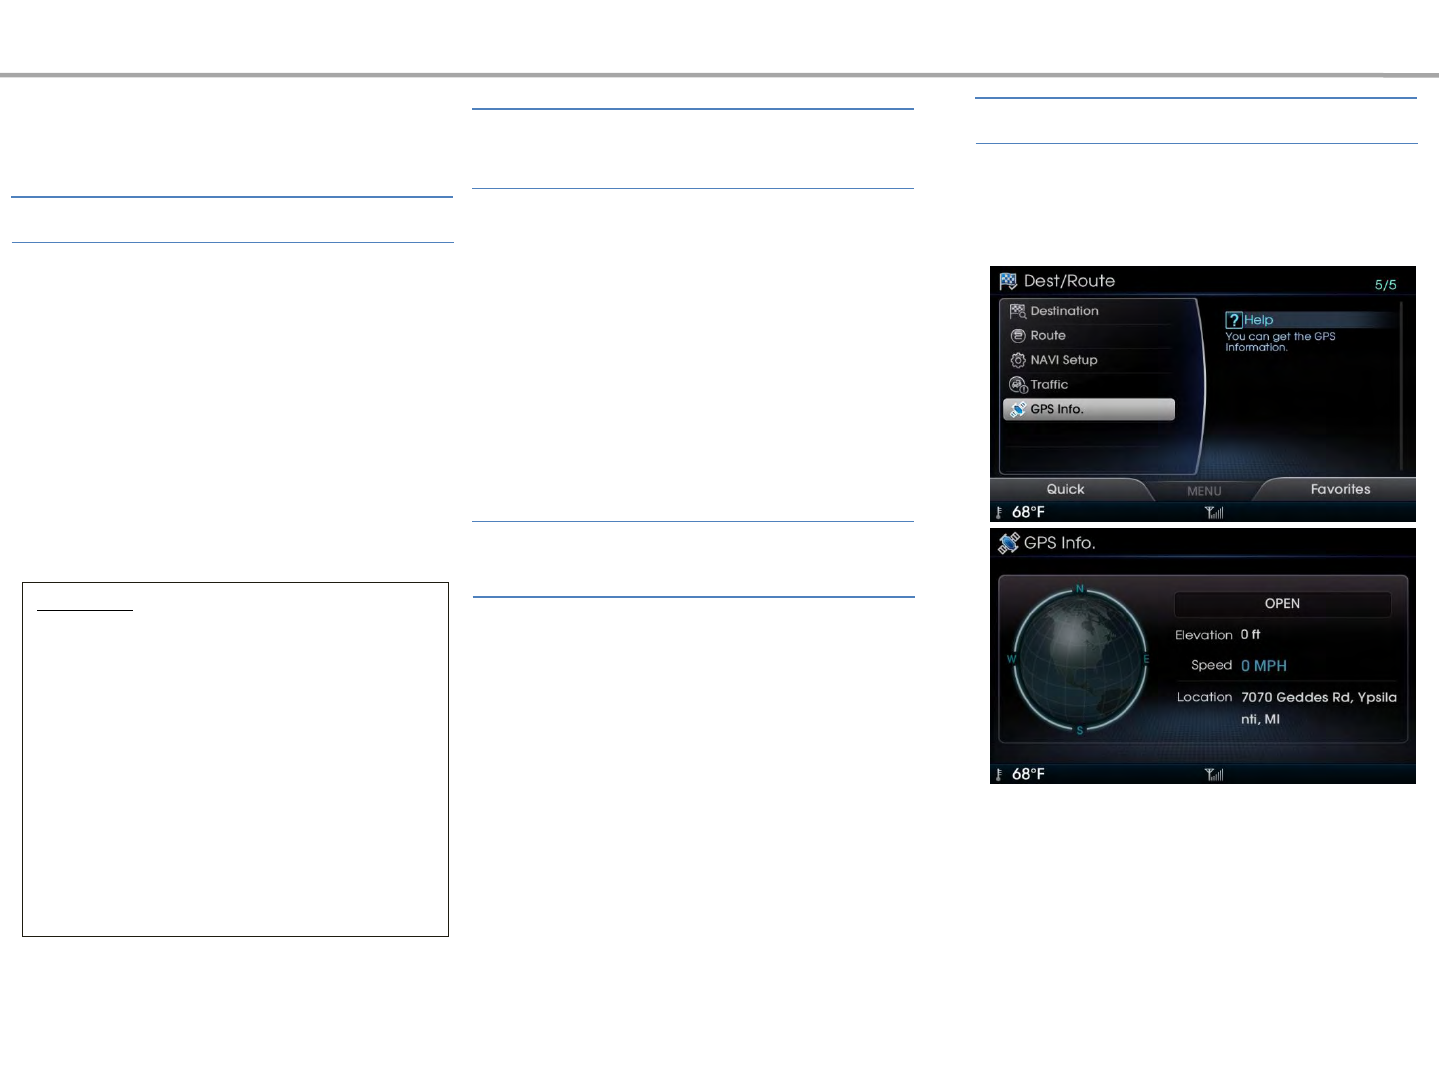
In the map screen ▶Press the [LFT] NAVI
Home button ▶Select [GPS Info]
This option is used to display the GPS satellite
reception state, car speed and position.
Navigation
When GPS information cannot be
used
About GPS
GPS Info
Errors unavoidable due to system
characteristics

Before Use
Starting Bluetooth®
Dial Mode Screen
Using Bluetooth®
Operating Menus during a Call
Contacts
Call history
Settings
4Bluetooth®

Bluetooth®
Bluetooth® refers to a short-distance wireless networking
technology which uses a 2.45GHz frequency to connect various
devices within a certain distance.
Supported within PCs, external devices, Bluetooth® phones,
PDAs, various electronic devices, and automotive environments,
Bluetooth® allows data to be transmitted at high speeds without
having to use a connector cable.
Bluetooth® Handsfree refers to a device which allows the user
to conveniently make phone calls with Bluetooth® mobile phones
through the AV/Navigation system.
Bluetooth® Handsfree may not be supported in some mobile
phones. To learn more about mobile device compatibility, visit
www.hyundaiusa.com.
Before Use
Bluetooth® Handsfree is a feature that enables drivers to
practice safe driving. Connecting the head unit with a Bluetooth®
phone allows the user to conveniently make and receive calls and
use contacts. Before using Bluetooth®, carefully read the contents
of this user‟s manual.
Excessive use or operations while driving may lead to negligent
driving practices and result in accidents. Refrain from excessive
operations while driving.
Viewing the screen for prolonged periods of time is dangerous
and may lead to accidents. When driving, view the screen only for
short periods of time.
What is Bluetooth®?
Before Using the Bluetooth® Handsfree Precautions for Safe Driving

Before connecting the head unit with the mobile phone, check to see
that the mobile phone supports Bluetooth®® features.
Even if the phone supports Bluetooth®®, the phone will not be found
during device searches if the phone has been set to hidden state or the
Bluetooth® power is turned off. Disable the hidden state or turn on the
Bluetooth® power prior to searching/connecting with the Head unit.
If Auto Connection is used, the Bluetooth® phone is automatically
connected when the ignition is turned on, making it unnecessary to have
to connect the phone with the head unit every time.
If you do not want automatic connection with your Bluetooth® device,
turn off the Bluetooth® feature within your mobile phone.
The Handsfree call volume and quality may differ depending on the
mobile phone.
To set Auto Connection, go to PHONE ▶Settings ▶Auto Connection.
The car name can be set at PHONE ▶Settings ▶Device Information.
The passkey needed to connect the mobile phone can be
verified/changed at PHONE ▶Settings ▶Change Passkey.
If the Bluetooth® audio is not operating, go to PHONE ▶Settings ▶
Bluetooth Audio. If the feature is set to Off , turn On and try again.
Park the vehicle when connecting the head unit with the mobile phone.
Bluetooth® connection may become intermittently disconnected in some
mobile phones. Follow these steps to try again.
1. Turn the Bluetooth® function within the mobile phone off/on and try
again.
2. Turn the mobile phone power Off/On and try again.
3. Completely remove the mobile phone battery, reboot, and then again.
4. Reboot the Audio Video Navigation System and try again.
5. Delete all paired devices, pair and try again.
Handsfree call quality and volume may differ depending on the model of
your mobile phone.
Bluetooth®
Cautions when connecting a Bluetooth® Phone
Information
• Press the [Help] button on the screen to
view the help section with information
related to pairing and connecting
Bluetooth® devices, and using Handsfree
related features.
• To learn more about searching from
Bluetooth® devices and pairing, refer to
the user's manual for your Bluetooth®
device.
•If the system becomes unstable or the
authentication popup is not displayed due
to some communication error, please wait
or reset the Bluetooth® device and try
again.
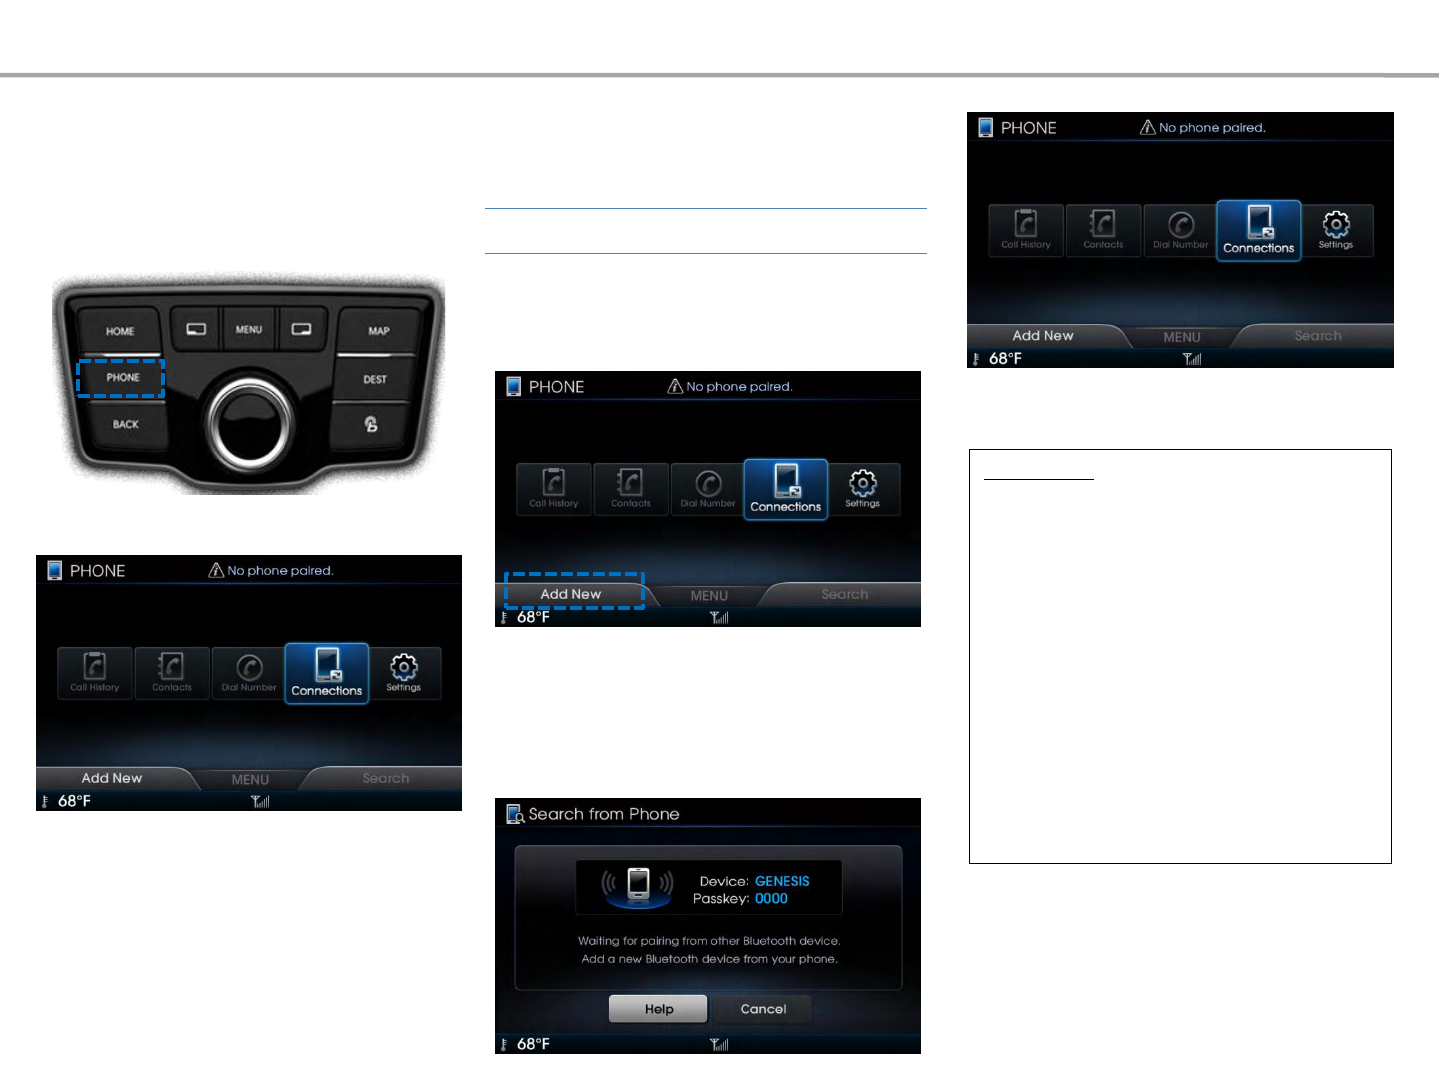
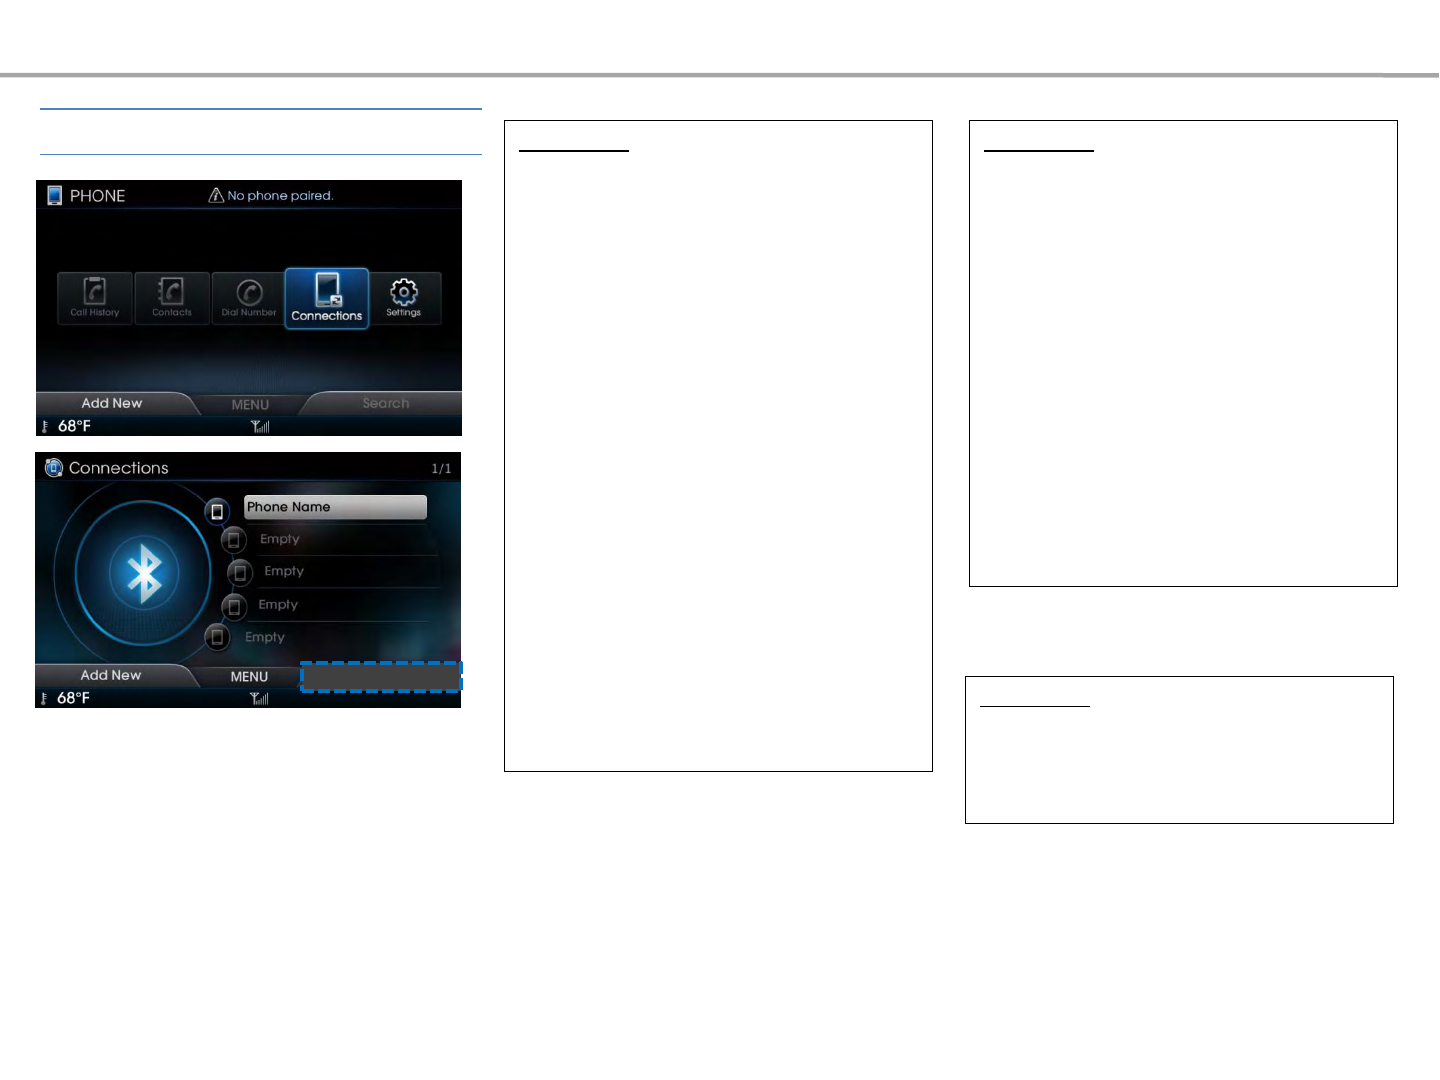
Starting Bluetooth®
Press the [PHONE] key Press the [LFT]
Add New button ▶Enter passkey in
Bluetooth® device
When the „Search from Phone‟screen is
displayed, search for the system on
your mobile device and enter the
passkey. The default passkey is set to
„0000‟.
Bluetooth®
Pairing and Connecting a
Phone
Press the [PHONE] key
When no phones have been paired
Information
• Bluetooth® features supported within the
vehicle are as follows. Some features may
not be supported depending on your
Bluetooth® device.
- Outgoing/Incoming Handsfree calls
- Operations during a call (Switch to
Private, Switch to call waiting, MIC on/off)
- Downloading Call History
- Downloading Mobile Contacts
- Downloading USIM Contacts
- Bluetooth® device auto connection
- Bluetooth® Audio Streaming
• Up to five Bluetooth® devices can be
paired to the Car Handsfree system.
• Only one Bluetooth® device can be
connected at a time.
• Other devices cannot be paired while a
Bluetooth® device is connected.
• Bluetooth® device connection cannot be
canceled while a device is being connected.
• Only Bluetooth® Handsfree and
Bluetooth® audio related features are
supported.
Information
• Normal operations are possible only
within devices that support Handsfree or
audio features, such as a Bluetooth® mobile
phone or a Bluetooth® audio device.
• If a connected Bluetooth® device becomes
disconnected due to being out of
communication range, turning the device
OFF, or a Bluetooth® communication error,
corresponding Bluetooth® devices are
automatically searched and connected.
• If the system becomes unstable due to
communication errors between the car
Handsfree and the Bluetooth® device, reset
the Bluetooth® and try again. Upon
resetting Bluetooth®, the system is restored
to its factory release state.
Select the device you want to connect and
press the [LFT] Connect button.
If the phone you want to connect does not
exist, press the [Add New] button to pair a
new Bluetooth® device.
Connect
Bluetooth®
When a phone is already paired
Information
• New devices cannot be paired while a
Bluetooth® device is connected. To pair a
new device, first disconnect the currently
connected device.
Information
•If a paired phone is deleted, the call
history and contacts will also be deleted.
A device cannot be deleted when it is
connected.
To delete a paired device, first disconnect
the Bluetooth® connection.
Press [Delete All] to delete all paired
Bluetooth® devices.
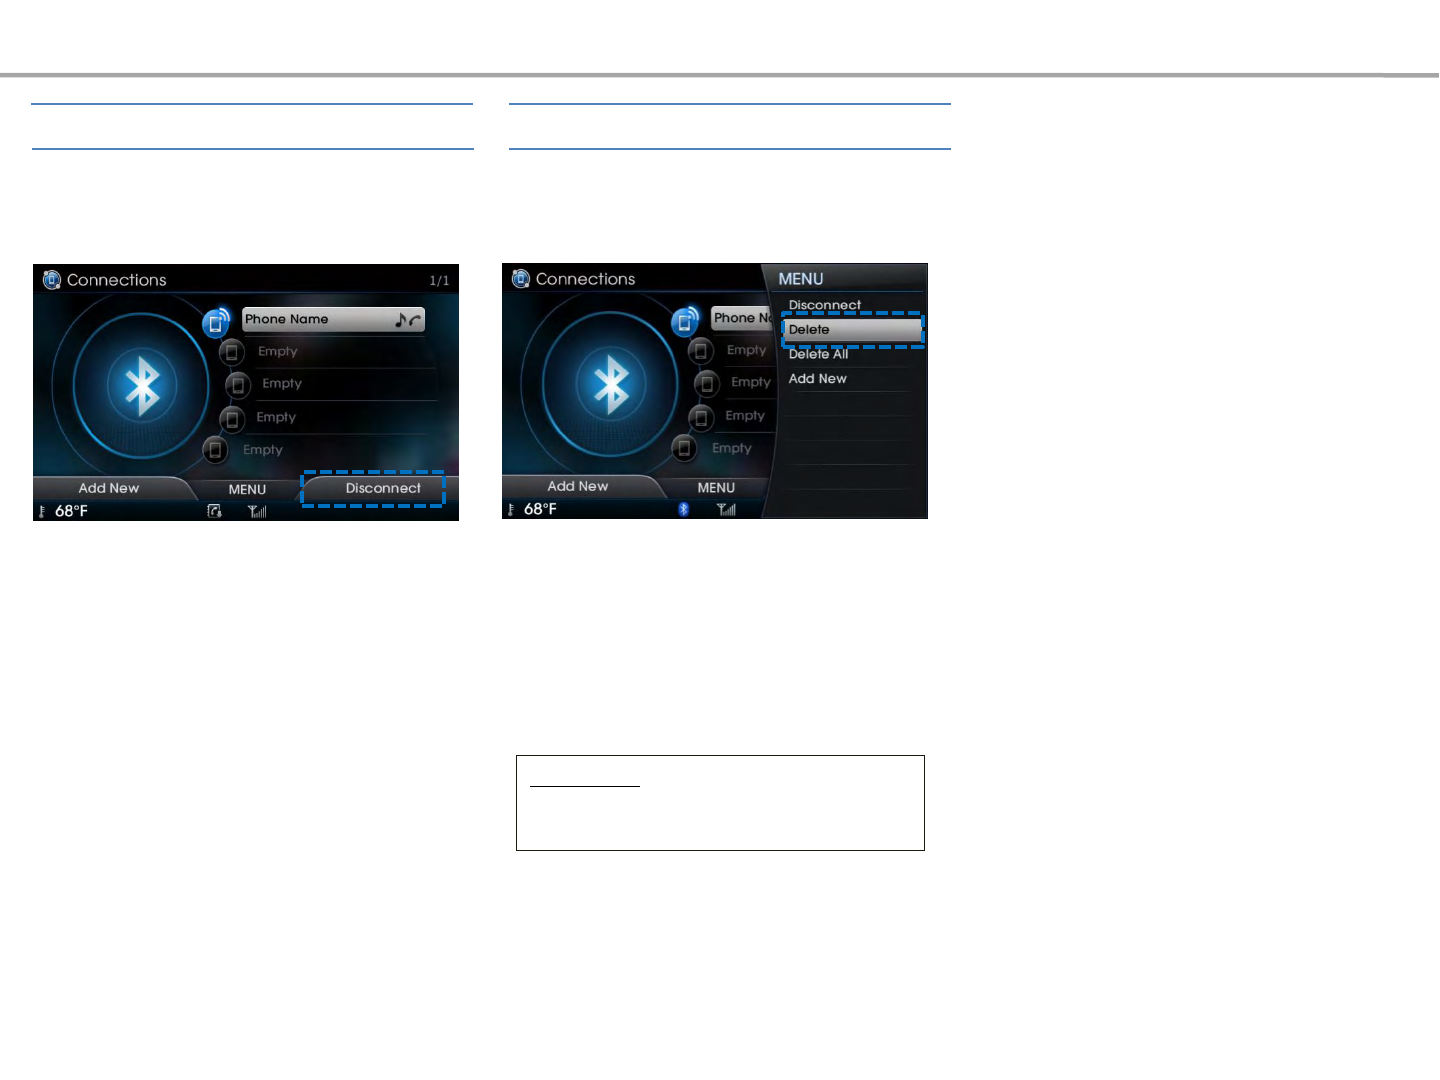
Select the device you want to disconnect ▶
Press the [RHT] Disconnect button.
Press the [MENU] key▶Select [Delete]
Disconnecting a Device
The currently connected Bluetooth®
device is disconnected.
Bluetooth®
Delete a Device
Information
• The mobile phone battery and signal strength icons may not be
supported in some mobile phones.
• The remaining battery level displayed on your mobile phone battery
icon may slightly differ with the device display.
• The speed dial feature may not be supported in some mobile phones.
• The name of the other party is displayed if the other party‟s number is
saved within your contacts. If not, only the phone number is displayed..
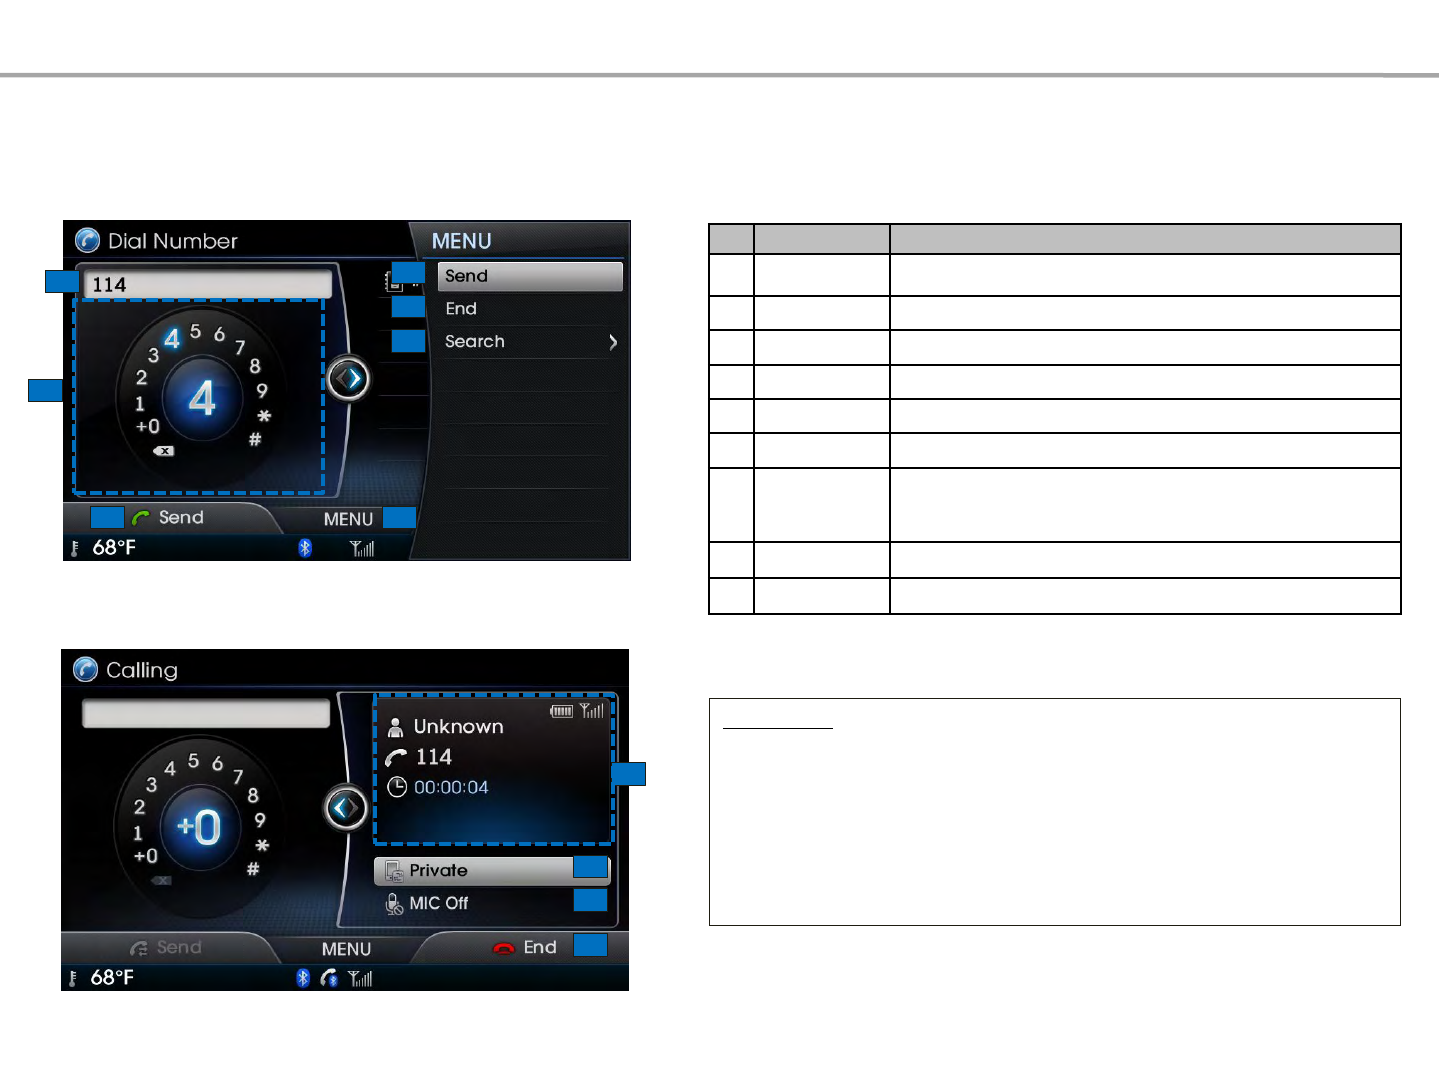
Dial Mode Screen
Dialing a Number
During a call
No Name Description
1 Number Field Shows entered numbers
2Send Calls the number
3 End Ends the current call
4 Search Moves to the contacts search screen
5 Dial Pad Used to enter/delete numbers
6 MENU Displays popup menu
7 Call
Connection
Info
Displays the other party‟s name/number, call time, battery
strength/reception level
8 Private Switches call to the mobile phone
9 MIC Off Mutes call volume
3
12
3
4
5
2 6
7
8
9
Bluetooth®

Information
Some features will not operate during a
Bluetooth® Handsfree call.
Using Bluetooth®
Turn the controller left/right to dial
numbers ▶Press the [LFT] Send button.
If you press the [LFT] Send button without
entering a number, the Call History screen is
displayed.
Select the [←] button to delete dialed
numbers.
Press and hold the dial pad +0 (over 0.8
seconds) to enter a "+".
Enter the 1 or 2 digit speed dial number
with the Dial Pad (Press and hold the last
number)
Information
• For speed dials saved within mobile phones,
up to 2 digits are supported.
•The speed dial feature may not be supported
in some mobile phones.
Press the hold (over 0.8 seconds) the [LFT]
Send button or the [☎] key on the steering
remote controller.
Bluetooth®
Making a Call
Making a Call from Speed Dial Calling through Redial
A call is made to the most recently
called number.
Redialing is not possible when there is
no call history or the Bluetooth® phone
has not been connected.
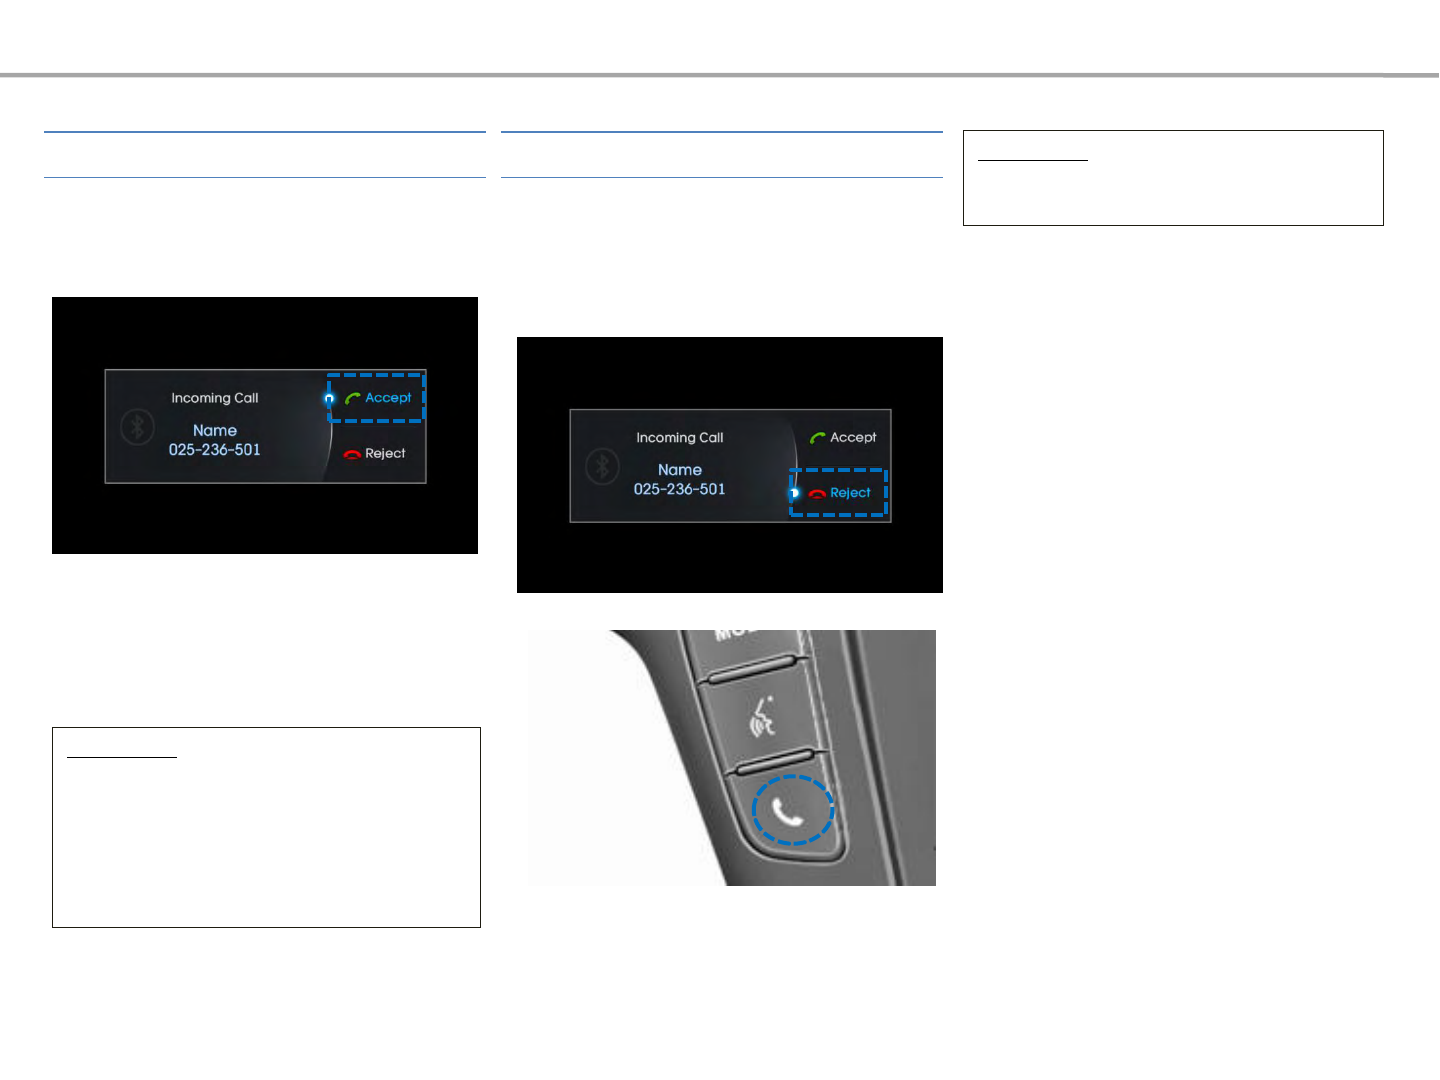
When a call is received on the connected
phone, the bell will sound and the phone
number of the other party will be displayed
on the incoming call pop-up, as shown
here.
Information
• When the incoming call pop-up is
displayed, most functions within AV mode
will not operate. Only the call volume and
Navigation screens can be operated.
• The telephone number may not be
displayed in some mobile phones.
Information
• The reject call function may not be
supported in some mobile phones.
Incoming call notice ▶Press the
[Accept] button or the [☎] key on the
steering remote controller.
Incoming call notice ▶Press the [Reject]
button or press and hold the [☎]
key(over 0.8 seconds) on the steering
remote controller.
Bluetooth®
Answering a Call Rejecting a Call
The incoming call is rejected.
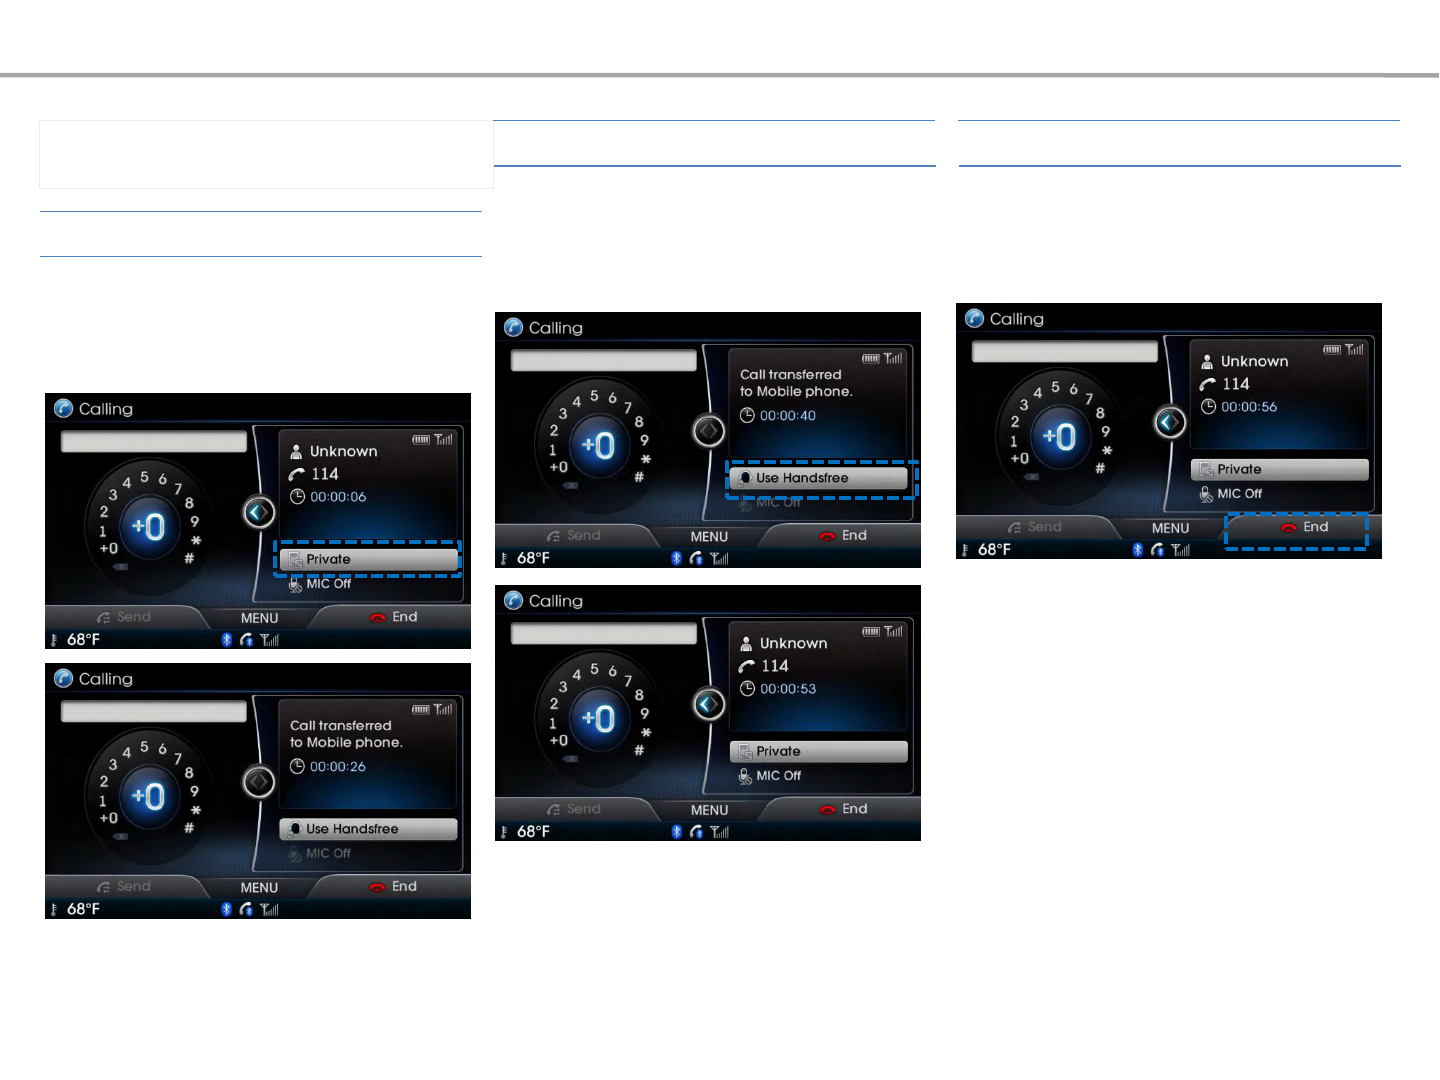
Operating features during a
Call
During Handsfree call ▶Press the
[Private] button or press the [☎] key on
the steering remote controller.
The call will be switched from the
Handsfree to the Bluetooth® mobile
phone.
During call on mobile phone ▶Press the
[Use Handsfree] button or press the [☎]
key on the steering remote controller.
The call will be switched from the
Bluetooth® mobile phone to the car
Handsree.
While on a call▶Press the [RHT] End
button or press the [☎] key (over 0.8
seconds) on the steering remote
controller.
The Bluetooth® Handsfree call will end.
Bluetooth®
Switching Call to Bluetooth® Phone
Switching Call to the Handsfree End a Call
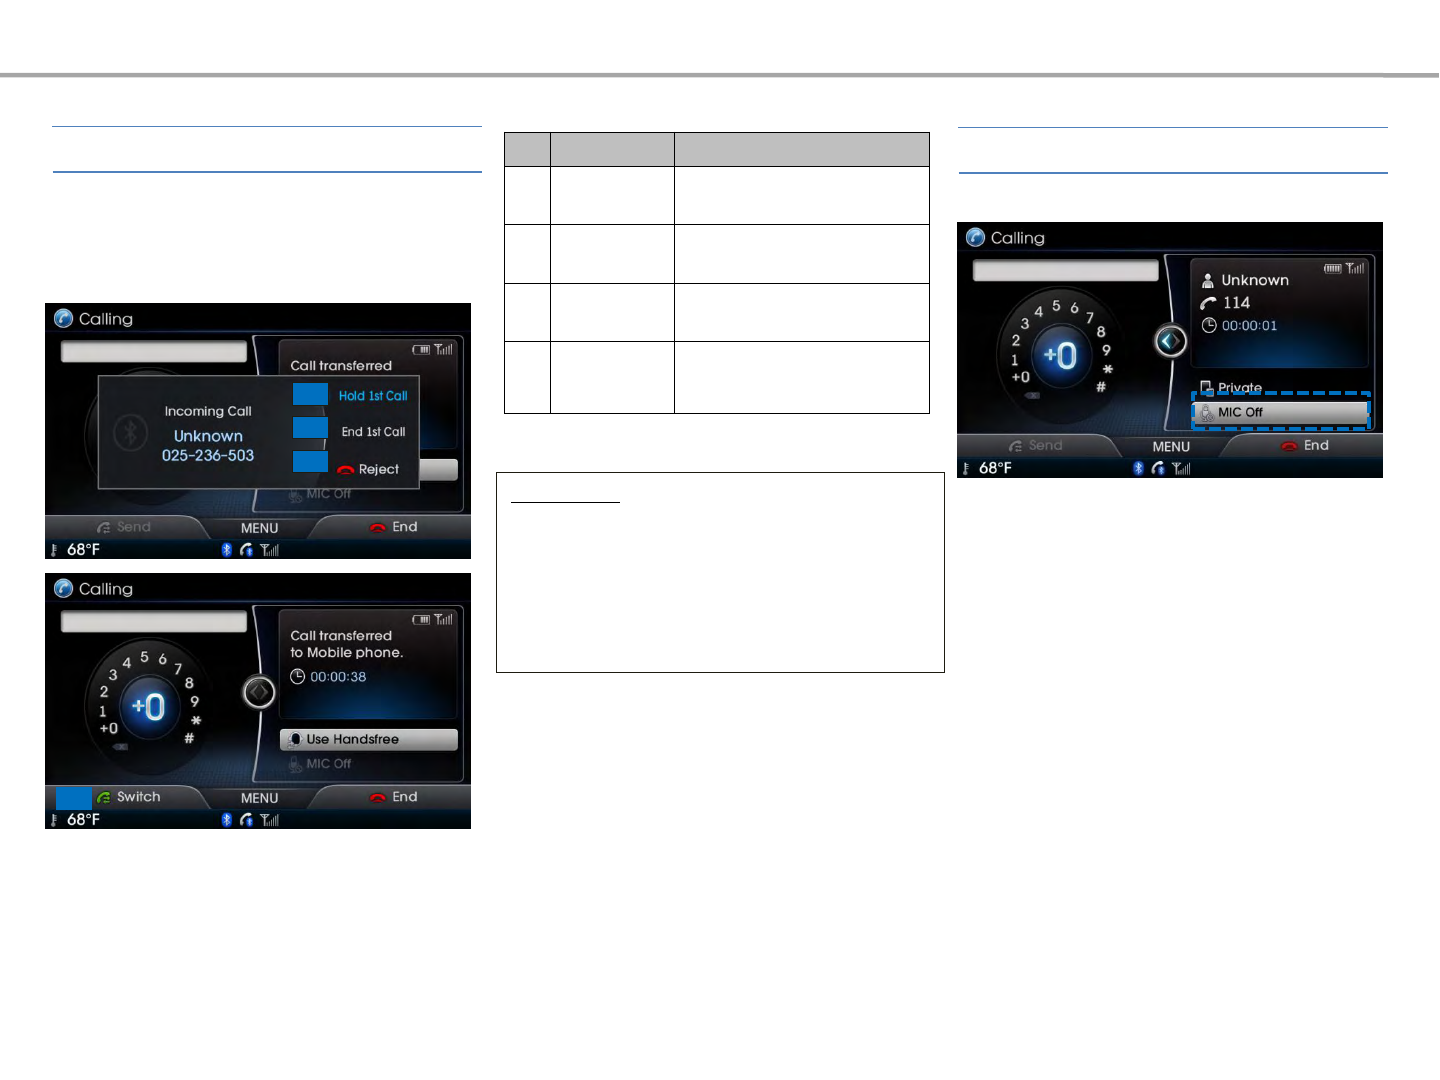
Information
• Call waiting is a feature that allows the caller
to answer a second call while already on a call.
When call waiting is used, the first call is
placed on waiting mode.
• The Call Waiting feature may not be
supported in some mobile phones.
If another person calls while you are
already on a call, the current call must be
placed on hold or ended to answer the
new call.
If there is waiting call, press the [MODE] key
on the steering remote controller or press
the [LFT] Switch button on the Phone
screen.
While on a call ▶Select [MIC Off]
If you press the [MIC Off] button, The
outgoing volume is muted and blocked to
the other party.
No Name Description
1 Hold 1st call Places current call on call
waiting and answer new call
2 End 1st call Ends current call and answer
new call
3 Reject Rejects new call and maintains
current call
4 Switch
If there is a call waiting,
switches to the waiting call
waiting call
1
2
3
4
Bluetooth®
Switching to Call Waiting Turning MIC On/Off
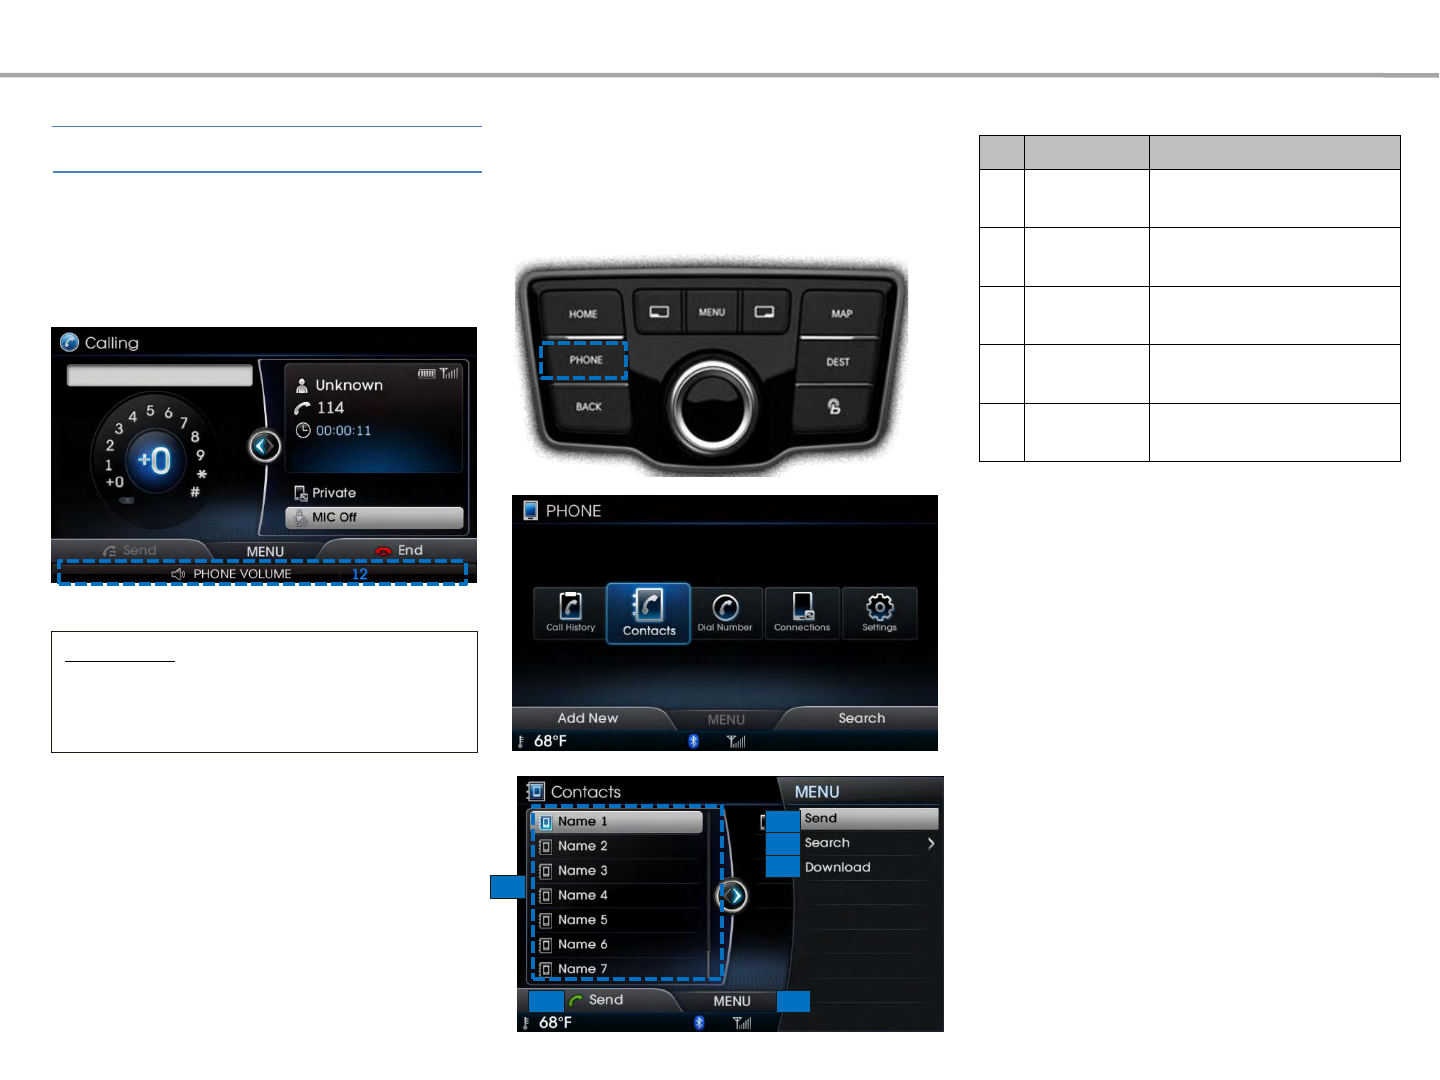
Press [PHONE] key▶Select Contacts
button.
Name Description
1Send Call the corresponding number
2 Search Search contacts by name or
number
3 Download D ownload contacts from
Bluetooth® device
4 Contacts List List of Downloaded Contacts
5 MENU Displays popup menu
1
2
3
4
15
Bluetooth®
While on a call ▶Turn the [O] VOLUME
knob on the head unit or press the [+], [-]
keys on the steering remote controller ▶
Adjust the ring/call volume
Adjusting Ring/Call Volume
Information
• The call volume as heard by the other
party may differ depending on your mobile
phone.
Contacts
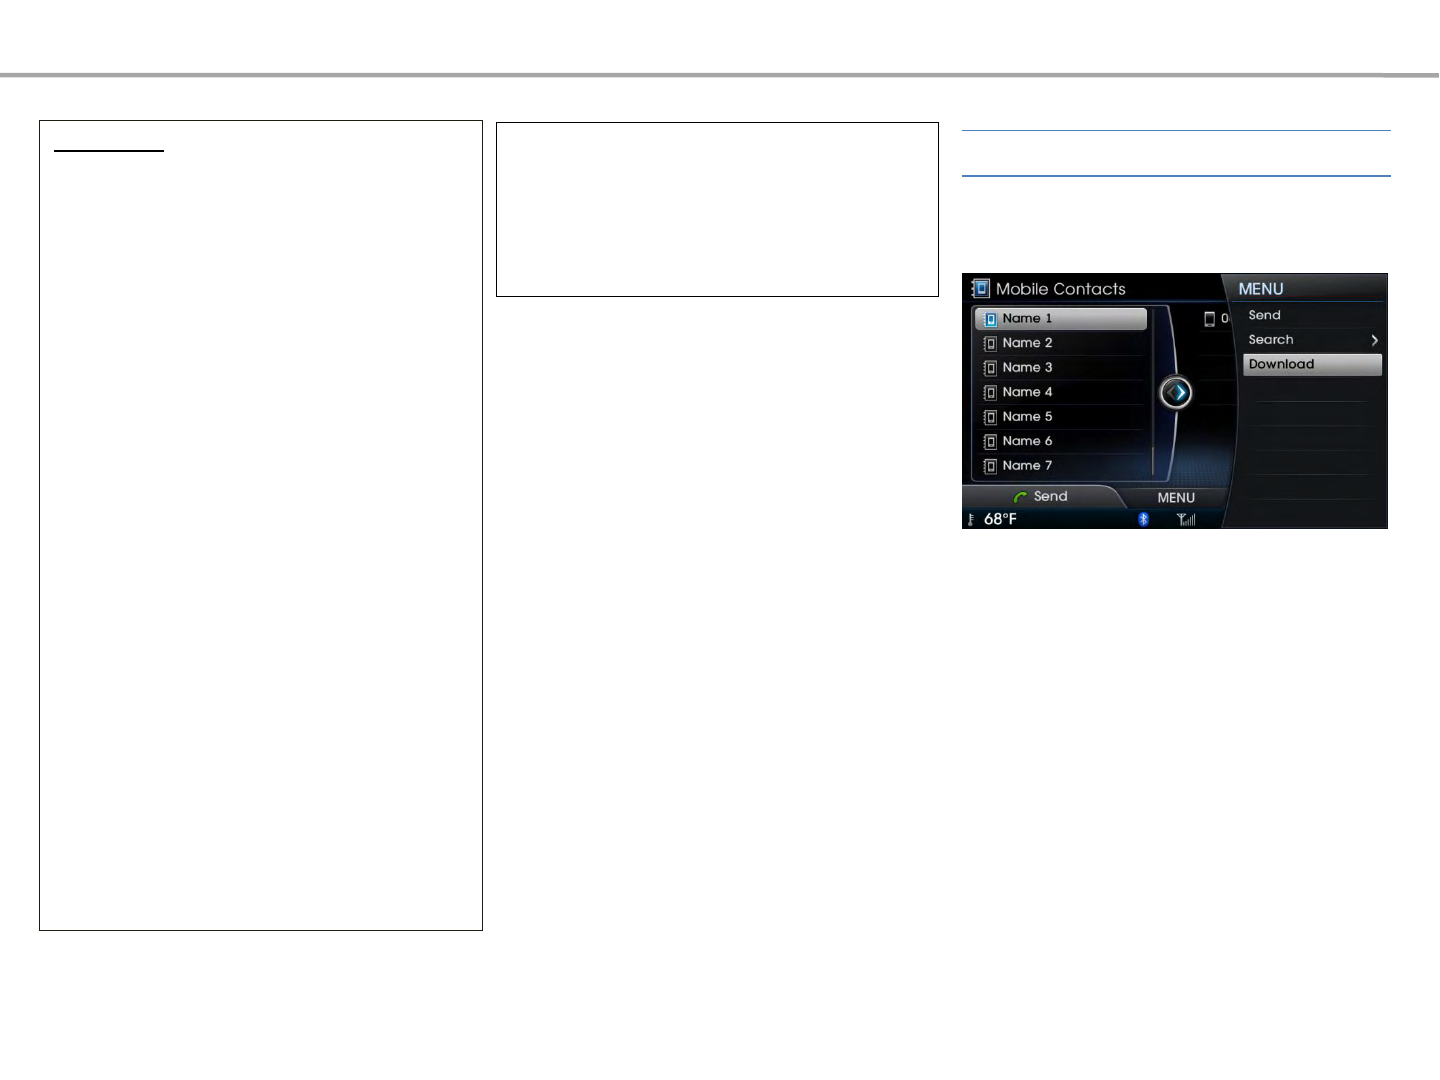
Press the [MENU] key▶Select
[Download]
Bluetooth®
Information
• Mobile phone contacts can only be
searched when a Bluetooth® device is
connected.
• Up to 5,000 contacts saved in your
Bluetooth® phone or USIM can be
downloaded into the car contacts. Contacts
that have been downloaded to the car cannot
be edited or deleted.
• Mobile phone contacts are managed
separately for each paired Bluetooth® device
(max 5 devices x 5,000 contacts each).
Previously downloaded data is maintained
even if the Bluetooth® device has been
disconnected. (However, the contacts and call
history saved to the phone will be deleted if a
paired phone is deleted.)
• It is possible to download contacts even
during a call or during Bluetooth® streaming
audio.
• When downloading contacts, the icon will
be displayed within the status bar.
• It is not possible to commence download
when the contacts download feature has
been turned of within the Bluetooth® device.
In addition, some devices may require device
authorization upon attempting to download
contacts. If downloading does not normally
occur, check the Bluetooth® device settings or
the screen state.
• The download feature may not be
supported in some mobile phones. Check to
see that the Bluetooth® device supports the
download feature. For more information of
supported Bluetooth® devices and function
support, visit www.hyundaiusa.com.
Downloading Mobile Contacts
Contacts saved within the mobile phone can be
downloaded to the car system.
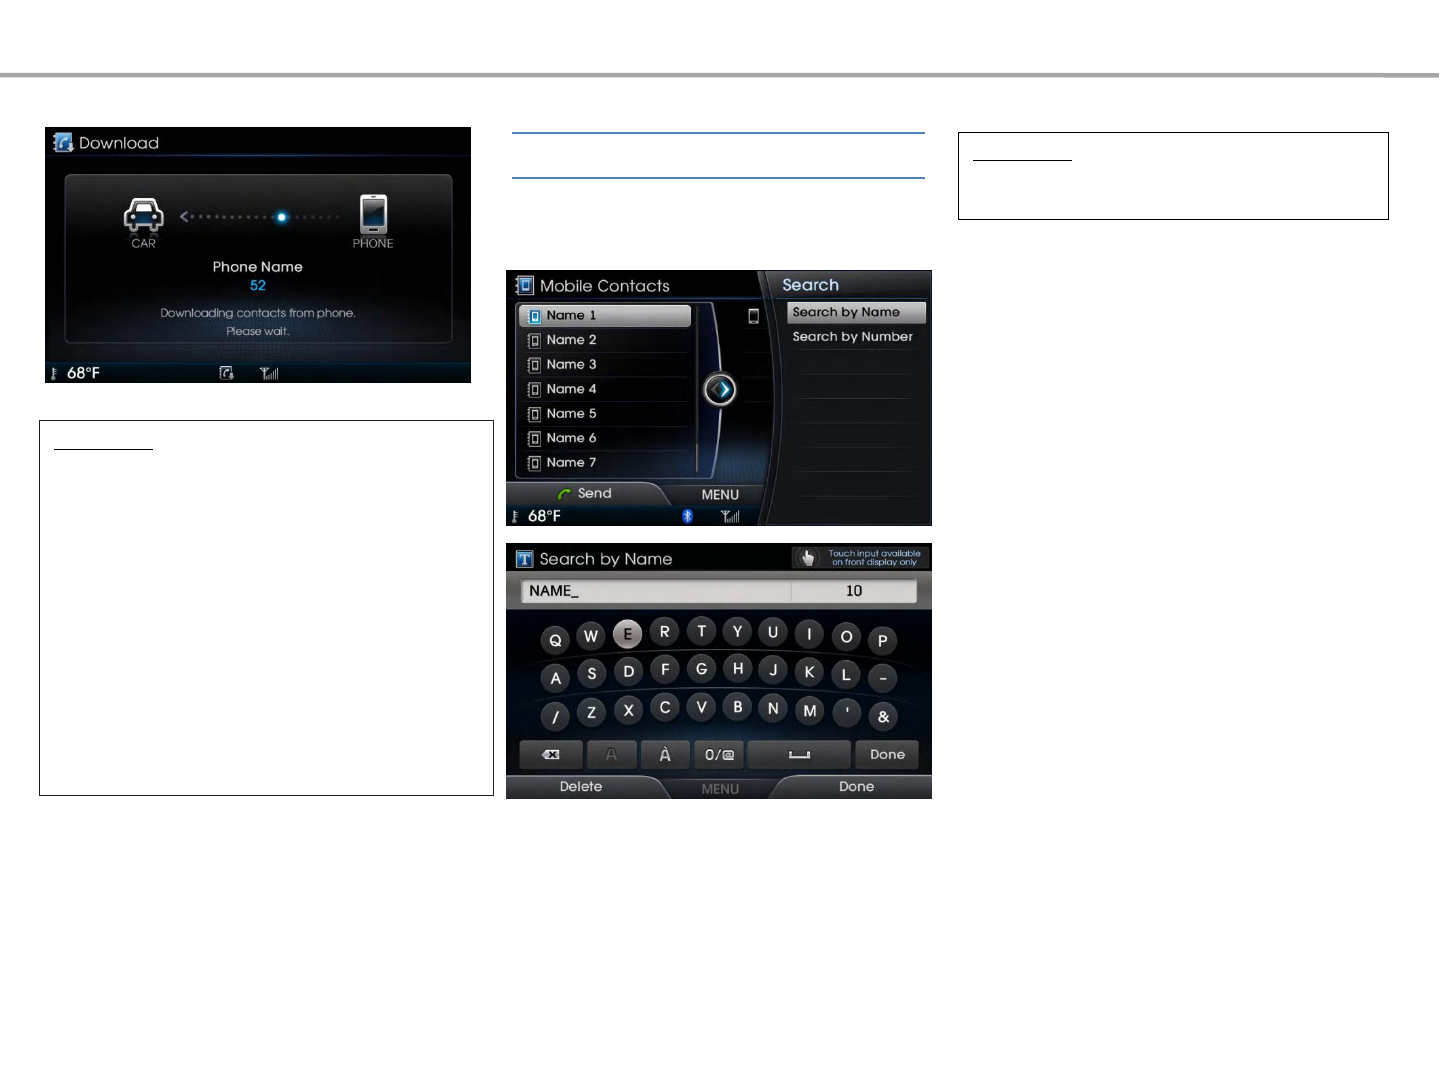
Select the [Search] button ▶Select
[Search by Name]
After inputting is complete, press the [LFT] Done
button to search contacts.
Information
Upon search, it is possible to search by entering
a part of the name.
Bluetooth®
Information
• Upon downloading mobile phone contacts,
the previous corresponding data is deleted.
• This feature may not be supported in some mobile
phones.
• Upon downloading, contacts saved in your USIM
and mobile phone are simultaneously downloaded.
• Voice Recognition may not operate for several
moments while contacts are being downloaded.
• When using Contacts Sync, the contacts
and call histories within your mobile phone are
automatically downloaded upon connecting
Bluetooth®. If you do not wish to use this feature,
turn Contacts Sync Setting off.
Searching Contacts (By Name)

Bluetooth®
Information
When searching a number, it is possible to
search by entering a part of the entire
number. (ex: if you enter “1234”, all
numbers with “1234”will be searched.
Select the [Search] button ▶Select
[Search by Number]
After inputting is complete, press the [RHT]
Done button to search saved numbers.
Searching Contacts (By Number)
Press the [PHONE] key ▶Select the Call
History button.
1
2
3
45
Call History
Entering Call History Screen
4
1
2
3
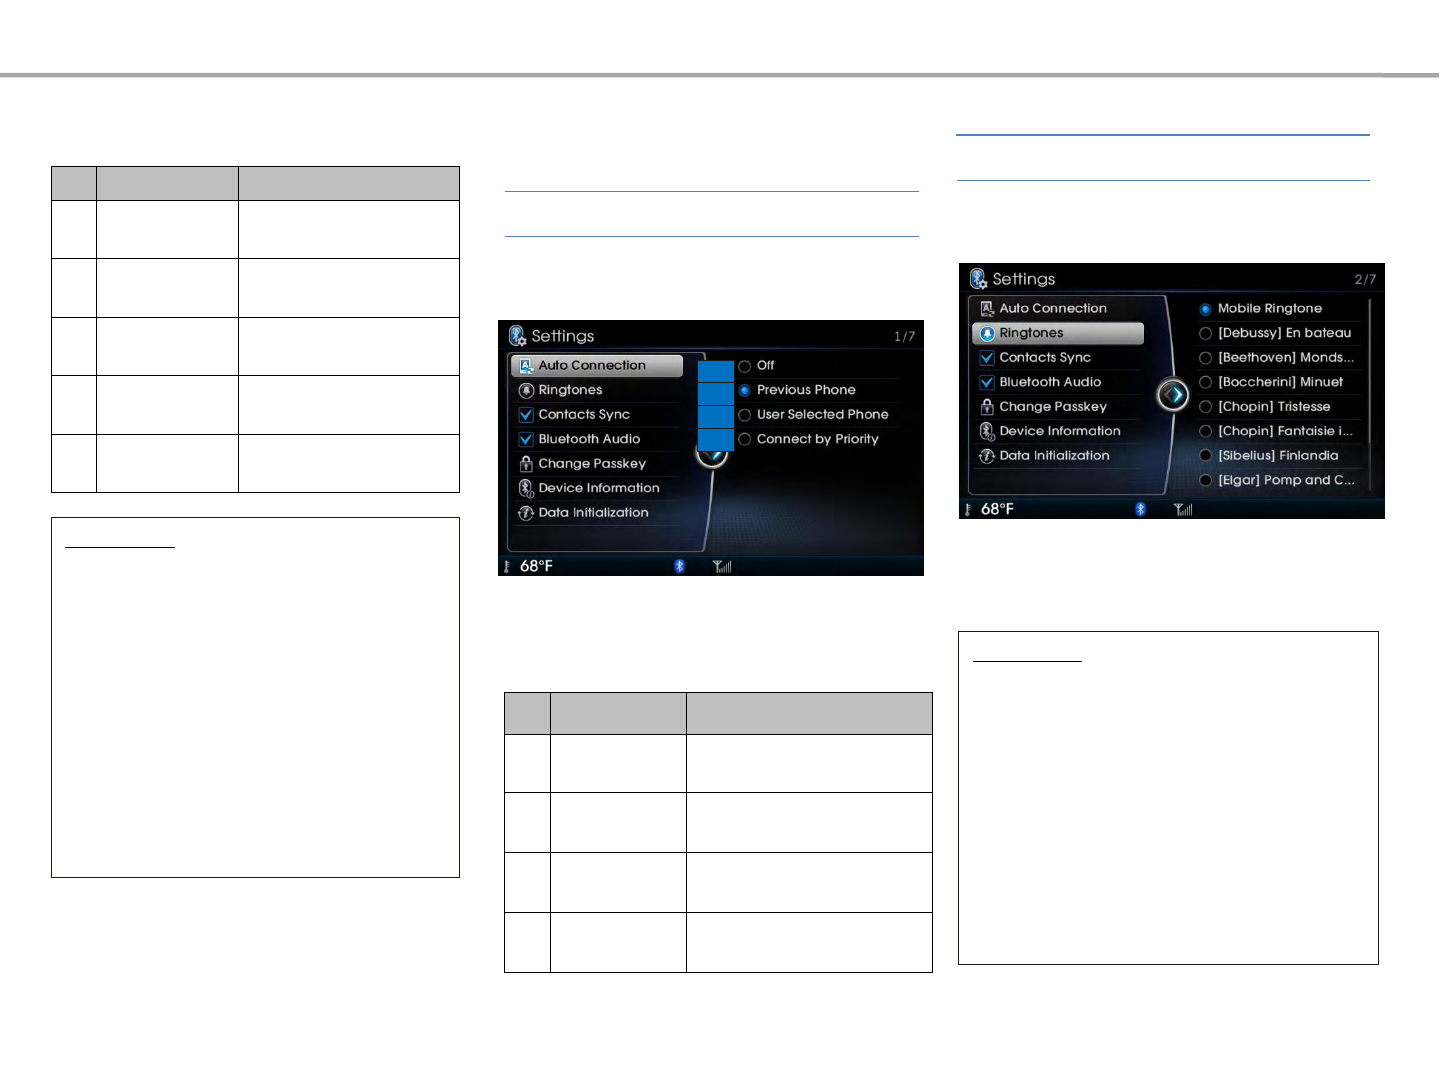
This option is used to select ringtones for
the connected phone.
In the Settings screen ▶Select [Auto
Connection]
If auto connection is turned on, a Bluetooth®
device will automatically be connected
according to the selected setting.
No Name Description
1 Off Disables auto connection
2 Previous Phone
Automatically connects with
the previously connected
Bluetooth® phone
3User Selected
Phone
Automatically connects to a
user selected Bluetooth®®
device
4C o n n e c t by
Priority
A u t o m a t i c a l l y c o n n e c t s
a c c o r d i n g to t h e s e t
Bluetooth® phone priority
In the Settings screen ▶Select
[Ringtones]
Bluetooth®
Name Description
1 Received Displays the incoming call
history list
2 Dialed Displays the outgoing call
history list
3 Missed Displays the missed call
history list
4Send Dial to selected number
5 Delete All Delete entire call history
Information
• The call history may not be saved in the
call history list in some mobile phones.
• Calls received with hidden caller ID will
not become saved in the call history list.
• Calling through the call history is not
possible when there is no call history or
the Bluetooth® phone has not been
connected.
•Up to 20 received, dialed and missed
calls are each saved.
•The time of received/dialed calls and call
time information are not saved.
Auto Connection
Settings
Information
•When set to [Mobile Ringtone], the
ringtone set within the connected mobile
phone will sound.
•The Mobile Ringtone feature may not be
supported in some mobile phones.
•For mobile phones that do not support
the Mobile Ringtone feature, the ring tone
set within the system will sound.
•For more information on mobile phones
that support the Mobile Ringtone feature,
visit www.hyundaiusa.com.
Ringtones
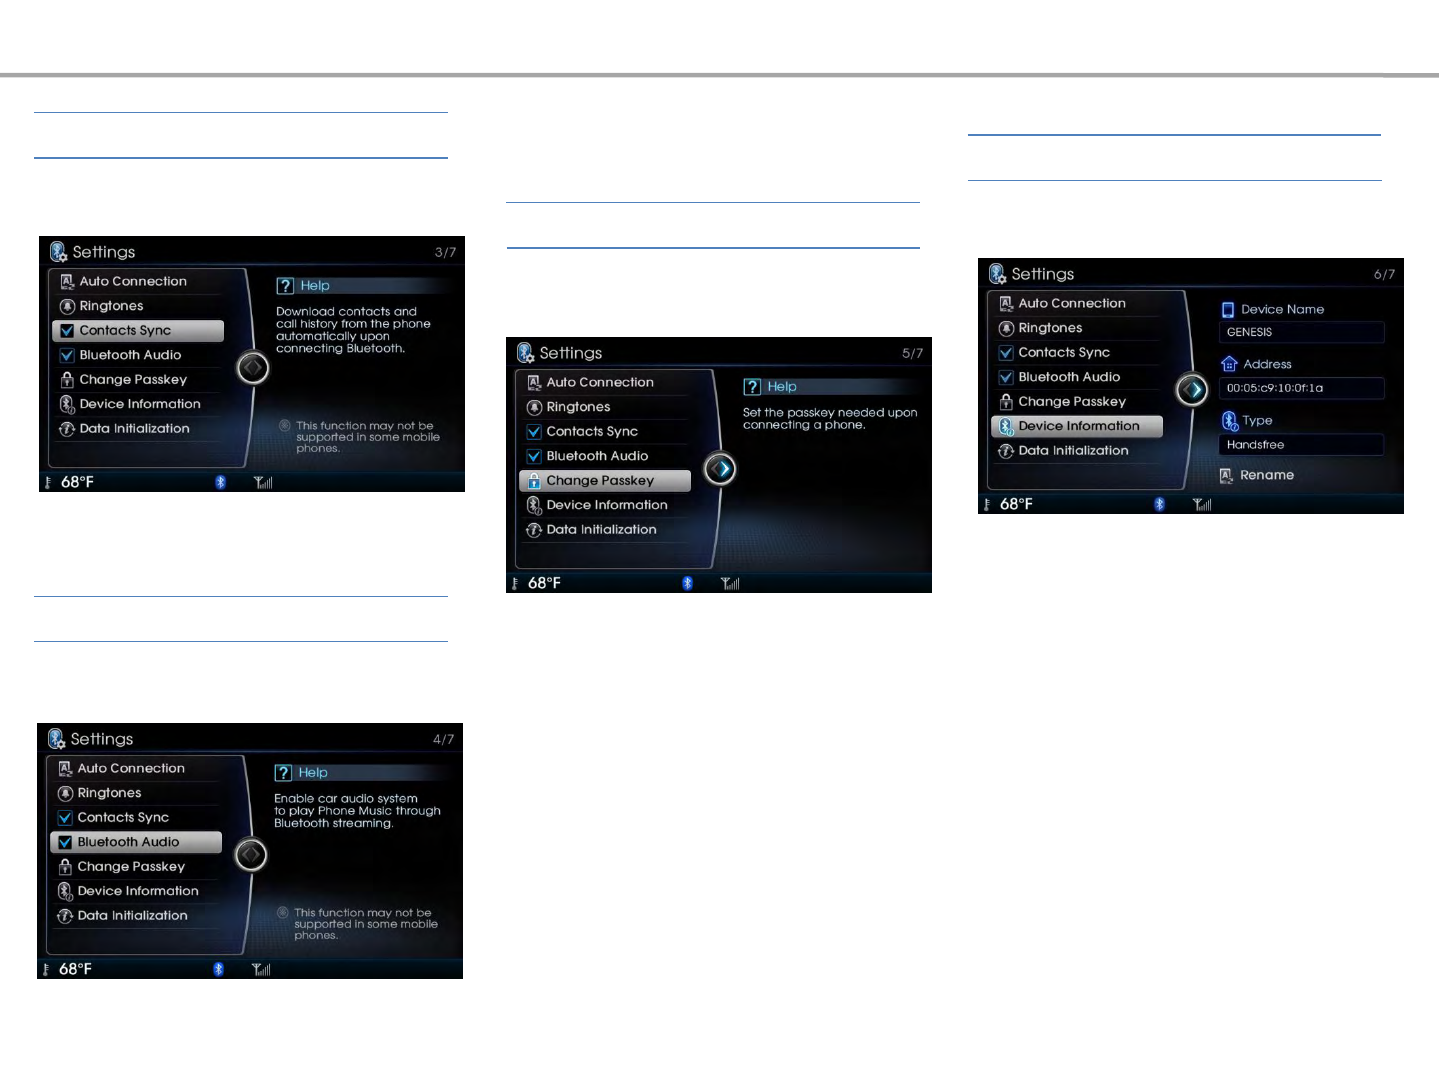
This option is used to check information
about the handsfree device, such as device
name, address, and type.
Device Information
In the Settings screen ▶Select [Device
Information]
This option is used to change the passkey
needed upon connecting a Bluetooth®
phone. The default passkey is set to „0000‟.
Change Passkey
In the Settings screen ▶Select [Change
Passkey]
Bluetooth®
Contacts Sync
In the Settings screen ▶Select [Contacts
Sync]
When connecting a Bluetooth® device, it is
possible to automatically download
contacts.
Bluetooth Audio
In the Settings screen ▶Select [Bluetooth
Audio]
You can play music files saved in your
Bluetooth® device from the car.
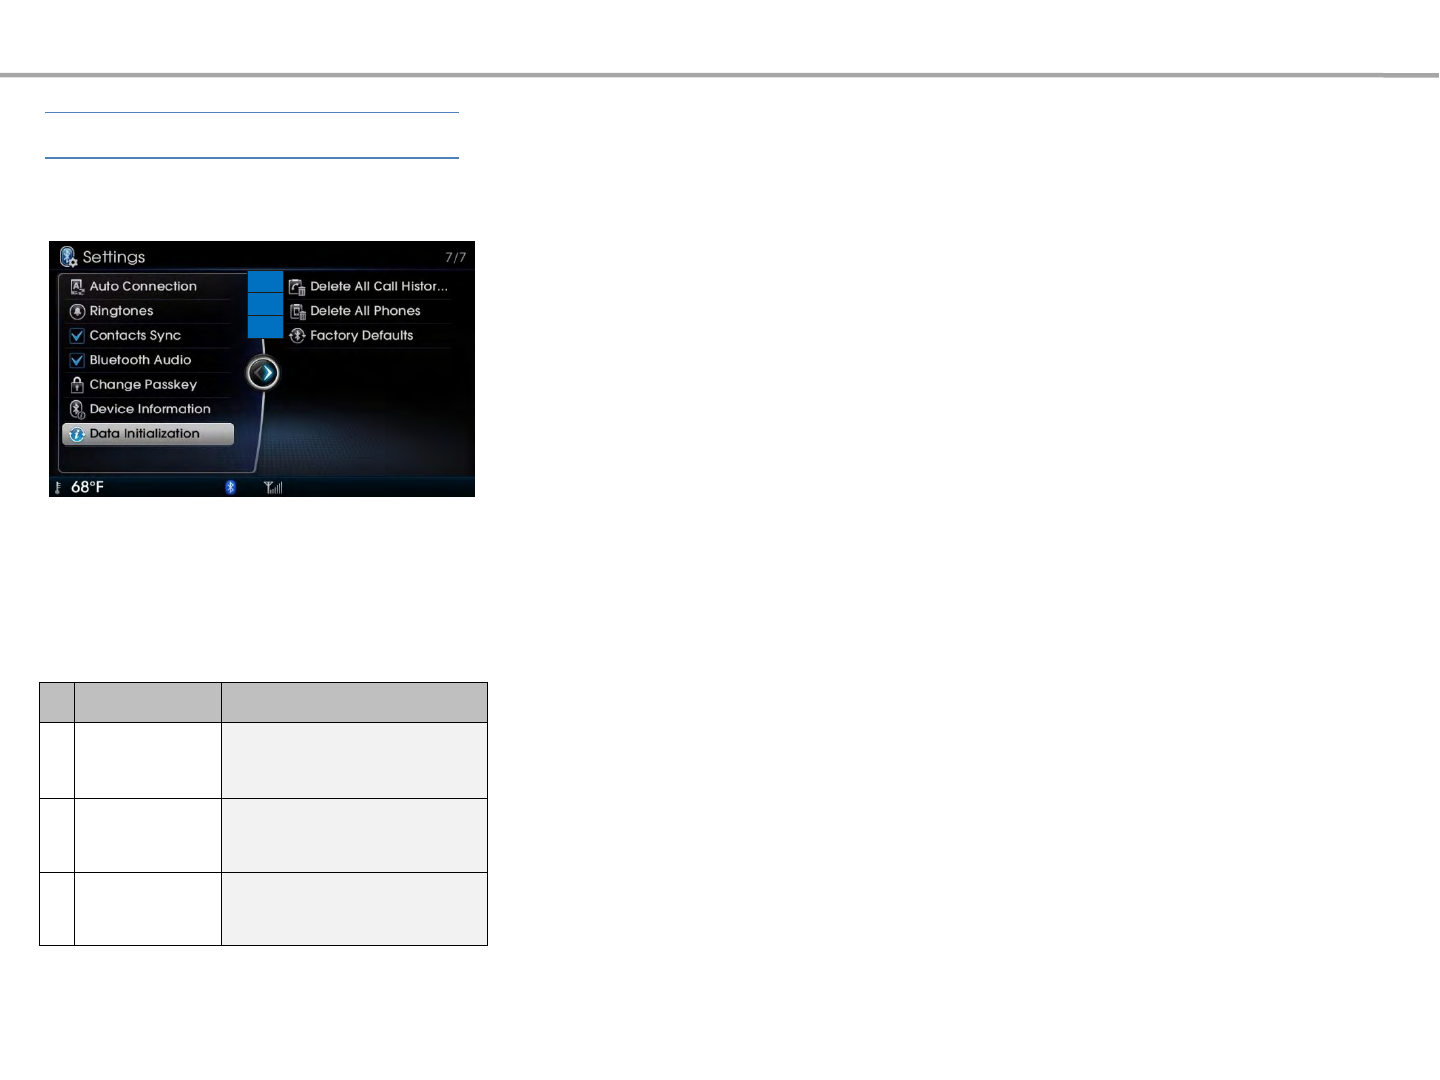
N
oName Description
1Delete all call
Histories
Delete all dialed / received /
missed call lists
2Delete All
Phones Delete all registered phones
3 Factory Defaults Reset Bluetooth® settings and
data to factory state
Data Initialization
In the Settings screen ▶Select [Data
Initialization]
Data Initialization is used to delete all call
histories/paired phones, or initialization
information related to the Bluetooth®
Handsfree.
1
2
3
Bluetooth®

Using Voice Recognition
Voice Command List
5Voice
Recognition

Using Voice Recognition
When using the voice recognition feature, only commands listed
within the user's manual are supported.
Be aware that during the operation of the voice recognition
system, pressing any key other than the [■VR] key will terminate
voice recognition mode.
For superior voice recognition performance, position the
microphone used for voice recognition above the head of the
driver’s seat and maintain a proper position when saying
commands.
Within the following situations, voice recognition may not
function properly due to external sound.
• When the windows and sunroof are open
• When the wind of the cooling / heating device is strong
• When entering and passing through tunnels
• When driving on rugged and uneven roads
• During severe rain (heavy rains, windstorms)
Using Voice Recognition
After downloading the Bluetooth® contacts, it takes some times to
convert the contacts into voice information. During this time, voice
recognition may not properly operate.
Pronounce the voice commands naturally and clearly as if in a
normal conversation.
The system may slow down slightly when using the Navigation to
calculate a new route or re-calculating an existing route. In such
cases, use voice recognition features after waiting a few moments.
Creating a suitable cabin environment
Starting Voice Recognition
Starting Voice Recognition
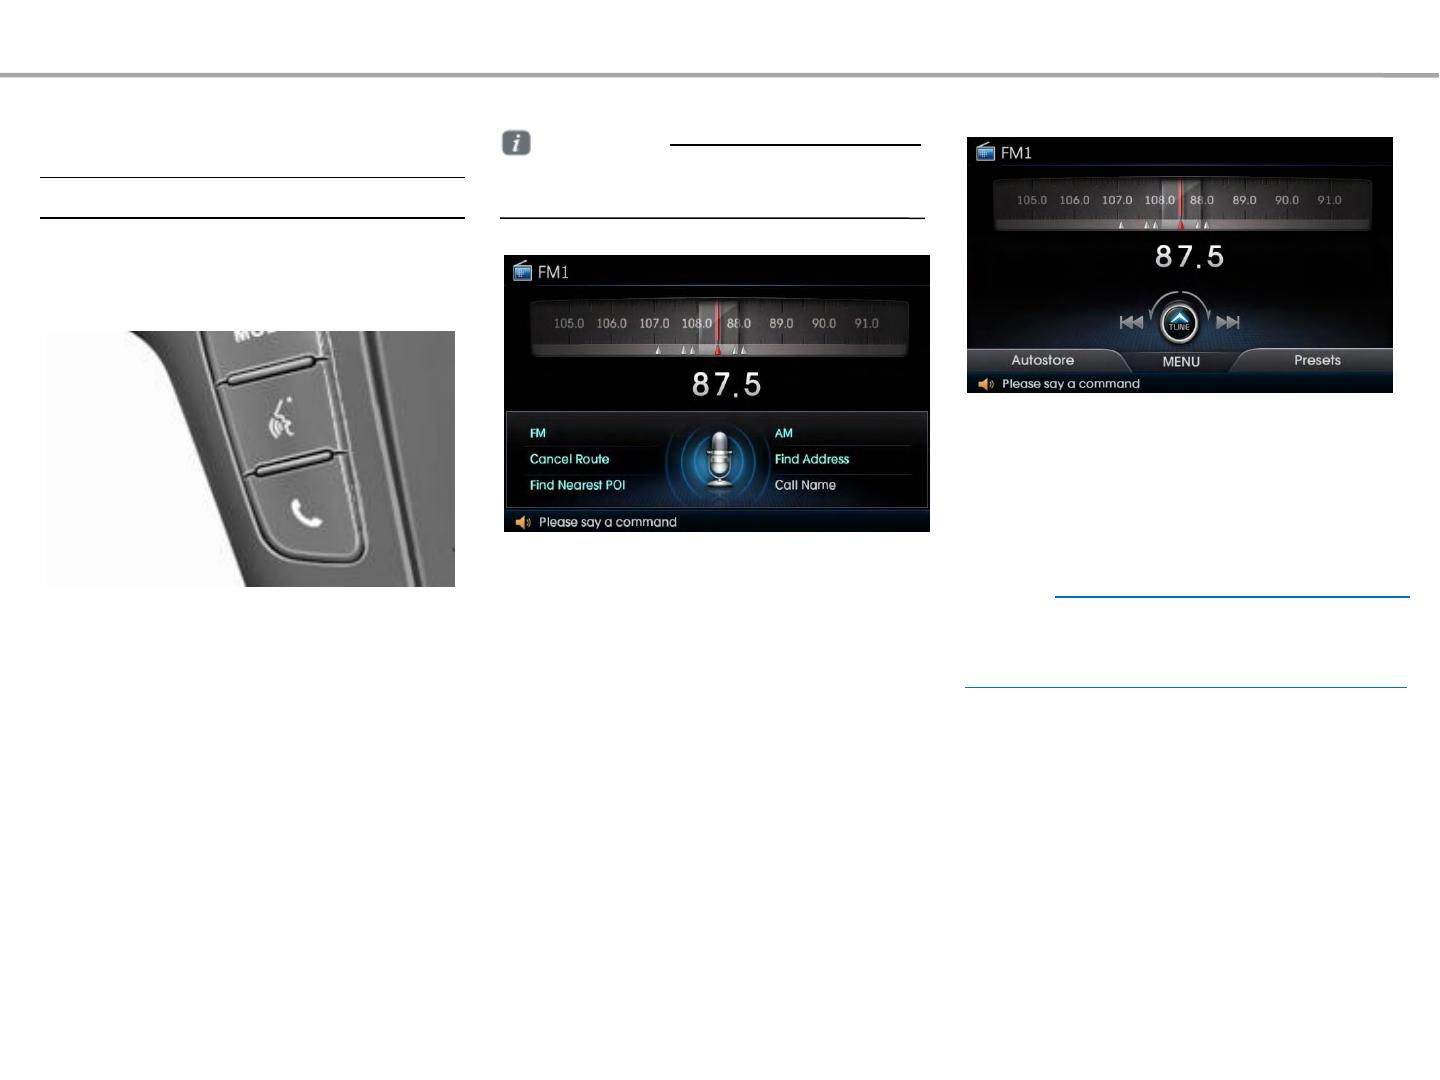
Shortly press the [■VR] key on the steering
remote controller (under 0.8 seconds) ▶Say a
command
Once voice recognition starts, the voice
command entry window and the six
representative commands are displayed.
• If voice recognition is in Normal Mode, then
the system will say “Please say a command.
(Beep)”
• If voice recognition is in Expert Mode, then the
system will only sound a beep tone.
• For proper recognition, say the command after
the voice instruction and beep tone.
Notice
Information
• To change the Normal/Expert setting, refer to
the Info/Settings section.
Using Voice Recognition
Screen displayed when Voice Recognition
is Normal Mode
(Six commands are displayed on the
screen)
Screen displayed when Voice Recognition is
Expert Mode.
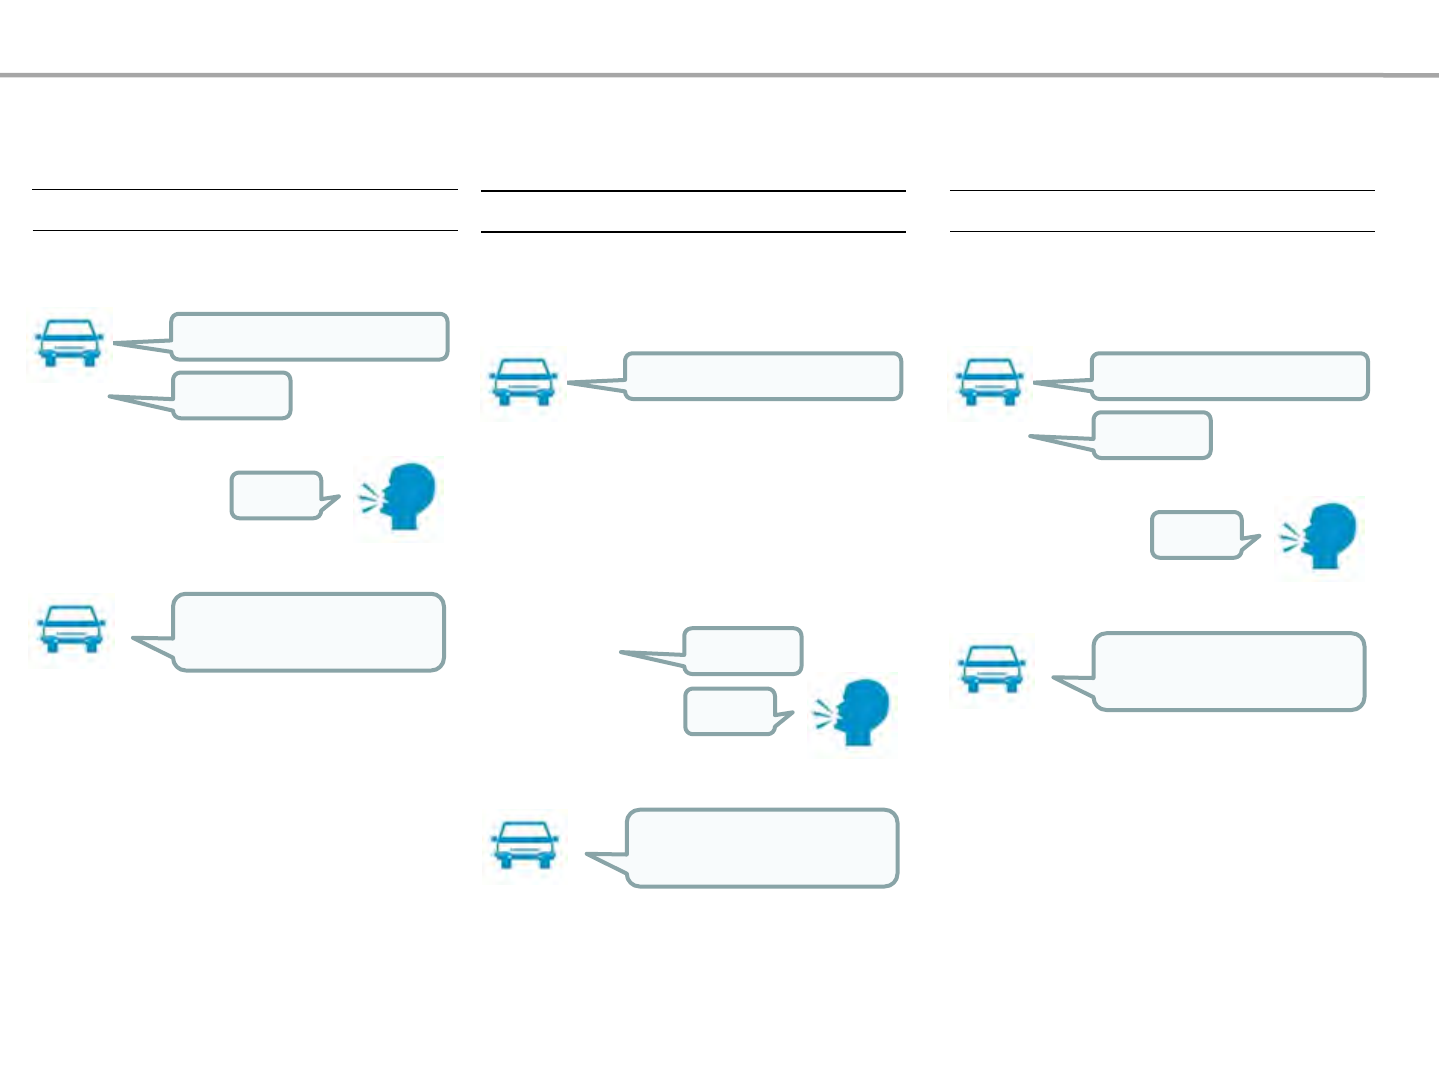
Using Voice Recognition
Illustration on Using Voice Recognition
Shortly press the [■VR] key (under 0.8 seconds).
Starting Voice Recognition Skipping Prompts
Shortly press the [■VR] key (under 0.8
seconds).
Ending Voice Recognition
Shortly press the [■VR] key (under 0.8
seconds).
Please say a command
(BEEP)
Help
Help.
Please say a command
Please say a command
(BEEP)
Help
Help.
Please say a command
Please say a command
(BEEP)
Help
Help.
Please say a command
Shortly press the [■VR] key (under 0.8
seconds).
While prompt message is being stated
Press and hold the [■VR] key (over 0.8
seconds) ▶Ends Voice Recognition.