HYUNDAI TELECOM HCH-H2PT loT Home Camera User Manual
HYUNDAI TELECOM Co., Ltd. loT Home Camera Users Manual
Users Manual
Smart
Home
Camera
Quick
Star t
Guide
COPY RI G HT
©2017
Hyundai
Telecom
Co.,
Ltd.ALL
RIGHT S
RESE RV E D.
Any
and
all
information,
including,
among
others,
wordings,
pictures,
graphs
are
the
properties
of
Hyundai
Telecom
Co.,
Ltd.
or
its
subsidiaries
(hereinafter
referred
to
be
“Hyunda i
Telecom”) .
This
user
manual
(hereinafter
referred
to
be
“the
Man ual” )
cannot
be
reproduced,
changed,
translated,
or
distributed,
partially
or
wholly,
by
any
means,
without
the
prior
written
permission
of
Hyundai
Telecom.
Unless
otherwise
stipulated,
Hyundai
Telecomdoesnotmakeanywarranties ,guaranteesorrepresentation s,e xpres sorimplied,
regarding
to
the
Manual.
▶
About
this
Manual
The
Manual
includes
instructions
for
using
and
managing
the
product.
Pictures,
charts,
imagesandallotherinformationhereinafterarefordescriptionandexplanationonly.The
information
contained
in
the
Manual
is
subject
to
change,
without
notice,
due
to
firmware
updates
or
other
reasons.
Please
find
the
latest
version
in
the
company
website
(http://
www.hyundaitel.co. kr/eng/).
Visit
the
company
website
(http://www.hyundaitel .co .kr /
eng/)
to
get
the
manuals,
client
software,
and
developing
tools.
Please
use
this
user
manual
under
the
guidance
of
profession al s .
▶
Trademar ks
Ackno wl ed g em en t
Hyundai
Telecom
and
other
Hyundai
Telecom’s
trademarks
and
logos
are
the
properties
of
Hyundai
Telecom
in
various
jurisdictions.
Other
trademarks
and
logos
mentioned
below
are
the
properties
of
their
respective
owners.
▶
Legal
Discl ai m er
TO
THE
MAXIM U M
EXTE N T
PERMI T T E D
BY
APPLI CA B L E
LAW,
THE
PROD U CT
DESCR IB E D ,
WITH
ITS
HARDWA R E,
SOFTW A RE
AND
FIRM WA R E ,
IS
PROVI DE D
“AS
IS”,
WITH
ALL
FAULTS
AND
ERROR S ,
AND
HYUND A I
TELECO M
MAKE S
NO
WARRA N TI E S ,
EXPRE S S
OR
IMPLIE D,
INCLUD ING
WITHO UT
LIMITATI O N ,
MERC HA NT A B I LIT Y,
SATISF ACT O R Y
QUALIT Y,
FITNE S S
FOR
A
PARTICU L A R
PURP O S E,
AND
NON- IN F R ING E M E N T
OF
THIRD
PARTY.
IN
NO
EVENT
WILL
HYUND AI
TELECO M ,
ITS
DIRE CT O RS ,
OFFICE RS ,
EMPLO Y E E S ,
OR
AGENT S
BE
LIABLE
TO
YOU
FOR
ANY
SPECI A L,
CONS E Q U E NT IAL ,
INCID E NT A L,
OR
INDIR E CT
DAMAG E S ,
INCLUD ING,
AMONG
OTHERS ,
DAMA G E S
FOR
LOSS
OF
BUSI NE S S
PROFIT S ,
BUSIN E SS
INTE RR U PT IO N ,
OR
LOSS
OF
DATA
OR
DOCUM E N TA TI O N,
IN
CONN E CT I O N
WITH
THE
USE
OF
THIS
PRODUCT,
EVEN
IF
HYU ND A I
TELECO M
HAS
BEEN
ADVI S E D
OF
THE
POSSI B IL I T Y
OF
SUCH
DAMA G E S .
REGARDI NG
TO
THE
PROD U CT
WITH
INTE RN E T
ACCESS,
THE
USE
OF
PRODUCT
SHALL
BE
WHOLLY
AT
YOUR
OWN
RISKS .
HYUND A I
TELECO M
SHALL
NOT
TAKE
ANY
RESP O N S IB IL I T E S
FOR
ABNO R M AL
OPERA T IO N ,
PRIVA CY
LEAKA G E
OR
OTHE R
DAMA G E S
RESULT I N G
FROM
CYBE R
ATTACK ,
HACK E R
ATTACK ,
VIRUS
INSP E C T IO N,
OR
OTHER
INTERN E T
SECURI T Y
RISK S ;
HOWE V E R ,
HYUND AI
TELECO M
WILLPRO VID E
TIMELYT E C H NI CAL S U P P O R T
IF
REQUI R E D .
SURV EILL A N C E
LAWS
VARY
BY
JURIS D IC T I O N .
PLEAS E
CHECK
ALL
RELEV A N T
LAWS
IN
YOUR
JURIS D IC T IO N
BEFORE
USING
THIS
PRODUCT
IN
ORDER
TO
ENSURE
THAT
YOUR
USE
CONFO R M S
THE
APPLI CA BL E
LAW.
HYUND A I
TELECO M
SHALL
NOT
BE
LIABLE
IN
THE
EVENT
THAT
THIS
PROD U CT
IS
USED
WITH
ILLEGIT IM AT E
PURP O S E S .
IN
THE
EVENT
OF
ANY
CONFLI CT S
BETW E E N
THIS
MANU AL
AND
THE
APPLI CA B L E
LAW,
THE
LATER
PREVA IL S .
▶
Regulator y
Informatio n
FCC
Informatio n
Please
take
attention
that
changes
or
modification
not
expressly
approved
by
the
party
responsible
for
compliance
could
void
the
user’s
authority
to
operate
the
equipment.
FCC
compliance:This
equipment
has
been
tested
and
found
to
comply
with
the
limits
for
a
Class
B
digital
device,
pursuant
to
part
15
of
the
FCC
Rules.These
limits
are
designed
to
provide
reasonable
protection
against
harmful
interference
in
a
residential
installation.
This
equipment
generates,
uses
and
can
radiate
radio
frequency
energy
and,
if
not
installed
and
used
in
accordance
with
the
instructions,
may
cause
harmful
interference
to
radio
communications.
However,
there
is
no
guarantee
that
interference
will
not
occur
in
a
particular
installation.
If
this
equipment
does
cause
harmful
interference
to
radio
or
television
reception,
which
can
be
determined
by
turning
the
equipment
off
and
on,
the
user
is
encouraged
to
try
to
correct
the
interference
by
one
or
more
of
the
following
measures:
—Reorient
or
relocate
the
receiving
antenna.
—Increase
the
separation
between
the
equipment
and
receiver.
—Connect
the
equipment
into
an
outlet
on
a
circuit
different
from
that
to
which
the
receiver
is
connected .
—Consul t
the
dealer
or
an
experienced
radio/TV
technician
for
help.
This
equipment
should
be
installed
and
operated
with
a
minimum
distance
20cm
between
the
radiator
and
your
body.
FCC
Conditions
This
device
complies
with
part
15
of
the
FCC
Rules.
Operation
is
subject
to
the
following
two
conditions:
1.
This
device
may
not
cause
harmful
interference.
2.
This
device
must
accept
any
interference
received,
including
interference
that
may
cause
undesired
operation.
EU
Conformit y
Statemen t
This
product
and
-
if
applicable
-
the
supplied
accessories
too
are
marked
with
"CE"
and
comply
therefore
with
the
applicable
harmonized
European
standards
listed
under
the
EMC
Directive
2014/30/EU,
the
RoHS
Directive
2011/65/EU,
Radio
Equipment
Directive
2014/53/EU.
Safety
Instruction
These
instructions
are
intended
to
ensure
that
a
user
can
use
the
product
correctly
to
avoid
danger
or
property
loss.
The
precaution
measure
is
divided
into
“Warn ings”
and
“Cautions”
Warnings:
Serious
injury
or
death
may
occur
if
any
of
the
warnings
are
neglected.
Cautions:
Injury
or
equipment
damage
may
occur
if
any
of
the
cautions
are
neglected.
Warnings
●
Proper
configuration
of
all
passwords
and
other
security
settings
is
the
responsibility
of
the
installer
and/or
end-user.
●
In
the
use
of
the
product,
you
must
be
in
strict
compliance
with
the
electrical
safety
regulations
of
the
nation
and
region.
Please
refer
to
technical
specifications
for
detailed
information .
●
Do
not
connect
several
devices
to
one
power
adapter
as
adapter
overload
may
cause
over-heating
or
a
fire
hazard.
●
Please
make
sure
that
the
plug
is
firmly
connected
to
the
power
socket.
When
the
product
is
mounted
on
wall
or
ceiling,
the
device
shall
be
firmly
fixed.
●
If
smoke,
odor,
or
noise
rise
from
the
device,
turn
off
the
power
at
once
and
unplug
the
power
cable,
and
contact
the
service
center.
Caution s
●
Make
sure
the
power
supply
voltage
is
correct
before
using
the
camera.
●
Do
not
drop
the
camera
or
subject
it
to
physical
shock.
●
Do
not
touch
sensor
modules
with
fingers.
If
cleaning
is
necessary,
use
a
clean
cloth
with
a
bit
of
ethanol
and
wipe
it
gently.
If
the
camera
will
not
be
used
for
an
extended
period,
replace
the
lens
cap
to
protect
the
sensor
from
dirt.
●
Do
not
aim
the
camera
at
the
sun
or
extra
bright
places.
Blooming
or
smearing
may
occur( wh ichisnotama lfunction) ,and affe ct thesen so r’send ura ncea tthe sameti me.
●
The
sensor
may
be
burned
out
by
a
laser
beam,
so
when
any
laser
equipment
is
in
use,
make
sure
that
the
surface
of
sensor
will
not
be
exposed
to
the
laser
beam.
●
Do
not
place
the
camera
in
extremely
hot,
cold
(the
operating
temperature
shall
be
-10°Cto+40°C),dusty,ordamplocations,anddonote xpo seittohighele ctromagne tic
radiation.
●
To
avoid
heat
accumulation ,
ensure
that
there
is
good
ventilatio n
to
the
device.
●
Keep
the
camera
away
from
liquids.
●
While
in
delivery,
pack
the
camera
in
its
original,
or
equivalent,
packing,
packing
materials.
Or
packing
of
the
same
texture.
●
Regular
part
replacement:
a
few
parts
(e.g.
electrolytic
capacitor)
of
the
equipment
shall
be
replaced
regularly
according
to
their
average
endurance.
The
average
time
varies
because
of
differences
between
operating
environments
and
usage
history,
so
regular
checking
is
recommended
for
all
users.
Please
contact
your
dealer
for
more
details.
●
Improper
use
or
replacement
of
the
battery
may
result
in
hazard
of
explosion.
Replace
with
the
same
or
equivalent
type
only.
Dispose
of
used
batteries
according
to
the
instruction s
provided
by
the
battery
manufacturer.
●
If
the
product
does
not
work
properly,
please
contact
your
dealer
or
the
nearest
service
center.
Never
attempt
to
disassemble
the
camera
yourself.
(We
shall
not
assume
any
responsibility
for
problems
caused
by
unauthorized
repair
or
maintenance .)
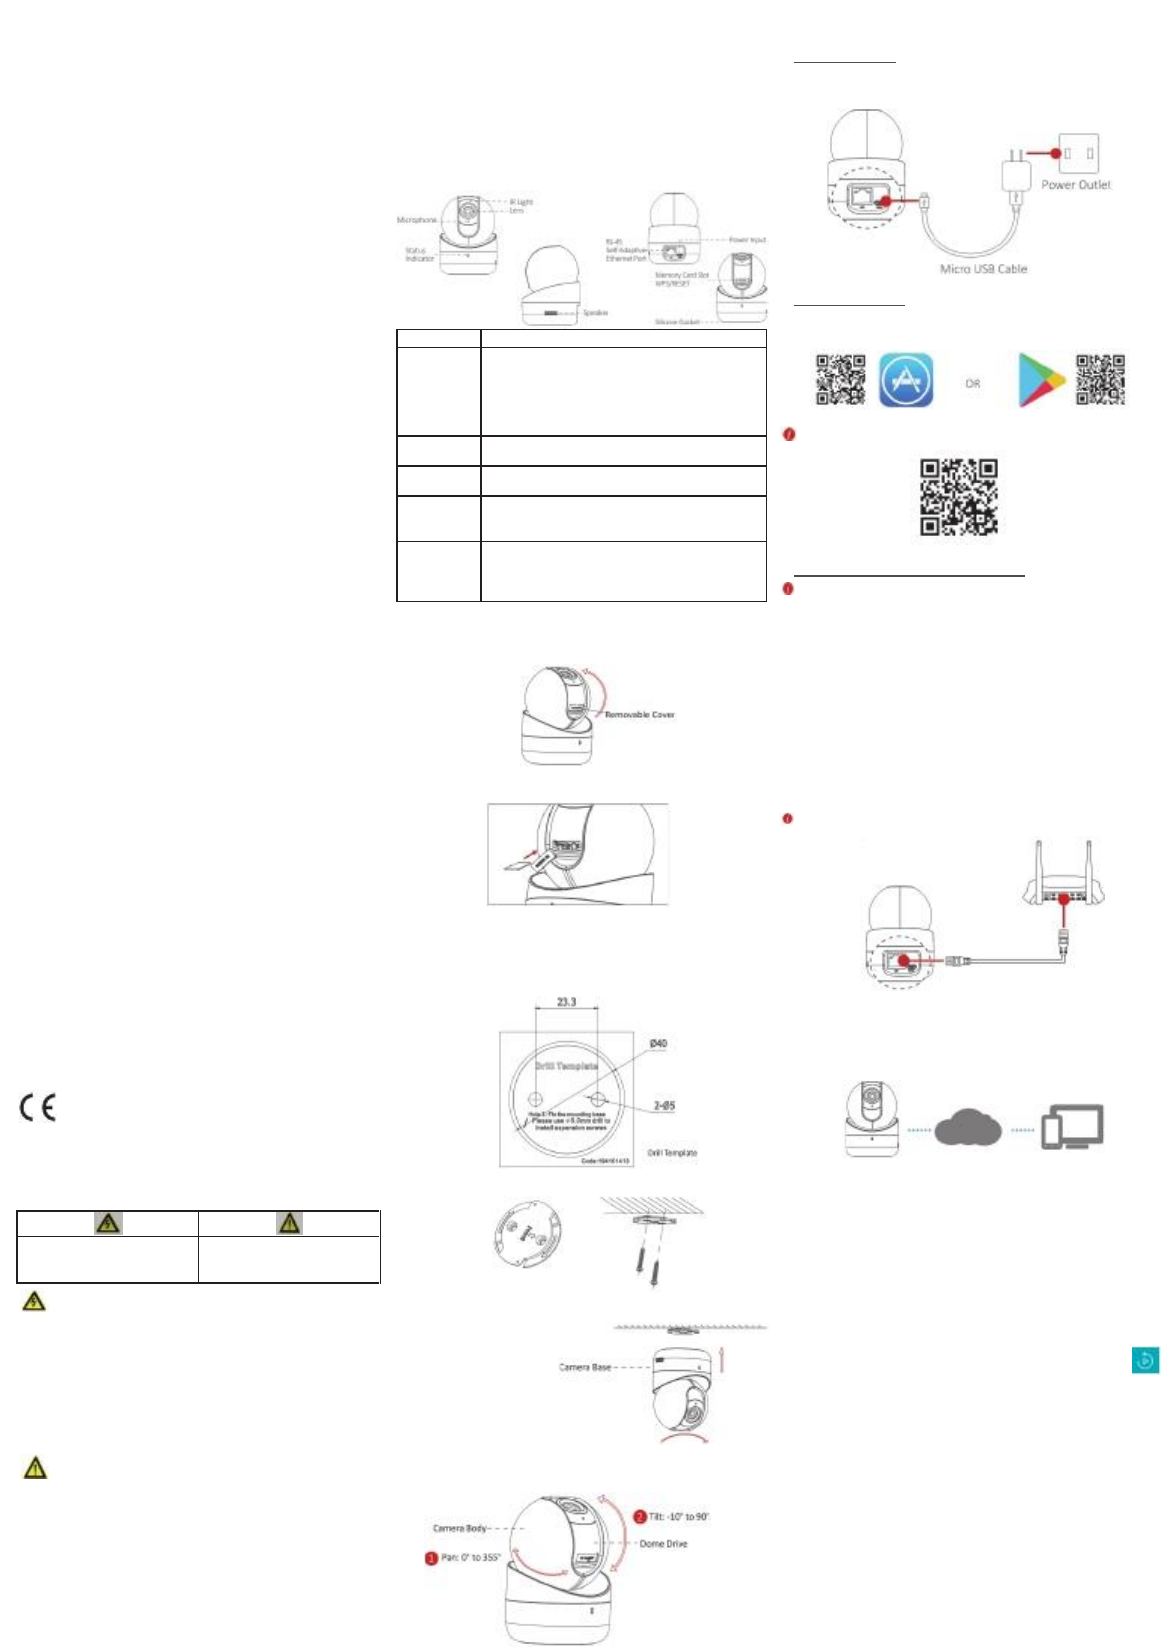
▶Appearance
▶Installation
1.Install memory card (optional).
➊ A djust the tilting position of the ca m era to expose the removable
cover.
➋ Open the cover to expose the m e m ory card slot, and insert the
m em ory card.
➌ Install the removable cover back.
2. Install the camera.
➊ Take out the drill te m plate from the package. P a ste it to the desired
moungting place.
➋ Drill two screw holes according to the drill tem plate if you use
expansion screws.
➌ Take out the bracket from the package. Align the screw holes and fix
the B racket
Bracket
➍ Fit the bracket into the cam era bottom , and rotate the ca m era base
clockwise to get it fixed.
3. Adjust the surveillance angle.
➊ Rotate the cam era body to adjust the panning position.
➋ M ove the dom e drive upwards or downwards to adjust tilting position.
▶Operations
Step 1
P ower on the Cam era
Connect the ca m era to the power adapter with the M icro U S B cable, and
then plug the power adapter into the power outlet. When the blue light
flashes, the ca m era is powered on. You can set the Wi-Fi connection.
Step 2
HT Hom e V iewer S etup
- Connect your mobile device to Wi-Fi.
- Download and install the HT Hom e Viewer app by searching the “H T
Hom e Viewer” in A pp Store or Google P la yTM .
- Launch the app and register for a HT Hom e Viewer user account.
Use of the product is subject to your registration with HT H om e Viewer
and your agreement to the Te rm s of S e rvice found at
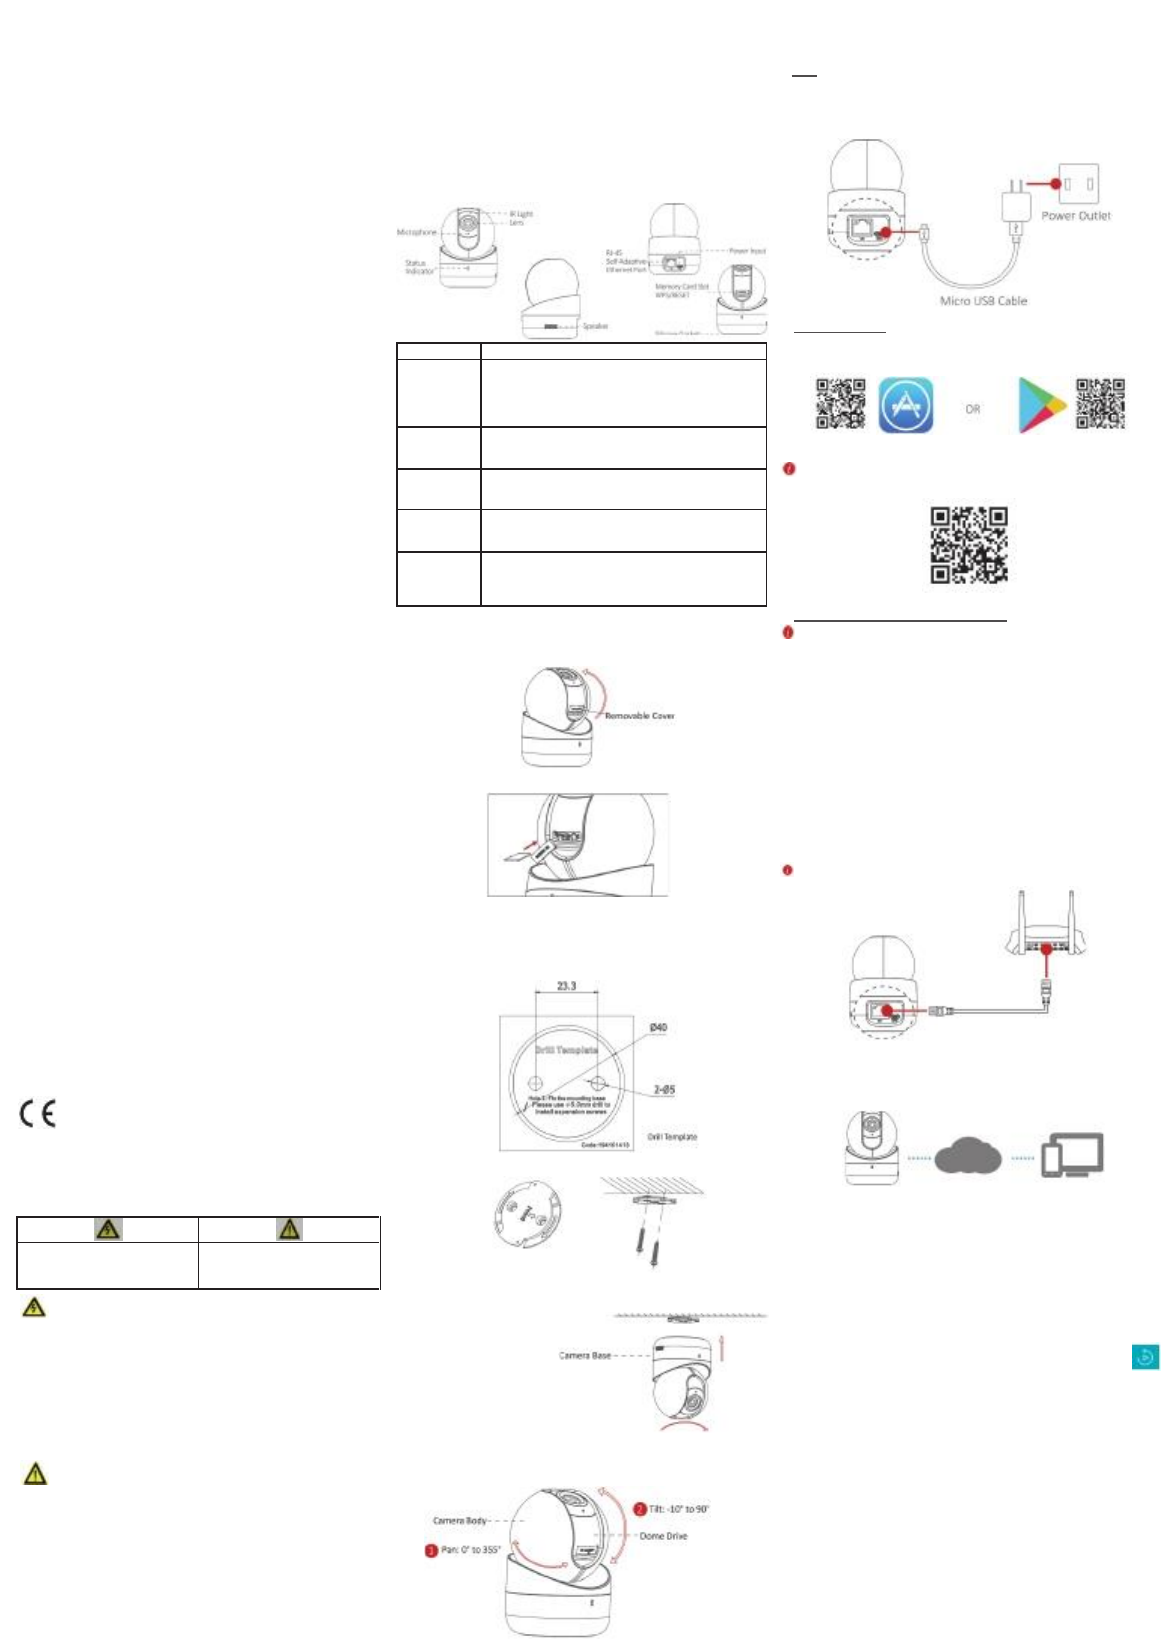
Step 3
A dd the Cam era to Your HT Hom e V iewer A ccount
S tart the adding process only when the indicator flashes blue.
- Connect your mobile phone to a Wi-Fi (5G Wi-Fi is not supported yet).
- Log into the HT Ho m e Viewer app.
- In the Ho m e page, tap “+” on the upper-right corner to add a cam era.
- S can the QR code on the b ottom of the ca m era or on the Quick S ta rt
Guide.
- Tap Connect to a Network button in the popup interface.
- Choose Wired Connection or Wireless Connection on your demand in
the popup interface.
● Wireless Connection
Input the Wi-Fi password that your mobile phone has connected to,
and tap Next to start the Wi-Fi connection process. (Locate the ca m era
within 3 m ete rs fro m the router when setting up the Wi-Fi.)
● Wired Connection
Connect the cam e ra to the router with a network cable and tap
Connected in the Result interface.
The router should be the sam e one that your mobile phone has connected
to.
- Tap A dd button in the next interface to finish adding.
▶HT Home View er
With HT Ho m e Viewer service, you can realize som e certain functions of
this product (including, but not limited to, live view, and rem ote playback)
, which depend on the internet and telecom value-added services.
Live View
Launch the HT H om e Viewer app and you can get the live view of the
connected devices.
Recording
- Check the m em o ry card status by tapping on the S to rage S ta tu s in the
Device S ettin gs interface.
- If the m e m ory card status displays as Uninitialized, tap to initialize it.
The status will then change to Normal. You can then start recording any
event-triggered video in the ca m era such as m o ti on detection.
Playback
Launch the HT H om e Viewer app, tap a connected device and tap
Gallery button to play back.
Alarm Notification
Launch the HT H om e Viewer app and tap M essa ge to see the alarm
m essages.
This equipm ent should be installed and operated with a m inim um distance 20cm
between the rad iator and your body
Name
Descrip tio n
-
-
S tatu s Indicator
-
-
Steady red: The camera is starting up.
Flashing blue: The camera is started, and is ready for
Wi-Fi set-up.
Steady blue: Wi-Fi configuratio n is completed and the
camera is running properly.
Flashing red: network communica tion is abnormal.
IR Light
Auto light source for night vision. The light is behind the
anti-reflectio n panel. You can see the light when it is on.
Power Input
Micro USB for power supply, 5V. Plug the power cable
into the power input interface to power on the camera.
M em ory
Card S lot
For microSD card. If a memory card is used, video files
will be stored in the memory card. You would need to
initialize it in the Hik-Connect app.
-
WPS/RESET
-
WPS: Set Wi-Fi connectio n via WPS (Wi-Fi Protected
Setup) function.
RESET: Hold down the button for 4 seconds when the
camera is running.
Warnin g s :
Follow
these
safeg u ar d s
to
preven t
seriou s
injury
or
death .
Cauti o n s:
Follow
these
precau ti o n s
to
preven t
potential
injury
or
materi al
damag e.
HYUNDAI TELECOM
Smart
Home
Camera
Quick
Star t
Guide
COPY RI G HT
©2017
Hyundai
Telecom
Co.,
Ltd.ALL
RIGHT S
RESE RV E D.
Any
and
all
information,
including,
among
others,
wordings,
pictures,
graphs
are
the
properties
of
Hyundai
Telecom
Co.,
Ltd.
or
its
subsidiaries
(hereinafter
referred
to
be
“Hyunda i
Telecom”) .
This
user
manual
(hereinafter
referred
to
be
“the
Man ual” )
cannot
be
reproduced,
changed,
translated,
or
distributed,
partially
or
wholly,
by
any
means,
without
the
prior
written
permission
of
Hyundai
Telecom.
Unless
otherwise
stipulated,
Hyundai
Telecomdoesnotmakeanywarranties ,guaranteesorrepresentation s,e xpres sorimplied,
regarding
to
the
Manual.
▶
About
this
Manual
The
Manual
includes
instructions
for
using
and
managing
the
product.
Pictures,
charts,
imagesandallotherinformationhereinafterarefordescriptionandexplanationonly.The
information
contained
in
the
Manual
is
subject
to
change,
without
notice,
due
to
firmware
updates
or
other
reasons.
Please
find
the
latest
version
in
the
company
website
(http://
www.hyundaitel.co. kr/eng/).
Visit
the
company
website
(http://www.hyundaitel .co .kr /
eng/)
to
get
the
manuals,
client
software,
and
developing
tools.
Please
use
this
user
manual
under
the
guidance
of
profession al s .
▶
Trademar ks
Ackno wl ed g em en t
Hyundai
Telecom
and
other
Hyundai
Telecom’s
trademarks
and
logos
are
the
properties
of
Hyundai
Telecom
in
various
jurisdictions.
Other
trademarks
and
logos
mentioned
below
are
the
properties
of
their
respective
owners.
▶
Legal
Discl ai m er
TO
THE
MAXIM U M
EXTE N T
PERMI T T E D
BY
APPLI CA B L E
LAW,
THE
PROD U CT
DESCR IB E D ,
WITH
ITS
HARDWA R E,
SOFTW A RE
AND
FIRM WA R E ,
IS
PROVI DE D
“AS
IS”,
WITH
ALL
FAULTS
AND
ERROR S ,
AND
HYUND A I
TELECO M
MAKE S
NO
WARRA N TI E S ,
EXPR ESS
OR
IMPLIE D,
INCLUD ING
WITHO UT
LIMITATI O N ,
MERC HA NT A B I LIT Y,
SATISF ACT O R Y
QUALIT Y,
FITNE S S
FOR
A
PARTICU L A R
PURP O S E,
AND
NON- IN F R ING E M E N T
OF
THIRD
PARTY.
IN
NO
EVENT
WILL
HYUND AI
TELECO M ,
ITS
DIRE CT O RS ,
OFFICE RS ,
EMPLO YEES,
OR
AGENT S
BE
LIABLE
TO
YOU
FOR
ANY
SPECI A L,
CONS E Q U E NT IAL ,
INCID E NT A L,
OR
INDIR E CT
DAMAG E S ,
INCLUD ING,
AMONG
OTHERS ,
DAMA G E S
FOR
LOSS
OF
BUSI NE S S
PROFIT S ,
BUSI NE S S
INTE RR U PT IO N ,
OR
LOSS
OF
DATA
OR
DOCUM E N TA TI O N ,
IN
CONN E CT I O N
WITH
THE
USE
OF
THIS
PRODUCT,
EVEN
IF
HYU ND A I
TELECO M
HAS
BEEN
ADVI S E D
OF
THE
POSSI B IL I T Y
OF
SUCH
DAMA G E S .
REGARDI NG
TO
THE
PROD U CT
WITH
INTE RN E T
ACCE S S ,
THE
USE
OF
PRODUCT
SHALL
BE
WHOLLY
AT
YOUR
OWN
RISKS .
HYUND A I
TELECO M
SHALL
NOT
TAKE
ANY
RESP O N S IB IL I T E S
FOR
ABNO R M AL
OPERA T IO N ,
PRIVA CY
LEAKA G E
OR
OTHE R
DAMA G E S
RESULT I N G
FROM
CYBE R
ATTACK ,
HACK E R
ATTACK ,
VIRUS
INSP E C T IO N,
OR
OTHER
INTERN E T
SECURI T Y
RISK S ;
HOWE V E R ,
HYUND AI
TELECO M
WILLPRO VID E
TIMELYT E C H NI CAL S U P P O R T
IF
REQUI R E D .
SURV EILL A N C E
LAWS
VARY
BY
JURIS D IC T I O N .
PLEAS E
CHECK
ALL
RELEV A N T
LAWS
IN
YOUR
JURIS D IC T IO N
BEFORE
USING
THIS
PRODUCT
IN
ORDER
TO
ENSURE
THAT
YOUR
USE
CONFO R M S
THE
APPLI CA BLE
LAW.
HYUND A I
TELECO M
SHALL
NOT
BE
LIABLE
IN
THE
EVENT
THAT
THIS
PROD U CT
IS
USED
WITH
ILLEGIT IM AT E
PURP O S E S .
IN
THE
EVENT
OF
ANY
CONFLI CT S
BETW E E N
THIS
MANU AL
AND
THE
APPLI CA B L E
LAW,
THE
LATER
PREVA IL S .
▶
Regulator y
Informatio n
FCC
Informatio n
Please
take
attention
that
changes
or
modification
not
expressly
approved
by
the
party
responsible
for
compliance
could
void
the
user’s
authority
to
operate
the
equipment.
FCC
compliance:This
equipment
has
been
tested
and
found
to
comply
with
the
limits
for
a
Class
B
digital
device,
pursuant
to
part
15
of
the
FCC
Rules.These
limits
are
designed
to
provide
reasonable
protection
against
harmful
interference
in
a
residential
installation.
This
equipment
generates,
uses
and
can
radiate
radio
frequency
energy
and,
if
not
installed
and
used
in
accordance
with
the
instructions,
may
cause
harmful
interference
to
radio
communications.
However,
there
is
no
guarantee
that
interference
will
not
occur
in
a
particular
installation.
If
this
equipment
does
cause
harmful
interference
to
radio
or
television
reception,
which
can
be
determined
by
turning
the
equipment
off
and
on,
the
user
is
encouraged
to
try
to
correct
the
interference
by
one
or
more
of
the
following
measures:
—Reorient
or
relocate
the
receiving
antenna.
—Increase
the
separation
between
the
equipment
and
receiver.
—Connect
the
equipment
into
an
outlet
on
a
circuit
different
from
that
to
which
the
receiver
is
connected .
—Co nsul t
the
dealer
or
an
experienced
radio/TV
technician
for
help.
This
equipment
should
be
installed
and
operated
with
a
minimum
distance
20cm
between
the
radiator
and
your
body.
FCC
Conditions
This
device
complies
with
part
15
of
the
FCC
Rules.
Operation
is
subject
to
the
following
two
conditions:
1.
This
device
may
not
cause
harmful
interference.
2.
This
device
must
accept
any
interference
received,
including
interference
that
may
cause
undesired
operation.
EU
Conformit y
Statemen t
This
product
and
-
if
applicable
-
the
supplied
accessories
too
are
marked
with
"CE"
and
comply
therefore
with
the
applicable
harmonized
European
standards
listed
under
the
EMC
Directive
2014/30/EU,
the
RoHS
Directive
2011/65/E U,
Radio
Equipment
Directive
2014/53/EU.
Safety
Instruction
These
instructions
are
intended
to
ensure
that
a
user
can
use
the
product
correctly
to
avoid
danger
or
property
loss.
The
precaution
measure
is
divided
into
“Warn ings”
and
“Cautions”
Warnings:
Serious
injury
or
death
may
occur
if
any
of
the
warnings
are
neglected.
Cautions:
Injury
or
equipment
damage
may
occur
if
any
of
the
cautions
are
neglected.
Warnings
●
Proper
configuration
of
all
passwords
and
other
security
settings
is
the
responsibility
of
the
installer
and/or
end-user.
●
In
the
use
of
the
product,
you
must
be
in
strict
compliance
with
the
electrical
safety
regulations
of
the
nation
and
region.
Please
refer
to
technical
specifications
for
detailed
information .
●
Do
not
connect
several
devices
to
one
power
adapter
as
adapter
overload
may
cause
over-heating
or
a
fire
hazard.
●
Please
make
sure
that
the
plug
is
firmly
connected
to
the
power
socket.
When
the
product
is
mounted
on
wall
or
ceiling,
the
device
shall
be
firmly
fixed.
●
If
smoke,
odor,
or
noise
rise
from
the
device,
turn
off
the
power
at
once
and
unplug
the
power
cable,
and
contact
the
service
center.
Caution s
●
Make
sure
the
power
supply
voltage
is
correct
before
using
the
camera.
●
Do
not
drop
the
camera
or
subject
it
to
physical
shock.
●
Do
not
touch
sensor
modules
with
fingers.
If
cleaning
is
necessary,
use
a
clean
cloth
with
a
bit
of
ethanol
and
wipe
it
gently.
If
the
camera
will
not
be
used
for
an
extended
period,
replace
the
lens
cap
to
protect
the
sensor
from
dirt.
●
Do
not
aim
the
camera
at
the
sun
or
extra
bright
places.
Blooming
or
smearing
may
occur( wh ichisnotama lfunction) ,and affe ct thesen so r’send ura ncea tthe sameti me.
●
The
sensor
may
be
burned
out
by
a
laser
beam,
so
when
any
laser
equipment
is
in
use,
make
sure
that
the
surface
of
sensor
will
not
be
exposed
to
the
laser
beam.
●
Do
not
place
the
camera
in
extremely
hot,
cold
(the
operating
temperature
shall
be
-10°Cto+40°C),dusty,ordamplocations,anddonote xpo seittohighele ctromagne tic
radiation.
●
To
avoid
heat
accumulation ,
ensure
that
there
is
good
ventilatio n
to
the
device.
●
Keep
the
camera
away
from
liquids.
●
While
in
delivery,
pack
the
camera
in
its
original,
or
equivalent,
packing,
packing
materials.
Or
packing
of
the
same
texture.
●
Regular
part
replacement:
a
few
parts
(e.g.
electrolytic
capacitor)
of
the
equipment
shall
be
replaced
regularly
according
to
their
average
endurance.
The
average
time
varies
because
of
differences
between
operating
environments
and
usage
history,
so
regular
checking
is
recommended
for
all
users.
Please
contact
your
dealer
for
more
details.
●
Improper
use
or
replacement
of
the
battery
may
result
in
hazard
of
explosion.
Replace
with
the
same
or
equivalent
type
only.
Dispose
of
used
batteries
according
to
the
instruction s
provided
by
the
battery
manufacturer.
●
If
the
product
does
not
work
properly,
please
contact
your
dealer
or
the
nearest
service
center.
Never
attempt
to
disassemble
the
camera
yourself.
(We
shall
not
assume
any
responsibility
for
problems
caused
by
unauthorized
repair
or
maintenance .)
▶外観
▶設置
1.
メモリーカードの設置(オプション)
➊
Removable Cover が取り外せるようにカメラの回転位置を調整します。
➋
カバーを取り外してメモリカードをスロットに挿入します。
➌
カバーを元に閉じます。
2.
カメラの設置
➊
パッケージからドリルテンプレートを取り出します。
希望の場所に貼り付けてください。
➋
ドリルテンプレートに合わせて 2つのネジ穴をドリルで作ってください。
➌
パッケージからブラケットを取り出します。ネジ穴に合わせ、ブラケッ
トを固定します。
Bracket
➍
ブラケットをカメラの底にはめ込み、カメラベースを時計回りに回して
固定します。
3.
監視角度を調整します。
➊
パンニングポジションを調整するには、カメラ本体を回転させます。
➋
ドームドライブを上または下に動かして傾動位置を調整します。
▶作動
Step
1
カメラの電源を入れる。
カメラを電源アダプタに接続します。マイクロ USB ケ ーブ ルを 接 続し 、電 源ア
ダプタをプラグに差し込みます。青色のライトが点滅すると、カメラの電源
がオンになっている状態です。
これで Wi-Fi 接続の設定準備ができました。
Step
2
HT Home Viewer Setup
.
- モバイルデバイスを Wi-Fi に接続します。
- App Store または Google Play で「HT Home Viewer」を検索し、
アプリをダウンロードしてインストールします。
- アプリケーションを起動し、HT Home Viewer ユー ザー ア カウ ント に 登録 しま
す。
製品の使用についての登録及び HT Home Viewer サービスをご利用するには利
用規約を必ず熟知して下さい。詳しい内容は下記の QR コー ドで ご 確認 して く
ださい。
Step
3
HT Ho m e V iew er アカウントにカメラを追加する。
インジケーターが青色で点滅しているときに追加設定を行ってください。
- 携帯電話を Wi-Fi に接続します。
(5G Wi-Fi は接続できませんのでご注意ください)
- HT Home Viewer アプリにログインします。
- ホーム画面で、右上の「+」をクリックプしてカメラを追加する。
- カメラ底面又はクイックスタートガイドカバーにある QR コードをスキャン
して下さい。
- ポップアップインターフェイスの[Connect to a Network]をク リ ック して く
ださい。
- ポップアップインターフェイス画面から有・無線の接続方法を選択して下
さい。
●
ワイヤレス接続
携帯電話に Wi-Fi のパスワードを入力して下さい。そして[次へ]を クリ ック
すると Wi-Fi 接続が開始します。(カメラを Wi-Fi 設定するときは無線ルー
タから 3メートル以内に配置します)
●
有線接続
ネットワークケーブルでカメラをルータに接続する Result イ ンタ ーフ ェイ
スで Connected をタップします。
携帯電話の Wi-Fi とルータの Wi-Fi が同じか確認してください。
(同じ Wi-Fi に設定してください)
-
次のインターフェイスで[追加]ボタンをクリックすると追加完了です。
▶ HT Ho m e V iew er
HT Home Viewer は、インターネット環境で(ライブビュー、リモート再生な
ど)のサービスができます。
ライブビュー
HT Home Viewer アプリを起動すると、接続したデバイスのライブビューがで
きます。
録画
デバイス設定インターフェイスのストレージステータスを押してメモリカー
ドのステータスを確認して下さい。メモリカードのステータスが初期化され
ていない場合は、初期化ボタンを押して下さい。そうするとモーションなど
イベントが発生した場合、正常に録画します。
再生
HT Home Viewer ア プリを 起動し、 繋がっ ているデ バイス をクリ ックしま す。
そして「ギャラリー」ボタンをクリックすると再生できます。
アラーム通知
HT Home Viewer アプリを起動し、メッセージをクリックしてアラームメッセ
ージ内容を確認します。
Name
説明
Statu s
Indica to r
*赤色に点灯:カメラの起動準備中です。
* 青色の点滅:カメラが起動し、Wi-Fi セットアップの準備
ができました。
*青色の点灯:Wi-Fi 構成が完了し、正常に動 作してい ます。
*赤く点滅:ネットワーク通信エラー。
IR
Light
夜間環境で自動的に付く光源 (赤 外線)。こ れは反 射パ ネ
ルの後ろにあり,周りが暗くなるとライト オン状態 が確認 で
きます。
Power
Input
電源用マイクロ USB、5V プラグを差し込み、電源 コードを 電
源入力インターフェイスに接続します。
カメラの電源を入れます。
Memor y
Card
Slot
microSD カード用でメモリカードを使用する場 合は、 ビデオ
ファイルはメモリカードに保 存さ れま す。あ なた はそ れを
HT Home Viewer アプリで初期化する必要 があり ます 。
WPS / RE S E T
WPS:WPS(Wi-FiProtected Setup)機能を通じて Wi-Fi 接続
を設定する
リセット:カメラの電源がオンの状態でボ タンを 4秒 間 押 し
続ける。
Warnin g s :
Follow
these
safeg u ar d s
to
preven t
seriou s
injury
or
death .
Cauti o n s:
Follow
these
precau ti o n s
to
preven t
potential
injury
or
materi al
damag e.
HYUNDAI TELECOM