Hangzhou Virtual And Reality Technology BACK1 KATVR-Back Sensor User Manual 2 1
Hangzhou Virtual And Reality Technology Co., LTD. KATVR-Back Sensor Users Manual 2 1
Contents
- 1. Users Manual_1
- 2. Users Manual_2-1
- 3. Users Manual_2-2
- 4. Users Manual_2-3
Users Manual_2-1
KAT WALK
Premium Package
User manual

2 Contents
Contents
About the User Manual 5
Declaration 6
Safety 6
Health Warnings 7
Maintenance 8
Attention
KAT WALK 9
Product Introduction 9
Product Appearance 9
Parameters 9
KAT STATION 10
Product Introduction 10
Product Appearance 10
Parameters 10
KAT SHOES 11
Product Introduction 11
Product Appearance 11
Product Introduction 12
Product Appearance 12
VR Head-Mounted Display 13
Product Introduction 13
Product Appearance 14
Product Introduction
List of Items 15
Installation Instructions 16
Preparation of Tools 16
KAT WALK PREMIUM Installation 17
Use of Base Plate Holder 17
Starting Installation
KAT SHOE COVER 12

3 Contents
Contents
Connect the KAT SENSORS 29
Pairing Sensor 30
KATVR-Foot Sensor 31
Wireless Receiver 32
KATVR-Central Sensor 33
KATVR-Back Sensor 34
Starting Installation
Power Switch 35
Sensor Status Indicators 36
Starting the Head-Mounted Display 36
Correct Wearing 37
Installation and Dismantling of KAT Foot Sensors on KAT SHOE COVER 38
Fast Replacement of KATVR-Foot Sensor 38
Dismantling of the Main Body of KATVR-Foot Sensor 38
Installation of the Main Body of KATVR-Foot Sensor 38
Installation and Dismantling of Foot Sensors on KAT SHOES 39
Installation of KATVR-Foot Sensor 39
Installation of the Main Body of KATVR-Foot Sensor 39
IInstalling the KATVR-Foot Sensor 40
Instructions for Use of KAT WALK Self - Adaptation Computer 41
Login the KAT Game Flat 42
Game settings 44
Calibration Settings 46
Setting the Static Value 50
Help Center 53
Quitting the Game 51
Turning Off the Software 52
Starting to Use
Connection of Grounding Cable 27
Connection of Logo Light Source Cable 28
Connection of VR Head-Mounted Display and Base Stations 28
Installation of KAT WALK Shell 25
Installation of Support Pillar Shell 25

4 Contents
Contents
61
Dismantling and Replacement of KAT WALK PREMIUM Components 55
Dismantling Shell 55
Dismantling Mechanical and Electrical Structure 55
56Dismantling and Replacement of KAT STATION Control Center Components
KAT SHOES Replacement Instructions 56
56Procedures of Replacing Sliders
Procedures of Replacing Wheels 58
Instructions for Replacing KAT SHOE COVER 59
Steps of Replacing Slide Blocks 59
Dismantling and Replacement
Frequently Asked Questions
65
Frequently Asked Questions
Warnings
FCC Warnings
66
IC Warnings
Contents

5 About this user manual
About this user manual
The user manual contains all the information needed for installing and using KAT WALK PREMIUM ODT platform.
The following signs are used for indicating useful and important information in the manual:
This sign means“Attention”, which usually provides additional information that is helpful in completing a certain job
as well as information applicable to certain scenarios.
This sign means“Hint”, which helps you understand options that may be help to you.
This sign indicates important information, which means that you must complete one or more than one installation or
setup of software and hardware according to the stated methods in the manual.
This sign means“Safety Warnings”, which reminds you to take care of your own safety. You need to pay special attention
to this information in case of any potential safety issues.

6 Declaration
Declaration
Safety
is the trademark of Hangzhou Virtual Reality Technology Co., Ltd. Trademarks, product identification and
commodity names of other companies in this manual are respectively owned by their owners. No organization or individual
is allowed to extract or copy parts or all of the contents in the manual, or spread them in any form or use them for any
commercial or profit-making purposes without the written consent of our company.
The contents of the manual are subject to changes due to product version upgrading or other causes. We reserve the
right to change the contents of the manual without any notice or hints. The manual is only used as usage guidance and we
try our best to provide accurate information in it, and yet we do not guarantee zero error. The statements, information and
suggestions in the manual do not constitute any explicit or implicit guarantee.
As the product contains the HTC VIVE BE commercial head-mounted display, parts of the contents are extracted from
HTC’s official manual. The instructions on how to use HTC products shall be subject to the description in HTC’s official
manual.
Risk of place selection
Please do not place the product in the following :
places: Outdoor places with direct sunlight
Unstable places, or places with slopes or vibrations
Exhibition stand with inadequate load bearing or places made of glass
Disaster prevention places such as safety exits or places with firefighting equipment
If it requires changing the place for usage after installation, please do strictly follow the steps of dismantling first, use
packs of the same materials as the original pack and select a high-quality logistics or moving company. Otherwise, the
device will be prone to damage. Please be alerted of it
Risk of electric shock or fire
Please do not expose the product or its accessories to rain or water or put any liquid container near the product. If water
is accidentally splashed or infiltrated into the inside of the device, please plug out the power immediately and contact
KAT customer service center for inspection before reusing the product.
Please do not place the product or its accessories near fire or heat, and avoid exposing it directly under the sunlight.
Please do not insert any items in the product vent or other openings.
Please plug out after switching off relevant products and do not randomly cut off their power supply.
Please plug out the product before a thunder storm.
Please pull out the power cable from the plug section and do not directly pull the cable.
Please make sure the socket voltage is the same as the value printed on the back of the product or within the guide
manual. If they differ, please do not connect the product to the power supply socket.
Please browse our website for the latest information
http://www.katvr.com

Health Warnings
The following health warnings will be updated anytime for accuracy and completeness.
Please carefully read the product instructions before using the product and do the setup according to the instructions.
Incorrect setup may increase the risk of discomfort.
It is advised that pregnant women, the elderly, those with visual disorder or a record of mental illness or those once
affected by other serious health conditions such as heart diseases, consult with the doctor before using the product.
As different people have different constitutions, we advise not to use the product for a long time in case of anydiscomfort,
such as giddiness, dizziness, headache, etc. If you have any discomfort, please stop using it immediately and stop any
potentially dangerous activities (such as driving) for the time being until the symptoms completely disappear. If the
symptoms persist, please do not continue to use it without consultation with the doctor.
If the user has a medical history of epilepsy or photosensitive epilepsy, then he/she needs to consult with the doctor
before watching VR with flashing light source or fast image sequence.
Children must use the product with parents aside to make sure that they will not suffer from any of the above mentioned
discomfort. As the visual system of children under 13 years old has not completely matured, it is not advised for them
to use the product.
Those who weigh over 100kg are not advised to use the product due to the limited load bearing of the base plate and
shoes. The best body height for the product is 150-180cm.
Do not use the product for too long (control it within a few minutes) when using it for the first time. The period of usage
can only be lengthened step by step after the gradual adaption to VR.
Comfortable VR experience requires undamaged sense of movement and balance. The user is strictly forbidden to use
the product when he/she is in fatigue, needs sleep, is affected by alcohol or medicine, or suffers from hangover, mental
stress or anxiety, headache or earache. Otherwise, the symptoms of discomfort will only be worsened.
Please stop using the product immediately if the following symptoms occur
Epilepsy seizure and loss of consciousness; eyestrain, eye or muscle cramp, involuntary movement, visual
change, blurred eyesight or other visual disorder; dizziness and loss of direction; damaged sense of balance
or hand-eye coordination capability; excessive sweating, nausea, dizziness, head or eye discomfort or pain,
drowsiness, fatigue or any symptoms similar to motion sickness.
Just like the symptoms people feel after getting off boat, the symptoms caused by VR may last and become
more obvious hours after the usage.
Please do not drive, operate machines or carry out any other activities requiring vision or certain body conditions
and with potential risks; or do any other activities that require undamaged sense of balance and hand-eye
coordination capability (such as sports activities), as they may result in serious consequences.
do not drive, operate the machine or engage in any other activities that are required for visual or physical and
potentially dangerous activities, or engage in other activities that require undisturbed balance and hand-eye
coordination (physical activity, etc.) until fully restored as it may cause serious consequences
7 Attention

8 Product maintenance
Maintenance of Base Plate
Once the materials of KAT Shoes and those of the base plate match, there will be a fixed friction coefficient, which is the
balance point of the best experience. Abrasion to the base plate will result in declined product experience and affect the
plate life. Please note the following three points prior to usage:
Do not make contact the base plate with non KAT Shoes or any other objects;
Make sure that the base plate is wiped clean ofany foreign matter before using the device every day.
If necessary, you may drop the complimentary maintenance oil specially for the device
(only one drop is needed as the materials are special);
Make sure that there is no foreign matter on the sole sliders and wheels of KAT Shoes every time before using
the device.
Daily Maintenance of Head-Mounted Display
The head-mounted display and handle sensors are highly sensitive, and thus, user experience will be severely affected
if they are damaged. Please note the following when using the display:
Please properly store the head-mounted device and keep the lens away from direct sunlight when it is not
being used. Otherwise, it might result in the damage of the display screen of the head-mounted device.
Please use the cleaning cloth provided in the packing box to clean the lens. Dip the cloth in alcohol or lens
detergent, and do the cleaning in circular motions from the center of the lens to the outer edge.
When cleaning the face pad, please take it off from the head-mounted device first. Dip a piece of soft cloth in
cold water and gently clean the areas that need cleaning. Please do not dip or soak the pad in water; dry it
under room temperature instead of rubbing, wringing or bleaching it; do not tumble dry, iron or expose it
under direct sunlight.
Instructions for regular examination of girdle
When a customer weighs beyond the limit (>100kg) or is with an overly sized waist, please duly check if the
girdle set has deformed. It is advised to conduct a regular examination on the girdle set every other week,
mainly checking if the bolt at the connection on the back of the girdle set has loosened, if the washer at the
bolt bottom has come off, and if the girdle set has deformed.
Any problem of the girdle set may cause safety issues. As it is a component that is prone to wear and tear, the
warranty period for it is three months from the issuance of the invoice. Please immediately contact the after
sales service by dialing the KAT hotline if any of the above situations occur.
Instructions for daily maintenance of three-in-one cable and sensors power supply
cable
It is necessary to carry out the daily maintenance of the three-in-one cable and the sensors power supply cable to
prevent them from being damaged due to entanglement. Check if the three-in-one cable and the sensors power supply
cable have any tangling every day by following the steps below:
Step one: entanglement of the three-in-one cable and the sensors power supply cable (tangling): based on
the tangling direction, rotate the connecting rod in a reverse direction until the three-in-one cable is separated
from the sensors power supply cable.
Step two: twisting of the three-in-one cable (twisting, and marked wrinkles can be seen on the outside): take
off the head-mounted display, and based on the twisting direction, rotate the display in a reverse direction
until the cable returns to the smooth state with no twist.
Maintenance
9 Product Introduction
KAT WALK
Production Introduction
KAT WALK is a VR multi-direction mobile platform, which is also called VR treadmill. It breaks the virtual and real-life
space limit, enabling users in extremely small space in reality to carry out 360° boundless movements in the virtual world
through the combination of different components including the VR head-mounted display like HTC Vive or Oculus Rift.
Product Appearance
Parameters
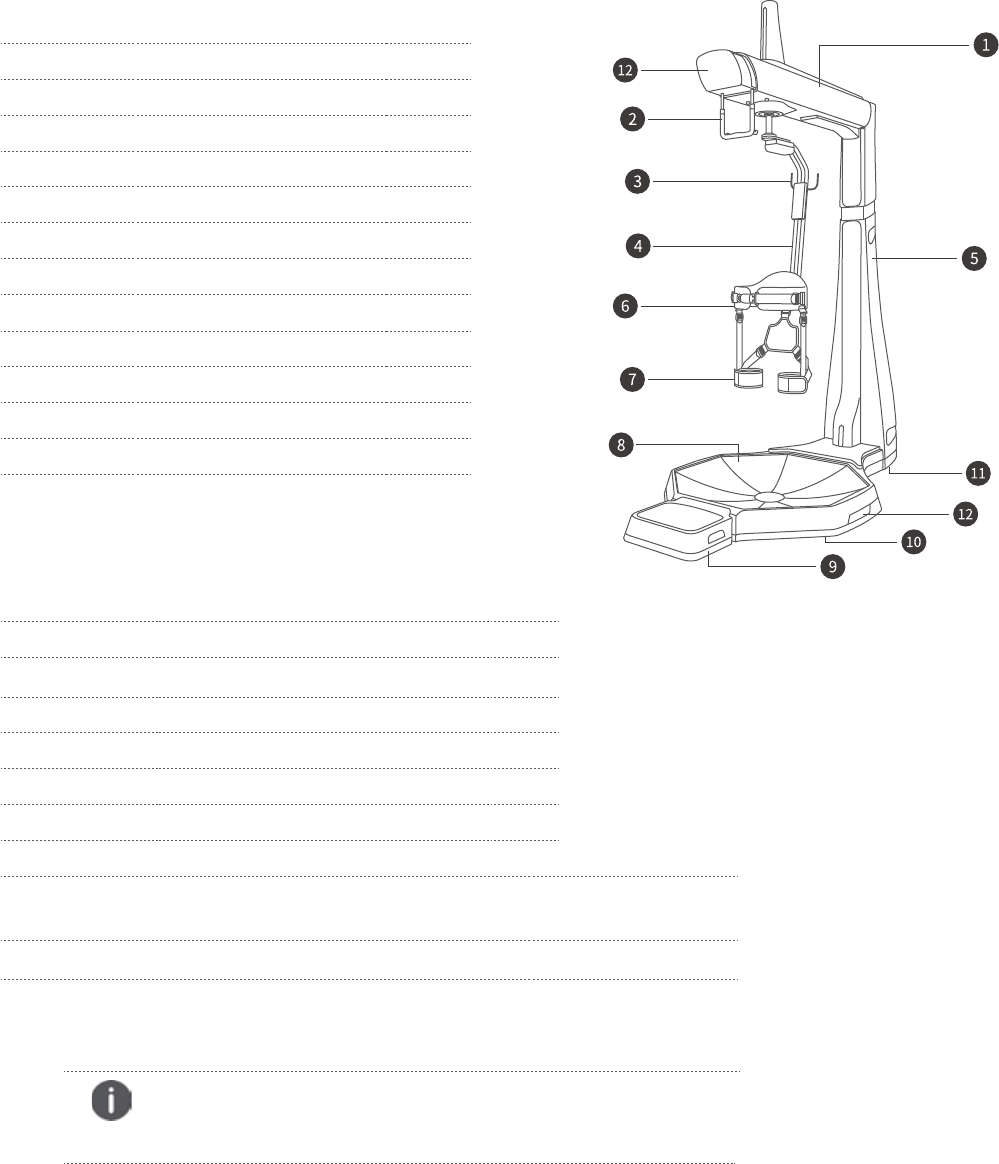
1 Girder
2 Hand rail
3 Equipment Storage Hook
4 Connecting rod
5 Support pillar
6 Girdle set
7 Leg set
8 Base plate
9 Pedal
10 Base plate holder
11 Pulley
12 LOGO light source kit
Total Weight 225kg
Height 2.8m
Area 2.16m²
Applicable Height 150cm—190cm
Applicable weight ≤100kg
Data Interface USB2.0 / USB3.0
Refresh rate 1000Hz
Product frequency range and output power: 2402-2480MHz, 0dbm-4dbm
from to that is suitable for waistline
60cm (1.96ft) 120cm (3.9ft)
Comfortable and adjustable
Attention
Cardiac patients are prohibited from using this product!
10 Product Introduction
KAT STATION
Product Introduction
KAT STATION Control Center, with a high-definition and touch LCD screen as the display and operation platform,
integrates the high performance computer, the game software platform and the business operation and management
system, providing assistance for businesses in solving purchase, maintenance and management with its one-stop service.
Product Appearance
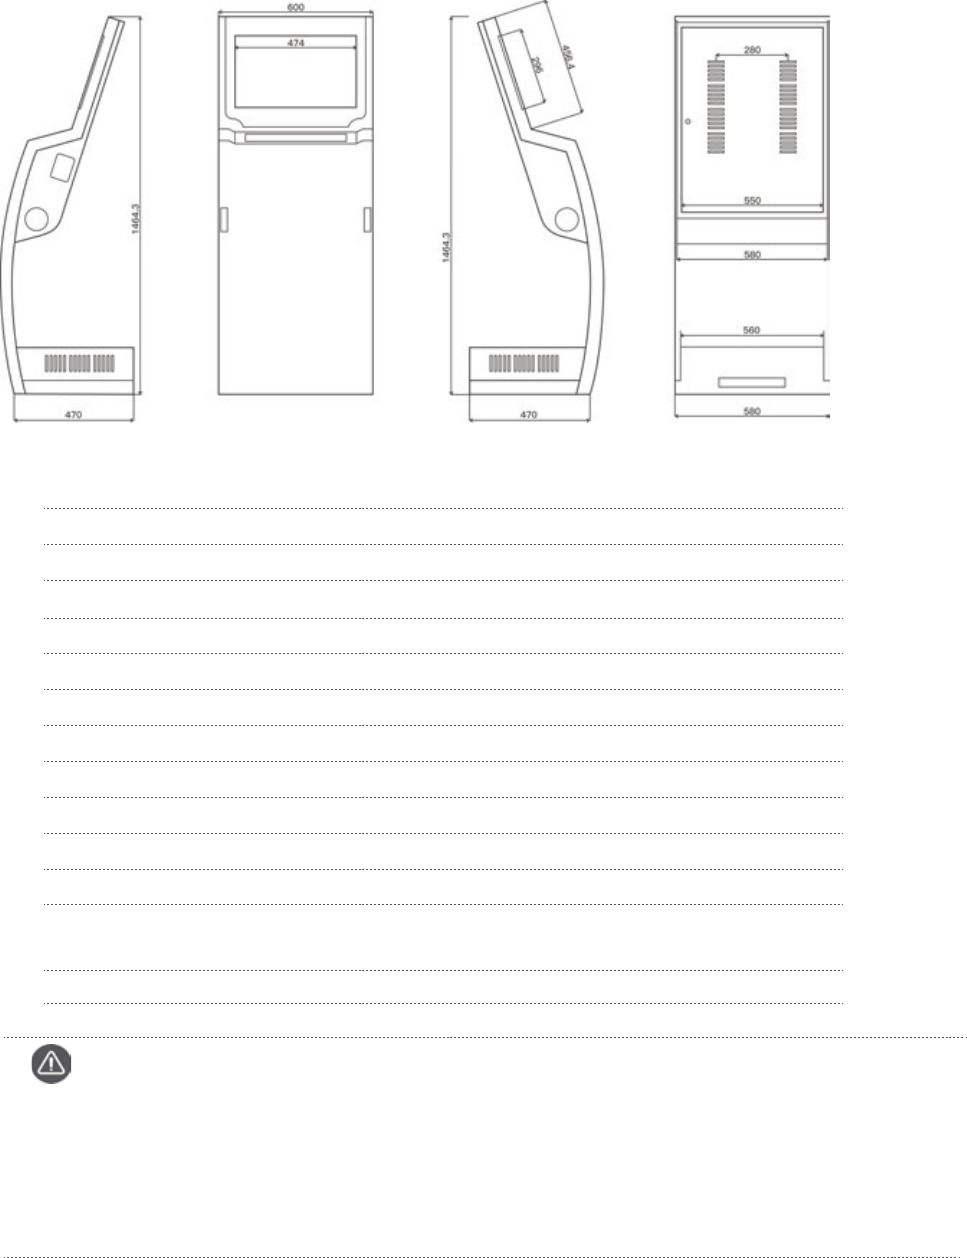
Parameters
Total weight of the kit 50kg
Design size 1465mm×600mm×470mm
Size of Display Screen 22-inch high-definition wide screen
Maximum Resolution 1920*1080
Supporting Winodws 10
Power Voltage AC220V±10% 50HZ±1HZ
Power <200W Instantaneous current upon Switch on 3A
Audio Two channel audio with stereo surround amplifier system
Audio Power 2 x 2W
Audio Frequency Response 20Hz~20KHz
Fan Industrial axial flow fan, noiseless, circulating heat dissipation
Working Environment Temperature: +0℃~+40℃
Humidity: 40%~80% (relative, non-reduced pressure)
Network Interface RJ45
Attention
In case the screen of STATION is accidentally turned off during the use of the product,the screen switch is
hidden in the switch plate cover on the side of the STATION and only the special key from the control center
can open the cover.
Another accessory key is used for opening the main device and the back cover of the STATION.
Please properly keep the two keys and do not randomly open the main device and the back cover of the
STATION.
11 Product Introduction
Product Appearance
KAT SHOES
Product Introduction
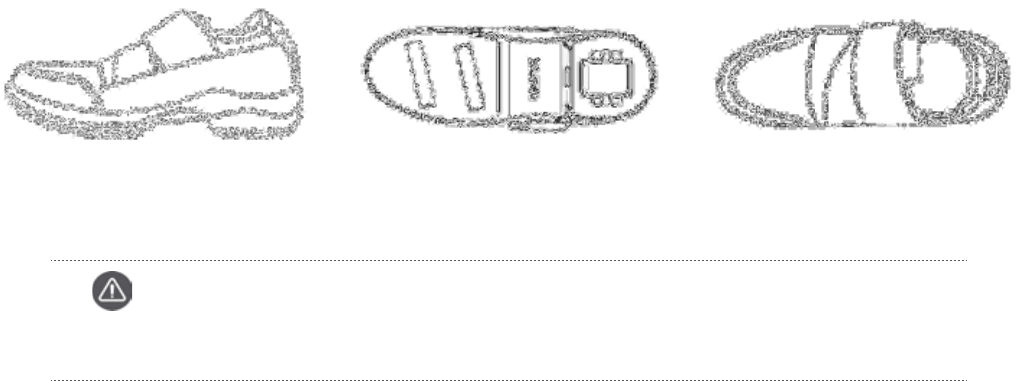
(Side View) (Bottom View) (Top View)
Attention
KAT SHOES are tailored for KAT WALK with a special sole design.
Please do not wear the shoes to walk outside KAT WALK base plate for your own safety.
KAT SHOES are specially designed for KAT WALK base plate. A fixed friction coefficient is a must for the best game
experience where users feel like walking naturally, while KAT WALK provides a good guarantee for it. It makes use of the
constant rolling friction to form the footstep curve and displacement produced during walking, and together with the
base plate, it ensures the motion trail of legs and feet during natural walking. Thus, KAT SHOES serve as a key balance
point for the best experience.
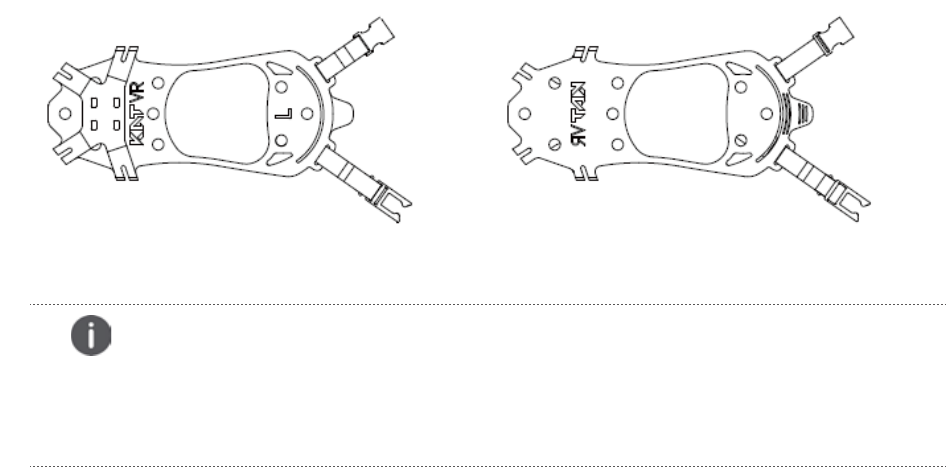
Product Introduction
12 Product Introduction
Product Appearance
KAT SHOE COVER
(Bottom View) (Top View)
Caution
KAT SHOE COVER is dedicated for KAT WALK with a special design. For your own safety,
please do not walk in other places than on the KAT WALK base plate in the Cover. Important
Indications:Those with * are optional accessories, which need to be purchased separately.
KAT SHOE COVER is the dedicated cover designed for the KAT WALK base plate. For the best game experience with the
feeling of a natural walk, it is necessary to have a fixed ideal friction coefficient, while KAT WALK produces the foot
curves and the displacement in human’s walking through a constant rolling friction, and with the support of the base
plate, creates the moving track of legs and feet. As a result, KAT SHOE COVER becomes the key balance point for the best
experience. The KAT SHOE COVER doesn’t require you to change your shoes, you can simply wear it on top of your
shoes. Reducing the time required to get on the treadmill.
13 Product Introduction
Product Appearance
VR Head-Mounted Display
Product Introduction
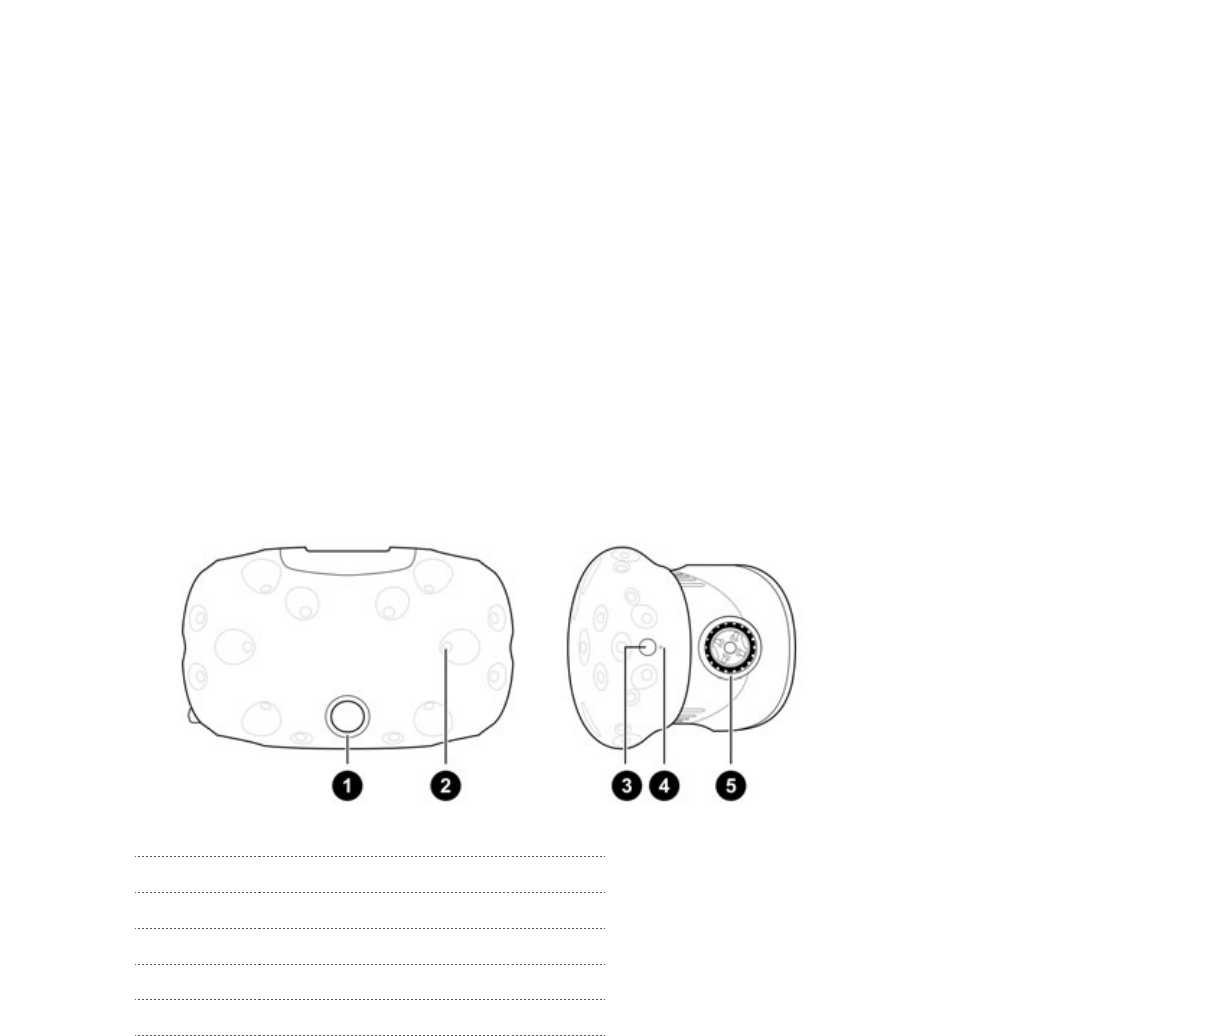
1 Camera Lens
2 Tracking Sensor
3 Head-Mounted Device Button
4 Status Indicator
5 Lens Distance Knob
Currently the whole set of KAT WALK is equipped with HTC Vive BE commercial head-mounted display, which includes
a head-mounted display, two single hand held controllers and one locating system (Lighthouse) that can
simultaneously track display and controller in the space. The controller locating system (Lighthouse) confirms the
location of moving objects through laser and photosensitive sensor without having to depend on cameras. In other
words, HTC Vive allows users to walk within a certain range and is able to simultaneously scan and locate multiple
head-mounted displays and handles in its capture range, which is the biggest difference between it and the other two
head-mounted displays - Oculus Rift and PS VR. KAT WALK also supports such mainstream VR head-mounted displays
as Oculus Rift.
14 Product Introduction
Product Appearance
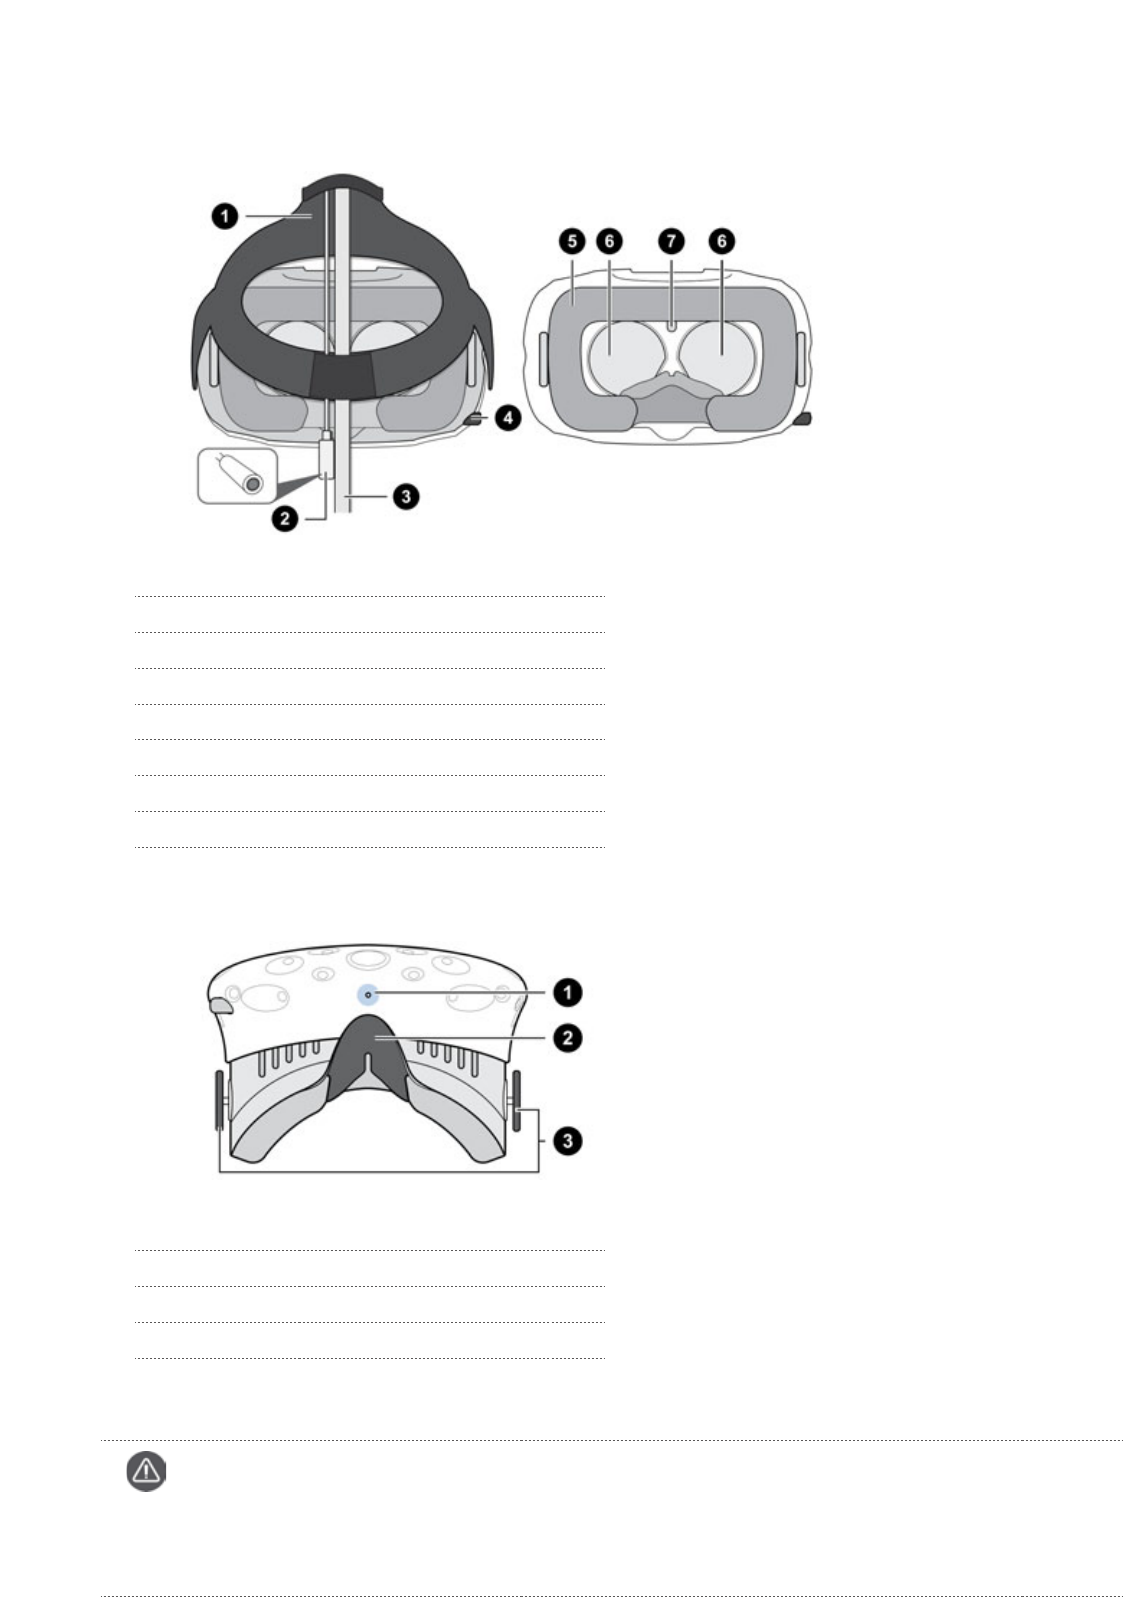
1 Slide Belt
2 Audio Cable
3 Three-in-one Connecting Cable
4 IPD (Interpupillary Distance) Knob
5 Face Pad
6 Lens
7 Distance Sensor
1 Microphone
2 Nose Pad
3 Lens Distance Knob
Attention
1.As the head-mounted display sensor is highly sensitive, please do not cover or scratch the sensor lens.
2.Please make sure the protecting film on the lens has been torn off before putting on the head-mounted device.
3.As the VIVE operating handle sensor is highly sensitive, please do not cover or scratch the sensor lens.
15 Starting Installation
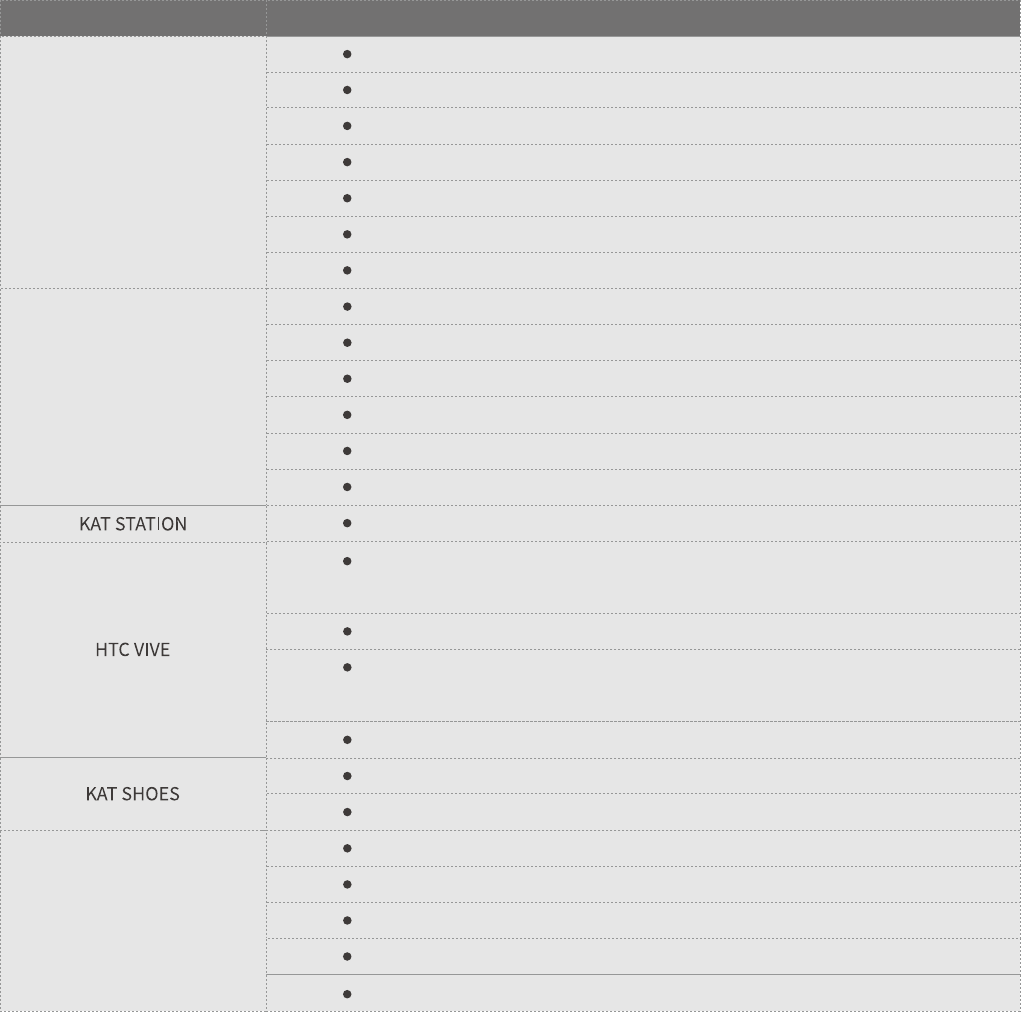
List of items
Connecting rod, girdle set and leg set
KAT SHOES*8( 34,35,36,37,38,39,40,41,42,43,44,45 )
Lighthouse Base stations (power adapter, mounting kit and sync data cable)
KAT WALK maintenance oil
Inner hexagon spanner, hook spanner 68-72 and open spanner 22-24
Slider*8
KAT WALK
KAT WALK Shell
Dismantling and
Installation Tools
Base plate component
Support pillar component
Girder component
A few connecting cables and one grounding cable
KAT SENSORS
Equipment Storage hook
Base plate shell
Support pillar shell
Girder shell
Girder casing cover
Shell fixing sheet metal parts
Pedals
KAT STATION control center
Link box (power adapter, HDMI cable, USB cable, Mounting pad)
HTC VIVE head-mounted display (three-in-one connecting cable,
audio cable, earphones, face pad*2 and cleaning cloth)
Controllers*2
(power adapter, lanyard*2 and Micro-USB data cable*2)
KAT SHOES’wheel replacement tools, bolt box, sensor storage box and gloves
束线管、束线夹
配套贴纸
Cable bunch tube and cable bunch clip
Ancillary paster
Main Device Components
Attention
Please prepare at least one three-hole socket and four two-hole sockets as there are quite a few cable
connections. Note that there must be sufficient distance between sockets as the adapter is quite big.
Preparation of Tools
Open the complimentary KAT WALK special tool box, which contains:
one bottle of KAT WALK PREMIUM maintenance oil
a set of inner hexagon spanners
one hook spanner 68-72
one open spanner 22-24
one KAT SHOES’wheel replacement tool
one screw box
16 Starting Installation
Installation Instructions
As the set of equipment needs to be supported by KAT STATION and HTC Lighthouse locating system, it is advised that
the place for installation shall be at least five meters wide with a floor height of at least three meters.
Please make sure to read in details the information provided in this manual prior to the installation of KAT WALK.
As the product itself is very heavy, please arrange at least three male adults to do the installation.
Keep the power off during installation and avoid potential safety hazards.
Please place a sponge pad of over 20cm thick (provided in the packing box) on the ground when installing the
support pillar to protect the shell from being damaged.
To avoid the influence of electric current, please do not open the girder shell when the product is working.
Even when there is no electricity, please do not open it by yourself as doing it without authorization will result in the
warranty invalidated.
Please do not put KAT WALK PREMIUM in a place where it is dusty, damp, shaky or with drastic temperature changes.
17 Starting Installation
KAT WALK PREMIUM Installation
KAT WALK DELUXE is quite heavy with a use height of 2.8 meters, and thus the indoor installation floor height should be at
least three meters. Please strictly follow the steps to do the installation, and the steps are as follows:
Note
All the bolt serial numbers in the picture are consistent with those in the bolt box.
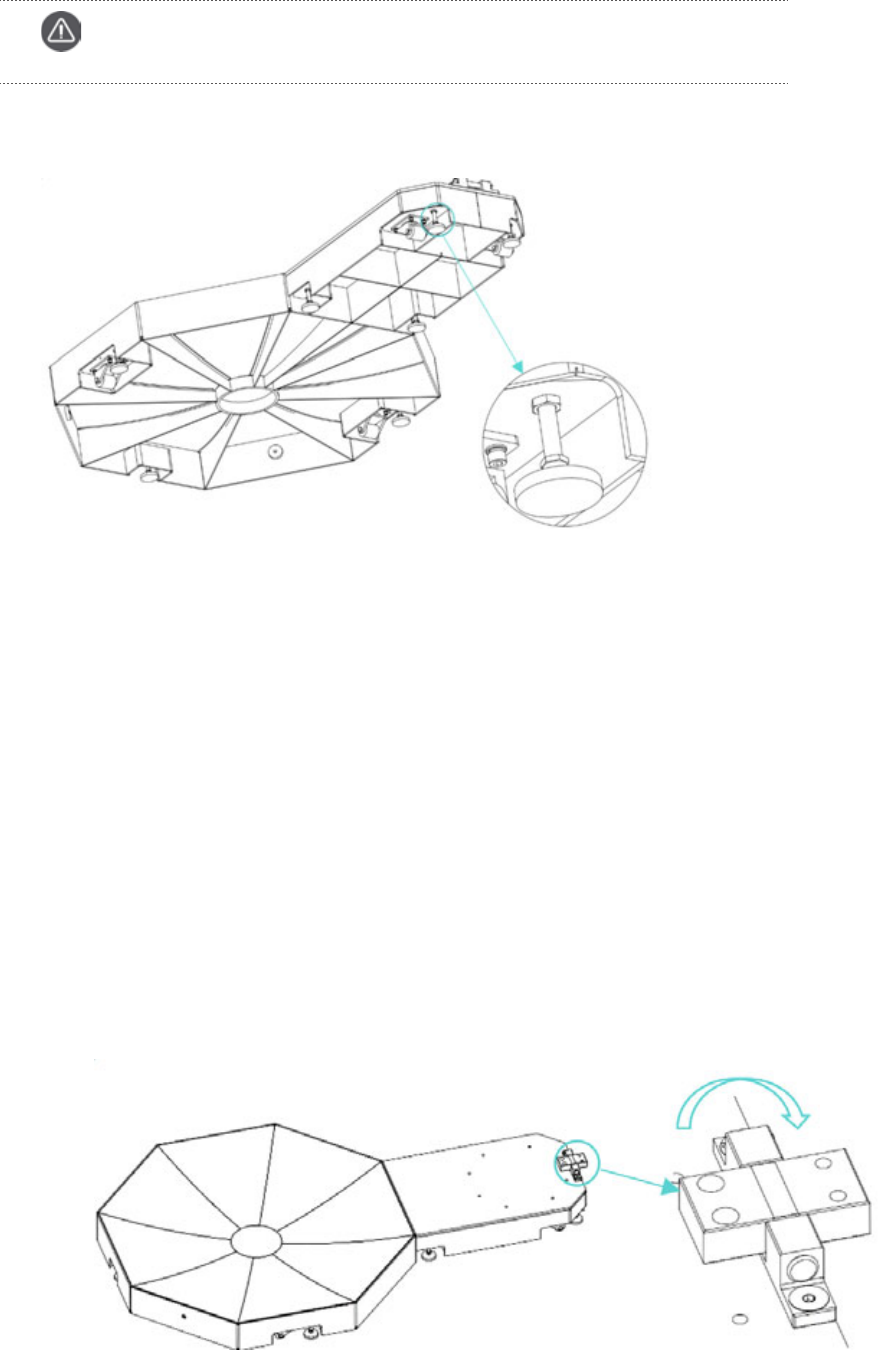
1.Place the base plate on an open floo, and use a spanner to fix the base plate holder to prevent it from sliding.
Procedures of Using Base Plate Holder
There are two nuts on the upper and lower part of the base plate holder. The lower nut helps the holder to stretch out
and draw back while the upper one helps to fix it. Please make sure the two nuts are fastened when fixing KAT WALK
.
1)Rotate the upper nut on the base plate holder in clockwise direction to move it down.
2)
Rotate the lower nut on the base plate holder in counter clockwise direction to move it up. Now the holder is drawing
back and you may move KAT WALK .
When it is necessary to fix KAT WALK.
1)Rotate the lower nut on the base plate holder in clockwise direction to move it down.
2)Rotate the upper nut on the base plate holder in counter counterclockwise direction to move it up. Now the holder is
stretching up and you may fix KAT WALK.
2.First turn the metal hinges of the product base plate so that they face outward.
18 Starting Installation
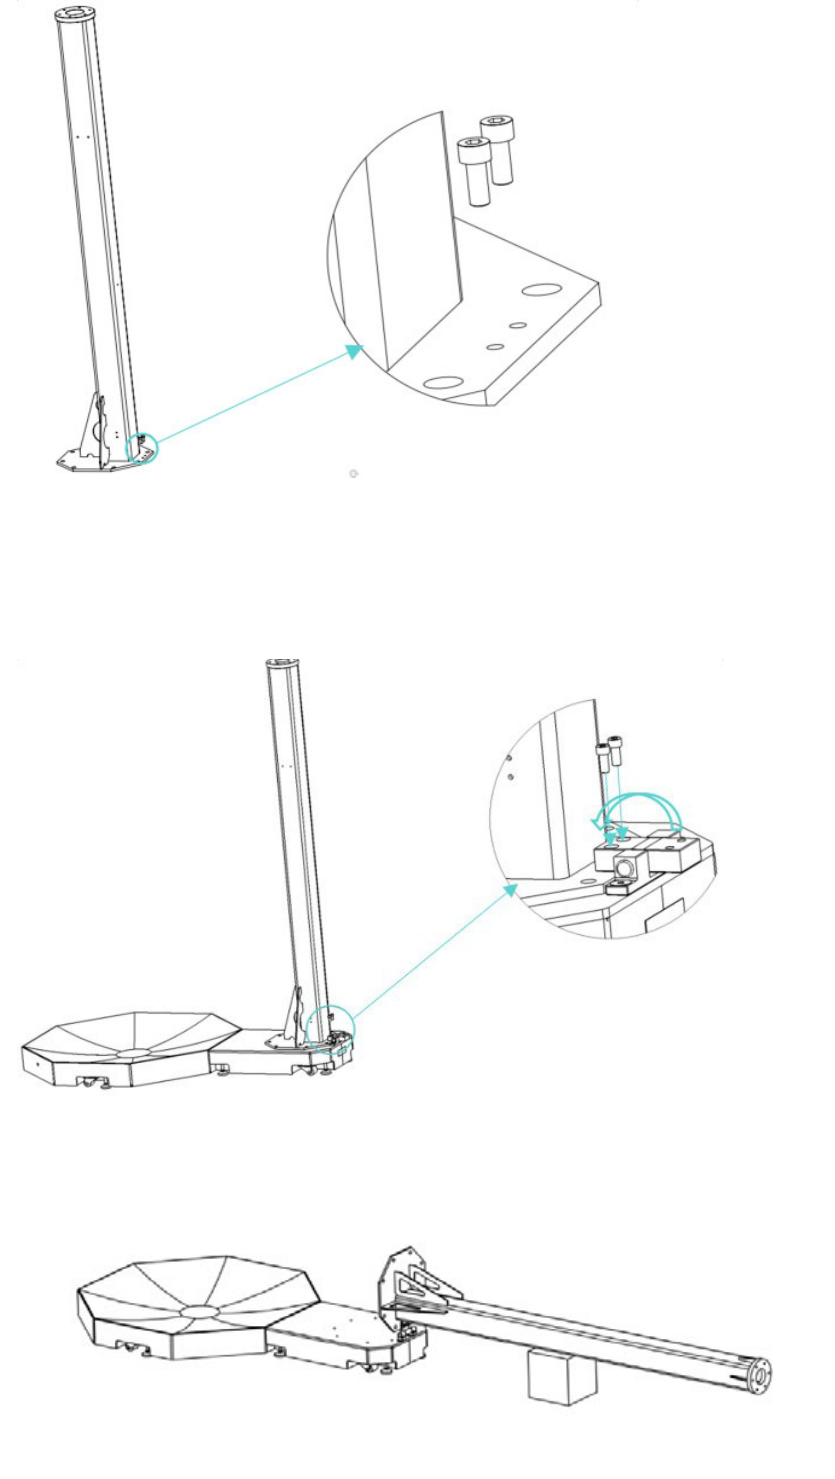
3.Remove the two bolts on the support pillar.
4.
At least two persons lift the support pillar and put it on the product base plate. Turn the hinges to buckle the external
metal part of the pillar, and make the two holes in the hinges aligned with the holes of the two bolts removed as is
stated in the last step. Tighten the bolts removed from the pillar.
5.Place a foam pad of at least 20cm thick under the support pillar. Slowly put the pillar down and make sure it is
placed on the pad.
The direction of the flange on
the end of the telescopic stick
19 Starting Installation
6.
Insert the girder into the support pillar, make the flanges fit with each other,tighten the screws and shims at the
connection of flanges.
7.
One person holds the support pillar while other two rotate the girder, making it rotate from a lying position to a
90-degree angle. Then place the bolts at the connection between the girder and the support pillar in the washer, and
tighten them to finish the fixing.
8.
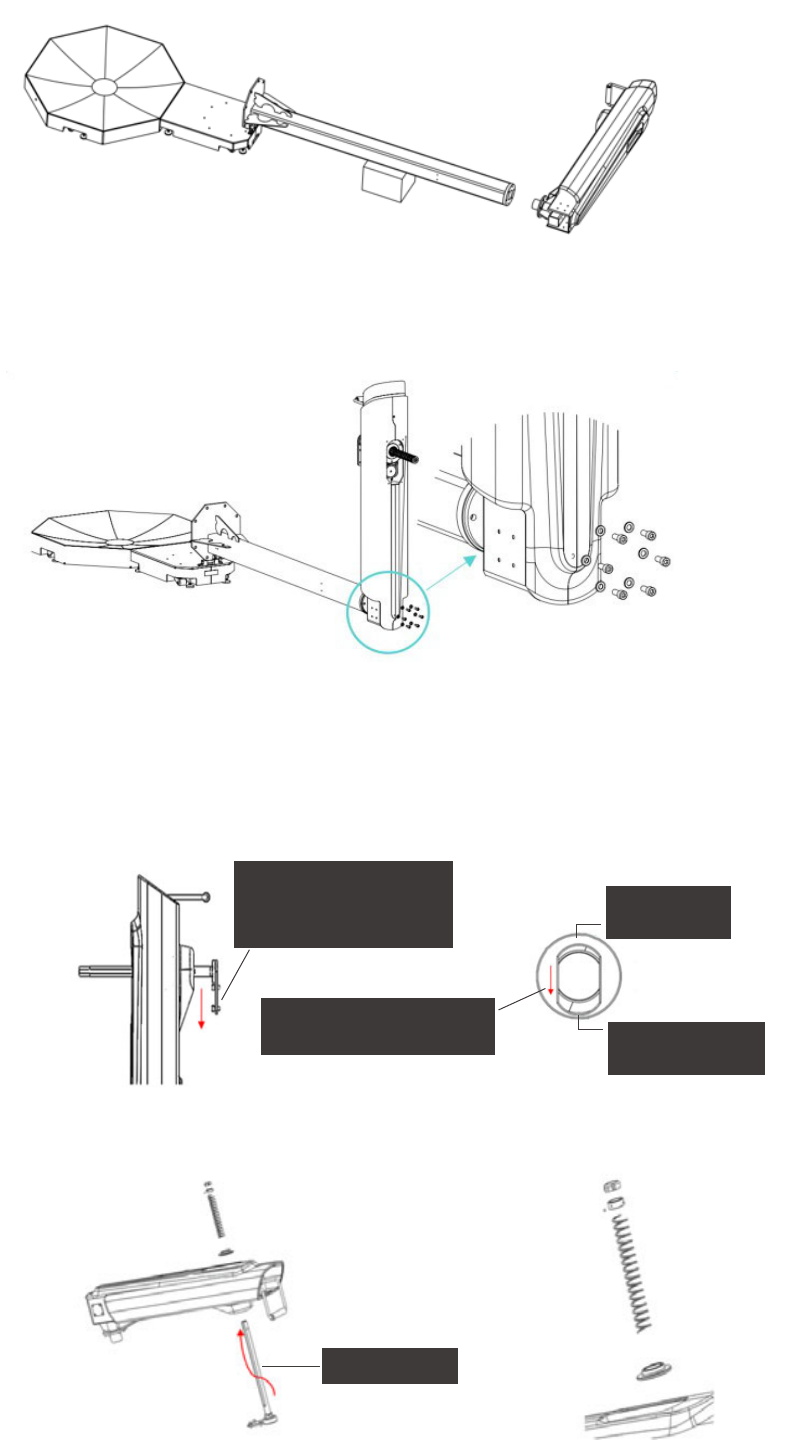
Insert the telescopic stick into the round hole at the front of the equipment, and slot the spring ?pallet and the spring
into the stick; then screw the safety nut onto thestick and the M5 set screws (two) to the side of ?the stick; screw the
round nut into the stick, and use the hook spanner to tighten it; finally slot the nylon nut into the upper end of the stick
and tighten it .
伸缩杆端部的法兰盘
必须处于此方向
telescopic stick
Always keep the flange on
the end of the stick facing
this direction
The direction of the flange on
the end of the telescopic stick
The thick side
of the flange
The thin side of
the flange
20 Starting Installation
9.
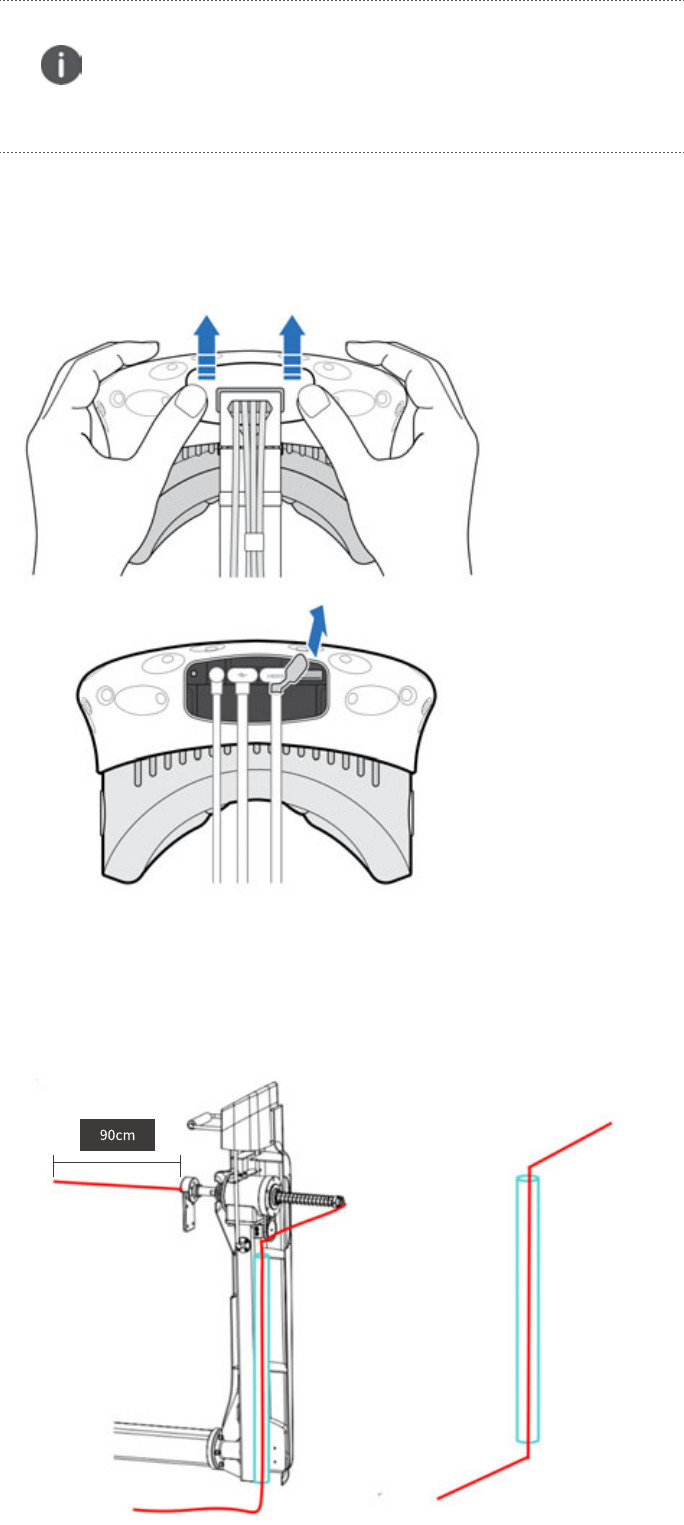
Unpack the HTC VIVE and separately take off the three-in-one data connecting cable for the head-mounted display;
push out the hatch cover of the display in a parallel way, unplug the three-in-one data connecting cable (HDMI, USB and
DC cable) for the display and properly keep the earphone cable.
10.
Put the HTC Vive three-in-one data connecting cable (the red line in the following picture) from the lower end of the
telescopic stick through the stick until it reaches out of the upper end. Put the sticking cable through the white line
channel of the girder (the blue area in the following picture) until it reaches out of the back end of the girder fixed with
the clamps on the end of the girder.
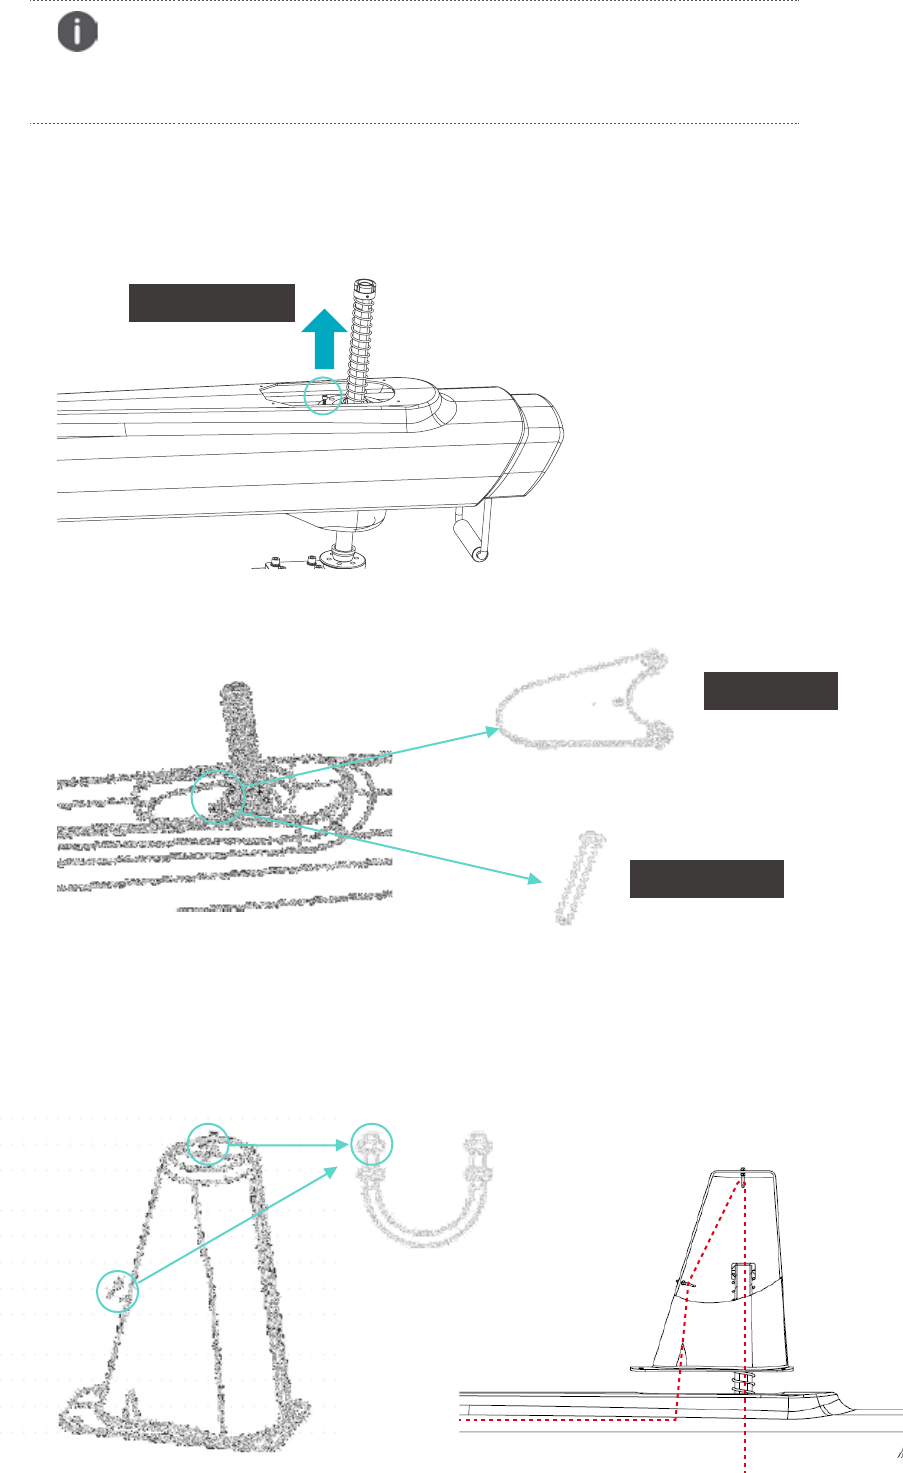
Attention
The spring pallet must be installed upwards in a convex shape!
The fastening screw is in the side hole of the upper spring lid and make sure it is fastened tightly,
or there will be a risk of toppling!
21 Starting Installation
11
.Use the inner hexagon spanner to remove the M6×16 screw located in the area as shown in the picture; take out the
support plate and one M6×45 screw. Fix the board onto the mechanical structure as shown in the picture.
12.Unscrew the U-shape bolts (two) on the top protection cover, put the three-in-one cable into the slot of the U-shape
bolts, and re-fasten the bolts onto the cover.
Attention
A 90cm-long HTC VIVE three-in-one data connecting cable needs to be reserved
at the lower end of the telescopic stick (see the mark in the picture)
support plate
Take out the screw
Screw - M6×45
22 Starting Installation
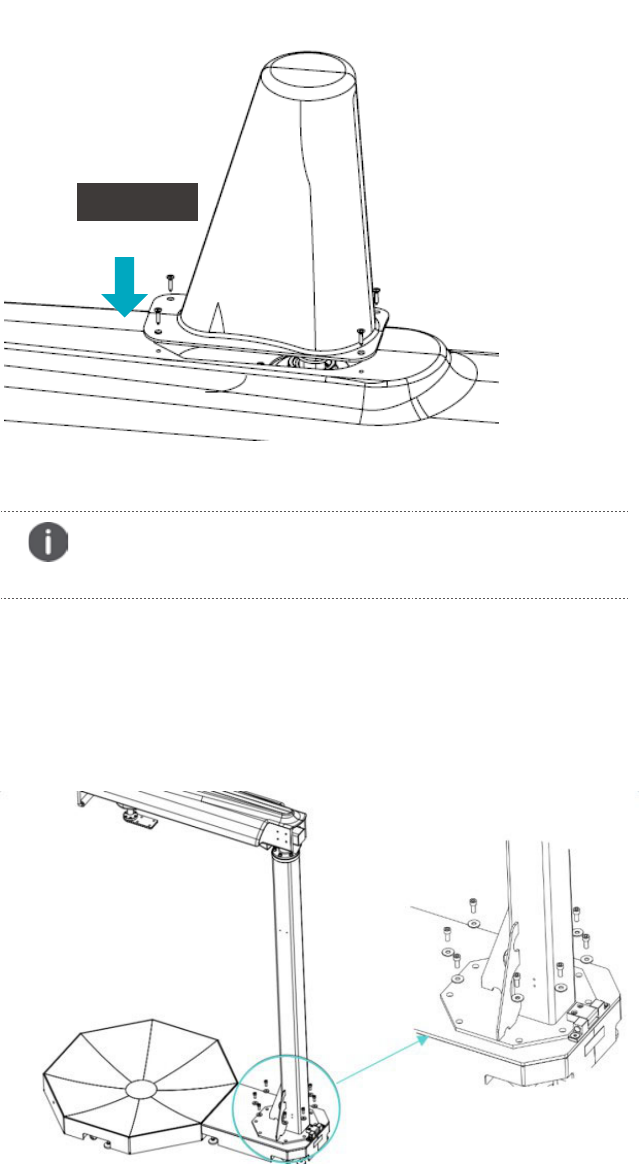
13.Use screws to fix the top protection cover onto the girder shell as shown in the picture.
14.The installation staff put the support pillar upright and at least one male adult should hold the pillar to prevent it
from suddenly toppling, while the others install the fixing bolts at the bottom
Attention
Please note the direction of the protection cover when fixing it.
Fix the screw
23 Starting Installation
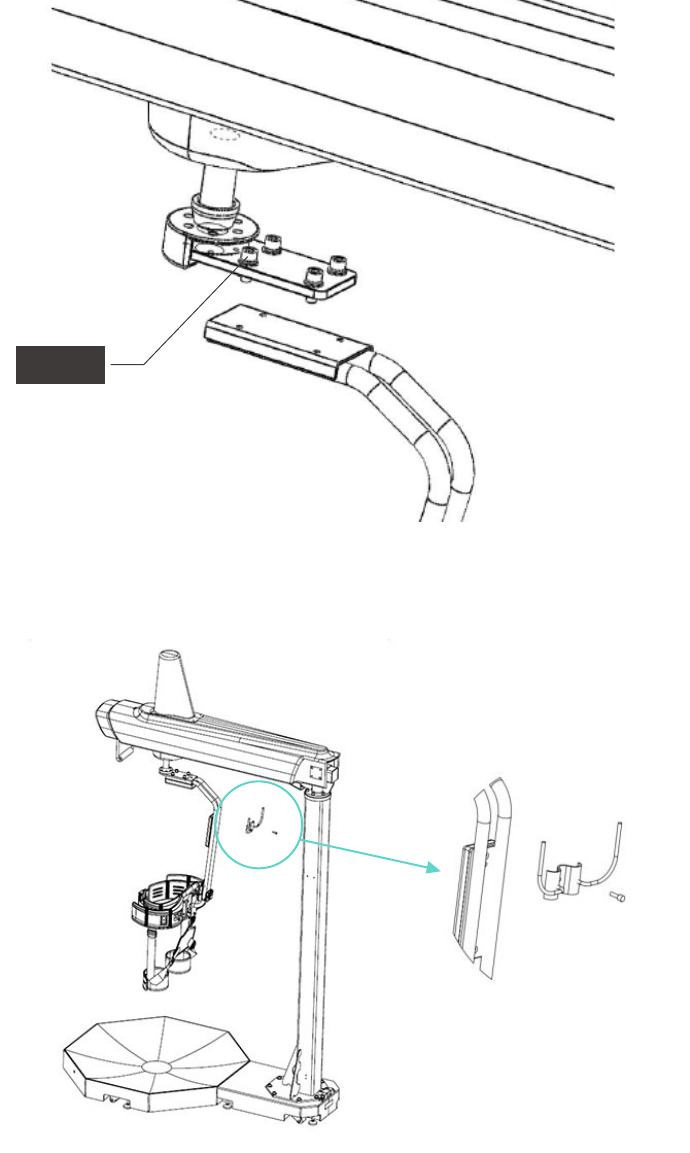
15.Installation of the connecting rod. One person stands below the telescopic stick and pulls it to the lowest point,
one aligns the holes in the connecting rod with those in the connecting panel of the stick, and another one installs
the bolts and fixes the rod.
16.
Install the equipment storage hook (the head-mounted display bracket) to fix the head-mounted display. The
bolts
have already been fixed on the back of the cushion of the connecting rod head; after unscrewing the bolts,
install the hook at the cushion part of the connecting rod head.
Screw-D
24 Starting Installation
17.
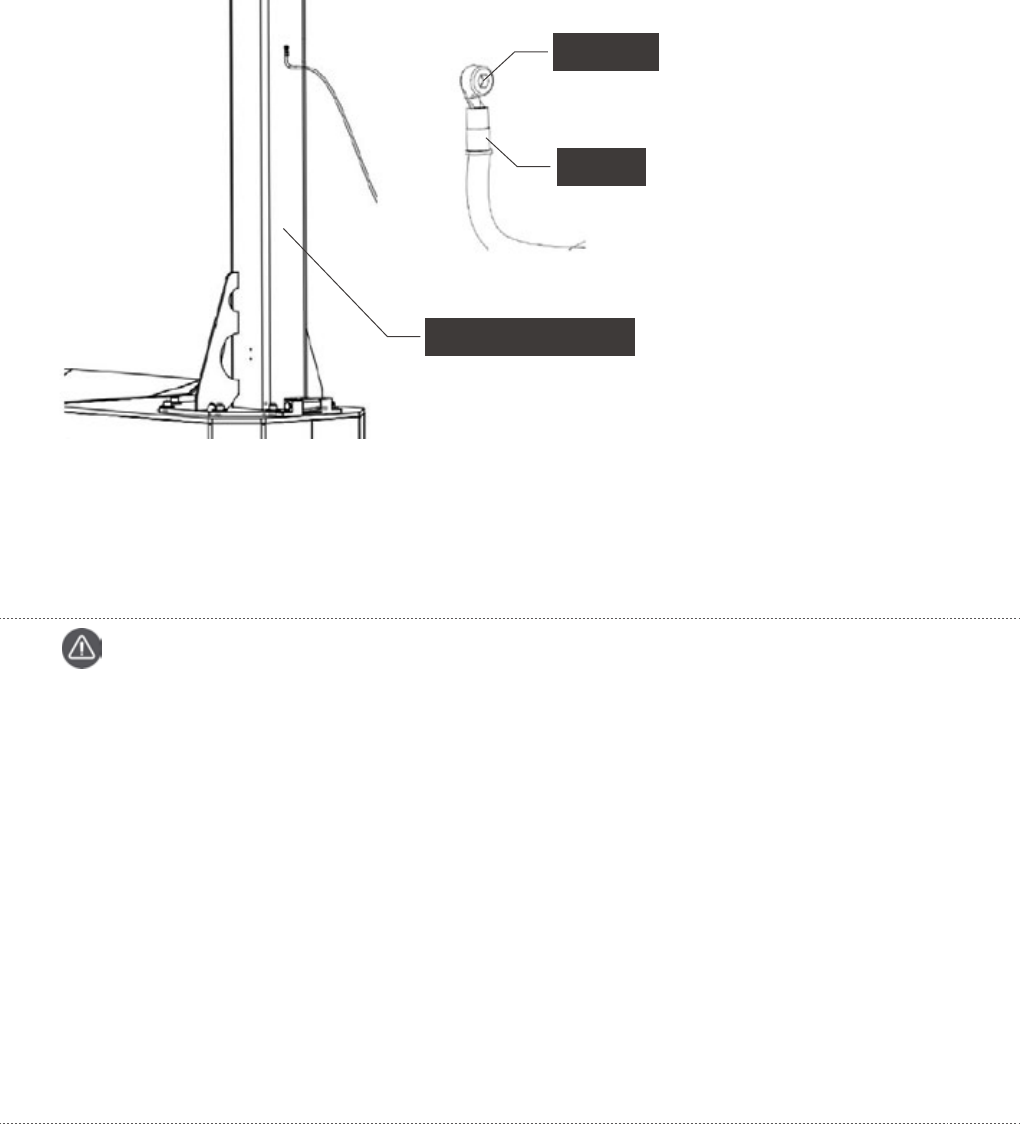
Insert the grounding cable on the back of the support pillar one M4 bolt and one M4 inner hexagon spanner.Fix the
cable onto the pillar as shown in the picture
and make sure the bolt is tightened.
18.
Loosen the base plate holder and adjust the bottom of the holder to make it higher than the wheels; move KAT WALK
to an appropriate location; re-fix the base plate holder to prevent KAT WALK from sliding, and the installation is
finished.
Back of the support pillar
Screw ‒ M4
Terminal
Attention
1.
The proper and stable installation of the support pillar structure serves as guarantee for users’good experience.
Therefore, please make sure the pillar structure is properly installed and that the installation is steady.
2.Avoid placing any objects on the base plate during the installation. Do not randomly step on the plate in
case of any damage to it, which spoils user’s good experience.
3.After the installation, check if all the bolts and nuts are fastened.
4.Please switch off all the power supply when installing circuits. Make sure all the circuits are power off to
avoid any potential danger.
5.As the three-in-one cable of the head-mounted display has limited length, please pay attention to the
length of the remaining circuit when doing circuit connection on the girder.
6.Please differentiate the connection conditions of different connections since there are comparatively
quite a lot of them.
7.If the bolt holes are not completely concentric when installing bolts, you may slightly rotate the parts to
make them concentric.
Installation of KAT WALK PREMIUM Shell
We have equipped the product with KAT WALK PREMIUM shell for the purposes of aesthetics and protecting the mechanical
engineering. The shell is made of ABS materials, and if you find any damage to the shell upon receiving it, please timely
contact KAT service center.
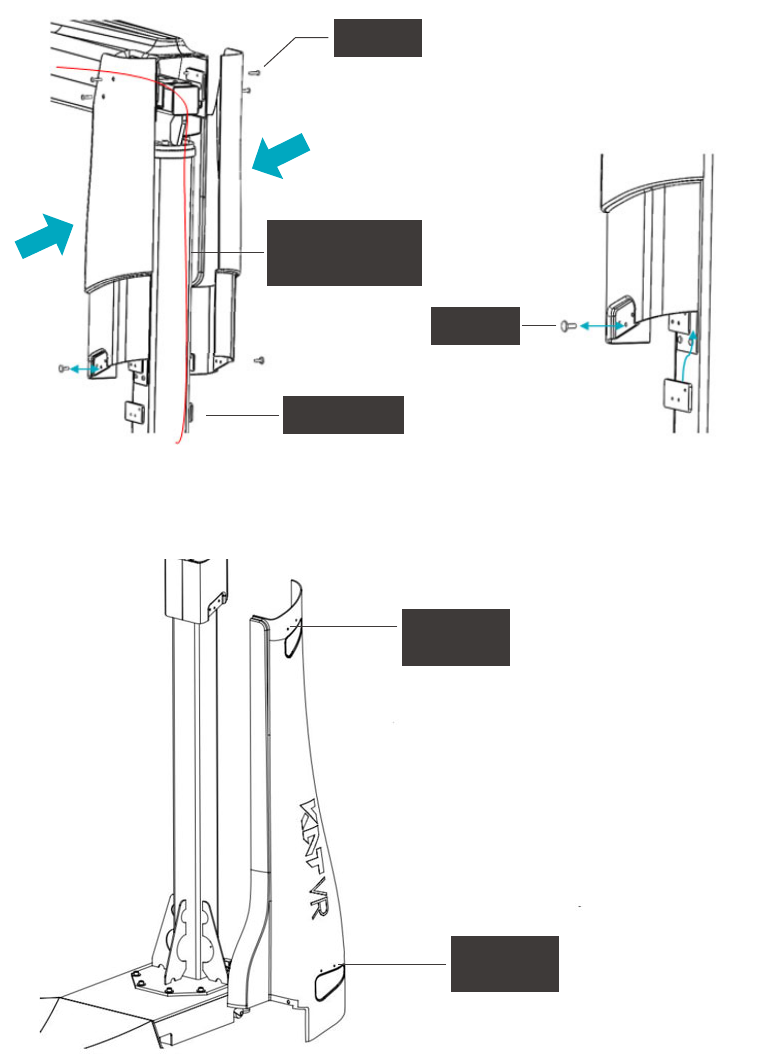
Installation of Support Pillar Shell
The support pillar shell is made up of the right section and the left one connecting with each other. It is divided into four
pieces that are located on the upper, lower, right and left side, which are fixed with screws.
1.
First install the upper part of the shell and tighten it with screws. Two screws along the diagonal line have been
installed on the girder, the remaining two screws along the other diagonal line needs to be installed at the connection
part between the support pillar shell and the girder, while only one screw needs to be installed at the connection
part between the shell and the sheet metal parts. The fixing flange plate is to be placed between the shell and the
sheet metal parts.
2.After finishing the installation of the upper part, start to install the lower part of the shell. Please note that now only
half piece of the shell is to be installed first and only the connection between the shell parts needs to be installed with
screws; there is no need to install screws at the screw holes on the lower end of the shell sides
Screw-E2
Screw-E1
Fix the flange
Place the wire
inside the housing
No need to
fix screw
No need to
fix screw
25 Starting Installation
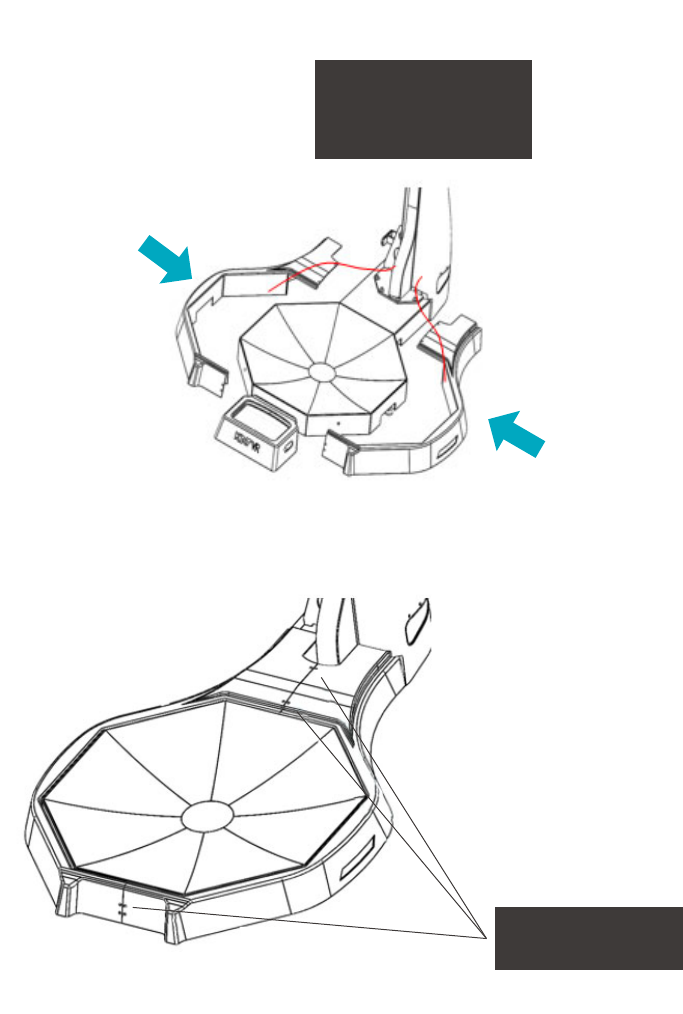
When installing the base
plate shell, put the shell
LED wires through the
reserved cable holes
3.Now start to install the base plate shell, and first please put the shell LED wires through the reserved cable hole at
the lower half part of the support pillar
4.Use the screw F to tighten the base plate shell and cover the base plate with the shell.
26 Starting Installation
tighten the base plate
shell with screw-F
5.
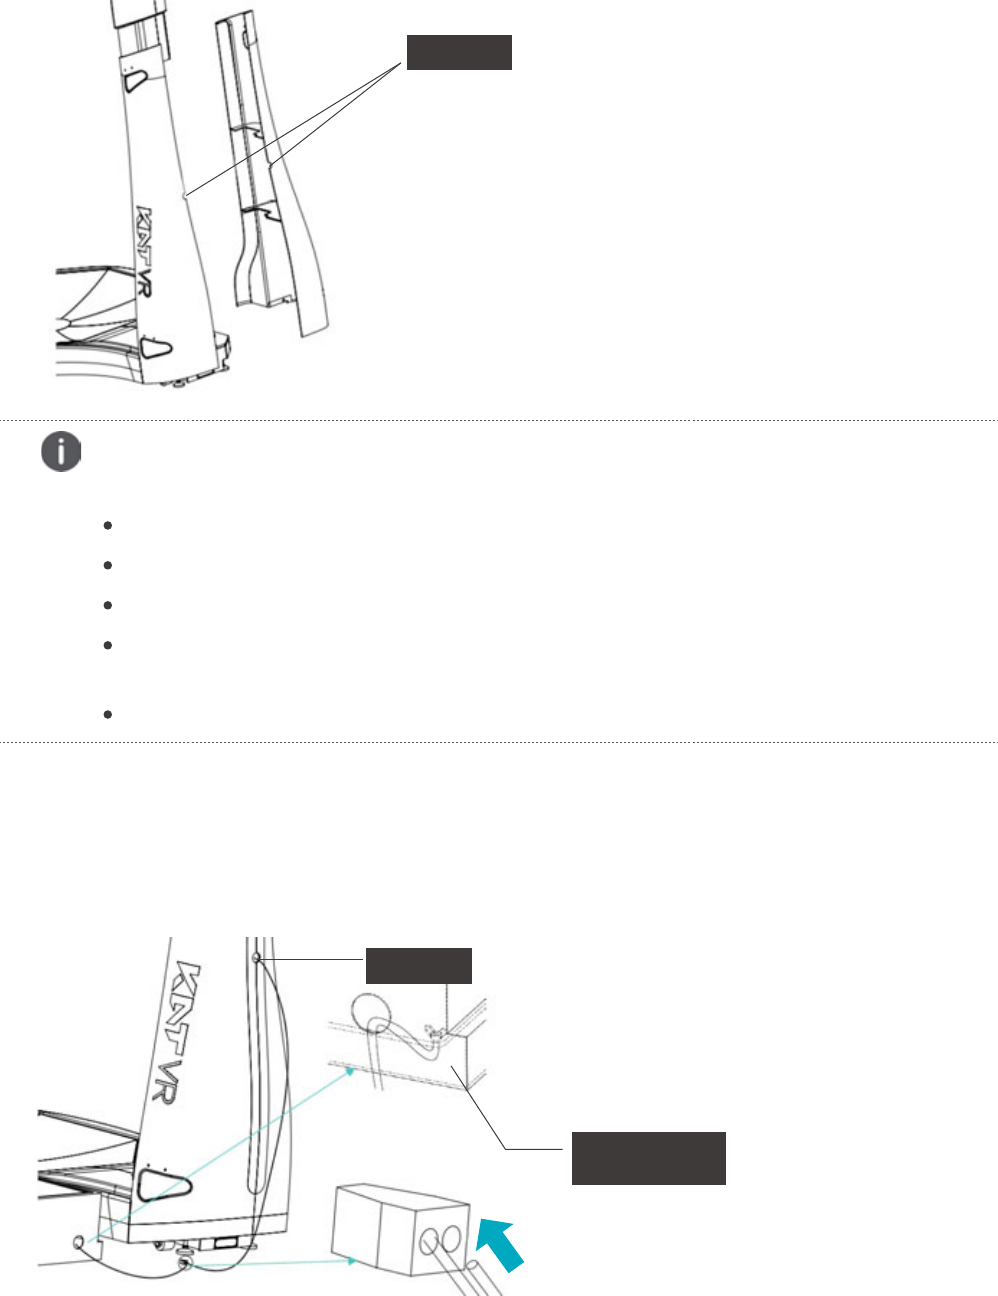
After the base plate shell is installed, the remaining half-side support pillar shell needs to be installed back to the pillar.
Please note that during the installation, the HTC VIVE three-in-one connecting cable and the grounding cable need
to be put through the cable hole.
The two LED wires on the bottom, the one LED wire on the top and the top sensor wire need to reach out of the shell
at the lower end of the support pillar. The three LED wires are to be connected with the power supply of the logo
light controller.
cable hole
Examination after installation of the mechanical structure
Please note the following after the installation:
Check each screw hole and make sure all the screws or bolts are tightened;
Check if there is enough space for heat dissipation surrounding the device and if the air flow is normal;
Check if the power socket supply complies with product specifications;
Check if each product is correctly connected and if those involved with power supply are correctly
connected to the ground;
Check if the connection between the KAT STATION control center and other network devices is normal.
Connection of Grounding Cable
Fasten the metal end onto the wing bolt in the KAT STATION cabinet as shown in the picture, and put the other end
through the cable hole of the cabinet. Insert the other end of the grounding cable on the support pillar into the quick
cable connection terminal as shown in the picture and make sure it will not loosen in a natural state.
27 Starting Installation
cable hole
the chassis of
the control center
Connection of Logo Light Source Cable
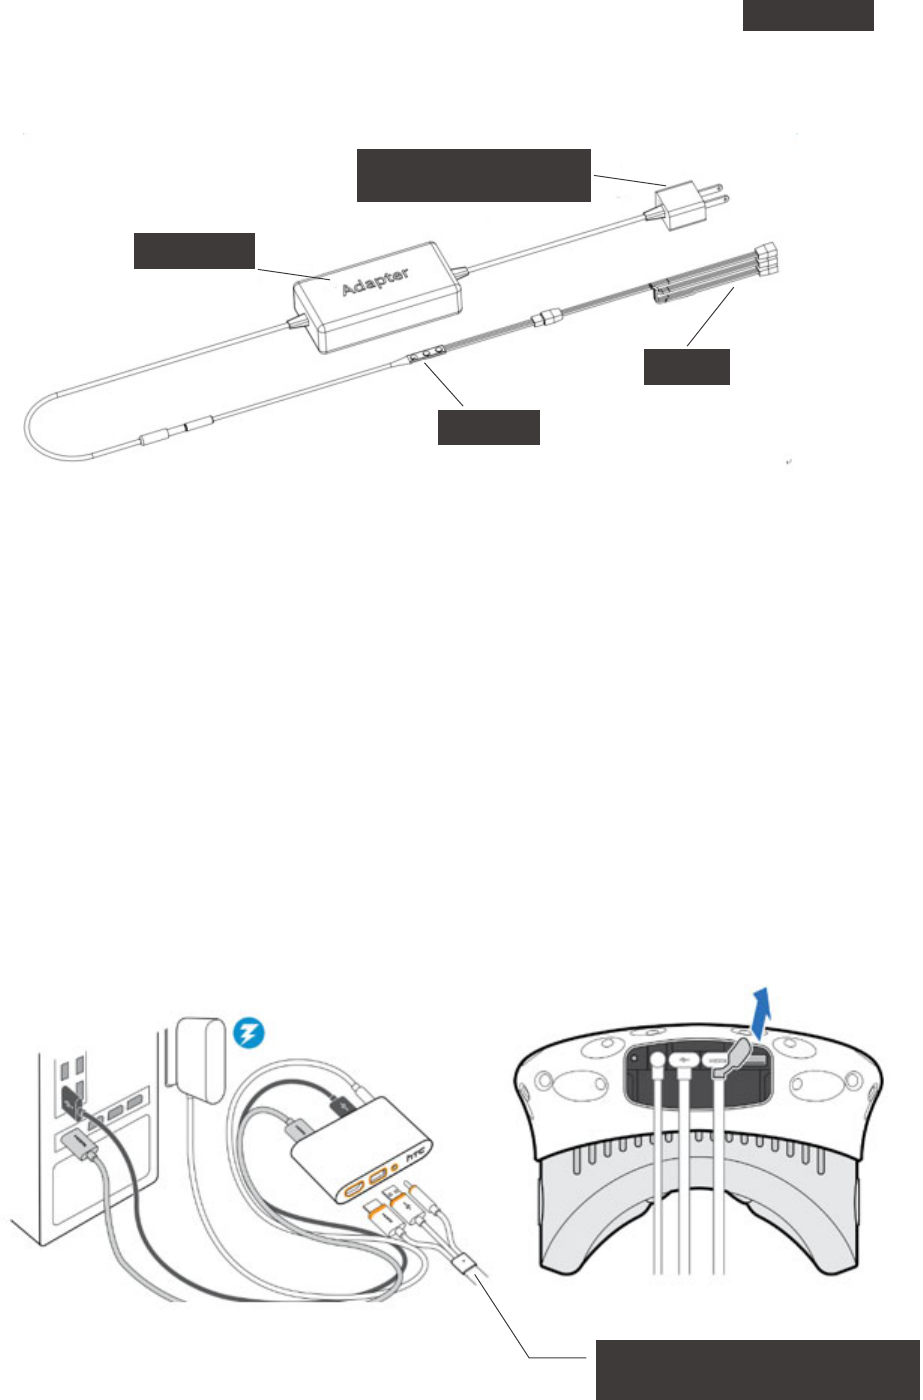
Connect the power adapter of the LED with the logo light controller, and connect the cable connection terminal on the
controller respectively with one logo light wire on the top and with two logo light wires on the bottom (sticking out of
the shell bottom). Insert the adapter plug into an external power strip.
28 Starting Installation
Insert the adapter plug into
an external power strip
Power adapter
Adapter
Controller
Connection of VR Head-Mounted Display and Base Station
Install the base stations in diagonals in the surrounding space of the KAT WALK. To obtain the best tracking, the distance
between two base stations cannot exceed five meters, and they should be more than two meters above the ground with
an inclination angle of 30°~45° around downwards. Please make sure no object blocks the board in the front.
You may refer to the user manual for head-mounted display for the detailed installation procedures.
With the completion of the cable arrangement for the three-in-one connecting cable of the head-mounted display, the
three cables sticking out of the girder head need to be inserted into their corresponding socket as per instructed in the
user manual for head-mounted display. The other end sticks out along the cable hole of the support pillar shell and
connects with the link box and with the KAT STATION and the power strip.
You may refer to the user manual for head-mounted display for the detailed cable connection requirements and attention
items.
Three-in-one connecting cable
on the HTC VIVE head-mounted display
telescopic stick