Hangzhou Virtual And Reality Technology BACK1 KATVR-Back Sensor User Manual 2 3
Hangzhou Virtual And Reality Technology Co., LTD. KATVR-Back Sensor Users Manual 2 3
Contents
- 1. Users Manual_1
- 2. Users Manual_2-1
- 3. Users Manual_2-2
- 4. Users Manual_2-3
Users Manual_2-3
Pairing Sensor
The KATVR-Central and the KATVR-Back Sensor can only be used after being paired, and the two KATVR-Foot Sensor can
only be used after being paired with the wireless receiver.
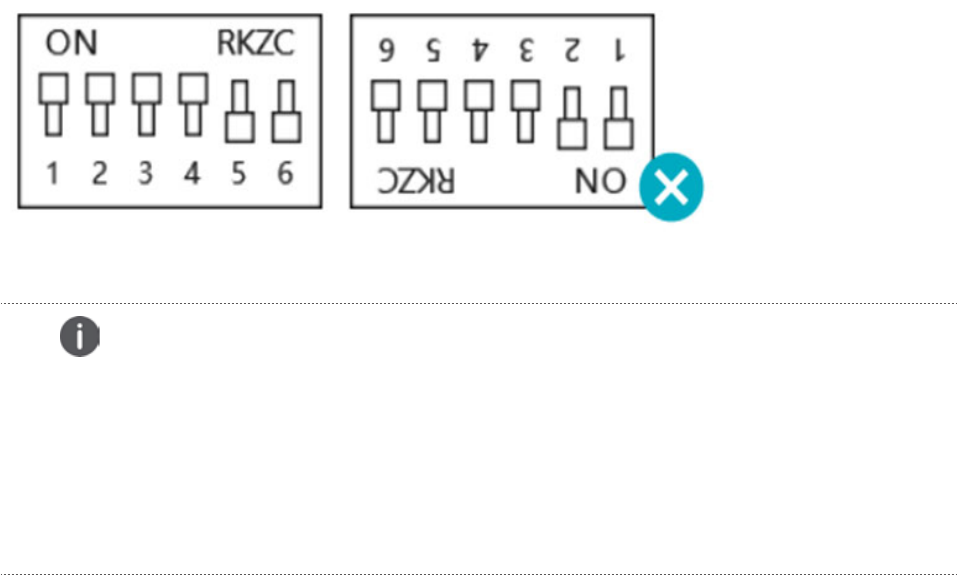
Pairing of KATVR-Central and KATVR-Back Sensor
The KATVR-Central and the KATVR-Back Sensor are paired when the six-digit dialers are dialed to the same position.
Similarly, dialing the dialers to different positions can prevent communication interference for the KATVR-Central and
the KATVR-Back Sensor between different equipment. Please note the positions of ON and the digits 1-6 as shown in t
he figure, which are wrong:
30 Starting Installation
Caution
Within the same place, all the KATVR-Central dialing values should differ from each other, and so
it is for the KATVR-Back Sensor dialing values. Otherwise, the KATVR-Central of one piece of
equipment might connect to the KATVR-Back Sensor of another. Within the same place, all the
wireless receiver dialing values should differ from each other, and so it is for the KATVR-Foot
Sensor dialing values. Otherwise, the KATVR-Foot Sensor of one piece of equipment might
connect to the wireless receiver of another.
31 Starting Installation
KATVR-Foot Sensor
1 Six-digit red dialer
2 Charging port
3
4
5 Switch button
6 3.5MM jack
Working indicator - red means that it is not connected
with the wireless receiver; blue indicates that it has been
connected with the wireless receiver;
Charging indicator - red indicates charging; blue indicates
that the battery is full, when the foot sensor is not used,
turn off the switch to reduce battery charge
32 Starting Installation
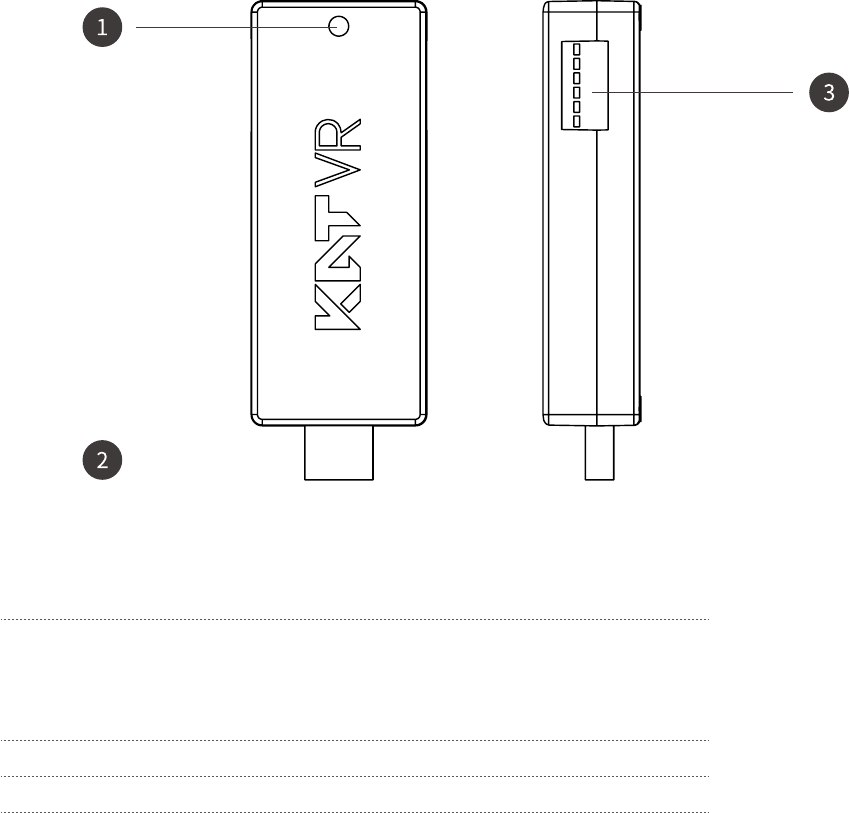
Wireless Receiver
1
2 USB A type plug
3 Six-digit red dialer
Working status indicator - red indicates that it is not
connected to two foot sensors or is connected only to
one foot sensor; blue indicates that it has been
connected with two foot sensors
Caution
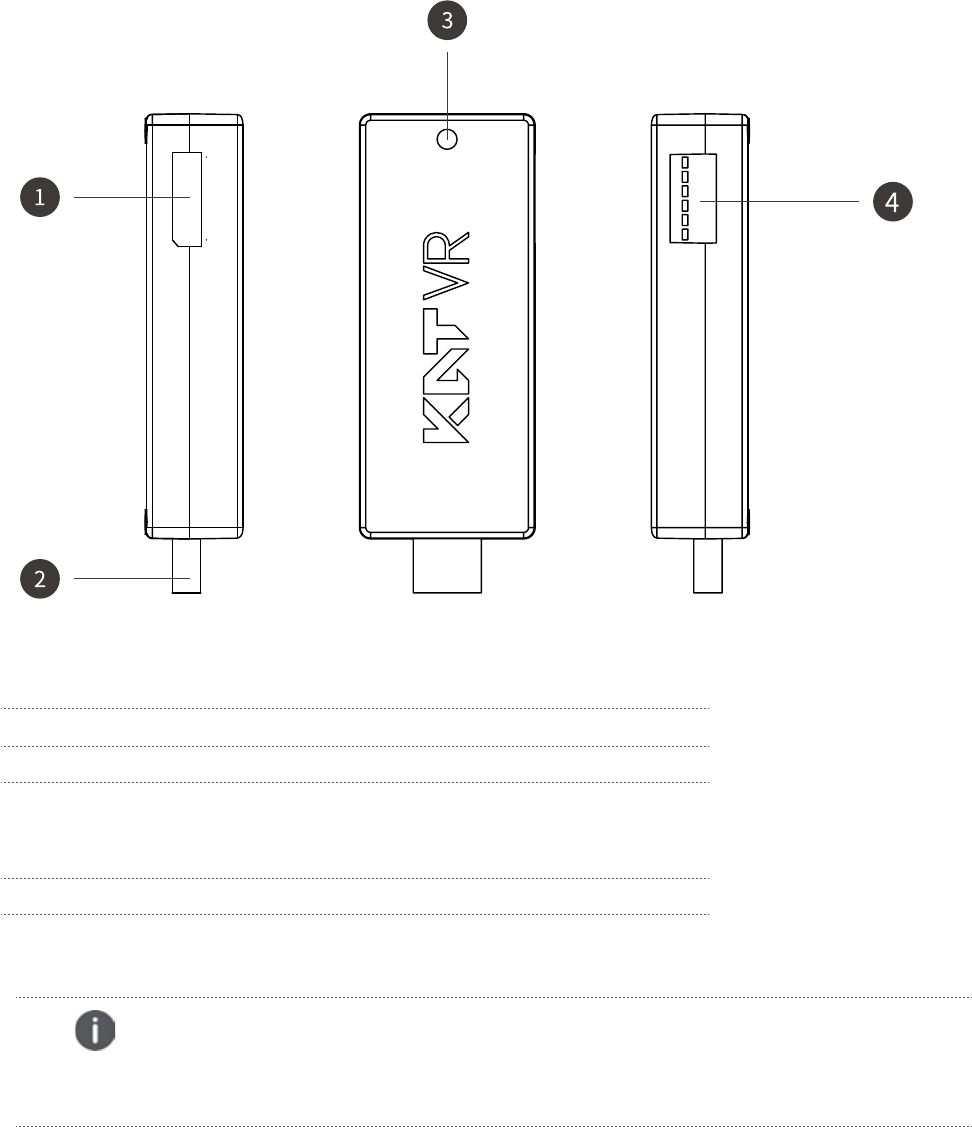
KATVR-Encoder working indicator: red means it is not connected to the KATVR-Back Sensor;
blue means it is connected to the KATVR-Back Sensor.
1
2 USB A type plug
3 Bottom sensor working indicator: red indicates that it
is not connected to the back sensor; green indicates
that it has been connected to the back-sensor
4 Six-digit red dialer
Top sensor cable interface
33 Starting Installation
KATVR-Central Sensor
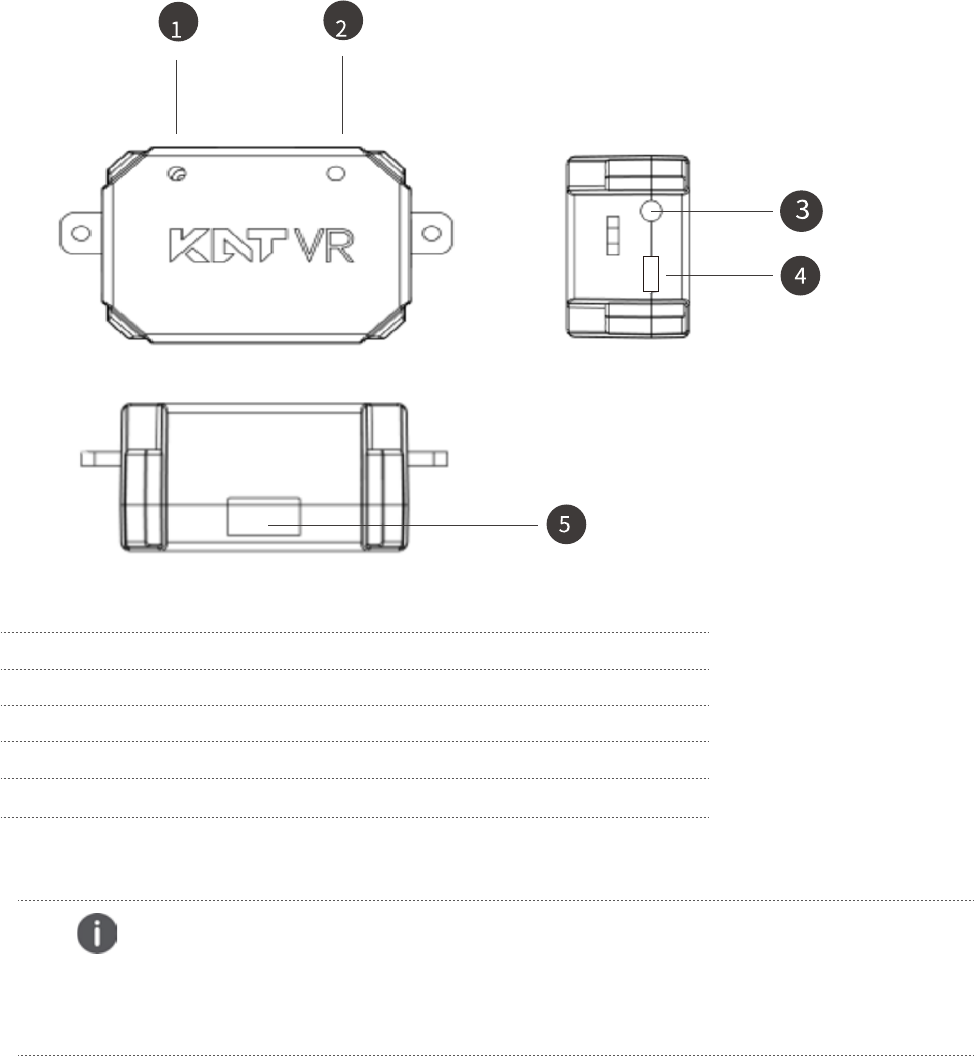
Caution
Red indicator: when it is on, it means the power supply to the KATVR-Back Sensor is normal but it
is not connected to the KATVR-Central. Green indicator: when it is on, it means the KATVR-Back
Sensor is connected to the KATVR-Central Sensor.
34 Starting Installation
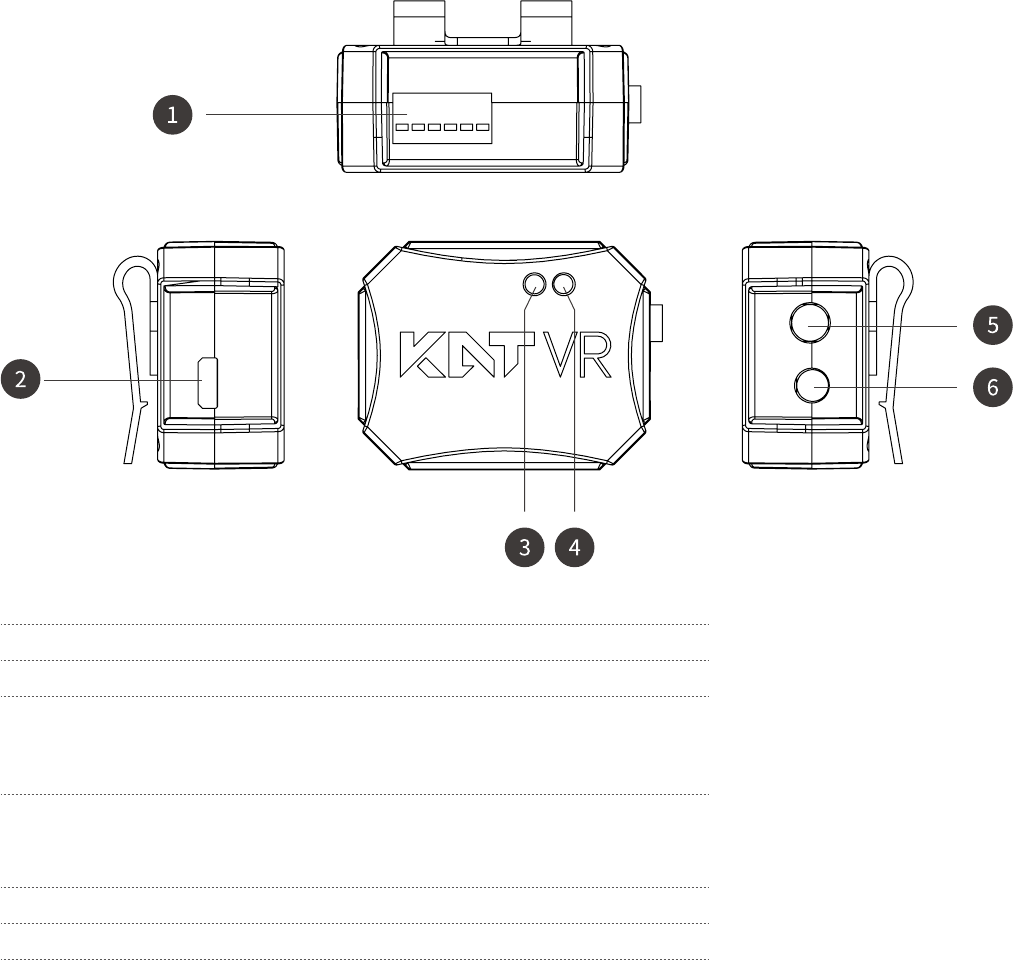
KATVR-Back Sensor
1 Working status indicator
2 Charging status indicator
3 Red switch button
4 Micro USB charging interface
5 Six-digit red dialer
1.ᅠ
Dial the 6-digit red dialer of KATVR-Back Sensor to match that of KATVR-Central Sensor. When dialing,note the distinction
of the digital direction and the position of ON, on the encoder.
2. Dial the six-digit red dialer for the wireless receiver to the same position as that for the two KATVR-Foot Sensor.
3.
Connect one end of the USB-A type extension cable for the wireless receiver to the receiver and insert the other
end into the USB port of the PC.
4.
Insert the other end of the KATVR-Top Sensor connecting cable into the KATVR-Top Sensor port on the side of the
KATVR-Central Sensor.
5.
Connect one end of the USB-A type extension cable to the KATVR-Central Sensor and insert the other end into the USB
port of the PC.
35 Starting Installation
Power Switch
Upon confirming the proper installation and connection of the product, press the power
button for all the devices
a.Check if the controllers are fully charged. You may check the controllers' battery charge level while not running any
program or upon opening the main control panel of the system. When the battery charge level is insufficient, the
indicator will display a red dot. Use the accessory power adapter and the USB data cable to charge each controller.
When the controllers are powered on and fully charged, the status indicator will display green color (powered on) or
white color (powered off).
b.Connecting base station to power
The base station needs continuous power supply when being used and it is advised to install a power socket near the
station.
c.The PC is Powered on
d.The foot sensor switch is ON
Press the red switch button on the side of the foot sensor, the red light indicates the foot sensor is activated, and the
blue light indicates that the foot sensor is connected with the wireless receiver normally.
e.The back sensor switch is ON
Press the red switch button on the side of the back of the sensor, the red light indicates that the back sensor is activated,
and the blue light indicates that the back sensor is connected with the central sensor.

36 Starting Installation
Starting the Head-Mounted Display
Attention:
1.Before starting the computer, check if all the ports are in normal connection and if all power suppliers are in normal
states.
2.
When starting the computer, the pairing between the base stations and the head-mounted display will be automatically
completed. The panel of the detection software Steam VR will automatically display on the lower right part of the
computer monitor.When all the five icons are on, it means the head-mounted display can work properly.
3.Turn on the KAT entertainment platform and key in the account username and password to complete the login.
Make sure the head-mounted display is properly debugged before the normal use
1.Adjust the head-mounted device to the position of eyes.
2.Wind the slide belt to the back of head and adjust it so that the device fixes to the head in a tight and comfortable way.
3.Make sure the cables go through the protection cover on the back of the head-mounted device and that they hang on
your back.
4.Adjust the lens distance on the head-mounted device; please refer to the manual for head-mounted display for
detailed adjustment steps.
Sensor Status Indicators
Blue OffRedLocation Indicator
KATVR-Central
Sensor
Wireless receiver Working indicator
Working indicator
KATVR-Central Sensor normal
power supply, not connected
to the back sensor
KATVR-Central Sensor
normal power supply,
connected to the
back sensor
Not connected to
the PC
KATVR-Foot
Sensor
Working indicator
Charging Indicator
Wireless receiver normal
power supply, not connected
to the KATVR-Foot Sensor
Wireless receiver normal
power supply, connected
to the KATVR-Foot Sensor
Not connected to
the PC
KATVR-Foot Sensor normal
power supply, not connected
to the wireless receiver
KATVR-Foot Sensor normal
power supply, connected to
the wireless receiver; the
flashing indicator indicates a
low charge level and please
timely charge it
The switch button is
not pressed or the
battery charge level
is too low
Being charged Fully charged Not connected to
the charger

37 Starting Installation
Correct Wearing
Steps of getting on the Device
1.The user sits in the chair, put on KAT SHOES by himself/herself and steps on the pedals.
2.The user holds safety handrails, carefully enters the treadmill base plate, and turns his/her back to the treadmill. The
working staff must accompany the user upon entrance to ensure personal safety.
3.The staff help to fasten the girdle set.
4.The staff help user to wear the.
5.
After wearing the head-mounted display, the staff can start the game on the KAT STATION, and the user can experience.
Attention
1.As there are wheels at the rear of KAT SHOES, which is a special structure, and thus, the working staff
have to be aside after the user puts on KAT SHOES in case of any slipping accident.
2.Please make sure the girdle is tightly fastened to ensure users’safety.
3.In order to ensure a perfect experience, a trial walking of 1~2 minutes is recommended before the formal
experience.
Steps for getting off the Device
1.The user takes off the head-mounted display.
2.The working removes foot sensors.
3.The working staff help to untie the girdle set.
4.The user walks out of the treadmill with the working staff’s help.
5.The user sits on the chair and takes off KAT SHOES by himself/herself.
Attention
1.Please strictly following the instructions when putting off the device to avoid damage to sensors.
2.There must be working staff aside to provide assistance for the user’s safety.
38 Starting Installation
Installation and Dismantling of KAT Foot Sensors on KAT
SHOE COVER
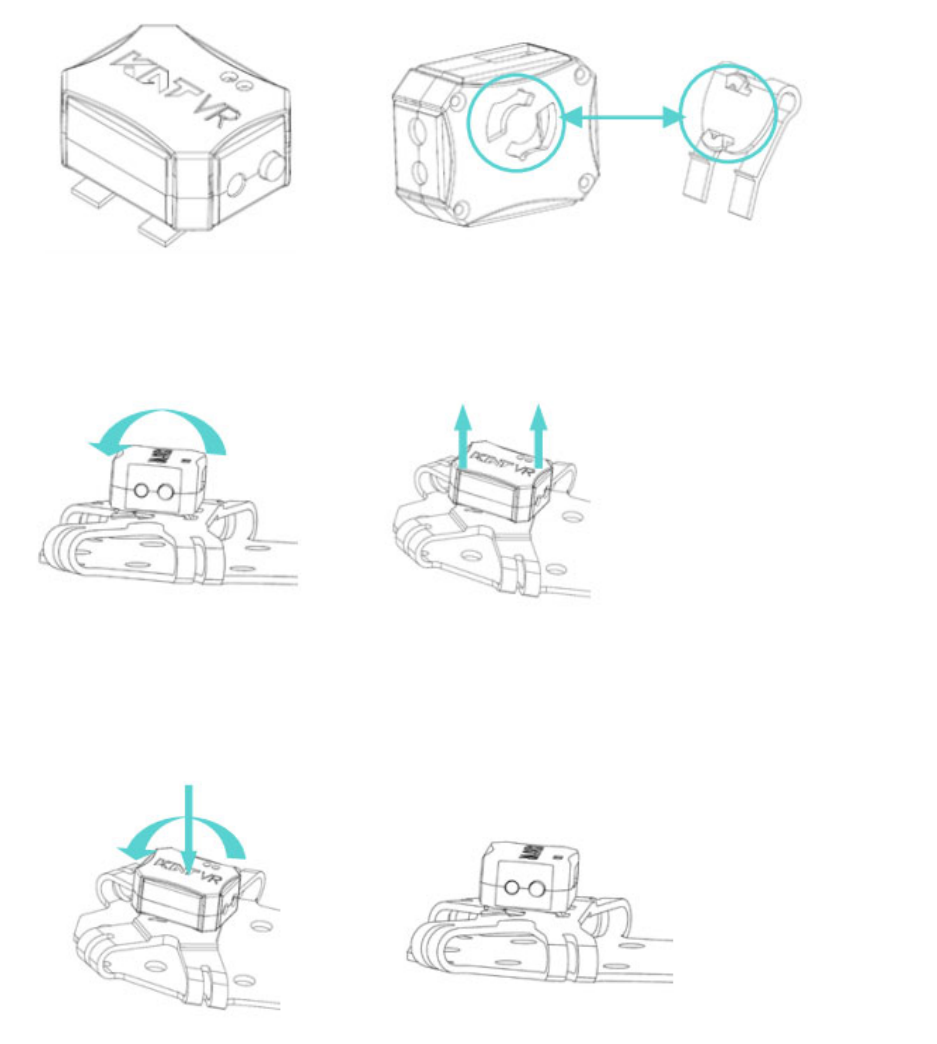
Fast Replacement of KATVR-Foot Sensor
A fast replacement module has been designed in the s tructure of the foot sensor f or an easier replacement of foot
sensor on the shoe cover. The replacement can be done in fast way through the turning of the foot main body and the
buckle.
Dismantling of the Main Body of KATVR-Foot Sensor:
Turn the main body of the IMU counter clockwise to pull out the main body of the KATVR-Foot Sensor.
Installation of the Main Body of KATVR-Foot Sensor:
As shown in the figure, fit the slot of the main body into that of the buckle and rotate it clockwise to the position
shown in the figure. When you hear a click sound, it means the installation has been successfully done.
39 Starting Installation
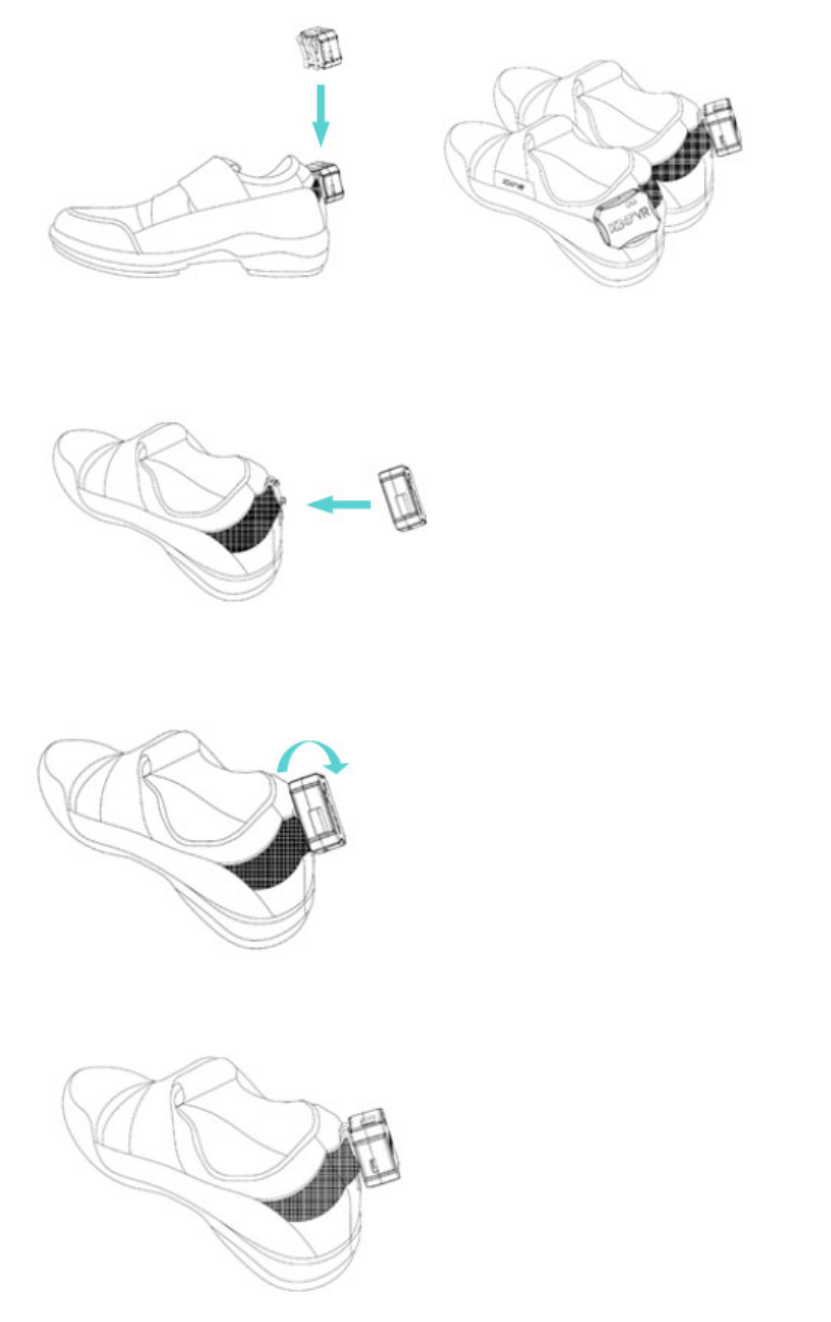
Installation and Dismantling of Foot Sensors on KAT SHOES
Installation of KATVR-Foot Sensor:
Insert the buckle of the KATVR-Foot Sensor into the external elastic belt of the Shoes and make sure the two sides of
the buckle are inserted into the belt respectively, as shown in the figure:
Installation of the Main Body of KATVR-Foot Sensor:
Fix the main body of the KATVR-Foot Sensor to the buckle, as shown in the figure:
Turn the main body of the KATVR-Foot Sensor clockwise and if you hear a click sound, it means the installation has been
successfully done.
Finish the installation of the KATVR-Foot Sensor.
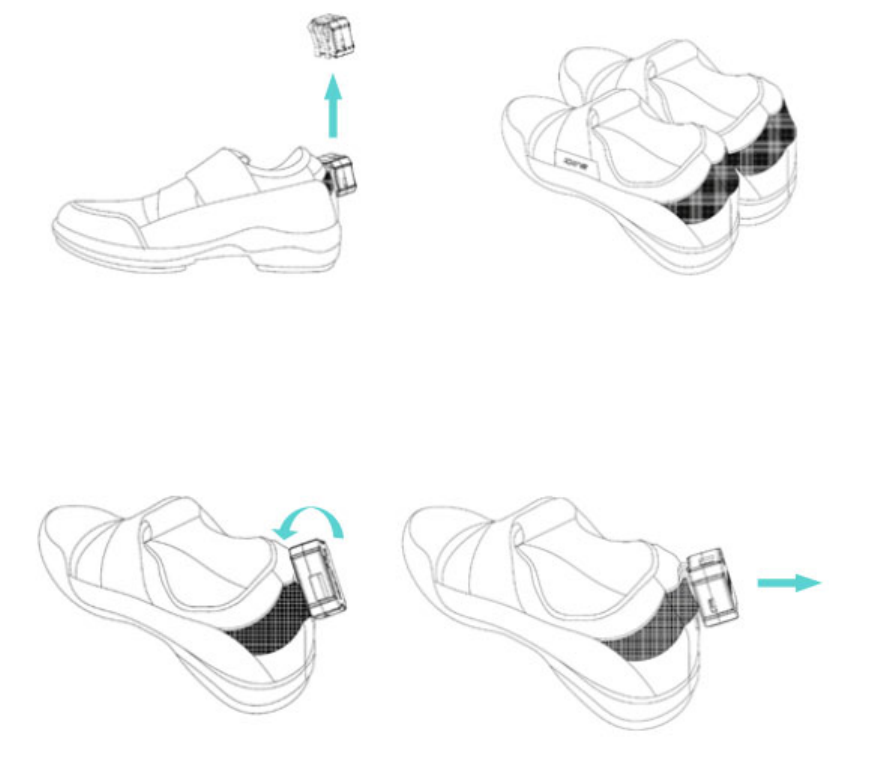
Installing the KATVR-Foot Sensor:
Insert the buckle of the KATVR-Foot Sensor into the external elastic belt of the Shoes and make sure the two sides of the
buckle are inserted into the belt respectively, as shown in the figure:
Dismantling the Main Body of KATVR-Foot Sensor:
Turn the KATVR-Foot Sensor counter-clockwise and pull it out.
40 Starting to Use
41 Starting to Use
Instructions for Using KAT WALK Self-Adaption Computer
If you want to use your own computer, please make sure it meets the following hardware
requirements:
CPU: Intel Core i5-4590 or higher.
Memory: 8GB or higher.
Graphics card: Geforce GTX 1070 equivalent or higher.
Hard disk space: at least 200GB available on the system partition.
Screen resolution: 1920x1080 or higher.
The PC running the KAT WALK must have the following software:
Operation System:
Recommended: Microsoft Windows 10 x64
Minimum: Microsoft Windows 7 Professional x64
Software and Run library requirements:
WinRAR decompression software.
Steam(Keep Updating)
SteamVR(Keep Updating)
Microsoft Visual C++ 2005 Run library(x86 & x64)
Microsoft Visual C++ 2008 Run library(x86 & x64)
Microsoft Visual C++ 2010 Run library(x86 & x64)
Microsoft Visual C++ 2012 Run library(x86 & x64)
Microsoft Visual C++ 2013 Run library(x86 & x64)
Microsoft Visual C++ 2015 Run library(x86 & x64)
Microsoft .NET Framework 3.5 sp1
Microsoft .NET Framework 4.0
Microsoft .NET Framework 4.5
Microsoft .NET Framework 4.6.2
Microsoft DirectX Run library
Note: The above software / run libraries can be obtained free of charge on the official website of each software.
WinRAR official Website:http://www.winrar.com/
Steam Official Website:http://store.steampowered.com/
Microsoft Download Center: https://www.microsoft.com/en-us/download/
When you have already met the hard / software requirements for running VR games and KAT platforms.
Please refer to the following process to deploy KAT entertainment platform.
42 Starting to Use
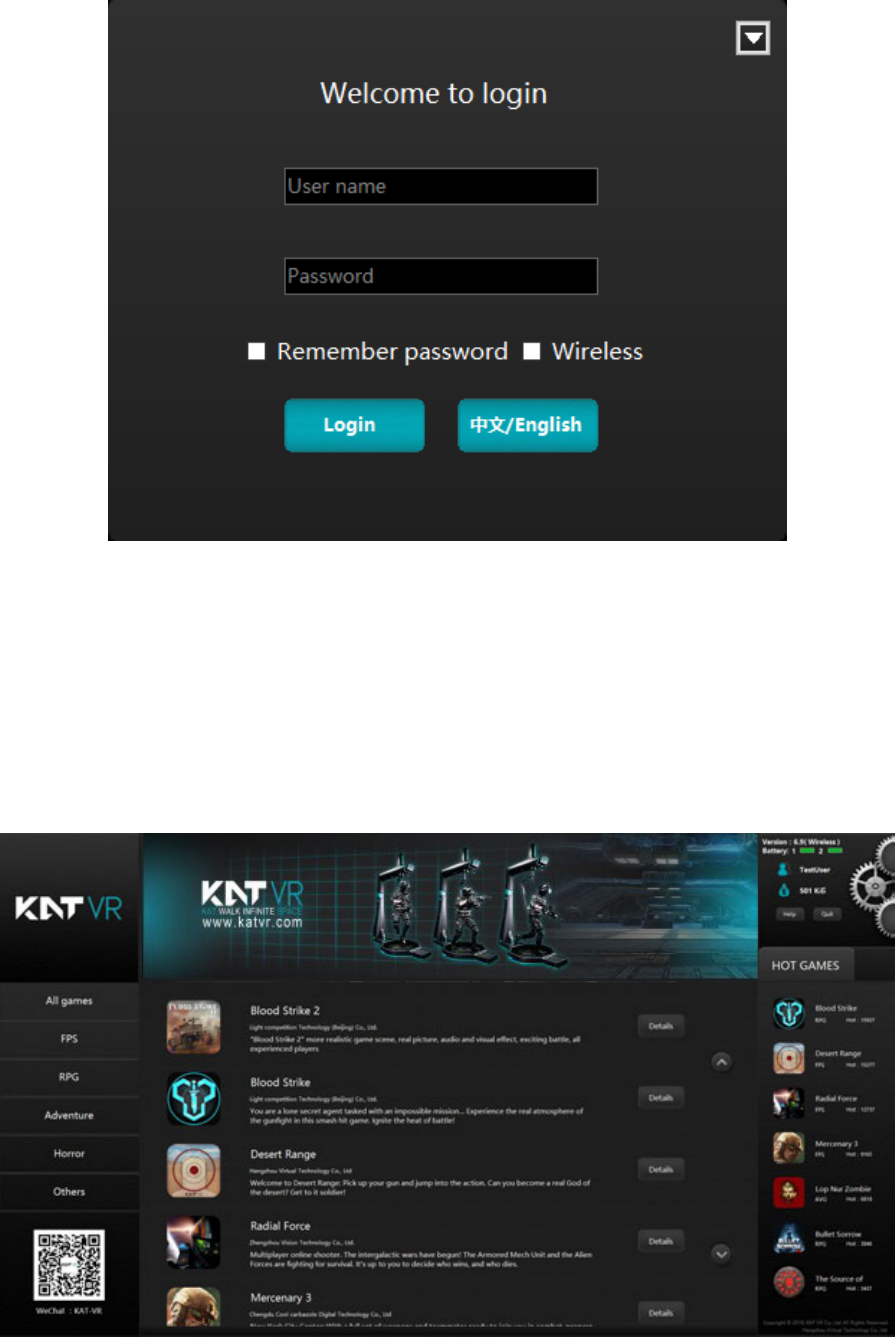
Login the KAT Game Flat
1.Double click the KAT entertainment platform icon and type in the username and password to log into the platform.
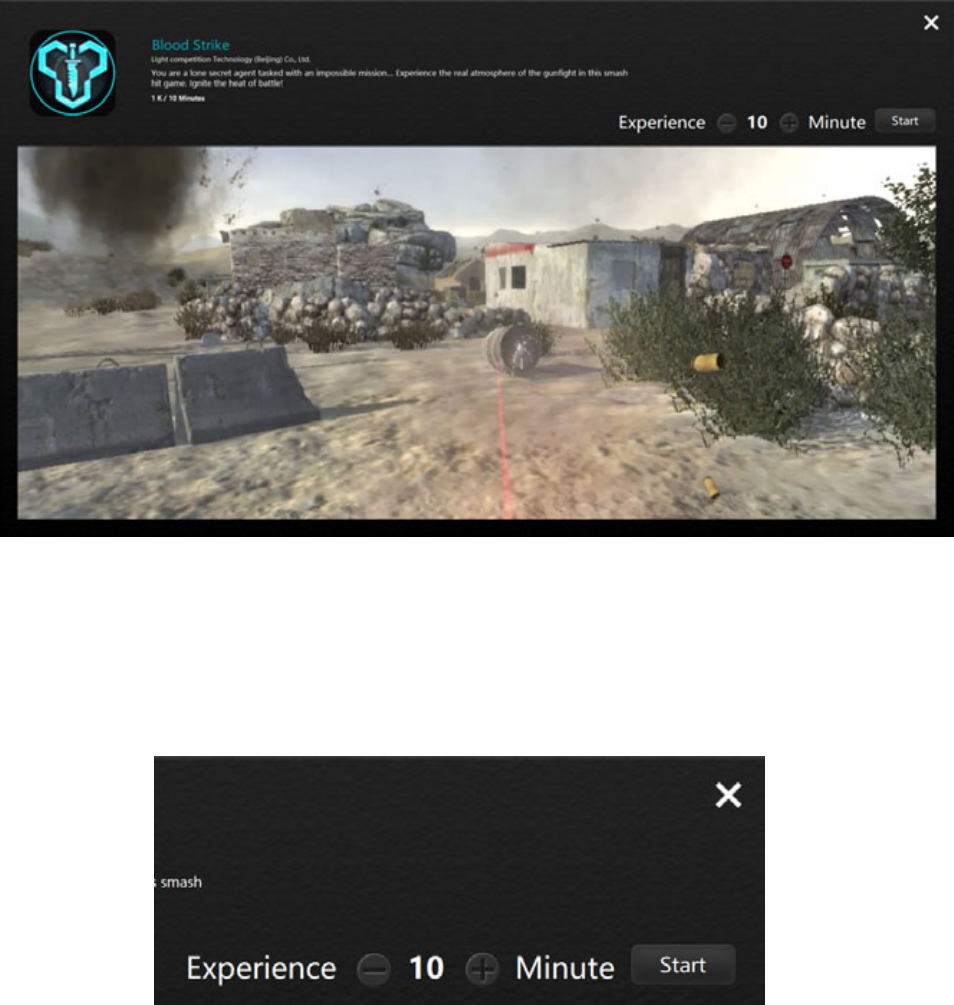
2. Enter the platform page, where the left side shows the category of games and the QR code of the Company, and the
user may choose the game based on his/her preference. The middle area displays all the KAT adaptable games under
the selected category, with colored icons indicating that the game has been downloaded while the black-white icons
indicating the the game has not been downloaded yet. The upper right part of the interface will show the account name
and the remaining K coins, and please watch out for the remaining coins. The right side of the interface shows the
popularity of the games.
43 Starting to Use
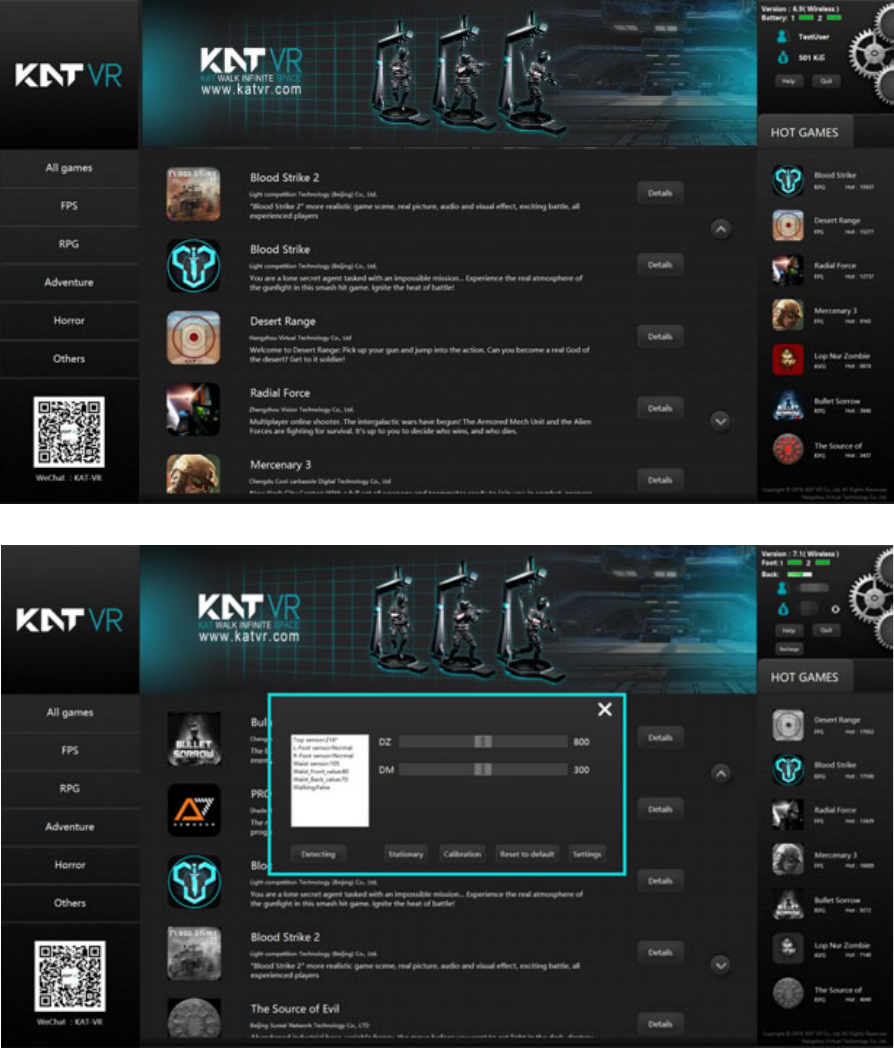
2. Select the game and click “Enter details” to view the introduction of the game for more details. If the game is not
installed to the computer yet, please click “Install” on the right side of the interface to install the game. While
downloading and installing games is free of charge, a certain number of K coins will be consumed when playing the
game. If the game is already installed, the right side of the interface will display the button for setting up the game time
and the button for starting the game.
6. Start the game. After selecting the game, enter the game and the right side of the interface will show the button for
setting up the game time, which can be done by clicking “+” or “-”. Click “Start” to start the game and the upper left
corner of the interface will display the remaining game time, while the upper right corner displays “Minimize”,
“Restore” and “Off”.
44 Starting to Use
Game Settings
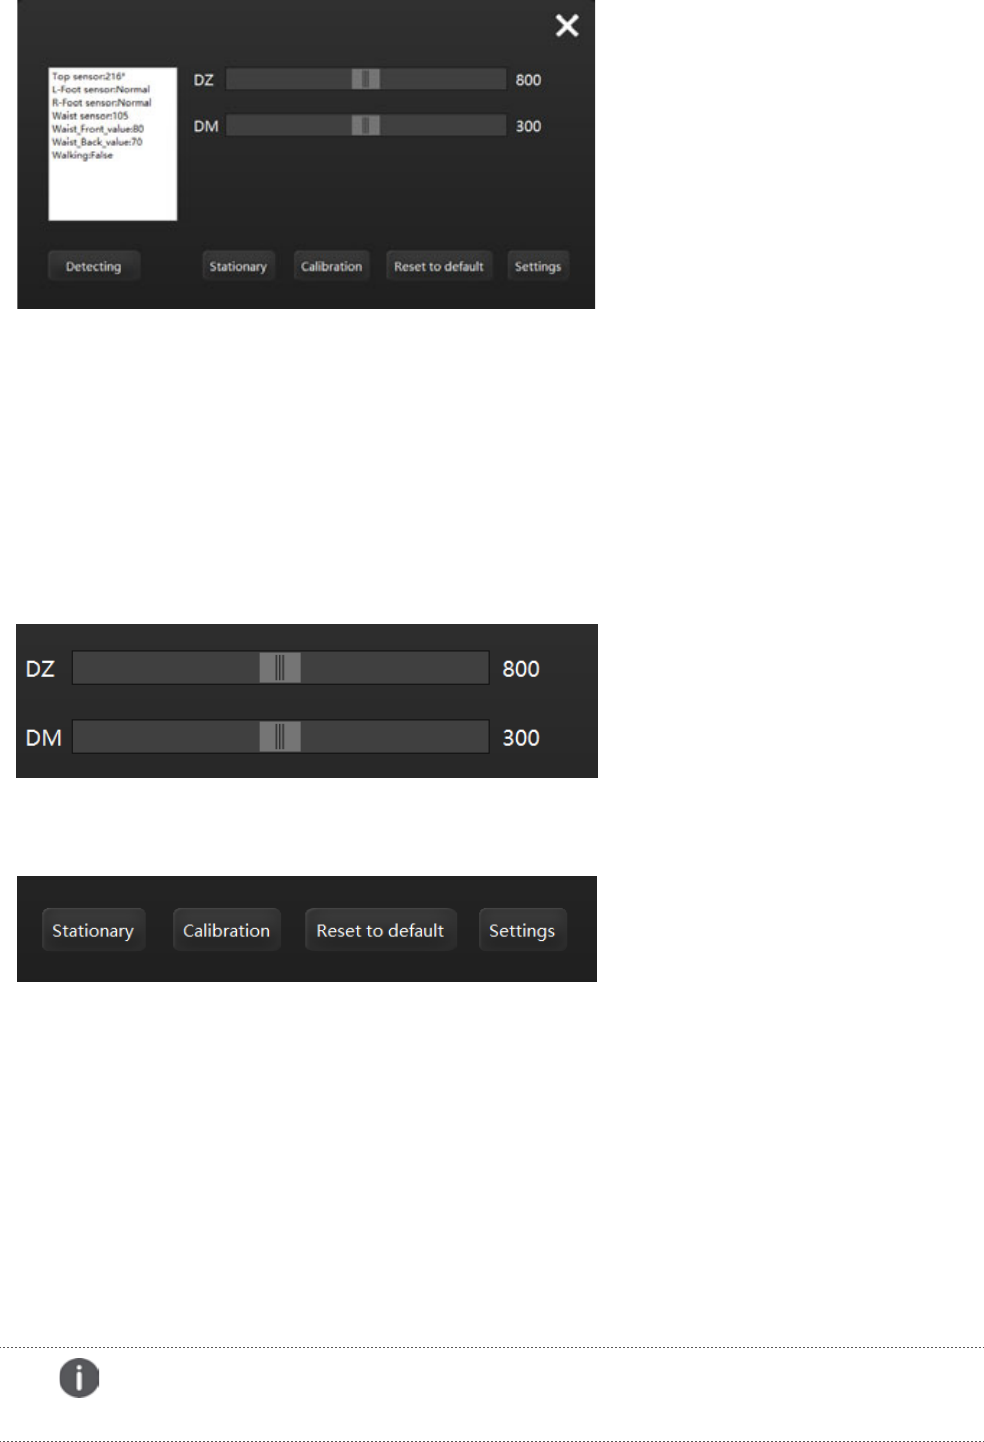
How to Enter the Game Settings Page
On the right side of the main interface, the gears area is the button to access game settings. The administrator may set
up the game by entering the page of game settings. KAT will preset the parameters for the game software and please
do not change them randomly. If there is any problem, please contact the KAT service center for advice. Open the
game platform software and click the gear on the right to enter the page for the settings.
45 Starting to Use
ntroduction of parameters and settings in the page of game settings
KATVR-Top Sensor: displays the KATVR-Top Sensor data
Left KATVR-Foot Sensor: shows if the left KATVR-Foot Sensor is operating normally
Right KATVR-Foot Sensor: shows if the right KATVR-Foot Sensor is operating normally
KATVR-Waist Sensor: displays the KATVR-Magnetic data
KATVR-Waist Sensor forward tilt threshold: shows the front inclination threshold value of the KATVR-Magnetic
KATVR-Waist Sensor backward tilt threshold: shows the rear inclination threshold value of the KATVR-Magnetic
Walking or not: shows whether the player is walking or not
DZ: threshold of the two KATVR-Foot Sensor
DM: threshold value of one KATVR-Foot Sensor
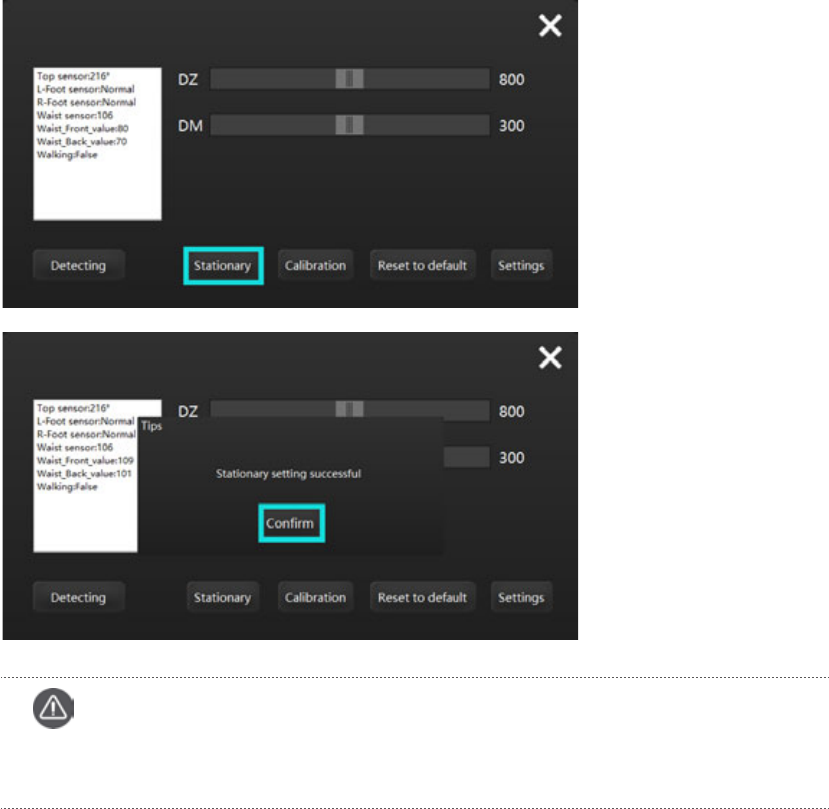
Static: When the player finishes wearing the equipment and stands upright on the KAT WALK, the staff member will
click “Static” and it will show a successful setting of the static status, which will be defined as the static value.
Then the threshold values for the front inclination and the rear inclination of the KATVR-Magnetic will change
accordingly.
Calibration: After installing the base station and the KAT WALK, click “Calibration” when turning them on for the first
time to confirm the orientations for the walking and the head-mounted display. Click “Calibration” again
when moving the base station or the KAT WALK.
Restore default: The software will preset the DZ and DM values. If you would like to restore to the factory settings
after changing the two values, you may click “Restore default” and they will be restored to the factory settings.
Settings: After changing the DZ value and the DM value, click “Settings” so that the changes take effect.
Click the “Error detection” at the lower left corner of the page, and the button will change to “Detecting”, and the
sensor data will appear in the text box.
Caution
Please do not randomly change the DZ value and the DM value as they are preset before the delivery.
46 Starting to Use
Calibration Settings
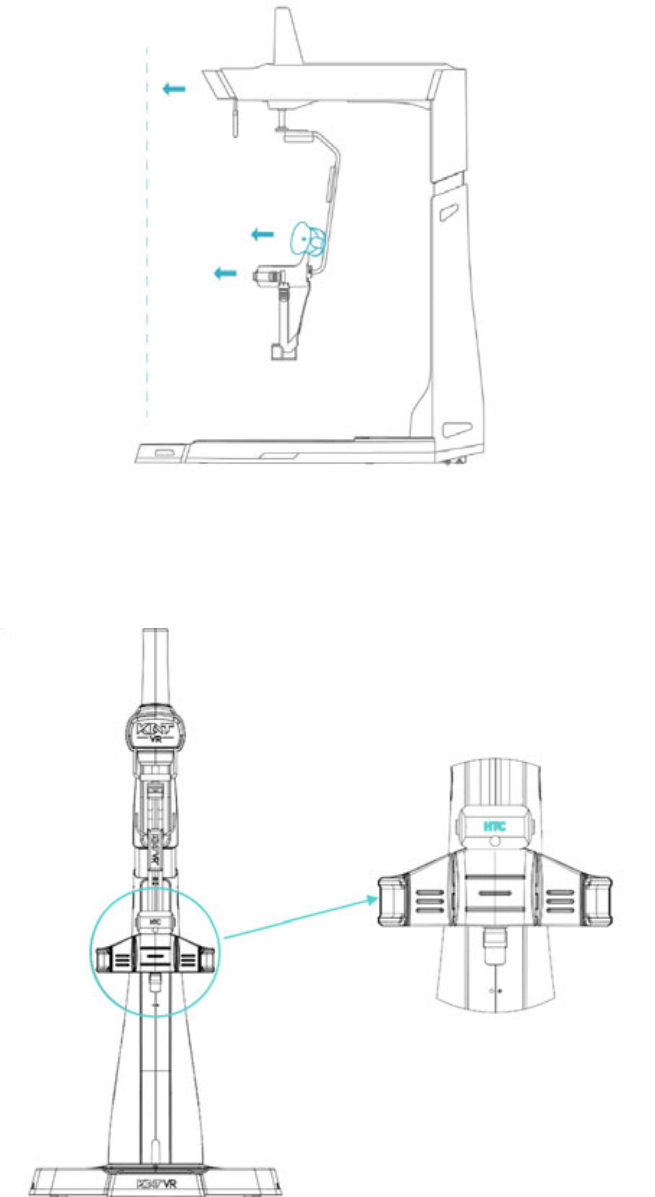
1. Place the HTC VIVE head-mounted display (Not included with this version, it needs to be purchased separately)
above the girdle set, and make sure the orientations of the display front, the girdle opening and the KAT WALK are
consistent.
2. Make sure the letters HTC on the head-mounted display is along the very middle of the girdle set (as shown in the picture),
make it horizontal and start the software“calibration”.
47 Starting to Use
3. After the completion of“Calibration”, keep the head-mounted display, the girdle and the KAT WALK PREMIUM facing
the same direction and start to set the room mode.
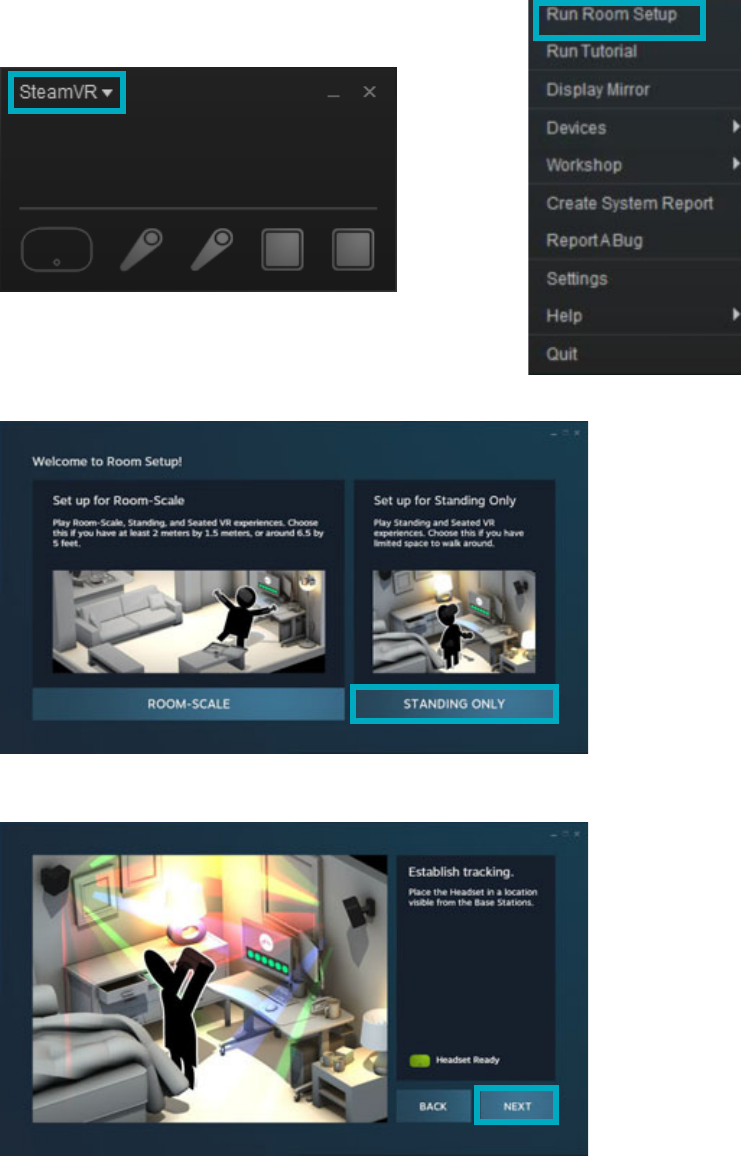
4. Click the Steam VR on the upper left corner of Steam testing software, and the menu will turn up.
Click the top“Run Room Setup”
5. Select the mode“Stand Only”
6. Click“Next”
Ready
48 Starting to Use
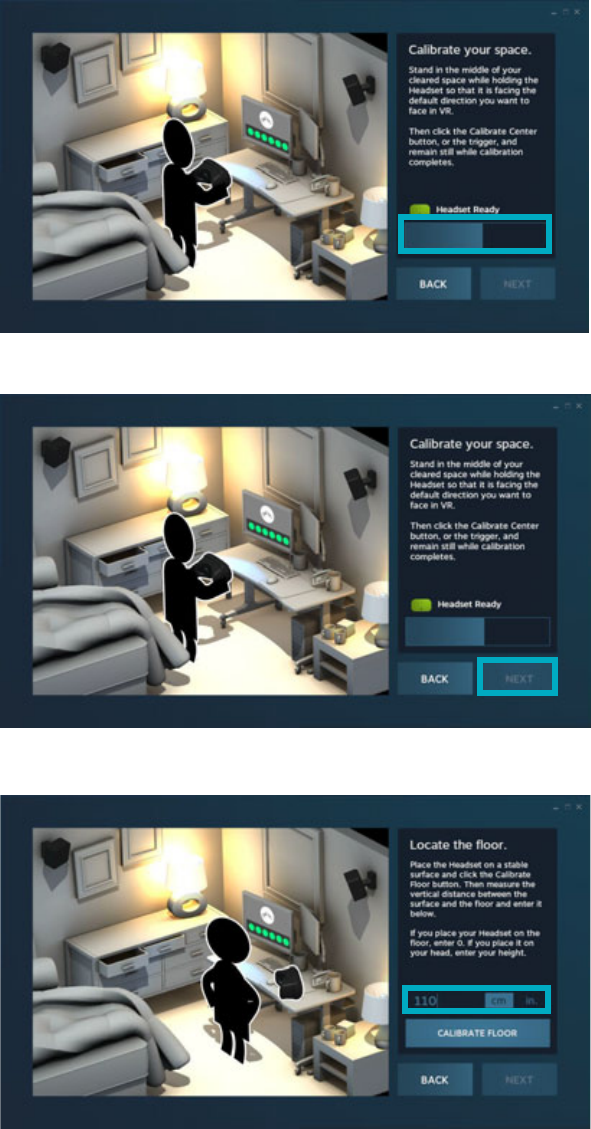
7. Click“Calibration Central Point”
8. Click“Next”after finishing calibration
9. Enter the height of the head-mounted display above the ground: 120cm, and then click“ground calibration”
2
49 Starting to Use
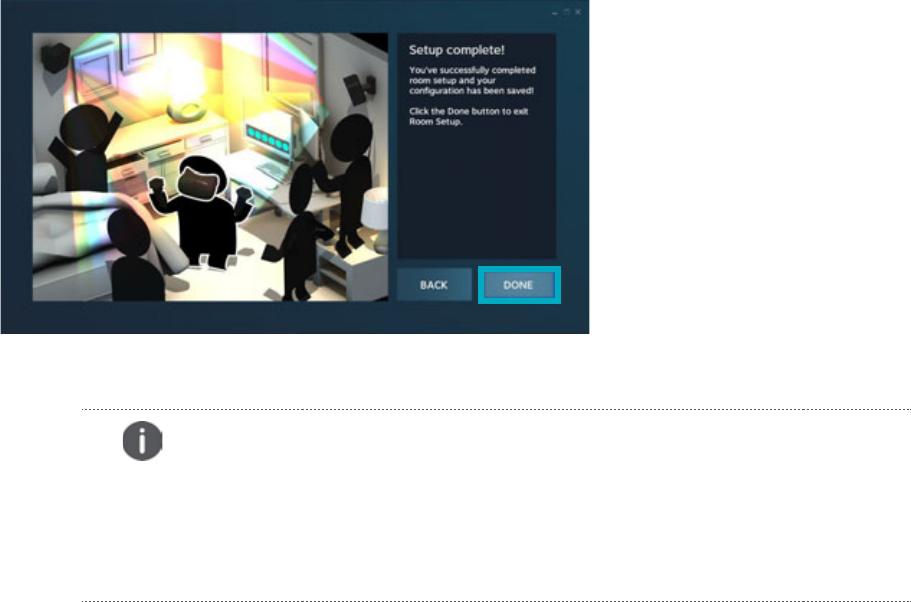
10. The room setup is done and click“done”
Attention:
1.Make sure the front of the head-mounted display,
the girdle set opening and KAT WALK are facing the same direction during the setup.
2.Please do not move KAT WALK or the base station after the setup.
You will need to re-calibrate when moving KAT WALK and the base station
50 Starting to Use
2.An user with a height of 150-190cm and a weight of no more than 100KG will need to wear the whole leg and girdle
set first, and then stands upright in the SPACE. Click the icon for static in the software and it will show successful setting
of static; the value will be defined as the static value. Both the front and the back inclination values of the KATVR-Magnetic
in the software will change accordingly. Click Setting and exit the interface.
Setting the Static Value
1.After the calibration, the static value needs to be set up for the user.
Attention
As different people have different stances and different walking postures,
the static value needs to be set up before each experiencer experiences the game.
Quitting the Game
1.Turing off during
Click the“ Close” button at the upper right corner of the page to turn off the game.
Click “Quit” at the upper right corner of the page and it will prompt a box requesting you to confirm whether to quit
the game. Click “Confirm” to quit the game and “Cancel” to continue the game.
51 Starting to Use
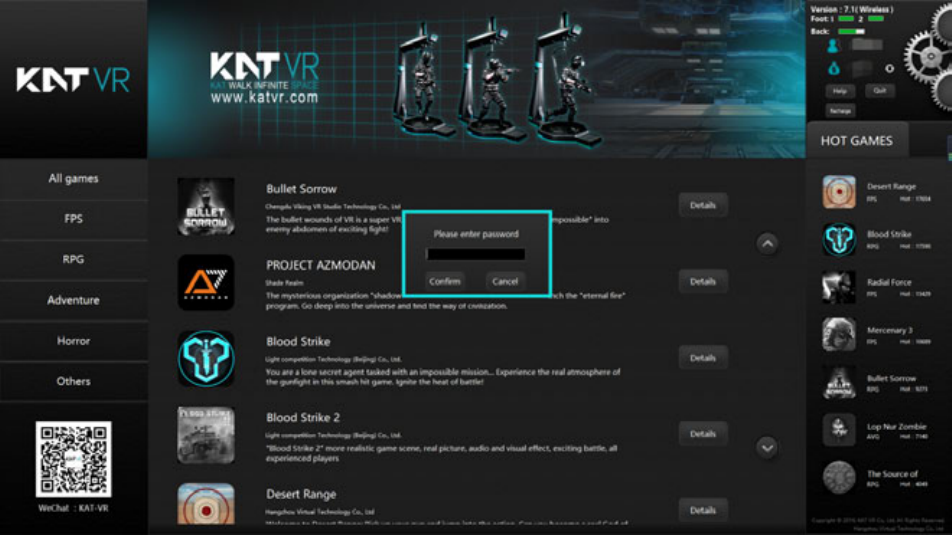
Turning Off the Software
Click“ Close” at the upper right corner of the page and it will prompt a box requesting the input of the password. Key
in the password and click“ Confirm” to turn off the software.
52 Starting to Use
53 Help Center
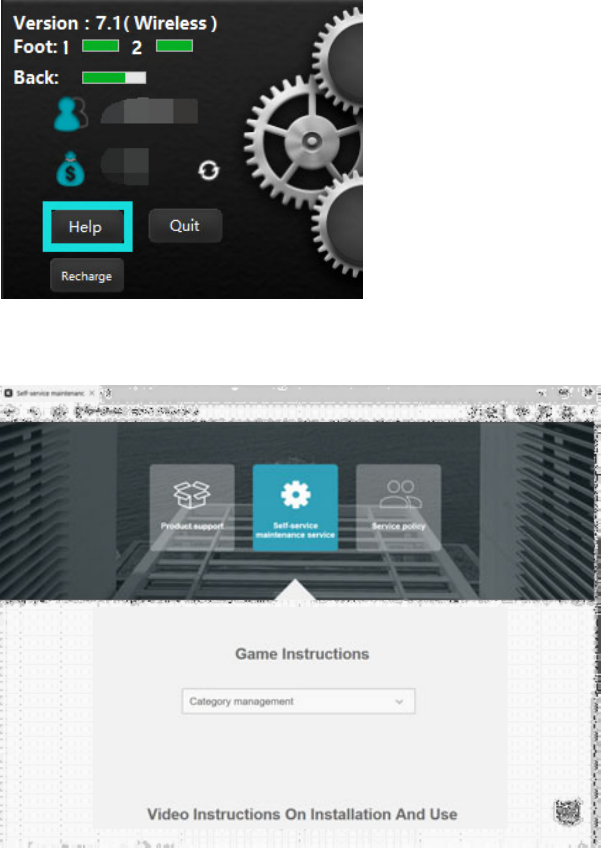
Help Center
The Help button is located on the upper right part of the page. Click it to enter the self-help repair service page under
the technical support on the KAT official website.
You may view the introduction of the game and the videos and texts for common operations in this page.
54 Help Center
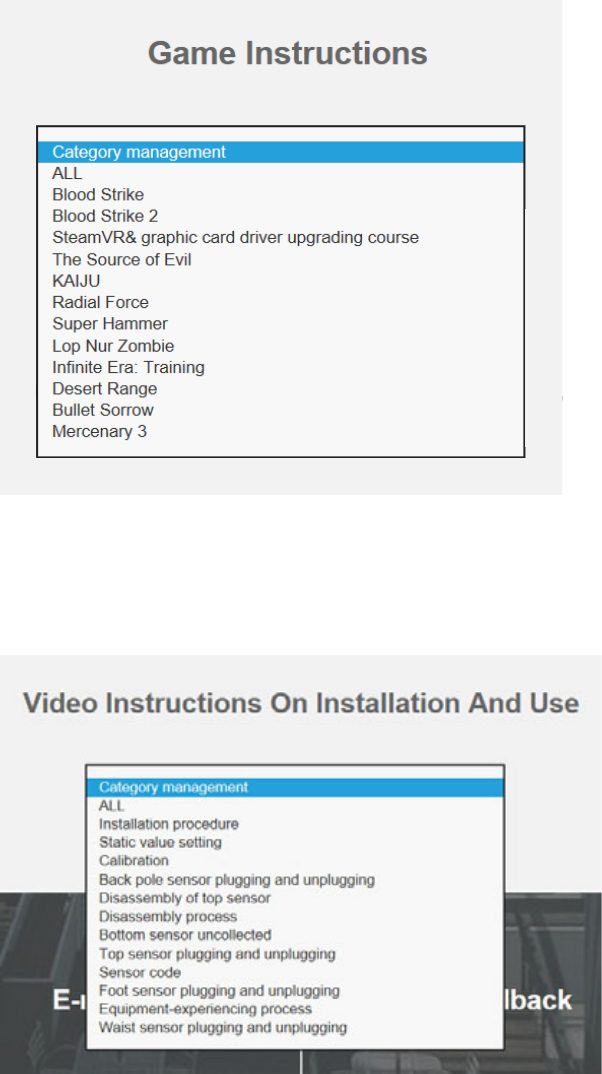
Click the drop-down box for the“ Videos of Installation and Use” and you will see the videos and texts for the installation
and daily use. Select an operation and you will be able to view the corresponding video and text.
Click the drop-down box for the“ Introduction of the game” and you will see the list for all the games on the platform.
Choose a game and you will be able to view the basic introduction and the instructions of the game.

55 Dismantling and Replacement
Dismantling and Replacement of KAT WALK PREMIUM
Component
Dismantling Shell
1.Remove the pedals and unscrew all the screws on the base plate shell; carefully dismantle the light source cable of
the base plate to separate the shell.
2.Unscrew all the screws on the side and back of the lower part of the support pillar to separate the shell of that part.
3.Unscrew the screws on the side of the upper part of the support pillar.
4.Unscrew the screws on the metal sheet parts of the middle part of the support pillar to separate the metal sheet parts.
Dismantling Mechanical and Electrical Structure:
1.Open the hatch cover of the HTC head-mounted display; unplug the original cable (HDMI, USB and DC cable), and the
earphone connecting cable may remain there; properly place the HTC head-mounted display.
2.Unplug the HDMI cable and the USB cable that connect the KAT WALK PREMIUM and the KAT STATION, and the DC
cable that connects the KAT WALK PREMIUM and the power socket.
3.Turn the base plate holder to move the KAT WALK PREMIUM to a flat and open field.
4.Unscrew the installing screws on the installing plate of the connecting rod to dismantle the rod.
5.Dismantle the base plate and the support pillar shell one by one for the KAT WALK PREMIUM.
6.Turn the fastening screws on the bottom of the support pillar, and make sure one person holds the pillar on its back
to prevent it from suddenly toppling.
7.Put the pillar down backwards so that it lies flat down on the ground; a foam pad of over 20cm thick should be placed
under the pillar in advance.
8.Dismantle the girder casing cover and turn the screw at the connection between the cover and the girder to take it off.
9.Hold the three-in-one data cable in the HTC head-mounted display on the telescopic stick, pull the cable out of the
girder and take out the part of the data cable in the telescopic stick and the three-in-one data cable in the head-mounted
display.
10.Remove the fastening screws on the flange between the support pillar and the girder, and turn the girder to make it
parallel with the ground.
11.Turn the flange between the support pillar and the girder to separate them.
12.Put the support pillar upright, unscrew the fastening screws on the hinges at the connection between the support
pillar and the base plate, turn the hinges, and separate the pillar from the base plate with at least two persons holding
up the pillar.
For your safety
Please make sure all the power is off prior to dismantling.
Attention
The shell is made up of special materials, and thus you may easily dismantle it by simply removing the screws.
Please do not forcibly dismantle the shell to prevent it from being damaged.

56 Dismantling and Replacement
Attention
1.Make sure all the power is off and that all the power connections are cut off prior to the dismantling.
2.As the device is very heavy, it requires at least three male adults to do the dismantling.
3.Please do follow the above procedures to do the dismantling for safety purposes.
4.Please properly keep all the items dismantled, including screws, cotter pins, etc.
5.As the internal wires are fragile, please do not forcibly dismantle.
Dismantling and Replacement of KAT STATION Control Center Components
KAT STATION is a customized control center for the KAT WALK PREMIUM. To make sure the KAT STATION works properly,
please do not randomly open the cabinet or replace the internal components.
Please contact KAT service center if there is any problem during the use of the product.
Please contact KAT service center before component dismantling in case the warranty for your KAT STATION is affected.
KAT SHOES Replacement Instructions
Procedures of Replacing Sliders
The sliders and the wheels are of embedded design, and when replacing them
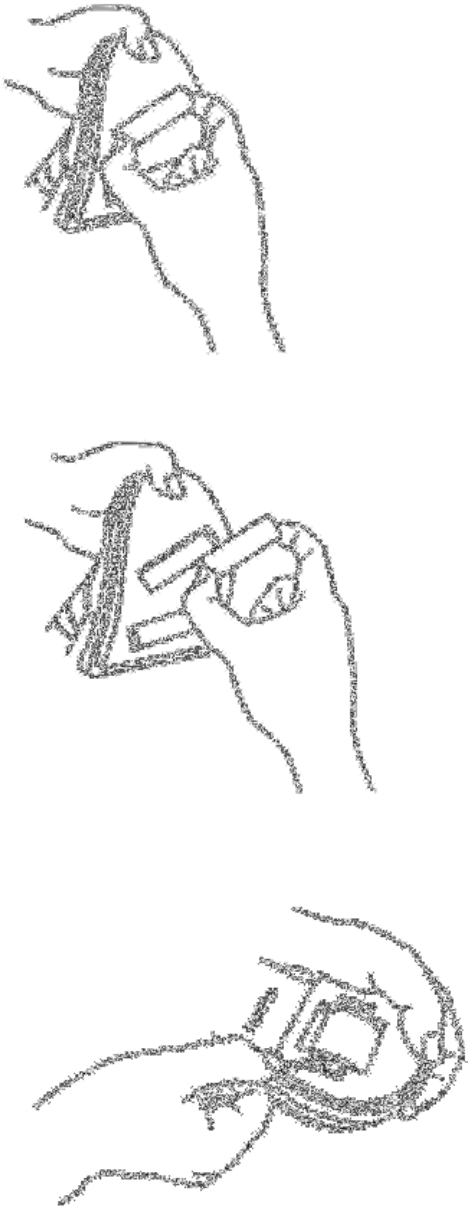
1.Hold the two ends of KAT SHOES to turn the sole outward while squeezing the SHOES inward.
You are advised to replace it when the wheel at the rear of the KAT SHOES sole is loose or cannot roll properly
You are advised to replace it when the slider on the KAT SHOES sole is seriously abraded.
As the first slider is more prone to abrasion than the second one, you may also swap the two first before the replacement.
You are advised to replace KAT SHOES when the shoe surface is abraded.
57 Dismantling and Replacement
3. Take off the old slider and use the same method to embed a
4.Relax KAT SHOES and the sole groove will return to normal; then the new slider automatically fits into the groove and
the replacement is done.new one
2.As the groove that holds the sole slider expands, the old slider can be easily taken off

Procedures of Replacing Wheels
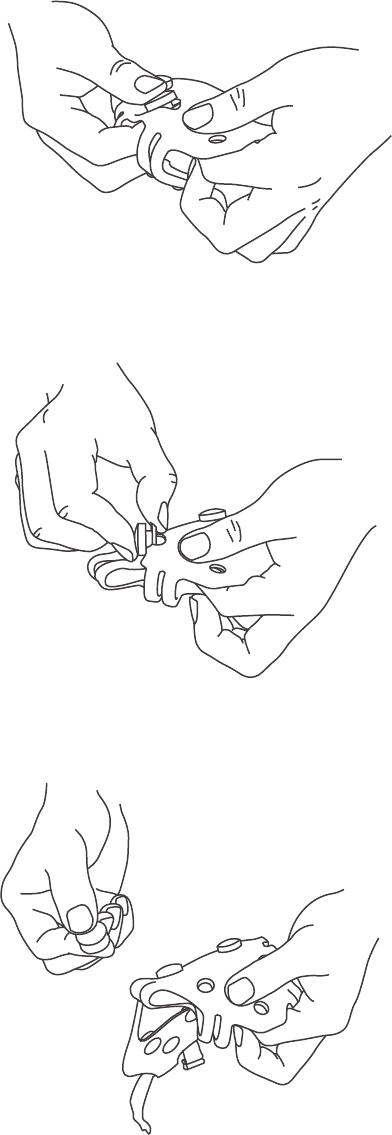
1.Turn the sole of KAT SHOES up
2.Use the accessory wheel replacement tools to pry the wheel
3.Take out the old wheel and replace with a new one to finish the replacement
Caution
1.As the wheel replacement tools are quite sharp, please do not use too much force when replacing the wheels
to ensure the safety of related personnel and the completeness of the groove.
2. Except for your hands, please keep your other body parts a certain distance from the wheel replacement tools
when doing the replacement.
You may purchase KAT SHOES and the sliders and the wheels for replacement in KAT’s official mall. In addition,
you may purchase the above-mentioned items through the officially signed
58 Dismantling and Replacement
59 Dismantling and Replacement
Instructions for Replacing KAT SHOE COVER
Steps of Replacing Slide Blocks
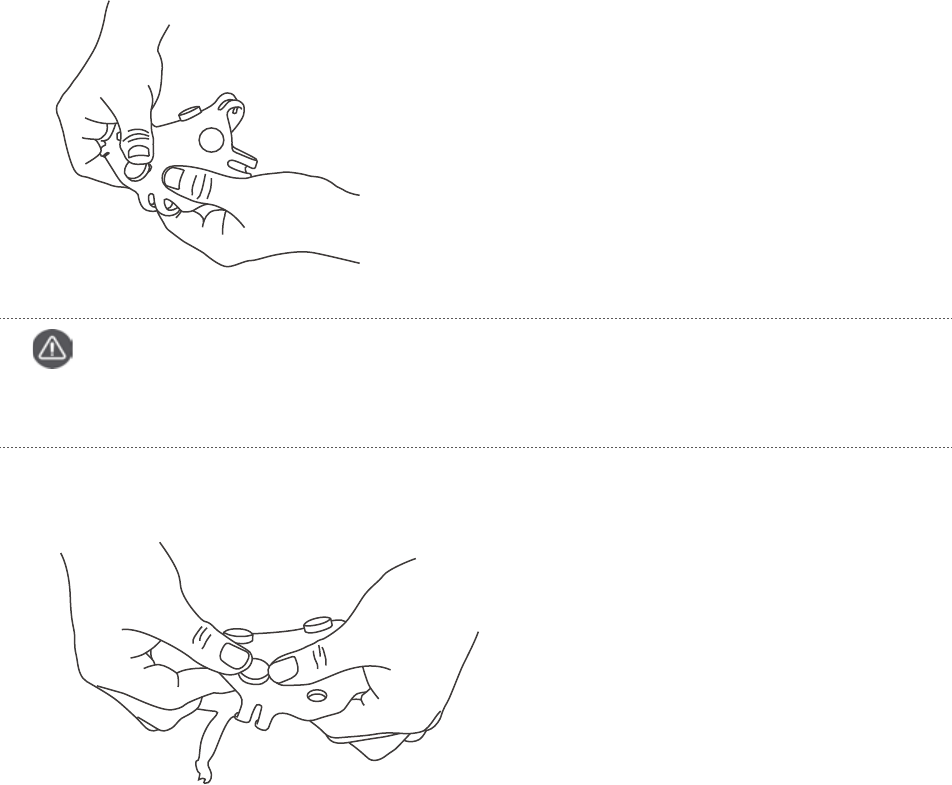
1. One hand holds the Cover, while the other pinches the slide block. Then bend the block outwards with
strength.
2. Take the damaged block off the Cover.
3. Take out the new block.
It is advised to replace the slide block at the sole of the KAT SHOE COVER when it is loose or cannot roll properly.
60 Dismantling and Replacement
4. One hand holds the Cover, while the other press the block into the block slot.
5. Complete the block replacement.
Caution
Make sure the orientations of the block upper and lower surface are consistent with those of other
blocks when pressing it.
61 FAQ
Unable to Walk or Walk Slowly in the Game
Cause: The DLL files are not installed
Solution; Choose settings ->add dlls of the game platform login screen.On the pop up window, double click the bat
file to install dlls.
Cause: Incorrect connection of KATVR-Foot Sensor
Solution: If the working indicator on the KATVR-Foot Sensor is red, check if its six-digit dialer value is consistent with
that of the wireless receiver. If not, switch off the foot sensor, re-dial it, then switch on.
Cause: Inconsistent dialing values of the two KATVR-Foot Sensors
Solution: Turn off the two KATVR-Foot Sensors, and make the values of the two KATVR-Foot Sensors consistent with that
of the wireless receiver.
Cause: KATVR-Foot Sensor erro
r
Solution: If the re-dial does not work, then there is an error with the KATVR-Foot Sensor which may need to be replaced
with a new one
.
Cause: The static value is not set; improper operations in the settings of the static value
Solution: Re-set the static value by following the steps on page 47 of the User Manual. Make sure the player stands
upright on the KAT WALK when setting up the static value. If the player is thin, ask him to slightly lean back.
Cause: The player did not stand upright on the KAT WALK as instructed in the settings of the
static value
Solution: Re-set the static value by following the steps on page 47 of the User Manual. Make sure the player stands
upright on the KAT WALK when setting up the static value. If the player is skinny, ask him to slightly lean back.
Cause: Inconsistent values of the KATVR-Central and the KATVR-Back Sensor or multiple
equipment with the same dialing value in the same place
Solution: Check if the dialing value of the KATVR-Central is consistent with that of the KATVR-Back Sensor. Make them
consistent if not and note the position of the ON on the dialer when dialing it.
(If there is more than one KAT WALK within the same room, check if their values are the same. If so, please dial the
dialers to make the values different.)
62 FAQ
Inconsistent Walking Orientation Between Figures in the
Game and in the Reality
Cause: The calibration is not done
Solution: Complete the calibration by following the steps on page 44 of the User Manual.
Cause: The base station or the equipment is moved
Solution: Redo the calibration by following the steps on page 44 of the User Manual.
Cause: Improper calibration, failure to follow the instructions in the User Manual
Solution: Redo the calibration by following the steps on page 46 of the User Manual.
Cause: The grounding cable is not installed
Solution: Install the grounding cable by following the steps on page 17 and page 27 of the User Manual
Cause: The positive direction is not reset
Solution: The app button on the controller is the button for resetting the positive direction in the game. During the game,
the player holds the handles in both hands facing the positive direction, and resets the positive direction of the game
by pressing the app button.
It prompts “The MAC address has been changed.
Please contact the administrator to rebind with the mac
address” when you enter the page with the details of the
game
Cause: The MAC address has been changed
Solution: Write down the new mac address and the account and contact the KAT service center to rebind your account
with the new address.
No sound from the speaker in the control center
Cause: The speaker in the control center is overloaded.
Solution: Control the volume within around 70% when playing sounds through the speaker.
It prompts “System error. Please contact the administrator”
Cause: Local network error
Solution: Check the local network connection. Restart the router before restarting the control center.
63 FAQ
Unable to Download the Game
Cause: Network connection error
Solution: Check if the network connection is normal
Cause: Insufficient storage of the C drive
Solution: Check the remaining space of the C drive. If it is small, clean up the drive.
Cause: Error in the game download
Solution: Enter the windows->downloadgame file to find the corresponding game file. Manually delete the file,
download and install the game once again on the KAT entertainment platform. Do not exit the software or switch to
other pages during the download.
No Signal on the Control Center Screen
Cause: The graphics card is not properly connected
Solution: Check if the DVI cable connection is normal between the case and behind the screen cover. If it is normal, cut
off the power supply to the control center, find the graphics card in the case, unplug it, re-install it and make sure it is
properly installed. Resupply the power to the control center to start it.
The Power Indicator of the Is Not On
Cause: No power supply to the KATVR-Central
Solution: Check if the USB cable is loose. Plug the cable out and in, replace the USB port on the control center and
resupply the power to the KATVR-Central.
Cause: KATVR-Central error
Solution: Replace the KATVR-Central with a new one
64 FAQ
The Blue Indicator of the KATVR-Central Is Not On
Cause: The KATVR-Back Sensor is not power on
Solution: Check if the KATVR-Back Sensor is power on. Plug the cable out of and into the power socket of the
KATVR-Back Sensor . Observe if the blue indicator turns on.
Cause: Inconsistent values of the KATVR-Central and of the KATVR-Back Sensor or multiple
equipment with the same dialing value in the same place
Solution: Check if the dialing value of the KATVR-Central is consistent with that of the KATVR-Back Sensor . If not, make
them consistent and note the position of the ON on the dialer when dialing it.
(If there is more than one KAT WALK within the same room, check if their values are the same. If so, please dial the
dialers to make the values different.)
Cause: KATVR-Central or KATVR-Back Sensor error
Solution: Replace the KATVR-Central or KATVR-Back Sensor .
The Game Character Cannot Turn Around Properly
Cause: KATVR-Top Sensor error
Solution: 1. Replug the end of top sensor connecting cable to the central sensor;
2. Replace the KATVR-Top Sensor.
Cause: The grounding cable is not installed and the sensors are affected by the static
electricity
Solution: Install the grounding cable by following the steps on page 16 of the User Manual.
65 Warnings
FCC Warnings
This device complies with Part 15 of the FCC Rules. Operation is subject to the following two conditions:
(1) this device may not cause harmful interference, and
(2) this device must accept any interference received, including interference that may cause undesired operation.
Changes or modifications not expressly approved by the party responsible for compliance could void the user's authority to
operate the equipment.
NOTE: This equipment has been tested and found to comply with the limits for a Class B digital device, pursuant to Part
15 of the FCC Rules. These limits aredesigned to provide reasonable protection against harmful interference in aresidential
installation. This equipment generates, uses and can radiate radio frequency energy and, if not installed and used in
accordance with the instructions, may cause harmful interference to radio communications. However, there is no guarantee
that interference will not occur in a particular installation.If this equipment does cause harmful interference to radio or
television reception, which can be determined by turning the equipment off and on, the user is encouraged to try to correct
the interference by one or more of the following measures:
-- Reorient or relocate the receiving antenna.
-- Increase the separation between the equipment and receiver.
-- Connect the equipment into an outlet on a circuit different
from that to which the receiver is connected.
-- Consult the dealer or an experienced radio/TV technician for help.
FCC RF warning statement:
The device has been evaluated to meet general RF exposure requirement. The device can be used in portable exposure
condition without restriction.
Manufacturer:Hangzhou Virtual And Reality Technology Co., LTD.
Address:Room 1405,Building 2,Haichuang Technology Centre,
Cangqian Street,Yuhang District,Hangzhou,Zhejiang Province
66 Warnings
IC Warnings
This device complies with Industry Canada licence-exempt RSS standard(s).Operation is subject to the following two
conditions:
(1) this device may not cause interference, and
(2) this device must accept any interference, including interference that may cause undesired operation of the device.
Le présent appareil est conforme aux CNR d'Industrie Canada applicables aux appareils radio exempts de licence.
L'exploitation est autorisée aux deux conditions suivantes :
(1) l'appareil ne doit pas produire de brouillage, et
(2) l'utilisateur de l'appareil doit accepter tout brouillage radioélectrique subi, même si le brouillage est susceptible
d'en compromettre le fonctionne-ment.
EU Regulatory Conformance
Hereby,we,Hangzhou Virtual And Reality Technology Co., LTD. declare that this equipment KATVR-KAT WALK is in
compliance with the essential requirements and other relevant provisions of Directive 2014/53/EU.The declaration of
conformity may be consulted at www.katvr.com