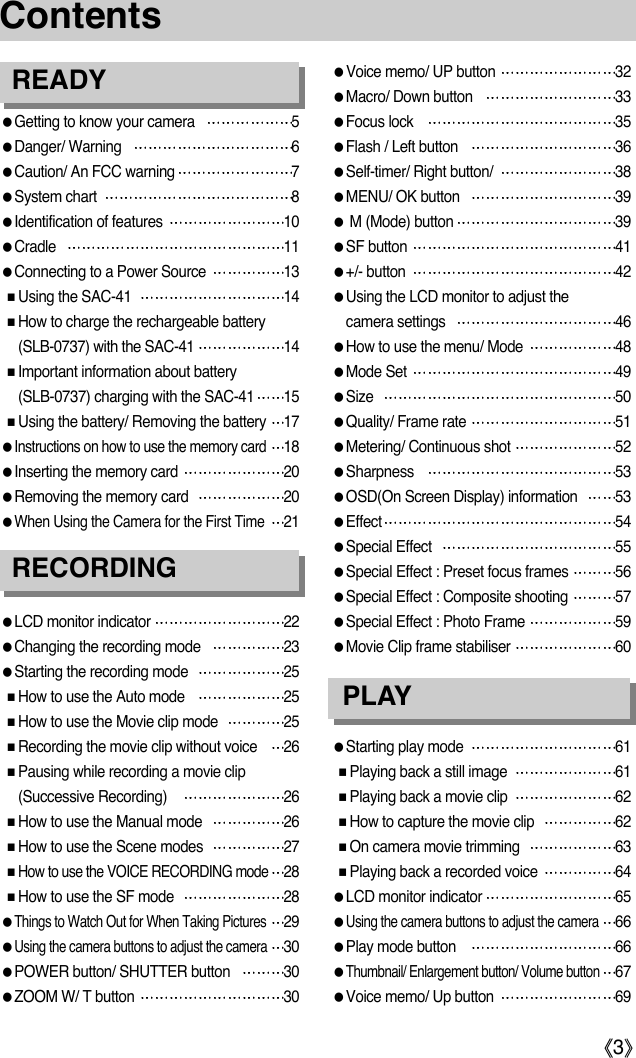
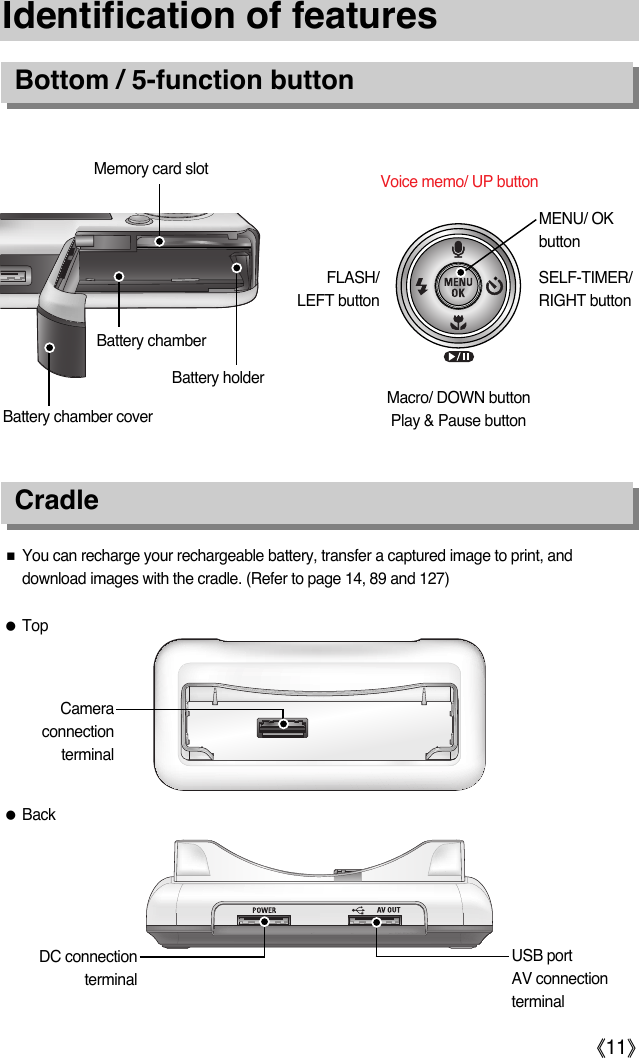
Hanwha Techwin DIGIMAXI50MP3 Digital Camera Including MP3 Play Function User Manual
Samsung Techwin Co Ltd Digital Camera Including MP3 Play Function Users Manual
UserManual.wiki
>
Hanwha Techwin
>
DIGIMAXI50MP3 User Manual
>
Users Manual 1 of 2
Contents
1.
Users Manual 1 of 2
2.
Users Manual 2 of 2
Users Manual 1 of 2
Navigation menu
Upload a User Manual
Namespaces
Wiki Guide
HTML
PDF
Info
Views
User Manual
Discussion / Help
Navigation
![ŝ2ŞInstructionsƈUse this camera in the following orderInsert the USB cableSet up the camera driverBefore connecting the camera to a PC, via the USBcable, you will need to set up the camera driver.Install the camera driver that is contained inApplication software CD-ROM. (p.117)Take a picture. (p.24)Insert the supplied USB cable into the PC’s USBport and the camera’s USB connection terminal.(p.127)Check the camera’s power. If the power is turned off,press the camera button to turn it on. (p.31)Take a pictureCheck the camera’s powerCheck [Removable Disk]Open WindowŖs EXPLORER and search for[Removable Disk]. (p.128)ƃIf you use a card reader to copy the images on the memory card to your PC, the imagescould be damaged. When transferring the images taken with the camera to your PC, be sureto use the supplied USB cable to connect the camera to your PC. Please note that themanufacturer holds no responsibility for loss or damage of images on the memory card dueto the use of a card reader.](https://usermanual.wiki/Hanwha-Techwin/DIGIMAXI50MP3.Users-Manual-1-of-2/User-Guide-572094-Page-2.png)
![ŝ4ŞContentsƃPlay & Pause/ Down button 70ƃDelete button 70ƃLeft/ Right/ Menu/ OK button 71ƃAlbum button 72ƃSetting up the play back function using theLCD monitor 75ƃStarting the slide show 78ƃProtecting images 80ƃDeleting images 81ƃResize 82ƃEffect 83ƃRotating an image/ DPOF 84ƃCopy To Card 87ƃOSD Information 88ƃPictBridge 89ƃSetup menu 94ƃFile name 95ƃAuto power off 96ƃLanguage 97ƃFormatting a memory card 97ƃSetting up the Date/ Time/ Date type 98ƃImprinting the recording date 98ƃSound 99ƃConnecting an External Device (USB) 99ƃAuto Focus lamp/ LCD brightness 100ƃSelecting Video out type 101ƃQuick view/ Initialisation 103ƃSetting up the Mycam menu 104ƃStart up image 104ƃStart up sound/ Shutter sound 105ƃMP3 mode 106ƃStarting the MP3 mode 107ƃLCD monitor indicator of the MP3 mode 109ƃUsing the camera buttons to adjust thecamera 110ƃList button 110ƃLock button 111ƃVolume button 112ƃControl button 112ƃDelete button 112ƃSetting up the play back function using theLCD monitor 113ƃPlay modeōōōōōōōōōōōōōƃDelete allōōōōōōōōōōōōōƃSlide ShowōōōōōōōōōōōōƃImportant notes 115ƃWarning indicator 117ƃBefore contacting a service centre 118ƃSpecifications 121ƃ༜ጕኤၢေ ໓၏စ ጥჶႉ໓ጫōōōōōōōōōōōōōōƃଇႧ ཫརታ ໓ōōōōōōōōōōƃ༜ጕኤၢ ࿎ஷ ōōōōōōōōōōƃ༜ጕኤၢ ᇛ "?QV! ;-໓၏ႜ၏ōƃ༜ጕኤၢ ᇛ "?QV5-@8໓၏ႜ၏ōōōōōōōōōōōōōō!ƃᇾጏብ တૃ ෂಝႉ ཫႝ ōōōōōōƃ?QVLW_[! ;-၏ ᇥධഉ ಝഉႎฦ ધōƃႎ౷ཬ ನརቁႉ ።၏ōōōōōōōō!ƃႎ౷ཬ ನརቁႉ ધōōōōōōōōƃ5IKQV\W[Pစ ᇥධഉ တૃጣଢ ōōōōƃ5IKQV\W[P၏ ႎ౷ཬ ನརቁ ໓၏ถอōƃ,QOQUI`5I[\MZႉ ።၏ ōōōōōōōƃ,QOQUI`:MILMZႉ ።၏ ōōōōōōō ƃQ0]Jႉ ።၏ōōōōōōōōōōōōƃ.)9 ōōōōōōōōōōōōōōōōMP3 MODESOFTWARESETUP](https://usermanual.wiki/Hanwha-Techwin/DIGIMAXI50MP3.Users-Manual-1-of-2/User-Guide-572094-Page-4.png)

![ŝ18ŞInstructions on how to use the memory cardƃBe sure to format the memory card (see p.97) if you are using a newly purchased memory forthe first time, if it contains data that the camera cannot recognise, or if it contains imagescaptured with a different camera.ƃTurn off the camera power whenever the memory card is being inserted or removed.ƃRepeated use of the memory card will eventually reduce the memory card’s performance.Should this be the case, you will need to purchase a new memory card. Wear and tear on the memory card is not covered by the Samsung warranty.ƃThe memory card is an electronic precision device. Do not bend, drop or subject the memory card to any heavy impact.ƃDo not store the memory card in an environment with strong electronic or magnetic fields,e.g. near loud speakers or TV receivers.ƃPlease do not use or store in an environment where there are extremes in temperature.ƃDo not allow the memory card to become dirty or to come into contact with any liquid. Should this happen, clean the memory card with a soft cloth.ƃPlease keep the memory card in its case when not in use.ƃDuring and after periods of extended use, you may notice that the memory card is warm. This is perfectly normal.ƃDo not use a memory card that is used in another digital camera.To use the memory card in this camera, format the memory card using this camera. ƃDo not use a memory card formatted by another digital camera or memory card reader.ƃIf the memory card is subjected to any of the following, the recorded data may becomecorrupted :- When the memory card is used incorrectly.- If the power is switched off or the memory card is removed while recording, deleting(formatting) or reading.ƃSamsung cannot be held responsible for lost data.ƃIt is advisable to copy important data onto other media as back-up e.g. floppy disks, harddisks, CD etc.ƃIf there is insufficient memory available : A [Card Full!] message will appear and the camera will not operate. To optimise the amountof memory in the camera, replace the memory card or delete unnecessary images storedon the memory.](https://usermanual.wiki/Hanwha-Techwin/DIGIMAXI50MP3.Users-Manual-1-of-2/User-Guide-572094-Page-18.png)
![ŝ19ŞInstructions on how to use the memory cardƃDon't remove the memory card when the camera status lamp is blinking as this maycause damage to data in the memory card.INFORMATION[ SD (Secure Digital) memory card ]WriteprotectswitchLabelCard pinsƈThe camera can use SD Memory Cards and MMC (Multi Media Cards). Please consult theenclosed manual for using the MMC Cards.The SD memory card has a write protect switchthat prevents image files from being deleted orformatted. By sliding the switch to the bottom ofthe SD memory card, the data will be protected.By sliding the switch to the top of the SDmemory card, the data protection will becancelled. Slide the switch to the top of the SD memorycard before taking a picture.ƈWhen using a 32MB memory, the specified shooting capacity will be as follows. These figures are approximate as image capacities can be affected by variables such assubject matter.ſThe zoom buttons are not pressed during the movie clip recording. The recording times can be changed by the zoom operation. Recorded image size S. Fine Fine Normal30FPS 15FPS5M(2592x1944) 11 21 32 - -4M(2272x1704) 14 27 40 - -3M(2048x1536) 17 33 49 - -2M(1600x1200) 28 52 75 - -1M(1024x768) 66 111 151 - -VGA(640x480) 149 217 275 - -640(640X480) - - -About 2MIN About 4MIN320(320X240) - - -About 4MIN About 7MIN160(160X128) - - -About 8MIN About 15MINStillimage* Movieclip](https://usermanual.wiki/Hanwha-Techwin/DIGIMAXI50MP3.Users-Manual-1-of-2/User-Guide-572094-Page-19.png)
![ŝ21ŞWhen Using the Camera for the First TimeƈCharge the rechargeable battery fully before using the camera for the first time. ƈWhen the camera is turned on for the first time, a menu will be displayed to set date, time andlanguage in the LCD monitor. This menu will not be displayed after setting up the date, timeand language. Set up the date, time and language before using this camera. ƃSetting up the date, time and date type1. Select the [Date&Time] menu by pressing the UP/DOWNbutton and press the RIGHT button.2. Select the desired sub menu by pressing the UP/ DOWN/LEFT/ RIGHT button.RIGHT button : selects YEAR/ MONTH/ DAY/ HOUR/ MINUTE/DATE TYPELEFT button : Moves the cursor to the [Date&Time]main menu if the cursor is at the first item of the date and time setup.In all other instances, the cursor will be shifted to the left of its currentposition.UP/ DOWN button : changes the value of each item.ƃYou can select 21 languages. These are listed below : English, Korean, French, German, Spanish, Italian, S.Chinese, T.Chinese, Japanese,Russian, Portuguese, Dutch, Danish, Swedish, Finnish, Thai, BAHASA(MALAY/ INDONESIAN), Arabic, Hungarian, Czech and Polish. ƃEven if the camera is restarted, the language setting will be maintained.INFORMATIONƃSetting up the language1. Select the [Language] menu by pressing the UP/DOWNbutton and press the RIGHT button.2. Select the desired sub menu by pressing the UP/ DOWNbutton and press the OK button. When the settings are complete, press the MENU buttontwice to exit the menu screen.Date&TimeLanguageSetupBack:ȜSet:OKƊ05/05/01 13:01ƌyy/mm/ddDate&TimeLanguage ENGLISHጥૹFRANÇAISDEUTSCHESPAÑOLSetupBack:ȜSet:OK](https://usermanual.wiki/Hanwha-Techwin/DIGIMAXI50MP3.Users-Manual-1-of-2/User-Guide-572094-Page-21.png)
![ŝ22ŞLCD monitor indicatorƈThe LCD monitor displays information about the shooting functions and selections.[Image & Full Status]No. Description Icons Page2Battery p.183Continuous shot p.534Flash p.375Self-timer p.396 Macro p.357 Metering p.538 Card inserted indicator -9 Auto focus frame -10 Camera shake warning p.3011 Date/ Time 2005/05/01 01:00 PM p.9812 Exposure compensation p.4513 White Balance p.4414 ISO p.44Recording mode1p.50ڹںڻڼڽھڿۀۅۄۆۇ؆؇؈ۂہ ۃ؊؉](https://usermanual.wiki/Hanwha-Techwin/DIGIMAXI50MP3.Users-Manual-1-of-2/User-Guide-572094-Page-22.png)
![ŝ23ŞLCD monitor indicatorChanging the recording modeƈSelecting the [Mode] menu1. Insert the battery (p.18). 2. Insert the memory card (p.21). As this camera has a 50MB internal memory, you do notneed to insert the memory card. If the memory card is not inserted, an image will be storedin the internal memory. If the memory card is inserted, an image will be stored on thememory card.3. Close the battery chamber cover.4. Press the power button to turn on the camera.5. Press the menu button and a menu will display. 6. Use the UP/DOWN button to select the [Mode] menu. 7. Select [Still/ Movie/ MP3] or [Full] sub menu by pressingthe UP/ DOWN button. - [Still/ Movie/ MP3]: A still image mode that was selectedon the [Mode set] menu and movie clip mode can be selected. Refer to page 50 for more information about using the [Mode set]menu. - [Full] : Auto, Manual, Movie clip and scene modes can be selected.8. Press the MENU button and the menu will disappear. ƈYou can select the desired working mode by the M (Mode) button located on the back of thecamera and [Mode], [Mode set] menu. Auto, manual, movie clip, scene (night, portrait,children, landscape, text recognition, close-up, sunset, dawn, backlight, fireworks, beach & snow) camera modes are available. 15 RGB RGB p.4316 Sharpness p.5417 Image quality p.52Number of available shots remaining 38Remaining time (Movie clip/ Voice recording)00:01:30/ 01:00:0020 Voice memo/ Mic. off p.34/271918p.51p.20Image sizeOptical/ Digital Zoom bar/ Digital Zoom rate21 p.32Still & MovieFullMode](https://usermanual.wiki/Hanwha-Techwin/DIGIMAXI50MP3.Users-Manual-1-of-2/User-Guide-572094-Page-23.png)
![ŝ24ŞChanging the recording modeƃChanging the recording mode : If the [Still/ Movie/ MP3] menu was selectedSteps from 1-4 are the same as those for selecting the [Mode] menu. 5. A recording mode used just before will display.6. Press the M (Mode) button located on the back of the camera and the recording mode willchange to the movie clip mode. 7. Press the M (Mode) button twice and a still image mode selected on the [Mode set] menuwill be selected. ƃChanging the recording mode : If the [Full] menu was selectedSteps from 1-4 are the same as those for selecting the [Mode] menu. 5. A recording mode used just before will display.6. Press the M (Mode) button located on the back of the camera and the mode selectionmenu will display. 7. To select the Auto, Manual, Movie clip or Scene modes, press the Left/Right button. To move between the Auto, Manual, Movie clip menu line and Scene menu line, press theUp/Down button. 8. Press the M (Mode) button and the mode selection menu will disappear.Pressing the M (Mode) button twice[AUTO mode] [MOVIE CLIP mode]Pressing the Up buttonNight[Selecting the Scene mode]Pressing the Left button[Mode selection menu]AUTOSet : OK/MMovie[Selecting the Movie clip mode]Set : OK/MSet : OK/M](https://usermanual.wiki/Hanwha-Techwin/DIGIMAXI50MP3.Users-Manual-1-of-2/User-Guide-572094-Page-24.png)
![ŝ25ŞStarting the recording modeƈHow to use the Auto modeUse this for shooting basic still images. 1. Select the [Full] sub menu on the [Mode] menu (p.24). 2. Select the Auto mode by pressing the M (Mode) button(p.25).3. Point the camera towards the subject and compose theimage by using the LCD monitor.4. Press the shutter button to capture an image.ƈHow to use the Movie clip modeA movie clip can be recorded for as long as the available recording time of the memorycapacity allows. 1. Select the [Full] sub menu on the [Mode] menu (p.24). 2. Select the Movie clip mode by pressing the M (Mode)button (p.25).3. Point the camera towards the subject and compose theimage by using the LCD monitor.4. Press the shutter button once and movie clips arerecorded for as long as the available recording timeallows. Movie clips will still be recorded if the shutterbutton is released. If you wish to stop recording, press the shutter button again.ſImage size and type are listed below.- Image size : 640X480, 320X240, 160X128 (user selectable)- Movie clip file type : AVI (MPEG-4)ƃIf the auto focus frame turns to red when you press the shutter button down half way, itmeans that the camera cannot focus on the subject. Should this be the case, the camerais less likely to capture an image clearly.ƃAvoid obstructing the lens or the flash when you capture an image.INFORMATION[AUTO mode][MOVIE CLIP mode]](https://usermanual.wiki/Hanwha-Techwin/DIGIMAXI50MP3.Users-Manual-1-of-2/User-Guide-572094-Page-25.png)
![ŝ26ŞStarting the recording modeƈHow to use the Manual modeSelecting the automatic mode will configure the camera with optimal settings. You can still manually configure all functions except the aperture value and shutter speed.1. Select the [Full] sub menu on the [Mode] menu (p.24). 2. Select the Manual mode by pressing the M (Mode) button(p.25).3. Point the camera towards the subject and compose theimage by using the LCD monitor.4. Press the shutter button to capture an image.ƈPausing while recording a movie clip (Successive Recording)This camera allows you to temporarily stop during unwanted scenes, while recording a movieclip. Using this function, you can record your favourite scenes into a movie clip without havingto create multiple movie clips.ƃUsing Successive RecordingSteps from 1-2 are the same as those for MOVIE CLIPmode.3. Point the camera towards the subject and compose theimage by using the LCD monitor. Press the shutterbutton and movie clips are recorded for as long as theavailable recording time. Movie clips will still be recordedif the shutter button is released.4. Press the Pause button( ) to pause recording.5. Press the Pause button( ) again to resume the recording.6. If you wish to stop recording, press the shutter button again.ƈRecording the movie clip without voiceYou can record the movie clip without voice. Steps from 1-3 are the same as those for MOVIE CLIPmode. 4. Press the Up button and the ( ) icon will display onthe LCD monitor. 5. Press the shutter button and movie clip is recorded foras long as the available recording time without voice. 6. To stop the recording, press the shutter button again. [MANUAL mode][Successive recording of a movie clip]](https://usermanual.wiki/Hanwha-Techwin/DIGIMAXI50MP3.Users-Manual-1-of-2/User-Guide-572094-Page-26.png)
![ŝ27ŞStarting the recording modeƈHow to use the Scene modesUse the menu to easily configure optimal settings for a variety of shooting situations.1. Select the [Full] sub menu on the [Mode] menu (p.24). 2. Select the Scene mode by pressing the M (Mode) button(p.25).3. Point the camera towards the subject and compose theimage by using the LCD monitor.4. Press the shutter button to capture an image.ſThe scene modes are listed below.[Night]( ) : Use this for shooting still images at night or in other darkconditions.[Portrait]( ) : To take a picture of a person.[Children]( ) : To take a picture of fast moving objects, for example, children.[Landscape]( ) : To take pictures of distant scenery.[Close up]( ) : Close-up shooting for small objects such as plants and insects.[Text]( ) : Use this mode to shoot a document.[Sunset]( ) : For taking pictures of sunsets.[Dawn]( ) : Daybreak scenes.[Backlight]( ) : Portrait without shadows caused by backlight.[Firework]( ) : Firework scenes.[Beach & Snow]( ) : For ocean, lake, beach and snowscape scenes.[SCENE mode]](https://usermanual.wiki/Hanwha-Techwin/DIGIMAXI50MP3.Users-Manual-1-of-2/User-Guide-572094-Page-27.png)
![ŝ28ŞStarting the recording modeƃA distance of 40cm between you and the camera (microphone) is the best distance torecord sound.INFORMATIONƈHow to use the VOICE RECORDING modeA voice recording can be recorded for as long as the available recording time of the memorycapacity allows. (Max: 1 hour)1. Select the [Full] sub menu on the [Mode] menu (p.24).2. Select the Voice Recording mode by pressing the M(Mode) button.3. Press the shutter button to record a voice.- Press the shutter button once and voice is recorded for aslong as the available recording time (Max : 1 hour) allows.The recording time will be displayed on the LCD monitor.Voice will still be recorded if the shutter button is released.- If you wish to stop recording, press the shutter buttonagain.- File type : WAVƈHow to use the SF modeIn poor indoor light conditions, Safety Flash will help you get a good image without the use ofa flash. In every camera mode, the SF mode can be selected. 1. Press the SF mode button. 2. Press the shutter button to capture an image.ſRefer to page 42 for more information about the SF function.[VOICE RECORDING mode][SF mode]](https://usermanual.wiki/Hanwha-Techwin/DIGIMAXI50MP3.Users-Manual-1-of-2/User-Guide-572094-Page-28.png)
![ŝ29ŞThings to Watch Out for When Taking PicturesƈPressing the shutter button down half way Lightly press the shutter button to confirm focus and flash battery charge. Press the shutter button all way down to take the picture.ƈThe available recording time may vary depending on shooting conditions and camerasettings.ƈWhen the Flash Off or Slow synchro mode is selected in a low lighting condition, the camerashake warning indicator ( ) may appear on the LCD monitor. In this case, support thecamera on a solid surface or change the flash mode to flash shot mode.ƈBacklight compensated shots : When taking an outdoor shot, avoid facing the sun, as theimage may be dark because of the strong backlight. To take a picture against the sun, please use the [Backlight] inthe scene shooting mode (see page 28), Fill-in flash (see page 37), Spot metering (see page 53), or Exposurecompensation (see page 45).ƈAvoid obstructing the lens or the flash when you capture an image.ƈUnder certain conditions the auto focus system may not perform as expected.- When photographing a subject that has little contrast.- If the subject is highly reflective or shiny.- If the subject is moving at high speed.- When there is strong reflected light, or when the background is very bright.- When the subject matter has only horizontal lines or the subject is very narrow (such as a stick or flagpole).- When the surroundings are dark[ Lightly press the shutter button ] [ Press the shutter button ]](https://usermanual.wiki/Hanwha-Techwin/DIGIMAXI50MP3.Users-Manual-1-of-2/User-Guide-572094-Page-29.png)
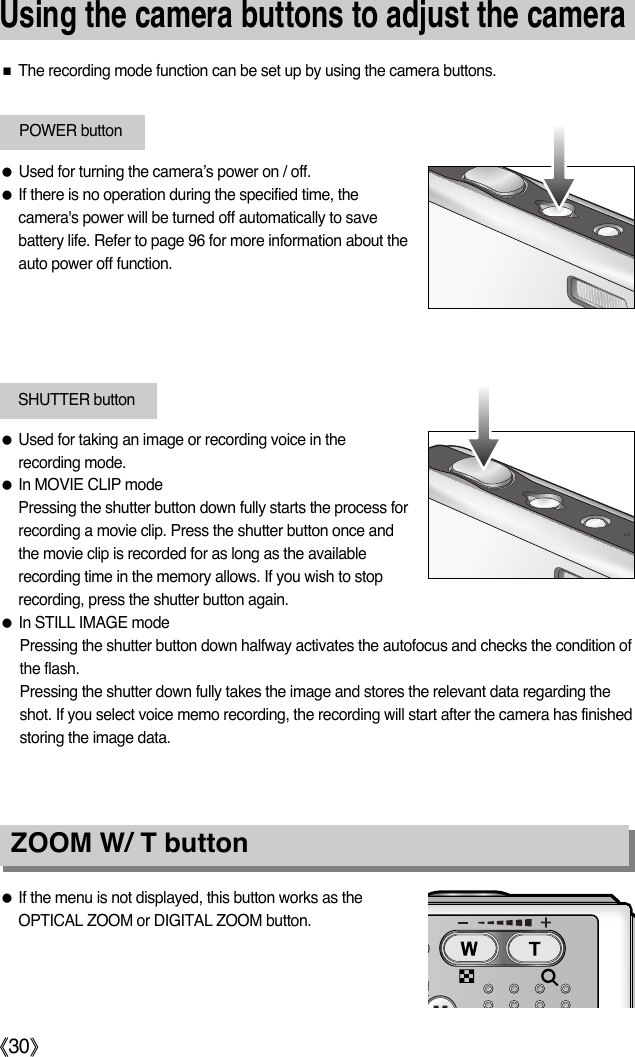
![ŝ31ŞZOOM W/ T buttonƈThis camera has a 3X optical zoom and a 5X digital zoom function. Using both will offer atotal zoom ratio of 15X.ƃTELE ZoomOptical zoom TELE : Pressing the ZOOM T button. This will zoom into the subject i.e.the subject will appear nearer.Digital zoom TELE : When the maximum (3X) optical zoom is selected, pressing theZOOM T button activates the digital zoom software. ReleasingZOOM T button stops the digital zoom at the required setting.Once the maximum digital zoom (5X) is achieved, pressing theZOOM T button will have no effect.[ WIDE zoom ] [ TELE zoom ] [ Digital zoom 5.0X ]Pressing theZOOM T buttonPressing theZOOM T buttonƃWIDE ZoomOptical zoom WIDE : Pressing the ZOOM W button. This will zoom out from the subjecti.e. the subject will appear further away. Pressing the ZOOM Wbutton continuously will set the camera to its minimum zoomsetting i.e. the subject appears at its furthest from the camera.Digital zoom WIDE : When the digital zoom is in operation, pressing the ZOOM Wbutton will reduce the digital zooming in steps.Releasing ZOOM W button stops digital zooming.Pressing the ZOOM W button will reduce the digital zoom andthen it will continue to reduce the optical zoom until the minimumsetting is reached. [ TELE zoom ] [ Optical zoom 2X ] [ WIDE zoom ]Pressing theZOOM W buttonPressing theZOOM W button[ Digital zoom 5.0X ] [ TELE zoom ] [ WIDE zoom ]Pressing theZOOM W buttonPressing theZOOM W buttonOptical zoomDigital zoom](https://usermanual.wiki/Hanwha-Techwin/DIGIMAXI50MP3.Users-Manual-1-of-2/User-Guide-572094-Page-31.png)
![ŝ32ŞZOOM W/ T buttonƃImages taken using the digital zoom may take a little longer for the camera to process.Allow time for this to take place.ƃThe digital zoom cannot be used in movie clip shots.ƃIf the Zoom buttons are being pressed during the Movie clip shots, the voice will notrecorded.ƃYou may notice a decrease in image quality when using the digital zoom.ƃTo view more clear digital zoom image, press the shutter button halfway at the maximum(3X) optical zoom position and press the zoom T button again.ƃThe digital zoom can’t be activated in the [Night], [Children], [Close up], [Text] and[Fireworks] scene modes.ƃTake care not to press the lens, lens cover and camera by force. This may cause thecamera malfunction.INFORMATIONƈWhile the menu is showing, press the UP button to move up the submenu cursor. When the menu is not displayed on the LCD monitor, the UP button operates as the voicememo ( ) button. ƃRecording a voice memo1. Press the M (Mode) button to select a Recording mode with the exception of Movie clipmode.2. Press the Voice memo ( ) button. If the voice memo indicator is displayed on the LCDmonitor, the setting is completed.Pressing the Voice memo buttonVoice memo( ) / UP button](https://usermanual.wiki/Hanwha-Techwin/DIGIMAXI50MP3.Users-Manual-1-of-2/User-Guide-572094-Page-32.png)
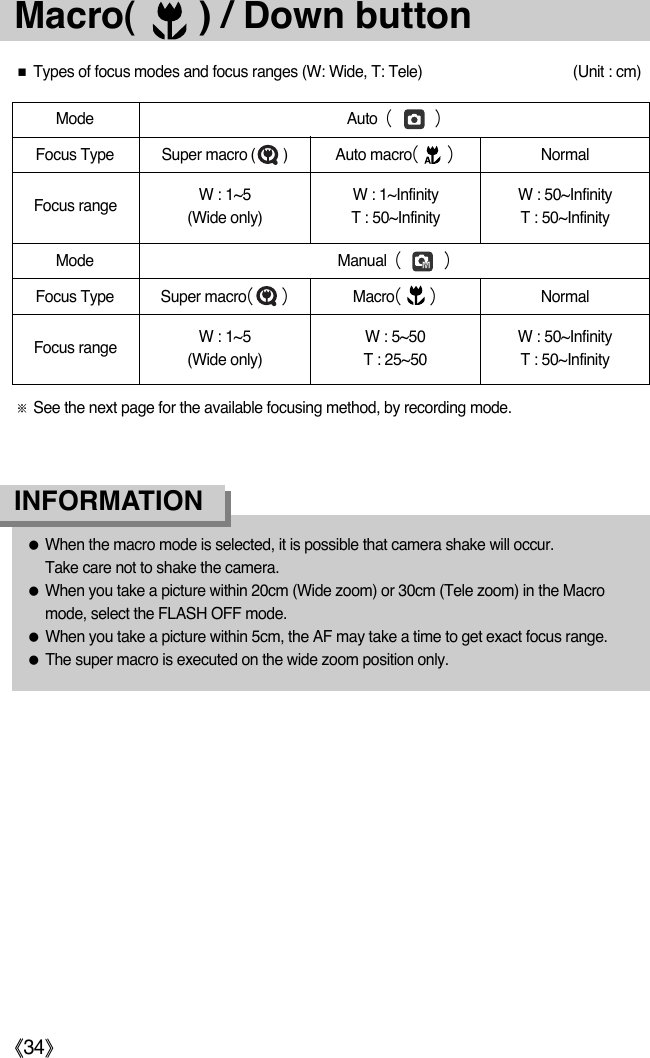
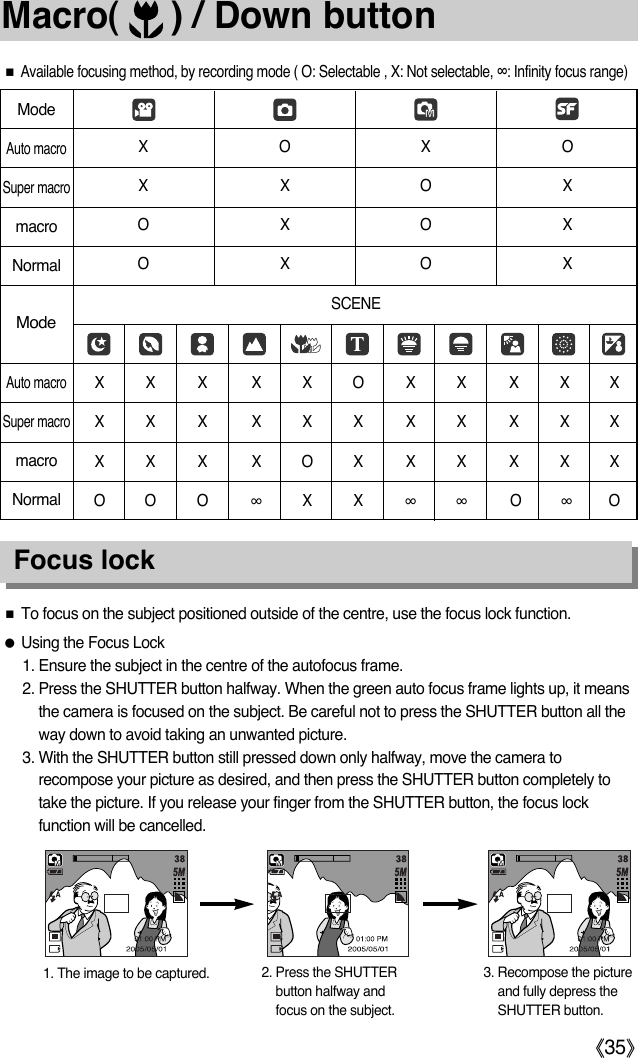
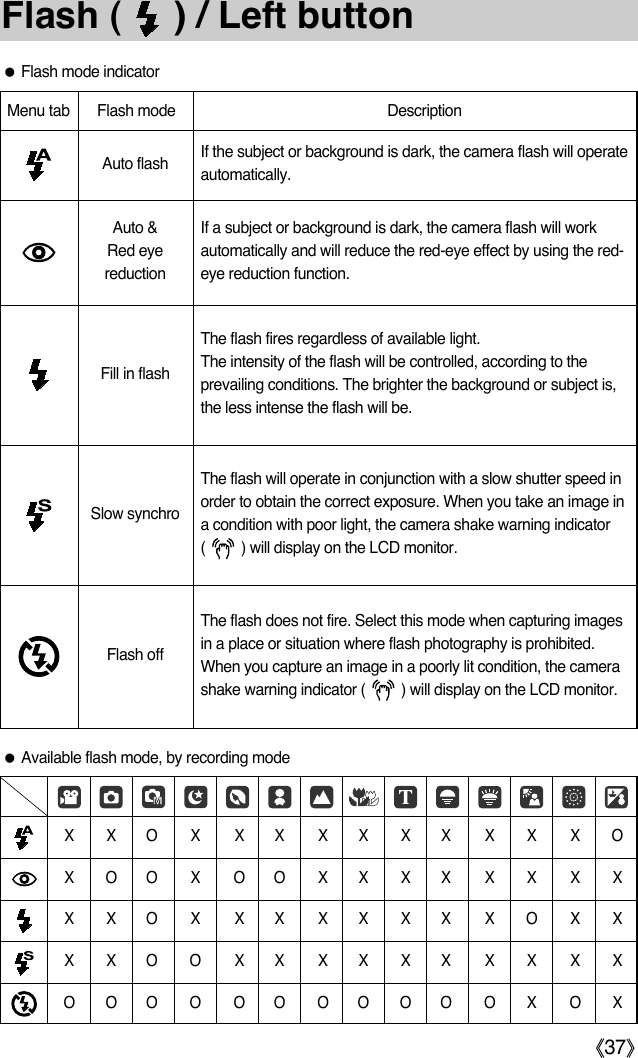
![ŝ33ŞVoice memo( ) / UP buttonƃA distance of 40cm between you and the camera (microphone) is the best distance torecord sound.INFORMATIONƈWhile the menu is showing, press the DOWN button tomove from the main menu to a submenu, or to move downthe submenu cursor. When the menu is not showing, youcan use the MACRO/ DOWN button to take macro pictures.The distance ranges are shown below. Press the Macrobutton until the desired macro mode indicator displays onthe LCD monitor. [Auto focus - No icon][Super macro ( )][Auto macro ( )] [Macro ( )]3. Press the shutter button and take a picture.The picture is stored on the memory.4. Voice memo will be recorded for ten seconds from themoment the picture is stored. In the middle of the voicerecording, pressing the shutter button will stop the voicememo.[Recording Voice Memo]Macro( ) / Down button](https://usermanual.wiki/Hanwha-Techwin/DIGIMAXI50MP3.Users-Manual-1-of-2/User-Guide-572094-Page-33.png)
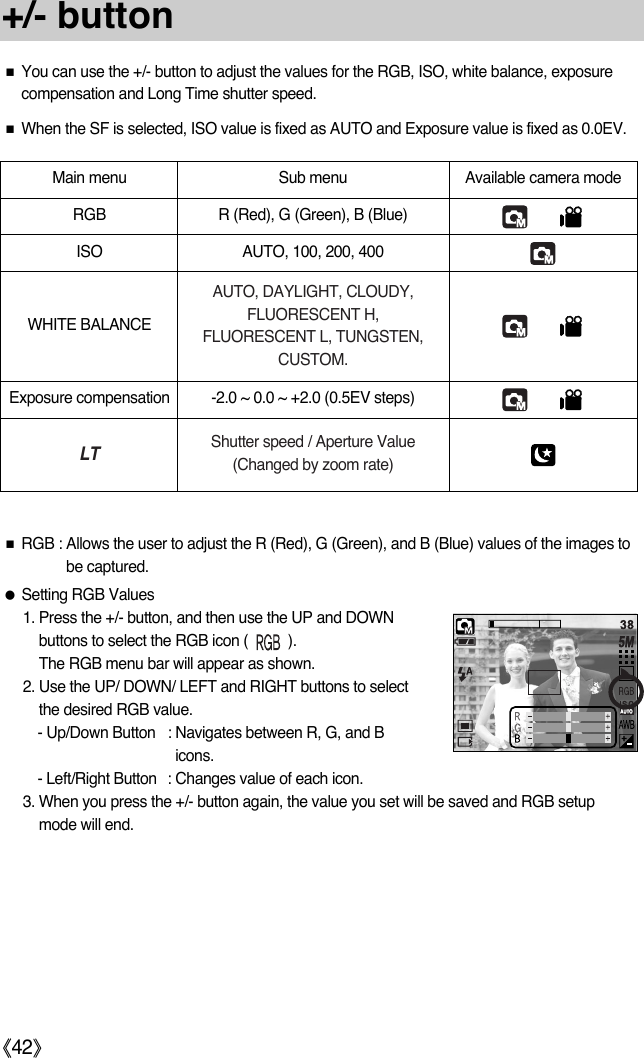
![ŝ36ŞFlash ( ) / Left button[Selecting the Auto flash]ƃFlash range (Unit : m)ƈWhen the menu is displayed on the LCD monitor, pressingthe LEFT button makes the cursor shift to the left tab.ƈWhen the menu is not displayed on the LCD monitor, theLEFT button operates as the FLASH ( ) button.ƃSelecting the flash mode1. Press the M (Mode) button to select a Recording modewith the exception of Movie clip mode (p.25).2. Press the Flash button until the desired flash modeindicator displays on the LCD monitor. 3. A flash mode indicator will be displayed on the LCD monitor. Use the correct flash to suitthe environment.ƃWhen the flash is charging, a flash mode icon (red colour) will blink on the LCD monitor. ƃUsing the flash frequently will reduce the life of the battery.ƃUnder normal operating conditions the charging time for the flash is normally within 4seconds. If the battery is weak, the charging time will be longer.ƃDuring the continuous shot and movie clip mode, the flash function will not operate. ƃTake photographs within the flash range.ƃThe image quality is not guaranteed if the subject is too close or highly reflective.INFORMATIONAuto Macro Auto macroWIDE TELE WIDE TELE WIDE TELE0.5 ~ 2.4 0.5 ~ 1.9 0.2 ~ 0.5 0.3 ~ 0.5 0.2 ~ 2.4 0.5 ~ 1.9ISOAutoſIf the Super macro is selected, the flash is fixed as the Flash Off.](https://usermanual.wiki/Hanwha-Techwin/DIGIMAXI50MP3.Users-Manual-1-of-2/User-Guide-572094-Page-36.png)
![ŝ38ŞSelf-timer ( )/ Right buttonƈWhen the menu is displayed on the LCD monitor, pressing the Right button makes the cursorshift to the right tab. The right button can also be used to move to a sub menu to select adifferent setting. When the menu is not displayed on the LCD monitor, the RIGHT buttonoperates as the Self-timer. This function is used when the photographer would also like to bein the image.ƃUsing the self-timer1. Press the M (Mode) button to select a still image mode or movie clip mode (p.25). 2. Press the Self-timer button until the desired mode indicator displays on the LCD monitor. In Movie clip mode, only the 10 Sec. self-timer can be used.- 2 Sec. Self-timer( ) : Pressing the shutter button will allow an interval of 2 secondsbefore the image is taken. - 10 Sec. Self-timer( ) : Pressing the shutter button will allow an interval of 10 secondsbefore the image is taken. - Double Self-timer( ) : A picture will be taken after about 10 seconds and 2 secondslater a second picture will be taken. When using the flash, the 2-second self-timer may be delayed for longer than 2 secondsdepending on the flash charge time.3. When you press the Shutter button, the picture will be taken after the specified time haselapsed.ſIf you operate the Power button and Self-timer button during the self-timer operation, theself-timer function is cancelled.Pressing the Self-timer button[2 Sec. self-timer]Pressing the Self-timer[10 Sec. self-timer][Double self-timer]](https://usermanual.wiki/Hanwha-Techwin/DIGIMAXI50MP3.Users-Manual-1-of-2/User-Guide-572094-Page-38.png)
![ŝ39ŞMENU/ OK buttonƈMENU button- When you press the MENU button, a menu related to each camera mode will be displayedon the LCD monitor. Pressing it again will return the LCD to the initial display.- A menu option can be displayed when the following are selected :MOVIE CLIP and STILL IMAGE mode. There is no menu available when the VOICERECORDING mode is selected.ƈOK button- When the menu is displayed on the LCD monitor, this button is used for shifting the cursorto the sub menu or for confirming data.ƈYou can turn on the camera with this button. When the camera is turned on by pressing theM button, the Start image will not display and only the still image mode will be executed. ƈYou can select the desired recording mode.The selectable recording modes are different from what you selected sub menu in the [Mode] menu.- [Still/ Movie/ MP3]: A recording mode selected in the [Mode set] menu, Movie clip mode- [Full] : Auto, Movie clip, Manual, Scene modesƃHow to use the mode button : In case of [Still & Movie] and [Auto] sub menu M (Mode) button Pressing the MENU button[Menu off] [Menu on][Auto mode] [Movie clip mode]Pressing the M button twiceAutoManualMovieNightportraitChildrenMode Set](https://usermanual.wiki/Hanwha-Techwin/DIGIMAXI50MP3.Users-Manual-1-of-2/User-Guide-572094-Page-39.png)
![ŝ40ŞPortraitSet : OK/MManualSet : OK/MM (Mode) button ƃHow to use the mode button : In case of [Full] sub menu and Auto modeſPress the Mode button and the mode selection menu will disappear.Pressing the Up buttonPressing the Right buttonPressing the Left/ Right buttonPressing the Left button[Auto mode][Manual mode][Mode selection menu][Movie clip mode][Scene mode]Pressing the Mode button[Selecting a scene mode]NightAutoSet : OK/MSet : OK/MMovieSet : OK/M](https://usermanual.wiki/Hanwha-Techwin/DIGIMAXI50MP3.Users-Manual-1-of-2/User-Guide-572094-Page-40.png)

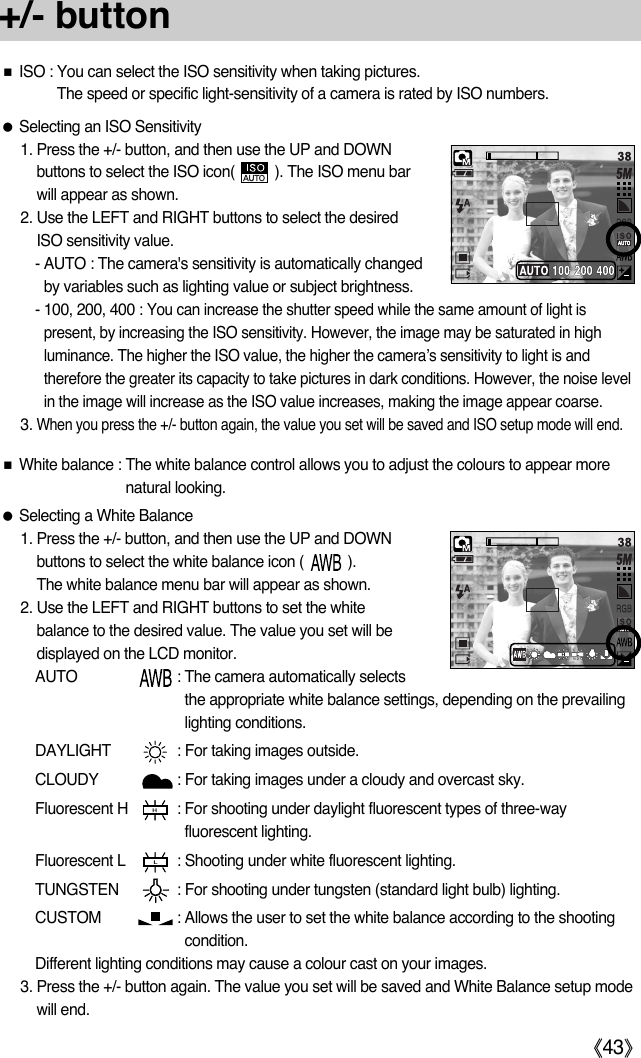
![ŝ44Ş+/- buttonƃUsing the Custom White BalanceWhite balance settings may vary slightly depending on the shooting environment. You can select the most appropriate white balance setting for a given shooting environmentby setting up the custom white balance.1. Select the CUSTOM ( ) menu of the WhiteBalance.2. Place a sheet of white paper in front of the camera sothat the LCD monitor shows only white, and then pressthe SHUTTER button.3. Your custom white balance value is stored.- The custom white balance value will be applied,starting with the next picture you take.- The user configured white balance will be remaineffective until it is overwritten.[ White paper ]ƈExposure compensation : This camera automatically adjusts the exposure according to theambient lighting conditions. You can also select the exposure value by using the +/- button.ƃCompensating Exposure1. Press the +/- button, and then use the UP and DOWNbuttons to select the exposure compensation icon ( ). The exposure compensation menu bar willappear as shown.2. Use the LEFT and RIGHT buttons to set the desiredexposure compensation factor.3. Press the +/- button again. The value you set will besaved and the Exposure Compensation setup mode willclose. If you change the exposure value, the exposure indicator ( ) will be displayedon the bottom of the LCD monitor.ſA negative exposure compensation value reduces the exposure. Note that a positive exposure compensation value increases the exposure and the LCDmonitor will appear white or you may not get good pictures.Measure:Shutter](https://usermanual.wiki/Hanwha-Techwin/DIGIMAXI50MP3.Users-Manual-1-of-2/User-Guide-572094-Page-44.png)
![ŝ45Ş+/- buttonƈLong Time shutter : This camera automatically adjusts the shutter speed and aperture valuesto the shooting environment. However, in NIGHT SCENE mode, you canset the shutter speed and aperture values to your preference.ƃAdjusting the shutter speed and aperture values1. Select the [Night] scene mode. (M button ƍ[Scene] ƍ[Night])2. Press +/- button and Long Time shutter menu(LT, For selecting shutter speed and aperture value) willbe displayed.3. Configure the Long Time shutter value with the up/ down/left/ right button.Up/ Down Button : Select the Aperture / Shutter speedLeft/ Right Button : Change the value. Available aperture value options, depending onzoom step will be displayed on the menu.4. Press the +/- button again. The value you set will be saved and the mode will switch toNIGHT SCENE mode. Press the SHUTTER button to take the picture.Aperture ValueShutter SpeedLarge/Small(Press right button)Large/Small(Press left button)Fast/Slow(Press left button)Fast/Slow(Press right button)ƈAperture values and shutter speeds changed by zoom scale are listed below.F 3.51 S Supported Aperture Values: AUTO, WIDE : F3.5 ~ F6.3, TELE : F4.5 ~ F8.0Supported Shutter Speeds: AUTO, 1 ~ 16S](https://usermanual.wiki/Hanwha-Techwin/DIGIMAXI50MP3.Users-Manual-1-of-2/User-Guide-572094-Page-45.png)
![ŝ48ŞHow to use the menu3. Use the UP and DOWN buttons to select a sub menu.4. Select a sub menu, and then the value you set will be saved. Press the MENU button andthe menu will disappear.ƈYou can select the desired working mode by the M(mode) button located on the back of thecamera and [Mode] menu. Auto, manual, movie clip, scene (night, portrait, children,landscape, text recognition, close-up, sunset, dawn, backlight, fireworks, beach & snow)camera modes are available.[Still/ Movie/ MP3] : A still image mode that was selected onthe [Mode set] menu and movie clipmode can be selected. [Full] : Auto, Manual, Movie clip and scenemodes can be selected.1. Turn on the camera and press the MENU button. A menu for each camera mode appears.However, there is no menu for Voice Recording mode ( ).2. Use the LEFT and RIGHT buttons to navigate through the menus.ModeStill & MovieFullModePress the LEFT or RIGHT button.Press the LEFT or RIGHT button.Press the UP orDOWN button.Press the UP orDOWN button.AutoManualMovieNightportraitChildrenMode Set2592 X 19442272 X 17042048 X 15361600 X 12001024 X 768640 X 480SizeStill & MovieFullModeAutoManualMovieNightportraitChildrenMode SetAutoManual MovieNightportraitChildrenMode SetAutoManual Movie NightportraitChildrenMode Set](https://usermanual.wiki/Hanwha-Techwin/DIGIMAXI50MP3.Users-Manual-1-of-2/User-Guide-572094-Page-48.png)
![ŝ49ŞMode SetƈYou can select the desired recording mode.[Auto] : For shooting basic still image[Manual] : You can still manually configure allfunctions except the aperture value andshutter speed.[Movie] : For taking a movie clip [Night] : Use this for shooting still images at nightor in other dark conditions.[Portrait] : To take a picture of a person.[Children] : To take a picture of fast moving objects, for example, children.[Landscape] : To take pictures of distant scenery.[Close up] : Close-up shooting for small objects such as plants and insects.[Text] : Use this mode to shoot a document.[Sunset] : For taking pictures of sunsets.[Dawn] : Daybreak scenes.[Backlight] : Portrait without shadows caused by backlight.[Firework] : Firework scenes.[Beach & Snow] : For ocean, lake, beach and snowscape scenes.ƃWhen [Night], [Landscape], [Close up], [Text], [Sunset], [Dawn] and [Firework] scenemode are selected, it is possible that camera shake will occur. In this case, take care ofthe camera shaking.INFORMATIONAutoManualMovieNightportraitChildrenMode Set](https://usermanual.wiki/Hanwha-Techwin/DIGIMAXI50MP3.Users-Manual-1-of-2/User-Guide-572094-Page-49.png)
![ŝ50ŞSizeƈYou can select the image size appropriate for your application.Icon5M 4M 3M 2M 1M VGA 640 320 160Size2592X1944 2272X1704 2048X15361600X1200 1024X768640X480 640X480 320X240 160X128STILL IMAGE modeMode MOVIE CLIP modeƃThe higher the resolution, the lower the number of available shots will be because highresolution images require more memory than lower resolution images.INFORMATION[ STILL IMAGE mode ] [ MOVIE CLIP mode ]2592 X 19442272 X 17042048 X 15361600 X 12001024 X 768640 X 480Size640 X 480320 X 240160 X 128Size](https://usermanual.wiki/Hanwha-Techwin/DIGIMAXI50MP3.Users-Manual-1-of-2/User-Guide-572094-Page-50.png)