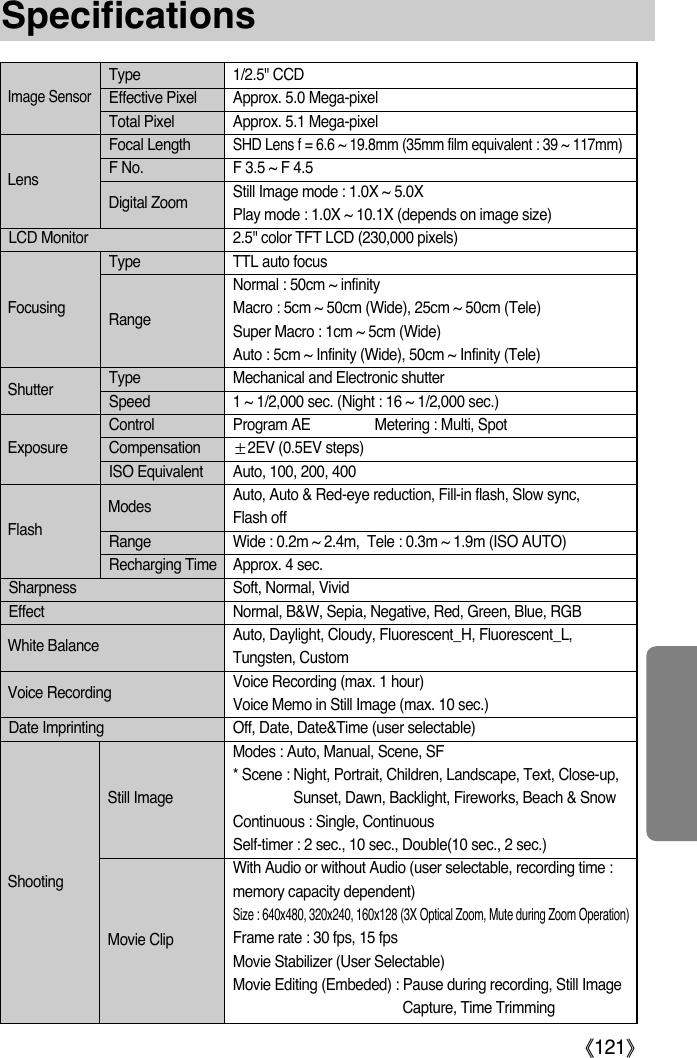
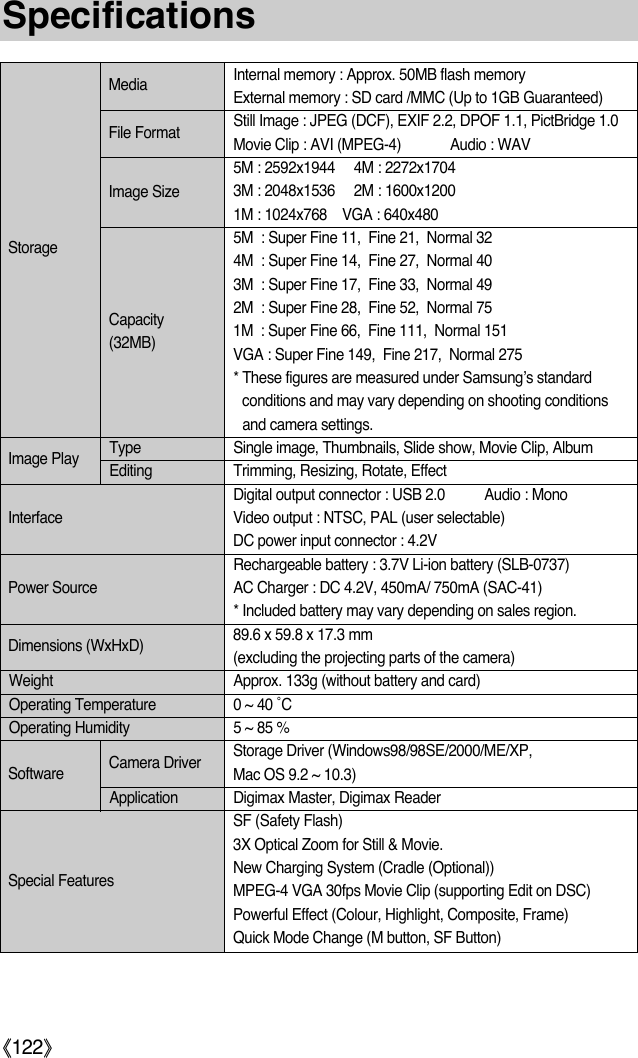
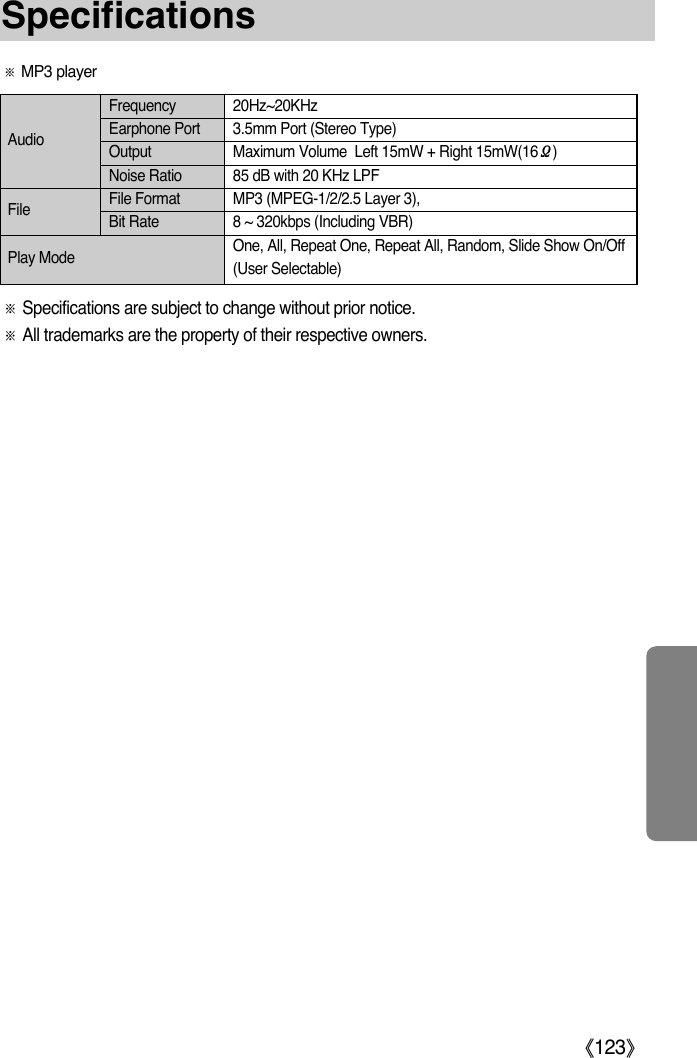
Hanwha Techwin DIGIMAXI50MP3 Digital Camera Including MP3 Play Function User Manual
Samsung Techwin Co Ltd Digital Camera Including MP3 Play Function Users Manual
UserManual.wiki
>
Hanwha Techwin
>
DIGIMAXI50MP3 User Manual
>
Users Manual 2 of 2
Contents
1.
Users Manual 1 of 2
2.
Users Manual 2 of 2
Users Manual 2 of 2
Navigation menu
Upload a User Manual
Namespaces
Wiki Guide
HTML
PDF
Info
Views
User Manual
Discussion / Help
Navigation
![ŝ51ŞQuality/ Frame rateƈYou can select the compression ratio appropriate for your application of the captured images.The higher the compression ratio, the lower the picture quality.Mode IconSub menu S. Fine Fine Normal 30FPS 15FPSFile Format jpeg jpeg jpeg avi avi STILL IMAGE mode MOVIE CLIP modeƃS. Fine is the highest quality and Normal is the lowest setting.Choose the setting appropriate for your needs.ƃThis file format complies with the DCF(Design rule for Camera File system).ƃJPEG (Joint Photographic Experts Group) : JPEG is the image compression standard developed by the Joint Photographic ExpertsGroup. This type of compression is most commonly used for compressing photos andgraphics because it can compress the files efficiently without damaging the data.INFORMATION[ STILL IMAGE mode ] [ MOVIE CLIP mode ]30 FPS15 FPSFrame RateS.FineFineNormalQuality](https://usermanual.wiki/Hanwha-Techwin/DIGIMAXI50MP3.Users-Manual-2-of-2/User-Guide-572095-Page-1.png)
![ŝ52ŞMeteringƈSelect the number of pictures in continuous shooting.[Single] : Take one picture only [Continuous] : Images will be taken continuously until theshutter button is released. The shootingcapacity depends on the memory. ſHigh resolution and picture quality increases file savingtime, which increases stand-by time.ſIf the [Continuous] sub menu is selected, the flash willbe off automatically.[MANUAL mode]ƈIf you cannot obtain suitable exposure conditions, you can change the metering method totake brighter pictures.[Multi] ( ) : Exposure will be calculated based on anaverage of the available light in the imagearea. However, the calculation will bebiased towards the centre of the imagearea. This is suitable for general use.[Spot] ( ) : Only the rectangular area in the centreof the LCD monitor will be metered forlight. This is suitable when the subject inthe centre is exposed correctly, regardless of the back lighting. ƃThe default metering mode is Multi pattern metering.ƃIf the subject is not the centre of the focus area, do not use the spot metering as this mayresult in an exposure error. In this circumstance, It is better to use exposurecompensation.INFORMATIONContinuous shot[STILL IMAGE mode]MultiSpotMeteringSingleContinuousShooting](https://usermanual.wiki/Hanwha-Techwin/DIGIMAXI50MP3.Users-Manual-2-of-2/User-Guide-572095-Page-2.png)
![ŝ53ŞSharpnessOSD(On Screen Display) informationƈYou can adjust the sharpness of the picture you want to take.You cannot check the sharpness effect on the LCD monitorbefore you take a picture, because this function is appliedonly when the captured image is stored on the memory. Sub menu Icon Description The edges of the image are softened. This effect is suitable for editing images on your PC.The edges of the image are sharp. This is suitable for printing.The edges of the image are emphasized. The edges will appearsharp, but noise may occur in the recorded image.VividNormalSoftƈIn any mode with the exception of VOICE RECORDINGmode, you can check the recording status in the LCD monitor.ƈIdle mode : If you select the [Save Mode] and the camera isn'toperated during the specified time(about 30SEC.), the camera power will be idle (LCDmonitor : OFF, Camera status lamp : Blinking)automatically.- To use the camera again, press any of the camera buttons except the power button.- If there is no operation during the specified time, the camera power will be turned offautomatically to save battery life. Refer to page 96 for more information about the autopower off function.Full OSDBasic OSDSave ModeOSD Infomation[Full information mode] [Basic information mode] [Power save mode]Full Inf. Mode Basic Inf. Mode Save ModeSoftNormalVividSharpness](https://usermanual.wiki/Hanwha-Techwin/DIGIMAXI50MP3.Users-Manual-2-of-2/User-Guide-572095-Page-3.png)
![ŝ54ŞEffectƈBy using the camera’s digital processor, it is possible to add special effects to your images.[Normal] : No effect is added to the image.[B & W] : Captured images will be stored in black and white.[Sepia] : Captured images will be stored in a sepia tone (a gradient of yellowish brown colours).[Red] : Captured images will be stored in a red tone.[Green] : Captured images will be stored in a green tone.[Blue] : Captured images will be stored in a blue tone.[Negative] : Save the image in negative mode. [MANUAL mode] [ MOVIE CLIP mode]NormalB & WSepiaRedGreenBlueEffectNormalB & WSepiaRedGreenBlueEffect](https://usermanual.wiki/Hanwha-Techwin/DIGIMAXI50MP3.Users-Manual-2-of-2/User-Guide-572095-Page-4.png)
![ŝ55ŞSpecial EffectƈYou can make the subject stand out from its surroundings. The subject will be sharp and in focus while making the rest out of focus.1. Select the MANUAL mode, and press the menu button. 2. Press the LEFT/ RIGHT button and select the [Special Effect] menu tab.3. Select the [HighLight] menu by pressing the UP/ DOWNbutton and press the Right button.4. Select a desired sub menu by pressing the UP/ DOWNbutton and press the OK button.- [Off] : The preset focus frame will not be added. ƈBy using the camera’s digital processor, it is possible to add special effects to your images.You can select this menu only in the MANUAL mode.ƈYou can select the preset focus frame, Composite shooting and Photo frame function. If aspecial effect is selected, the rest special functions set before are cancelled automatically. ƈEven if the camera is turned off, the special effect setting will be preserved. To cancel thespecial effect, select the [Off] sub menu of each menu. ƈThe digital zoom function will not activate in the special effect menu. ƈDate & Time information will not be displayed on the LCD monitor in the special effect menu. Special Effect : Preset focus frames5. Press the menu button twice and the menu will disappear.If you select the [Range 1 ~ 4] menu, the preset focusframe area will appear. [Range 1] [Range 2] [Range 3] [Range 4]HighLightCompositePhoto FrameOffRange 1Range 2Range 3Range 4Special EffectBack:ȜSet:OKCapture:SH Edit:+/-](https://usermanual.wiki/Hanwha-Techwin/DIGIMAXI50MP3.Users-Manual-2-of-2/User-Guide-572095-Page-5.png)
![ŝ56ŞSpecial Effect : Preset focus framesƃMoving and changing the focus frameYou can change the focus frame after selecting a Range menu.1. Point the camera towards the subject and compose the image by using the LCD monitor. 2. Press the +/- button. 3. The colour of focus frame turns white. Press the Up/Down/Left/Right button to moves thefocus frame position. 4. To select the focus frame position, press the +/- button again and you can take a picture. Pressing the +/- button[The frame is activated][After changing the frameposition]Pressing the +/- buttonPressing theUp/Down/Left/RightbuttonCapture:SH Edit:+/- Capture:SH Move:Capture:SH Move:Capture:SH Edit:+/-](https://usermanual.wiki/Hanwha-Techwin/DIGIMAXI50MP3.Users-Manual-2-of-2/User-Guide-572095-Page-6.png)
![ŝ57ŞSpecial Effect : Composite shootingƈYou can combine 2 ~ 4 different shots in a still image.ſYou can use the flash button, self-timer button, macro button, voice memo button and theZoom W/T button during the composite shooting.ſIf you press the camera buttons (SF button, Play mode buttonand M button) during the composite shots, each mode of thecamera buttons is executed. The images captured before willbe deleted. ſIf you press the Menu button during the composite shots, awindow will display. Select the submenu value by pressing theUp/Down button and then press the OK button.[Menu] : A menu will display. After confirming a menu, a camera mode used before will be executed. [Cancel] : Turns to the previous capture mode. ſThe voice memo will start after taking the last composite shooting.ſYou canŖt select the Voice recording mode during the composite shots. ſSelecting 2 composite shooting7. To save the composite shots, press the OK button after taking the last shot. 1. Select the MANUAL mode, and press the menu button.2. Press the LEFT/ RIGHT button and select the [Special Effect] menu tab.3. Select the [Composite] menu by pressing the UP/ DOWNbutton and press the Right button.4. Select a desired sub menu by pressing the UP/ DOWNbutton and press the OK button.- [Off] : cancels the composite shooting- [2 Parts] : 2 different shots are combined in a still image. - [3 Parts] : 3 different shots are combined in a still image.- [4 Parts] : 4 different shots are combined in a still image.- [Pano. 2 Parts] : 2 different panorama shots are combined in a still image. 5. Press the menu button twice and the menu will disappear.6. The number of frames you selected in step 4 is displayed on the LCD monitor. Press the shutter button to start the composite shootingHighLightCompositePhoto FrameOff2 Parts3 Parts4 PartsPANO.2 PartSpecial EffectBack:ȜSet:OK[Ready for taking]Pressingthe shutterbutton[First shot]Pressing the shutterbutton[Second shot]Pressingthe OKbutton[The final picture]Menu?MenuCancelConfirm:OKSave:OK Del:+/-Capture:SH Del:+/-Capture:SH Del:+/-](https://usermanual.wiki/Hanwha-Techwin/DIGIMAXI50MP3.Users-Manual-2-of-2/User-Guide-572095-Page-7.png)
![ŝ58ŞSpecial Effect : Composite shootingƃChanging a part of composite shot before taking the last shotBefore taking the last composite shot, you can change a part of composite shot. 1. During the composite shots, press the +/- button. 2. A previous image will be deleted and new frame will display. If there is an image takenbefore, press the +/- button again and a previous image will be deleted again. 3. Press the shutter button to capture a new image.ƃChanging a part of composite shot after taking the last shotAfter taking the last composite shot, you can change a part of composite shot. 1. After taking the last shot , a cursor to select a frame will display. Press theUp/Down/Left/Right button to select the frame. 2. Press the +/- button and an image will be deleted. Composite frame will be activated. 3. Press the Shutter button. You can take another images again by using theUp/Down/Left/Right button and +/- button.4. Press the OK button again to save the captured image.[After taking the 4th shot]Pressing the Up button[Moving backward to the 2nd shot][Deleting the 2nd shot] [The final picture]Pressing theOK button [After taking the 2nd shot again]Pressing theShutter button. Pressing the +/- buttonPressing the +/- button[Before taking the 3rd shot][Moving backward to the 2nd shot]Save:OK Del:+/- Save:OK Del:+/-Save:OK Del:+/-Capture:SH Del:+/- Capture:SH Del:+/-](https://usermanual.wiki/Hanwha-Techwin/DIGIMAXI50MP3.Users-Manual-2-of-2/User-Guide-572095-Page-8.png)
![ŝ59ŞSpecial Effect : Photo FrameƈYou can add 9 types of frame-like borders to a still image you want to capture.ƈDate & Time information will not be printed on the stored image taken with [Photo Frame]menu. 1. Select the MANUAL mode, and press the menu button.2. Press the LEFT/ RIGHT button and select the [Special Effect] menu tab.3. Select the [Photo Frame] menu by pressing the UP/ DOWNbutton and press the Right button.4. Select a desired sub menu by pressing the UP/ DOWNbutton and press the OK button.- [Off] : The photo frame will not be added. 5. Press the menu button twice and the menu will disappear.If you select the [Frame 1 ~ 9] menu, the selected photoframe will appear.ſBefore taking a picture, you can change the frame type bypressing the +/- button. Change the frame type bypressing the Up/Down/Left/Right button.[Frame 1] [Frame 2] [Frame 3][Frame 4] [Frame 5] [Frame 6][Frame 7] [Frame 8] [Frame 9]HighLightCompositePhoto FrameOffFrame1Frame2Frame3Frame4Special EffectBack:ȜSet:OKCapture:SH Frame:+/-](https://usermanual.wiki/Hanwha-Techwin/DIGIMAXI50MP3.Users-Manual-2-of-2/User-Guide-572095-Page-9.png)
![ŝ60ŞMovie Clip frame stabiliserƈThis function helps stabilize images captured during movie recording. You can select this menu only in the MOVIE CLIP mode. If the memory card is not inserted,this function will not operate.ƃHow to use this function 1. Select the MOVIE CLIP mode by pressing the M (Mode)button and press the menu button. Press the Left/Rightbutton to select the [Stabilizer] menu.2. Select a desired sub menu by pressing the Up/Downbutton and press the OK button. - [Off] : Movie clip frame stabilizer function becomesdisabled. - [On] : Prevents camera shake during movie recording. The recording frame range willbecome narrower than when you select the [Off] menu. Pre-view frames may notdisplay smoothly on the LCD monitor.ƃWhen you select the [On] sub menu, the movie clip frame range will be narrow dependingon the movie clip size. INFORMATIONOffOnStabilizer](https://usermanual.wiki/Hanwha-Techwin/DIGIMAXI50MP3.Users-Manual-2-of-2/User-Guide-572095-Page-10.png)
![ŝ62ŞStarting play modeƃPlaying back a movie clipSteps from 1-2 are the same as those to play back a stillimage.3. Select the recorded movie clip that you want to play backby using the LEFT/RIGHT button. If you select a movieclip, the movie clip indicator ( ) will be displayed onthe LCD monitor.4. Press the play & pause button ( ) to play back amovie clip file.- To pause a movie clip file while playing it back, pressthe play & pause button again.- Pressing the play & pause button again will cause themovie clip file will restart.- To rewind the movie clip while it is playing, press theLEFT button. To fast forward the movie clip, press the RIGHT button.- To stop playback of the movie clip, press the play & pause button, and then press theLEFT or RIGHT button.ƃHow to capture the movie clipSteps 1-2 are the same as those for playing back a stillimage.3. Select the recorded movie clip that you want to playback by using the LEFT/RIGHT button.4. Press the Play/Pause button to play the movie clip5. Press the Play/Pause button while playing the movieclip. Then press the Shutter button.6. The paused movie clip is saved in a new file name.ſThe captured movie clip file has same size as theoriginal movie clip (640X480, 320X240, 160X128).ƈMovie clip capture function : capture still images from the movie clip.[Paused][Press the shutter button]Trim:T Capture:SH](https://usermanual.wiki/Hanwha-Techwin/DIGIMAXI50MP3.Users-Manual-2-of-2/User-Guide-572095-Page-12.png)
![ŝ63ŞStarting play modeƈOn camera movie trimming : You can extract desired frames of movie clip during the movieclip play back. ƃIf the running time is under 10 seconds, the movie clip can’tbe trimmed.1. Select a desired movie clip in the play mode. 2. Play back the movie clip by pressing the Play & Pausebutton.3. Press the Pause button at the point of the movie clip thatyou want to start extracting. 4. Press the T button. (The start point doesn't display on thestatus bar, but the start point will be marked.)5. Press the Play & Pause button and the extracted range willbe displayed on the status bar. 6. Press the Play & Pause button once more at the pointwhere you wish the extracted file to stop. 7. Press the T button and a confirmation window will display.8. Select a desired sub menu by pressing the UP/ DOWNbutton and press the OK button.[Trimming] : The extracted frames are saved as a new filename. [Cancel] : The movie trimming will cancel. ƃIf you want to extract the movie clip at the beginning of the frame, press the Zoom Tbutton before starting the movie clip. (The start point doesn’t display on the status bar, butthe start point is selected.)ƃIf the time line bar passes by the start point by pressing the REW(Left) button, the firstframe of the movie clip will display. ƃIf you doesn’t specify the ending point of the movie clip, the trimming confirmation windowwill display at the point of the last frame.INFORMATION Trim:T Capture:SHTrim:TTrimming?TrimmingCancelConfirm:OK](https://usermanual.wiki/Hanwha-Techwin/DIGIMAXI50MP3.Users-Manual-2-of-2/User-Guide-572095-Page-13.png)

![ŝ66ŞUsing the camera buttons to adjust the cameraƈIn Play mode, you can use the buttons on the camera to conveniently set up the Play modefunctions.ƈIf you have turned on the camera by pressing the POWER button, you can press the PLAYMODE button once to switch to Play mode and press it (Under 1 Sec.) again to switch toRecording mode.ƈYou can turn the power on with the play mode button. The camera is turned on in play mode.Press the play mode button (Under 1 Sec.) again to turn off the camera.ƈPressing the Play mode button for over 1 Sec., you can check the recording information.Play mode button[Play mode display] [Recording information]Pressing for over 1 Sec.Pressing under 1 Sec.Size : 2592X1944Av : F3.5Tv : 1/60ISO : 100 Flash : OffDate : 2005/05/01](https://usermanual.wiki/Hanwha-Techwin/DIGIMAXI50MP3.Users-Manual-2-of-2/User-Guide-572095-Page-16.png)
![ŝ67ŞThumbnail( )/ Enlargement( ) button/ Volume button( )ƃImage enlargement1. Select an image that you want to enlarge and press the enlargement button.2. Different parts of the image can be viewed by pressingthe 5 function button.3. Pressing the thumbnail button will zoom back to theoriginal full sized image.- You can tell whether the image displayed is an enlargedview by checking the image enlargement indicatorshown at the bottom left of the LCD monitor. (If the image is not an enlarged view, the indicator willnot be displayed.) You can also check the area ofenlargement.- Movie clips and WAV files can’t be enlarged.- If an image is enlarged, a loss of quality may occur.ƈYou can view multiple pictures, enlarge a selected picture, and crop and save a selected areaof an image.ƈWhen a movie clip, voice memo or voice recording files is playing back, you can controlvolume of those files by this button. ƃThumbnail display1. While an image is displayed full screen, press the thumbnailbutton.2. The thumbnail display will highlight the image that had beenshowing at the time the thumbnail mode was selected.3. Press the 5 function button to move to a desired image.4. To view an image separately, press the enlargement button.[Normal display mode] [Thumbnail display mode]Pressing the thumbnail button ( )Pressing the enlargementbutton ( )Highlighted imageX1.5](https://usermanual.wiki/Hanwha-Techwin/DIGIMAXI50MP3.Users-Manual-2-of-2/User-Guide-572095-Page-17.png)
![ŝ68ŞThumbnail( )/ Enlargement( ) button/ Volume button( )ƃThe maximum enlargement rate in proportion to the image size.ƃTrimming : You can extract part of the image that you want and save it separately.1. Select an image that you want to enlarge and press theenlargement button.2. Different parts of the image can be viewed by pressingthe 5 function button.3. Press the MENU button and a message will bedisplayed as shown alongside.4. Select a desired sub menu by pressing the UP/ DOWNbutton and press the OK button.[Trimming] : The trimmed image will save as a new file name, and display on the LCDmonitor. [Cancel] : The trimming menu will disappear. ſIf there is little memory space to save the trimmed image, the image can’t be trimmed.ſTo delete the enlarged image during the trimming function, press the delete button.Image size 2592 2272 2048 1600 1024 640Maximum enlargement rate X10.1 X8.8 X8.0 X6.2 X4.0 X2.5X1.5Trimming?TrimmingCancelConfirm:OKƃVolume control : When a movie clip, voice memo or voicerecording files is playing back, you cancontrol volume of those files by this button. PAUSE?[Movie Clip : Playing back] [Movie Clip : Stop]](https://usermanual.wiki/Hanwha-Techwin/DIGIMAXI50MP3.Users-Manual-2-of-2/User-Guide-572095-Page-18.png)
![ŝ70ŞPlay & Pause ( )/ Down buttonƈThis deletes images stored on the memory card.ƃDeleting Images in Play Mode1. Select an image that you want to delete by pressing theLEFT / RIGHT button and press the DELETE( )button.2. A message will display as shown alongside on the LCDmonitor.3. Select the submenu values by pressing the UP/DOWNbutton and then press the OK button.If [Delete] is selected : deletes the selected images.If [Cancel] is selected : cancels "Delete Image".Delete ( ) buttonƈIn Play mode, the play & pause/ down button works as follows:- If the menu is displayedPress the DOWN button to move from the main menu to a sub menu, or to move down thesub menu cursor.- If a still image with a voice memo, a voice file, or a movie clip is playingIn Stop mode : Plays a still image with a voice memo, a voice file, or a movie clip.During playback : Temporarily stops playback.In Pause mode : Resumes playback[Voice recording is stopped] [Voice recording is paused][Voice recording is playing]Delete?DeleteCancelConfirm:OK](https://usermanual.wiki/Hanwha-Techwin/DIGIMAXI50MP3.Users-Manual-2-of-2/User-Guide-572095-Page-20.png)
![ŝ71ŞDelete ( ) buttonƈLEFT / RIGHT/ MENU/ OK buttons activate the following.- LEFT button : While the menu is showing, press the LEFT button to select the menu tabto the left of the cursor.- RIGHT button : While the menu is showing, press the RIGHT button to select the menutab to the right of the cursor, or to move an secondary menu.- MENU button : When you press the MENU button, the play mode menu will be displayedon the LCD monitor. Pressing it again will return the LCD to the initialdisplay.- OK button : When the menu is displayed on the LCD monitor, the OK button is usedfor confirming data that is changed by using the 5 function button.ƃBefore deleting images from the camera, you should protect or download images to yourcomputer that you wish to keep.INFORMATION ƃDeleting Images in Thumbnail Display Mode1. Use the UP, DOWN, LEFT, and RIGHT buttons to select the image you want to delete,and then press the DELETE ( ) button.2. The following message will be displayed on the LCD monitor.3. Select the submenu values by pressing the UP/DOWN button and then press the OKbutton.If [Delete] is selected : deletes the selected images.If [Cancel] is selected : cancels "Delete Image".Press the DELETE button. Delete?DeleteCancelConfirm:OKLeft/ Right/ Menu/ OK button](https://usermanual.wiki/Hanwha-Techwin/DIGIMAXI50MP3.Users-Manual-2-of-2/User-Guide-572095-Page-21.png)
![ŝ72ŞAlbum buttonSelectSlideAddRemoveƈYou can organise the captured still images into albums byusing the Album button.ƈThis camera has 8 albums and each album can take up to100 images. ƈThe album menu loading time depends on the memorycard type. ƃInserting still images into the album1. Select an album.2. Select the [Add] menu by pressing the Up/Down buttonand press the Right button. ƈHow to use the albumƃSelecting the album1. In the play mode, press the Album button. 2. Select the [Select] menu by pressing the Up/Downbutton and press the Right button. 3. Select a desired album by pressing theUp/Down/Left/Right buttons and press the OK button. Exit:MENU Move: SelectSlideAddRemoveSet:OKSelectSlideAddRemoveSelect:T Set:OK](https://usermanual.wiki/Hanwha-Techwin/DIGIMAXI50MP3.Users-Manual-2-of-2/User-Guide-572095-Page-22.png)
![ŝ73ŞSelect:T Set:OKSelectSlideAddRemoveSelect:T Set:OKSelectSlideAddRemoveSet:OKAlbum buttonSelectAll Pics3. Select the still images you wish to add by pressing theUp/Down/Left/Right buttons and press the Zoom Tbutton. marks are displayed on the selected images.ſTo cancel the selection, press the Zoom T button again. 4. Press the OK button and a confirmation window willdisplay. Select a desired sub menu by pressing the UP/DOWN button and press the OK button.- [Add] : Inserts the selected images into the album. - [Cancel] : Cancels the inserting images.ƃRemoving still images from the album1. Select an album.2. Select [Remove] menu by pressing the Up/Down buttonand press the Right button. 3. Select a desired sub menu and press the OK button. - [All] : All of the still images in the album will beremoved. - [Select] : Specific still images in the album can beremoved. ſIf [Select] is selected- Select images that you want to remove by pressing theUp/Down/Left/Right buttons and press the Zoom T button. marks are displayed on theselected images. 4. Press the OK button and a confirmation window willdisplay. Select a desired sub menu by pressing the UP/DOWN button and press the OK button.- [Remove] : Removes the selected images from thealbum. - [Cancel] : Cancels the removing images.ſThe removed images are not deleted from the memory,but just removed from the album.Add?AddCancelConfirm:OKSelect:T Set:OKRemove?RemoveCancelConfirm:OKSelectSlideAddRemoveSelect:T Set:OK](https://usermanual.wiki/Hanwha-Techwin/DIGIMAXI50MP3.Users-Manual-2-of-2/User-Guide-572095-Page-23.png)
![ŝ74ŞAlbum buttonƃIf an image is deleted from the memory, the image doesn’t display on an album. ƃAn image can’t be added twice into the same album. ƃAn image can be added into the different albums. INFORMATIONƃPlaying back the albumsƄPlaying back all of the albums1. Select [All] menu and press the OK button. All of the albums will be selected. 2. Select [Slide] menu by pressing the Up/Down button andpress the Right button. ſYou can select [Start], [Interval], [Repeat] and [Effect]menus. - [Start] : Start the slide show- [Interval] : Set the slide show play interval- [Repeat] : Choose to repeat the slide show afterfinishing the first cycle. - [Effect] : Unique screen effects can be used for theslide show.3. Select [Start] menu by pressing the Up/Down button andpress the OK button to start the slide show. 4. Press the MENU/OK button and the slide show will stop.ƄPlaying a desired album1. Select a desired album and press the OK button. 2. Select [Slide] menu by pressing the Up/Down button andpress the Right button. ſYou can select [Start], [Interval], [Repeat] and [Effect]menu.3. Select the [Start] menu and press the OK button to startthe slide show. 4. Press the MENU/OK button and the slide show will stop.SelectSlideAddRemoveExit:MENU Move: StartInterval 1 secOffCancelRepeatEffectSelectSlideAddRemoveExit:MENU Move: SelectSlideAddRemoveMove: Set:OK StartInterval 1 secOffCancelRepeatEffectSelectSlideAddRemoveExit:MENU Move: ](https://usermanual.wiki/Hanwha-Techwin/DIGIMAXI50MP3.Users-Manual-2-of-2/User-Guide-572095-Page-24.png)
![ŝ78ŞStarting the slide showƃThe loading time depends on the image size and quality.ƃWhile the slide show is playing, only the first frame of a MOVIE file is displayed.ƃWhile the slide show is playing, the voice recording file will not display. INFORMATIONƃStart the slide show : The slide show can start only in the [Start] menu.1. Use the Up/Down buttons to select the [Start] menu.2. Press the OK button to start the slide show.- Press the Pause button to pause the slide show.-Press the Pause button ( ) again to resume theslide show.- To stop the slide show, press the play & pause button,and then press the LEFT or RIGHT button.ƈImages can be displayed continuously at pre-set intervals.You can view the slide show by connecting the camera to an external monitor.1. Press the play mode button and press the menu button.2. Press the LEFT/ RIGHT button and select the [Slide] menu tab.ƃSetting play interval: Set the slide show play interval.1. Select the [Interval] sub menu by pressing the UP/DOWNbutton and press the RIGHT button.2. Use the Up/Down buttons to select the desired interval.3. Press the OK button to save the configuration.ƃRepeat setting : Setting the slide show to repeat after the first cycle.1. Use the Up/Down buttons to select the [Repeat] menu andpress the Right button.2. Use the Up/Down buttons to select the desired sub menu.[On] selected : The slide show is repeated until cancelled.[Off] selected : The slide show is closed after one cycle.3. Press the OK button to save the configuration.StartIntervalRepeatEffectSlideMove: Set:OK1 secOffCancelStartIntervalRepeatEffectSlideBack:ȜSet:OK1 sec3 sec5 sec10 secStartIntervalRepeatEffectOffOnSlideBack:ȜSet:OK](https://usermanual.wiki/Hanwha-Techwin/DIGIMAXI50MP3.Users-Manual-2-of-2/User-Guide-572095-Page-28.png)
![ŝ79ŞStarting the slide showƃConfigure slide show effects: Unique screen effects can be used for the slide show.1. Select the [Effect] sub menu by pressing the UP/ DOWNbutton and press the RIGHT button.2. Use the Up/Down Button to select the type of effect.[Cancel] : Normal display.[Effect 1] : Image is displayed slowly.[Effect 2] : Image is displayed slowly from the centreoutwards.[Effect 3] : Image moves from the top left.[Effect 4] : The image slides diagonally from top left to bottom right. [Random] : The image slides irregularly.3. Press the OK button to confirm the setting.StartIntervalRepeatEffectCancelEffect 1Effect 2Effect 3Effect 4SlideBack:ȜSet:OK](https://usermanual.wiki/Hanwha-Techwin/DIGIMAXI50MP3.Users-Manual-2-of-2/User-Guide-572095-Page-29.png)
![ŝ80ŞProtecting imagesƈThis is used to protect specific shots from being accidentally erased (Lock).It also unprotects images that have been previously protected (Unlock).ƃProtecting Images1. Press the play mode button and press the menu button.2. Press the LEFT/ RIGHT button and select the [Protect]menu tab.3. Select a desired sub menu by pressing the UP/ DOWNbutton and press the OK button.[Select ] : Selection window for an image to beprotected/released is displayed.- Up/Down/Left/Right : Select an image- Zoom W/T Button : Protect/release the image- Menu Button : Your changes will be saved andthe menu will disappear.[All Pics] : Protect/release all saved images- Zoom W/T Button : Protect/release the images- Menu Button : Your changes will be saved and themenu will disappear.- If you protect an image, the protect icon will be displayedon the LCD monitor. (An unprotected image has noindicator)- An image in LOCK mode will be protected from thedelete function or [Delete] functions, but will NOT beprotected from the [Format] function.ProtectExit:MENU Move:SelectAll PicsSet:OKWȜUnlock ȞTWȜUnlock ȞTSet:OK](https://usermanual.wiki/Hanwha-Techwin/DIGIMAXI50MP3.Users-Manual-2-of-2/User-Guide-572095-Page-30.png)
![ŝ81ŞDeleting imagesƈOf all the files stored in the memory card, the unprotected files in the DCIM subfolder will bedeleted. Remember that this will permanently delete unprotected images. Important shots should be stored on a computer before deletion takes place. The startup image is stored in the camera's internal memory (i.e., not on the memory card)and it will not be deleted even if you delete all files on the memory card.ƃDeleting images1. Press the play mode button and press the menu button.2. Press the LEFT/ RIGHT button and select the [Delete]menu tab.3. Select a desired sub menu by pressing the UP/ DOWNbutton and press the OK button.[Select] : Selection window for an image to delete isdisplayed.- Up/Down/Left/Right : Select an image- Zoom T Button : Select the image for deletion.( mark)- OK Button : Press the OK Button to display theconfirmation message. Select the[Delete] menu and press the OKbutton to delete markedimages. [All Pics] : Displays confirmation window. Select the[Delete] menu and press the OK button todelete all unprotected images. If there aren’tprotected images, all the images are deletedand a [No Image!] message will display. 4. After deletion, the screen will be changed to the playmode screen.Select:TDel:OKDel:OKDelete?DeleteCancelConfirm:OKDeleteExit:MENU Move:SelectAll Pics](https://usermanual.wiki/Hanwha-Techwin/DIGIMAXI50MP3.Users-Manual-2-of-2/User-Guide-572095-Page-31.png)
![ŝ82ŞResize1. Press the play mode button and press the menu button.2. Press the LEFT/ RIGHT button and select the [Resize]menu tab.3. Select a desired sub menu by pressing the UP/ DOWNbutton and press the OK button.ƈChange the resolution (size) of pictures taken. Select [User image] to save an image to bethe start-up image. The resized image will have a new file name.ƃA large sized image can be resized to a smaller sized image, but not vice versa.ƃOnly JPEG images can be resized. Movie clip(AVI) and Voice recording(WAV) files can’tbe resized.ƃYou can change the resolution of only those files compressed in the JPEG 4:2:2 format.ƃThe resized image will have a new file name. The [User Image] image is stored not on thememory card but on the internal memory.ƃOnly two [User Image] images can be saved. If you save a new [User Image] image, theexisting startup image will be deleted in order.ƃIf the memory capacity is insufficient to store the resized image, a [Card Full!] messagewill display on the LCD monitor and the resized image will not be stored.INFORMATIONResize2272X1704 2048X1536 1600X1200 1024X768 640X480 User image5M O O O O O O4M X O O O O O3M X X O O O O2M X X X O O O1M X X XXOOVGA X X X X X OƃImage Resize TypesResizeExit:MENU Move:2272 X 17042048 X 15381600 X 12001024 X 768640 X 480](https://usermanual.wiki/Hanwha-Techwin/DIGIMAXI50MP3.Users-Manual-2-of-2/User-Guide-572095-Page-32.png)
![ŝ83ŞƈBy using the camera’s digital processor, it is possible to add special effects to your images.1. Press the play mode button and press the menu button.2. Press the LEFT/ RIGHT button and select the [Effect] menutab.3. Select a desired sub menu by pressing the UP/ DOWNbutton.[B & W] : Captured images will be stored in black andwhite[Sepia] : Captured images will be stored in a sepia tone(a gradient of yellowish brown colours).[Red] : Captured images will be stored in a red tone. [Green] : Captured images will be stored in a green tone.[Blue] : Captured images will be stored in a blue tone.[Negative] : Save the image in negative mode.4. Press the OK button and then a confirmation window willdisplay. [Save] : Effect added image will be saved as a new file name.[Cancel] : cancels the effect. EffectEffectExit:MENU Move:B & WSepiaRedGreenBlueSave?SaveCancel Confirm : OK](https://usermanual.wiki/Hanwha-Techwin/DIGIMAXI50MP3.Users-Manual-2-of-2/User-Guide-572095-Page-33.png)
![ŝ84ŞRotating an imageƈDPOF(Digital Print Order Format) allows you to embed printing information on your memorycard’s MISC folder. Select the pictures to be printed and how many prints to make.ƈThe DPOF indicator will display on the LCD monitor when an image that has DPOFinformation plays back. Images can then be printed on DPOF printers, or at an increasingnumber of photo labs.ƈThis function is not available for Movie clips and Voice recording files.DPOF ƈYou can rotate the stored images by various degrees. Once the playback of the rotatedpicture is finished, it will switch back to the original state.1. Press the play mode button and press the menu button.2. Press the LEFT/ RIGHT button and select the [Rotate]menu tab.3. Select a desired sub menu by pressing the UP/ DOWNbutton.4. Press the OK button and the rotated image will be displayed. If you display the rotated image on the LCD monitor, empty spaces may appear to the leftand right of the image.RotateExit:MENU Move:Right 90ŭLeft 90ŭ180ŭHorizontalVertical[Horizontal] : Rotate picture horizontally[Vertical] : Rotate picture vertically [Right 90˚] : Rotate picture in a clock-wise direction[Left 90˚] : Rotate picture in a counter-clock-wise direction[180˚] : Rotate picture 180degrees](https://usermanual.wiki/Hanwha-Techwin/DIGIMAXI50MP3.Users-Manual-2-of-2/User-Guide-572095-Page-34.png)
![ŝ85ŞDPOF : StandardƈThis function allows you to embed print quantity information on a stored image.1. Press the play mode button and press the menu button.2. Press the LEFT/ RIGHT button and select the [DPOF]menu tab.3. Select the [Standard] menu by pressing the UP/ DOWNbutton and press the RIGHT button.4. Select a desired sub menu by pressing the UP/ DOWNbutton and press the OK button.[Select] : Selection window for an image to print isdisplayed.- Up/Down/Left/Right : Select an image to print.- Zoom W/T Button : Select the number of prints.[All Pics] : Configure number of prints for all picturesexcept movie and voice files.- W/T button : Select a number of prints[Cancel] : Cancel the print setup.5. Press the OK button to confirm the setting.If an image carries DPOF instructions, the DPOF indicator( ) will show.1. Press the play mode button and press the menu button.2. Press the LEFT/ RIGHT button and select the [DPOF]menu tab.3. Select the [Index] menu by pressing the UP/ DOWNbutton and press the RIGHT button.4. Select a desired sub menu by pressing the UP/ DOWNbutton.If [No] is selected : Cancel the index print setting.If [Yes] is selected : The image will be printed in index format.5. Press the OK button to confirm the setting.DPOF : IndexƈImages (except for movie clips and voice file) are printed as index type.StandardIndexSizeSelectAll PicsCancelDPOFBack:ȜSet:OKSet:OKWȜ0 Prints ȞTWȜ0 Prints ȞTSet:OKStandardIndexSizeNoYesDPOFBack:ȜSet:OK](https://usermanual.wiki/Hanwha-Techwin/DIGIMAXI50MP3.Users-Manual-2-of-2/User-Guide-572095-Page-35.png)
![ŝ86ŞDPOF : Print sizeƃSetting the Print Size1. Press the play mode button and press the menu button.2. Press the LEFT/ RIGHT button and select the [DPOF]menu tab.3. Select the [Size] menu by pressing the UP/ DOWN buttonand press the RIGHT button.4. Select a desired sub menu by pressing the UP/ DOWNbutton and press the OK button.[Select] : Selection window for an image to be changedprinted size is displayed.- Up/Down/Left/Right : Select an image.- Zoom W/T Button : Change the print size.- OK button : Your changes will be saved and themenu will disappear.[All Pics] : Change print size of all saved images.- W/ T button : Select a print size- OK button : Confirm the changed setting.[Cancel] : Cancel all of the print size settings.ſDPOF [Size] secondary menu : Cancel, 3X5, 4X6, 5X7,8X10ƈYou can specify the print size when printing images stored on the memory card.The [Size] menu is available only for DPOF 1.1 compatible printers.StandardIndexSizeSelectAll PicsCancelDPOFBack:ȜSet:OKSet:OKWȜCancel ȞTWȜCancel ȞTSet:OK](https://usermanual.wiki/Hanwha-Techwin/DIGIMAXI50MP3.Users-Manual-2-of-2/User-Guide-572095-Page-36.png)
![ŝ87ŞCopy To CardƈThis enables you to copy image files to the memory card.ƃCopying to the Memory Card1. Press the play mode button and press the menu button.2. Select the [Copy to Card] menu tab by pressing the LEFT/RIGHT button.3. Select a desired sub menu by pressing the UP/ DOWNbutton and press the OK button.- [No] : Cancels "Copy to Card".- [Yes] : All images saved in the internal memory arecopied to the memory card after the [Processing!] message is displayed. After copying has been completed, the screen will return to play mode.ƃWhen this menu is selected without inserting a memory card, you can select the [Copy to Card] menu but the menu can’t be run.ƃIf there is not enough space available in the memory card to copy saved images in theinternal memory (50MB), the [Copy to Card] command will copy only some of the imagesand display [Card Full!] message. Then the system will return to the playback mode.Please be sure to delete any unnecessary images to free up space before inserting thememory card into the camera.ƃWhen you move the images that are stored in the internal memory by doing [Copy to Card] to the card, the next number of file names will be created in the card toavoid duplication of the file name. If the last file in the memory card is SSM10010.jpg, the copied file names start from SSM10011.jpg. After completing [Copy to Card], the laststored image of the last copied folder is displayed on the LCD monitor. INFORMATIONCopy To CardExit:MENU Move:NoYes](https://usermanual.wiki/Hanwha-Techwin/DIGIMAXI50MP3.Users-Manual-2-of-2/User-Guide-572095-Page-37.png)
![ŝ88ŞOSD InformationƈYou can check shooting information about the displayed image.ƃHow to select a type of OSD information1. Press the play mode button and press the menu button.2. Select the [OSD Information] menu tab by pressing theLEFT/ RIGHT button.3. Select a desired sub menu by pressing the UP/ DOWNbutton and press the OK button.Full OSDNo OSDOSD InformationExit:MENU Move:[No OSD][Full OSD]100-0004](https://usermanual.wiki/Hanwha-Techwin/DIGIMAXI50MP3.Users-Manual-2-of-2/User-Guide-572095-Page-38.png)
![ŝ89ŞPictBridge[Using the USB cable with Cradle][Using the USB cable with Camera]ƈConnecting the Camera to a PrinterƃUsing the USB cable with Cradle : Connect the camera and the cradle. Connect the cradle to a printer’s USB port with thesupplied USB cable. ƃUsing the USB cable with Camera : Connect the camera to a printer’s USB port with the supplied USB cable.ƃSetting up the camera for connection with the printer1. In any mode with the exception of Voice Recording mode,press the MENU button.2. Press the LEFT/ RIGHT button and select [Setup] menutab.3. Select [USB] menu by pressing the UP/ DOWN buttonand press the RIGHT button.4. Select [Printer] menu by pressing the UP/ DOWN buttonand press the OK button.ſIf you selected [Computer] in Step 4, when you connect the camera to your printer, the[Connecting Computer] message will display and the connection will not be established.In this case, disconnect the USB cable, and then follow the procedure from Step 2 andonward.ƈYou can use the USB cable to connect this camera to a printer that supports PictBridge (soldseparately) and print the stored images directly. Movie clips and voice files cannot be printed.FormatDate&TimeImprintSoundUSBComputerPrinterSetupBack:ȜSet:OK](https://usermanual.wiki/Hanwha-Techwin/DIGIMAXI50MP3.Users-Manual-2-of-2/User-Guide-572095-Page-39.png)
![ŝ90ŞPictBridge : Picture SelectionƈEasy printingWhen you connect the camera to printer in the Play backmode, you can print a picture easily. - Pressing the shutter button : Currently displayed image willbe printed with the printer’sdefault setting. - Pressing the Left / Right button : Selects a previous / nextimage.[When [One Pic] is selected] [When [All Pics] is selected]- Press the Up/Down button to select the number of prints. - Use the Left/Right button to select another picture and select the number of prints foranother picture.- After setting the number of prints, press the OK button to save.- Press the Shutter button to return to the menu without setting the number of prints.010ƃSetting the Number of Copies to Print-Select [One Pic] or [All Pics]. A screen where you can set the number of copies to print willappear as shown below.Prev ȜȞNextƊƌƈSelect pictures to print1. The [Images] menu will appear.2. Use the UP and DOWN buttons to select the desiredsubmenu value, and then press the OK button.When [One Pic] is selected : The PictBridge function willbe applied only to thepicture currently displayed.When [All Pics] is selected : The PictBridge function willbe applied to all pictures,excluding movie clips and voice files.Exit:Shutter Set:OK0ƊƌExit:Shutter Set:OKImagesMove:One PicAll Pics141-0001Print:Shutter Menu:OKȜȞ](https://usermanual.wiki/Hanwha-Techwin/DIGIMAXI50MP3.Users-Manual-2-of-2/User-Guide-572095-Page-40.png)
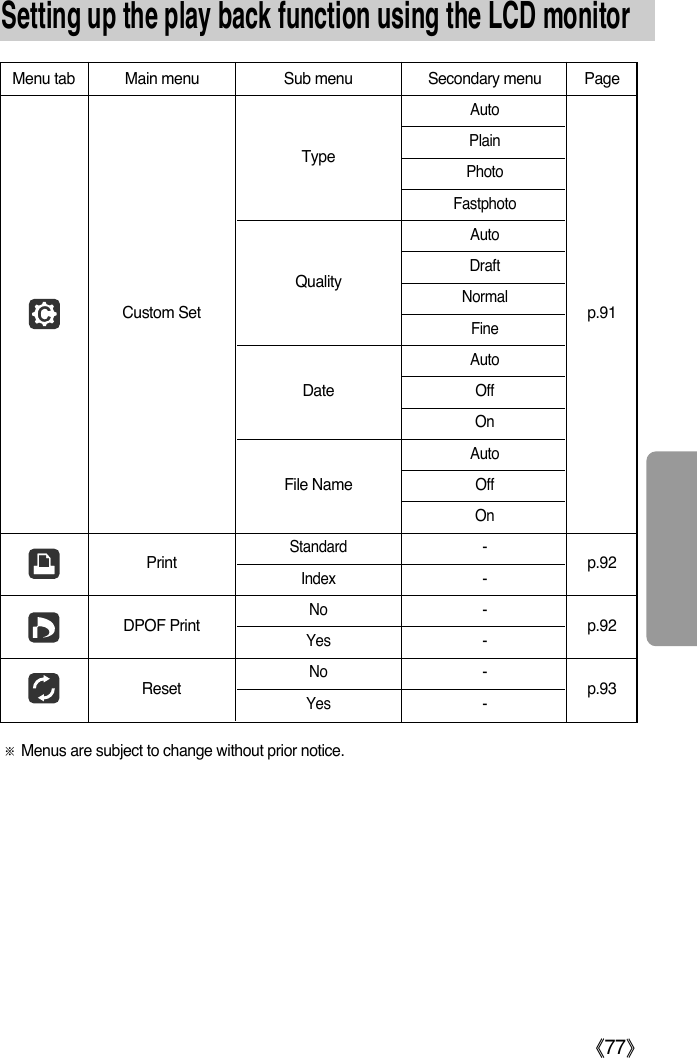
![ŝ91ŞPictBridge : Print SettingMenuSize Setting the size of the printing paperAuto, Postcard, Card, 4X6, L, 2L, Letter, A4, A3Setting the number of pictures to be printed on a sheet of paperType Setting the quality of the printing paper Auto, Plain, Photo, FastphotoSetting the quality of the picture to be printedDate Setting whether to print the date Auto, Off, OnFile Name Setting whether to print the file name Auto, Off, OnƈAUTO SET1. Use the LEFT and RIGHT buttons to select the [Auto Set] menu tab.2. Use the UP and DOWN buttons to select the desiredsubmenu value, and then press the OK button.[No] : [Custom Set] values are kept.[Yes] : All values in the [Custom Set] are automaticallychanged.ſSome menu options are not supported in all manufacturer and printer models. If not supported, the menus are still displayed in the LCD, but are not selectable.ſIf the setting values are not changed in the automatic/manual setting, the setting values areautomatically kept.1. Use the LEFT and RIGHT buttons to select the [Custom Set] menu tab.2. Use the UP and DOWN buttons to select the desiredsubmenu value, and then press the RIGHT button.3. Use the UP and DOWN buttons to select the desiredsubmenu value, and then press the OK button. ƈCustom Set : You can select the Paper Size, Print Format, Paper Type, Print Quality, DatePrint, and File Name Print menus for printed pictures.FunctionAuto, Draft, Normal, FineAuto, Full, 1, 2, 4, 8, 9, 16Sub menuLayoutQualityƃThe menus you can set up are as follows:Auto SetMove:NoYesSizeLayoutTypeQualityDateAutoAutoAutoAutoAutoCustom SetMove:](https://usermanual.wiki/Hanwha-Techwin/DIGIMAXI50MP3.Users-Manual-2-of-2/User-Guide-572095-Page-41.png)
![ŝ92Ş1/1Cancel:OKPictBridge : PrintingƈPrinting Pictures1. Use the LEFT and RIGHT buttons to select the [Print]menu tab.2. Use the UP and DOWN buttons to select the desiredsubmenu value, and then press the OK button.[Standard] : Print the pictures stored in the memory cardin set numbers. One picture is printed onone piece of paper.[Index] : Print multiple images on one sheet of paper.3. The screen shown on the right will appear and the picturewill be printed. If no picture is selected, the [No image!]message will be displayed. Press the Menu/OK buttonwhile printing to cancel the printing and the [Print] menuis displayed.ſNumber of pictures in an index print varies depends on theprinter used.1. Use the LEFT and RIGHT buttons to select the [DPOF Print] menu tab.2. Use the UP and DOWN buttons to select the desiredsubmenu value, and then press the OK button.[No] : Cancel the printing[Yes] : Directly print the file with the DPOF informationſDepending on the manufacturer and printer model, somemenus may not be available. With a printer without supporting the DPOF, the menu is stilldisplayed but not available.ƈDPOF Print : This allows you to directly print the files with DPOF information.Now PrintingPrintMove:StandardIndexDPOF PrintMove:NoYes](https://usermanual.wiki/Hanwha-Techwin/DIGIMAXI50MP3.Users-Manual-2-of-2/User-Guide-572095-Page-42.png)
![ŝ93ŞPictBridge : RESET1. Use the LEFT and RIGHT buttons to select the [Reset]menu tab.2. Use the UP and DOWN buttons to select the desiredsubmenu value, and then press the OK button.If [No] is selected : Settings will not be reset.If [Yes] is selected : All print and image settings will bereset.ſDefault print setting varies depending on the printer manufacturer.For your printer’s default setting, refer to the user’s guide that came with your printer.ƈInitialises user-changed configurations.ResetMove:NoYes](https://usermanual.wiki/Hanwha-Techwin/DIGIMAXI50MP3.Users-Manual-2-of-2/User-Guide-572095-Page-43.png)

![ŝ95ŞSetup menuſMenus are subject to change without prior notice.Menu tab Main menu Sub menu Secondary menu PageOff -On -Dark -LCD Normal - p.100Bright -NTSC -PAL -Quick View Off, 0.5, 1, 3 sec - p.103No -Yes -Video OutAF LampResetp.100p.101p.103ƈThis function allows the user to select the file naming format.ƃAssigning File Names1. In any mode with the exception of Voice Recording andMP3 mode, press the MENU button.2. Press the LEFT/ RIGHT button and select the [Setup]menu tab.3. Select the [File] menu by pressing the UP/ DOWN buttonand press the RIGHT button.4. Select a desired sub menu by pressing the UP/ DOWNbutton and press the OK button.[Series] : New files are named using numbers that follow the previous sequence, evenwhen a new memory card is used, or after formatting, or after deleting allpictures. [Reset] : After using the reset function, the next file name will be set from 0001 even afterformatting, deleting all or inserting a new memory card.5. Press the menu button twice and the menu will disappear.File nameFilePower SaveLanguageFormatDate&TimeSeriesResetSetupBack:ȜSet:OK](https://usermanual.wiki/Hanwha-Techwin/DIGIMAXI50MP3.Users-Manual-2-of-2/User-Guide-572095-Page-45.png)
![ŝ96ŞFile nameƃThe first stored folder name is 100SSCAM, and the first file name is SSM10001.ƃFile names are assigned sequentially from SSM10001 ƍSSM10002 ƍ~ ƍSSM10099.ƃThe folder number is assigned sequentially from 100 to 999 as follows: 100SSCAM ƍ101SSCAM ƍ~ ƍ999SSCAM.ƃThe files used with the memory card conform to the DCF(Design rule for Camera Filesystems) format.INFORMATIONƃEven if the battery and AC charger are removed and inserted again, the power off settingwill be preserved.ƃNote that the automatic power off function will not operate if the camera is in PC mode,slide show, playing back a voice recording, playing back a movie clip and the [Composite]shooting.INFORMATIONAuto power offƃSetting Power Off1. In any mode with the exception of Voice Recording andMP3 mode, press the MENU button.2. Press the LEFT/ RIGHT button and select the [Setup]menu tab.3. Select the [Power Save] menu by pressing the UP/DOWN button and press the RIGHT button.4. Select a desired sub menu by pressing the UP/ DOWNbutton and press the OK button.[1, 3, 5, 10min] : The power will turn off automatically if not used for the period of timespecified.5. Press the menu button twice and the menu will disappear.ƈThis function switches the camera off after a set amount of time in order to preventunnecessary battery drainage.FilePower SaveLanguageFormatDate&Time1 min3 min5 min10 minSetupBack:ȜSet:OK](https://usermanual.wiki/Hanwha-Techwin/DIGIMAXI50MP3.Users-Manual-2-of-2/User-Guide-572095-Page-46.png)
![ŝ97ŞLanguage ƃSetting Language1. In any mode with the exception of Voice Recording and MP3mode, press the MENU button.2. Press the LEFT/ RIGHT button and select the [Setup] menu tab.3. Select the [Language] menu by pressing the UP/ DOWNbutton and press the RIGHT button.4. Select a desired sub menu by pressing the UP/ DOWNbutton and press the OK button. LANGUAGE sub menu : English, Korean, French, German, Spanish, Italian, S.Chinese,T.Chinese, Japanese, Russian, Portuguese, Dutch, Danish, Swedish, Finnish, Thai,BAHASA(MALAY/ INDONESIAN), Arabic, Hungarian, Czech and Polish.5. Press the menu button twice and the menu will disappear.ƃFormatting a Memory Card1. In any mode with the exception of Voice Recording andMP3 mode, press the MENU button.2. Press the LEFT/ RIGHT button and select the [Setup]menu tab.3. Select the [Format] menu by pressing the UP/ DOWNbutton and press the RIGHT button.4. Select a desired sub menu by pressing the UP/ DOWNbutton and press the OK button.If [No] is selected : The memory card will not be formatted. Press the menu button twice and the menu display will disappear. If [Yes] is selected : A [Processing!] message appears and the memory card will beformatted. If you ran FORMAT in Play mode, a [No Image!] messagewill appear.ƈThere is a choice of languages that can be displayed on the LCD monitor. Even if the batteryand AC charger are removed and inserted again, the language setting will be preserved.Formatting a memory cardƈThis is used for formatting the memory card. If you run [Format] on the memory card, allimages, including the protected images, will be deleted. Be sure to download importantimages to your PC before formatting the memory card.ƃBe sure to run [Format] on the following types of memory card.- A new memory card, or an unformatted memory card.- A memory card that has a file this camera can't recognise or one that has been takenfrom another camera.ƃAlways format the memory card using this camera. If you insert a memory card that hasbeen formatted using other cameras, memory card readers, or PCs, you will get a [Card Error!] message.INFORMATIONFilePower SaveLanguageFormatDate&TimeENGLISHጥૹFRANÇAISDEUTSCHESPAÑOLSetupBack:ȜSet:OKFilePower SaveLanguageFormatDate&TimeNoYesSetupBack:ȜSet:OK](https://usermanual.wiki/Hanwha-Techwin/DIGIMAXI50MP3.Users-Manual-2-of-2/User-Guide-572095-Page-47.png)
![ŝ98ŞSetting up the Date/ Time/ Date typeƈYou can change the date and time that will be displayed on the captured images and set upthe date type.ƃSetting Date/Time & Selecting Date Format1. In any mode with the exception of Voice Recording andMP3 mode, press the MENU button.2. Press the LEFT/ RIGHT button and select the [Setup]menu tab.3. Select the [Date&Time] menu by pressing the UP/ DOWNbutton and press the RIGHT button.4. Use the UP, DOWN, LEFT, and RIGHT buttons to selectthe desired submenu value, and then press the OK button.RIGHT button : Selects the year/month / day/hour / minute date type.LEFT button : Moves the cursor to the [Date&Time] main menu if the cursor isat the first item of the date and time setup. In all other cases, thecursor will be shifted to the left of its current position.UP and DOWN buttons : Changes the setting value.5. Press the menu button twice and the menu will disappear.ƈThere is an option to include DATE/TIME on still images.ƃDate Imprinting1. In any mode with the exception of Voice Recording andMP3 mode, press the MENU button.2. Press the LEFT/ RIGHT button and select the [Setup]menu tab.3. Select the [Imprint] menu by pressing the UP/ DOWNbutton and press the RIGHT button.4. Use the UP and DOWN buttons to select the desired dateimprint type, and then press the OK button.[Off] : The DATE & TIME will not be imprinted on the image file.[Date] : Only the DATE will be imprinted on the image file.[Date&Time] : The DATE & TIME will be imprinted on the image file.5. Press the menu button twice and the menu will disappear.ſThe Date & Time are imprinted at the bottom right side of the still image.ſThe date will be imprinted as a DATE TYPE setting.ſTIME is imprinted in the following way : [Hour : Minute] and hours are shown using the 24 hour clock.ſThe imprint function is applied only to still images except for the images taken in the [Text]scene mode. Imprinting the recording dateFilePower SaveLanguageFormatDate&TimeƊ05/ 05/ 01 13:01ƌyy/mm/ddSetupBack:ȜSet:OKPower SaveLanguageFormatDate&TimeImprintOffDateDate&TimeSetupBack:ȜSet:OK](https://usermanual.wiki/Hanwha-Techwin/DIGIMAXI50MP3.Users-Manual-2-of-2/User-Guide-572095-Page-48.png)
![ŝ99ŞSound Connecting an External Device (USB)ƈIf you set the operation sound to ON, various sounds will be activated for camera startup,when button are pressed, and if there is a card error, so that you can be aware of the cameraoperation status.ƃSetting Operation Sounds1. In any mode with the exception of Voice Recording andMP3 mode, press the MENU button.2. Press the LEFT/ RIGHT button and select the [Setup]menu tab.3. Select the [Sound] menu by pressing the UP/ DOWNbutton and press the RIGHT button.4. Select a desired sub menu by pressing the UP/ DOWNbutton and press the OK button.[Sound] sub menu : Off/ Low/ Medium/ High5. Press the menu button twice and the menu will disappear.ƈYou can select an external device to which you want to connect the camera using the USBcable.ƃSelecting an External Device1. In any mode with the exception of Voice Recording andMP3 mode, press the MENU button.2. Press the LEFT/ RIGHT button and select the [Setup]menu tab.3. Select the [USB] menu by pressing the UP/ DOWN buttonand press the RIGHT button.4. Select a desired sub menu by pressing the UP/ DOWNbutton and press the OK button.[Computer] : Select this if you want to connect the camera to your PC. Refer to page 127 for instructions on how to connect the camera to your PC.[Printer] : Select this if you want to connect the camera to your printer. Refer to page 89 for instructions on how to connect the camera to yourprinter.5. Press the menu button twice and the menu will disappear.LanguageFormatDate&TimeImprintSoundOffLowMediumHighSetupBack:ȜSet:OKFormatDate&TimeImprintSoundUSBComputerPrinterSetupBack:ȜSet:OK](https://usermanual.wiki/Hanwha-Techwin/DIGIMAXI50MP3.Users-Manual-2-of-2/User-Guide-572095-Page-49.png)
![ŝ100ŞAuto Focus lampLCD brightnessƃAdjusting LCD Brightness1. In any mode with the exception of Voice Recording andMP3 mode, press the MENU button.2. Press the LEFT/ RIGHT button and select the [Setup]menu tab.3. Select the [LCD] menu by pressing the UP/ DOWN buttonand press the RIGHT button.4. Select a desired sub menu by pressing the UP/ DOWNbutton and press the OK button.[LCD] sub menu : Dark, Normal, Bright5. Press the menu button twice and the menu will disappear.ƈYou can adjust the LCD brightness.ƃHow to set up the lamp1. In any mode with the exception of Voice Recording andMP3 mode, press the MENU button.2. Press the LEFT/ RIGHT button and select the [Setup]menu tab.3. Select the [AF Lamp] menu by pressing the UP/ DOWNbutton and press the RIGHT button.4. Select a desired sub menu by pressing the UP/ DOWNbutton and press the OK button.If [Off] is selected : The AF lamp will not light up.If [On] is selected : The AF lamp will light up.ſIf you select [Off] menu and take an image in poorly lit conditions or select the [Night]scene mode, the camera may not take exact focus.ſThe Auto Focus lamp will function while using the self-timer even if the configuration is setto off the lamp. ƈYou can turn on and off the Auto Focus lampDate&TimeImprintSoundUSBAF LampOffOnSetupBack:ȜSet:OKImprintSoundUSBAF LampLCDDarkNormalBrightSetupBack:ȜSet:OK](https://usermanual.wiki/Hanwha-Techwin/DIGIMAXI50MP3.Users-Manual-2-of-2/User-Guide-572095-Page-50.png)
![ŝ101ŞSelecting Video out typeƈThe Movie output signal from the camera can be NTSC or PAL.Your choice of output will be governed by the type of device (monitor or TV, etc.) to which thecamera is connected. PAL mode can support only BDGHI.ƃSetting the Video Out Type1. In any mode with the exception of Voice Recording andMP3 mode, press the MENU button.2. Press the LEFT/ RIGHT button and select the [Setup]menu tab.3. Select the [Video Out] menu by pressing the UP/ DOWNbutton and press the RIGHT button.4. Select a desired sub menu by pressing the UP/ DOWNbutton and press the OK button.- [Video Out] sub menu : NTSC, PAL5. Press the menu button twice and the menu will disappear.ƈConnecting to an external monitorƃUsing the AV cable with Cradle : Connect the camera and the cradle. Connect the cradle to an external monitor with thesupplied AV cable.ƃUsing the AV cable with Camera : Connect the camera to an external monitor with thesupplied AV cable.Yellow - VideoWhite - sound[Using the AV cable with Cradle][Using the AV cable with Camera]SoundUSBAF LampLCDVideo OutNTSCPALSetupBack:ȜSet:OK](https://usermanual.wiki/Hanwha-Techwin/DIGIMAXI50MP3.Users-Manual-2-of-2/User-Guide-572095-Page-51.png)

![ŝ103ŞQuick viewƈIf you enable Quick View before capturing an image, you can view the image you justcaptured on the LCD monitor for the duration set in the [Quick View] setup. Quick view ispossible only with still images.ƃSetting Quick View1. In any mode with the exception of Voice Recording andMP3 mode, press the MENU button.2. Press the LEFT/ RIGHT button and select the [Setup]menu tab.3. Select the [Quick View] menu by pressing the UP/ DOWNbutton and press the RIGHT button.4. Select a desired sub menu by pressing the UP/ DOWNbutton and press the OK button.[Off] : The quick view function can’t be activated.[0.5, 1, 3sec] : The captured image is briefly displayed during the selected time.5. Press the menu button twice and the menu will disappear.InitialisationƈAll camera menu and function settings will be restored to their default values. However, values for DATE/TIME, LANGUAGE, and VIDEO OUT will not be changed.ƃInitialising the Camera1. In any mode with the exception of Voice Recording andMP3 mode, press the MENU button.2. Press the LEFT/ RIGHT button and select the [Setup]menu tab.3. Select the [Reset] menu by pressing the UP/ DOWNbutton and press the RIGHT button.4. Select a desired sub menu by pressing the UP/ DOWNbutton and press the OK button.If [No] is selected : Settings will not be restored to their defaults.If [Yes] is selected : All settings will be restored to their defaults.USBAF LampLCDVideo OutQuick ViewOff0.5 sec1 sec3 secSetupBack:ȜSet:OKAF LampLCDVideo OutQuick ViewResetNoYesSetupBack:ȜSet:OK](https://usermanual.wiki/Hanwha-Techwin/DIGIMAXI50MP3.Users-Manual-2-of-2/User-Guide-572095-Page-53.png)
![ŝ104ŞSetting up the Mycam menuƈYou can set up a start up image, start up sound and shutter sound. Every camera workingmode (with the exception of Voice recording mode) has the MyCAM menu.The items indicated by are default settings.Menu tab Main menu Sub menu PageOff LOGOUser Image 1 User Image 2Off Sound 1Sound 2 Sound 3Off Sound 1Sound 2 Sound 3S.ImageS.SoundSH.Soundp.104p.105p.105ƈYou can select the image that is first displayed on the LCD monitor whenever the camera isturned on.ƃSetting a Startup Image1. In any mode with the exception of Voice Recording andMP3 mode, press the MENU button.2. Press the LEFT/ RIGHT button and select the [Mycam]menu tab.3. Select the [S.Image] menu by pressing the UP/ DOWNbutton and press the RIGHT button.4. Select a desired sub menu by pressing the UP/ DOWNbutton and press the OK button.5. Press the menu button twice and the menu will disappear.Start up imageƃUse a saved image for the start-up image with the [User Image] in the [Resize] menu inthe play mode.ƃThe start-up image will not be deleted by deleting all images or [Format] menu.ƃThe User images will be deleted by [Reset] menu.INFORMATIONſMenus are subject to change without prior notice.S.ImageS.SoundSH.SoundMycamBack:ȜSet:OK](https://usermanual.wiki/Hanwha-Techwin/DIGIMAXI50MP3.Users-Manual-2-of-2/User-Guide-572095-Page-54.png)
![ŝ105ŞStart up soundShutter soundƃSetting the Startup Sound1. In any mode with the exception of Voice Recording andMP3 mode, press the MENU button.2. Press the LEFT/ RIGHT button and select the [Mycam]menu tab.3. Select the [S.Sound] menu by pressing the UP/ DOWNbutton and press the RIGHT button.4. Select a desired sub menu by pressing the UP/ DOWNbutton and press the OK button.5. Press the menu button twice and the menu will disappear.ƈYou can select the sound that is activated whenever the camera is turned on.ƃSelecting the Shutter Sound1. In any mode with the exception of Voice Recording andMP3 mode, press the MENU button.2. Press the LEFT/ RIGHT button and select the [Mycam]menu tab.3. Select the [SH.Sound] menu by pressing the UP/ DOWNbutton and press the RIGHT button.4. Select a desired sub menu by pressing the UP/ DOWNbutton and press the OK button.5. Press the menu button twice and the menu will disappear.ƈYou can select the shutter sound.S.ImageS.SoundSH.SoundOffSound1Sound2Sound3MycamBack:ȜSet:OKS.ImageS.SoundSH.SoundOffSound1Sound2Sound3MycamBack:ȜSet:OK](https://usermanual.wiki/Hanwha-Techwin/DIGIMAXI50MP3.Users-Manual-2-of-2/User-Guide-572095-Page-55.png)
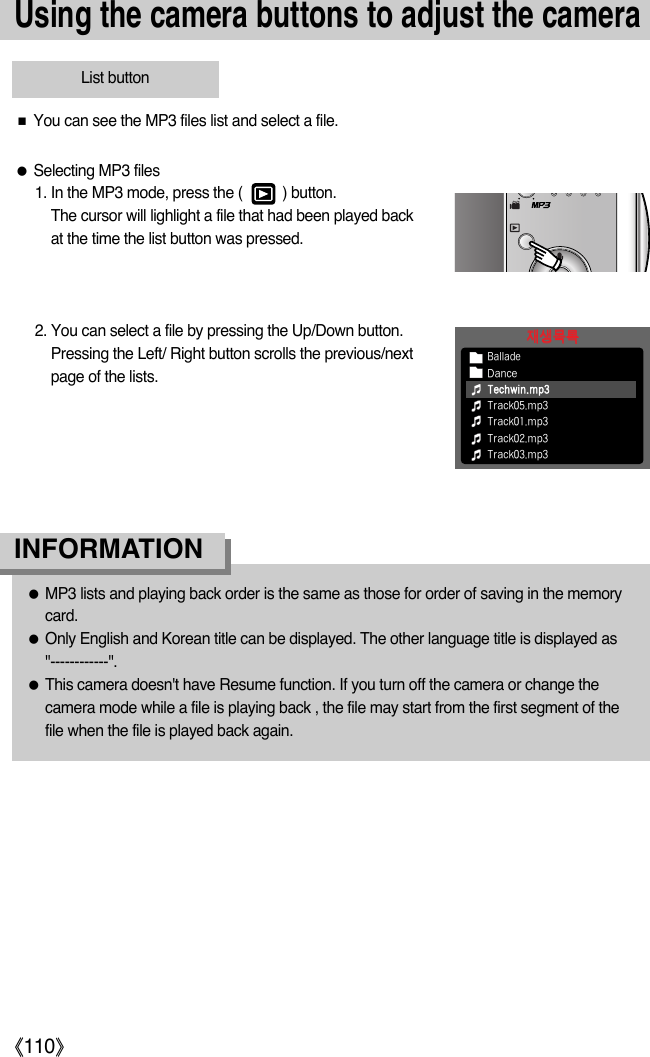
![ŝ106ŞDownloading MP3 filesƈDigimax i50 MP3 playerThis camera has embedded MP3 player program. You can save the MP3 files on this camera and listen to the MP3 files that is near enough tocompact disk quality.ƈTo use MP3 files, ther must be saved in the internal memory or memory card of this camera. 1. Save the desired files on your PC. 2. Connect the camera to your PC with the USB cable andturn on the camera. 3. Open Window's EXPLORER and search for [Removable Disk]. 4. Make MP3 folder under the Removable Disk. 5. Select MP3 files that you want to save and copy them to the MP3 folder. ƃTake care of the illegal duplication of MP3 files. It violates the copyright law. ƃThis camera can only play back MP3 files.ƃYou can make up to 100 subfolder under the MP3 folder. You can't make subdirectoryunder the subfolder. ƃYou can save up to 200 MP3 files under 1 folder. INFORMATION1VKWZZMK\LQZMK\WZaC+WZZMK\LQZMK\WZaEMP3 mode](https://usermanual.wiki/Hanwha-Techwin/DIGIMAXI50MP3.Users-Manual-2-of-2/User-Guide-572095-Page-56.png)
![ŝ107ŞStarting the MP3 modeƃChanging the MP3 mode : If the [Still/Movie/MP3] menu wasselected Steps from 1~4 are the same as those for selectingthe [Mode] menu5. A mode used just before will display. 6. Press the M (Mode) button located on the back of thecamera and the MP3 mode will be selected. 7. Inser the earphones. Press the Play button ( )and an MP3 file will play back. 8. Press the M (Mode) button or the Shutter button and thecamera mode will change to another recording mode. 00:33/ 04:07<ZIKSUXƈYou can select the MP3 mode by the M (Mode) button located on the back of the cameraand [Mode] menu. ƃSelecting the [Mode] menu1. Insert the battery (p.17).2. Insert the memory card that holds MP3 files (p.21). As thiscamera has a 43MB internal memory, you can save MP3files on the internal memory. 3. Close the battery chamber cover.4. Press the power button to turn on the camera.5. Press the menu button and a menu will display. (Except forthe MP3 and Voice recording mode)6. Select [Mode] menu by pressing the Left/Right button. 7. Select [Still/Movie/MP2] or [Full] menu by pressing the Up/ Down button. - [Still/ Movie/ MP3] : MP3, Still image and Movie clip modes can be selected.- [Full] : MP3, Voice recording and All recording modes can be selected. 8. Press the Menu button and the menu will disappear. Still/ Movie/ MP3Full[Pressing the M (Mode) button]Mode](https://usermanual.wiki/Hanwha-Techwin/DIGIMAXI50MP3.Users-Manual-2-of-2/User-Guide-572095-Page-57.png)
![ŝ108ŞStarting the MP3 modeƃChanging the MP3 mode : If the [Full] menu was selectedSteps from 1-4 are the same as those for selecting the [Mode]menu.5. A recording mode used just before will display.6. Press the M (Mode) button located on the back of thecamera and the mode selection menu will display.7. To select the MP3 mode, press the Left/Right button.8. Press the Play button ( ) and an MP3 file will playback. To use an earphones, insert it to the Earphones jack.9. Press the M (Mode) button or the Shutter button and the camera mode will change toanother recording mode. 58;M\"735ƃIn the MP3 mode, if there isn't MP3 file, [No file]message will display.ƃIf there is no operation during the specified time (About30 sec.) the LCD monitor is turned off automaticall andthe camera status lamp is blinking. To use the camera,press the camera buttons except for the Power button. ƃThe automatic power off function will not operate if theMP3 file is playing back.ƃThe included earphones plug is 3.5mm through. To buy an earphones, contact yournearest Samsung dealer or Samsung service centre.Before buying the earphones, checkthe dimensiion of the earphones. INFORMATIONNo file!](https://usermanual.wiki/Hanwha-Techwin/DIGIMAXI50MP3.Users-Manual-2-of-2/User-Guide-572095-Page-58.png)
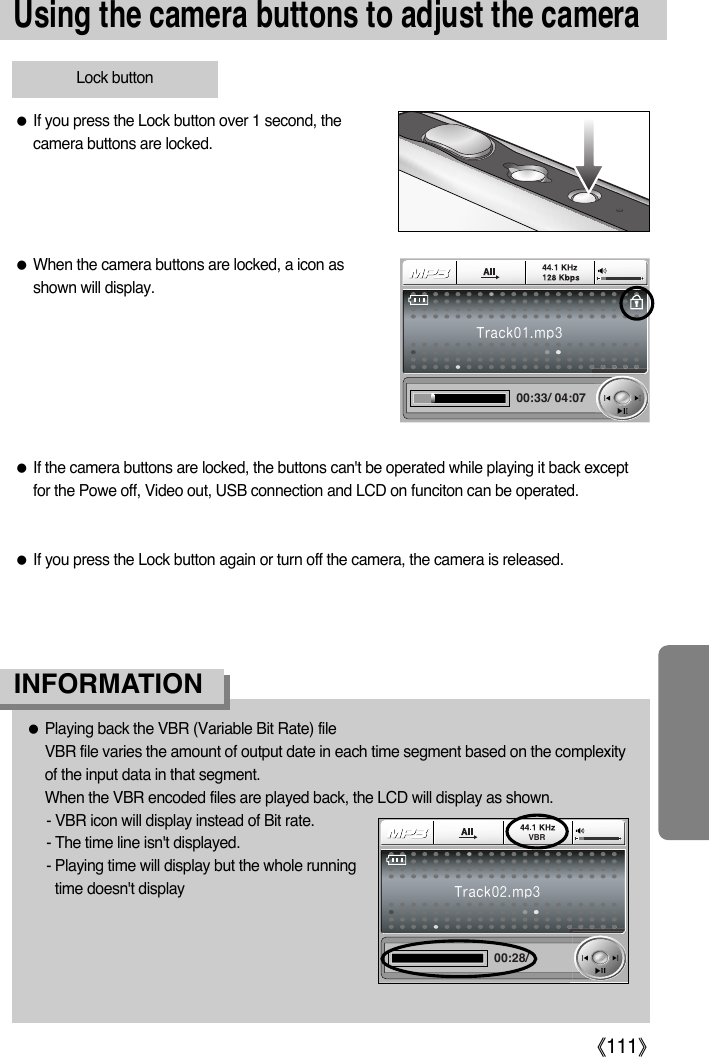
![ŝ112ŞUsing the camera buttons to adjust the cameraƃBefore deleting MP3 files from the camera, you should download files to your computer.INFORMATIONVolume buttonƈYou can control the volume with this button. ƈThere are 0~30 steps. If you press it shortly, the volume willincrease or decrease with 1 step and if you press and hold it,the volume will increase/decrease continuously. Control buttonƈWhen a file is playing back, press the Down button to pausethe file. Pressing it again will resume playback. ƈYou can search the MP3 files by pressing the Left/Right button. Delete buttonƈThis deletes MP3 files stored on the memory. 1. Press the List button and MP3 lists are displayed. 2. Select a desired file by pressing the Up/Down/Left/Rightbutton and press the Delete button. 3. A message will display as shown4. Select a desired menu by pressing the Up/Down button andpress the OK button. [Delete] : deletes the selected file.[Cancel] : cancels "Delete files" Delete?DeleteCancelConfirm : OK](https://usermanual.wiki/Hanwha-Techwin/DIGIMAXI50MP3.Users-Manual-2-of-2/User-Guide-572095-Page-62.png)
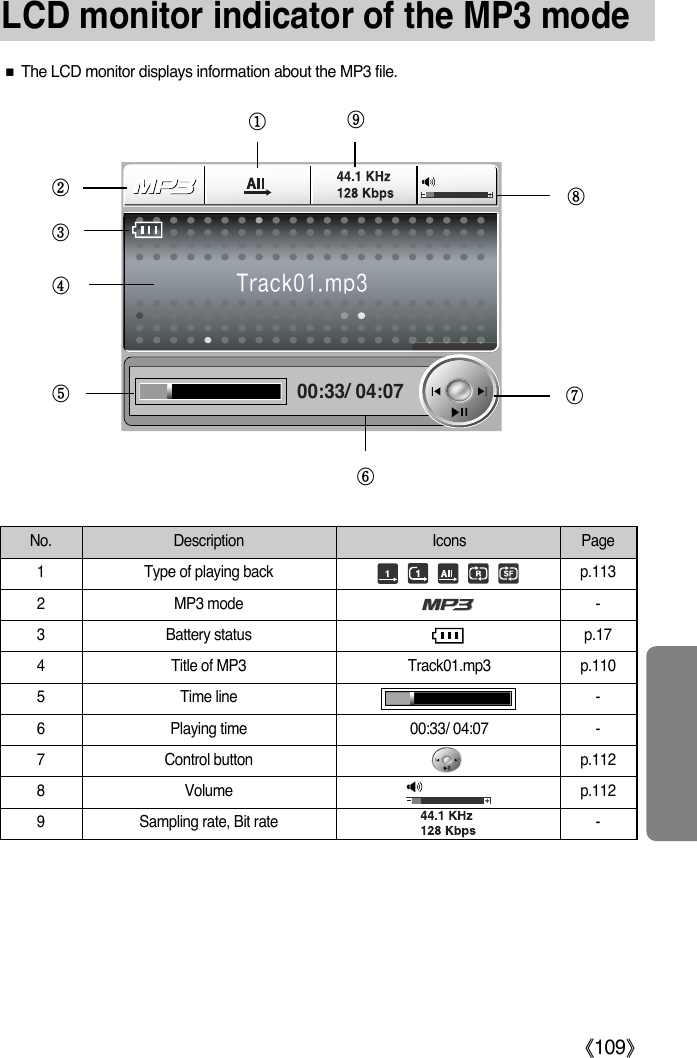
![ŝ113ŞSetting up the play back function using the LCD monitorPlay modeƈYou can set various repeat and shuffle options. This function is adopted only the selected folder.1. In the MP3 mode, press the Menu button. 2. Select the [Playlist] menu tab by pressing the Left/ Rightbutton. 3. Select a desired option by pressing the Up/Down button. - [Play One] : plays a single track once.- [Repeat One] : plays a single track repeatedly.- [Play All] : plays all tracks in the folder and stop. - [Repeat All] : plays all tracks in the folder repeatedly.- [Shuffle] : randomly play all tracks in the folder.4. Press the OK button to set the setting and the menu will disappear. ƈMP3 mode functions can be changed by using the LCD monitor. In the MP3 mode, pressing the MENU button displays the menu on the LCD monitor. The menus you can set up in MP3 mode are as follows. Menu tab Main menu Sub menu PagePlay OneRepeat OnePlay AllRepeat AllShuffleNoAllOffOnPlay modep.113p.114p.114Delete allSlide showſMenus are subject to change without prior notice.Play ModePlay OneRepeat OnePlay AllRepeat AllShuffle](https://usermanual.wiki/Hanwha-Techwin/DIGIMAXI50MP3.Users-Manual-2-of-2/User-Guide-572095-Page-63.png)
![ŝ114ŞSetting up the play back function using the LCD monitorSlide ShowƈWhile the MP3 file is playing back, captured images are displaying on the LCD monitorcontinuously. 1. In the MP3 mode, press the Menu button. 2. Select the [Slide Show] menu tab by pressing the Left/Right button. 3. Select a desired menu by pressing the Up/Down button andpress the OK button.[Off] : cancels the slide show. The menu will disappear. [On] : Captured images are displaying continuously. ſWhen the playing back is complete, the slide show will stop. - Press the Pause button to pause the slide show. - Press the Pause button again to resume the slide show. - To stop the slide show, press the Pause button and thenpress the Menu button. Delete allƈHow to delete the files1. In the MP3 mode, press the Menu button. 2. Select the [Delete All] menu tab by pressing the Left/Rightbutton. 3. Select a desired menu by pressing the Up/ Down buttonand press the OK button. [No] : Cancel the "Delete files"[All] : a confirmation window will display. Select [Delete] menu and press the OK button. All MP3 files are deleted and [No Music!] messagewill display. NoAllDelete AllExit:MENU Move: OFFONSlide ShowEXIT:MENU MOVE:Delete?DeleteCancelConfirm:OK](https://usermanual.wiki/Hanwha-Techwin/DIGIMAXI50MP3.Users-Manual-2-of-2/User-Guide-572095-Page-64.png)
![ŝ119ŞBefore contacting a service centreCamera does not take images when pressing the Shutter buttonϛThere is insufficient memory capacityƍDelete unnecessary image filesϛThe memory card has not been formattedƍFormat the memory card (p.97)ϛThe memory card is exhaustedƍInsert a new memory cardϛThe memory card is lockedƍRefer to [Card Locked!] error message (p.108)ϛThe camera’s power is offƍTurn the camera power onϛThe battery are exhaustedƍInsert charged battery (p.14 ~ 18).ϛBattery is inserted incorrectly with the reverse polaritiesƍInsert the battery according to the polarity marks (+, -)The camera suddenly stops working while in use ϛThe camera was stopped due to a malfunctionƍRemove /re-insert battery and switch the camera onThe images are unclearϛA picture was taken within 0.5m from the subject without setting an appropriate macro modeƍIf the subject is closer than 0.5m, select macro shot modeϛTaking a picture beyond the flash rangeƍTake a picture within the flash rangeϛThe lens is smudged or dirtyƍClean the lensThe flash does not fireϛFlash off mode has been selectedƍDis-engage flash off modeϛThe camera mode can’t use the flashƍRefer to the FLASH instruction (p.37)Incorrect date and time is displayedϛThe date and time have been set incorrectly or the camera has adopted the default settingsƍReset the date and time correctly](https://usermanual.wiki/Hanwha-Techwin/DIGIMAXI50MP3.Users-Manual-2-of-2/User-Guide-572095-Page-69.png)
![ŝ120ŞBefore contacting a service centreThe camera buttons do not operateϛCamera malfunctionƍRemove /re-insert battery and switch the camera onA card error has occurred while the memory card is in the camera.ϛIncorrect memory card formatƍRe-format the memory card The images don't play backϛIncorrect file name (Violation of DCF format)ƍDo not change the image file nameColour of image is different to the original scene ϛWhite balance setting is incorrectƍSelect appropriate White balanceImages are too brightϛExposure is excessiveƍReset exposure compensationNo image on external monitorϛThe external monitor has not been connected properly with the cameraƍCheck the connection cablesϛThere are incorrect files in the memory cardƍInsert a memory card that has correct filesWhen using the PC’s explorer, the [Removable Disk] file does not showϛCable connection is incorrectƍCheck the connectionϛThe camera is offƍTurn the camera onϛThe operating system is not Windows 98, 98SE, 2000, ME, XP/ Mac OS 9.2 ~ 10.3.Alternatively the PC does not support USBƍInstall Windows 98, 98SE, 2000, ME, XP/ Mac OS 9.2 ~ 10.3 to PC that supports USBϛThe camera driver is not installedƍInstall a [USB Storage Driver]](https://usermanual.wiki/Hanwha-Techwin/DIGIMAXI50MP3.Users-Manual-2-of-2/User-Guide-572095-Page-70.png)