Hanwha Techwin IEYEPRO USB PC Camera User Manual
Samsung Techwin Co Ltd USB PC Camera
USER MANUAL

- 1 -
U
U
US
S
SB
B
B
P
P
PC
C
C
C
C
Ca
a
am
m
me
e
er
r
ra
a
a
I
I
In
n
ns
s
st
t
ta
a
al
l
ll
l
la
a
at
t
ti
i
io
o
on
n
n
G
G
Gu
u
ui
i
id
d
de
e
e
SAMSUNG AEROSPACE

- 2 -
FCC Compliance Statement
This device complies with part 15 of the FCC Rules. Operation is subject
to the following two conditions: (1) This device may not cause harmful
interference, and (2) this device must accept any interference received,
including interference that may cause undesired operation.
Note: This equipment has been tested and found to comply with the limits for a Class B digital device,
pursuant to part 15 of the FCC Rules. These limits are designed to provide reasonable protection against
harmful interference in a residential installation. This equipment generates, uses and can radiate radio
frequency energy and, if not installed and used in accordance with the instructions, may cause harmful
interference to radio communications. However, there is no guarantee that interference will not occur in a
particular installation. If this equipment does cause harmful interference to radio or television reception,
which can be determined by turning the equipment off and on, the user is encouraged to try to correct the
interference by one or more of the following measures:
- Reorient or relocate the receiving antenna.
- Increase the separation between the equipment and receiver.
- Connect the equipment into an outlet on a circuit different from that to which the receiver is
connected.
- Consult the dealer or an experienced radio/TV technician for help.
Warning: You are cautioned that any change or modifications to the equipment not expressly approved by
the party responsible for compliance could void your authority to operate such equipment.
NOTE: This unit was tested with shielded cables on the peripheral devices. Shielded cables must be used
with the unit to insure compliance.

- 3 -
S
S
SA
A
AM
M
MS
S
SU
U
UN
N
NG
G
G
U
U
US
S
SB
B
B
P
P
PC
C
C
C
C
Ca
a
am
m
me
e
er
r
ra
a
a
I
I
In
n
ns
s
st
t
ta
a
al
l
ll
l
la
a
at
t
ti
i
io
o
on
n
n
G
G
Gu
u
ui
i
id
d
de
e
e
1. Before the installation
• Check your PC system if it is superior than the following
Minimum System
Requirements. In case of inferiority, it may cause the
installation error
or malfunction of the camera.
•Minimum System Requirements
- USB support Host PC
- Pentium 200MHz MMX (233MHz MMX or faster recommended)
- Windows 98/2000
- 32MB RAM (64MB recommended)
- 100MB hard disk space available
- CD-ROM drive
- 800x600, 16 bit color display (1024x768 recommended)
- Microsoft Internet Explorer for video e-mail
- LAN card or 56.6K bps modem for Video Conference
- Windows compatible sound card (full duplex sound card
recommended)
- Speakers required for receiving audio
- Microphone required for sending audio
• Power on the PC and start Windows.
2. Installing the software
• Place the CD-ROM into your CD-ROM drive. The autoplay
installation program
will start automatically.
- It takes 5~10 seconds to load the autoplay according to PC
system.
If the software does not automatically load, run “Windows
Explorer”.
And then run “autoplay.exe” in CD-ROM drive.
! Note : Install the software first before connecting the
amera with P
! Note : Install the software first before connecting the
amera with P
- 4 -
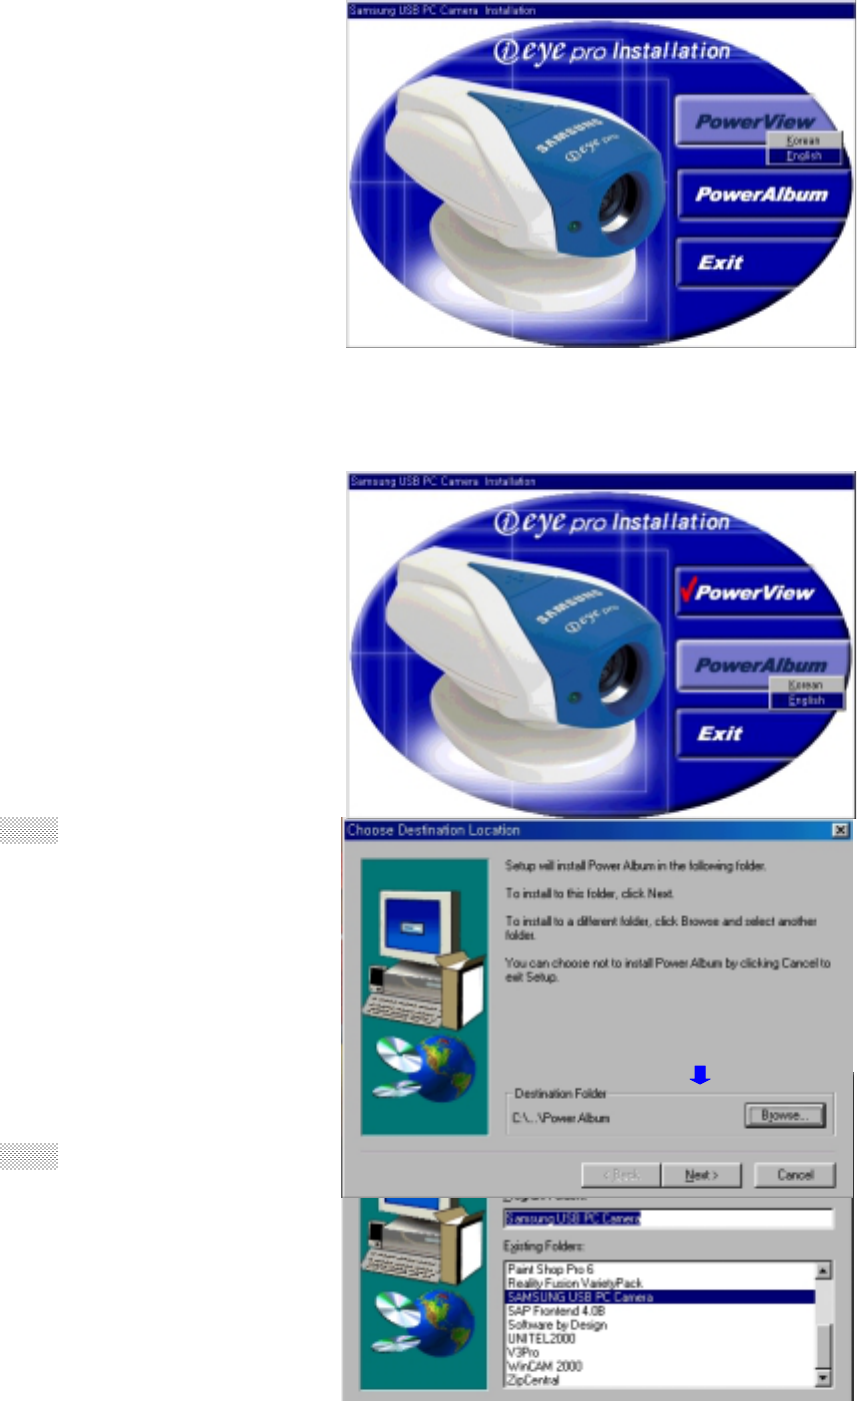
1) Installing the Power View
The autoplay will load the
installation window, as
shown in
right picture.
Press “Power View” and select
“English”. Power View program
will be Installed
automatically
and come back to the
installation
window.
2) Installing the Power Album and finishing the installation
• Press “Power Album” and
select
“English”.
• Click Next.
• Click Next.
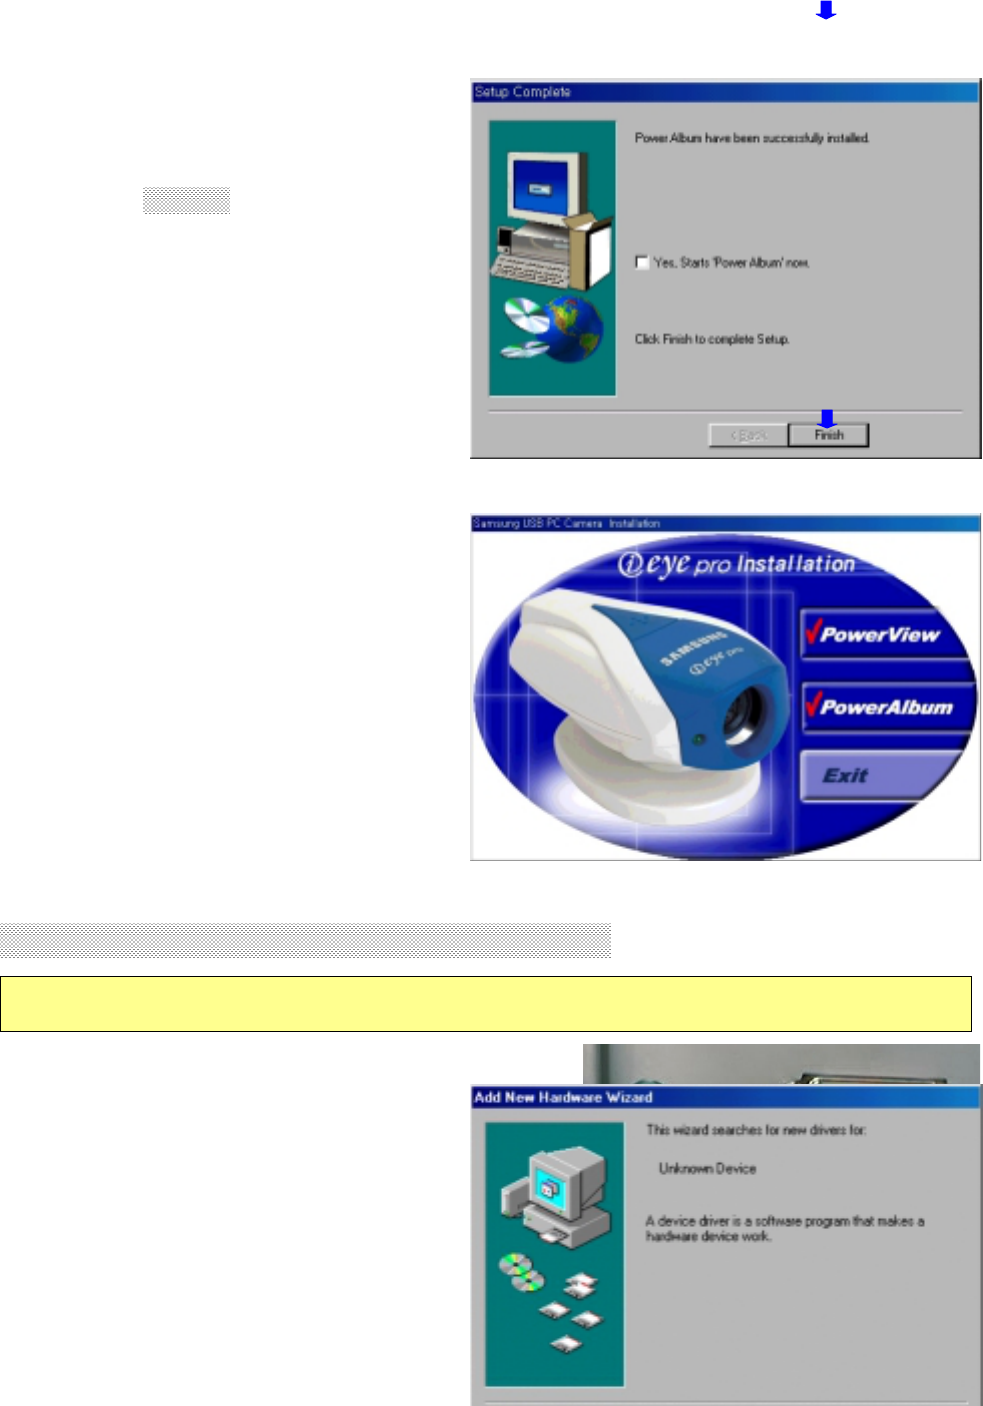
- 5 -
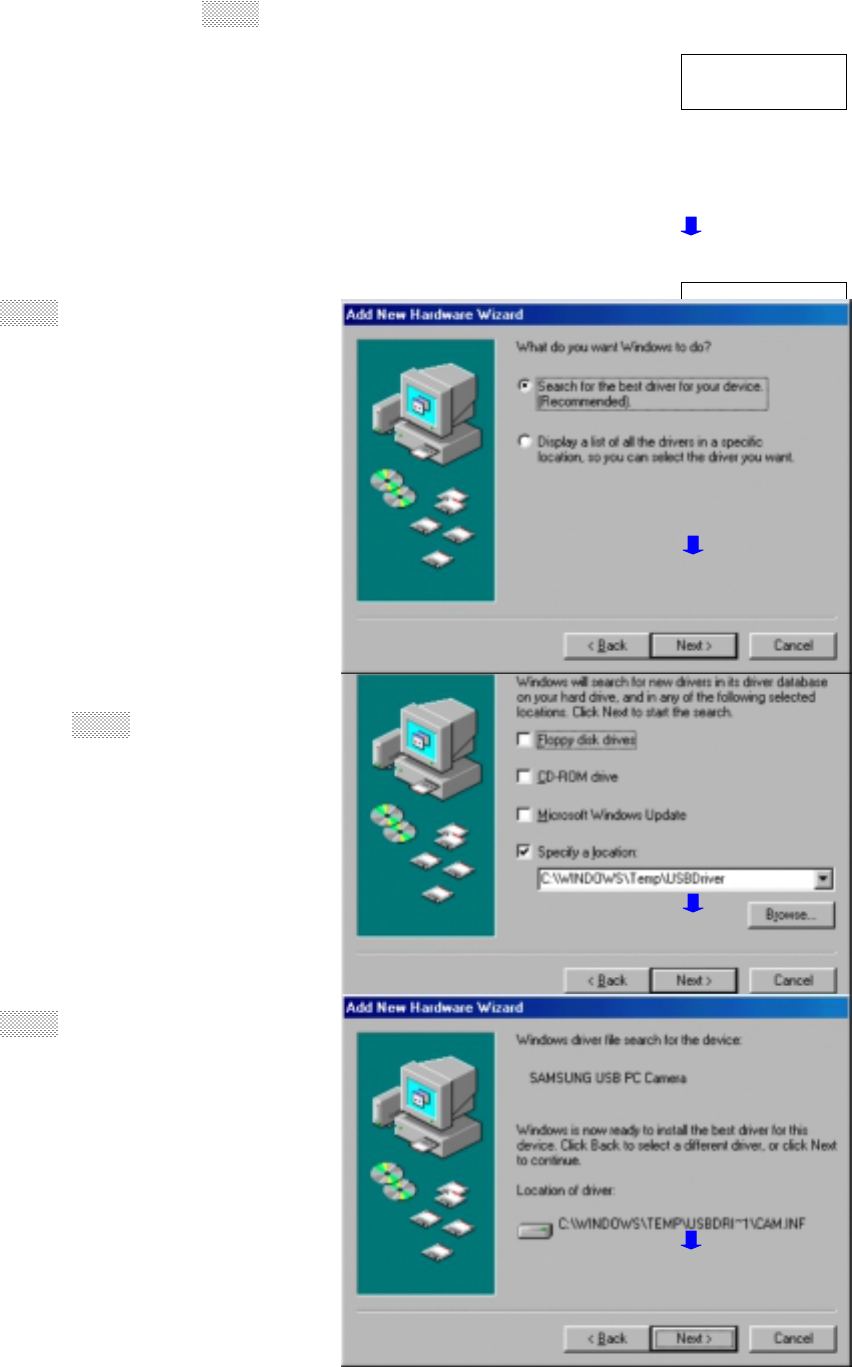
• After successful
installation,
the right window will
appear.
Click Finish and then the
installation window will
appear
once again.
• The software installation is
finished completely.
Find the finish mark (•) in
the
installation window and
click
“Exit”.
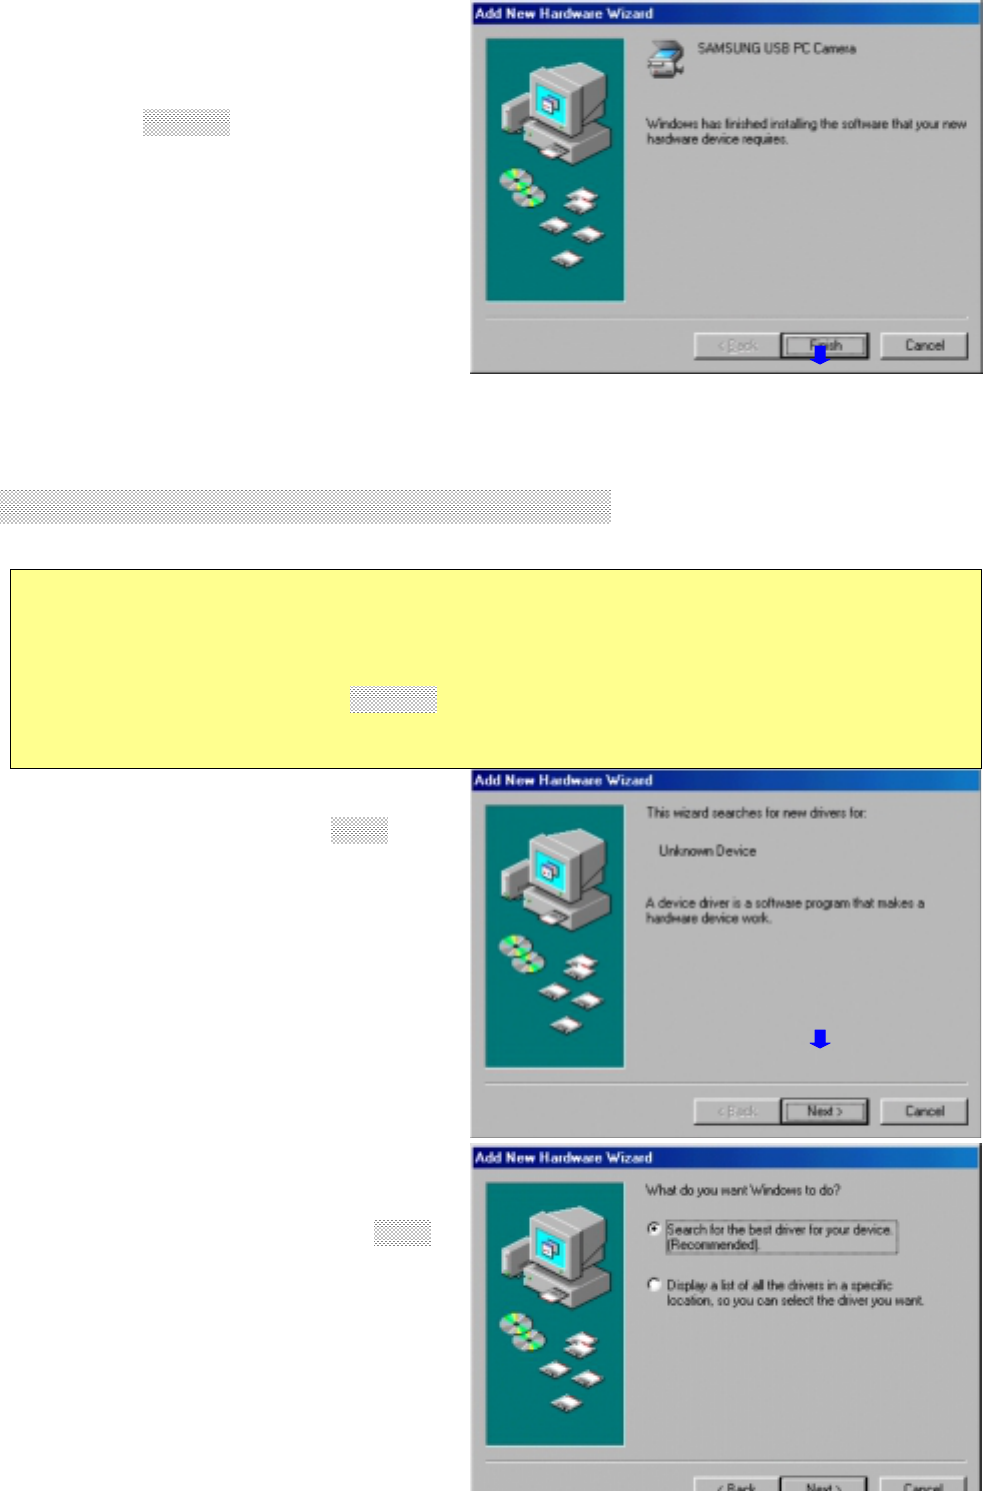
3. Connecting the camera with PC []
• Plug the USB cable of camera in USB
port
of PC.
• “Add New Hardware Wizard”
! Note : Install the software first before connecting the camera
with P
- 6 -
ENH-se05.jpg
ENH-se03.jpg
ENH-se04.jpg
ENH-se02.jpg
ENH-se05.jpg
window
will appear. Click Next to
continue.
• Click Next.
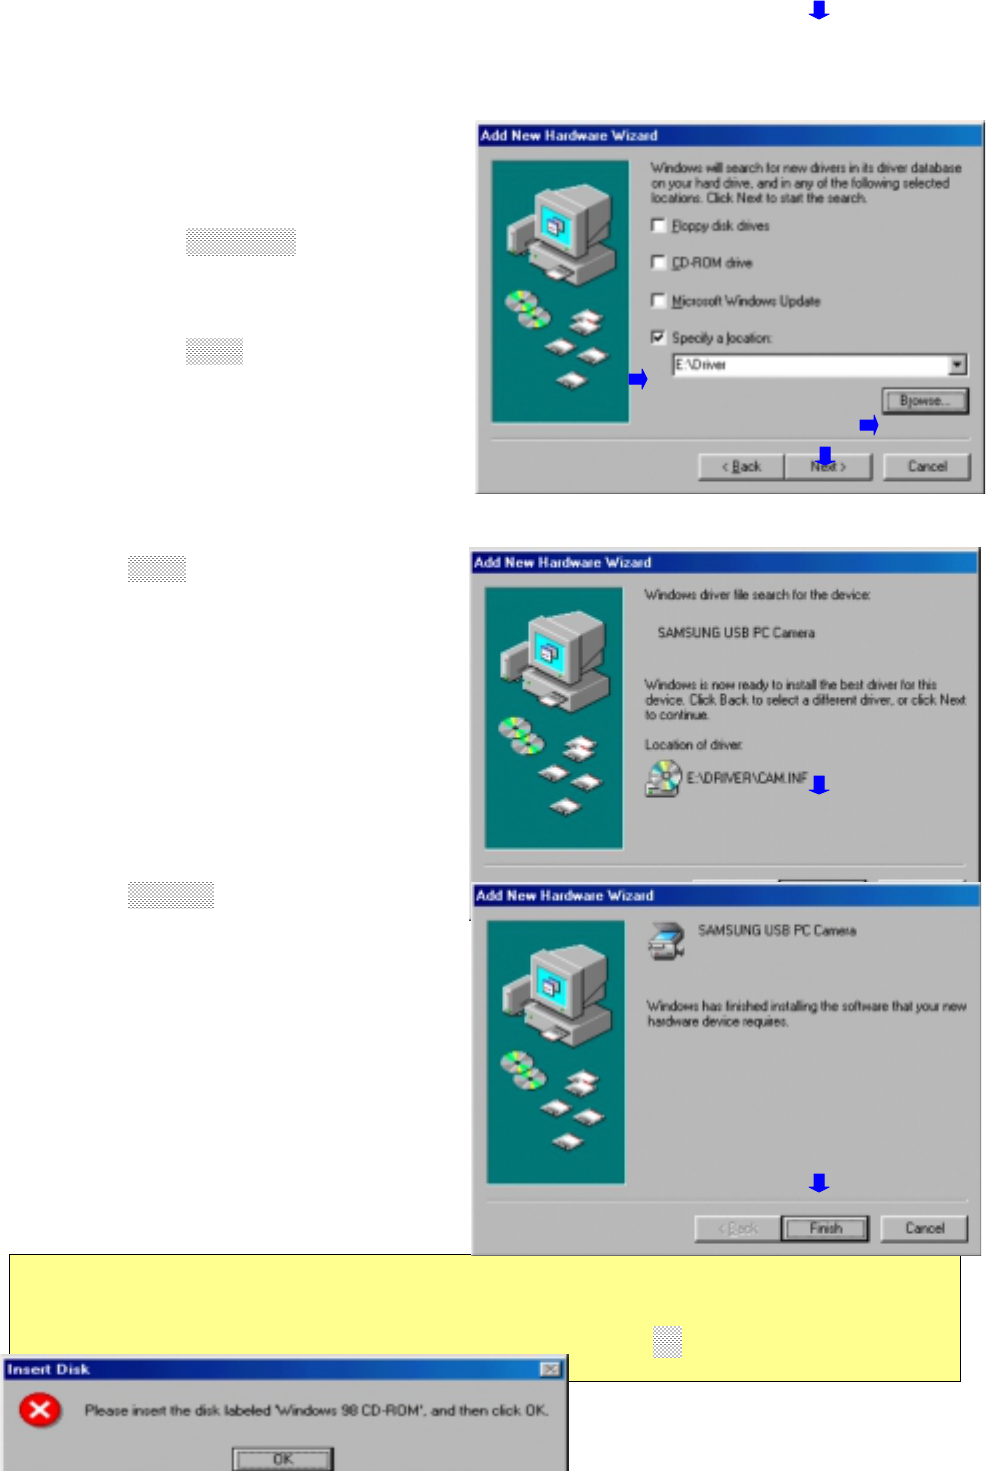
• Find the mark (•) at
“Specify a
location” in Wizard window.
And click Next.
• Click Next.
- 7 - ENH-se03.jpg
ENH-se02.jpg
ENH-se06.jpg
• After successful
installation,
the right window will
appear.
Click Finish and then the
indicator lamp of camera
will
turn on.
Now you can work with USB
PC
Camera.
4. Connecting the camera with PC []
• If you connect the camera with PC before software installation
• “Add New Hardware Wizard”
window
will appear. Click Next to
continue.
• Choose "Search for the best
driver for your device
(Recommended)". Click Next.
! Note : If you connect the camera with PC before software
installation,
installation error may occur. Therefore it is
recommended that you
should click Cancel during the following •-• stage and
disconnect
the camera with PC, and then install the software first
- 8 -
EH-set06.jpg
• a) Insert the installation
CD-ROM.
b) Choose "Specify a
location”.
c) Click Browse… and select
"Driver" folder in the
CD-ROM
drive.
d) Click Next.
• Click Next.
• Click Finish and then the
indicator lamp of camera
will
turn on.
Install the software
referring to
Page 5-8.
1) Click OK in the Insert Disk message window.
EH-set08.jpg
! Note : In case of occurring the following message during the
installation,
insert the Windows CD- ROM and click OK.
If d 't h th Wi d D ROM f ll th t
b
c
d

- 9 -
EH-set10.jpg
2) Remember unfound file name
in
right window.
3) Select•Start•Find•File or
folder•in the task bar. Type
the
file name at "Named" frame
and
click Find Now.
Specify a location of the
file at
"Copy files from" frame in
above
2) window. And click OK.
4) If Insert Disk message window occurs again, repeat the above
1)-3) stages.
4. Starting the program
• Select and double-click Samsung USB PC Camera icon to
start.
• Shell program will appear and
you can control the
application
programs easily.
EH-set11.jpg
! Note
- Generally, application programs related with video display
and record
need a lot of memories of PC. Therefore it is recommended
that you
should close all other programs before starting video
application
programs.
- After starting video application programs,
adjust the Focusing Dial to take good video
quality.
- This
g
uide is onl
y
for installation and brief
H-set11.jpg

- 10 -
Power View displays and captures
still images & video clips.
Also you can send e-mail the captured
still images & video clips by it's compression technology without
network troubles.
Power Album allows the users to
edit the captured still images,
and create
sticky pictures & photo album.
It supplies more 600 clip art
images and you can make CD-ROM
with edited photo album.
Video Conference links Microsoft NetMeeting allows you to hold
face to face conversations over the Internet with friends and
family. Collaborate with co-workers around the world with this
standard video conferencing tool
It is PC surveillance program. While you
are away from your computer, this program
makes a sound
with several beepers and captures still
Power View
Power Album
! Note : The installation CD-ROM must be in the CD-ROM drive to
run
Power Album. Please be cautious not to be lost
su
pp
lied
Video
Motion
! Note : Microsoft NetMeeting Ver. 2.0 is supported by Windows
98.
If you do not have Microsoft NetMeeting in your
computer, Video
Conference does not work properly. Please setup the
NetMeeting at

- 11 -
images
whenever any motion is detected.
It supplies four kinds of simple Games with PC Camera, as it is,
Shoop,
Punch The Clown, Pop The Bubble, BounceIt.
It provides a guide of using Shell program.
Exit Shell program.
Game
Help
Exit
! Note : You need another installation procedures for game.
Please refer to
t
h
e
In
sta
ll
at
i
o
n
o
f
Ga
m
e
in H
e
l
p
o
f
S
h
e
ll
p
r
og
r
a
m
- 12 -
7. Specifications
•Specifications are subject to change without prior notice.
Stilland Video ImageQuality
Image Sensor 1/3¡±CMOS with VGA resolution, 640¡¿480 pixels
Still Image Resolution 640¡¿480 pixels, 24 bit color
Video Image Resolution ¡¤VGA(640¡¿480) : 15 frame per second
¡¤CIF(352¡¿288) : 30 frame per second
¡¤QCIF(176¡¿144): 30 frame per second
Video Compression 1/50 ~ 1/100 (software compression : MPEG)
White Balance Automatic
Exposure Automatic or manual controlled
S/N Ratio Greater than 48dB
Optics & M echanical
Lens Manual focus ; f=6.0§®, F 1.8
Focus Range 10§¯ to infinity
Interface 1.8m USB cable
Power Supplied by USB port
Power Consumption : 5V / 150§Ì Active
Dimensions(W¡¿H¡¿D) 52¡¿44.6¡¿92§®
Software Power View, Power Album, Motion Detector, Game
* Connection with Microsoft NetMeeting
Minimum System R equire m e n ts
¡¤USB support Host PC
¡¤Pentium 200MHz MMX (233MHz MMX or faster recommended)
¡¤Windows 98/2000
¡¤32MB RAM (64MB recommended)
¡¤100MB hard disk space available
¡¤CD-ROM drive
¡¤800x600, 16 bit color display (1024x768 recommended)
¡¤Microsoft Internet Explorer for video e-mail
¡¤LAN card or 56.6K bps modem for Video Conference
¡¤Windows compatible sound card (full duplex sound card recommended)
¡¤Speakers required for receiving audio
¡¤Microphone required for sending audio