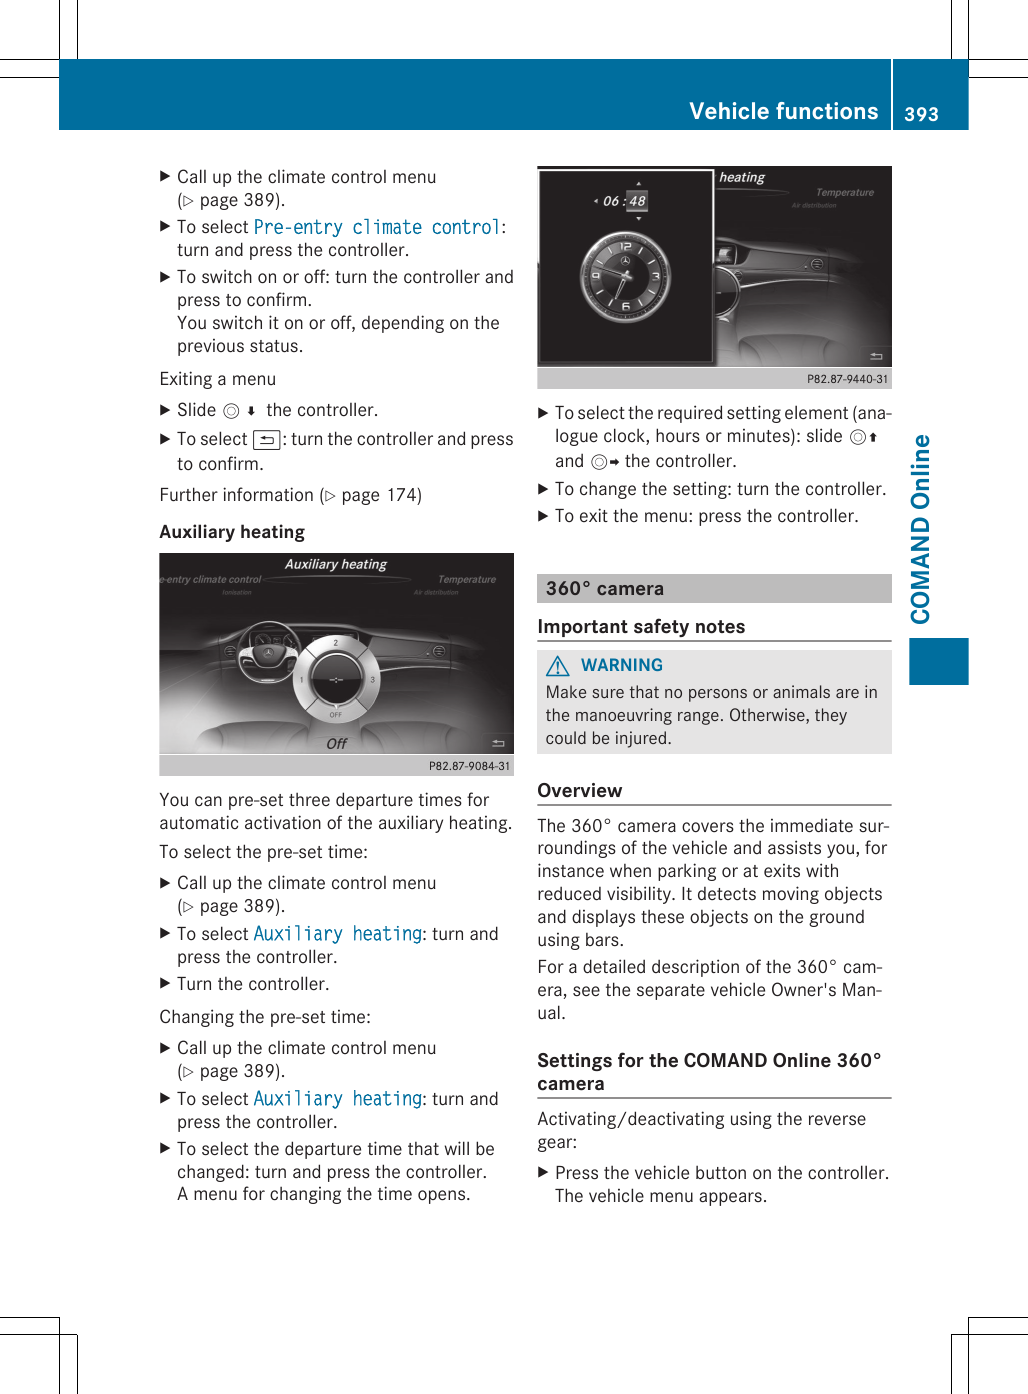
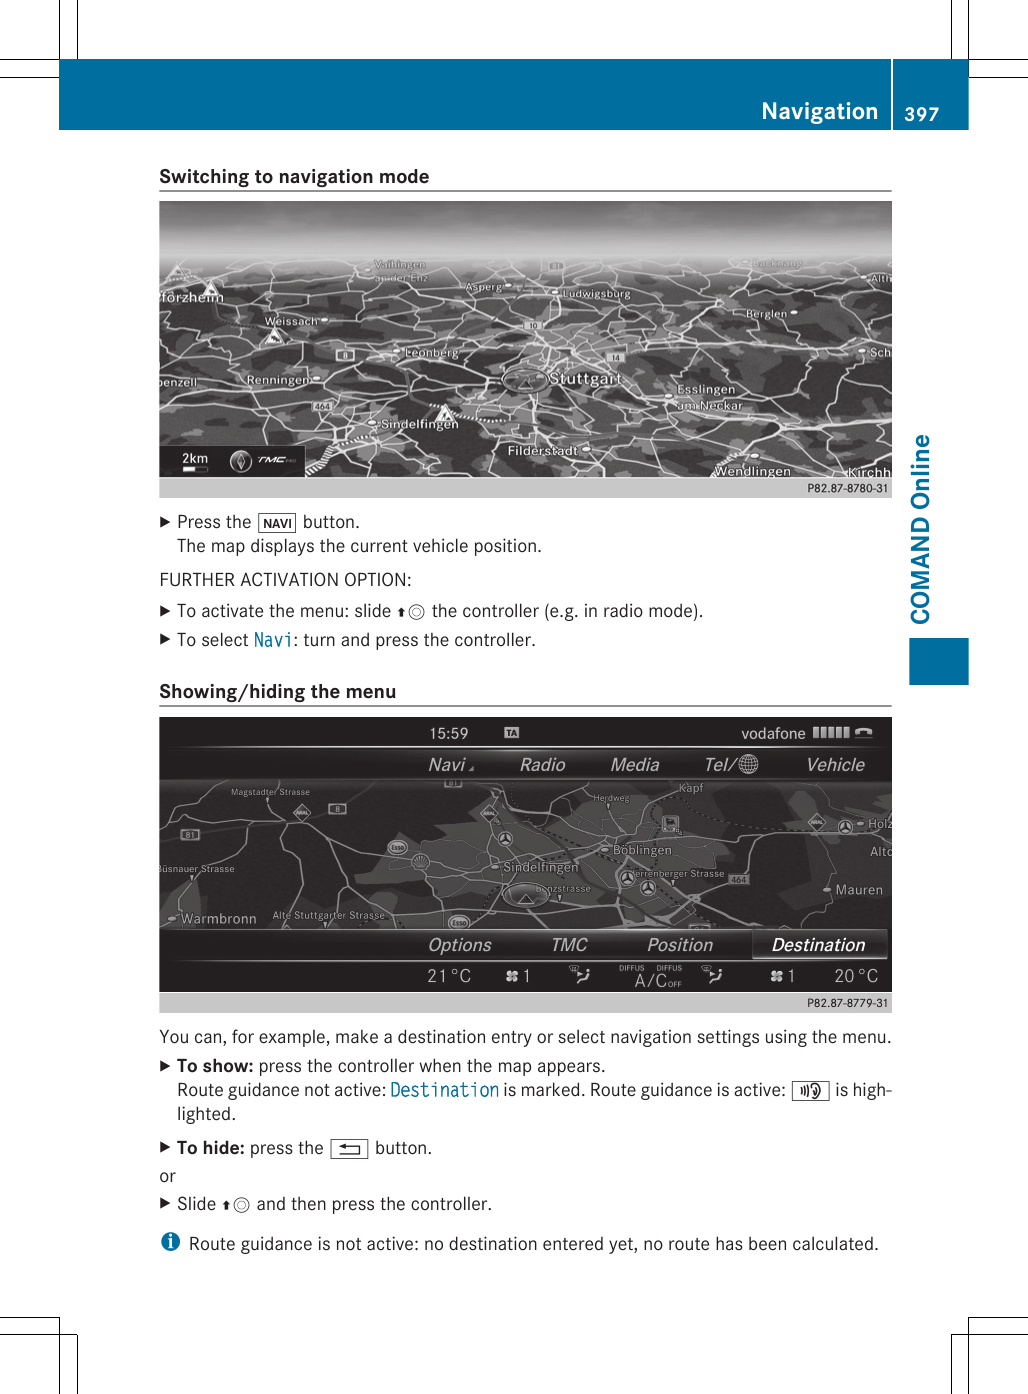
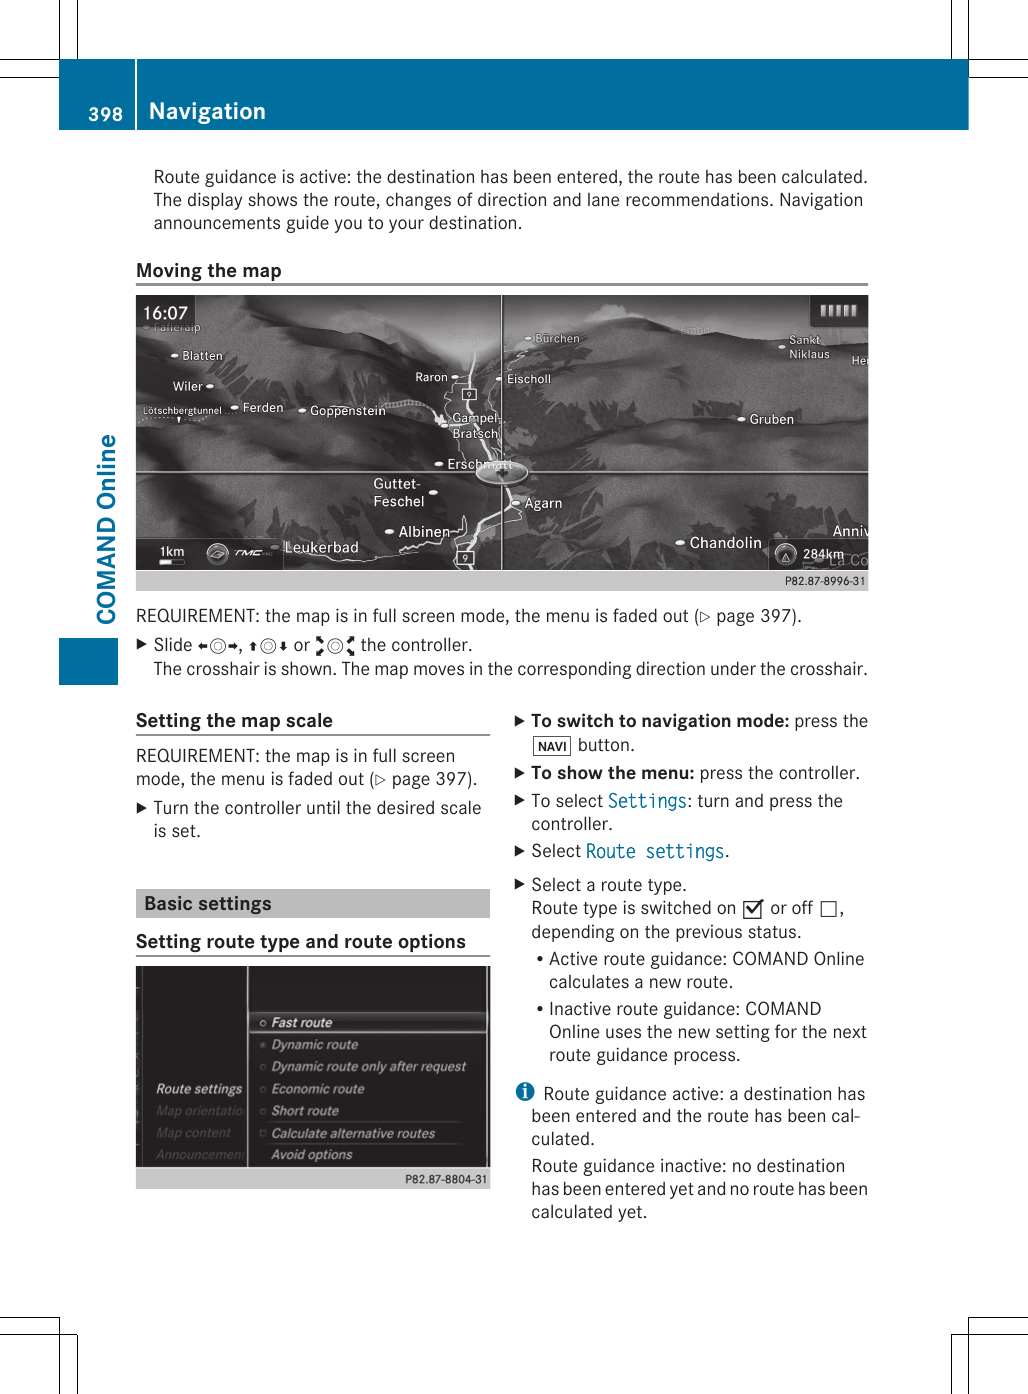
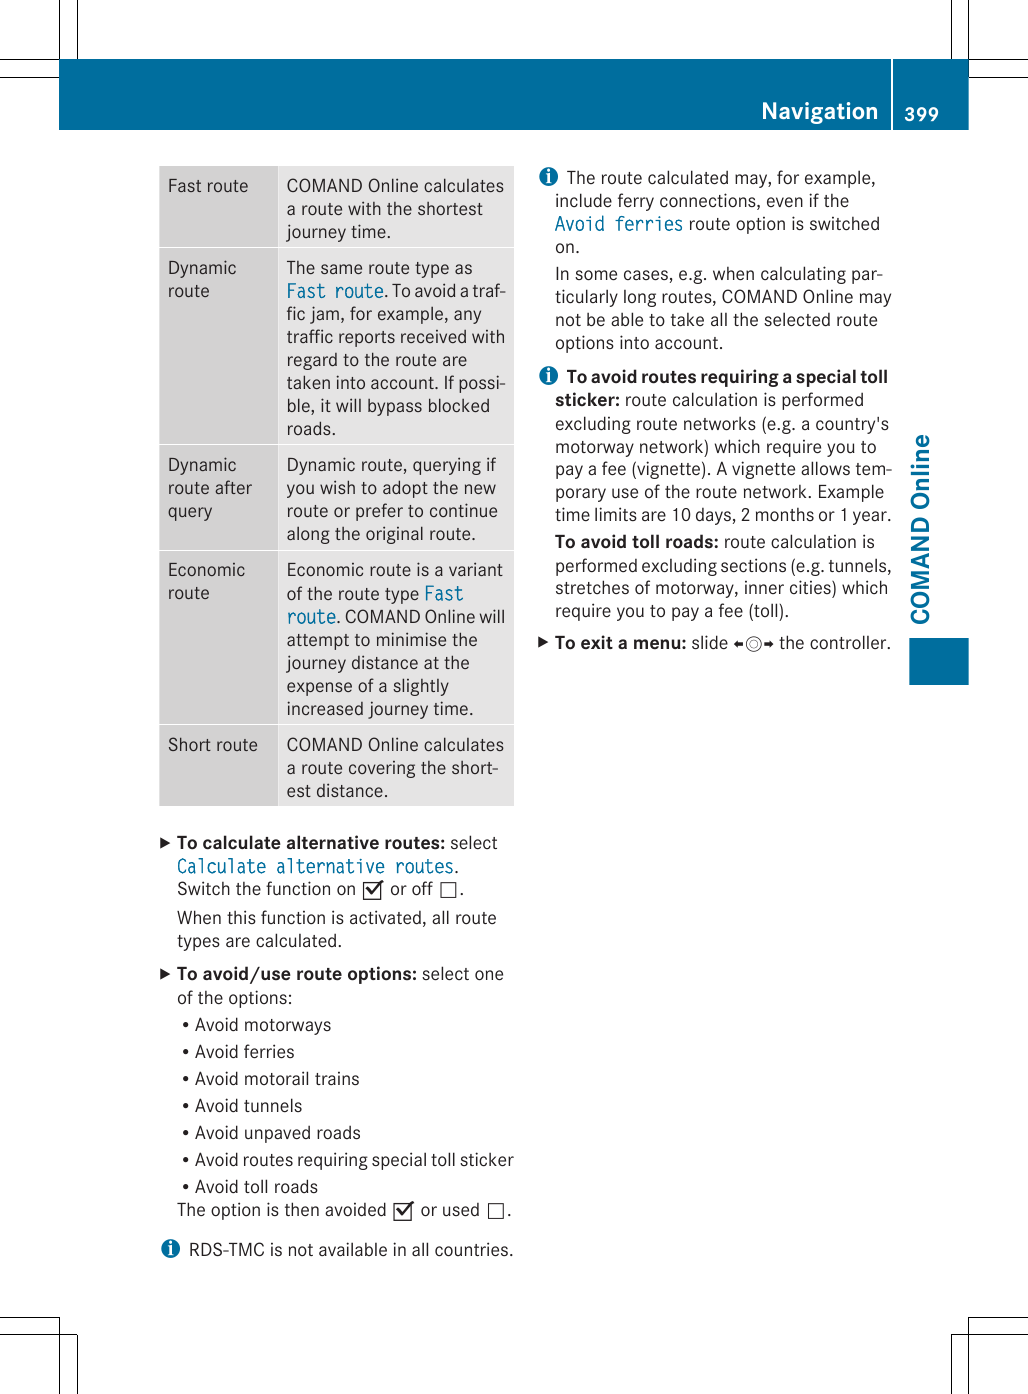
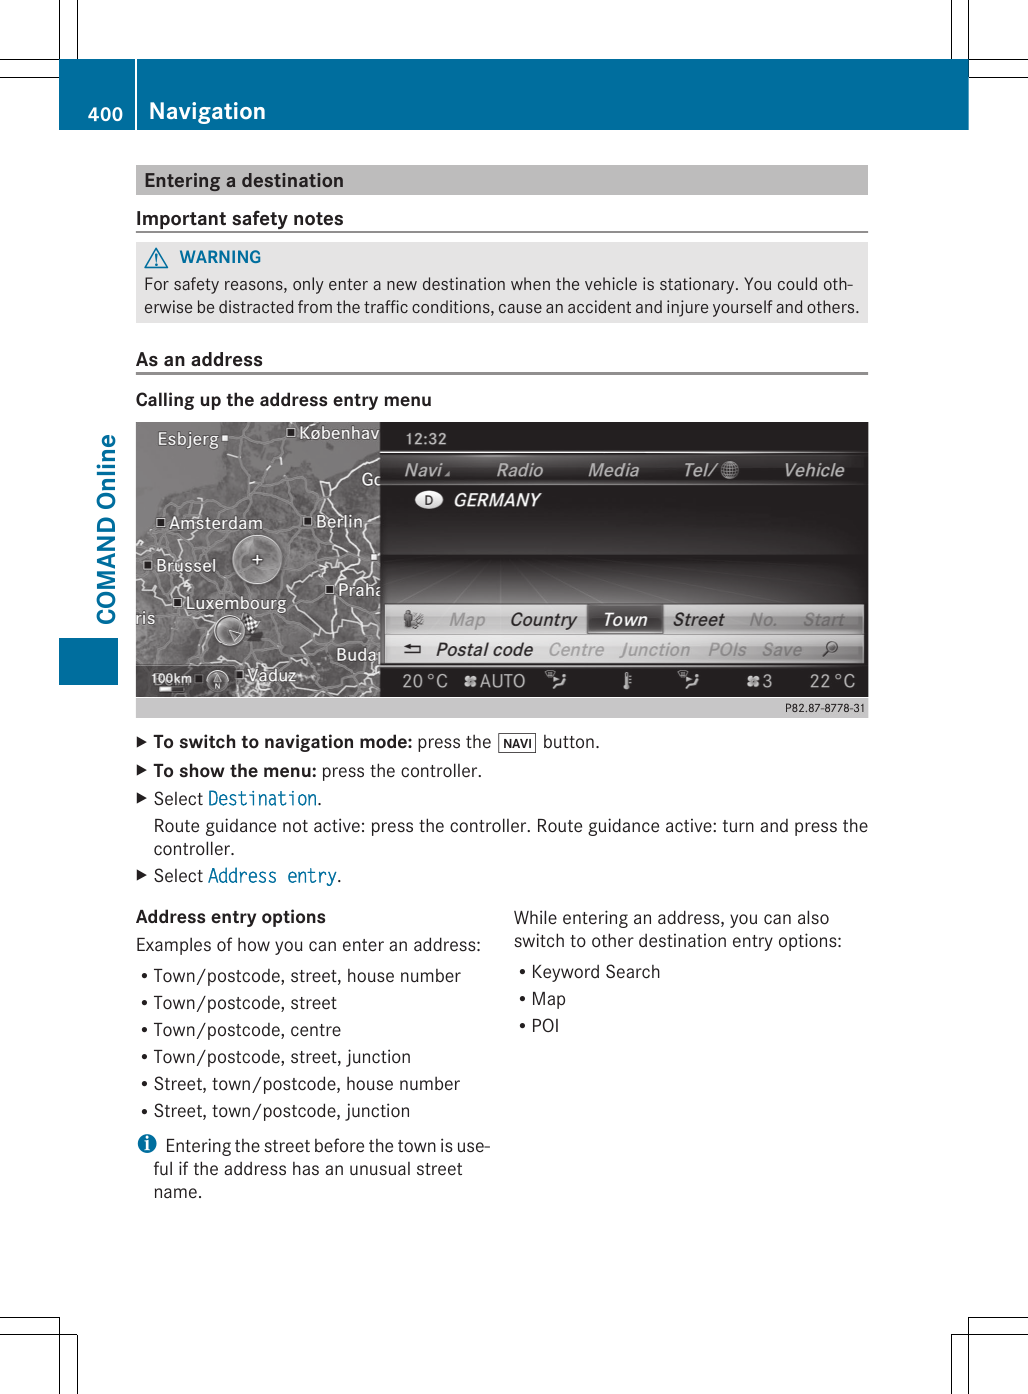
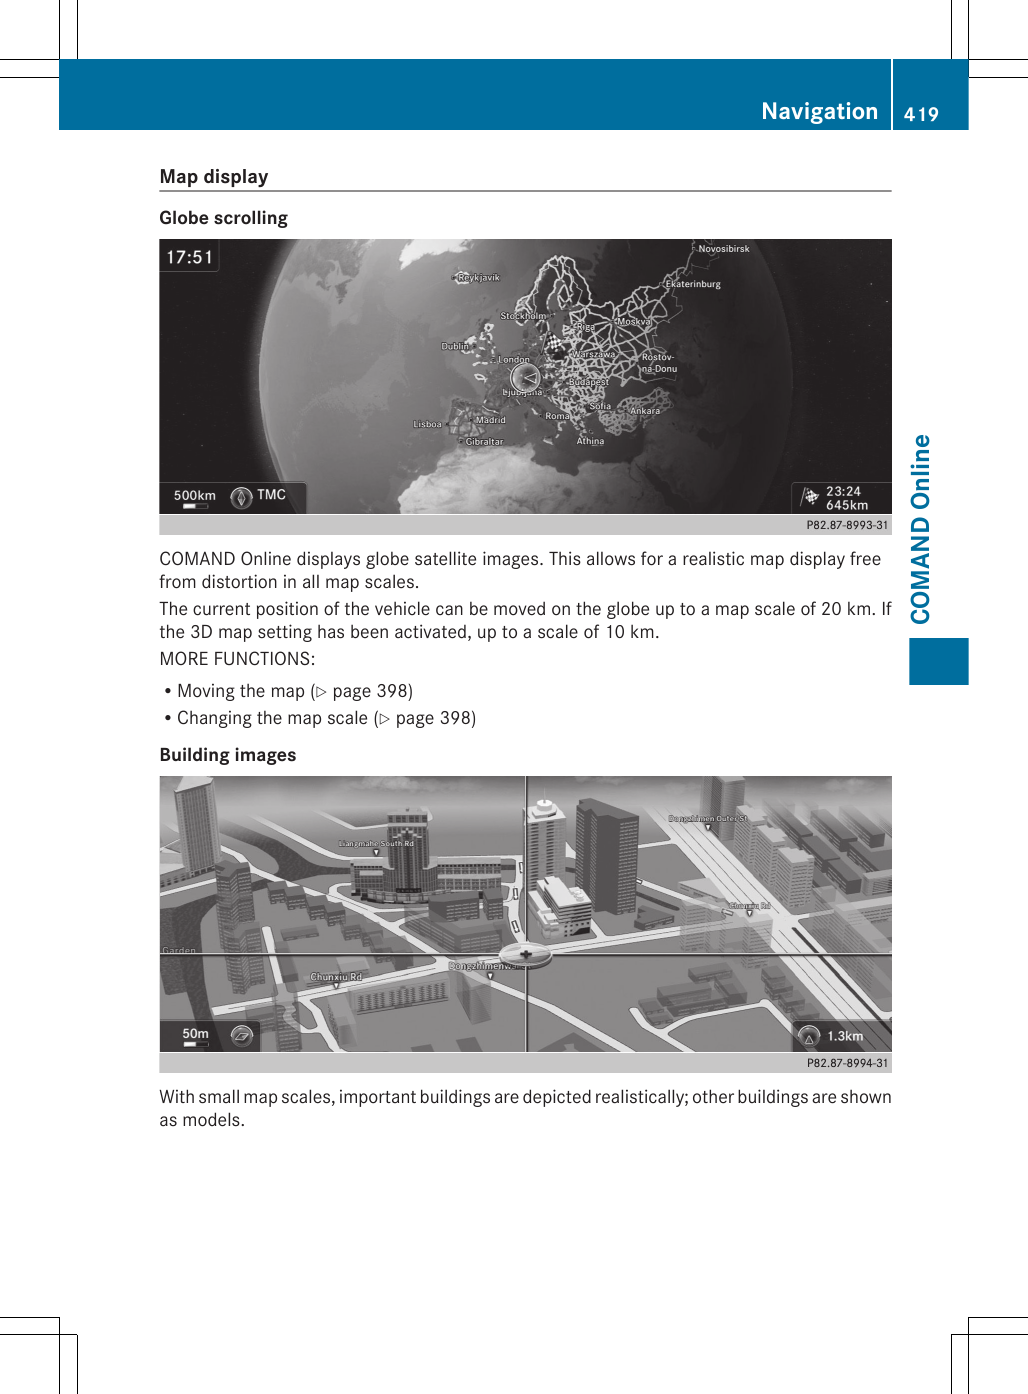
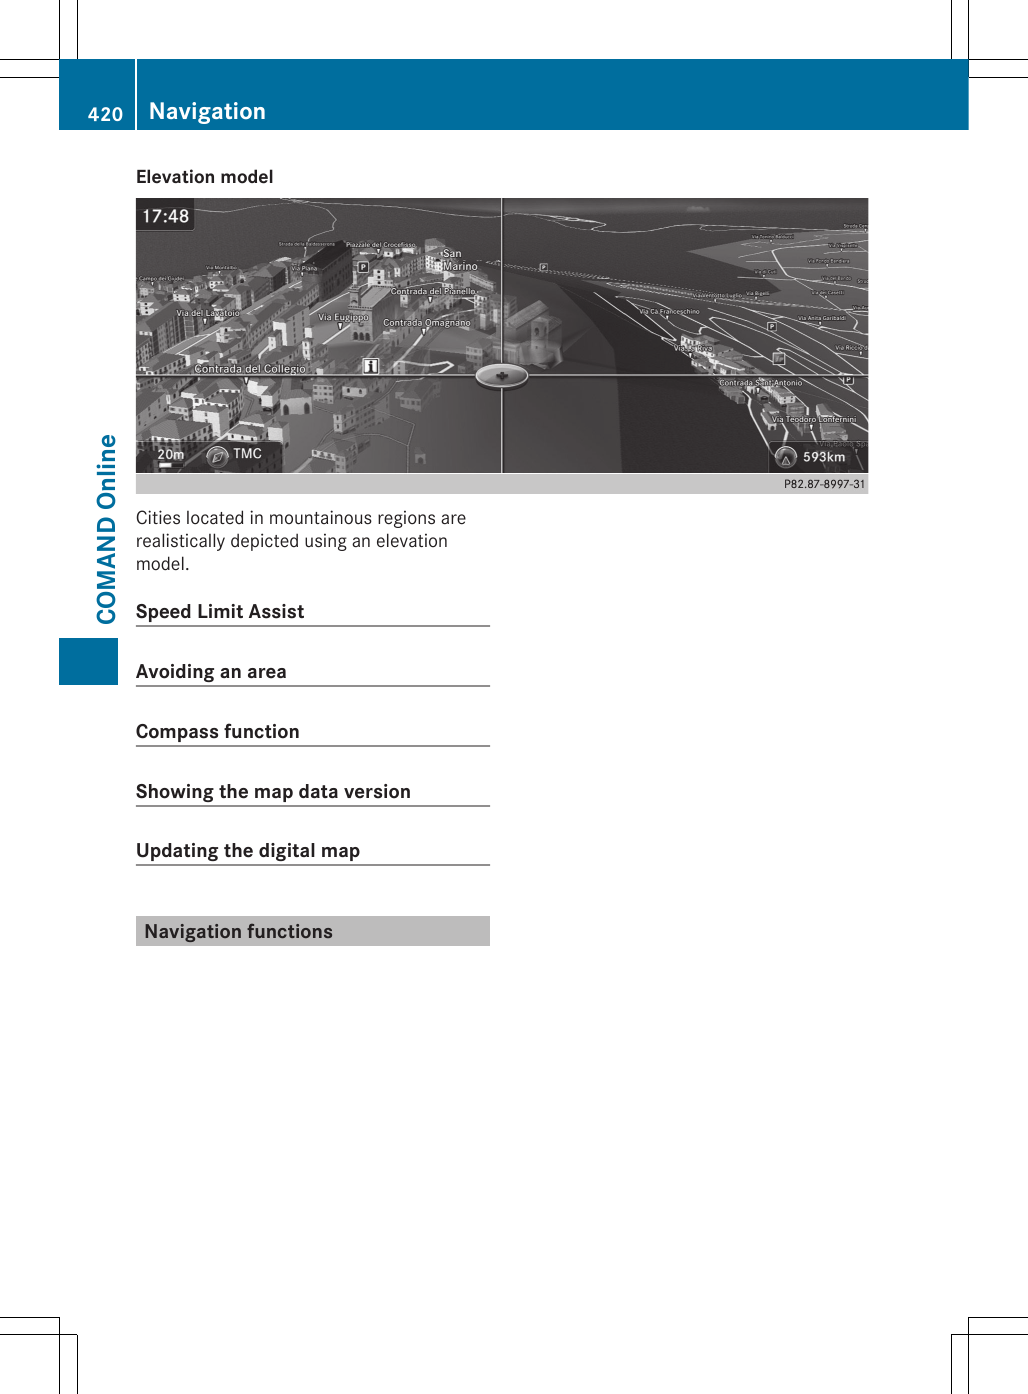
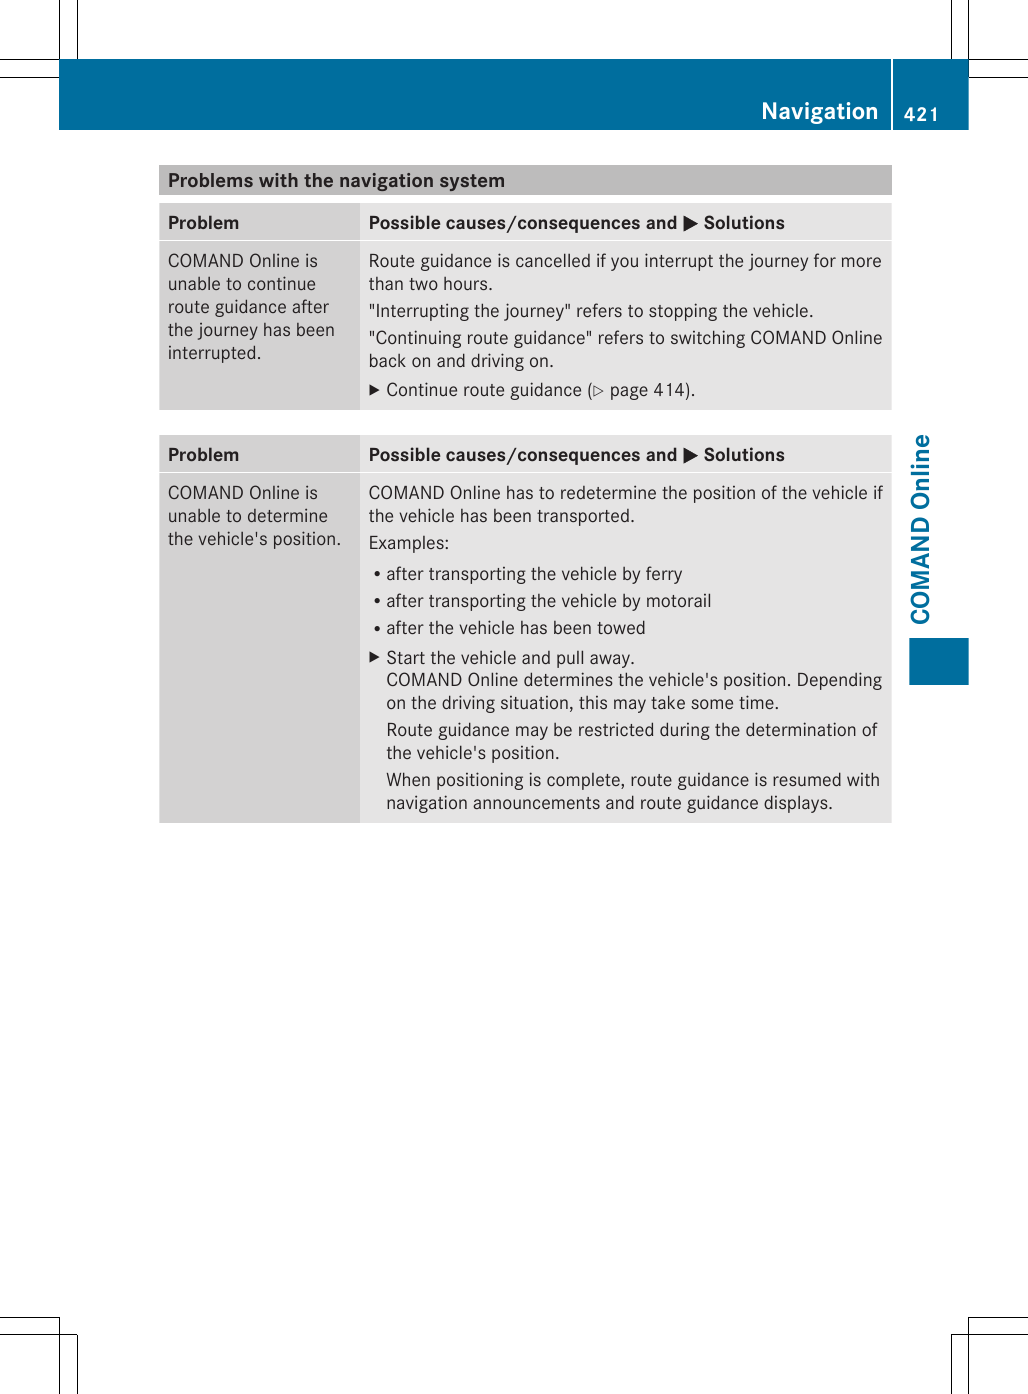
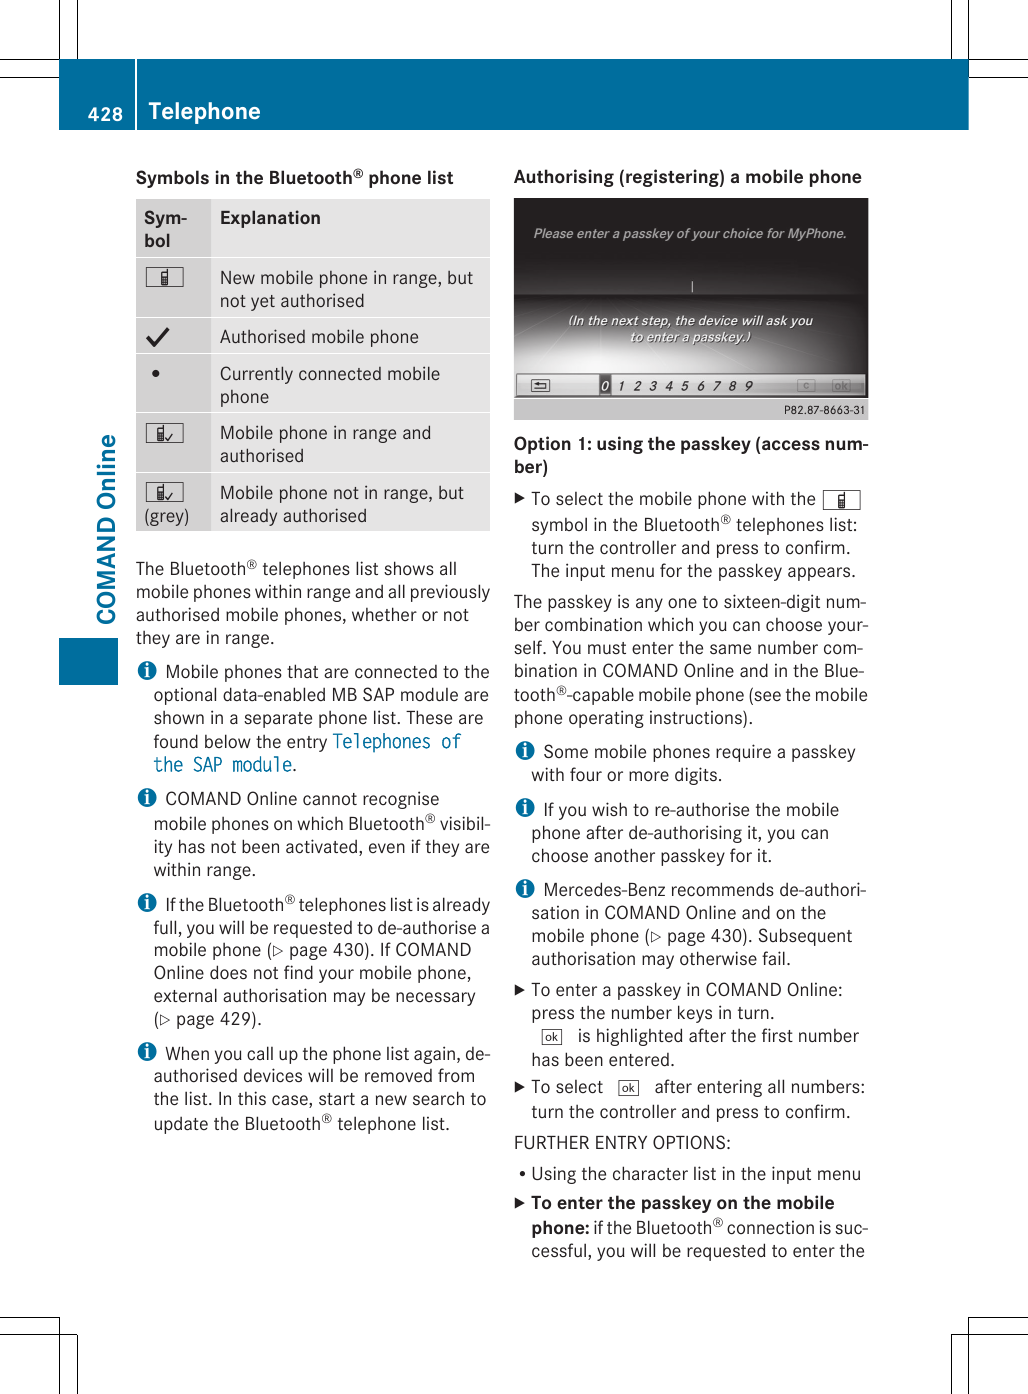
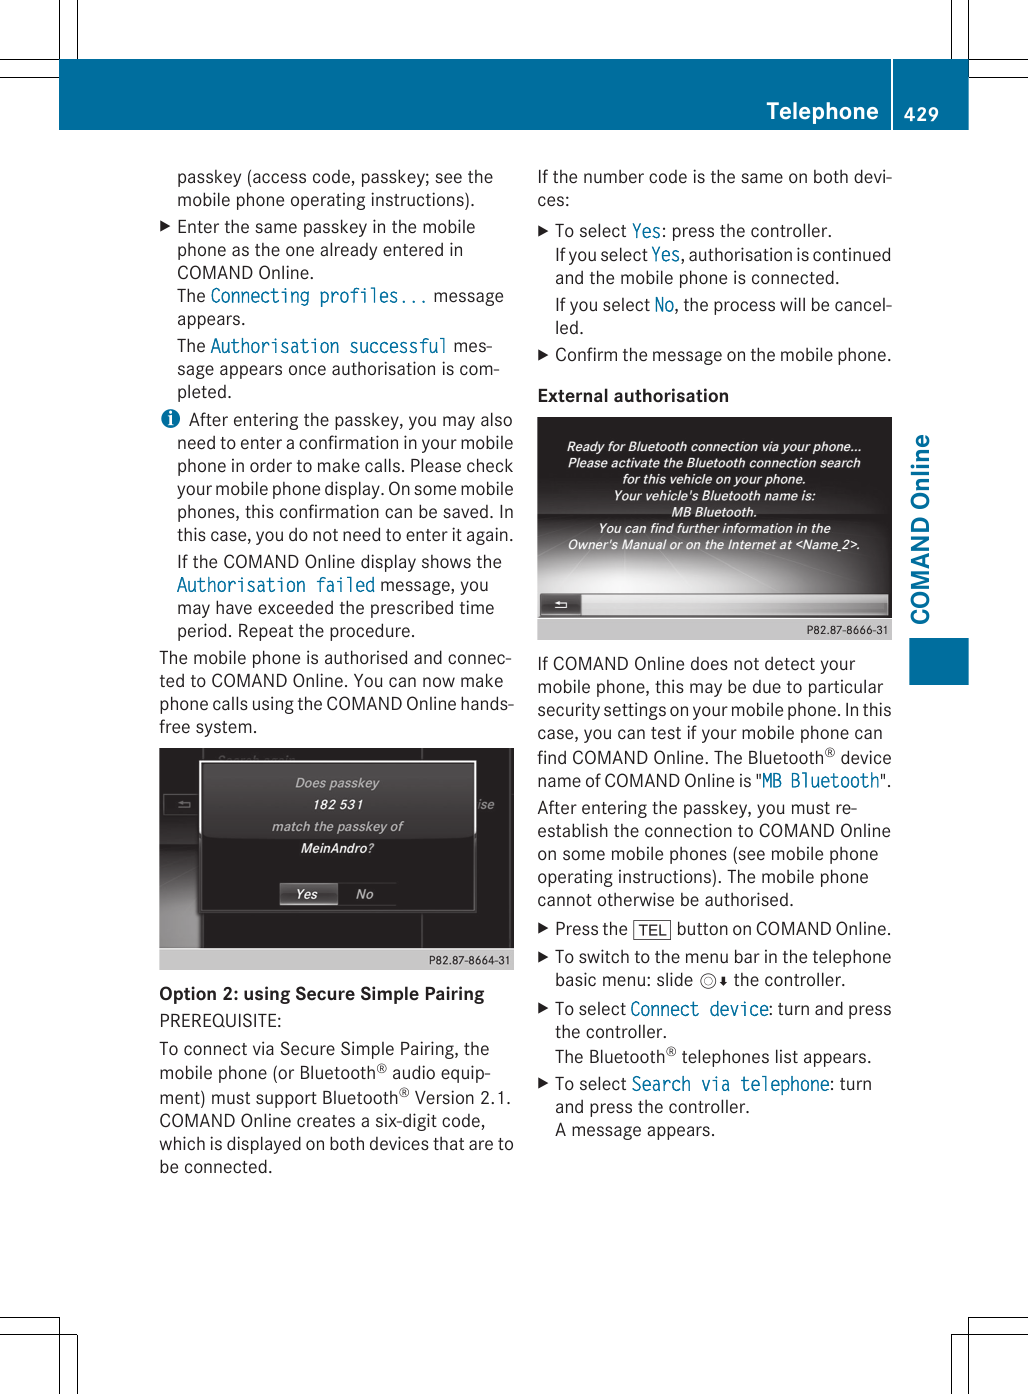
Harman Becker Automotive Systems 9099 Infotainment System with Headunit (with BT, WLAN, Kleer technology) User Manual BA 222 ECE NA 2013 05b kein Druck 1 en GB

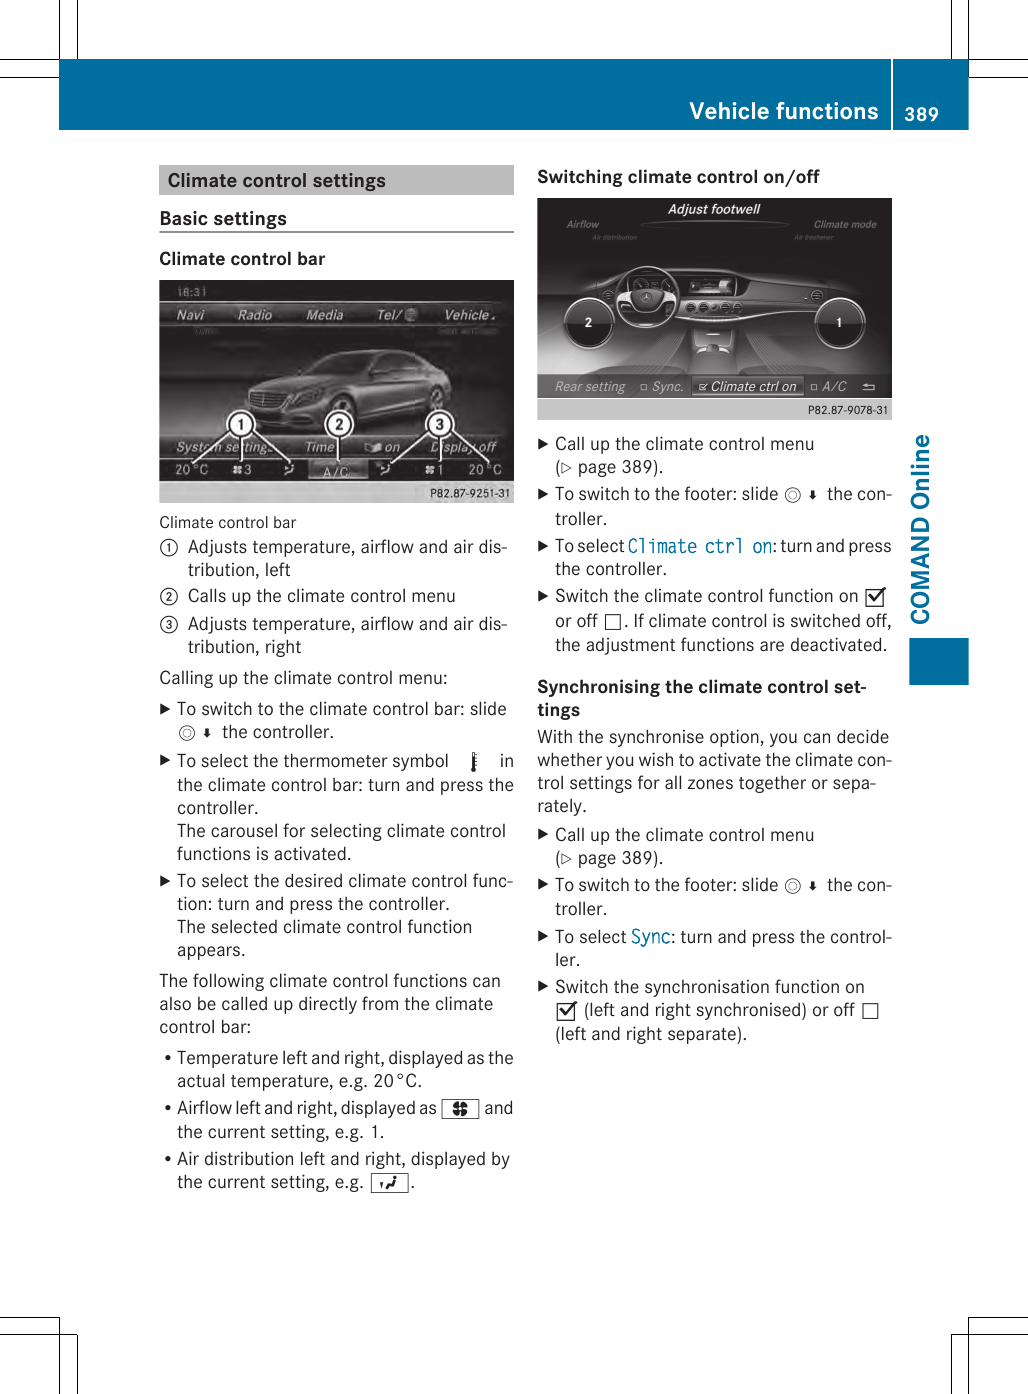
Harman Becker Automotive Systems Infotainment System with Headunit (with BT, WLAN, Kleer technology) BA 222 ECE NA 2013 05b kein Druck 1 en GB

Contents

User Manual I

Owner's Manual
NTG5_UserManual-SV_130307-english.docx User Instruction Manual NTG5 Infotainment System NTG5 HU -  head unit NTG5 FU - fond unit NTG5 P104 - wireless headphone Commercial name: COMAND Online Version:  1.0 - english Date:  2013-03-07
SymbolsIn this manual, you will find the following sym-bols:GWARNINGWarning notices draw your attention to haz-ards that may endanger your health or life, orthe health or life of others.HEnvironmental noteEnvironmental notes provide you with infor-mation on environmentally aware actions ordisposal.! Notes on material damage alert you todangers that could lead to damage to yourvehicle.iThese symbols indicate useful instruc-tions or further information that could behelpful to you.XThis symbol designates an instruc-tion you must follow.XSeveral consecutive symbols indi-cate an instruction with severalsteps.(Y page) This symbol tells you where youcan find further information on atopic.YY This symbol indicates a warning oran instruction that is continued onthe next page.Display This text indicates a message onthe multifunction/COMAND dis-play.Parts of the software in the vehicle are pro-tected by copyright © 2005The FreeType Projecthttp://www.freetype.org. All rightsreserved.
Thank you for buying Mercedes-BenzBefore you first drive off, read this Owner'sManual carefully and familiarise yourself withyour vehicle. For your own safety and a longervehicle life, follow the instructions and warn-ing notices in this manual. Disregarding themmay lead to damage to the vehicle or personalinjury.The equipment or model designation of yourvehicle may vary according to:RModelROrderRCountry variantRAvailabilityThe illustrations in this manual show a left-hand-drive vehicle. On right-hand-drive vehi-cles, the layout of components and controlsdiffers accordingly.Mercedes-Benz is constantly updating itsvehicles to the state of the art.Mercedes-Benz therefore reserves the rightto introduce changes in the following areas:RDesignREquipmentRTechnical featuresThe equipment in your vehicle may thereforediffer from that shown in the descriptions andillustrations.The following are integral components of thevehicle:ROwner's ManualRService BookletREquipment-dependent supplementsKeep printed copies of the documents in thevehicle at all times. If you sell the vehicle,always pass the documents on to the newowner.iYou can get to know the important fea-tures of your vehicle in the interactive Own-er's Manual on the Internet at:http://www.mercedes-benz.de/betriebsanleitungThe technical documentation team atDaimler AG wishes you safe and pleasantmotoring.xxxxxxxxxx ÉxxxxxxxxxxÌËÍ
Index ....................................................... 4Introduction ......................................... 31At a glance ........................................... 37Safety ................................................... 49Opening and closing ........................... 93Seats, steering wheel and mirrors .. 119Lights and windscreen wipers ......... 143Climate control ................................. 157Driving and parking .......................... 185On-board computer and displays .... 293COMAND Online ................................ 357Stowing and features ....................... 565Maintenance and care ...................... 595Breakdown assistance ..................... 611Wheels and tyres .............................. 635Technical data ................................... 661Contents 3
Operating safety ............................... 358At a glance ......................................... 361System settings ................................ 373Vehicle functions .............................. 381Navigation ......................................... 395Telephone .......................................... 423Online and Internet ........................... 463Radio .................................................. 484Media ................................................. 491Sound ................................................. 533Rear Seat Entertainment System .... 536357COMAND Online
Operating safetyImportant safety notesGWARNINGYour attention must always be focused on thetraffic conditions.Only use COMAND Online or the telephonewhen the road and traffic conditions permit.Bear in mind that, at a speed of only50 km/h, your vehicle covers a distance ofnearly 14 m per second. The navigation sys-tem does not provide you with informationabout stop signs, give way signs, traffic regu-lations or road safety features. It is up to youto pay attention to these while driving thevehicle. Only enter a new destination whenthe vehicle is stationary.Declarations of conformityWireless vehicle componentsThe following information applies to all com-ponents of the vehicle and the COMANDOnline system which receive and/or transmitradio waves:The components of this vehicle which receiveand/or transmit radio waves are compliantwith the basic requirements and other rele-vant provisions of Directive 1999/5/EC. Youcan obtain further information from aMercedes-Benz Service Centre.Electromagnetic compatibilityThe electromagnetic compatibility of the vehi-cle components has been checked and certi-fied according to the currently valid versionof Directive ECE-R 10.Correct useObserve the following information when usingCOMAND Online:Rthe safety notes in this manualRtraffic rules and regulationsRlaws and safety standards pertaining tomotor vehiclesiImproper work on electronic componentsor other systems (e.g. radio, DVD changer)and their software may result in malfunc-tion or failure. Even systems that have notbeen modified could be affected becausethe electronic systems are connected.Electronic malfunctions can seriously jeop-ardise the operational safety of your vehi-cle.iThe functionality of a roof aerial (tele-phone, GPS) may be impaired if roof carriersystems are used.Attaching metallised retrofit film to thewindscreen may affect radio reception andhave a negative impact on all other aerials(e.g. emergency aerial) in the vehicle inte-rior.iOnly have work or changes to electroniccomponents carried out at a qualified spe-cialist workshop. This workshop shouldhave the necessary specialist knowledgeand tools to carry out the work required.Mercedes-Benz recommends that you usea Mercedes-Benz Service Centre. In partic-ular, work relevant to safety or on safety-related systems must be carried out at aqualified specialist workshop.iProtection against theft: this device isequipped with technical provisions to pro-tect it against theft. Further information onprotection against theft can be obtainedfrom a Mercedes-Benz Service Centre.Data stored in the vehicleA wide range of electronic components inyour vehicle contain data memories.358 Operating safetyCOMAND Online
These data memories temporarily or perma-nently store technical information about:Rthe vehicle's operating stateReventsRfaultsIn general, this technical information docu-ments the state of a component, a module, asystem or the surroundings.These include, for example:Roperating conditions of system compo-nents, e.g. fluid levelsRthe vehicle's status messages and those ofits individual components, e.g. number ofwheel revolutions/speed, deceleration inmovement, lateral acceleration, accelera-tor pedal positionRmalfunctions and defects in important sys-tem components, e.g. lights, brakesRvehicle reactions and operating conditionsin special driving situations, e.g. airbagdeployment, intervention of stability con-trol systemsRambient conditions, e.g. outside tempera-tureThis data is of an exclusively technical natureand can be used to:Rassist in recognising and rectifying faultsand defectsRanalyse vehicle functions, e.g. after an acci-dentRoptimise vehicle functionsThe data cannot be used to trace the vehicle'smovements.When your vehicle is serviced, technical infor-mation can be read from the event data mem-ory and fault data memory.Services include, for example:Rrepair servicesRservice processesRwarrantiesRquality assuranceIt is read by employees of the service network(including manufacturers) using special diag-nostic testers. More detailed information isobtained from it, if required.After a fault has been rectified, the informa-tion is deleted from the fault memory or iscontinually overwritten.When operating the vehicle, situations areconceivable in which this technical data, inconnection with other information (if neces-sary, under consultation with an authorisedexpert), could be traced to a person.Examples include:Raccident reportsRdamage to the vehicleRwitness statementsFurther additional functions that have beencontractually agreed upon with the customerallow certain vehicle data to be conveyed bythe vehicle as well. The additional functionsinclude, for example, vehicle location in caseof an emergency.Qualified specialist workshopRead the information on qualified specialistworkshops in the vehicle Owner's Manual.Copyright informationGeneral notesYou can find information on licences for freeand open-source software used in your vehi-cle and its electronic components on the fol-lowing website: http://www.mercedes-benz.com/opensource.Features of your COMAND OnlineThese operating instructions describe allstandard and optional equipment availablefor your COMAND Online system at the timeof purchase. Country-specific differences arepossible. Please note that yourCOMAND Online system may not be equip-ped with all the features described. This isOperating safety 359COMAND OnlineZ
also the case for systems and functions rele-vant to safety. Therefore, the equipment onyour COMAND Online system may differ fromthat in the descriptions and illustrations.Should you have any questions concerningequipment and operation, please consult aMercedes-Benz Service Centre.Function restrictionsFor safety reasons, some COMAND functionsare restricted or unavailable while the vehicleis in motion. You will notice this, for example,because either you will not be able to selectcertain menu items or COMAND Online willdisplay a message to this effect.360 Operating safetyCOMAND Online
At a glanceOverviewComponents:COMAND display;DVD changer/single DVD drive=Controller and buttonsCOMAND Online consists of:Rthe COMAND displayThe COMAND display has 1440 x 540 pixels.Rthe DVD changer/single DVD driveRthe controllerRthe buttonsRthe touch-sensitive telephone keypadRports in the centre console (2 x USB, AUX)An iPod® is connected via USB cable.Ra universal telephone interface for the driver's mobile phone or equipment with SAP tele-phone moduleRheadphones for the front passenger (cordless or connected by means of a cable to the audiojack in the footwell)iCOMAND Online can be operated from the front-passenger side using the correspondingremote control if your vehicle is equipped with the Rear Seat Entertainment System. Thefront passenger views the display in SPLITVIEW. The COMAND display can show separateinformation for the driver and the front passenger.At a glance 361COMAND OnlineZ
FunctionsRRadio/DAB radioRMediaMedia support: audio CD, MP3 CD, DVDvideo, 2 x USB, SD card, iPod®, BluetoothaudioMusic search using all mediaDigital TV reception for TV and radio sta-tions with the electronic programme guide(EPG), data services, subtitles and lan-guage selection optionsRSound systemBurmester high-end sound system for ulti-mate listening pleasureRNavigation systemDestination entry using keyword searchRealistic 3D mapPersonal POIsTravel guide with GPXD dataNavitainment for passengers, e.g. Drive-show, Routeflight, Google Maps, ServicesPremium TrafficRCommunicationTelephony via Bluetooth interface/SAPtelephone moduleMessaging functions (text messages,email)Address bookInternet browserMercedes-Benz Apps with Google™ LocalSearch, Destination/Route Download,Weather, Facebook, Google™ Street ViewWLAN interface for the connection of asmartphone to COMAND Online and theoption of remote control for the frontpassenger (SPLITVIEW)Mercedes-Benz emergency call systemRVehicle functionsSetting the multicontour seat with newmassage programmesClimate control functionsControlling ambient light: several colourand brightness level options360° cameraRFavourites buttonFaster access of frequently used functionsRMulti-user entertainmentAll passengers have access to entertain-ment options via COMAND OnlineBusiness telephony in the rear compart-mentDigital remote control operation and digitalcordless headphones362 At a glanceCOMAND Online
COMAND displayExample: radio display:Status bar with active traffic announcements;Main function bar with active radio function=Main display field with available stations in carousel view?Radio station currently setARadio menu barBAir-conditioning function barCContext display with additional radio text informationButtons and controllerOverview:Switches COMAND Online on/off;Sets the volume or mutes=Telephone keypadAt a glance 363COMAND OnlineZ
?Back buttonASeat adjustment buttonBNavigation buttonCRadio buttonDMedia buttonETelephone, address book, online and Internet buttonFVehicle and system settings buttonGControllerHg Favourites buttonBack buttonYou can use the % back button to exit amenu or to call up the basic display of thecurrent operating mode.XTo exit the menu: briefly press the %back button.COMAND Online changes to the nexthigher menu level in the current operatingmode.XTo call up the basic display: press andhold the % back button.COMAND Online changes to the basic dis-play of the current operating mode.Telephone keypadThe telephone keypad is touch-sensitive: assoon as one or several of the keys are gentlytouched, the telephone keypad is shown inthe COMAND Online display. The key beingtouched is highlighted.ControllerThe controller is used to:Rselect menu items from the COMAND dis-playRenter charactersRenter a destination on the mapRsave entriesThe controller can be:RturnedRslid left or right XVYRslid forwards or back ZVÆRslid diagonally aVbRpressed briefly or pressed and heldComponentsSplitViewMethod of operationSPLITVIEW allows you to simultaneously usedifferent COMAND Online functions on thefront-passenger side and on the driver's side.Different content is seen depending on yourperspective when viewing the display.The "Navi" function, for example, can be usedfrom the driver's side while a video is watchedfrom the front-passenger side.SPLITVIEW is operated with the COMANDremote control from the front-passengerside.To do so, use the cordless headphones. Usingthe headphones on the correct sides ensuresan optimal sound.You can connect your own headphones to aspecial headphones jack. You can use theCOMAND remote control to operate them.364 At a glanceCOMAND Online
Points to rememberRYou can only adjust the volume for theheadphones supplied, directly on the head-phones.ROnly entertainment functions, i.e. audio,TV, video and Internet, for example, may beused with SPLITVIEW.RIf media from different sources are used,they can be used separately from the driv-er's and front-passenger sides. Example: ifa medium from the DVD changer is beingplayed on the driver's side. Then, no othermedium can be used separately on thefront-passenger side that is also playedfrom the DVD changer. However, othermedia can be used at the same time on thefront-passenger side, including radio,memory card, MUSIC REGISTER, MediaInterface, USB or AUX.RIf you use the same medium on both sides,you can both carry out the respective set-tings.RThe Internet can be separately used by boththe driver and front passenger at the sametime. A corresponding message appears onthe display.RInternet can only be used, if it is set andconnected via a telephone on the driver'sside.RThe multifunction steering wheel can onlybe used for functions which relate to thedriver's side.Switching SPLITVIEW on/offFrom the driver's side:SPLITVIEW symbol;SPLITVIEW modeActivatingXPress the vehicle button on the controller.The carousel view for the vehicle settingsappears.XSlide V¬ the controller.The menu bar appears.XTo select ùOn in the menu bar (as illus-trated in ;): turn and press the controller.SPLITVIEW switches on. The ù displaychanges to Off.In the status bar, the SPLITVIEW symbolappears (as illustrated in :).The front passenger sees the display of thefunction last activated. If the switch-ontime was longer than 30 minutes previ-ously, the display from the driver's side isshown.XDeactivatingTo select ùOff in the menu bar: turn andpress the controller.The ù display changes to On.The SPLITVIEW symbol is hidden in the sta-tus bar.From the front-passenger sideXActivatingTo select the SPLITVIEW display using theCOMAND remote control: turn thumb-wheel : until the SPLITVIEW symbolappears in the window.XPress the u button on the COMANDremote control.XDeactivatingPress the u button on the COMANDremote control again.The ù display changes to On.The SPLITVIEW symbol is hidden in the sta-tus bar.The menu called up on the driver's side isshown.At a glance 365COMAND OnlineZ
The SPLITVIEW display remains on for approx-imately 30 minutes after the key has beenturned to position 0 in the ignition lock. Afterthis time or after the key has been removed,the settings on the front-passenger side aresaved for approximately 30 minutes longer.After this period, reactivation on the front-passenger side means that the settings fromthe driver's side will be used.From media modeSPLITVIEW can be switched on from anymedia mode.ActivatingXTo switch on from any media mode, e.g.Media Interface Options: press the con-troller.A menu appears.XTo select Start this application in other location: turn and press the con-troller.A menu appears.XSelect SplitView.A window with the message Starting source in SplitView… appears.SPLITVIEW switches on. The ù symbolappears in the status bar.XDeactivatingXFrom the driver's side via vehicle settings.XFrom the front-passenger side using theCOMAND remote control.Transferring a destination to the driverUsing SPLITVIEW you can select a destinationfrom the front-passenger side and transferthis to the driver's side.XTo activate SPLITVIEW: press the vehiclebutton on the controller.XTo select ùOn in the menu bar: turn andpress the controller.The SPLITVIEW symbol appears in the dis-play, and the ù display switches to Off.XSelect ® in the main function bar with theCOMAND remote control.The carousel view appears.XSelect Mercedes-Benz Apps with theCOMAND remote control.You see the selection of Mercedes-BenzApps.XSelect Google Local Search with theCOMAND remote control.Using a menu you can select a category forthe destination.366 At a glanceCOMAND Online
XSelect At current location, for exam-ple.Using a menu you can determine the typeof search enquiry.XSelect Enter search term, for example.An input field appears.XEnter the destination with the COMANDremote control and confirm the entry withb.You see the results list from Google.XSelect the exact destination with theCOMAND remote control.An additional menu appears.XSelect Navigate to.XA pop-up window appears on the driver'sside with the message: Should the nav‐igation data from Mercedes-Benz Apps be accepted?Features of your COMAND OnlineThese operating instructions describe allstandard and optional equipment availablefor your COMAND Online system at the timeof purchase. Country-specific differences arepossible. Please note that yourCOMAND Online system may not be equip-ped with all the features described. This isalso the case for systems and functions rele-vant to safety. Therefore, the equipment onyour COMAND Online system may differ fromthat in the descriptions and illustrations.Should you have any questions concerningequipment and operation, please consult aMercedes-Benz Service Centre.Operating COMAND OnlineSelecting a main functionSituation: switching from navigation mode(address entry menu) to the system settings.XTo switch on navigation mode: press theØ function button.XTo show the menu: press W the COMANDcontroller.XSelect Destination by sliding VÆ andturning cVd the COMAND controller andpress W to confirm.XSelect Address entry and press W toconfirm.The address entry menu appears.XSlide ZV the COMAND controller andswitch to main function bar :.XSelect System in the main function bar byturning cVd the COMAND controller andpress W to confirm.The system menu appears.At a glance 367COMAND OnlineZ
Selecting the menu of a main functionIf one of the navigation, audio, telephone orvideo main functions is switched on, trian-gle : appears next to the entry in the mainfunction bar. You can now select an associ-ated menu.The example shows how to call up the audiomenu from audio CD mode (an audio CD isplaying).XSelect Audio in the main function bar bysliding ZV the COMAND controller andpress W to confirm.The Audio menu appears.The # dot indicates the currently selectedaudio mode.XSelect another audio mode, e.g. Radio, byturning cVd the COMAND controller andpress W to confirm.Radio mode is activated.Selecting a menu itemXSelect the station by turning cVd theCOMAND controller and press W to con-firm.The station is set.Basic functions of COMAND OnlineSwitching COMAND Online on/offXPress the u button on the centre con-sole to the right of the COMAND controller.When you switch on COMAND Online, awarning message will appear.COMAND Online calls up the previouslyselected menu.If you switch off COMAND Online, playbackof the current audio or video source willalso be switched off.Adjusting the volumeAdjusting the volume for the audio orvideo sourceXTo adjust: turn thumbwheel :.orXPress the W or X button on the mul-tifunction steering wheel.The volume of the currently selected audioor video source changes.You can also adjust the volume for the fol-lowing:Rtraffic announcementsRnavigation announcements368 At a glanceCOMAND Online
Rphone callsRLINGUATRONIC voice control (see the sep-arate operating instructions)Adjusting the volume for trafficannouncements and navigationannouncementsDuring traffic or navigation announcements:XTurn dial :.orXPress the W or X button on the mul-tifunction steering wheel.iYou can set the volume of traffic and nav-igation announcements relative to the vol-ume of the audio or video source.Adjusting the volume for phone callsYou can adjust the volume for hands-freemode during a telephone call.XTurn dial :.orXPress the W or X button on the mul-tifunction steering wheel.Adjusting the sound settingsCharacter entry (telephony)Example: entering charactersThe example describes how to enter the sur-name "Schulz".XCall up the input menu with data fields(Y page 441).XSelect S and confirm W with the COMANDcontroller.S appears in the data field.XSelect c and confirm W with the COMANDcontroller.The letter c is added to S in the data field.XRepeat the process until the name hasbeen entered in full.Other input menu functions:RDeleting a character/entry (Y page 370)RSwitching between upper/lower-case let-ters (Y page 370)RChanging the character set (Y page 370)RMoving the cursor to the next data field(Y page 370)X To enter a phone number: select the dig-its one by one in the corresponding datafield by turning cVd and sliding ZVÆ theCOMAND controller and press W to con-firm.Switching data fieldsIn the input menu, if you want to enter a firstname after you have entered a surname, forexample, proceed as follows to switchbetween the data fields:Option 1XSelect 4 or 5 in the character bar andpress W to confirm.The input menu shows the data field selec-ted.At a glance 369COMAND OnlineZ
Option 2XSlide ZV the COMAND controller repeat-edly until the character bar disappears.XSelect the data field by sliding ZVÆ andpress W to confirm.Saving an entryXAfter making an entry in the input menu, to create a new entry, for exam-ple (Y page 441): select the ¬ symbolin the character bar by turning cVd theCOMAND controller and press W to con-firm.The entry is stored in the address book.Further functions available in the char-acter barChanging the language of the characterbarWhile making an entry in the input menu(Y page 441):XSelect B and press W to confirm.XSelect the language by turning cVd theCOMAND controller and press W to con-firm.Switching the character bar to lettersWhile making an entry in the input menu, tocreate a new entry, for example(Y page 441):XSelect the * (upper case) or E(lower case) symbol and press W to con-firm.Changing the character setWhile making an entry in the input menu(Y page 441):XSelect the p symbol and press W toconfirm.RABC (upper/lower case)R123 (digits)ROther (special characters such as @, €,etc.)Moving the cursor to the next data fieldWhile making an entry in the input menu(Y page 441):XSelect the 2 or 3 symbol and press Wto confirm.Deleting a character/entryWhile making an entry in the input menu(Y page 441):XTo delete characters: press the $ but-ton on the control panel.orXSelect the F symbol by sliding VÆ andturning cVd the COMAND controller andpress W to confirm.orXPress the j button next to theCOMAND controller.370 At a glanceCOMAND Online
XTo delete an entry: press and hold the$ button on the control panel until theentire entry has been deleted.orXSelect the F symbol and press and holdW the COMAND controller until the entireentry has been deleted.orXPress and hold the j button next to theCOMAND controller until the entire entry isdeleted.Character entry (navigation)General notesThe following paragraphs describe how toenter characters using town input for BER‐LIN as an example.If you want to use the address entry menu toenter a town, a street or a house number, forexample, COMAND Online offers you:Ra list with a character bar (option 1)Ra selection list (option 2)You can enter the characters using either thecharacter bar or the number keypad. In theselection list, you select an entry to copy it tothe address entry menu.Option 1: list of towns/streets withcharacter barXCall up the town list with the character bar(Y page 401).The alphabetically sorted town list showsthe first available entries.:Character entered by the user B;Characters automatically added byCOMAND Online AABE=List entry that most closely resembles thecurrent entry by the user?To switch to the selection listATo delete an entryBTo change the character set (Latin/Cyril-lic)CCharacters not currently availableDCharacters currently availableECharacter barFTo cancel an entryGCurrently selected characterHListEntering characters using the character barXSelect B by turning cVd the COMAND con-troller and press W to confirm.List H shows all available town namesbeginning with a B. List entry most closelyresembling current entry by user = isalways highlighted at the top of the list(BAABE in the example).All of the characters that have beenentered so far are shown in black (letterB: in the example). Letters added byCOMAND Online are shown in grey ;(AABE in the example).At a glance 371COMAND OnlineZ
Character bar E shows the letters stillavailable for selection in black D. Thesecan be selected. In the example, the letterA is highlighted G. The characters availa-ble depend on the entry made by the userso far and the data contained in the digitalmap. Characters that are no longer availa-ble are shown in grey C.XSelect E, R, L, I, N in succession, confirmingeach by pressing W.Entering characters using the number keypadXTo enter the letter B: press the l num-ber key twice in quick succession.The character appears at the bottom of thedisplay when the key is pressed. The firstavailable letter is highlighted.You see which characters you can enterwith that key. Each time the key is pressed,the next character is selected.Example: key l:Rpress once = ARpress twice = BRpress three times = CXWait until the character display goes out.The entries matching your input are shownin the list.XEnter E, R, L, I, N using the correspondingkeys.Further functions in the list with char-acter barXTo delete characters: press the $ but-ton on the control panel.orXPress the j button next to theCOMAND controller.orXSelect the F symbol in the character barby sliding VÆ and turning cVd theCOMAND controller and press W to con-firm.XTo delete an entry: press $ on thecontrol panel.orXPress and hold the j button next to theCOMAND controller until the entire entry isdeleted.orXSelect the F symbol in the character barand press and hold W the COMAND con-troller until the entire entry is deleted.XTo switch the character set: selectB and press W to confirm.This will switch the character set from Latinto Cyrillic and back.372 At a glanceCOMAND Online
XTo cancel an entry: select the & symbolin the bottom left of the character bar andpress W to confirm.orXPress the % back button.The address entry menu appears.XTo accept the first list entry: press andhold W the COMAND controller until theaddress entry menu appears.The accepted list entry is shown there.Calling up the list as a selection listIt is also possible to switch from the town listwith character bar to the town selection listat any time during character input.XSlide ZV the COMAND controller repeat-edly until the town list appears as a selec-tion list.Select the desired town from the selectionlist.orXSelect¬in the character bar by turningcVd the COMAND controller and pressW to confirm.If there are several entries for a town or ifseveral towns of the same name are stored,then ¬ is highlighted in the character bar.XPress W the COMAND controller.Option 2: town list as selection listCOMAND Online either shows the selectionlist automatically or you can call up the selec-tion list from the list with the character bar.The example shows the selection list after thetown BERLIN has been entered. The entry ishighlighted automatically.XConfirm BERLING by pressing W theCOMAND controller.You see the available entries.XConfirm BERLIN(1XXXX) by pressing Wthe COMAND controller.The address entry menu appears.Observe the information relating to destina-tion entry (Y page 400).System settingsFeatures of your COMAND OnlineThese operating instructions describe allstandard and optional equipment availablefor your COMAND Online system at the timeof purchase. Country-specific differences arepossible. Please note that yourSystem settings 373COMAND OnlineZ
COMAND Online system may not be equip-ped with all the features described. This isalso the case for systems and functions rele-vant to safety. Therefore, the equipment onyour COMAND Online system may differ fromthat in the descriptions and illustrations.Should you have any questions concerningequipment and operation, please consult aMercedes-Benz Service Centre.Display settingsSetting the brightnessThe brightness detected by the display lightsensor affects the setting options for thisfunction.XPress W.XTo select Options: turn and press the con-troller.XSelect Display.XSelect Brightness.XSelect brightness with the COMAND con-troller.Display designYour COMAND Online display features opti-mised designs for operation during daytimeand night-time hours. You can customise thedesign by manually selecting day or nightdesign, or opt for an automatic setting.XPress W.XTo select Options: turn and press the con-troller.XSelect Display.XSelect Day design, Night design orAutomatic.A dot indicates the current setting.Design ExplanationDay design The display is set perma-nently to day design.Night design The display is set perma-nently to night design.Automatic If the Automatic settingis selected,COMAND Online evalu-ates the readings fromthe automatic vehiclelight sensor and auto-matically switchesbetween the displaydesigns.Time settingsGeneral notesIf COMAND Online is equipped with a naviga-tion system and has GPS reception, COMANDOnline automatically sets the time and date.You can also adjust the time yourself in 30-minute increments, but the date cannot bechanged.iIf you set the time in 30-minute incre-ments, any time zone settings and settingsfor changing between summer and stand-ard time are lost. Switching between sum-mer and standard time (Y page 375).iThe following navigation system functionsrequire the time, time zone and summer/standard time to be set correctly in orderto work properly:Rroute guidance on routes with time-dependent traffic guidanceRcalculation of expected time of arrivaliUse this function to set the time for alldisplays in the vehicle.374 System settingsCOMAND Online
Setting the timeXPress W.XSelect Time by turning cVd the COMANDcontroller and press W to confirm.XSelect Set time and press W to confirm.XSet the time by turning cVd the COMANDcontroller and press W to confirm.The time is accepted.Setting the time/date formatXPress W.XSelect Time by turning cVd the COMANDcontroller and press W to confirm.XSelect Format and press W to confirm.The # symbols show the current settings.XSet the format by turning cVd theCOMAND controller and press W to con-firm.Abbreviation MeaningDD . MM . YY Day . Month . Year(date format, twodigits)MM / DD / YYYY Month/Day/Yeardate format, year (allfour digits)YY / MM / DD Year/Month/Daydate format, year(two digits)Abbreviation MeaningHH : MM (24 hrs) Hours : Minutes(24 hour time for-mat)HH : MM (AM/PM) Hours : Minutes(AM/PM time for-mat)Adjusting the time zone and switchingto summer timeXPress W.XSelect Time by turning cVd the COMANDcontroller and press W to confirm.XSelect Time zone and press W to confirm.A list of countries or time zones appears.The # dot indicates the current setting.XSelect the country or time zone by turningcVd the COMAND controller and pressW to confirm.A time zone list may also be displayed,depending on the country selected.XSelect the time zone and press W to con-firm.The entry for the Automatic time set‐tings is accepted.Subsequent operation depends on whetherthe navigation system has GPS reception andwhether the changeover function to summertime is available.XTo switch manually: select On or Off andpress W to confirm.XTo switch automatically: select Auto‐matic and press W to confirm.The entry for the Automatic time set‐tings is accepted.XTo switch the automatic time setting off/on: press the W button.XSelect Time by turning cVd the COMANDcontroller and press W to confirm.System settings 375COMAND OnlineZ
XPress W to confirm the Automatic time settings.Switch the automatic time setting off ª oron again O.To switch on: the menu item is switchedon as the default setting. If Automatic time settings is reactivated, the previ-ous settings for time zone and summertime changeover are selected.To switch off: the time zone is deselectedand the summer time is switched off. IfAutomatic is set for the summer timechangeover, a prompt will appear askingwhether this should be maintained.XSelect Yes or No and press W to confirm.If you select Yes, the settings will not bechanged.If you select No, the settings will beswitched Off.Text reader settingsXPress the vehicle button.XSlide VÆ the controller.XTo select System settings: turn andpress the controller.XSelect Text reader speed.A list appears. The # dot indicates the cur-rent setting.XSelect the setting.LINGUATRONIC settingsOpening/closing the help windowThe help window provides information in addi-tion to the audible instructions during indi-vidualisation and during the subsequent voicecontrol.XPress W.XSelect Settings by turning cVd theCOMAND controller and press W to con-firm.XSelect Linguatronic and press W to con-firm.XSelect Help window and press W to con-firm.You have switched the help window onO or off ª.IndividualisationUsing individualisation, you can fine-tune LIN-GUATRONIC to your own voice and thusimprove voice recognition. See the separateoperating instructions.WLANOverviewPrerequisite for establishing a connectionbetween COMAND Online and a WLAN-ena-bled device, such as a tablet computer orsmartphone:RWLAN must be activated at COMANDOnline and at the device to be connected.376 System settingsCOMAND Online
Prerequisites for using COMAND Online as aWLAN hotspot:RCOMAND Online must be connected to amobile phone via Bluetooth or USB.RThe Internet access data for the mobilephone network provider must be selectedor set for COMAND Online.RThere must be an Internet connection toCOMAND Online.Activating WLANXTo select Vehicle in the main function bar:turn the controller and press to confirm.XTo switch to the menu bar: slide V¬ thecontroller.XTo select System settings: turn andpress the controller.The system settings menu is shown.XTo select WLAN: turn and press the control-ler.The WLAN menu appears.XSelect Activate and press the controller.Switch the connection on O or off ª,depending on the previous setting.Connecting the device via WPS pinA prerequisite for this type of connection isthat the device to be connected supports aconnection via WPS pin.XTo select Vehicle in the main function bar:turn the controller and press to confirm.XTo switch to the menu bar: slide V¬ thecontroller.XTo select System settings: turn andpress the controller.The system settings menu is shown.XTo select WLAN: turn and press the control-ler.The WLAN menu appears.XTo select Connect via WPS pin: turn andpress the controller.XSelect the vehicle from the device to beconnected and establish a connection viaWPS pin. The vehicle is displayed with theSSID MB WLAN XXXXX.XThe device to be connected usually gener-ates a pin. Enter this pin into COMANDOnline also.iThe exact procedure taken variesbetween the different devices. Follow theinstructions that are shown in the display.Further information can be found on theoperating instructions for the device youwish to connect.System settings 377COMAND OnlineZ
Connecting the device by pressing abutton (push button)A prerequisite for this type of connection isthat the device to be connected supports aconnection via push button.XTo select Vehicle in the main function bar:turn the controller and press to confirm.XTo switch to the menu bar: slide V¬ thecontroller.XTo select System settings: turn andpress the controller.The system settings menu is shown.XTo select WLAN: turn and press the control-ler.The WLAN menu appears.XTo select Connect via WPS PBC: turn andpress the controller.XSelect the vehicle from the device to beconnected and establish a connection viaWPS PBC pin. The vehicle is displayed withthe SSID MB WLAN XXXXX.XSelect Continue on COMAND Online.iThe exact procedure taken variesbetween the different devices. Follow theinstructions that are shown in the display.Further information can be found on theoperating instructions for the device youwish to connect.Connecting the device via SSID andsecurity keyXTo select Vehicle in the main function bar:turn the controller and press to confirm.XTo switch to the menu bar: slide V¬ thecontroller.XTo select System settings: turn andpress the controller.The system settings menu is shown.XTo select WLAN: turn and press the control-ler.The WLAN menu appears.XTo select Connect via security key:turn and press the controller.XSelect the vehicle from the device to beconnected. The vehicle is displayed withthe SSID MB WLAN XXXXX.XEnter the security key that is to be dis-played in COMAND Online into the deviceand confirm the entry.iThe exact procedure taken variesbetween the different devices. Follow theinstructions that are shown in the display.Further information can be found on theoperating instructions for the device youwish to connect.378 System settingsCOMAND Online
Generating a new security keyXTo select Vehicle in the main function bar:turn the controller and press to confirm.XTo switch to the menu bar: slide V¬ thecontroller.XTo select System settings: turn andpress the controller.The system settings menu is shown.XTo select WLAN: turn and press the control-ler.The WLAN menu appears.XTo select Generate a new security key: turn and press the controller.XSelect Generate new.A dialogue for entering the security keyappears.XEnter the new security key, select ¬ andpress the controller.The new security key will now be displayedand verified when a connection is estab-lished via the security key.Changing the name of the SSIDXTo select Vehicle in the main function bar:turn the controller and press to confirm.XTo switch to the menu bar: slide V¬ thecontroller.XTo select System settings: turn andpress the controller.The system settings menu is shown.XTo select WLAN: turn and press the control-ler.The WLAN menu appears.XTo select Change the SSID name: turnand press the controller.A dialogue for entering the SSID appears.XEnter the new SSID, select ¬ and pressthe controller.The vehicle with the new SSID will now beshown on the device when a connection isestablished.Bluetooth® settingsGeneral information about Bluetooth®Bluetooth® technology is a standard forshort-range wireless data transmissions up toapproximately 10 metres. Bluetooth® allows,for example, the exchange of vCards.Bluetooth® is a registered trademark of Blue-tooth Special Interest Group (SIG) Inc.Activating/deactivating Bluetooth®XPress the W button.The system menu appears.XTo select Options: turn and press the con-troller.XSelect Activate Bluetooth.This switches Bluetooth® on O or off ª.Setting the system languageThis function allows you to determine the lan-guage for the menu displays and the naviga-System settings 379COMAND OnlineZ
tion announcements. The selected languageaffects the characters available for entry.The navigation announcements are not avail-able in all languages. If a language is not avail-able, the navigation announcements will be inEnglish.If you change the system language, the lan-guage for LINGUATRONIC will be also bechanged. If the selected language is not sup-ported by LINGUATRONIC, English will beselected.XPress the W button.XSelect Settings by turning cVd theCOMAND controller and press W to con-firm.XSelect Language and press W to confirm.The list of languages appears. The # dotindicates the current setting.XSelect the language by turning cVd theCOMAND controller and press W to con-firm.COMAND loads the selected language andsets it.iIf you are using Arabic map data, the textinformation can also be shown in Arabic onthe navigation map. To do this, select Eng‐lish (Arabic map) as the language fromthe list of languages. Navigation announce-ments are then made in Arabic.Assigning a favourites buttonXTo assign a favourites button: press theW button.XTo select Options: turn the controller andpress to confirm.XSelect Assign as favourite.The list of predefined functions appears.The dot # indicates the currently selectedfunction.XSelect the desired function.The favourites button is assigned the selec-ted function.XExample: to call up a favourite: press theg favourites button.This calls up the predefined function.You can select the following predefined func-tions in a menu:RDisplay off/on: you can switch the dis-play off or on.RFull screen: 'Clock': you can call upthe full screen with clock.R®Menu: you can call up the COMANDOnline and Internet functions.RFull screen: 'Map': you can call up thefull screen with map.RSpoken driving tip: you can call up thecurrent driving recommendation.RDisplay traffic messages: you can callup traffic reports.RNavigate to 'Home address': you canstart route guidance to your home addressif you have already entered and saved theaddress (Y page 402).RDetour menu: you can call up the Detourmenu and then avoid a section of the routeand recalculate the route (Y page 414).RCompass screen: you can call up the com-pass.RDriver’s seat massage, Front-pas‐senger's seat massage or Massage: both front seats: you can start the mas-sage function, depending on which seatsare selected (Y page 387).Importing/exporting dataReset functionYou can completely reset COMAND Online tothe factory settings. Amongst other things,this will delete all personal COMAND data.This includes the station presets, entries in380 System settingsCOMAND Online
the destination memory and in the list of pre-vious destinations in the navigation systemand address book entries. In addition, an acti-vated PIN protection, which you have used toprotect your data against unwanted export,will be deactivated. Resetting is recommen-ded before handing over or selling the vehicle,for example.Data on the internal hard drive, e.g. musicfiles in the MEDIA REGISTER, will be deleted.You can also delete music files from theMEDIA REGISTER using the "Delete all musicfiles" function.XPress the W function button.XTo select Options: turn and press the con-troller.XSelect Reset.A prompt appears asking whether you wishto reset.XSelect Yes or No.If you select No, the process will be cancel-led.If you select Yes, a prompt will appear againasking whether you really wish to reset.XSelect Yes or No.If you select Yes, a message will be shown.COMAND Online is reset and restarted.If you select No, the process will be cancel-led.Vehicle functionsFeatures of your COMAND OnlineThese operating instructions describe allstandard and optional equipment availablefor your COMAND Online system at the timeof purchase. Country-specific differences arepossible. Please note that yourCOMAND Online system may not be equip-ped with all the features described. This isalso the case for systems and functions rele-vant to safety. Therefore, the equipment onyour COMAND Online system may differ fromthat in the descriptions and illustrations.Should you have any questions concerningequipment and operation, please consult aMercedes-Benz Service Centre.Vehicle settingsCalling up vehicle settingsXPress the vehicle button on the controller.The vehicle menu appears.XTo select Vehicle settings: turn andpress the controller.The carousel view for the vehicle settingsis active.XTo select the desired vehicle setting: turnand press the controller.The main area with the setting element isactive.Selecting a different vehicle setting:XTo activate the carousel view for selectingthe vehicle setting: slide Z the controller.Exiting the vehicle settings:XTo select &: slide ¬ the controller andpress to confirm.Vehicle functions 381COMAND OnlineZ
Ambient lightingSetting the colourXCall up vehicle settings (Y page 381).XTo select Ambient lighting: colour:turn and press the controller.The setting element is active.XTo select a colour: turn the controller.For further information, see (Y page 152).Setting the brightnessXCall up vehicle settings (Y page 381).XTo select Ambient lighting: bright‐ness: turn and press the controller.The setting element is active.XTo change the brightness: turn the control-ler.For further information, see (Y page 152).Setting the zoneXCall up vehicle settings (Y page 381).XTo select Ambient lighting: zone: turnand press the controller.The setting element is active.XTo select a zone: turn the controller.For further information, see (Y page 152).Activating/deactivating the ambientlighting displayThis display lighting adjustment function isonly available if the vehicle is not equippedwith the adjustment functions for ambientlighting: colour, brightness and zone.XCall up vehicle settings (Y page 381).XTo select Ambient lighting: display:turn and press the controller.The function switches on or off, dependingon the previous setting.For further information, see (Y page 152).Setting the EASY-ENTRY/EXIT featureThe EASY-ENTRY/EXIT feature makes gettingin and out of your vehicle easier.382 Vehicle functionsCOMAND Online
XCall up vehicle settings (Y page 381).XTo select Easy Entry/Exit: turn andpress the controller.The setting element is active.XTo change the setting: turn the controller.For further information, see (Y page 136).Activating/deactivating the panel heat-ingThe panel heating function warms the surfa-ces with which the vehicle occupants fre-quently come into contact.XCall up vehicle settings (Y page 381).XTo select Panel heating: turn and pressthe controller.XTo change the setting: turn the controller.Activating/deactivating the acousticlocking confirmationYou can also set an audible signal to confirmthat the vehicle has been locked.XCall up vehicle settings (Y page 381).XTo select Acoustic lock feedback: turnand press the controller.The function switches on or off, dependingon the previous setting.For further information, see (Y page 95).Activating/deactivating the seat-beltadjustment functionThe seat-belt adjustment function adjusts thedriver's and front-passenger seat belt to theupper body of the occupants.XCall up vehicle settings (Y page 381).XTo select Belt adjustment: turn andpress the controller.The function switches on or off, dependingon the previous setting.For further information, see (Y page 62).Activating/deactivating the automaticfolding mirror functionIf the function "Automatic folding mirror func-tion" is switched on, the exterior mirrors foldin automatically as soon as you lock the vehi-Vehicle functions 383COMAND OnlineZ
cle from the outside and then fold out againwhen you unlock it.XCall up vehicle settings (Y page 381).XTo select Automatic mirror-folding function: turn and press the controller.The function switches on or off, dependingon the previous setting.For further information, see (Y page 138).Switching the locator lighting on/offIf the locator illumination (surround lighting)is switched on, as well as the turn signals, theheadlamps will also light up briefly when thevehicle is unlocked.XCall up vehicle settings (Y page 381).XTo select Locator illumination: turnand press the controller.The function switches on or off, dependingon the previous setting.For further information, see (Y page 95).Switching the automatic locking fea-ture on/offWhen the automatic locking feature is acti-vated, the vehicle is locked automaticallywhen the ignition is switched on and the vehi-cle is travelling faster than walking pace.XCall up vehicle settings (Y page 381).XTo select Automatic locking feature:turn and press the controller.The function switches on or off, dependingon the previous setting.For further information, see (Y page 102).Setting the delayed switch-off timeInterior lighting delayed switch-off timeThe interior lighting is activated for the dura-tion of the delayed switch-off time when thekey is removed from the ignition lock.XCall up vehicle settings (Y page 381).XTo select Interior lighting delayed shut-off: turn and press the controller.The setting element is active.XTo change the delayed switch-off time: turnthe controller.For further information, see (Y page 152).384 Vehicle functionsCOMAND Online
Exterior lighting delayed switch-off timeThe surround lighting is activated for the dura-tion of the delayed switch-off time when thevehicle is unlocked using the remote controlkey.XCall up vehicle settings (Y page 381).XTo select Exterior lighting delayed shut-off: turn and press the controller.The setting element is active.XTo change the delayed switch-off time: turnthe controller.For further information, see (Y page 95).Priming/deactivating tow-away protec-tionAn audible and visual alarm is triggered if yourvehicle's angle of inclination is altered whiletow-away protection is primed. This can occurif the vehicle is jacked up on one side, forexample.XCall up vehicle settings (Y page 381).XTo select Tow-away protection: turn andpress the controller.The function switches on or off, dependingon the previous setting.Priming/deactivating the interiormotion sensorWhen the interior motion sensor is primed, avisual and audible alarm is triggered if move-ment is detected in the vehicle interior. Thiscan occur if someone reaches into the vehicleinterior, for example.XCall up vehicle settings (Y page 381).XTo select Interior motion sensor: turnand press the controller.The function switches on or off, dependingon the previous setting.Activating/deactivating the boot lidopening limiterThe boot lid opening limiter makes it easier toclose the boot lid manually.Vehicle functions 385COMAND OnlineZ
XCall up vehicle settings (Y page 381).XTo select Boot opening-height restriction: turn the controller.XTo activate/deactivate the function: pressthe controller.SeatsOverviewUsing the T button next to the controlleror the seat settings menu item in the vehiclemenu, you can call up the following adjust-ment functions:Rbackrest side bolstersRlumbarRshoulder sectionRmassageRdriving dynamicsRseat heating balanceiYou also can save and recall the currentsettings of a seat function using the mem-ory button and the corresponding memoryposition switch; see the separate vehicleOwner's Manual.The massage function cannot be started orstopped using the memory button.Selecting the adjustment function andseatXPress the T button.The menu for the seat settings appears.orXTo select Vehicle in the main function bar:turn the controller and press to confirm.XTo select Seat settings from the carou-sel: turn the controller and press to con-firm.The carousel for selecting the seat functionis activated.The settings for the driver's seat appear inthe left of the display; those for the frontpassenger in the right.XTo select the desired seat function: turn thecontroller and press to confirm.XTo switch between the Driver and Front passenger: slide XVY the controller.Adjustment functionsSetting the backrest side bolstersXCall up the seat functions (Y page 386).XTo select Backr. sides: turn and pressthe controller.XTo select a seat: slide XVY the controller.XTo change the setting: turn the controller.The change can be seen in the settings dis-play.XTo exit the menu: press the % button.386 Vehicle functionsCOMAND Online
Adjusting the seat contour in the lumbarregion of the seat backrestThis function allows you to adjust the aircushions in the lumbar region of the backrest(4-way lumbar support).XCall up the seat functions (Y page 386).XTo select Lumbar: turn the controller andpress to confirm.XTo select a seat: slide XVY the controller.XTo activate the setting element: press thecontroller.XTo change the setting: slide ZV¬ orXVY the controller.The change will be visible in the setting ele-ment.XTo exit the menu: press the % button.Setting the shoulder sectionXCall up the seat functions (Y page 386).XTo select the Shoulders: turn the control-ler and press to confirm.XTo select a seat: slide XVY the controller.XTo change the setting: turn the controller.The change can be seen in the settings dis-play.XTo exit the menu: press the % button.Massage functionXCall up the seat functions (Y page 386).XTo select Massage: turn the controller andpress to confirm.XTo select a seat: slide XVY the controller.XTo select the massage function (1 to 6):turn the controller and press to confirm.The massage function runs for approx-imately 15 to 25 minutes, depending on thesetting.You may select the following massageoptions:R1: Hot relaxing massage for backR2:Hot relaxing massage for should‐ersR3: Activating MassageR4: Classic MassageR5: Mobilizing MassageR6: Active WorkoutXTo change the massage intensity: turn thecontroller to ? and press to confirm.The intensity becomes stronger or weakereach time the controller is pressed.XTo exit the menu: press the % button.Vehicle functions 387COMAND OnlineZ
Setting the driving dynamicsXCall up the seat functions (Y page 386).XTo select a seat: slide XVY the controller.XTo select Dynamic seat: turn the control-ler and press to confirm.You can select:R0: OffR1: Level 1 (weak)R2: Level 2 (strong)XTo select the setting: turn the controller.XTo exit the menu: press the % button.Seat heating balanceThe Balance function controls the distributionof heat on the seat backrest and cushion.The Balance function influences the currentlyset heating level of the seat heating; see theseparate vehicle Owner's Manual.XCall up the seat functions (Y page 386).XTo select Seat heating balance: turnand press the controller.XTo select a seat: slide XVY the controller.XTo change the setting: turn the controller.The change can be seen in the settings dis-play.The settings represent the following:R0 — the backrest and seat cushion areevenly heated according to the settingselected with the seat heating button.R1 to 3 — the heat output to the seat cushionis reduced one level at a time.R-1 to -3 — the heat output to the backrestis reduced one level at a time.XTo exit the menu: press the % button.Resetting all adjustmentsXCall up the seat functions (Y page 386).XSelect a seat (Y page 386).XTo select Reset: turn the controller andpress to confirm.XTo select a seat: slide XVY the controller.XTo reset: press the controller.A query appears.XSelect Yes or No and turn the controller.If you select No, the process will be cancel-led.After you select Yes, all seat adjustmentsare reset to the default values (factory set-ting).388 Vehicle functionsCOMAND Online
Climate control settingsBasic settingsClimate control barClimate control bar:Adjusts temperature, airflow and air dis-tribution, left;Calls up the climate control menu=Adjusts temperature, airflow and air dis-tribution, rightCalling up the climate control menu:XTo switch to the climate control bar: slideV¬ the controller.XTo select the thermometer symbol E inthe climate control bar: turn and press thecontroller.The carousel for selecting climate controlfunctions is activated.XTo select the desired climate control func-tion: turn and press the controller.The selected climate control functionappears.The following climate control functions canalso be called up directly from the climatecontrol bar:RTemperature left and right, displayed as theactual temperature, e.g. 20 °C.RAirflow left and right, displayed as J andthe current setting, e.g. 1.RAir distribution left and right, displayed bythe current setting, e.g. O.Switching climate control on/offXCall up the climate control menu(Y page 389).XTo switch to the footer: slide V¬ the con-troller.XTo select Climate ctrl on: turn and pressthe controller.XSwitch the climate control function on Oor off ª. If climate control is switched off,the adjustment functions are deactivated.Synchronising the climate control set-tingsWith the synchronise option, you can decidewhether you wish to activate the climate con-trol settings for all zones together or sepa-rately.XCall up the climate control menu(Y page 389).XTo switch to the footer: slide V¬ the con-troller.XTo select Sync: turn and press the control-ler.XSwitch the synchronisation function onO (left and right synchronised) or off ª(left and right separate).Vehicle functions 389COMAND OnlineZ
With the synchronisation function switchedoff, you can alternate between driver andfront passenger.XTo switch from the footer to the main area:slide VZ the controller.XTo switch between left and right: slideXVY the controller.Not all climate control functions allowswitching between the driver and frontpassenger.iThe synchronise function can also bedeactivated by sliding the controller to theleft or right in the setting area. The settingelements for the driver and front passengerare then shown separately once again.Further information (Y page 168)Switching climate control functions fromfront to rearXCall up the climate control menu(Y page 389).XTo switch to the footer: slide V¬ the con-troller.XTo select the Rear setting: turn andpress the controller.XThe climate control function is switchedfrom the front to the rear. The vehicle inte-rior display changes accordingly.XTo switch the setting back to the frontagain: select Exit rear climate con‐trol.After a short time, COMAND Online auto-matically switches the adjustment func-tions back to the front.Activating/deactivating cooling with airdehumidificationActivating the cooling with air dehumidifica-tion facilitates the cooling of the vehicle inte-rior even with high outside temperatures.XCall up the climate control menu(Y page 389).XTo switch to the footer: slide V¬ the con-troller.XTo select A/C: turn and press the controller.XSwitch cooling with air dehumidification onO or off ª.Setting the temperatureXTo select the current temperature in theclimate control bar on the left or right: turnand press the controller.The temperature setting scale appears.XTo change the setting: turn the controller.XTo close the temperature setting scale:press the controller.iYou can also set the temperature usingthe climate control menu, i.e. as describedfor setting the footwell temperature(Y page 391).Setting the airflowXTo select J on the left or right in theclimate control bar: turn and press the con-troller.The airflow setting scale appears.XTo change the setting: turn the controller.XTo close the temperature setting scale:press the controller.390 Vehicle functionsCOMAND Online
iYou can also set the airflow using the cli-mate control menu, i.e. as described forsetting the footwell temperature(Y page 391).Setting the air distributionXTo select the current air distribution displayon the left or right in the climate control bar,e.g. O: turn and press the controller.The air distribution setting scale appears.XTo change the setting: turn the controller.XTo close the temperature setting scale:press the controller.iYou can also set the air distribution usingthe climate control menu, i.e. as describedfor setting the footwell temperature(Y page 391).Further settingsAdjusting the footwell temperatureXCall up the climate control menu(Y page 389).XTo select Adjust footwell: turn andpress the controller.XIf necessary, change sides: slide XVY thecontroller.XTo change the setting: turn and press thecontroller.Exiting a menuXSlide V¬ the controller.XTo select &: turn and press the controller.Setting the climate modeSetting the climate mode determines thestrength of the airflow (force).XCall up the climate control menu(Y page 389).XTo select Climate mode: turn and pressthe controller.XIf necessary, change sides: slide XVY thecontroller.XTo change the setting: turn and press thecontroller.Exiting a menuXSlide V¬ the controller.XTo select &: turn and press the controller.Starting/stopping the perfume atomizerVehicle functions 391COMAND OnlineZ
XCall up the climate control menu(Y page 389).XTo select Air freshener: turn and pressthe controller.Depending on the previous status, you startor stop the perfume atomizer.XSetting the intensity: turn the controllerwhen the atomizer is switched on.Exiting a menuXSlide V¬ the controller.XTo select &: turn and press the controller.You can connect the perfume atomiser withthe pre-entry climate control, i.e. the atom-iser switches on together with the pre-entryclimate control.XTo activate the control element on the right:slide VY the controller.XTo switch the connection on/off: turn thecontroller.The connection is switched on O or offª, depending on the previous setting.Further information (Y page 172)Switching the ionisation on/offXCall up the climate control menu(Y page 389).XTo select Ionisation: turn and press thecontroller.You switch it on or off, depending on theprevious status.Exiting a menuXSlide V¬ the controller.XTo select &: turn the controller and pressto confirm.You can connect the ionisation function withthe pre-entry climate control, i.e. the ionisa-tion function switches on together with thepre-entry climate control.XTo activate the control element on the right:slide VY the controller.XTo switch the connection on/off: turn thecontroller.The connection is switched on O or offª, depending on the previous setting.Pre-entry climate control392 Vehicle functionsCOMAND Online
XCall up the climate control menu(Y page 389).XTo select Pre-entry climate control:turn and press the controller.XTo switch on or off: turn the controller andpress to confirm.You switch it on or off, depending on theprevious status.Exiting a menuXSlide V¬ the controller.XTo select &: turn the controller and pressto confirm.Further information (Y page 174)Auxiliary heatingYou can pre-set three departure times forautomatic activation of the auxiliary heating.To select the pre-set time:XCall up the climate control menu(Y page 389).XTo select Auxiliary heating: turn andpress the controller.XTurn the controller.Changing the pre-set time:XCall up the climate control menu(Y page 389).XTo select Auxiliary heating: turn andpress the controller.XTo select the departure time that will bechanged: turn and press the controller.A menu for changing the time opens.XTo select the required setting element (ana-logue clock, hours or minutes): slide VZand VY the controller.XTo change the setting: turn the controller.XTo exit the menu: press the controller.360° cameraImportant safety notesGWARNINGMake sure that no persons or animals are inthe manoeuvring range. Otherwise, theycould be injured.OverviewThe 360° camera covers the immediate sur-roundings of the vehicle and assists you, forinstance when parking or at exits withreduced visibility. It detects moving objectsand displays these objects on the groundusing bars.For a detailed description of the 360° cam-era, see the separate vehicle Owner's Man-ual.Settings for the COMAND Online 360°cameraActivating/deactivating using the reversegear:XPress the vehicle button on the controller.The vehicle menu appears.Vehicle functions 393COMAND OnlineZ
XTo switch to the menu bar: slide ¬ thecontroller.XTo select Settings: turn and press thecontroller.XTo select the 360° camera: turn and pressthe controller.XTo select Activation by R gear: turnand press the controller.The function is switched on O or off ª,depending on the previous status.iThis function must only be switched on ifyou want the image from the 360° camerato be displayed when the reverse gear isengaged. The other activation options arealways available.Switching object detection on/off:XTo select Object detection: turn andpress the controller.The function is switched on O or off ª,depending on the previous status.Opening the camera cover:XTo select Open camera cover: turn andpress the controller.Image of the 360° cameraThe 360° camera image can be displayed if:Ryour vehicle is equipped with a 360° cam-eraRCOMAND Online is switched on(Y page 368)Rthe 360° camera function is activatedDisplaying the image of the 360° camera:XTo select the 360° camera from the vehiclecarousel: turn and press the controller.The split view of the 360° camera appears.orXEngage reverse gear (only possible if theActivation by R gear option is activa-ted)The 360° camera in split view and thereverse drive image appears.If the function is activated, the COMAND dis-play will automatically switch back to the pre-viously selected display as soon as you shiftout of the forward or reverse gear, or if thevehicle exceeds a speed of approx. 3 km/h.You can also switch the display by selectingthe & symbol in the display and pressingW the COMAND controller to confirm.Reversing cameraThe reversing camera is only an aid. It is nota substitute for your attention to the imme-diate surroundings. The responsibility for safemanoeuvring and parking remains with you.Make sure that there are no persons, animalsor objects in range while manoeuvring andparking.The image from the reversing camera isshown in the COMAND display when reversegear is engaged if:Ryour vehicle is equipped with a reversingcameraRCOMAND Online is switched onRthe Activation by R gear function isactivated.If the function is activated, the COMAND dis-play will automatically switch back to the pre-viously selected display as soon as you shiftout of reverse gear.iFor further information on the reversingcamera, see separate vehicle Owner'sManual.XPress the vehicle button.The vehicle carousel appears.XSlide VÆ the controller.XTo select System settings: turn andpress the controller.XSelect Reversing camera.XSelect Activation by R gear.The function is switched on O or off ª,depending on the previous status.394 Vehicle functionsCOMAND Online
NavigationFeatures of your COMAND OnlineThese operating instructions describe allstandard and optional equipment availablefor your COMAND Online system at the timeof purchase. Country-specific differences arepossible. Please note that yourCOMAND Online system may not be equip-ped with all the features described. This isalso the case for systems and functions rele-vant to safety. Therefore, the equipment onyour COMAND Online system may differ fromthat in the descriptions and illustrations.Should you have any questions concerningequipment and operation, please consult aMercedes-Benz Service Centre.IntroductionImportant safety notesGWARNINGFor safety reasons, only enter a new destina-tion when the vehicle is stationary. You mayotherwise be distracted from the traffic con-ditions, cause an accident and injure yourselfand others.COMAND Online calculates the route to thedestination without taking account of the fol-lowing, for example:Rtraffic lightsRstop and give way signsRparking or stopping restrictionsRroad narrowingRother road and traffic rules and regulationsCOMAND Online may give incorrect drivingrecommendations if the data on the digitalmap does not correspond to actual condi-tions. For example, a route may have beendiverted or the direction of a one-way streetmay have changed.For this reason, you must always observe roadand traffic rules and regulations during yourjourney. Road and traffic rules and regulationsalways have priority over the system's drivingrecommendations.General notesOperational readiness of the navigationsystemIn vehicles for certain countries, the naviga-tion system is not operational immediatelyafter delivery. The digital map is not pre-installed.If this is the case, the following messageappears in the display after you switch to nav-igation mode:Please insert DVD number <<xxxxx_xx>>.XTo install the digital map:(Y page 420).The navigation system must determine theposition of the vehicle before first use orwhenever operational status is restored.Therefore, you may have to drive for a whilebefore precise route guidance is possible.GPS receptionCorrect functioning of the navigation systemdepends, amongst other things, on GPSreception. In certain situations, GPS recep-tion may be impaired, there may be interfer-ence or there may be no reception at all, e.g.in tunnels or multi-storey car parks.iThe functionality of a roof aerial (tele-phone, GPS) may be impaired if roof carri-ers are used.Entry restrictionFor vehicles in certain countries, there is adata entry restriction.The restriction is active above a vehicle speedof about 5 km/h. The restriction is deactiva-ted as soon as the vehicle speed drops belowabout 3 km/h.When the restriction is active, certain entriescannot be made. This will be indicated by thefact that certain menu items are greyed outand cannot be selected.Navigation 395COMAND OnlineZ
The following entries are not possible, forexample:Rentering the destination town and streetRentering a destination via the mapRentering POIs in the vicinity of a town or viaa name searchRediting entriesRdirect entry using the number keypadOther entries are possible, however, such asentering POIs in the vicinity of the destinationor current position.396 NavigationCOMAND Online
Switching to navigation modeXPress the ß button.The map displays the current vehicle position.FURTHER ACTIVATION OPTION:XTo activate the menu: slide ZV the controller (e.g. in radio mode).XTo select Navi: turn and press the controller.Showing/hiding the menuYou can, for example, make a destination entry or select navigation settings using the menu.XTo show: press the controller when the map appears.Route guidance not active: Destination is marked. Route guidance is active: y is high-lighted.XTo hide: press the % button.orXSlide ZV and then press the controller.iRoute guidance is not active: no destination entered yet, no route has been calculated.Navigation 397COMAND OnlineZ
Route guidance is active: the destination has been entered, the route has been calculated.The display shows the route, changes of direction and lane recommendations. Navigationannouncements guide you to your destination.Moving the mapREQUIREMENT: the map is in full screen mode, the menu is faded out (Y page 397).XSlide XVY, ZVÆ or aVb the controller.The crosshair is shown. The map moves in the corresponding direction under the crosshair.Setting the map scaleREQUIREMENT: the map is in full screenmode, the menu is faded out (Y page 397).XTurn the controller until the desired scaleis set.Basic settingsSetting route type and route optionsXTo switch to navigation mode: press theß button.XTo show the menu: press the controller.XTo select Settings: turn and press thecontroller.XSelect Route settings.XSelect a route type.Route type is switched on O or off ª,depending on the previous status.RActive route guidance: COMAND Onlinecalculates a new route.RInactive route guidance: COMANDOnline uses the new setting for the nextroute guidance process.iRoute guidance active: a destination hasbeen entered and the route has been cal-culated.Route guidance inactive: no destinationhas been entered yet and no route has beencalculated yet.398 NavigationCOMAND Online
Fast route COMAND Online calculatesa route with the shortestjourney time.DynamicrouteThe same route type asFast route. To avoid a traf-fic jam, for example, anytraffic reports received withregard to the route aretaken into account. If possi-ble, it will bypass blockedroads.Dynamicroute afterqueryDynamic route, querying ifyou wish to adopt the newroute or prefer to continuealong the original route.EconomicrouteEconomic route is a variantof the route type Fast route. COMAND Online willattempt to minimise thejourney distance at theexpense of a slightlyincreased journey time.Short route COMAND Online calculatesa route covering the short-est distance.XTo calculate alternative routes: selectCalculate alternative routes.Switch the function on O or off ª.When this function is activated, all routetypes are calculated.XTo avoid/use route options: select oneof the options:RAvoid motorwaysRAvoid ferriesRAvoid motorail trainsRAvoid tunnelsRAvoid unpaved roadsRAvoid routes requiring special toll stickerRAvoid toll roadsThe option is then avoided O or used ª.iRDS-TMC is not available in all countries.iThe route calculated may, for example,include ferry connections, even if theAvoid ferries route option is switchedon.In some cases, e.g. when calculating par-ticularly long routes, COMAND Online maynot be able to take all the selected routeoptions into account.iTo avoid routes requiring a special toll sticker: route calculation is performedexcluding route networks (e.g. a country'smotorway network) which require you topay a fee (vignette). A vignette allows tem-porary use of the route network. Exampletime limits are 10 days, 2 months or 1 year.To avoid toll roads: route calculation isperformed excluding sections (e.g. tunnels,stretches of motorway, inner cities) whichrequire you to pay a fee (toll).XTo exit a menu: slide XVY the controller.Navigation 399COMAND OnlineZ
Entering a destinationImportant safety notesGWARNINGFor safety reasons, only enter a new destination when the vehicle is stationary. You could oth-erwise be distracted from the traffic conditions, cause an accident and injure yourself and others.As an addressCalling up the address entry menuXTo switch to navigation mode: press the ß button.XTo show the menu: press the controller.XSelect Destination.Route guidance not active: press the controller. Route guidance active: turn and press thecontroller.XSelect Address entry.Address entry optionsExamples of how you can enter an address:RTown/postcode, street, house numberRTown/postcode, streetRTown/postcode, centreRTown/postcode, street, junctionRStreet, town/postcode, house numberRStreet, town/postcode, junctioniEntering the street before the town is use-ful if the address has an unusual streetname.While entering an address, you can alsoswitch to other destination entry options:RKeyword SearchRMapRPOI400 NavigationCOMAND Online
Entering an addressThe example shows you how to enter a town,street and house number for an address, e.g.for your home address.XIn the address entry menu, select Town:press the controller (Y page 400).XEnter BERLIN. Character entry(Y page 371).XTo call up the list: select OK or slide ZV thecontroller repeatedly until the characterbar disappears.The entry for BERLIN has additional selec-tion options. This is indicated by the Gicon.XSelect BERLING: turn and press the con-troller.XSelect GERMANY(1XXXX).The address entry menu transfers theentry.XTo select Street: press the controller.XEnter the street, e.g. UNTER DEN L. Thencall up the list and select an entry. Proceedin the same way as when entering a town.XTo select House no.: press the controller.XEnter the house number. Then call up thelist and select an entry. Proceed in thesame way as when entering a town.The address entry menu shows theaddress. The map section on the left showsthe destination.iYou can enter any of the towns, streets,postcodes, etc. which are stored in the dig-ital map. However, postcodes are not avail-able for some countries.Country and town are sufficient to startnavigating. You can enter either a town ora postcode. The street and house numbercomplete the destination address.Navigation 401COMAND OnlineZ
Entering additional address dataYou can enter additional address data:RCountryRPostcodeEntering a postcode will delete a previouslyentered town.RCentreEntering a centre will delete a previouslyentered street.RJunctionEntering a junction will delete a previouslyentered house number.XIn the address entry menu, select Coun‐try, Postcode, Centre or Junc‐tion(Y page 400).XSelect an entry. Proceed as describedunder "Entering an address" (Y page 401).Saving an addressYou can store the address you have enteredeither as your home address or as anothernavigable contact in the address book.XCall up the address entry menu(Y page 400).XTo select Save: slide VÆ, turn and pressthe controller.XTo save as your home address: selectAs "My address".COMAND Online stores your home addressunder My address in the list of contacts.Own addressXTo save as a contact: select As a new address book entry.XSelect Not classified, Home or Work.XEnter a surname and first name. CharacterentryXTo select OK: turn and press the controller.The destination address is saved in theaddress book as a navigable contact.402 NavigationCOMAND Online
Starting route calculationThe entered destination appears in the address entry menu.XTo confirm Start: press the controller.Calculating route. While route calculation is in progress, an arrow will indicate the directionto your destination. Once the route has been calculated, route guidance begins. If the vehicleis travelling on a non-digitised road, the system displays the linear distance to the destina-tion, the direction to the destination and the Road off map message.If route guidance is already active: a prompt appears asking whether you wish to endthe current route guidance. Confirm the prompt with Yes or No.If you select Yes, the current route guidance is stopped and route calculation to the newdestination is started.If you select No, the currently active route guidance is continued.iThe route is calculated using digital map data. The calculation time depends on the dis-tance from the destination, for example.The calculated route may differ from the ideal route, e.g. due to roadworks or incompletemap data. Please also refer to the notes about the digital map (Y page 420).Using keyword searchEntering keywordsThe keyword search supports Latin fonts. Youcan search for an address, a POI or a syno-nym. For example, you can search for theHouses of Parliament or Big Ben. The keywordsearch finds geographically tolerant hits. If,for example, you are searching for a streetlocated on the edge of a city, the search willalso cover adjacent smaller towns.XTo switch to navigation mode: press theß button.XTo show the menu: press the controller.XSelect Destination.Navigation 403COMAND OnlineZ
Route guidance not active: press the con-troller. Route guidance active: turn andpress the controller.XSelect Keyword search.XEnter the first few letters of the town andstreet, e.g. STUT and KÖN.The hits are displayed in the followingorder: exact hits/total hits.---/--- is displayed if fewer than threecharacters have been entered.999+ is displayed if there are too many hits.XSelect OK.The search results are divided into catego-ries, e.g. town, street. The number of exact/total hits is shown in brackets.XSelect Town, street: press the controller.Exact hits appear at the very top of the list;hits are sorted alphabetically in the list. Thesearch term that you entered is highlighted inorange in the entries.XSelect an entry: turn and press the control-ler.The address entry menu appears, showingthe destination address.XTo start route calculation: select Start.Selecting search optionsXTo switch to navigation mode: press theß button.XTo show the menu: press the controller.XSelect Destination.Route guidance not active: press the con-troller. Route guidance active: turn andpress the controller.XSelect Keyword search.XSelect Search options.XSelect Error-tolerant search, POI search or Online search.Switch the setting on O or off ª.Error-tolerant search: useful if parts of theaddress are incomplete or the spelling isunclear.POI search: points of interest are taken intoaccount in the search.Online search: the search is performed viathe online functions.Selecting the countryXTo switch to navigation mode: press theß button.XTo show the menu: press the controller.XSelect Destination.Route guidance not active: press the con-troller. Route guidance active: turn andpress the controller.XSelect Keyword search.XSelect Country .The alphabetical list of countries is dis-played.XSelect a country: turn and press the con-troller.404 NavigationCOMAND Online
Searching via COMAND OnlineXTo switch to navigation mode: press theß button.XTo show the menu: press the controller.XSelect Destination.Route guidance not active: press the con-troller. Route guidance active: turn andpress the controller.XSelect Keyword search.XSelect Online search.The search switches to the online func-tions.Selecting a destination from the list oflast destinationsCOMAND Online automatically stores the last100 destinations.XTo switch to navigation mode: press theß button.XTo show the menu: press the controller.XSelect Destination.Route guidance not active: press the con-troller. Route guidance active: turn andpress the controller.XSelect From last destinations.XSelect the destination.The address entry menu appears, showingthe destination address.XTo start route calculation: select Start.Selecting an address book contact as adestinationYou can select navigable address book con-tacts as the destination. These are identifiedby the L symbol. If you have already enteredand saved your home address, you can selectthis as the destination by using My address.XTo switch to navigation mode: press theß button.XTo show the menu: press the controller.XSelect Destination.Route guidance not active: press the con-troller. Route guidance active: turn andpress the controller.XSelect From contacts.XSelect the destination.The address entry menu appears, showingthe contact and associated destinationaddress.XTo start route calculation: select Start.Selecting a destination from POIsCalling up the POI menuNavigation 405COMAND OnlineZ
XTo switch to navigation mode: press theß button.XTo show the menu: press the controller.XSelect Destination.Route guidance not active: press the con-troller. Route guidance active: turn andpress the controller.XSelect From POIs.406 NavigationCOMAND Online
Defining the position for the POI searchSelection Characteristic InstructionsNear destina‐tionRoute guidance is active XIn the POIs menu, select In the vicin‐ity of the destination.XSelect a POI category (Y page 407).Current posi‐tionSearch in the vicinity ofthe current vehicle posi-tionXIn the POIs menu, select Current position.XSelect a POI category (Y page 407).Other town After entering a town,the search is performedwithin the town's boun-dariesOption 1XIn the POIs menu, select Other town.XSelect the country, if desired(Y page 402).XEnter the town (Y page 401).XSelect a POI category (Y page 407).Option 2XEnter a town in the address entry menu(Y page 401).XSelect POIs.XSelect a POI category (Y page 407).Search by name Search for all POIs on thedigital map or aroundone of the three previ-ously specified positionsXIn the POIs menu, select Search by name.XSelect All POIs or one of the three pre-viously selected positions.The POI list with character bar appears.XEnter a name.Search by phone numberThis function gives youaccess to all POIs thathave a phone number.XSelect Search by phone number.You will see a list of phone numbers.XEnter the telephone number.Selecting a POI category After entering a town, POI categories appearafter choosing the menu item Near desti‐nation, Current position or Other town.Navigation 407COMAND OnlineZ
XSelect a POI category: turn and press thecontroller.The G symbol after an entry shows thatfurther categories are available.XSelect a sub-category.The search for POIs begins within a radiusof approximately 100 km of the selectedposition.Once the search is completed, the POI listis displayed.The search results display the followinginformation:Ran arrow that shows the linear directionto the POIRthe linear distance to the POIRthe name of the POIXSelecting a POI.The complete address of the POI is shown.408 NavigationCOMAND Online
Selecting a POIThe complete address of the POI is shown.XTo start route calculation: select Start.XTo save the POI: select Save.The POI can be saved as a navigable address book contact or as "My address".XTo call up the map: select Map.XYou can move the map, change the map scale and select POIs (Y page 410).XTo call a POI: select Call.COMAND Online switches to telephone mode .XTo load data from the Internet: select www.Available data are loaded from the Internet.XTo view the surrounding area in Street View: select the icon on the left hand side, nextto Map.The street in the vicinity of the destination address is shown.Navigation 409COMAND OnlineZ
Using map:Current vehicle position;Crosshair=Distance of crosshair position from current vehicle positionXTo switch to navigation mode: press the ß button.XTo show the menu: press the controller.XSelect Destination.Route guidance not active: press the controller. Route guidance active: turn and press thecontroller.XSelect Using map.The map with crosshair is shown.XTo move the map: slide XVY, ZVÆ or aVb the controller.XTo change the map scale: turn the controller until the desired map scale is set.The scale is displayed at the bottom. Turning clockwise zooms out from the map; turninganti-clockwise zooms in.XTo select a destination: press the controller.If the digital map provides navigable address data, you will see the destination address inthe address entry menu. If not, the Destination from map entry is shown.XTo start route calculation: select Start.Entering way pointsIntroductionYou can map the route yourself by enteringup to four waypoints. The sequence of thewaypoints can be changed at any time.COMAND Online provides a selection of pre-defined destinations in eight categories forthis purpose, e.g. FILLING STATION or COF‐FEE SHOP. You can also use the destinationentry options to enter waypoints.Creating waypoints410 NavigationCOMAND Online
XTo switch to navigation mode: press theØ button.XTo show the menu: press the controller.XTo select Destination: turn and press thecontroller.XSelect Way points.The destination is entered into the way-points menu. The waypoints are not yetentered.XTo select Add: press the controller.XTo select the category or Other: turn andpress the controller.After selecting a category, the POIs whichare available along the route and in thevicinity are displayed.COMAND Online first searches for destina-tions along the route. If there are no desti-nations available there, it then continuessearching for destinations within a radiusof approximately 100 km of the vehicleposition.XAfter selecting Other, select one of thedestination entry options from the list.Selection StepAddress entry XEnter a destina-tion by address(Y page 401).Keyword Search XSelect a destina-tion by means of akeyword search.From last desti‐nationsXSelect a destina-tion from the listof last destina-tions(Y page 405).From POIs XSelect a POI(Y page 405).Using map XEnter a destina-tion using the map(Y page 410).Selection StepFrom the memory cardXSelect a destina-tion from the SDcard.From Mercedes-Benz AppsXEnter a destina-tion fromMercedes-BenzApps.Using geo-coor‐dinatesXEnter a destina-tion using the geo-coordinates(Y page 413).XTo select a POI: turn the controller andpress to confirm.After selecting a POI or entering a destina-tion, the address of the waypoint is dis-played.After entering a destination using the map,the address entry menu is displayed. OK ishighlighted.XTo accept the waypoint: select OK.When you have accepted the waypoint, it isentered in the waypoint menu.XTo select details: turn and press the con-troller.XTo make a call: select Call.iCOMAND Online switches to telephonemode (Y page 435).This menu item is available if the waypointhas a telephone number and a mobilephone is connected to COMAND Online(Y page 426).XTo call up the map: select Map.XYou can move the map and select the des-tination.XTo store a waypoint in the destination memory: select Presets.Navigation 411COMAND OnlineZ
Editing waypointsYou can:Rchange waypointsRchange the sequence in the waypoint menuRdeletedTo change the sequence, at least one way-point and the destination must be entered.XTo select a waypoint in the waypoint menu:turn the controller and press to confirm.A menu appears.XTo change the waypoint: in the menu,select Edit.XChange the address, e.g. the town andstreet. Then confirm with OK.The waypoint menu appears and displaysthe modified waypoint.You can change the sequence of the way-points and the destination.XTo change the order: in the menu, selectMove.XTurn the controller and move the waypointor destination to the desired position. Thenpress the controller.XTo delete waypoints: In the menu, selectDelete.Accepting waypoints for the routeXIn the waypoints menu, select Start.The route is calculated with the enteredwaypoints.iContinue is displayed instead of Startwhen Calculate alternative routes is activated in the navigation menu .iIf a waypoint has been passed duringroute guidance, the waypoint will be dis-played in the waypoint menu with a greenarrow. Once the route has been recalcula-ted, the waypoint is deleted from the way-point menu.Searching for a filling station when thefuel level is lowIf the reserve fuel warning is displayed, youwill see the message: Fuel tank reserve level. Do you want to start the search for filling stations?.XSelect Yes or No.If you select Yes, the filling station searchstarts. When the search is complete, a listof the filling stations available along theroute or in the vicinity is displayed.If you select No, the search is cancelled.XTo select a filling station: turn the controllerand press to confirm.The address of the filling station is dis-played.XTo select Start: press the controller.The selected filling station is entered intoposition 1 of the waypoints menu. Routeguidance begins.If the waypoints menu already containsfour waypoints, a prompt will be displayed,asking you whether you wish to enter thefilling station into position 1. If you selectYes, the filling station is transferred into thelist and waypoint 4 is deleted.Entering a destination from Mercedes-Benz AppsXTo switch to navigation mode: press theØ button.XTo show the menu: press the controller.XTo select Destination: turn and press thecontroller.412 NavigationCOMAND Online
XSelect From Mercedes-Benz Apps.If an Internet connection is established, youwill see the message Do you want to accept the navigation data sent via Mercedes-Benz Apps?Using geo-coordinatesXTo switch to navigation mode: press theß button.XTo show the menu: press the controller.XSelect Destination.Route guidance not active: press the con-troller. Route guidance active: turn andpress the controller.XSelect Using geo-coordinates.Entering the latitude and longitude coor-dinatesXTo change the value: turn the controller.XTo move the selection within the line: slideXVY the controller.XTo move the selection between lines: slideZVÆ the controller.XTo confirm the value: press the controller.XTo save the destination: select Save.The destination can be saved as a navigableaddress book contact or as "My address".XTo start route calculation: select Start route guidance.Personal POIsGeneral notesiThe use of personal POIs to display trafficmonitoring installations is not permitted inall countries. Please observe the country-specific regulations and always drive at asuitable speed.Travel guideTextRoute guidanceChanging directionLane recommendationsMotorway informationDisplaysNavigation 413COMAND OnlineZ
You can use this function to display upcomingmotorway exits, filling stations, restaurantsand similar types of information.XTo switch to navigation mode: press theØ button.XTo show the menu: press the controller.XSelect Settings: turn and press the con-troller.XSelect Map content.XSelect Motorway information.Depending on the previous status, motor-way information is switched on or off.Using for route guidanceDestination or area of destinationreachedNavigation announcementsCancelling/continuing route guidanceRoute informationDestination informationAlternative routesRoute listTraffic jam functionRecording the routeDynamic route guidanceIntroductionAn RDS-TMC radio station transmits RDS-TMC traffic reports in addition to the radioprogramme. COMAND Online can receiveRDS-TMC traffic reports and take them intoconsideration for dynamic (traffic-depend-ent) route guidance. The navigation systemcan, for example, guide you around a trafficjam.In Germany, COMAND Online uses high-qual-ity traffic data for the TMCpro traffic jamwarning system. TMCPro provides exclusivetraffic data that is detected with an automa-ted sensor network, in addition to the mes-sages generated by the TMC service. The traf-fic data received from the traffic jam warningservices named above could differ.There may also be differences between thetraffic reports received and the actual roadand traffic conditions.The respective traffic data being receivedappears at the bottom right of the display withthe symbols "TMCPro" or "TMC". If there is noreception, no symbol is displayed.iRDS-TMC is not available in all countries.414 NavigationCOMAND Online
Switching dynamic route guidance on/offXTo switch on: select the Dynamic routeor Dynamic route only after request route type (Y page 398).XTo switch off: select the Fast route orShort route route type (Y page 398).iCOMAND Online calculates a new route ifyou change the route type setting withroute guidance active. If you change theroute type setting when route guidance isinactive, COMAND Online uses the newsetting for the next route guidance.RDS-TMC traffic reports on the mapCOMAND Online can show certain traffic inci-dents on the map. The displays can be shownin map scales of 50 m to 20 km.XTo set the map scale: turn the controlleruntil the desired map scale is selected.The display shows the entire affected routesection with the corresponding symbols,regardless of how long the incident actuallyis. The symbols are placed on the side of thecarriageway affected by the incident.RDS-TMC symbols on the map:Traffic jam on the route;Slow-moving traffic on the route=Road blocked?Road blockedASlow-moving traffic (yellow line along theaffected route)BTraffic jam (red line along the affectedroute)Displaying RDS-TMC traffic reportsStarting a search for traffic reportsXTo switch to navigation mode: press theØ button.XTo show the menu: press the controller.XTo select TMC: turn the controller in themenu bar and press.A menu appears. COMAND Online firstsearches for RDS-TMC stations withinreceiver range. If RDS-TMC stations arefound, a search for traffic reports is thenstarted.If no RDS-TMC stations are found, or thereare no traffic reports, you will see a mes-sage to this effect.XTo close the report: press the controller.Traffic symbol information:Affected section of road;Symbol for incident (traffic jam in theexample shown)=Line indicating the affected section ofroadNavigation 415COMAND OnlineZ
XTo switch to navigation mode: press theØ button.XTo show the menu: press the controller.XTo select Traffic symbol information:turn the controller in the menu bar andpress.XSelect Traffic symbol information.XTo display the next/previous incident:select Next or Previous (if available).XTo display details: select Details.XTo scroll the map: select Map.You can move the map to enable furthertraffic reports to be displayed(Y page 398).Displaying reports on the route:Country designation, road number, direc-tion and number/total number of reportsfor the affected road (1/2);Section of the road to which the trafficreport applies=Traffic report?Type of traffic report (warning)XTo switch to navigation mode: press theØ button.XTo show the menu: press W the COMANDcontroller.XTo select TMC: turn the controller in themenu bar and press.XSelect Reports on the route.The traffic report is displayed. If there ismore than one traffic report for a section ofthe route, this is indicated by 1/2, forexample.XTo scroll within a report or to access the next report: turn the controller.XTo close the report: slide XVY the con-troller one or more times.Displaying all traffic reportsXTo switch to navigation mode: press theØ button.XTo show the menu: press W the COMANDcontroller.XTo select TMC: turn the controller in themenu bar and press.XSelect Show all reports.A list is shown containing all roads, areasor regions affected by traffic reports.Roads, areas or regions not on the routealso appear in the list.XTo show a traffic report: select a road, anarea or a region and press W to confirm.The traffic report is displayed. If there ismore than one traffic report for a section ofthe route, this is indicated by 1/2, forexample.You can find an example of a traffic reporthere: (Y page 416).XTo close the report: slide XVY the con-troller one or more times.Reading out traffic reports on the routeCalling up traffic reportsYou can select from the following text readerproperties:RLanguage (Y page 379)RText reader speed (Y page 376)XTo switch to navigation mode: press theØ button.XTo show the menu: press the controller.XTo select TMC: turn the controller and pressit.XSelect Read out reports on the route.COMAND Online reads out the messagesin sequence.No reports on the route: the Read out reports on the route function does notwork.416 NavigationCOMAND Online
XTo cancel the text reader function:select Cancel text reader function.The current traffic report is read out to theend and then the function is deactivated.orXBriefly press the 8 button.The function is deactivated immediately.iCOMAND Online interrupts the read-aloud function automatically as it recalcu-lates the route following a new RDS-TMCtraffic report.Automatic read-aloud functionTraffic reports can be read out automaticallyon the route. Announcements are made asyou approach traffic incidents.XTo switch on/off: press the Ø button.XTo show the menu: press the controller.XTo select TMC: turn the controller and pressit.XSelect Read out traffic reports automatically.XThe function is activated O or deactivatedª.Saving destinationsOverviewMap functionsGeneral notesCompany logos displayed on the map aretrademarks of the respective companies andused solely for the purpose of indicating thelocations of these companies. The use of suchlogos on the map does not indicate approvalof, support of or advertising by these compa-nies for the navigation system itself.Navigation 417COMAND OnlineZ
Map settingsRotating the 3D mapYou can use this function to explore the area of the map. The function is available in all mapscales.REQUIREMENT: the 3D map display must be switched on.XTo switch to navigation mode: press the Ø button.XTo show the menu: press the controller.XTo select Settings: turn and press the controller.XSelect Map orientation.XSelect 3D map rotation.XTurn the controller.MORE FUNCTIONS:RMoving the map (Y page 398)RChanging the map scale (Y page 398)418 NavigationCOMAND Online
Map displayGlobe scrollingCOMAND Online displays globe satellite images. This allows for a realistic map display freefrom distortion in all map scales.The current position of the vehicle can be moved on the globe up to a map scale of 20 km. Ifthe 3D map setting has been activated, up to a scale of 10 km.MORE FUNCTIONS:RMoving the map (Y page 398)RChanging the map scale (Y page 398)Building imagesWith small map scales, important buildings are depicted realistically; other buildings are shownas models.Navigation 419COMAND OnlineZ
Elevation modelCities located in mountainous regions arerealistically depicted using an elevationmodel.Speed Limit AssistAvoiding an areaCompass functionShowing the map data versionUpdating the digital mapNavigation functions420 NavigationCOMAND Online
Problems with the navigation systemProblem Possible causes/consequences and M SolutionsCOMAND Online isunable to continueroute guidance afterthe journey has beeninterrupted.Route guidance is cancelled if you interrupt the journey for morethan two hours."Interrupting the journey" refers to stopping the vehicle."Continuing route guidance" refers to switching COMAND Onlineback on and driving on.XContinue route guidance (Y page 414).Problem Possible causes/consequences and M SolutionsCOMAND Online isunable to determinethe vehicle's position.COMAND Online has to redetermine the position of the vehicle ifthe vehicle has been transported.Examples:Rafter transporting the vehicle by ferryRafter transporting the vehicle by motorailRafter the vehicle has been towedXStart the vehicle and pull away.COMAND Online determines the vehicle's position. Dependingon the driving situation, this may take some time.Route guidance may be restricted during the determination ofthe vehicle's position.When positioning is complete, route guidance is resumed withnavigation announcements and route guidance displays.Navigation 421COMAND OnlineZ
Problem Possible causes/consequences and M SolutionsThe Navigation unavailable messageappears.COMAND Online has an integrated hard drive on which the digitalmap is stored.To protect the integrated hard drive against damage,COMAND Online deactivates it at very high and low temperatures.The navigation system will then be temporarily unavailable.XLet the vehicle and COMAND Online cool down.XTo hide the message: switch COMAND Online off and then onagain.If an area of the hard disk has a fault, COMAND Online can nolonger access the map data in this area. This may occur whencalculating a route, for example.XTo hide the message: switch COMAND Online off and then onagain.The navigation system will be operational again until it has toaccess the faulty area of the hard drive once more. The messagewill then reappear.XConsult a Mercedes-Benz Service Centre.Problem Possible causes/consequences and M SolutionsYou see a messageinforming you that theDVD containing the dig-ital map is incompatiblewith the system soft-ware.The DVD containing the digital map cannot be used for the update.XTo confirm the message: press the COMAND controller.XEject the DVD.XHave the system database checked at a Mercedes-Benz ServiceCentre.Problem Possible causes/consequences and M SolutionsThe map softwareupdate has failed.The DVD is dirty.XClean the DVD.XRestart the update.The DVD is scratched.XConsult a Mercedes-Benz Service Centre.422 NavigationCOMAND Online
Problem Possible causes/consequences and M SolutionsThere is overheating due to excessive temperatures in the vehicleinterior.XWait until the vehicle interior has cooled down.XRestart the update.COMAND Online's integrated hard disk is defective.XConsult a Mercedes-Benz Service Centre.Problem Possible causes/consequences and M SolutionsCOMAND Online asksfor an activation codeduring the map update.The digital map is secured with an activation code.XConsult a Mercedes-Benz Service Centre.TelephoneFeatures of your COMAND OnlineThese operating instructions describe allstandard and optional equipment availablefor your COMAND Online system at the timeof purchase. Country-specific differences arepossible. Please note that yourCOMAND Online system may not be equip-ped with all the features described. This isalso the case for systems and functions rele-vant to safety. Therefore, the equipment onyour COMAND Online system may differ fromthat in the descriptions and illustrations.Should you have any questions concerningequipment and operation, please consult aMercedes-Benz Service Centre.General notesImportant safety notesGWARNINGOperating communications equipment inte-grated into the vehicle while driving will dis-tract you from traffic conditions. You couldthen lose control of the vehicle. There is a riskof an accident.Only operate these devices if road traffic con-ditions permit. If you are unsure about thesurrounding conditions, pull over to a safelocation and make entries only while the vehi-cle is stationary.GWARNINGIf you use the RF transmitter in the vehicle inan improper way, its electromagnetic radia-tion can disrupt vehicle electronics, e.g. if:Rthe RF transmitter is not connected to anexterior aerialRthe exterior aerial is fitted incorrectly or isnot a low-reflection aerialThis can jeopardise the operating safety of thevehicle. There is a risk of an accident.Have the low-reflection exterior aerial fitted ata qualified specialist workshop. When oper-ating in the vehicle, always connect the RFtransmitter to the low-reflection exterior aer-ial.You must observe the legal requirements forthe country in which you are currently drivingwhen operating mobile communicationsequipment in the vehicle.Telephone 423COMAND OnlineZ
Excessive levels of electromagnetic radiationmay cause damage to your health and to thehealth of others.There is scientific discussion surrounding thepossible health risks posed by electromag-netic fields. You can reduce this risk by usingan exterior aerial.Therefore, only use mobile communicationequipment if it is connected to the exterioraerial of the vehicle.IntroductionCOMAND Online allows you to use the fol-lowing modes of telephony:RTelephony via the Bluetooth® interfaceusing COMAND OnlineRpermanently installed/SAP telephony (onlyin conjunction with a data-enabled MBSAP module)RBusiness telephony via the Bluetooth®interface of the Rear Seat EntertainmentSystem.iBusiness telephony is only available if thevehicle is equipped with a Rear Seat Enter-tainment System and the business teleph-ony option.In telephony via Bluetooth® interfacemode, the mobile phone is connected directlyto COMAND Online via Bluetooth®.Enhancing this operating mode with theoptional mobile phone bracket allows you to:Rconnect the mobile phone to the exterioraerial on the vehicleRcharge the mobile phoneIn the permanently installed/SAP teleph-ony mode, the optional data-enabled MBSAP module is inserted into the fitting in thearmrest designed for housing the mobilephone bracket.When connecting Bluetooth®-capable mobilephones with PBAP (Phone Book AccessProfile), the contacts are automatically down-loaded to COMAND Online or the Rear SeatEntertainment System.You can use the text message and e-mailfunction under the following conditions:Rthe mobile phone supports the MAP Blue-tooth® profile (Message Access Profile).Further information on the following topicscan be obtained from your Mercedes-BenzService Centre or on the Internet at http://www.mercedes-benz.com/connect:Rsuitable mobile phonesRavailable mobile phone bracketsRconnecting Bluetooth®-capable mobilephones to COMAND OnlineRoverview of the functions for the operatingmodesBusiness telephonyIf your vehicle is equipped with a Rear SeatEntertainment System, you can also selectthe business telephony option.The following scenarios are possible:ROperation of two telephones:-A mobile phone is connected toCOMAND Online as the COMAND Tele-phone. COMAND Online is generallyused as a hands-free system here whenmaking calls. A call can be transferred tothe business telephone in the rear com-partment.-A second mobile phone is connected asa business telephone with the Rear SeatEntertainment System. With the busi-ness telephony option, a passenger inthe rear compartment uses the handsetwhen making calls. He can transfer thecall to the COMAND telephone.Both telephones can be used independ-ently of each other.ROperation with one telephoneA mobile phone is either connected withCOMAND Online as a COMAND telephoneor with the Rear Seat Entertainment Sys-tem as a business telephone. A call can betransferred from front to rear or from rear424 TelephoneCOMAND Online
to front. Only one call can be made at atime.Disconnecting a call while the vehicle isin motionA call may be disconnected if:Rthere is insufficient GSM network coveragein certain areasRyou move from one GSM or UMTS trans-mitter/receiver area (GSM/UMTS cell) intoanother and no channels are freeRyou use a SIM card that is not compatiblewith the network availableRyou are using a mobile phone with "Twin-card" and the mobile phone with the sec-ond SIM card is logged into the network atthe same timeOperating optionsYou can operate the telephone by:Rusing the controller:turningsliding XVY or ZVÆpressingRusing the 6 or ~ button and usingthe telephone keypad on COMAND OnlineRusing the 6 or ~ button on the mul-tifunction steering wheelRusing LINGUATRONIC (see the separateLINGUATRONIC operating instructions)Unless stated otherwise, the descriptions andillustrations in this section refer toCOMAND Online.Function restrictionsYou will not be able to use the telephone, willno longer be able to use the telephone, or youmay have to wait before using it in the follow-ing situations:Rif the mobile phone is switched offRif the "Bluetooth®" function is switched offin COMAND OnlineRif the Bluetooth® function is switched off onthe mobile phone while you are using Blue-tooth® interface telephonyRif the mobile phone is not logged into amobile phone networkiThe telephone automatically tries to logon to a network. If no network is available,you may not be able to make a "999" or"112" emergency call. If you attempt tomake an outgoing call, the No servicemessage will appear for a short while.If you switch COMAND Online off during a callin hands-free mode, the call will be termina-ted. You can prevent this as follows:Telephony via the Bluetooth® interfaceXSwitch the mobile phone to private modebefore switching off COMAND Online (seethe mobile phone operating instructions)."999" or "112" emergency callThe following conditions must be fulfilled inorder to make a 999 or 112 emergency call:Rthe mobile phone must be switched onRa network must be availableRa valid and operational SIM card must beinserted in the mobile phoneRthe PIN must have been enteredIf you cannot make an emergency call, youmust arrange rescue measures yourself.iThe 999 or 112 emergency call numberis a public service. Any misuse is punisha-ble by law.Telephony via the Bluetooth® inter-faceConditionsFor telephony via COMAND Online's Blue-tooth® interface, a Bluetooth®-capablemobile phone is required.Telephone 425COMAND OnlineZ
On COMAND OnlineXActivate the Bluetooth® function inCOMAND Online (Y page 379).On the mobile phoneXSwitch on the mobile phone and enter thePIN when prompted to do so (see themobile phone operating instructions).XActivate Bluetooth® functions and, if nec-essary, Bluetooth® visibility on the mobilephone (see the mobile phone operatinginstructions).The battery of the mobile phone shouldalways be kept sufficiently charged in orderto prevent malfunctions.In preparation for telephoning via the Blue-tooth® interface, you should check the fol-lowing items on your mobile phone (see themobile phone operating instructions):RHands-Free ProfileThe mobile phone must support Hands-Free Profile 1.0 or above.RBluetooth® visibilityOn certain mobile phones, the device itselfmust be made "visible" to other devices, aswell as activating the Bluetooth® function(see the mobile phone operating instruc-tions).This visibility is for restricted periods oftime on some mobile phones.RBluetooth® device nameEvery Bluetooth® device has a Bluetooth®device name. This device name is freelydefinable, but can be identical for all devi-ces from the same manufacturer. It istherefore recommended that you changethis name so that you can easily recogniseyour mobile phone (see the mobile phoneoperating instructions).iNot all mobile phones available on themarket are equally suitable. Further infor-mation on suitable mobile phones andmobile phone brackets can be obtained atyour Mercedes-Benz Service Centre or onthe Internet at http://www.mercedes-benz.com/connect.iNot all mobile phones available on themarket are equally suitable. Further infor-mation on suitable mobile phones can beobtained from a Mercedes-Benz ServiceCentre.iSome displays (e.g. the signal strength)depend on the supported version of theHands-Free Profile.Connecting a mobile phoneGeneral notesBefore using your mobile phone withCOMAND Online for the first time, you willneed to:Rsearch(Y page 426) and thenRauthorise (register) it (Y page 428).Device-specific information on authorisingand connecting Bluetooth®-capable mobilephones can be found on the Internet athttp://www.mercedes-benz.com/connect.When you authorise a new mobile phone, it isconnected automatically.You can authorise up to 15 mobile phones.If the mobile phone supports PBAP (PhoneBook Access Profile) and MAP (MessageAccess Profile), the following contacts andmessages are downloaded into COMANDOnline when connecting:Rthe phone bookRthe call listsRthe messages (text and e-mail)Further information on the conditions for con-necting (Y page 425).Searching for a mobile phoneXPress the % button.XTo switch to the menu bar in the telephonebasic menu: slide VÆ the controller.XTo select Connect device: turn the con-troller and press to confirm.426 TelephoneCOMAND Online
If your vehicle is equipped with a Rear SeatEntertainment System, you can decidewhether you wish to connect the mobilephone as a COMAND telephone or a businesstelephone. Further information on businesstelephony .XTo select the COMAND telephone or Busi‐ness phone: turn and press the controller.If you select the COMAND telephone, themobile phone will be connected withCOMAND Online. If you select the Busi‐ness phone, the mobile phone will be con-nected with the Rear Seat EntertainmentSystem.XTo select Search for phones: turn thecontroller and press to confirm.A message appears.XTo select Start search: slide the control-ler VY and press to confirm.The Searching for Bluetooth devi‐ces message appears. COMAND Onlinelooks for Bluetooth® telephones withinrange and adds them to the Bluetooth® tel-ephones list.If a new phone is found, it appears in thelist with the Ï symbol.The duration of the search depends on thenumber of Bluetooth® telephones withinrange and their characteristics.Telephone 427COMAND OnlineZ
Symbols in the Bluetooth® phone listSym-bolExplanationÏNew mobile phone in range, butnot yet authorisedYAuthorised mobile phone#Currently connected mobilephoneÑMobile phone in range andauthorisedÑ(grey)Mobile phone not in range, butalready authorisedThe Bluetooth® telephones list shows allmobile phones within range and all previouslyauthorised mobile phones, whether or notthey are in range.iMobile phones that are connected to theoptional data-enabled MB SAP module areshown in a separate phone list. These arefound below the entry Telephones of the SAP module.iCOMAND Online cannot recognisemobile phones on which Bluetooth® visibil-ity has not been activated, even if they arewithin range.iIf the Bluetooth® telephones list is alreadyfull, you will be requested to de-authorise amobile phone (Y page 430). If COMANDOnline does not find your mobile phone,external authorisation may be necessary(Y page 429).iWhen you call up the phone list again, de-authorised devices will be removed fromthe list. In this case, start a new search toupdate the Bluetooth® telephone list.Authorising (registering) a mobile phoneOption 1: using the passkey (access num-ber)XTo select the mobile phone with the Ïsymbol in the Bluetooth® telephones list:turn the controller and press to confirm.The input menu for the passkey appears.The passkey is any one to sixteen-digit num-ber combination which you can choose your-self. You must enter the same number com-bination in COMAND Online and in the Blue-tooth®-capable mobile phone (see the mobilephone operating instructions).iSome mobile phones require a passkeywith four or more digits.iIf you wish to re-authorise the mobilephone after de-authorising it, you canchoose another passkey for it.iMercedes-Benz recommends de-authori-sation in COMAND Online and on themobile phone (Y page 430). Subsequentauthorisation may otherwise fail.XTo enter a passkey in COMAND Online:press the number keys in turn.¬ is highlighted after the first numberhas been entered.XTo select ¬ after entering all numbers:turn the controller and press to confirm.FURTHER ENTRY OPTIONS:RUsing the character list in the input menuXTo enter the passkey on the mobile phone: if the Bluetooth® connection is suc-cessful, you will be requested to enter the428 TelephoneCOMAND Online
passkey (access code, passkey; see themobile phone operating instructions).XEnter the same passkey in the mobilephone as the one already entered inCOMAND Online.The Connecting profiles... messageappears.The Authorisation successful mes-sage appears once authorisation is com-pleted.iAfter entering the passkey, you may alsoneed to enter a confirmation in your mobilephone in order to make calls. Please checkyour mobile phone display. On some mobilephones, this confirmation can be saved. Inthis case, you do not need to enter it again.If the COMAND Online display shows theAuthorisation failed message, youmay have exceeded the prescribed timeperiod. Repeat the procedure.The mobile phone is authorised and connec-ted to COMAND Online. You can now makephone calls using the COMAND Online hands-free system.Option 2: using Secure Simple PairingPREREQUISITE:To connect via Secure Simple Pairing, themobile phone (or Bluetooth® audio equip-ment) must support Bluetooth® Version 2.1.COMAND Online creates a six-digit code,which is displayed on both devices that are tobe connected.If the number code is the same on both devi-ces:XTo select Yes: press the controller.If you select Yes, authorisation is continuedand the mobile phone is connected.If you select No, the process will be cancel-led.XConfirm the message on the mobile phone.External authorisationIf COMAND Online does not detect yourmobile phone, this may be due to particularsecurity settings on your mobile phone. In thiscase, you can test if your mobile phone canfind COMAND Online. The Bluetooth® devicename of COMAND Online is "MB Bluetooth".After entering the passkey, you must re-establish the connection to COMAND Onlineon some mobile phones (see mobile phoneoperating instructions). The mobile phonecannot otherwise be authorised.XPress the % button on COMAND Online.XTo switch to the menu bar in the telephonebasic menu: slide VÆ the controller.XTo select Connect device: turn and pressthe controller.The Bluetooth® telephones list appears.XTo select Search via telephone: turnand press the controller.A message appears.Telephone 429COMAND OnlineZ

Navigation menu