User Manual
THANK YOU
We appreciate the trust and condence you have placed in Deant through the purchase of this motion security light.
We strive to continually create quality products designed to enhance your home. Visit us online to see our full line of
products available for your home improvement needs. Thank you for choosing Deant!
USE AND CARE GUIDE
MOTION SECURITY LIGHT
Questions, problems, missing parts?
Before returning to the store, call Deant Customer Service
8 a.m.-7 p.m., EST, Monday-Friday, 9 a.m. - 6 p.m., EST, Saturday
1-866-308-3976
HOMEDEPOT.COM
Item #1001318516
1001311061
Model #DFI-5985-BZ
DFI-5985-WH
Model # 5985
Serial # DFI-5985-BZ, DFI-5985-WH
2
Table of Contents
Table of Contents ......................................2
Safety Information ....................................2
Warranty ...................................................2
5-Year Limited Warranty ........................2
Pre-Installation .........................................3
Planning Installation ..............................3
Specications ........................................3
Tools Required .......................................3
Hardware Included .................................4
Package Contents ..................................4
Installation ................................................5
Operation...................................................7
Care and Cleaning ..................................11
Troubleshooting ......................................11
Safety Information
PRECAUTIONS
ƑPlease read and understand this entire manual
before attempting to assemble, install, or operate
this light xture.
ƑThis light xture requires a 120-Volt AC power
source.
ƑSome codes require installation by a qualied
electrician.
ƑThis light xture must be properly grounded.
ƑThis light xture should be installed outdoors to a
wall or eave.
ƑThe light xture should be mounted approximately
8 ft. (2.4 m) above the ground. If the light xture
is mounted higher than recommended, aiming the
sensor down will reduce the coverage area.
WARNING: Turn the power off at the circuit breaker or
fuse. Place tape over the circuit breaker switch and verify
power is off at the light xture.
WARNING: Risk of re. Keep the lamp heads at least
2in. (51mm) from combustible materials.
CAUTION: Burn hazard. Allow the light xture to cool
before touching.
ƑThis device complies with Part 15 of the FCC Rules.
Operation is subject to the following two conditions:
(1) this device may not cause harmful interference,
and (2) this device must accept any interference
received, including interference that may cause
undesired operation.
ƑCAN ICES-3 (B)/NMB-3(B)
Warranty
5-YEAR LIMITED WARRANTY
WHAT IS COVERED
This product is guaranteed to be free of factory defective parts and workmanship for a period of 5 years from date
of purchase. Purchase receipt is required for all warranty claims.
WHAT IS NOT COVERED
This guarantee does not include repair service, adjustment and calibration due to misuse, abuse or negligence, or
LEDs. Unauthorized service or modication of the product or of any furnished component will void this warranty in
its entirety. This warranty does not include reimbursement for inconvenience, installation, setup time, loss of use,
unauthorized service, or return shipping charges. This warranty is not extended to other equipment and components
that a customer uses in conjunction with this product.
Contact the Customer Service Team at 1-866-308-3976 or visit www.homedepot.com.
3 HOMEDEPOT.COM
Please contact 1-866-308-3976 for further assistance.
Pre-Installation
PLANNING INSTALLATION
Before installing the light xture, ensure that all parts are present. Compare parts with the Hardware Included and
Package Contents sections. If any part is missing or damaged, do not attempt to assemble, install, or operate this
light xture.
Estimated installation time: 30 minutes
SPECIFICATIONS
Range Up to 70 ft. (21.3 m) (Varies with surrounding temperature)
Sensing angle Up to 270°
Electrical load - LED 28 Watts
Lumens 2350
Power requirements 120 VAC, 60 Hz
Operating modes Test, Motion activated, Manual
Time delay 1, 5, 20 minutes
DualBrite timer Off, 3 hours, 6 hours, dusk-to-dawn
Mobile device requirements iPhone 4S or newer running iOS 7.x or later.
Android v4.3 or later.
Phone must also have Bluetooth® version 4.0 or later.
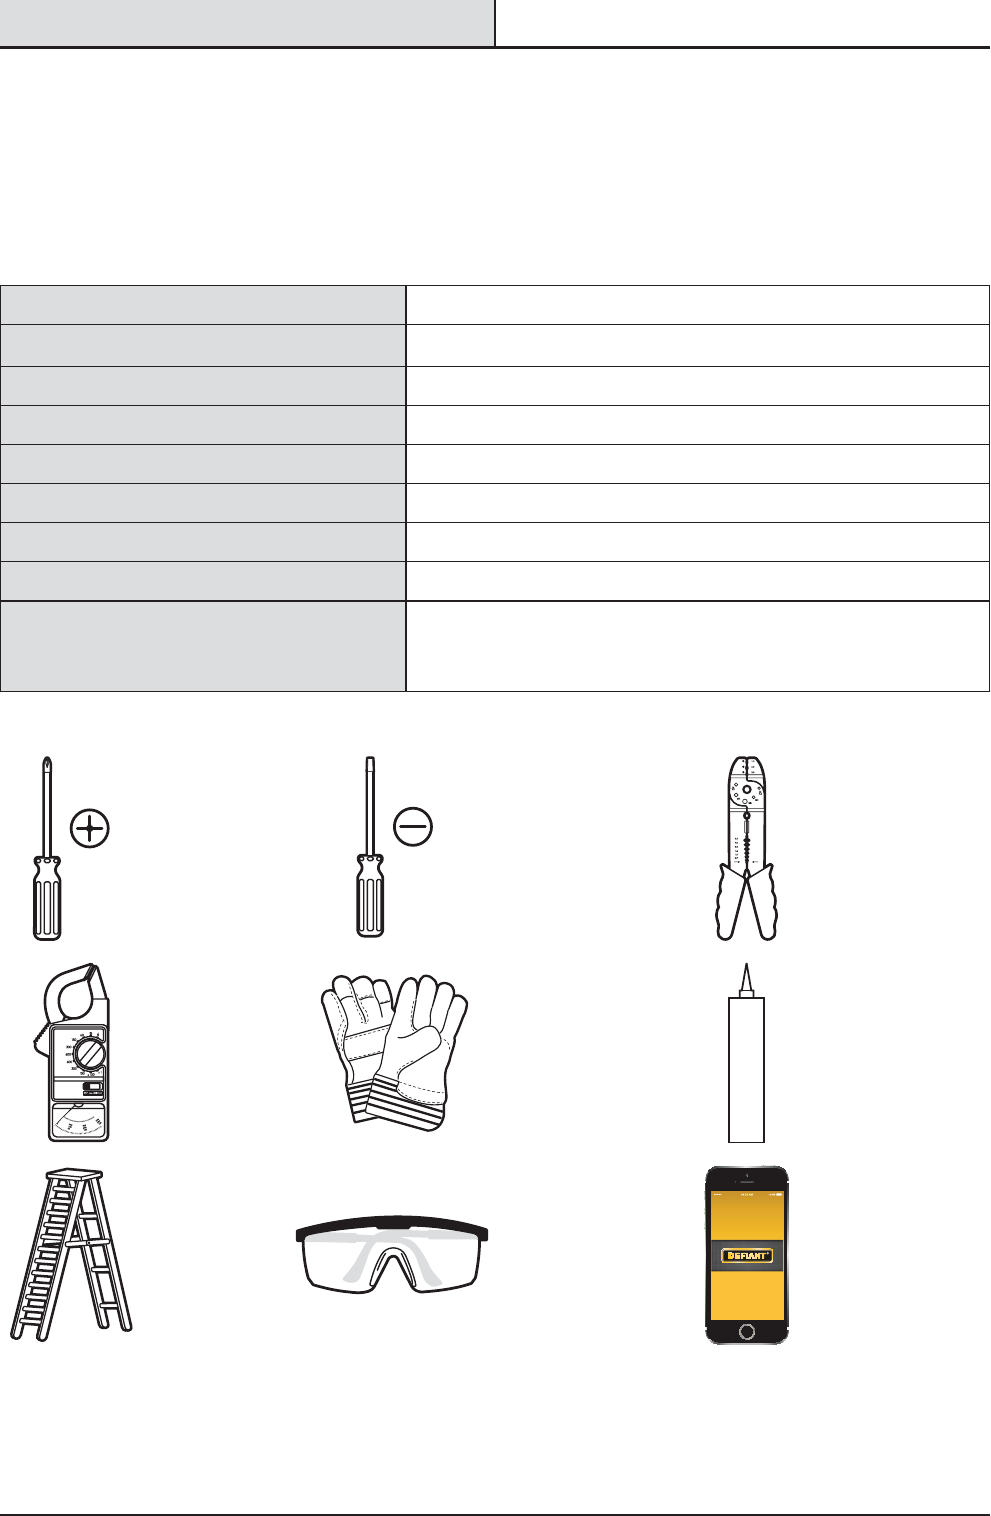
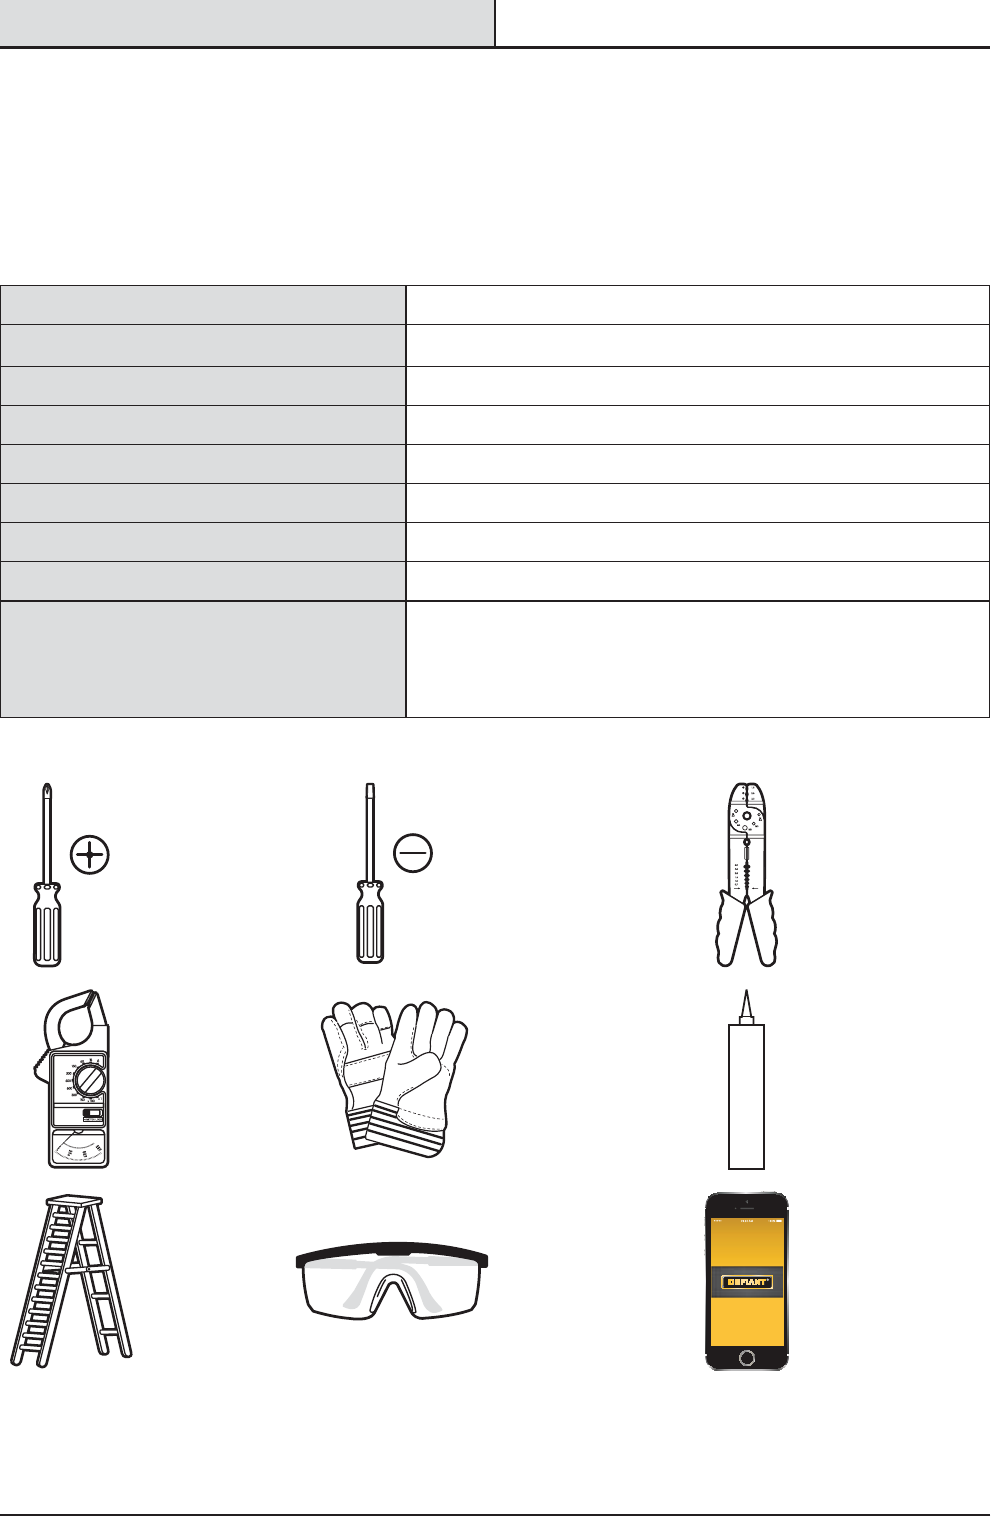
TOOLS REQUIRED
Phillips
screwdriver
1/8 in. Flathead
screwdriver
Wire strippers/
cutters
Circuit tester Work gloves Silicone
sealant
Ladder Safety goggles Mobile Device
4
Pre-Installation (continued)
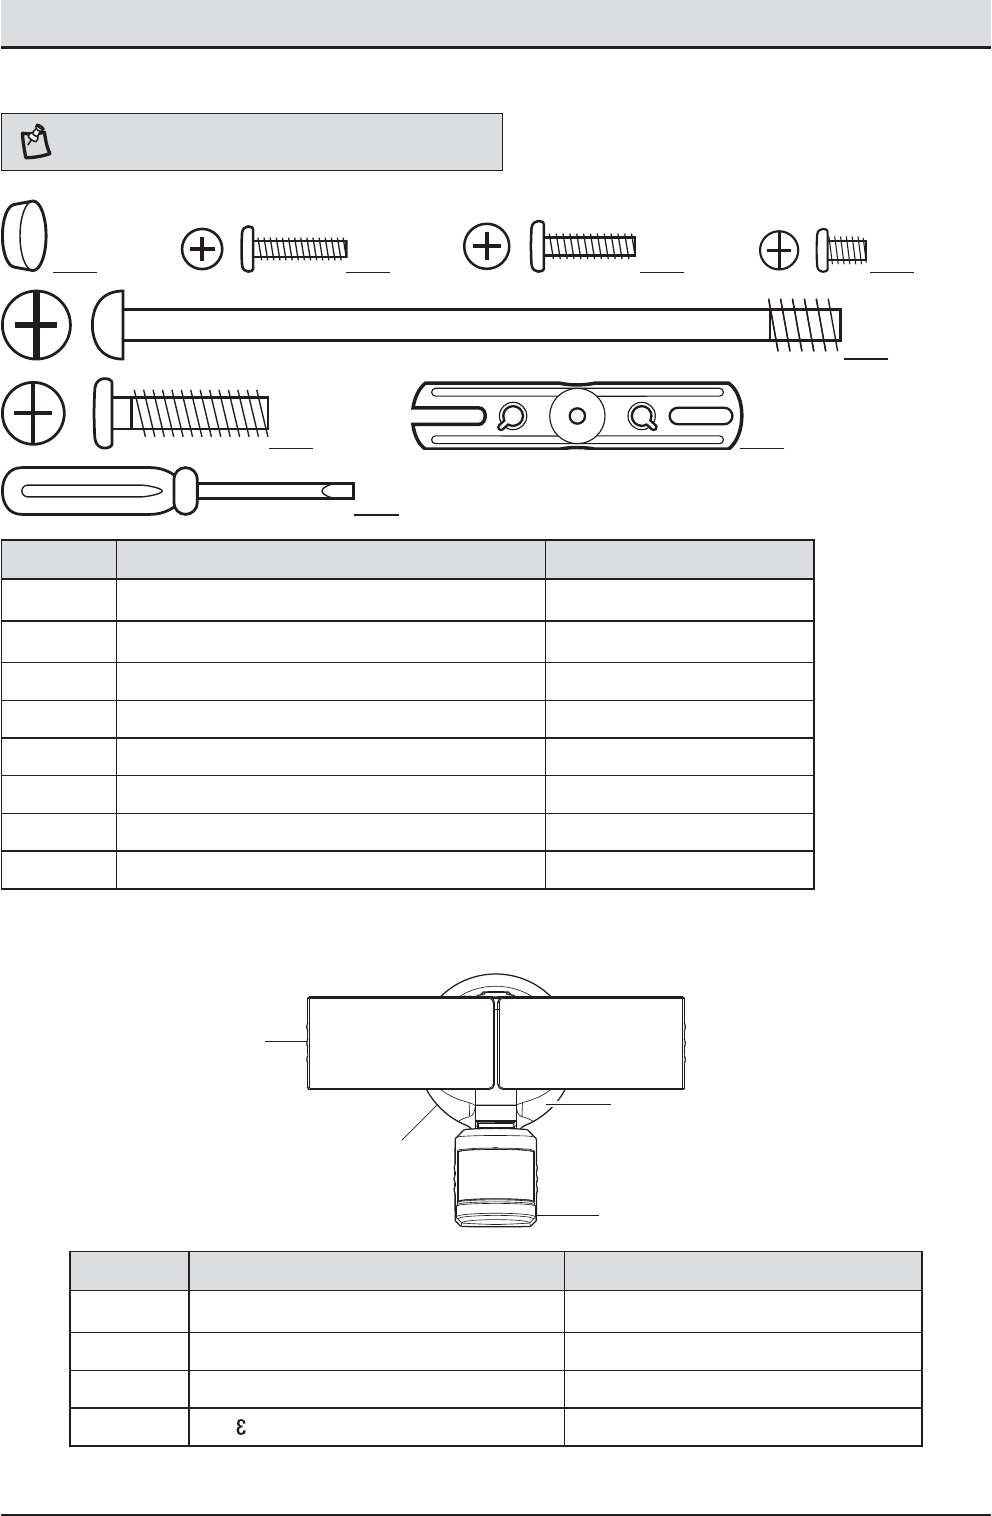
HARDWARE INCLUDED
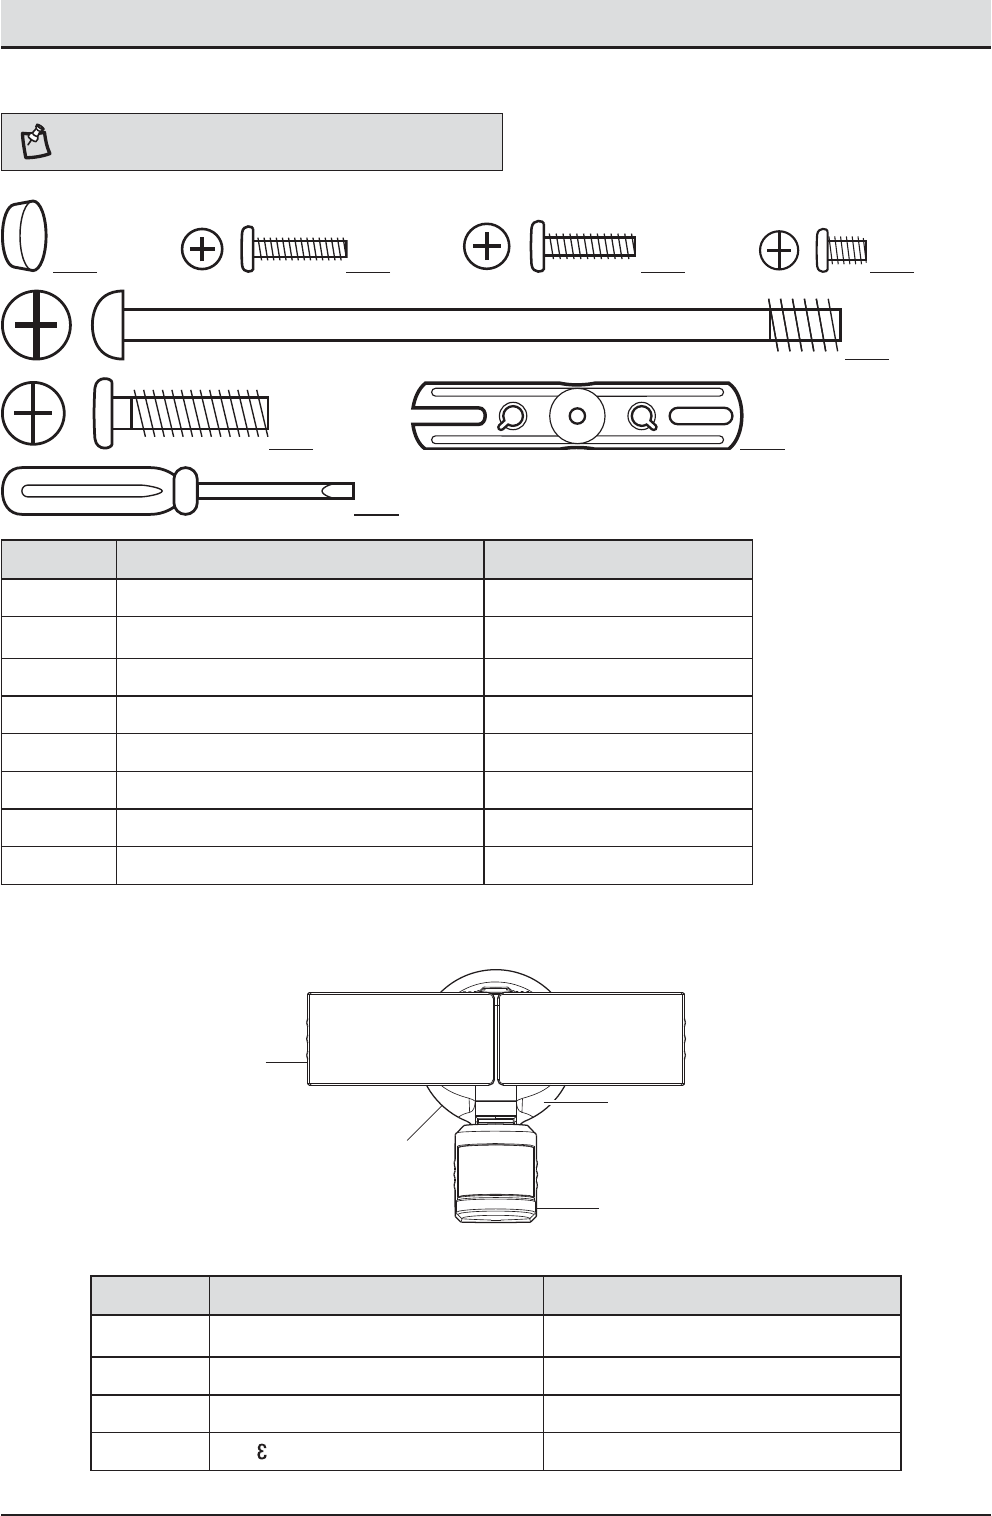
NOTE: Hardware shown to actual size.
AA BB CC DD
EE
FF
FRONT
GG
HH
Part Description Quantity
AA Rubber plug 1
BB Mounting bracket screw 2
CC Mounting bracket screw 2
DD Mounting bracket screw 2
EE Large mounting bolt (pre-installed) 1
FF Small mounting bolt 1
GG Mounting bracket (not to scale) 1
HH Mini screwdriver 1
PACKAGE CONTENTS
Part Description Quantity
A Lamp head 2
B Light xture 1
C Motion sensor 1
D1-2- asy Connect™ 1
C
A
D
B
5 HOMEDEPOT.COM
Please contact 1-866-308-3976 for further assistance.
Installation
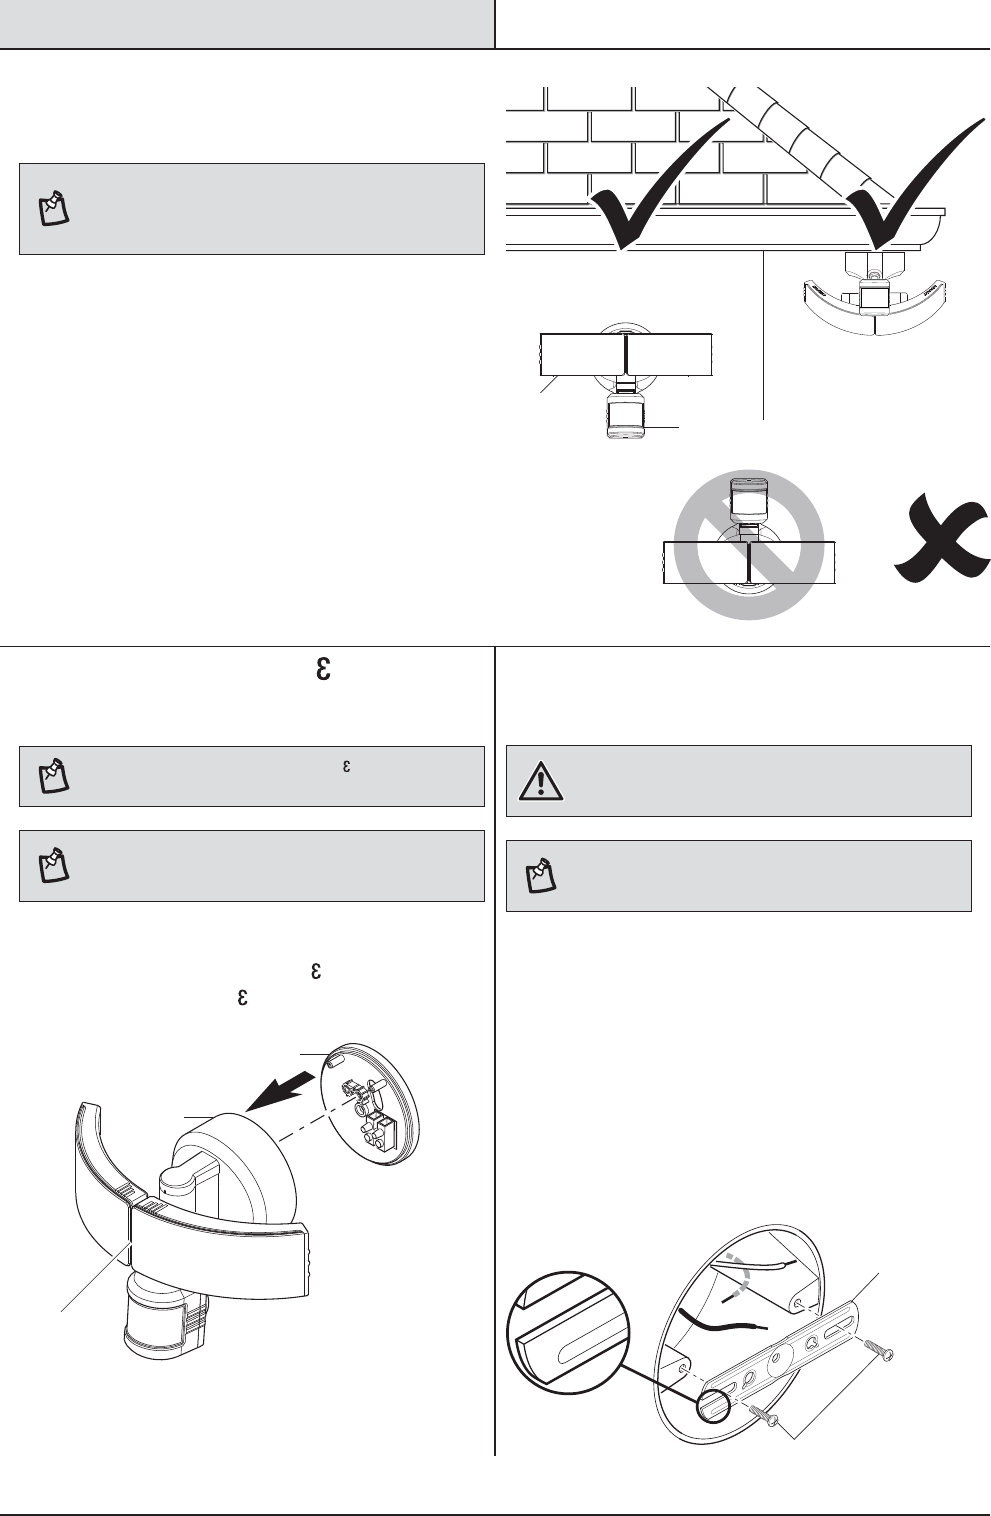
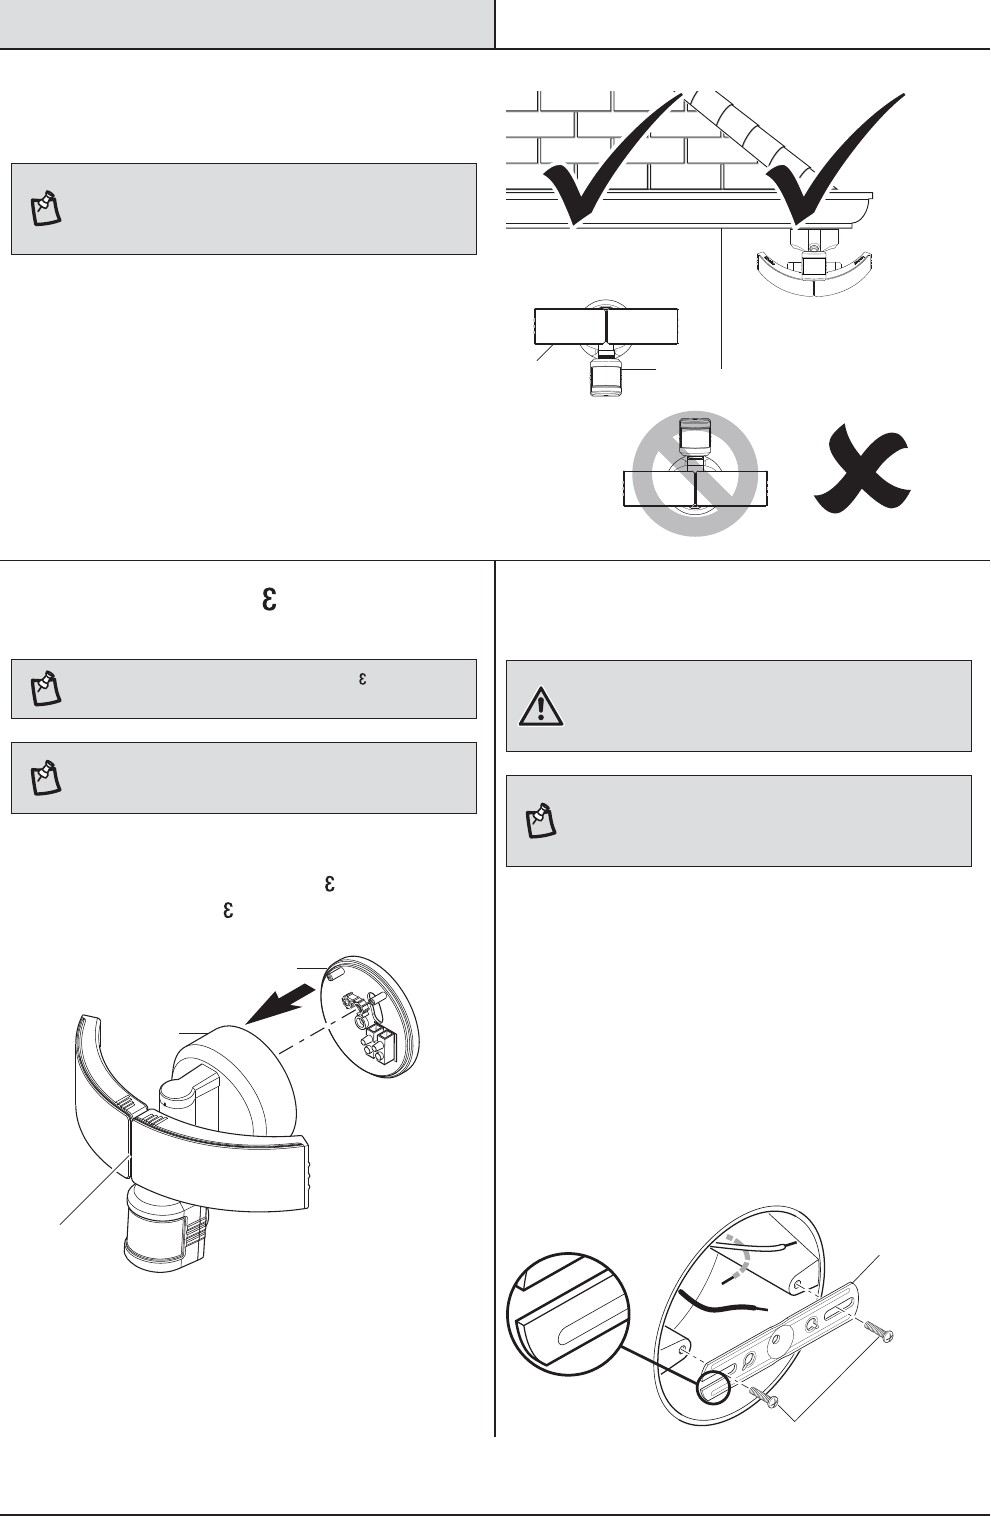
1 Determining the mounting
location
NOTE: The light xture should be mounted approximately
8 ft. (2.4 m) above the ground. If the light xture is
mounted higher than recommended, aiming the sensor
down will reduce the coverage area.
ƑDetermine the mounting location – wall or eave
mount.
ƑPosition the lamp heads (A) in the general
direction of the desired light coverage.
ƑIf needed, rotate the motion sensor (C) so the
text faces upward.
Wall Mount
Eave Mount
2 Removing the 1-2- asy
Connect™
NOTE: This xture comes with a 1-2- asy Connect™ (D).
It is pre-assembled on the light xture (B) for shipping.
NOTE: The large mounting bolt (EE) is pre-installed in
the light xture (B). Do not attempt to remove the large
mounting bolt (EE).
ƑUnscrew the large mounting bolt (EE) connecting
the light xture (B) to the 1-2- asy Connect™ (D)
and remove the 1-2- asy Connect™ (D).
3 Installing the mounting bracket
WARNING: Turn the power off at the circuit breaker or
fuse. Place tape over the circuit breaker switch and verify
power is off at the light xture.
NOTE: Six mounting bracket screws of various sizes are
included. The installation will only require two. Discard the
unused mounting bracket screws after installation.
ƑRemove the existing light xture.
ƑInstall the mounting bracket (GG) with the
stamped word “FRONT” facing away from the
junction box. Use the mounting bracket screws
(BB, CC, or DD) that best t the junction box.
ƑFirmly pull on the mounting bracket to verify
it is securely mounted to the junction box. If
necessary, use the screws that were removed
from the existing light xture.
FRONT
FRONT
A
C
EE
D
B
BB, CC, or DD
GG
6
Installation (continued)
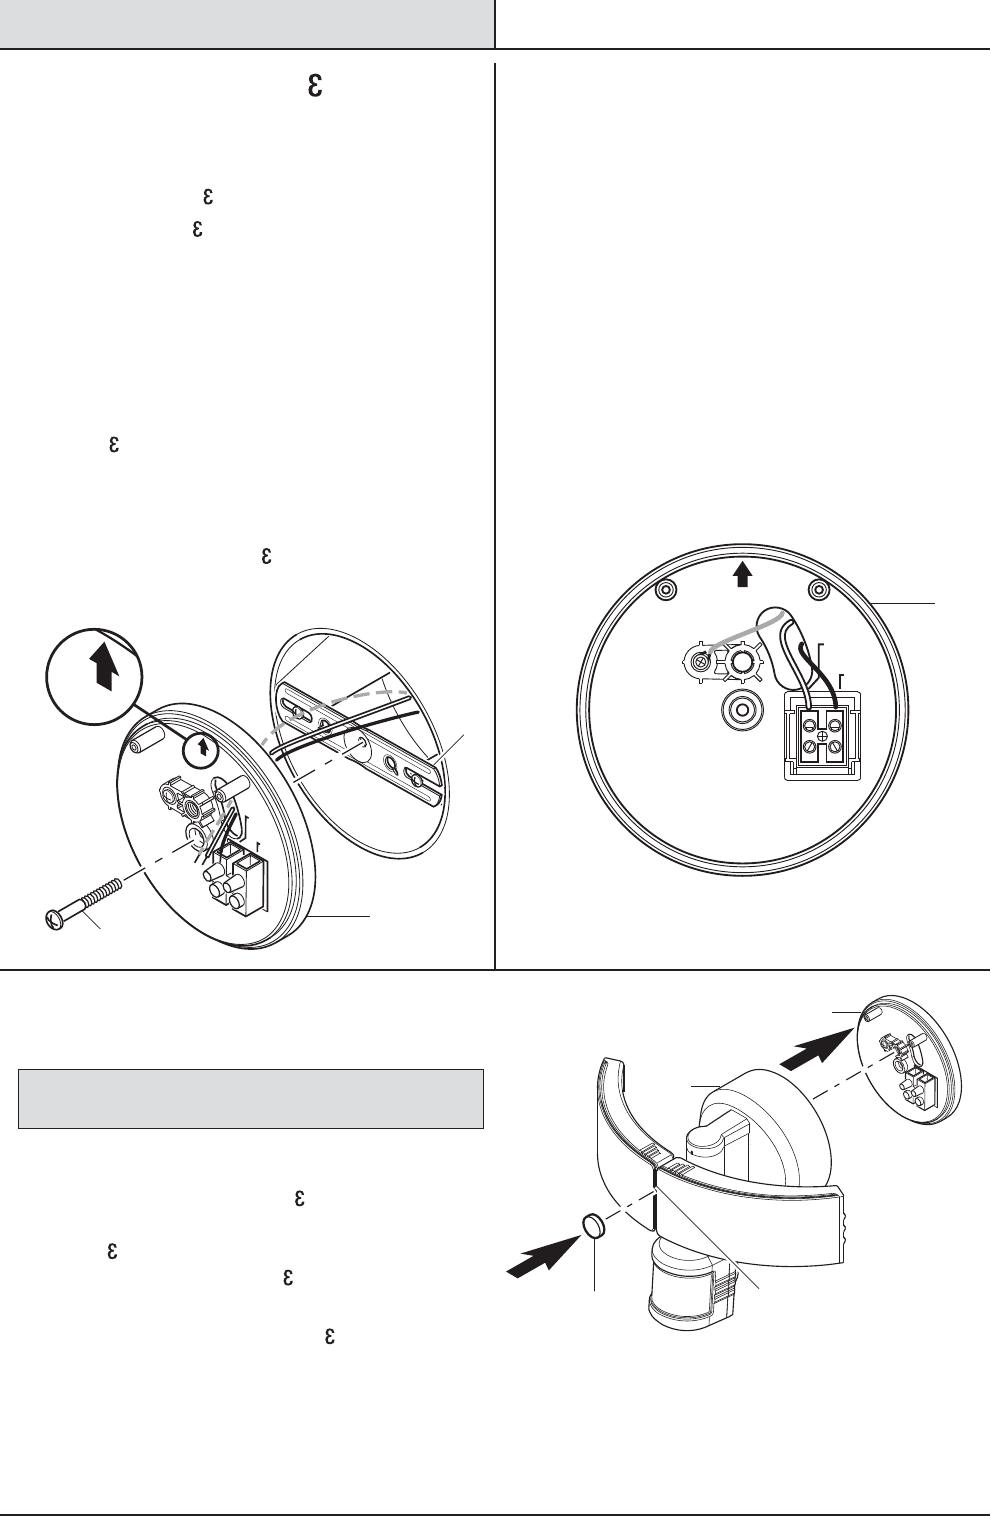
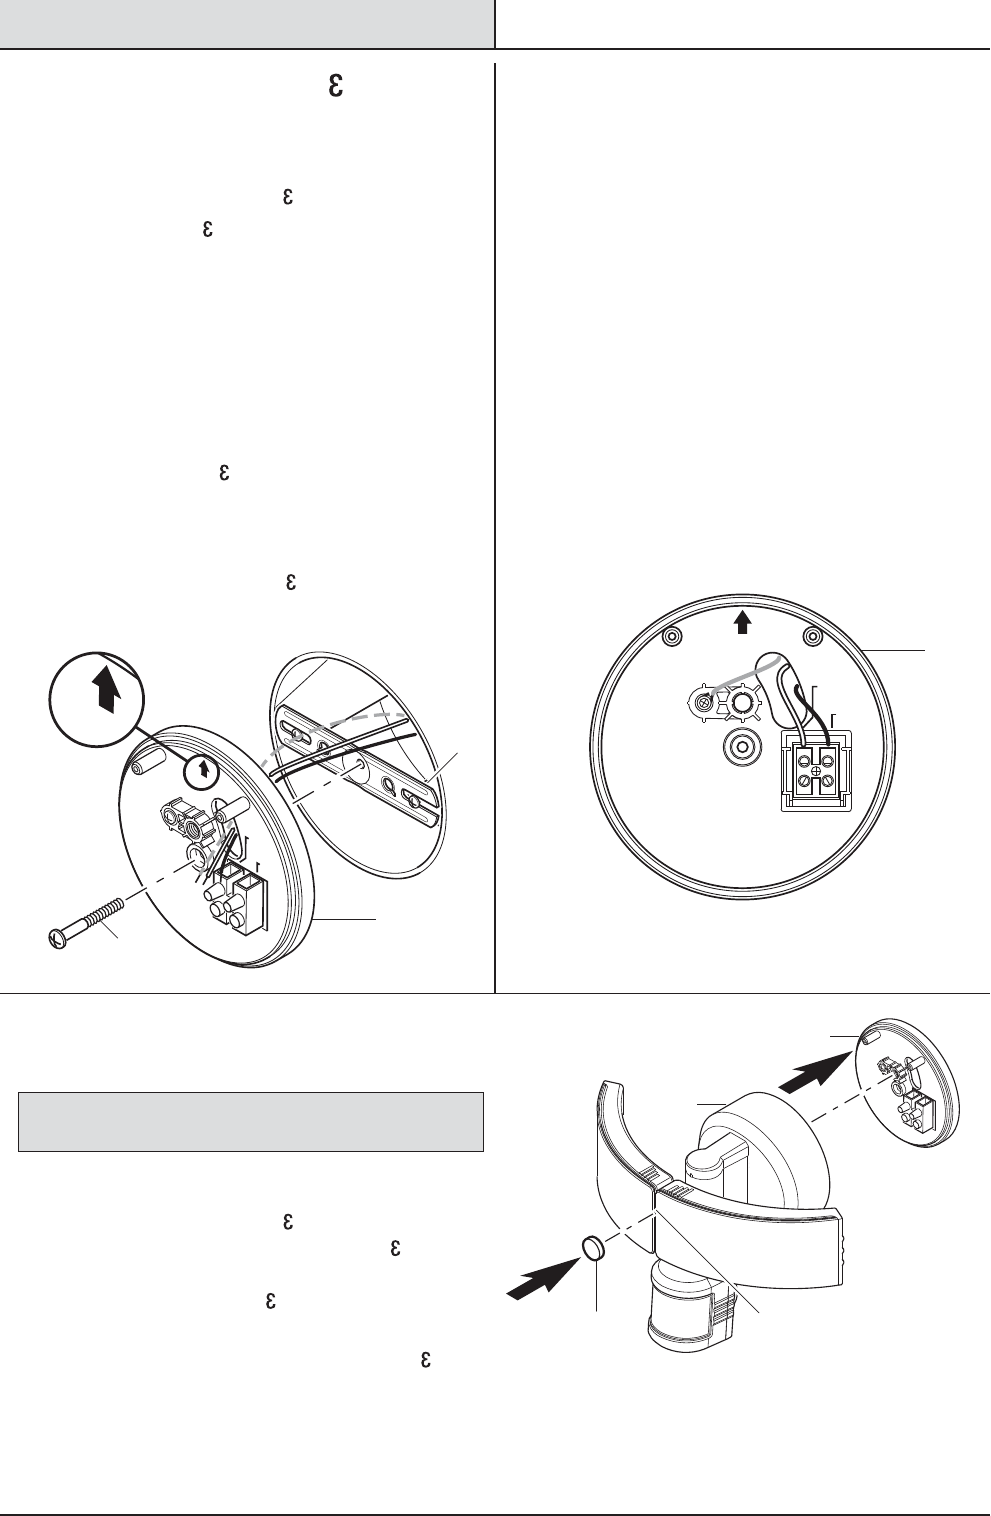
4 Installing the 1-2- asy
Connect™
ƑRoute the junction box wires through the large
hole in the 1-2- asy Connect™ (D).
ƑPlace the 1-2- asy Connect™ (D) against the
junction box.
ƑWhen mounting to a wall, the “UP” arrow
must point upward.
ƑWhen mounting to an eave, the “UP” arrow
must point toward the building.
ƑInsert the small mounting bolt (FF) through the
1-2- asy Connect™ (D) hole located below
the threaded hole, and thread it into the center
hole of the mounting bracket (GG). Tighten the
bolt (FF) securely.
ƑFirmly pull on the 1-2- asy Connect™ to verify
it is securely attached to the mounting bracket.
FRONT
N (White/
Blanc/Blanco)
GND
Terre
Tierra
UP/Haut/Arriba
L (Black/
Noir/Negro)
UP/Haut/Arriba
5 Making the electrical
connections
ƑInsert the junction box wires into the side of
the terminal block and around the ground
screw. Tighten terminal block screws using
the mini-screwdriver (HH) and ground screw to
secure the wires.
ƑInsert the white wire from the junction box
into the terminal marked “N (White)”.
ƑInsert the black wire from the junction box
into the terminal marked “L (Black)”.
ƑConnect the bare or green ground wire
from the junction box to the ground screw
(marked with “GND”).
N (White/
Blanc/Blanco)
GND
Terre
Tierra
UP/Haut/Arriba
L (Black/
Noir/Negro)
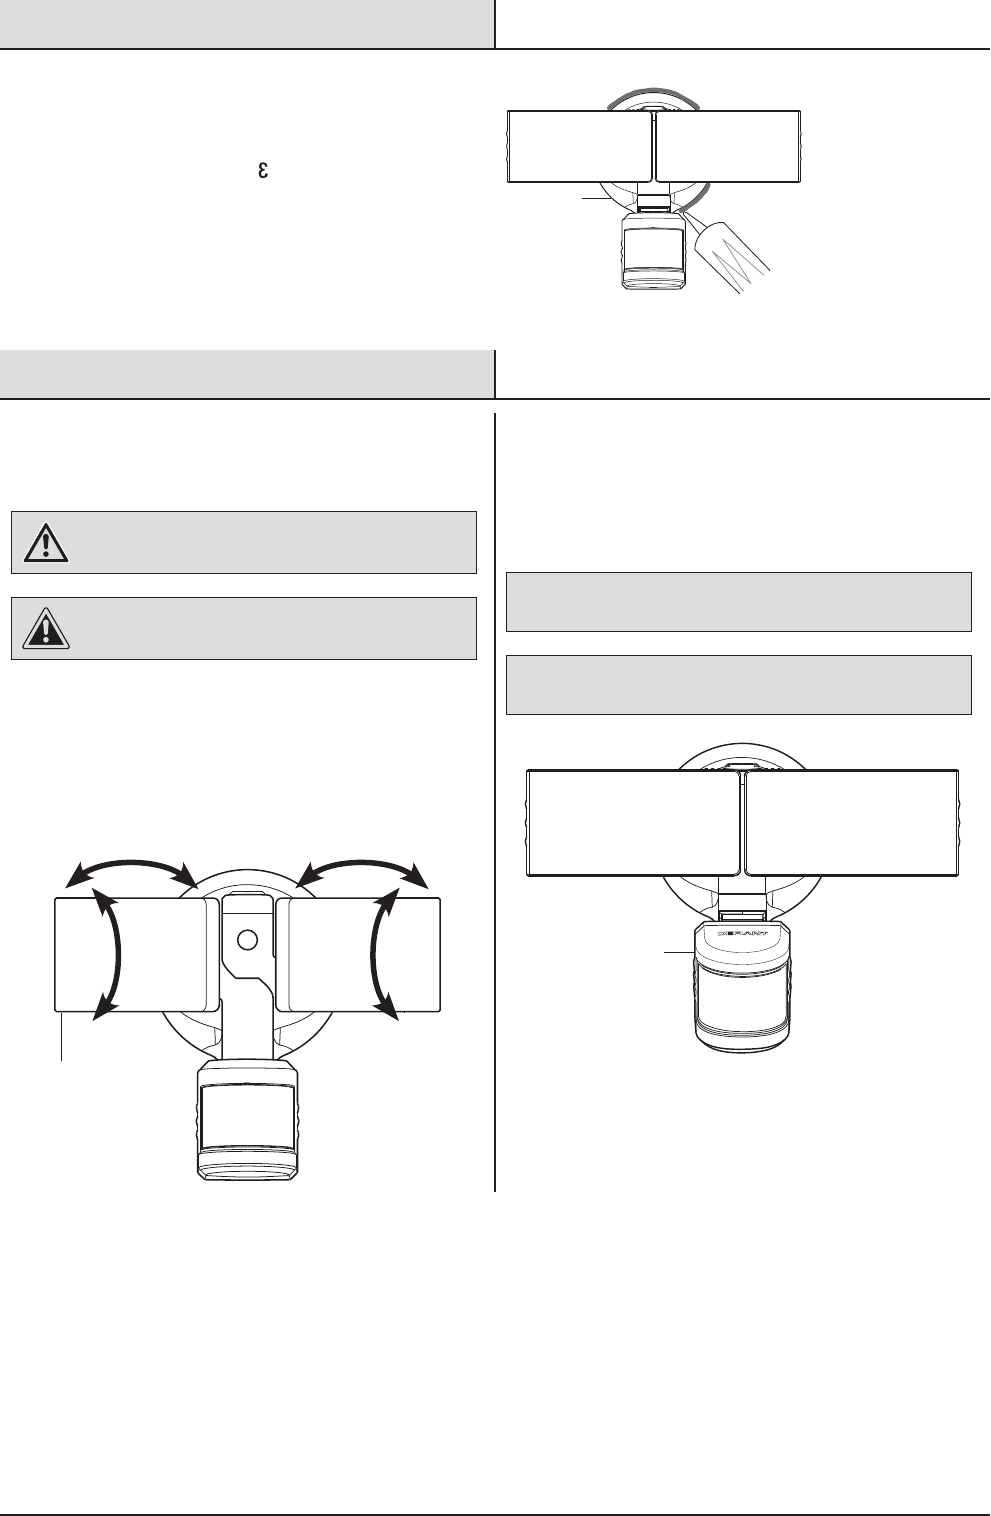
6 Mounting the light fixture
NOTICE: The two pins on the rear of the light xture must be
inserted into the terminal block for the light to work.
ƑAlign the bottom edge of the light xture (B) with
the bottom edge of the 1-2- asy Connect™ (D)
and tilt the light xture (B) toward the
1-2- asy Connect™ (D). Ensure the light xture
(B) is centered on the 1-2- asy Connect™ (D).
ƑTighten the large mounting bolt (EE) securely
through the center of the 1-2- asy Connect™
(D). Do not overtighten.
ƑPush the rubber plug (AA) rmly into the
mounting bolt hole on the light xture (B).
EE
AA
D
B
D
D
FF
GG
7 HOMEDEPOT.COM
Please contact 1-866-308-3976 for further assistance.
Installation (continued)
7 Caulking around the light
fixture
ƑCaulk around the 1-2- asy Connect™ (D) and
mounting surface with silicone sealant (not
included).
Operation
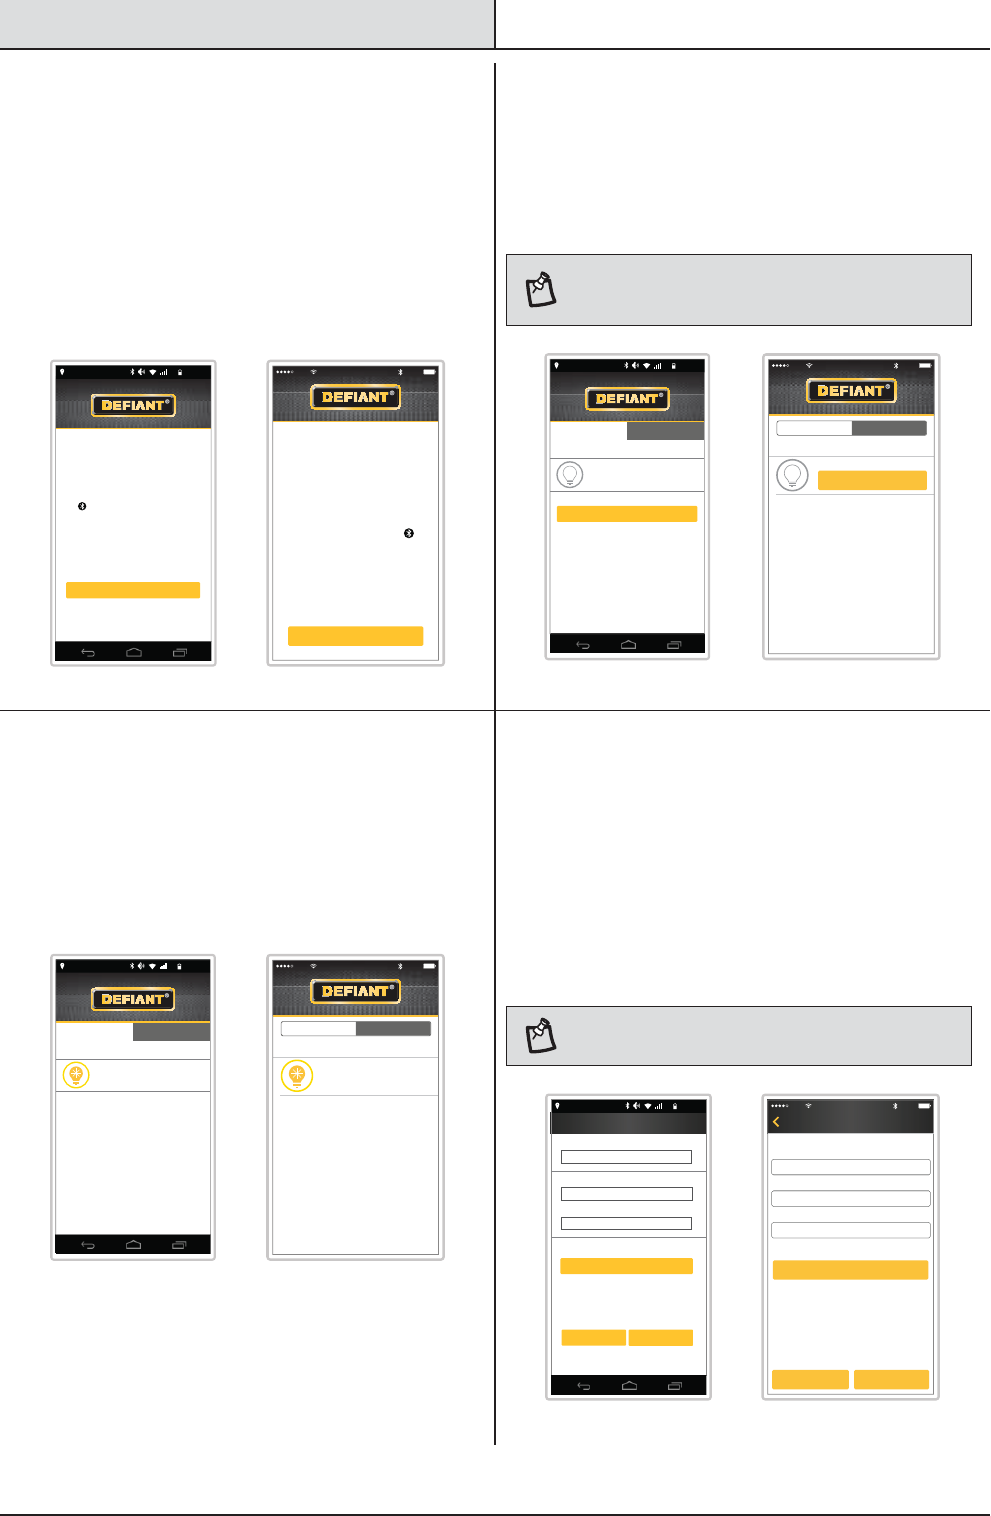
1 Adjusting the lamp heads
WARNING: Risk of re. Keep the lamp heads at least
2in. (51mm) from combustible materials.
CAUTION: Keep lamp heads 30° below horizontal to
avoid water damage and electrical shock.
ƑTurn the power on at the circuit breaker or fuse
and turn on the wall switch.
ƑIf needed, gently grasp the lamp heads (A) and
tilt them up or down or side to side to adjust
the light coverage area.
2 Rotating the sensor controls
downward
ƑRotate the motion sensor (C) so the text faces
upward.
NOTICE: All clearances must be maintained. See Safety Information
on page 2.
NOTICE: The Deant mobile app must be downloaded to operate
the light xture. See Step 3 on page 8 for instructions.
270°
THIS SIDE UP
D
C
A
8
Operation (continued)
3 Downloading the Defiant®
mobile app
ƑDownload the Deant® mobile app from the
Apple® or Android® app store (search for
“Deant”).
ƑTurn on the Bluetooth® in the device
settings.
ƑOpen the Deant app and touch “Begin”.
Configuring your light settings with a mobile
device requires Bluetooth connectivity.
Before proceeding, ensure your mobile device’s
Bluetooth is turned on. The Bluetooth indicator
icon should appear somewhere on the screen.
If it does not, go into your mobile device’s Settings
menu and turn it on.
TURN ON BLUETOOTH
Begin
7:15 AM
68%
Configuring your light settings with
a mobile device requires Bluetooth
connectivity.
Before proceeding, ensure your
mobile device’s Bluetooth is turned
on. The Bluetooth indicator icon
should appear somewhere on the
screen. If it does not, go into your
mobile device’s Settings menu and
turn it on.
TURN ON BLUETOOTH
Begin
ATT 100 %9:25 PM
Android iOS
4 Pairing the light to the mobile
app
ƑEnsure the power to the light is turned ON.
ƑTouch “Scan for lights” to search for existing
lights.
NOTE: During the scanning process, the app will locate
ALL Bluetooth® lights in the area. Lights previously
paired to other devices should already be named.
Scan for lights
SELECT A LIGHT
No lights configured
7:15 AM
68%
My Lights All My Lights All
Scan for lights
SELECT A LIGHT
No lights configured
ATT 100 %9:25 PM
Android iOS
5 Beginning the pairing process
The new light will be shown in a yellow circle
indicating it is not paired.
ƑTouch the new light to begin the pairing
process.
SELECT A LIGHT
New Light
7:15 AM
68%
My Lights All My Lights All
SELECT A LIGHT
ATT 100 %9:25 PM
New Light
Android iOS
6 Finishing the pairing process
ƑTouch “Set Up” and enter a name and
password for the light (the password must be
4 to 6 alpha-numeric characters).
ƑEither touch “Save” to continue or “Add Photo”
to add an optional picture (the photo may be
an existing photo or a new photo may be taken
of the light).
NOTE: A preview of the light will not show until the
“Save” button is touched.
Set Up
7:15 AM
68%
Cancel Save
Add Photo
Please create a password
Password
Enter name
Name This Light
Verify password
Verify Password
Add Image
ATT 100 %9:25 PM
Set UpBack
Name This Light
Password
Verify Password
Add Image
Add Photo
Cancel Save
Please create 4 character password
Android iOS
9 HOMEDEPOT.COM
Please contact 1-866-308-3976 for further assistance.
Operation (continued)
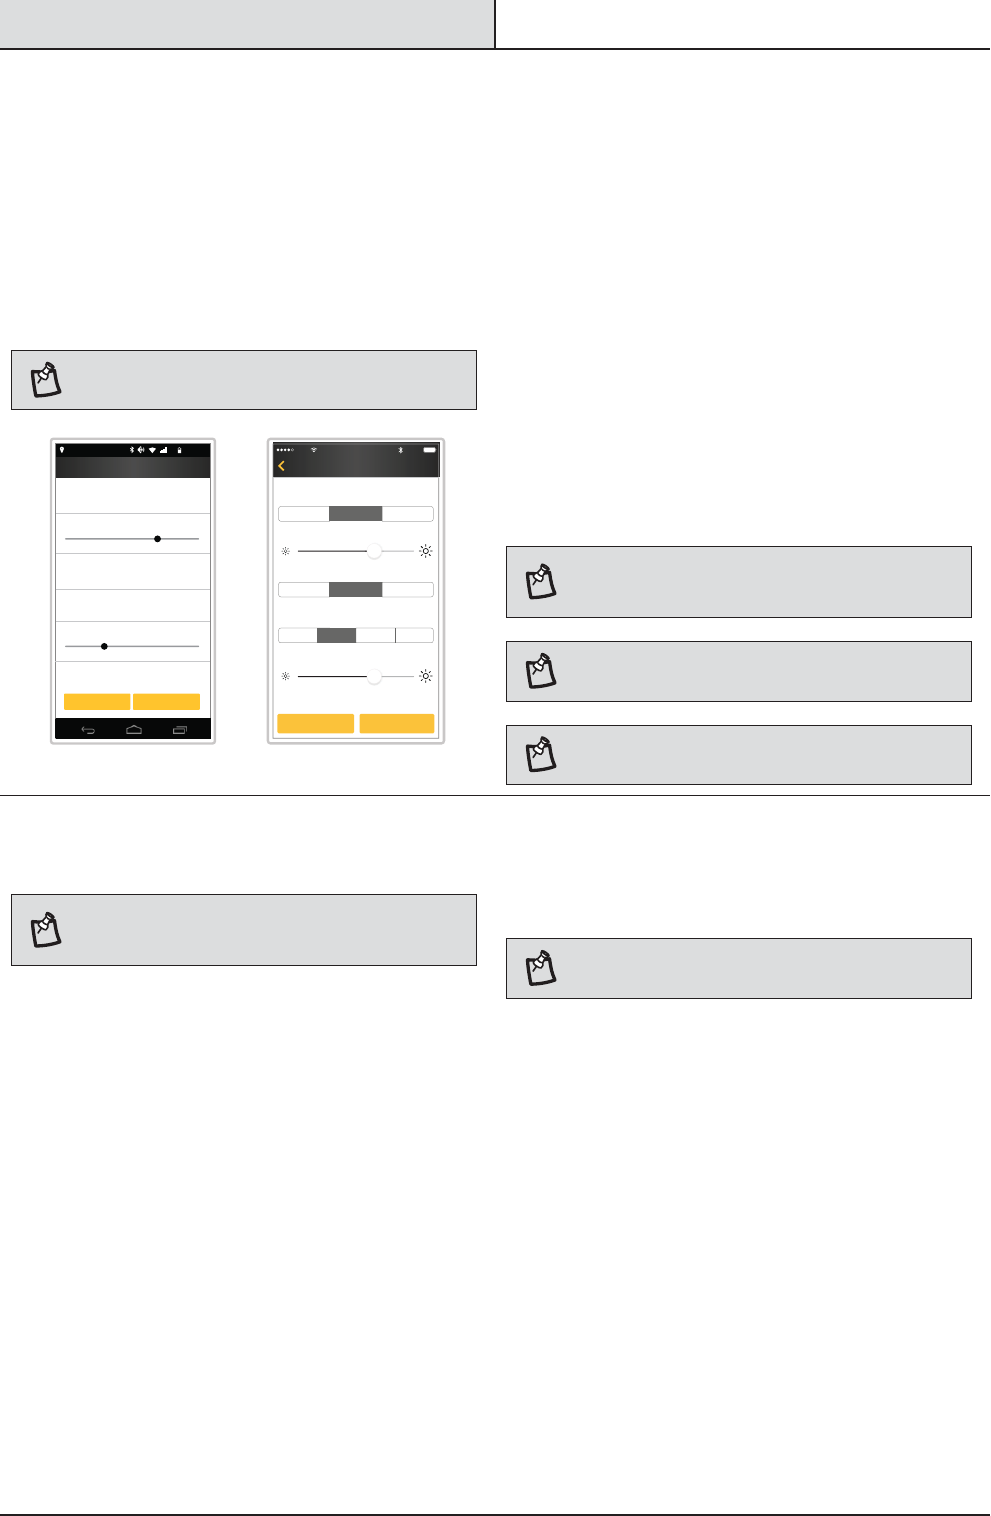
7 Adjusting the light settings
After the light is paired to the mobile app, the yellow
circle around the light will change to green.
ƑTouch the light icon.
ƑTouch “Settings” to adjust the light controls.
ƑTouch “Save” after all adjustments have been
made. Setup is complete.
NOTE: Changes made to one light’s settings will not
affect another light’s settings.
Settings
7:15 AM
68%
Cancel Save
ON time
5 minutes
Sensitivity
Medium
DualBrite time
3 hours
Full ON brightness level
DualBrite dimming level
75%
25%
ATT 100 %
9:25 PM
SettingsPorch
ON Time: 5 Minutes
Full ON Brightness Level: 85%
Sensitivity: Medium
DualBrite Dimming Level: 25%
Cancel Save
20 Minutes1 Minute 5 Minutes
HighLow Medium
DualBrite Time: 3 Hours
Dusk to Dawn6 HoursOff 3 Hours
Android iOS
The “ON-TIME” option determines the amount of time
the light will stay on “Full ON Brightness Level” after
all motion has stopped.
The “Full ON Brightness Level” option determines the
light brightness level after the light has been turned
on by motion.
The “Sensitivity” option increases and decreases the
size of the detection area.
The “DualBrite” option determines the amount of
time the lights stay on at a reduced light level after
sundown. Switching this setting to “OFF” will not
affect the “ON-TIME” setting.
The “DualBrite Dimming Level” option determines the
light brightness level of the reduced light level after
sundown.
NOTE: The higher the “Sensitivity” setting, the greater the
possibility of false triggering. To reduce false triggering,
select a lower setting.
NOTE: The “Dusk-to-Dawn” setting keeps the lights on at
an accent level from sundown to sun up.
NOTE: If the “DualBrite” option is set to OFF, changing the
dimming level will have no affect on the light.
8 Setting the sensor for testing
NOTE: The light xture will operate during the day or
night during testing. The light will stay on for 8 seconds
after all motion is stopped.
The light xture will automatically enter “Test” mode
whenever the “Sensitivity” option is changed. The light
xture will remain in “Test” until one of the following
actions occurs:
ƑThe “Save” or “Cancel” option is selected.
ƑNo movement during the testing process for 30
seconds.
ƑThree minutes have passed without changing
one of the on-screen settings.
ƑSet the “DualBrite” option to the “OFF”
position.
ƑSet the “Sensitivity” option to the “LOW”
position.
NOTE: The motion sensor will need to completely warm
up (60 seconds) before beginning the setup process.
10
Operation (continued)
9 Adjusting the motion sensor
detection zone
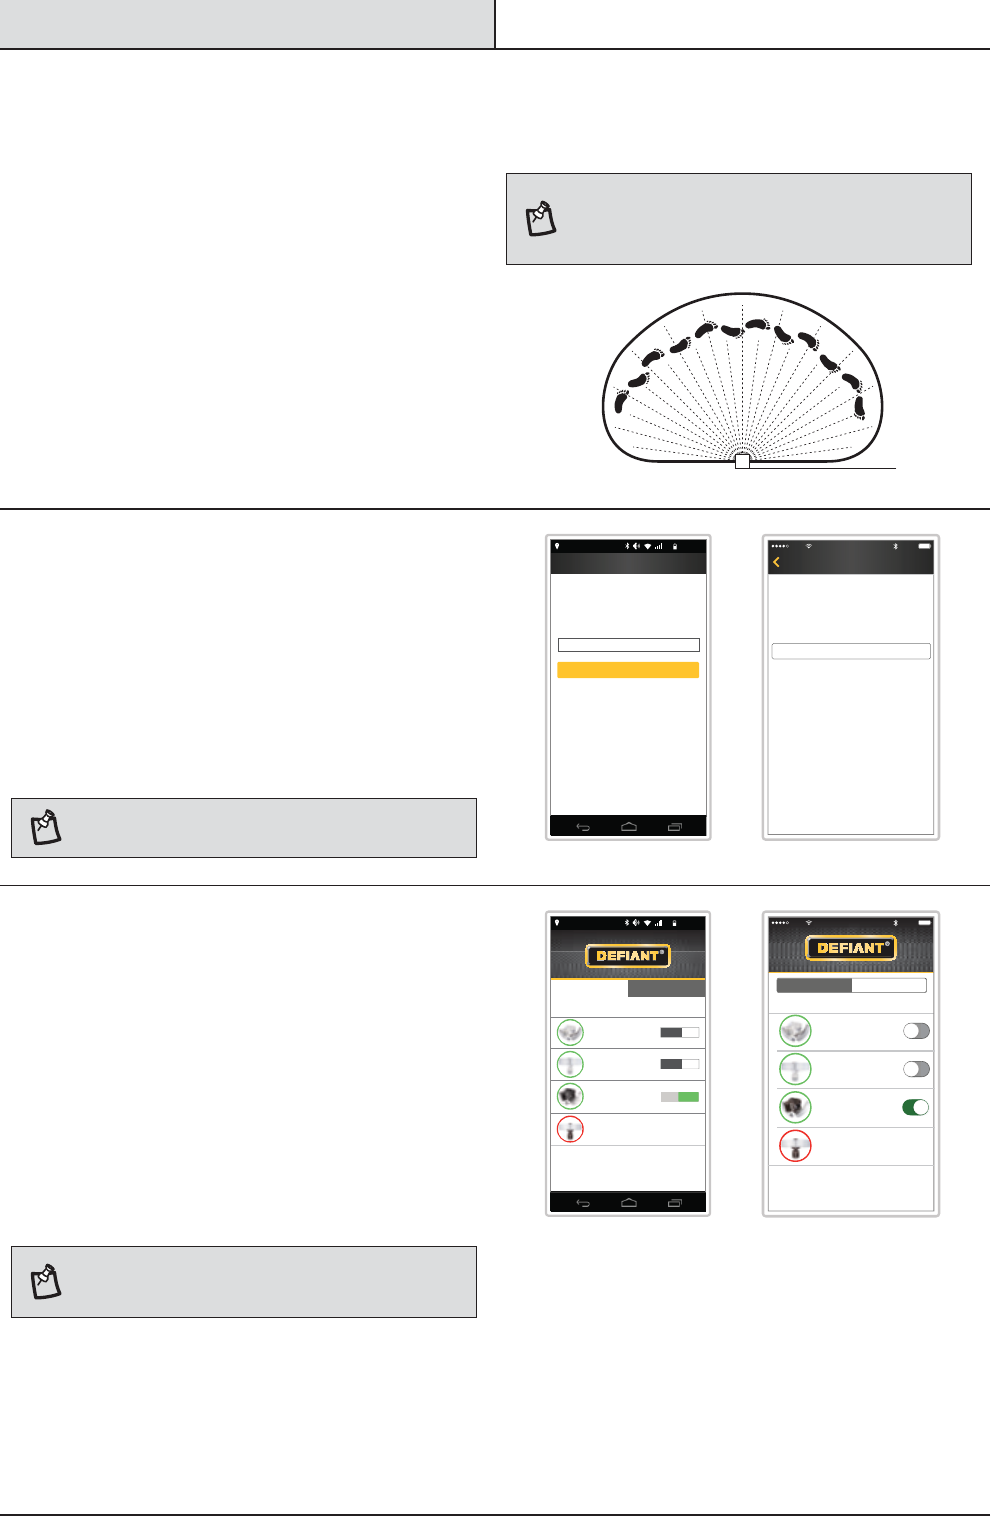
ƑPerform a “walk test”: walk in an arc across
the front of the motion sensor (C).
ƑWatch the light. The light will come on and the
red LED will ash indicating motion has been
detected.
ƑStop, wait for the light to turn off, and then
begin walking again.
ƑContinue this process until the detection zone
has been established.
ƑIf needed, gently grasp the motion sensor (C)
and move it from side to side or up and down
to adjust the detection zone.
NOTE: The motion sensor (C) is more sensitive to motion
moving across the front of the sensor. The motion sensor
(C) is less sensitive to motion moving directly toward the
front of the sensor.
10 Adding additional mobile
devices
Additional mobile devices may be added to control the
light xture.
ƑOn the new device follow steps 3 and 4 above.
ƑAfter scanning for lights, select the “All” tab.
ƑTouch the desired light on the screen and enter
the previous user-dened password.
NOTE: The light settings and name are stored in the light
xture. The light photo will need to be added separately.
This light is configured on another
smartphone
Enter the light’s password to gain normal
access:
Password
7:15 AM
68%
Deck
Next
ATT 100 %9:25 PM
DeckBack
Password
This light is configured on
another smartphone
Enter the light’s password to gain
normal access:
Next
Android iOS
11
Using manual mode
Manual mode overrides the motion sensor (C) and
“ON-TIME” control so the light will operate at the preset
“Full ON Brightness Level”
. This feature only works at
night and only for one night at a time. The motion sensor
(C) will reset to motion sensing mode at sunrise.
ƑSlide the switch under “Manual Override” to
the right.
ƑTo return the light to the original settings, slide
the switch to the left.
NOTE: If the power to the light xture is off for more than
5 seconds, allow the motion sensor to warm up prior to
switching to manual mode.
My Lights All
SELECT A LIGHT
Side Door
Garage Front
Porch
Deck
OFF
OFF
Manual
Override
7:15 AM
68%
ON
ATT 100 %9:25 PM
SELECT A LIGHT
Side Door
Garage Front
Porch
Deck
My Lights All
Manual
Override
Android iOS
C

11 HOMEDEPOT.COM
Please contact 1-866-308-3976 for further assistance.
Operation (continued)
12 Resetting the light fixture to
factory settings
If the password is forgotten, the light xture may be
reset to the original factory settings.
ƑTouch the light icon.
ƑTouch “Restore Factory Defaults”.
ƑFollow the on-screen instructions to restore
all light settings back to the original factory
settings.
7:15 AM
68%
Porch
Cancel
Settings
Rename Light
Restore Factory Defaults
Settings
Rename Light
Restore Factory Defaults
ATT 100 %
9:25 PM
PorchBack
Cancel
Android iOS
Care and Cleaning
ƑTo prolong the original appearance, clean the light xture with clear water and a soft, damp cloth only.
ƑDo not use paints, solvents, or other chemicals on this light xture. They could cause a premature
deterioration of the nish. This is not a defect in the nish and will not be covered by the warranty.
ƑDo not spray the light xture with a hose or power washer.
Troubleshooting
Problem Possible Cause Solution
The light will not come on. ƑThe light switch is turned off. ƑTurn the light switch on.
ƑThe fuse is blown or the circuit
breaker is turned off.
ƑReplace the fuse or turn the
circuit breaker on.
ƑDaylight turn-off (photocell) is in
effect.
ƑRecheck after dark.
ƑThe circuit wiring is incorrect (if this
is a new installation).
ƑVerify the wiring is correct.
ƑThe motion sensor is aimed in the
wrong direction.
ƑRe-aim the motion sensor to
cover the desired area.
ƑThe outside air temperature is close
to the same as a person’s body
heat.
ƑIncrease the “Sensitivity”
setting.
The light comes on during
the day.
ƑThe motion sensor may be installed
in a relatively dark location.
ƑThe light xture is operating
normally under these
circumstances.

12
Troubleshooting (continued)
Problem Possible Cause Solution
The light comes on for no
apparent reason.
ƑThe motion sensor may be sensing
small animals or automobile trafc.
ƑDecrease the “Sensitivity”
setting or reposition the motion
sensor.
ƑThe “Sensitivity” setting is set too
high.
ƑDecrease the “Sensitivity”
setting.
ƑThe “DUALBRITE” setting is in the
3 hour, 6 hour, or dusk-to-dawn
setting.
ƑThe light xture is operating
normally under these
circumstances.
ƑThe outside temperature is much
warmer or cooler than a person’s
body heat (summer or winter).
ƑDecrease the “Sensitivity”
setting.
ƑThe light xture is wired through a
dimmer or timer.
ƑDo not use a dimmer or timer to
control the light xture. Replace
the dimmer or timer with a
standard on/off wall switch.
The lights turn off too late in
the Dusk-to-Dawn setting.
ƑThe light xture may be installed in
a relatively dark location.
ƑRelocate the light xture or use
the 3 hour or 6 hour setting.
The lights stay on
continuously.
ƑThe motion sensor may be picking
up a heat source, such as an air
vent, dryer vent, or brightly painted,
heat-reective surface.
ƑDecrease the “Sensitivity”
setting or reposition the motion
sensor.
ƑThe motion sensor is in manual
mode.
ƑTurn the manual mode option to
off. See Using manual mode on
page 10.
ƑThe light xture is wired through a
dimmer or timer.
ƑDo not use a dimmer or timer to
control the light xture. Replace
the dimmer or timer with a
standard on/off wall switch.
ƑThe light xture is on the same
circuit as a motor, transformer, or
uorescent bulb.
ƑInstall the light xture on
a circuit without motors,
transformers, or uorescent
bulbs.
The lights ash on and off. ƑHeat or light from the lamp heads
may be turning the motion sensor
on and off.
ƑReposition the lamp heads away
from the motion sensor.
ƑHeat is being reected from other
objects and may be turning the
motion sensor on and off.
ƑDecrease the “Sensitivity”
setting or reposition the motion
sensor.
The light xture is not
responding to the Deant app.
ƑBluetooth® is not turned on. ƑTurn Bluetooth® “ON” in the
device’s settings.
The Deant app is not nding
the light xture.
ƑBluetooth® is not turned on. ƑTurn Bluetooth® “ON” in the
device’s settings.
The App is not turning on the
light xture.
ƑThe power to the light is turned off.
ƑBluetooth® is not turned on.
ƑTurn on the power to the light.
ƑTurn Bluetooth® “ON” in the
device’s settings.

13 HOMEDEPOT.COM
Please contact 1-866-308-3976 for further assistance.
NOTE: This equipment has been tested and found to comply with the limits for a Class B digital device,
pursuant to Part 15 of the FCC rules. These limits are designed to provide reasonable protection against
harmful interference in a residential installation. This equipment generates, uses and can radiate radio
frequency energy and, if not installed and used in accordance with the instructions, may cause harmful
interference to radio communications.
However, there is no guarantee that interference will not occur in a particular installation. If this
equipment does cause harmful interference to radio or television reception, which can be determined by
turning the equipment off and on, the user is encouraged to try to correct the interference by one or
more of the following measures:
1. Reorient or relocate the receiving antenna.
2. Increase the separation between the equipment and receiver
3. Connect the equipment into an outlet on a circuit different from that to which the receiver is
connected.
4. Consult the dealer or an experienced radio/TV technician for help.
Warning: Changes or modifications to this unit not expressly approved by the party responsible for compliance
could void the user's authority to operate the equipment.
For Canada RSS-210 :
T
his device complies with Industry Canada Licence-exempt RSS-210. Operation is subject to the following two
conditions (1) this device may not cause interference, and (2) this device must accept any interference, including
interference that may cause undesired operation of the device.
T
o maintain compliance with the FCC/RSS-102's RF exposure guidelines, place the unit at least 20cm from nearby
persons.

Questions, problems, missing parts?
Before returning to the store, call Deant Customer Service
8 a.m.-7 p.m., EST, Monday-Friday, 9 a.m. - 6 p.m., EST, Saturday
1-866-308-3976
HOMEDEPOT.COM
Retain this manual for future use.
207910-01A
The Bluetooth® word mark and logos are registered trademaks owned by Bluetooth® SIG, Inc. and any use of such marks by HeathCo LLC is under
license. Other trademarks and trade names are those of their respective owners.
GRACIAS
Agradecemos la fe y la conanza que usted ha depositado en Deant al comprar esta luz de seguridad por
movimiento. Procuramos crear continuamente productos de calidad diseñados para mejorar su hogar. Visítenos en
internet para ver nuestra línea completa de productos disponibles que necesita para el mejoramiento de su hogar.
¡Gracias por escoger Deant!
GUÍA PARA EL USO Y CUIDADO
LUZ DE SEGURIDAD POR MOVIMIENTO
¿Tiene preguntas, problemas o piezas faltantes?
Antes de devolverlo a la tienda, llame a Servicio al Cliente de Deant
de 08 a.m.-7 p.m., EST, Lunes - Viernes, 09 a.m.-6 p.m., EST, sábado.
1-866-308-3976
HOMEDEPOT.COM
Articulo #1001318516
1001311061
Modelo #DFI-5985-BZ
DFI-5985-WH
Model # 5985
Serial # DFI-5985-BZ, DFI-5985-WH
16
Contenido
Contenido ................................................16
Información de seguridad ......................16
Garantía...................................................16
5 años de garantía limitada .................16
Antes de la instalación ...........................17
Planicación de la Instalación .............17
Especicaciones ..................................17
Herramientas Requeridas ....................17
Ferretería Incluida ................................18
Contenido del Paquete .........................18
Instalación ..............................................19
Operación ................................................21
Cuidado y limpieza .................................25
Análisis de averías .................................25
Información de seguridad
PRECAUCIONES
ƑPor favor lea y entienda todo este manual antes de
tratar de ensamblar, instalar u operar este aparato
de luz.
ƑEsta lámpara requiere una fuente de alimentación
de 20 voltios de CA.
ƑAlgunos códigos exigen que la instalación la realice
un electricista calicado.
ƑEste aparato de luz debe estar correctamente
conectado a tierra.
ƑPara que opere correctamente, este aparato de luz
debe ser:
ƑEsta lámpara debe ser instalada fuera de casa
sobre una pared o aleros.
ƑEsta lámpara debe ser instalada aproximadamente
a 8 pies (2,4 m) por encima del suelo. Si se la
instala a una altura más alta de la recomendada, se
reducirá la zona de cobertura si apunta el detector
hacia abajo.
ADVERTENCIA: Desconecte la energía eléctrica en el
disyuntor o en el fusible. Coloque cinta aislante sobre el
interruptor disyuntor y compruebe que no haya energía
eléctrica en el aparato de luz.
ADVERTENCIA: Riesgo de incendio. Mantenga los
cabezales de la lámpara por lo menos a 2 pulgadas (51
mm) de materiales combustibles.
PRECAUCIÓN: Peligro de quemaduras. Deje que el
aparato de luz se enfríe antes de tocarlo.
AVISO: No conecte este aparato de luz a un interruptor reductor de
luz ni a un temporizador.
ƑEste aparato cumple con la Parte 15 de las
Reglas de la FCC. La operación está sujeta a las
dos siguientes condiciones: (1) este aparato no
puede causar interferencias perjudiciales y (2)
este aparato debe aceptar cualquier interferencia
recibida, incluyendo una interferencia que pueda
causar un funcionamiento indeseado.
ƑCAN ICES-3 (B)/NMB-3(B)
Garantía
5 AÑOS DE GARANTÍA LIMITADA
LO QUE SE CUBRE
Se garantiza que este producto no tiene partes defectuosas de fábrica o de mano de obra por un período de 5 años
desde la fecha de compra. Se necesita el recibo de compra para todos los reclamos de garantía.
LO QUE NO SE CUBRE
Esta garantía no incluye el servicio de reparación, ajuste y calibración debido al mal uso, abuso o negligencia, o
LEDs. Los servicios no autorizados o las modicaciones hechas al producto o a cualquier componente invalidarán
esta garantía en su totalidad. Esta garantía no incluye reembolso por inconveniencia, instalación, tiempo de
instalación, perdida de uso, servicio no autorizado, o gastos de envío. Esta garantía no se extiende a otros equipos o
componentes que el consumidor usa junto con este producto.
Póngase en contacto con el personal de servicio al cliente al 1-866-308-3976 o visite el sitio www.homedepot.com.
17 HOMEDEPOT.COM
Por favor, póngase en contacto al 1-866-308-3976 para obtener más ayuda.
Antes de la instalación
PLANIFICACIÓN DE LA INSTALACIÓN
Antes de instalar el aparato de luz, esté seguro que estén todas las piezas. Compare las piezas con la Ferretería
incluida y las secciones de Contenidos del paquete. Si cualquier pieza falta o está dañada, no intente ensamblar,
instalar ni operar este aparato de luz.
Tiempo estimado para la instalación: 30 minutos
ESPECIFICACIONES
Alcance Hasta 70 pies (21,3 m) (Varía con la temperatura circundante)
Ángulo de detección Hasta 270°
Carga eléctrica - DEL 28 Vatios
Lúmenes 2350
Requisitos de la energía eléctrica 120 VCA, 60 Hz
Fases de operación Prueba, activado por movimiento, manual
Retardo de tiempo 1, 5, 20 minutos
Temporizador DualBrite Apagado, 3 horas, 6 horas, del crepúsculo al amanecer
Requisitos de los aparatos móviles iPhone 4S o más nuevo que usan iOS 7.x o posterior.
V4.3 Android o posterior.
El teléfono también debe tener Bluetooth® versión 4.0 o
posterior.
HERRAMIENTAS REQUERIDAS
Destornillador
phillips
Destornillador
de cabeza
plana de 1/8 de
pulgada
Peladores/
cortadores de
cables
Probador de
circuitos
Guantes de
trabajo
Sellador de
silicona
Escalera Gafas de
seguridad Aparato móvil
18
Antes de la instalación (continuación)
FERRETERÍA INCLUIDA
NOTA: La ferretería se muestra en su tamaño real
AA BB CC DD
EE
FF
FRONT
GG
HH
Pieza Descripción Cantidad
AA Tapón de caucho 1
BB Tornillo del soporte de montaje 2
CC Tornillo del soporte de montaje 2
DD Tornillo del soporte de montaje 2
EE Tornillo grande de montaje (pre-instalado) 1
FF Tornillo pequeño de montaje 1
GG Soporte de montaje (no está a escala) 1
HH Mini-destornillador 1
CONTENIDO DEL PAQUETE
Pieza Descripción Cantidad
A Cabezal de lámpara 2
B Artefacto de luz 1
C Detector de movimiento 1
D1-2- asy Connect™ (conexión rápida) 1
C
D
B
A
19 HOMEDEPOT.COM
Por favor, póngase en contacto al 1-866-308-3976 para obtener más ayuda.
Instalación
1 Determinación del sitio de
montaje
NOTA: Esta lámpara debe ser instalada aproximadamente
a 8 pies (2,4 m) por encima del suelo. Si se la instala a una
altura más alta de la recomendada, se reducirá la zona de
cobertura si apunta el detector hacia abajo.
ƑDetermine el sitio de montaje – pared o alero.
ƑColoque los cabezales de la lámpara (A) en
la dirección general de la cobertura de luz
deseada.
ƑSi es necesario, gire el detector de movimiento
(C) de forma que el texto quede hacia arriba.
Montaje
en alero
Montaje
en pared
2 Retiro del 1-2- asy Connect™
NOTA: Este dispositivo viene con un 1-2- asy Connect™
(D). Está premontado en la lámpara (B) para ser enviado.
NOTA: El tornillo de jación grande (EE) está pre-
instalado en la lámpara (B). No trate de quitar el tornillo
grande de montaje (EE).
ƑQuite el tornillo de jación grande (EE) que
conecta la lámpara (B) al 1-2- asy Connect ™
(D) y retire el 1-2- asy Connect ™ (D).
3 Instalación del soporte de
montaje
ADVERTENCIA: Desconecte la energía eléctrica en el
disyuntor o en el fusible. Coloque cinta aislante sobre el
interruptor disyuntor y compruebe que no haya energía
eléctrica en el aparato de luz.
NOTA: Se incluyen seis tornillos de varios tamaños para
el soporte de montaje. La instalación sólo requiere dos.
Deseche los tornillos del soporte de montaje no utilizados
luego de la instalación.
ƑRetire el aparato de luz existente.
ƑInstale el soporte de montaje (GG) con la
palabra estampada “FRENTE” en dirección
contraria a la caja de conexiones. Use los
tornillos del soporte de montaje (BB, CC o DD)
que mejor encajen con la caja de conexiones.
ƑHale con rmeza el soporte de montaje para
vericar que esté bien montado en la caja de
conexiones. Si es necesario, use los tornillos
que fueron retirados del aparato de luz anterior.
FRONT
FRONT
EE
D
B
BB, CC, or DD
GG
AC
20
Instalación (continuación)
4 Instalación del 1-2- asy
Connect™
ƑPase los cables de la caja de conexiones por el
oricio grande en la 1-2- asy Connect™ (D).
ƑColoque el 1-2- asy Connect™ (D) contra la
caja de conexiones.
ƑCuando la instale sobre una pared, la
echa “UP” (Hacia Arriba) debe apuntar
hacia arriba.
ƑCuando la instale sobre un alero, la echa
“UP” (Hacia Arriba) debe apuntar hacia el
edicio.
ƑInserte el perno de montaje pequeño (FF) por
el oricio del 1-2- asy Connect™ (D) situado
por debajo del oricio roscado, y enrósquelo en
el oricio central del soporte de montaje (GG).
Apriete el perno (FF) de forma segura.
ƑHale rmemente del 1-2- asy Connect™ para
vericar que está correctamente conectado al
soporte de montaje.
FRONT
N (White/
Blanc/Blanco)
GND
Ter re
Tierra
UP/Haut/Arriba
L (Black/
Noir/Negro)
UP/Haut/Arriba
5 Cómo hacer las conexiones
eléctricas
ƑInserte los cables de la caja de conexiones en
el lado del bloque de terminales y al rededor
del tornillo de tierra. Apriete los tornillos del
bloque de terminales utilizando el mini-
destornillador (HH) y el tornillo de tierra para
asegurar los cables.
ƑInserte el cable blanco de la caja de
conexiones en el terminal marcado “N
(White)”.
ƑInserte el cable negro de la caja de
conexiones en el terminal marcado “L
(Black)”.
ƑConecte el alambre desnudo o verde de
tierra de la caja de conexiones al tornillo
de tierra (marcado con “GND”).
N (White/
Blanc/Blanco)
GND
Terre
Tierra
UP/Haut/Arriba
L (Black/
Noir/Negro)
6 Montaje del aparato de luz
AVISO: Las dos clavijas de la parte posterior de la lámpara se deben
insertar en el bloque de terminales para que la luz funcione.
ƑAlinee el borde inferior de la lámpara (B) con
el borde inferior de la 1-2- asy Connect™
(D) e incline la lámpara (B) hacia la 1-2- asy
Connect™ (D). Asegúrese de que la lámpara (B)
esté centrada en el 1-2- asy Connect™ (D).
ƑApriete el tornillo de jación grande (EE) de
forma segura a través del centro del 1-2- asy
Connect™ (D). No apriete excesivamente.
ƑEmpuje con fuerza el tapón de caucho (AA)
en el oricio del perno de montaje de la
lámpara(B).
EE
AA
D
B
D
D
FF
GG
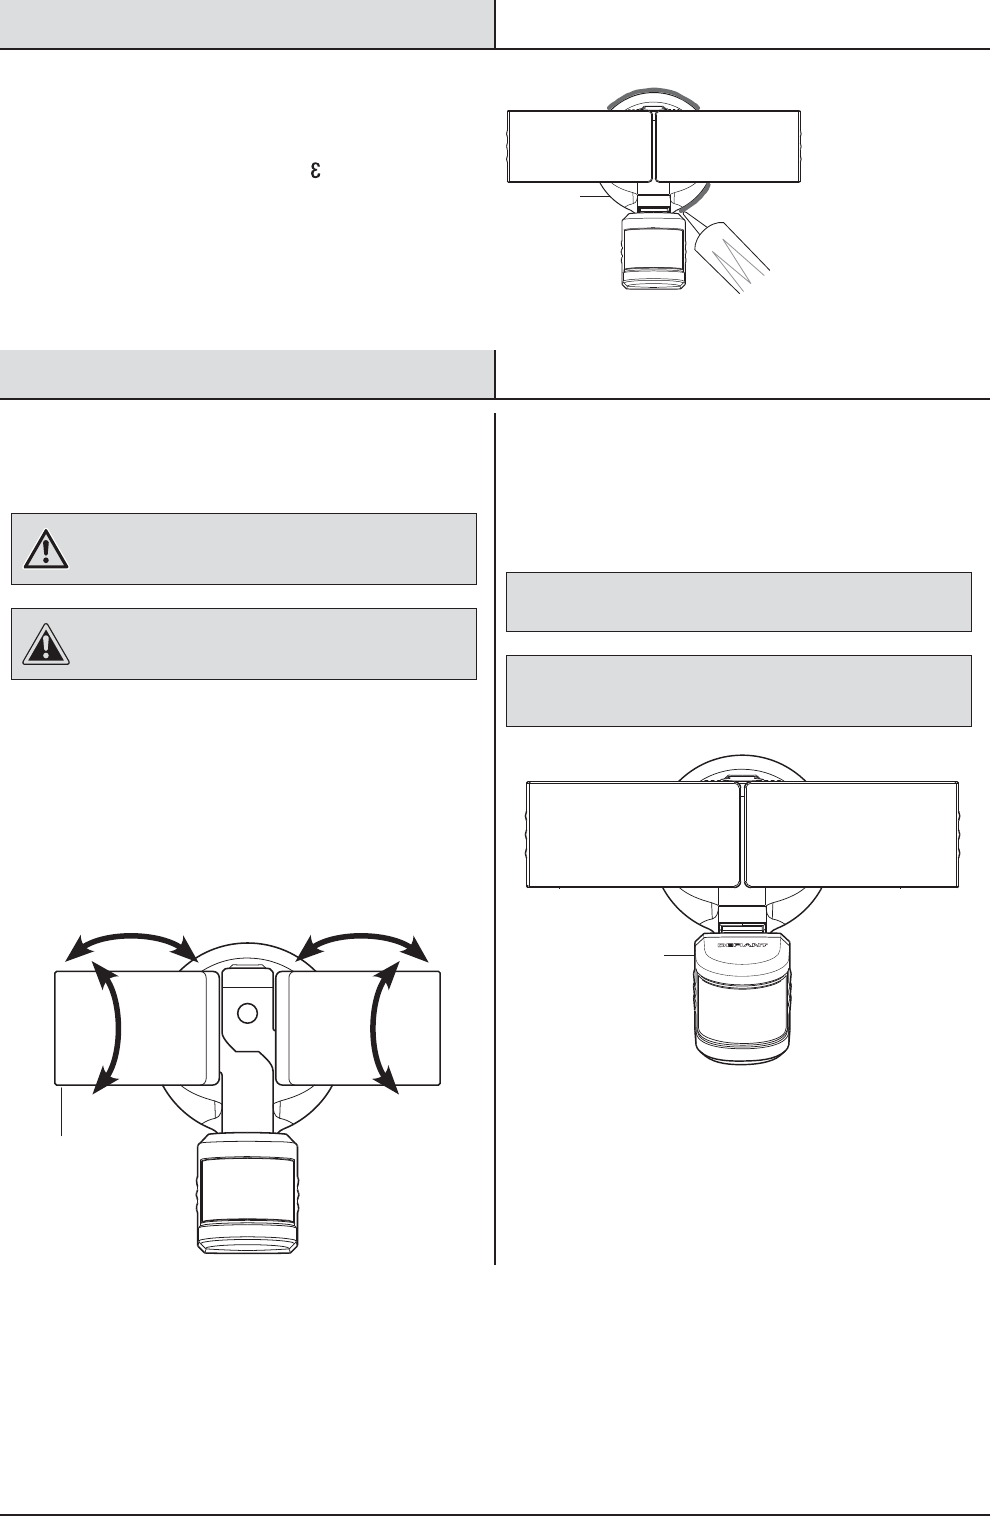
21 HOMEDEPOT.COM
Por favor, póngase en contacto al 1-866-308-3976 para obtener más ayuda.
Instalación (continuación)
7 Calafatee alrededor del aparato
de luz
ƑCalafatee alrededor del 1-2- asy Connect™
(D) y de la supercie de montaje con un
sellador de silicona contra la intemperie (no
incluido).
Operación
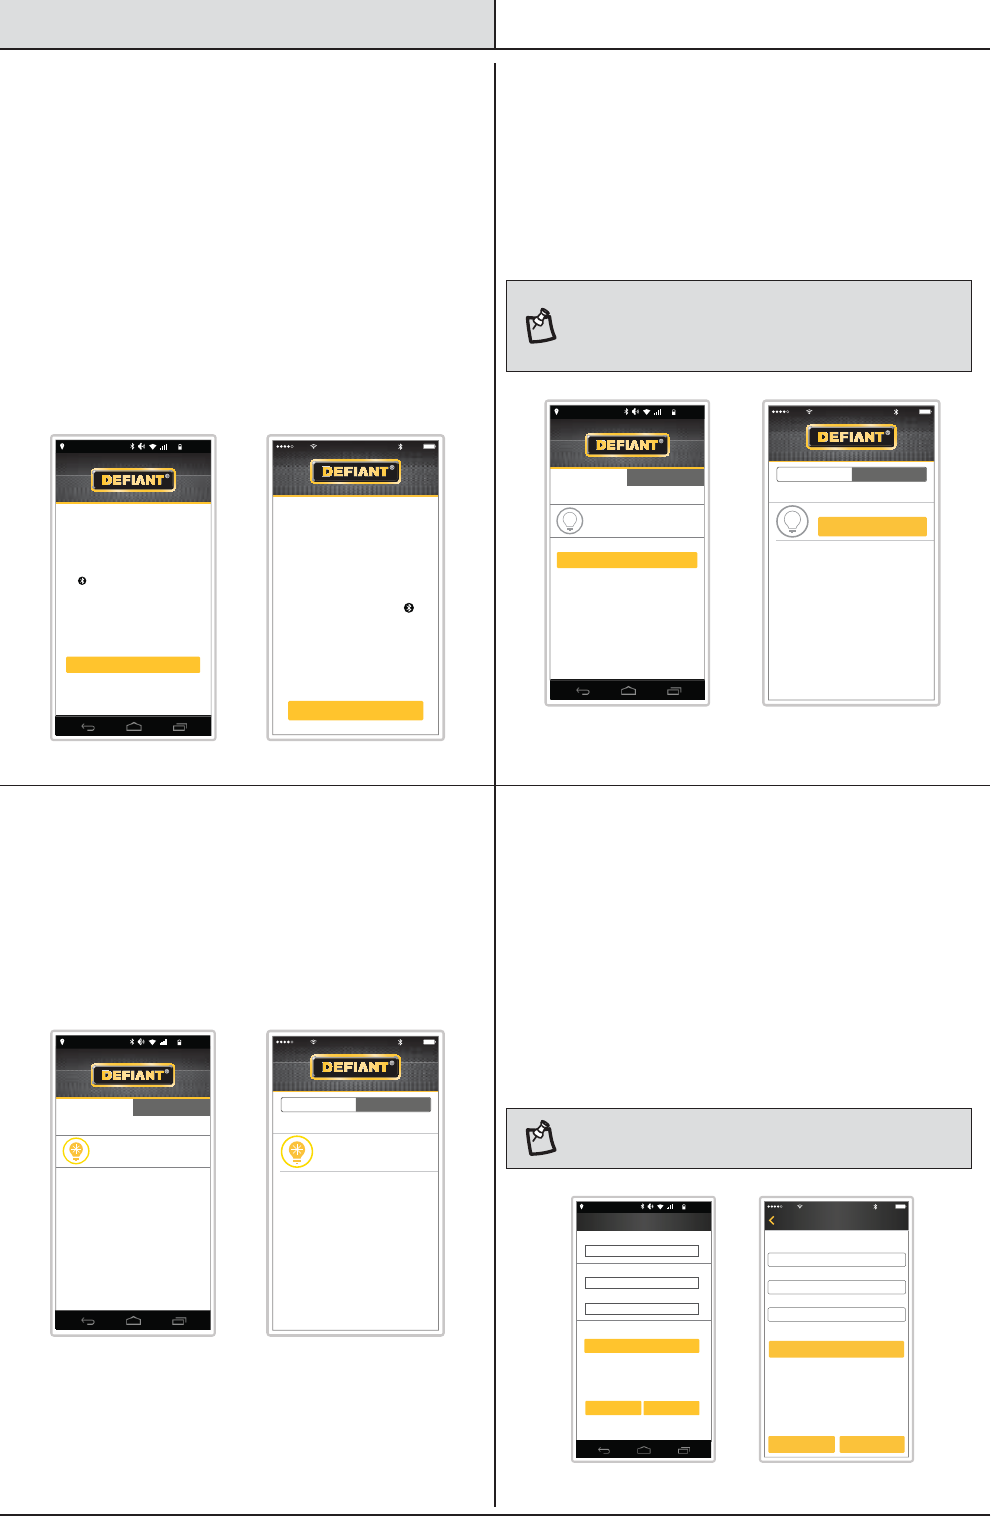
1 Ajuste de los cabezales de la
lámpara
ADVERTENCIA: Riesgo de incendio. Mantenga los
cabezales de la lámpara por lo menos a 2 pulgadas (51
mm) de materiales combustibles.
PRECAUCIÓN: Mantenga los cabezales de la lámpara
30° debajo de la línea horizontal para evitar daños por
agua y descargas eléctricas.
ƑConecte la energía eléctrica en el disyuntor
o en el fusible y encienda el interruptor de la
pared.
ƑSi es necesario, sujete suavemente los
cabezales de la lámpara (A) e inclínelos hacia
arriba o hacia abajo o de lado a lado para
ajustar el área de cobertura de la luz.
2 Giro hacia abajo de los
controles del detector
ƑGire el detector de movimiento (C) de modo
que el texto quede hacia arriba.
AVISO: Todos los espacios libres deben ser mantenidos. Vea
Información sobre seguridad en la página 14.
AVISO: La aplicación móvil Deant debe ser descargado para hacer
funcionar la lámpara. Vea el paso 3 en la página 22 para ver las
instrucciones.
270°
THIS SIDE UP
D
C
A
22
Operación (continuación)
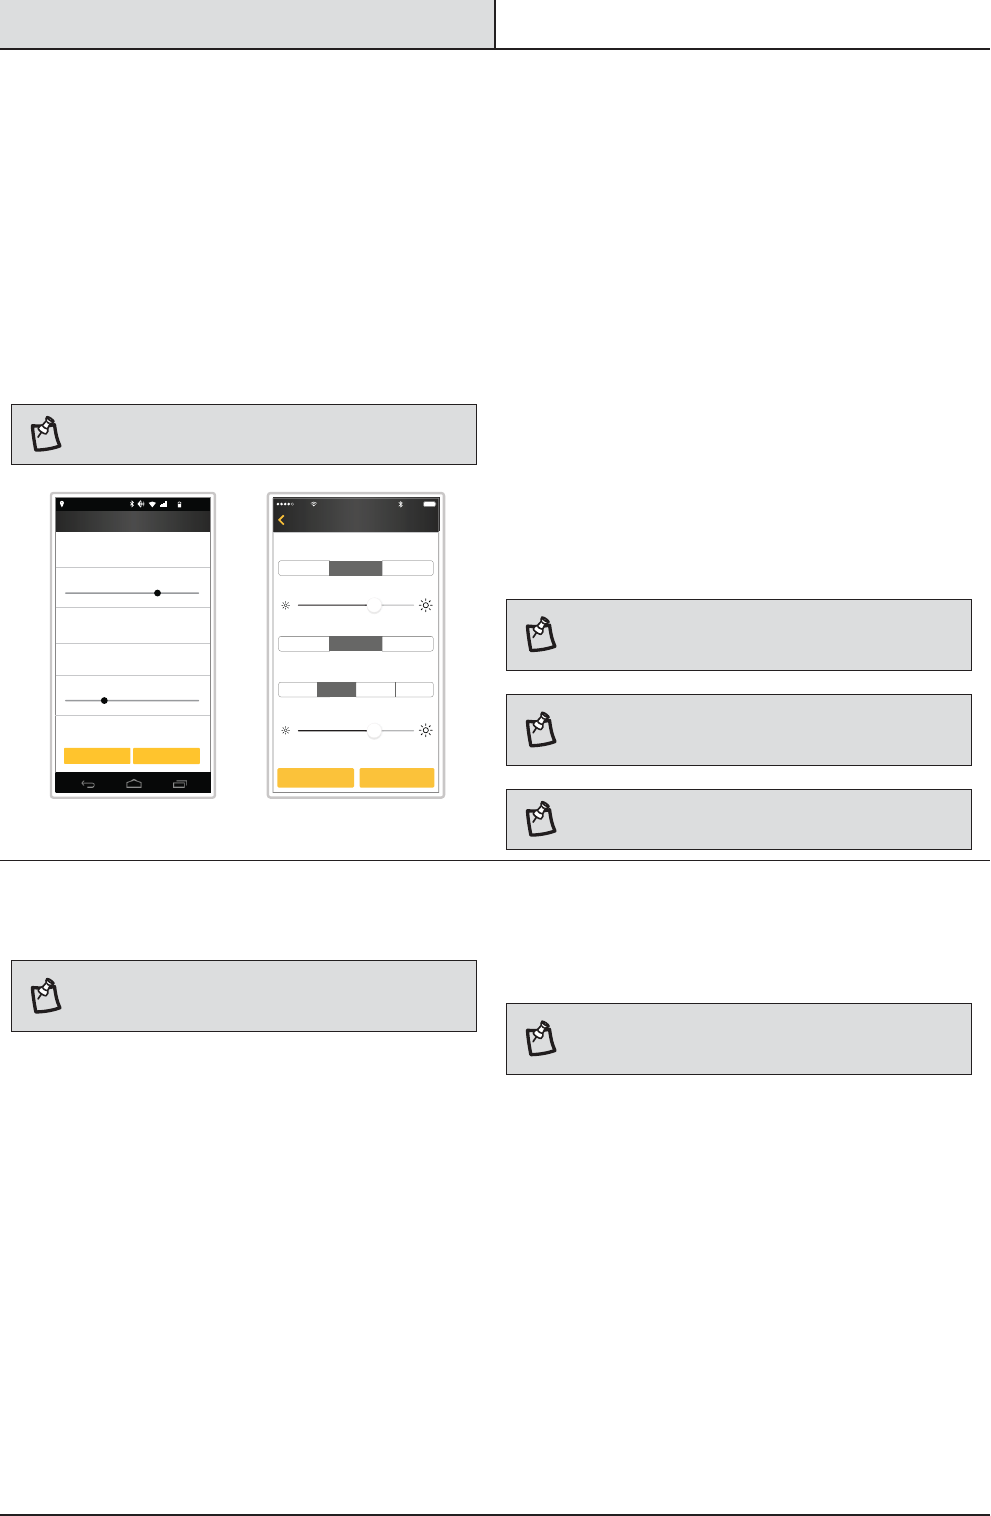
1 Descargando la aplicación
móvil de Defiant®
ƑDescargue la aplicación móvil Deant® de la
tienda de aplicaciones de Apple® o de Android®
(busque “Deant”).
ƑActive el Bluetooth® en los ajustes del
aparato.
ƑAbra la aplicación Deant y toque “Comenzar”
(“Begin”).
Configuring your light settings with a mobile
device requires Bluetooth connectivity.
Before proceeding, ensure your mobile device’s
Bluetooth is turned on. The Bluetooth indicator
icon should appear somewhere on the screen.
If it does not, go into your mobile device’s Settings
menu and turn it on.
TURN ON BLUETOOTH
Begin
7:15 AM
68%
Configuring your light settings with
a mobile device requires Bluetooth
connectivity.
Before proceeding, ensure your
mobile device’s Bluetooth is turned
on. The Bluetooth indicator icon
should appear somewhere on the
screen. If it does not, go into your
mobile device’s Settings menu and
turn it on.
TURN ON BLUETOOTH
Begin
ATT 100 %9:25 PM
Android iOS
2 Emparejando la luz a la
aplicación móvil
ƑAsegúrese que la alimentación a la luz esté
PRENDIDA (ON).
ƑToque “Escanear luces” para buscar las luces
existentes.
NOTA: Durante el proceso de escaneo, la aplicación
localizará TODAS las luces Bluetooth® en la zona. Las
luces anteriormente emparejadas a otros dispositivos
deben ya tener un nombre.
Scan for lights
SELECT A LIGHT
No lights configured
7:15 AM
68%
My Lights All My Lights All
Scan for lights
SELECT A LIGHT
No lights configured
ATT 100 %9:25 PM
Android iOS
3 Comenzando el proceso de
emparejamiento
La nueva luz se mostrará en un círculo amarillo lo que
indicará que no está emparejada.
ƑToque la nueva luz para comenzar el proceso
de emparejamiento.
SELECT A LIGHT
New Light
7:15 AM
68%
My Lights All My Lights All
SELECT A LIGHT
ATT 100 %9:25 PM
New Light
Android iOS
4 Terminado el proceso de
emparejamiento
ƑToque “Set Up” (“Congurar”) y escriba un
nombre y una contraseña para la luz (la
contraseña debe ser de 4 a 6 caracteres
alfanuméricos).
ƑToque sea “Guardar” para continuar o “Añadir
foto” para añadir una imagen opcional (la foto
puede ser una foto existente o se puede tomar
una nueva foto de la luz).
NOTA: No se mostrará una vista previa de la luz hasta
que se toque el botón “Guardar”.
Set Up
7:15 AM
68%
Cancel Save
Add Photo
Please create a password
Password
Enter name
Name This Light
Verify password
Verify Password
Add Image
ATT 100 %9:25 PM
Set UpBack
Name This Light
Password
Verify Password
Add Image
Add Photo
Cancel Save
Please create 4 character password
Android iOS
23 HOMEDEPOT.COM
Por favor, póngase en contacto al 1-866-308-3976 para obtener más ayuda.
Operación (continuación)
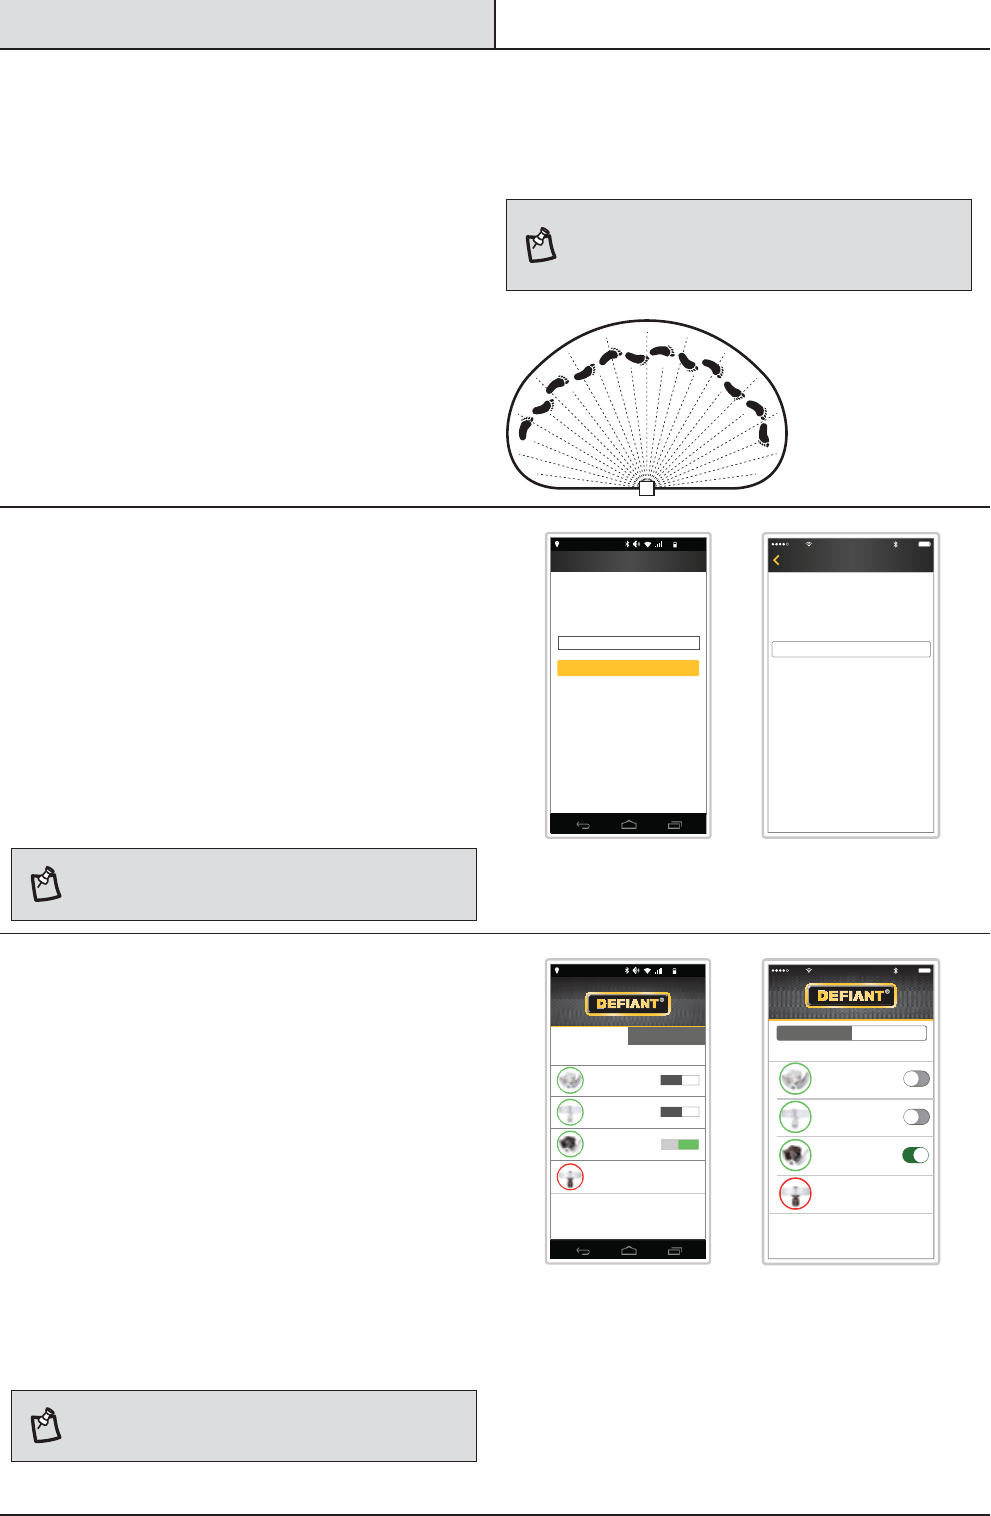
5 Ajuste de la configuración de
la luz
Después que la luz esté emparejada con la aplicación
móvil, el círculo amarillo alrededor de la luz se
cambiará a verde.
ƑToque el icono de la luz.
ƑToque “Conguración” para ajustar los
controles de la luz.
ƑToque “Guardar” luego de haber hecho todos
los ajustes. La instalación está completa.
NOTA: Los cambios hechos en la conguración de una
luz no afectarán la conguración de otra luz.
Settings
7:15 AM
68%
Cancel Save
ON time
5 minutes
Sensitivity
Medium
DualBrite time
3 hours
Full ON brightness level
DualBrite dimming level
75%
25%
ATT 100 %
9:25 PM
SettingsPorch
ON Time: 5 Minutes
Full ON Brightness Level: 85%
Sensitivity: Medium
DualBrite Dimming Level: 25%
Cancel Save
20 Minutes1 Minute 5 Minutes
HighLow Medium
DualBrite Time: 3 Hours
Dusk to Dawn6 HoursOff 3 Hours
Android iOS
La opción “ON-TIME” (“DURACIÓN”) determina la
cantidad de tiempo que la luz permanecerá encendida
“a un nivel de brillo total”, después que todo
movimiento se ha detenido.
La opción “Nivel de brillo total” determina el nivel de
brillo de la luz después que la luz se ha encendido por
un movimiento.
La opción “Sensibilidad” aumenta y disminuye el
tamaño de la zona de detección.
La opción “DUALBRITE” determina la cantidad de
tiempo que las luces permanecen encendidas a un
nivel de luz reducido después de la puesta del sol.
Si cambia este ajuste a “OFF” no afectará el ajuste
“ON-TIME”.
La opción “nivel de atenuación DUALBRITE” determina
el nivel de brillo de la luz del nivel de luz reducida
después de la puesta del sol.
NOTA: Cuanto mayor sea el ajuste de “Sensibilidad”,
mayor es la posibilidad de falsas alarmas. Para reducir las
falsas alarmas, seleccione un ajuste más bajo.
NOTA: El ajuste “anochecer al amanecer” mantiene las
luces encendidas a un cierto nivel desde el atardecer
hasta el amanecer.
NOTA: Si la opción “DUALBRITE” está en OFF, el cambio
del nivel de atenuación no tendrá ningún efecto en la luz.
6 Calibración del detector para
prueba
NOTA: La lámpara funcionará durante el día o la noche
durante la prueba. La luz permanecerá encendida 8
segundos después que todo movimiento se ha detenido.
La lámpara entrará automáticamente en la modalidad
“Prueba” siempre que se cambie la opción
“Sensibilidad”. La lámpara se quedará en “Test” hasta
que ocurra una de las siguientes acciones:
ƑSe seleccione la opción “Guardar” o “Cancelar”.
ƑNo hay movimiento por 30 segundos durante el
proceso de prueba.
ƑHan pasado tres minutos sin cambiar ninguna de
las conguraciones en pantalla.
ƑFije la opción “DUALBRITE” a la posición
“OFF”.
ƑFije la opción “Sensibilidad” a la posición
“LOW”.
NOTA: El detector de movimiento necesitará calentarse
completamente (60 segundos) antes de empezar el
proceso de puesta a punto.
24
Operación (continuación)
7 Regulación de la zona de
detección del detector de
movimiento
ƑHaga una “prueba caminando”: camine
transversalmente a la parte frontal del detector de
movimiento (C) siguiendo la trayectoria de un arco.
ƑObserve la luz. La luz se encenderá y el LED
rojo destellará indicando que se ha detectado
movimiento.
ƑDeténgase, espere que la luz se apague, y
luego empiece a caminar de nuevo.
ƑContinúe este proceso hasta que la zona de
detección haya sido establecida.
ƑSi es necesario, sujete suavemente el detector
de movimiento (C) y muévalo de lado a lado o
de arriba hacia abajo para ajustar la zona de
detección.
NOTA: El detector de movimiento (C) es más sensible al
movimiento transversal a la parte frontal del detector. El
detector de movimiento (C) es menos sensible al movimiento
que se dirige directamente hacia la parte frontal del detector.
8 Añadiendo dispositivos
móviles adicionales
Se pueden añadir dispositivos móviles adicionales
para controlar el aparato de luz.
ƑEn el nuevo dispositivo siga los pasos 3 y 4
anteriores.
ƑDespués de escanear las las luces, seleccione
la pestaña “Todas”.
ƑToque la luz deseada en la pantalla y escriba la
contraseña anterior denida por el usuario.
NOTA: Los ajustes de la luz y el nombre se almacenan
en el aparato de luz. La foto de luz deberá ser añadida
por separado.
This light is configured on another
smartphone
Enter the light’s password to gain normal
access:
Password
7:15 AM
68%
Deck
Next
ATT 100 %9:25 PM
DeckBack
Password
This light is configured on
another smartphone
Enter the light’s password to gain
normal access:
Next
Android iOS
9 Uso del la fase manual
La modalida manual anula el sensor de movimiento
(C) y el control “ON TIME” así que la luz funcionará
al nivel preseleccionado de “nivel de brillo total”.
Esta característica funciona solamente en la noche
y solamente una noche a la vez. El detector de
movimiento (C) vuelve a ponerse en la fase detección
del movimiento al salir el sol.
ƑDeslice hacia la derecha el interruptor
“sobrecontrol manual”.
ƑPara poner de nuevo la luz a su conguración
original, deslice el interruptor hacia la
izquierda.
NOTA: Si la energía eléctrica al aparato de luz es
apagada por más de 5 segundos, deje que el detector de
movimiento se caliente antes del cambio a la fase manual.
My Lights All
SELECT A LIGHT
Side Door
Garage Front
Porch
Deck
OFF
OFF
Manual
Override
7:15 AM
68%
ON
ATT 100 %
9:25 PM
SELECT A LIGHT
Side Door
Garage Front
Porch
Deck
My Lights All
Manual
Override
Android iOS
25 HOMEDEPOT.COM
Por favor, póngase en contacto al 1-866-308-3976 para obtener más ayuda.
Operación (continuación)
10 Restablecimiento de la
lámpara a los ajustes de
fábrica
Si se olvida la contraseña, se puede restablecer la
lámpara a los ajustes originales de fábrica.
ƑToque el icono de la luz.
ƑToque “Restaurar valores predeterminados en
fábrica”.
ƑSiga las instrucciones de la pantalla para
restaurar todos los ajustes de la luz a la
conguración original de fábrica.
7:15 AM
68%
Porch
Cancel
Settings
Rename Light
Restore Factory Defaults
Settings
Rename Light
Restore Factory Defaults
ATT 100 %
9:25 PM
PorchBack
Cancel
Android iOS
Cuidado y limpieza
ƑPara prolongar la apariencia original, limpie la lámpara solo con agua limpia y un paño suave y húmedo.
ƑNo use pinturas, solventes ni otros químicos en este aparato de luz. Podrían ser la causa de una prematura
deterioración del acabado. Esto no es un defecto del acabado y no será cubierto por la garantía.
ƑNo rocíe la lámpara con una manguera o lavadora a presión.
Análisis de averías
Problema Causa Probable Solución
La luz no se enciende. ƑEl interruptor de la luz está apagado. ƑEncienda el interruptor de la luz.
ƑEl fusible está quemado o el disyuntor
está desconectado.
ƑCambie el fusible o conecte el
disyuntor.
ƑEl apagado de la luz diurna (fotocélu-
la) está vigente.
ƑVuelva a revisar al amanecer.
ƑEl cableado del circuito es incorrecto
(si esta es una instalación nueva).
ƑVerique que el cableado esté
correcto.
ƑEl detector de movimiento está enfo-
cando a la dirección incorrecta.
ƑVuelva a enfocar el detector de
movimiento para que cubra el área
deseada.
ƑLa temperatura del aire exterior está cer-
cana al calor corporal de una persona.
ƑAumente el ajuste de “Sensibili-
dad”.
La luz se enciende duran-
te el día.
ƑEl detector de movimiento puede estar
instalado en un sitio relativamente oscuro.
ƑEl aparato de luz está operando normal-
mente bajo estas circunstancias.

26
Problema Causa Probable Solución
La luz se enciende sin
razón aparente.
ƑEl detector de movimiento puede
estar detectando pequeños animales
o tráco automotor.
ƑReduzca el ajuste de “Sensibilidad”
o cambie la posición del detector
de movimiento.
ƑEl ajuste “Sensibilidad” es demasiado
alto.
ƑReduzca el ajuste de “Sensibili-
dad”.
ƑEl ajuste “DUALBRITE” está progra-
mado para 3 horas, 6 horas, o del
anochecer hasta el amanecer.
ƑEl aparato de luz está operando
normalmente bajo estas circuns-
tancias.
ƑLa temperatura exterior está más ca-
liente o más fría que el calor corporal
de una persona (verano o invierno).
ƑReduzca el ajuste de “Sensibili-
dad”.
ƑEl aparato de luz está cableado a
través de un reductor de luz o de un
temporizador.
ƑNo use un reductor de luz o un tem-
porizador para controlar el aparato
de luz. Cambie el reductor de luz o
el temporizador por un interruptor
de pared estándar de encendido/
apagado.
Las luces se apagan dema-
siado tarde en la calibración
crepúsculo-al-amanecer.
ƑEl aparato de luz puede estar instala-
do en un sitio relativamente oscuro.
ƑVuelva a ubicar el aparato de luz
o utilice la calibración 3 horas o 6
horas.
Las luces permanecen
encendidas constante-
mente.
ƑEl detector de movimiento puede estar
absorbiendo calor de una fuente de calor
como una ventosa de aire, una secadora
de aire, o una supercie pintada con
colores brillantes y que reeja el calor.
ƑReduzca el ajuste de “Sensibilidad”
o cambie la posición del detector
de movimiento.
ƑEl detector de movimiento está en la
fase manual.
ƑApague la opción de modalidad
manual. Vea Uso de la fase manual
en la página 24.
ƑEl aparato de luz está cableado a
través de un reductor de luz o de un
temporizador.
ƑNo use un reductor de luz o un
temporizador para controlar el
aparato de luz. Cambie el reductor
de luz o el temporizador por un
interruptor de pared estándar de
encendido/apagado.
ƑEl aparato de luz está en el mismo
circuito que un motor, transformador
o tubo uorescente.
ƑInstale el aparato de luz en un cir-
cuito sin motores, transformadores
o tubos uorescentes.
Las luces se encienden y
se apagan.
ƑEl calor o la luz de los cabezales de la
lámpara pueden prender y apagar al
detector de movimiento.
ƑVuelva a colocar los cabezales de
la lámpara lejos del detector de
movimiento.
ƑEl calor reejado desde otro objeto
puede estar encendiendo y apagando
al detector de movimiento.
ƑReduzca el ajuste de “Sensibilidad”
o cambie la posición del detector
de movimiento.
La lámpara no responde a
la aplicación Deant.
ƑEl Bluetooth® no está encendido. Ƒ“ACTIVE” (“ON”) el Bluetooth® en
la conguración del aparato.
Análisis de averías (continuación)

27 HOMEDEPOT.COM
Por favor, póngase en contacto al 1-866-308-3976 para obtener más ayuda.
Análisis de averías (continuación)
Problema Causa Probable Solución
La aplicación Deant no
encuentra la lámpara.
ƑEl Bluetooth® no está encendido. Ƒ“ACTIVE” (“ON”) el Bluetooth® en
la conguración del aparato.
La aplicación Deant no
enciende la lámpara.
ƑLa alimentación a la luz está apagada. ƑEncienda la alimentación a la luz.
ƑEl Bluetooth® no está encendido. Ƒ“ACTIVE” (“ON”) el Bluetooth® en
la conguración del aparato.
NOTE: Cet équipement a été testé et déclaré conforme aux limites d'un dispositif numérique de
classe B, conformément à la partie 15 des règles de la FCC. Ces limites sont conçues pour fournir
une protection raisonnable contre les interférences nuisibles dans une installation résidentielle. Cet
équipement génère, utilise et peut émettre de l'énergie radiofréquence et, se il ne est pas installé
et utilisé conformément aux instructions, peut causer des interférences nuisibles aux
communications radio.
Cependant, il ne est pas garanti que des interférences ne se produiront pas dans une installation
particulière. Si cet équipement provoque des interférences nuisibles à la réception radio ou de
télévision, ce qui peut être déterminé en mettant l'équipement hors et sous tension, l'utilisateur est
encouragé à essayer de corriger l'interférence par une ou plusieurs des mesures suivantes:
1. Réorienter ou déplacer l'antenne de réception.
2. Augmenter la séparation entre l'équipement et le récepteur
3. Branchez l'appareil dans une prise sur un circuit différent de celui sur lequel le récepteur est
branché.
4. Consulter le revendeur ou un technicien radio / TV expérimenté.
A
vertissement: Les changements ou modifications de cette unité non expressément
approuvés par la partie responsable de la conformité pourraient annuler l'autorité de
l'utilisateur à utiliser l'équipement.
Pour le Canada RSS-210;
Cet appareil est conforme avec Industrie Canada, exempts de licence RSS-210. Son
fonctionnement est soumis aux deux conditions suivantes (1) ce dispositif ne doit pas
causer d'interférences et (2) cet appareil doit accepter toute interférence, y compris les
interférences qui peuvent causer un mauvais fonctionnement de l'appareil.
Pour maintenir la conformité avec les directives d'exposition aux RF de la FCC / RSS-102, placez
l'appareil au moins 20 cm des personnes à proximité.

¿Tiene preguntas, problemas o piezas faltantes?
Antes de devolverlo a la tienda, llame a Servicio al Cliente de Deant
de 08 a.m.-7 p.m., EST, Lunes - Viernes, 09 a.m.-6 p.m., EST, sábado.
1-866-308-3976
HOMEDEPOT.COM
Guarde este manual para uso futuro.
207910-01A
La marca Bluetooth® y sus logotipos son marcas comerciales registradas propiedad de Bluetooth® SIG, Inc. y cualquier uso de dichas marcas por
HeathCo LLC está hecho bajo licencia. Otras marcas comerciales y nombres comerciales pertenecen a sus respectivos propietarios.