Hisense Electric LCDD0008 Part15 Subpart B-LCD TV User Manual W9HLCDD0008 1
Hisense Electric Co., Ltd. Part15 Subpart B-LCD TV W9HLCDD0008 1
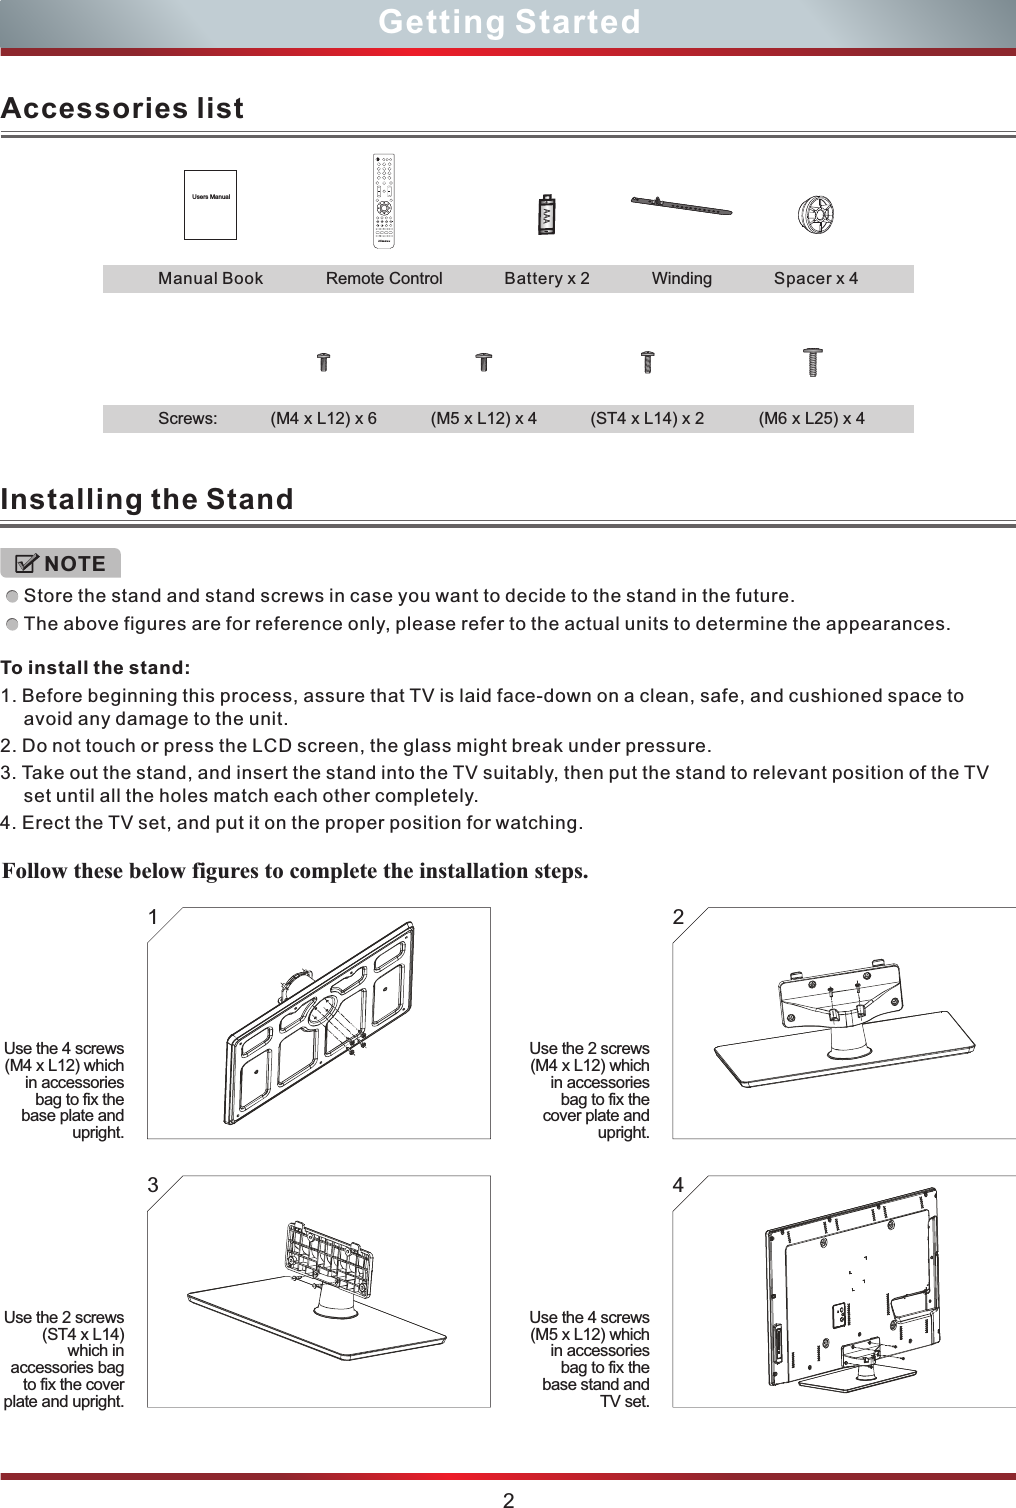
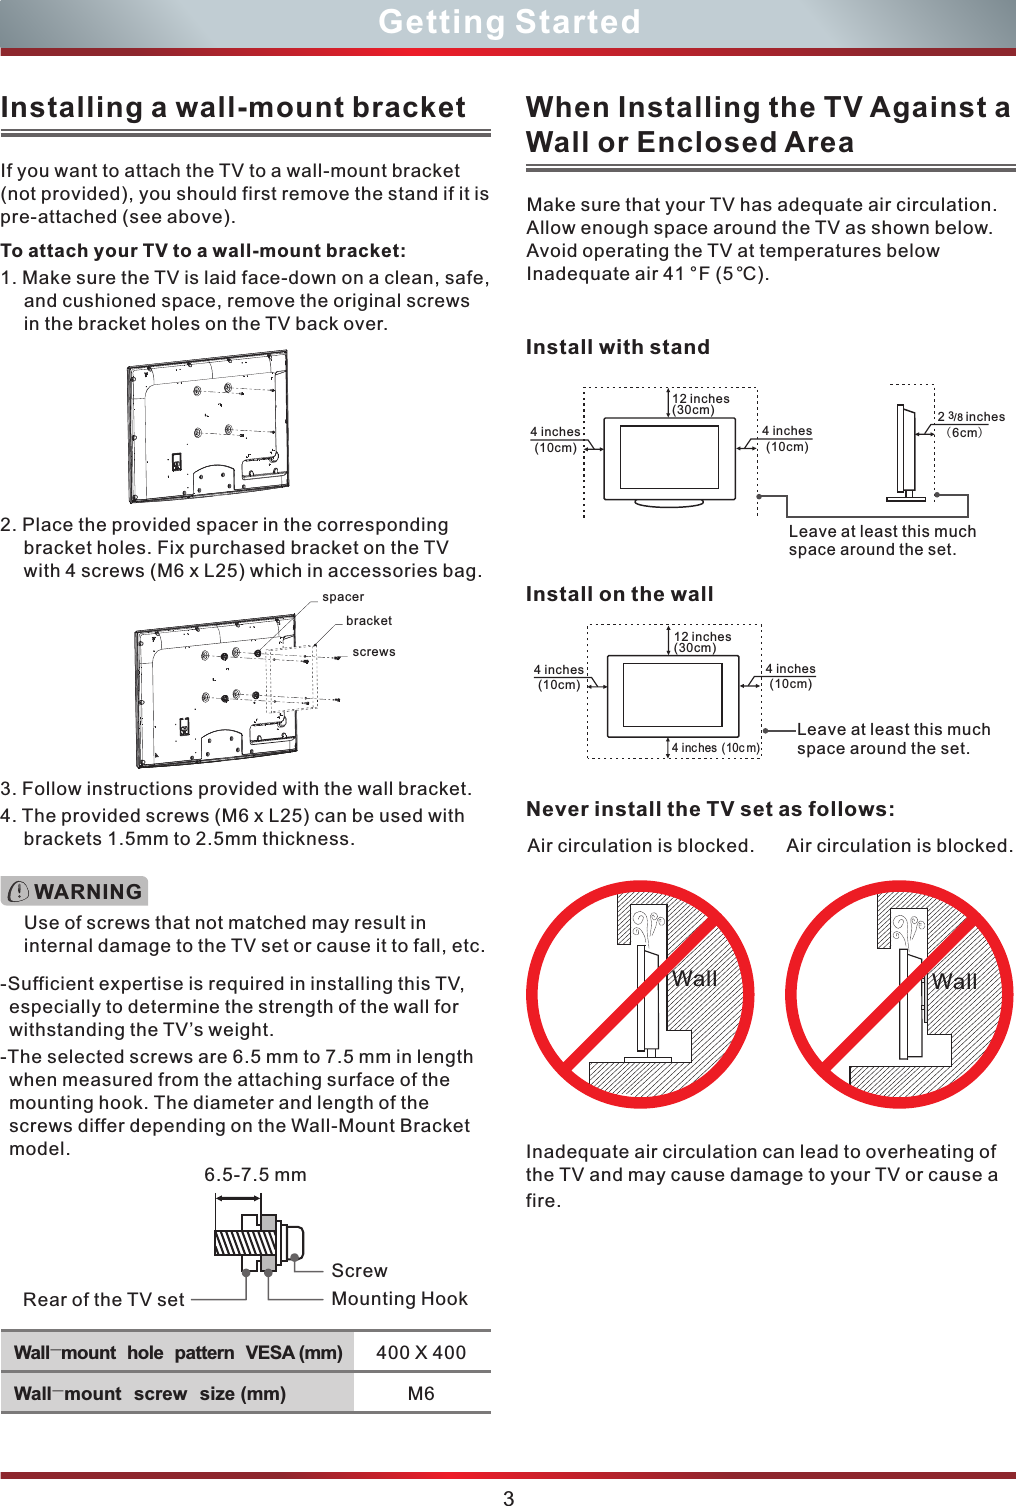
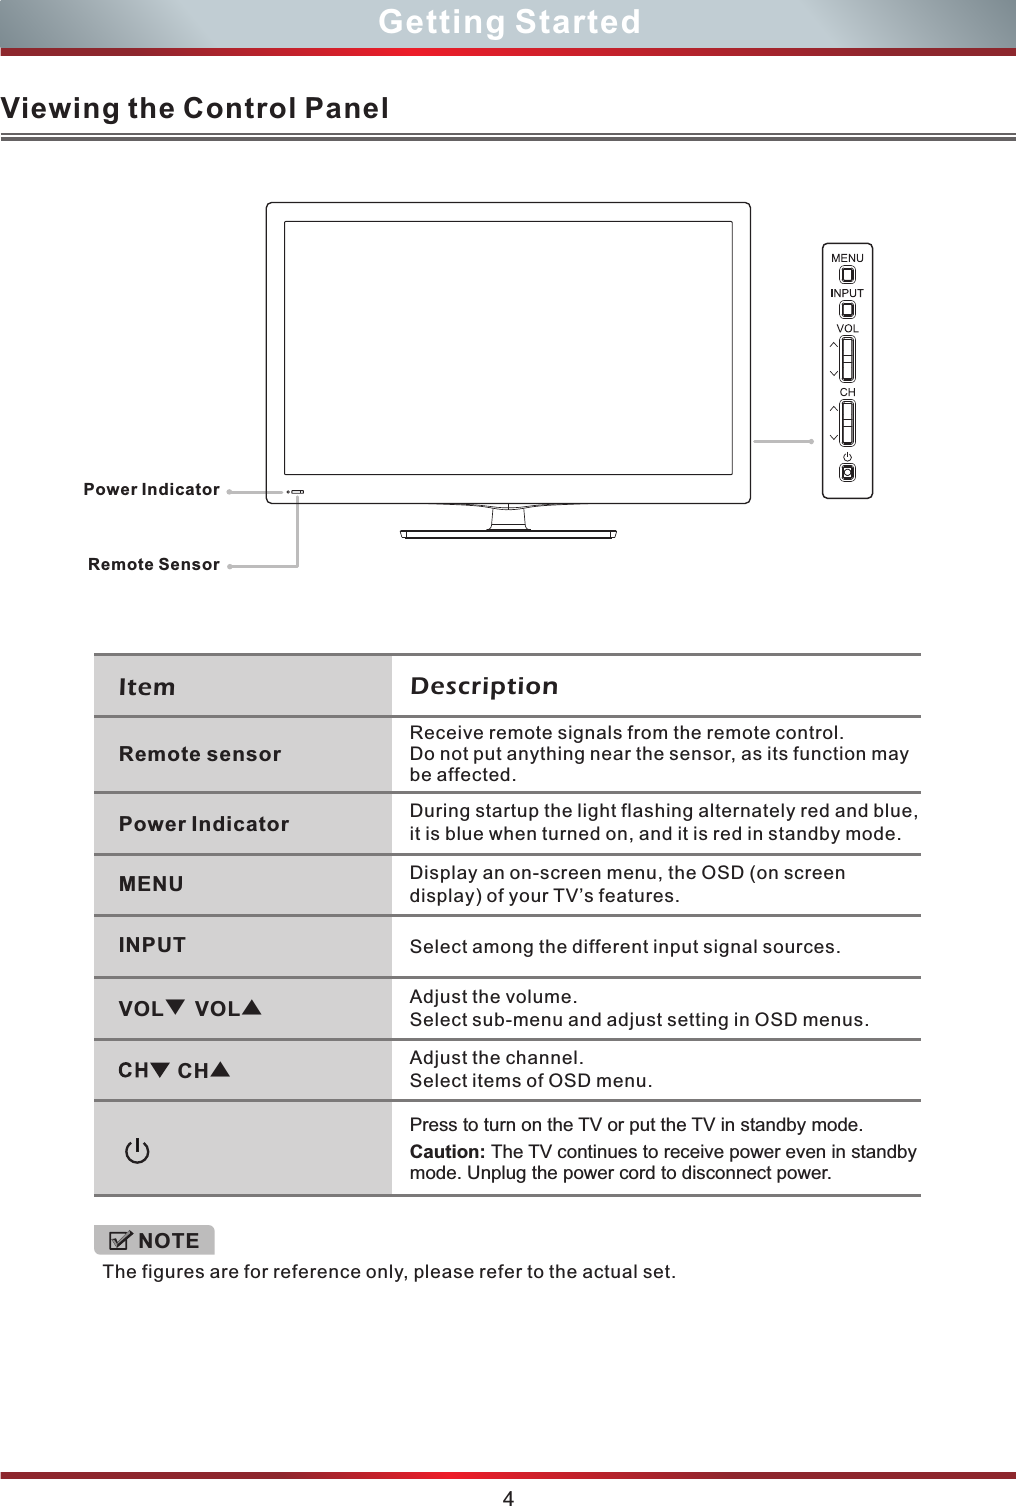
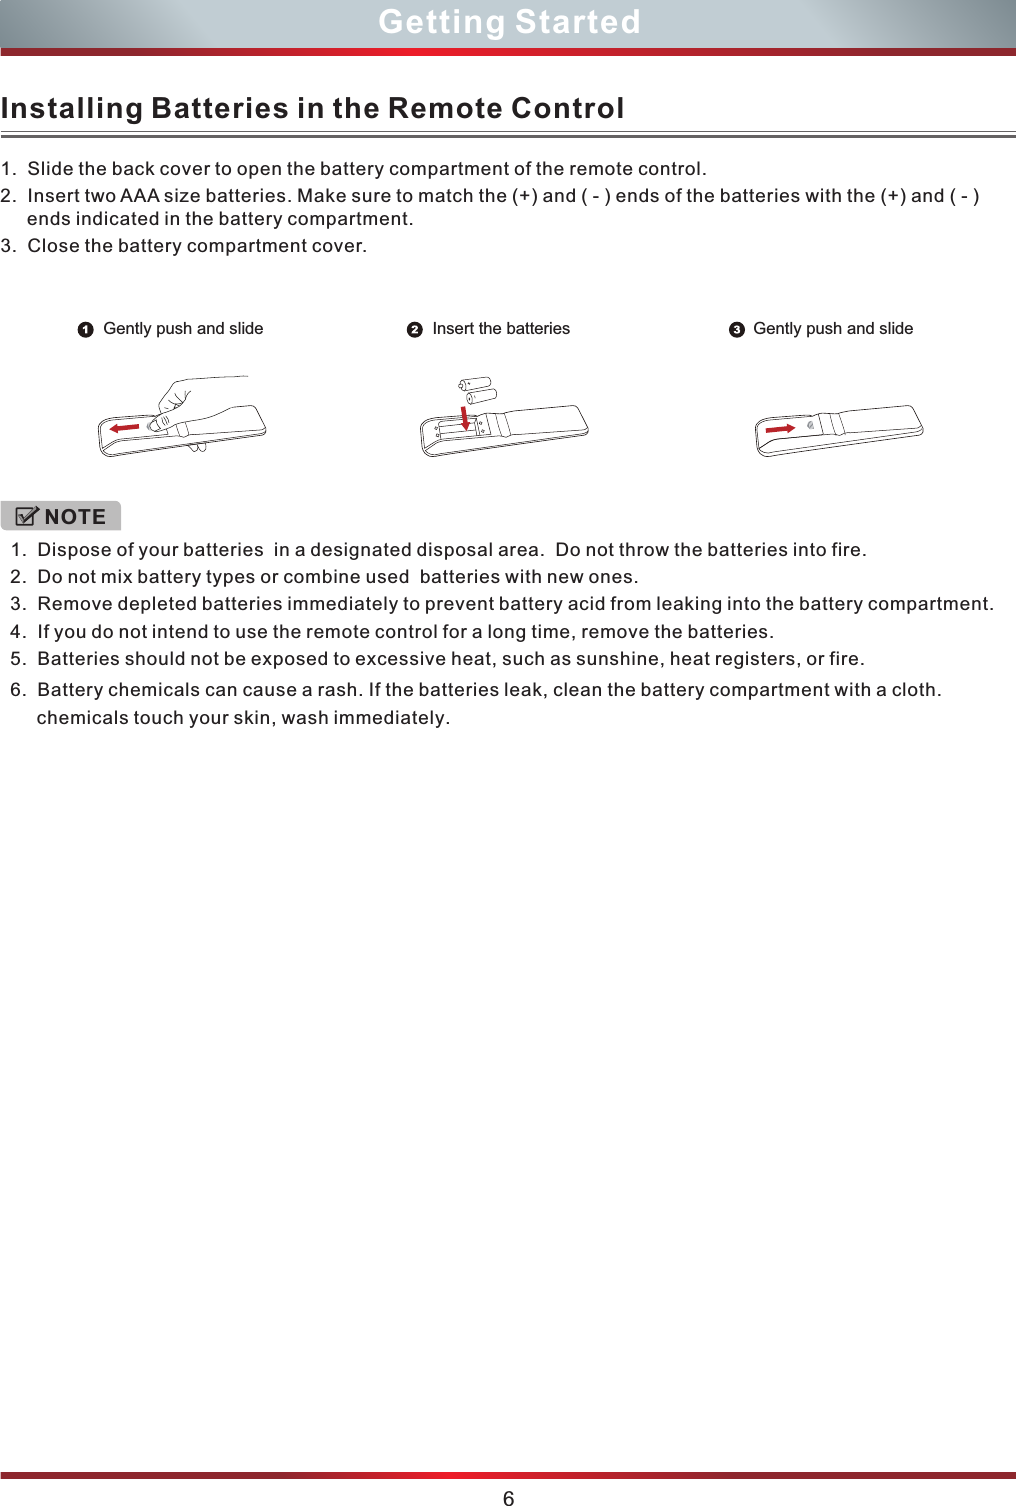
Contents
- 1. W9HLCDD0008_User Manual 1
- 2. W9HLCDD0008_User Manual 2
- 3. W9HLCDD0008_User Manual 3
W9HLCDD0008_User Manual 1


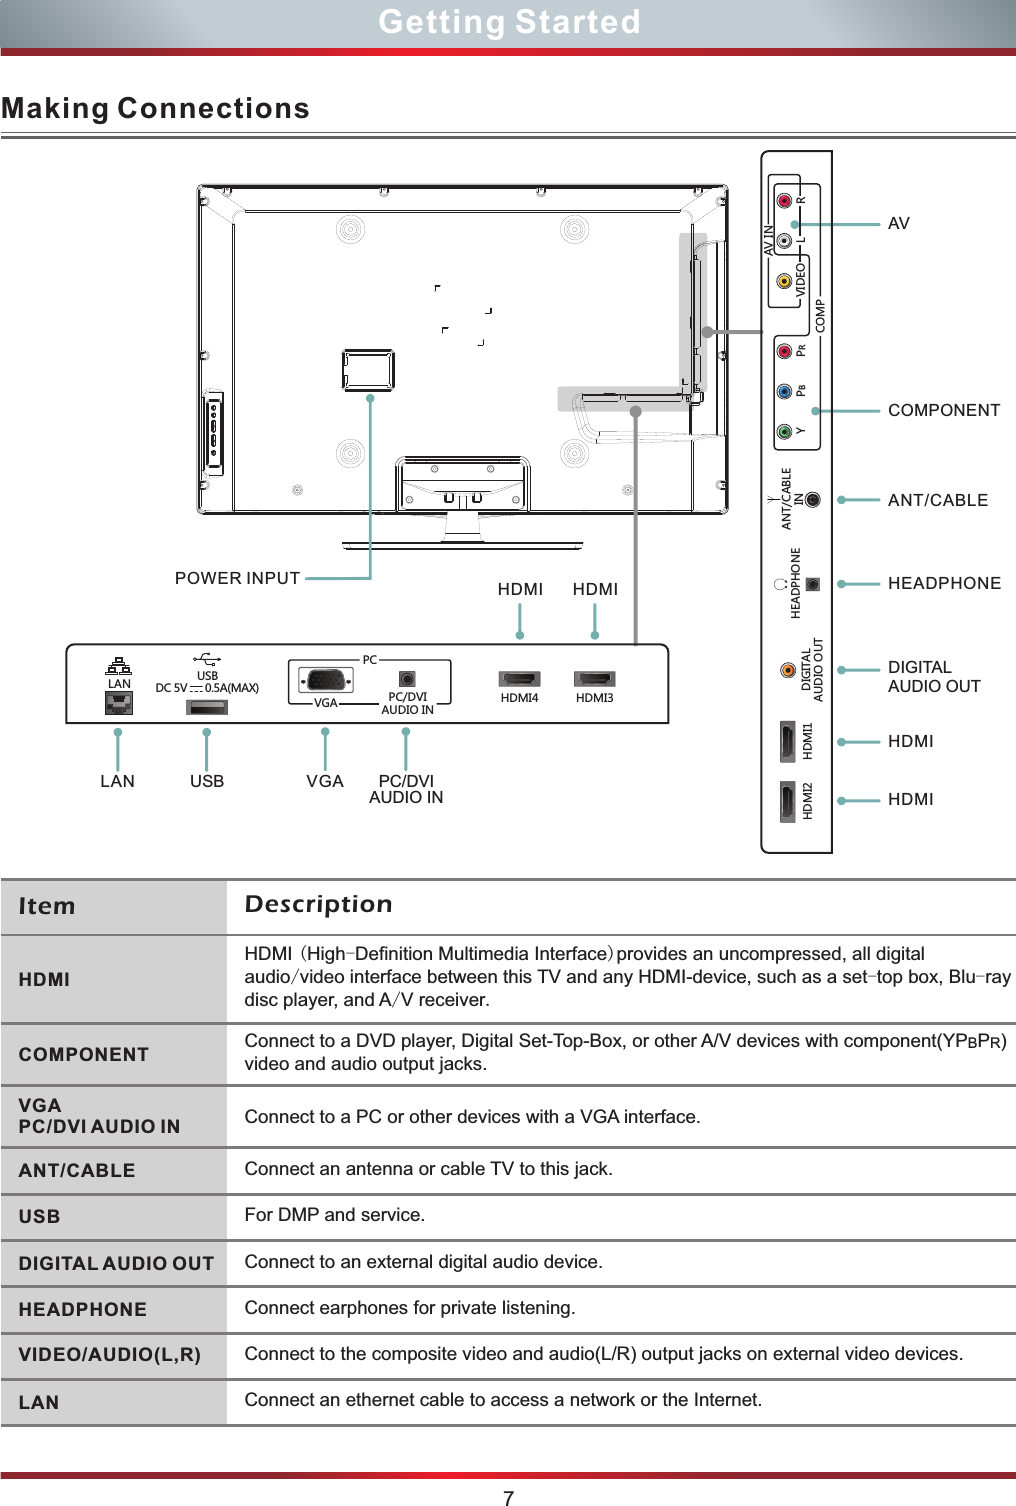
![Viewing the Remote control 1. Illustrations are for your reference only.2. Red/Green/Yellow/Cyan buttons are used for EPG.After pressing the [GUIDE] button when viewing digital channels, the same color buttons will appear with explanations in the on-screen display (OSD). Follow the steps shown in the OSD.NOTE5Getting StartedSelect input sourceDisplay the information bannerSelect sound modeSelect picture mode/ / /Move Up/Down/Left/Rightor adjust settings Confirm selectionsSpecial function buttonsSelect AV Component VGA sourceHDMI Media content control function buttonsSet the sleep timerAudio select buttonMono/Stereo/SAP operationZoom ButtonAdjust CC mode Open the DTV program guide(if available)Power on/offDirect channel selectionMute buttonNext channelEnter the network main menuEnter the NETFLIX interfaceEnter the vudu main menuPower IndicatorPrevious channelReturn to the upper menu Increase VolumeDecrease VolumeMenu buttonClose the menuDisplay the favorite channel listGo to the previous channel Dash buttonSelect a digital sub-channelENTER4A](https://usermanual.wiki/Hisense-Electric/LCDD0008.W9HLCDD0008-User-Manual-1/User-Guide-1505764-Page-10.png)

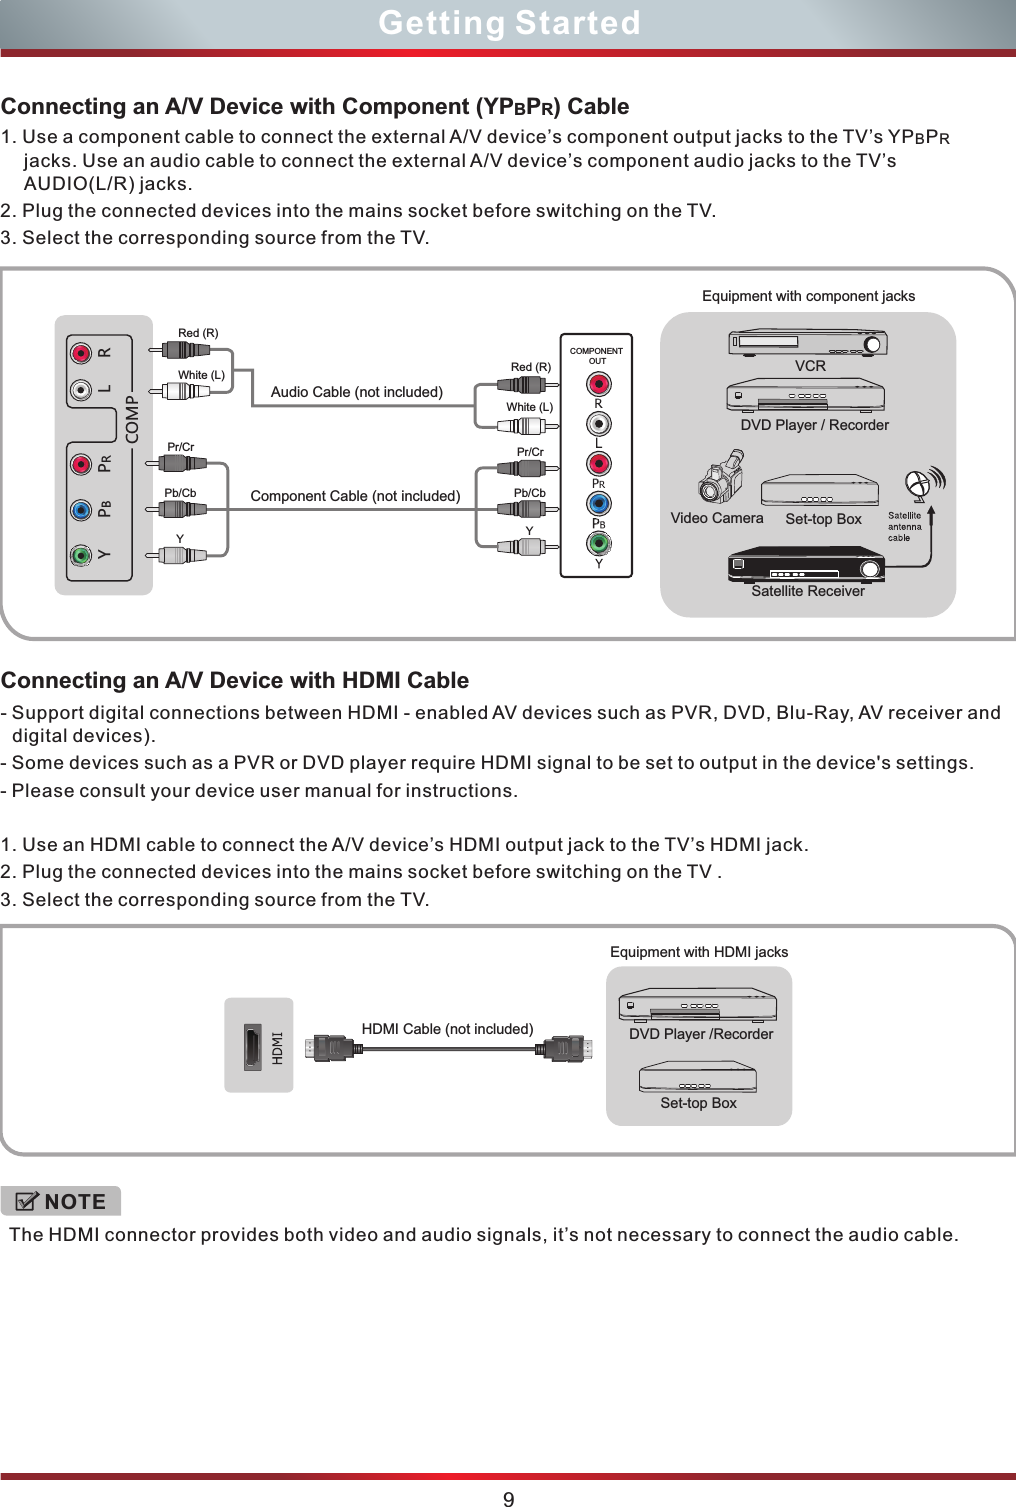
![The Setup Wizard menu appears the first time you turn on the TV. It will assist you to specify the menu language, time zone, picture mode, tuner mode and channel installation.Turning the TV On for the First TimeTurning your TV on or offTo turn your TV on or off (standby mode):1. Plug the power cord into an AC power outlet.2. Press [POWER] button. Your TV turns on. 3. Press [POWER] button again to turn off your TV. When you turn off your TV, it goes into standby mode.NOTEIf your TV does not receive an input signal for several minutes, it automatically goes into standby mode. When your TV is in standby mode, it is still receiving power. To completely disconnect power, unplug the power cord.WARNINGThe first time you turn on your TV, you must select the TV signal source. Your TV stores this information, so you do not need to change the TV signal source unless it changes. For example, you change from an outside antenna to cable TV.To select the video input source:1. Turn on your TV, then press [INPUT] button on the remote or on the TV. The Input Source menu opens.2. Press [ / ] button to highlight the input source, then press [ENTER] button. 11Basic FeaturesSelecting the Input SourceV1. Press [CH ] button on the remote control, you can change the channels. (Press [VOL ] button to raise or lower the volume).2. Press [CH ]button on the back panel of the TV set, you can also change the channels.(Press [VOL ] button to raise or lower the volume).3. Press the numeric buttons on the remote control to display the corresponding channels. / VV / V / / Changing the channels can also be achieved by directly pressing the programme No. If you want to choose the programme No. from 1 to 9, press the numeric buttons directly. If you want to select a programme No. that double-digit or three-figure, the time between twice pressing the numbers should not be more than 3 seconds. NOTEChanging Channels/ VolumeIMPORTANT: Make sure that the antenna or cable connection is made. 1. Make sure that you have:Installed the remote control batteries.Connected an antenna or cable.Connected the power cord.2. Press [POWER] ( ) to turn on your TV. The Setup Wizard menu displays.3. Press [ / ] to select your menu language: English, Spanish or French, press [ENTER] button to confirm.4. Press [ / ] to select your picture mode: Home Mode or Retail Mode, press [ENTER] button to confirm.5. Press [ / ] to select your tuner mode: Antenna or Cable, press [ENTER] button to confirm. 6. Press [ / ] to set the channel installation: Scan or Skip Scan, press [ENTER] button to confirm. If you select “Scan”, your TV automatically starts Channel Installation available in your viewing area. If you select “Skip Scan”, your TV does not scan for channels.Depending on the reception condition, it may take up to 25 minutes or more to complete memorizing channels. Please allow the process to complete without interruption.Please connect cable or antennaChannel InstallationStatus: Scanning...ATV Program Installed:3DTV Program Installed:2Cancel20%EXITSelectEnterENTERExitMENUTVAVComponentVGAHDMI1HDMI2HDMI3HDMI4DMPINPUT](https://usermanual.wiki/Hisense-Electric/LCDD0008.W9HLCDD0008-User-Manual-1/User-Guide-1505764-Page-16.png)
![Aspect - Select the screen aspect ration from Normal, Wide, Zoom and Cinema.Normal: The original 4:3 aspect ratio (1.33:1 signal) is preserved, so black bars are added to the left and right of the image. Standard TV broadcasts are displayed with a 4:3 aspect ratio.Wide: When watching a standard broadcast or full-frame movie in this mode, the display image is stretched proportionately to fill the TV screen. When watching a widescreen (1.78:1 signal) program or movie, the display image fills the TV screen.Zoom: Stretch the 4:3 aspect ratio image vertically and horizontally to fill the screen at 1:1.78 aspect ratio.Cinema: Stretch the 4:3 aspect ratio image vertically and horizontally to fill the screen at 1:2.35 aspect ratio. Shortcuts Instructions12Getting StartedVUDU - VUDU™ is an on-demand service that offers high-definition movies on the Web. You can access the VUDU service by press this button. HICAST@ - Press to browse the rich Apps in HICAST Dock. The Apps in the HICAST Dock let you watch movies, TV shows, listen to music,and much more.Favorite List345-15-25-3AT05-1AT05-2AT05-3Add/Erase Page up/down11:00 PM - 2:00 AMNot Rated Service1 EnglishAntennaStereo480p SDAT05-4AT05 480p(No program details.)5-411:10 PM5-3 611:00 PM - 2:00 AM Wed, 8-Jun(No program details.)Not Rated5-4 AT05-4Wednesday, 8-June-2011 11:10:00PMNext DayTodayTomorrowTomorrowTomorrow11:00 PM2:00 AM5:00 AM8:00 AMAT05 480pAT05 480pAT05 480pAT05 480pNETFLIX - Open the Netflix interface. Netflix is an online DVD and Blu-ray Disc rental service, offering rental-by mail and streaming instantly to Netflix members.Fav. - D add or delete Cursor up/down: Press Add/Erase: Press [YELLOW] button to add or delete the channel from Favorite List.Page up/down: Press [RED/GREEN] button to turn the page up or down. DISPLAY - DGUIDE - Open the DTV program guideisplay your Favorite List. You can channels to create your favorite list. isplay the information banner. The information including channel number, channel name, current system time, tuner mode, audio stream, video format, audio language, closed caption mode, parental locks rated, program details, etc.. The program guide information is provided by the broadcasting company. [ / ] button to select the option.](https://usermanual.wiki/Hisense-Electric/LCDD0008.W9HLCDD0008-User-Manual-1/User-Guide-1505764-Page-17.png)
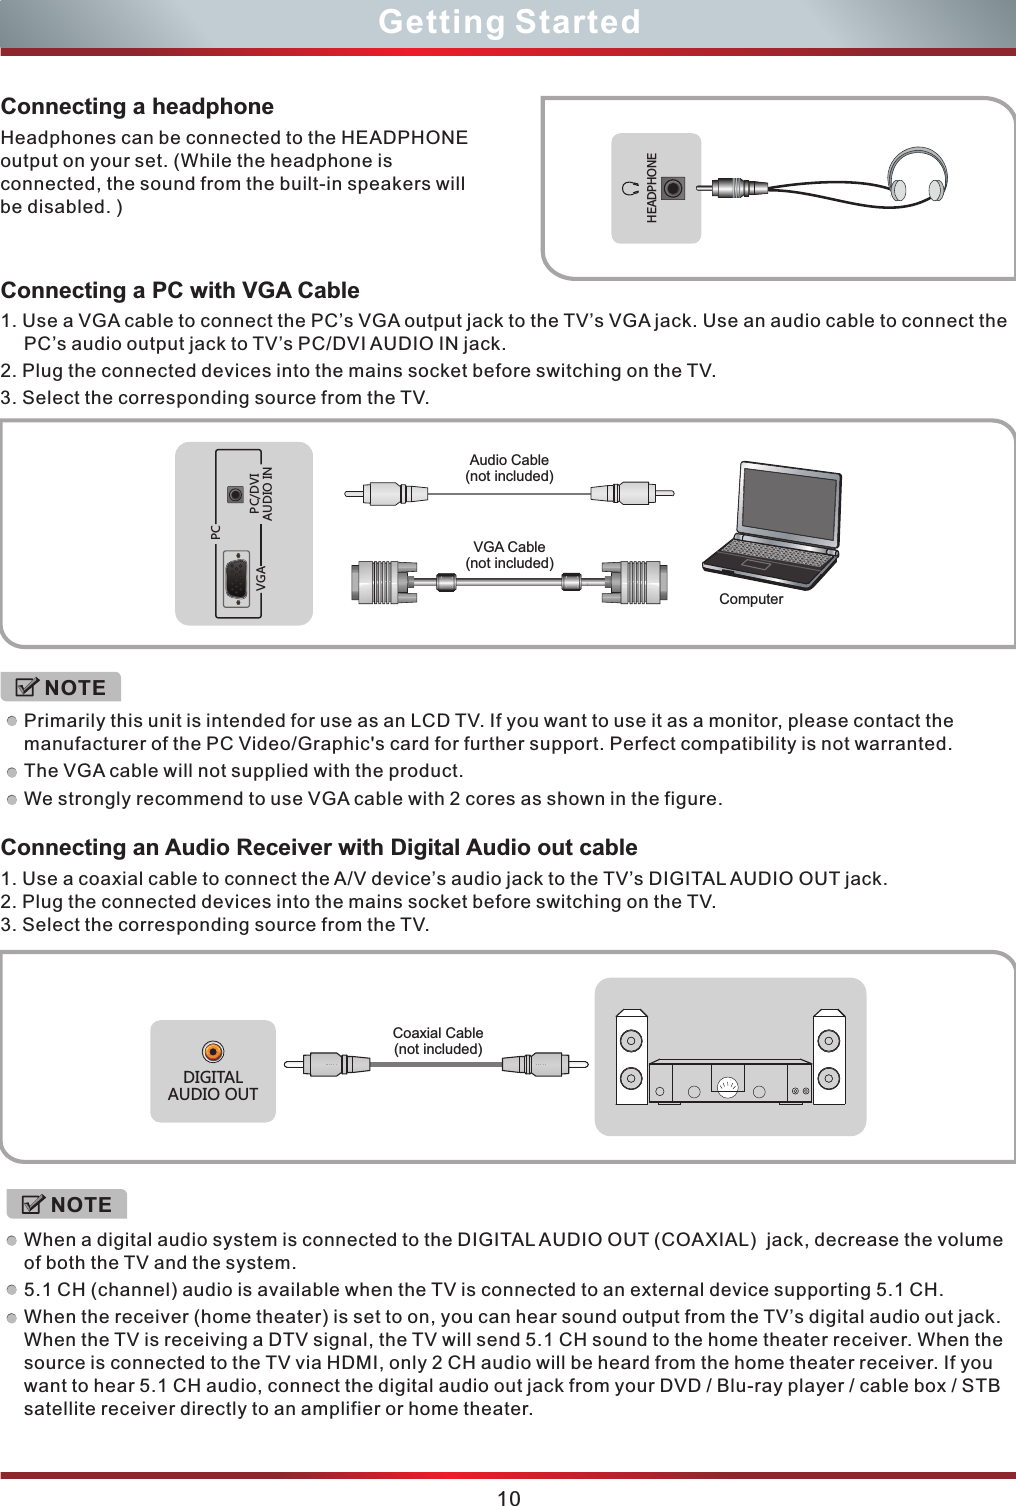
![To Use the MenuUsing the Picture Menu You can adjust: 13Basic FeaturesPicture Mode - Adjust the Picture Mode. You can select: Energy Saving, Sports, Custom, Vivid, Standard or Theater.Brightness - You can increase or decrease the brightness of the picture. Increasing the brightness can add more light to dark areas of the picture, while decreasing the brightness can add more darkness to light areas of the picture.Contrast - You can increase or decrease the contrast of the picture. Increase the contrast to adjust the white areas of the picture or decrease the contrast to adjust the black areas of the picture. Color - Adjust the level of color in the picture.Tint - Adjust flesh tones so they appear natual.Sharpness - You can increase the sharpness level for clearer images or decrease the sharpness level for smoother images.Advanced Video - Access advanced video settings such as Color Temperature, Noise Reduction and Adaptive Contrast.Color Temperature: Change the color temperature. You can select the color temperature from three options: Cool, Standard and Warm.Noise Reduction: It can optimize the picture signal from time and space; reduce the outside noise interference and return the pure initial signal. It has four ratings: Off, Low, Medium and High.Adaptive Contrast: According to the content of picture, it can adjust contrast automatically.1234Press the [MENU] button to open the main menu.Press the to select a menu option, then press the to enter the menu.In the menu, you can: press the to select an item, press the to adjust the value, or press the [ /ENTER] to enter a submenu.Press the [MENU] button to return to the previous menu or press the [EXIT] button to exit the menu. [ / ] button[ /ENTER][ / ][ / ]The menus in the user’s manual may vary slightly from the actual screen.NOTEPicturePicture Mode Energy SavingBrightnessContrastColorTintSharpnessAdvanced Video455550100Select BackMENUSound Mode - Select the Sound Mode: Standard, Speech, User or Music.Balance - Equalizer - Adjust the volume of the left and right speakers.Weaken or enlarge the sound of the main frequency points.Using the Audio Menu You can adjust: AudioSound Mode MusicBalanceEqualizerSound SurroundSPDIF TypeAuto Volume ControlOffPCMOff0Select BackMENUAudio10DB0DB-10DB5 0 0 2 4120Hz 500Hz 1.5KHz 5KHz 10KHzSelectAdjust BackMENUNOTEAdjust for NTSC signal reception in DTV mode.](https://usermanual.wiki/Hisense-Electric/LCDD0008.W9HLCDD0008-User-Manual-1/User-Guide-1505764-Page-18.png)
![Tuner Mode - Select TV source: Antenna or CableAuto Channels Search - Scan for Channels that have signals and stores the channels information in the channel list.Channel Skip - You can Favorite List - Add or delete MTS - Select the default audio stream: Mono, Stereo or SAP.Mono: If there is noise or static on weak stereo broadcasts.Stereo: For programs broadcast in stereo.SAP: To listen to a secondary audio program. Audio Language - Select the audio language: English, Spanish or French.cancel a channel stored in the channel list.channels to create a favorite list. You can press [FAV] button to display your Favorite List..Auto ScanStatus: Scanning...Analog Channels: 0Digital Channels: 0AntennaBackMENU15%14Basic FeaturesUsing the Screen MenuNOTEOnly available in VGA mode.Sound Surround - SPDIF Type - Enhance the surround sound and bass sound effects.Send digital audio to an external audio system. You can select PCM, RAW or Off.PCM: PCM is an encoding, mainly used for analog signal, Dolby mainly used for digital signal.RAW: When the data stream carries Dolby signal, digital audio outputs Dolby data stream. When the data stream carries no Dolby signal, it transports PCM data stream. Auto Volume Control - According to different audio signal, it can adjust volume automatically.H.Position - V.Position - Phase - Clock - Auto Adjust - Move the image right or left.Move the image up or down.Adjust the focus of stable images.Adjust the sample frequency.It can adjust the image settings such as position and phase automatically. You can adjust: You can adjust: EnterENTERScreenH.PositionV.PositonPhaseClockAuto Adjust41270127Select BackMENUUsing the Channels MenuEnterENTERChannelsTuner ModeAuto Channel SearchChannel SkipFavorite ListMTSAudio LanguageCableStereoEnglishSelect BackMENUNOTEVWhen you press [CH / V] button, your TV skips the channel you cancelled. You can still tune to the channel using the number buttons on the remote control. NOTEOnly available in analog TV signal.NOTEOnly available in digital TV signal.](https://usermanual.wiki/Hisense-Electric/LCDD0008.W9HLCDD0008-User-Manual-1/User-Guide-1505764-Page-19.png)