Hisense Electric LCDD0008 Part15 Subpart B-LCD TV User Manual W9HLCDD0008 2
Hisense Electric Co., Ltd. Part15 Subpart B-LCD TV W9HLCDD0008 2
Contents
- 1. W9HLCDD0008_User Manual 1
- 2. W9HLCDD0008_User Manual 2
- 3. W9HLCDD0008_User Manual 3
W9HLCDD0008_User Manual 2
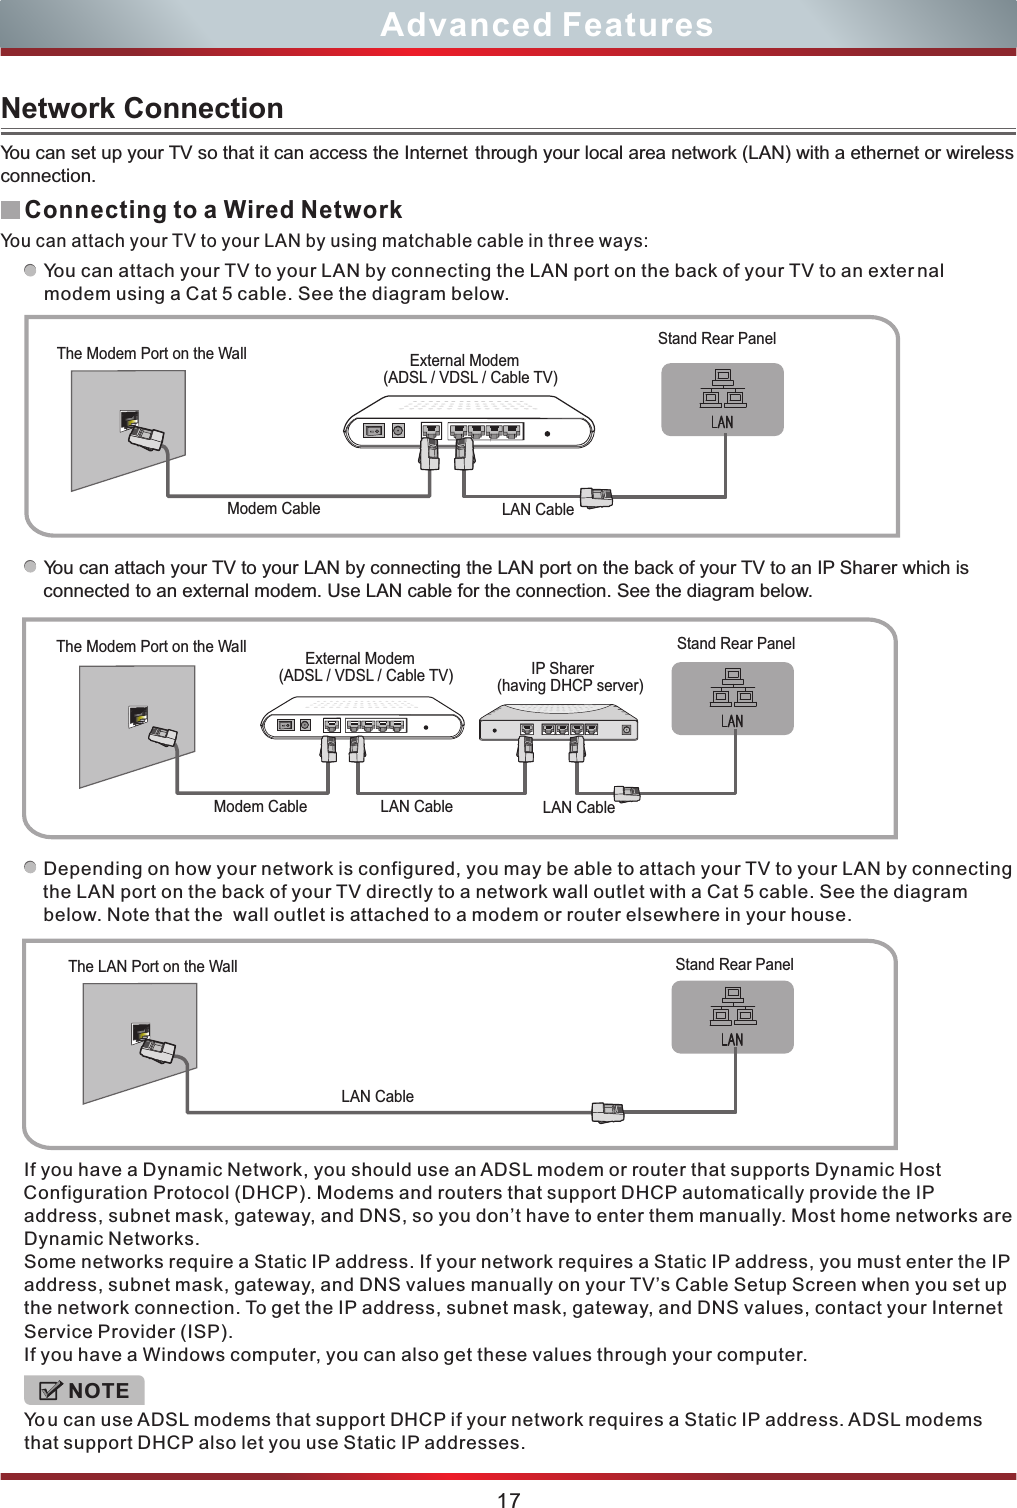
![16Basic FeaturesChannel Block - Lock Channels on the TV. Program Block - Lock Program on the TV.Rating Enable: Block or unblock TV ratings. Open V-Chip: Display an advanced V-Chip ratings table for digital channels.Block Unrated TV: Block unrated TV programs. Input Block - Lock Input source on the TV. Change Password - If you want change the default password, first enter the new password then enter the same password again.Clean All - You can reset all locks to factory mode.U.S. TV Ratings: Restrict TV programs by USA Ratings.U.S. Movie Ratings: Restrict movie by USA Ratings.Canadian English/French Ratings: Restrict movie and TV programs by Canadian Ratings.Using the Lock Menu You can adjust: When you first use this function, the default password is [0000].Once you input this password, you can set options. Following is the description of these ratings. RatingGPGPG-13RNC-17XGeneral audienceParental Guidance suggestedParents strongly cautionedRestrictedNo one 17 and under admittedAdult audience onlyDefined asU.S. Movie RatingsAgeTV-YTV-Y7TV-GTV-PGTV-14TV-MAAll childrenDirected to older childrenGeneral audienceParental Guidance suggestedParents Strongly cautionedMature Audience onlyDefined asU.S. TV RatingsContentsAFV Fantasy ViolenceDLSSuggestive dialogueStrong languageSexual situationsVViolenceDefined asAll of the ratings below that rating set blocked automatically Rating DescriptionG8 ans+13 ans+16 ans+18 ans+GeneralProgramming restricted to adults8+General; Not recommended for young childrenProgramming may not be suitable for children under the age of 13Programming is not be suitable for children under the age of 16Canadian French RatingsRating Description 14+ Viewers 14 years and older18+ Adult ProgrammingCC8+GPGChildrenChildren 8 years and olderParents GuidanceGeneral Programming, suitable for all audiencesCanadian English RatingsEnterENTERLockChannel BlockProgram BlockInput BlockChange PasswordClean AllSelect BackMENU](https://usermanual.wiki/Hisense-Electric/LCDD0008.W9HLCDD0008-User-Manual-2/User-Guide-1505765-Page-1.png)
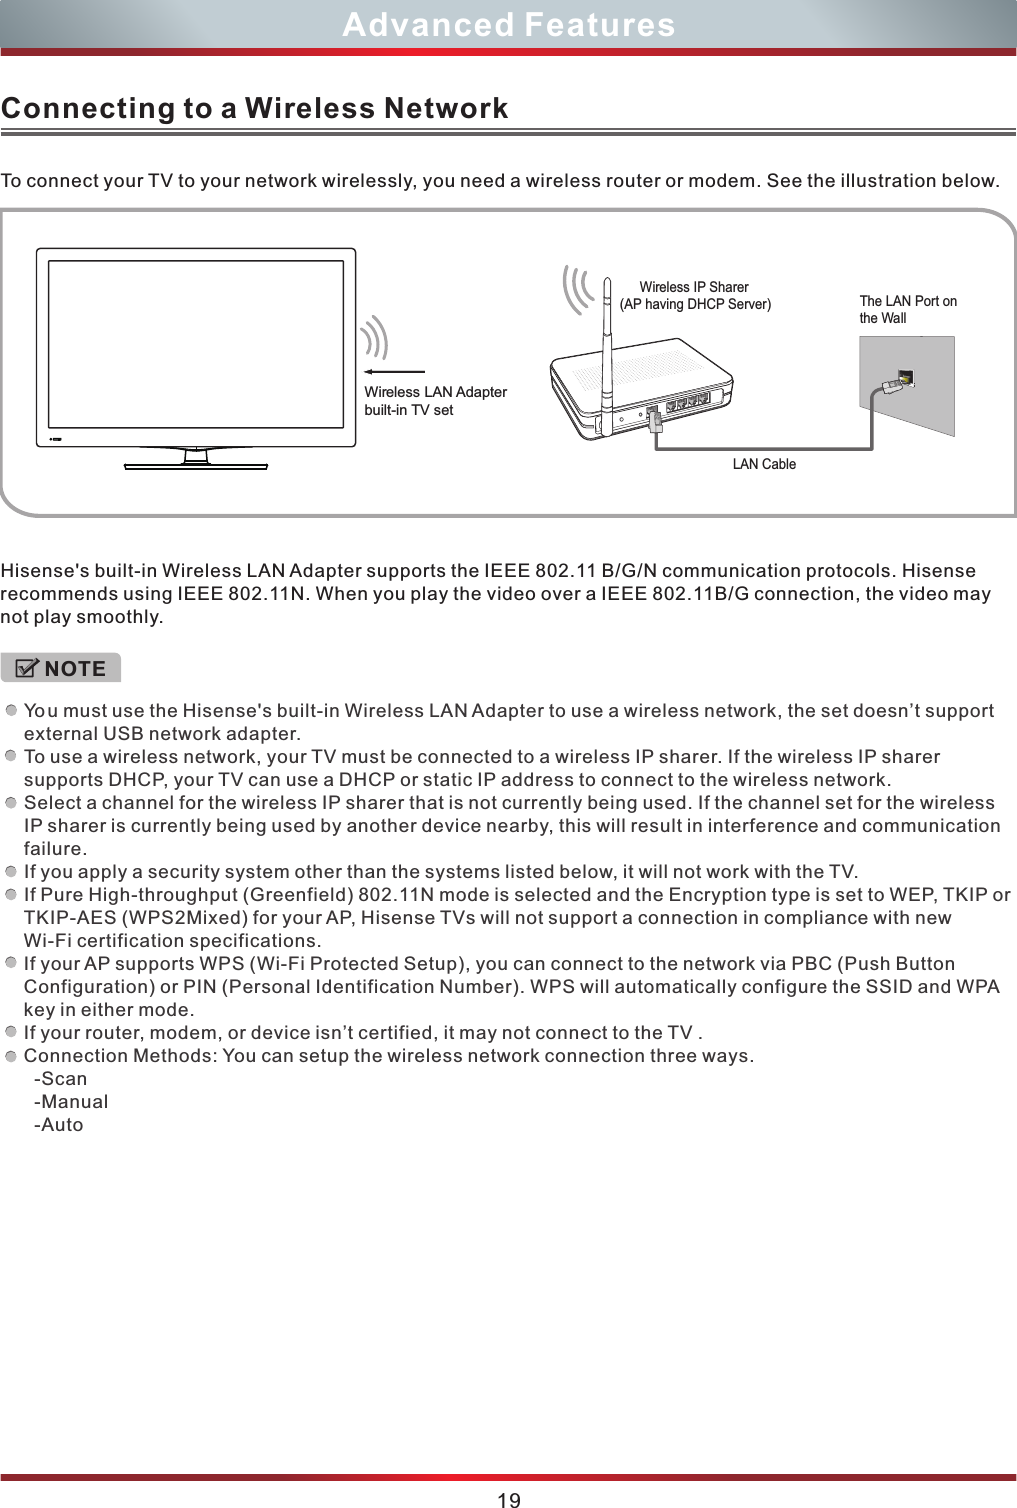
![Network Setup (Auto) Network Setup (Manual)18Advanced Features1. Connect your TV to your LAN as described in the previous section. 2. Turn on your TV, operate according to the description in the Settings menu until the Network screen appears.3. On the Network screen, select Configuration and press [ENTER] button to enter the submenu.4. Set Internet Connection to On and Interface to Ethernet.5. Select IP Setting and press [ENTER] button to enter it.6. Set Address Type to Auto.7. Auto acquires and enters the needed internet values automatically.8. If the Network function has not acquired the network connection values, go to the manual for directions.How to set up automaticallyUse the Automatic Network Setup while your connecting the TV to a network that supports DHCP. To set up your TV’s cable network connection automatically, follow these steps:Use the Automatic Network Setup when connecting your TV to a network that requires a Static IP address.Getting the Network Connection ValuesTo get the network connection values on most windows computers, follow these steps:1. Right click the Network icon on the bottom right of the screen.2. In the pop-up menu that appears, click Status.3. On the dialog that appears, click the Support tab.4. On the Support tab, click the Details button. The network connection values are displayed.How to set up manuallyTo set up your TV’s cable network connection manually, follow these steps:1. Follow Steps 1 through 5 in the “How to set up automatically” procedure.2. Set Address Type to Manual.3. Press [▲/▼] button to select IP Address and press [◄/►] button to move the cursor to the entry field. Then press 0~9 buttons to enter the numbers.4. Press [Menu] button to exit IP Address and press [▲/▼] button to select the next options to enter the numbers. 5. When done, press [Menu] button to return to the previous menu.6. Select Connection Test to check the internet connectivity. SettingsLanguage EnglishMenu SettingsTime SetupCaptionDemo ModeVersion InfoNetworkSelect BackMENUEnterOKSettingsInternet Connection OnInterface EthernetWireless SettingInformationIP SettingConnection TestSelect BackMENUSettingsBackMENUSubnet MaskDefault GatewayPrimary DNSSecondary DNSAddress TypeIP AddressManual 0. 0. 0. 00. 0. 0. 00. 0. 0. 00. 0. 0. 00. 0. 0. 0Select](https://usermanual.wiki/Hisense-Electric/LCDD0008.W9HLCDD0008-User-Manual-2/User-Guide-1505765-Page-3.png)
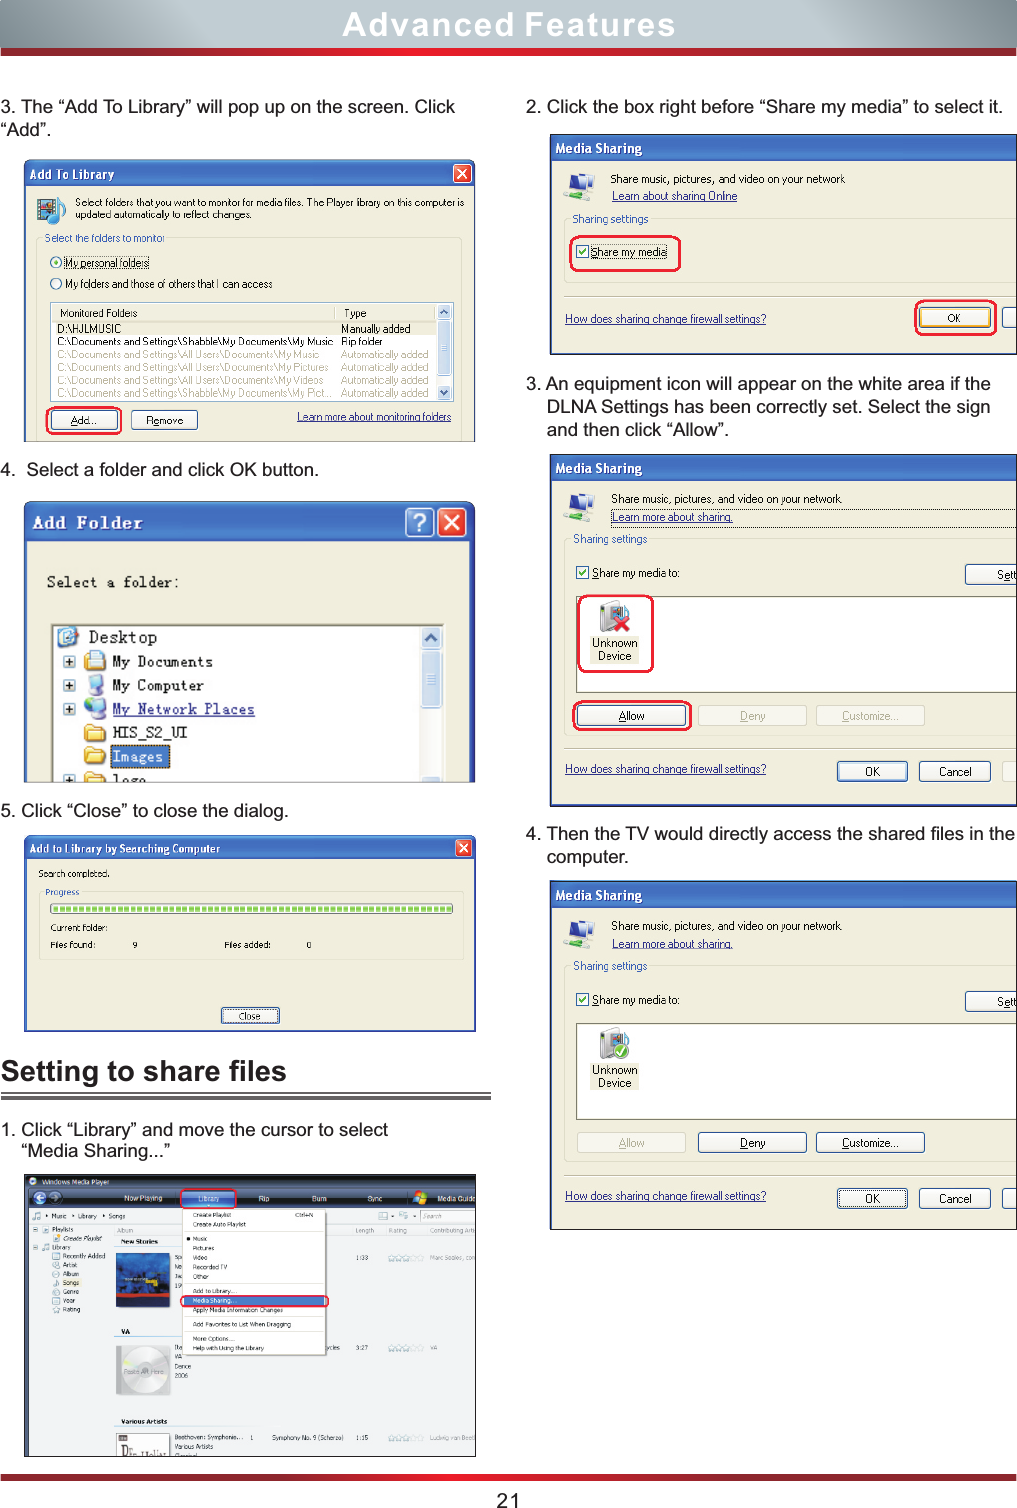
![20Advanced FeaturesComputer, TV and other digital devices can be connected via DLNA and they can share files with each other. You can use the TV set as a DLNA DMP device to enjoy movies, pictures, musics and other multimedia materials in your computer through DLNA connection.DLNA Setting needs to be set on TV and computer Respectively.The Network setup on the TV ’s screen:Network setup:1. Turn on your TV, operate according to the description in the Settings menu until the Network screen appears.2. On the Network screen, select Configuration and press [ENTER] button to enter the submenu.3. Set Internet Connection to On and Interface to Ethernet.4. Select IP Setting and press [ENTER] button to enter it.5. Set Address Type to Auto.6. Auto acquires and enters the needed internet values automatically.7. If the Network function has not acquired the network connection values, go to the manual for directions.8. If set Address Type to Manual, enter IP Setting. Then press [▲/▼] button to select IP Address and press [◄/►] button to move the cursor to the entry field. Then press 0~9 buttons to enter the numbers.DLNA SettingsSettingsInterfaceAddress TypeIP AddressSubnet MaskDefault GatewayPrimary DNSSecondary DNSEthernet MACBackMENUEthernetAuto192.168.1.103255.255.255.0192.168.1.1172.16.2.123172.16.14.10000:0C:E7:06:00:00Set DLNA to On:1. On the Network screen, select Applications and press [ENTER] button to enter the submenu.2. Press [◄/►] button to set DLNA to On. SettingsBackMENUSubnet MaskDefault GatewayPrimary DNSSecondary DNSAddress TypeIP AddressManual 0. 0. 0. 00. 0. 0. 00. 0. 0. 00. 0. 0. 00. 0. 0. 0Select9. Press [Menu] button to exit IP Address and press [▲/▼] button to select the next options to enter the numbers. 10. When done, press Menu to return to the previous menu.11. Select Connection Test to check the internet connectivity. If the test is not successful, please check Whether the configuration is correct. If the test is successful, operate as the following instructions.SettingsBackMENUSelectDLNA On NetflixVUDUIf your computer can not support DLNA, you need install the software that supports DLNA such asTVersity and Windows Media Player11. It is recommended to select Windows Media Player11 to set and its setup is more simple. Media Share Settings in computer1. Start the Windows Media Player11.2. Click “Library” and then “Add to Library...”.](https://usermanual.wiki/Hisense-Electric/LCDD0008.W9HLCDD0008-User-Manual-2/User-Guide-1505765-Page-5.png)
![22Advanced FeaturesNetwork FunctionVUDU HD MoviesVUDU is an on-demand service that offers high-definition movies on the Web.For enjoying more movies, please register and log in to your account.1. Press the [HICAST@] button to display network main menu.2. Press [◄/►] button to select the VUDU HD Movies icon and press [ENTER] to enter it, or press [VUDU] button to enter directly. efer to “How to Input the Emai Address” Press [▲/▼/◄/►] button to move the cursor to select service items in the VUDU HD Movies home page, and press [ENTER] button to confirm.6. In the process of watching a movie, press [ENTER] button to display/exit the tool bar, press [◄/►] button to select the function icon, and press [ENTER] button to confirm. 7. Press [RETURN] button to return the upper menu, or press [EXIT] button to close the menu.3. Select the Sign Up icon on the VUDU HD Movies interface, and press [ENTER] to enter.4. Enter your email address to begin enjoying VUDU. ( R )5. Press the [VUDU] button to enter the VUDU HD Movies interface directly.From the shortcut of the remote control:1. Configure the network settings before using network function. For more information, refer to “Network Connection”.2. Unsupported fonts within the provider’s content will not display normally.3. Slow responses and/or interruptions may occur, depending on your network conditions.4. Depending on the region, English may be the only language supported for application services.Press Enter to launch VUDU Movies. Brief introductionOperation instructionsYou can access the VUDU HD Movies by the following methods:1. Use of internet services requires a working broadband internet connection (1 to 2 Mbps for SD video, 2.25 to 4.5 Mbps for HD video and 4.5 to 9 Mbps for HDX video).2. VUDU and other internet-based services are not provided by Hisense, may change or be discontinued at any time and may be subject to restrictions imposed by your internet service provider. The quality, functionality, or availability of such services may be affected by the capacity of your Internet connection. Use of VUDU video-on-demand and other internet services may require the creation of a separate account through a computer with internet access.3. Not all VUDU services would be used on this model.4. VUDU video-on-demand and other internet services may require payment of one-time and/or recurring charges.5. You are solely responsible for any charges incurred as a result of using internet-based content, including, without limitation, communications charges for the provision of internet or network services and any charges incurred for third-party internet content services, such as video on demand or subscription services. All third-party services are provided in accordance with whatever terms and conditions are established between such third-party providers and you.6. HISENSE MAKES NO REPRESENTATIONS OR WARRANTIES ABOUT THE CONTENT, AVAILABILITY OR FUNCTIONALITY OF THE VUDU SERVICE OR OTHER INTERNET DELIVERED THIRD-PARTY SERVICES AND DOES NOT WARRANT THAT ANY OF THEM WILL BE UNINTERRUPTED, ERROR FREE OR SATISFACTORY. ANY IMPLIED WARRANTY, INCLUDING BUT NOT LIMITED TO ANY IMPLIED WARRANTY OF MERCHANTABILITY OR FITNESS FOR A PARTICULAR PURPOSE OF ANY THIRD PARTY CONTENT OR SERVICE, IS EXPRESSLY EXCLUDED AND DISCLAIMED. UNDER NO CIRCUMSTANCES WILL HISENSE BE LIABLE IN CONTRACT, TORT OR UNDER ANY OTHER THEORY FOR ANY DAMAGES ARISING OUT OF OR IN CONNECTION WITH YOUR USE OF ANY CONTENT OR SERVICE PROVIDED BY ANY THIRD PARTY, EVEN IF ADVISED OF THE POSSIBILITY OF SUCH DAMAGES.If you use VUDU services, see the following note before using it.NOTICE FOR USEENTEROperational buttonsButtons DescriptionStops playback and displays the movie title screen.Selects the on-screen menu itemsPress to launch Netflix instant streaming directly.Press to enter VUDU HD Movies directly.Sets pauses and still pictures. Press the button to return to playback.Displays the TrickPlay screen and fast forwards playback.Displays the TrickPlay screen and fast reverses playback.ENTEREXITRETURNPlays the next video. Plays the previous video. Returns to the previous menu.Confirms selectionsCloses the menu.Links to various internet services.](https://usermanual.wiki/Hisense-Electric/LCDD0008.W9HLCDD0008-User-Manual-2/User-Guide-1505765-Page-7.png)