Hisense Electric LCDD0064 LED LCD TV User Manual W9HLCDD0064 6
Hisense Electric Co., Ltd. LED LCD TV W9HLCDD0064 6
UserManual.wiki
>
Hisense Electric
>
LCDD0064 User Manual
>
W9HLCDD0064_User Manual 6
Contents
1.
W9HLCDD0064_User Manual 1
2.
W9HLCDD0064_User Manual 2
3.
W9HLCDD0064_User Manual 3
4.
W9HLCDD0064_User Manual 5
5.
W9HLCDD0064_User Manual 6
6.
W9HLCDD0064_User Manual 7
7.
W9HLCDD0064_User Manual 8
8.
W9HLCDD0064_User Manual 4
9.
W9HLCDD0064_User Manual 9
W9HLCDD0064_User Manual 6
Navigation menu
Upload a User Manual
Namespaces
Wiki Guide
HTML
PDF
Info
Views
User Manual
Discussion / Help
Navigation
![6Connecting Devices to your TVConnecting a digital sound bar to use Audio Return Channel (ARC)If you'd like to use the Audio Return Channel (ARC) feature to have sound sent from the TV back down an HDMI cable to a digital soundbar, then you will need to connect the cable to the [HDMI (ARC)] port. By using this feature, you will also be able to control the soundbar with your TV remote instead of having to use multiple remotes for each device. • When a digital audio system is connected to the [DIGITAL AUDIO OUT] jack, decrease the TV and system volume. • 5.1 CH (channel) audio is available when the TV is connected to an external device that supports a 5.1 channel surround sound • You can receive 5.1 channel audio in one of two ways. The first way is to connect the [DIGITAL AUDIO OUT] jack from the device to the Amplifier. The second way is to connect the [DIGITAL AUDIO OUT] jack on the back of the TV to the [Optical] port on the Amplifier.After you’ve completed one of the two methods then be sure to go into the Advanced Audio Settings of the TV and select RAW to receive the 5.1 channel audio. You will need to also go into the sound or audio settings of your device to ensure it is set to 5.1 Channel output. It may read ‘Bitstream’, ‘RAW’ or ‘Digital’.Only digital sound bars that require a wired connection are compatible with the H6 Series Smart TV.To connect a digital sound bar with an HDMI cable:1. Connect the cable that’s attached to the soundbar to the HDMI (ARC) port on the TV.2. Turn on the soundbar by pressing the Power button.3. Press the Quick Setup menu button on your remote and go to System > CEC Function4. Turn on the CEC Control setting.5. Press the right arrow on the D-pad of your remote to show the full menu settings.6. Select Sound > Advance Audio Settings 7. Go to the section of the screen that reads ‘TV Speaker & ARC’ and select ARC First.Figure 7. Digital Sound Bar to the HDMI (ARC) port NOTESNOTESEXTERNAL DEVICESDigital Sound BarHDMI / ARCTV JACKHDMI Cable (not included)NOTE: If the device has an Input Selector feature then make sure to change it to TV.](https://usermanual.wiki/Hisense-Electric/LCDD0064.W9HLCDD0064-User-Manual-6/User-Guide-3180522-Page-1.png)
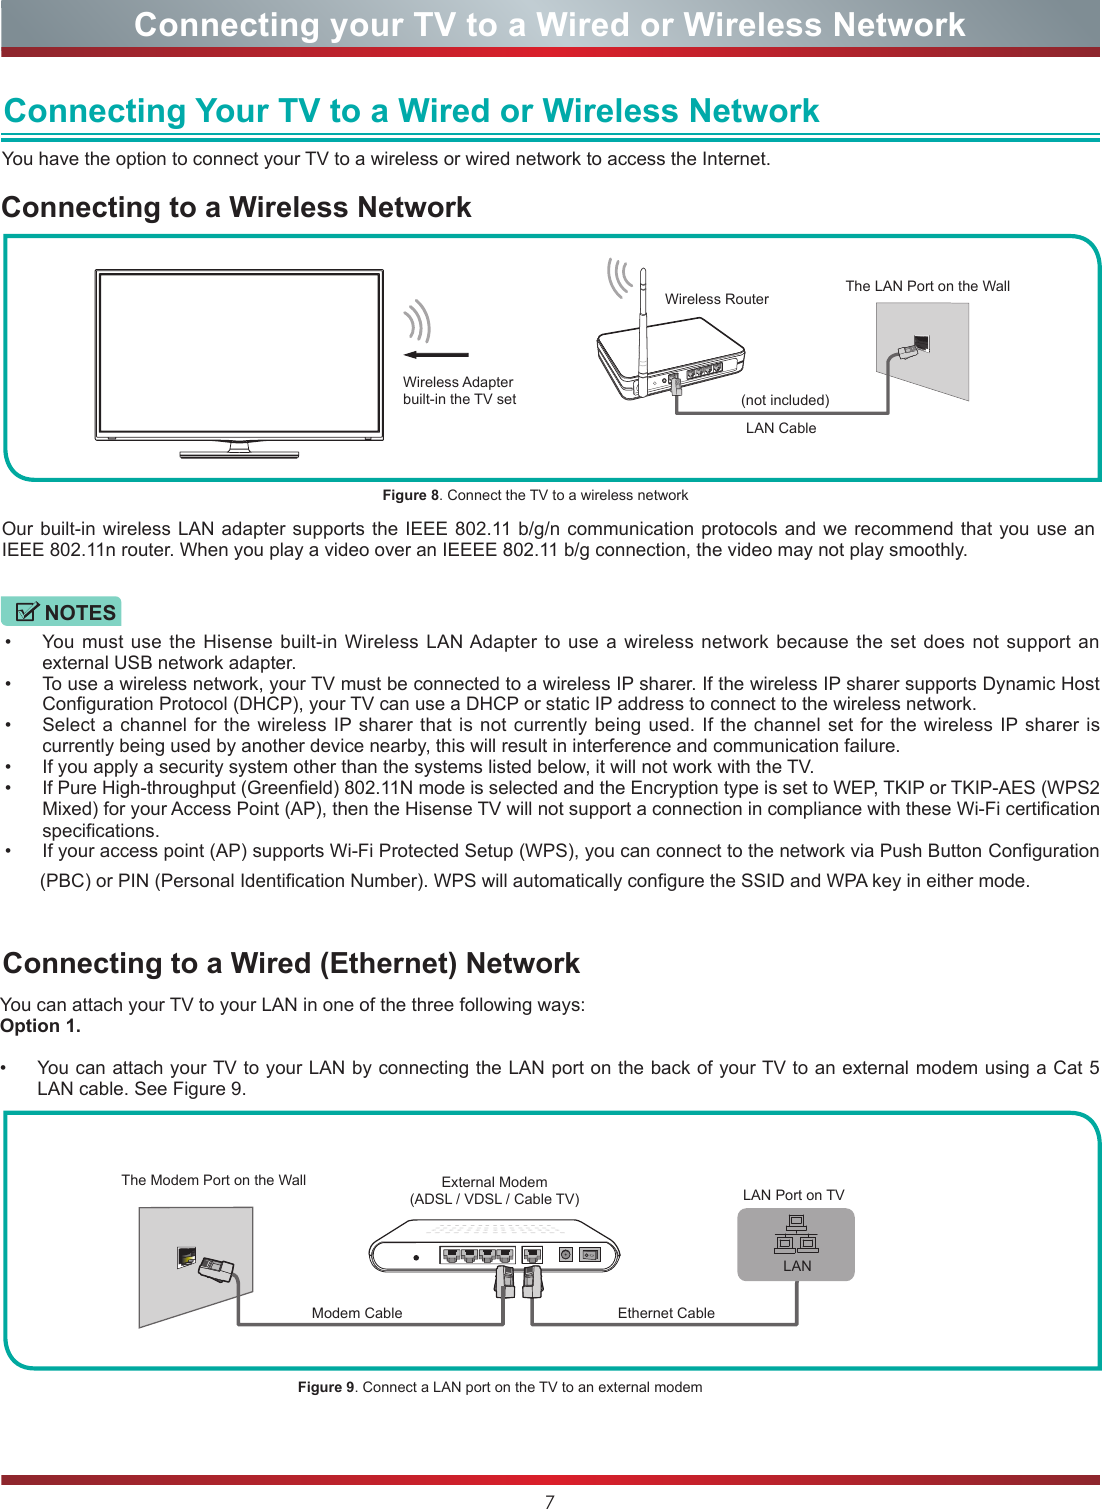
![8Connecting your TV to a Wired or Wireless Network• You can attach your TV to your LAN by connecting the [LAN] port on the back of your TV to an IP Sharer which is connected to an external modem. Use an Ethernet cable for the connection. See figure 10.• Depending on how your network is configured, you may be able to attach your TV to your LAN by connecting the [LAN] port on the back of your TV directly to a network wall outlet with an Ethernet cable. See the diagram below. If you have a Dynamic Network, you should use an ADSL modem or router that supports Dynamic Host Configuration Protocol (DHCP). Modems and routers that support DHCP automatically provide the IP address, subnet mask, gateway, and DNS, so you don’t have to enter them manually. Most home networks are Dynamic Networks.Some networks require a Static IP address. If your network requires a Static IP address, you must enter the IP address, subnet mask, gateway, and DNS values manually on your TV’s Cable Setup Screen when you set up the network connection. To get the IP address, subnet mask, gateway and DNS values, contact your Internet Service Provider (ISP).Figure 10. Connect a LAN port on the TV to an IP sharerFigure 11. Connect a LAN port on the TV to a network wall outletYou can use ADSL modems that support DHCP if your network requires a static IP address. ADSL modems that support DHCP also let you use static IP addresses.Option 2Option 3The LAN Port on the Wall LAN Port on TVEthernet CableLANThe Modem Port on the WallModem Cable Ethernet Cable Ethernet CableLAN Port on TVExternal Modem(ADSL / VDSL / Cable TV) IP Sharer (Router)(with DHCP server) LANNOTES](https://usermanual.wiki/Hisense-Electric/LCDD0064.W9HLCDD0064-User-Manual-6/User-Guide-3180522-Page-3.png)