Hisense Electric LCDD0064 LED LCD TV User Manual W9HLCDD0064 6
Hisense Electric Co., Ltd. LED LCD TV W9HLCDD0064 6
Contents
W9HLCDD0064_User Manual 6
6
Connecting Devices to your TV
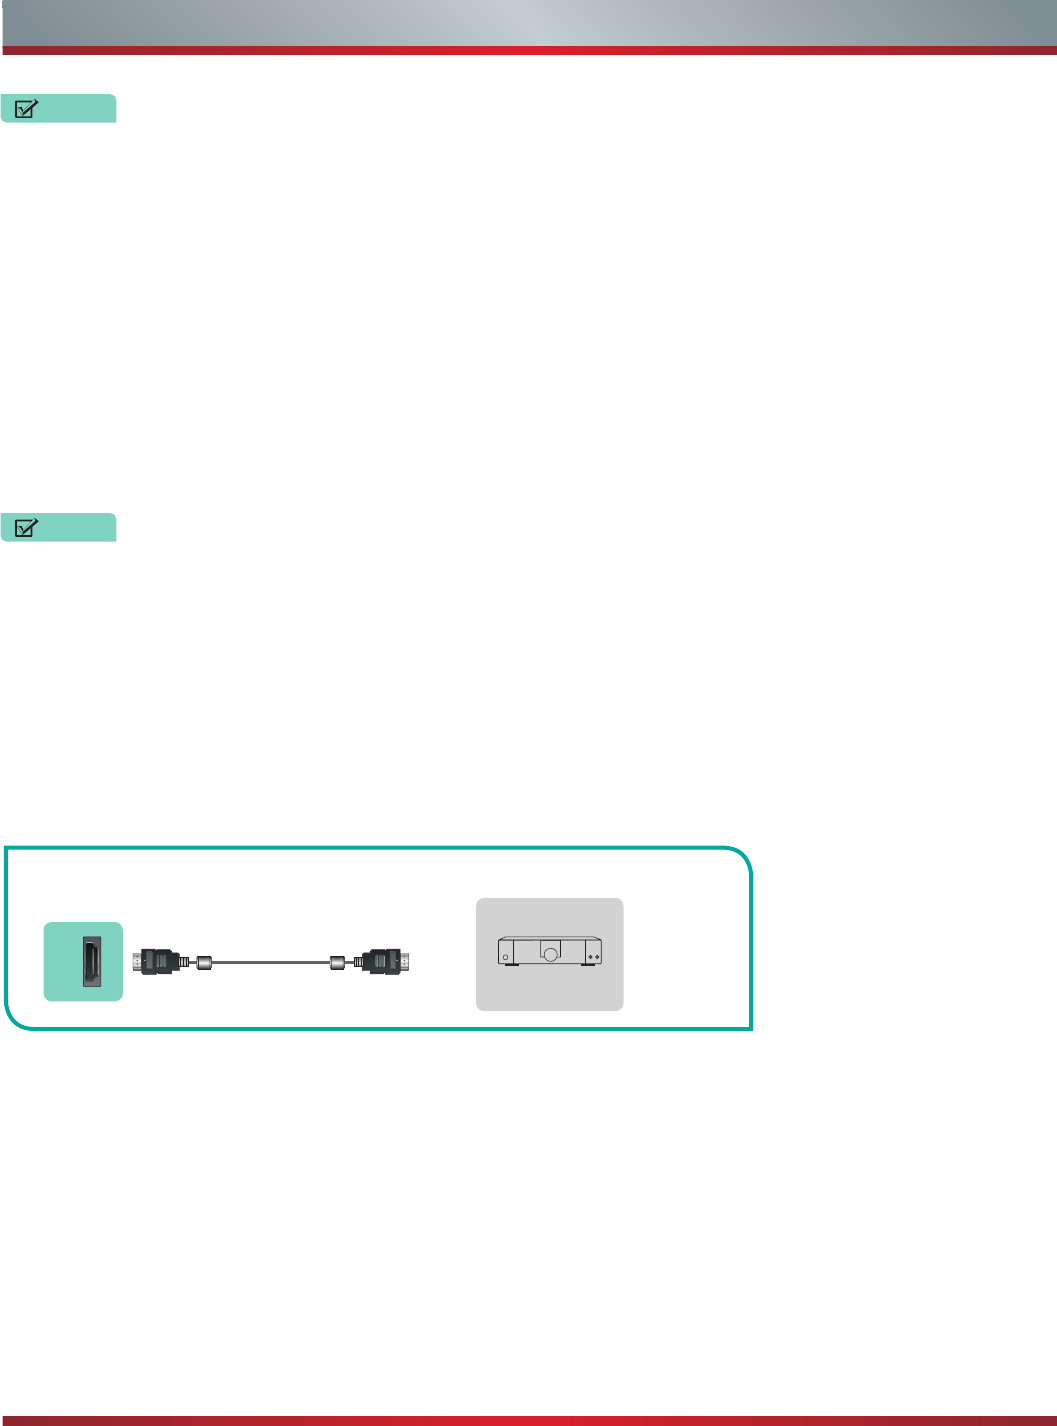
Connecting a digital sound bar to use Audio Return Channel (ARC)
If you'd like to use the Audio Return Channel (ARC) feature to have sound sent from the TV back down an HDMI cable to a digital
soundbar, then you will need to connect the cable to the [HDMI (ARC)] port. By using this feature, you will also be able to control the
soundbar with your TV remote instead of having to use multiple remotes for each device.
• When a digital audio system is connected to the [DIGITAL AUDIO OUT] jack, decrease the TV and system volume.
• 5.1 CH (channel) audio is available when the TV is connected to an external device that supports a 5.1 channel surround sound
• You can receive 5.1 channel audio in one of two ways. The first way is to connect the [DIGITAL AUDIO OUT] jack from the
device to the Amplifier. The second way is to connect the [DIGITAL AUDIO OUT] jack on the back of the TV to the [Optical]
port on the Amplifier.After you’ve completed one of the two methods then be sure to go into the Advanced Audio Settings of the
TV and select RAW to receive the 5.1 channel audio. You will need to also go into the sound or audio settings of your device to
ensure it is set to 5.1 Channel output. It may read ‘Bitstream’, ‘RAW’ or ‘Digital’.
Only digital sound bars that require a wired connection are compatible with the H6 Series Smart TV.
To connect a digital sound bar with an HDMI cable:
1. Connect the cable that’s attached to the soundbar to the HDMI (ARC) port on the TV.
2. Turn on the soundbar by pressing the Power button.
3. Press the Quick Setup menu button on your remote and go to System > CEC Function
4. Turn on the CEC Control setting.
5. Press the right arrow on the D-pad of your remote to show the full menu settings.
6. Select Sound > Advance Audio Settings
7. Go to the section of the screen that reads ‘TV Speaker & ARC’ and select ARC First.
Figure 7. Digital Sound Bar to the HDMI (ARC) port
NOTES
NOTES
EXTERNAL DEVICES
Digital Sound Bar
HDMI / ARC
TV JACK
HDMI Cable
(not included)
NOTE: If the device has an Input Selector feature then make sure to change it to TV.
7
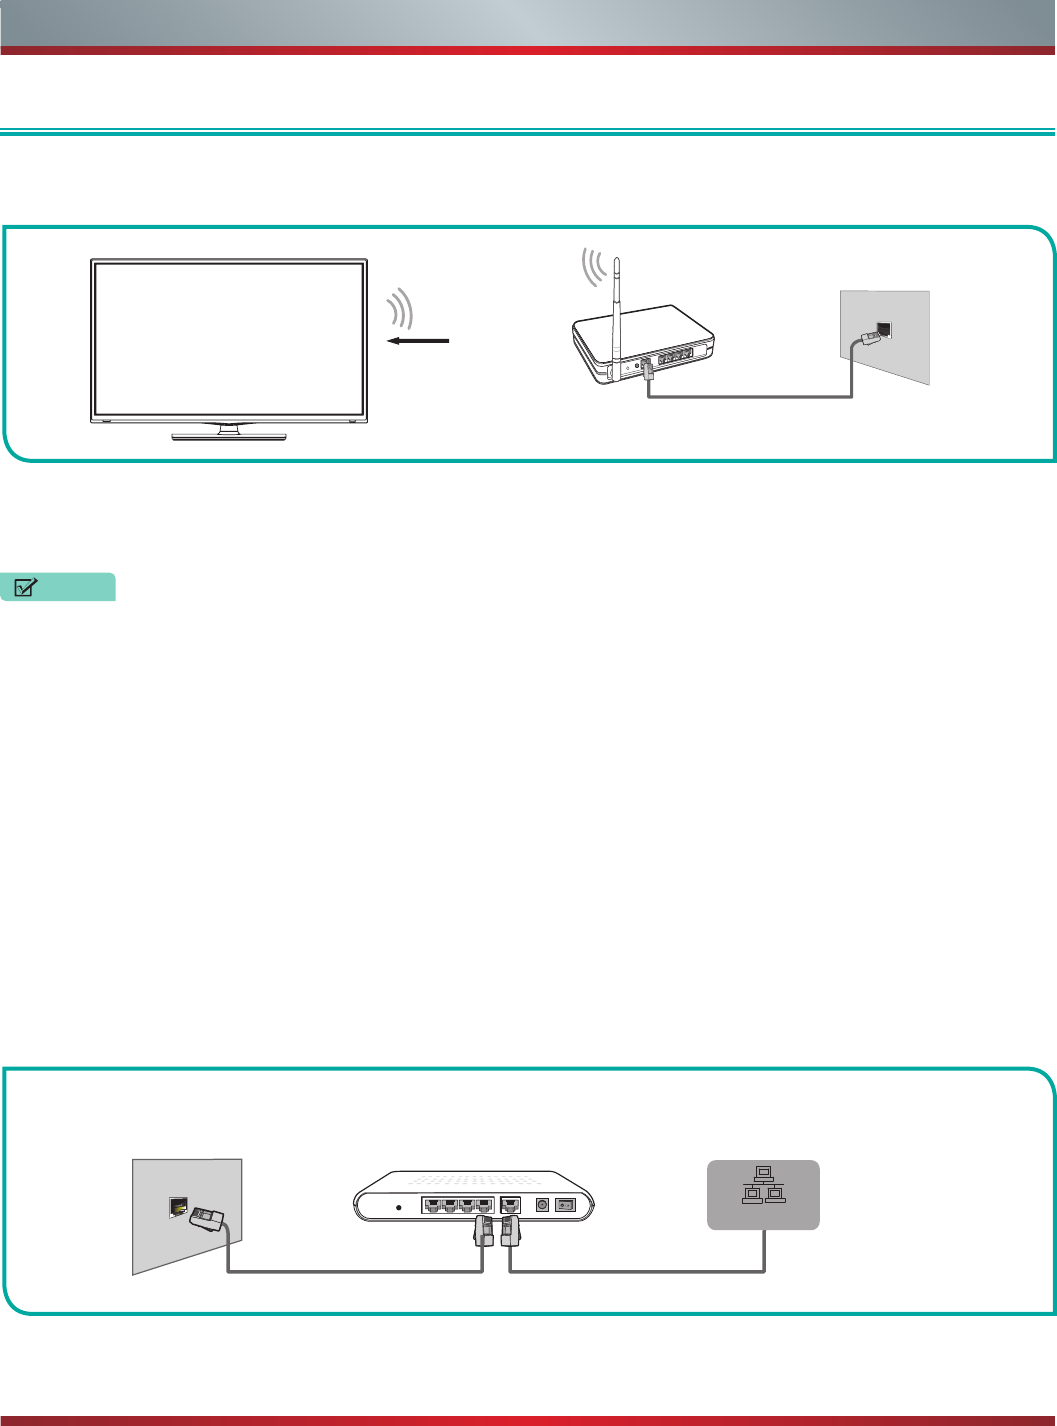
Connecting your TV to a Wired or Wireless Network
Wireless Adapter
built-in the TV set
LAN Cable
Wireless Router The LAN Port on the Wall
Connecting Your TV to a Wired or Wireless Network
Connecting to a Wired (Ethernet) Network
You have the option to connect your TV to a wireless or wired network to access the Internet.
You can attach your TV to your LAN in one of the three following ways:
Option 1.
• You can attach your TV to your LAN by connecting the LAN port on the back of your TV to an external modem using a Cat 5
LAN cable. See Figure 9.
(PBC) or PIN (Personal Identification Number). WPS will automatically configure the SSID and WPA key in either mode.
Our built-in wireless LAN adapter supports the IEEE 802.11 b/g/n communication protocols and we recommend that you use an
IEEE 802.11n router. When you play a video over an IEEEE 802.11 b/g connection, the video may not play smoothly.
• You must use the Hisense built-in Wireless LAN Adapter to use a wireless network because the set does not support an
external USB network adapter.
• To use a wireless network, your TV must be connected to a wireless IP sharer. If the wireless IP sharer supports Dynamic Host
Configuration Protocol (DHCP), your TV can use a DHCP or static IP address to connect to the wireless network.
• Select a channel for the wireless IP sharer that is not currently being used. If the channel set for the wireless IP sharer is
currently being used by another device nearby, this will result in interference and communication failure.
• If you apply a security system other than the systems listed below, it will not work with the TV.
• If Pure High-throughput (Greenfield) 802.11N mode is selected and the Encryption type is set to WEP, TKIP or TKIP-AES (WPS2
Mixed) for your Access Point (AP), then the Hisense TV will not support a connection in compliance with these Wi-Fi certification
specifications.
• If your access point (AP) supports Wi-Fi Protected Setup (WPS), you can connect to the network via Push Button Configuration
Figure 8. Connect the TV to a wireless network
Figure 9. Connect a LAN port on the TV to an external modem
Connecting to a Wireless Network
(not included)
NOTES
External Modem
(ADSL / VDSL / Cable TV)
Ethernet Cable Modem Cable
The Modem Port on the Wall
LAN Port on TV
LAN
8
Connecting your TV to a Wired or Wireless Network
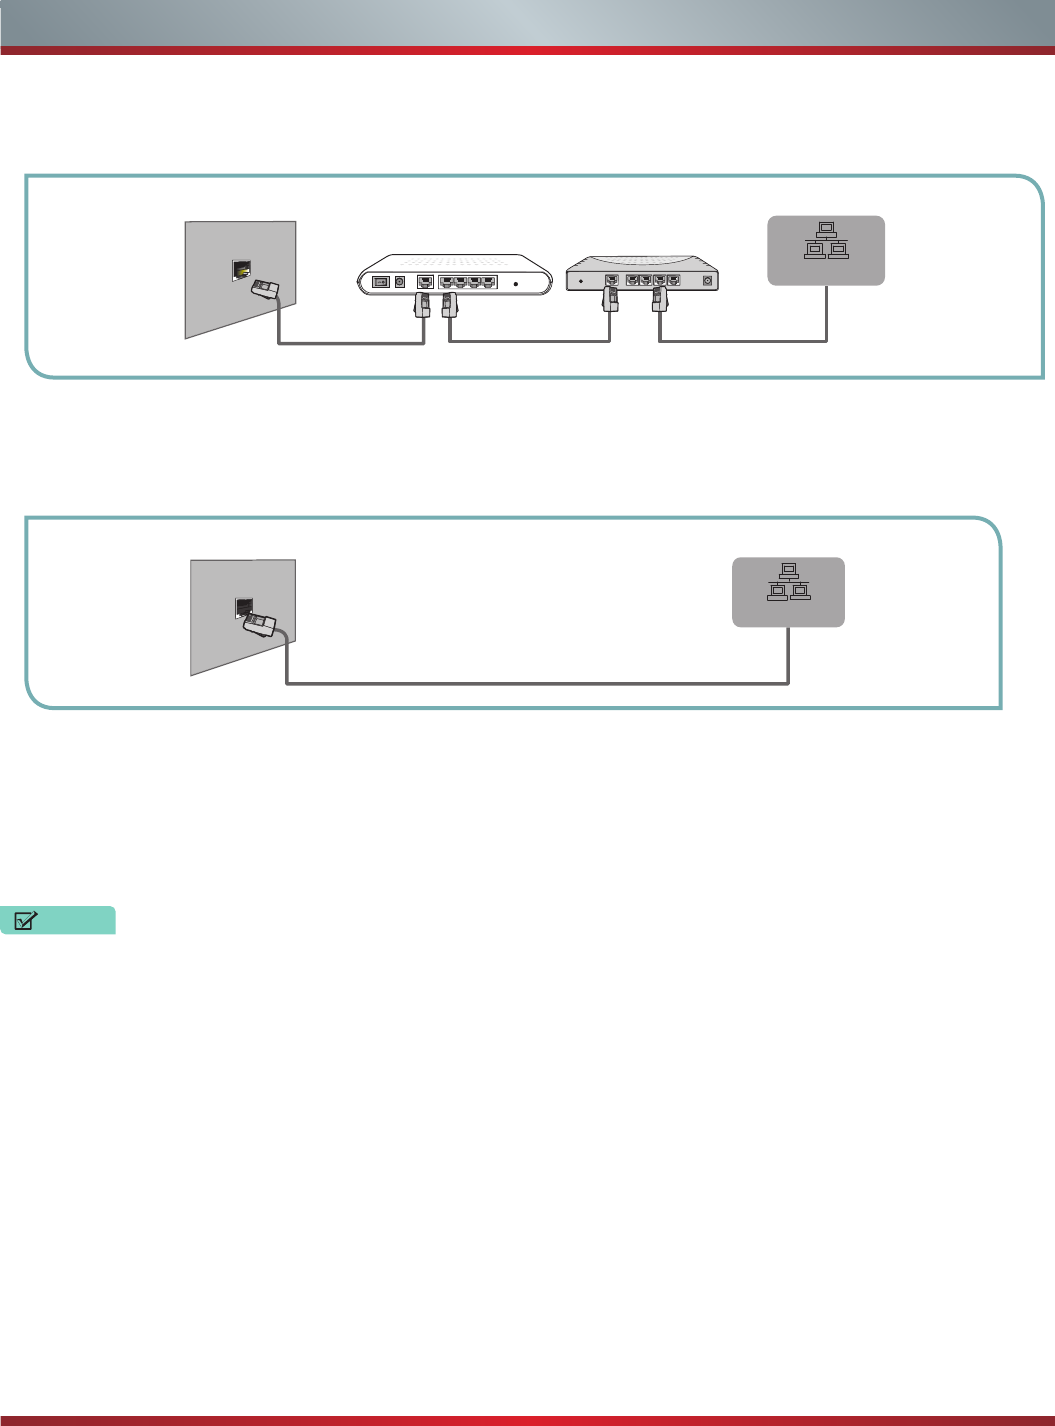
• You can attach your TV to your LAN by connecting the [LAN] port on the back of your TV to an IP Sharer which is connected to
an external modem. Use an Ethernet cable for the connection. See figure 10.
• Depending on how your network is configured, you may be able to attach your TV to your LAN by connecting the [LAN] port on
the back of your TV directly to a network wall outlet with an Ethernet cable. See the diagram below.
If you have a Dynamic Network, you should use an ADSL modem or router that supports Dynamic Host Configuration Protocol
(DHCP). Modems and routers that support DHCP automatically provide the IP address, subnet mask, gateway, and DNS, so
you don’t have to enter them manually. Most home networks are Dynamic Networks.
Some networks require a Static IP address. If your network requires a Static IP address, you must enter the IP address, subnet
mask, gateway, and DNS values manually on your TV’s Cable Setup Screen when you set up the network connection. To get
the IP address, subnet mask, gateway and DNS values, contact your Internet Service Provider (ISP).
Figure 10. Connect a LAN port on the TV to an IP sharer
Figure 11. Connect a LAN port on the TV to a network wall outlet
You can use ADSL modems that support DHCP if your network requires a static IP address. ADSL modems that support DHCP
also let you use static IP addresses.
Option 2
Option 3
The LAN Port on the Wall LAN Port on TV
Ethernet Cable
LAN
The Modem Port on the Wall
Modem Cable Ethernet Cable Ethernet Cable
LAN Port on TV
External Modem
(ADSL / VDSL / Cable TV)
IP Sharer (Router)
(with DHCP server)
LAN
NOTES
9
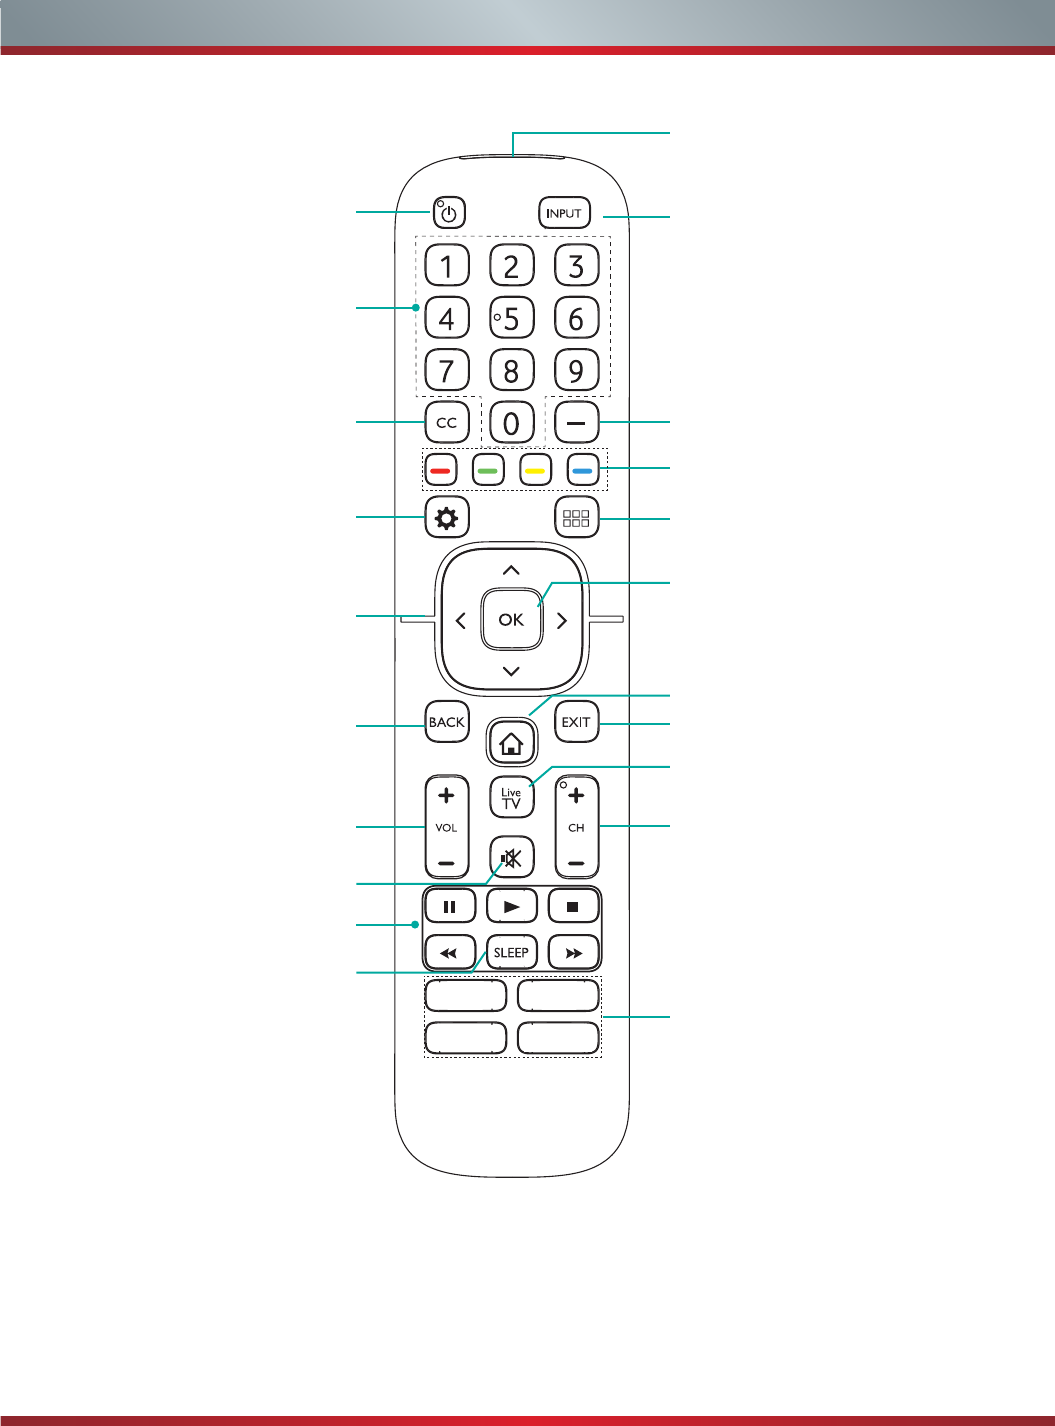
Using Your TV Remote Control
Buttons on your TV remote
Power on / off
Enter Channels / input numbers
Media content control function buttons
Dash button
Select a digital sub-channel
D-pad (up/down/left/right
navigation buttons)
Volume (up/down)
Mute and restore sound
Adjust Sleep timer setting
Quick Setup menu
Return to the previous place in
the menu or app
Live TV
Infrared transmitter
Change TV input source
Channel (up/down)
Exit the application
Turn Closed Caption On/Off
Special function buttons
All Apps
Display the Home screen
Confirm button
Quick access buttons to apps
APP
APPAPP
APP
10
Using Your TV Remote Control
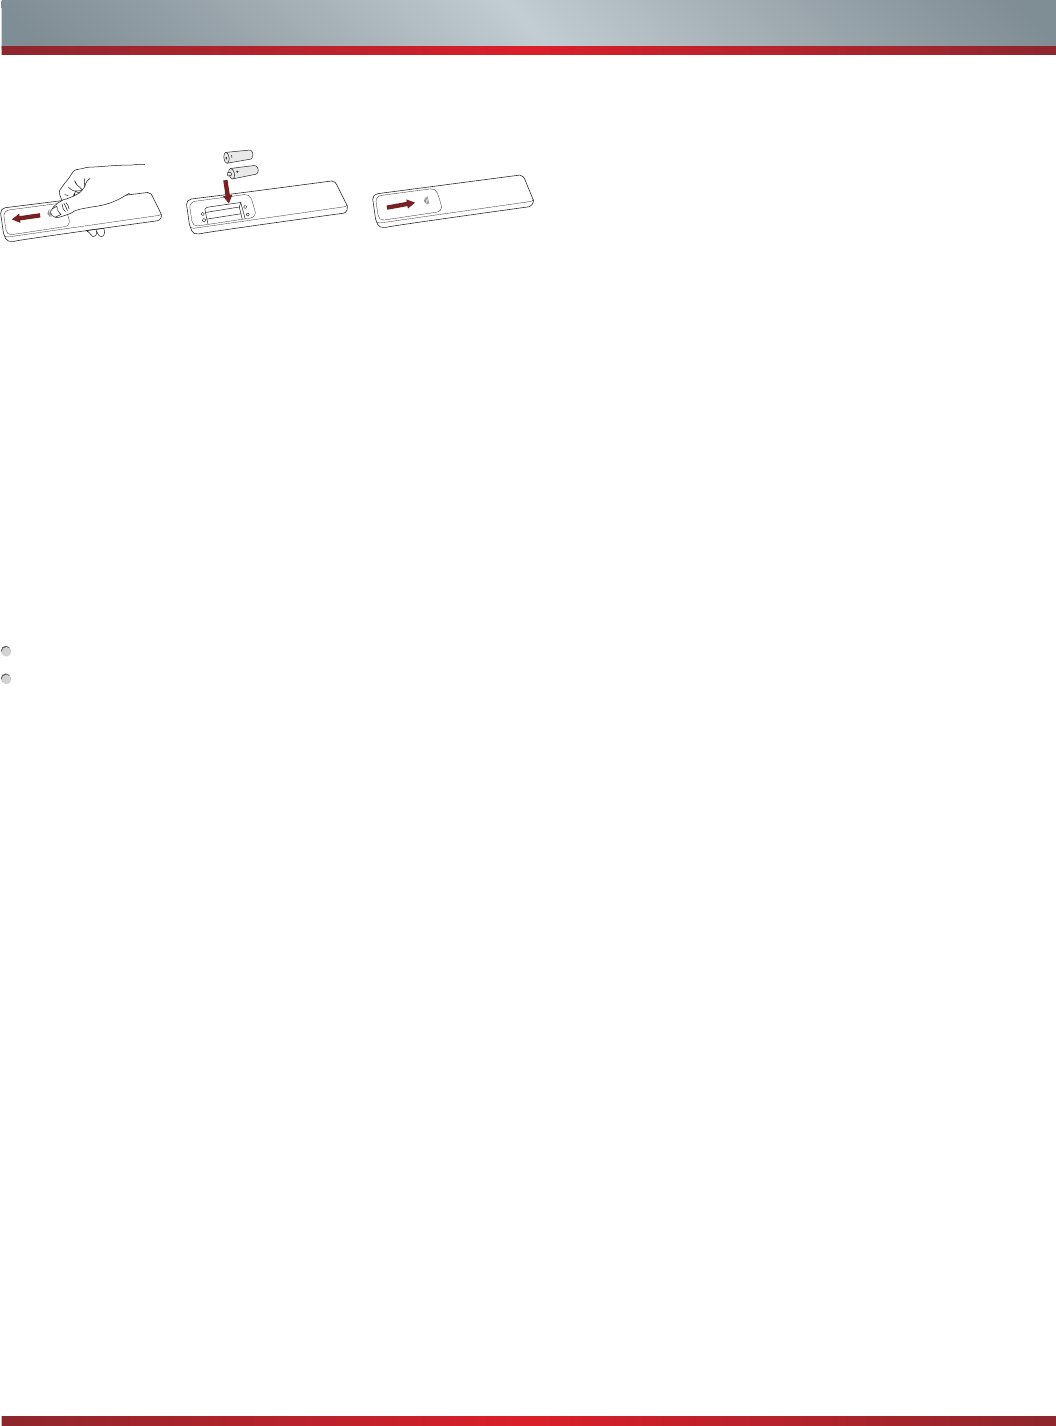
Begin using your remote
1. Slide the back cover to open the battery compartment of the remote control.
2. Insert two AAA size batteries. Make sure to match the (+) and (-) ends of the batteries with the (+) and ( - ) ends indicated in the
battery compartment.
3. Replace the battery compartment cover.
Important Information about the remote and batteries:
• Discardbatteriesinadesignateddisposalarea.Donotthrowthemintoafire.
• Removeoldbatteriesimmediatelytopreventthemfromleakingintothebatterycompartment.
• Ifyoudonotintendtousetheremotecontrolforalongtime,removethebatteries.
• Batterychemicalscancausearash.Ifthebatteriesleak,cleanthebatterycompartmentwithacloth.Ifchemicalstouch
your skin then wash it immediately.
• Donotmixoldandnewbatteries.
• Donotmixalkaline,standard(carbon-zinc)orrechargeable(NiCd,NiMH,etc.)batteries.
• Donotcontinueusingtheremoteifitgetswarmorhot.
Call our Support Center immediately on the Hisense support website.
Remote Control Range Information
The remote control can work at a distance of up to 26 feet in front of the TV set.
It can work at a 30 degree horizontal or vertical angle.
Program Your Universal Cable or Satellite Remote Control to Operate Your New Hisense Television
(only for USA)
If you would like to program your other household remote controls to your new Hisense television,please refer to the User's Manual
supplied by your Cable or Satellite provider. The Cable or Satellite providers' User's Manuals should include instructions on how to
program their remote to your television.
A list of Hisense codes for the most common Cable and Satellite providers are listed below. Use the Hisense code that is associated
with your Cable or Satellite provider (if applicable).
DIRECTV......0178, 10178, 10019, 10748, 11314, 11660, 11710, 11780, 12049, 10171, 11204, 11326, 11517, 11564, 11641, 11963,
12002, 12183
Time Warner Cable......386, 0178, 10178, 400, 450, 461, 456, 0748, 1463, 0463, 10463
Comcast......0178, 10178, 10463, 11463, 10748, 11314, 11660, 10171, 11204, 11326, 11517, 11641, 11780, 11785, 11892, 11963,
12002
Cox Communications......0178, 10178, 1326, 1463
Dish Network......505, 627, 538, 720, 659
If the Hisense code associated with your Cable or Satellite provider is not listed, does not work or you cannot locate the instructions
to program your remote, call your local Cable or Satellite provider’s customer service center.
Insert the batteriesGently push and slide Gently push and slide
If your Cable or Satellite provider does not have a Hisense code available, please contact us.
Using Your Cable Set-top Box or Satellite Receiver Remote as a ‘Universal’ Remote
If you prefer to use your Cable Set-top Box or Satellite Receiver Remote as a ‘Universal Remote’, then visit the Support page to view
a list of the codes.