Hobbico Z1020 Droneview 1080P Wi-Fi Camera User Manual DIDE05xx Dromida XL indd

Hobbico Inc Droneview 1080P Wi-Fi Camera DIDE05xx Dromida XL indd

Contents

Users Manual Part Two

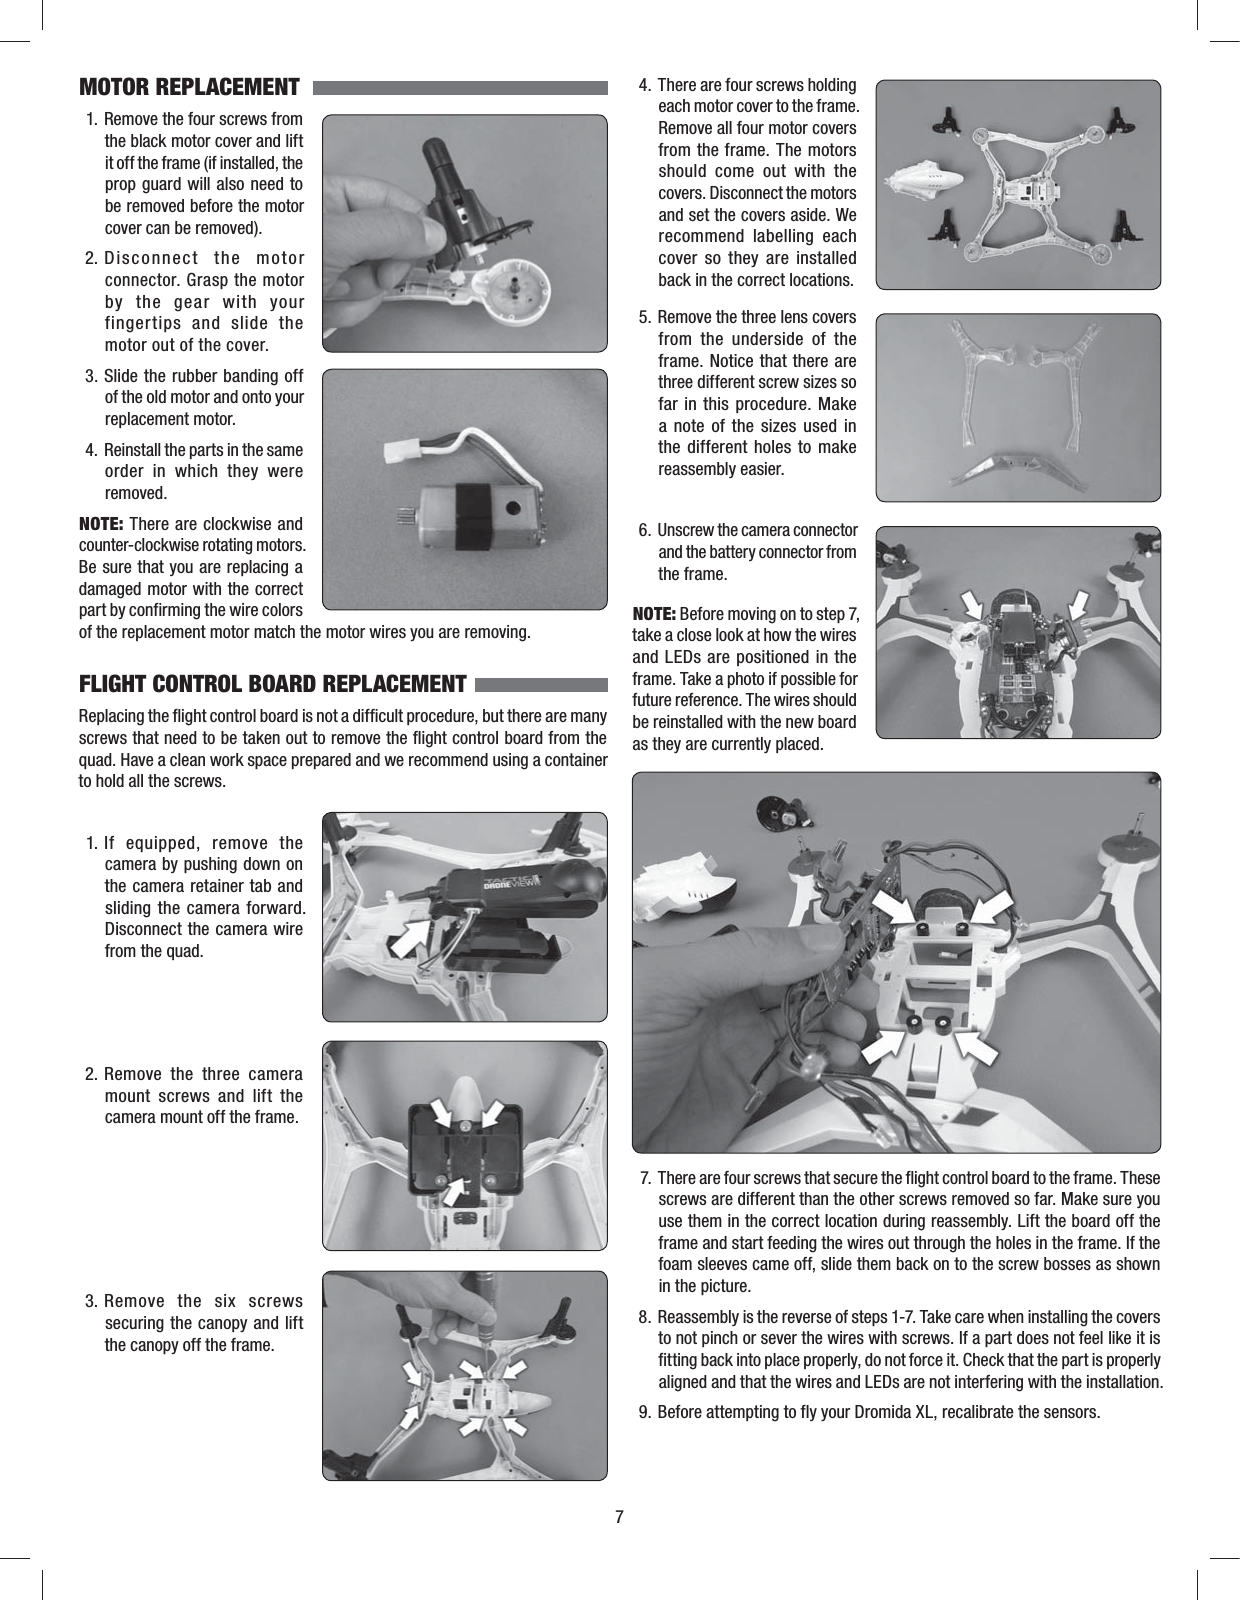
MOTOR REPLACEMENT  1.  Remove the four screws from the black motor cover and lift it off the frame (if installed, the prop guard will also need to be removed before the motor cover can be removed). 2.  Dis c on n e c t  t h e  m o t o r connector. Grasp the motor by the gear with your fingertips and slide the motor out of the cover. 3.  Slide the rubber banding off of the old motor and onto your replacement motor.  4.   Reinstall the parts in the same order in which they were removed.NOTE: There are clockwise and counter-clockwise rotating motors. Be sure that you are replacing a damaged motor with the correct part by confirming the wire colors of the replacement motor match the motor wires you are removing.FLIGHT CONTROL BOARD REPLACEMENTReplacing the flight control board is not a difficult procedure, but there are many screws that need to be taken out to remove the flight control board from the quad. Have a clean work space prepared and we recommend using a container to hold all the screws. 1.  If equipped, remove the camera by pushing down on the camera retainer tab and sliding the camera forward. Disconnect the camera wire from the quad. 2.  Remove the three camera mount screws and lift the camera mount off the frame. 3.  Remove the six screws securing the canopy and lift the canopy off the frame.  4.  There are four screws holding each motor cover to the frame. Remove all four motor covers from the frame. The motors should come out with the covers. Disconnect the motors and set the covers aside. We recommend labelling each cover so they are installed back in the correct locations.  5.  Remove the three lens covers from the underside of the frame. Notice that there are three different screw sizes so far in this procedure. Make a note of the sizes used in the different holes to make reassembly easier.  6.   Unscrew the camera connector and the battery connector from the frame.NOTE: Before moving on to step 7, take a close look at how the wires and LEDs are positioned in the frame. Take a photo if possible for future reference. The wires should be reinstalled with the new board as they are currently placed.  7.   There are four screws that secure the flight control board to the frame. These screws are different than the other screws removed so far. Make sure you use them in the correct location during reassembly. Lift the board off the frame and start feeding the wires out through the holes in the frame. If the foam sleeves came off, slide them back on to the screw bosses as shown in the picture.  8.   Reassembly is the reverse of steps 1-7. Take care when installing the covers to not pinch or sever the wires with screws. If a part does not feel like it is fitting back into place properly, do not force it. Check that the part is properly aligned and that the wires and LEDs are not interfering with the installation.  9.  Before attempting to fly your Dromida XL, recalibrate the sensors.7
FCC IC PRECAUTIONSantenna or ting in conjunction with any other lisé avec un minimum de 20cm de distance nd operated with minimum distance 20cm 8BATTERY PRECAUTIONSThe Dromida XL uses a lithium polymer (LiPo) battery. Follow these precautions to ensure safe and trouble-free operation.•  ALWAYS disconnect the battery from the quadcopter when not in use.•  Do not attempt to use this charger with NiCd or NiMH battery packs.•  Do not attempt to use a damaged battery.•  This product contains a LiPo battery that must be recycled or disposed of properly.•  Do not leave the charger unattended while charging. Disconnect the battery and unplug the charger immediately if either becomes hot! However, it is normal for the charger to get warm.•  Disconnect the battery from the charger and carefully move the battery to a  reproof location if the battery begins to swell or smoke!•  Never allow the battery temperature to exceed 140° F [60° C].•  Do not attempt to charge a battery if it is swollen or hot.•  Do not place the charger or any battery on a  ammable surface or near combustible materials while in use.•  Never disassemble or modify pack wiring in any way or puncture cells.•  Never charge inside a vehicle.•  Always disconnect the battery and unplug the charger when not in use.•  Land your model immediately when the LEDs  ash to indicate that the battery power is low. Recharge the battery before attempting another  ight. A dangerous situation can occur when attempting to recharge an over-discharged battery!•  ALWAYS keep a supply of sand accessible when charging. Dumping sand on the battery will extinguish a LiPo chemical  re.•  ALWAYS KEEP OUT OF REACH OF CHILDRENSAFETY PRECAUTIONSFollow these safety precautions when operating this or any model quadcopter.•  Adult supervision required.•  Before  ying, go to www.knowbeforeyou y.org.•  Do not touch the spinning blades or  y over another person’s head.•  Keep your face and body as well as all spectators away from the rotors whenever the battery is connected.•  Stay clear of buildings, trees and power lines. AVOID  ying in or near crowded areas. DO NOT  y close to people, children or pets.•  Maintain a safe pilot-to-quadcopter distance while  ying.•  Your Dromida XL quadcopter should not be considered a toy, but rather a small, working model. If not operated correctly, the model could possibly cause injury to you or spectators and damage to property.•  You must check the operation of the model before every  ight to ensure that the model has remained structurally sound.•  Do not alter or modify the model, as doing so may result in an unsafe or un yable model.•  Do your part in preserving the integrity of the FPV hobby. Know the boundaries of your flying area and ALWAYS respect the privacy of others.90-DAY LIMITED WARRANTY PLEASE DO NOT RETURN YOUR PRODUCT TO THE STORE. Dromida will repair or replace factory defects for 90 days from the date of purchase. This warranty speci cally does not cover crash damage, misuse or abuse. To make a warranty claim, please contact our product support team at 1-217-398-8970 option 6 or e-mail us at helihotline@greatplanes.com. If requested by Product Support, please send defective product to:Hobby Services3002 N Apollo Dr., Suite #1Champaign, IL 61822In the European Union, send it postpaid and insured to:Service Abteilung Revell GmbH Tel: 01805-110111Henschelstrasse 20-30  (nur für Deutschland)32257 Bünde GermanyE-mail: Hobbico-Service@Revell.de Please include a note about the problem, your contact information, and a copy of the receipt.This warranty applies only if the product is operated in compliance with the instructions and warnings provided with each model. Dromida assumes no liability except for the exclusive remedy or repair of parts as speci ed above. Dromida shall not be liable for consequential or incidental damages. Some states do not allow the exclusion of consequential or incidental damages so the above exclusion may not apply to you. This warranty gives you speci c legal rights and you may also have other rights which vary from state to state.This device complies with Industry Canada licence-exempt RSS standard (s). Operation is subject to the following two conditions: (1) this device may not cause interference, and (2) this device must accept any interference,including interference that may cause undesired operation of the device.   LeprésentappareilestconformeauxCNRd'IndustrieCanadaapplicablesauxappareilsradioexemptsdelicence.L'exploitationestautoriséeauxdeuxconditionssuivantes:(1)l'appareilnedoitpasproduiredebrouillage,et(2)l'utilisateurdel'appareildoitacceptertoutbrouillageradioélectriquesubi,mêmesilebrouillageestsusceptibled'encompromettrelefonctionnement.IC Radiation Exposure Statement:   This equipment complies with IC RF radiation exposure limits set forth for an uncontrolled environment. This transmitter must not be co-located or operating in conjunction with any other antenna or transmitter. IC exposition aux radiations:   Cet équipement est conforme avec IC les limites d'exposition aux rayonnements définies pour un contrôlé environnement.   Cet émetteur ne doit pas être co-localisés ou fonctionner en conjonction avec une autre antenne ou émetteur.This equipment should be installed abetween the radiator & your body. Cet équipement doit être installé et utientre le radiateur et votre corps. FCC Radiation Exposure Statement:     IC RSS warning   This equipment complies with FCC radiation exposure limits set forth for an uncontrolled environment. This equipment should be installed and operated with minimum distance 20cm between the radiator& your body.     This transmitter must not be co-located or operatransmitter.
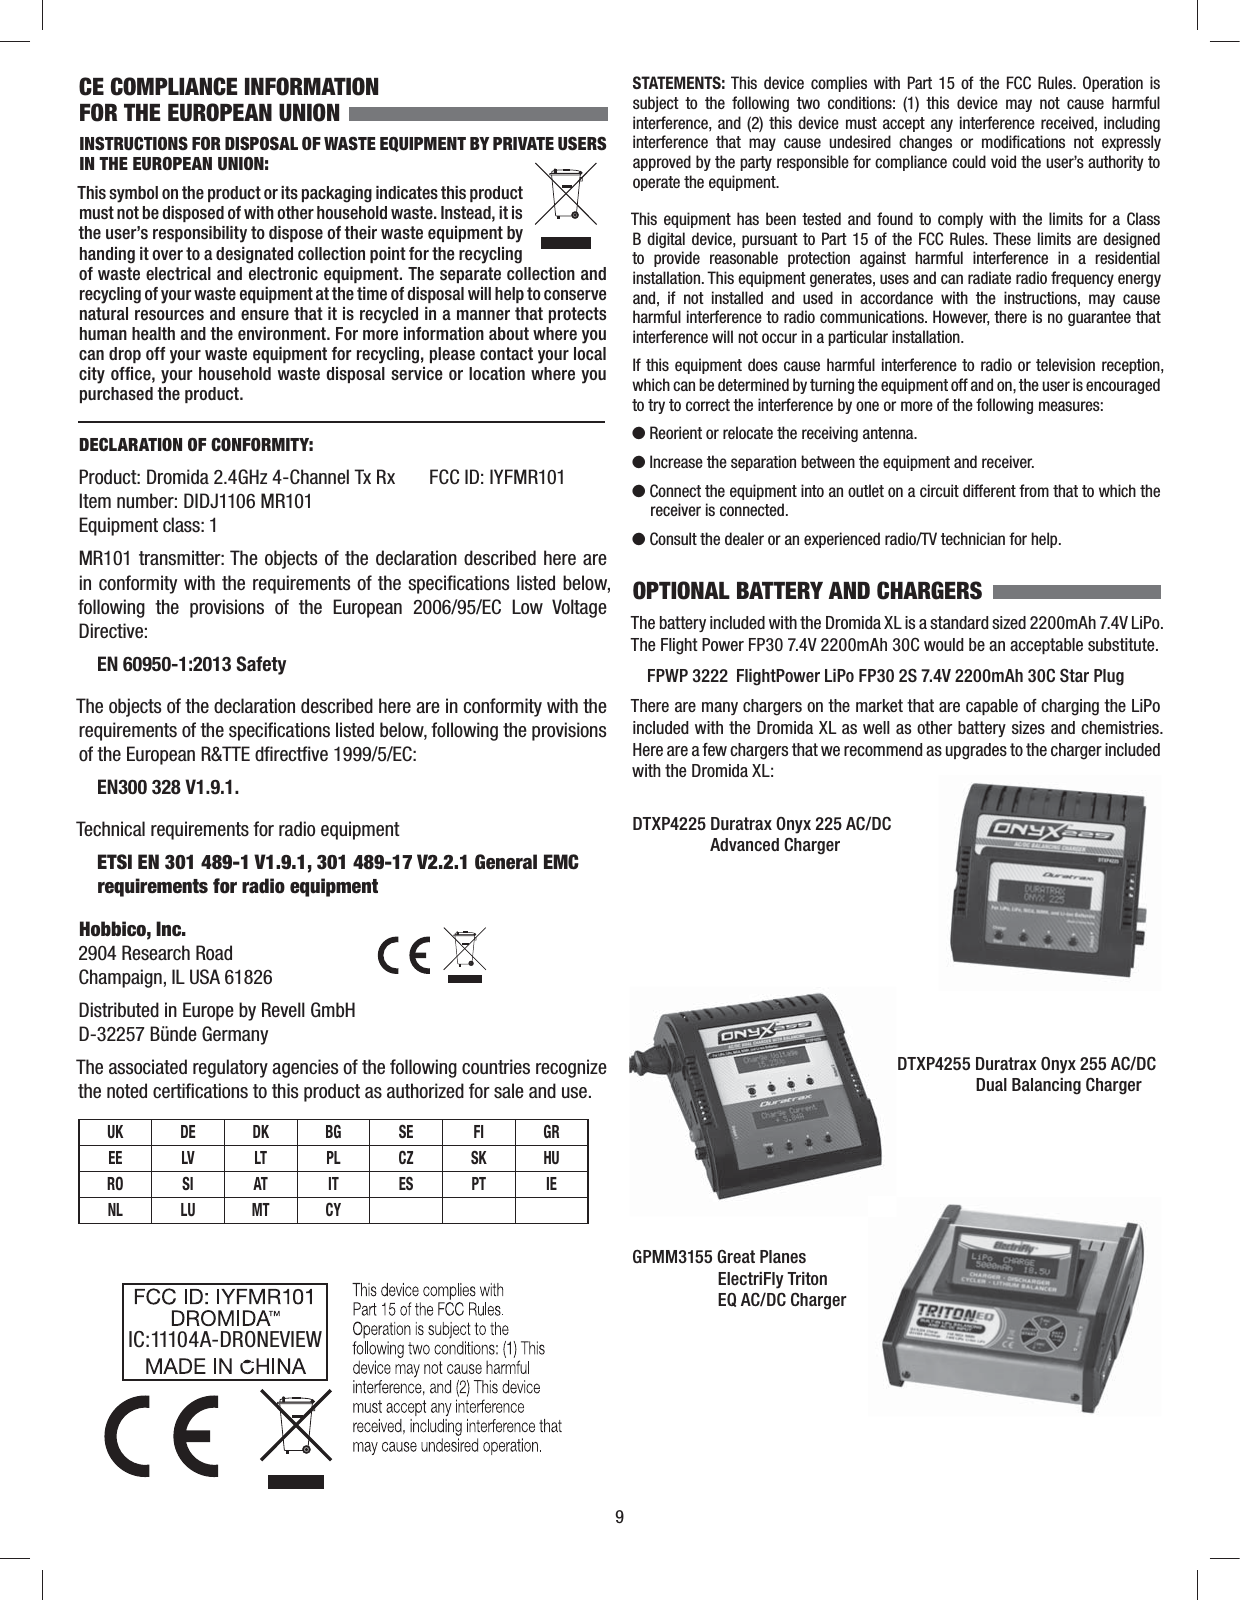
9CE COMPLIANCE INFORMATIONFOR THE EUROPEAN UNION INSTRUCTIONS FOR DISPOSAL OF WASTE EQUIPMENT BY PRIVATE USERS IN THE EUROPEAN UNION:This symbol on the product or its packaging indicates this product must not be disposed of with other household waste. Instead, it is the user’s responsibility to dispose of their waste equipment by handing it over to a designated collection point for the recycling of waste electrical and electronic equipment. The separate collection and recycling of your waste equipment at the time of disposal will help to conserve natural resources and ensure that it is recycled in a manner that protects human health and the environment. For more information about where you can drop off your waste equipment for recycling, please contact your local city of ce, your household waste disposal service or location where you purchased the product.DECLARATION OF CONFORMITY:Product: Dromida 2.4GHz 4-Channel Tx Rx  FCC ID: IYFMR101Item number: DIDJ1106 MR101Equipment class: 1MR101 transmitter: The objects of the declaration described here are in conformity with the requirements of the speci cations listed below, following the provisions of the European 2006/95/EC Low Voltage Directive:EN 60950-1:2013 SafetyThe objects of the declaration described here are in conformity with the requirements of the speci cations listed below, following the provisions of the European R&TTE drectve 1999/5/EC:EN300 328 V1.9.1.Technical requirements for radio equipmentETSI EN 301 489-1 V1.9.1, 301 489-17 V2.2.1 General EMC requirements for radio equipmentHobbico, Inc.2904 Research RoadChampaign, IL USA 61826Distributed in Europe by Revell GmbHD-32257 Bünde GermanyThe associated regulatory agencies of the following countries recognize the noted certi cations to this product as authorized for sale and use.UK DE DK BG SE FI GREE LV LT PL CZ SK HURO SI AT IT ES PT IENL LU MT CYIC: 11104 A-DRONEVIEWSTATEMENTS: This device complies with Part 15 of the FCC Rules. Operation is subject to the following two conditions: (1) this device may not cause harmful interference, and (2) this device must accept any interference received, including interference that may cause undesired changes or modi cations not expressly approved by the party responsible for compliance could void the user’s authority to operate the equipment.This equipment has been tested and found to comply with the limits for a Class B digital device, pursuant to Part 15 of the FCC Rules. These limits are designed to provide reasonable protection against harmful interference in a residential installation. This equipment generates, uses and can radiate radio frequency energy and, if not installed and used in accordance with the instructions, may cause harmful interference to radio communications. However, there is no guarantee that interference will not occur in a particular installation.If this equipment does cause harmful interference to radio or television reception, which can be determined by turning the equipment off and on, the user is encouraged to try to correct the interference by one or more of the following measures:●  Reorient or relocate the receiving antenna.●  Increase the separation between the equipment and receiver.●  Connect the equipment into an outlet on a circuit different from that to which the receiver is connected.●  Consult the dealer or an experienced radio/TV technician for help.OPTIONAL BATTERY AND CHARGERSThe battery included with the Dromida XL is a standard sized 2200mAh 7.4V LiPo. The Flight Power FP30 7.4V 2200mAh 30C would be an acceptable substitute.  FPWP 3222  FlightPower LiPo FP30 2S 7.4V 2200mAh 30C Star PlugThere are many chargers on the market that are capable of charging the LiPo included with the Dromida XL as well as other battery sizes and chemistries. Here are a few chargers that we recommend as upgrades to the charger included with the Dromida XL:DTXP4225  Duratrax Onyx 225 AC/DC Advanced ChargerDTXP4255  Duratrax Onyx 255 AC/DC Dual Balancing ChargerGPMM3155  Great Planes ElectriFly Triton EQ AC/DC Charger
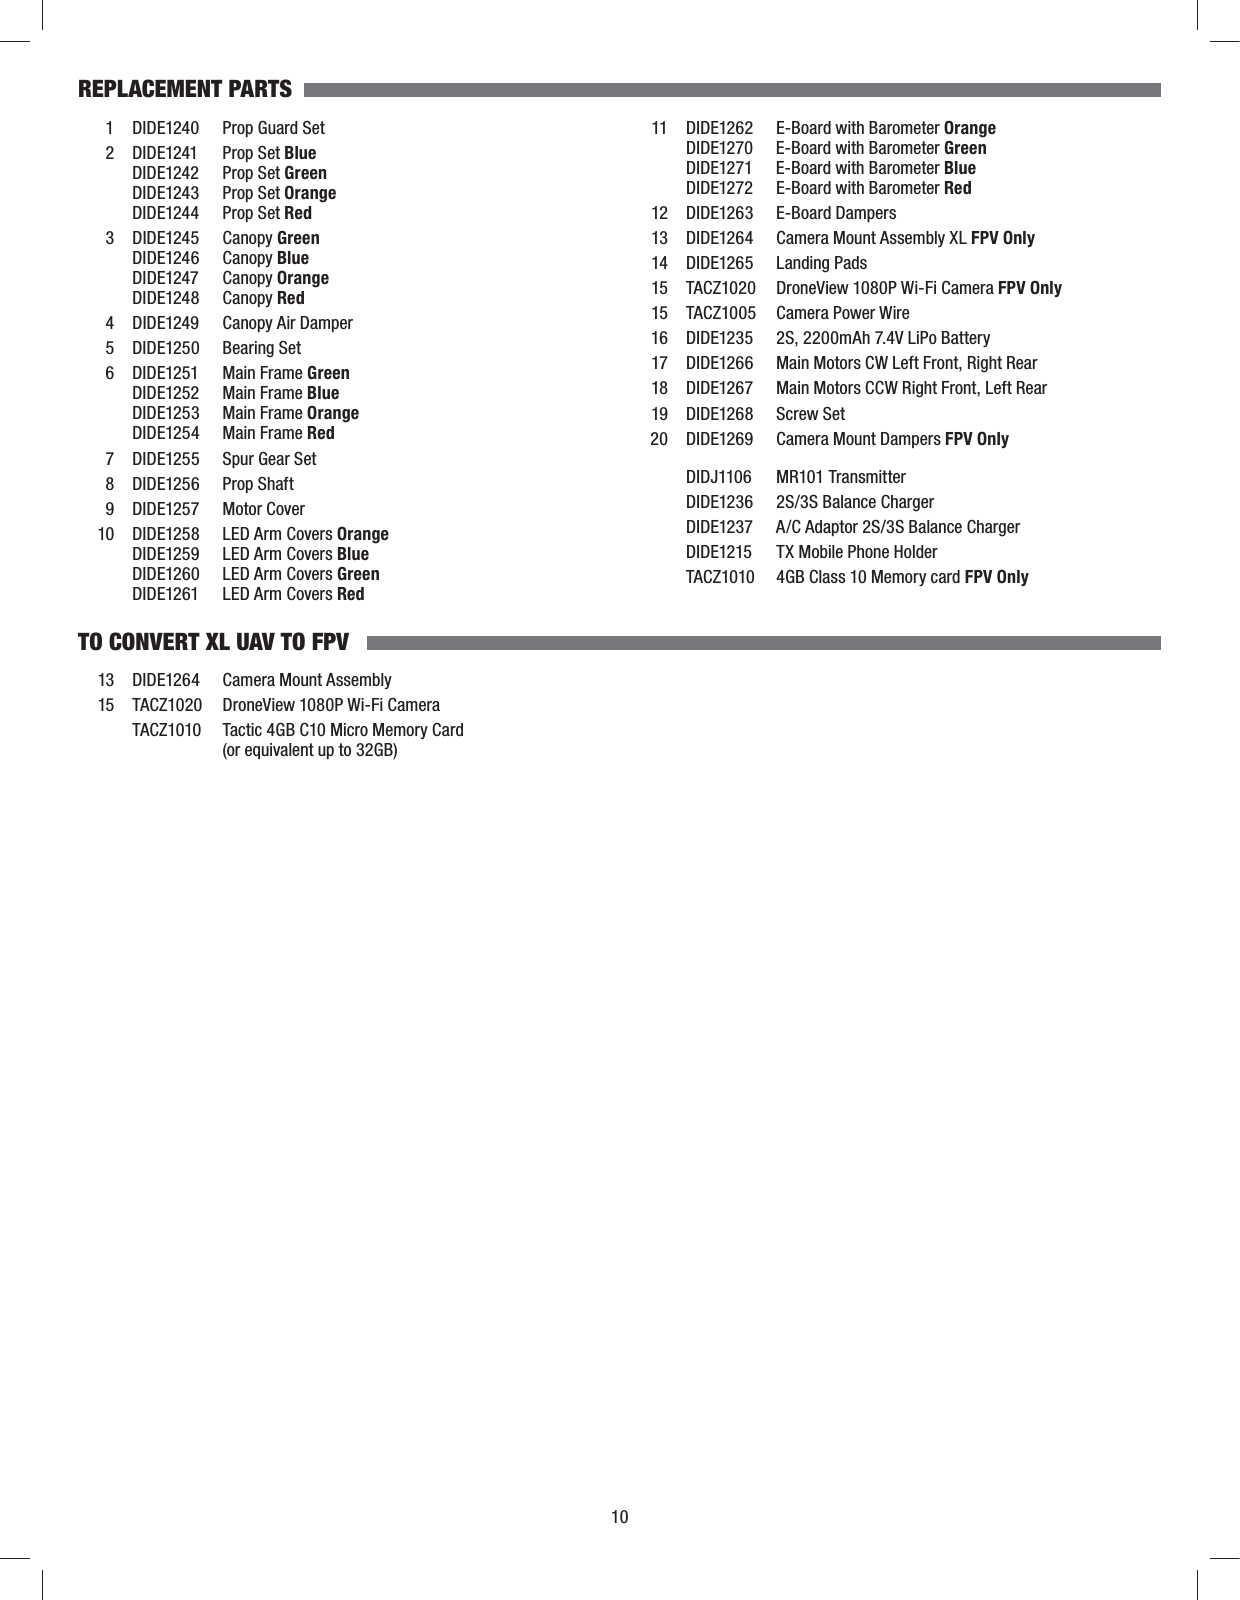
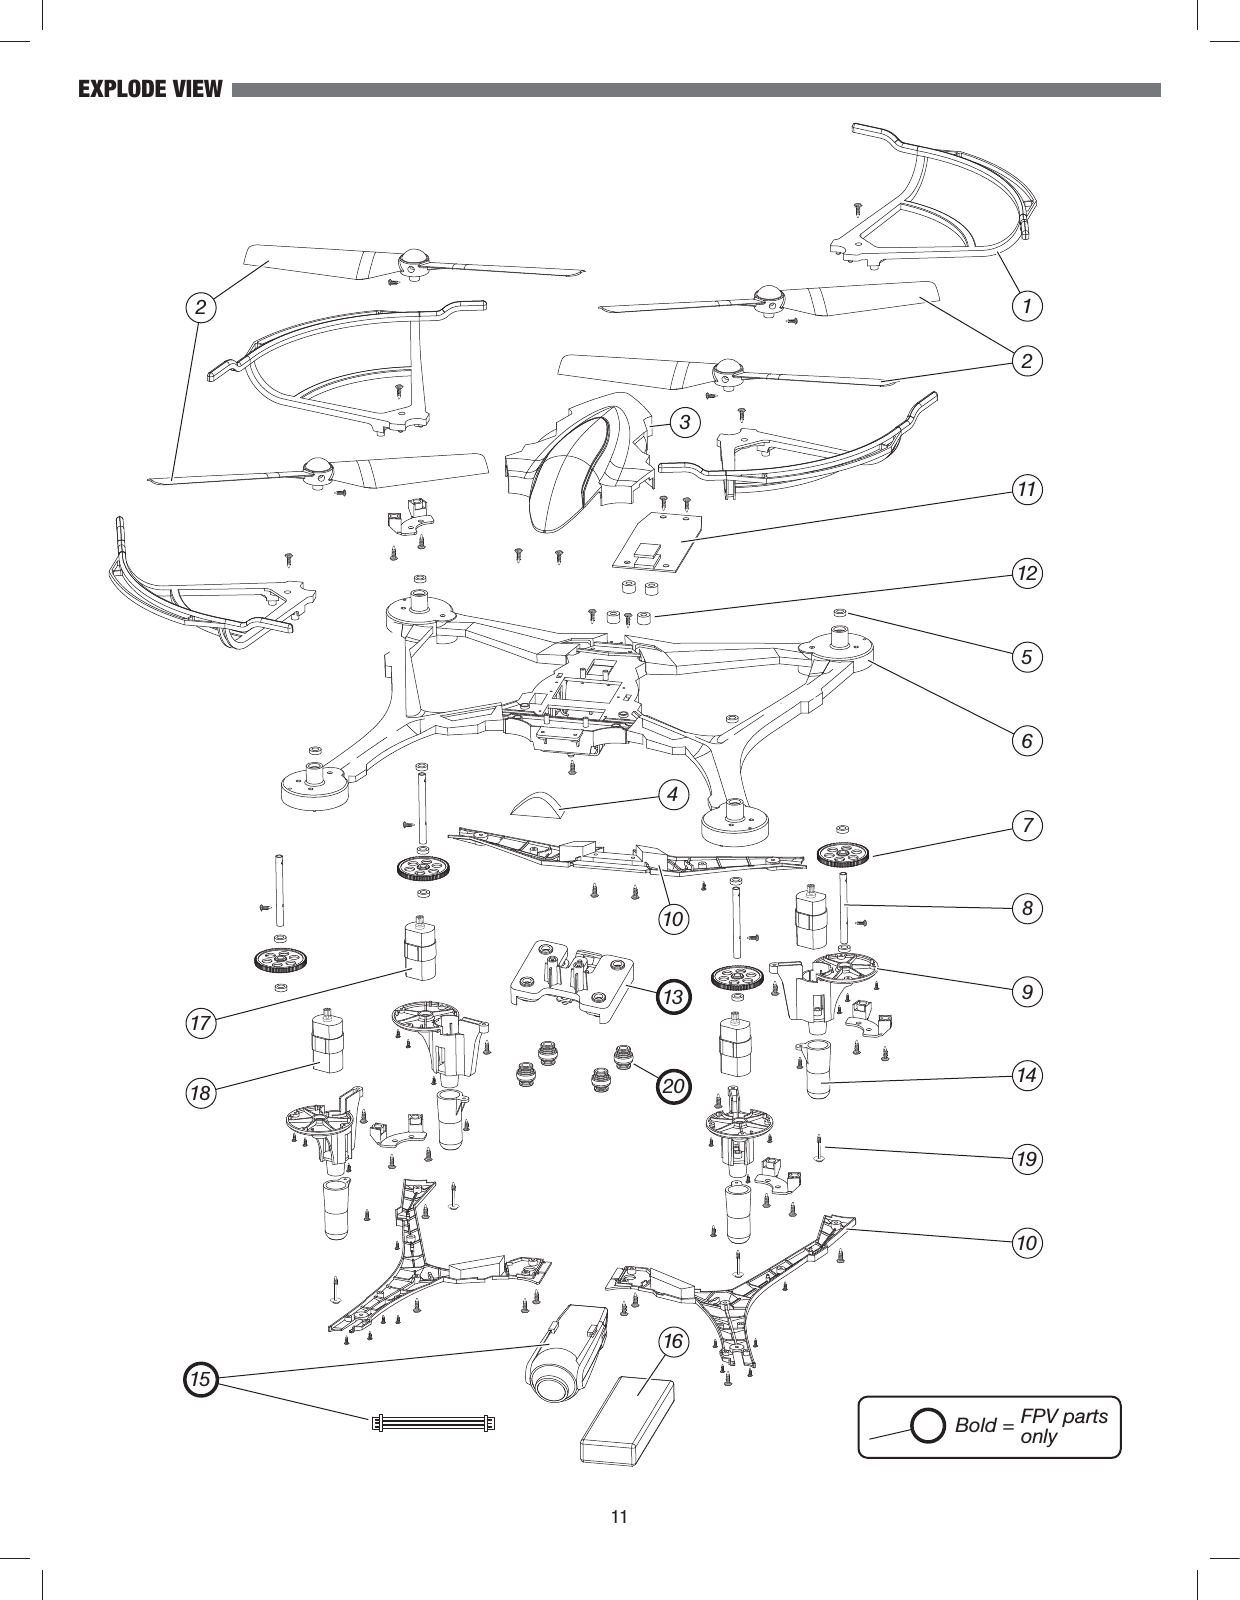
10  1  DIDE1240  Prop Guard Set 2 DIDE1241 Prop Set Blue  DIDE1242 Prop Set Green  DIDE1243 Prop Set Orange  DIDE1244 Prop Set Red 3 DIDE1245 Canopy Green  DIDE1246 Canopy Blue  DIDE1247 Canopy Orange  DIDE1248 Canopy Red  4  DIDE1249  Canopy Air Damper 5 DIDE1250 Bearing Set 6 DIDE1251 Main Frame Green  DIDE1252 Main Frame Blue  DIDE1253 Main Frame Orange  DIDE1254 Main Frame Red  7  DIDE1255  Spur Gear Set 8 DIDE1256 Prop Shaft 9 DIDE1257 Motor Cover  10  DIDE1258  LED Arm Covers Orange    DIDE1259  LED Arm Covers Blue    DIDE1260  LED Arm Covers Green    DIDE1261  LED Arm Covers Red  11  DIDE1262  E-Board with Barometer Orange    DIDE1270  E-Board with Barometer Green    DIDE1271  E-Board with Barometer Blue    DIDE1272  E-Board with Barometer Red 12 DIDE1263  E-Board Dampers  13  DIDE1264  Camera Mount Assembly XL FPV Only 14 DIDE1265  Landing Pads  15  TACZ1020  DroneView 1080P Wi-Fi Camera FPV Only  15  TACZ1005  Camera Power Wire  16  DIDE1235  2S, 2200mAh 7.4V LiPo Battery  17  DIDE1266  Main Motors CW Left Front, Right Rear  18  DIDE1267  Main Motors CCW Right Front, Left Rear 19 DIDE1268  Screw Set   20  DIDE1269  Camera Mount Dampers FPV Only  DIDJ1106 MR101 Transmitter    DIDE1236  2S/3S Balance Charger    DIDE1237  A/C Adaptor 2S/3S Balance Charger    DIDE1215  TX Mobile Phone Holder    TACZ1010  4GB Class 10 Memory card FPV OnlyREPLACEMENT PARTS TO CONVERT XL UAV TO FPV  13  DIDE1264  Camera Mount Assembly  15  TACZ1020  DroneView 1080P Wi-Fi Camera    TACZ1010  Tactic 4GB C10 Micro Memory Card      (or equivalent up to 32GB)
111231721816410512116879141910Bold = FPV partsonly132015EXPLODE VIEW
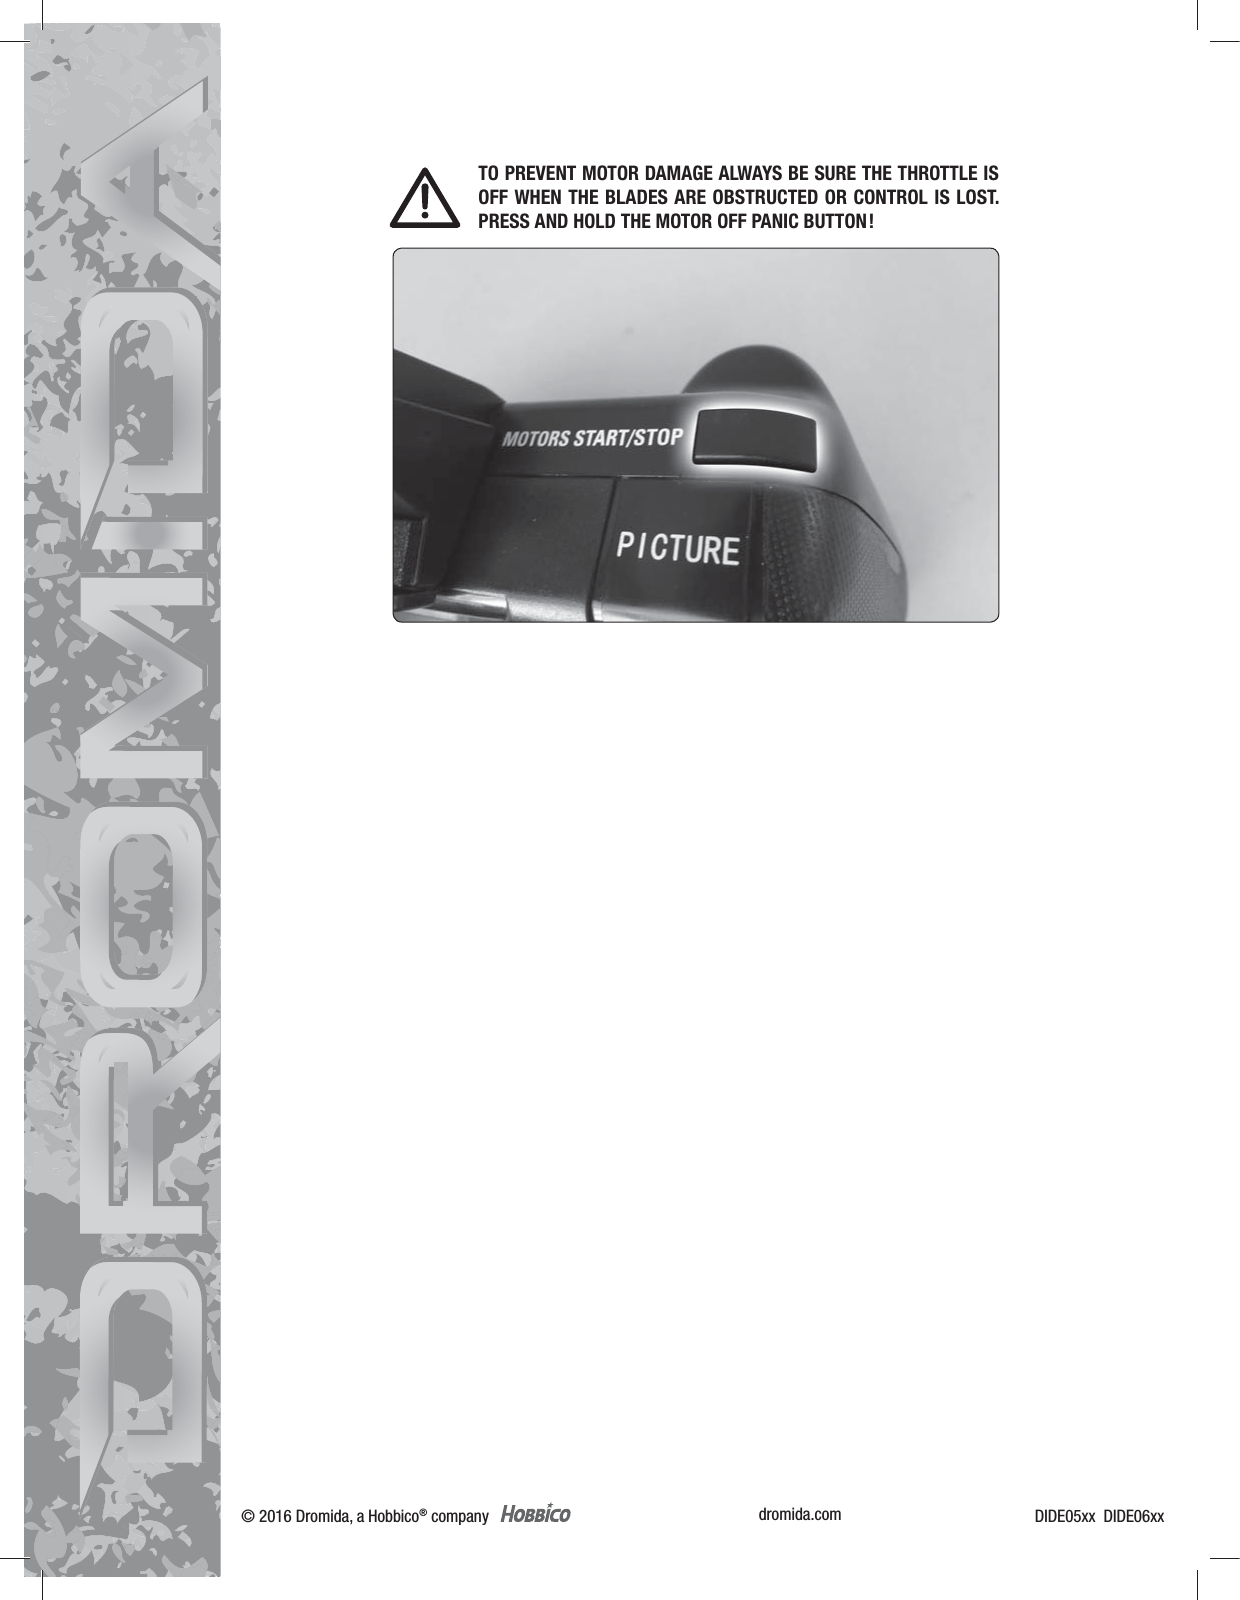
dromida.com© 2016 Dromida, a Hobbico® company DIDE05xx  DIDE06xxTO PREVENT MOTOR DAMAGE ALWAYS BE SURE THE THROTTLE IS OFF WHEN THE BLADES ARE OBSTRUCTED OR CONTROL IS LOST. PRESS AND HOLD THE MOTOR OFF PANIC BUTTON!

Navigation menu