Honeywell 7400-3021 Wireless Data Collection Terminal User Manual Chapter 3 Dolphin7400 Overview
Honeywell International Inc Wireless Data Collection Terminal Chapter 3 Dolphin7400 Overview
Contents
Manual ch 3

25
•
•
•
•
•
•
PRELIMINARY
DOCUMENT
Dolphin 7400/7450 Overview
System Features
Processor
The Dolphin® 7400/7450 terminal is equipped with a StrongARM®
206MHz RISC microprocessor that runs on a 100 MHz BUS and is
the most powerful Windows® CE platform on the market.
Operating System
Microsoft® Windows® CE is a compact, highly efficient, scalable
operating system. Its open architecture and minimal memory
requirements facilitate development of applications for energy-
efficient data collection devices like the Dolphin 7400/7450 terminal.
The graphical interface also makes the device more user-friendly.
Memory
Main Board
The memory configuration for the Dolphin 7400/7450 terminals is
32 MB RAM and 32 MB FLASH.
Compact Flash Card
Dolphin 7400/7450 terminals have one Type I compact flash card
socket for additional application and data storage capacity. Additional
modular compact flash upgrades of 64 MB, 128 MB, and 256 MB are
available through an authorized HHP service center. The compact
flash card socket is not user accessible, to preserve the terminal’s
environmental rating.
Radio Options
Dolphin 7400/7450 terminals have one Type II PCMCIA card slot to
allow for an interface with wireless network adapter cards. Radio
options currently available include the Cisco® 342 (FCC
#LDK102035) and Cisco® 352 (FCC #HD5-7400-352) series network
cards and the Spectrum24® 2Mbs (FCC #HD5-7400-3021).
3
26
•
•
•
•
•
•
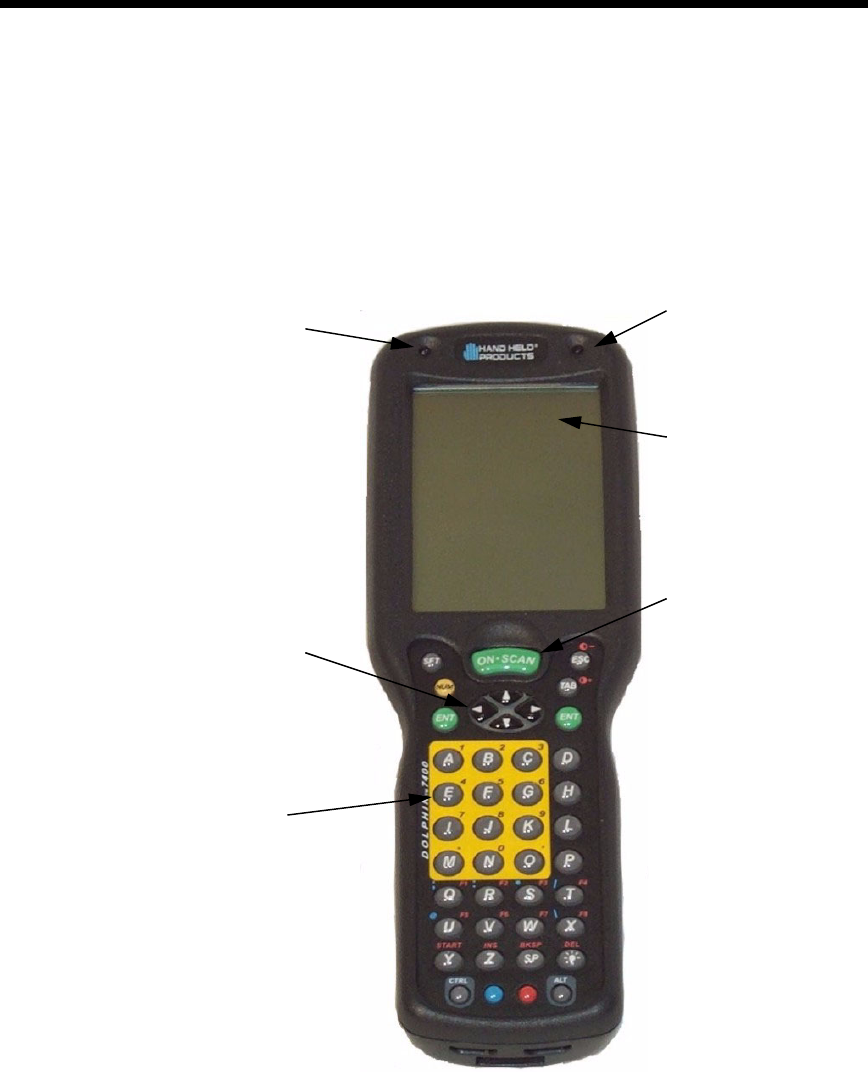
Front Panel Features
This section describes features on the Dolphin 7400/7450 terminal front panel.
LEDs
The red light emitting diode (LED) located at the upper right corner of the LCD
display is SCAN LED. This LED illuminates when the user presses the ON/SCAN
key and activates the scan engine. The green LED located at the upper left corner
of the LCD display is DECODE LED. This LED illuminates when the bar code
software successfully decodes a bar code. Both LEDs are software
programmable.
Decode LED Scan LED
1/4 VGA Display
(Optional
Touchscreen)
Cursor Key
ON/SCAN Key
Keypad with
epoxy-coated keys

27
•
•
•
•
•
•
1/4 VGA Display
The Dolphin 7400/7450 screen is a non-touch 240 x 320 pixel 1/4 VGA industrial
protective lens display. The electroluminescent backlight allows you to view the
display in low light conditions. To conserve power, the backlight may be
programmed to automatically turn off after a prescribed amount of time. The
contrast may be adjusted with the contrast keys.
The Dolphin 7400/7450 display may be equipped with a touchscreen that can be
activated with a stylus or finger.
ON/SCAN Key
The ON/SCAN key is centrally located for easy use with the right or the left hand.
On the 7450 terminal, the ON/SCAN key operates as an On or system wakeup
control; scanning is activated with the handle trigger.
Cursor Keys
The centrally located cursor keys allow full Windows® navigation.
Audio Signals
The Dolphin 7400/7450 terminal has an internal speaker that sounds audio
signals as you scan bar code labels and enter data. Signals are emitted at a
sound level of 80 dB sound pressure level at two feet. The operating frequency
range is 500 Hz up to 8 kHz. The speaker can also be used for playing sounds
using WAV files.
Keyboard
The Dolphin 7400/7450 terminal’s keyboard features epoxy-coated keys and is
backlit for easy use in dark and dim lighting conditions. The keyboard’s yellow
background enhances the readability of the numeric keys. The centrally located
ON/SCAN key and other important keys allow for easy imaging, bar code
scanning and application navigation. All keyboard versions are suited for right-
handed and left-handed use.
28
•
•
•
•
•
•
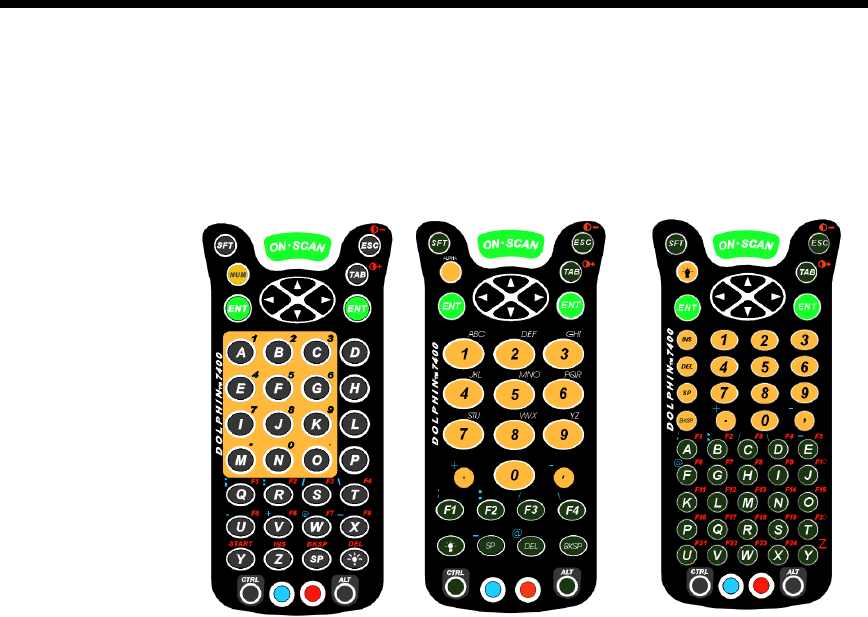
There are three keyboard options for the Dolphin 7400/7450 terminals:
•
43-key alpha/numeric
•
35-key numeric/alpha only
•
56-key alpha/numeric
RF Antenna
The Dolphin 7400/7450 RF terminal’s antenna is a unity gain, quarter-wave,
monopole antenna.
43-key
alpha/numeric keyboard
35-key numeric/alpha
keyboard
56-key
alpha/numeric keyboard
29
•
•
•
•
•
•
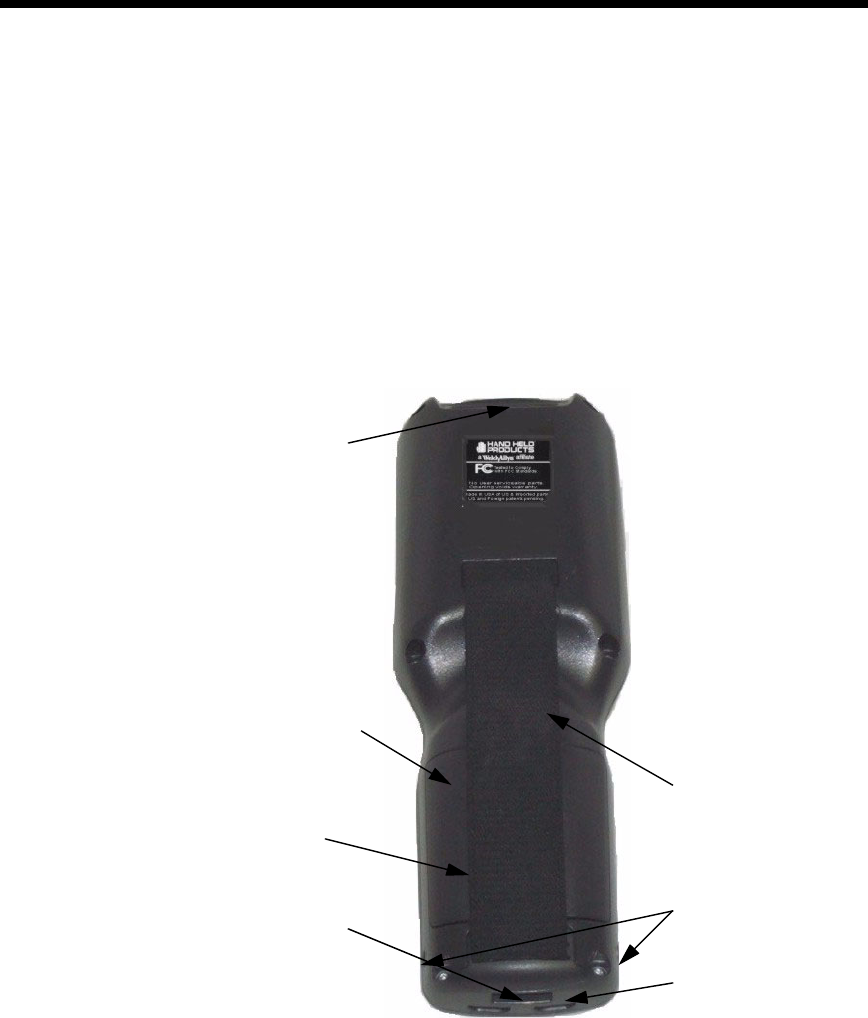
Back Panel Features
This section describes features on the back panels of the Dolphin 7400 and
Dolphin 7450 terminals.
Dolphin 7400
All versions of the 7400 terminal have similar back panels except for the safety
labels specific to how the the terminal is equipped.
Image Engine
Dolphin 7400/7450 terminals are equipped with an image engine that reads and
decodes linear, stacked linear (PDF417) and 2D matrix bar code symbologies.
With the latest CMOS-based technology, the engine works like a digital camera
and adds functionality and value to the Dolphin 7400/7450 by adding additional
capabilities, such as digital image capture, signature capture and reading OCR
characters. Digital images taken with the 7400/7450 terminal have a maximum
image size of 640 x 480 pixels and may have up to a 256 gray scale image
definition. Files formats supported for image storage include Bitmap (bmp), JPEG
(jpg) and Portable Network Graphics (png).
Battery Well
Battery
RS-232 Port
IrDA Port
Hand Strap
Battery Charging
Contacts
Image Engine/
Laser Engine
Window

30
•
•
•
•
•
•
Laser Engine
Dolphin 7400/7450 terminals are also available with an optional Advanced Long
Range (ALR) laser scanner for long range scanning applications prevelant in
warehousing and distribution centers.
A clear window with anti-reflective, scratch-proof coating covers the image/laser
engine to protect it from dust and dirt.
Battery Well
The Battery well is a recessed area on the back of the Dolphin that holds the 2700
mAh NiMH battery pack.
Battery Charging Contacts
When the Dolphin is placed in the main well of the Dolphin HomeBase, the
Dolphin’s battery pack is charged through these gold-plated contacts.
Hand Strap
The 7400 has an integrated elastic hand strap to provide the user with a
comfortable, secure grip on the terminal. If desired, the strap may be removed.
31
•
•
•
•
•
•
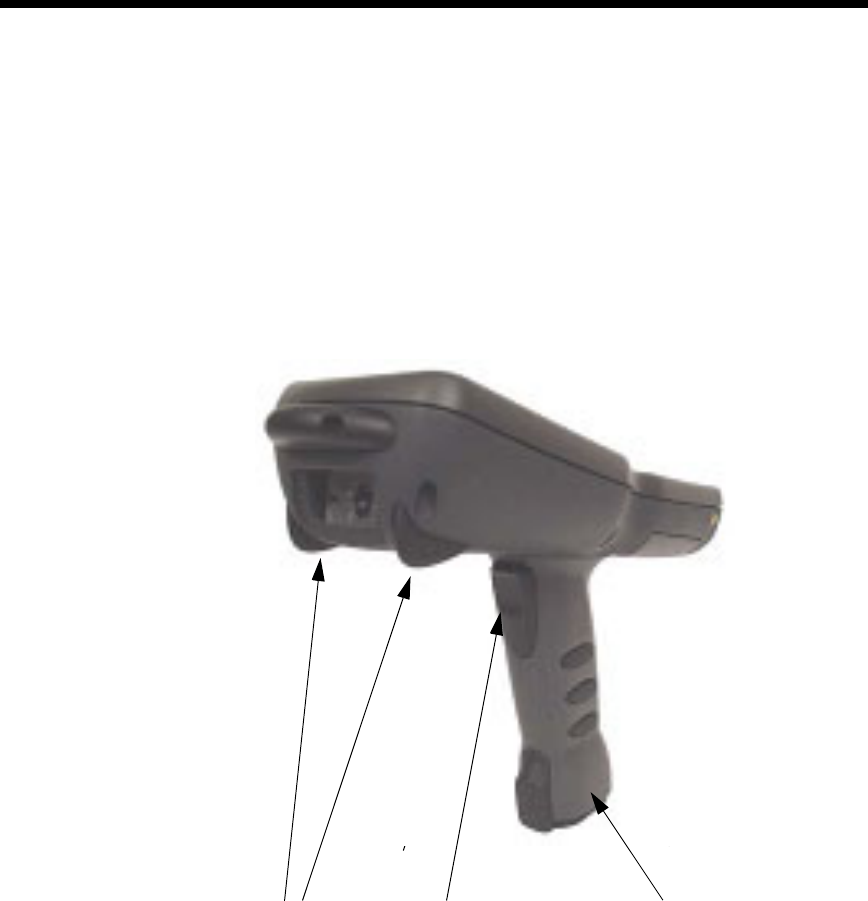
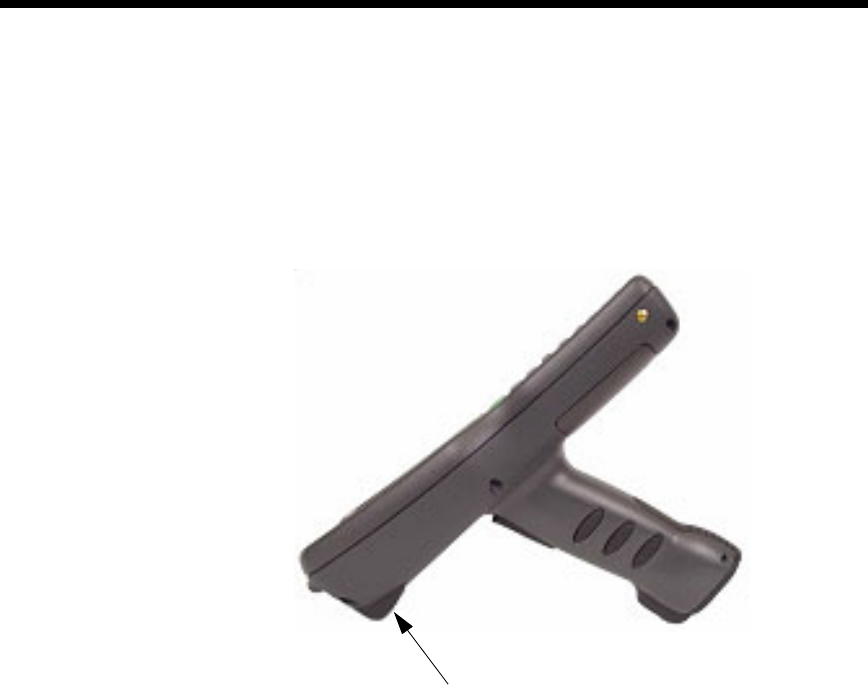
Dolphin 7450
The bottom cover of the Dolphin 7450 terminal is similar to the Dolphin 7400 as
described in the previous section with the following exceptions: the pistol-grip
handle with imager/scanner trigger and the rubber bumpers. All versions of the
7450 terminal have similar bottom covers except for the safety labels specific to
how the terminal is equipped.
Rubber Nose
Bumpers
Handle
Scan Trigger
32
•
•
•
•
•
•
Rubber Nose Bumpers
Rubber bumpers allow the Dolphin 7450 to rest in a stable, nose-down position
when the unit is set on a flat surface by the user.
Scan Trigger
The scan trigger provides comfortable two-finger scan activation.
Pistol Grip Handle
The comfortable, ergonomic handle is designed especially for use in rapid, high
volume scanning applications and features rubber surface details for improved
handle grip, comfort, and shock absorption.
Communication
Micro-DB9 RS-232 Port
The industry-standard RS-232 port allows the user to connect with peripherals,
such as printers, serial modems and desktop computers for serial communication
to the Dolphin 7400/7450 terminal. The maximum speed is 115kbps with seven
baud rate settings.
Rubber Bumpers

33
•
•
•
•
•
•
IrDA Port
The IrDA (Infrared Communications) Port allows the Dolphin to communicate
through the Dolphin HomeBase, IntelliBase and IntelliBase+ to host serial devices
or IrDA printers. The maximum speed is 115kbps.
RJ-45 Phone Jack (7400 only)
The optional phone jack is located on the back of Dolphin 7400 terminals
equipped with a low power, high speed, V.90 56K FAX/modem to allow
communications via an analog phone line.
CAUTION: Only connect the modem to an analog phone line. Connecting to a digital
PBX phone line could result in damage to the modem.
Power
5 VDC Port
This port connects the Dolphin 7400/7450 to DC power for powering peripheral
devices and charging the main and backup batteries.
Power is fed through the RS-232 communications port.
Batteries
CAUTION: Use only the 3.6V battery packs provided by HHP. The use of any other
battery pack in the Dolphin 7400 terminal will void your warranty and may result in
damage to the Dolphin terminal or battery.
There are two batteries in the Dolphin:
Internal NiMH Backup Battery Located inside the Dolphin, this battery backs
up the RAM and clock when the NiMH main battery is discharged or removed
from the terminal. The internal backup battery is not user replaceable.
NiMH Battery Pack The battery pack is the primary power source for operating
the Dolphin terminal.
Internal NiHM Backup Battery
The Dolphin’s internal backup battery prevents the terminal from being reset if you
need to remove and replace the main battery pack. The battery retains RAM data
and allows the real-time clock to remain operational for up to 30 minutes when the
battery pack is removed. For the initial charging cycle, it is recommended that the
terminal be charged for approximately 8 hours to allow adequate charging time for
the back-up battery. Not doing so may result in the terminal becoming unstable
should the unit lose power and the backup battery is required.
If the backup battery becomes discharged of power after the initial charge cycle, it
will require a minimum of 5 hours of charging time to perform and maintain the
system as described above.

34
•
•
•
•
•
•
The internal backup battery is charged by the Dolphin’s main battery pack when
an external power source such as the Dolphin HomeBase, is not available. If the
terminal is left without the main battery pack for more than 30 minutes, the internal
backup battery will need to be recharged.
Note: Data and programs stored in FLASH remain safe even if the internal backup
battery fails. However, you must reset the real-time clock using the Windows® CE
Time and Date function.
Follow these guidelines to maximize the life of the Dolphin’s backup battery:
•
Keep a charged NiMH battery pack in the Dolphin. The internal battery will prematurely
discharge if there is not at least a partially charged battery in the terminal.
•
Put the Dolphin in the HomeBase when the terminal is not in use.
Main Battery Pack
The 3.6V, 2700 mAh Nickel-Metal-Hydride (NiMH) battery pack is the primary
power source for the Dolphin. Other NiMH batteries may be approved by HHP to
work with your Dolphin. Contact HHP for more information.
The 2700 mAh NiMH battery is designed to operate in a temperature range of -10
to 50°C (14 to 122°F). For maximum performance, charge the batteries between
10 and 35°C (50 and 95°F).
Managing Battery Power
Data and files saved on the Dolphin 7400/7450 terminal may be stored in RAM, so
it is important to maintain a continuous power supply to the terminal. When the
main battery pack becomes low, the Low Battery Charge icon will appear in the
notification tray at the bottom of the screen. The Critical icon will appear when the
battery is critically low. There is also a Low Battery icon that will appear when the
back-up battery is low.
Letting the back-up battery become fully discharged will cause the terminal to lose
all data in RAM. Therefore, you should keep a charged battery pack in the Dolphin
at all times to conserve the internal back-up battery. When you remove a battery
pack, insert another charged pack in the Dolphin. The internal battery will
prematurely discharge if there is not at least a partially charged battery in the
terminal.
A battery status indicator will display in the notification tray when the battery is low
or critically low. If there is no indicator, the battery is adequately charged.
If the main battery is low and the terminal is in sleep mode, pressing the ON/
SCAN button or the scan trigger will not wake up the Dolphin 7400/7450 terminal;
you must replace the discharged battery with a fully charged battery.
Setting Critical and Low Battery Points
The Dolphin 7400/7450 may be programmed to display warnings when the
battery reaches critical and low battery points. There are two entries defined in the
registry. The specific settings are:
[HKEY_LOCAL_MACHINE\System\CurrentControlSet\Control\Power]

35
•
•
•
•
•
•
"CriticalBatt"=dword:a
"LowBatt"=dword:19
"CriticalBatt"=dword:a
This sets the Critical Battery point to 10 percent (a hex = 10 decimal). The critical
battery is the point at which the customer is warned that the battery charge is very
low. This warning will be posted every 3 minutes until the situation is corrected.
"LowBatt"=dword:19
This sets the Low battery point to 25 percent (19 hex = 25 decimal). The low
battery setting is the point at which the user is alerted that the battery is low. The
user is notified only once for a low battery.
These are the default values. Developers can set these parameters from 0 (no
warning at all) to 99 (would nearly always warn). The warnings do not appear
when the terminal is on external power.
Using the Power Control Panel
The Power control panel displays information about current battery status and
allows you to set options that can conserve battery power.
There is also a battery usage indicator displayed. This indicator represents the
total cumulative time that the current main battery pack has been in use. If the
main battery is replaced with a new battery pack, the indicator will reset to 0:00.
Each battery is uniquely identified with a serial number that the Dolphin terminal
uses to track cumulative time. Also, if the terminal is placed in a HomeBase and
is running on external power, the indicator will cease counting. When the terminal
is removed from the HomeBase, the timer will resume.
To open the Power control panel:
Touchscreen-equipped terminals:
1. Tap the Start button, tap Settings, and then tap Power. If the power plug icon is on the
task bar, double-tap it.
2. Tap the Battery or Power Off tab.
3. Select your preferences. For more information, read the following paragraphs, or tap the
Help ? button in the upper right corner of the screen.
4. Tap OK to save the changes and exit or tap the Close (X) button in the upper right cor-
ner to exit without saving the changes.
Non-touch screen terminals:
1. Use the cursor keys to navigate to the last program icon on the desktop.
2. Press the Tab and then the Enter key to open the Start menu.
3. Use the cursor keys to navigate to the Settings menu and then press Enter.
4. Press Enter again to select the Control Panel.
5. Use the Cursor keys to navigate to Power and then press Enter to open Power Proper-
ties.
6. Use the Cursor and Tab keys to navigate between the Battery and Power Off tabs and
to select your preferences.

36
•
•
•
•
•
•
7. Press Enter to return to the Control Panel.
8. Press ALT to open the File menu and use the Cursor key to navigate to Close.
9. Press Enter to close the Control Panel.
Servicing the Battery Pack
For maximum battery life, you must service, or deep cycle, the battery twice
before initial use. It is also recommended that you service the battery once per
month. To deep cycle, insert the battery into the auxiliary well of the Dolphin
Intellibase+ charging/communication cradle, Dolphin QuadCharger or use the
Battery Conditioning Utility. See Chapter 6 for more information on using the
IntelliBase+ and Chapter 7 for information on using the QuadCharger.
Using the Battery Conditioning Utility
The Battery Conditioning Utility is used to condition or deep cycle a battery in the
Dolphin 7400/7450 terminal. The discharge/charge cycle minimizes battery
memory effects and ensures the battery data is correct. A complete discharge/
charge cycle may take up to 15 hours for a fully charged battery. The actual cycle
time will vary depending on the battery state when the cycle was initiated.
Follow these instructions to use the Battery Conditioning Utility to deep cycle the
battery before initial use:
1. Put the battery pack in the Dolphin terminal.
2. Connect the Dolphin 7400/7450 terminal to external power or place the terminal in the
HomeBase or IntelliBase. After starting the Battery Conditioning Utility, the Dolphin will
beep and then indicate an error if the terminal is not on AC power.
3. Select Start>Programs>HHP>Battery Conditioning to start the Battery Conditioning
Utility.
4. Touch the ‘Start’ button (or the ‘S’ key on non-touchscreen terminals) to start the battery
conditioning process. The terminal will beep and the process will begin in approximately
60 seconds.
5. Touch the ‘Abort’ button (or the ‘A’ key on non-touchscreen terminals). The terminal will
beep and the battery conditioning process will be aborted.

37
•
•
•
•
•
•
Charging the Battery Pack
You can charge the Dolphin’s main battery pack with one of the following
methods:
•
Place the battery pack in the Dolphin 7400/7450 terminal and then place the terminal in
the terminal well of a charging/communication cradle.
•
Place the battery pack in the Dolphin Quad Battery Charger.
•
Place the battery back in the Auxiliary Battery Well of the IntelliBase+.
Storing Batteries
To maintain top performance from batteries, follow the guidelines below when
storing them:
Avoid storing batteries outside the specified range of -4 to 104° F (-20 to 40°C) or
in extremely high humidity.
For prolonged storage, do not keep batteries stored in a charger that is connected
to a power source.
During long-term storage, battery deactivation may tend to occur, which may
cause charging to stop early during recharging after storage. This issue can be
handled by charging and discharging the battery several times. Also, the first
charging after prolonged storage may yield a lower than normal capacity. While
this will vary depending on the storage conditions, charging and discharging the
battery several times will almost completely restore capacity.

38
•
•
•
•
•
•