Honeywell WNMNFHSS Multinode FHSS Radio User Manual WN00 100
Honeywell International Inc. Multinode FHSS Radio WN00 100
Contents
User Manual 2

Honeywell Wireless
Getting Started with Honeywell Wireless
Guide
WN00-100: Draft No. 4
Field Trial
3/2007
Field Trial Preliminary Version

ii Getting Started with Honeywell Wireless Guide Field Trial
Honeywell - Confidential & Proprietary 3/2007
Notices and Trademarks
Copyright 2007 by Honeywell International Inc.
Field Trial February 2007
While this information is presented in good faith and believed to be accurate, Honeywell disclaims the implied
warranties of merchantability and fitness for a particular purpose and makes no express warranties except as may
be stated in its written agreement with and for its customers.
In no event is Honeywell liable to anyone for any indirect, special or consequential damages. The information and
specifications in this document are subject to change without notice.
Honeywell, PlantScape, Experion PKS, and TotalPlant are registered trademarks of Honeywell International Inc.
Other brand or product names are trademarks of their respective owners.
Honeywell International
Process Solutions
2500 West Union Hills
Phoenix, AZ 85027
1-800 343-0228

Field Trial Getting Started with Honeywell Wireless Guide iii
3/2007 Honeywell - Confidential & Proprietary
About This Document
This document briefly describes Honeywell’s Wireless system and all its associated components and provides
basic steps for setting up and configuring your Honeywell Wireless components. It also serves as a quick
reference for performing key tasks and for finding additional information in other Wireless documents
Release Information
Document Name Document ID Release
Number Publication Date
Getting Started with Honeywell Wireless Guide -
WN00 WN00-100:
Draft No. 4 Field Trial 3/2007
Contacts
World Wide Web
The following Honeywell web sites may be of interest to Process Solutions customers.
Honeywell Organization WWW Address (URL)
Corporate http://www.honeywell.com
Process Solutions http://www.acs.honeywell.com
International http://content.honeywell.com/global/
iv Getting Started with Honeywell Wireless Guide Field Trial
Honeywell - Confidential & Proprietary 3/2007
Telephone
Contact us by telephone at the numbers listed below.
Organization Phone Number
United States
and Canada Honeywell International Inc.
Industry Solutions 1-800-343-0228 Sales
1-800-525-7439 Service
1-800-822-7673 Technical
Support
Asia Pacific Honeywell Asia Pacific Inc.
Hong Kong (852) 23 31 9133
Europe Honeywell PACE
Brussels, Belgium [32-2] 728-2711
Latin America Honeywell International Inc.
Sunrise, Florida U.S.A. (954) 845-2600
Symbol Definitions
The following table lists those symbols used in this document to denote certain conditions.
Symbol Definition
CAUTION: Indicates a potentially hazardous situation which, if not avoided, may
result in minor or moderate injury. It may also be used to alert against unsafe
practices.
CAUTION symbol on the equipment refers the user to the product manual for
additional information. The symbol appears next to required information in the
manual.

Field Trial Getting Started with Honeywell Wireless Guide v
3/2007 Honeywell - Confidential & Proprietary
Contents
1. ABOUT THIS GUIDE .................................................................................. 9
1.1 Purpose............................................................................................................................ 9
Scope ...................................................................................................................................................... 9
Intended audience................................................................................................................................... 9
How to use this guide .............................................................................................................................. 9
1.2 Before you begin........................................................................................................... 10
Prerequisites ......................................................................................................................................... 10
FCC requirements ................................................................................................................................. 10
Assumptions.......................................................................................................................................... 10
2. GETTING STARTED................................................................................. 11
2.1 About the Honeywell Wireless System....................................................................... 11
Wireless network ................................................................................................................................... 11
Wireless software and devices.............................................................................................................. 12
2.2 About Wireless Server Tools software ....................................................................... 13
Software tools sources .......................................................................................................................... 13
Wireless software components.............................................................................................................. 13
2.3 Configuration information you will need.................................................................... 13
2.4 Wireless system installation overview ....................................................................... 14
Overview of process.............................................................................................................................. 14
Recommended strategy ........................................................................................................................ 14
2.5 Installation scenqarios ................................................................................................. 15
Installation tasks for installing a Wireless System ................................................................................. 15
Installation tasks for adding a new wireless field device........................................................................ 16
2.6 Wireless system configuration quick reference ........................................................ 16
3. INSTALLING AND CONFIGURING WIRELESS SOFTWARE................. 17
3.1 Installing wireless software tools................................................................................ 17
3.2 Installing authentication device software................................................................... 18
3.3 Generating security keys ............................................................................................. 18
3.4 Loading security keys .................................................................................................. 19
3.5 Configuring OPC for wireless...................................................................................... 19
4. CONFIGURING WIRELESS DEVICES IN WIRELESS BUILDER............ 20
4.1 Defining the WSG.......................................................................................................... 20
4.2 Configuring Modbus..................................................................................................... 20
4.3 Creating wireless field device type ............................................................................. 21
5. INSTALLING AND AUTHENTICATING THE WSG.................................. 23

Contents
vi Getting Started with Honeywell Wireless Guide Field Trial
Honeywell - Confidential & Proprietary 3/2007
5.1 Connecting to and starting the WSG........................................................................... 23
Cable connections..................................................................................................................................23
5.2 Updating firmware on WSG..........................................................................................24
5.3 Configuring operating mode and security for the WSG............................................25
5.4 Authenticating the WSG ...............................................................................................25
5.5 Verifying WSG is available on wireless network........................................................26
5.6 About deploying the WSG to the field.........................................................................26
6. INSTALLING AND AUTHENTICATING INODES......................................27
6.1 Connecting to and starting iNodes..............................................................................27
Cable connections..................................................................................................................................27
6.2 Updating firmware on iNodes....................................................................................... 28
6.3 Configuring operating mode and security for iNodes...............................................29
6.4 Authenticating iNodes ..................................................................................................29
6.5 Verifying iNodes are available on the wireless network ...........................................30
6.6 About deploying iNodes to the field............................................................................30
7. INSTALLING AND AUTHENTICATING WIRELESS FIELD DEVICES.....31
7.1 Starting wireless field devices .....................................................................................31
7.2 Authenticating wireless field devices .........................................................................31
7.3 Verifying wireless field devices are available on wireless network.........................31
7.4 Commissioning wireless field devices........................................................................ 31
7.5 About deploying wireless field devices ...................................................................... 32
8. FOR ADDITIONAL INFORMATION ..........................................................33
8.1 Honeywell Wireless documents................................................................................... 33
8.2 Other references............................................................................................................34
9. WIRELESS TOOLS QUICK REFERENCES .............................................35
9.1 Key Server quick reference ..........................................................................................35
9.2 Authentication device quick reference .......................................................................37
9.3 WSG/iNode quick reference .........................................................................................38
9.4 Wireless Builder quick reference.................................................................................38
Wireless Builder configuration scenarios................................................................................................38
Wireless Builder functions......................................................................................................................38
9.5 Data Collection Tool quick reference.......................................................................... 38
9.6 Network Management and Diagnostics tool quick reference...................................38

Contents
Field Trial Getting Started with Honeywell Wireless Guide vii
3/2007 Honeywell - Confidential & Proprietary
10. TROUBLESHOOTING.............................................................................. 39
10.1 Resolving software startup problems..................................................................... 39
Cannot login to Wireless Builder ........................................................................................................... 39
10.2 Resolving authentication errors .............................................................................. 39
Wireless device cannot join the network................................................................................................ 39

Field Trial Getting Started with Honeywell Wireless Guide 9
3/2007 Honeywell - Confidential & Proprietary
1. About this guide
1.1 Purpose
Scope
This guide briefly describes Honeywell’s wireless solution and its components. It also provides high-
level procedures for installing Honeywell’s Wireless software and configuring wireless devices. For
more detailed information on Honeywell’s wireless system components, see the documents listed in
Section 1.
Intended audience
This guide is intended for people who are responsible for initially configuring the Honeywell wireless
components or those that need to add a new device to an existing system. For a list of topics covered in
other wireless documents, see Section 1.
How to use this guide
The following table describes the purpose of each of the three sections in this guide.
If you . . . . Go to
Want to know what you should be aware of
before you begin or where to go for more
information
Section 1, “About this guide”
Want a high-level overview of a Wireless
System and a brief description of its
components and a list of tasks for installing
them.
Section 2, “Getting started”
Want step-by-step procedures for a particular
task, go to the relevant section. Section 3, “Installing and configuring wireless
software”
Section 4, “Configuring wireless devices in Wireless
Builder”
Section 5, “Installing and authenticating the WSG”
Section 6, “Installing and authenticating iNodes”
Section 7, “Installing and authenticating wireless
field devices”

1. About this guide
1.2. Before you begin
10 Getting Started with Honeywell Wireless Guide Field Trial
Honeywell - Confidential & Proprietary 3/2007
1.2 Before you begin
Prerequisites
Before deploying your Honeywell wireless system, a radio frequency (RF) site survey must be
completed. Honeywell services can perform a comprehensive site survey for you.
FCC requirements
After initial set up and configuration of wireless components, you will be ready to install them. We
assume you have available qualified personnel to install wireless devices.
Important
FCC Regulations require that industrial wireless devices be professionally installed by an
installer certified by the National Association of Radio and Telecommunications Engineers or
equivalent institution.
Assumptions
Honeywell assumes the following about the installation and maintenances of your wireless network.
• You are familiar with good security networking practices, and are prepared to implement them for
all wireless devices.
• You understand the critical nature of the Key Server and the Authentication Device and will take
additional precautions for protecting their integrity.
• You are prepared to carry out ongoing monitoring and diagnostics for optimal network management.
Field Trial Getting Started with Honeywell Wireless Guide 11
3/2007 Honeywell - Confidential & Proprietary
2. Getting started
This section provides a brief overview of a Honeywell Wireless system and summarizes the tasks for
installing wireless software and configuring wireless devices.
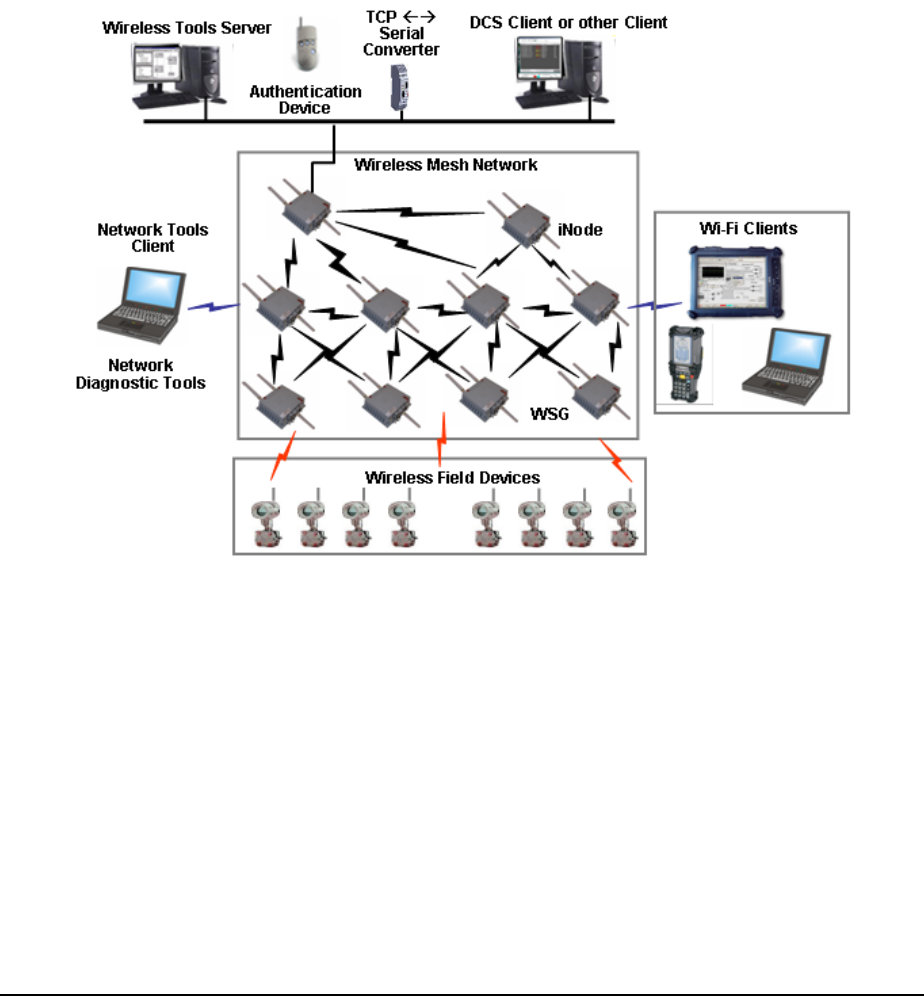
2.1 About the Honeywell Wireless System
Wireless network
Honeywell’s wireless network solution provides a multi-functional wireless mesh network that supports
sensors, actuators, and wireless-enabled applications within a single network to optimize plant
productivity and reliability, improve safety and security, and ensure regulatory compliance.

2. Getting started
2.1. About the Honeywell Wireless System
12 Getting Started with Honeywell Wireless Guide Field Trial
Honeywell - Confidential & Proprietary 3/2007
Wireless software and devices
Following is a brief description of the wireless software and devices of the Honeywell Wireless System.
Component Description
Wireless Key Server Acts as the center of trust for the network by generating, issuing and
managing security keys. All devices on the wireless network must be
authenticated to join the secured network.
Used for initial configuration of wireless devices and to store wireless
network system data for configuring wireless devices. Associated software:
Key Server Manager, Wireless Builder, Directory Server, Security Server,
Network Tools Server, OPC Server.
Wireless system
gateway node
(WSG)
A mesh network node that serves as a gateway between the wireless
network and the wired network. Associated software: 3eTi configuration
software.
Infrastructure node
(iNode) A mesh network node that facilitates communications between the wireless
devices and the wireless subsystem gateway. It may also be used to
facilitate communication among the different nodes on the Wireless network.
The network of iNodes and WSGs form the mesh network. Associated
software: 3eTi configuration software.
Wireless field
devices The wireless field devices such as the wireless temperature transmitter,
pressure transmitter and temperature transmitter devices.
DCS Client or other
Client Node Client node used for communication with server nodes.
Associated software: OPC DA/AE, Modbus Serial, Modbus TCP
Network Tools
Client Node Client node used to communicate with the Wireless Server & Configuration
Node for network maintenance and troubleshooting.
Wireless
Authentication
Device
A personal digital assistant (PDA) handheld with IR capability and Honeywell
authentication software. It receives security keys from the Key Server and
then transmits a security key to each wireless device. Without a valid security
key the wireless device cannot be authenticated and will not be allowed to
join the network.

2. Getting started
2.2. About Wireless Server Tools software
Field Trial Getting Started with Honeywell Wireless Guide 13
3/2007 Honeywell - Confidential & Proprietary
2.2 About Wireless Server Tools software
Software tools sources
Setting up and configuring wireless devices requires you to install and configure software from the
following sources:
• Honeywell Wireless Server Tools media
• Software pre-loaded on the WSG/iNode
Wireless software components
Following is a brief description of each of the software components used in the Honeywell Wireless
System.
Software component Description
Key Server Manager Provides user interface for generating and managing wireless security
keys. Use to manage network security. Contains database to store
information about the secured devices.
Wireless Builder Use to configure and troubleshoot wireless devices and gateways.
Directory Server Automatically assigns Honeywell Wireless network address for the iNodes
and field devices, and maintains the fixed address range 0xFXXX for the
Wireless System Gateway (WSG).
OPC Server Provides open access to all device data.
Network Management
and Diagnostics Tool Network diagnostic tool for network troubleshooting and network
maintenance.
iNode Tools and utilities Pre-loaded on the iNode: Web Server/HTTPS; SNMP Agent; Ping utility;
Trace route utility; Firmware upgrade via wireless; Reboot device; Factory
default; Signal strength reporting
Data Collection Tool TBD
2.3 Configuration information you will need
Before you begin, you will need the following information:
Information needed
IP address – a list of IP addresses available on the organization's LAN that you can assign to the
WSG/iNode.
Subnet Mask for the LAN
Default IP address of the WSG/iNode
Doman Name Server (DNS) IP address
SSID – an ID number/letter string that you want to use in the configuration process to identify all
members of the wireless LAN
MAC addresses of all the wireless cards that will be used to access the wireless network of, if
MAC address filtering is to be enabled.

2. Getting started
2.4. Wireless system installation overview
14 Getting Started with Honeywell Wireless Guide Field Trial
Honeywell - Confidential & Proprietary 3/2007
2.4 Wireless system installation overview
Overview of process
Recommended strategy
Honeywell recommends the following general strategy when installing and authenticating wireless field
devices:
• You power up and authenticate each wireless device in a staging area before deploying it to the field.
• You verify each device is completely functional on the wireless network before you authenticate the
next device.

2. Getting started
2.5. Installation scenqarios
Field Trial Getting Started with Honeywell Wireless Guide 15
3/2007 Honeywell - Confidential & Proprietary
2.5 Installation scenqarios
Installation tasks for installing a Wireless System
The following table lists the tasks for installing wireless software and the wireless devices. Go to the
page number listed for step-by-step instructions.
Task Go to: Done?
Installing wireless software tools Page 17
Installing authentication device software Page 18
Generating security keys Page 18
Loading security keys Page 19
Configuring OPC for wireless Page 19
Defining the WSG Page 20
Configuring Modbus Page 20
Creating wireless field device type Page 21
Connecting to and starting the WSG Page 23
Updating firmware on WSG, if necessary Page 24
Configuring operating mode and security for the WSG Page 25
Authenticating the WSG Page 25
Verifying WSG is available on wireless network Page 26
Connecting to and starting iNodes Page 27
Updating firmware on iNodes Page 28
Configuring operating mode and security for iNodes Page 29
Authenticating iNodes Page 29
Verifying iNodes are available on the wireless network Page 30
Starting wireless field devices Page 31
Authenticating wireless field devices Page 31
Verifying wireless field devices are available on wireless network Page 31
Commissioning wireless field devices Page 31

2. Getting started
2.6. Wireless system configuration quick reference
16 Getting Started with Honeywell Wireless Guide Field Trial
Honeywell - Confidential & Proprietary 3/2007
Installation tasks for adding a new wireless field device
The following table lists the tasks for adding a new device to an existing system. Go to the page number
listed for step-by-step instructions.
Task Go to: Done?
Generating security keys Page 18
Loading security keys Page 19
Starting wireless field devices Page 31
Authenticating wireless field devices Page 31
Verifying wireless field devices are available on wireless network Page 31
Commissioning wireless field devices Page 31
2.6 Wireless system configuration quick reference
To install and configure a wireless system, you use a number of wireless software tools. The following
table provides a quick reference for using these tools to perform wireless system installation and
configuration tasks.
Task Tool Options that must be configured
Generating security keys
Loading security keys
Configuring OPC for wireless
Defining Wireless System Gateway
Creating wireless field device type
Configuring Modbus
Connecting to the WSG/iNode
Updating firmware on WSG/iNode,
if necessare
Configuring operating mode and
security for WSG/iNode
Starting field devices
Updating firmware on wireless field
devices
Authenticating wireless devices
Commissioning wireless devices

Field Trial Getting Started with Honeywell Wireless Guide 17
3/2007 Honeywell - Confidential & Proprietary
3. Installing and configuring wireless software
3.1 Installing wireless software tools
Use this procedure to install the wireless software from the Honeywell Wireless Software Tools media.
Prerequisites:
Hardware requirements
• Pentium 4, single processor 2.4 GHz processor; 1 GB memory; 40 GB hard drive is recommended
with at least 10 GB free for the wireless software tools
• Ethernet capable with wired network access to the wireless gateway
Software requirements
• Windows XP Operating System with Service Pack 2, or Windows 2003 Operating System with
Service Pack 1
• Microsoft .Net Framework 1.1
Additional prerequisites for Experion systems:
• Experion R300.1 Process Server
• R300.1 Engineering Tools Patch
To install the wireless software tools:
Step Action
1 Login to the system using an account with Administrator privileges.
2 Close all applications.
3 Insert the Honeywell Wireless Software Tools media in the drive.
4 Launch the Wireless Software tools installation:
• On the media, navigate to the Installation folder.
• Double-click Setup.exe
• Click Continue from the Welcome dialog box.
5 If your system has SQL Server/Developer/Desktop Edition 2000 installed, go to Step 6.
Otherwise, SQL Server MSDE 2000 will be installed automatically.
• Follow the screen prompts to complete the installation.
• After restarting, make sure to login using an account with Administrator privileges.
6 If your system has SQL Server/Developer/Desktop Edition 2000 SP4 installed, go to Step 7.
Otherwise, SP4 for SQL Server MSDE 2000 will be installed automatically.
• Follow the screen prompts to complete the installation.
• After restarting, make sure to login using an account with Administrator privileges.
7 Wireless software tools will be installed automatically.
• Follow the screen prompts to complete the installation.
• Restart the system when complete.
• After restarting, make sure to login using an account with Administrator privileges.

3. Installing and configuring wireless software
3.2. Installing authentication device software
18 Getting Started with Honeywell Wireless Guide Field Trial
Honeywell - Confidential & Proprietary 3/2007
3.2 Installing authentication device software
Use this procedure to install the Honeywell authentication device software on your handheld personal
digital assistant (PDA) so you may load it with security keys.
Prerequisites
• You must be familiar with operating your handheld device.
• You must have set a secure password on the handheld authentication device.
To install authentication device software:
Step Action
TIP
For additional details about the authentication device software, see the help in the tutorial
available from the Advanced Options menu.
1 Locate the Authentication Device software:
Drive:\Program Files\Honeywell\Raptor\Engineering Tools\System\firmware\AuthDev
2 Copy the authentication device software to your PDA.
3
3.3 Generating security keys
Prerequisites
TBD
To generate security keys
Use this procedure to generate the security keys on the Key Server.
Step Action
1 Select Start > Programs > Honeywell Raptor > KeyServer Manager
2 From the left pane of the Key Server Manager window, expand the
Operation tree
3 Click Authentication Device
4 Click the Configure AD tab
5 Enter the Network Parameters information:
• Default WFN_ID
• Freq Hopping ID
• Freq Hopping Mode
6 Enter the Key Information:
7 Select the DS IP Address

3. Installing and configuring wireless software
3.4. Loading security keys
Field Trial Getting Started with Honeywell Wireless Guide 19
3/2007 Honeywell - Confidential & Proprietary
Step Action
8 Enter the Authentication Device information:
9 Click Listen.
10 If you entered all the correct information an IR Comm dialog appears:
3.4 Loading security keys
To load security keys:
Use this procedure to load security keys on the handheld authentication device.
Step Action
1 Log into authentication device, if necessary.
2 Place the handheld authentication device within 6 to 12 inches away from
the Key Server Manager with its IR port aimed at the computer.
3 From the main menu of the authentication device, select Security and
Device Deployment.
4 Select Receive Security Keys.
5 From the IR Comm dialog box on the Key Server Manager, click OK.
Note: When the Key Server Manager detects the authentication device, the
OK button will no longer be grayed out.
6 Verify you receive a message on the handheld authentication device
indicating the handheld device received the security keys successfully.
3.5 Configuring OPC for wireless
Use this procedure to TBD.
Prerequisites
TBD
Step Action
1 Login to the system using an account with Administrator privileges.
2
3

Field Trial Getting Started with Honeywell Wireless Guide 20
3/2007 Honeywell - Confidential & Proprietary
4. Configuring wireless devices in Wireless Builder
This section contains procedures for performing the minimal initial configuration of wireless devices in
Wireless Builder before the devices are available online. See the Wireless Builder Guide for more
information.
4.1 Defining the WSG
You have the option of defining the Wireless System Gateway (WSG) in Wireless Builder before you
install the device.
To define the WSG:
Step Action
1 Select Start > Programs > Honeywell Raptor > Wireless Builder.
Enter the login information for your system:
Login Info Description
User Name
Password
Server Name
2
Domain Name
3 Click File->New->Interface Modules->WSG – Wireless System Gateway.
4 Enter WSG tag name
5 Enter WSG Ethernet IP Address
6
7
8
4.2 Configuring Modbus
To configure Modbus for the WSG
Step Action
1
2

4. Configuring wireless devices in Wireless Builder
4.3. Creating wireless field device type
Field Trial Getting Started with Honeywell Wireless Guide 21
3/2007 Honeywell - Confidential & Proprietary
4.3 Creating wireless field device type
Use this procedure to create a device block type for each of the wireless field devices. Skip this
procedure if a block for the wireless field type already exists in the Wireless Builder library database.
You can create a device block type without being connected to a device.
Prerequisites
You must have the Device Description (DD) files for the wireless field device. These are available on a
disk supplied by the manufacturer or from the vendor’s web site.
To create wireless device template:
Step Action
1 Copy the data definition folder for each device to the following location:
Drive:\Program Files\Honeywell\Raptor\System\ER\WirelessDevices
Note: Data definition folders must contain these files:
*.FFO - DD binary
*.SYM - device symbol file
*.CFF - device capability file.
2 Select Start > Programs > Honeywell Raptor > Wireless Builder.
3 Click File->New->Type->Wireless Device.
4 Click OK on any message dialogs that may appear to acknowledge the error messages.
5 In the Select Device Type dialog, click Browse and navigate to the location of the data
definition folder.
6 In Device List: box, click the device you want to add to the Wireless Builder Library.
7 Click OK to initiate the block type creation.
8 Click OK to acknowledge the Wireless Builder dialog message about device help
information in Knowledge Builder.
9 In the Library tab, look for the new device block type under the Vendor’s name.

Field Trial Getting Started with Honeywell Wireless Guide 23
3/2007 Honeywell - Confidential & Proprietary
5. Installing and authenticating the WSG
This section contains procedures for performing the minimal initial configuration of the Wireless System
Gateway (WSG) and authenticating each WSG so it may join the wireless network. See the WSG/iNode
Users Guide for more information.
5.1 Connecting to and starting the WSG
Cable connections
The following figure shows the WSG/iNode cable connections.
PICTURE OF WSG/iNode TBD
• Light grey – Ethernet connection
• Blue – Ethernet connection
• Dark grey – power
Prerequisites
• You must know the most recent qualified version of the WSG/iNode firmware as listed in the
Wireless SCN.
• For initial configuration of the WSG/iNode you must have at least one computer that has Windows
2000 or Windows XP with Microsoft Internet Explorer 5.5 or later and an Ethernet card.
To prepare the WSG
Step Action
1 Connect computer to one of the Ethernet cables from the LAN/WAN port.
Note: To avoid transmitting before the device is secure, do not attach the antennae to the
device at this time.
2 Open Internet Explorer and access the WSG/iNode management software. by typing the
default URL for the WSG/iNode in the address line:
https:// 192.168.254.254
3 From the sign-in screen, type the default username and password and click Sign In:
Username: CryptoOfficer
Password: CryptoGIPS
Note: Honeywell strongly recommends you change these defaults on each WSG/iNode
after you initially configure it. If this username and password does not work, review the
SCN for any changes.
4 From the left pane of the WSG/iNode management software, click System Configuration
> General.
5 Enter values for the following options:
Description: Consider describing the physical location of the unit. This is useful when
deploying units to remote locations.
Host Name: Consider naming according to the operating mode (WSG or iNode) followed
by a number. Example: WSG1
Domain Name: Enter the domain where the unit will be deployed.

5. Installing and authenticating the WSG
5.2. Updating firmware on WSG
24 Getting Started with Honeywell Wireless Guide Field Trial
Honeywell - Confidential & Proprietary 3/2007
Step Action
6 Enter values for the remaining options based on your site requirements and click Apply
when you are through.
7 Determine the firmware version listed after the Version option.
8 If the version listed is the same as the qualified version listed in the Wireless SCN, go to
“Configuring operating mode and security for the WSG” on page 25.
If the version is not the same, go to “Updating firmware on WSG” on page 24.
5.2 Updating firmware on WSG
Use this procedure to obtain the latest the firmware version and update WSG/iNode.
Prerequisites
• You must have access to the Solution Support Online (SSOL) website. If you are a new user, you
can register for access to the Solution Support Online site at www.honeywell.com\ps.
To check the Solution Support Online site:
Step Action
1 Open Internet Explorer and connect to the SSOL website:
www.honeywell.com\ps
2 Click Login to My Account, type your user name and password, and then click Login.
3 From the Quick Links Section, choose SSOL and then select Solution Support Online.
4 In the Your Entitled Products section, choose TBD.
5 Download the firmware version for both the mesh software and the FHSS radio software.
6 Sign-in to the WSG/iNode management software.
8 From the left pane, click System Administration > System Upgrade.
9 Update the mesh software:
• Click the top Browse button and navigate to the location of the software you
downloaded in step 5.
• Click the top Upload firmware button.
10 Update the FHSS radio software:
• Click the bottom Browse button and navigate to the location of the software you
downloaded in step 5.
• Click the bottom Upload firmware button.
11 Go to “Configuring operating mode and security for the WSG” on page 25.

5. Installing and authenticating the WSG
5.3. Configuring operating mode and security for the WSG
Field Trial Getting Started with Honeywell Wireless Guide 25
3/2007 Honeywell - Confidential & Proprietary
5.3 Configuring operating mode and security for the WSG
Use this procedure to establish the operating mode, IP address and the minimum security for the
WSG/iNode. If you want to configure additional options and require more information, see the
WSG/iNode Users Guide.
Prerequisites
You need to know if the unit will be deployed as an iNode or as a Level 1/Level 2 gateway or a Level
3/Level 4 gateway.
To configure operating mode:
Step Action
1 From the left pane of the WSG/iNode management software, click System Administration
> Operating Mode.
2 Select one of the following options and click Apply:
iNode:
L1/L2 Gateway:
L3/L4:
3 From the left pane, click System Administration > WAN.
4 From Link Speed and Duplex, select a WAN Link speed that is compatible with your
network switches.
5 From IP Address, enter values for the remaining options based on your site requirements
and click Apply when you are through.
6 Configure additional security options based on your site requirements.
5.4 Authenticating the WSG
Authenticating a wireless device is the action taken to inject a wireless device with a security key so that
when it requests access to the system, it will be recognized and be allowed to join the secure wireless
network and start publishing packets. Use this procedure to authenticate wireless mesh nodes and field
devices.
To transmit security key to wireless device:
Step Action
1 If you have not already done so, power on the wireless device.
2 Align the IR port of the authentication device with the IR port of the WSG in
6 to 12 inches away from the wireless device with its IR port aimed at the
wireless device.
3 From the main menu of the authentication device, select Manage Security
Keys.
4 Select Transmit Keys.
5 Verify you receive a message on the handheld authentication device
indicating the wireless device received the security key successfully.

5. Installing and authenticating the WSG
5.5. Verifying WSG is available on wireless network
26 Getting Started with Honeywell Wireless Guide Field Trial
Honeywell - Confidential & Proprietary 3/2007
5.5 Verifying WSG is available on wireless network
After the WSG has been injected with a authtentication key and authenticated by the Key Server, you can
view its status from the Data Collection Tool, Wireless Builder and from the event log in the Key Server.
To view the status of the WSG:
Step Action
1 To view the status from the Data Collection Tool:
Select Start > Programs > Honeywell Raptor > Data Collection Tool
2
5.6 About deploying the WSG to the field
After the WSG is authenticated, you are ready to physically install the device. Refer to the Honeywell
Wireless WSG/iNode User Guide for more information, including:
• Installing the antenna
• Mounting the device
• Operating specifications

Field Trial Getting Started with Honeywell Wireless Guide 27
3/2007 Honeywell - Confidential & Proprietary
6. Installing and authenticating iNodes
This section contains procedures for performing the minimal initial configuration of the Honeywell
Infrastructure Node (iNode) and authenticating each iNode so it may join the wireless network. See the
WSG/iNode Users Guide for more information.
6.1 Connecting to and starting iNodes
Cable connections
The following figure shows the WSG/iNode cable connections.
PICTURE OF WSG/iNode TBD
• Light grey – Ethernet connection
• Blue – Ethernet connection
• Dark grey – power
•
Prerequisites
• You must know the most recent qualified version of the WSG/iNode firmware as listed in the
Wireless SCN.
• For initial configuration of the WSG/iNode you must have at least one computer that has Windows
2000 or Windows XP with Microsoft Internet Explorer 5.5 or later and an Ethernet card.
To prepare the iNode
Step Action
1 Connect computer to one of the Ethernet cables from the LAN/WAN port.
Note: Do not attach the antennae to the device at this time.
2 Open Internet Explorer and access the WSG/iNode management software. by typing the
default URL for the WSG/iNode in the address line:
https:// Default IP Address
192.168.254.254. It may also be 192.168.15.1
3 From the sign-in screen, type the default username and password and click Sign In:
Username: CryptoOfficer
Password: CryptoGIPS
Note: Honeywell strongly recommends you change these defaults on each WSG/iNode
after you initially configure it.
4 From the left pane of the WSG/iNode management software, click System Configuration
> General.

6. Installing and authenticating iNodes
6.2. Updating firmware on iNodes
28 Getting Started with Honeywell Wireless Guide Field Trial
Honeywell - Confidential & Proprietary 3/2007
Step Action
5 Enter values for the following options:
Description: Consider describing the physical location of the unit. This is useful when
deploying units to remote locations.
Host Name: Consider naming according to the operating mode (WSG or iNode) followed
by a number. Example: iNode8
Domain Name: Enter the domain where the unit will be deployed.
6 Enter values for the remaining options based on your site requirements and click Apply
when you are through.
7 Determine the firmware version listed after the Version option.
8 If the version listed is the same as the qualified version listed in the Wireless SCN, go to
“Configuring operating mode and security for the WSG” on page 25.
If the version is not the same, go to “Updating firmware on WSG” on page 24.
6.2 Updating firmware on iNodes
Use this procedure to obtain the latest the firmware version and update WSG/iNode.
Prerequisites
• You must have access to the Solution Support Online (SSOL) website. If you are a new user, you
can register for access to the Solution Support Online site at www.honeywell.com\ps.
To check the Solution Support Online site:
Step Action
1 Open Internet Explorer and connect to the SSOL website:
www.honeywell.com\ps
2 Click Login to My Account, type your user name and password, and then click Login.
3 From the Quick Links Section, choose SSOL and then select Solution Support Online.
4 In the Your Entitled Products section, choose TBD.
5 Download the firmware version for both the mesh software and the FHSS radio software.
6 Sign-in to the WSG/iNode management software.
8 From the left pane, click System Administration > System Upgrade.
9 Update the mesh software:
• Click the top Browse button and navigate to the location of the software you
downloaded in step 5.
• Click the top Upload firmware button.

6. Installing and authenticating iNodes
6.3. Configuring operating mode and security for iNodes
Field Trial Getting Started with Honeywell Wireless Guide 29
3/2007 Honeywell - Confidential & Proprietary
Step Action
10 Update the FHSS radio software:
• Click the bottom Browse button and navigate to the location of the software you
downloaded in step 5.
• Click the bottom Upload firmware button.
11 Go to “Configuring operating mode and security for the WSG” on page 25.
6.3 Configuring operating mode and security for iNodes
Use this procedure to establish the operating mode, IP address and the minimum security for the
WSG/iNode. If you want to configure additional options and require more information, see the
WSG/iNode Users Guide.
Prerequisites
You need to know if the unit will be deployed as an iNode or as a Level 1/Level 2 gateway or a Level
3/Level 4 gateway.
To configure operating mode:
Step Action
1 From the left pane of the WSG/iNode management software, click System Administration
> Operating Mode.
2 Select one of the following options and click Apply:
iNode:
L1/L2 Gateway:
L3/L4:
3 From the left pane, click System Administration > WAN.
4 From Link Speed and Duplex, select a WAN Link speed that is compatible with your
network switches.
5 From IP Address, enter values for the remaining options based on your site requirements
and click Apply when you are through.
6 Configure additional security options based on your site requirements.
6.4 Authenticating iNodes
Authenticating a wireless device is the action taken to inject a wireless device with a security key so that
when it requests access to the system, it will be recognized and be allowed to join the secure wireless
network and start publishing packets. Use this procedure to authenticate wireless mesh nodes and field
devices.
Prerequisites
See also the quick start guide for each wireless field device.
To transmit security key to wireless device:
Step Action

6. Installing and authenticating iNodes
6.5. Verifying iNodes are available on the wireless network
30 Getting Started with Honeywell Wireless Guide Field Trial
Honeywell - Confidential & Proprietary 3/2007
Step Action
1 If you have not already done so, power on the wireless device.
2 Place the handheld authentication device within 6 to 12 inches away from
the wireless device with its IR port aimed at the wireless device.
3 From the main menu of the authentication device, select Manage Security
Keys.
4 Select Transmit Keys.
5 Verify you receive a message on the handheld authentication device
indicating the wireless device received the security key successfully.
6.5 Verifying iNodes are available on the wireless network
After the iNode has been injected with a authtentication key and authenticated by the Key Server, you
can view its status from the Network Diagnostics Tool.
To view the status of the iNode:
Step Action
1 Select Start > Programs > Honeywell Raptor > Network Diagnostics
Tool
2
6.6 About deploying iNodes to the field
After the iNode is authenticated, you are ready to physically install the device. Refer to the Honeywell
Wireless WSG/iNode User Guide for more information, including:
• Installing the antenna
• Mounting the device
• Operating specifications

Field Trial Getting Started with Honeywell Wireless Guide 31
3/2007 Honeywell - Confidential & Proprietary
7. Installing and authenticating wireless field devices
7.1 Starting wireless field devices
To
TBD
Step Action
1
2
3
7.2 Authenticating wireless field devices
Authenticating a wireless device is the action taken to inject a wireless device with a security key so that
when it requests access to the system, it will be recognized and be allowed to join the secure wireless
network and start publishing packets. Use this procedure to authenticate wireless mesh nodes and field
devices.
Prerequisites
See also the quick start guide for each wireless field device.
To transmit security key to wireless device:
Step Action
1 If you have not already done so, power on the wireless device.
2 Place the handheld authentication device within 6 to 8 inches away from the
wireless device with its IR port aimed at the wireless device.
3 From the main menu of the authentication device, select Manage Security
Keys.
4 Select Transmit Keys.
5 Verify you receive a message on the handheld authentication device
indicating the wireless device received the security key successfully.
7.3 Verifying wireless field devices are available on wireless
network
TBD
7.4 Commissioning wireless field devices
Commissioning is the action taken to match a physical field device to its corresponding database object.
TBD: Additionally, you will associate each device with a specific WSG.
To commission a device:
Step Action

7. Installing and authenticating wireless field devices
7.5. About deploying wireless field devices
32 Getting Started with Honeywell Wireless Guide Field Trial
Honeywell - Confidential & Proprietary 3/2007
Step Action
1 Select Start > Programs > Honeywell Raptor > Wireless Builder.
2
3
4
7.5 About deploying wireless field devices
After the wireless field device is authenticated, you are ready to physically install the device. Refer to the
Honeywell Wireless Transmitter Quick Start Guide and the user guide for the type of transmitter you are
installing (pressure, temperature, corrosion). These documents contain information for:
• Installing the antenna
• Mounting the device
• Calibrating the device
• Operating specifications

Field Trial Getting Started with Honeywell Wireless Guide 33
3/2007 Honeywell - Confidential & Proprietary
8. For additional information
8.1 Honeywell Wireless documents
The following table describes other Honeywell Wireless documents and lists the type of information
covered in each document.
Document and Description
Wireless Field Network Dictionary
• Defines all the terms used and components of Honeywell’s wireless system.
Wireless Planning Guide
• Introduces the Honeywell wireless system and fully describes each component.
• Provides guidelines and best practices for setting up a system, including requirements and
wireless compliance information.
• Contains recommended strategy for integrating a wireless system into an existing Distributed
Control System (DCS).
Wireless System Installation and Administration Guide
• Contains additional details for the procedures covered in the Getting Started Guide.
• Provides procedures for installing, configuring and maintaining the Key Server, the
Authentication Device and the wireless network.
• Contains a comprehensive troubleshooting section for the wireless system.
Wireless Inode/System Gateway User’s Guide
• Describes the Inode and Gateway devices and their roles in a wireless system.
• Provides procedures for installing, configuring and maintaining the wireless devices.
• Contains technical specifications.
Wireless Builder User’s Guide
• Describes the Wireless Builder interface.
• Provides procedures for using the Wireless tool to build Wireless control strategies and
commission wireless devices.
Wireless Builder Parameter Reference
• Provides details for wireless parameters.
Wireless Field Device Quick Start Guide
• Contains a quick reference for installing and configuring Honeywell’s wireless field devices
(pressure transmitters, temperature transmitters, high-level analog input transmitters, corrosion
transmitters).
Wireless Field Device User Manuals
• A separate user manual for each wireless field device (pressure transmitter, temperature
transmitter, high-level analog input transmitter, corrosion transmitter) that provides procedures
for installing and configuring the devices in the field.
• Contains compliance information and the technical specifications.

8. For additional information
8.2. Other references
34 Getting Started with Honeywell Wireless Guide Field Trial
Honeywell - Confidential & Proprietary 3/2007
8.2 Other references
The following table describes other sources of information for implementing an industrial wireless
system.
Document and Description
Honeywell Preparing for Industrial Wireless Whitepaper
• Lists the benefits of industrial wireless technology.
• Discusses planning issues for implementing industrial wireless systems in the
automation and control environment.
Instrumentation, Systems and Automation Society’s (ISA) SP-100
• Defines a set of standards for implementing wireless systems in the automation
and control environment.
• Recommends best practices for wireless systems.
IEEE 802.15.4 RF Standard
• Radio standards that specifically address the requirements of wireless monitoring
and control systems.
IEEE 802.11(a) (b) (g)
• Specifications for wireless local area networks.
Field Trial Getting Started with Honeywell Wireless Guide 35
3/2007 Honeywell - Confidential & Proprietary
9. Wireless Tools Quick References
9.1 Key Server quick reference
The following table describes the parameters for each of the Key Server’s functional areas. Values for
parameters in bold are supplied by the system and do not need to be entered by the user.
Authentication Device – Configure AD tab
Network Parameters:
Default
WFN_ID Default wireless field network identification. You may edit this parameter when you
initially deploy the system. Used to support multiple wireless networks within the
same physical area. The WFN_ID is only a logical entity and will not be associated
with or loaded to any of the real equipment.
For example: Devices on WFN ID 1 will be on one wireless network, while devices
on WFN ID 2 will be on a second wireless network. This is similar to an SSID for an
802.11g network.
Freq
Hopping ID Default value is zero. This parameter is not used in this release.
Defines the frequency hopping pattern for the nodes in the wireless network:
Freq
Hopping
Mode US Channel #1
US Channel #6
US Channel #11
Guard bands outside US
channel #1, 6 and 11
EU Channel #1
EU Channel #7
EU Channel #13
EU Guard Bands Outside 1, 7, 13
Guard banks outside EU channels 1, 7 and 13
Key information:
Number of
Keys Defines the total number of security keys to generate during the session.
Use
Date/Time Identifies the date the security keys loaded on the Authentication Device can be
used.
Use
Duration Establishes the length of time after the use date that the security keys loaded on the
Authentication Device will remain valid.
DS IP
Address Identifies the IP address for the Directory Server/Key Server so that iNodes and
Gateways can communicate with it. Each IP address represents a network interface
on the computer.
Authentication device:
AD ID Authentication device identification number.
InstallerID Identifies the person or group using the Authentication Device. Used to account for all
users who generate security keys.
COM Port Establishes the serial port on the Key Server used to transmit security keys to the
authentication device. On a typical system it would be COM1 or COM2 depending on
where the IR transceiver is attached.

9. Wireless Tools Quick References
9.1. Key Server quick reference
36 Getting Started with Honeywell Wireless Guide Field Trial
Honeywell - Confidential & Proprietary 3/2007
Authentication Device – Log tab
Text area:
Log
information List of problems related to IR communications with the Authentication Device.
Wireless Nodes – Manage tab
Secure wireless Nodes: Lists all wireless devices that have been issued security keys and
authenticated.
Node_ID Wireless 16 bit address of a secured device in the network.
WFN_ID Wireless field network identification of the network where the secured device resides.
AD_ID Authentication Device that was used to authenticate the secured device.
Event Log
Key Server events:
Event Log List of events for the Key Server. Errors appear here and can be used to debug the
installation.

9. Wireless Tools Quick References
9.2. Authentication device quick reference
Field Trial Getting Started with Honeywell Wireless Guide 37
3/2007 Honeywell - Confidential & Proprietary
9.2 Authentication device quick reference
The following table describes the functions of the authentication device. For additional details about the
authentication device, see the help in the tutorial available from the device’s Advanced Options menu.
Function Description
Security and Device Deployment
Receive Security
Keys Use to receive keys on the device after you have generated them on the
Key Server manager.
Transmit Key and
Connect Device Function available when the device receives the security keys. Use to
transmit security key to wireless device.
Device Local Configuration
Up, Down, Back,
Enter buttons Use to scroll through menus displayed on the device LCD panel and
perform various tasks such as calibrate the device, read the signal strength
(RSSI), etc.
Read Device Information
Read Device
Information Use to retrieve parameter information from the wireless device.
Advanced Options
Restart to defaults Use to reset a device, a gateway, or an interface node to its default
values. This clears the radio configuration and removes the current security
key.

9. Wireless Tools Quick References
9.3. WSG/iNode quick reference
38 Getting Started with Honeywell Wireless Guide Field Trial
Honeywell - Confidential & Proprietary 3/2007
9.3 WSG/iNode quick reference
The following table identifies those configuration options for the WSG/iNode that you either must
change or are strongly encouraged to change.
Access the WSG/iNode configuration forms by entering the device’s URL from Internet Explorer (URL
is https:// plus the devices IP address).
Option Description
System Configuration
Wireless Access Point
9.4 Wireless Builder quick reference
Wireless Builder is control building software used to configure wireless hardware devices. In future
releases you will also be able to create continuous and sequential control strategies. For additional
information about Wireless Builder, see the Wireless Builder User’s Guide.
Wireless Builder configuration scenarios
TBD.
Wireless Builder functions
The following table describes the functions of the Wireless Builder application.
To do this . . . Do this . . .
TBD: add functions for
wireless builder
9.5 Data Collection Tool quick reference
TBD
9.6 Network Management and Diagnostics tool quick reference
TBD

Field Trial Getting Started with Honeywell Wireless Guide 39
3/2007 Honeywell - Confidential & Proprietary
10. Troubleshooting
10.1 Resolving software startup problems
Cannot login to Wireless Builder
Cause 1: If all the services are not started, Wireless Builder cannot access its database.
Solution: Start the WNSIA services
• Click Start > Control Panel > Administrative Tools > Services.
• Click the Name column to sort the services and locate the WNSIA services.
• Verify all the following are started: cda server, erserver, gcl, , Raptor
DirectoryServer, SysRep, WNSIA Key Server.
10.2 Resolving authentication errors
Wireless device cannot join the network
Cause 1: Wireless device has not yet been authenticated.
Solution: Re-inject device with new security key.
Cause 2: Key Server can no longer recognize the device’s security key or the device lost its
security key.
Solution: Reset a device, a gateway, or an interface node to its default values. This clears the
radio configuration and removes the current security key.
• Align the authentication device with the device’s IR port.
• On the authentication device, select Advanced options.
• Select Restart to defaults.
• Re-inject device with new security key.
Cause 3: Wireless device is authenticated, but is not yet active in the wireless tools (Wireless
Builder, Data Collection Tool).
Solution: Allow at least 10 minutes for the device to be visible in the Wireless Tools.