Huawei Technologies BTS3902E-U850 Micro BTS User Manual Site Maintenance Guide
Huawei Technologies Co.,Ltd Micro BTS Site Maintenance Guide
Contents
- 1. UserManual_part1.pdf
- 2. UserManual_part2.pdf
- 3. UserManual_Safety Manual.pdf
UserManual_part1.pdf

BTS3902E WCDMA
Hardware Description
Issue 09
Date 2014-05-16
HUAWEI TECHNOLOGIES CO., LTD.

Copyright © Huawei Technologies Co., Ltd. 2014. All rights reserved.
No part of this document may be reproduced or transmitted in any form or by any means without prior written
consent of Huawei Technologies Co., Ltd.
Trademarks and Permissions
and other Huawei trademarks are trademarks of Huawei Technologies Co., Ltd.
All other trademarks and trade names mentioned in this document are the property of their respective holders.
Notice
The purchased products, services and features are stipulated by the contract made between Huawei and the
customer. All or part of the products, services and features described in this document may not be within the
purchase scope or the usage scope. Unless otherwise specified in the contract, all statements, information,
and recommendations in this document are provided "AS IS" without warranties, guarantees or representations
of any kind, either express or implied.
The information in this document is subject to change without notice. Every effort has been made in the
preparation of this document to ensure accuracy of the contents, but all statements, information, and
recommendations in this document do not constitute a warranty of any kind, express or implied.
Huawei Technologies Co., Ltd.
Address: Huawei Industrial Base
Bantian, Longgang
Shenzhen 518129
People's Republic of China
Website: http://www.huawei.com
Email: support@huawei.com
Issue 09 (2014-05-16) Huawei Proprietary and Confidential
Copyright © Huawei Technologies Co., Ltd.
i

About This Document
Purpose
This document provides reference for planning and deploying an BTS3902E WCDMA. It
presents the exterior and describes the ports, functions, cable types, connector specifications,
and cable connections of the BTS3902E WCDMA.
Product Version
The following table lists the product version related to this document.
Product Name Product Version
BTS3902E WCDMA (referred to
as the BTS3902E in this
document)
V200R013C00 and later versions
V100R008C00 and later versions
The single-mode base station version mapping to
V100R008C00 is: NodeB V200R015C00
Intended Audience
This document is intended for:
lBase station installation engineers
lSystem engineers
lSite maintenance engineers
Organization
1 Changes in BTS3902E WCDMA Hardware Description
This chapter describes the changes in BTS3902E WCDMA Hardware Description.
2 BTS3902E Overview
BTS3902E WCDMA
Hardware Description About This Document
Issue 09 (2014-05-16) Huawei Proprietary and Confidential
Copyright © Huawei Technologies Co., Ltd.
ii
This chapter presents the BTS3902E exterior and describes the ports and indicators on the
BTS3902E.
3 BTS3902E Cables
This chapter provides BTS3902E cable exteriors and describes the pin assignments for the wires
of the cables and installation positions for the cables.
4 BTS3902E Auxiliary Devices
This chapter describes the BTS3902E auxiliary devices.
Conventions
Symbol Conventions
The symbols that may be found in this document are defined as follows.
Symbol Description
Indicates an imminently hazardous situation which, if not
avoided, will result in death or serious injury.
Indicates a potentially hazardous situation which, if not
avoided, could result in death or serious injury.
Indicates a potentially hazardous situation which, if not
avoided, may result in minor or moderate injury.
Indicates a potentially hazardous situation which, if not
avoided, could result in equipment damage, data loss,
performance deterioration, or unanticipated results.
NOTICE is used to address practices not related to personal
injury.
Calls attention to important information, best practices and
tips.
NOTE is used to address information not related to personal
injury, equipment damage, and environment deterioration.
General Conventions
The general conventions that may be found in this document are defined as follows.
Convention Description
Times New Roman Normal paragraphs are in Times New Roman.
Boldface Names of files, directories, folders, and users are in
boldface. For example, log in as user root.
BTS3902E WCDMA
Hardware Description About This Document
Issue 09 (2014-05-16) Huawei Proprietary and Confidential
Copyright © Huawei Technologies Co., Ltd.
iii

Convention Description
Italic Book titles are in italics.
Courier New Examples of information displayed on the screen are in
Courier New.
Command Conventions
The command conventions that may be found in this document are defined as follows.
Convention Description
Boldface The keywords of a command line are in boldface.
Italic Command arguments are in italics.
[ ] Items (keywords or arguments) in brackets [ ] are optional.
{ x | y | ... } Optional items are grouped in braces and separated by
vertical bars. One item is selected.
[ x | y | ... ] Optional items are grouped in brackets and separated by
vertical bars. One item is selected or no item is selected.
{ x | y | ... }*Optional items are grouped in braces and separated by
vertical bars. A minimum of one item or a maximum of all
items can be selected.
[ x | y | ... ]*Optional items are grouped in brackets and separated by
vertical bars. Several items or no item can be selected.
GUI Conventions
The GUI conventions that may be found in this document are defined as follows.
Convention Description
Boldface Buttons, menus, parameters, tabs, window, and dialog titles
are in boldface. For example, click OK.
>Multi-level menus are in boldface and separated by the ">"
signs. For example, choose File > Create > Folder.
Keyboard Operations
The keyboard operations that may be found in this document are defined as follows.
BTS3902E WCDMA
Hardware Description About This Document
Issue 09 (2014-05-16) Huawei Proprietary and Confidential
Copyright © Huawei Technologies Co., Ltd.
iv

Format Description
Key Press the key. For example, press Enter and press Tab.
Key 1+Key 2 Press the keys concurrently. For example, pressing Ctrl+Alt
+A means the three keys should be pressed concurrently.
Key 1, Key 2 Press the keys in turn. For example, pressing Alt, A means
the two keys should be pressed in turn.
Mouse Operations
The mouse operations that may be found in this document are defined as follows.
Action Description
Click Select and release the primary mouse button without moving
the pointer.
Double-click Press the primary mouse button twice continuously and
quickly without moving the pointer.
Drag Press and hold the primary mouse button and move the
pointer to a certain position.
BTS3902E WCDMA
Hardware Description About This Document
Issue 09 (2014-05-16) Huawei Proprietary and Confidential
Copyright © Huawei Technologies Co., Ltd.
v

Contents
About This Document.....................................................................................................................ii
1 Changes in BTS3902E WCDMA Hardware Description.........................................................1
2 BTS3902E Overview......................................................................................................................5
2.1 BTS3902E Exterior........................................................................................................................................................6
2.2 BTS3902E Ports.............................................................................................................................................................8
2.3 BTS3902E Indicators...................................................................................................................................................10
3 BTS3902E Cables.........................................................................................................................12
3.1 BTS3902E Cable List...................................................................................................................................................13
3.1.1 AC Cable List (Working at The 1.9 GHz or 2.1 GHz Frequency Band)..................................................................13
3.1.2 AC Cable List (Working at The 850 MHz Frequency Band)....................................................................................14
3.1.3 DC Cable List (Working at The AWS Frequency Band)..........................................................................................16
3.2 BTS3902E PGND Cables.............................................................................................................................................17
3.3 BTS3902E Power Cable...............................................................................................................................................18
3.3.1 AC Power Cable (Working at The 1.9 GHz or 2.1 GHz Frequency Band)..............................................................18
3.3.2 AC Power Cable (Working at The 850 MHz Frequency Band)................................................................................21
3.3.3 DC Power Cable (Working at the AWS Frequency Band).......................................................................................23
3.4 (Optional) Alarm Cable for the BTS3902E..................................................................................................................24
3.5 FE/GE Fiber Optic Cable.............................................................................................................................................25
3.6 FE/GE Cable.................................................................................................................................................................26
3.7 Cascading FE/GE Fiber Optic Cable............................................................................................................................27
3.8 Cascading FE/GE Cable...............................................................................................................................................27
3.9 BTS3902E RF Jumper..................................................................................................................................................28
4 BTS3902E Auxiliary Devices.....................................................................................................29
4.1 IFS06............................................................................................................................................................................30
4.2 (Optional) AC Surge Protection Box............................................................................................................................31
4.2.1 SPD60D (Working at the 1.9 GHz or 2.1 GHz Frequency Band).............................................................................32
4.2.2 SPM60A (Working at the 850 MHz Frequency Band).............................................................................................33
BTS3902E WCDMA
Hardware Description Contents
Issue 09 (2014-05-16) Huawei Proprietary and Confidential
Copyright © Huawei Technologies Co., Ltd.
vi

1 Changes in BTS3902E WCDMA Hardware
Description
This chapter describes the changes in BTS3902E WCDMA Hardware Description.
09 (2014-05-16)
This is the ninth commercial release.
Compared with 08 (2014-02-28), no information is added.
Compared with 08 (2014-02-28), this issue incorporates the following change:
Topic Change Description
Entire document The BTS3902E working at the 850 MHz frequency
band is added.
Compared with 08 (2014-02-28), no information is deleted.
08 (2014-02-28)
This is the eighth commercial release.
Compared with 07 (2013-12-05), no information is added.
Compared with 07 (2013-12-05), this issue incorporates the following change:
Topic Change Description
About This Document Modified the description of the application scope
of this document.
Compared with 07 (2013-12-05), no information is deleted.
BTS3902E WCDMA
Hardware Description 1 Changes in BTS3902E WCDMA Hardware Description
Issue 09 (2014-05-16) Huawei Proprietary and Confidential
Copyright © Huawei Technologies Co., Ltd.
1

07 (2013-12-05)
This is the seventh commercial release.
Compared with 06 (2013-11-30), no information is added.
Compared with 06 (2013-11-30), this issue incorporates the following change:
Topic Change Description
Entire document The DC-powered BTS3902E working at the AWS
frequency band is added.
Compared with 06 (2013-11-30), no information is deleted.
06 (2013-11-30)
This is the sixth commercial release.
Compared with 05 (2012-12-30), no information is added.
Compared with 05 (2012-12-30), this issue incorporates the following changes:
Topic Change Description
About This Document V100R008C00 is added to the application scope of
this document.
3.7 Cascading FE/GE Fiber Optic
Cable
Modified the cable name from Interconnection
Cable Between FE/GE Optical Ports to
Cascading FE/GE Fiber Optic Cable.
3.8 Cascading FE/GE Cable Modified the cable name from Interconnection
Cable Between FE/GE Electrical Ports to
Cascading FE/GE Cable.
Compared with 05 (2012-12-30), no information is deleted.
05 (2012-12-30)
This is the fifth commercial release.
Compared with 04 (2012-09-15), no information is added.
Compared with 04 (2012-09-15), this issue incorporates the following changes:
Topic Change Description
2.2 BTS3902E Ports Modified the DBG port description.
BTS3902E WCDMA
Hardware Description 1 Changes in BTS3902E WCDMA Hardware Description
Issue 09 (2014-05-16) Huawei Proprietary and Confidential
Copyright © Huawei Technologies Co., Ltd.
2

Topic Change Description
3.3 BTS3902E Power Cable Modified the pin assignment for the wires of the
power cable between an AC surge protection box
and a power device.
3.6 FE/GE Cable Modified the pin assignment for the wires of the
FE/GE cable.
4.2 (Optional) AC Surge Protection
Box
Added the description of wiring terminal for a
ground cable on the cabling cavity panel.
Compared with 04 (2012-09-15), no information is deleted.
04 (2012-09-15)
This is the fourth commercial release.
Compared with 03 (2012-06-30), no information is added.
Compared with 03 (2012-06-30), this issue incorporates the following change:
Topic Change Description
2.2 BTS3902E Ports Added the PoE port description.
Compared with 03 (2012-06-30), no information is deleted.
03 (2012-06-30)
This is the third commercial release.
Compared with 02 (2012-03-15), no information is added.
Compared with 02 (2012-03-15), this issue incorporates the following changes:
Topic Change Description
3.2 BTS3902E PGND Cables Added the length of the cables.
3.5 FE/GE Fiber Optic Cable
3.6 FE/GE Cable
Compared with 02 (2012-03-15), no information is deleted.
02 (2012-03-15)
This is the second commercial release.
BTS3902E WCDMA
Hardware Description 1 Changes in BTS3902E WCDMA Hardware Description
Issue 09 (2014-05-16) Huawei Proprietary and Confidential
Copyright © Huawei Technologies Co., Ltd.
3

Compared with 01 (2011-11-19), no information is added.
Compared with 01 (2011-11-19), this issue incorporates the following change:
Topic Change Description
Entire document The ground terminals of BTS3902E are updated.
Compared with 01 (2011-11-19), no information is deleted.
01 (2011-11-19)
This is the first commercial release.
Compared with draft B (2011-09-22), no information is added.
Compared with draft B (2011-09-22), no information is changed.
Compared with draft B (2011-09-22), no information is deleted.
Draft B (2011-09-22)
This is a draft release.
Compared with draft A (2011-06-30), this issue includes the following new information:
l4.1 IFS06
Compared with draft A (2011-06-30), this issue incorporates the following changes:
Topic Change Description
2.1 BTS3902E Exterior The position of the ESN is modified.
3.4 (Optional) Alarm Cable for the
BTS3902E
Modified the cable name from BTS3902E
Monitoring Signal Cable to BTS3902E Alarm
Cable.
Compared with draft A (2011-06-30), no information is deleted.
Draft A (2011-06-30)
This is a draft release.
BTS3902E WCDMA
Hardware Description 1 Changes in BTS3902E WCDMA Hardware Description
Issue 09 (2014-05-16) Huawei Proprietary and Confidential
Copyright © Huawei Technologies Co., Ltd.
4

2 BTS3902E Overview
About This Chapter
This chapter presents the BTS3902E exterior and describes the ports and indicators on the
BTS3902E.
2.1 BTS3902E Exterior
The BTS3902E has a modular design with its ports on the bottom.
2.2 BTS3902E Ports
The BTS3902E ports are on the bottom, and the indicators are on the front.
2.3 BTS3902E Indicators
A BTS3902E has six indicators, which indicate the running status of the BTS3902E.
BTS3902E WCDMA
Hardware Description 2 BTS3902E Overview
Issue 09 (2014-05-16) Huawei Proprietary and Confidential
Copyright © Huawei Technologies Co., Ltd.
5
2.1 BTS3902E Exterior
The BTS3902E has a modular design with its ports on the bottom.
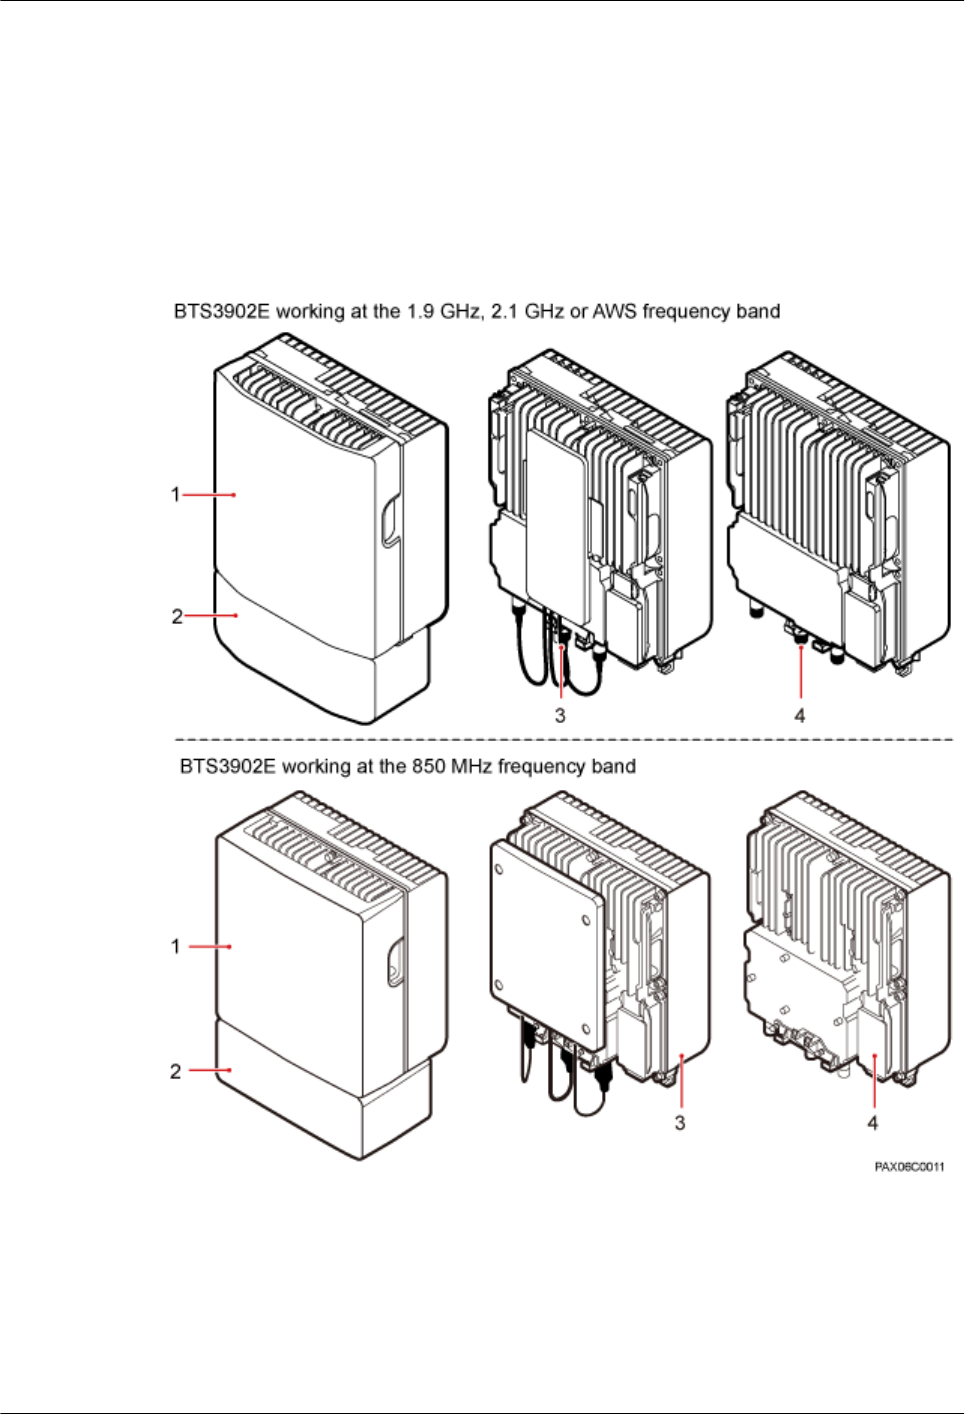
Figure 2-1 shows the BTS3902E. The BTS3902E on the left has a housing, and the
BTS3902E on the right does not have a housing. The camouflage shell is optional.
Figure 2-1 BTS3902E
(1) Upper
housing
(2) Camouflage
shell
(3) BTS3902E with built-in antenna (4) BTS3902E with external antennas
Figure 2-2 shows the dimensions of a BTS3902E, Table 2-1 shows the specifications of a
BTS3902E
BTS3902E WCDMA
Hardware Description 2 BTS3902E Overview
Issue 09 (2014-05-16) Huawei Proprietary and Confidential
Copyright © Huawei Technologies Co., Ltd.
6
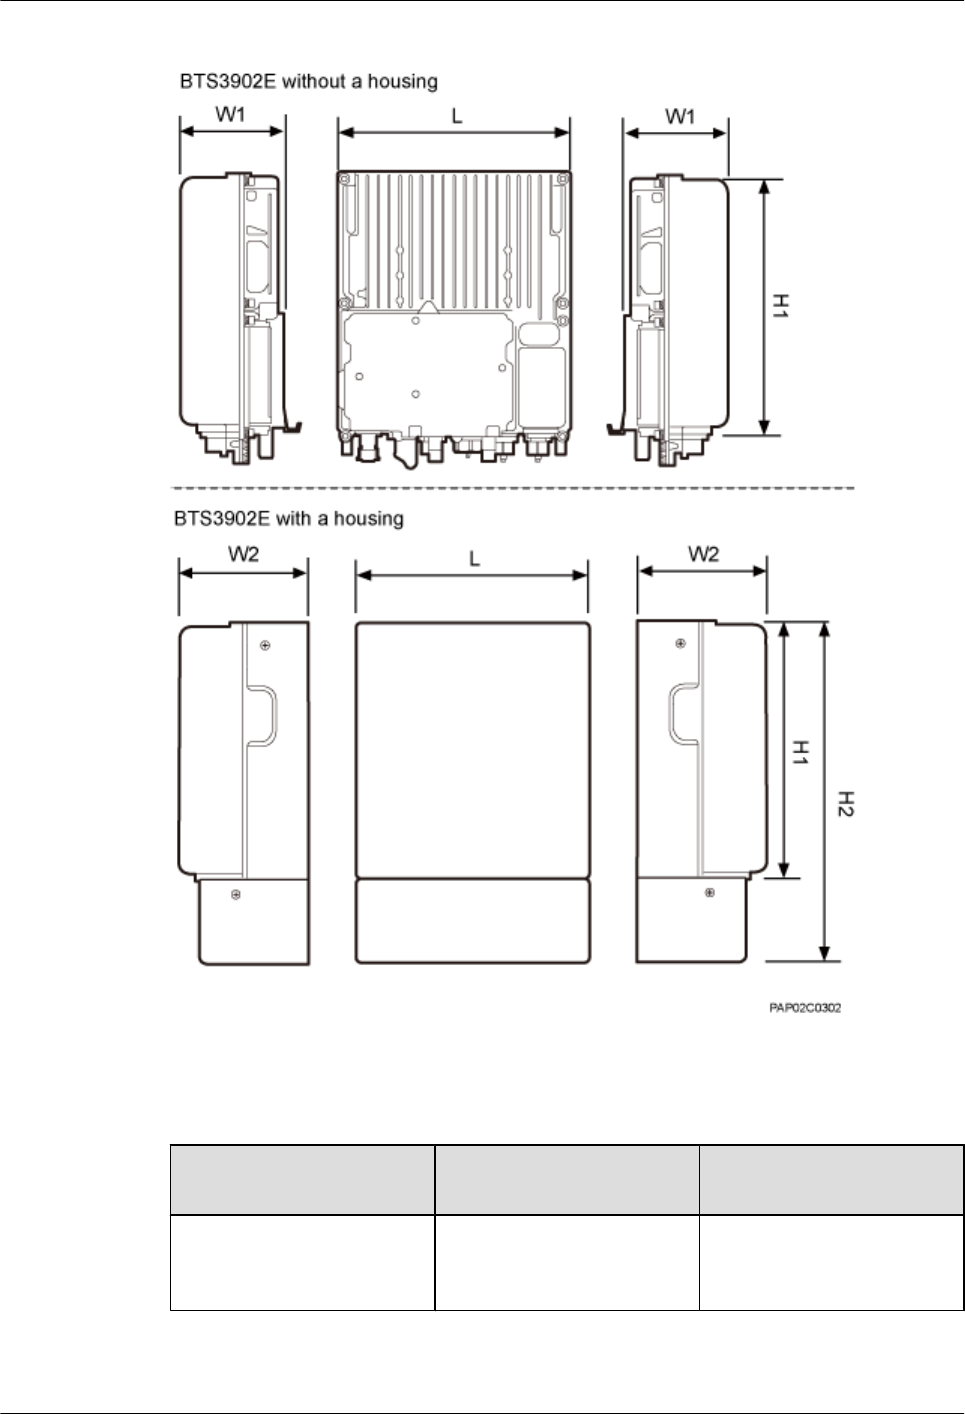
Figure 2-2 Dimensions of a BTS3902E
Table 2-1 Specifications of a BTS3902E
Module Dimensions (H1 x W1 x
D) (Without the Housing)
Dimensions (H2 x W2 x
D) (with the Housing)
BTS3902E working at the 1.9
GHz, 2.1 GHz or AWS
frequency band
300 mm x 120 mm x 270 mm 400 mm x 145 mm x 277 mm
BTS3902E WCDMA
Hardware Description 2 BTS3902E Overview
Issue 09 (2014-05-16) Huawei Proprietary and Confidential
Copyright © Huawei Technologies Co., Ltd.
7
Module Dimensions (H1 x W1 x
D) (Without the Housing)
Dimensions (H2 x W2 x
D) (with the Housing)
BTS3902E working at the
850MHz frequency band
300 mm x 127 mm x 270 mm 400 mm x 170 mm x 277 mm
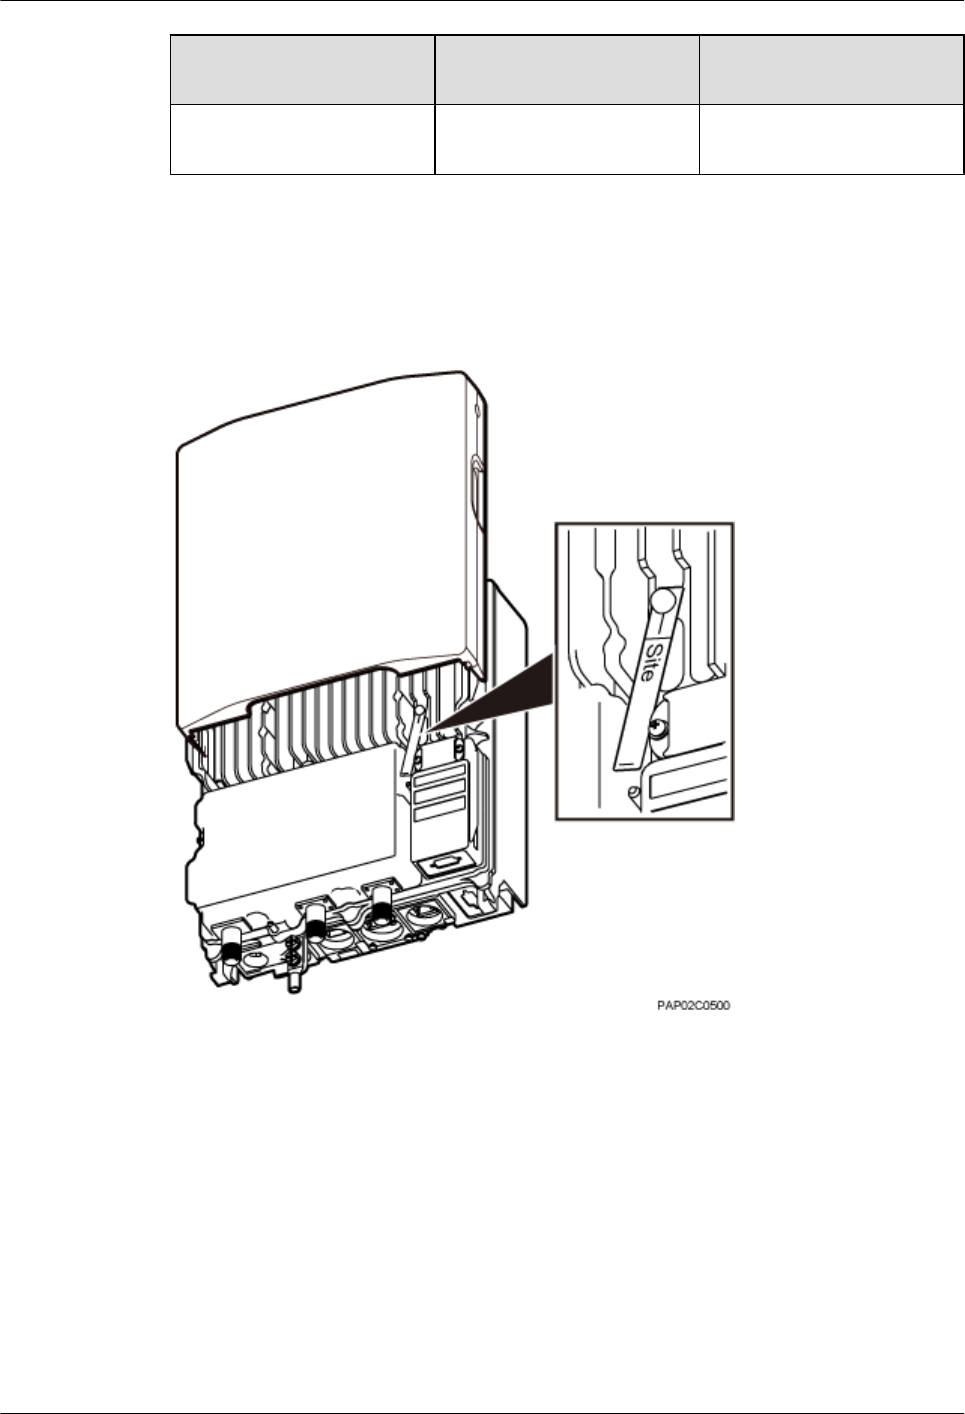
The electronic serial number (ESN) identifies a unique device, which is used during
commissioning. The ESN is printed on a label, as shown in Figure 2-3.
Figure 2-3 ESN position
2.2 BTS3902E Ports
The BTS3902E ports are on the bottom, and the indicators are on the front.
The BTS3902E working at the 1.9 GHz, 2.1 GHz, 850 MHz frequency band supports AC power
supply, and the BTS3902E working at the AWS frequency band supports DC power supply.
The two types of BTS3902Es have the same appearance and dimensions.
Figure 2-4 shows the positions of the BTS3902E ports and indicators.
BTS3902E WCDMA
Hardware Description 2 BTS3902E Overview
Issue 09 (2014-05-16) Huawei Proprietary and Confidential
Copyright © Huawei Technologies Co., Ltd.
8
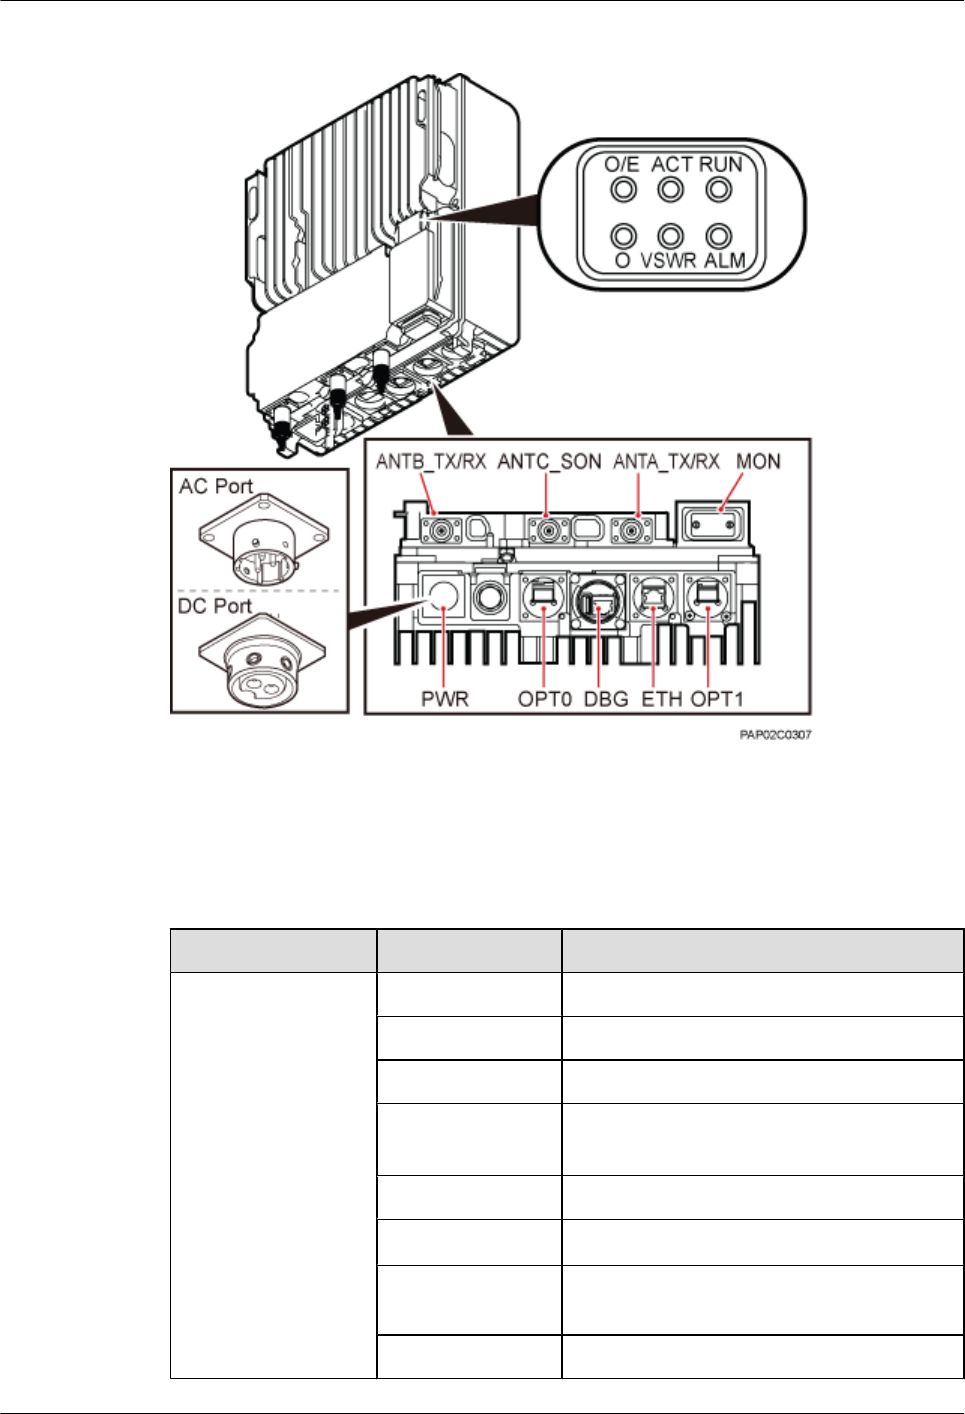
Figure 2-4 Positions of the BTS3902E ports and indicators
Table 2-2 describes the BTS3902E ports and indicators.
Table 2-2 BTS3902E ports and indicators
Item Silkscreen Description
Ports ANTA_TX/RX TX/RX port A
ANTB_TX/RX TX/RX port B
ANTC_SON SON antenna port
ETH FE/GE electrical port or power over Ethernet
(PoE) port*
OPT0 FE/GE optical port
OPT1 FE/GE optical port*
MON Environment monitoring port for an RS485
input and four dry contact inputs
PWR Power supply port
BTS3902E WCDMA
Hardware Description 2 BTS3902E Overview
Issue 09 (2014-05-16) Huawei Proprietary and Confidential
Copyright © Huawei Technologies Co., Ltd.
9

Item Silkscreen Description
DBG There are two ports:
lNetwork port, used for local
commissioning on the LMT
lUSB port**, used for local commissioning
with a USB flash drive and for clock
testing
Indicators RUN For details, see 2.3 BTS3902E Indicators
ALM
ACT
VSWR
O/E
O
NOTE
l*: The ETH port and OPT1 port cannot be used simultaneously.
l**: The security of the USB port is ensured by encryption. The USB port is used for commissioning
the base station rather than importing or exporting the base station configuration.
2.3 BTS3902E Indicators
A BTS3902E has six indicators, which indicate the running status of the BTS3902E.
For details about the indicator positions on the BTS3902E panel, see 2.2 BTS3902E Ports.
Table 2-3 describes BTS3902E indicators.
Table 2-3 BTS3902E indicators
Indicator Color Status Description
RUN Green Steady on There is power supply, but the BTS3902E is
faulty.
Off There is no power supply, or the BTS3902E
is faulty.
Blinking (on for
1s and off for 1s)
The BTS3902E is working properly.
Blinking (on for
0.125s and off for
0.125s)
Software is being loaded to the BTS3902E,
or the BTS3902E is not started.
BTS3902E WCDMA
Hardware Description 2 BTS3902E Overview
Issue 09 (2014-05-16) Huawei Proprietary and Confidential
Copyright © Huawei Technologies Co., Ltd.
10

Indicator Color Status Description
ALM Red Steady on Alarms are generated, and the BTS3902E
must be replaced.
Blinking (on for
1s and off for 1s)
Alarms are generated. The alarms may be
caused by the faults on the related boards or
ports. Therefore, the necessity for
BTS3902E replacement is uncertain.
Off No alarm is generated.
ACT Green Steady on The BTS3902E is working properly with TX
channels enabled.
Blinking (on for
1s and off for 1s)
The BTS3902E is working properly with TX
channels disabled.
VSWR Red Off No VSWR alarm is generated.
Blinking red (on
for 1s and off for
1s)
VSWR alarms are generated on the
ANTB_TX/RX port.
Steady red VSWR alarms are generated on the
ANTA_TX/RX port.
Blinking red (on
for 0.125s and off
for 0.125s)
VSWR alarms are generated on the
ANTA_TX/RX and ANTB_TX/RX ports.
O/E Green Steady on The OPT1 or ETH port is connected
properly.
Blinking (on for
0.125s and off for
0.125s)
The OPT1 or ETH port is transmitting or
receiving data.
Off The OPT1 or ETH port is connected
improperly.
O Green Steady on The OPT0 port is connected properly.
Blinking (on for
0.125s and off for
0.125s)
The OPT0 port is transmitting or receiving
data.
Off The OPT0 port is connected improperly.
BTS3902E WCDMA
Hardware Description 2 BTS3902E Overview
Issue 09 (2014-05-16) Huawei Proprietary and Confidential
Copyright © Huawei Technologies Co., Ltd.
11

3 BTS3902E Cables
About This Chapter
This chapter provides BTS3902E cable exteriors and describes the pin assignments for the wires
of the cables and installation positions for the cables.
3.1 BTS3902E Cable List
BTS3902E cables connect different devices.
3.2 BTS3902E PGND Cables
The BTS3902E PGND cable connects a BTS3902E and a ground bar, ensuring proper grounding
of the BTS3902E. The maximum length of a PGND cable is 30 m (98.42 ft).
3.3 BTS3902E Power Cable
A BTS3902E power cable feeds power to a BTS3902E from an external power device.
3.4 (Optional) Alarm Cable for the BTS3902E
The BTS3902E alarm cable, transmits alarm signals from an external device to a BTS3902E so
that the base station monitors the operating status of external devices. This cable is optional.
3.5 FE/GE Fiber Optic Cable
A fast Ethernet or gigabit Ethernet (FE/GE) fiber optic cable transmits fiber signals between a
BTS3902E and a transmission device. The maximum length of a FE/GE fiber optic cable is 20
m (65.61 ft). This cable is optional.
3.6 FE/GE Cable
The fast Ethernet or gigabit Ethernet (FE/GE) cable transmits FE/GE signals between a
BTS3902E and a transmission device. This cable is optional, and the maximum length of a FE/
GE Cable is 20 m (65.62 ft).
3.7 Cascading FE/GE Fiber Optic Cable
A cascading FE/GE Fiber Optic Cable connects two FE/GE optical ports on two modules.
3.8 Cascading FE/GE Cable
A cascading FE/GE cable connects two FE/GE electrical ports on two modules.
3.9 BTS3902E RF Jumper
The superflexible 1/2" radio frequency (RF) jumper used by the BTS3902E transmits and
receives RF signals.
BTS3902E WCDMA
Hardware Description 3 BTS3902E Cables
Issue 09 (2014-05-16) Huawei Proprietary and Confidential
Copyright © Huawei Technologies Co., Ltd.
12

3.1 BTS3902E Cable List
BTS3902E cables connect different devices.
3.1.1 AC Cable List (Working at The 1.9 GHz or 2.1 GHz Frequency
Band)
This section lists the AC cables applied to the BTS3902E working at the 1.9 GHz or 2.1 GHz
frequency band.
Table 3-1 lists the AC cables applied to the BTS3902E working at the 1.9 GHz or 2.1 GHz
frequency band.
Table 3-1 AC cable list of the BTS3902E (working at the 1.9 GHz or 2.1 GHz frequency band)
Cable
Name
One End The Other End
Connector Installation
Position
Connector Installation
Position
3.2
BTS3902E
PGND
Cables
OT terminal (M6,
16 mm2)
Ground
terminal for the
BTS3902E
OT terminal (M6,
16 mm2)
AC surge
protection box
Prepared onsite
to match the
ground bar
Ground terminal
on the ground bar
3.3.1 AC
Power Cable
(Working at
The 1.9 GHz
or 2.1 GHz
Frequency
Band)
3-pin
waterproofed
round AC
connector
PWR port on
the BTS3902E
OT terminal (M4,
1.5 mm2)
AC surge
protection box
OT terminal (M4,
4 mm2)
AC surge
protection box
Bare wire Power device
3-pin
waterproofed
round AC
connector
PWR port on
the BTS3902E
Bare wire Power device
3.4
(Optional)
Alarm
Cable for
the
BTS3902E
DB15 male
connector
MON on the
BTS3902E
Bare wire External
monitoring
device
3.5 FE/GE
Fiber Optic
Cable
DLC connector OPT0 port on
the BTS3902E
DLC connector External
transmission
device
BTS3902E WCDMA
Hardware Description 3 BTS3902E Cables
Issue 09 (2014-05-16) Huawei Proprietary and Confidential
Copyright © Huawei Technologies Co., Ltd.
13

Cable
Name
One End The Other End
Connector Installation
Position
Connector Installation
Position
3.7
Cascading
FE/GE
Fiber Optic
Cable
DLC connector OPT0/OPT1
port on the
BTS3902E
DLC connector OPT0/OPT1 port
on the
BTS3902E
3.6 FE/GE
Cable
RJ45 connector ETH port on the
BTS3902E
RJ45 connector External
transmission
device
3.8
Cascading
FE/GE
Cable
RJ45 connector ETH port on the
BTS3902E
RJ45 connector ETH port on the
BTS3902E
3.9
BTS3902E
RF Jumper
Type N male
connector
ANTA_TX/
RX,
ANTB_TX/
RX, or
ANTC_SON
port on the
BTS3902E
Type N male
connector
Antenna system
3.1.2 AC Cable List (Working at The 850 MHz Frequency Band)
This section describes the AC power cables applied to the BTS3902E working at the 850 MHz
frequency band.
Table 3-2 lists the AC power cables applied to the BTS3902E working at the 850 MHz frequency
band.
Table 3-2 AC power cable list of the BTS3902E (working at the 850 MHz frequency band)
Cable
Name
One End The Other End
Connector Installation
Position
Connector Installation
Position
3.2
BTS3902E
PGND
Cables
OT terminal (M6,
6 mm2)
Ground
terminal of the
BTS3902E
OT terminal (M6,
6 mm2)
AC surge
protection box
Prepared onsite
to match the
ground bar
Ground terminal
on the ground bar
BTS3902E WCDMA
Hardware Description 3 BTS3902E Cables
Issue 09 (2014-05-16) Huawei Proprietary and Confidential
Copyright © Huawei Technologies Co., Ltd.
14

Cable
Name
One End The Other End
Connector Installation
Position
Connector Installation
Position
3.3.2 AC
Power Cable
(Working at
The 850
MHz
Frequency
Band)
3-pin
waterproofed
round AC
connector
PWR port on
the BTS3902E
OT terminal (M4,
1.5 mm2)
AC surge
protection box
OT terminal (M4,
2.5 mm2)
AC surge
protection box
Bare wire Power device
3-pin
waterproofed
round AC
connector
PWR port on
the BTS3902E
Bare wire Power device
3.4
(Optional)
Alarm
Cable for
the
BTS3902E
DB15 male
connector
MON on the
BTS3902E
Bare wire External
monitoring
device
3.5 FE/GE
Fiber Optic
Cable
DLC connector OPT0 port on
the BTS3902E
DLC connector External
transmission
device
3.7
Cascading
FE/GE
Fiber Optic
Cable
DLC connector OPT0/OPT1
port on the
BTS3902E
DLC connector OPT0/OPT1 port
on the
BTS3902E
3.6 FE/GE
Cable
RJ45 connector ETH port on the
BTS3902E
RJ45 connector External
transmission
device
3.8
Cascading
FE/GE
Cable
RJ45 connector ETH port on the
BTS3902E
RJ45 connector ETH port on the
BTS3902E
3.9
BTS3902E
RF Jumper
Type N male
connector
ANTA_TX/
RX,
ANTB_TX/
RX, or
ANTC_SON
port on the
BTS3902E
Type N male
connector
Antenna system
BTS3902E WCDMA
Hardware Description 3 BTS3902E Cables
Issue 09 (2014-05-16) Huawei Proprietary and Confidential
Copyright © Huawei Technologies Co., Ltd.
15

3.1.3 DC Cable List (Working at The AWS Frequency Band)
This section lists the DC cables applied to the BTS3902E working at the AWS frequency band.
Table 3-3 lists the DC cables applied to the BTS3902E working at the AWS frequency band.
Table 3-3 DC cable list of the BTS3902E (working at the AWS frequency band)
Cable
Name
One End The Other End
Connector Installation
Position
Connector Installation
Position
3.2
BTS3902E
PGND
Cables
OT terminal (M6,
16 mm2)
Ground
terminal of the
BTS3902E
Prepared onsite
to match the
ground bar
Ground terminal
on the ground bar
3.3
BTS3902E
Power Cable
2-pin
waterproofed
round DC
connector
PWR port on
the BTS3902E
Bare wire Power device
3.4
(Optional)
Alarm
Cable for
the
BTS3902E
DB15 male
connector
MON on the
BTS3902E
Bare wire External
monitoring
device
3.5 FE/GE
Fiber Optic
Cable
DLC connector OPT0 port on
the BTS3902E
DLC connector External
transmission
device
3.7
Cascading
FE/GE
Fiber Optic
Cable
DLC connector OPT0/OPT1
port on the
BTS3902E
DLC connector OPT0/OPT1 port
on the
BTS3902E
3.6 FE/GE
Cable
RJ45 connector ETH port on the
BTS3902E
RJ45 connector External
transmission
device
3.8
Cascading
FE/GE
Cable
RJ45 connector ETH port on the
BTS3902E
RJ45 connector ETH port on the
BTS3902E
BTS3902E WCDMA
Hardware Description 3 BTS3902E Cables
Issue 09 (2014-05-16) Huawei Proprietary and Confidential
Copyright © Huawei Technologies Co., Ltd.
16
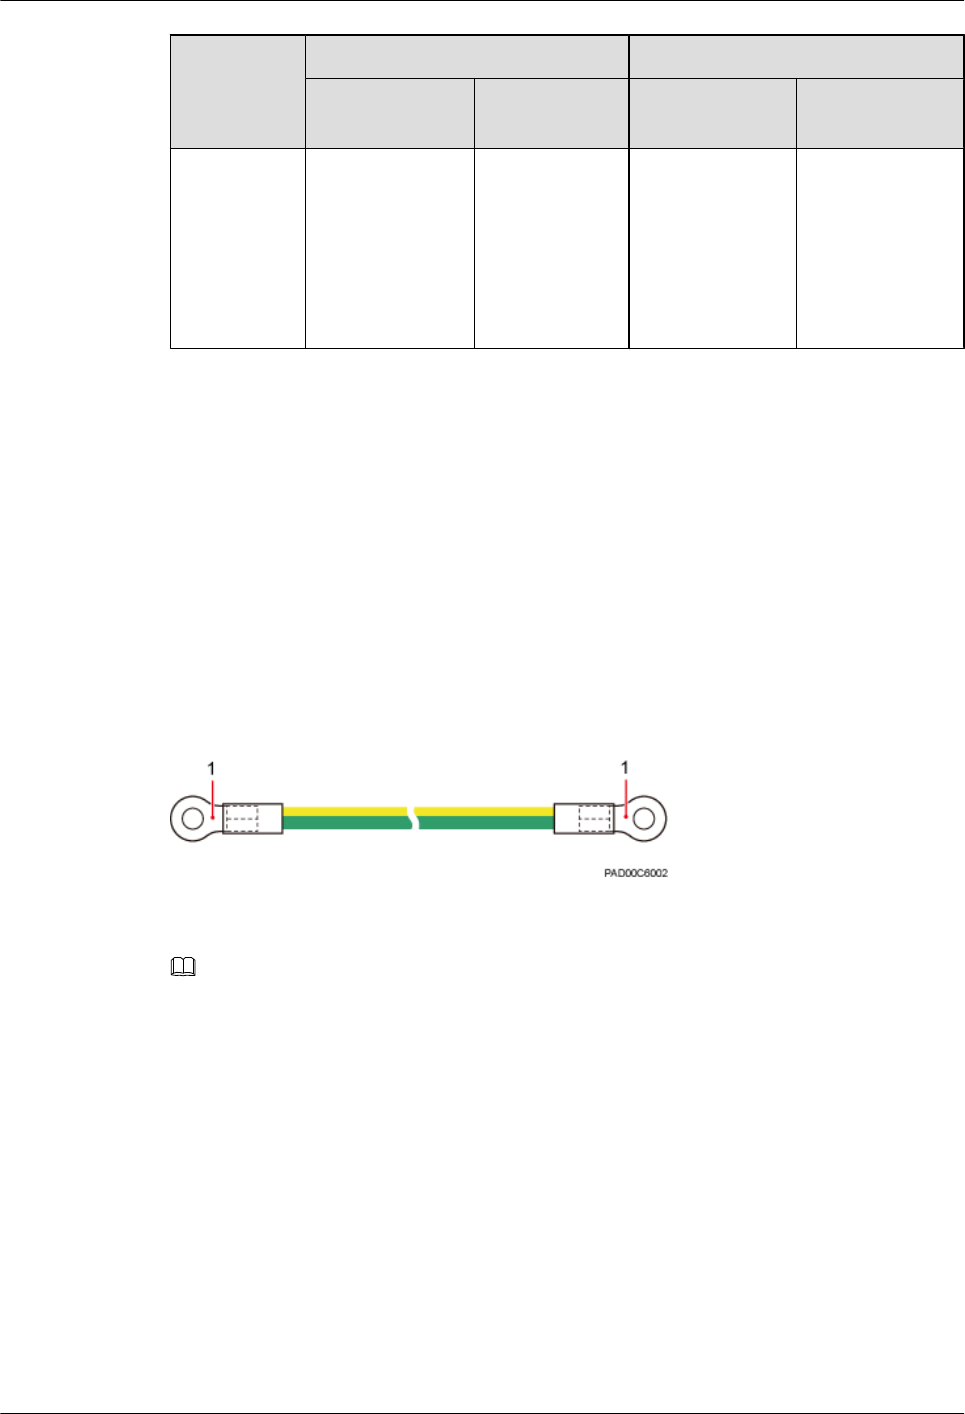
Cable
Name
One End The Other End
Connector Installation
Position
Connector Installation
Position
3.9
BTS3902E
RF Jumper
Type N male
connector
ANTA_TX/
RX,
ANTB_TX/
RX, or
ANTC_SON
port on the
BTS3902E
Type N male
connector
Antenna system
3.2 BTS3902E PGND Cables
The BTS3902E PGND cable connects a BTS3902E and a ground bar, ensuring proper grounding
of the BTS3902E. The maximum length of a PGND cable is 30 m (98.42 ft).
Exterior
The PGND cable is green and yellow. Both ends of the cable are OT terminals. Figure 3-1 shows
the PGND cable.
Figure 3-1 PGND cable
(1) OT terminal
NOTE
lWhen an AC surge protection box (which is optional) is configured for a BTS3902E that uses AC
power supply, two PGND cables are required. One provides equipotential connection between the AC
surge protection box and the BTS3902E, and the other connects the AC surge protection box and a
ground bar to ensure proper grounding of the AC surge protection box.
lOne end of the PGND cable connected to the BTS3902E or AC surge protection box is an M6 OT
terminal. The other end connected to the ground bar is an OT terminal added onsite.
Cables
Specifications of the used PGND cables vary with the operating frequency band. You are advised
to prepare the PGND cables with a cross-sectional area not less than that of the copper-core
cable of the same specifications. Table 3-4 lists the specifications of PGND cables.
BTS3902E WCDMA
Hardware Description 3 BTS3902E Cables
Issue 09 (2014-05-16) Huawei Proprietary and Confidential
Copyright © Huawei Technologies Co., Ltd.
17

Table 3-4 Specifications of PGND cables
Cable Name Cross-
Sectional
Area
One End The Other
End
Cable Color
PGND cable
used for the 1.9
GHz, 2.1 GHz
AWS frequency
band
16 mm2 (0.025
in.2)
OT terminal
(M6, 16 mm2
[0.025 in.2])
OT terminal
(M6, 16 mm2
[0.025 in.2])
Yellow and
green
PGND cable
used for the 850
MHz frequency
band
6 mm2 (0.025 in.
2)
OT terminal
(M6, 6 mm2
[0.025 in.2])
OT terminal
(M6, 6 mm2
[0.025 in.2])
Yellow and
green
OT terminals must be added to both ends of the PGND cable onsite. You can determine the color
of the cable and whether to use two-hole terminals in compliance with local regulations.
Figure 3-2 shows a two-hole terminal.
Figure 3-2 Two-hole terminal
3.3 BTS3902E Power Cable
A BTS3902E power cable feeds power to a BTS3902E from an external power device.
3.3.1 AC Power Cable (Working at The 1.9 GHz or 2.1 GHz
Frequency Band)
This section describes the AC power cable applied to the BTS3902E working at the 1.9 GHz or
2.1 GHz frequency band. For outdoor BTS3902Es, the AC surge protection box is optional.
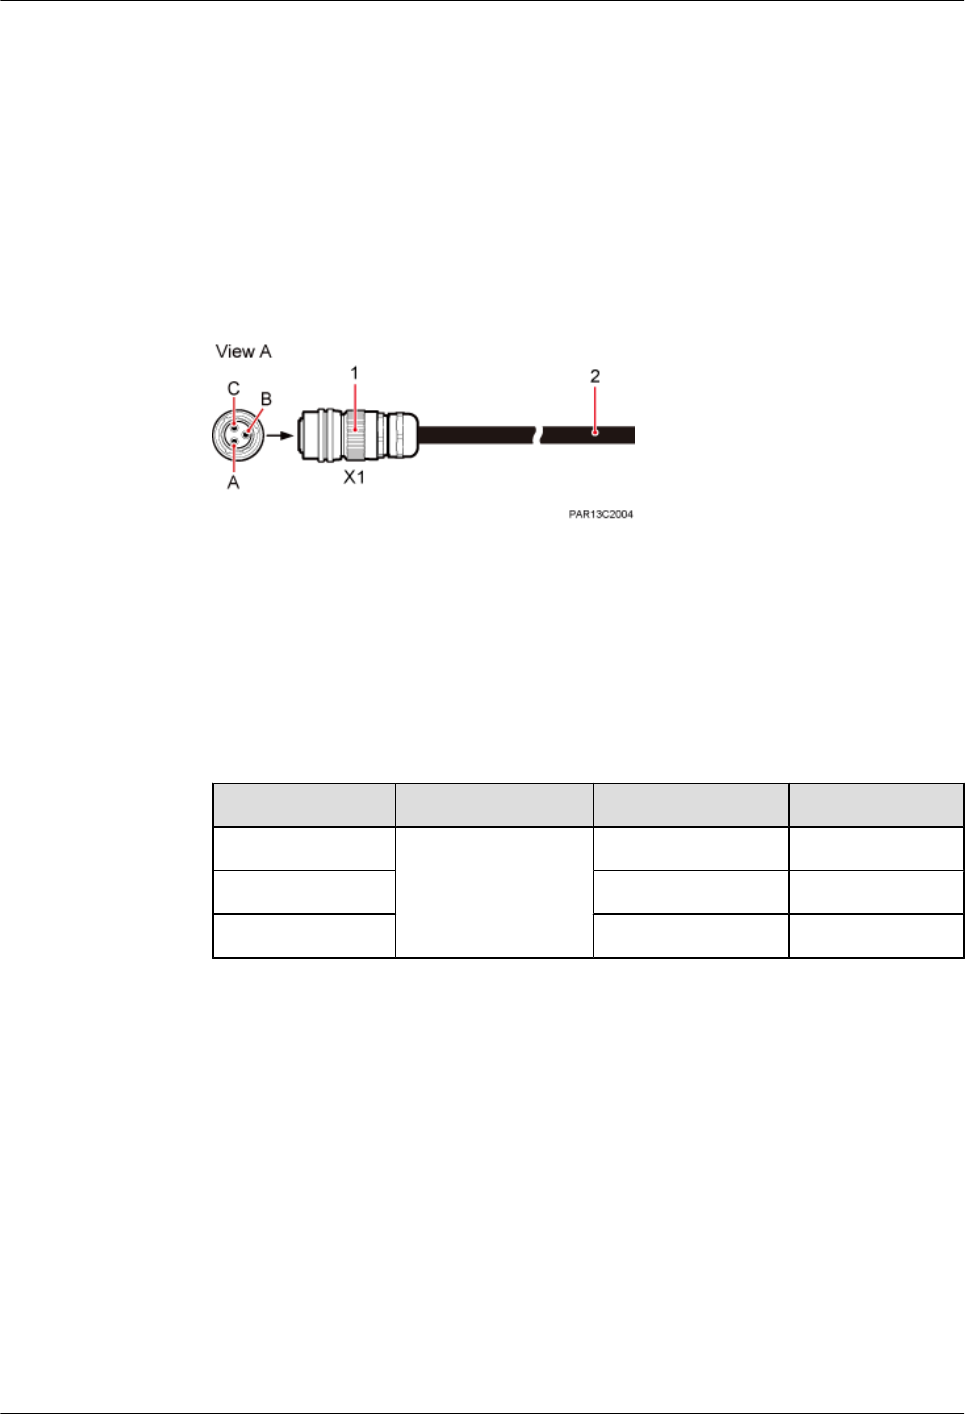
lWithout AC Surge Protection Box
Figure 3-3 shows the power cable between the BTS3902E and the power device when no
AC surge protection box is configured. The cross-sectional area of the power cable is 1.5
mm2.
BTS3902E WCDMA
Hardware Description 3 BTS3902E Cables
Issue 09 (2014-05-16) Huawei Proprietary and Confidential
Copyright © Huawei Technologies Co., Ltd.
18
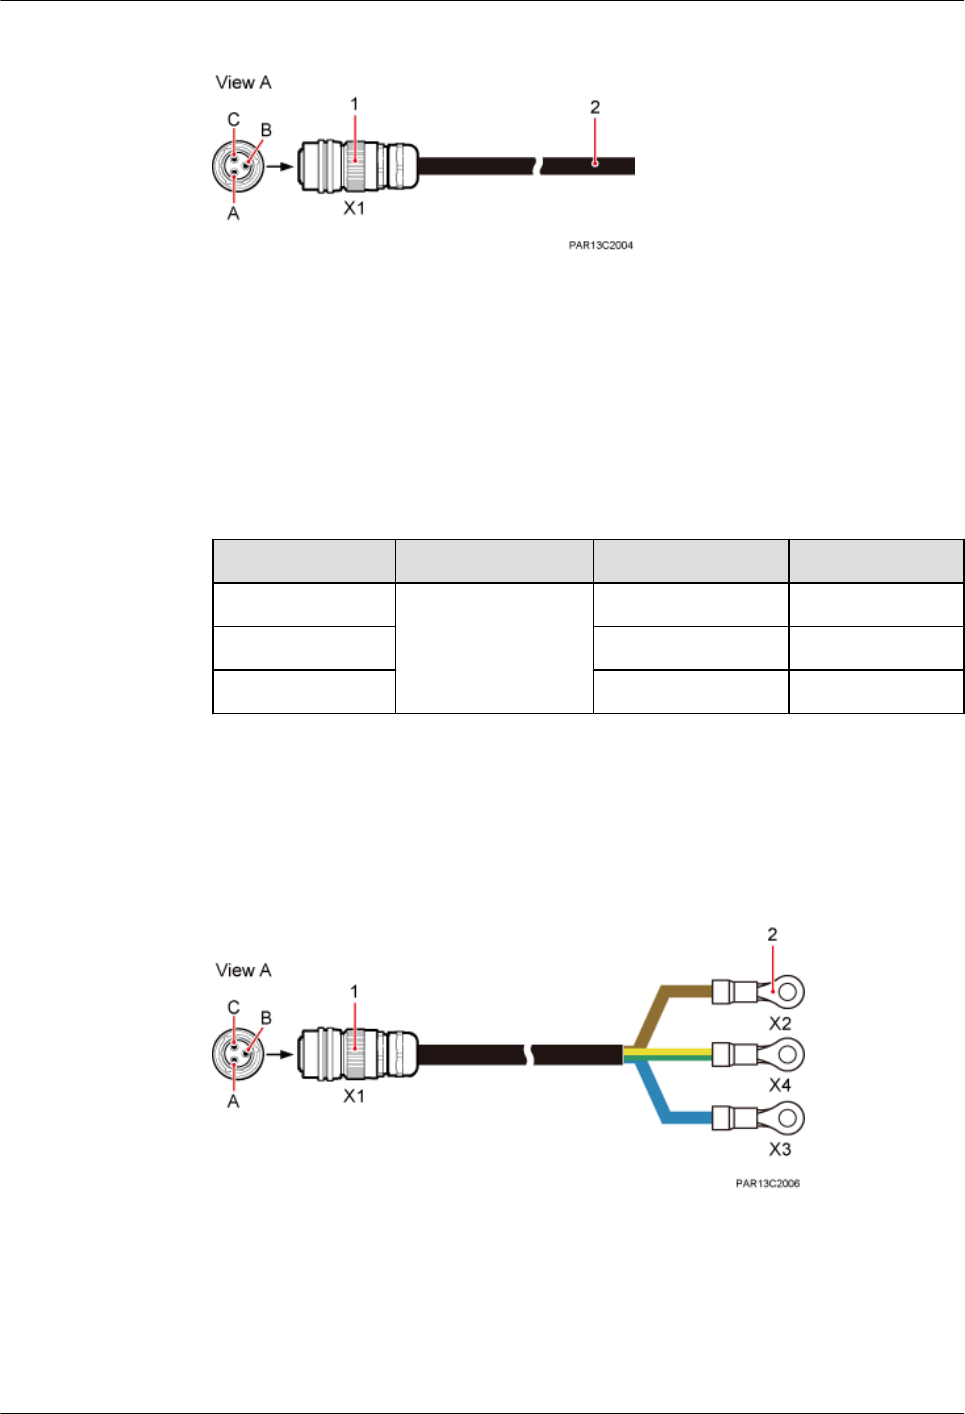
Figure 3-3 Power cable between a BTS3902E and a power device
(1) 3-pin waterproofed round AC connector (2) Bare wire
Table 3-5 describes the pin assignment for the wires of the power cable between a
BTS3902E and a power device.
Table 3-5 Pin assignment for the wires of the BTS3902E power cable (AC surge protection
box not configured)
BTS3902E End Power Device End Wire Color Description
X1.A Bare wire Brown L
X1.C Blue N
X1.B Yellow and green PE
lWith an AC Surge Protection Box
Figure 3-4 shows the power cable between a BTS3902E and an AC surge protection box,
which is already configured. The cross-sectional area of the power cable is 1.5 mm2.
Figure 3-4 Power cable between a BTS3902E and an AC surge protection box
(1) 3-pin waterproofed round AC connector (2) OT terminal
Table 3-6 describes the pin assignment for the wires of the power cable between a
BTS3902E and an AC surge protection box.
BTS3902E WCDMA
Hardware Description 3 BTS3902E Cables
Issue 09 (2014-05-16) Huawei Proprietary and Confidential
Copyright © Huawei Technologies Co., Ltd.
19
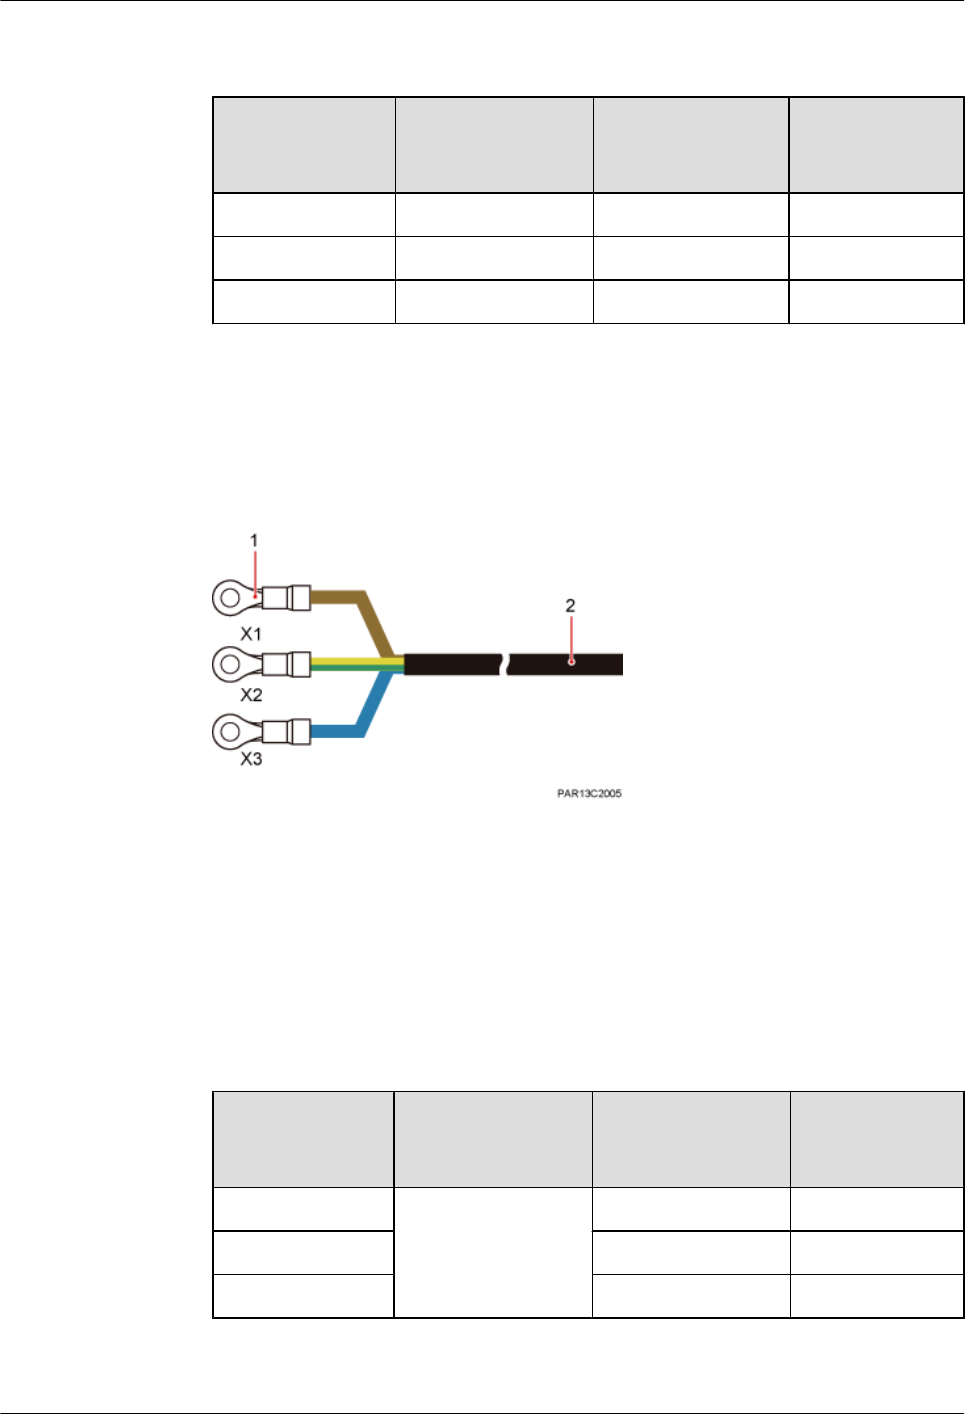
Table 3-6 Pin assignment for the wires of the BTS3902E power cable (AC surge protection
box configured)
BTS3902E End AC Surge
Protection Box
End
Wire Color Description
X1.A X2 Brown L
X1.C X3 Blue N
X1.B X4 Yellow and green PE
Figure 3-5 shows the power cable between a power device and an AC surge protection
box, which is already configured. The cross-sectional area of the power cable is 4 mm2.
Figure 3-5 Power cable between an AC surge protection box and a power device
(1) OT terminal (2) Bare wire
Table 3-7 describes the pin assignment for the wires of the power cable between an AC
surge protection box and a power device.
Table 3-7 Pin assignment for the wires of the power cable between an AC surge protection
box and a power device
AC Surge
Protection Box
End
Power Device End Wire Color Description
X1 Bare wire Brown L
X31 Blue N
X2 Yellow and green PE
BTS3902E WCDMA
Hardware Description 3 BTS3902E Cables
Issue 09 (2014-05-16) Huawei Proprietary and Confidential
Copyright © Huawei Technologies Co., Ltd.
20
3.3.2 AC Power Cable (Working at The 850 MHz Frequency Band)
This section describes the AC power cables applied to the BTS3902E working at the 850 MHz
frequency band. For outdoor BTS3902Es, the AC surge protection box is optional.
lWithout AC Surge Protection Box
Figure 3-6 shows the power cable between the BTS3902E and the power device when no
AC surge protection box is configured. The cross-sectional area of the power cable is 1.5
mm2.
Figure 3-6 Power cable between a BTS3902E and a power device
(1) 3-pin waterproofed round AC connector (2) Bare wire
Table 3-8 describes the pin assignment for the wires of the power cable between a
BTS3902E and a power device.
Table 3-8 Pin assignment for the wires of the BTS3902E power cable (AC surge protection
box not configured)
BTS3902E End Power Device End Wire Color Description
X1.A Bare wire Brown L
X1.C Blue N
X1.B Yellow and green PE
lWith an AC Surge Protection Box
Figure 3-7 shows the power cable between a BTS3902E and an AC surge protection box,
which is already configured. The cross-sectional area of the power cable is 1.5 mm2.
BTS3902E WCDMA
Hardware Description 3 BTS3902E Cables
Issue 09 (2014-05-16) Huawei Proprietary and Confidential
Copyright © Huawei Technologies Co., Ltd.
21
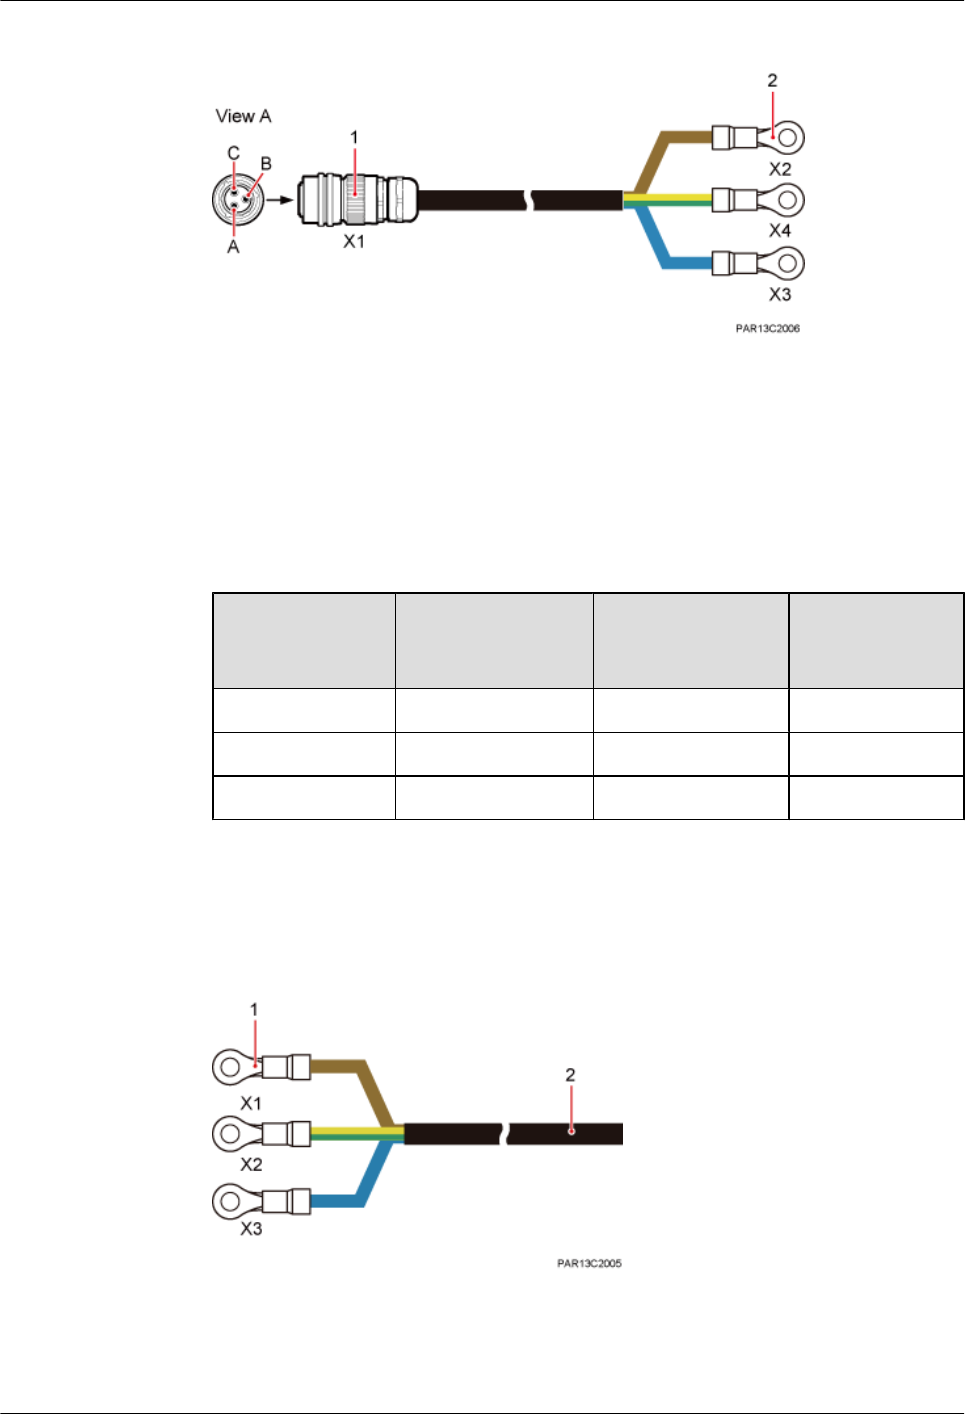
Figure 3-7 Power cable between a BTS3902E and an AC surge protection box
(1) 3-pin waterproofed round AC connector (2) OT terminal
Table 3-9 describes the pin assignment for the wires of the power cable between a
BTS3902E and an AC surge protection box.
Table 3-9 Pin assignment for the wires of the BTS3902E power cable (AC surge protection
box configured)
BTS3902E End AC Surge
Protection Box
End
Wire Color Description
X1.A X2 Brown L
X1.C X3 Blue N
X1.B X4 Yellow and green PE
Figure 3-8 shows the power cable between a power device and an AC surge protection
box, which is already configured. The cross-sectional area of the power cable is 2.5 mm2.
Figure 3-8 Power cable between an AC surge protection box and a power device
(1) OT terminal (2) Bare wire
BTS3902E WCDMA
Hardware Description 3 BTS3902E Cables
Issue 09 (2014-05-16) Huawei Proprietary and Confidential
Copyright © Huawei Technologies Co., Ltd.
22
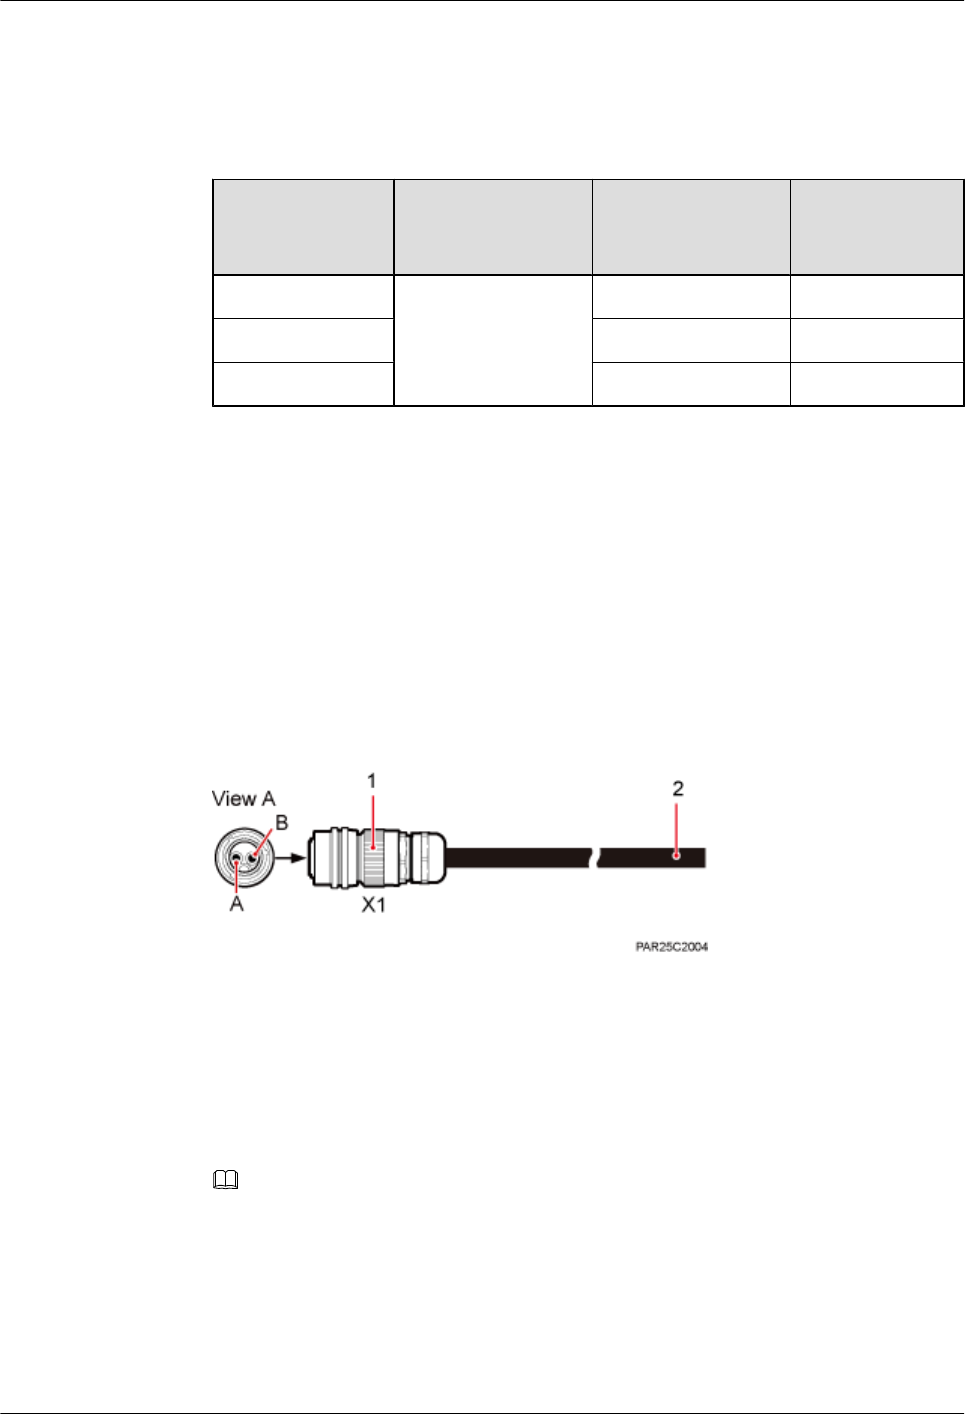
Table 3-10 describes the pin assignment for the wires of the power cable between an AC
surge protection box and a power device.
Table 3-10 Pin assignment for the wires of the power cable between an AC surge protection
box and a power device
AC Surge
Protection Box
End
Power Device End Wire Color Description
X1 Bare wire Brown L
X31 Blue N
X2 Yellow and green PE
3.3.3 DC Power Cable (Working at the AWS Frequency Band)
This section describes the DC power cables applied to the BTS3902E working at the AWS
frequency band.
lExterior
Figure 3-9 shows a BTS3902E power cable. There are two types of power cables in terms
of cross-sectional areas: 3.3 mm2 (12 AWG) complying with North American standards
and 4 mm2 complying with European standards.
Figure 3-9 Power cable between a BTS3902E and power equipment
(1) 2-pin waterproofed round DC connector (2) Bare wire
lPin Assignment
Table 3-11 and Table 3-12 list the pin assignment for the wires of a BTS3902E power
cable.
NOTE
The colors and structures of cables vary according to countries and areas. If cables are purchased at local
markets, the cables must comply with local rules and regulations.
BTS3902E WCDMA
Hardware Description 3 BTS3902E Cables
Issue 09 (2014-05-16) Huawei Proprietary and Confidential
Copyright © Huawei Technologies Co., Ltd.
23
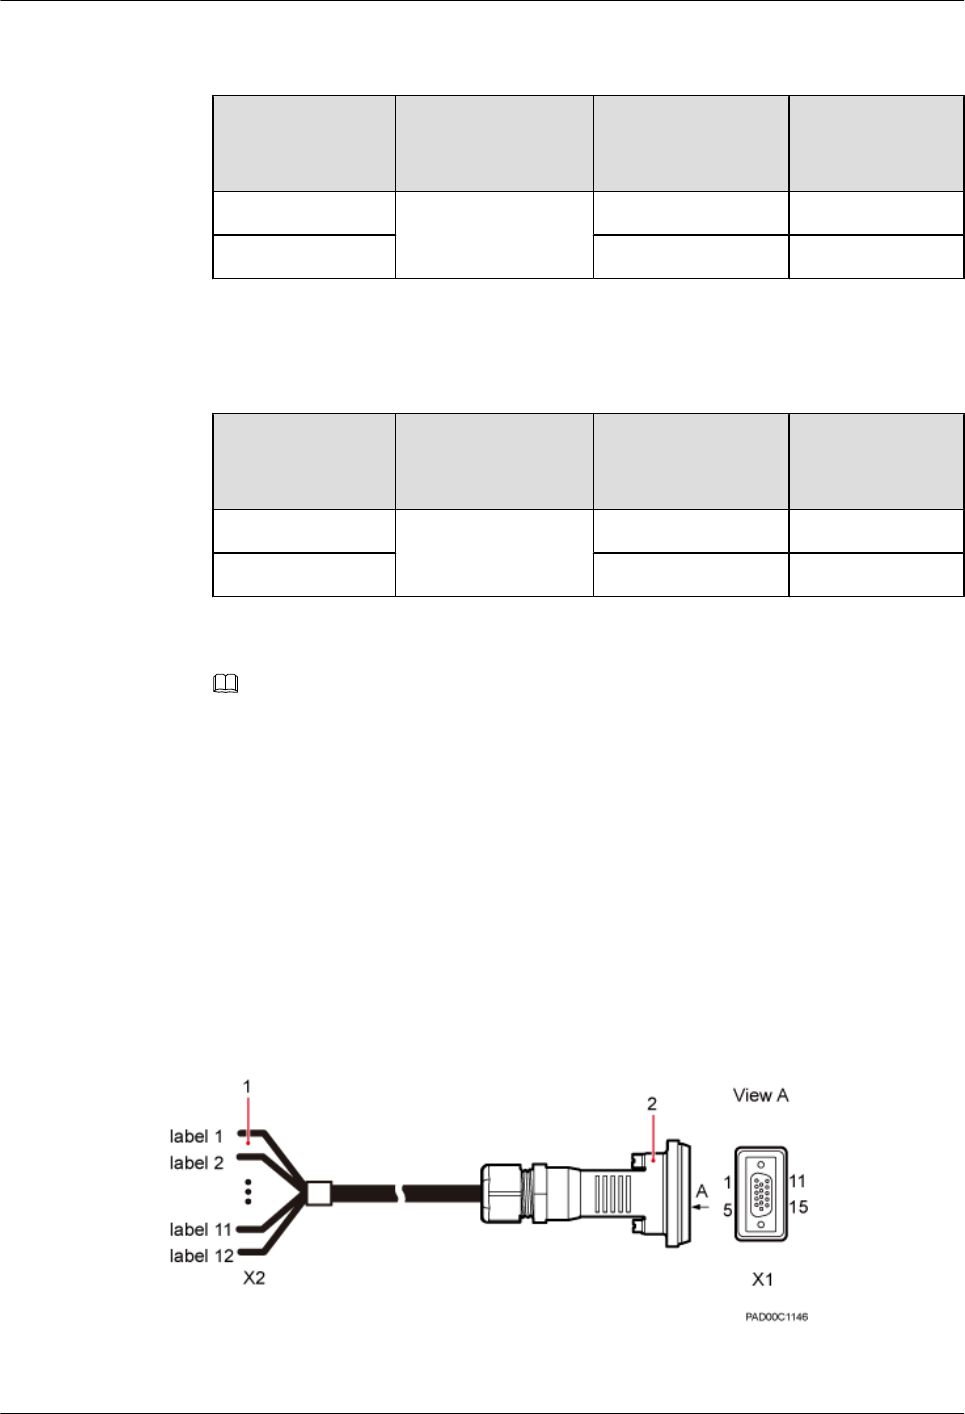
Table 3-11 Pin assignment for the wires of a BTS3902E power cable complying with North
American standards
One End (On the
BTS3902E Side)
The Other End
(On the Power
Equipment Side)
Wire Color Description
X1.A Bare wire Blue NEG(-)
X1.B Black RTN(+)
Table 3-12 Pin assignment for the wires of a BTS3902E power cable complying with
European standards
One End (On the
BTS3902E Side)
The Other End
(On the Power
Equipment Side)
Wire Color Description
X1.A Bare wire Blue NEG(-)
X1.B Brown RTN(+)
NOTE
The BTS3902E power cable can be purchased at the local market in Britain. The colors of the core wires
are brown NEG(-) and blue RTN(+).
3.4 (Optional) Alarm Cable for the BTS3902E
The BTS3902E alarm cable, transmits alarm signals from an external device to a BTS3902E so
that the base station monitors the operating status of external devices. This cable is optional.
Exterior
Figure 3-10 shows the alarm cable for the BTS3902E.
Figure 3-10 Alarm cable for the BTS3902E
(1) Bare wire (2) DB15 male connector
BTS3902E WCDMA
Hardware Description 3 BTS3902E Cables
Issue 09 (2014-05-16) Huawei Proprietary and Confidential
Copyright © Huawei Technologies Co., Ltd.
24

Pin Assignment
Table 3-13 describes the pin assignment for the wires of the alarm cable.
Table 3-13 Pin assignment for the wires of the alarm cable for the BTS3902E
X1 X2 Color Description Port on the X2
End
X1.1 X2.1 Blue and white Twisted pair SWITCH_H1
X1.6 X2.2 Blue GND
X1.2 X2.3 Orange and white Twisted pair SWITCH_H2
X1.7 X2.4 Orange GND
X1.3 X2.5 Green and white Twisted pair SWITCH_H3
X1.8 X2.6 Green GND
X1.4 X2.7 Brown and white Twisted pair SWITCH_H4
X1.9 X2.8 Brown GND
X1.11 X2.9 Blue and red Twisted pair PSU 485 TX-
X1.12 X2.10 Blue PSU 485 TX+
X1.13 X2.11 Orange and red Twisted pair PSU 485 RX-
X1.14 X2.12 Orange PSU 485 RX+
X1.Shield - - Shield -
3.5 FE/GE Fiber Optic Cable
A fast Ethernet or gigabit Ethernet (FE/GE) fiber optic cable transmits fiber signals between a
BTS3902E and a transmission device. The maximum length of a FE/GE fiber optic cable is 20
m (65.61 ft). This cable is optional.
Exterior
The FE/GE fiber optic cable has a round connector at one end and DLC connectors at both ends,
as shown in Figure 3-11.
BTS3902E WCDMA
Hardware Description 3 BTS3902E Cables
Issue 09 (2014-05-16) Huawei Proprietary and Confidential
Copyright © Huawei Technologies Co., Ltd.
25
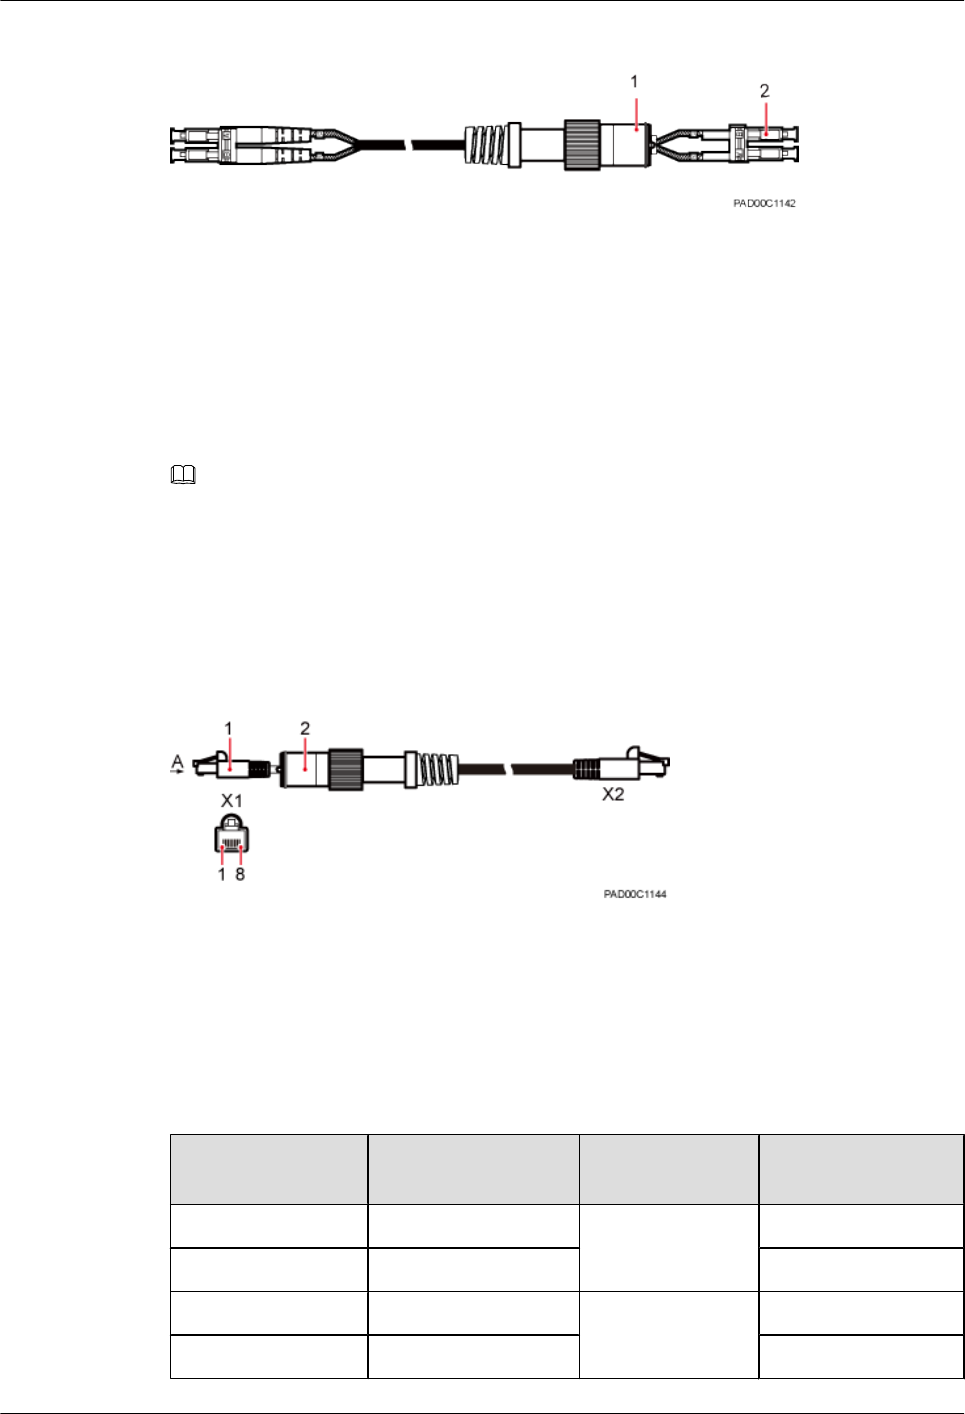
Figure 3-11 FE/GE fiber optic cable
(1) DLC connector (2) Round connector
3.6 FE/GE Cable
The fast Ethernet or gigabit Ethernet (FE/GE) cable transmits FE/GE signals between a
BTS3902E and a transmission device. This cable is optional, and the maximum length of a FE/
GE Cable is 20 m (65.62 ft).
NOTE
The FE/GE cable can be used between two devices for a distance of less than 100 m (328.08 ft).
Exterior
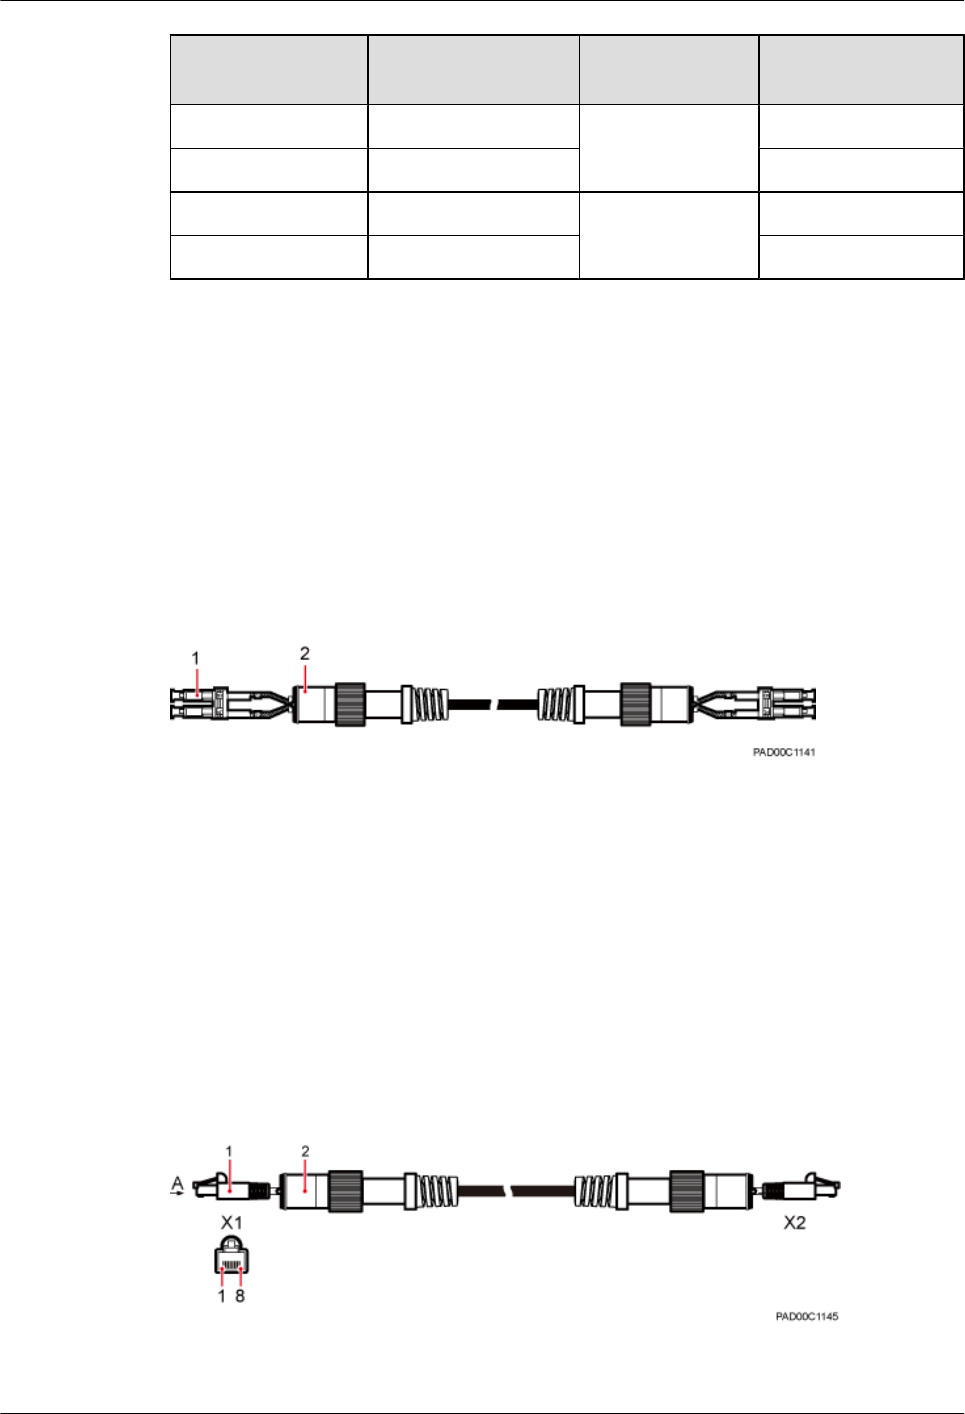
The FE/GE Ethernet cable is a shielded straight-through cable with an RJ45 connector and round
connector at one end and an RJ45 connector at the other end, as shown in Figure 3-12.
Figure 3-12 FE/GE cable
(1) RJ45 connector (2) Round connector
Pin Assignment
Table 3-14 describes the pin assignment for the wires of the FE/GE cable.
Table 3-14 Pin assignment for the wires of the FE/GE cable
Pin on the RJ-45
Connector
Wire Color Wire Type Pin on the RJ-45
Connector
X1.2 Orange Twisted pair X2.2
X1.1 White and orange X2.1
X1.6 Green Twisted pair X2.6
X1.3 White and green X2.3
BTS3902E WCDMA
Hardware Description 3 BTS3902E Cables
Issue 09 (2014-05-16) Huawei Proprietary and Confidential
Copyright © Huawei Technologies Co., Ltd.
26
Pin on the RJ-45
Connector
Wire Color Wire Type Pin on the RJ-45
Connector
X1.4 Blue Twisted pair X2.4
X1.5 White and blue X2.5
X1.8 Brown Twisted pair X2.8
X1.7 White and brown X2.7
3.7 Cascading FE/GE Fiber Optic Cable
A cascading FE/GE Fiber Optic Cable connects two FE/GE optical ports on two modules.
Exterior
A cascading FE/GE Fiber Optic Cable has a DLC connector and round connector at each end,
as shown in Figure 3-13.
Figure 3-13 Cascading FE/GE Fiber Optic Cable
(1) DLC connector (2) Round connector
3.8 Cascading FE/GE Cable
A cascading FE/GE cable connects two FE/GE electrical ports on two modules.
Exterior
A Cascading FE/GE Cable has an RJ45 connector and round connector at each end, as shown
in Figure 3-14.
Figure 3-14 Cascading FE/GE Cable
(1) RJ45 connector (2) Round connector
BTS3902E WCDMA
Hardware Description 3 BTS3902E Cables
Issue 09 (2014-05-16) Huawei Proprietary and Confidential
Copyright © Huawei Technologies Co., Ltd.
27

3.9 BTS3902E RF Jumper
The superflexible 1/2" radio frequency (RF) jumper used by the BTS3902E transmits and
receives RF signals.
Exterior
One end of the RF jumper is a type N male connector, and the other end is connected to the
antenna system.
Figure 3-15 shows an RF jumper with a type N male connector at each end.
Figure 3-15 RF jumper
(1) Type N male connector
BTS3902E WCDMA
Hardware Description 3 BTS3902E Cables
Issue 09 (2014-05-16) Huawei Proprietary and Confidential
Copyright © Huawei Technologies Co., Ltd.
28

4 BTS3902E Auxiliary Devices
About This Chapter
This chapter describes the BTS3902E auxiliary devices.
4.1 IFS06
An Indoor Floor installation Support (IFS06) is used for installing indoor BTS3902Es which are
equipped with external antennas.
4.2 (Optional) AC Surge Protection Box
An AC surge protection box implements surge protection for AC input power. The AC surge
protection box can be configured when the BTS3902E with an AC port is installed outdoors.
Two AC surge protection boxes SPD60D and SPM60A are available for the BTS3902E.
BTS3902E WCDMA
Hardware Description 4 BTS3902E Auxiliary Devices
Issue 09 (2014-05-16) Huawei Proprietary and Confidential
Copyright © Huawei Technologies Co., Ltd.
29
4.1 IFS06
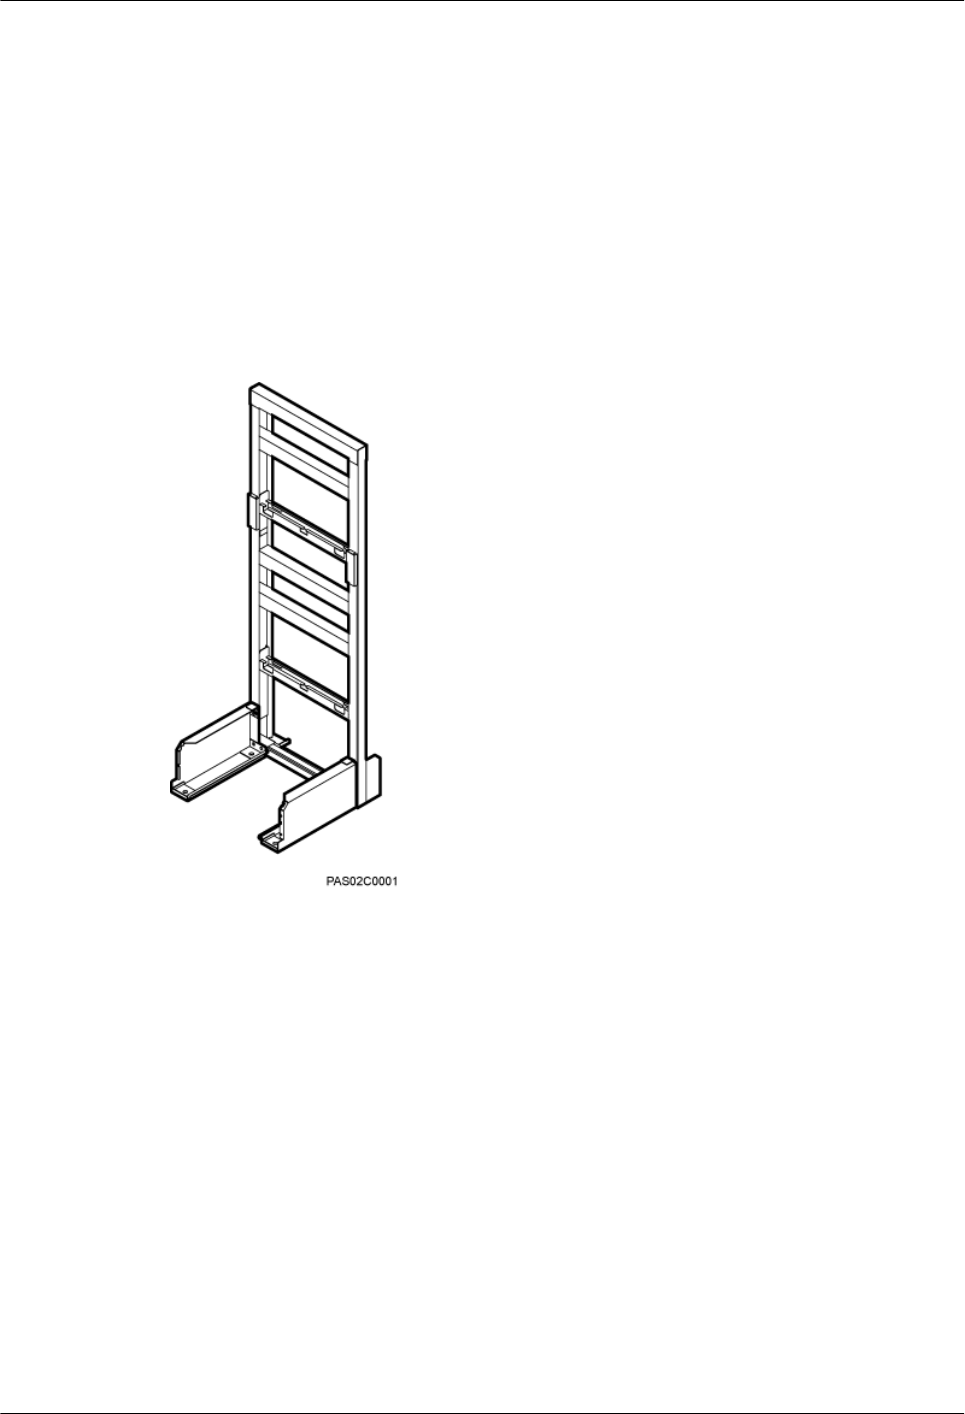
An Indoor Floor installation Support (IFS06) is used for installing indoor BTS3902Es which are
equipped with external antennas.
Exterior
Figure 4-1 shows an IFS06.
Figure 4-1 IFS06
Function
lIt can be installed on the ground.
lIt supports the installation of four BTS3902Es.
lIt supports the installation of two BTS3902Es.
lThe upper and lower adjustable beams on an IFS06 can be moved up and down to fit for
heights of BTS3902Es.
Structure
The IFS06 consists of the main frame, cable tray, upper and lower adjustable beams, and front
and rear feet, as shown in Figure 4-2.
BTS3902E WCDMA
Hardware Description 4 BTS3902E Auxiliary Devices
Issue 09 (2014-05-16) Huawei Proprietary and Confidential
Copyright © Huawei Technologies Co., Ltd.
30
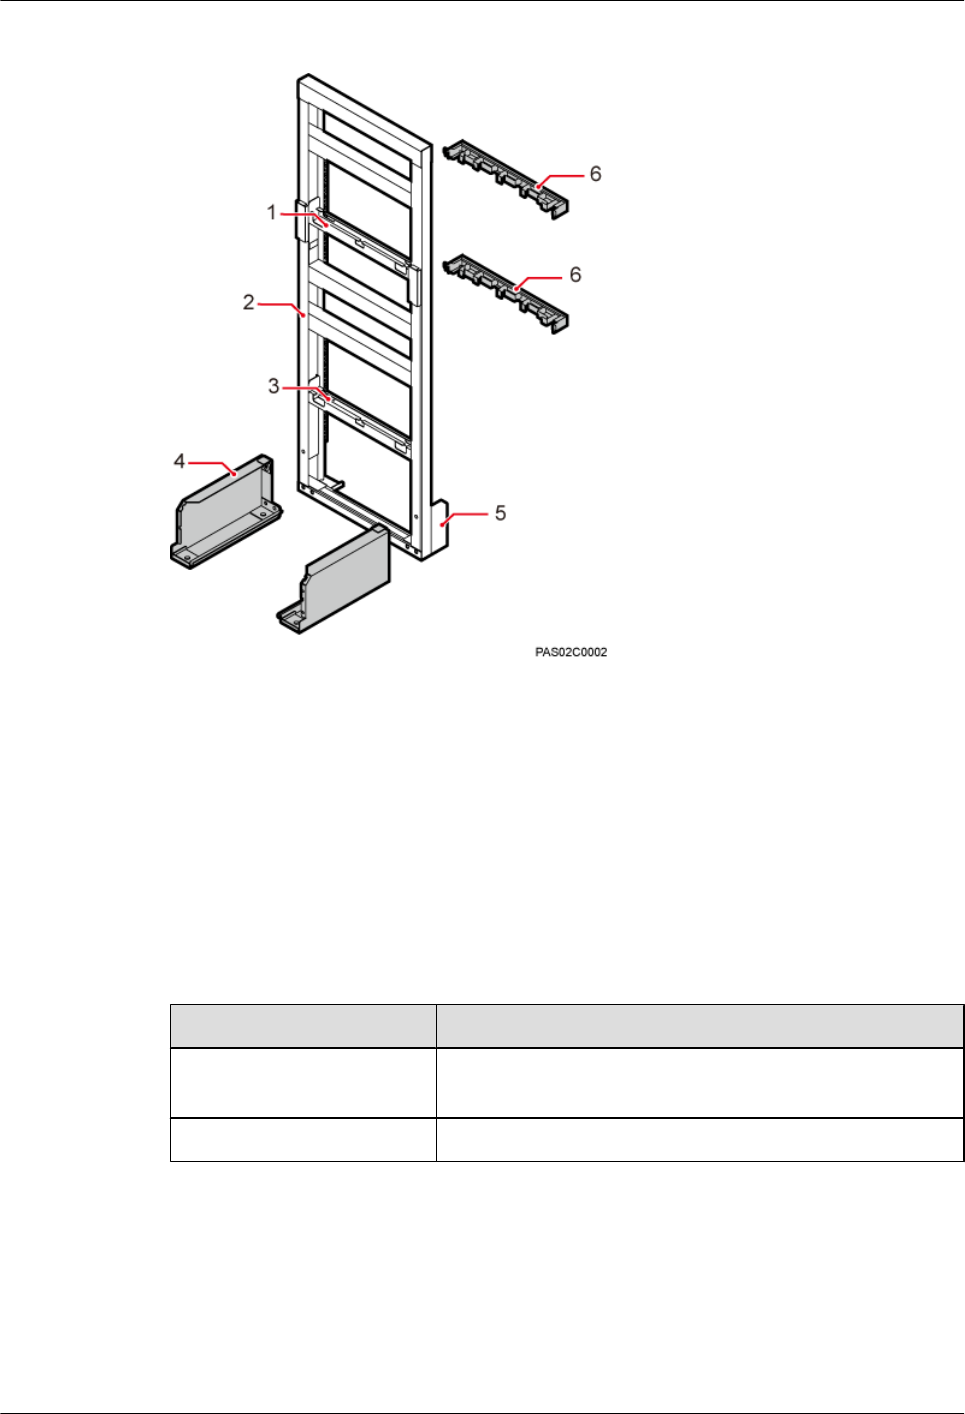
Figure 4-2 IFS06 structure
(1) Upper adjustable beam (2) Main frame (3) Lower adjustable beam
(4) Front foot (5) Rear foot (6) Cable tray
Specifications
Table 4-1 describes IFS06 specifications.
Table 4-1 IFS06 specifications
Item Specification
Dimensions 1730 mm (79 in.) x 600 mm (23.62 in.) x 600 mm (23.62 in.)
(H x W x D)
Weight 45 kg (99.23 lb)
4.2 (Optional) AC Surge Protection Box
An AC surge protection box implements surge protection for AC input power. The AC surge
protection box can be configured when the BTS3902E with an AC port is installed outdoors.
Two AC surge protection boxes SPD60D and SPM60A are available for the BTS3902E.
BTS3902E WCDMA
Hardware Description 4 BTS3902E Auxiliary Devices
Issue 09 (2014-05-16) Huawei Proprietary and Confidential
Copyright © Huawei Technologies Co., Ltd.
31
4.2.1 SPD60D (Working at the 1.9 GHz or 2.1 GHz Frequency Band)
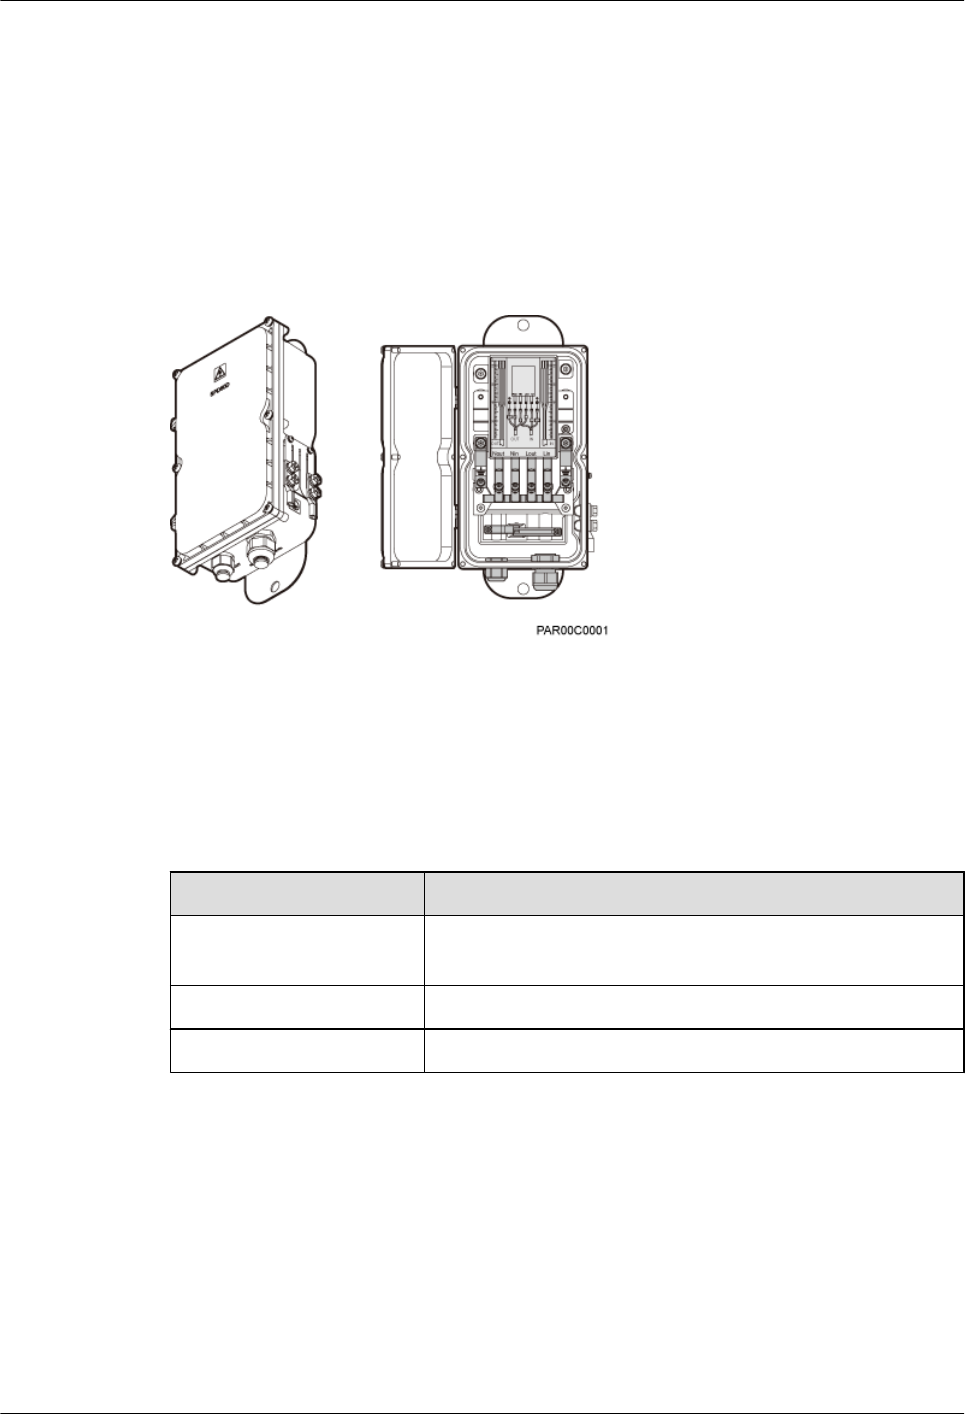
The outdoor BTS3902E working at the 1.9 GHz or 2.1 GHz frequency band can use the SPD60D
(Surge Protection Device 60D).
Exterior
Figure 4-3 shows the exterior of an SPD60D.
Figure 4-3 Exterior of an SPD60D
Specifications
Table 4-2 shows the specifications of an SPD60D.
Table 4-2 Specifications of an SPD60D
Item Specification
Dimensions 240 mm (9.45 in.) x 140 mm (5.51 in.) x 75 mm (2.95 in.) (H
x W x D)
Installation option On a pole, on a wall, or on a wood pole
Surge protection capability 60 kA (8/20 us) in differential mode/common mode
Ports
Table 4-3 describes the ports on an SPD60D.
BTS3902E WCDMA
Hardware Description 4 BTS3902E Auxiliary Devices
Issue 09 (2014-05-16) Huawei Proprietary and Confidential
Copyright © Huawei Technologies Co., Ltd.
32
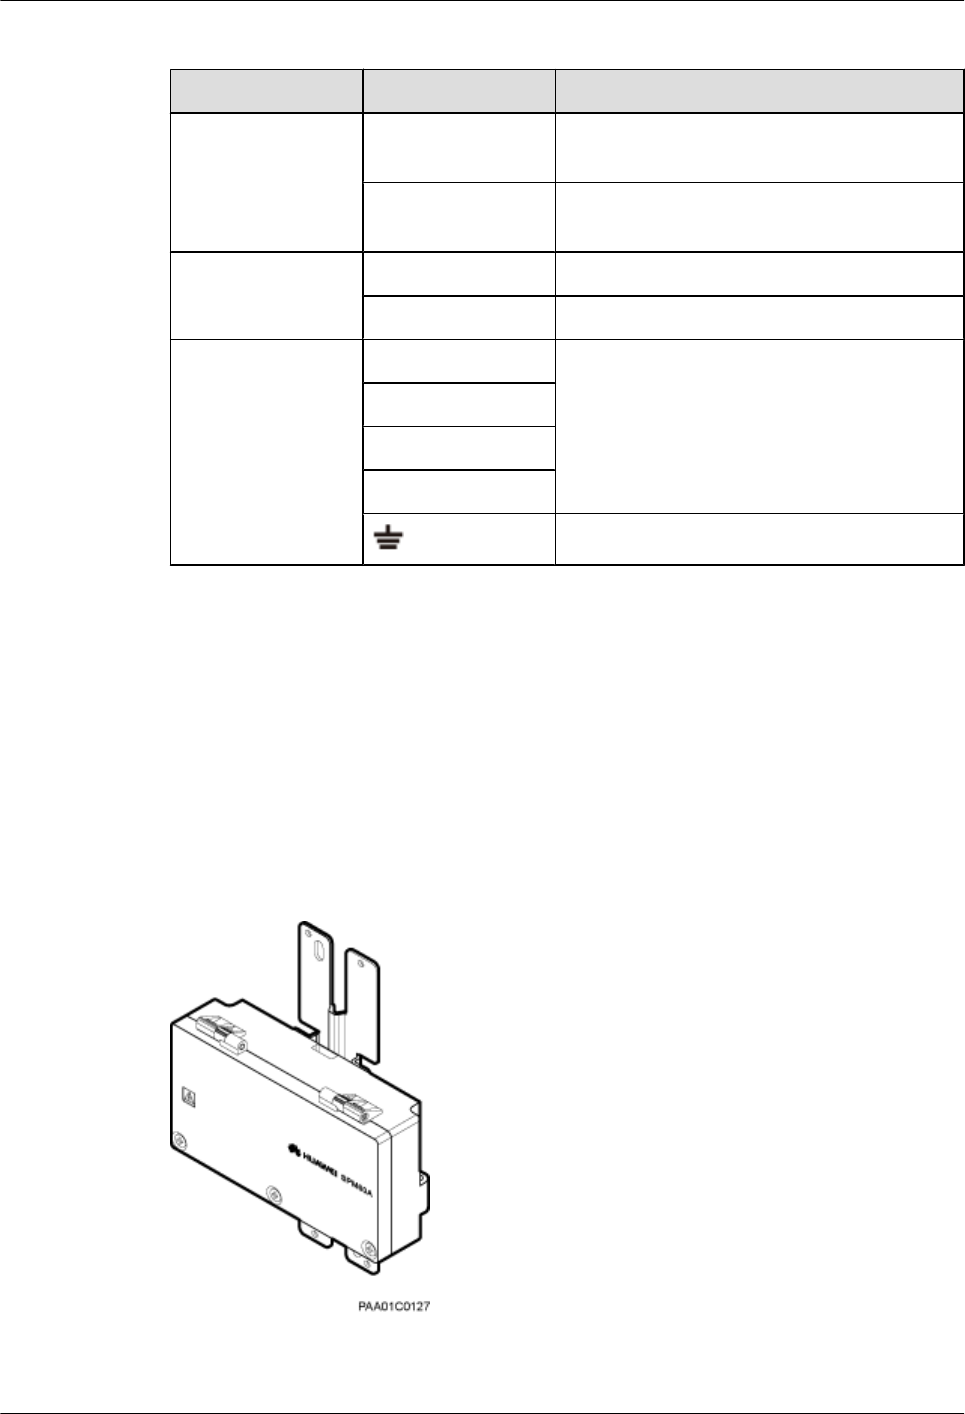
Table 4-3 Ports on an SPD60D
Item Label Description
Ports on the bottom
panel
IN Port for the AC input power cable between the
onsite power device and the SPD60D
OUT Port for the AC output power cable between the
SPD60D and the BTS3902E
Ports on the side
panel
- Port for the external ground cable
- Port for the BTS3902E ground cable
Ports on the cabling
cavity panel
Nout Wiring terminal for a power cable
Nin
Lout
Lin
Wiring terminal for a ground cable
4.2.2 SPM60A (Working at the 850 MHz Frequency Band)
The outdoor BTS3902E working at the 850 MHz frequency band can use the SPM60A (Surge
Protection Module 60A).
Exterior
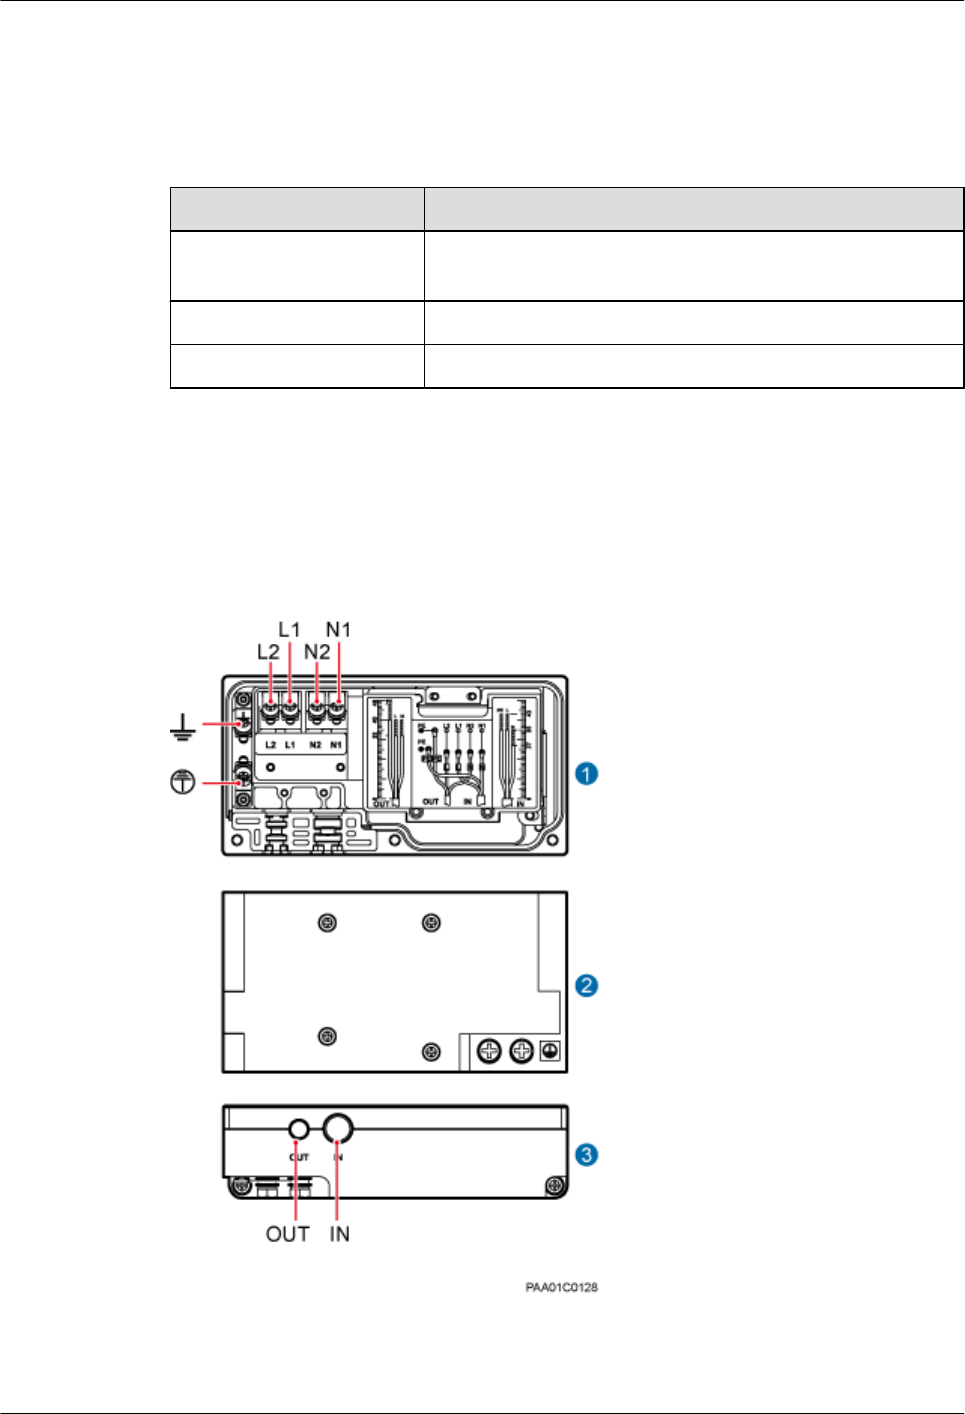
Figure 4-4 shows the exterior of an SPM60A.
Figure 4-4 Exterior of an SPM60A
BTS3902E WCDMA
Hardware Description 4 BTS3902E Auxiliary Devices
Issue 09 (2014-05-16) Huawei Proprietary and Confidential
Copyright © Huawei Technologies Co., Ltd.
33
Specifications
Table 4-4 shows the specifications of an SPM60A.
Table 4-4 Specifications of an SPM60A
Item Specification
Dimensions 240 mm (9.45 in.) x 140 mm (5.51 in.) x 75 mm (2.95 in.) (H
x W x D)
Installation option On a pole, or on a wall
Surge protection capability 60 kA (8/20 us) in differential mode/common mode
Ports
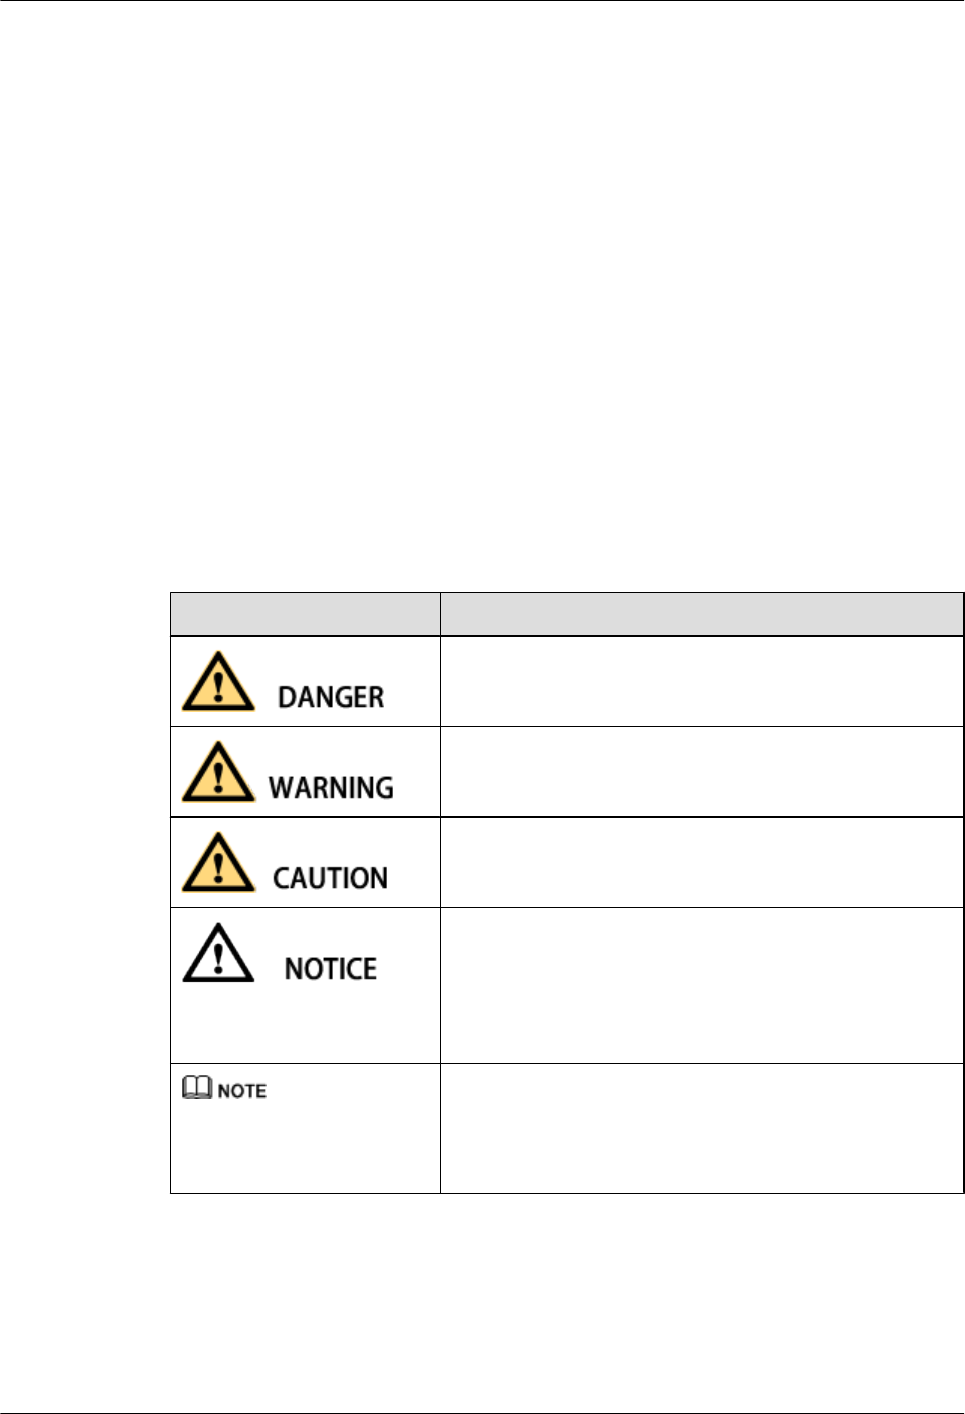
Figure 4-5 shows the ports on the SPM60A panel.
Figure 4-5 Ports on the SPM60A panel
Table 4-5 describes the ports on an SPM60A.
BTS3902E WCDMA
Hardware Description 4 BTS3902E Auxiliary Devices
Issue 09 (2014-05-16) Huawei Proprietary and Confidential
Copyright © Huawei Technologies Co., Ltd.
34

Table 4-5 Ports on an SPM60A
Item Label Description
(1) Ports on the
cabling cavity panel
N1 Wiring terminal for a power cable
N2
L1
L2
PE: output ground terminal
PE: input ground terminal
(2) Port on the
bottom surface
External ground terminal
(3) Ports at the
bottom
IN Port for the AC input power cable between the
onsite power device and the SPM60A
OUT Port for the AC output power cable between the
SPM60A and the BTS3902E
BTS3902E WCDMA
Hardware Description 4 BTS3902E Auxiliary Devices
Issue 09 (2014-05-16) Huawei Proprietary and Confidential
Copyright © Huawei Technologies Co., Ltd.
35

BTS3902E WCDMA
Site Maintenance Guide
Issue 06
Date 2014-05-16
HUAWEI TECHNOLOGIES CO., LTD.

Copyright © Huawei Technologies Co., Ltd. 2014. All rights reserved.
No part of this document may be reproduced or transmitted in any form or by any means without prior written
consent of Huawei Technologies Co., Ltd.
Trademarks and Permissions
and other Huawei trademarks are trademarks of Huawei Technologies Co., Ltd.
All other trademarks and trade names mentioned in this document are the property of their respective holders.
Notice
The purchased products, services and features are stipulated by the contract made between Huawei and the
customer. All or part of the products, services and features described in this document may not be within the
purchase scope or the usage scope. Unless otherwise specified in the contract, all statements, information,
and recommendations in this document are provided "AS IS" without warranties, guarantees or representations
of any kind, either express or implied.
The information in this document is subject to change without notice. Every effort has been made in the
preparation of this document to ensure accuracy of the contents, but all statements, information, and
recommendations in this document do not constitute a warranty of any kind, express or implied.
Huawei Technologies Co., Ltd.
Address: Huawei Industrial Base
Bantian, Longgang
Shenzhen 518129
People's Republic of China
Website: http://www.huawei.com
Email: support@huawei.com
Issue 06 (2014-05-16) Huawei Proprietary and Confidential
Copyright © Huawei Technologies Co., Ltd.
i

About This Document
Purpose
This document describes routine maintenance procedures for the BTS3902E WCDMA, such as
equipment maintenance and power-on and power-off operations. It also describes how to replace
the BTS3902E WCDMA and optical modules.
Product Version
The following table lists the product version related to this document.
Product Name Product Version
BTS3902E WCDMA (referred to
as the BTS3902E in this
document)
V200R013C00 and later versions
V100R008C00 and later versions
The single-mode base station version mapping to
V100R008C00 is: NodeB V200R015C00
Intended Audience
This document is intended for:
lSystem engineers
lSite maintenance engineers
Organization
1 Changes in BTS3902E WCDMA Site Maintenance Guide
This chapter describes the changes in BTS3902E WCDMA Site Maintenance Guide.
2 Powering On and Powering Off a BTS3902E
After a BTS3902E is powered on, check the status of the indicators on the BTS3902E. When
you power it off, you can perform normal power-off.
BTS3902E WCDMA
Site Maintenance Guide About This Document
Issue 06 (2014-05-16) Huawei Proprietary and Confidential
Copyright © Huawei Technologies Co., Ltd.
ii
3 Replacing the BTS3902E
The BTS3902E is an integrated micro base station. Replacing a faulty BTS3902E interrupts all
services carried by the base station.
4 Replacing the Attachment Plate
This section describes the procedure for replacing the attachment plate matching the angle-
adjustable mounting kits with the attachment plate matching the aluminum mounting kits.
5 Replacing an Optical Module
An optical module implements optical-electrical conversion, enabling optical transmission
between a BTS3902E and other devices. You must disconnect the fiber optic cable from an
optical module before replacing the optical module. Disconnecting the fiber optic cable
interrupts the transmission of optical signals.
Conventions
Symbol Conventions
The symbols that may be found in this document are defined as follows.
Symbol Description
Indicates an imminently hazardous situation which, if not
avoided, will result in death or serious injury.
Indicates a potentially hazardous situation which, if not
avoided, could result in death or serious injury.
Indicates a potentially hazardous situation which, if not
avoided, may result in minor or moderate injury.
Indicates a potentially hazardous situation which, if not
avoided, could result in equipment damage, data loss,
performance deterioration, or unanticipated results.
NOTICE is used to address practices not related to personal
injury.
Calls attention to important information, best practices and
tips.
NOTE is used to address information not related to personal
injury, equipment damage, and environment deterioration.
General Conventions
The general conventions that may be found in this document are defined as follows.
BTS3902E WCDMA
Site Maintenance Guide About This Document
Issue 06 (2014-05-16) Huawei Proprietary and Confidential
Copyright © Huawei Technologies Co., Ltd.
iii

Convention Description
Times New Roman Normal paragraphs are in Times New Roman.
Boldface Names of files, directories, folders, and users are in
boldface. For example, log in as user root.
Italic Book titles are in italics.
Courier New Examples of information displayed on the screen are in
Courier New.
Command Conventions
The command conventions that may be found in this document are defined as follows.
Convention Description
Boldface The keywords of a command line are in boldface.
Italic Command arguments are in italics.
[ ] Items (keywords or arguments) in brackets [ ] are optional.
{ x | y | ... } Optional items are grouped in braces and separated by
vertical bars. One item is selected.
[ x | y | ... ] Optional items are grouped in brackets and separated by
vertical bars. One item is selected or no item is selected.
{ x | y | ... }*Optional items are grouped in braces and separated by
vertical bars. A minimum of one item or a maximum of all
items can be selected.
[ x | y | ... ]*Optional items are grouped in brackets and separated by
vertical bars. Several items or no item can be selected.
GUI Conventions
The GUI conventions that may be found in this document are defined as follows.
Convention Description
Boldface Buttons, menus, parameters, tabs, window, and dialog titles
are in boldface. For example, click OK.
>Multi-level menus are in boldface and separated by the ">"
signs. For example, choose File > Create > Folder.
Keyboard Operations
BTS3902E WCDMA
Site Maintenance Guide About This Document
Issue 06 (2014-05-16) Huawei Proprietary and Confidential
Copyright © Huawei Technologies Co., Ltd.
iv

The keyboard operations that may be found in this document are defined as follows.
Format Description
Key Press the key. For example, press Enter and press Tab.
Key 1+Key 2 Press the keys concurrently. For example, pressing Ctrl+Alt
+A means the three keys should be pressed concurrently.
Key 1, Key 2 Press the keys in turn. For example, pressing Alt, A means
the two keys should be pressed in turn.
Mouse Operations
The mouse operations that may be found in this document are defined as follows.
Action Description
Click Select and release the primary mouse button without moving
the pointer.
Double-click Press the primary mouse button twice continuously and
quickly without moving the pointer.
Drag Press and hold the primary mouse button and move the
pointer to a certain position.
BTS3902E WCDMA
Site Maintenance Guide About This Document
Issue 06 (2014-05-16) Huawei Proprietary and Confidential
Copyright © Huawei Technologies Co., Ltd.
v

Contents
About This Document.....................................................................................................................ii
1 Changes in BTS3902E WCDMA Site Maintenance Guide.......................................................1
2 Powering On and Powering Off a BTS3902E...........................................................................4
2.1 Powering On a BTS3902E.............................................................................................................................................5
2.2 Powering Off a BTS3902E.............................................................................................................................................6
3 Replacing the BTS3902E...............................................................................................................7
4 Replacing the Attachment Plate...............................................................................................16
5 Replacing an Optical Module...................................................................................................18
BTS3902E WCDMA
Site Maintenance Guide Contents
Issue 06 (2014-05-16) Huawei Proprietary and Confidential
Copyright © Huawei Technologies Co., Ltd.
vi

1 Changes in BTS3902E WCDMA Site
Maintenance Guide
This chapter describes the changes in BTS3902E WCDMA Site Maintenance Guide.
06 (2014-05-16)
This is the sixth commercial release.
Compared with 05 (2014-02-28), no information is added.
Compared with 05 (2014-02-28), this issue incorporates the following change:
Topic Change Description
Entire document The BTS3902E working at the 850 MHz frequency
band is added.
Compared with 05 (2014-02-28), no information is deleted.
05 (2014-02-28)
This is the fifth commercial release.
Compared with 04 (2013-12-05), no information is added.
Compared with 04 (2013-12-05), this issue incorporates the following change:
Topic Change Description
About This Document Modified the description of the application scope
of this document.
Compared with 04 (2013-12-05), no information is deleted.
BTS3902E WCDMA
Site Maintenance Guide 1 Changes in BTS3902E WCDMA Site Maintenance Guide
Issue 06 (2014-05-16) Huawei Proprietary and Confidential
Copyright © Huawei Technologies Co., Ltd.
1

04 (2013-12-05)
This is the fourth commercial release.
Compared with 03 (2013-11-30), no information is added.
Compared with 03 (2013-11-30), this issue incorporates the following change:
Topic Change Description
Entire document The DC-powered BTS3902E working at the AWS
frequency band is added.
Compared with 03 (2013-11-30), no information is deleted.
03 (2013-11-30)
This is the third commercial release.
Compared with 02 (2012-03-15), no information is added.
Compared with 02 (2012-03-15), this issue incorporates the following change:
Topic Change Description
About This Document V100R008C00 is added to the application scope of
this document.
Compared with 02 (2012-03-15), no information is deleted.
02 (2012-03-15)
This is the second official release.
Compared with 01 (2011-11-19), this issue incorporates the following new information:
l4 Replacing the Attachment Plate
Compared with 01 (2011-11-19), this issue incorporates the following change:
Topic Change Description
3 Replacing the BTS3902E Added the description about removing the
BTS3902E when an angle-adjustable mounting kit
is used.
Compared with 01 (2011-11-19), no information is deleted.
01 (2011-11-19)
This is the first official release.
BTS3902E WCDMA
Site Maintenance Guide 1 Changes in BTS3902E WCDMA Site Maintenance Guide
Issue 06 (2014-05-16) Huawei Proprietary and Confidential
Copyright © Huawei Technologies Co., Ltd.
2

Compared with draft A (2011-06-30), no information is added.
Compared with draft A (2011-06-30), no information is changed.
Compared with draft A (2011-06-30), no information is deleted.
Draft A (2011-06-30)
This is a draft release.
BTS3902E WCDMA
Site Maintenance Guide 1 Changes in BTS3902E WCDMA Site Maintenance Guide
Issue 06 (2014-05-16) Huawei Proprietary and Confidential
Copyright © Huawei Technologies Co., Ltd.
3

2 Powering On and Powering Off a BTS3902E
About This Chapter
After a BTS3902E is powered on, check the status of the indicators on the BTS3902E. When
you power it off, you can perform normal power-off.
2.1 Powering On a BTS3902E
This section describes how to power on a BTS3902E and how to check the running status of the
BTS3902E by observing the status of the indicators.
2.2 Powering Off a BTS3902E
This section describes how to power off a BTS3902E.
BTS3902E WCDMA
Site Maintenance Guide 2 Powering On and Powering Off a BTS3902E
Issue 06 (2014-05-16) Huawei Proprietary and Confidential
Copyright © Huawei Technologies Co., Ltd.
4

2.1 Powering On a BTS3902E
This section describes how to power on a BTS3902E and how to check the running status of the
BTS3902E by observing the status of the indicators.
Prerequisites
lThe BTS3902E and related cables are installed.
lThe input power voltage of the BTS3902E is within the following range:
–The input power voltage of the AC-powered BTS3902E working at the 1.9 GHz, 2.1
GHz or 850 MHz frequency band ranges from 100 V AC to 240 V AC.
–The input power voltage of the DC-powered BTS3902E working at the AWS frequency
band ranges from -57 V AC to -36 V AC.
Context
NOTICE
After you unpack a BTS3902E, you must power it on within 24 hours. If you power off the
BTS3902E for maintenance, you must restore power to it within 24 hours.
Procedure
Step 1 Power on the BTS3902E.
CAUTION
Do not look into the optical module without eye protection after the BTS3902E is powered on.
Step 2 Wait three to five minutes, and then check the status of the BTS3902E indicators. For details,
see BTS3902E Indicators in BTS3902E WCDMA Hardware Description.
NOTE
If BTS3902Es are cascaded, check the status of all BTS3902E indicators.
Step 3 Take corresponding actions based on the status of the indicators.
If... Then...
The BTS3902E operates properly End the power-on check task.
If the BTS3902E is faulty Rectify the fault, and then go to Step 1.
----End
BTS3902E WCDMA
Site Maintenance Guide 2 Powering On and Powering Off a BTS3902E
Issue 06 (2014-05-16) Huawei Proprietary and Confidential
Copyright © Huawei Technologies Co., Ltd.
5

2.2 Powering Off a BTS3902E
This section describes how to power off a BTS3902E.
Procedure
Step 1 Turn off the external power switch of the BTS3902E.
----End
BTS3902E WCDMA
Site Maintenance Guide 2 Powering On and Powering Off a BTS3902E
Issue 06 (2014-05-16) Huawei Proprietary and Confidential
Copyright © Huawei Technologies Co., Ltd.
6

3 Replacing the BTS3902E
The BTS3902E is an integrated micro base station. Replacing a faulty BTS3902E interrupts all
services carried by the base station.
Prerequisites
lThe following tools and materials are available: ESD gloves or ESD wrist strap, M4 Phillips
screwdriver, M6 Phillips screwdriver, M8 inner hexagon torque screwdriver, waterproof
tape, and insulation tape.
lThe BTS3902E to be replaced is confirmed, and the new BTS3902E is available.
lAssociated personnel have gained permissions to access the site and have obtained the
required keys.
Context
NOTE
lThere are two types of the BTS3902E, for which the replacement procedure is the same. The following
part uses one type as an example to describe how to replace the BTS3902E.
lThe camouflage shell is optional. The following uses the BTS3902E equipped with a camouflage shell
as an example.
Procedure
Step 1 Instruct the network operator to perform the following operations before replacing the
BTS3902E:
1. On the NodeB, run the BLK LOCELL command to block all cells controlled by the NodeB.
2. Modify the ESN on the RNC by referring to the ESN on the new BTS3902E.
3. Upload the configuration files of the base station through FTP. For details, see the Base
Station Commissioning Guide.
4. Copy the configuration files of the base station and software package into a USB flash drive
or a PC on which the LMT is installed.
Step 2 Turn off the external power switch of the BTS3902E to power off the BTS3902E.
Step 3 Wear an ESD wrist strap or ESD gloves.
BTS3902E WCDMA
Site Maintenance Guide 3 Replacing the BTS3902E
Issue 06 (2014-05-16) Huawei Proprietary and Confidential
Copyright © Huawei Technologies Co., Ltd.
7
NOTICE
Take proper ESD measures, for example, wear an ESD wrist strap or ESD gloves, to prevent
electrostatic damage to the boards, modules, or electronic components.
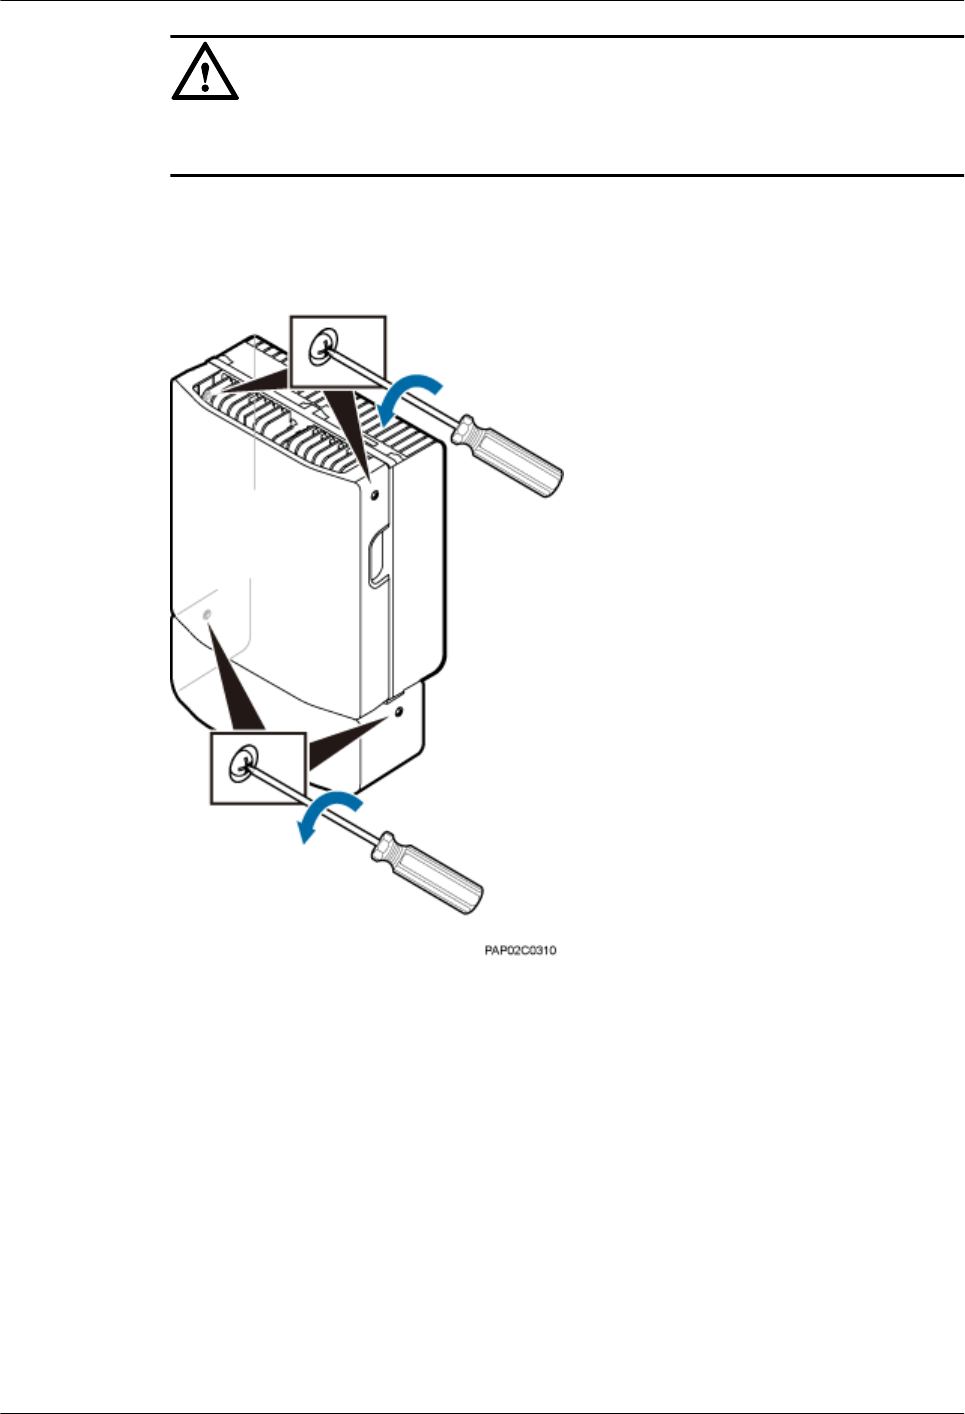
Step 4 Use an M4 Phillips screwdriver to loosen the four captive screws on the housing, as shown in
Figure 3-1.
Figure 3-1 Loosening the screws on the housing
Step 5 Raise the upper housing until it is stopped, as shown in Figure 3-2.
BTS3902E WCDMA
Site Maintenance Guide 3 Replacing the BTS3902E
Issue 06 (2014-05-16) Huawei Proprietary and Confidential
Copyright © Huawei Technologies Co., Ltd.
8
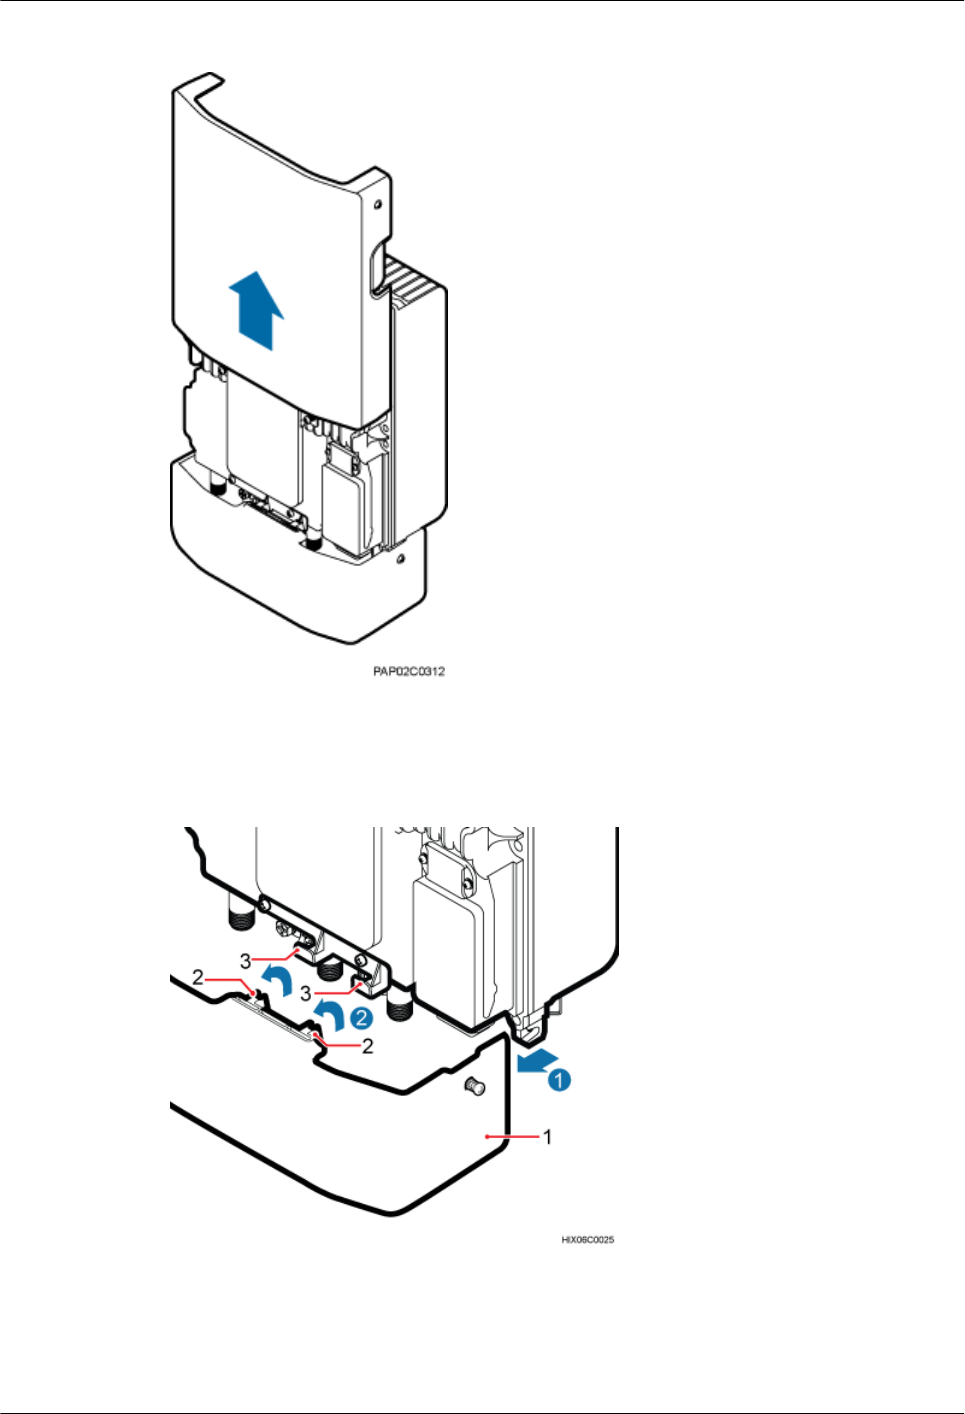
Figure 3-2 Raising the upper housing
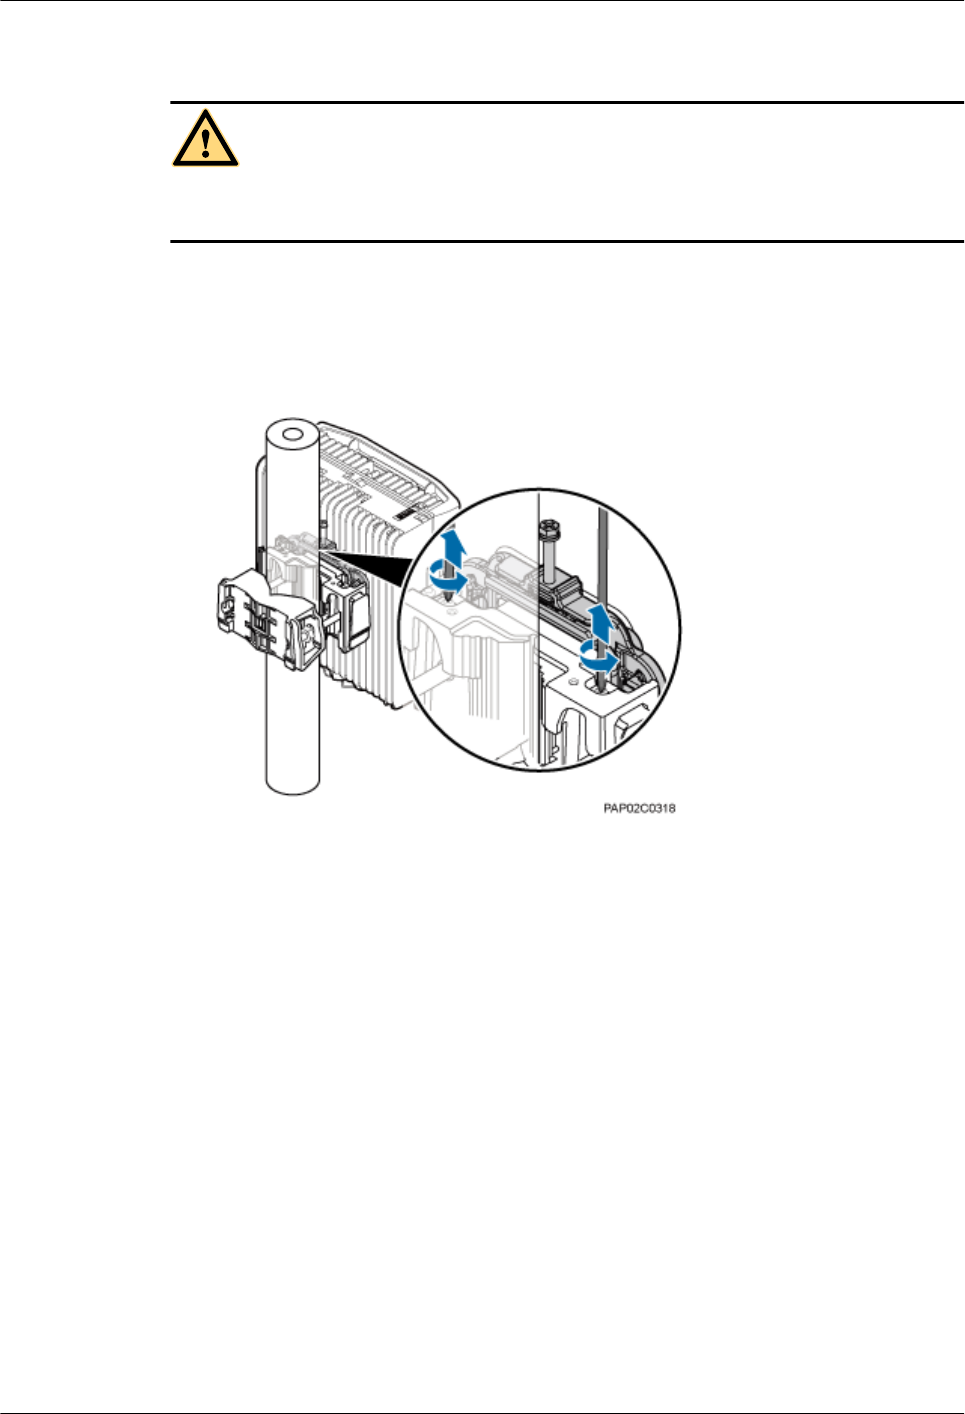
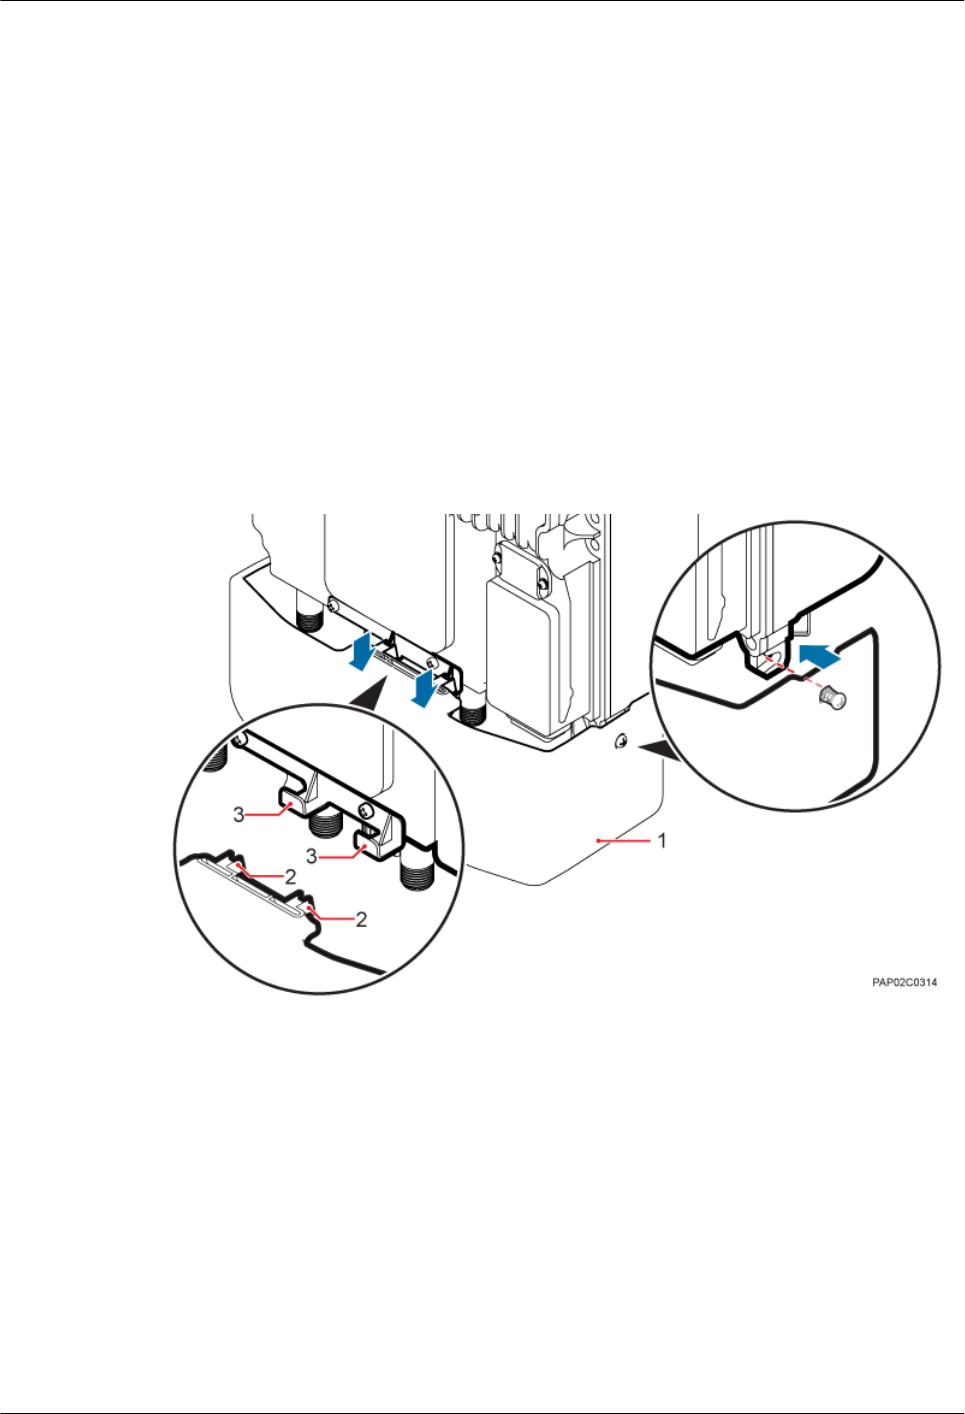
Step 6 Separate the slots on the camouflage shell from the tabs to remove the camouflage shell, as
shown in Figure 3-3.
Figure 3-3 Removing the camouflage shell
(1) Camouflage shell (2) Slots (3) Tabs
Step 7 Record all the cable connections on the bottom of the faulty BTS3902E.
Step 8 Disconnect the cables connected to the external equipment from the bottom of the BTS3902E.
BTS3902E WCDMA
Site Maintenance Guide 3 Replacing the BTS3902E
Issue 06 (2014-05-16) Huawei Proprietary and Confidential
Copyright © Huawei Technologies Co., Ltd.
9
Step 9 Replace the BTS3902E.
CAUTION
When removing the BTS3902E, hold the BTS3902E handle with two hands and slightly raise
the BTS3902E to avoid the BTS3902E from falling down.
lWhen an aluminum mounting kit is used, perform the following operations:
1. Use an M4 Phillips screwdriver to loosen the captive screws on the two hoist clamps on
the main mounting bracket, as shown in Figure 3-4.
Figure 3-4 Loosening captive screws on the main mounting bracket
2. Use an M6 Phillips screwdriver to tighten the screws on the attachment plate of the
BTS3902E, as shown in Figure 3-5. Use the screw only for removing the BTS3902E to
loosen the connection between the attachment plate and the main mounting bracket, and
then raise the BTS3902E bottom to remove it, as shown in Figure 3-6.
BTS3902E WCDMA
Site Maintenance Guide 3 Replacing the BTS3902E
Issue 06 (2014-05-16) Huawei Proprietary and Confidential
Copyright © Huawei Technologies Co., Ltd.
10
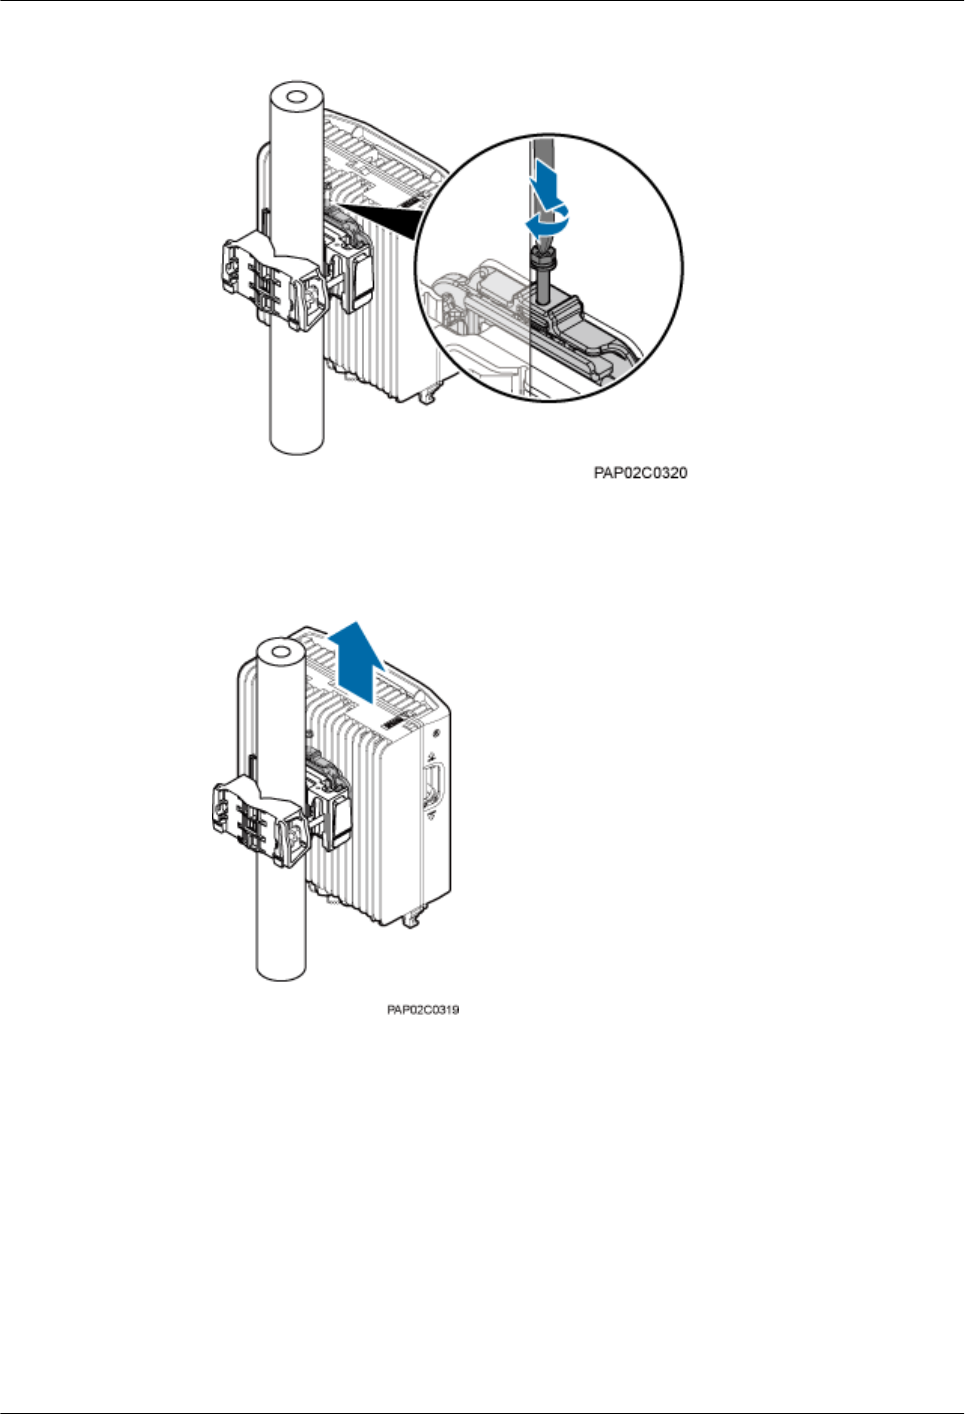
Figure 3-5 Tightening screws on the attachment plate
Figure 3-6 Raising the BTS3902E bottom
3. Tighten the captive screws on the two hoist clamps on the main mounting bracket to 1.4
N·m (12.39 lbf·in.). Install and waterproof a new BTS3902E.
lWhen an angle-adjustable mounting kit is used, perform the following operations:
1. Use an M8 hexagon screwdriver to loosen the four positioning screws to separate the upper
and lower positioning pins with the mounting holes, and remove the BTS3902E, as shown
in Figure 3-7.
BTS3902E WCDMA
Site Maintenance Guide 3 Replacing the BTS3902E
Issue 06 (2014-05-16) Huawei Proprietary and Confidential
Copyright © Huawei Technologies Co., Ltd.
11
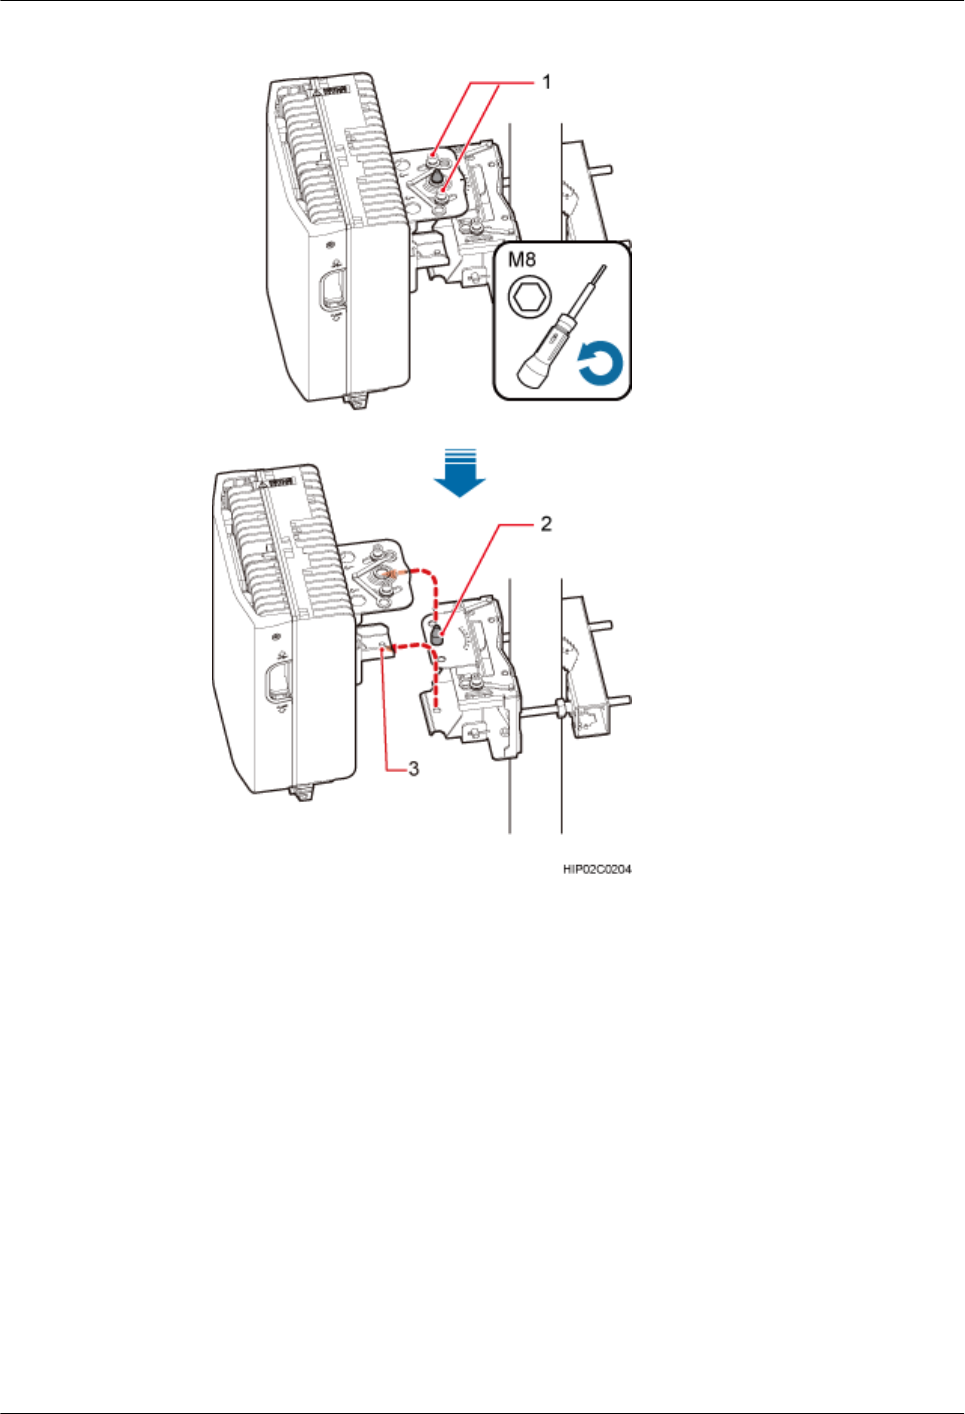
Figure 3-7 Removing the BTS3902E
(1) Positioning screw (2) Positioning pins
2. Install and waterproof a new BTS3902E.
Step 10 Reconnect all cables to the BTS3902E and seal all vacant ports by waterproof caps.
Step 11 Power on the BTS3902E according to the instructions in 2.1 Powering On a BTS3902E.
Step 12 Check whether the BTS3902E is working properly by observing the status of the indicators
labeled O/E or O. For details about the status of the indicators, see BTS3902E Indicators in
BTS3902E WCDMA Hardware Description.
Step 13 Go to Perform the following operations on the LMT or use the USB storage device depending
on whether the laptop or USB storage device is used.
lPerform the following operations on the LMT:
1. In the Software Update window, select Downloading the Data Configuration File,
Download NodeB Software Package, and Download by Configuration to download the
configuration file and NodeB software package, and select Effective Data Configuration
BTS3902E WCDMA
Site Maintenance Guide 3 Replacing the BTS3902E
Issue 06 (2014-05-16) Huawei Proprietary and Confidential
Copyright © Huawei Technologies Co., Ltd.
12
File and Activate NodeB Software to activate the configuration file and NodeB software.
After activation, the NodeB automatically resets, and the NodeB software takes effect in
the NodeB. For details, see the LMT User Guide. For details, see the LMT User Guide.
2. Verify that no alarm related to the BTS3902E is generated. For details, see the LMT User
Guide.
lDownload the data configuration files and software package to the NodeB by using the
USB storage device. For details, see the NodeB Commissioning Guide.
Step 14 Instruct the network operator to perform the following operations:
1. On the NodeB, run the UBL LOCELL command to unblock all cells controlled by the
NodeB.
2. Synchronize the inventory information manually.
3. Set TESTING to NORMAL manually.
Step 15 Install the slots on the camouflage shell to the tabs to secure the shell, as shown in Figure 3-8.
Figure 3-8 Installing the camouflage shell
(1) Camouflage shell (2) Slots (3) Tabs
Step 16 Use an M4 Phillips screwdriver to tighten the two captive screws to 1.2 N·m (10.62 lbf·in.), as
shown in Figure 3-9.
BTS3902E WCDMA
Site Maintenance Guide 3 Replacing the BTS3902E
Issue 06 (2014-05-16) Huawei Proprietary and Confidential
Copyright © Huawei Technologies Co., Ltd.
13
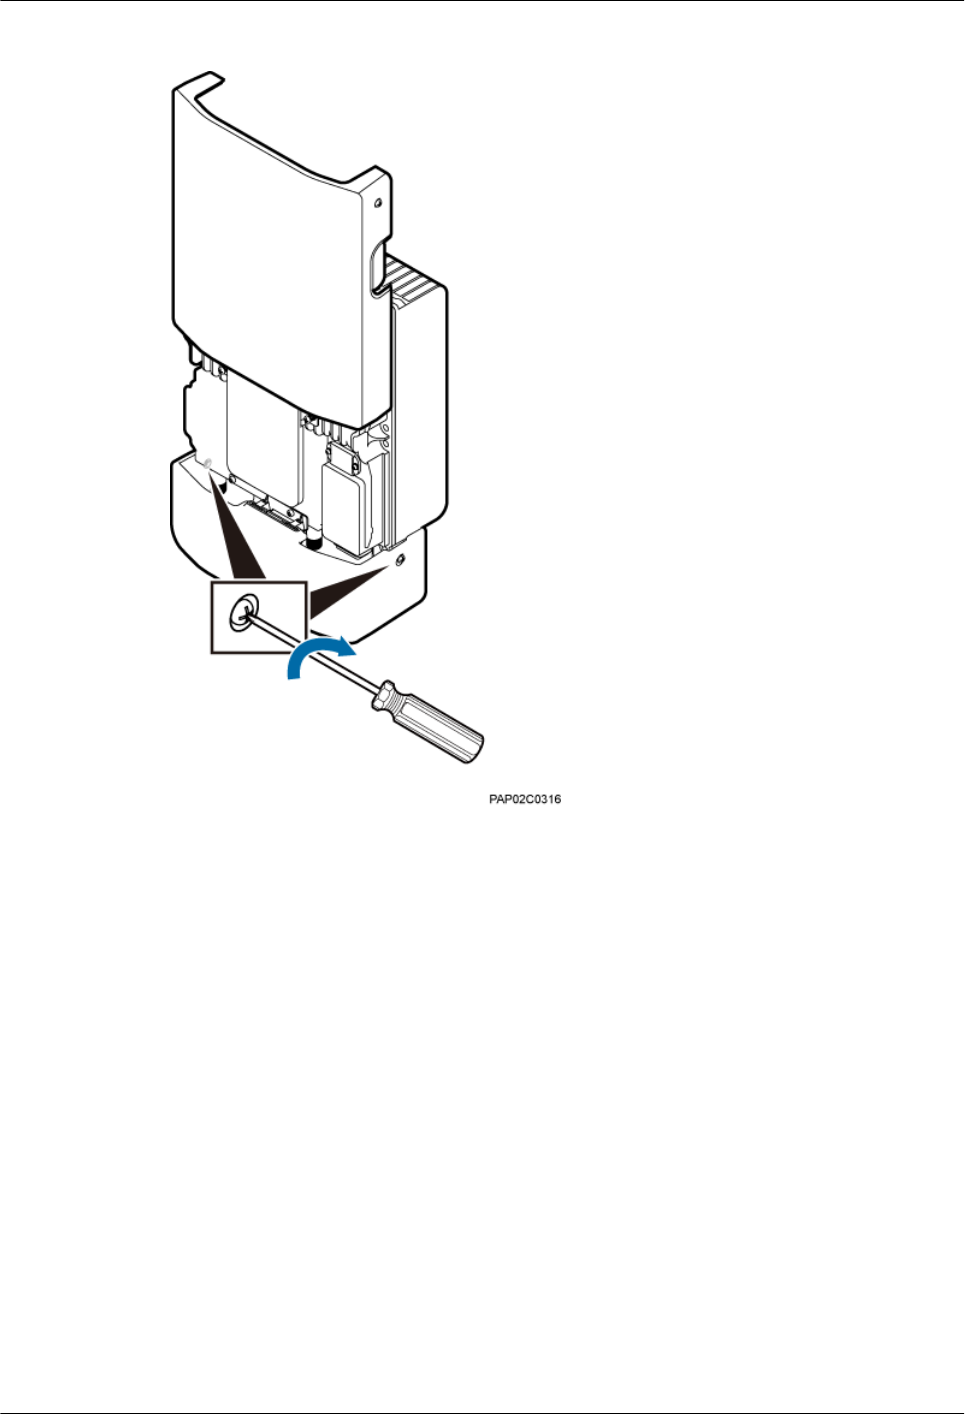
Figure 3-9 Tightening the screws
Step 17 Close the housing, and use an M4 Phillips screwdriver to tighten the two captive screws to 1.2
N·m (10.62 lbf·in.), as shown in Figure 3-10.
BTS3902E WCDMA
Site Maintenance Guide 3 Replacing the BTS3902E
Issue 06 (2014-05-16) Huawei Proprietary and Confidential
Copyright © Huawei Technologies Co., Ltd.
14
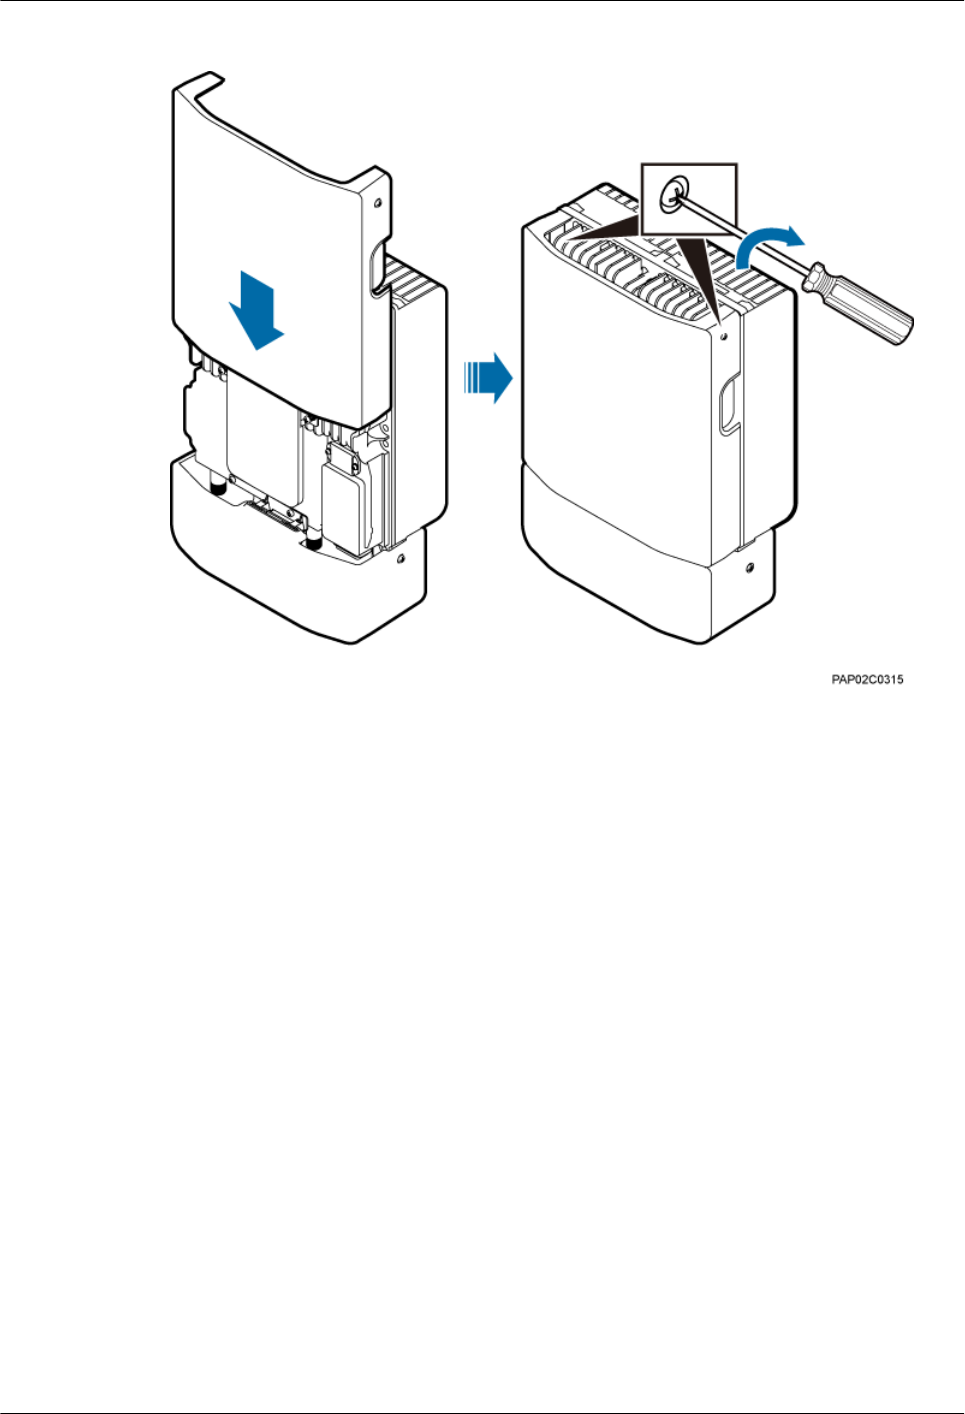
Figure 3-10 Closing the housing and tightening the screws
Step 18 Take off the ESD wrist strap or ESD gloves, and pack up all tools.
----End
Follow-up Procedure
lPut the replaced component into an ESD box or bag. Then, put the ESD box or bag into a
carton padded with foam or into the packing box of the new board.
lFill in the fault form with the detail information of the replaced board.
lContact the local Huawei office to handle the faulty component.
BTS3902E WCDMA
Site Maintenance Guide 3 Replacing the BTS3902E
Issue 06 (2014-05-16) Huawei Proprietary and Confidential
Copyright © Huawei Technologies Co., Ltd.
15

4 Replacing the Attachment Plate
This section describes the procedure for replacing the attachment plate matching the angle-
adjustable mounting kits with the attachment plate matching the aluminum mounting kits.
Prerequisites
lThe tools and materials are available, such as the ESD wrist strap or ESD gloves and M6
screwdriver.
lThe new attachment plate is available.
lAssociated personnel have gained permissions to access the site and have obtained the
required keys.
NOTE
Before replacing the attachment plate, power off the BTS3902E, and then power on the BTS3902E after
the attachment plate is replaced according to the instructions in 2 Powering On and Powering Off a
BTS3902E. This section only describes the procedure for removing and installing the attachment plate.
Procedure
Step 1 Wear an ESD wrist strap or ESD gloves.
NOTICE
Take proper ESD measures, for example, wear an ESD wrist strap or ESD gloves, to prevent
electrostatic damage to the boards, modules, or electronic components.
Step 2 Use an M6 screwdriver to loosen the screws that secure the attachment plate, and remove the
attachment plate.
Step 3 Install the new attachment plate on the BTS3902E. Use an M6 screwdriver to tighten the screws
to 5 N·m (44.25 lbf·in.), as shown in Figure 4-1.
BTS3902E WCDMA
Site Maintenance Guide 4 Replacing the Attachment Plate
Issue 06 (2014-05-16) Huawei Proprietary and Confidential
Copyright © Huawei Technologies Co., Ltd.
16
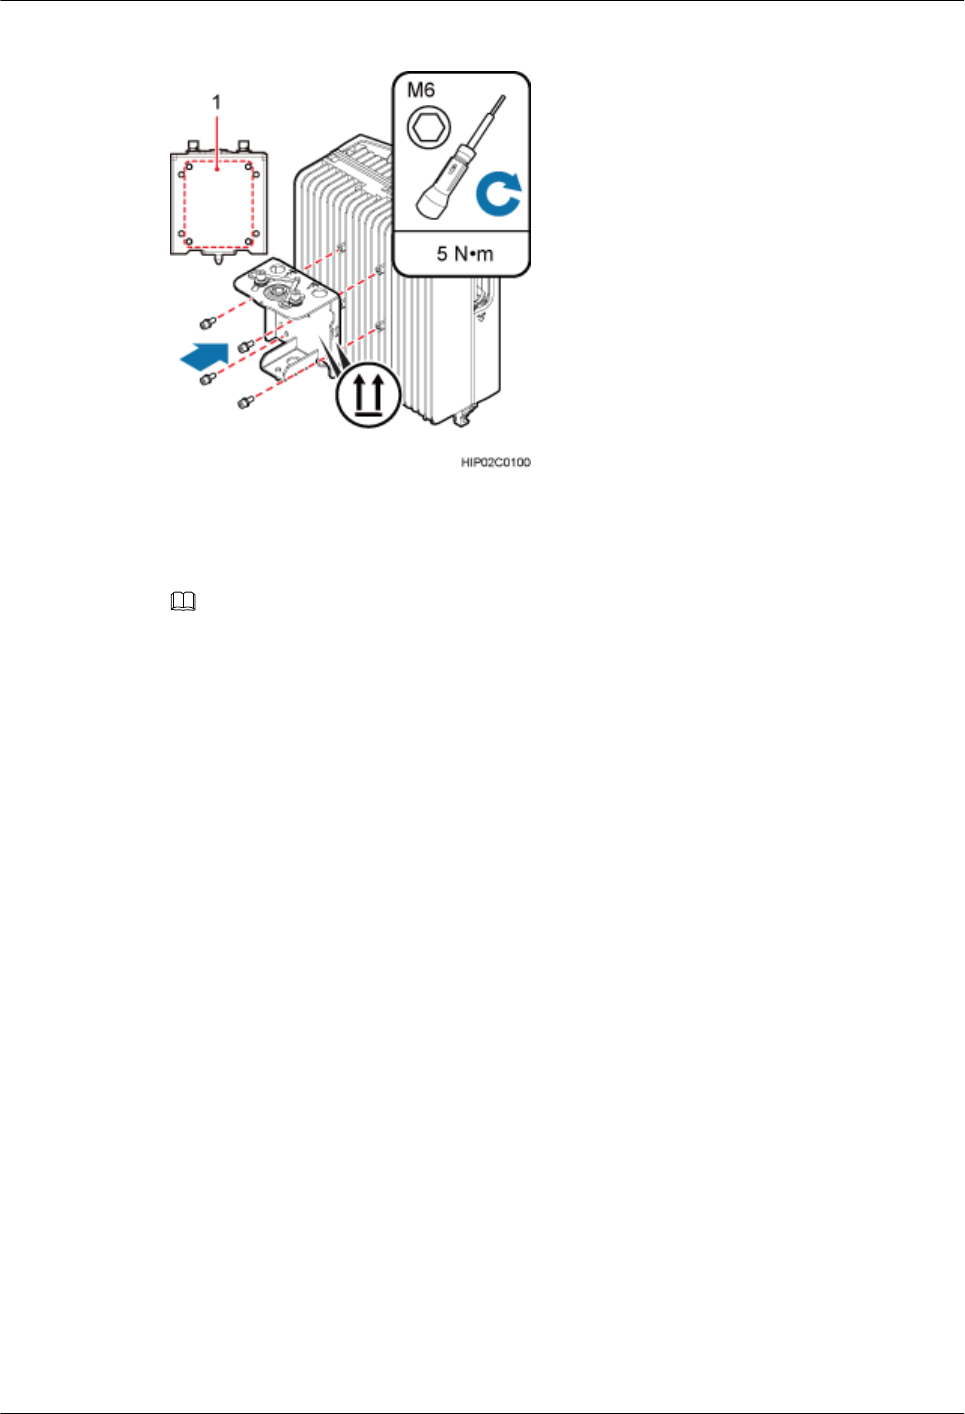
Figure 4-1 Tightening screws on the attachment plate
(1) Mounting holes on the attachment plate
NOTE
The attachment plate needs to be installed based on the mounting holes shown in Figure 4-1.
Step 4 Take off the ESD wrist strap or ESD gloves, and pack up all tools.
----End
Follow-up Procedure
lPlace the replaced component into the ESD box or bag. Then, place the ESD box or bag
into a foam-padded carton or the packing box of the new component.
lFill in the fault form with detailed information about the replaced component.
lContact the local Huawei office to handle the replaced component.
BTS3902E WCDMA
Site Maintenance Guide 4 Replacing the Attachment Plate
Issue 06 (2014-05-16) Huawei Proprietary and Confidential
Copyright © Huawei Technologies Co., Ltd.
17

5 Replacing an Optical Module
An optical module implements optical-electrical conversion, enabling optical transmission
between a BTS3902E and other devices. You must disconnect the fiber optic cable from an
optical module before replacing the optical module. Disconnecting the fiber optic cable
interrupts the transmission of optical signals.
Prerequisites
lThe type and number of optical modules to be replaced are confirmed, and new optical
modules are ready.
lTools and materials, such as electrostatic discharge (ESD) gloves, M4 Phillips
screwdrivers, and an ESD box or bag, are ready.
Context
lThe optical module is installed on the OPT0 or OPT1 port on the BTS3902E.
lOptical modules are hot-swappable.
lIt takes about five minutes to replace an optical module on the BTS3902E, which involves
disconnecting the fiber optic cable, removing the faulty optical module, inserting a new
optical module, reconnecting the fiber optic cable, and waiting for the link on the Ethernet
optical port to resume.
Procedure
Step 1 Wear ESD gloves.
NOTICE
Take proper ESD protection measures; for example, wear ESD gloves, to prevent electrostatic
damage to the boards, modules, or electronic components.
Step 2 Record the connections of the optical module and fiber optic cable.
Step 3 Press the latch on the connector of the fiber optic cable, and then remove the connector from the
faulty optical module.
BTS3902E WCDMA
Site Maintenance Guide 5 Replacing an Optical Module
Issue 06 (2014-05-16) Huawei Proprietary and Confidential
Copyright © Huawei Technologies Co., Ltd.
18

CAUTION
Do not look into the fiber optic cable or optical module without eye protection after the fiber
optic cable is removed from the optical module.
Step 4 Lower the puller on the faulty optical module, and then pull the puller until the optical module
is removed from the BTS3902E.
Step 5 Prepare an optical module of the same type as the faulty optical module according to the label
on the module. Install the new optical module onto the BTS3902E.
NOTE
The optical modules to be installed must match the rate at the fast Ethernet or gigabit Ethernet (FE/GE)
port.
Step 6 Insert the fiber optic cable connector into the new optical module.
Step 7 Check the transmission of FE/GE signals by observing the status of the indicators labeled O/E
or O. For details about the status of the indicators, see BTS3902E Indicators in BTS3902E
WCDMA Hardware Description.
Step 8 Take off the ESD gloves, and pack up all the tools.
----End
Follow-up Procedure
lPlace the removed optical module into the ESD box or bag. Then, place the ESD box or
bag into a foam-padded carton or the packing box of the new module.
lFill in the fault form with detailed information about the removed component.
lContact the local Huawei office to handle the faulty optical module.
BTS3902E WCDMA
Site Maintenance Guide 5 Replacing an Optical Module
Issue 06 (2014-05-16) Huawei Proprietary and Confidential
Copyright © Huawei Technologies Co., Ltd.
19