Humax X1 11n Wireless Roaming Extender User Manual QG X1 100GB 16 0902 indd
Humax Co., Ltd. 11n Wireless Roaming Extender QG X1 100GB 16 0902 indd
Humax >
Users Manual

WPS
ETHERNET
2. Connecting to Router
2-1 Connect your extender to a host router and press the WPS buttons of both devices
within 2 minutes.
Note: Press the WPS button on the extender 1 minute after turning it on.
2-2 Wait until the green or orange light on the Extended LED blinks slow.
In green light, you can enjoy Wi-Fi network in an extended area.
In orange light, you can experience the seamless roaming & mesh network in your home.
To enjoy roaming & mesh network, you should congure the network with HUMAX
products only.
Note: For more information about using the WPS feature on your router, refer to the user
guide of the router.
2-3 Check the network when the connection is complete.
If you connect the extender to a HUMAX router, both network names are the same as if
they congure a single network. But, if you use a router other than HUMAX products, the
network name of your extender will copy the router›s name following Ext2G or Ext5G.
(ex. Router_Ext5G)
3. Relocating Extender
Place your extender about halfway between your router and Wi-Fi dead zone.
Plug the extender into an electrical outlet and wait until the Good Range LED lights green.
Note: If a green light on the Too Close or Too Far LEDs is turned on, move the extender far
from or closer to the router until the Good Range LED lights green.
1. Powering On
Plug in your extender to an electrical outlet and wait until a
green light on the Power LED is turned on. It may take one
minute.
Note: We recommend that the extender be positioned near
the router to get the best signal.
Warning
1. Connect all devices before you plug any power cords into the electrical outlet.
2. Always turn o the product and network devices before you connect or disconnect any cables.
3. Hazardous electrical voltages can exist on the product and peripheral devices and can be present on any
connected cables.
Scan the QR code
to access @@ on your mobile device.
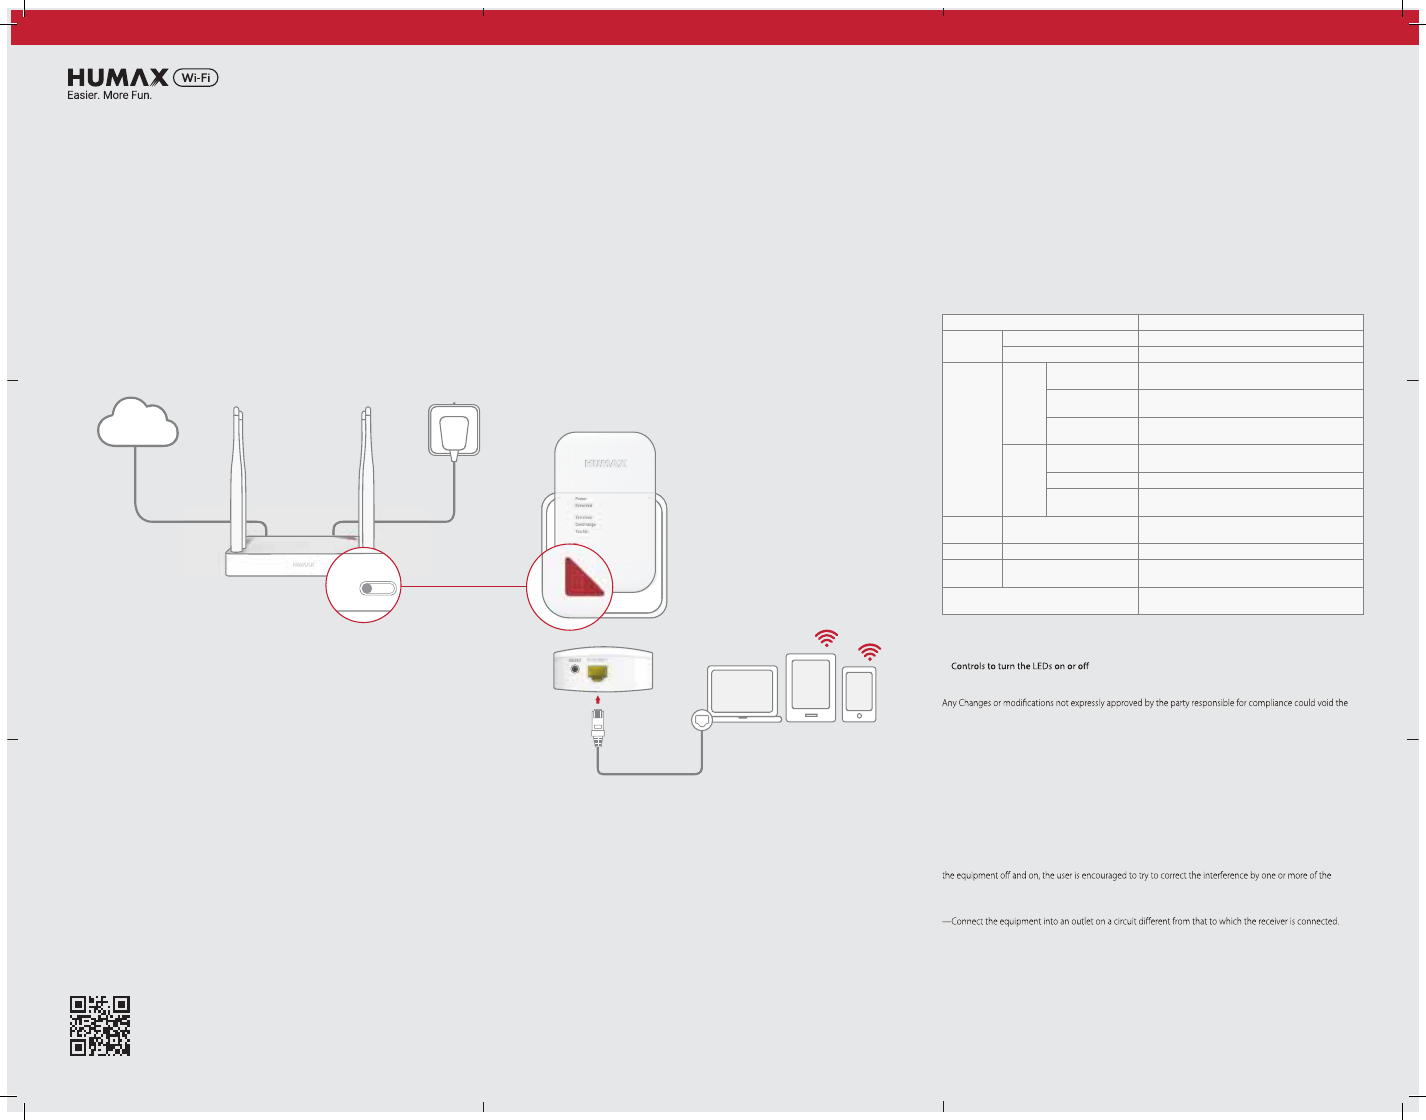
t WPS: Press the WPS button to activate the wireless protected setup.
t RESET: Keep pressing the reset button for 5 seconds and release it if all LEDs are blink.
t ETHERNET: Connect your smart TV, gaming console or PC.
Electrical Outlet
Electrical Outlet
PC Mobile PhoneTablet
QUANTUM Router
X1 Extender
Internet
Quick Start Guide
Wireless or Wired, it's 11n Wireless Roaming Extender
QUANTUM X1
FCC warning:
user’s authority to operate the equipment.
This device complies with part 15 of the FCC Rules. Operation is subject to the following two conditions: (1) This
device may not cause harmful interference, and (2) this device must accept any interference received, including
interference that may cause undesired operation.
FCC Radiation Exposure Statement:
This equipment complies with FCC radiation exposure limits set forth for an uncontrolled environment. This
equipment should be installed and operated with minimum distance 20cm between the radiator& your body.
This transmitter must not be co-located or operating in conjunction with any other antenna or transmitter.
Note: This equipment has been tested and found to comply with the limits for a Class B digital device, pursuant
to part 15 of the FCC Rules. These limits are designed to provide reasonable protection against harmful
interference in a residential installation. This equipment generates uses and can radiate radio frequency energy
and, if not installed and used in accordance with the instructions, may cause harmful interference to radio
communications. However, there is no guarantee that interference will not occur in a particular installation. If this
equipment does cause harmful interference to radio or television reception, which can be determined by turning
following measures:
—Reorient or relocate the receiving antenna.
—Increase the separation between the equipment and receiver.
—Consult the dealer or an experienced radio/TV technician for help.
LEDs on the Front Panel
After the product is successfully registered on the network, the LEDs illuminate continuously to indicate that
the product is active and fully operational.
noitarepODEL
Power .nosirewoPnOneerG
.ffosirewoPffO
Extended
Extender
Green On WPS Conncetion between router and extender is in
progress.
Green Fast Blinking WPS Conncetion between router and extender is failed.
It blinks for 2 minutes.
Green Slow Blinking WPS connection between router and extender is
successful. It blinks for 5 seconds.
Roaming
& Mesh
Orange On Synchronization over smart roaming & mesh network is
successful.
Orange Fast Blinking WPS connection between router and extender is failed.
Orange Slow Blinking WPS connection between router and extender is
successful.
Too Close Green On Wireless network signal is strong.
Move a client device far from the product.
Good Range .doogsilangiskrowtensseleriWnOneerG
Too Far Green On Wireless network signal is weak.
Move a client device closer to the product.
Extended, Too Close,
Good Range, Too Far Blinking Resetting the system is in progress.
Note:
tOrange light is turned on when your product operates over the roaming & mesh network.
tYou can turn the LEDs o if the notication is not needed. Go to Management > Energy Saving > LED
.

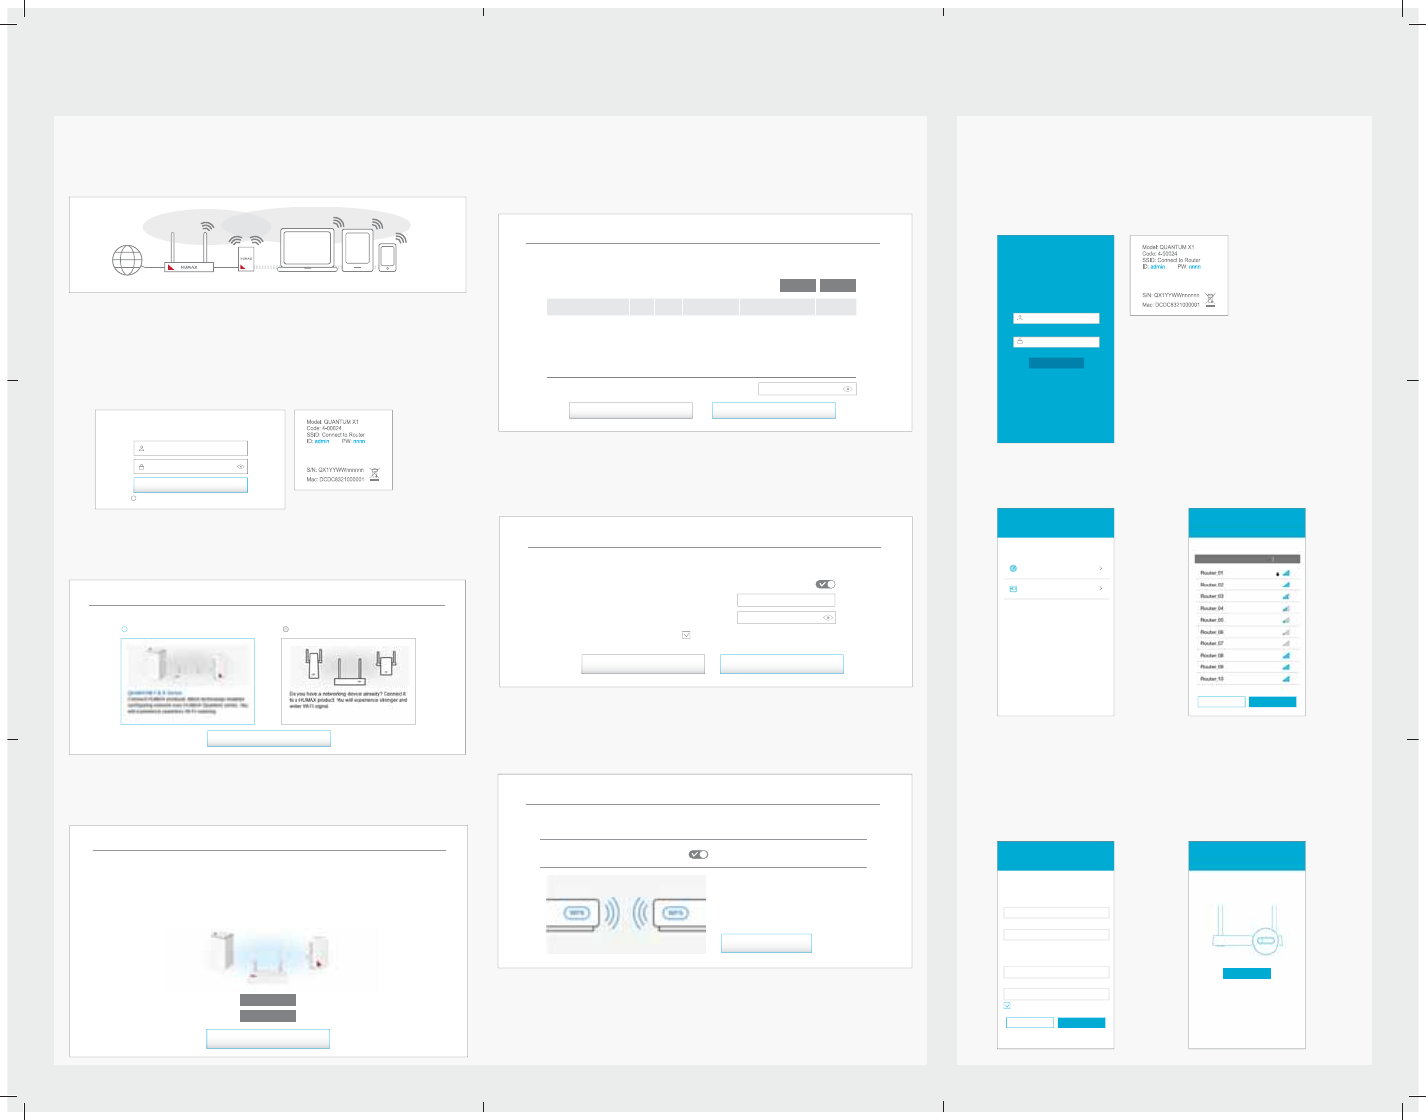
Setting up on Web Page
If you want to set the extender in more detail, you can set it up on your PC or mobile device.
Setting up on Mobile
1 Connecting Network Devices
Wirelessly connect your network devices to the extender.
Note: You need a network name and password of the extender.
Or, you can connect your PC to the LAN port of your extender through an Ethernet cable.
2 Login to the Web
1. Open the web browser.
2. Enter http://dearmyrouter.net to the address bar, and then press the Enter key.
3. Enter the ID and password. The default ID and password are admin and nnnn. nnnn is the last 4
digits of serial number. Refer to the serial number at the bottom of your product.
Note: We recommend you to change the ID and password to secure your network.
Go to Management > Change Password to change your password.
3 Welcome
4-2. Repeater
If you have a networking device other than HUMAX products, select it from the list and then enter the
password. You will experience stronger and wider Wi-Fi signal.
Click Next to set the connection with the host router.
If you click WPS to connect to the host router automatically, 5. Extender Setting page does not appear.
5 Extender Setting
Enter your network name and password. The default name is the same as your host network.
Note: We recommend the network share the same network name and password as your host network if
you configure the network with HUMAX products only.
6 WPS Connection
Click Start WPS to configure WPS between your router and extender. When the WPS is successfully
configured, the green or orange light on the Extended LED blinks slowly.
Note: You can see whether the WPS connection is successful or not on the Extender Setting page.
Login to the Mobile web
1. Open the web browser on your mobile device. If the web page does not appear, enter http://
dearmyrouter.net to the address bar.
2. Enter the ID and password. The default ID and password are admin and nnnn. nnnn is the last 4
digits of serial number. Refer to the serial number at the bottom of your product.
Note: We recommend you to change the ID and password to secure your network.
Go to Management > Change Password to change your password.
Connection to Host
3. Tap SCAN.
4. Select a host network from the list and enter the password.
Extender Setting
5. Enter your network name and password.
The default name is the same as your host
network.
Note: We recommend the network share the
same network name and password as your
host network if you configure the network
with HUMAX products only.
WPS Con guration
6. Click WPS to configure WPS between
your router and extender. When the WPS
is successfully configured, the green or
orange light on the Extended LED blinks
slowly.
If you configure the network with HUMAX
products only, click HUMAX Products and go to
4-1. Roaming & Mesh.
If you use a third party product other than
HUMAX, click Other Products and go to
4-2 Repeater.
4-1 Roaming & Mesh
Just press the WPS buttons on HUMAX products within 1 second. Then, they are connected each
other automatically, and configure the mesh network. You will experience seamless Wi-Fi roaming
over the mesh network.
Extended NetworkHost Network
Internet QUANTUM Router QUANTUM Laptops Tablets Phones
([WHQGHU6HWWLQJ
<RXFDQVHWWKH([WHQGHU1HWZRUNWKURXJK
WKH+RVW1HWZRUNFRQQHFWLRQ
6&$1
<RXFDQVHOHFWD1HWZRUNWKDW\RXZDQWWRFRQQHFW
:36
,IWKHGHYLFH\RXZDQWWRFRQQHFWKDYHWKH:36
EXWWRQFKRRVHWKLVSURFHVV
6HOHFWWKHQHWZRUN\RXZDQWWRFRQQHFW
1HWZRUN1DPH6,6' 6LJQDO
([WHQGHU6HWWLQJ
%DFN 5HIUHFK
,IWKHKRVWGHYLFH\RXZDQWWRFRQQHFWKDYHWKH:36
EXWWRQSUHVVWKH:36EXWWRQ$QGZLWKLQVHFRQGV
FOLFNWKH:36EXWWRQEHORZRUSUHVVWKH:36EXWWRQ
RQH[WHQGHUGHYLFH
([WHQGHU6HWWLQJ%\:36
:36
DGPLQ
/RJLQ
/2*,1
KWWSGHDUP\URXWHUQHW
)RUWKHGHIDXOW,'DQGSDVVZRUG
VHHWKHERWWRPRIWKHSURGXFW
8VHU1DPH
3DVVZRUG
(QWHUWKHVHWWLQJVIRU+RVW1HWZRUNDQG
([WHQGHU1HWZRUN
1HWZRUN1DPH6,6'
([WHQGHUSDVVZRUGLVWKHVDPHDV\RXUKRVWSDVVZRUG
1HWZRUN1DPH6,6'
3DVVZRUG
3DVVZRUG
+RVW1HWZRUN
([WHQGHU1HWZRUN
([WHQGHU6HWWLQJ
%DFN 5HIUHFK
&RQQHFWWR5RXWHU
&RQQHFWWR5RXWHU
:HOFRPHWR48$1780;
KWWSGHDUP\URXWHUQHW
DGPLQ
3DVVZRUG
)RUWKHGHIDXOW,'DQGSDVVZRUGVHHWKHERWWRPRIWKHSURGXFW
/RJLQ
,'
Welcome to Quantum X1!
You can expand the Wi-Fi coverage with Quantum X1 by wirelessly connecting it to a host router.
Next
HUMAX Products Other Products
Roaming & Mesh Setting
HUMAX products work together. You can extend Wi-Fi coverage simply using the WPS button.
Place Quantum X1 near the product to connect, and press the WPS button on both products within 2 minutes.
Tip!
Place the two products without walls or obstacles there between, and keep no distance between them too far.
They work best at up to 12m (40feet) inside and outside.
If the mesh network has been configured already, press the WPS button on the device closest
to a new product within 2 minutes.
Previous
WPS
Manual Setting
Repeater Setting
Select a device from the list below and enter the password to connect to the host device.
Using the WPS button on both devices, you can easily connect them.
Network Name (SSID) CH RSSI Security MAC Address Band
IPTime Zone
TIANA_89
ASUS
Wafya
1
1
1
3
-45
-47
-51
-26
WPA2-PSK
WPA2-PSK
WPA2-PSK
None
BC:76:70:7C:5C:74
F8:D1:11:5C:84:BA
70:7C:F8:D1:11:55
11:5C:54:D8:33:98
2.4GHz
2.4GHz
2.4GHz
2.4GHz
Password **********
WPS
NextPrevious
Refresh
Repeater Setting
You can more easily connect the device to be connected via the WPS function. The device you want to connect,
you need to check whether it supports the WPS function.
Press the WPS button on both devices to connect
within 120 seconds. Operating status can be checked
through the LED Status of products or Message below.
Press the WPS button
On/O
Start WPS
2.4GHz
Network Name (SSID)
Password
Password is the same as your host password
Connect to Router
Back Done
Repeater Setting
Set the Network Name(SSID) and password of your device in Repeater mode.
!"#$%&
!"#$%&