Hytera Communications PD78XU1 Digital Portable Radio User Manual
Hytera Communications Corporation Ltd. Digital Portable Radio Users Manual
UserManual.wiki
>
Hytera Communications
>
PD78XU1 User Manual
>
Users Manual
Contents
1.
Users Manual
2.
user manual
Users Manual
Navigation menu
Upload a User Manual
Namespaces
Wiki Guide
HTML
PDF
Info
Views
User Manual
Discussion / Help
Navigation

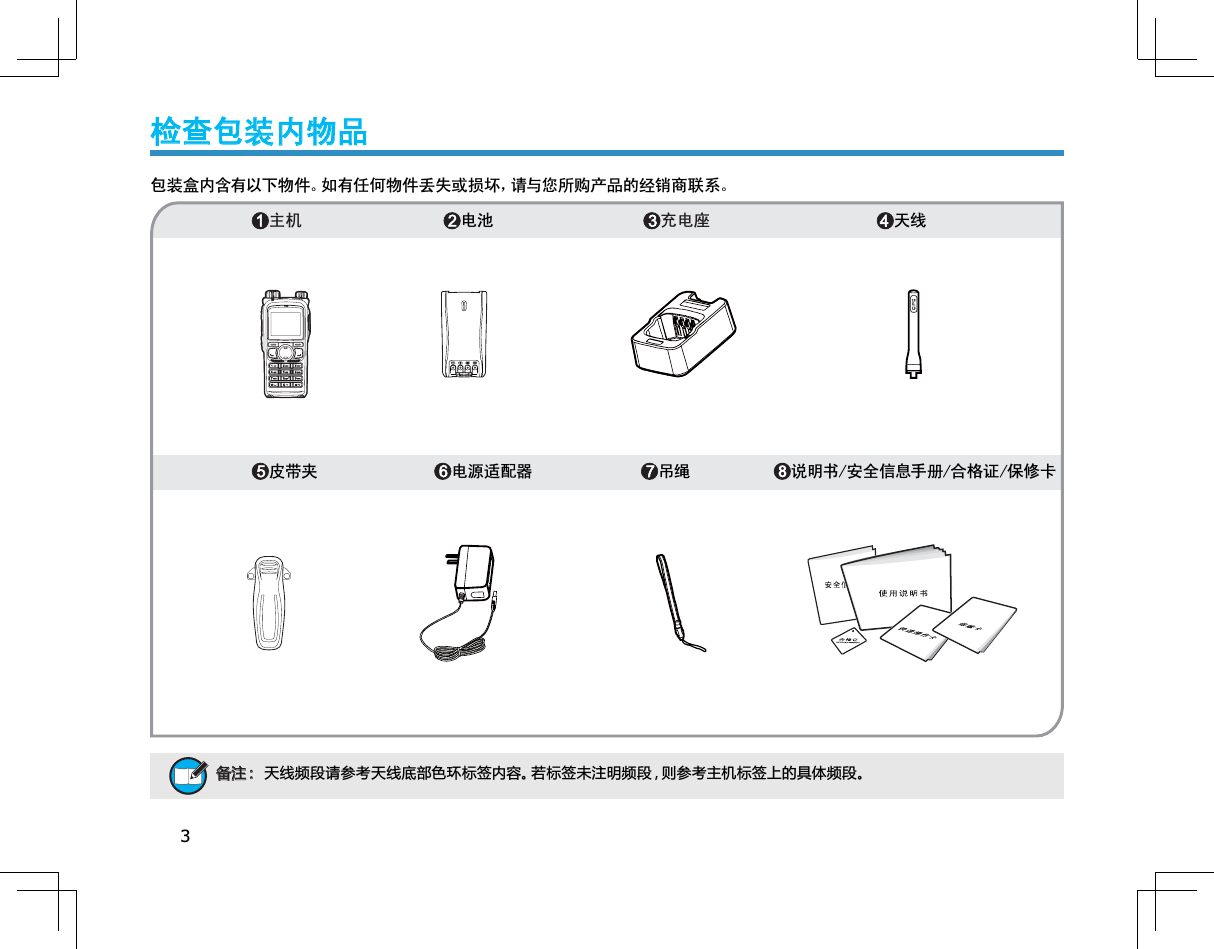
![2Checking Items in the PackageChecking Items in the PackageSafety Information BookletOwner’s Quick Reference Guide4UZK :NKGTZKTTGSG_\GX_]OZNJOLLKXKTZLXKW[KTI_HGTJY'TJZNKLXKW[KTI_HGTJOYSGXQKJUTZNKRGHKRULGTZKTTG!OLTUZVRKGYKXKLKXZUZNKRGHKRUTZNKXGJOU[TOZLUXLXKW[KTI_HGTJOTLUXSGZOUTPlease unpack carefully and check that all items listed below are received. If any item is missing or damaged, please contact your dealer. Radio Unit Battery Charger Antenna Belt Clip Power Adapter Strap Owner’s Manual/Safety Information Booklet Quick Reference Guide](https://usermanual.wiki/Hytera-Communications/PD78XU1.Users-Manual/User-Guide-1288413-Page-7.png)
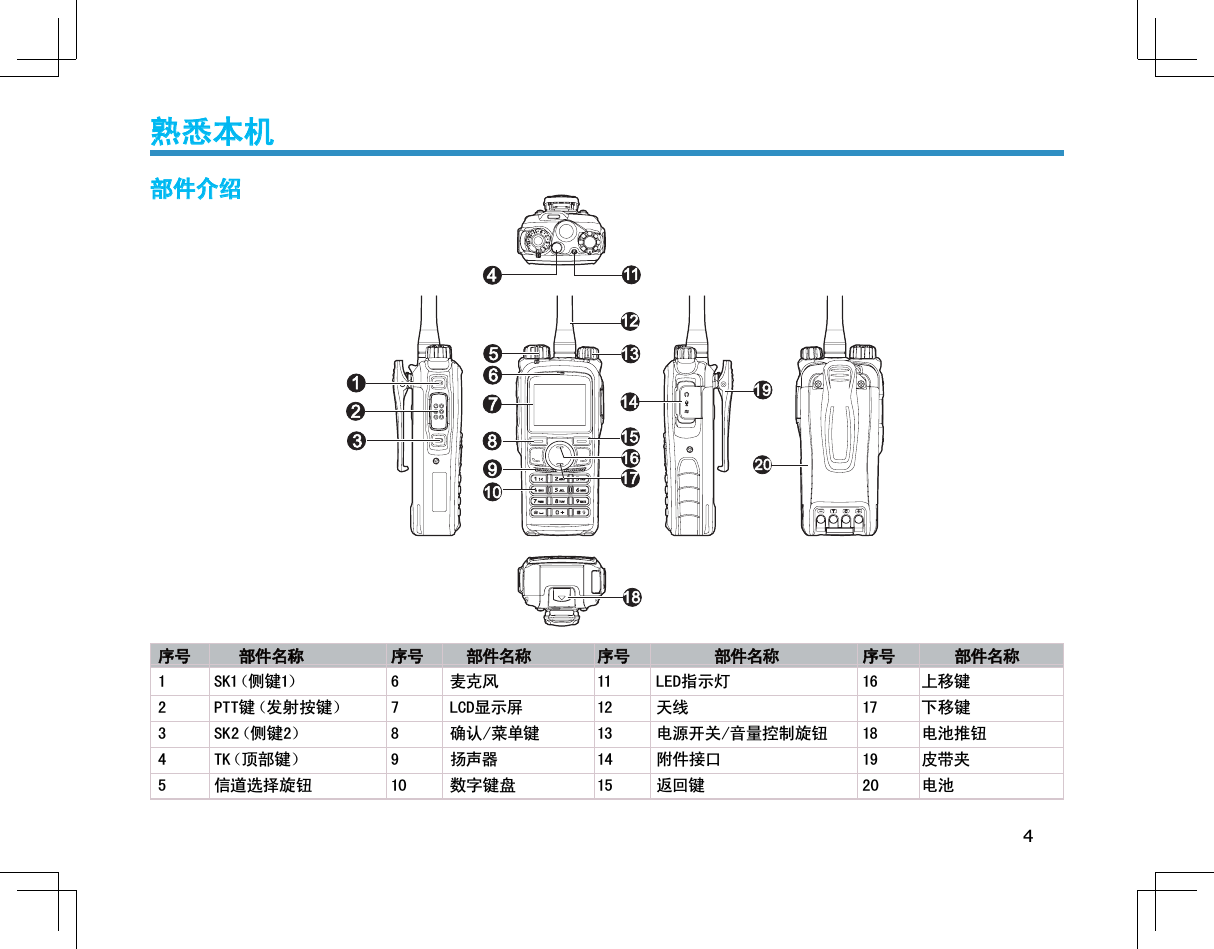
![4Programmable KeysProgrammable KeysFor enhanced convenience, you may request your dealer to program the keys SK1, SK2, TK3, and as shortcuts to the functions listed below: No. Shortcut Keys Description1Zone Up Quick access to a desired zone2Zone Down3Keypad Lock To lock or unlock the keypad quickly4Contact List Quick access to Contact List5Message Quick access to the menu “Message”6Call Logs Quick access to the menu “Call Logs”7Adjust Power Level To adjust power level through one button press.8Talk Around To directly communicate with other radios.9Monitor To adjust the condition for incoming signal match. 10 Monitor Momentary 11 Squelch Off To always unmute speaker no matter whether carrier is present or not. 12 Squelch Off Momentary 13 Home Screen To quickly return to the previous menu or home screen. 14 Scan To receive signals on other channels. 15 Nuisance Temporary Delete To temporarily ignore unwanted channel activity. 16 Emergency To summon help in emergent situations. 17 Adjust Squelch Level To temporarily adjust the squelch threshold required for the radio to unmute. 4UZK 2UTMGTJYNUXZVXKYYULGQK_IGTHKGYYOMTKJ]OZNJOLLKXKTZL[TIZOUTYH__U[XJKGRKX:NK:1OYVXUMXGSSKJGYZNK+SKXMKTI_QK_H_JKLG[RZGTJOYVXUMXGSSGHRKH__U[XJKGRKXRadio OverviewRadio Overview](https://usermanual.wiki/Hytera-Communications/PD78XU1.Users-Manual/User-Guide-1288413-Page-9.png)
![6Attaching the BatteryAttaching the Battery1. Insert the battery into top of the radio. See arrow ķ.2. Slightly press the bottom of the battery until a click is heard. See arrow ĸ.To remove the battery, turn off the radio fi rst. Then slide the battery latch upwards to unlock the battery. Attaching the Belt ClipAttaching the Belt Clip 1. Remove the screws; 2. Align the screw holes on the belt clip with those on the radio’s body, and then tighten the screws. To remove the belt clip, loosen the screws. Attaching AudioAccessoy/Programming CableAttaching AudioAccessoy/Programming Cable1. Open the accessory jack cover as the arrow shown. 2. Align the plug with the accessory jack. 3. Tighten the screw on the plug. To remove accessories, loosen the screw. )G[ZOUT =NKT_U[GXK[YOTMGTK^ZKXTGRGIIKYYUX_]GZKXVXUULVKXLUXSGTIKULZNKXGJOUSG_MKZGLLKIZKJBefore UseBefore Use](https://usermanual.wiki/Hytera-Communications/PD78XU1.Users-Manual/User-Guide-1288413-Page-11.png)
![9Turning the Radio On/OffTurning the Radio On/OffRotate the Radio On-Off/Volume Control knob clockwise/counter-clockwise until a click is heard to turn the radio on/off. Adjusting the VolumeAdjusting the VolumeAfter turning the radio on, rotate the Radio On-Off/Volume Control knob clockwise to increase the volume, or counter-clockwise to decrease the volume.Selecting a ZoneSelecting a ZoneA zone is a group of channels exhibiting the same property, and is programmed by your dealer. The radio supports up to 32 zones, each with a maximum of 16 channels. You may select a zone through any of the following methods: 1. Through menu selection Go to the menu “Zone”, and use the Up/Down keys to select your desired zone.2. Through the function keys You may quickly toggle to your desired zone by pressing the programmed Zone Up or Zone Downkey. Basic OperationsBasic OperationsSelecting a ChannelSelecting a Channel Rotate the Channel Selector knob to select a desired channel.Digital/Analog SwitchDigital/Analog SwitchEach channel can be programmed as either analog channel or digital channel. If the current zone includes both analog and digital channels, you may quickly switch between digital and analog through the Channel Selectorknob.Locking/Unlocking the KeypadLocking/Unlocking the KeypadWhen the keypad is not in use, you can lock the keypad to prevent accidental keypad operation. Three methods are available for you to lock or unlock the keypad:1. Through key combination Use “OK+” to lock or unlock the keypad.2. Through the function key Press the programmed Keypad Lock key to lock or unlock the keypad. 4UZK =NKT1K_VGJ'[ZU2UIQOYKTGHRKJZNKQK_VGJ]ORRHKRUIQKJG[ZUSGZOIGRR_OLTUUVKXGZOUTOYSGJKLUXZNKVXKYKZZOSKVKXOUJ](https://usermanual.wiki/Hytera-Communications/PD78XU1.Users-Manual/User-Guide-1288413-Page-14.png)
![11Receiving and Responding to a CallReceiving and Responding to a Call Receiving a Call When a call is received, your radio will display the corresponding icon as follows: for a Private Call, for a Group Call and for an All Call. Responding to a Private/Group CallAfter a Private Call or Group Call is received, you may press the PTT key within the preset time period to call back.If you do not respond to a received Private Call, the radio will display the missed call icon .Calls on Analog ChannelsCalls on Analog ChannelsTo transmit on an analog channel, hold down the PTT andspeak into the microphone. To receive, release the PTT.Transmitting a Group CallTransmitting a Group Call You may transmit a Group Call through any of the following methods. When transmitting a Group Call, the icon will appear. Transmitting a call to the preset contactIn standby mode, pressing PTT will transmit a Group Call to the contact (a Group Call number) preset for the current channel.Transmitting a call through Contact List 1) Go to Contact -> Contact List. 2) Use the Up/Down key to select the Group Call number you want to call. 3) Hold down PTT to transmit a Group Call to the selected contact.Transmitting an All CallTransmitting an All Call Methods are the same as those in Transmitting a Group Call. When transmitting an All Call, the icon will appear. 4UZK ?U[IGTZXGTYSOZGT'RR)GRRUTR_]NKTOZOYKTGHRKJH__U[XJKGRKX4UZK ?U[IGTTUZXKYVUTJZUGT'RR)GRR4UZK :UKTY[XKGTUVZOSGR\UR[SKLUXZNKXKIKO\OTMXGJOUNURJZNKXGJOUGVVXU^OSGZKR_ZUIKTZOSKZKXYG]G_LXUS_U[XSU[ZNJ[XOTMZXGTYSOYYOUTCallCall](https://usermanual.wiki/Hytera-Communications/PD78XU1.Users-Manual/User-Guide-1288413-Page-16.png)
![15SettingsSettingsTo access this item, press the Menu key in idle mode and then select “Settings”. You can optimize your radio performance by customizing related parameters according to actual needs and your preferences.Radio Set Radio SetPower LevelThis option allows you to set transmit power level. Alternatively, you can change the power level by pressing the shortcut key for Adjust Power Level in idle mode. There are two levels available: High (indicated by )and Low (indicated by ). High power level enables you to communication with farther team members. 4UZK 6U]KXRK\KRYNU[RJHKYKZLUXKGININGTTKROTJO\OJ[GRR_Squelch LevelThis option allows you to select an appropriate squelch level. Alternatively, you can change the squelch level by pressing the shortcut key for Adjust Squelch Level in idle mode. There are three levels available: Tight, Normal and Open.The default squelch level is “Normal”, and generally used in low noise environment.Generally, “Tight” is used in high noise environment. It requires stronger signal for the radio to unmute. If the squelch level is set to Open, the speaker will keep unmuted irrespective of the satisfaction of decoding conditions.LanguageTo set the language in which all interface information is displayed. At the moment, this radio only supports two languages: Simplifi ed Chinese and English.BacklightTo set the backlight parameters. There are three options available: On, Off and Timer. The timer is programmed by your dealer. Available range: 5-60 seconds. BrightnessTo set the display brightness. You can increase or lower it using the Up or Down key. Menu NavigationMenu Navigation](https://usermanual.wiki/Hytera-Communications/PD78XU1.Users-Manual/User-Guide-1288413-Page-20.png)

![25You can enter aliases, numbers or messages using the keypad. This radio supports the following input methods: Chinese Pinyin (simplifi ed), English and Number. Chinese Pinyin (Simplified) Chinese Pinyin (Simplifi ed) Operation:1. Press to switch to Chinese Pinyin mode; 2. Enter the pinyin through alphanumeric keys; then a list of possible combinations and corresponding characters will appear; 3. Use the Up/Down key to choose the right pinyin; 4. Press the OK key to highlight the characters, and choose the right character using the Up/Down key; 5. Press the OK key to enter the selected character. You can repeat the above steps to continue. English English Operation:1. Press to switch to uppercase English or lowercase English mode; 2. Enter the English letters through alphanumeric keys; then a list of possible letters will appear; 3. Use the Up/Down key to choose the right letter; 4. Press the OK key to enter the selected letter. You can repeat the above steps to continue. Appendix: Input MethodAppendix: Input MethodNumber Number Operation:1. Press to switch to Number mode;2. Enter the numbers through alphanumeric keys to .Special Character Special Character To enter common punctuations and special characters, press .To input a space, press .4UZK ?U[IGT[YKZNK;V*U]TQK_ZUSU\KZNKI[XYUXRKLZ]GXJXOMNZ]GXJOTZNKKTZKXKJZK^Z](https://usermanual.wiki/Hytera-Communications/PD78XU1.Users-Manual/User-Guide-1288413-Page-30.png)