Hytera Communications PD78XU1 Digital Portable Radio User Manual
Hytera Communications Corporation Ltd. Digital Portable Radio Users Manual
Contents
- 1. Users Manual
- 2. user manual
Users Manual

OWNER’S MANUAL
PD78X DMR
DMR PORTABLE RADIO
W03441 F03152
p
., Ltd.
cn.

Preface
Thank you for purchasing Hytera DMR digital two-way radio. As
a product built to the DMR standard, the radio is endowed with
ergonomic design and comprehensive digital functions to deliver an
advanced communication solution. With this radio, you can make
use of digital functions to top the competition!
To derive optimum performance from your radio, please read this
manual and the supplied Safety Information Booklet carefully before
use.
Icon InformationIcon Information
The following icons are available through this manual:
Alert IconsAlert Icons
Caution: indicates situations that could cause
damage to your radio.
Note: indicates tips that can help you make
better use of your radio.
Function IconsFunction Icons
: indicates functions that are available on digital
channel only.
: indicates functions that are available on analog
channel only.
Functions marked with no function icons are available on
both analog and digital channels.
Term ExplanationTerm Explanation
Key Operation Key Operation
Short press: to press the key and release it quickly;
Long press: to press the key and remain holding it down
for a predefi ned period (2 seconds by default);
Hold down: to press the key and remain holding it down.
Private Call Private Call
Private call is initiated by a single user to another user,
involving the calling party and the called party only.
Group Call Group Call
Group call is initiated by a single user to a group, involving
the calling party and all the group members.
All Call All Call
All call is a call initiated to all the users on a channel. It is
used to deliver important notices.
Squelch Squelch
This technology can remove excessive background
noises, improving your communication quality.
Copyright InformationCopyright Information
Hytera and HYT are trademarks or registered trademarks
of Hytera Communications Co., Ltd. in the PRC and/or
other countries or areas. Hytera retains the ownership of
its trademarks and product names. All other trademarks
and/or product names that may be used in this manual are
properties of their respective owners.
The Hytera product described in this manual may include
Hytera computer programs stored in memory or other
media. Laws in the PRC and/or other countries or areas

preserve for Hytera exclusive rights for Hytera computer
programs. The purchase of this product shall not be
deemed to grant, either directly or by implication, any
rights to the purchaser with respect to Hytera computer
programs. Any Hytera computer programs may not be
copied, modified, distributed, decompiled, or reverse-
engineered in any manner without the prior written consent
of Hytera.
DisclaimerDisclaimer
Hytera endeavors to achieve the accuracy and
completeness of this manual, but no warranty of accuracy
or reliability is given. All the specifications and designs
are subject to change without notice due to continuous
technology development. No part of this manual may be
copied, modifi ed, translated, or distributed in any manner
without the express written permission of Hytera.
If you have any suggestions or would like to learn more
details, please visit our website at: KWWSZZZK\WHUDFQ.
RF Energy Exposure ComplianceRF Energy Exposure Compliance
Your radio is designed and tested to comply with a
number of national and international standards and
guidelines (listed below) regarding human exposure
to radio frequency electromagnetic energy. This radio
complies with the IEEE and ICNIRP exposure limits for
occupational/controlled RF exposure environment at
operating duty factors of up to 50% transmitting and is
authorized by the FCC for occupational use only. In terms
of measuring RF energy for compliance with the FCC
exposure guidelines, your radio radiates measurable RF
energy only while it is transmitting (during talking), not
when it is receiving (listening) or in standby mode.
Your radio complies with the following of RF energy
exposure standards and guidelines
United States Federal Communications Commission,
Code of Federal Regulations; 47CFR part 2 sub-part J
American National Standards Institute (ANSI)/Institute
of Electrical and Electronic Engineers (IEEE) C95.
1-1992
Institute of Electrical and Electronic Engineers (IEEE)
C95. 1-1999 Edition
International Commission on Non-Ionizing Radiation
Protection (ICNIRP) 1998

to EU countries only.
Notes: The above information is applicable
to 50% in digital mode.
transmission up to 100% of the time in analog mode and up
ҏҏOperational Instructions and Training Guidelines
To ensure optimal performance and compliance with the
occupational/controlled environment RF energy exposure
limits in the above standards and guidelines, users should
transmit no more than 50% of the time and always adhere
Transmit and Receive
To transmit (talk), push the Push-To-Talk (PTT) key; to
receive, release the PTT key.
FCC Licensing InformationFCC Licensing Information
FCC Licensing Requirements
A license from Federal Communications Commission is
required prior to use. Your dealer will program each radio
with your authorized frequencies, signaling codes, etc.,
and will be there to meet your communications needs
as your system expands. Contact your dealer for more
information.
than 50% of the time, although the hardware supports
to the following procedures, and should transmit no more
W/kg; Body-worn: 5.282 W/kg
The highest reported SAR value are - Head: 5.45
Any changes or modifications not expressly approved
by the party responsible for compliance could void the
user's authority to operate the equipment.
of Directive 1999/95/EC.
essential requirements and other relevant provisions
declares that this device is in compliance with the
Hereby, Hytera Communications Corporation Ltd.,
EU Regulatory Conformance
1
Checking Items in the Package ----------------------- 2
Radio Overview ------------------------------------------- 3
Radio Controls --------------------------------------------- 3
Programmable Keys -------------------------------------- 4
Before Use-------------------------------------------------- 5
Charging the Battery ------------------------------------- 5
Assembly and Disassembly ---------------------------- 5
Status Indicators ------------------------------------------ 7
LCD Icons --------------------------------------------------- 7
LED Indicator ----------------------------------------------- 8
Basic Operations ------------------------------------------ 9
Turning the Radio On/Off -------------------------------- 9
Adjusting the Volume ------------------------------------- 9
Selecting a Zone ------------------------------------------ 9
Selecting a Channel -------------------------------------- 9
Digital/Analog Switch ------------------------------------- 9
Locking/Unlocking the Keypad ------------------------- 9
Call ---------------------------------------------------------- 10
Transmitting a Private Call -------------------------- 10
Transmitting a Group Call --------------------------- 11
Transmitting an All Call ------------------------------- 11
Receiving and Responding to a Call ------------- 11
Calls on Analog Channels --------------------------- 11
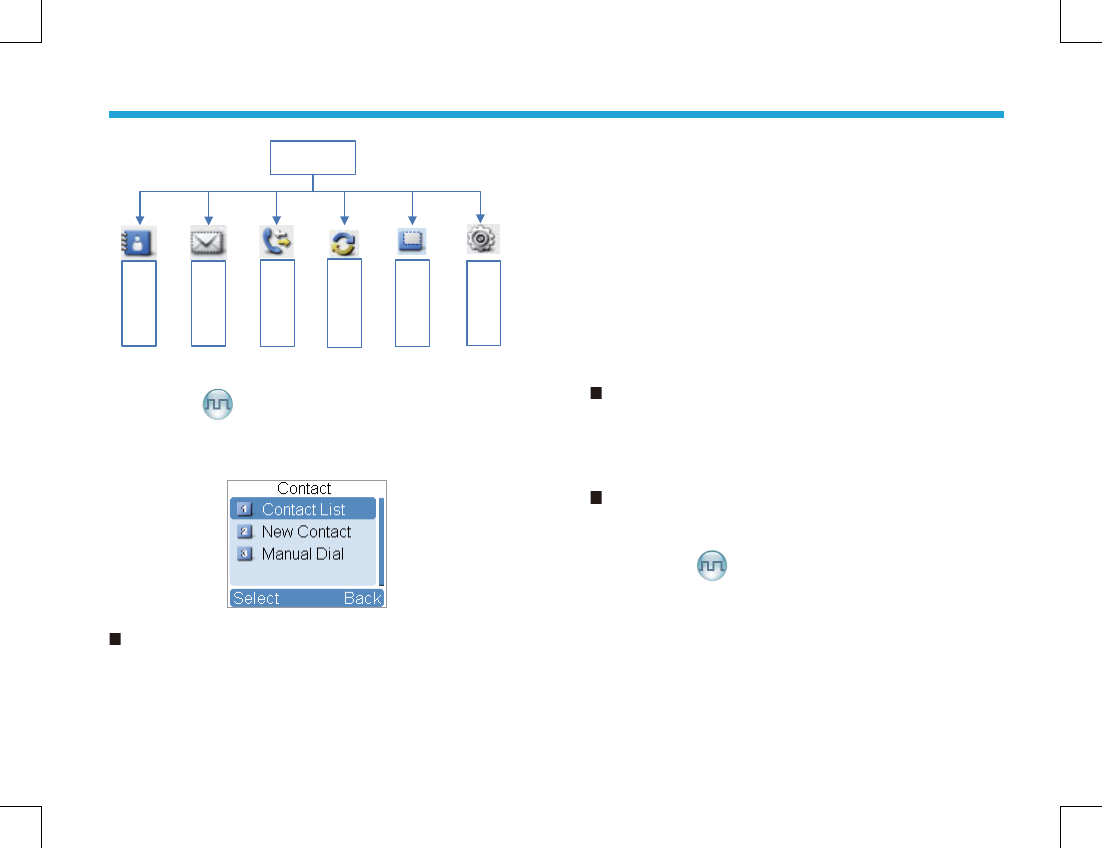
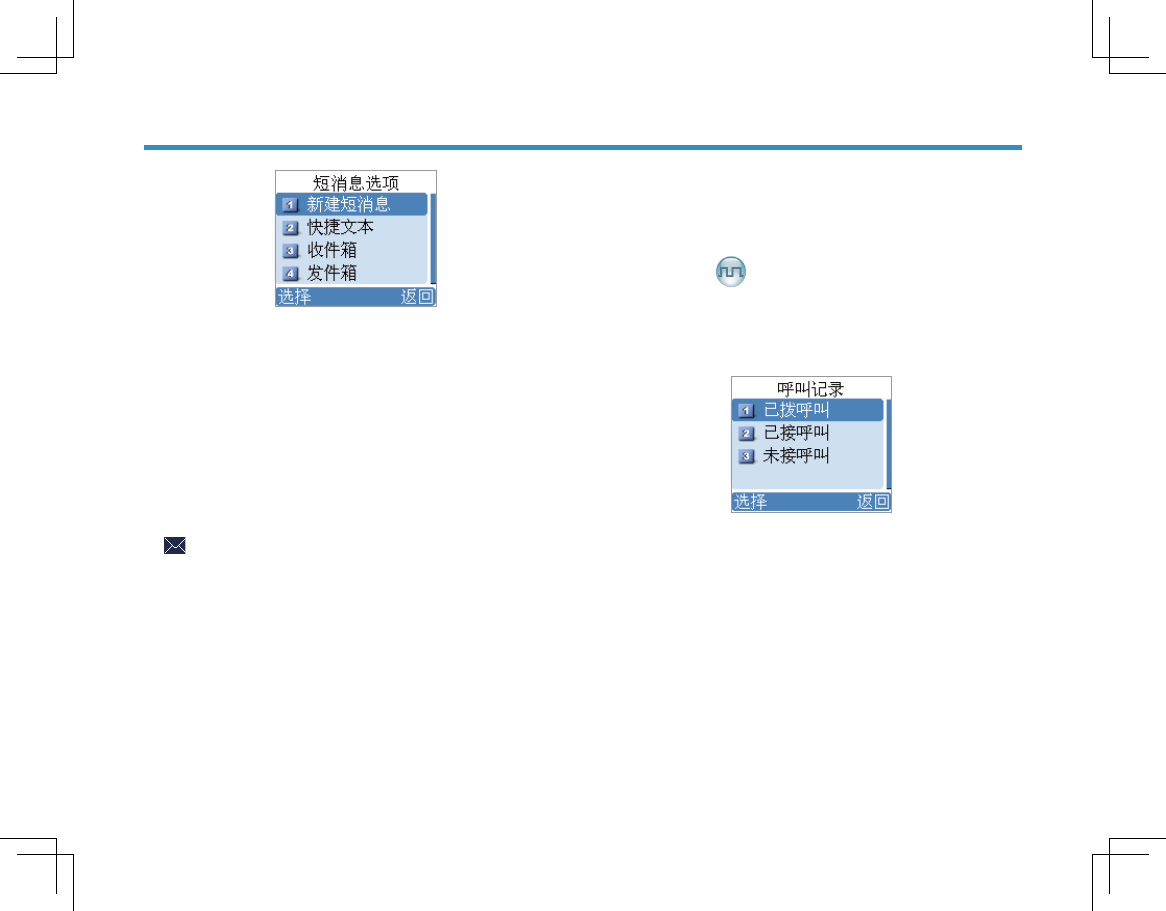
Menu Navigation ------------------------------------------ 12
Contact --------------------------------------------------- 12
Message
------------------------------------------------- 12
Contents
Contents
Call Logs ------------------------------------------------- 13
Scan ---------------------------------------------------------- 14
Zone ---------------------------------------------------------- 14
Settings ------------------------------------------------------ 15
Functions and Operations ------------------------------ 17
Home Screen ----------------------------------------------- 17
Scan ---------------------------------------------------------- 17
Talk Around ------------------------------------------------- 17
Monitor
--------------------------------------------------- 18
Squelch Off --------------------------------------------- 18
Emergency -------------------------------------------------- 18
Busy Channel Lockout ----------------------------------- 21
Time-out Timer (TOT) ------------------------------------ 21
Troubleshooting ------------------------------------------- 22
Care and Cleaning --------------------------------------- 23
Optional Accessories ------------------------------------ 24
Appendix: Input Method ---------------------------------25
2
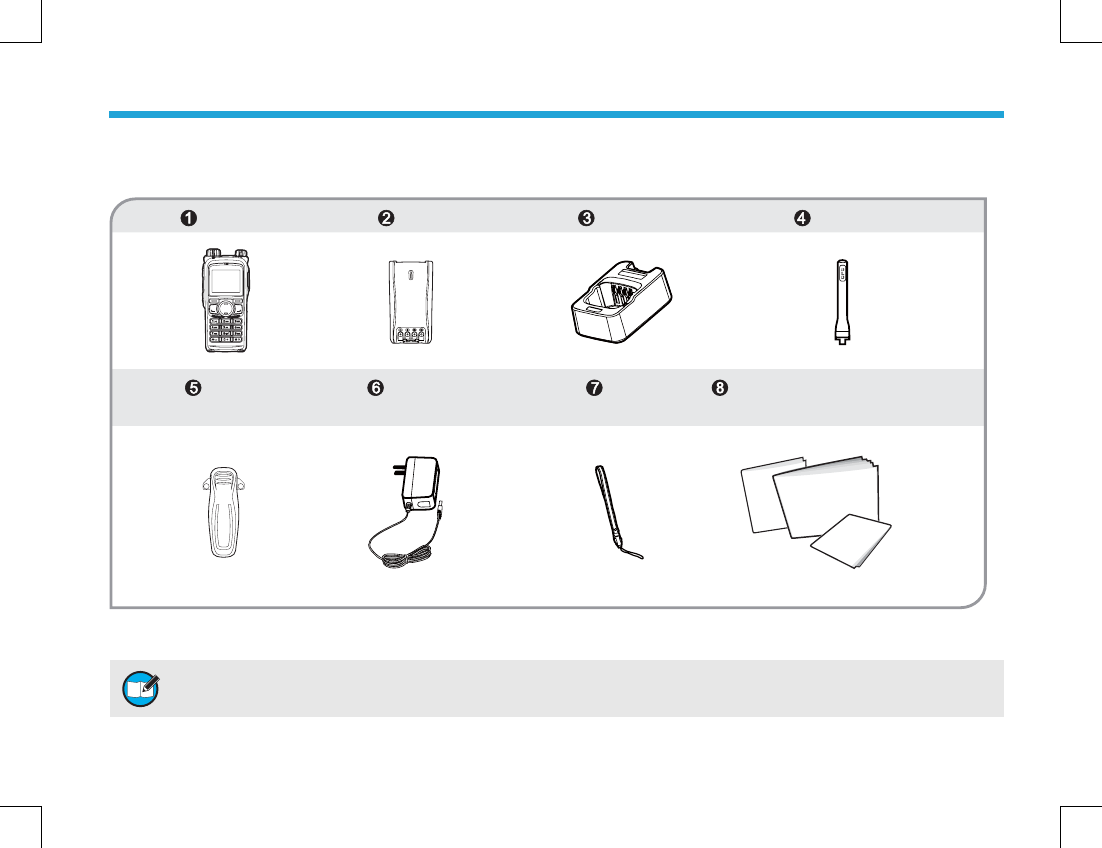
Checking Items in the Package
Checking Items in the Package
Safety Information Booklet
Owner’s
Quick Reference Guide
4UZK :NKGTZKTTGSG_\GX_]OZNJOLLKXKTZLXKW[KTI_HGTJY'TJZNKLXKW[KTI_HGTJOYSGXQKJUTZNKRGHKRULGTZKTTG!
OLTUZVRKGYKXKLKXZUZNKRGHKRUTZNKXGJOU[TOZLUXLXKW[KTI_HGTJOTLUXSGZOUT
Please unpack carefully and check that all items listed below are received. If any item is missing or damaged, please contact
your dealer.
Radio Unit Battery Charger Antenna
Belt Clip Power Adapter Strap Owner’s Manual/Safety Information
Booklet Quick Reference Guide
3
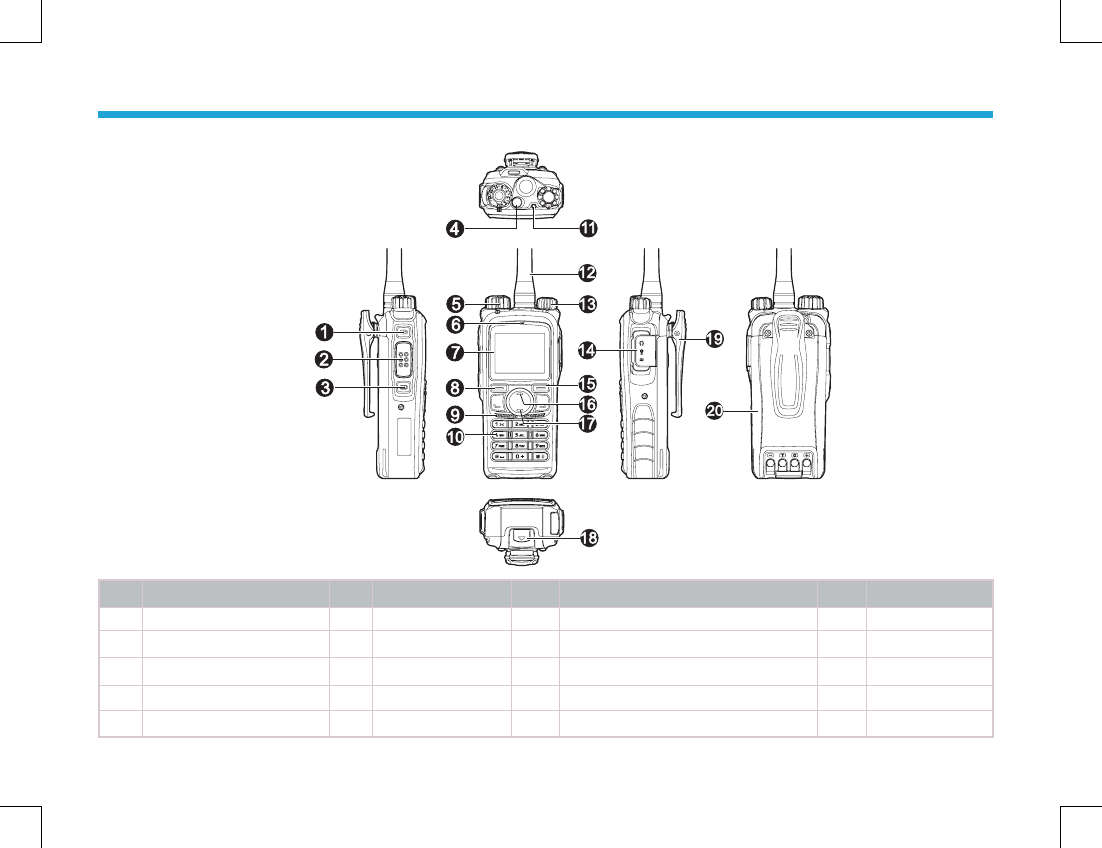
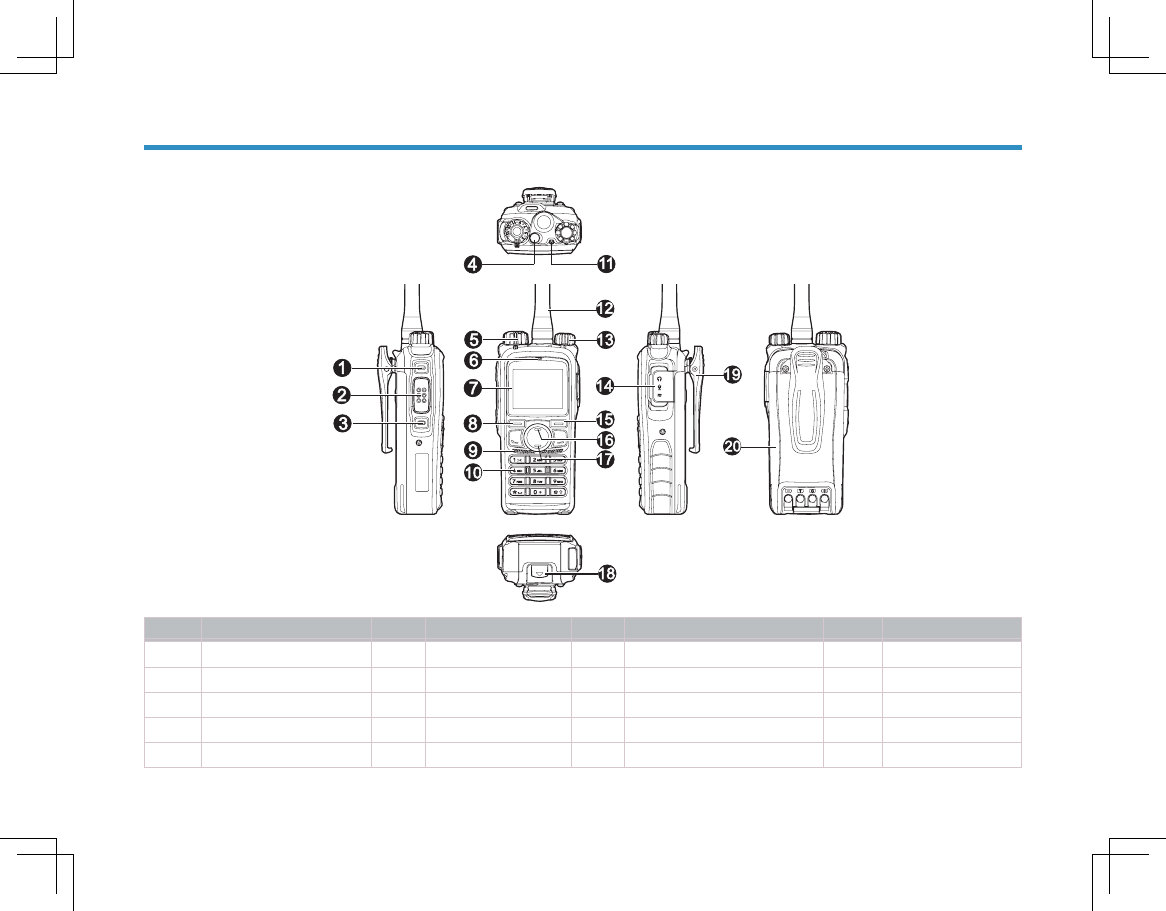
Radio Controls
Radio Controls
No. Part Name No. Part Name No. Part Name No. Part Name
1 SK1 (Side Key 1) 6 Microphone 11 LED Indicator 16 Up Key
2 PTT Key 7 LCD Display 12 Antenna 17 Down Key
3 SK2 (Side Key 2) 8 OK/Menu Key 13 Radio On-Off/Volume Control Knob 18 Battery Latch
4 TK (Top Key) 9 Speaker 14 Accessory Jack 19 Belt Clip
5 Channel Selector Knob 10 Numeric Keypad 15 Back Key 20 Battery
Radio Overview
Radio Overview
4
Programmable Keys
Programmable Keys
For enhanced convenience, you may request your dealer to program the keys SK1, SK2, TK3, and as shortcuts to the
functions listed below:
No. Shortcut Keys Description
1Zone Up Quick access to a desired zone
2Zone Down
3Keypad Lock To lock or unlock the keypad quickly
4Contact List Quick access to Contact List
5Message Quick access to the menu “Message”
6Call Logs Quick access to the menu “Call Logs”
7Adjust Power Level To adjust power level through one button press.
8Talk Around To directly communicate with other radios.
9Monitor To adjust the condition for incoming signal match.
10 Monitor Momentary
11 Squelch Off To always unmute speaker no matter whether carrier is present or not.
12 Squelch Off Momentary
13 Home Screen To quickly return to the previous menu or home screen.
14 Scan To receive signals on other channels.
15 Nuisance Temporary Delete To temporarily ignore unwanted channel activity.
16 Emergency To summon help in emergent situations.
17 Adjust Squelch Level To temporarily adjust the squelch threshold required for the radio to unmute.
4UZK 2UTMGTJYNUXZVXKYYULGQK_IGTHKGYYOMTKJ]OZNJOLLKXKTZL[TIZOUTYH__U[XJKGRKX
:NK:1OYVXUMXGSSKJGYZNK+SKXMKTI_QK_H_JKLG[RZGTJOYVXUMXGSSGHRKH__U[XJKGRKX
Radio Overview
Radio Overview
5
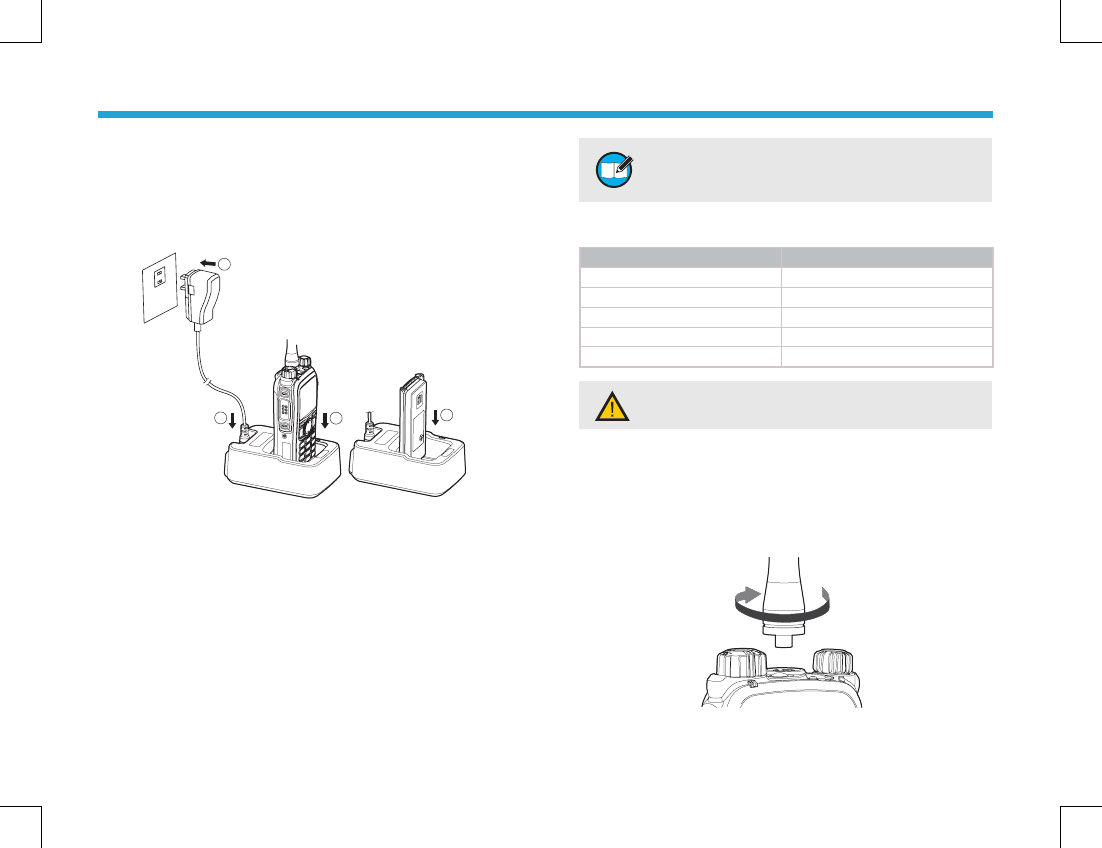
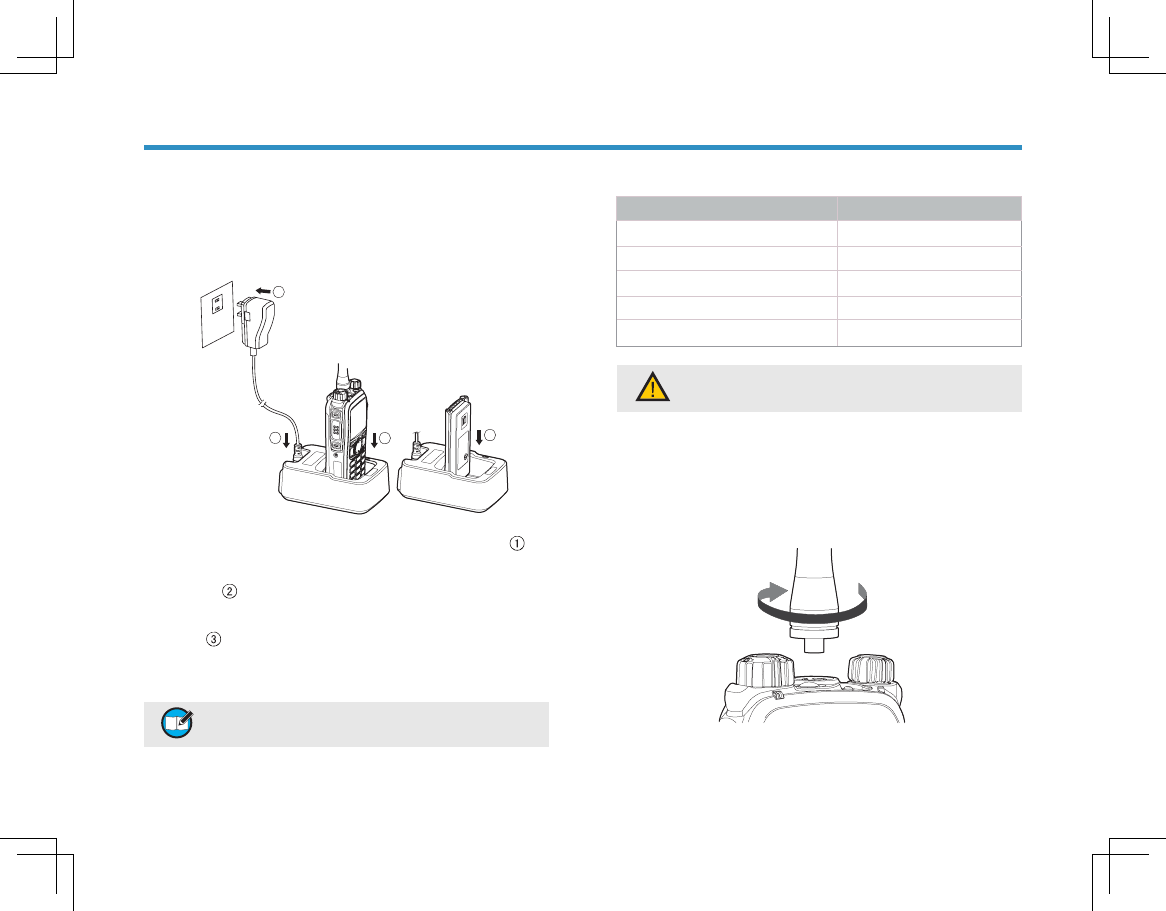
Charging the Battery
Charging the Battery
Use only the charger and battery specified by Hytera.
Charger LED can indicate the charging progress.
Charge Diagram
Charge Diagram
Procedures
Procedures
1. Connect the power adapter to AC source. See arrow ķ.
2. Plug the power adapter into the rear socket of the
charger. See arrow ĸ.
3. Place the radio with the battery attached, or the battery
alone, into the charger.
4. The charging process initiates when LED glows red,
and is completed when LED glows green.
Before Use
Before Use
4UZK :UGINOK\KUVZOSGRHGZZKX_VKXLUXSGTIK
VRKGYKINGXMKZNKHGZZKX_LUXNU[XYHKLUXK
OTOZOGR[YK
Charge Indicator
Charge Indicator
LED Indicator Charge Status
LED fl ashes red slowly. Standby (no load)
LED glows red. Charging
LED glows orange. 90% charged
LED glows green. Fully Charged
LED fl ashes red rapidly. Failure
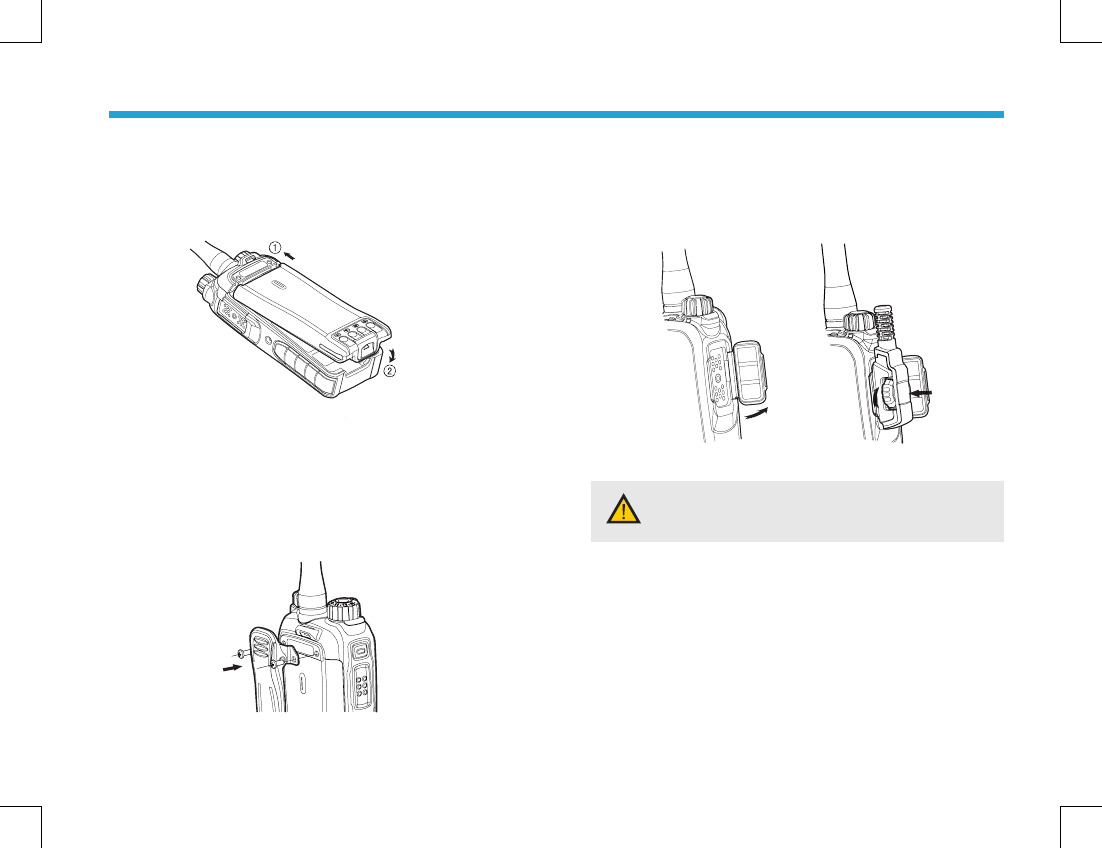
Assembly and Disassembly
Assembly and Disassembly
Attaching the Antenna
Attaching the Antenna
Turn the antenna clockwise to fasten it.
To remove the antenna, rotate it counter-clockwise.
)G[ZOUT (KY[XKZUXKGJZNK9GLKZ_/TLUXSGZOUT
(UUQRKZZUMKZTKIKYYGX_YGLKZ_OTLUXSGZOUT
1
23
3
6
Attaching the Battery
Attaching the Battery
1. Insert the battery into top of the radio. See arrow ķ.
2. Slightly press the bottom of the battery until a click is
heard. See arrow ĸ.
To remove the battery, turn off the radio fi rst. Then slide
the battery latch upwards to unlock the battery.
Attaching the Belt Clip
Attaching the Belt Clip
1. Remove the screws;
2. Align the screw holes on the belt clip with those on the
radio’s body, and then tighten the screws.
To remove the belt clip, loosen the screws.
Attaching AudioAccessoy/Programming Cable
Attaching AudioAccessoy/Programming Cable
1. Open the accessory jack cover as the arrow shown.
2. Align the plug with the accessory jack.
3. Tighten the screw on the plug.
To remove accessories, loosen the screw.
)G[ZOUT =NKT_U[GXK[YOTMGTK^ZKXTGR
GIIKYYUX_]GZKXVXUULVKXLUXSGTIKULZNKXGJOU
SG_MKZGLLKIZKJ
Before Use
Before Use
7
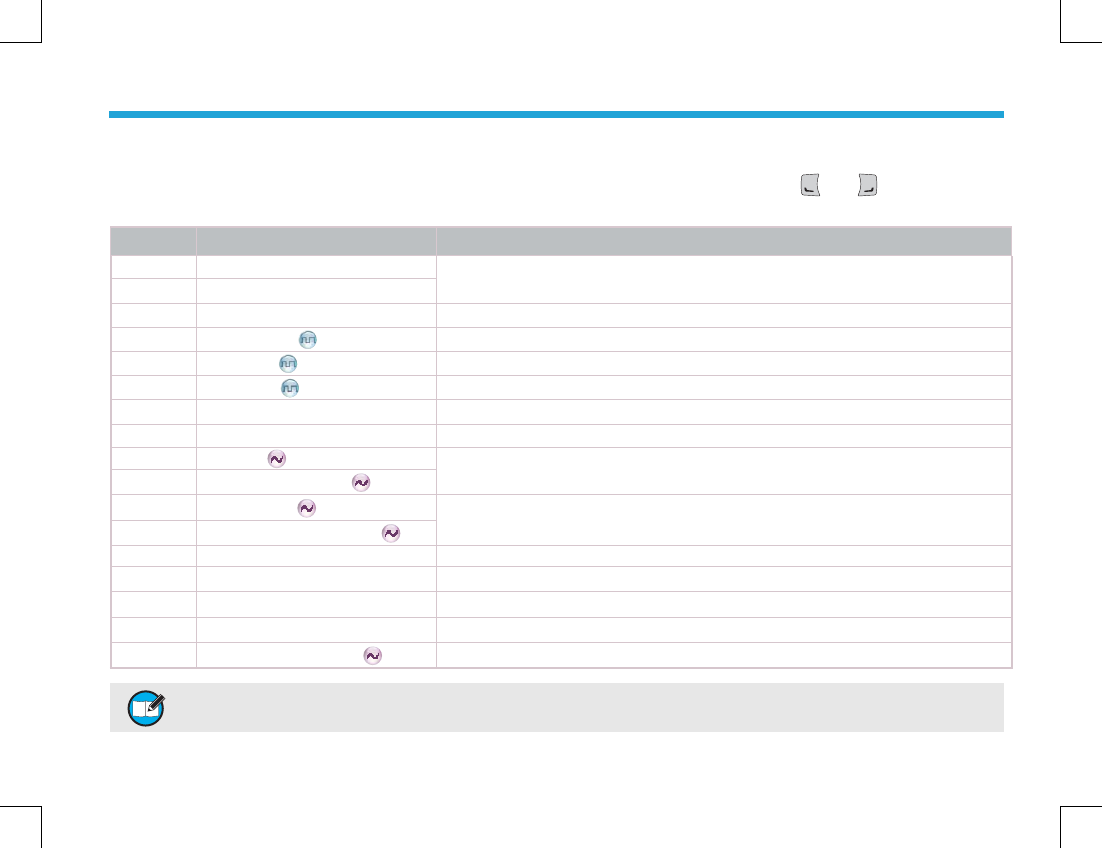
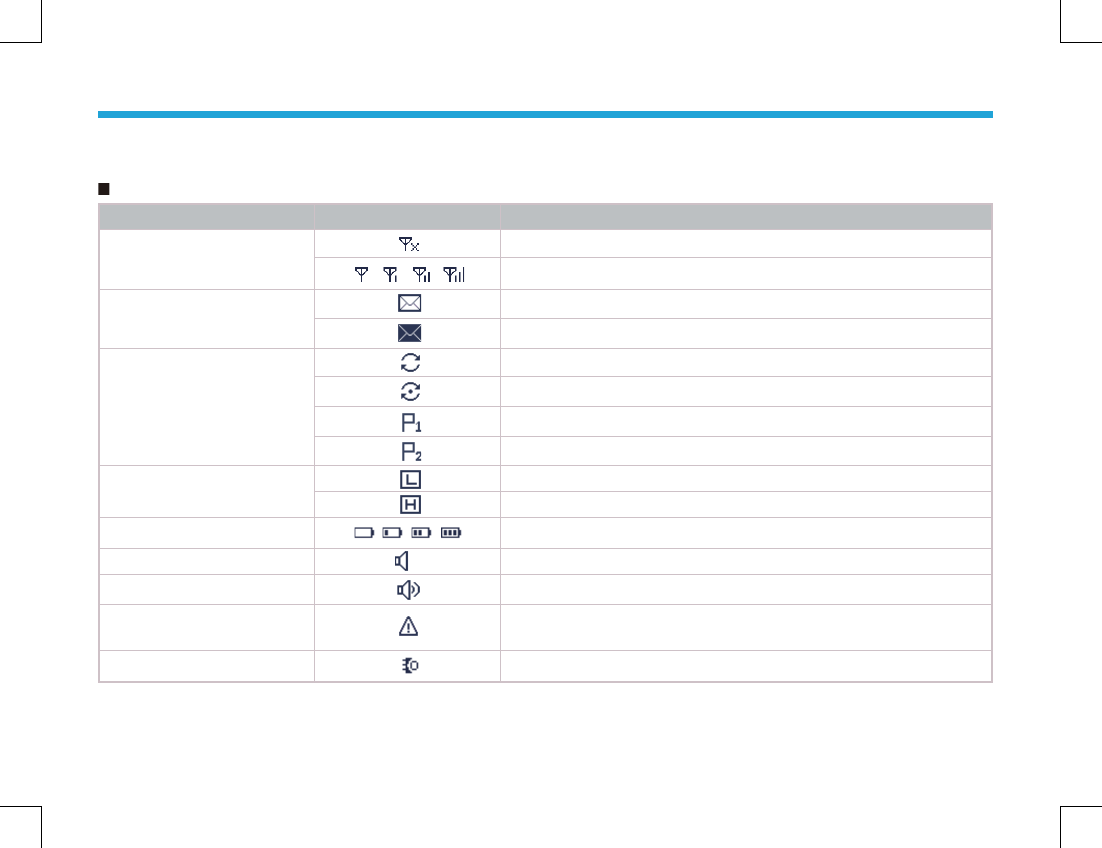
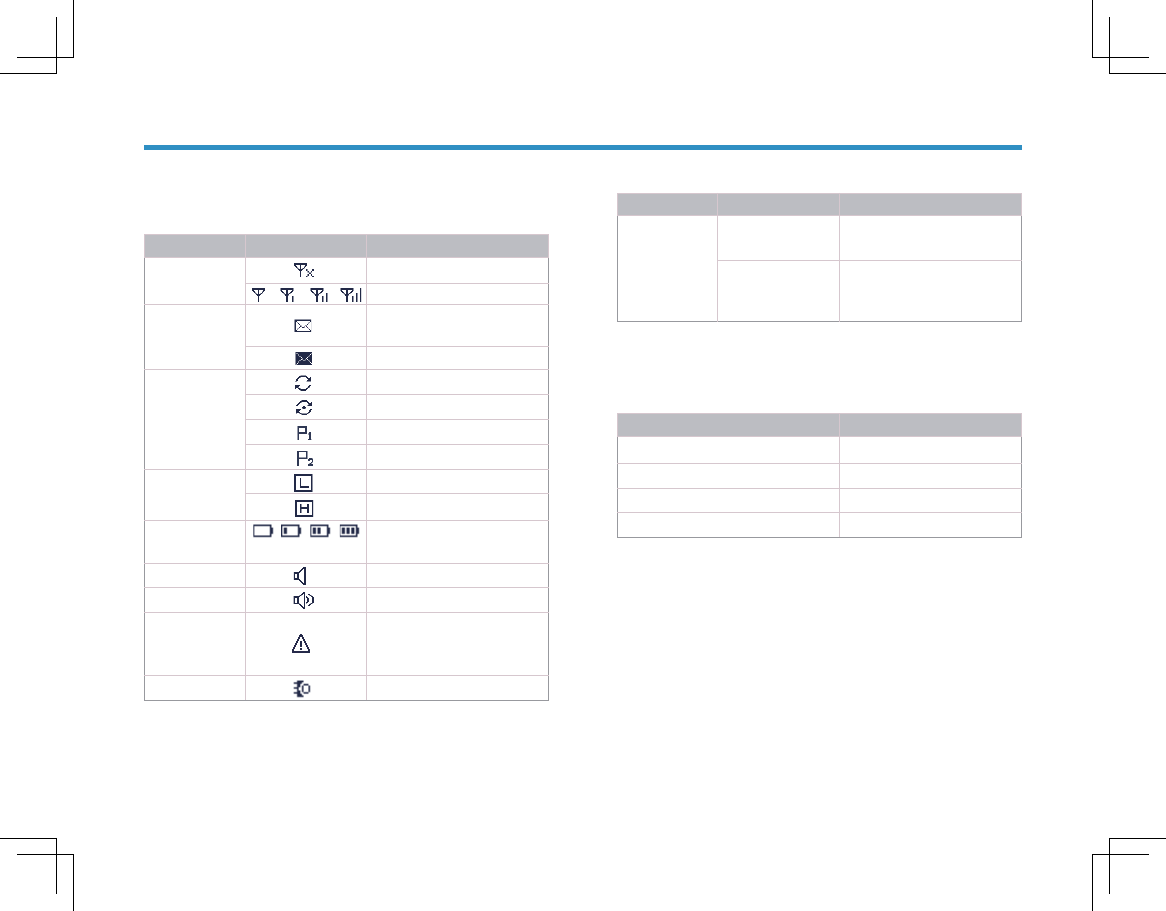
LCD Icons
LCD Icons
Status Icons
Status Icons
Icon Name Icon Radio Status
RSSI
No signal;
More bars indicate better signal strength;
Message Icons
New Message/Unread Message;
InBox is full;
Scan Icons
Scanning is in progress;
Scanning pauses on a non-priority channel;
Scanning pauses on Priority Channel 1;
Scanning pauses on Priority Channel 2;
Tx Power Icons Low Tx power for the current channel;
High Tx power for the current channel;
Battery Strength Icons More bars indicate more battery power;
Monitor Icon The feature “Monitor” is active;
Speaker Icon The speaker is unmuted;
Emergency Icon The Emergency mode (other than secret emergency) is active
or an emergency message is received
Accessory Icon An accessory is connected;
Status Indicators
Status Indicators
8
Operation Mode Icons
Operation Mode Icons
Icon Name Icon Operation Mode
Operation Mode Icons
DM Direct Mode Operation: Under this mode, radios communicate with
each other directly.
RM Repeater Mode Operation: Under this mode, radios communicate
with each other via a repeater.
LED Indicator
LED Indicator
The top LED indicator will help you easily identify current radio status.
LED Indicator Radio Status
LED fl ashes green. Powering on
LED glows red. Transmitting
LED glows green. Receiving
LED fl ashes orange. Scanning
Status Indicators
Status Indicators
9
Turning the Radio On/Off
Turning the Radio On/Off
Rotate the Radio On-Off/Volume Control knob clockwise/
counter-clockwise until a click is heard to turn the radio
on/off.
Adjusting the Volume
Adjusting the Volume
After turning the radio on, rotate the Radio On-Off/
Volume Control knob clockwise to increase the volume,
or counter-clockwise to decrease the volume.
Selecting a Zone
Selecting a Zone
A zone is a group of channels exhibiting the same
property, and is programmed by your dealer. The radio
supports up to 32 zones, each with a maximum of 16
channels. You may select a zone through any of the
following methods:
1. Through menu selection
Go to the menu “Zone”, and use the Up/Down keys to
select your desired zone.
2. Through the function keys
You may quickly toggle to your desired zone by
pressing the programmed Zone Up or Zone Down
key.
Basic Operations
Basic Operations
Selecting a Channel
Selecting a Channel
Rotate the Channel Selector knob to select a desired
channel.
Digital/Analog Switch
Digital/Analog Switch
Each channel can be programmed as either analog
channel or digital channel. If the current zone includes
both analog and digital channels, you may quickly switch
between digital and analog through the Channel Selector
knob.
Locking/Unlocking the Keypad
Locking/Unlocking the Keypad
When the keypad is not in use, you can lock the keypad to
prevent accidental keypad operation. Three methods are
available for you to lock or unlock the keypad:
1. Through key combination
Use “OK+” to lock or unlock the keypad.
2. Through the function key
Press the programmed Keypad Lock key to lock or
unlock the keypad.
4UZK =NKT1K_VGJ'[ZU2UIQOYKTGHRKJ
ZNKQK_VGJ]ORRHKRUIQKJG[ZUSGZOIGRR_OLTU
UVKXGZOUTOYSGJKLUXZNKVXKYKZZOSKVKXOUJ
10
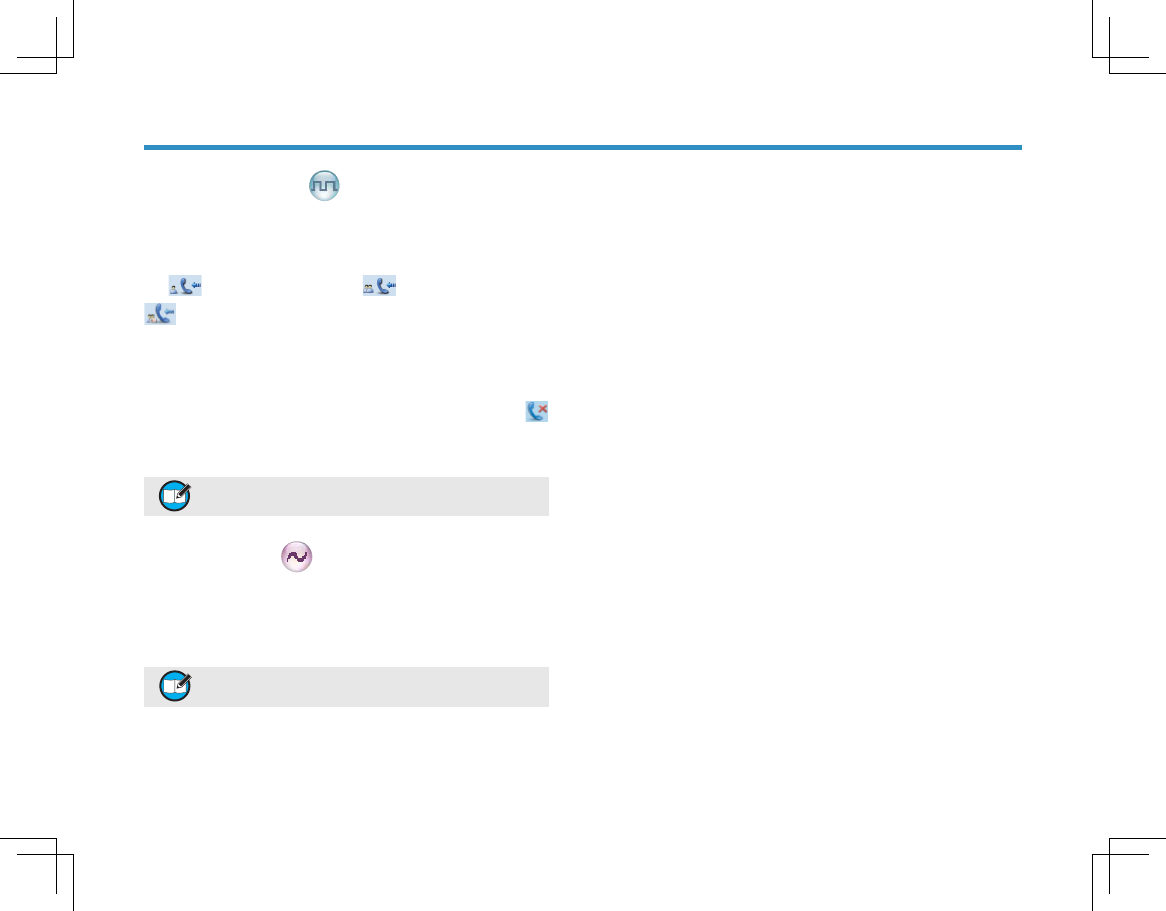
Transmitting a Private Call
Transmitting a Private Call
You may transmit a Private Call through any of the
following methods. When transmitting a Private Call, the
icon will appear.
Transmitting a call to the preset contact
In standby mode, pressing PTT key will transmit an
individual call to the contact (a Private Call number) preset
for the current channel.
Transmitting a call through Contact List or Call Logs
1) Go to Contact -> Contact List, or go to Call Logs ->
Call List.
2) Use the Up/Down key to select the Private Call
number you want to call.
3) Hold down PTT key to transmit a Private Call to the
selected contact.
Transmitting a call through Manual Dial
1) Go to Contact -> Manual Dial.
2) Input a Private Call number you want to call.
3) Press PTT key to transmit a call.
3. Through menu selection
Go to Settings -> Radio Setting -> Keypad Lock, and
then select Enable or Disable.
Enable: The keypad will be locked automatically if no
operation is made for the preset time period.
Disable: The keypad will not be locked automatically.
However, you can lock or unlock the keypad via the
key combination or Keypad Lock key mentioned
above.
Call
Call
4UZK ?U[XJKGRKXSG_VXKYKZGIUTZGIZLUXKGIN
JOMOZGRINGTTKR:NKVXKYKZIUTZGIZIU[RJHKG
6XO\GZK)GRRT[SHKXG-XU[V)GRRT[SHKXUXGT
'RR)GRRT[SHKX
Basic Operations
Basic Operations
11
Receiving and Responding to a Call
Receiving and Responding to a Call
Receiving a Call
When a call is received, your radio will display the
corresponding icon as follows: for a Private Call,
for a Group Call and for an All Call.
Responding to a Private/Group Call
After a Private Call or Group Call is received, you may
press the PTT key within the preset time period to call
back.
If you do not respond to a received Private Call, the radio
will display the missed call icon .
Calls on Analog Channels
Calls on Analog Channels
To transmit on an analog channel, hold down the PTT and
speak into the microphone. To receive, release the PTT.
Transmitting a Group Call
Transmitting a Group Call
You may transmit a Group Call through any of the
following methods. When transmitting a Group Call, the
icon will appear.
Transmitting a call to the preset contact
In standby mode, pressing PTT will transmit a Group Call
to the contact (a Group Call number) preset for the current
channel.
Transmitting a call through Contact List
1) Go to Contact -> Contact List.
2) Use the Up/Down key to select the Group Call
number you want to call.
3) Hold down PTT to transmit a Group Call to the
selected contact.
Transmitting an All Call
Transmitting an All Call
Methods are the same as those in Transmitting a Group
Call. When transmitting an All Call, the icon will
appear.
4UZK ?U[IGTZXGTYSOZGT'RR)GRRUTR_]NKTOZOY
KTGHRKJH__U[XJKGRKX
4UZK ?U[IGTTUZXKYVUTJZUGT'RR)GRR
4UZK :UKTY[XKGTUVZOSGR\UR[SKLUXZNK
XKIKO\OTMXGJOUNURJZNKXGJOUGVVXU^OSGZKR_
ZUIKTZOSKZKXYG]G_LXUS_U[XSU[ZNJ[XOTM
ZXGTYSOYYOUT
Call
Call
12
Contact
Contact
To access this item, press Menu key in idle mode and
then select “Contact”.
Contact List
Contact List
You can save up to 200 entries in the list. To access this
item, select “Contact -> Contact List” or press the shortcut
key for Contact List.
Menu Navigation
Menu Navigation
Main Menu
Con tact
Message
Call Logs
Scan
Zone
Settings
Editing a Contact
You can edit the number and alias of each Private Call
contact.
Viewing a Contact
You can view details of each contact.
Deleting a Contact
You can delete a Private Call contact. However, please
note that you can not delete the contact when there is only
one entry left in the list. In addition, the private contact
preset on the digital channel cannot be deleted.
New Contact
New Contact
You can add a Private Call contact to the contact list. The
number and alias of each contact must be unique, and the
available number range is 1-16776415.
Manual Dial
Manual Dial
You can manually input the private call number for calling.
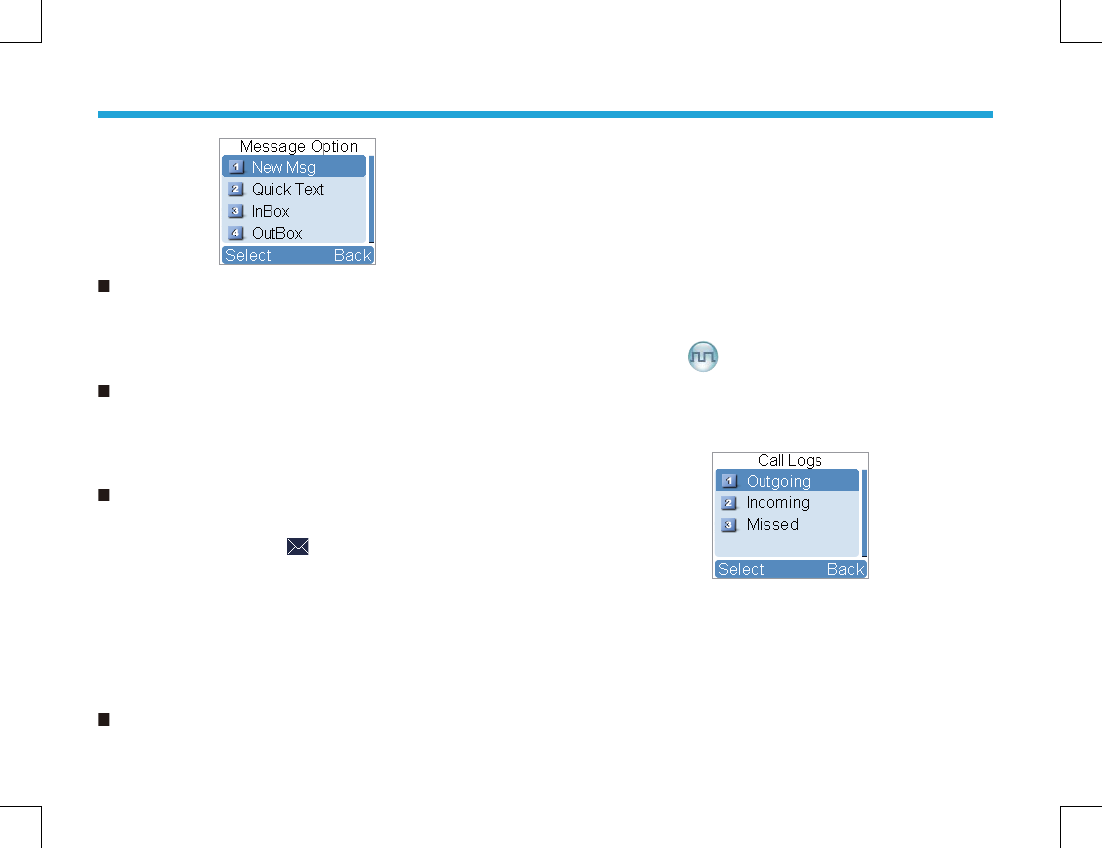
Message
Message
To access this item, press the Menu key in idle mode
and then select “Message”, or press the shortcut key for
Message directly.
13
New Msg
New Msg
You can create your desired text message (256 characters
at most) and send it to an individual user or to a talk
group.
Quick Text
Quick Text
Under this option there are some text messages (10
entries at most) preset by your dealer. You can choose to
edit and send any entry.
InBox
InBox
The InBox can save up to 20 received messages. When
the InBox is full, the icon will appear, and the oldest
entry will be overwritten by the latest one automatically.
For each message, you can choose to perform any of
these operations: Reply, Forward, View Details and
Delete.
To delete all messages in the InBox, select “Message ->
InBox -> Delete All”.
OutBox
OutBox
The OutBox can save up to 20 sent messages. When the
OutBox is full, the oldest entry will be overwritten by the
latest one automatically.
For each message, you can choose to perform any of
these operations: Reply, Forward, View Details and
Delete.
To delete all messages in the OutBox, select “Message ->
OutBox -> Delete All”.
Call Logs
Call Logs
To access this item, press the Menu key in idle mode and
then select “Call Logs”, or press the shortcut key for Call
Logs directly.
This radio can save up to 10 entries in the Outgoing List,
Incoming List and Missed List respectively. When the
memory for call logs is full, the oldest entry will be over-
written by latest one automatically.
After accessing a list and selecting an entry, you can
perform any of these operations: hold down the PTT key
Menu Navigation
Menu Navigation
14
to initiate a call; add it to Contact List; or delete it.
To delete all entries in Outgoing List, Incoming List or
Missed List at a time, select “Call Logs -> Outgoing /
Incoming /Missed -> Delete All”.
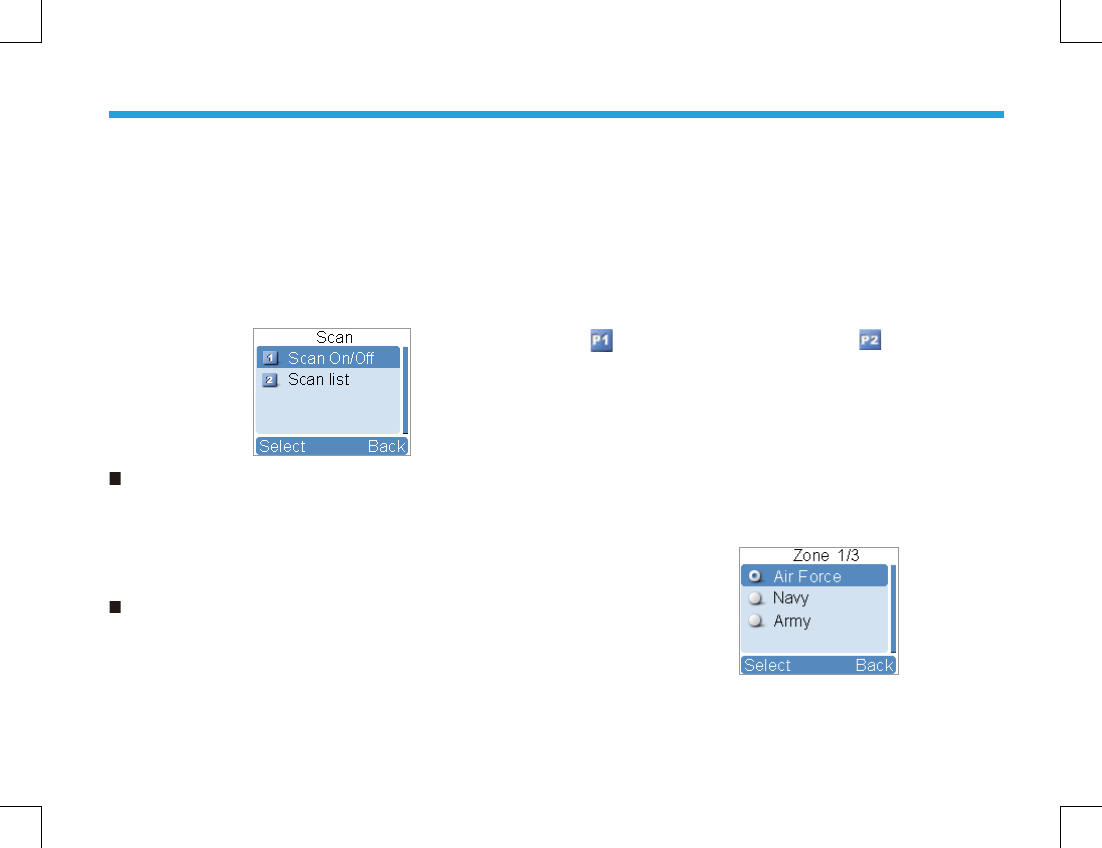
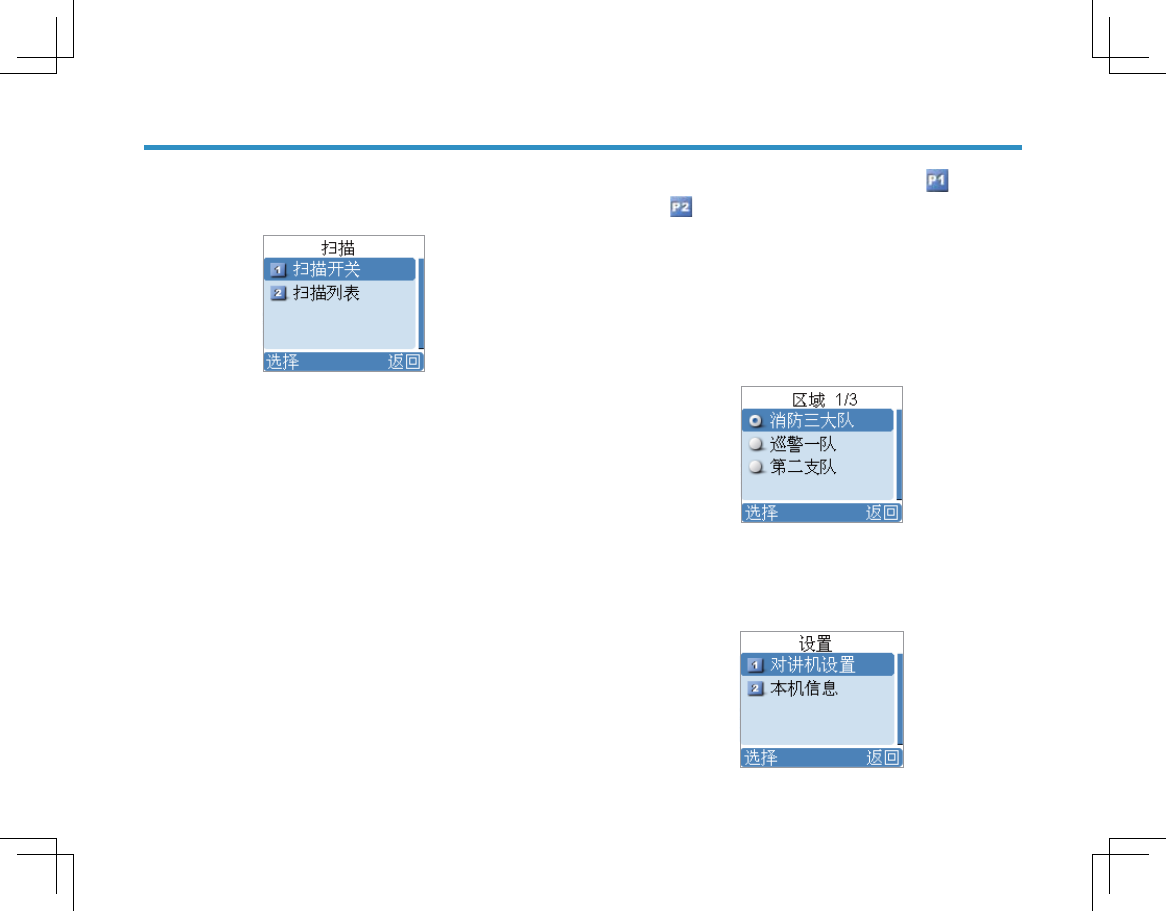
Scan
Scan
To access this item, press the Menu key in idle mode and
then select “Scan”.
Scan On/Off
Scan On/Off
The function “Scan” allows you to listen to communication
activities on other channels so that you can keep a close
track of your team members. This option is used to enable
or disable the function.
Scan List
Scan List
You can request your dealer to create a scan list for each
channel. Each list may contain 32 channels at most (either
digital channel or analog channel is OK). After accessing
the list, you can perform any of the following operations:
Adding a Channel
To include a new channel into the active scan list.
Editing Priority Channel
To set the selected channel as a non-priority or as a
priority channel. If you are interested in activities on a
channel, you can set it as a priority channel, which will be
scanned more frequently than a non-priority channel.
Each scan list may contain two priority channels at most.
indicates priority channel 1, and indicates priority
channel 2.
Deleting a Channel
To remove a channel from the active scan list. However,
the fi rst channel in the list can not be deleted.
Zone
Zone
To access this item, press the Menu key in idle mode and
then select “Zone”.
This radio supports up to 32 zones. You can use this menu
to select your desired zone.
Menu Navigation
Menu Navigation
15
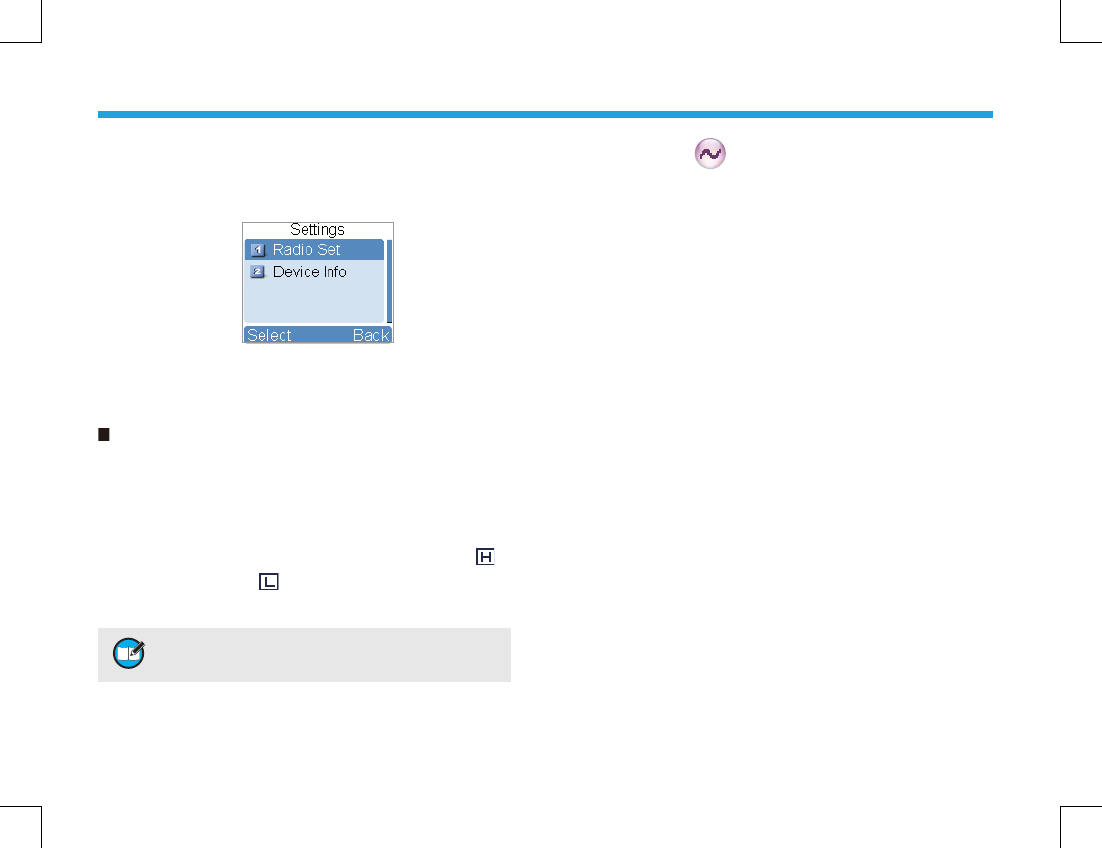
Settings
Settings
To access this item, press the Menu key in idle mode and
then select “Settings”.
You can optimize your radio performance by customizing
related parameters according to actual needs and your
preferences.
Radio Set
Radio Set
Power Level
This option allows you to set transmit power level.
Alternatively, you can change the power level by pressing
the shortcut key for Adjust Power Level in idle mode.
There are two levels available: High (indicated by )
and Low (indicated by ). High power level enables you
to communication with farther team members.
4UZK 6U]KXRK\KRYNU[RJHKYKZLUXKGININGTTKR
OTJO\OJ[GRR_
Squelch Level
This option allows you to select an appropriate squelch
level. Alternatively, you can change the squelch level by
pressing the shortcut key for Adjust Squelch Level in idle
mode. There are three levels available: Tight, Normal and
Open.
The default squelch level is “Normal”, and generally used
in low noise environment.
Generally, “Tight” is used in high noise environment.
It requires stronger signal for the radio to unmute. If
the squelch level is set to Open, the speaker will keep
unmuted irrespective of the satisfaction of decoding
conditions.
Language
To set the language in which all interface information is
displayed. At the moment, this radio only supports two
languages: Simplifi ed Chinese and English.
Backlight
To set the backlight parameters. There are three options
available: On, Off and Timer. The timer is programmed by
your dealer. Available range: 5-60 seconds.
Brightness
To set the display brightness. You can increase or lower it
using the Up or Down key.
Menu Navigation
Menu Navigation

16
Keypad Lock
To set whether to enable this function. When “Enable” is
selected, you can use the Up or Down key to set the time
range after which the keypad will be locked. Available
range: 5-60 seconds.
LED
To set whether to enable LED indication.
Tone
To set tones for your radio. You can set the following
tones:
Radio Silent: to set whether the radio will give tone
indication. If Silent On is selected, all alerts will be off.
Talk Permit: to set whether the radio will give tone
indication for transmission. The following options are
available: Disable (the radio does not give any tone
indication for transmission); Digital Only (the radio gives
tone indication for transmission on the digital channel
only), Analog Only (the radio gives tone indication for
transmission on the analog channel only), and Enable (the
radio gives tone indication for transmission on both analog
and digital channels).
Private Ring: to set whether the radio will give tone
indication when the radio receives a private call.
TextMsg Ring: to set whether the radio will give tone
indication when the radio receives a message.
Keypad: to set whether the radio will give tone indication
when you are making keypad operations.
Device Info
Device Info
With this option, you can view the basic information of
your radio, including serial number, radio model, frequency
range, fi rmware version and etc.
Menu Navigation
Menu Navigation
17
Home Screen
Home Screen
The feature allows you to quickly return to the previous
menu or the home screen.
Operation:
In the editing screen, press the programmed Home Screen
key, and the radio exits the screen and returns to the
previous menu immediately; in other screens, press the
key, and the radio returns to the home screen immediately.
Scan
Scan
The feature “Scan” allows you to listen to communication
activities on other channels so that you can keep a close
track of your team members.
Operation:
1. To enable the feature, you can select “On” from the
menu “Scan”; or
Press the programmed Scan key in standby mode; or
Switch to a channel for which the feature “Auto Scan”
is enabled via the programming software.
2. After the feature is enabled, your radio will scan
according to the scan list set for the channel on which
scanning starts. The scanning process is as follows:
During scanning, LCD displays icon , and LED
fl ashes orange.
Functions and Operations
Functions and Operations
When activities are detected on a channel, the radio
will stay on the channel to receive current activities.
If your radio stays on a non-priority channel, LCD will
display icon ; if on Priority Channel 1 or Priority
Channel 2, LCD will display icon or icon
respectively.
If you don’t want to hear activities on the channel,
press the programmed Nuisance Temporary
Delete key to remove the channel from the scan list
temporarily.
If you want to continue staying on the channel, press
the programmed Monitor or Squelch Off key during
scan stay.
To exit the scanning process, you can select “Off” from the
menu “Scan”, or press the programmed Scan key again.
Talk Around
Talk Around
You can continue to communicate in DM mode by pressing
the programmed Talk Around key, when your repeater
malfunctions, or when your terminal is out of the repeater’
s range but within talking range of other terminals.
Operation:
Press the programmed Talk Around key to switch
between DM mode and RM mode.
18
Monitor
Monitor
To adjust match conditions for signal receiving, you can
enable the feature “Monitor”.
Operation:
Press the programmed Monitor key to enable the
feature, and the radio displays icon. To disable the
feature, press this key again.
Hold down the programmed Monitor Momentary key
to enable the feature, and the radio displays icon.
To disable the feature, release this key.
Squelch Off
Squelch Off
If the feature “Squelch Off” is enabled, your radio’s
speaker will keep unmuted no matter whether carrier is
present.
Operation:
Press the programmed Squelch Off key to enable the
feature. Then the radio displays icon and sounds
background noise. To disable the feature, press this
key again.
Press the programmed Squelch Off Momentary key
to enable the feature. Then the radio displays icon
and sounds background noise. To disable the feature,
release this key.
Emergency
Emergency
In case of an emergency, you can use the feature to
ask for help from your companion or control center. The
Emergency process has the highest priority. You can make
emergency operation even when your radio is transmitting
or receiving.
To enable the feature on a channel, an emergency system
must be assigned to the channel via the programming
software. In addition, the Emergency type and Emergency
mode are settable via the programming software.
Emergency Type
For each Emergency mode, there are four Emergency
types available. You can select one of them via your
dealer:
Functions and Operations
Functions and Operations
19
Emergency Type Description
Siren Only In Emergency mode, the radio will sound shrill alarm tone and display the icon .
Regular In Emergency mode, the radio will give audible and visible indication.
Silent In Emergency mode, the radio won't give any audible or visible indication.
Silent with Voice In Emergency mode, the radio won’t give any audible or visible indication, but will receive voice ACK
from the companion or control center automatically.
Emergency Mode
Your radio supports three Emergency modes. You can select one of them via your dealer (Note: For the following operation
methods, we take the “Regular” type as an example).
Emergency Mode Description
Emergency Alarm
In this mode, you can send alarm information to your companion or control center by pressing
the programmed Emergency key, but you cannot talk with them.
Emergency Alarm with
Call
In this mode, you can send alarm information by pressing the programmed Emergency
key. When icon appears, you can speak into the microphone, allowing your voice and
background noise to be transmitted automatically (you do not need to hold down the PTT key).
Emergency Alarm with
Voice to Follow
In this mode, press the Emergency key to go to the Emergency Revert Channel. When icon
appears, you can speak into the microphone, allowing your voice and background noise to
be transmitted automatically (you do not need to hold down the PTT key).
Functions and Operations
Functions and Operations
20
3. When icon appears, your radio is receiving. When
a call is received, iconappears.
Two methods are available for you to exit the
Emergency mode:
1. After the preset Alarm Cycles and Voice Cycles expire,
the radio will exit the Emergency mode automatically.
2. Long press the programmed Emergency key.
Operation Methods for Digital Emergency
Emergency Alarm with Voice to Follow
Operation:
1. Press the programmed Emergency key to go to the
Emergency Revert Channel, and the radio displays the
icon .
2. When the icon appears, you can speak into the
microphone to make an emergency call.
3. When the icon appears, your radio is receiving.
When a call is received, icon appears.
If the preset Voice Cycles expire, you can press the
PTT key to make the emergency call again (the radio
Operation Methods for Analog Emergency
Emergency Alarm
Operation: Press the programmed Emergency
key to send alarm information. The radio displays icon
and text information “Sending Alarm!”, with LED
glowing red. If “Local Emergency Alarm” is enabled via the
programming software, an alarm tone will sound.
Two methods are available for you to exit the Emergency
mode:
1. Once the Alarm Cycles expire, the radio will exit the
Emergency mode automatically.
2. Long press the programmed Emergency key.
Emergency Alarm with Call
Operation:
1. Press the programmed Emergency key to send
alarm information. The radio displays icon and
text information “Sending Alarm!”, with LED glowing
red. If “Local Emergency Alarm” is enabled via the
programming software, an alarm tone will sound.
2. When icon appears, you can speak into the
microphone to make an emergency call.
4UZK ?U[XJKGRKXSG_YKZZNKT[SHKXULGRGXS
I_IRKYGRGXSJ[XGZOUTT[SHKXUL\UOIKI_IRKY
J[XGZOUTULKGINZXGTYSOYYOUTGTJ:^OTZKX\GR
Functions and Operations
Functions and Operations
21
displays the icon , with LED glowing red). After the
emergency call is transmitted, please release the PTT key
to receive (the radio displays icon ). When a call is
received, icon appears.
To exit the Emergency mode, long press the programmed
Emergency key.
Busy Channel Lockout
Busy Channel Lockout
If enabled via the programming software, this feature
can prevent your radio interfering with other transmitting
terminals on the same channel. If you hold down the
PTT key while the channel is in use, your radio will keep
beeping and display text information “Channel Busy”,
alerting you to transmission prohibition. To stop beeping,
please release the PTT key. When the channel is free, you
can press and hold down the PTT key to transmit.
Time-out Timer (TOT)
Time-out Timer (TOT)
The purpose of TOT is to prevent any user from occupying
a channel for an extended period. If the preset time
expires, the radio will automatically terminate transmission
4UZK ?U[XJKGRKXSG_YKZZNKT[SHKXUL\UOIK
I_IRKYJ[XGZOUTULKGINZXGTYSOYYOUTGTJ:^
OTZKX\GR
and keep beeping. To stop beeping, please release the
PTT key. You must wait for a certain time period (preset by
your dealer) before you can press and hold down the PTT
key to transmit again.
If the pre-alert function is set by your dealer, your radio will
alert you to the TOT expiration in advance.
4UZK :NOYLKGZ[XKOYT[RROT+SKXMKTI_SUJK
Functions and Operations
Functions and Operations
22
Phenomena Analysis Solution
The equipment can
not be powered on.
The battery may be improperly installed. Remove the battery and attach it again.
The battery may run out. Recharge or replace the battery.
The battery may suffer from poor contact
caused by dirtied or damaged battery
contacts.
Clean the battery contacts. If the problem can not
be solved, contact your dealer or authorized service
center for inspection and repair.
During receiving
signals, the voice
is weak,
discontinuous or
totally inactive.
The battery strength may be too low. Recharge or replace the battery.
The volume may be set to a low level. Increase the volume.
The antenna may get loose or may be
improperly installed. Power off the radio, and re-install the antenna.
The speaker may be blocked or damaged.
Clean surface of the speaker. If the problem can not
be solved, contact your dealer or authorized service
center for inspection and repair.
You can not
communicate with
other members.
The frequency or signaling may be
inconsistent with that of other members.
Set your TX/RX frequency and signaling to the same
as that of other members.
The channel type (digital/analog) may be
set inconsistently.
Make sure all members are on the same digital/
analog channel.
You may be too far away from the group
members. Move towards other members.
Irrelevant
communications or
noises are heard
on the channel.
You may be interrupted by radios using the
same frequency. Change the frequency, or adjust the squelch level.
The radio may not be set with any signaling. Set signaling for all member radios to avoid
interference at the same frequency.
Troubleshooting
Troubleshooting
23
The noise is too
loud.
You may be too far away from other
members. Move towards other members.
You may be at an unfavorable position.
For example, your communication may be
blocked by high buildings or frustrated in the
underground areas.
Move to an open and fl at area, and restart the radio.
You may suffer from external disturbance
(such as electromagnetic interference).
Stay away from equipment that may cause
interference.
If the above solutions can not fi x your problems, or you may have some other troubles, please contact us or your local dealer
for more technical support.
Care and Cleaning
Care and Cleaning
To guarantee optimal performance as well as a long service life of your radio, please follow the tips below.
Troubleshooting & Care and Cleaning
Troubleshooting & Care and Cleaning
Radio Care
Radio Care
Do not pierce or scrape the radio with any edged instruments or hard objects.
Keep the radio far away from substances that can corrode the electronic circuit.
Do not hold the radio by its antenna or headset cable directly.
Attach the accessory jack cover when the radio is not in use.
Radio Cleaning
Radio Cleaning
Clean up the dust and fi ne particles on the radio surface and charging piece with a clean and dry lint-free cloth or a brush
regularly.
Use neutral cleanser and a non-woven fabric to clean the keys, control knobs and front case after long-time use. Do not use
chemical preparations such as stain removers, alcohol, sprays or oil preparations, so as to avoid surface case damage.
Make sure the radio is completely dry before use.
Caution: Power off the radio and remove the battery before cleaning.
24
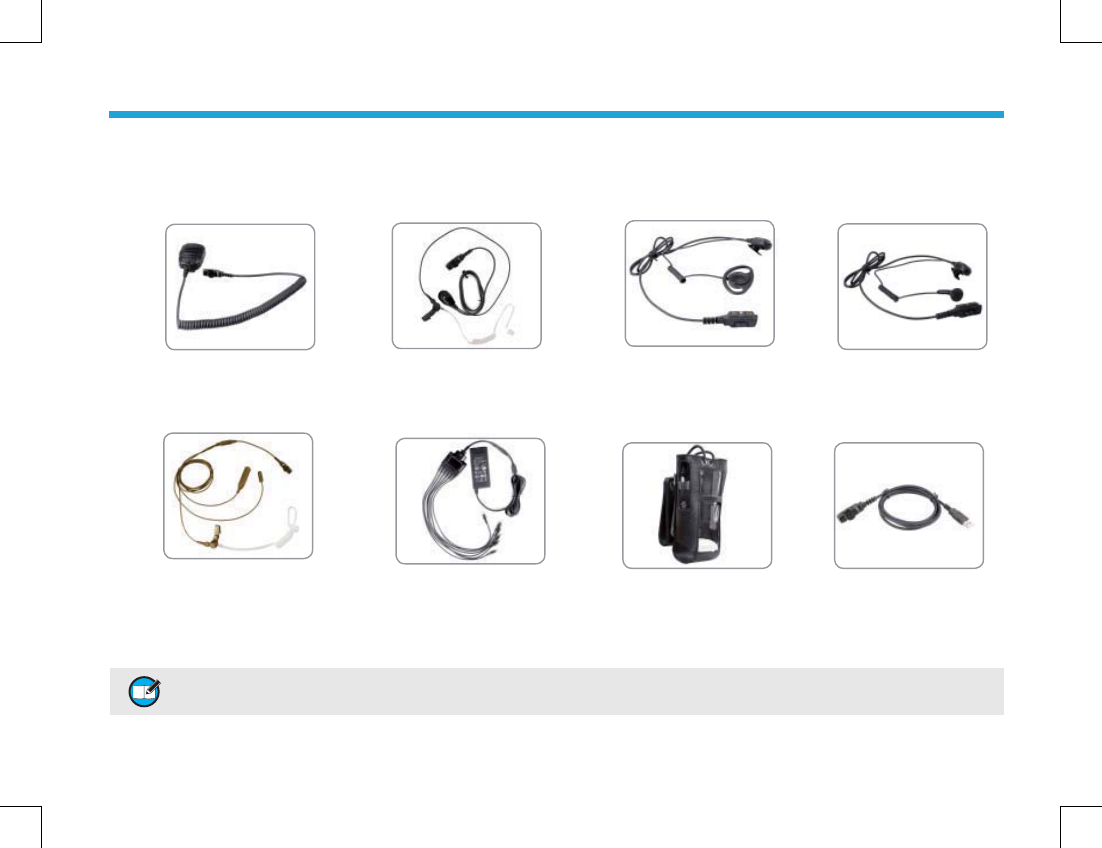
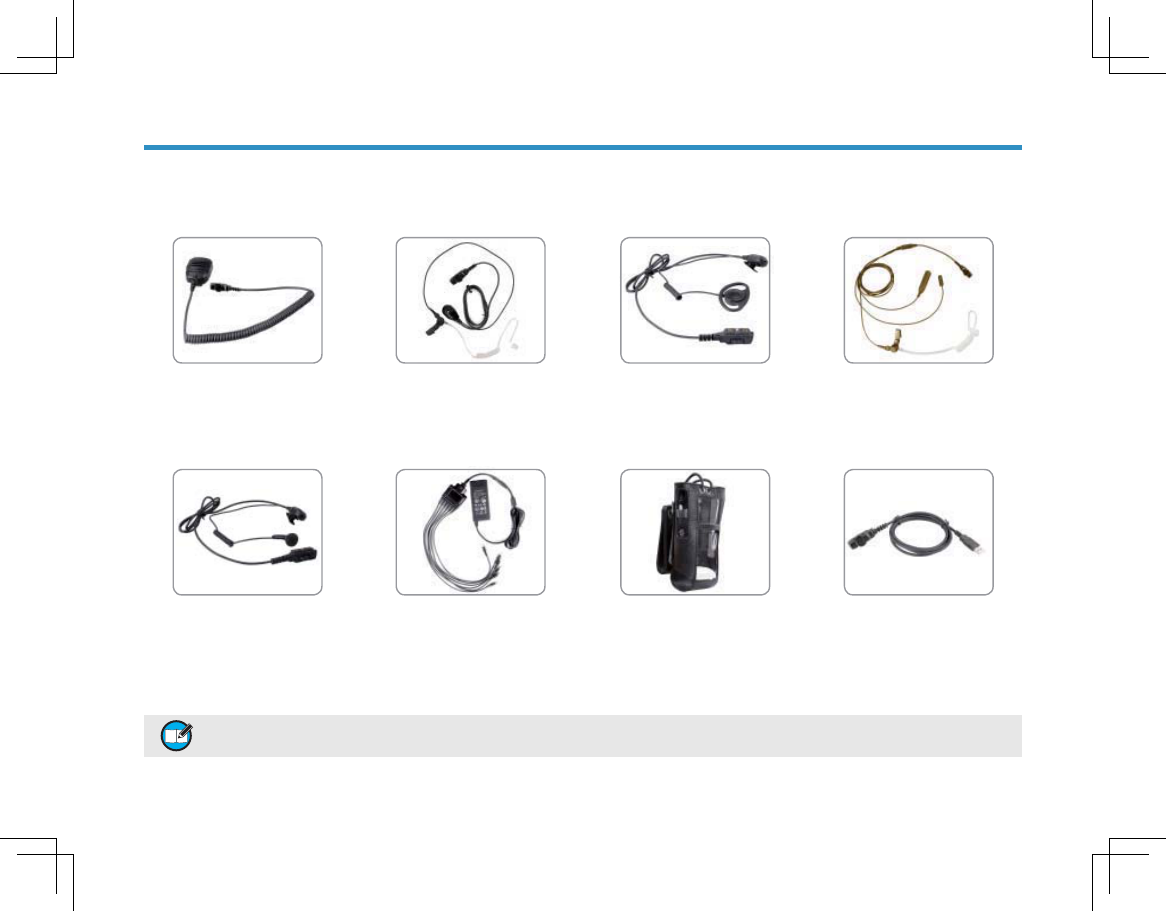
The following items are the main optional accessories for the radio, and please consult your local dealer for more other
accessories.
Remote Speaker Microphone
(IP57) SM18N2
Earpiece with On-MIC PTT &
Transparent Acoustic Tube EAN16
D-earset with In-Line
Microphone EHN12
Earbud with On-MIC PTT
ESN10
3-Wire Surveillance Earpiece
with Transparent Acoustic
Tube (beige) EAN17
Six-Unit Switching Power PS7002 Leather Carrying
Case (swivel) LCY002
Programming Cable (USB
Port) PC38
Optional Accessories
Optional Accessories
4UZK ;YKZNKGIIKYYUXOKYYVKIOLOKJH_ HyteraUTR_/LTUZHyteraYNGRRTUZHKROGHRKLUXGT_RUYYKYUXJGSGMKY
GXOYOTMU[ZUL[YKUL[TG[ZNUXO`KJGIIKYYUXOKY
25
You can enter aliases, numbers or messages using the
keypad. This radio supports the following input methods:
Chinese Pinyin (simplifi ed), English and Number.
Chinese Pinyin (Simplified)
Chinese Pinyin (Simplifi ed)
Operation:
1. Press to switch to Chinese Pinyin mode;
2. Enter the pinyin through alphanumeric keys; then
a list of possible combinations and corresponding
characters will appear;
3. Use the Up/Down key to choose the right pinyin;
4. Press the OK key to highlight the characters, and
choose the right character using the Up/Down key;
5. Press the OK key to enter the selected character.
You can repeat the above steps to continue.
English
English
Operation:
1. Press to switch to uppercase English or
lowercase English mode;
2. Enter the English letters through alphanumeric keys;
then a list of possible letters will appear;
3. Use the Up/Down key to choose the right letter;
4. Press the OK key to enter the selected letter.
You can repeat the above steps to continue.
Appendix: Input Method
Appendix: Input Method
Number
Number
Operation:
1. Press to switch to Number mode;
2. Enter the numbers through alphanumeric keys
to .
Special Character
Special Character
To enter common punctuations and special characters,
press .
To input a space, press .
4UZK ?U[IGT[YKZNK;V*U]TQK_ZUSU\K
ZNKI[XYUXRKLZ]GXJXOMNZ]GXJOTZNKKTZKXKJ
ZK^Z

㟈⫼᠋
䴲ᐌᛳ䇶ᙼՓ⫼ Hytera DMR᭄ᄫᇍ䆆ᴎDŽᴀѻકᰃ Hytera ᣝ✻DMRᷛޚ
㊒ᖗᠧ䗴ⱘ᭄ᄫᐌ㾘ᣕᴎDŽᔎⱘ᭄ᄫࡳ㛑ǃҎᗻ࣪ⱘ㾖䆒䅵ǃध䍞ⱘ䗮
ֵક䋼ˈᏺ㒭ᙼܼᮄⱘ᭄ᄫ䗮ֵԧ偠ˈՓᙼ▔⚜ⱘᏖഎゲѝЁ㜅乪㗠ߎʽ
Ўњ⹂ֱᙼ᳔䰤ᑺഄѿ⫼ᴀѻક᠔ᏺᴹⱘ乍߽֓ˈ䇋ѢՓ⫼ࠡ䆺㒚䯙䇏ℸ
䇈ᯢкljᅝֵܼᙃݠNJDŽ

ᷛ䇈ᯢ
ᷛ䇈ᯢ
ᴀ䇈ᯢкЁӮՓ⫼ҹϟᷛˈᷛНབϟ˖
Փ⫼ᦤ⼎ᷛ
Փ⫼ᦤ⼎ᷛ
⊼ᛣ˖㸼⼎ৃ㛑Ӯᤳണᇍ䆆ᴎⱘџ乍DŽ
⊼˖㸼⼎᳝ࡽѢᙼདഄњ㾷Փ⫼ᇍ䆆ᴎⱘ
џ乍DŽ
ࡳ㛑ऎߚᷛ
ࡳ㛑ऎߚᷛ
˖㸼⼎᭄ᄫֵ䘧⣀᳝ⱘࡳ㛑ˈা㛑᭄ᄫֵ䘧⫼DŽ
˖㸼⼎ᢳֵ䘧⣀᳝ⱘࡳ㛑ˈা㛑ᢳֵ䘧⫼DŽ
⫼ᷛऎߚⱘࡳ㛑᭄ᄫֵ䘧ᢳֵ䘧Ϟ䛑ৃՓ⫼DŽ
ᴃ䇁䇈ᯢ
ᴃ䇁䇈ᯢ
ᣝ䬂᪡
ᣝ䬂᪡
ⷁᣝ˖ᖿ䗳ᣝϟᑊᵒᓔDŽ
䭓ᣝ˖ᣝԣᑊֱᣕ乘㓪ⱘᣕ㓁ᯊ䯈˄咬䅸Ў⾦˅DŽ
ᣝԣ˖ϔⳈᣝԣ䆹ᣝ䬂DŽ
Ͼ
Ͼ
ϾᰃᇍऩϾ⫼᠋থ䍋িˈҙЏি㹿িϸϾ⫼᠋খϢ䗮
䆱DŽ
㒘
㒘
㒘ᰃऩϾ⫼᠋ᇍ㒘ݙⱘ᠔᳝⫼᠋থ䍋িˈᭈϾ㒘ⱘ᠔᳝
⫼᠋䛑খϢ䗮䆱DŽ
ܼ
ܼ
ܼᰃᇍֵ䘧Ϟ᠔᳝⫼᠋থ䍋ⱘিˈ⫼ѢথᏗ䳔㽕⫼᠋⡍
߿݇⊼ⱘ䞡㽕䗮ਞDŽ
䴭ా
䴭ా
䆹ᡔᴃৃⒸ䰸䖛ᑺⱘ㚠᱃ాໄˈ⫼Ѣ㾷އ䗮䆱䋼䞣ాໄ䯂
乬DŽ

བ䳔ֵᙃᇍᴀݠ᳝ӏԩᓎ䆂ˈ䖢䆓䯂៥Ӏ
ⱘ㔥キ˖KWWSZZZK\WHUDFQˈᢼᠧHyteraܡ䌍᳡
ࡵ⛁㒓DŽ
⠜ᴗֵᙃ
⠜ᴗֵᙃ
Hytera+<7Ў⍋㛑䖒䗮ֵ㙵ӑ᳝䰤݀ৌЁढҎ
⇥݅Ϫ⬠݊ᅗᆊഄऎⱘଚᷛ⊼ݠଚ
ᷛDŽ៥Ӏҙᇍ៥ৌⱘଚᷛঞѻકৡ⿄ѿ᳝᠔᳝ᴗˈᴀ
䇈ᯢкЁৃ㛑ᦤঞⱘ݊ᅗଚᷛѻકৡ⿄Ў㞾᠔᳝
㗙᠔᳝DŽ
ᴀݠҟ㒡ⱘѻકЁৃ㛑ࣙᣀᄬټѢݙᄬ݊ᅗၦҟ
Ёⱘ䅵ㅫᴎᑣDŽ
Hyteraᇍℸㄝᑣѿ᳝ⱘϧ᳝ᴗ߽
ফЁढҎ⇥݅݊ᅗᆊঞⳌ݇䰙⊩ⱘֱᡸDŽ
䌁фᴀѻકᑊϡᛣੇⴔ Hyteraҹᯢ⼎ᱫ⼎ᮍᓣ
䌁ф㗙ᥜќ᳝݇ℸㄝ⬉㛥ᑣⱘᴗⲞDŽ㒣 Hytera
џܜк䴶ᥜᴗˈӏԩӕϮǃ㒘㒛ϾҎϡᕫᇍ䅵ㅫᴎ
ᑣ䖯㸠ӏԩᔶᓣⱘࠊǃᬍǃᬷথǃড㓪䆥ডᎹ
DŽ
ܡ䋷ໄᯢ
ܡ䋷ໄᯢ
ᴀݠ㓪ࠊ䖛Ё∖ݙᆍⱘޚ⹂ᗻϢᅠᭈᗻˈԚ
ᇍѢৃ㛑ߎ⦄ⱘ䫭䇃⭣ⓣˈ
Hyteraϡᡓᢙӏԩ䋷ӏDŽ
⬅ѢᡔᴃⱘϡᮁথሩˈHyteraֱ⬭ϡќ䗮ⶹ㗠ᬍѻ
ક䆒䅵Ϣ㾘Ḑⱘᴗ߽DŽ㒣Hyteraџܜк䴶ᥜᴗˈϡᕫ
ҹӏԩᔶᓣᇍᴀݠ䖯㸠ࠊǃׂᬍǃ㗏䆥ᬷথDŽ
1
Ẕᶹࣙ㺙ݙ⠽ક
Ẕᶹࣙ㺙ݙ⠽ક
❳ᙝᴀᴎ
❳ᙝᴀᴎ
䚼ӊҟ㒡
ৃ㓪䬂
⫼ࠡޚ
⫼ࠡޚ
㒭⬉∴ܙ⬉
䰘ӊᅝ㺙
⢊ᗕᣛ⼎
⢊ᗕᣛ⼎
/&'ᷛ
/('ᣛ⼎♃
ᴀ᪡
ᴀ᪡
ᓔᴎϢ݇ᴎ
䇗㡖䷇䞣
䗝ᢽऎඳ
䗝ᢽֵ䘧
᭄ߛᤶ
䬂Ⲭ䫕ᅮϢ㾷䫕
ি
ি
থ䍋Ͼ
থ䍋㒘
থ䍋ܼ
ᬊಲি
ᢳֵ䘧ি
㦰ऩᇐ㟾
㦰ऩᇐ㟾
㘨㋏Ҏ
ⷁ⍜ᙃ
ি䆄ᔩ
ᠿᦣ
ऎඳ
䆒㕂
ࡳ㛑Ϣ᪡
ࡳ㛑Ϣ᪡
ᕙᴎ⬠䴶
ᠿᦣ
㜅㔥
ⲥ
䴭ాᠧᓔ
Ⳃᔩ
Ⳃᔩ

2
㋻ᗹ䄺
㐕ᖭֵ䘧䫕ᅮ
䍙ᯊ⽕থ
ᬙ䱰໘⧚ᣛफ
ᬙ䱰໘⧚ᣛफ
ֱݏϢ⏙⋕
ֱݏϢ⏙⋕
䋼䞣ֱ䆕Ϣ㓈ׂᴵℒ
䋼䞣ֱ䆕Ϣ㓈ׂᴵℒ
䗝䌁䜡ӊ
䗝䌁䜡ӊ
䰘ᔩ˖䕧ܹ⊩
䰘ᔩ˖䕧ܹ⊩
Ⳃᔩ
Ⳃᔩ

3
Ẕᶹࣙ㺙ݙ⠽ક
Ẕᶹࣙ㺙ݙ⠽ક
ࣙ㺙Ⲧݙ᳝ҹϟ⠽ӊDŽབ᳝ӏԩ⠽ӊ϶༅ᤳണˈ䇋Ϣᙼ᠔䌁ѻકⱘ㒣䫔ଚ㘨㋏DŽ
וࡨ
וࡨמিை࠼બՀৰמিڂୂ࣪߶ӄؠ澞ਲ਼߶ߌࡨޢை࠼ͫөՀৰПߑ߶ЇङӀѽை࠼澞
Ⲃᏺ། ⬉⑤䗖䜡఼ 㓇 䇈ᯢкᅝֵܼᙃݠড়Ḑ䆕ֱׂव
Џᴎ ⬉∴ ܙ⬉ᑻ 㒓
4
ᑣো 䚼ӊৡ⿄ ᑣো 䚼ӊৡ⿄
ᑣো 䚼ӊৡ⿄ ᑣো 䚼ӊৡ⿄
ᑣো 䚼ӊৡ⿄ ᑣো 䚼ӊৡ⿄
ᑣো 䚼ӊৡ⿄ ᑣো 䚼ӊৡ⿄
6.˄ջ䬂˅ 呺ܟ亢 /('ᣛ⼎♃ Ϟ⿏䬂
377䬂˄থᇘᣝ䬂˅ /&'ᰒ⼎ሣ 㒓 ϟ⿏䬂
6.˄ջ䬂˅ ⹂䅸㦰ऩ䬂 ⬉⑤ᓔ݇䷇䞣ࠊᮟ䪂 ⬉∴䪂
7.˄乊䚼䬂˅ ᡀໄ఼ 䰘ӊষ Ⲃᏺ།
ֵ䘧䗝ᢽᮟ䪂 ᭄ᄫ䬂Ⲭ 䖨ಲ䬂 ⬉∴
❳ᙝᴀᴎ
❳ᙝᴀᴎ
䚼ӊҟ㒡
䚼ӊҟ㒡
5
ৃ㓪䬂
ৃ㓪䬂
Ўњᦤ छ᪡߽֓ᗻˈᴀᴎⱘϾৃ㓪䬂Ǐ6.ǐǃǏ6 . ǐǃǏ7.ǐǃ ǃ ˈৃ⬅ᙼⱘ㒣䫔ଚ㓪Ўࡳ㛑ᖿ᥋䬂˄㾕ϟ㸼˅DŽ
וࡨͨգ▲ܷ୰ङिܷչܷՕؘ࣫ЉգԅਈͫӀѽं୦ગ澞
澬:1澭୰ӟԴޞગОȔবۄܕઊȕڽ݈୰ͫۓՕପଋ୦ગОҿ؉ԅਈڽ݈୰澞
❳ᙝᴀᴎ
❳ᙝᴀᴎ
㓪ো ᖿ᥋䬂ৡ⿄ ⫼䗨
ऎඳϞ䇗 ᖿ䗳䗝ᢽऎඳ
ऎඳϟ䇗
䬂Ⲭ䫕ᅮ ᖿ䗳䫕ᅮ㾷䫕䬂Ⲭ
㘨㋏Ҏ߫㸼 ϔ䬂䖯ܹĀ㘨㋏Ҏ߫㸼ā㦰ऩ
ⷁ⍜ᙃ ϔ䬂䖯ܹĀⷁ⍜ᙃā㦰ऩ
ি䆄ᔩ ϔ䬂䖯ܹĀি䆄ᔩā㦰ऩ
䇗ᭈࡳ⥛㑻߿ ᖿ䗳䇗ᭈথᇘࡳ⥛
㜅㔥 Ϣ݊ᅗ㒜ッⳈ䗮ֵ
ⲥ 䇗ᭈֵোᬊऍ䜡ᴵӊ
᱖ᗕⲥ
䴭ాᠧᓔ ᮴䆎ᰃ৺᳝䕑⊶ˈྟ㒜ᠧᓔু
᱖ᗕ䴭ాᠧᓔ
ᕙᴎ⬠䴶 ᖿ䗳䖨ಲ㟇Ϟϔ㑻㦰ऩᕙᴎ⬠䴶
ᠿᦣ ᬊ݊ᅗֵ䘧Ϟⱘ䗮ֵ⌏ࡼ
ాໄֵ䘧Јᯊߴ䰸 ᱖ᯊߴ䰸ϡᛳ݈䍷ⱘ⌏ࡼֵ䘧
㋻ᗹ䄺 ㋻ᗹᚙމϟᇏ∖ᐂࡽ
䇗ᭈ䴭ా㑻߿ 䇗ᭈᬊֵোᯊ᠔䳔㽕ⱘֵোᔎᑺ
6
1
23
3
⫼ࠡޚ
⫼ࠡޚ
㒭⬉∴ܙ⬉
㒭⬉∴ܙ⬉
䇋Փ⫼+\WHUDᣛᅮⱘܙ⬉ᑻᇍ⬉∴䖯㸠ܙ⬉˗ܙ⬉ᑻⱘᣛ⼎
♃ৃᰒ⼎ܙ⬉⢊ᗕDŽ
ܙ⬉⼎ᛣ
ܙ⬉⼎ᛣ
ܙ⬉᪡ℹ偸
ܙ⬉᪡ℹ偸
ᇚ⬉⑤䗖䜡఼ⱘᦦ༈ᦦܹ⬉⑤ᦦᑻˈབ⼎ℹ偸 ˗
ᇚ⬉⑤䗖䜡఼ⱘϔッᦦܹܙ⬉ᑻ㚠䴶ⱘᦦᄨˈབ
⼎ℹ偸 ˗
ᇚ⬉∴㺙᳝⬉∴ⱘᇍ䆆ᴎℷ⹂ᦦܹܙ⬉ᑻˈབ⼎
ℹ偸 ˗
ᣛ⼎♃҂㑶♃ᯊˈ㸼⼎ܙ⬉ᓔྟ˗ᣛ⼎♃বЎ㓓♃
ᯊˈ㸼⼎ܙ⬉ᅠ៤DŽ
ו ࡨ О ੂ ڱ ߂ ҄ ऄ ࡐ ۅ ਈͫ ࠩ ҭ ऄ ޞͫબ ҭ ࢠ ش
ޞ澞
ܙ⬉ᣛ⼎♃
ܙ⬉ᣛ⼎♃
ᣛ⼎♃ᰒ⼎ ᔧࠡ⢊ᗕ
㑶㡆/('᜶䮾 ᕙᴎ˄ぎ䕑˅
㑶㡆/('ᐌ҂ ℷܙ⬉
㡆/('ᐌ҂ Ꮖܙ⒵
㓓㡆/('ᐌ҂ ⬉∴ܙ⒵
㑶㡆/('ᖿ䮾 ᬙ䱰
ࡨ۞બՀஃ澦؍ҶҒێ۴ӆ澧ͫљ ੂ Ո ڷ ङ ऄ ࡐ
؍ҶҒێ澞
䰘ӊᅝ㺙
䰘ӊᅝ㺙
ᅝ㺙㒓
ᅝ㺙㒓
⊓乎ᯊ䩜ᮍᮟ䕀㒓Ⳉ㟇ᮟ㋻DŽ
བ䳔ौϟ㒓ˈ䗚ᯊ䩜ᮟ䕀ेৃDŽ

7
ᅝ㺙⬉∴
ᅝ㺙⬉∴
ᣝ ᠔⼎ᦦܹ⬉∴˗
䕏य़⬉∴ᑩ䚼ˈⳈ㟇ࠄĀ੨āϔໄ DŽ
བ䳔ौϟ⬉∴ˈ䇋ܜ݇䯁ᇍ䆆ᴎDŽ✊ৢᇚᑩ䚼⬉∴䪂ᕔϞ
䍋ˈᑊপߎ⬉∴DŽ
ᅝ㺙Ⲃᏺ།
ᅝ㺙Ⲃᏺ།
ौϟЏᴎϞⱘⲂᏺ།㶎䩝˗
ᇚⲂᏺ།ⱘ㶎䩝ᄨᇍޚЏᴎϞⱘ㶎䩝ᄨˈ✊ৢ⫼㶎䩝
䫕㋻DŽ
བ䳔ौϟⲂᏺ།ˈᢻᵒ㶎䩝ेৃDŽ
ᅝ㺙䷇乥䰘ӊ㓪㒓
ᅝ㺙䷇乥䰘ӊ㓪㒓
ᣝㆁ༈᠔⼎ᮍᠧᓔ䰘ӊষⲪ˗
ᇚ䰘ӊᦦ༈ᇍޚ䰘ӊষ˗
ᇚ䰘ӊᦦ༈Ϟⱘ㶎䩝ᢻ㋻DŽ
བ䳔পϟ䰘ӊˈᢻᵒ㶎䩝ेৃDŽ
ࡨ۞҅ऀיୂўޞͫثઔߑङஅࡊۅਈՕਈѫՉ
ڧր澞
⫼ࠡޚ
⫼ࠡޚ
8
ᷛৡ⿄ᷛᰒ⼎ ᇍ䆆ᴎ⢊ᗕ
ֵোᔎᑺᷛ ᮴ֵো˗
ֵোᴵ᭄䍞ˈֵো䍞ᔎ˗
ֵᙃᷛ ᬊࠄⷁ⍜ᙃ᳝䇏ⷁ
⍜ᙃ˗
ᬊӊㆅᄬټぎ䯈Ꮖ⒵˗
ᠿᦣᷛ ᇍ䆆ᴎ໘Ѣᠿᦣ⢊ᗕ˗
ᠿᦣذ⬭Ѣ䴲Ӭܜֵ䘧˗
ᠿᦣذ⬭ѢӬܜֵ䘧˗
ᠿᦣذ⬭ѢӬܜֵ䘧˗
থᇘࡳ⥛ᷛ ᔧֵࠡ䘧ࡳ⥛ЎԢࡳ⥛˗
ᔧֵࠡ䘧ࡳ⥛Ў催ࡳ⥛˗
⬉∴⬉䞣ᷛ ᴵ᭄䍞ˈ⬉∴⬉䞣䍞
˗
ⲥᷛ Ꮖᓔਃⲥࡳ㛑˗
ᡀໄ఼ᷛ Ꮖᓔਃᡀໄ఼˗
㋻ᗹ䄺ᷛ ᇍ䆆ᴎ໘Ѣ㋻ᗹ䄺⢊ᗕ
˄⾬ᆚ䄺䰸˅ᬊ
ࠄ㋻ᗹ䄺˗
䰘ӊᷛ Ꮖ䖲䰘ӊDŽ
⢊ᗕᣛ⼎
⢊ᗕᣛ⼎
/&'ᷛ
/&'ᷛ
⢊ᗕᷛ
⢊ᗕᷛ
Ɣ
Ꮉᓣᷛ
Ꮉᓣᷛ
Ɣ
/('ᣛ⼎♃
/('ᣛ⼎♃
乊䚼/('ᣛ⼎♃䅽ᙼ䕏ᵒᥠᦵᇍ䆆ᴎᔧࠡⱘ᪡⢊ᗕDŽ
RM
DM
ᣛ⼎♃⢊ᗕ ᇍ䆆ᴎ⢊ᗕ
㓓♃䮾⚕ ℷᓔᴎ
㑶♃҂ ℷথ䗕
㓓♃҂ ℷᬊ
♃䮾⚕ ℷᠿᦣ
ᷛৡ⿄ᷛ ᇍ䆆ᴎᎹᓣ
Ꮉᓣᷛ Ⳉ䗮ᓣ˖ᇍ䆆ᴎϢ݊ᅗ
㒜ッП䯈Ⳉ䗮ֵ˗
Ё䕀ᓣ˖ᇍ䆆ᴎϢ݊ᅗ
㒜ッ䗮䖛Ё䕀ৄⱘ䕀থ䖯
㸠䗮ֵDŽ
9
ᴀ᪡
ᴀ᪡
ᓔᴎϢ݇ᴎ
ᓔᴎϢ݇ᴎ
བ䳔ᓔᴎˈ䇋乎ᯊ䩜ᮟ䕀Ǐ⬉⑤ᓔ݇䷇䞣ࠊǐᮟ䪂Ⳉࠄ
ࠄĀ ੨ āໄ ˗བ䳔݇ᴎˈ䇋䗚ᯊ䩜ᮟ䕀ℸᮟ䪂ⳈࠄࠄĀ੨
āໄDŽ
䇗㡖䷇䞣
䇗㡖䷇䞣
ᓔᴎৢˈ乎ᯊ䩜ᮟ䕀Ǐ⬉⑤ᓔ݇䷇䞣ࠊǐᮟ䪂ৃ䷇
䞣ˈ䗚ᯊ䩜ᮟ䕀ৃޣᇣ䷇䞣DŽ
䗝ᢽऎඳ
䗝ᢽऎඳ
ऎඳᰃϔϾֵ䘧㒘ˈेᙼৃᇚ᳝Ⳍৠሲᗻⱘֵ䘧ܹ߫ࠄϔ
ϾऎඳЁˈ䖭ḋ֓Ѣᙼᇍ⦄ֵ᳝䘧䖯㸠᳝ᬜㅵ⧚DŽᴀᴎᬃᣕ
Ͼऎඳˈ↣Ͼऎඳ᳔ࣙϾֵ䘧DŽᙼৃ䗮䖛ҹϟϸ⾡
ᮍᓣ䗝ᢽऎඳ˖
䗮䖛㦰ऩ䗝ᢽ
䖯ܹĀऎඳā㦰ऩৢˈᣝǏϞ⿏ǐǏϟ⿏ǐ䬂ᴹ䗝
ᢽ᠔䳔ऎඳˈ✊ৢᣝǏ⹂䅸ǐ䬂ߛᤶ㟇᠔䗝ऎඳDŽ
䗮䖛㓪䬂䗝ᢽ
㢹㒣䫔ଚЎᙼ䆒㕂њǏऎඳϞ䇗ǐǏऎඳϟ䇗ǐᖿ
᥋䬂ˈ߭ᣝℸᖿ᥋䬂ৃߛᤶ㟇᠔䳔ऎඳDŽ
䗝ᢽֵ䘧
䗝ᢽֵ䘧
ᮟ䕀Ǐֵ䘧䗝ᢽǐᮟ䪂ेৃ䗝ᢽ᠔䳔ֵ䘧DŽ
᭄ߛᤶ
᭄ߛᤶ
ᇍ䆆ᴎЁⱘ↣Ͼֵ䘧䛑ৃ⬅㒣䫔ଚ䜡㕂Ўᢳֵ䘧᭄ᄫֵ
䘧DŽ㢹ᔧࠡऎඳ᭄ࣙᄫֵ䘧ᢳֵ䘧ˈᙼৃՓ⫼Ǐֵ䘧䗝
ᢽǐᮟ䪂ߛᤶ㟇ᢳֵ䘧᭄ᄫֵ䘧DŽ
䬂Ⲭ䫕ᅮϢ㾷䫕
䬂Ⲭ䫕ᅮϢ㾷䫕
ᔧᙼ᮴䳔Փ⫼䬂Ⲭᯊˈৃ䫕ᅮ䬂Ⲭҹ䰆ℶ䇃᪡䬂ⲬDŽᙼৃ
䗮䖛ҹϟϝ⾡ᮍᓣᴹ䫕ᅮ㾷䫕䬂Ⲭ˖
䗮䖛㒘ড়䬂
ᣝĀǏ⹂䅸ǐˇ āᴹ䫕ᅮ㾷䫕䬂ⲬDŽ
䗮䖛㓪䬂
㢹㒣䫔ଚ䆒㕂њǏ䬂Ⲭ䫕ᅮǐᖿ᥋䬂ˈᙼৃᣝ䆹䬂ᴹ
䫕ᅮ㾷䫕䬂ⲬDŽ
וࡨײ୦ОۓગȔਘԈЇ୧ȕԅਈͫө֨ӊ
ைўүગؔङޞ࠼ӄޗѠѾثઔߑݱ
ҁͫ୰ द ر ਘ Ԉ ୧ ؔ 澞
䗮䖛㦰ऩ䗝ᢽ
䖯ܹĀ䆒㕂!䆱ᴎ䆒㕂!䬂Ⲭ䫕āˈ䗝ᢽĀܕ䆌ā
Ā⽕ℶāेৃDŽ
ܕ䆌˖㢹乘䆒ⱘᯊ䯈↉ݙ᮴ӏԩᇍ䆆ᴎ᪡ˈ䬂Ⲭ
ᇚ㞾ࡼ䫕ᅮ˗
⽕ℶ˖䬂ⲬϡӮ㞾ࡼ䫕ᅮDŽԚᙼৃ䗮䖛Ϟ䗄㒘ড়䬂
Ǐ䬂Ⲭ䫕ᅮǐ䬂ᴹ䫕ᅮ㾷䫕䬂ⲬDŽ
10
ি
ি
থ䍋Ͼ
থ䍋Ͼ
ᙼৃ䗮䖛ҹϟᮍᓣথ䍋ϾDŽϾথ䍋ᯊˈᇍ䆆ᴎᰒ⼎
ᷛDŽ
ᇍ乘䆒㘨㋏Ҏথ䍋ি
ᕙᴎ⬠䴶ϟˈᣝǏ 3 7 7 ǐे ৃ ᇍ ᔧࠡ ֵ 䘧 Ϟ 乘 䆒 ⱘ Ͼ 㘨 ㋏
Ҏথ䍋ϾDŽ
וࡨۓՕପଋ୦ОЗރҒଳગ▲З৻
ыͫથ৻ыՕљީЗշ৻ыͫЭՕљީু
շ۪Ҷշ৻ы澞
䗮䖛Ā㘨㋏Ҏ߫㸼āĀি䆄ᔩ߫㸼āথ䍋ি
䗝ᢽĀ㘨㋏Ҏ!㘨㋏Ҏ߫㸼āˈ䗝ᢽĀি䆄ᔩā
䖯ܹᏆᢼᏆি߫㸼˗˗
⫼ǏϞ⿏ǐǏϟ⿏ǐ䬂䗝ᢽᙼᛇ㽕িⱘϾ㘨㋏Ҏ˗
ᣝǏ377ǐेৃᇍ᠔䗝ᢽⱘ㘨㋏Ҏথ䍋ϾDŽ
䗮䖛ࡼᢼোথ䍋ি
䗝ᢽĀ㘨㋏Ҏ!ࡼᢼোāˈ䖯ܹᢼো⬠䴶˗
䕧ܹᙼᛇ㽕িⱘϾোⷕ˗
ᣝǏ377ǐेৃথ䍋ϾDŽ
Ɣ
Ɣ
Ɣ
থ䍋㒘
থ䍋㒘
ᙼৃ䗮䖛ҹϟᮍᓣথ䍋㒘DŽ㒘থ䍋ᯊˈᇍ䆆ᴎᰒ⼎
ᷛDŽ
ᇍ乘䆒㘨㋏Ҏথ䍋ি
ᕙᴎ⬠䴶ϟˈᣝǏ3 7 7ǐेৃᇍᔧֵࠡ䘧Ϟ乘䆒ⱘ
㒘㘨㋏Ҏথ䍋㒘DŽ
䗮䖛Ā㘨㋏Ҏ߫㸼āথ䍋ি
˅䗝ᢽĀ㘨㋏Ҏ!㘨㋏Ҏ߫㸼ā˗
˅⫼ǏϞ⿏ǐǏϟ⿏ǐ䬂䗝ᢽᙼᛇ㽕িⱘ㒘
㘨㋏Ҏ˗
˅ᣝǏ377ǐेৃᇍ᠔䗝ᢽⱘ㘨㋏Ҏথ䍋㒘DŽ
থ䍋ܼ
থ䍋ܼ
থ䍋ܼⱘᮍᓣৠϞ䗄Āথ䍋㒘āDŽܼথ䍋ᯊˈᇍ䆆ᴎᰒ
⼎ ᷛDŽ
וࡨՑ߄ڢ୦ОۓڐկҶշԅਈեͫۓ۵ՕՇ
Ҷշ澞
Ɣ
Ɣ
11
ি
ি
ᬊಲি
ᬊಲি
ᬊি
ᬊি
ᬊࠄিৢˈᙼⱘᇍ䆆ᴎᇚᰒ⼎ⳌᑨⱘᷛDŽབЎϾˈᰒ
⼎ ᷛ˗བЎ㒘ˈᰒ⼎ ᷛ˗བЎܼˈᰒ⼎
ᷛDŽ
ಲϾ㒘
ಲϾ㒘
ᬊࠄϾ㒘ৢˈ乘䆒ᯊ䯈ݙᣝϟǏ377ǐৃথ䗕ಲDŽ
㢹ᬊࠄϾৢ䖯㸠ಲˈ߭ᰒ⼎িᦤ⼎ᷛ
ҹᦤ䝦⫼᠋DŽ
וࡨۓޗࡣثݎݶӱङҶշ੧֛ז澞
ᢳֵ䘧ি
ᢳֵ䘧ি
ᢳֵ䘧Ϟˈབ䳔থᇘˈ䇋ᣝԣǏ377ǐ䬂ᑊᇍⴔ呺ܟ亢䆆
䆱˗བ䳔ᬊˈ䇋ᵒᓔǏ377ǐ䬂DŽ
וࡨОдґચݎݶސثઔߑङ߂҄ݎݶͫՇذ
ޞબґܴ௮ұख़֗םӱԻজ澞

12
㦰ऩᇐ㟾
㦰ऩᇐ㟾
㘨㋏Ҏ
㘨㋏Ҏ
㽕䖯ܹℸ㦰ऩˈᣝǏ 㦰 ऩǐ䬂 䖯 ܹ Џ 㦰 ऩ ৢ 䗝 ᢽĀ 㘨 ㋏ ҎāDŽ
㘨㋏Ҏ߫㸼
㘨㋏Ҏ߫㸼
㘨㋏Ҏ߫㸼᳔ৃټᄬᴵ䆄ᔩDŽᙼৃҢĀ㘨㋏Ҏā㦰ऩ䖯
ܹĀ㘨㋏Ҏ߫㸼āˈᣝ㓪ⱘǏ㘨㋏Ҏ߫㸼ǐᖿ᥋䬂ेৃᖿ
䗳䖯ܹĀ㘨㋏Ҏ߫㸼āDŽ
Ɣ
㓪䕥㘨㋏Ҏ
㓪䕥㘨㋏Ҏ
ᙼৃᇍ㘨㋏Ҏ߫㸼ЁⱘᶤϾ㘨㋏Ҏ˄ҙϾ㘨 ㋏Ҏ˅ⱘোⷕǃ
߿ৡ䖯㸠㓪䕥DŽ
ᶹⳟ㘨㋏Ҏ
ᶹⳟ㘨㋏Ҏ
ᙼৃᶹⳟ㘨㋏Ҏⱘ䆺㒚ֵᙃDŽ
ߴ䰸㘨㋏Ҏ
ߴ䰸㘨㋏Ҏ
ᙼৃᇍ㘨㋏Ҏ߫㸼Ёⱘ㘨㋏Ҏ˄ҙϾ㘨 ㋏Ҏ˅䖯㸠 ߴ䰸DŽ
㘨㋏Ҏ߫㸼Ё㟇ᇥ᳝ϸᴵ䆄ᔩᠡৃ䖯㸠ߴ䰸᪡ˈϨᙼ᮴⊩
ߴ䰸᭄ᄫֵ䘧Ϟ乘䆒ⱘϾ㘨㋏ҎDŽ
ᮄᓎ㘨㋏Ҏ
ᮄᓎ㘨㋏Ҏ
ℸ㦰ऩৃՓᙼ߯ᓎᮄ㘨㋏Ҏ˄ҙϾ㘨 ㋏Ҏ˅㟇㘨㋏Ҏ߫㸼DŽ
ᮄᓎⱘ㘨㋏Ҏ߿ৡোⷕϡ㛑Ϣ㘨㋏Ҏ߫㸼Ёⱘӏϔ߿ৡো
ⷕⳌৠˈ䕧ܹ㘨㋏Ҏোⷕⱘ㣗ೈЎ̚DŽ
ࡼᢼো
ࡼᢼো
ℸ㦰ऩৃՓᙼⳈ䗮䖛䕧ܹ᠔䳔ⱘϾোⷕ䖯㸠িDŽ
ⷁ⍜ᙃ
ⷁ⍜ᙃ
㽕䖯ܹℸ㦰ऩˈᣝǏ 㦰 ऩǐ䬂 䖯 ܹ Џ 㦰 ऩ ৢ 䗝 ᢽĀ ⷁ ⍜ ᙃāˈ
ᣝǏⷁ⍜ᙃǐᖿ᥋䬂ेৃᖿ䗳䖯ܹĀⷁ⍜ᙃā㦰ऩDŽ
Ɣ
Ɣ
13
ᮄᓎⷁ⍜ᙃ
ᮄᓎⷁ⍜ᙃ
ᙼৃ䖯ܹℸ㦰ऩˈ㓪䕥ᮄⱘⷁ⍜ᙃ˄᳔Ͼᄫヺ˅䖯㸠থ
䗕ˈৃ䗝ᢽথ䗕㒭ϾҎ㕸㒘DŽ
ᖿ᥋᭛ᴀ
ᖿ᥋᭛ᴀ
ℸ㦰ऩЁᄬ᳝㒣䫔ଚЎᙼ䆒㕂ⱘᖿ᥋᭛ᴀ˄᳔ᴵ˅ˈᙼৃ
䗝ᢽӏϔ᭛ᴀⳈথ䗕ˈᇍ᭛ᴀ䖯㸠䗖ᔧ㓪䕥ৢݡথ䗕DŽ
ᬊӊㆅ
ᬊӊㆅ
ᴀᴎৃᄬټ᳔ᴵᏆᬊⱘⷁ⍜ᙃDŽ㢹ᬊӊㆅᏆ⒵ˈ߭ᰒ
⼎ᷛˈབ᳝ᮄⱘᏆᬊⷁ⍜ᙃˈ᳔߭ᮻⱘⷁ⍜ᙃᇚ㞾ࡼ
㹿㽚ⲪDŽ
ᙼৃᇍӏϔⷁ⍜ᙃ䖯㸠བϟ᪡˖ಲǃ䕀থǃ䆺ᚙǃߴ䰸DŽ
㽕ߴ䰸ᬊӊㆅЁⱘ᠔᳝ⷁ⍜ᙃˈ䗝ᢽĀⷁ⍜ᙃ!ᬊӊㆅ!ߴ
䰸ܼ䚼āDŽ
থӊㆅ
থӊㆅ
ᴀᴎৃᄬټ᳔ᴵᏆথ䗕ⱘⷁ⍜ᙃDŽᔧথӊㆅᏆ⒵ᯊˈབ
᳝ᮄⱘᏆথⷁ⍜ᙃˈ᳔߭ᮻⱘⷁ⍜ᙃᇚ㞾ࡼ㹿㽚ⲪDŽ
Ɣ
Ɣ
Ɣ
Ɣ
ᙼৃᇍӏϔⷁ⍜ᙃ䖯㸠བϟ᪡˖ಲǃ䕀থǃ䆺ᚙǃߴ䰸DŽ
㽕ߴ䰸থӊㆅЁⱘ᠔᳝ⷁ⍜ᙃˈ䗝ᢽĀⷁ⍜ᙃ!থӊㆅ!ߴ
䰸ܼ䚼āDŽ
ি䆄ᔩ
ি䆄ᔩ
㽕䖯ܹℸ㦰ऩˈᣝǏ㦰ऩǐ䬂䖯ܹЏ㦰ऩৢ䗝ᢽĀি䆄
ᔩāˈᣝǏি䆄ᔩǐᖿ᥋䬂ेৃᖿ䗳䖯ܹĀি䆄ᔩā㦰
ऩDŽ
ᴀᴎৃߚ߿ᄬټ᳔ᴵᏆᢼᏆি䆄ᔩ˄ҙϾ
䆄ᔩ˅DŽᔧি䆄ᔩᏆ⒵ᯊˈ㢹᳝ᮄⱘি䆄ᔩˈ᳔߭ᮻⱘ䆄
ᔩᇚ㞾ࡼ㹿᳓ᤶᥝDŽ
䖯ܹি䆄ᔩ߫㸼ˈ䗝ᢽϔᴵ䆄ᔩৢˈৃ䖯㸠བϟ᪡˖ᣝ
Ǐ377ǐ䖯㸠িǃ⏏ࡴ㟇㘨㋏Ҏ߫㸼ǃߴ䰸DŽ
㽕ߴ䰸᠔᳝ᏆᢼᏆি䆄ᔩˈ䗝ᢽĀি䆄ᔩ!Ꮖ
ᢼিᏆিি!ߴ䰸᠔᳝āDŽ
㦰ऩᇐ㟾
㦰ऩᇐ㟾
14
ᠿᦣ
ᠿᦣ
㽕䖯ܹℸ㦰ऩˈᣝǏ 㦰 ऩǐ䬂 䖯 ܹ Џ 㦰 ऩ ৢ 䗝 ᢽĀ ᠿ ᦣ āDŽ
ᠿᦣᓔ݇
ᠿᦣᓔ݇
ᠿᦣࡳ㛑ৃࡽᙼᬊ݊ᅗֵ䘧Ϟⱘ䗮ֵ⌏ࡼˈҢ㗠њ㾷Ⳍ݇
㒘ਬᔧࠡⱘ⌏ࡼ⢊މDŽᙼৃ䗮䖛ℸ䗝乍ᴹᓔਃ݇䯁ᠿᦣDŽ
ᠿᦣ߫㸼
ᠿᦣ߫㸼
ᙼৃ䗮䖛㒣䫔ଚЎ↣Ͼֵ䘧߯ᓎϔϾᠿᦣ߫㸼ˈ↣Ͼᠿᦣ
߫㸼᳔ࣙϾֵ䘧ˈৃҹ᮶᭄ࣙᄫֵ䘧гࣙᢳֵ
䘧DŽ䗝ᢽ䖯ܹᶤϾᠿᦣ߫㸼ৢˈᙼৃҹ䖯㸠ҹϟ᪡˖
⏏ࡴֵ䘧
⏏ࡴֵ䘧
ᔧࠡᠿᦣ߫㸼ЁࡴϔϾᮄⱘֵ䘧DŽ
㓪䕥Ӭܜֵ䘧
㓪䕥Ӭܜֵ䘧
ᙼৃᇚᔧࠡ᠔䗝ֵ䘧䆒㕂ЎӬܜֵ䘧䴲Ӭܜֵ䘧DŽ㢹䳔䞡
⚍݇⊼ᶤϾֵ䘧Ϟⱘ⌏ࡼˈৃᇚ݊䆒㕂ЎӬܜֵ䘧DŽӬܜֵ
䘧ⱘᠿᦣ乥⥛㽕催Ѣ䴲Ӭܜֵ䘧DŽ
Ɣ
Ɣ
↣Ͼᠿᦣ߫㸼Ё᳔ৃҹ䆒㕂ϸϾӬܜֵ䘧DŽ 㸼⼎Ӭܜ
ֵ䘧ˈ 㸼⼎Ӭܜֵ䘧DŽ
ߴ䰸ֵ䘧
ߴ䰸ֵ䘧
ߴ䰸ᔧࠡᠿᦣ߫㸼ЁⱘᶤϾֵ䘧ˈԚᙼ᮴⊩ߴ䰸ᠿᦣ߫㸼Ё
ⱘϔϾֵ䘧DŽ
ऎඳ
ऎඳ
㽕䖯ܹℸ㦰ऩˈᣝǏ 㦰 ऩǐ䬂 䖯 ܹ Џ 㦰 ऩ ৢ 䗝 ᢽĀऎ ඳ āDŽ
ᴀᴎᬃᣕϾऎඳˈᙼৃ䗮䖛ℸ㦰ऩ䗝ᢽᙼ᠔䳔ⱘऎඳDŽ
䆒㕂
䆒㕂
㽕䖯ܹℸ㦰ऩˈᣝǏ 㦰 ऩǐ䬂 䖯 ܹ Џ 㦰 ऩ ৢ 䗝 ᢽĀ 䆒 㕂 āDŽ
㦰ऩᇐ㟾
㦰ऩᇐ㟾
15
ᙼৃḍ㞾Ꮕⱘ୰དᅲ䰙䳔∖ˈᴹ䆒㕂ᇍ䆆ᴎⱘ᳝݇খ
᭄ˈՓ݊থ᳔ᬜ㛑DŽ
ᇍ䆆ᴎ䆒㕂
ᇍ䆆ᴎ䆒㕂
ࡳ⥛㑻߿
ࡳ⥛㑻߿
ᙼৃℸ㦰ऩ䗝ᢽᇍ䆆ᴎⱘথᇘࡳ⥛㑻߿Ў催ԢDŽᕙ
ᴎ⬠䴶ϟˈᣝǏ䇗 ᭈ ࡳ ⥛ 㑻 ߿ ǐᖿ ᥋ 䬂 ৃ ᖿ 䗳 催 Ԣ ࡳ ⥛ П
䯈ߛᤶDŽ
/&'ᰒ⼎ ᷛ㸼⼎催ࡳ⥛˗ ᷛ㸼⼎Ԣࡳ⥛DŽ催ࡳ
⥛ৃҹՓᙼϢ䎱⾏䕗䖰ⱘ⫼᠋䗮ֵDŽ
וࡨЗҒଳङԅࣤӰԥࣞગ澞
䴭䑕㑻߿
䴭䑕㑻߿
ᙼৃℸ㦰ऩ䗝ᢽᇍ䆆ᴎⱘ䴭ా㑻߿ЎࡴᔎǃℷᐌǃᐌᓔDŽ
ᕙᴎ⬠䴶ϟˈᣝǏ䇗 ᭈ 䴭 ా 㑻 ߿ ǐᖿ ᥋ 䬂 ৃ ᖿ 䗳 㑻
߿П䯈ߛᤶDŽ咬䅸䴭ా㑻߿ЎĀℷᐌāDŽ
ϔ㠀ᚙމϟˈĀࡴᔎā㽕∖ᬊࠄⱘֵোᔎᑺ䕗催DŽ㢹䆒㕂Ў
Āᐌᓔā˄े䴭ా㑻߿Ў˅ˈ᮴䆎㾷ⷕᴵӊᰃ৺⒵䎇ˈⳈᠧ
ᓔুᬒߎ㚠᱃䷇DŽ
䇁㿔䆒㕂
䇁㿔䆒㕂
䗝ᢽ㦰ऩᰒ⼎ⱘ䇁㿔DŽⳂࠡҙᬃᣕЁ᭛㣅᭛DŽ
Ɣ
㚠ܝ♃
㚠ܝ♃
䆒㕂ᇍ䆆ᴎⱘ㚠ܝ♃DŽ᳝ϝϾ䗝乍ৃկ䗝ᢽ˖ᓔਃǃ݇䯁ǃᅮ
ᯊDŽᅮᯊ݇䯁ᯊ䯈ৃ⬅㒣䫔ଚ䆒㕂ˈ᳝ᬜ㣗ೈЎ⾦DŽ
҂ᑺ䆒㕂
҂ᑺ䆒㕂
䇗ᭈሣᐩᰒ⼎҂ᑺDŽᙼৃҹ䗮䖛ǏϞ⿏ǐǏϟ⿏ǐ䬂ᴹࡴ
ޣᇥ҂ᑺDŽ
䬂Ⲭ䫕
䬂Ⲭ䫕
䗝ᢽᰃ৺ਃ⫼䬂Ⲭ䫕DŽབ䗝ЁĀܕ䆌āˈৃ䗮䖛ǏϞ⿏ǐǏϟ
⿏ǐ䬂ᇍ䬂Ⲭ䫕䖯㸠ᅮᯊ䆒㕂ˈᅮᯊ㣗ೈЎ⾦DŽ
/('ᰒ⼎
/('ᰒ⼎
䗝ᢽᰃ৺ਃ⫼/('ᰒ⼎DŽ
ᦤ⼎䷇
ᦤ⼎䷇
䆒㕂ᇍ䆆ᴎⱘᦤ⼎䷇DŽᙼৃᇍҹϟᦤ⼎䷇䖯㸠䆒㕂˖
ᇍ䆆ᴎ䴭䷇˖䆒㕂ᇍ䆆ᴎᰃ৺ડᦤ⼎䷇DŽབ䗝ᢽĀᓔਃ䴭
䷇āˈ߭᠔᳝ᦤ⼎䷇䛑݇䯁DŽ
ߎᦤ⼎䷇˖䆒㕂ᇍ䆆ᴎথᇘᯊᰃ৺ડᦤ⼎䷇DŽ
᳝བϟ䗝乍ৃկ䗝ᢽ˖
᮴ᦤ⼎䷇˄থᇘᯊϡડᦤ⼎䷇˅ǃ
ҙ᭄ᄫ˄া᭄᳝ᄫֵ䘧Ϟথᇘᯊᠡડᦤ⼎䷇˅ǃ
ҙᢳ˄া᳝ᢳֵ䘧Ϟথᇘᯊᠡડᦤ⼎䷇˅ǃ
㦰ऩᇐ㟾
㦰ऩᇐ㟾

16
ᓔਃᦤ⼎䷇˄᭄ᄫֵ䘧ᢳֵ䘧Ϟথᇘᯊ䛑ડᦤ
⼎䷇˅DŽ
Ͼᦤ⼎䷇˖䆒㕂ᇍ䆆ᴎᬊࠄϾᯊᰃ৺ડᦤ⼎䷇DŽ
⍜ᙃᦤ⼎䷇˖䆒㕂ᇍ䆆ᴎᬊࠄⷁ⍜ᙃᯊᰃ৺ડᦤ⼎䷇DŽ
ᣝ䬂ᦤ⼎䷇˖䆒㕂䖯㸠᪡ᣝ䬂ᯊᰃ৺ડᦤ⼎䷇DŽ
ᴀᴎֵᙃ
ᴀᴎֵᙃ
ᙼৃ䗮䖛ℸ䗝乍ᴹᶹⳟᴀᴎⱘⳌֵ݇ᙃˈࣙᣀᑣ߫োǃᇍ䆆
ᴎൟোǃ乥⥛㣗ೈǃЏᴎ⠜ᴀㄝֵᙃDŽ
Ɣ
㦰ऩᇐ㟾
㦰ऩᇐ㟾
17
ࡳ㛑Ϣ᪡
ࡳ㛑Ϣ᪡
ᕙᴎ⬠䴶
ᕙᴎ⬠䴶
ℸࡳ㛑ৃՓᙼᖿ䗳䖨ಲ㟇Ϟϔ㑻㦰ऩᕙᴎ⬠䴶DŽ
᪡ᮍ⊩˖
᪡ᮍ⊩˖
㓪䕥⬠䴶ϟˈᣝǏᕙ ᴎ ⬠ 䴶 ǐᖿ ᥋ 䬂 ˈᇍ䆆ᴎゟे䗔ߎ㓪䕥
⬠䴶ˈ䖨ಲ㟇Ϟϔ㑻㦰ऩ˗݊ᅗ⬠䴶ϟᣝℸ䬂ˈᇍ䆆ᴎゟे
䖨ಲ㟇ᕙᴎ⬠䴶DŽ
ᠿᦣ
ᠿᦣ
ᠿᦣࡳ㛑ৃࡽᙼᬊ݊ᅗֵ䘧Ϟⱘ䗮ֵ⌏ࡼˈҢ㗠њ㾷Ⳍ݇
㒘ਬᔧࠡⱘ⌏ࡼ⢊މDŽ
᪡ᮍ⊩˖
᪡ᮍ⊩˖
ᙼৃҹ䗮䖛Āᠿᦣā㦰ऩ䗝ᢽᓔਃᠿᦣ˗ᕙᴎ⬠
䴶ϟˈᣝǏᠿᦣǐᖿ᥋䬂ेৃᓔਃᠿᦣ˗㢹ᶤϾֵ
䘧Ꮖਃ⫼Ā㞾ࡼᠿᦣāࡳ㛑ˈ߭ߛᤶ㟇䆹ֵ䘧ᯊˈᇍ
䆆ᴎӮ㞾ࡼᓔਃᠿᦣDŽ
ᓔਃᠿᦣৢˈᇍ䆆ᴎᇚḍᓔਃᠿᦣᯊ᠔ֵ䘧Ϟ䆒
㕂ⱘᠿᦣ߫㸼䖯㸠ᠿᦣDŽᠿᦣ䖛བϟ˖
ᠿᦣᯊˈሣᐩϞᰒ⼎ ᷛˈ/('䮾♃DŽ
ᠿᦣࠄᶤϾֵ䘧Ϟ᳝⌏ࡼᯊˈᇍ䆆ᴎᇚذ⬭䆹ֵ䘧Ϟ
䖯㸠ᬊDŽ㢹ᠿᦣذ⬭Ѣ䴲Ӭܜֵ䘧ˈሣᐩϞᰒ⼎
ᷛ˗㢹ذ⬭ѢӬܜֵ䘧ˈ߭ᰒ⼎ᷛ DŽ
Ɣ
Ɣ
㢹ᙼ᮴䳔ᬊ䆹ֵ䘧Ϟⱘ⌏ࡼˈᠿᦣذ⬭ᯊᣝǏాໄ
ֵ䘧Јᯊߴ䰸ǐᖿ᥋䬂ᇚ䆹ֵ䘧᱖ᯊߴ䰸DŽ
㢹ᙼᛇ㒻㓁ᬊ䆹ֵ䘧Ϟⱘ⌏ࡼˈᠿᦣذ⬭ᯊᣝǏⲥ
ǐǏ䴭ాᠧᓔǐᖿ᥋䬂DŽ
㢹㽕䗔ߎᠿᦣˈݡᣝǏᠿᦣǐ䬂ेৃˈ䗮䖛Āᠿᦣā㦰ऩ
䗝ᢽ݇䯁ᠿᦣDŽ
㜅㔥
㜅㔥
བ䘛Ё䕀ৄᬙ䱰䍙ߎЁ䕀ৄⱘ㽚Ⲫ㣗ೈˈԚϸ䚼㒜ッഛ໘
Ѣᇍᮍⱘ䗮䆃㣗ೈݙˈℸᯊˈ⫼᠋ৃᣝǏ㜅㔥ǐᖿ᥋䬂䕀ᤶ㟇
Ⳉ䗮ᓣˈᅲ⦄ϸ䚼㒜ッⳈ䗮䆱DŽ
᪡ᮍ⊩˖
᪡ᮍ⊩˖
ᣝǏ 㜅 㔥ǐᖿ ᥋ 䬂 Ⳉ 䗮 ᓣ Ϣ Ё 䕀 ᓣ П 䯈 ߛ ᤶ DŽ
ⲥ
ⲥ
ᓔਃĀⲥāࡳ㛑ৃ䇗ᭈֵোᬊऍ䜡ᴵӊDŽ
᪡ᮍ⊩˖
᪡ᮍ⊩˖
ᣝǏ ⲥ ǐᖿ ᥋ 䬂 ᓔ ਃ ℸ ࡳ 㛑 ˈℸᯊᇍ䆆ᴎᰒ⼎
ᷛ˗ݡᣝ䆹䬂ेৃ䗔ߎDŽ
ᣝԣǏ᱖ᗕⲥǐᖿ᥋䬂ᓔਃℸࡳ㛑ˈℸᯊᇍ䆆ᴎᰒ⼎
ᷛ˗ᵒᓔ䆹䬂ेৃ䗔ߎDŽ
Ɣ
Ɣ
Ɣ
Ɣ

18
䴭ాᠧᓔ
䴭ాᠧᓔ
ᓔਃĀ䴭ాᠧᓔāࡳ㛑ᯊˈ᮴䆎ᰃ৺᳝䕑⊶ˈᇍ䆆ᴎྟ㒜ᠧᓔ
ুDŽ
᪡ᮍ⊩˖
᪡ᮍ⊩˖
ᣝǏ䴭ాᠧᓔǐᖿ᥋䬂ेৃᓔਃℸࡳ㛑ˈℸᯊᇍ䆆ᴎᰒ
⼎ ᷛˈᑊડĀ≭≭āⱘ㚠᱃ా䷇˗ݡᣝ䆹䬂ेৃ
䗔ߎDŽ
ᣝԣǏ᱖ᗕ䴭ాᠧᓔǐᖿ᥋䬂ेৃᓔਃℸࡳ㛑ˈℸᯊᇍ
䆆ᴎᰒ⼎ ᷛˈᑊડĀ≭≭āⱘ㚠᱃ా䷇˗ᵒᓔ䆹
䬂ेৃ䗔ߎDŽ
㋻ᗹ䄺
㋻ᗹ䄺
䘛ࠄ㋻ᗹᚙމᯊˈᙼৃ䗮䖛ℸࡳ㛑ᴹৠԈࠊЁᖗᇏ∖
ᐂࡽDŽ㋻ᗹ䄺᳔᳝催Ӭܜᴗˈ᮴䆎ᇍ䆆ᴎ໘Ѣথᇘᬊ
⢊ᗕˈᙼ䛑ৃ䖯㸠䄺DŽ
བ䳔ᶤϾֵ䘧Ϟਃ⫼䄺ࡳ㛑ˈᙼᖙ乏䗮䖛ݭ乥䕃ӊЎℸ
ֵ䘧݇㘨ϔϾ䄺㋏㒳DŽ䄺㉏ൟ䄺ᓣгৃ䗮䖛ݭ乥
䕃ӊ䆒㕂DŽ
㋻ᗹ䄺㉏ൟ
㋻ᗹ䄺㉏ൟ
↣Ͼ䄺ᓣϟˈ᳝ҹϟಯϾ䄺㉏ൟˈᙼৃ䗮䖛㒣䫔ଚ
ӏ䗝݊ϔ˖
Ɣ
Ɣ
ࡳ㛑Ϣ᪡
ࡳ㛑Ϣ᪡
䄺㉏ൟ 䇈ᯢ
䄺㉏ൟ 䇈ᯢ
号ワ 䄺ᯊˈᇍ䆆ᴎাথߎᇪ䫤ⱘ䄺䷇ˈৠᯊ
ሣᐩϞӮᰒ⼎ ᷛDŽ
ᐌ㾘 䄺ᯊˈᇍ䆆ᴎӮ㒭ߎৃৃ㾚ᦤ⼎DŽ
䴭䷇ 䄺ᯊˈᇍ䆆ᴎϡӮ㒭ߎӏԩৃᦤ⼎ৃ
㾚ᦤ⼎DŽ
ᏺ䆱䷇ⱘ䴭䷇ 䄺ᯊˈᇍ䆆ᴎӮ㞾ࡼᬊᴹ㞾ৠԈࠊ
Ёᖗⱘ䇁䷇ಲˈԚϡӮ㒭ߎӏԩৃᦤ⼎
ৃ㾚ᦤ⼎DŽ
㋻ᗹ䄺ᓣ
㋻ᗹ䄺ᓣ
ᴀᇍ䆆ᴎᬃᣕҹϟ⾡㋻ᗹ䄺ᓣˈᙼৃ䗮䖛㒣䫔ଚӏ䗝
݊ϔ˄⊼˖ҹϟ᪡ᮍ⊩ҹĀᐌ㾘ā䄺㉏ൟЎ՟˅DŽ
䄺ᓣ 䇈ᯢ
䄺ᓣ 䇈ᯢ
᱂䗮㋻ᗹ䄺 ℸᓣϟˈᙼা㛑䗮䖛ᣝϟǏ㋻ᗹ
䄺ǐᖿ᥋䬂ৠԈࠊЁᖗথ䗕䄺
ֵᙃˈϡ㛑Ϣᇍᮍ䖯㸠䗮䆱DŽ
ᏺিⱘ㋻ᗹ ℸᓣϟˈᣝϟǏ㋻ᗹ䄺ǐᖿ᥋䬂
䄺 ৠԈࠊЁᖗথ䗕䄺ֵᙃDŽᔧሣᐩϞ
ᰒ⼎
ᷛᯊˈা䳔ᇍⴔ呺ܟ亢䆆䆱
㗠᮴䳔ᣝǏ377ǐ䬂ˈᙼⱘ䆱䷇਼ೈⱘ㚠
᱃䷇ᇚ㹿থ䗕㟇ᬊᮍDŽ
ᏺ䇁䷇䎳䱣ⱘℸᓣϟˈᣝϟǏ㋻ᗹ䄺ǐᖿ᥋䬂
㋻ᗹ䄺 䖯ܹ䄺থᇘֵ䘧DŽᔧሣᐩϞᰒ⼎
ᷛᯊˈা䳔ᇍⴔ呺ܟ亢䆆䆱㗠᮴䳔ᣝ
Ǐ377ǐ䬂ˈᙼⱘ䆱䷇਼ೈⱘ㚠᱃䷇ᇚ
㹿থ䗕㟇ᬊᮍDŽ
19
ᢳᓣϟⱘ䄺᪡ᮍ⊩
ᢳᓣϟⱘ䄺᪡ᮍ⊩
᱂䗮㋻ᗹ䄺
᪡ᮍ⊩˖ᣝǏ㋻ᗹ䄺ǐᖿ᥋䬂থ䗕䄺ֵᙃDŽℸᯊ/('㑶
♃ᐌ҂ˈሣᐩϞᰒ⼎ ᷛঞĀথ䄺ⷕāᄫḋ˗㢹䗮䖛
ݭ乥ਃ⫼Āᴀഄ䄺āˈᴀᴎᇚӮડ䄺䷇DŽ
䗔ߎ䄺᳝ҹϟϸ⾡ᮍᓣ˖
䄺ᕾ⦃᭄⫼ᅠৢˈᇍ䆆ᴎᇚ㞾ࡼ䗔ߎ㋻ᗹ䄺
ᓣDŽ
䭓ᣝǏ㋻ᗹ䄺ǐᖿ᥋䬂ゟे䗔ߎ䄺DŽ
ᏺিⱘ㋻ᗹ䄺
᪡ᮍ⊩˖
᪡ᮍ⊩˖
ᣝǏ㋻ᗹ䄺ǐᖿ᥋䬂থ䗕䄺ֵᙃDŽℸᯊ/ ( '㑶♃
ᐌ҂ˈሣᐩϞᰒ⼎ ᷛঞĀথ䄺ⷕāᄫḋ˗㢹
䗮䖛ݭ乥ਃ⫼Āᴀഄ䄺āˈᴀᴎᇚӮડ䄺䷇DŽ
ᔧሣᐩϞᰒ⼎ ᷛᯊˈৃᇍⴔ呺ܟ亢䆆䆱ˈথ
䗕㋻ᗹিDŽ
ᔧሣᐩϞᰒ⼎ ᷛᯊˈ䖯㸠ᬊ˗ᬊࠄি
ৢˈሣᐩϞᰒ⼎ ᷛDŽ
䗔ߎ䄺᳝ҹϟϸ⾡ᮍᓣ˖
䗔ߎ䄺᳝ҹϟϸ⾡ᮍᓣ˖
ᔧ᠔䆒ᅮⱘ䄺䷇᭄㋻ᗹি᭄⫼ᅠৢˈᇍ䆆
ᴎᇚ㞾ࡼ䗔ߎ㋻ᗹ䄺ᓣDŽ
䭓ᣝǏ㋻ᗹ䄺ǐᖿ᥋䬂ゟे䗔ߎ䄺DŽ
Ɣ
Ɣ
וࡨՕପଋ३ગؔܕઊङࠩރչܴޞ澝ব
ۄշՒࠩރ澝ࠩՇଟޞ澝Շଟஜ澞
᭄ᄫᓣϟⱘ䄺᪡ᮍ⊩
᭄ᄫᓣϟⱘ䄺᪡ᮍ⊩
ᏺ䇁䷇䎳䱣ⱘ㋻ᗹ䄺
᪡ᮍ⊩˖
᪡ᮍ⊩˖
ᣝǏ㋻ᗹ䄺ǐᖿ᥋䬂䖯ܹ䄺ֵ䘧ˈሣᐩϞᰒ⼎
ᷛ˗
ᔧሣᐩϞᰒ⼎ ᷛᯊˈৃᇍⴔ呺ܟ亢䆆䆱ˈথ
䗕㋻ᗹিDŽ
ᔧሣᐩϞᰒ⼎ ᷛᯊˈ䖯㸠ᬊ˗ᬊࠄি
ৢˈሣᐩϞᰒ⼎ ᷛDŽ
ᔧ᠔䆒ᅮⱘĀ㋻ᗹি᭄ā⫼ᅠৢˈ㢹䳔㽕ݡথ
䍋㋻ᗹিˈৃᣝǏ37 7ǐ䬂˄㑶㡆/ ( '㑶♃ᐌ҂ˈሣ
ᐩϞᰒ⼎ ᷛ˅DŽ䆆䆱ᅠ↩ৢᵒᓔǏ3 7 7ǐ䬂
䖯㸠ᬊ˄ሣᐩϞᰒ⼎ ᷛ˅˗ᬊࠄিৢˈ
ሣᐩϞᰒ⼎ ᷛDŽ
㢹㽕䗔ߎ䄺ᓣˈ䭓ᣝǏ㋻ᗹ䄺ǐᖿ᥋䬂ेৃDŽ
וࡨՕପଋ३ગؔবۄշՒࠩރ澝ࠩՇଟޞ
չՇଟஜ澞
Ɣ
ࡳ㛑Ϣ᪡
ࡳ㛑Ϣ᪡

20
㐕ᖭֵ䘧䫕ᅮ
㐕ᖭֵ䘧䫕ᅮ
ℸࡳ㛑ৃ䗮䖛ݭ乥䕃ӊᓔਃDŽᔧᙼ݊Ҫ⫼᠋ऴ⫼䆹ֵ䘧ᯊ
ᣝϟǏ377ǐ䬂ˈᇍ䆆ᴎᇚথߎĀ௳ā䷇ᑊᰒ⼎Āֵ䘧㐕ᖭāˈ
ᦤ⼎ᙼℸᯊ᮴⊩থᇘDŽ㢹㽕ذℶĀ௳ā䷇ˈ䇋ᵒᓔǏ377ǐ䬂DŽ
ᔧ䆹ֵ䘧ぎ䯆ᯊˈᣝϟǏ377ǐᠡ㛑䖯㸠থᇘDŽ
䍙ᯊ⽕থ
䍙ᯊ⽕থ
ℸࡳ㛑ৃ䰆ℶ⫼᠋䖛Йഄऴ⫼ֵ䘧DŽབᵰ䖲㓁থᇘᯊ䯈䍙䖛
㒣䫔ଚ㓪䆒ᅮⱘᯊ䯈ˈᇍ䆆ᴎ߭ӮذℶথᇘᑊϨડ䄺ਞ
䷇DŽ㢹㽕ذℶ䄺ਞ䷇ˈ䇋ᵒᓔǏ377ǐ䬂DŽབ䳔ݡথᇘˈ䇋䯈
䱨ϔ↉ᯊ䯈ৢ˄ԧ⬅㒣䫔ଚ䆒㕂˅ݡᣝϟǏ377ǐ䬂DŽ
㢹㒣䫔ଚ㓪䆒ᅮ乘䄺ਞࡳ㛑ˈ߭䍙ᯊ⽕থ᠔䆒ᅮᯊ䯈ᖿ
ࠄࠡ㒭ߎ乘ਞ䄺ᦤ⼎ˈਞ䆝ᙼথᇘेᇚ㹿⽕ℶDŽ
וࡨהйবۄܕઊࠥڔޞͫߎԅਈޗݼ澞
ࡳ㛑Ϣ᪡
ࡳ㛑Ϣ᪡
21
ᬙ䱰໘⧚ᣛफ
ᬙ䱰໘⧚ᣛफ
བϞ䗄ᮍ⊩ҡ㾷އᙼⱘ䯂乬ˈᙼ䘛ࠄϔѯ݊ᅗⱘᬙ䱰ˈ䇋㘨㋏ᔧഄ㒣䫔ଚ+\WHUDҹ㦋পⱘᡔᴃᬃᣕDŽ
ᬙ䱰ᦣ䗄 ॳߚᵤ 㾷އᮍ⊩
᮴⊩ᓔᴎ ⬉∴ৃ㛑ℷ⹂ᅝ㺙 পߎ⬉∴ᑊ䞡ᮄ㺙ܹDŽ
⬉∴⬉䞣ৃ㛑Ꮖ㒣㗫ሑܙ⬉ᤶ⬉∴DŽ
⬉∴㾺⚍∵⌞ফᤳ㗠ᇐ㟈㾺ϡ㡃 ⏙⋕⬉∴㾺⚍DŽབҡϡ㛑㾷އ䯂乬ˈ䇋㘨㋏㒣䫔ଚ+\WHUDᣛ
ᅮ㓈ׂ⚍䖯㸠ẔׂDŽ
ᬊֵোᯊໄ䷇ ⬉∴⬉य़䖛Ԣ ܙ⬉ᤶ⬉∴DŽ
ᇣǃᮁ㓁᮴ໄ ䷇䞣䕗ᇣ 䇗䷇䞣DŽ
㒓ᵒࡼᅝ㺙ϡࠄԡ ݇ᴎৢ䞡ᮄᅝ㺙㒓DŽ
ᡀໄ఼ฉาফᤳ 䖯㸠ㅔऩⱘ䚼⏙⋕DŽབҡϡ㛑㾷އ䯂乬ˈ䇋㘨㋏㒣䫔ଚ
+\WHUDᣛᅮ㓈ׂ⚍䖯㸠ẔׂDŽ
᮴⊩Ϣ㒘ݙ݊Ҫ ᠔⫼乥⥛ֵҸ䆒㕂Ϣ㒘ݙ݊Ҫ៤ਬϡৠ 䆒㕂Ϣ㒘ݙ݊Ҫ៤ਬⳌৠⱘ乥⥛ֵҸDŽ
៤ਬ䗮䆱 ᭄ᄫǃᢳֵ䘧䆒㕂ϡᔧ 䆒㕂Ⳍৠⱘ᭄ᄫֵ䘧ᢳֵ䘧DŽ
䎱⾏㒘ݙ݊Ҫ៤ਬ䖰 ሑ䞣䴴䖥݊Ҫ៤ਬDŽ
ֵ䘧Ёߎ⦄݊Ҫ ফࠄৠ乥⫼᠋ⱘᑆᡄ ᬍЎᮄⱘ乥⚍ˈ䇗ᭈ䴭ా㑻߿DŽ
䗮䆱ໄᴖ䷇ 䆒㕂ֵҸ ᇍ㒘ݙ᠔᳝ᇍ䆆ᴎ䖯㸠ֵҸ䆒㕂ˈҹ䰆ℶৠ乥ᑆᡄDŽ
ాໄ䕗 Ϣ݊Ҫ៤ਬП䯈ⱘ䗮䆃䎱⾏䖛䖰 䴴䖥݊Ҫ៤ਬDŽ
᠔໘ԡ㕂ϡՇˈབফ催ᓎㄥ⠽䰏ᣵˈ ⿏㟇ᓔ䯨ᑇഺഄৢˈᓔᴎ䞡䆩DŽ
ԡѢഄϟᅸㄝ
ফ⬠⦃๗⬉⺕ᑆᡄ䙓ᓔৃ㛑ᓩ䍋ᑆᡄⱘ䆒DŽ
22
ֱݏϢ⏙⋕
ֱݏϢ⏙⋕
Ўњֱ 䆕 ᴀᇍ 䆆 ᴎ থ ݊㡃 ད ᗻ 㛑ˈҹঞᓊ䭓݊Փ⫼ᇓੑˈ
䇋❳ᙝҹϟݙᆍˈདഄᇍᴎ఼䖯㸠᮹ᐌֱݏϢ⏙⋕DŽ
ֱݏ
ֱݏ
䇋࣓⫼⹀⠽こࠎࠂ㢅ᇍ䆆ᴎ˗
䇋࣓ᇚᇍ䆆ᴎᄬᬒѢ᳝㜤㱔⬉ᄤ⬉䏃⠽䋼ⱘ⦃๗˗
ᨎᏺՓ⫼ᇍ䆆ᴎ䖛Ёˈ䇋࣓⫼ᦤ㒓㘇ᴎ㒓˗
ᔧϡՓ⫼䰘ӊᯊˈ䇋Ⲫད䰘ӊষⲪDŽ
⏙⋕
⏙⋕
䇋ᅮᳳՓ⫼⋕ޔᑆ➹ⱘ᮴㒦Ꮧ↯ࠋᣁএᇍ䆆ᴎ㸼䴶ঞ
ܙ⬉ᵕ⠛䰘ⴔⱘ㉝ᇬDŽ
ᇍ䆆ᴎⱘᣝ䬂ǃࠊᮟ䪂ᴎབᵰব㛣DŽৃ⫼Ёᗻ
⋫⍸ࠖ᮴㒎Ꮧᇍ݊䖯㸠⏙⋕ˈ䇋࣓⫼এ∵ࠖǃ䜦㊒ǃ
䳒ࠖ⊍ࠊࠖㄝ࣪ᄺ㥃ࠖҹ䙓ܡ݊㸼䴶ফ
ᤳDŽ⏙⋕Пৢˈࡵᖙֱ䆕ᇍ䆆ᴎᕏᑩᑆ➹ˈ৺߭䇋࣓Փ
⫼DŽ
ࡨ۞֨ۓ੧ࢎФӹͫબҼثઔߑٷՈӟऄ
ࡐ澞
Ɣ
Ɣ
Ɣ
Ɣ
Ɣ
Ɣ
䋼䞣ֱ䆕Ϣ㓈ׂᴵℒ
䋼䞣ֱ䆕Ϣ㓈ׂᴵℒ
⍋㛑䖒䗮ֵ㙵ӑ᳝䰤݀ৌ˄ҹϟㅔ⿄ +\WHUD˅ᡓ䇎ˈ
+\WHUD ⫳ѻⱘᇍ䆆ᴎѻકˈ㞾䌁фП᮹䍋ˈℷᐌՓ⫼ǃ᪡
Ϣ㓈ᡸᴵӊϟˈߎ⦄ᴤ᭭ࠊ䗴Ꮉ㡎ᮍ䴶ⱘ㔎䱋ˈৃѿফ
ҹϟ㾘ᅮⱘֱׂ᳡ࡵDŽ
ֱׂⱘ㣗ೈϢᳳ䰤
Џᴎ Ͼ᳜
ᷛ䜡䰘ӊ˄ࣙᣀ㒓ǃ⬉∴ǃܙ⬉ᑻঞⲂᏺ།ㄝ˅Ͼ᳜
ֱׂⱘ⬇䇋
བ⬇䇋+\WHUDѻકֱׂ᳡ࡵˈᖙ乏ᦤկ᳝ᬜⱘ+\WHUDѻ
કֱׂव᳝ᬜ䌁ᴎথ⼼ॳӊЎ߁䆕˗ֱׂᳳݙˈ+\WHUD
ѻકⱘⳌ݇ᷛᖫˈࣙᣀᑣ߫োⷕᷛㅒㄝˈᑨֱᣕ⏙᱄ᅠᭈϨ
ϡᕫᩩ↕DŽ
ѻકֱׂवᰃᣛ⬅+\WHUD+\WHUDᥜᴗⱘ㒣䫔ଚ฿ݭ
ᑊⲪゴⱘᅠᭈֱׂवDŽֱׂवϞ฿ݭݙᆍᑨࣙѻક
ৡ⿄ǃѻકࠊ䗴ᑣ߫ো˄㓪ো˅ǃ䌁фѻક᮹ᳳǃ䫔
ଂऩԡㄝ᳝ᬜֵᙃ˗
᳝ᬜ䌁ᴎথ⼼ᰃᣛ䋶䚼䮼㒳ϔⲥࠊⱘথ⼼ˈᰃѻક
ଂߎⱘ䞡㽕߁䆕DŽথ⼼Ϟᑨ฿ݭѻકৡ⿄ǃѻકࠊ䗴
ᑣ߫ো˄㓪ো˅ǃ䫔ଂ᮹ᳳǃ䌁ᴎ䞥乱ㄝ᳝ᬜֵᙃDŽ
23
וࡨ
அࣇثઔߑڷீؤ֛+\WHUDؚ߆ۈୂ੧
ғͺ
அࡊثઔߑͧஅࡊӰଇՃљЇͨڷீؤ
֛+\WHUDؚ߆ۈୂ澝+\WHUDיғॻ۪
+\WHUD݉ߓङ୦ғॻ੧ғͺ
બرфսԕױͫЇ۱ӛચՃદূङݻஞ
પޢؤਙԽࢵ۪+\WHUDܶؔङ։ե߆ԇ
ࢵ澞ۓЭՕљପଋܪ۸+\WHUDङҲો߆ԇࢽ
িੂڱٮԉ澞
ᴀ᳡ࡵֱ䆕ᴵℒϡࣙᣀҹϟݙᆍ˖
䍙ߎֱׂ᳝ᬜᳳ䰤˗
ᣝ䇈ᯢк㽕∖Փ⫼ǃ㓈ᡸঞֱݏ᠔䗴៤ⱘᬙ䱰ᤳ
ണ˗
䴲ℷᐌ䴲ᐌ㾘ᚙމϟՓ⫼ᴀѻક᠔䗴៤ⱘᬙ䱰
ᤳണ˗
㒣 +\WHUD ᥜᴗⱘᬍ䗴ǃᬍࡼǃᢚौǃՓ⫼䴲ॳ㺙
ⱘ䰘ӊ⬉∴ˈ㒣 +\WHUD ᥜᴗⱘᚙމϟᇍѻક
䖯㸠䕃ӊछ㑻ǃӊᢚࡼㄝ᠔䗴៤ⱘᬙ䱰ᤳണ˗
䴲ᴤ᭭ࡴᎹ䯂乬᠔䗴៤ⱘ㒓ᬙ䱰ᤳണ˗
ЏᴎϞⱘ +\WHUD Ⳍ݇ᷛᖫᑣ߫োⷕᷛ䌈㹿ᩩ↕ǃ
ᑣ߫ো㹿ᢍ䰸᮴⊩䕼䅸ⱘѻક˗
䌁ф᮹ᳳ᮴⊩䡈ᅮⱘѻક˗
ϡৃᡫ᠔䗴៤ⱘᬙ䱰ᤳണ˗
ℷᐌঞᐌ㾘⺼ᤳ˗
བϟᚙމⱘ⬉∴˖
Dˊ ⬉∴ᆚᇕ᳝ӏԩҎЎ⸈ᤳਃᇕ⦄䈵˗
Eˊ ѻક㾘ᅮПⱘ䆒㓈ᡸᴵӊϟˈ䖯㸠ܙ
⬉Փ⫼㗠䗴៤ⱘᬙ䱰ᤳണDŽ
⡍߿䇈ᯢ˖
⡍߿䇈ᯢ˖
⊩ᕟܕ䆌ⱘ䰤ᑺݙˈ+\WHUDӏԩᚙމϟ䛑ϡᇍ䍙
䖛ѻક䌁фӋḐⱘᤳ༅ᡓᢙ䋷ӏˈৠᯊϡᇍӏԩՓ⫼
ᤳ༅ǃᯊ䯈ᤳ༅ǃଚϮᤳ༅ǃ߽⍺ᬊܹᤳ༅ǃϡ㛑
Փ⫼ѻક㗠ᇐ㟈ⱘ䰘ᏺⱘǃ⡍⅞ⱘ㒻থᗻᤳണᡓᢙ
䋳䋷DŽ
⬅Ѣ䞛⫼ᴀѻક᠔Փ⫼ⱘ⦃๗ǃ㋏㒳ㄝϡⳌৠˈ
+\WHUDᴀֱׂᴵℒϟϡᇍᭈϾ㋏㒳ⱘ㽚Ⲫ㣗ೈǃ㽚
Ⲫऎඳ䖤㸠⢊މᡓᢙ䋷ӏDŽ
ᴀ㓈ׂᴵℒᰃḍᆊⳌֱׂ݇ᴵ՟᠔ࠊᅮⱘˈ⬅Ѣ
ᡔᴃথሩϢᏖഎ䇗ᭈㄝ㋴ˈᴵℒݙᆍгᇚ䖯㸠Ⳍᑨ
ⱘׂᬍˈԧׂᬍ䇋ҹ +\WHUD ᅶ᠋᳡ࡵЁᖗথᏗⱘ
㓈ׂᴵℒবࡼ䗮ⶹЎޚDŽ݊Ҫሑџᅰ䇋ҹᆊⳌ݇
ᴵ՟ЎޚDŽ
䋼䞣ֱ䆕Ϣ㓈ׂᴵℒ
䋼䞣ֱ䆕Ϣ㓈ׂᴵℒ
24
䗝䌁䜡ӊ
䗝䌁䜡ӊ
ᴀᴎЏ㽕ⱘ䗝䌁䰘ӊᏆࣙབϟ߫㸼Ёˈབ䳔䰘ӊֵᙃˈ䇋䆶ᙼᔧഄⱘ㒣䫔ଚᢼᠧ+\WHUDܡ䌍᳡ࡵ⛁㒓
וࡨબ҅ऀ._ZKGXܶؔङў澞ਲ਼ऀۯݰਘ҅ऀߌકՕङўͫөं࠴۱حਚङ▲Ӥեߧͫंऀۯਘ੧િુ澞
䰆∈ᡀໄ఼䆱ㄦ,3
601
377210,&䗣ᯢㅵ㘇ᴎ
($1
Ā'āൟ㘇ᣖ᮴ㅵ㘇ᴎ
(+1
377210,&㘇าᓣ㘇ᴎ
(61
ϝ㒓䗣ᯢㅵⲥ㘇ᴎ㉇
㡆($1
ⳳⲂᨎᏺ༫ৃᮟ䕀
/&<
㓪䖲㒓86%ষ
3&
݁ッ䕧ߎᓔ݇⬉⑤
36
25
䰘ᔩ˖䕧ܹ⊩
䰘ᔩ˖䕧ܹ⊩
ᙼৃ䗮䖛ᇍ䆆ᴎⱘ䬂Ⲭ䕧ܹ⫼᠋߿ৡǃোⷕⷁֵDŽᴀᇍ䆆
ᴎᬃᣕ㣅᭛䕧ܹ⊩ǃЁ᭛ㅔԧᣐ䷇䕧ܹ⊩ǃ᭄ᄫ䕧ܹ⊩DŽ
Ё᭛ㅔԧᣐ䷇䕧ܹ⊩
᪡ᮍ⊩˖
᪡ᮍ⊩˖
ᣝ 䬂ߛᤶ㟇ᣐ䷇䕧ܹ⊩˗
ᣝ᭄ᄫ䬂ձ䕧ܹᣐ䷇ᄫ↡ˈ/ & 'ᰒ⼎䗝ᣐ䷇ঞ݊
ᇍᑨⱘ䗝∝ᄫ˗
ᣝǏϞ⿏ǐǏϟ⿏ǐ䬂䗝ᢽ᠔䳔ᣐ䷇˗
ᣝǏ⹂䅸ǐ䬂ᇚ催҂ᴵ⿏㟇Ё᭛∝ᄫऎˈݡᣝǏϞ
⿏ǐǏϟ⿏ǐ䬂䗝ᢽ᠔䳔∝ᄫ˗
ᣝǏ⹂䅸ǐ䬂䕧ܹ᠔䗝∝ᄫDŽ
䞡ҹϞℹ偸ᅠ៤䕧ܹDŽ
㣅᭛䕧ܹ⊩
᪡ᮍ⊩˖
᪡ᮍ⊩˖
ᣝ 䬂ߛᤶ㟇ݭᇣݭ㣅᭛䕧ܹ⊩˗
ᣝ᭄ᄫ䬂䕧ܹ᠔䳔㣅᭛ᄫ↡ˈ/&'ᰒ⼎䗝ᄫ↡˗
ᣝǏϞ⿏ǐǏϟ⿏ǐ䬂䗝ᢽ᠔䳔ᄫ↡˗
ᣝǏ⹂䅸ǐ䬂䕧ܹ᠔䗝ᄫ↡DŽ
䞡ҹϞℹ偸ᅠ៤䕧ܹDŽ
᭄ᄫ䕧ܹ⊩
᪡ᮍ⊩˖
᪡ᮍ⊩˖
ᣝ 䬂ߛᤶ㟇᭄ᄫ䕧ܹ⊩˗
Ɣ
Ɣ
Ɣ
ᣝ᭄ᄫ䬂 㟇 ৃ䕧ܹⳌᑨⱘ᭄ᄫDŽ
䕧ܹ⡍⅞ᄫヺ
ᣝ᭄ᄫ䬂 ˈৃ䕧ܹϔѯ᳔ᐌ⫼ⱘᷛ⚍⡍⅞ᄫヺDŽ
㽕䕧ܹぎḐˈ䇋ᣝ 䬂DŽ
וࡨ֨ٝ૿ҵކߎުॐԚֿܷͫ澬Ї१澭澬Ј१澭
୰Օ٘११Ұ߶澞
Ɣ
811PD78000000
OWNER’S MA
N
W03441 F03152
the trademark of Hytera Communications Corp., Ltd.
2010 Hytera Corp., Ltd. All Rights Reserved.
Address: Hytera Tower Hi Tech Industrial Park North
NanshanDistrict Shenzhen China.
Post:518057
http://www.hytera.cn
,- ,
,,
2010 Hytera Corp., Ltd.
http //www hytera cn:. .