Hyundai Electronics Co HGP-230 Single Band PCS CDMA Phone User Manual
Hyundai Electronics Industries Co Ltd Single Band PCS CDMA Phone Users Manual
UserManual.wiki
>
Hyundai Electronics Co
>
HGP 230 User Manual
Users Manual
Navigation menu
Upload a User Manual
Namespaces
Wiki Guide
HTML
PDF
Info
Views
User Manual
Discussion / Help
Navigation

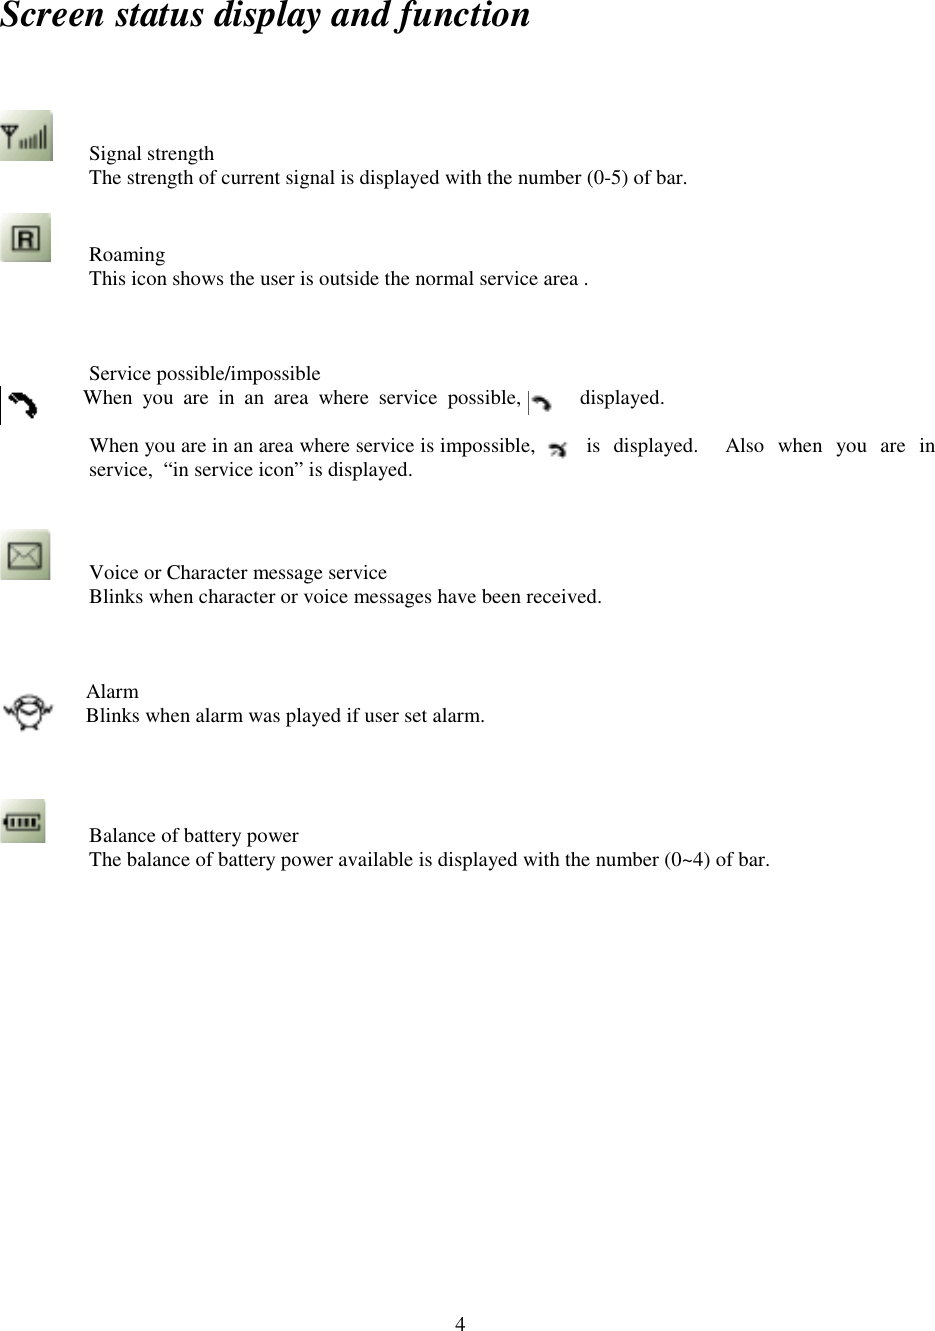
![3Role of the function buttons[TALK] This button is used when you make a call or receive a call..[END] This button is used when you terminate a call or exit the current menu in the menu[RCL] This button is used when you look up the list of stored phone numbers or names or the phone number you just called.[CLR] This button is used to clear the digits and/or text from the display or Memory.[STO] This button is used to go to a lower level menu or to store the set parameter; put phone number and names into memory or erase those that were input.[*][# ] These buttons are scroll buttons which you use to select screen contents.[PWR] This button is used to turn the handset on or off[MENU] This button is used to select menu.This button is used to select SMS service ..](https://usermanual.wiki/Hyundai-Electronics-Co/HGP-230/User-Guide-35236-Page-3.png)

![8 Menu RECALL MENU 1: PHONE BOOK2: CALL LOGS MENU IN CALLS 1: SEND PHONE #2: SCRATCH PAD3: MUTE DIAL MENU( DIAL BUTTON + [MENU]BUTTON)1:HARD PAUSE2:TIME PAUSE3:ONE HYPHEN DIAL MENU IN CALLS 1:SEND PHONE #2:HART PAUSE3:TIME PAUSE4:ONE HYPHEN](https://usermanual.wiki/Hyundai-Electronics-Co/HGP-230/User-Guide-35236-Page-8.png)
![9How to use Menu function1. In a standby screen, press [MENU] button.2. To move around the menu, use scroll buttons.If you press the scroll button continuously, the menupasses by automatically. .3. To go back to previous screen, press [CLR] button.To exit menu screen, press [END] button.4. To go to a lower menu, press appropriate number, or selectdesired item by scroll button, and then press[STO]button.5. [SMS],[RCL],[SEND] buttons can be used while using menufunction ♣ Please read this before you use your handsetScroll buttons: [*▲],[#▼],volume[+],volume[-]If there is lower menu, the lower menu will benewly displayed.](https://usermanual.wiki/Hyundai-Electronics-Co/HGP-230/User-Guide-35236-Page-9.png)
![10How to use handsetHow to turn the handset on• Press [PWR]button until the lamp turn onHow to turn the handset off• Press [PWR]button until the lamp turn on! “REGISTERING...” message is displayed when the user presses PWR button.This message indicates that the handset is registering the power offinformation, and that means mobile telecommunications service system does not have to search theuser.!!!! If the “LOW BATTERY WARNING POWER OFF” message is displayed and thepower goes off, there is a possibility of damaging the memory. Therefore, in thatcase, do not turn the power on, and change or charge the batteryimmediately.!!!! When the power goes off when the battery is separated while it waspower on status,the calling time, phone number previous call, and frequently used areacode might not get stored properly.! Handset is in locking status if “Lock code” is displayed on the screen. When the lock code is displaying, enter a 4-digit lock release number to unlock the handset. then use.!The default value of lock code is “0000”..! If there is a lot of stored information, ittakes](https://usermanual.wiki/Hyundai-Electronics-Co/HGP-230/User-Guide-35236-Page-10.png)
![11How to call1 Press area code + phone number in order How to modify a phone number you have entered: " number by number modification: Press [CLR] button. " Whole number modification: Press [CLR] button and hold more than 0.5 second.• Press [TALK]. ! "CALL FAILED” message is displayed when the call is not connected. ! When the line is busy, press (END) button, and retry [TALK] button.! If you select AUTO RETRY function, the call will be repeatedautomatically .! It is convenient to connect the call after hearing system connectionsignal sounding “beep, beep, beep” .• press [END]button when end the call ! The number of calling minutes blinks for 3 seconds. Depending on the network the user is using, there can be edifferences but it is not related to actual service charge the user has to pay. Press any button to go back to standby statusNote To go back to previous call number, press [TALK] button. If the sign shows up on the screen, the call cannot beconnected, and the user should get out of the current area. .](https://usermanual.wiki/Hyundai-Electronics-Co/HGP-230/User-Guide-35236-Page-11.png)
![12Phone number input method! To call convention phone : area code + phone number+ [TALK]! To call emergency numbers : emergency number ( 911,311,*911,#911,#311)+ [TALK]! To call other cellular phone : area code + phone number+ [TALK]! To call international number: international call identification number + country code +phone number + [TALK]! To call wireless beeper:wireless beeper identification number + beeper number+ [TALK]Electronic dialing function using pause characterElectronic dialing function to use ARS service provided bybanks, etc,and auto beep function.1. Enter phone number, and press [MENU]#### [1] or [2]. 0154834326P2. Press numbers to be electronically dialed. 01548343 26P1T023449000 3. Press [TALK] button. " $ HARD PAUSE : Enter the pause character (P) after the phonenumber and press [TALK]number to send phone number entered after thepause character.](https://usermanual.wiki/Hyundai-Electronics-Co/HGP-230/User-Guide-35236-Page-12.png)
![13 " % TIME PAUSE : If you enter the pause character (T), the phonenumber entered after the pause character will be send outautomatically in three seconds.How to answer callsNote ! If you set AUTO ANSWER function in advance, the call will be connected afterthe designated number of bell rings. (Refer to P )Sender number display function PCS service provider supports sender number displayfunction. The service will be available after subscribing to theservice.1 Any button except [PWR] button when phone bell rings or lamp blinks.• To end the call, press [END] button.](https://usermanual.wiki/Hyundai-Electronics-Co/HGP-230/User-Guide-35236-Page-13.png)
![14 When there is an incoming call, the sender’s phone number isdisplayed on the screen as following. Caller ID : 02 - 3 4 4 9 - 0 0 0 0 Missing message display functionDisplays calls that the user didn’t answered.① Displays the number of missed calls and latest callingtime. MISSED XX CALLS 18 : 25 & If the user subscribes sender number display function service, senders’numbers will be displayed on the screen. And the call will be stored in the previous call & The message will be cleared when the user presses [CLR]/[END] button.How to adjust volume Volume adjusting can be done in two ways: by using the volume button on the side of the receiver, or by using the buinon menu ①Adjust volume by pressing the volume button during the state of operation of the handset as below: " Call status: Ear piece volume adjustment " Standby status: Beep volume adjustment " When bell rings: Ringer volume adjustment " Call status in hands-free: hands-free volume adjustment](https://usermanual.wiki/Hyundai-Electronics-Co/HGP-230/User-Guide-35236-Page-14.png)
![15 ➁ After adjusting the volume, store using [STO] button. " The volume level is stored automatically2 seconds after adjusting the volume.](https://usermanual.wiki/Hyundai-Electronics-Co/HGP-230/User-Guide-35236-Page-15.png)
![16Call functionsSilent pad phone number storage functionIn this function a beep sound is blocked from transmission to the other party when you press a new phonenumber to store during a call.① Press [MENU]→ 2 during a call② Enter the phone number you want to store.Muting functionThis function mutes your voice from being transmitted to the other party during a call.① Press [MENU]→ 3 during a call.Caller number sending functionThis function enables the caller number to be transmitted automatically to a pager you called without pressingthe whole phone number .① Press [MENU]→➀ when you are asked to enter your number after recalling. To cancel this function, repeat the above procedure. Then “MUTE” message disappears.Reference • To cancel this function, repeat the above procedure. Then “SILENT PAD” message disappears.ReferenceTo check current time while using the handset, press [CLR] button..](https://usermanual.wiki/Hyundai-Electronics-Co/HGP-230/User-Guide-35236-Page-16.png)
![18How to store a phone numberYou can store up to 100 frequently used phone numbers in memory.➀ Enter the phone number you wish to store and press [STO] button! Initial empty memory location number is displayed. If there is no empty memory,warning message saying “MEMORY SPACE IS FULL !“ is displayed with warning sound.! If there is desired memory location number, enter the number.➁ To store in the location number that appears in the display window, press [STO] button.! If the "OVERWRITE? “ message appears after entering memory locationnumber, that means there is another stored phone number on thelocation already.Select designated value using scroll button, and press [STO]• ••••. (YES) : clearing previously stored number and storing newly enterednumber. (NO): leaving the previously stored number.➂ Enter the person’s name and press [STO] button. ! Select phone number hiding function using scroll button.If you select “ YES”, the number is entered as secret number. And it canbedisplayed only when the lock code is entered.• Press [STO]button to store.](https://usermanual.wiki/Hyundai-Electronics-Co/HGP-230/User-Guide-35236-Page-18.png)
![19How to make a call using a stored phone number This function lets you call stored phone numberYou can make a call conveniently using a stored mber without pressing [TALK] button .0~9 : Press corresponding memory number and hold more than 1 second. 10~99 : Press first digit and second digits of the memory number short and long respectively. " If no phone number is stored, “no contents is found in the location number” is displayed on the screen. " If a phone number was stored using hiding function, the number is not displayed when originating a call.How to store a phone number One –touch /Two-touch dialing function](https://usermanual.wiki/Hyundai-Electronics-Co/HGP-230/User-Guide-35236-Page-19.png)
![20 Reference -How to enter letter characters using dial buttons-❸ Repeat until all the characters you want are entered.❷ Press [#• ]button to enter the next character.❶ Select characters you wish to enter using the dial buttons.Dial button 1 repetition 2 repetitions 3 repetitions 4 repetitions 5 repetitions 1 12ABC A B C 23DEF D E F 34GHI G H I 49WXYZ W X Y 9 Z----------" You can store up to 16 characters." Cursor moves to the next column automatically in two seconds after the selection of the character." When press [ ] button change the ~" When entering special characters such as 0!.?,-( )’ ”*#=$-+[ ], press [0] button repeatedly. The special characters will be displayed in order.How to modify incorrectly entered characters (use [CLR] button)" For correcting one character at a time: press [CLR] button shortly or [*•]button." For correcting the entire entry: press [CLR] button and hold more .](https://usermanual.wiki/Hyundai-Electronics-Co/HGP-230/User-Guide-35236-Page-20.png)
![21How to find the phone numbers of your latest callsThe user can search up to 20 latest called numbers➀ Press [RCL] + [1] + [1] and Locate phone numbers you want using the scroll button " [*•] scans up the phone numbers [#•] shows 1: EDIT, 2: ERASE➁ If you want to make a call to the corresponding number, press [TALK] button.How to find a stored phone numberRecalling by memory location number• Press [RCL]+[2]• Enter the memory location number ! If you don’t enter specific memory location number, use the scroll button tosearch from the first memory location number.• Search phone numbers using scroll button. " [*•] scans up the phone numbers [#•] shows 1: EDIT, 2: ERASE• Press [TALK]button if you want to call to corresponding number.Recalling by alphaEnter the alpha(or part of the alpha) ,find the phone number• Press [RCL] + [1] + [2].• Enter the alpha (or part of the alpha) you want. After entering the alpha, press [STO]button➂ Locate the phone number you want using the scroll button. " The first number of an entered character row is displayed. " [*•] scans up the phone numbers [#•] shows 1: EDIT, 2: ERASE➃ Press [TALK] button if you want to call to corresponding number.](https://usermanual.wiki/Hyundai-Electronics-Co/HGP-230/User-Guide-35236-Page-21.png)
![22Recalling by number• Enter a phone number (or part of the number) you want. After entering the number, press [RCL] button.• Locate the phone number you want using the scroll buttons. " [*•] scans up the phone numbers [#•] shows 1: EDIT, 2: ERASE• Press [TALK] button if you want to call the corresponding number.• If you want erase all stored numbers refer to P58• To clear phone number stored suing hiding function, enter the lock code.](https://usermanual.wiki/Hyundai-Electronics-Co/HGP-230/User-Guide-35236-Page-22.png)
![24Auto Set FunctionAuto Retry interval functionWhen a call is not connected because of too much traffic in the service system, this functionretries the call automatically at a set interval.• Press [MENU] ➜ [2]➜[1] ➜[1]• Select the parameter you want using scroll button and press [STO] buttonAuto Retry times• Press [MENU] ➜ [2] ➜ [1]➜[2]• Select the parameter you want using scroll button and press [STO] buttonAuto answer functionThis function answers an incoming call automatically after a number of rings that the user sets.• Press [MENU] ➜ [2] ➜ [2]• Select the parameter you want using scroll button and press [STO]buttonAutomatic hyphen-insertion function1 Press [MENU] ➜ [2] ➜ [3]• Select the parameter you want using scroll button " When the other party is busy, this function does not work." Auto answer function not used if you select BEEP sound or lamp](https://usermanual.wiki/Hyundai-Electronics-Co/HGP-230/User-Guide-35236-Page-24.png)
![25 and press [STO]buttonAuto Lighting FunctionThis function is used in setting the day-light hours that do not need lighting. The function can beused after acquiring the system. The lighting will be on for the hours not set by the user.• Press [MENU] ➜ [3] ➜ [4]➜[1]• Select the parameter you want using scroll button and press[STO] button. • Enter the time when you selected “YES”. OFF TIME ¢ºFROM 08 : 00 TO 17 : 00 [STO] -> OK ! Default parameters are set at 8 a.m. •5 p. m. ! To move to next item, press [STO]/[SND] button. ! The user can add or subtract number using scroll button.• To set the time, press [STO]button.DTMP speed adjusting functionThis function changes DTMP speed transmitted when DTMP is dialed.• Press [MENU] ➜ [2] ➜ [4]• Select the parameter you want using scroll button and press[STO] button.One Touch Dialing Select FunctionSelect Ont-touch or Two-touch dialing function• Press [MENU] ➜ [2] ➜ [5]• Select the parameter you want using scroll button and press[STO] button.](https://usermanual.wiki/Hyundai-Electronics-Co/HGP-230/User-Guide-35236-Page-25.png)
![26Current time and day display functionThis function displays current time, date, and day• Press [MENU] ➜ [3] ➜ [1]• Select the designated parameter you want using scroll button and press [STO]button .Change banner functionThis function changes banner displayed on the screen when you turn on your handset.You can enter a banner up to 14 characters long.• Press [MENU] ➜ [3] ➜ [2]• Enter a banner and press [STO]Screen adjusting functionThis function adjusts the LCD screen contrast of the handset.• Press [MENU] ➜ [3] ➜ [3]• Select the contrast level you want using the scroll buttons.Ringer selection functionBell Sound Selection① Press [MENU] ➜ [4] ➜ [1] ➜ [1]• Select the sound you want using scroll button and press [STO]button • 7 kinds of bell sounds (1~7) are available and 7 kinds of melodies (8~14) are available.](https://usermanual.wiki/Hyundai-Electronics-Co/HGP-230/User-Guide-35236-Page-26.png)
![27Vibrate SelectionThis function can be conveniently used by setting the beep sound function when the user is in places where it is difficult to get calls.① Press [MENU] ➜ [4] ➜ [2]• Select the vibrate you want using scroll button and press [STO]buttonSelect Lamp① Press [MENU] ➜ [4] ➜ [2]• Select Lamp type you want using scroll button and press [STO]button • Support 2 kind of Lamp soundVolume Adjustment Functions1. After pressing [MENU]-> [4], enter number(from [1] to [4] ) that corresponse to adjustment of volume(ear volume, ringer volume, key tone volume, and handsfree volume). • If the warning alarm sounds because of low battery, the sound will not be heard even if the user press the button2. Select the level using scroll button and press [STO]button.](https://usermanual.wiki/Hyundai-Electronics-Co/HGP-230/User-Guide-35236-Page-27.png)
![28Timer FunctionVerification of total air time① Press [MENU] ➜ [5] ➜ [1] ➜ [2]Verification of the last call time① Press [MENU] ➜ [5] ➜ [1] ➜ [1]Verification of home calls① Press [MENU] ➜ [5] ➜ [1] ➜ [3]Verification of roaming time① Press [MENU] ➜ [5] ➜ [1] ➜ [4]Alert FunctionAlert during a call① Press [MENU] ➜ [7] ➜ [1]This function sounds an alert in every minute, letting you know the call lapse time.• Select the parameter you want using scroll button and press [STO] button.. YES: sounds alert when change service area NO: sounds no alertsAlert failed serviceThis function sounds alerts when the handset can’t make calls irregularly.① Press [MENU] ➜ [7] ➜ [2]• Select the parameter you want. and press [STO] button](https://usermanual.wiki/Hyundai-Electronics-Co/HGP-230/User-Guide-35236-Page-28.png)
![29 YES: sounds alert when calls can’t be made. NO: sounds no alert.Alert change of serviceThis function sounds an alert and gives out a message when the handset enters a new service area,or when it enters other system service area, or when it leaves the user’s service area.① Press [MENU] ➜ [7] ➜ [3]• Select the parameter you want using scroll button and press[STO]button YES: sounds alert and displays message when change of service NO: sounds no alert.There is 3 kind of MessageCHANGING SVC ARE : when you are entering a service area different from the one you just left .LEAVING SVC AREA: when you are leaving your service area.ENTERING SVC AREA: when you are entering a new service area.Alert the low strength level of a received callThis function sounds an alert when the signal of a received call is weak.① Press [MENU] ➜ [7] ➜ [4]• Select the parameter you want using scroll button and press[STO]button YES: sounds alarm when the received call strength is weak. NO: sounds no alarm.](https://usermanual.wiki/Hyundai-Electronics-Co/HGP-230/User-Guide-35236-Page-29.png)
![30Self number check functionThis is a function to check the telephone number of the handset currently in use.① Press [MENU] ➜ [8] ➜ [1] When the user press [# !] button in standby status, the handset’s phone number is displayed.Handset version check functionThis function checks the version of the handset currently in use.① Press [MENU] ➜ [8] ➜ [2]EVRC mode functionThis function checks the version of the handset currently in use.① Press [MENU] ➜ [8] ➜ [3]](https://usermanual.wiki/Hyundai-Electronics-Co/HGP-230/User-Guide-35236-Page-30.png)
![32Lock FunctionAuto Lock FunctionThis function prevents any other person from using the handset without permission. If locked, the handsetcan’t be used to dial or use any other function① Press [MENU] ➜ [9] ➜ [Lock Code] ➜ [1] ➜ [1] • Default parameter of lock code at the purchase is “0000”• Select the parameter you want using scroll button and press [ STO] button. • Lock function is ended when the 4-digit lock code is entered when the handset is in lock status • “ AFTER POWER” : lock the handset when power is cycled. • “ NOW ” : lock the handset immediately • “OFF ” : unlock the handset NoteLock code changeThis function is used when you change a 4-digit lock code, which is necessary after you release the lockingstatus of the handset.① Press [MENU] ➜ [9] ➜ [Lock Code] ➜ [1] ➜ [2] • Default parameter of the lock code is set to “0000” when shipped out of factory• Enter 4-digit new lock code.• Enter the lock code once again• Press [STO]Receiving call, Emergency dialing, Hot-line dialing, Alarmingfunction still used](https://usermanual.wiki/Hyundai-Electronics-Co/HGP-230/User-Guide-35236-Page-32.png)
![33Use restricting functionThis is a function to restrict using certain functions in the handset. You can restrict five different functionsindependently.① Press [MENU] ➜ [9] ➜ [Lock Code] ➜ [2] Default parameter of the lock code is set to “0000” when shipped out of factory.② Using the scroll buttons, select the set parameter as YES. " If you set NO, this function does not advance and returns to the previous step. ③ Press [STO] button.Blocking incoming callsThis is a function you can use when you do not want to answer calls. When this function is enabled, the phonedoes not respond to incoming calls. However, you can still make outgoing calls.① Press Dial •[INCOMING] .② Select the parameter you want using the scroll buttons. . RESTRICT: to refuse incoming calls. ALLOW : to accept incoming calls.③ Press [STO] button.Blocking outgoing callsThis is function allows you to prevent others from using your phone. When this function is enabled, incomingcalls can be answered, but outgoing calls cannot be made. (But it is still possible to make emergency calls ).①Press Dial •[OUTGOING] .② Select the parameter you want using the scroll buttons. RESTRICT: to lock outgoing calls. ALLOW : to allow outgoing calls.③ Press [STO] button.](https://usermanual.wiki/Hyundai-Electronics-Co/HGP-230/User-Guide-35236-Page-33.png)
![34Locking the dial buttonsThis function blocks the use of dial buttons. However when this function is enabled, you can still makecalls to numbers stored in the memory.① Press Dial •[DIAL #] .② Select the parameter you want using the scroll buttons. . RESTRICT: to lock the use of dial buttons. ALLOW : to allow the use of dial buttons.③ Press [STO] button.Blocking stored phone numbersThis function blocks the storage of phone numbers or the use of stored phone numbers.① Press Dial •[MEMORY ONLY].② Select the parameter you want using the scroll buttons. . RESTRICT: to lock the use of memory. ALLOW : to allow the use of memory.③ Press [STO] button. If you try to use the handset when under restriction, the message THIS PHONE’S RESTRICTED is displayed with an alarm sound.](https://usermanual.wiki/Hyundai-Electronics-Co/HGP-230/User-Guide-35236-Page-34.png)
![35Memory reset function This function sets each value set in the memory into a default status when thehandset is shipped out of the factory.① Press [MENU] ➜ [9] ➜ [Lock Code] ➜ [3] Default parameter of the lock code is set to “0000” when shipped out of factory.• Select the parameter using scroll button, andpress[STObutton. INITIALIZE? ¢º YES SEND END INITIALIZING USER MEMORY... ! If you select “YES”, following screen is displayed.And when the initialization is finished, the handset will start over.Note ' When you initialize your handset setting, following items will be changed. Auto set function Auto Retry interval ➔ 5 seconds Number of Auto Retry ➔ Three times Auto Answer ➔ off Auto Hyphen ➔ Yes Auto Lightting ➔ off Lighting length ➔ 8 seconds Key tone length ➔ short DTMF speed ➔ High speed ONE TOUCH ➔ YesScreen setup functions Current Time and Day Display ➔ Yes Brightness of the screen ➔ 4 levels](https://usermanual.wiki/Hyundai-Electronics-Co/HGP-230/User-Guide-35236-Page-35.png)
![36Sound setup functions Answering mode ➔ 1 bell Ear Volume, Handsfree Volume➔ 6 levels Phone Bell ➔ 8 levels Key Tone ➔ 4 levels Melody ➔ Ongdalsem Melody Speed ➔ 50Timer function Alarm setup ➔ YesWarning function Cancel all Security functions Auto lock ➔ No Use Restriction Function➔ Yes Blocking incoming and outgoing calls, use of dial button, and use of memory ➔ Allow ' Items such as greeting, lock code, stored phone numbers, air time , alarm contents, preferred area code, and previous call contents cannot be initialized. To clear these items, except for greeting and lock code, refer to Memory Clearing Function Memory clearing functionClearing stored phone numbersThis function clears all stored numbers. ① Press [MENU] ➜ [9] ➜ [Lock Code] ➜ [4] ➜ [1] Default parameter of the lock code is set to “0000” when shipped out of factory.• Select the parameter you want using scroll button and press[STO] button.Clearing alarm contentsThis function clears all alarm contents and reserved call information① Press [MENU] ➜ [9] ➜ [Lock Code] ➜ [4] ➜ [2] Default parameter of the lock code is set to “0000” when shipped out of factory.• Select the parameter you want using scroll button and press[STO] button.Clearing air time in home service areaThis function clears air time used in home service area.](https://usermanual.wiki/Hyundai-Electronics-Co/HGP-230/User-Guide-35236-Page-36.png)
![37① Press [MENU] ➜ [9] ➜ [Lock Code] ➜ [4] ➜ [3] Default parameter of the lock code is set to “0000” when shipped out of factory.• Select the parameter you want using scroll button and press[STO] button.Clearing air time in other service areaThis function clears air time used in other service area.① Press [MENU] ➜ [9] ➜ [Lock Code] ➜ [4] ➜ [4] Default parameter of the lock code is set to “0000” when shipped out of factory.• Select the parameter you want using scroll button and press[STO] button.](https://usermanual.wiki/Hyundai-Electronics-Co/HGP-230/User-Guide-35236-Page-37.png)
![38 Chapter 6 Supplementary Functions • Reserved call and alarm warning• Melody input functionReserved call and alarm warning setup functionThis function sounds alarm at the set time and displays alarm contents on the screen. In case of reserved call,the user can use this function after acquiring the system..Alarm setup① Press [MENU] ➜ [5] ➜ [2] ➜ [1]• Select the parameter you want using scroll button and press [STO]button.• When you select ”YES” at the alarm setup, sign is displayed onthe screen.](https://usermanual.wiki/Hyundai-Electronics-Co/HGP-230/User-Guide-35236-Page-38.png)
![39 ( ALARM XX # 1 0 / 2 5 , 1 2 : 0 0 No MessageChecking alarm warnings① Press [MENU] ➜ [5] ➜ [2] ➜ [2] ➜ [1]• Select alarm location number using scroll button .• If there are more than 2 alarm warnings,“( #” sign is displayed' If you set the answering status at beep or lamp mode, the handset beeps in every2 seconds at the designated time in alarm status.](https://usermanual.wiki/Hyundai-Electronics-Co/HGP-230/User-Guide-35236-Page-39.png)
![40 ( ALARM XX # 1 4 : 0 0Select AlarmSTO -> OK - ALARM 01 - 1 0 / 2 5 , 1 5 : 0 0 Month ?STO -> OKMESSAGE ?_SEND ENDAlarm locationCurrent time! Enter the date! Press [STO] button.Entering alarm warningAlarm sound at the designated time, and the alarm sound stops when the user presses any button except thePower button or closed the cover. The alarm will sound for 1 minute.① Press [MENU] ➜ [5] ➜ [2] ➜ [2] ➜ [2]① Using scroll button, select the alarm location and press [ STO] button.• Up to 10 alarm warning can be entered. • If there are more than 2 empty alarm location, “( #” sign is displayed.② After entering time, press [ STO]button. • Time should be entered on 24 hour basis.. (Ex: 2 p.m. #14:00) • To move to next item, press [STO]] . • You can add or subtract number using scroll button.③ Select the parameter using acroll button When you select ONE TIME setup and press [STO] button. ! ONE TIME : The alarm sounds once at the designated time and date, and alarm contents get cleared after that. ! DAILY : The alarm sounds everyday at the same time ! When you enter the time and date, and “OVERWRITE” message is displayed on the screen, that means identical information is already reserved. . ! To clear previouly reserved time and set the new time, press [STO] button. ! To leave previously reserved time, select “NO” or press [END] button.③ Select the parameter and press [STO] button. ' For character input, refer to P .](https://usermanual.wiki/Hyundai-Electronics-Co/HGP-230/User-Guide-35236-Page-40.png)
![41 ALARM CALL 1 0 / 2 5 , 1 2 : 0 0 No Message0 2 – 3 4 4 9 – 0 0 0 0_CALL NO ?Checking alarm Call① Press [MENU] ➜ [5] ➜ [2] ➜ [3] ➜ [1] Checking reserved call contens.Entering call reservation① Press [MENU] ➜ [5] ➜ [2] ➜ [3] ➜ [2]② The input method for time, date, and message is identical to that of alarm warning input..③ Entering phone number.• Press [STO] button to store.'To clear entered alarm warning and call reservation, refer to P .](https://usermanual.wiki/Hyundai-Electronics-Co/HGP-230/User-Guide-35236-Page-41.png)
![42NAMEOF MELODYXXXXXMelody setup functionThis function allows user to setup the user’s favorite melody as an answering bell sound.Entering melody① Press [MENU] ➜ [4] ➜ [7] ➜ [1]• Press [STO]button after entering melody. ' When the user press [RCL] button, previously entered melody is played with musical note displayed on the screen. ' To end the melody, press [END] button. ' The user can edit previously entered melody. ' If there is no entered melody, Ongdalsem is played.•Press [STO]/[TALK] button after entering melody speed. ' Speed : 0 ~ 99 ' Default value at the purchase : 50• Press [STO] button after entering the title of the melody. ' If there is previously entered melody, “OVERWRITE” is displayed. ' Select the parameter you want. ' Entered melody is added to the bell sound list.( Refer to P )Listening to the melody• Press [MENU] ➜ [4] ➜ [7] ➜ [1]• The title of melody is displayed and melody gets played. ' The melody gets replayed when pressing [RCL] button. ' Press [END] button to stop the melody. ' If there is no entered message, Ondalsem will be played.](https://usermanual.wiki/Hyundai-Electronics-Co/HGP-230/User-Guide-35236-Page-42.png)
![43MELODY TEMPO ? XXSEND ENDMelody speed adjustment• Press [MENU] ➜ [4] ➜ [7] ➜ [1]• Current speed of entered melody is displayed.. Enter new speed value and press [STO] button. .To enter melody1. When you press dial button ) to • , a quarter note is displayed. ' The dial button $, %, *, +, ,, -, ., /, 0, and ) corresponds to musical note do, re, mi, fa, sol, ra, ti, do, high scale do, re, and mi respectively.2. Select the length of tone by pressing [*▲] button in sequence while the quarter note is displayed.3. When you press [ #▼ ] button, ‘#” sign is displayed under the musical note and half note is setup.4. To enter a pause, press [*▲] button in sequence after pressing (1 ) button, and select the length of a pause.5. It is possible to move and edit around musical notes by pressing volume buttons[-]/[+].6. To add musical note while you edit, hold [ 1 ] button and enter the note.7. To erase the note, press [CLR] button.8. When you press [RCL] button while you entering, entered melody is played. And when you press [END] button, themelody will stop.9. When you enter 11 notes, the screen moves to the next screen. ' You can enter up to 100 notes.](https://usermanual.wiki/Hyundai-Electronics-Co/HGP-230/User-Guide-35236-Page-43.png)
![46 1 Let’s meet XX. 2 I love you. 3 it’s a long time. 00 / 00 A.M. 00 : 00¢Ï 011-345-6789 New MessageO O VoiceO O Character . [Voice*] [TEXT#] "1: In Message 2: Erase AllTo Check the Received Message• Press button.•Press the dial button ①“In Meassage”.Character Message• Press the character ( button).' The message list is displayed in order of receipt.' Unchecked messages are indicated by numbers with reversed shadow.• Select the message number you want to check by using the scroll buttons + [STO] ' After a period of time, the next screen will automatically be displayed (auto scroll)' It is possible to confirm the displayed message by using the auto scroll or volume button. Most recentlyreceived message' The unchecked character and voice messages are displayed on the screen.](https://usermanual.wiki/Hyundai-Electronics-Co/HGP-230/User-Guide-35236-Page-46.png)
![47 00/00 A.M. 00 : 00¢Ï 011-345-6789 ReferenceChecking the received message Voice message• Press voice ( button).' A voice message can only be checked; it cannot be stored in the message list.• Press [END] button.' If during the check you want to call the person who sent themessage, press [SEND] button.' To delete a message, press [CLR] button.' To return to the previous screen, press [END] button.](https://usermanual.wiki/Hyundai-Electronics-Co/HGP-230/User-Guide-35236-Page-47.png)