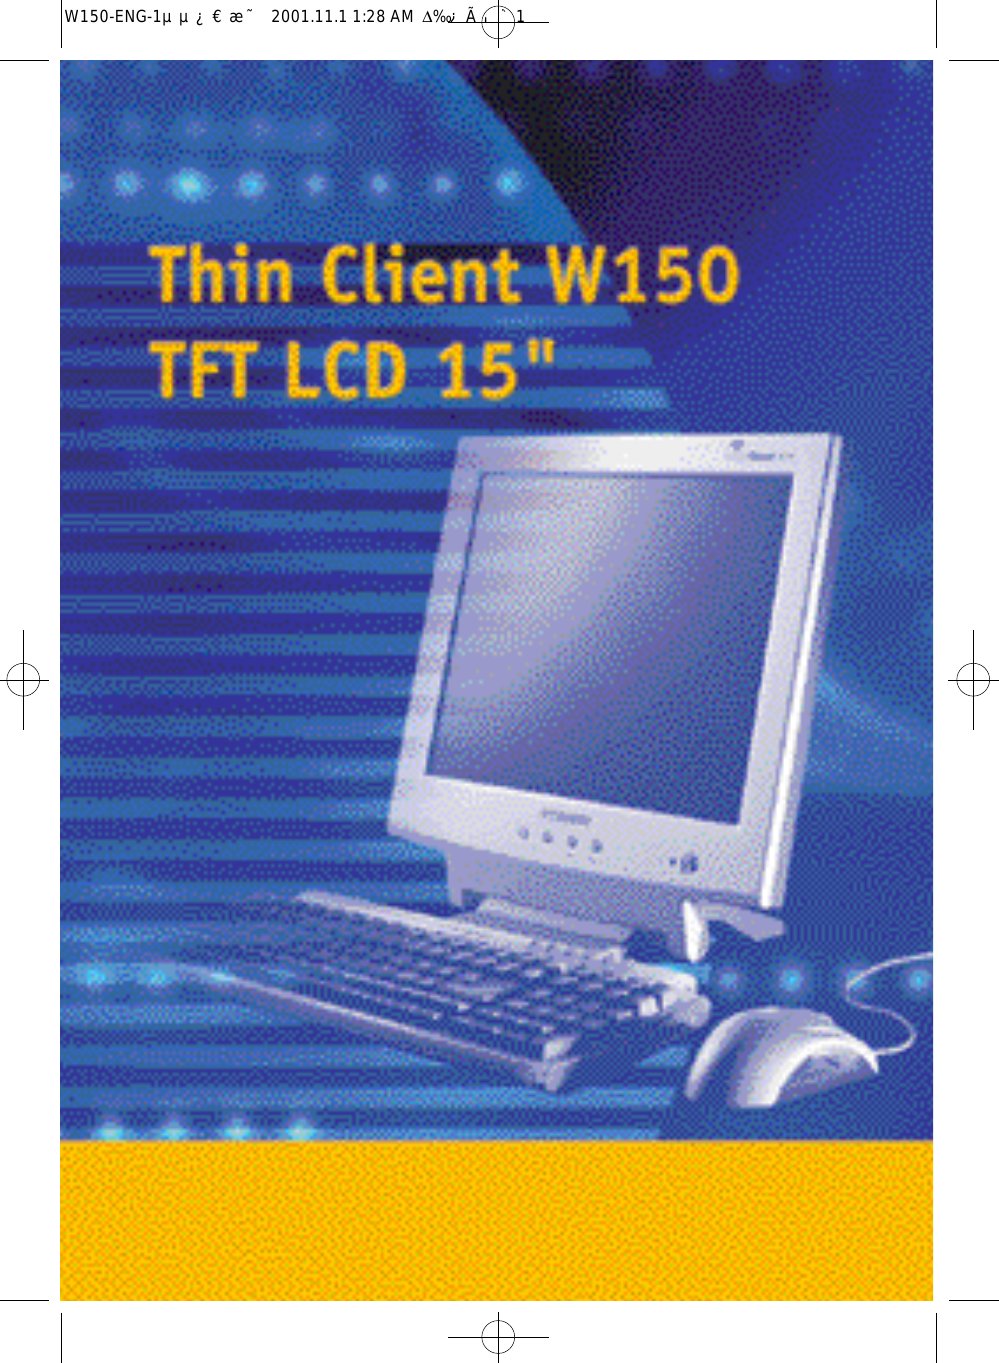
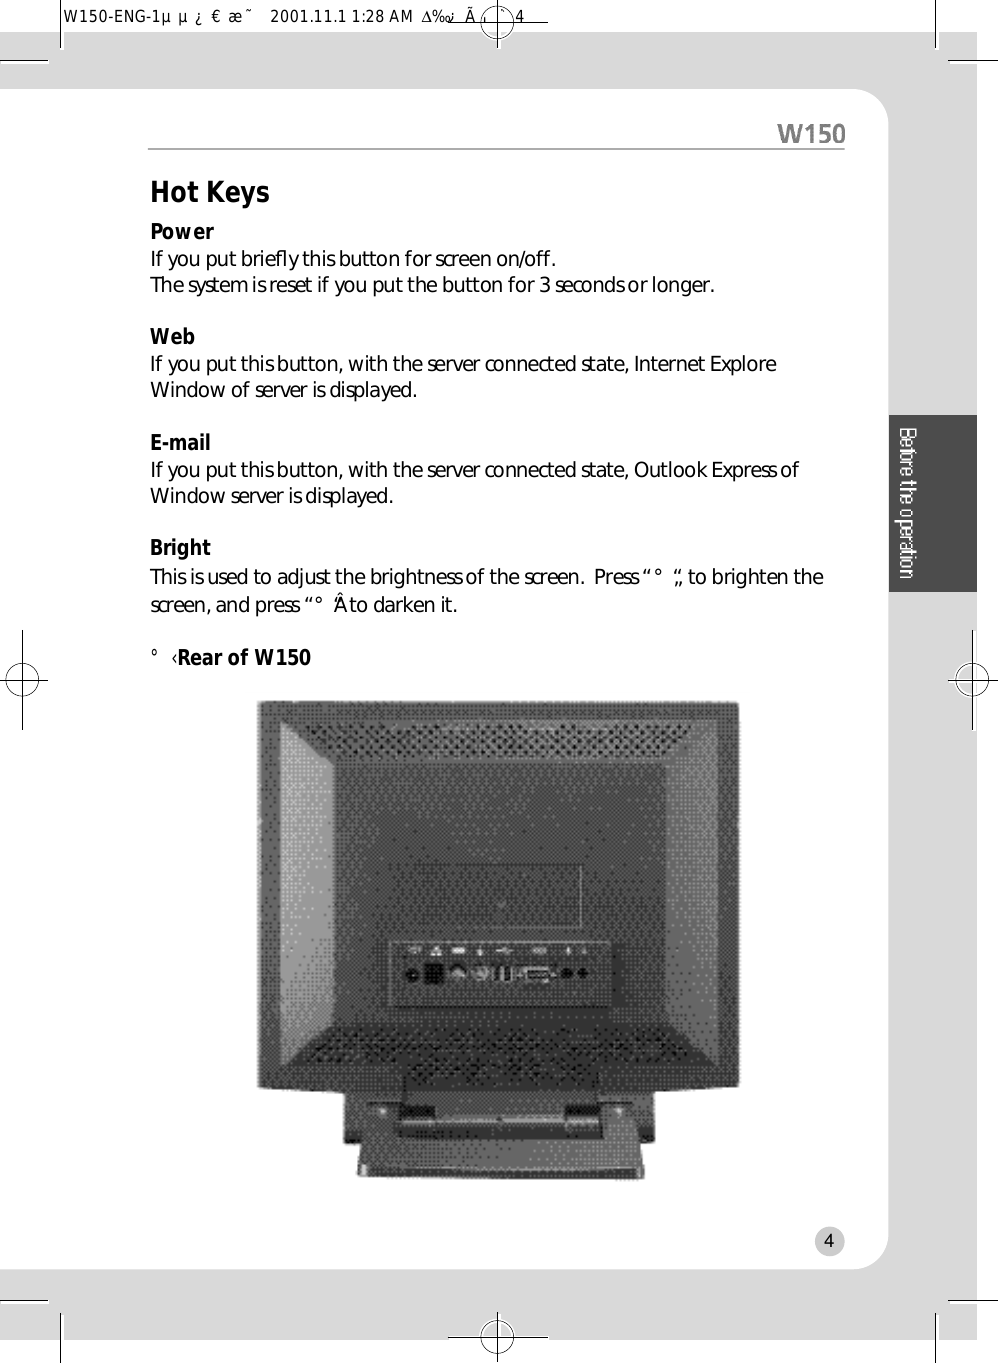
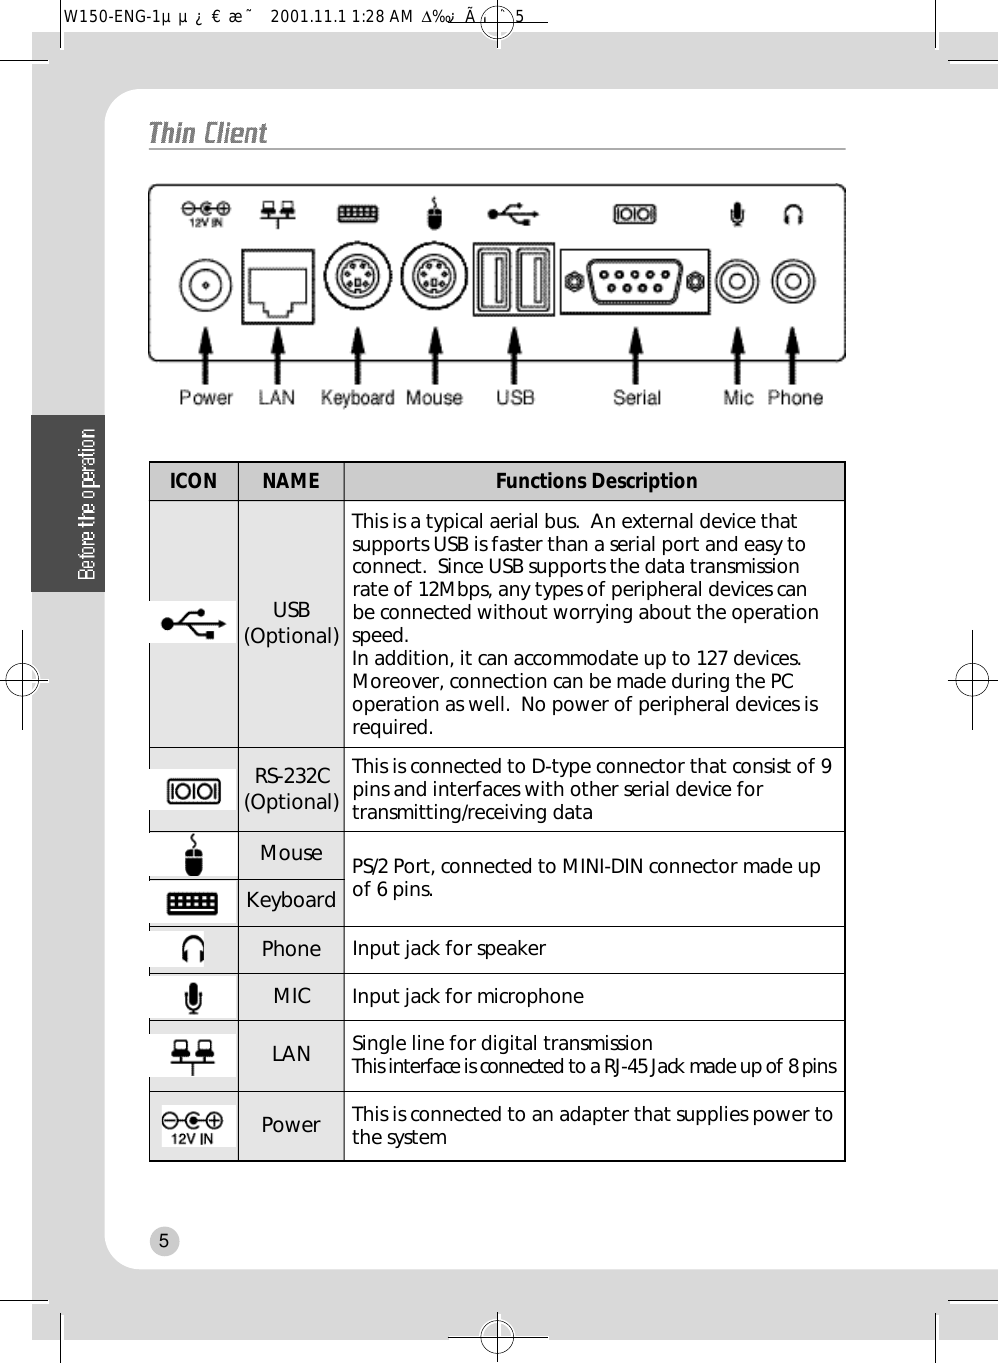
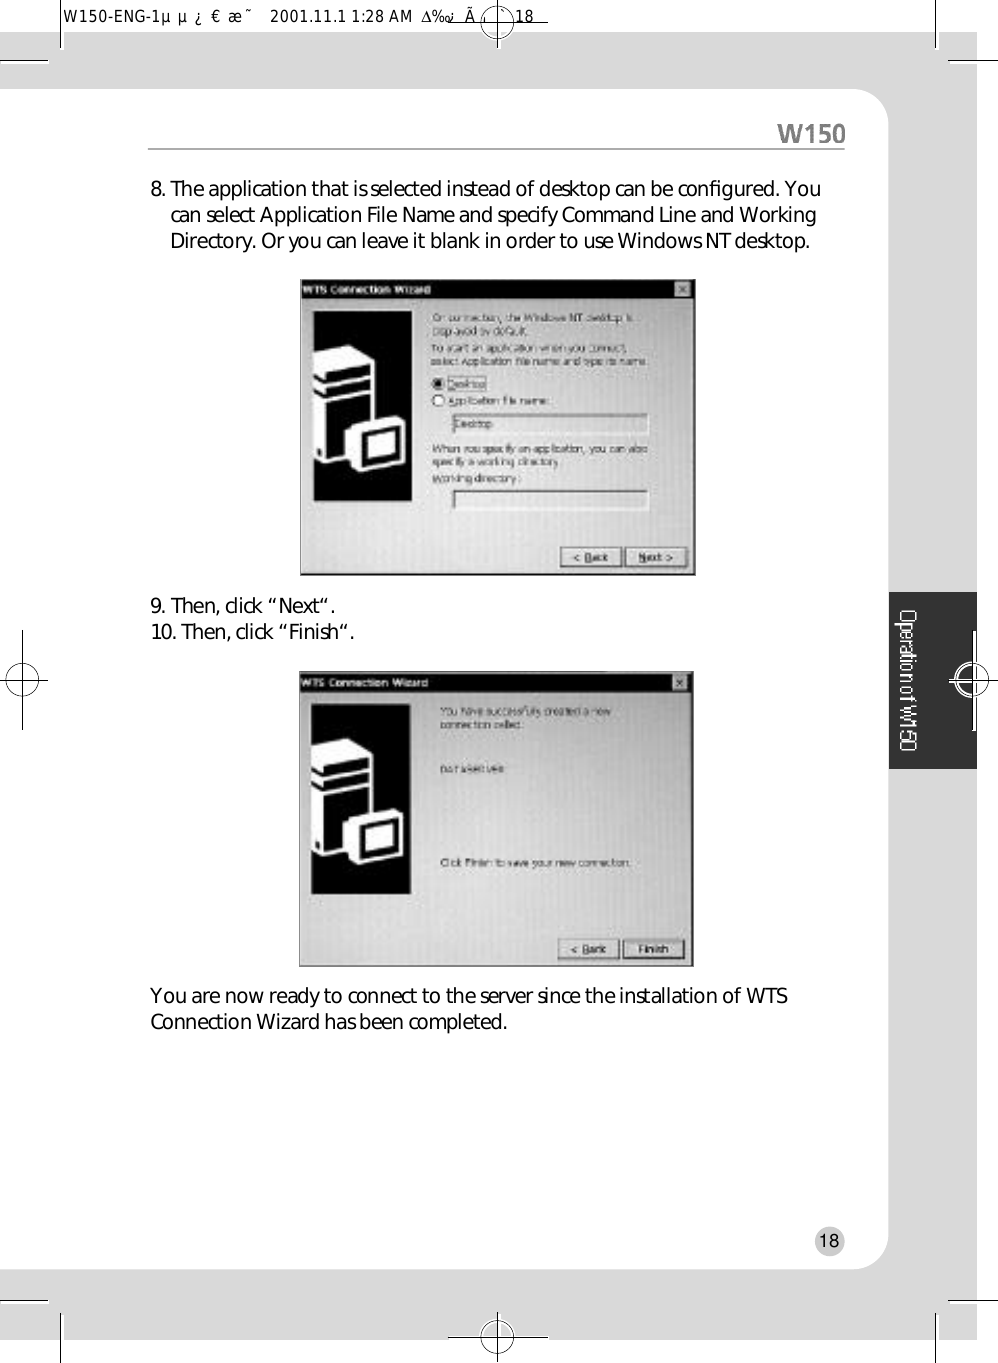
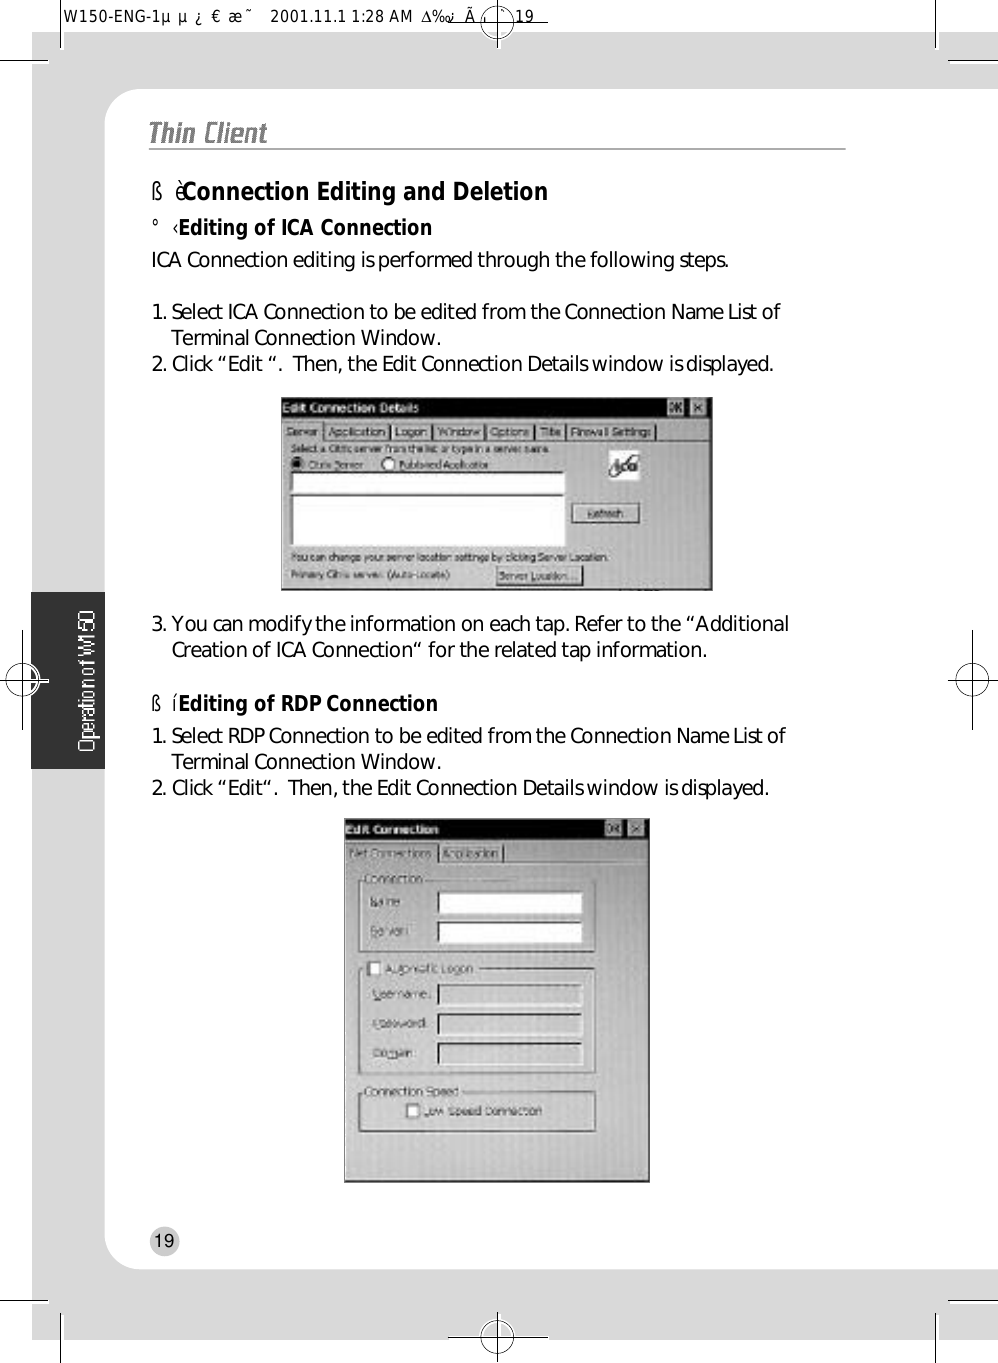
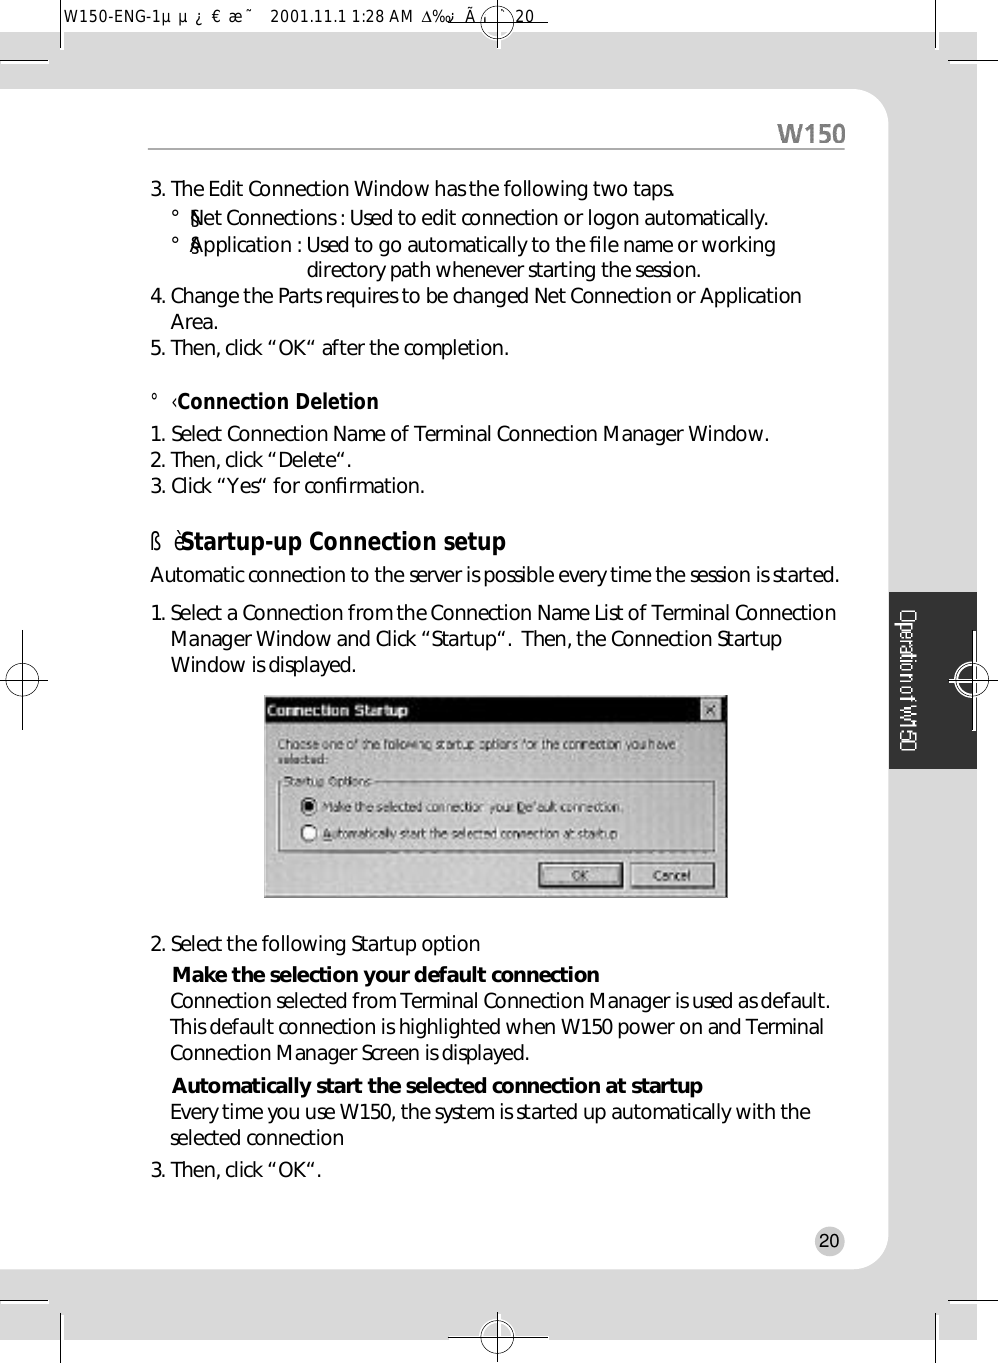
Hyundai IBT W15L00001 Intel RISC - 206MHz CPU w/ 15" LCD Client Monitor User Manual

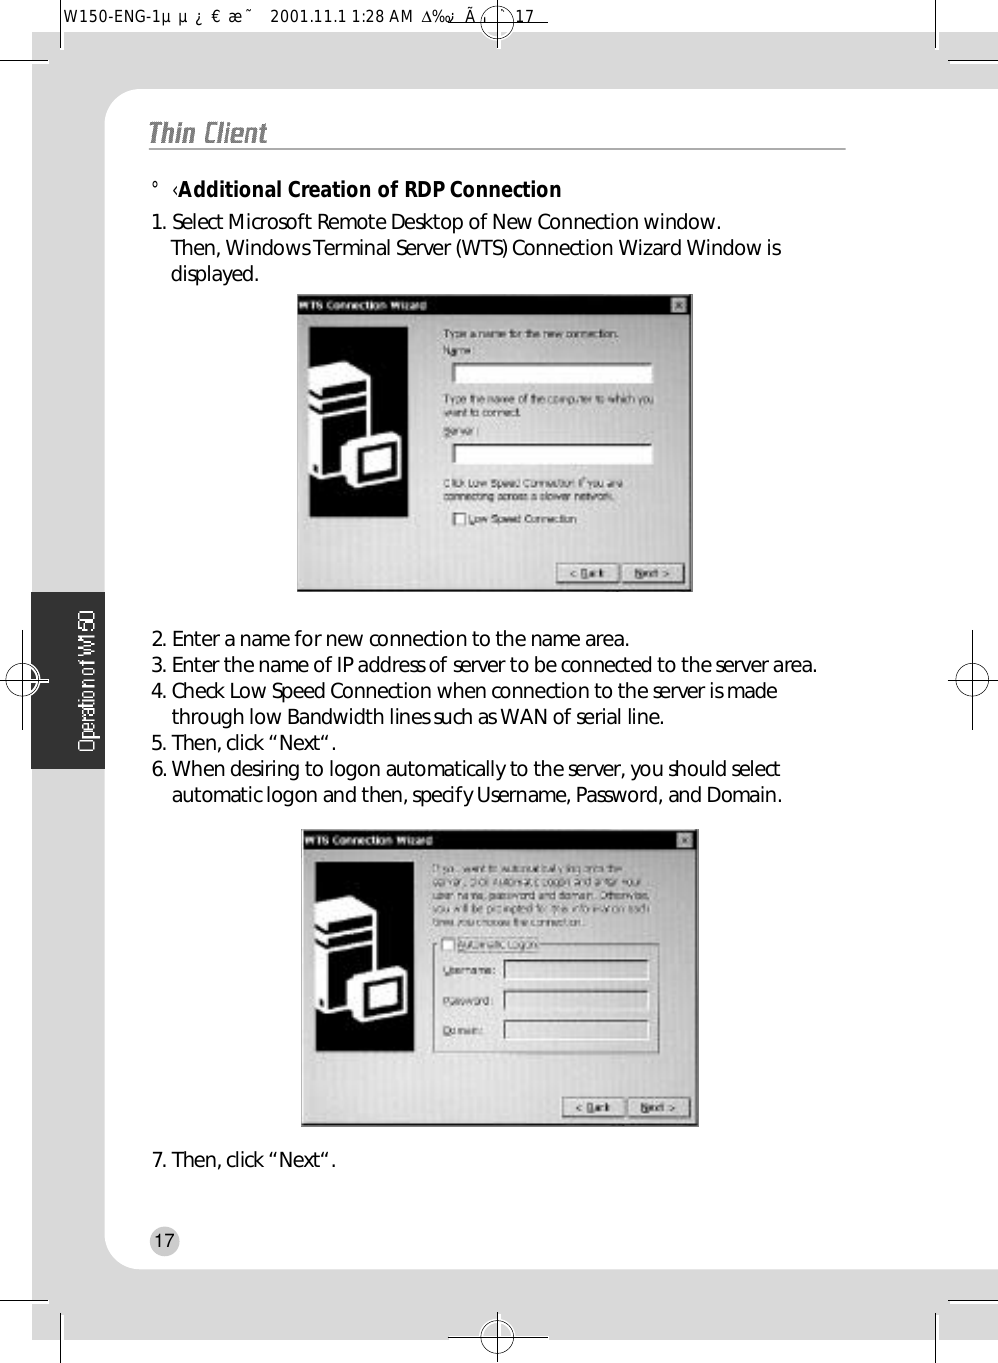
Hyundai IBT Corp. Intel RISC - 206MHz CPU w/ 15" LCD Client Monitor Users Manual

Users Manual

W150-ENG-1µµ¿¤æ˜  2001.11.1 1:28 AM  ∆‰¿Ã¡ˆ1
U.S.A.U.S.FEDERAL COMMUNICATIONS COMMISSIONRADIO FREQUENCY INTERFERENCE STATEMENTINFORMATION TO THE USERNOTE : This equipment has been tested and found to comply with the limits for aClass B digital device pursuant to Part 15 of the FCC Rules.These limits are designed to provide reasonable protection against harmfulinterference in a residential installation.This equipment generates, uses, and can radiate radio frequency energy and, ifnot installed and used in accordance with the instructions, may cause harmfulinterference to radio communications.However, there is no guarantee that interference will not occur in a particulari n s t a l l a t i o n .If this equipment does cause harmful interference to radio or television reception,which can be determined by turning the equipment off and on, the user isencouraged to try to correct the interference by one or more of the followingm e a s u r e s :• Reorient or relocate the receiving antenna.• Increase the separation between the equipment and receiver.• Connect the equipment into an outlet of a circuit different from that to which the receiver is connected.• Consult the dealer or an experienced radio/TV technician for assistance.Changes or modification not expressly approved by the party responsible forcompliance could void the user's authority to operate the equipment.Connecting of peripherals requires the use of grounded shielded signal cables.W150-ENG-1µµ¿¤æ˜  2001.11.1 1:28 AM  ∆‰¿Ã¡ˆ2
WE                       ImageQuest CO., LTD.Ami-ri Bubal-Eub Ichon-Si Kyungki-Do467-860  KOREAdeclare under our sole responsibility that the product:to which this declaration relates is in conformity with thefollowing standard(s) or other normative document(s)following the provisions of the Low Voltage Directive 73/23/EEC,93/68/EEC and the EMC Directive 89/336/EEC.KOREA /Oct. 31,  2001                    HONG KI, KIM(Place and date of issue)                       (Name and signature of authorized person)D E C L A R ATION OF CONFORMITYD E C L A R ATION OF CONFORMITYKind of equipment          :         COLOR LCD CLIENTType-Designation             :         W15L00001Safety    :    EN 60950 : 1992 + A1, A2, A3, A4, A11EMC      :    EN 55022 / 1998, EN 55024 : 1998EN 61000-3-2 : 1995+A1 : 1998+A2 : 1998EN 61000-3-3 : 1995Accredited testlaboratory:TÜV RheinlandAm Grauen Stein51105 KölnW150-ENG-1µµ¿¤æ˜  2001.11.1 1:28 AM  ∆‰¿Ã¡ˆ3
Contents1. Introduction of W150 ......................1OverView  ...............................................1Function   ................................................1Feature   ..................................................12. Before the Operation ......................3System structure ....................................3Front of W150 .............................................3Hot Keys .................................................4Rear of W150 ..............................................4System Connection ................................6Connection of External Device .............63. Operation of W150 ..........................7Setup of Operating Environment .........7Menu window Composition  .....................7Setup of Network  ......................................7Setup of Preference  ...................................9Setup Keyboard Feature ..........................10Setup of Display Feature .........................10System Properties  ....................................11Volume & sound Properties .....................11Network Environment View ...............12Ping   ..........................................................12Ipconfig .....................................................12W150-ENG-1µµ¿¤æ˜  2001.11.1 1:28 AM  ∆‰¿Ã¡ˆ4
Terminal Connection Manager ...........13New connection Creation .......................13Additional Creation of ICA Connection  . . .1 4Additional Creation of RDP Connection . . .1 7Connection Editing and Deletion ...........19Editing of ICA Connection . . . . . . . . . . . . . . . . . . . . . . . . . .1 9Editing of RDP Connection . . . . . . . . . . . . . . . . . . . . . . . . .1 9Connection Deletion  . . . . . . . . . . . . . . . . . . . . . . . . . . . . . . . . . .2 0Start-up Connection Setup .....................20Server Connection ...................................21Using of W150 Hot Keys .........................21W150 Hot Keys . . . . . . . . . . . . . . . . . . . . . . . . . . . . . . . . . . . . . . . . . . . . .2 1Multi Connection start . . . . . . . . . . . . . . . . . . . . . . . . . . . . . . . .2 1Client Setting and Save  ..........................22Client Setting . . . . . . . . . . . . . . . . . . . . . . . . . . . . . . . . . . . . . . . . . . . . . . . .2 2Save . . . . . . . . . . . . . . . . . . . . . . . . . . . . . . . . . . . . . . . . . . . . . . . . . . . . . . . . . . . . . . . .2 3Ending the Operation  .............................23Disconnecting . . . . . . . . . . . . . . . . . . . . . . . . . . . . . . . . . . . . . . . . . . . . . . .2 3Terminal Ends . . . . . . . . . . . . . . . . . . . . . . . . . . . . . . . . . . . . . . . . . . . . . . .2 34. Troubleshooting ........................245. System Specification .................25W150-ENG-1µµ¿¤æ˜  2001.11.1 1:28 AM  ∆‰¿Ã¡ˆ5
11. Introduction of W150Overview“Easy installation, Optimized function, The least expenses”. It is this web terminal’s strong points that you can expect when you utilize it inyour environments. Under the basic environments of server based on computing and internetconnection speed of 56kbps, you can use various applications on the highperformance servers based on Windows 2000 Server OS as well as internetconnection. Function  All the application programs are operated through the server, not in itselfW 1 5 0 .W150 as a client transfers to the server only the inputs of mouse andkeyboard. The result of application programs executed in the server are transferred tothe client with the use of Protocol ( RDP or ICA ). Accordingly, traffic size thatcauses problems in the existing network is reduced considerably and nosophisticated is required for client. FeaturesAs Operation system, “Windows CE” is utilizedW150 has an open type architecture. It is run with a 32 bit multitasking andmultithread operating system that supports various types of device.°§Utilize a kernel based on the architecture of WINDOWS NT. °§Support pre-occupied multi tasking and multi thread.ClassificationOperation ModeCPUSDRAMFLASHOperating SystemW150WBTIntel Strong ARM 206Mhz16M8MWindows CE 3.0W150-ENG-1µµ¿¤æ˜  2001.11.1 1:28 AM  ∆‰¿Ã¡ˆ1
°§Provides a user friendly GUI environment °§Booting process is not necessary since the operating system is stored onR O M .Strong ARM CPU as of Intel°§Low powered (4W) operation is available.°§Size and Weight are reduced °§Low noise ( no cooling fan is required ) Quick Booting Circuit Design (Compared to the general PC)During the Power On, system booting is performed in the last taskenvironment.A/S Cost ReducedSince there are no fixture elements such as HDD, FDD, CD-ROM, and cooingfan that are main causes of trouble, only minimum A/S is required.Can be operated in the server environment The program is executed in the server and only the results of execution (screenvalue) are displayed on the client.Multi-user who are connecting to the server at the same time can executeown program independently.2Basic duty ServerHeadquater LANBranch office LANWBT ClientsWBT- Win CEApplication Server- Windows 2000- Meta FrameApplication ServerERP Server ASP ServerEC Web Hosting Server(ISP DATA Center)W150-ENG-1µµ¿¤æ˜  2001.11.1 1:28 AM  ∆‰¿Ã¡ˆ2
32. Before the operation In the section, the structure and setup method of W150 is described.System Structure   You should be familiar with the system structure for the proper connection ofperipheral devices.  Basic parts supplied include a mount ( Main body ),keyboard, mouse, adaptor, and AC power cord.°‹Front Side of W150 W150-ENG-1µµ¿¤æ˜  2001.11.1 1:28 AM  ∆‰¿Ã¡ˆ3
Hot KeysPowerIf you put briefly this button for screen on/off. The system is reset if you put the button for 3 seconds or longer.WebIf you put this button, with the server connected state, Internet ExploreWindow of server is displayed.E-mailIf you put this button, with the server connected state, Outlook Express ofWindow server is displayed. BrightThis is used to adjust the brightness of the screen.  Press “°„“ to brighten thescreen, and press “°Â“ to darken it. °‹Rear of W150 4W150-ENG-1µµ¿¤æ˜  2001.11.1 1:28 AM  ∆‰¿Ã¡ˆ4
5Functions DescriptionThis is a typical aerial bus.  An external device thatsupports USB is faster than a serial port and easy toconnect.  Since USB supports the data transmissionrate of 12Mbps, any types of peripheral devices canbe connected without worrying about the operationspeed.  In addition, it can accommodate up to 127 devices.Moreover, connection can be made during the PCoperation as well.  No power of peripheral devices isrequired. This is connected to D-type connector that consist of 9pins and interfaces with other serial device fortransmitting/receiving dataPS/2 Port, connected to MINI-DIN connector made upof 6 pins.Input jack for speaker Input jack for microphoneSingle line for digital transmission This interface is connected to a RJ-45 Jack made up of 8 pinsThis is connected to an adapter that supplies power tothe systemN A M EUSB(Optional)RS-232C(Optional)LANKeyboardMousePhoneMICICONPowerW150-ENG-1µµ¿¤æ˜  2001.11.1 1:28 AM  ∆‰¿Ã¡ˆ5
System ConnectionIn the proceeding section, the system connection order and method ared e s c r i b e d .The power should be off during the system connection.Connecting KeyboardConnect the keyboard to its port after checking whether the port is PS/2.Connecting MouseConnect the mouse to its port after checking whether the port is PS/2.Connecting LAN Connect the RJ-45 jack to the LAN port.Connecting Adapter Connect the adapter to the POWER port and outlet.Connecting Speaker and MicrophoneConnect the speaker or earphone to Phone port and the microphone to theMIC port.Connection of External DeviceW150 has RS 232-C port and USB port for accommodating additional externald e v i c e .Serial PortSerial port can be connected to an external modem or other device thatsupport serial Device.  USB PortUSB Port can be connected to a peripheral that support USB.6W150-ENG-1µµ¿¤æ˜  2001.11.1 1:28 AM  ∆‰¿Ã¡ˆ6
3. Operation of W150Setup of Operating EnvironmentIn this section, the operation of W150 under the server setup environment isdescribed. For more details, ask your server manager.ßèMenu window CompositionYou should go through the following steps in order to set up W150 Properties.Menu window is displayed if you click right button of mouse from the desktopscreen Menu window is composed following. ßèSetup of Network1. You can click “System setting“ °Ê“Network“ from Menu window. 7OS & MemoryD i s p l a yI n p u tM o u s eN e t w o r kS o u n dP i n gI P c o n fi g< Menu window >< Network Test >< System Setting >PreferenceSystem Setting   ¢∫Client SettingNetwork Test    ¢∫SaveShutDownW150-ENG-1µµ¿¤æ˜  2001.11.1 1:28 AM  ∆‰¿Ã¡ˆ7
2. Click “property“ of Adaptor tap. 3. Select one of the following options from the “IP Address“ tab°§If the network uses Dynamic Host Configuration Protocol (DHCP), click theabove “Obtain an IP Address via DHCP“. °§If you want to use Static IP information allocated to you, click the below“Specify an IP Address“ and then, enter IP Address, Subnet Mask, andGateway.    4. If the network requires DNS or WINS setup, you can select “Name Servers“tab and then, enter DNS or WINS information. 5. You can click “OK“ in order to fin i s h .6. Select “save“ from Menu window to save setup. 7. Select “shutdown“ from Menu window to apply setup.8W150-ENG-1µµ¿¤æ˜  2001.11.1 1:28 AM  ∆‰¿Ã¡ˆ8
8. You can check “Restart system“ and click “OK“.  Then, W150 is re-booted. ßèSetup of Preference Click “Preference“ from Menu window to display Terminal Preferencewindow. Terminal Preference has the following two tabs.Manufacture : It shows factory-default settings and operating system versioni n f o r m a t i o n .Preference     : It enables you to set the name and information of this terminal,type of keyboard and screen saver function. If you select thebottom option, the terminal environment will be reset tofactory-default settings.9W150-ENG-1µµ¿¤æ˜  2001.11.1 1:28 AM  ∆‰¿Ã¡ˆ9
ßèSetup of Keyboard FeaturesKeyboard features are changed based on you requirements and the type ofboard keyboard used.Repeat delay : Keyboard characters are displayed repeatedly.( Ex : time passed until the next character is recognizedduring the key pressing.)Repeat Rate : The rate in which characters are repeated by the keyboard. You should go through the following steps in order to change keyboardf e a t u r e s .1. Click  “System Setting“ °Ê“Input“  from Menu Window. 2. Use the mouse to drag Repeat delay Slider toward left or right in order tochange Repeat delay.3. Use the mouse to drag Repeat rate Slider toward left or right in order tochange Repeat rate.4. Then, click “OK“ßèSetup of Display FeaturesAdjust of colors and Brightness rateYou should go through the following steps in order to change display settings.1. Click  “System Setting“ °Ê“Display“  from Menu window.10W150-ENG-1µµ¿¤æ˜  2001.11.1 1:28 AM  ∆‰¿Ã¡ˆ10
2. Select the desired colors & Adjust brightness. 3. Click “OK“.ßèSystem PropertiesYou can click  “System Setting“ °Ê“OS & Memory“ from Menu window.You can display system information by clicking General.You can display a window for managing system memory by clicking Memory.ßèVolume & Sound Properties   You can click “System Setting“ °Ê“Sound“ from Menu window.     You can drag the audio slider bar on either side of it for volume adjustment.11W150-ENG-1µµ¿¤æ˜  2001.11.1 1:28 AM  ∆‰¿Ã¡ˆ11
Network Environment ViewßèPingClick “Network Test“ °Ê“Ping“ from Menu window to open “Ping“ window.You can check the connection condition when typing the opposite side IP orname on the “Destination Hostname or IP“ section and pressing the “Start“.ßèIpconfigClick “Network Test“ °Ê“ I p c o n fi g“ from Menu window to open “Ipconfig “w i n d o w .When clicking the “Ipconfig“ button, the information of the operatingnetwork will appear.12W150-ENG-1µµ¿¤æ˜  2001.11.1 1:28 AM  ∆‰¿Ã¡ˆ12
Terminal Connection ManagerThis is used when connecting the network of W150. In case you fail to setupInitial Start or Automatic Start Connection, Terminal Connection Manager isdisplayed automatically during the start and end of W150. The Host (Server)and Client (Terminal) are recognized based on the connection state. You cancreate, edit, and delete network connection Terminal Connection Managerw i n d o w .ßèNew Connection Creation1. Click “Add“ in Terminal Connection Manager Window in order to displayNew Connection window.2. Select one of the following two connection protocols.°§Citrix Independent Computing Architecture Protocol ( ICA )°§Microsoft Remote Desktop Client Protocol ( RDP ) 3. Then, click “OK“.  Click “Cancel“ to return to the previous window.  13W150-ENG-1µµ¿¤æ˜  2001.11.1 1:28 AM  ∆‰¿Ã¡ˆ13
°‹Additional Creation of ICA Connection1. Select Citrix ICA Client of New Connection window in order to display theSpecify Connection Type Window.2. Specify connection type.  °§Network connection : Direction connection line is required as in the case of°§Network Connection 10/100Base-T Dial-in connection : modem is used.3. Then, click “Next“.4. All available Citrix server or application on the servers will be inquired andrecognized. Select the required servers or application. If the server listdoesn’t appear, search it again using “Refresh“ or type the server name orIP to connect directly. 5. Then, click “Next “.  If you select “Finish“, following option will be savedwithout specific a t i o n .6. The Connection Name of Terminal Connection Manager can be changed onthe following window.14W150-ENG-1µµ¿¤æ˜  2001.11.1 1:28 AM  ∆‰¿Ã¡ˆ14
7. Then, click “Next“.  8. C o n figuration can be made in such a way that same applications can beused from the selected server. You can leave it blank in order to specifyCommand Line and Working Directory or to use windows NT Desktop.9. Then, click “Next“.10. Specify Username, Password, and Domain in order to logon to the serverautomatically. 11. Then, click “Next“.12. Select Window Colors desired on Select Window Option Window.15W150-ENG-1µµ¿¤æ˜  2001.11.1 1:28 AM  ∆‰¿Ã¡ˆ15
13. Click “Next“.14. You can configure the ICA session.°§Compress Data Stream  -  select this when connection is made withmodem (modem dial-up) or WAN(Wide Area Network).°§Enable Sound  -  select this if you use 10/100Base T as LAN (Local AreaNetwork). When using Sound through WAN and modem, increasingusage of bandwidth causes some problems.°§If you use modem or WAN, set “Sound Quality“ to LOW and“SpeedScreen“ to ON.15. Click “Next“.  Then, Firewall Settings window is displayed.16. You can enter Firewall information in Firewall Settings window if thenetwork requires Firewall setup. Then, click “Finish“.17. Since the installation of ICA connection is over, connection the server isr e a d y .16W150-ENG-1µµ¿¤æ˜  2001.11.1 1:28 AM  ∆‰¿Ã¡ˆ16
°‹Additional Creation of RDP Connection1. Select Microsoft Remote Desktop of New Connection window.Then, Windows Terminal Server (WTS) Connection Wizard Window isd i s p l a y e d .2. Enter a name for new connection to the name area.3. Enter the name of IP address of server to be connected to the server area.4. Check Low Speed Connection when connection to the server is madethrough low Bandwidth lines such as WAN of serial line.5. Then, click “Next“.6. When desiring to logon automatically to the server, you should selectautomatic logon and then, specify Username, Password, and Domain.7. Then, click “Next“.17W150-ENG-1µµ¿¤æ˜  2001.11.1 1:28 AM  ∆‰¿Ã¡ˆ17
8. The application that is selected instead of desktop can be configured. Youcan select Application File Name and specify Command Line and WorkingDirectory. Or you can leave it blank in order to use Windows NT desktop.9. Then, click “Next“.10. Then, click “Finish“.You are now ready to connect to the server since the installation of WTSConnection Wizard has been completed. 18W150-ENG-1µµ¿¤æ˜  2001.11.1 1:28 AM  ∆‰¿Ã¡ˆ18
ßèConnection Editing and Deletion°‹Editing of ICA ConnectionICA Connection editing is performed through the following steps.1. Select ICA Connection to be edited from the Connection Name List ofTerminal Connection Window.2. Click “Edit “.  Then, the Edit Connection Details window is displayed.3. You can modify the information on each tap. Refer to the “AdditionalCreation of ICA Connection“ for the related tap information.ßíEditing of RDP Connection1. Select RDP Connection to be edited from the Connection Name List ofTerminal Connection Window.2. Click “Edit“.  Then, the Edit Connection Details window is displayed.19W150-ENG-1µµ¿¤æ˜  2001.11.1 1:28 AM  ∆‰¿Ã¡ˆ19
3. The Edit Connection Window has the following two taps.°§Net Connections : Used to edit connection or logon automatically.°§Application : Used to go automatically to the file name or workingdirectory path whenever starting the session.4. Change the Parts requires to be changed Net Connection or ApplicationArea. 5. Then, click “OK“ after the completion.°‹Connection Deletion 1. Select Connection Name of Terminal Connection Manager Window.2. Then, click “Delete“.3. Click “Yes“ for confir m a t i o n .ßèStartup-up Connection setupAutomatic connection to the server is possible every time the session is started.1. Select a Connection from the Connection Name List of Terminal ConnectionManager Window and Click “Startup“.  Then, the Connection StartupWindow is displayed. 2. Select the following Startup option Make the selection your default connectionConnection selected from Terminal Connection Manager is used as default.This default connection is highlighted when W150 power on and TerminalConnection Manager Screen is displayed.Automatically start the selected connection at startup Every time you use W150, the system is started up automatically with theselected connection  3. Then, click “OK“. 20W150-ENG-1µµ¿¤æ˜  2001.11.1 1:28 AM  ∆‰¿Ã¡ˆ20
ßèServer Connection  Terminal Connection Manager lists all the network connections available foruse. You Should go through the following steps in order to connect to theserver. 1. Select a Connection Name on the list.2. Click “Connection“ or double click “Connection Name“.  If the connectionhas been defined as automatic logon, W150 is connected and you arelogged on automatically.3. In case the logon is not automatic, Window Logon Information Window isdisplayed. Enter logon with the prompt.   ßèUsing of W150 Hot KeysHot keys are used to simplify the switching process between active sessions.By using hot keys instead of Terminal Connection Manager, you can switchautomatically each program through simple key manipulation. In the below,several W150 hot keys are specified as below.< W150 Hot Keys >If the hot keys are not working, see the instruction of Multi Connection Start.< Multi Connection start >W150 can perform multi connections at the same time. The number ofconnection is connections is limited by the RAM capacity.  1. Press CTRL+ALT+END to access to W150 Connection Manager.2. Select Connection Name and then, click “Connect“.21Hot Key F u n c t i o nCTRL+ALT+up arrowChanges to Up between active sessionsCTRL+ALT+Down arrowChanges to Down between active sessionsC T R L + A L T + H o m eChanges automatically to default sessionsC T R L + A L T + E N DThe screen is changed to directly to W150Connection Manager < F 2 >The screen is changed to Terminal Preference Screenin case Connection Manager is run.W150-ENG-1µµ¿¤æ˜  2001.11.1 1:28 AM  ∆‰¿Ã¡ˆ21
You should go through the following steps in order to change thec o n n e c t i o n .1. Press CTRL+ALT+END to access to W150 Connection Manager.2. Select Connection Name and then, click “Connect“.3. Or press CTRL+ALT+UP or CTRL+ALT+DOWN in order to change thec o n n e c t i o n .Client Setting and SaveßèClient SettingClick “Client setting“ from Menu window to open “Client Setting“ window.1. ICA SettingPress “Global Setting“ button in order to change various settings on thew i n d o w .2. RDP Setting You can select RDP Encryption Enable option.22W150-ENG-1µµ¿¤æ˜  2001.11.1 1:28 AM  ∆‰¿Ã¡ˆ22
ßèSaveYou can press “Save“ from Menu window, and then, The information thatusers have changed is saved on the FLASH ROM, so it cannot disappear if thepower is gone off. Ending the OperationßèDisconnectingClick the “System exit“ in its Windows Start menu. “Logoff“ or “Disconnect“will be displayed. “Logoff“ closes all application programs and “Disconnect“leaves application programs operating and just disconnects from the server.If you end the system using “Disconnect“, the same environment as beforewill be configured when connecting the same account.ßèPower on/off of W150In case you do not use W150, you can turn the power off just by pressing the“power” button on the front cover of W150. Then, it consumes a little power.And if you will not use W150 for a long time, please disconnect the adaptercord from the power connecting jack in the rear cover of product or powercable from the wall outlet.23W150-ENG-1µµ¿¤æ˜  2001.11.1 1:28 AM  ∆‰¿Ã¡ˆ23
4. TroubleshootingThe followings provide some solutions to common problems when usingsetting up your terminalThe monitor screen is blank.Check whether the power cord has been inserted properly into the terminalCheck whether the monitor is properly plugged into an AC outlet.Check whether the Terminal is OFF.Check whether the system is on suspend mode.The mouse does not work.    Check whether the mouse jack insert properly into the mouse port.Check whether the mouse ball is operated freely.The Keyboard does not respond.Check whether the keyboard has been connected properly to the keyboardport Check whether power is being supplied properly to W150.The Network connection does not workCheck whether the cables are connected properly to the LAN port.Verify the network settings.Check whether the network address is valid.Verify the configuration of the server terminal.24W150-ENG-1µµ¿¤æ˜  2001.11.1 1:28 AM  ∆‰¿Ã¡ˆ24
255. System SpecificationThe specification of W150 is specified as below :ßèHardware specification ßèCommunication and Input/Output Specification Intel Strong ARM 32bit          RISC Processor                    206 MHz              8MB FLASH                        16MB SDRAM                       16-bit Stereo                        1024 x 768 16bit True ColorsCPU Flash memoryRAM memoryAudioVidedEthernet 10 Base T TCP/IP with DNS, DHCP, and PPPMicrosoft RDP   Ctrix ICA1 x DB-9 RS232C Serial Port2 x USB P o r tEarphone Jack        Microphone InKeyboard and Mouse Port(PS/2 Keyboard and Mouse included)12V DC InNetworking ProtocolCommunication protocolSerial PortUSB PortAudio PortKeyboard and Mouse PortPowerW150-ENG-1µµ¿¤æ˜  2001.11.1 1:28 AM  ∆‰¿Ã¡ˆ25
26W150-ENG-1µµ¿¤æ˜  2001.11.1 1:28 AM  ∆‰¿Ã¡ˆ26

Navigation menu