Hyundai IBT W15L00001 Intel RISC - 206MHz CPU w/ 15" LCD Client Monitor User Manual
Hyundai IBT Corp. Intel RISC - 206MHz CPU w/ 15" LCD Client Monitor Users Manual
Users Manual

W150-ENG-1µµ¿¤æ˜ 2001.11.1 1:28 AM ∆‰¿Ã¡ˆ1
U.S.A.
U.S.FEDERAL COMMUNICATIONS COMMISSION
RADIO FREQUENCY INTERFERENCE STATEMENT
INFORMATION TO THE USER
NOTE : This equipment has been tested and found to comply with the limits for a
Class B digital device pursuant to Part 15 of the FCC Rules.
These limits are designed to provide reasonable protection against harmful
interference in a residential installation.
This equipment generates, uses, and can radiate radio frequency energy and, if
not installed and used in accordance with the instructions, may cause harmful
interference to radio communications.
However, there is no guarantee that interference will not occur in a particular
i n s t a l l a t i o n .
If this equipment does cause harmful interference to radio or television reception,
which can be determined by turning the equipment off and on, the user is
encouraged to try to correct the interference by one or more of the following
m e a s u r e s :
• Reorient or relocate the receiving antenna.
• Increase the separation between the equipment and receiver.
• Connect the equipment into an outlet of a circuit different from that to which
the receiver is connected.
• Consult the dealer or an experienced radio/TV technician for assistance.
Changes or modification not expressly approved by the party responsible for
compliance could void the user's authority to operate the equipment.
Connecting of peripherals requires the use of grounded shielded signal cables.
W150-ENG-1µµ¿¤æ˜ 2001.11.1 1:28 AM ∆‰¿Ã¡ˆ2

WE ImageQuest CO., LTD.
Ami-ri Bubal-Eub Ichon-Si Kyungki-Do
467-860 KOREA
declare under our sole responsibility that the product:
to which this declaration relates is in conformity with the
following standard(s) or other normative document(s)
following the provisions of the Low Voltage Directive 73/23/EEC,
93/68/EEC and the EMC Directive 89/336/EEC.
KOREA /Oct. 31, 2001 HONG KI, KIM
(Place and date of issue) (Name and signature of
authorized person)
D E C L A R ATION OF CONFORMITY
D E C L A R ATION OF CONFORMITY
Kind of equipment : COLOR LCD CLIENT
Type-Designation : W15L00001
Safety : EN 60950 : 1992 + A1, A2, A3, A4, A11
EMC : EN 55022 / 1998, EN 55024 : 1998
EN 61000-3-2 : 1995+A1 : 1998+A2 : 1998
EN 61000-3-3 : 1995
Accredited testlaboratory:
TÜV Rheinland
Am Grauen Stein
51105 Köln
W150-ENG-1µµ¿¤æ˜ 2001.11.1 1:28 AM ∆‰¿Ã¡ˆ3

Contents
1. Introduction of W150 ......................1
OverView ...............................................1
Function ................................................1
Feature ..................................................1
2. Before the Operation ......................3
System structure ....................................3
Front of W150 .............................................3
Hot Keys .................................................4
Rear of W150 ..............................................4
System Connection ................................6
Connection of External Device .............6
3. Operation of W150 ..........................7
Setup of Operating Environment .........7
Menu window Composition .....................7
Setup of Network ......................................7
Setup of Preference ...................................9
Setup Keyboard Feature ..........................10
Setup of Display Feature .........................10
System Properties ....................................11
Volume & sound Properties .....................11
Network Environment View ...............12
Ping ..........................................................12
Ipconfig .....................................................12
W150-ENG-1µµ¿¤æ˜ 2001.11.1 1:28 AM ∆‰¿Ã¡ˆ4

Terminal Connection Manager ...........13
New connection Creation .......................13
Additional Creation of ICA Connection . . .1 4
Additional Creation of RDP Connection . . .1 7
Connection Editing and Deletion ...........19
Editing of ICA Connection . . . . . . . . . . . . . . . . . . . . . . . . . .1 9
Editing of RDP Connection . . . . . . . . . . . . . . . . . . . . . . . . .1 9
Connection Deletion . . . . . . . . . . . . . . . . . . . . . . . . . . . . . . . . . .2 0
Start-up Connection Setup .....................20
Server Connection ...................................21
Using of W150 Hot Keys .........................21
W150 Hot Keys . . . . . . . . . . . . . . . . . . . . . . . . . . . . . . . . . . . . . . . . . . . . .2 1
Multi Connection start . . . . . . . . . . . . . . . . . . . . . . . . . . . . . . . .2 1
Client Setting and Save ..........................22
Client Setting . . . . . . . . . . . . . . . . . . . . . . . . . . . . . . . . . . . . . . . . . . . . . . . .2 2
Save . . . . . . . . . . . . . . . . . . . . . . . . . . . . . . . . . . . . . . . . . . . . . . . . . . . . . . . . . . . . . . . .2 3
Ending the Operation .............................23
Disconnecting . . . . . . . . . . . . . . . . . . . . . . . . . . . . . . . . . . . . . . . . . . . . . . .2 3
Terminal Ends . . . . . . . . . . . . . . . . . . . . . . . . . . . . . . . . . . . . . . . . . . . . . . .2 3
4. Troubleshooting ........................24
5. System Specification .................25
W150-ENG-1µµ¿¤æ˜ 2001.11.1 1:28 AM ∆‰¿Ã¡ˆ5
1
1. Introduction of W150
Overview
“Easy installation, Optimized function, The least expenses”.
It is this web terminal’s strong points that you can expect when you utilize it in
your environments.
Under the basic environments of server based on computing and internet
connection speed of 56kbps, you can use various applications on the high
performance servers based on Windows 2000 Server OS as well as internet
connection.
Function
All the application programs are operated through the server, not in itself
W 1 5 0 .
W150 as a client transfers to the server only the inputs of mouse and
keyboard.
The result of application programs executed in the server are transferred to
the client with the use of Protocol ( RDP or ICA ). Accordingly, traffic size that
causes problems in the existing network is reduced considerably and no
sophisticated is required for client.
Features
As Operation system, “Windows CE” is utilized
W150 has an open type architecture. It is run with a 32 bit multitasking and
multithread operating system that supports various types of device.
°§Utilize a kernel based on the architecture of WINDOWS NT.
°§Support pre-occupied multi tasking and multi thread.
Classification
Operation Mode
CPU
SDRAM
FLASH
Operating System
W150
WBT
Intel Strong ARM 206Mhz
16M
8M
Windows CE 3.0
W150-ENG-1µµ¿¤æ˜ 2001.11.1 1:28 AM ∆‰¿Ã¡ˆ1
°§Provides a user friendly GUI environment
°§Booting process is not necessary since the operating system is stored on
R O M .
Strong ARM CPU as of Intel
°§Low powered (4W) operation is available.
°§Size and Weight are reduced
°§Low noise ( no cooling fan is required )
Quick Booting Circuit Design (Compared to the general PC)
During the Power On, system booting is performed in the last task
environment.
A/S Cost Reduced
Since there are no fixture elements such as HDD, FDD, CD-ROM, and cooing
fan that are main causes of trouble, only minimum A/S is required.
Can be operated in the server environment
The program is executed in the server and only the results of execution (screen
value) are displayed on the client.
Multi-user who are connecting to the server at the same time can execute
own program independently.
2
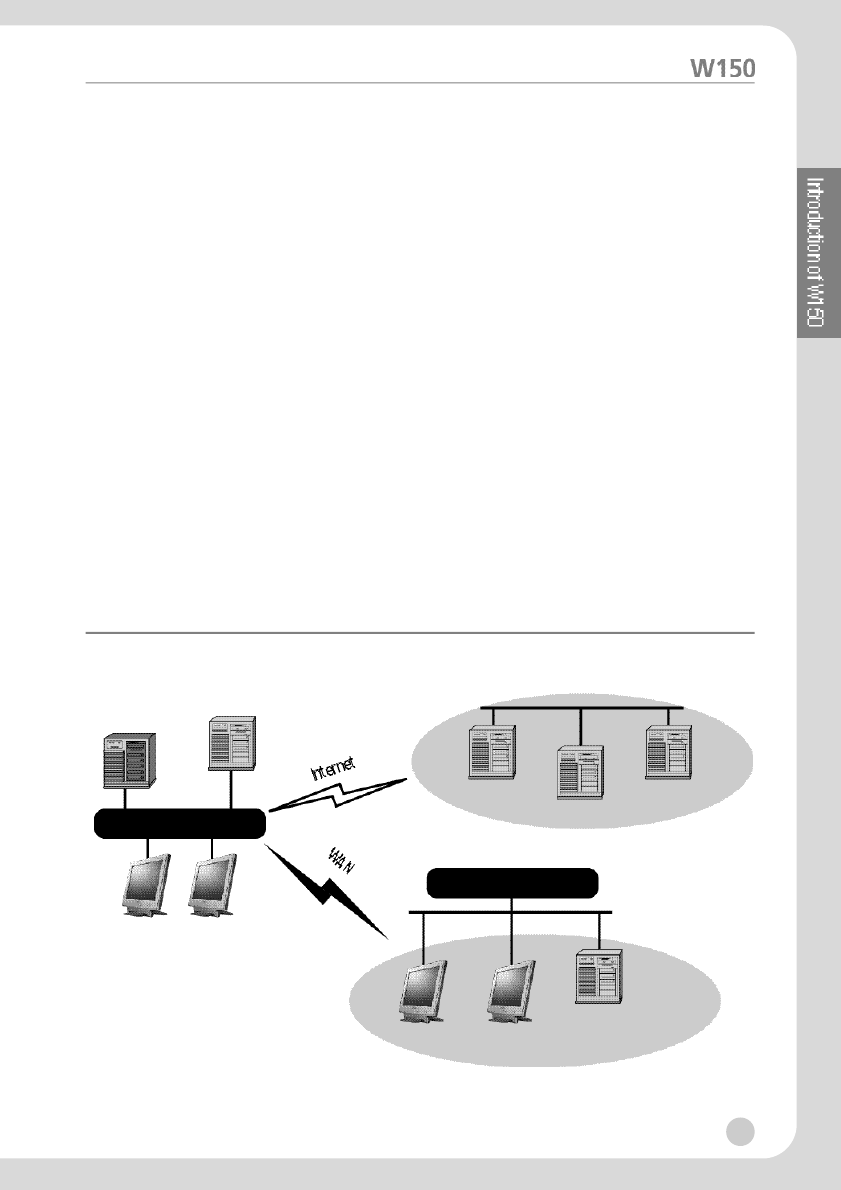
Basic duty Server
Headquater LAN
Branch office LAN
WBT Clients
WBT
- Win CE
Application Server
- Windows 2000
- Meta Frame
Application Server
ERP Server ASP Server
EC Web Hosting Server
(ISP DATA Center)
W150-ENG-1µµ¿¤æ˜ 2001.11.1 1:28 AM ∆‰¿Ã¡ˆ2
3
2. Before the operation
In the section, the structure and setup method of W150 is described.
System Structure
You should be familiar with the system structure for the proper connection of
peripheral devices. Basic parts supplied include a mount ( Main body ),
keyboard, mouse, adaptor, and AC power cord.
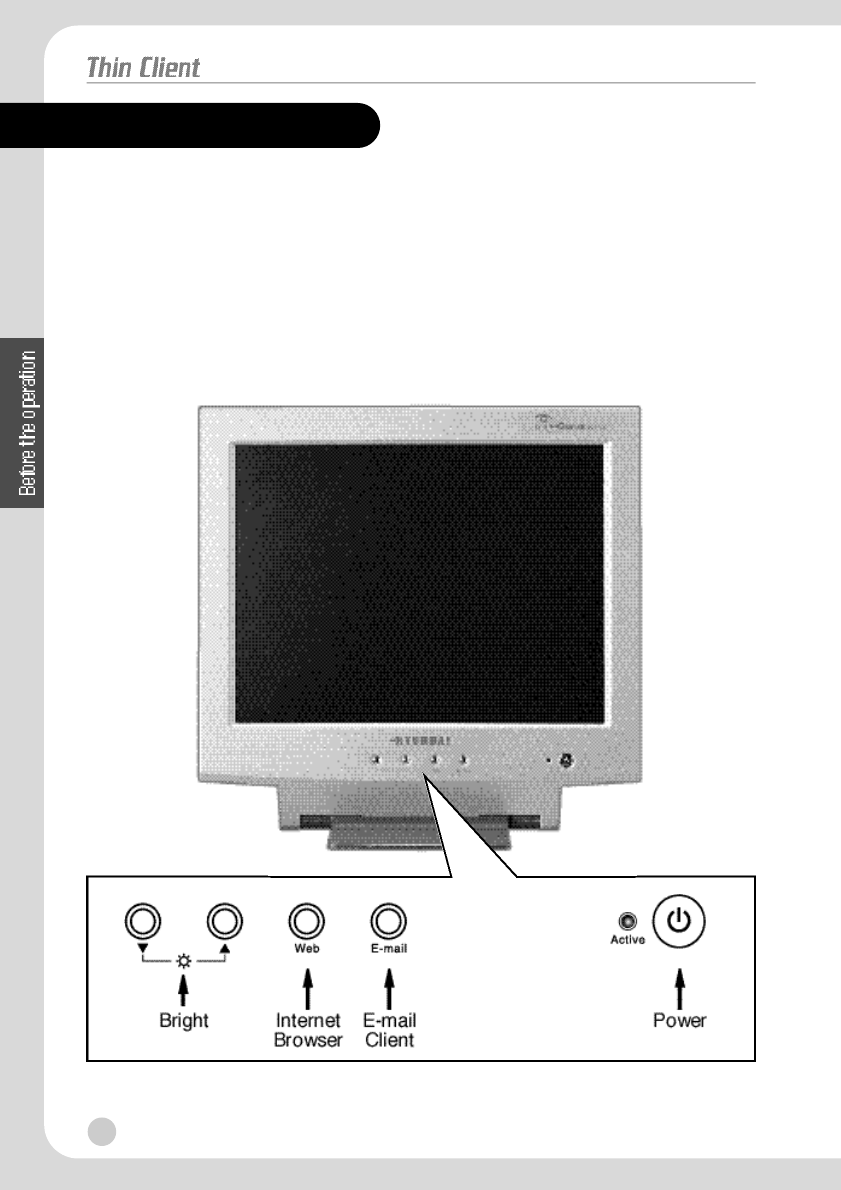
°‹Front Side of W150
W150-ENG-1µµ¿¤æ˜ 2001.11.1 1:28 AM ∆‰¿Ã¡ˆ3
Hot Keys
Power
If you put briefly this button for screen on/off.
The system is reset if you put the button for 3 seconds or longer.
Web
If you put this button, with the server connected state, Internet Explore
Window of server is displayed.
E-mail
If you put this button, with the server connected state, Outlook Express of
Window server is displayed.
Bright
This is used to adjust the brightness of the screen. Press “°„“ to brighten the
screen, and press “°Â“ to darken it.
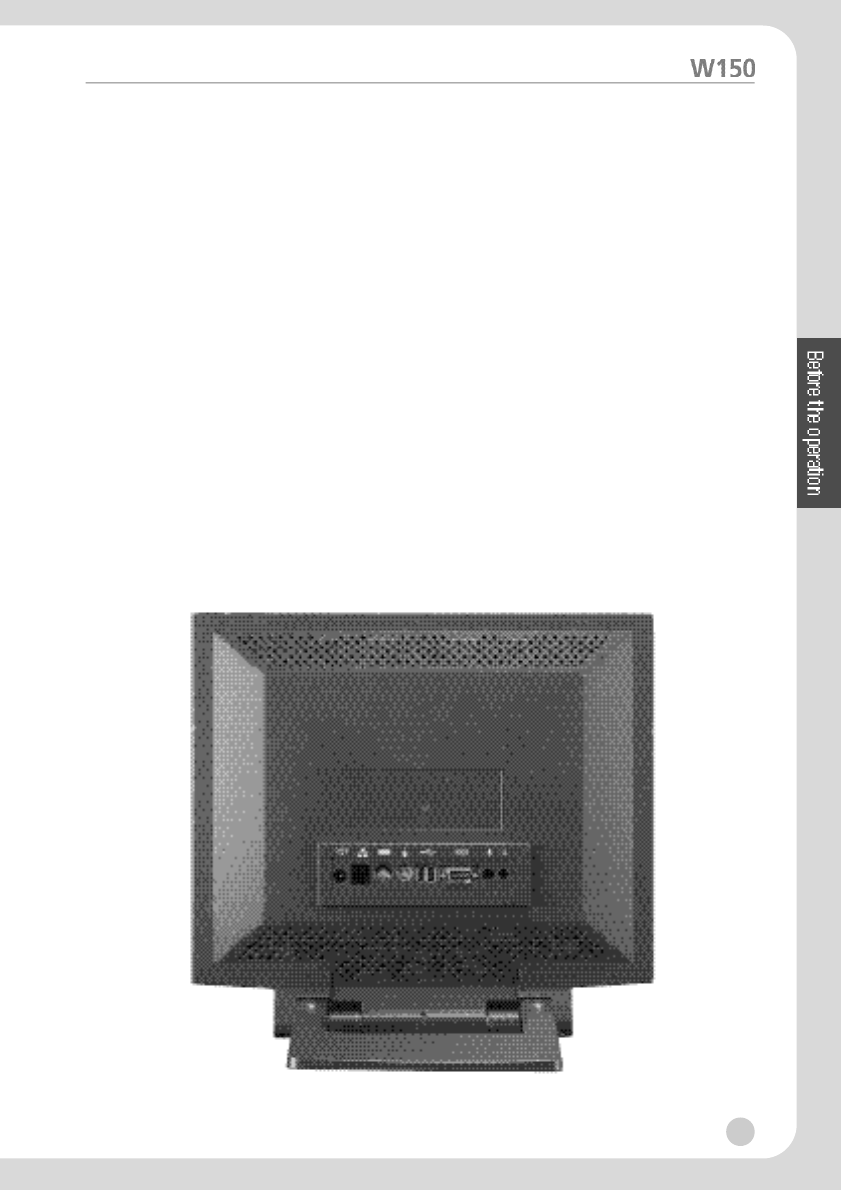
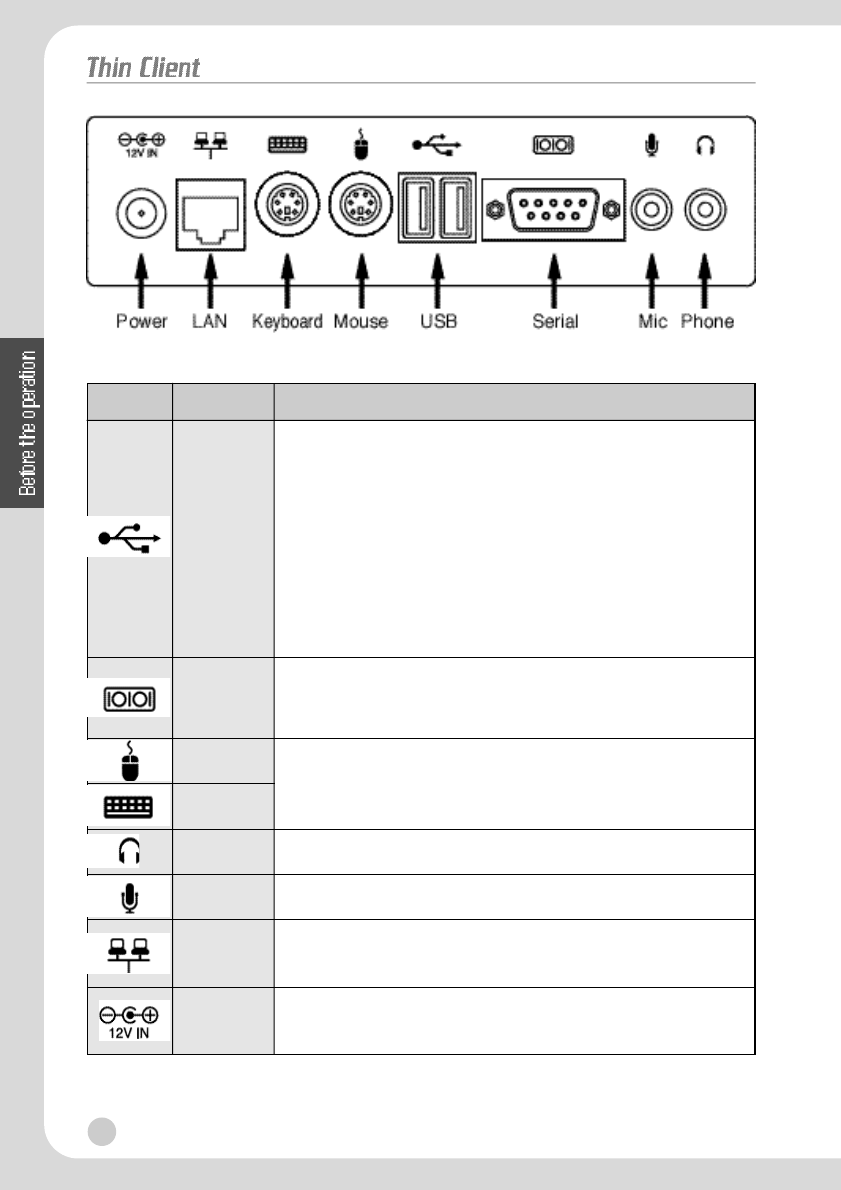
°‹Rear of W150
4
W150-ENG-1µµ¿¤æ˜ 2001.11.1 1:28 AM ∆‰¿Ã¡ˆ4
5
Functions Description
This is a typical aerial bus. An external device that
supports USB is faster than a serial port and easy to
connect. Since USB supports the data transmission
rate of 12Mbps, any types of peripheral devices can
be connected without worrying about the operation
speed.
In addition, it can accommodate up to 127 devices.
Moreover, connection can be made during the PC
operation as well. No power of peripheral devices is
required.
This is connected to D-type connector that consist of 9
pins and interfaces with other serial device for
transmitting/receiving data
PS/2 Port, connected to MINI-DIN connector made up
of 6 pins.
Input jack for speaker
Input jack for microphone
Single line for digital transmission
This interface is connected to a RJ-45 Jack made up of 8 pins
This is connected to an adapter that supplies power to
the system
N A M E
USB
(Optional)
RS-232C
(Optional)
LAN
Keyboard
Mouse
Phone
MIC
ICON
Power
W150-ENG-1µµ¿¤æ˜ 2001.11.1 1:28 AM ∆‰¿Ã¡ˆ5

System Connection
In the proceeding section, the system connection order and method are
d e s c r i b e d .
The power should be off during the system connection.
Connecting Keyboard
Connect the keyboard to its port after checking whether the port is PS/2.
Connecting Mouse
Connect the mouse to its port after checking whether the port is PS/2.
Connecting LAN
Connect the RJ-45 jack to the LAN port.
Connecting Adapter
Connect the adapter to the POWER port and outlet.
Connecting Speaker and Microphone
Connect the speaker or earphone to Phone port and the microphone to the
MIC port.
Connection of External Device
W150 has RS 232-C port and USB port for accommodating additional external
d e v i c e .
Serial Port
Serial port can be connected to an external modem or other device that
support serial Device.
USB Port
USB Port can be connected to a peripheral that support USB.
6
W150-ENG-1µµ¿¤æ˜ 2001.11.1 1:28 AM ∆‰¿Ã¡ˆ6
3. Operation of W150
Setup of Operating Environment
In this section, the operation of W150 under the server setup environment is
described. For more details, ask your server manager.
ßèMenu window Composition
You should go through the following steps in order to set up W150 Properties.
Menu window is displayed if you click right button of mouse from the desktop
screen Menu window is composed following.
ßèSetup of Network
1. You can click “System setting“ °Ê“Network“ from Menu window.
7
OS & Memory
D i s p l a y
I n p u t
M o u s e
N e t w o r k
S o u n d
P i n g
I P c o n fi g
< Menu window >
< Network Test >
< System Setting >
Preference
System Setting ¢∫
Client Setting
Network Test ¢∫
Save
ShutDown
W150-ENG-1µµ¿¤æ˜ 2001.11.1 1:28 AM ∆‰¿Ã¡ˆ7
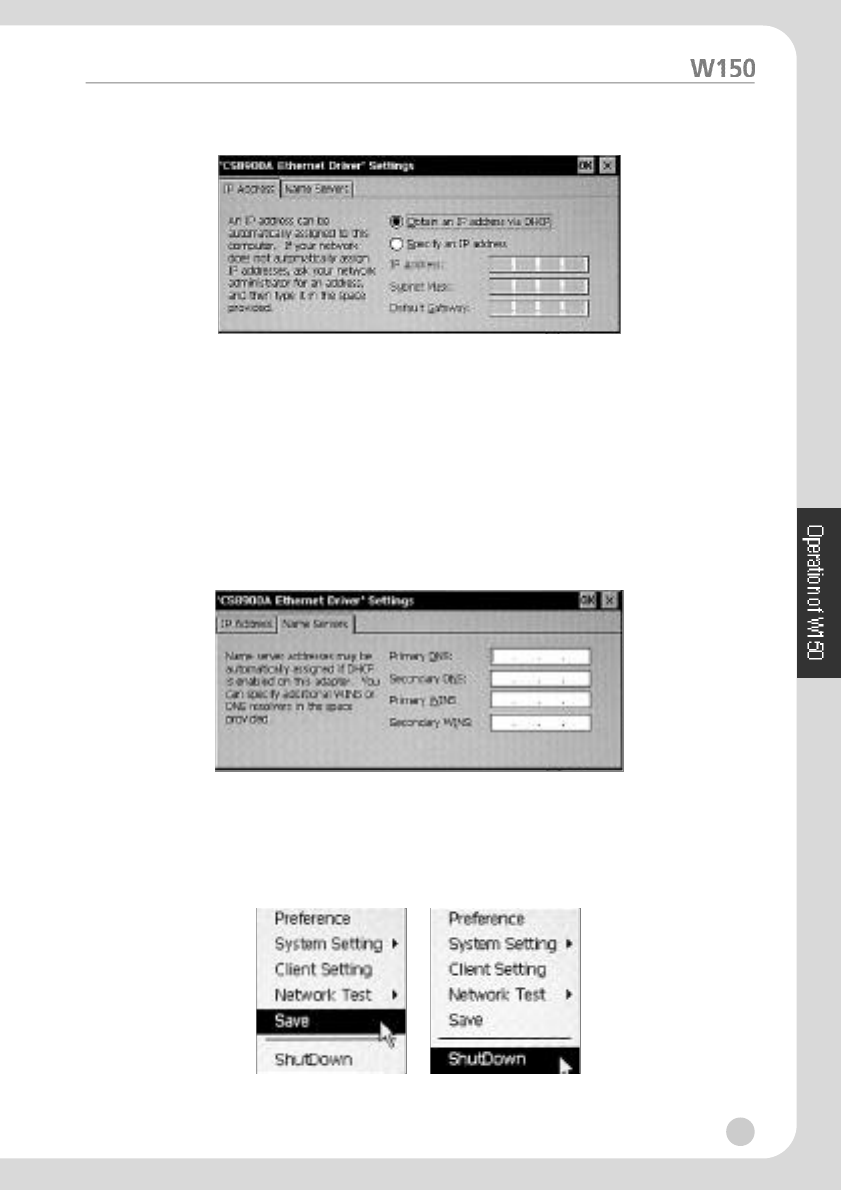
2. Click “property“ of Adaptor tap.
3. Select one of the following options from the “IP Address“ tab
°§If the network uses Dynamic Host Configuration Protocol (DHCP), click the
above “Obtain an IP Address via DHCP“.
°§If you want to use Static IP information allocated to you, click the below
“Specify an IP Address“ and then, enter IP Address, Subnet Mask, and
Gateway.
4. If the network requires DNS or WINS setup, you can select “Name Servers“
tab and then, enter DNS or WINS information.
5. You can click “OK“ in order to fin i s h .
6. Select “save“ from Menu window to save setup.
7. Select “shutdown“ from Menu window to apply setup.
8
W150-ENG-1µµ¿¤æ˜ 2001.11.1 1:28 AM ∆‰¿Ã¡ˆ8
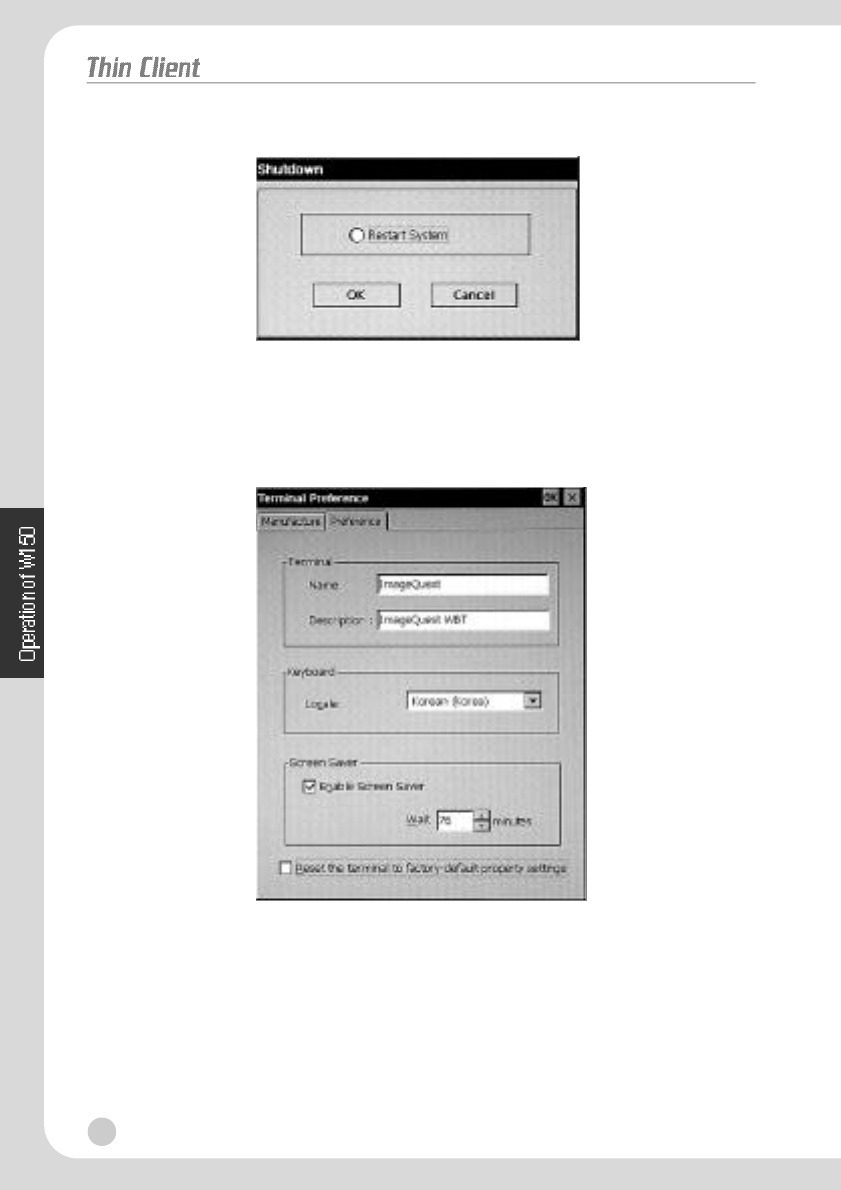
8. You can check “Restart system“ and click “OK“. Then, W150 is re-booted.
ßèSetup of Preference
Click “Preference“ from Menu window to display Terminal Preference
window.
Terminal Preference has the following two tabs.
Manufacture : It shows factory-default settings and operating system version
i n f o r m a t i o n .
Preference : It enables you to set the name and information of this terminal,
type of keyboard and screen saver function. If you select the
bottom option, the terminal environment will be reset to
factory-default settings.
9
W150-ENG-1µµ¿¤æ˜ 2001.11.1 1:28 AM ∆‰¿Ã¡ˆ9
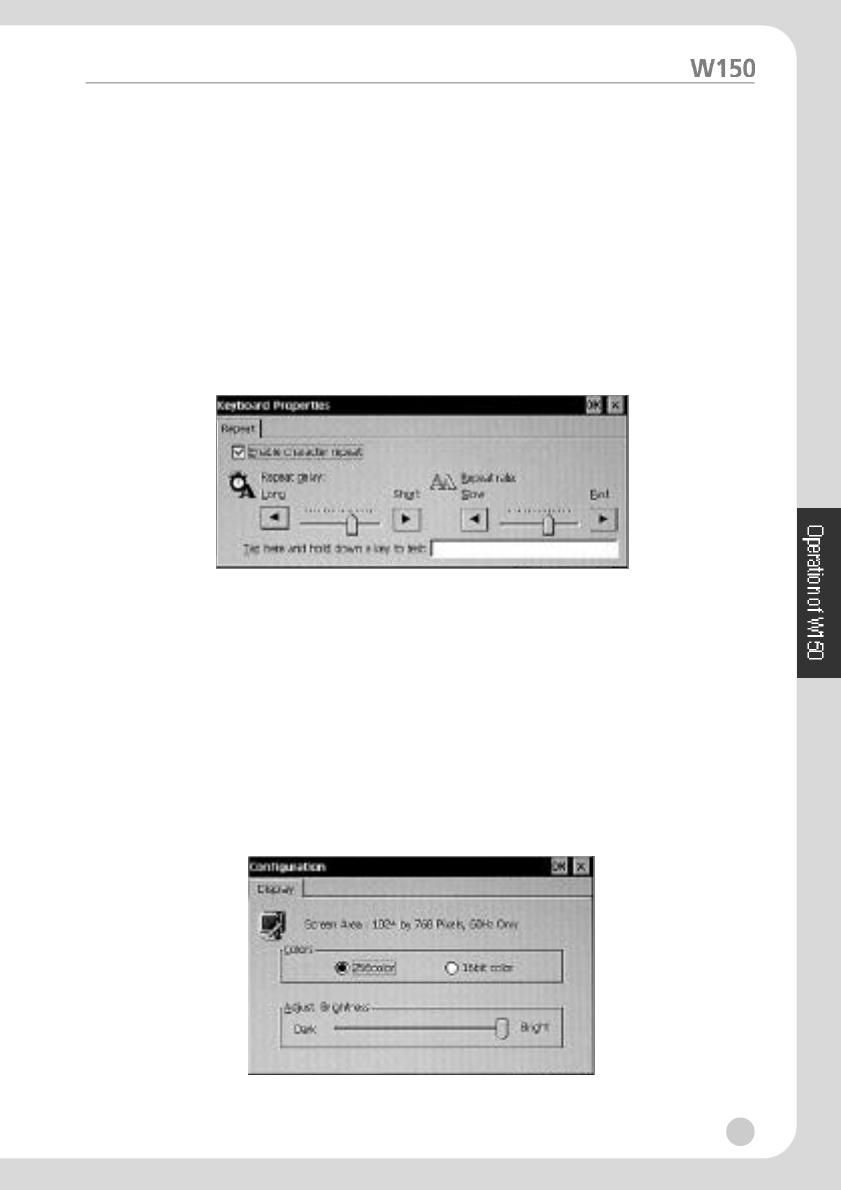
ßèSetup of Keyboard Features
Keyboard features are changed based on you requirements and the type of
board keyboard used.
Repeat delay : Keyboard characters are displayed repeatedly.
( Ex : time passed until the next character is recognized
during the key pressing.)
Repeat Rate : The rate in which characters are repeated by the keyboard.
You should go through the following steps in order to change keyboard
f e a t u r e s .
1. Click “System Setting“ °Ê“Input“ from Menu Window.
2. Use the mouse to drag Repeat delay Slider toward left or right in order to
change Repeat delay.
3. Use the mouse to drag Repeat rate Slider toward left or right in order to
change Repeat rate.
4. Then, click “OK“
ßèSetup of Display Features
Adjust of colors and Brightness rate
You should go through the following steps in order to change display settings.
1. Click “System Setting“ °Ê“Display“ from Menu window.
10
W150-ENG-1µµ¿¤æ˜ 2001.11.1 1:28 AM ∆‰¿Ã¡ˆ10
2. Select the desired colors & Adjust brightness.
3. Click “OK“.
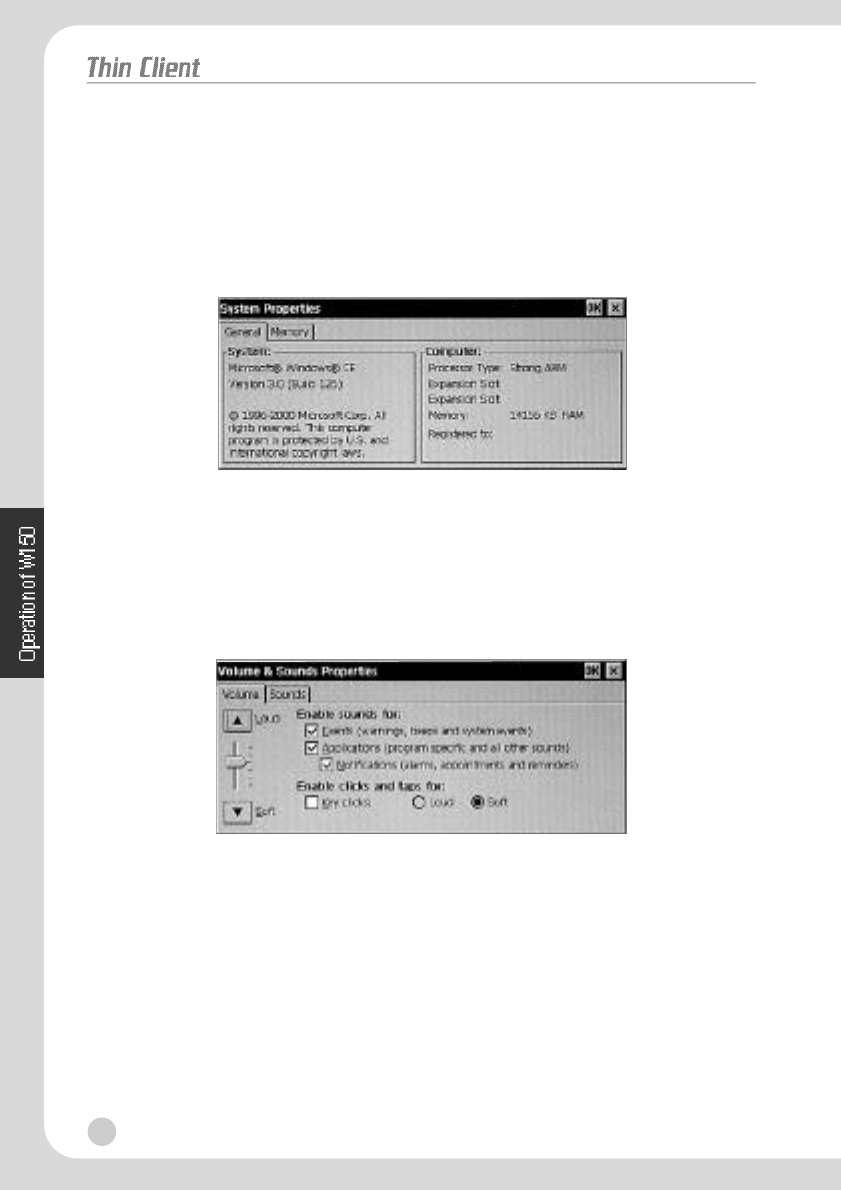
ßèSystem Properties
You can click “System Setting“ °Ê“OS & Memory“ from Menu window.
You can display system information by clicking General.
You can display a window for managing system memory by clicking Memory.
ßèVolume & Sound Properties
You can click “System Setting“ °Ê“Sound“ from Menu window.
You can drag the audio slider bar on either side of it for volume adjustment.
11
W150-ENG-1µµ¿¤æ˜ 2001.11.1 1:28 AM ∆‰¿Ã¡ˆ11
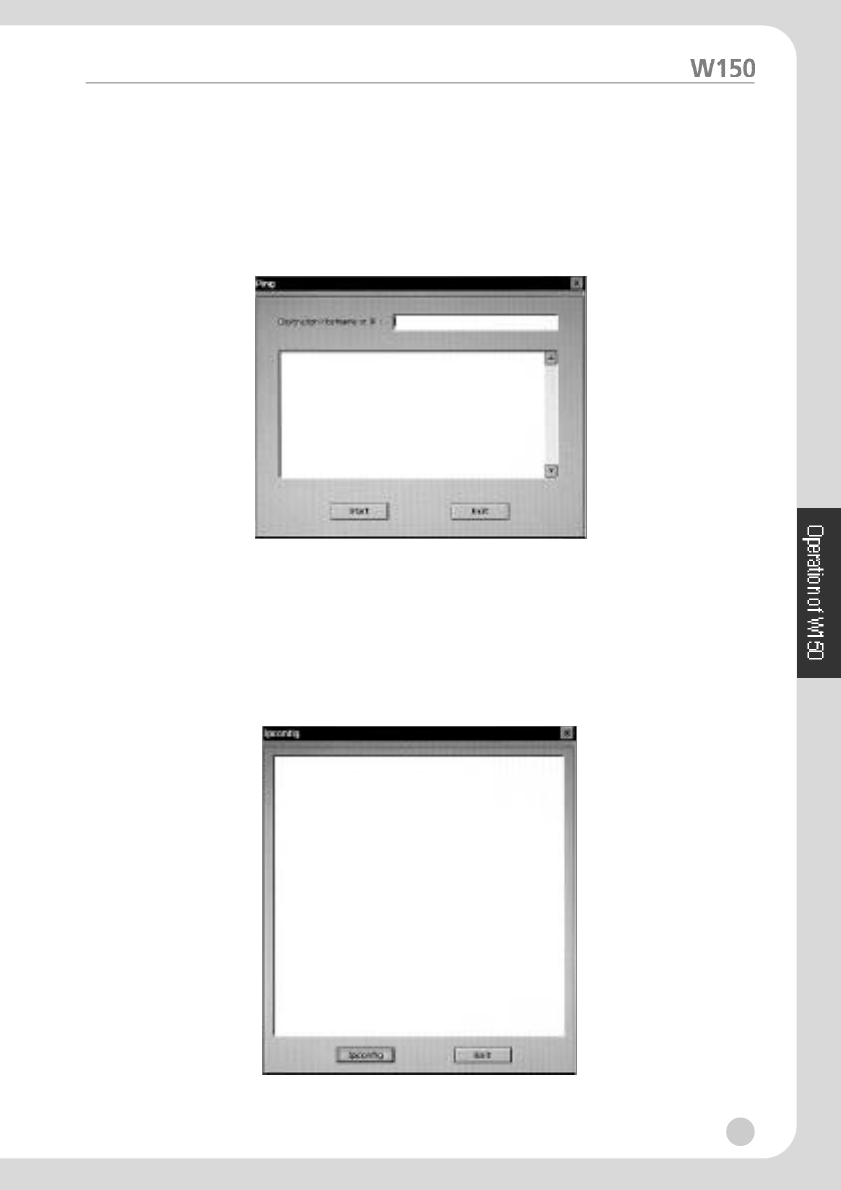
Network Environment View
ßèPing
Click “Network Test“ °Ê“Ping“ from Menu window to open “Ping“ window.
You can check the connection condition when typing the opposite side IP or
name on the “Destination Hostname or IP“ section and pressing the “Start“.
ßèIpconfig
Click “Network Test“ °Ê“ I p c o n fi g“ from Menu window to open “Ipconfig “
w i n d o w .
When clicking the “Ipconfig“ button, the information of the operating
network will appear.
12
W150-ENG-1µµ¿¤æ˜ 2001.11.1 1:28 AM ∆‰¿Ã¡ˆ12
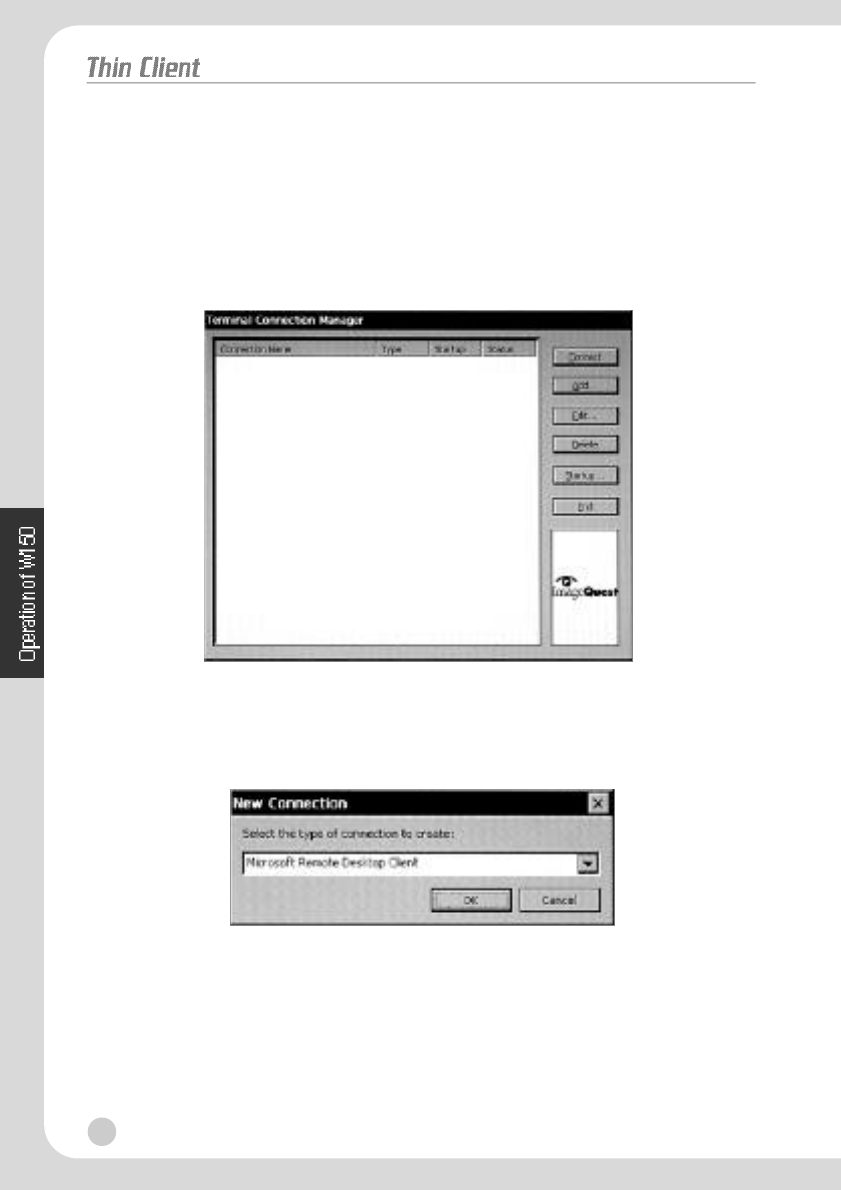
Terminal Connection Manager
This is used when connecting the network of W150. In case you fail to setup
Initial Start or Automatic Start Connection, Terminal Connection Manager is
displayed automatically during the start and end of W150. The Host (Server)
and Client (Terminal) are recognized based on the connection state. You can
create, edit, and delete network connection Terminal Connection Manager
w i n d o w .
ßèNew Connection Creation
1. Click “Add“ in Terminal Connection Manager Window in order to display
New Connection window.
2. Select one of the following two connection protocols.
°§Citrix Independent Computing Architecture Protocol ( ICA )
°§Microsoft Remote Desktop Client Protocol ( RDP )
3. Then, click “OK“. Click “Cancel“ to return to the previous window.
13
W150-ENG-1µµ¿¤æ˜ 2001.11.1 1:28 AM ∆‰¿Ã¡ˆ13
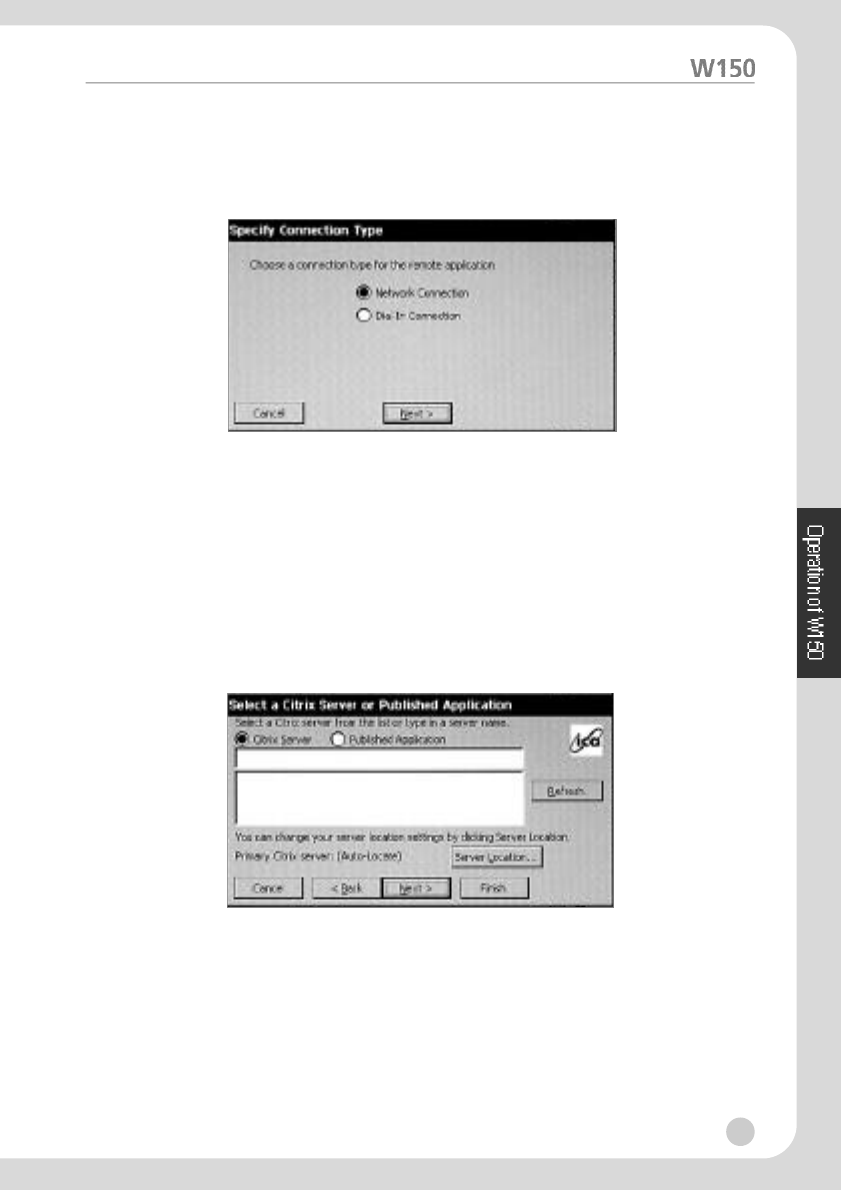
°‹Additional Creation of ICA Connection
1. Select Citrix ICA Client of New Connection window in order to display the
Specify Connection Type Window.
2. Specify connection type.
°§Network connection : Direction connection line is required as in the case of
°§Network Connection 10/100Base-T Dial-in connection : modem is used.
3. Then, click “Next“.
4. All available Citrix server or application on the servers will be inquired and
recognized. Select the required servers or application. If the server list
doesn’t appear, search it again using “Refresh“ or type the server name or
IP to connect directly.
5. Then, click “Next “. If you select “Finish“, following option will be saved
without specific a t i o n .
6. The Connection Name of Terminal Connection Manager can be changed on
the following window.
14
W150-ENG-1µµ¿¤æ˜ 2001.11.1 1:28 AM ∆‰¿Ã¡ˆ14
7. Then, click “Next“.
8. C o n figuration can be made in such a way that same applications can be
used from the selected server. You can leave it blank in order to specify
Command Line and Working Directory or to use windows NT Desktop.
9. Then, click “Next“.
10. Specify Username, Password, and Domain in order to logon to the server
automatically.
11. Then, click “Next“.
12. Select Window Colors desired on Select Window Option Window.
15
W150-ENG-1µµ¿¤æ˜ 2001.11.1 1:28 AM ∆‰¿Ã¡ˆ15
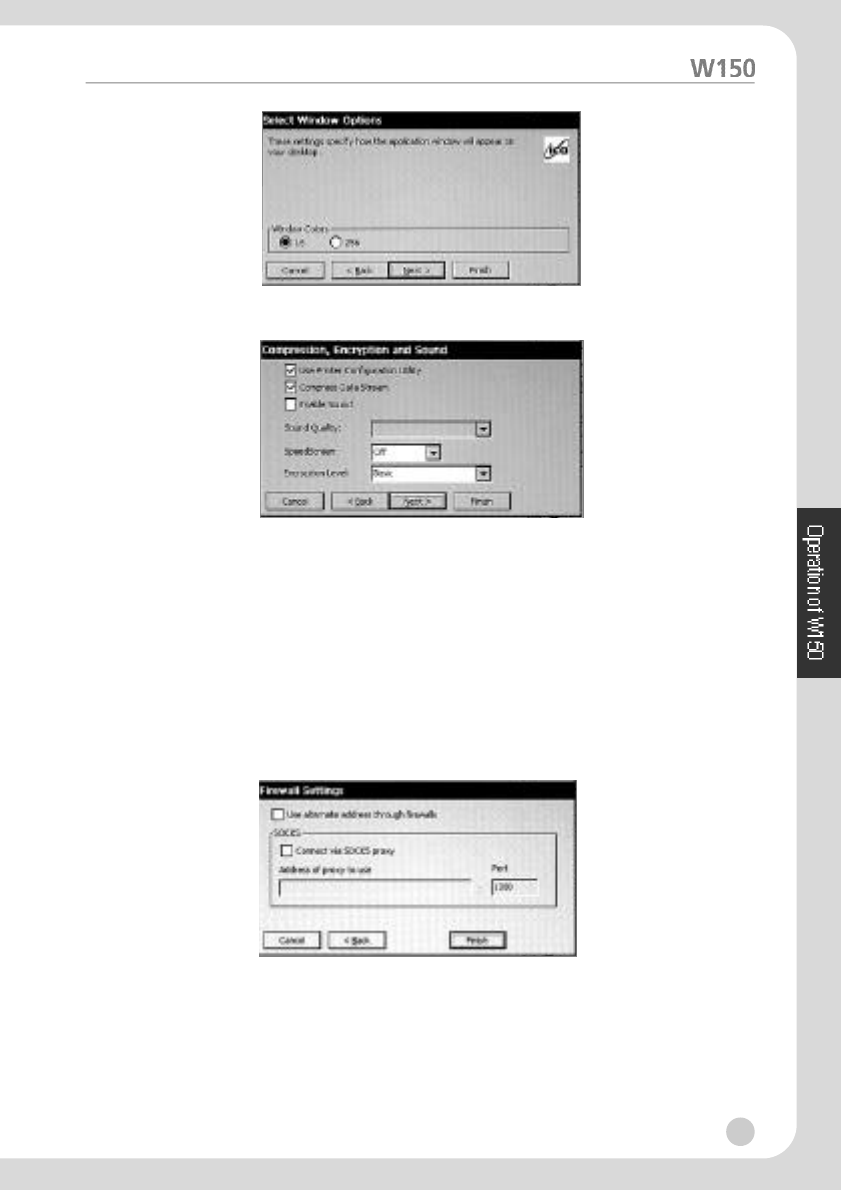
13. Click “Next“.
14. You can configure the ICA session.
°§Compress Data Stream - select this when connection is made with
modem (modem dial-up) or WAN(Wide Area Network).
°§Enable Sound - select this if you use 10/100Base T as LAN (Local Area
Network). When using Sound through WAN and modem, increasing
usage of bandwidth causes some problems.
°§If you use modem or WAN, set “Sound Quality“ to LOW and
“SpeedScreen“ to ON.
15. Click “Next“. Then, Firewall Settings window is displayed.
16. You can enter Firewall information in Firewall Settings window if the
network requires Firewall setup. Then, click “Finish“.
17. Since the installation of ICA connection is over, connection the server is
r e a d y .
16
W150-ENG-1µµ¿¤æ˜ 2001.11.1 1:28 AM ∆‰¿Ã¡ˆ16
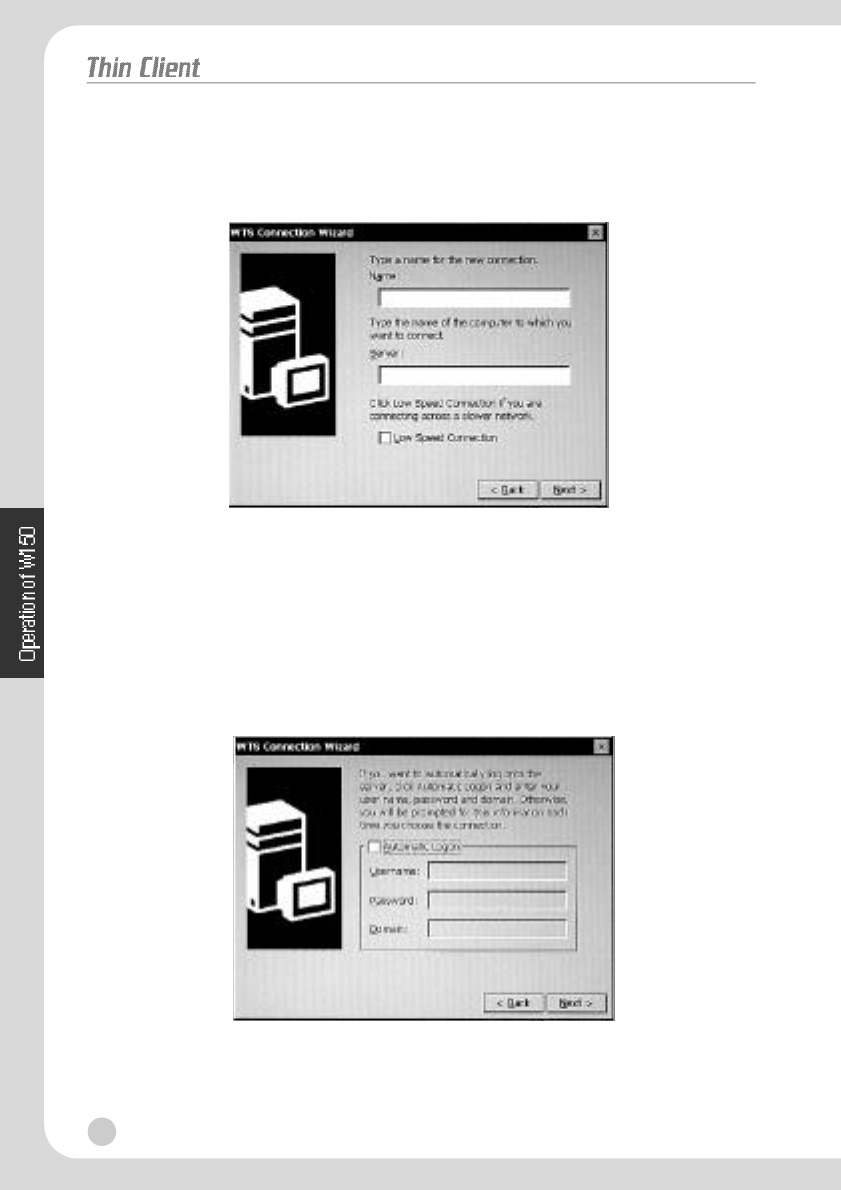
°‹Additional Creation of RDP Connection
1. Select Microsoft Remote Desktop of New Connection window.
Then, Windows Terminal Server (WTS) Connection Wizard Window is
d i s p l a y e d .
2. Enter a name for new connection to the name area.
3. Enter the name of IP address of server to be connected to the server area.
4. Check Low Speed Connection when connection to the server is made
through low Bandwidth lines such as WAN of serial line.
5. Then, click “Next“.
6. When desiring to logon automatically to the server, you should select
automatic logon and then, specify Username, Password, and Domain.
7. Then, click “Next“.
17
W150-ENG-1µµ¿¤æ˜ 2001.11.1 1:28 AM ∆‰¿Ã¡ˆ17
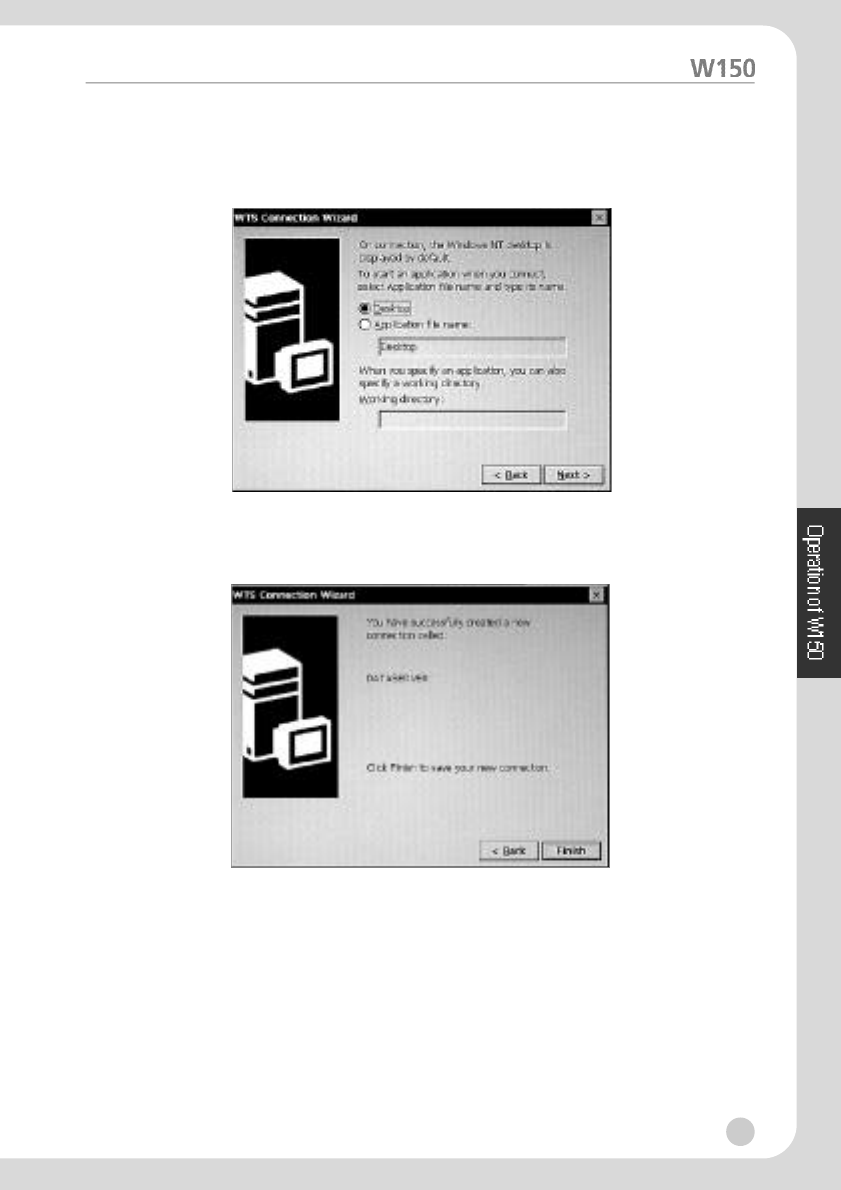
8. The application that is selected instead of desktop can be configured. You
can select Application File Name and specify Command Line and Working
Directory. Or you can leave it blank in order to use Windows NT desktop.
9. Then, click “Next“.
10. Then, click “Finish“.
You are now ready to connect to the server since the installation of WTS
Connection Wizard has been completed.
18
W150-ENG-1µµ¿¤æ˜ 2001.11.1 1:28 AM ∆‰¿Ã¡ˆ18
ßèConnection Editing and Deletion
°‹Editing of ICA Connection
ICA Connection editing is performed through the following steps.
1. Select ICA Connection to be edited from the Connection Name List of
Terminal Connection Window.
2. Click “Edit “. Then, the Edit Connection Details window is displayed.
3. You can modify the information on each tap. Refer to the “Additional
Creation of ICA Connection“ for the related tap information.
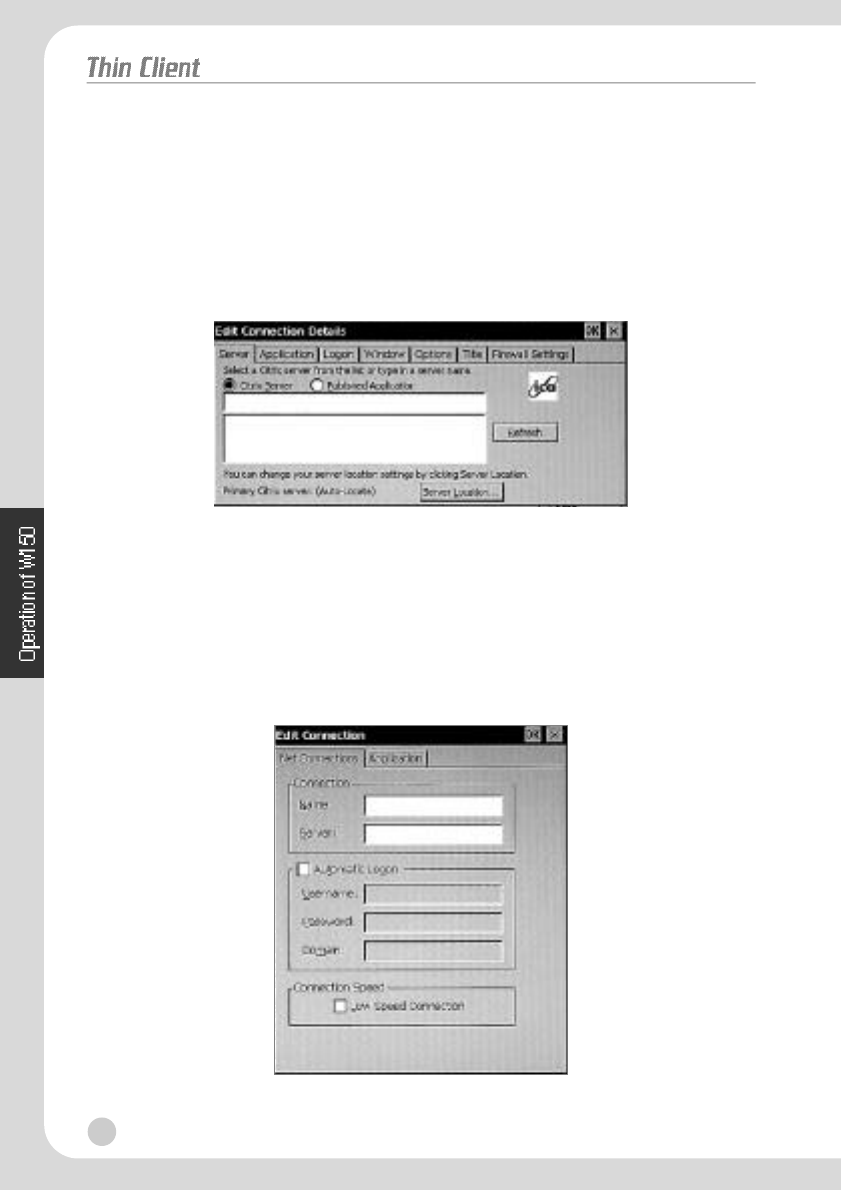
ßíEditing of RDP Connection
1. Select RDP Connection to be edited from the Connection Name List of
Terminal Connection Window.
2. Click “Edit“. Then, the Edit Connection Details window is displayed.
19
W150-ENG-1µµ¿¤æ˜ 2001.11.1 1:28 AM ∆‰¿Ã¡ˆ19
3. The Edit Connection Window has the following two taps.
°§Net Connections : Used to edit connection or logon automatically.
°§Application : Used to go automatically to the file name or working
directory path whenever starting the session.
4. Change the Parts requires to be changed Net Connection or Application
Area.
5. Then, click “OK“ after the completion.
°‹Connection Deletion
1. Select Connection Name of Terminal Connection Manager Window.
2. Then, click “Delete“.
3. Click “Yes“ for confir m a t i o n .
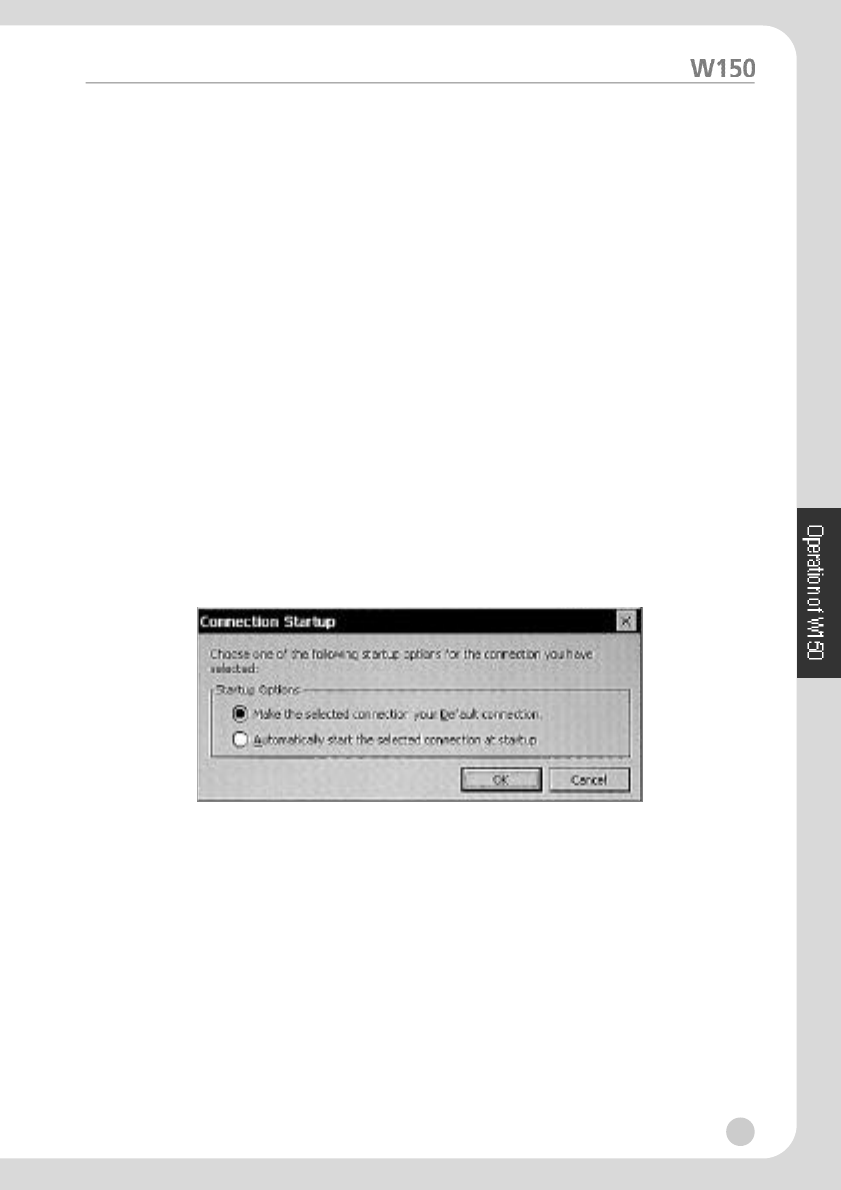
ßèStartup-up Connection setup
Automatic connection to the server is possible every time the session is started.
1. Select a Connection from the Connection Name List of Terminal Connection
Manager Window and Click “Startup“. Then, the Connection Startup
Window is displayed.
2. Select the following Startup option
Make the selection your default connection
Connection selected from Terminal Connection Manager is used as default.
This default connection is highlighted when W150 power on and Terminal
Connection Manager Screen is displayed.
Automatically start the selected connection at startup
Every time you use W150, the system is started up automatically with the
selected connection
3. Then, click “OK“.
20
W150-ENG-1µµ¿¤æ˜ 2001.11.1 1:28 AM ∆‰¿Ã¡ˆ20
ßèServer Connection
Terminal Connection Manager lists all the network connections available for
use. You Should go through the following steps in order to connect to the
server.
1. Select a Connection Name on the list.
2. Click “Connection“ or double click “Connection Name“. If the connection
has been defined as automatic logon, W150 is connected and you are
logged on automatically.
3. In case the logon is not automatic, Window Logon Information Window is
displayed. Enter logon with the prompt.
ßèUsing of W150 Hot Keys
Hot keys are used to simplify the switching process between active sessions.
By using hot keys instead of Terminal Connection Manager, you can switch
automatically each program through simple key manipulation. In the below,
several W150 hot keys are specified as below.
< W150 Hot Keys >
If the hot keys are not working, see the instruction of Multi Connection Start.
<
Multi Connection start
>
W150 can perform multi connections at the same time. The number of
connection is connections is limited by the RAM capacity.
1. Press CTRL+ALT+END to access to W150 Connection Manager.
2. Select Connection Name and then, click “Connect“.
21
Hot Key F u n c t i o n
CTRL+ALT+up arrow
Changes to Up between active sessions
CTRL+ALT+Down arrow
Changes to Down between active sessions
C T R L + A L T + H o m e
Changes automatically to default sessions
C T R L + A L T + E N D
The screen is changed to directly to W150
Connection Manager
< F 2 >
The screen is changed to Terminal Preference Screen
in case Connection Manager is run.
W150-ENG-1µµ¿¤æ˜ 2001.11.1 1:28 AM ∆‰¿Ã¡ˆ21
You should go through the following steps in order to change the
c o n n e c t i o n .
1. Press CTRL+ALT+END to access to W150 Connection Manager.
2. Select Connection Name and then, click “Connect“.
3. Or press CTRL+ALT+UP or CTRL+ALT+DOWN in order to change the
c o n n e c t i o n .
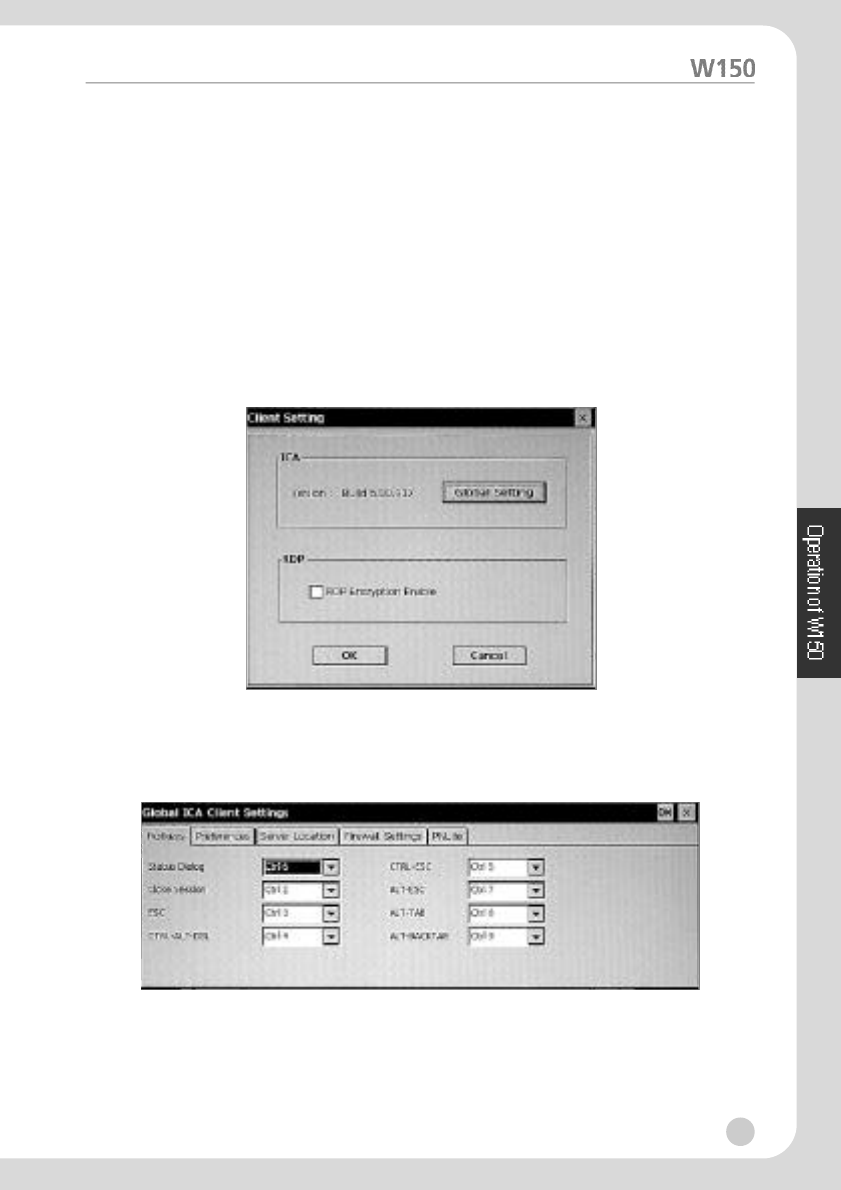
Client Setting and Save
ßèClient Setting
Click “Client setting“ from Menu window to open “Client Setting“ window.
1. ICA Setting
Press “Global Setting“ button in order to change various settings on the
w i n d o w .
2. RDP Setting
You can select RDP Encryption Enable option.
22
W150-ENG-1µµ¿¤æ˜ 2001.11.1 1:28 AM ∆‰¿Ã¡ˆ22

ßèSave
You can press “Save“ from Menu window, and then, The information that
users have changed is saved on the FLASH ROM, so it cannot disappear if the
power is gone off.
Ending the Operation
ßèDisconnecting
Click the “System exit“ in its Windows Start menu. “Logoff“ or “Disconnect“
will be displayed. “Logoff“ closes all application programs and “Disconnect“
leaves application programs operating and just disconnects from the server.
If you end the system using “Disconnect“, the same environment as before
will be configured when connecting the same account.
ßèPower on/off of W150
In case you do not use W150, you can turn the power off just by pressing the
“power” button on the front cover of W150. Then, it consumes a little power.
And if you will not use W150 for a long time, please disconnect the adapter
cord from the power connecting jack in the rear cover of product or power
cable from the wall outlet.
23
W150-ENG-1µµ¿¤æ˜ 2001.11.1 1:28 AM ∆‰¿Ã¡ˆ23

4. Troubleshooting
The followings provide some solutions to common problems when using
setting up your terminal
The monitor screen is blank.
Check whether the power cord has been inserted properly into the terminal
Check whether the monitor is properly plugged into an AC outlet.
Check whether the Terminal is OFF.
Check whether the system is on suspend mode.
The mouse does not work.
Check whether the mouse jack insert properly into the mouse port.
Check whether the mouse ball is operated freely.
The Keyboard does not respond.
Check whether the keyboard has been connected properly to the keyboard
port Check whether power is being supplied properly to W150.
The Network connection does not work
Check whether the cables are connected properly to the LAN port.
Verify the network settings.
Check whether the network address is valid.
Verify the configuration of the server terminal.
24
W150-ENG-1µµ¿¤æ˜ 2001.11.1 1:28 AM ∆‰¿Ã¡ˆ24
25
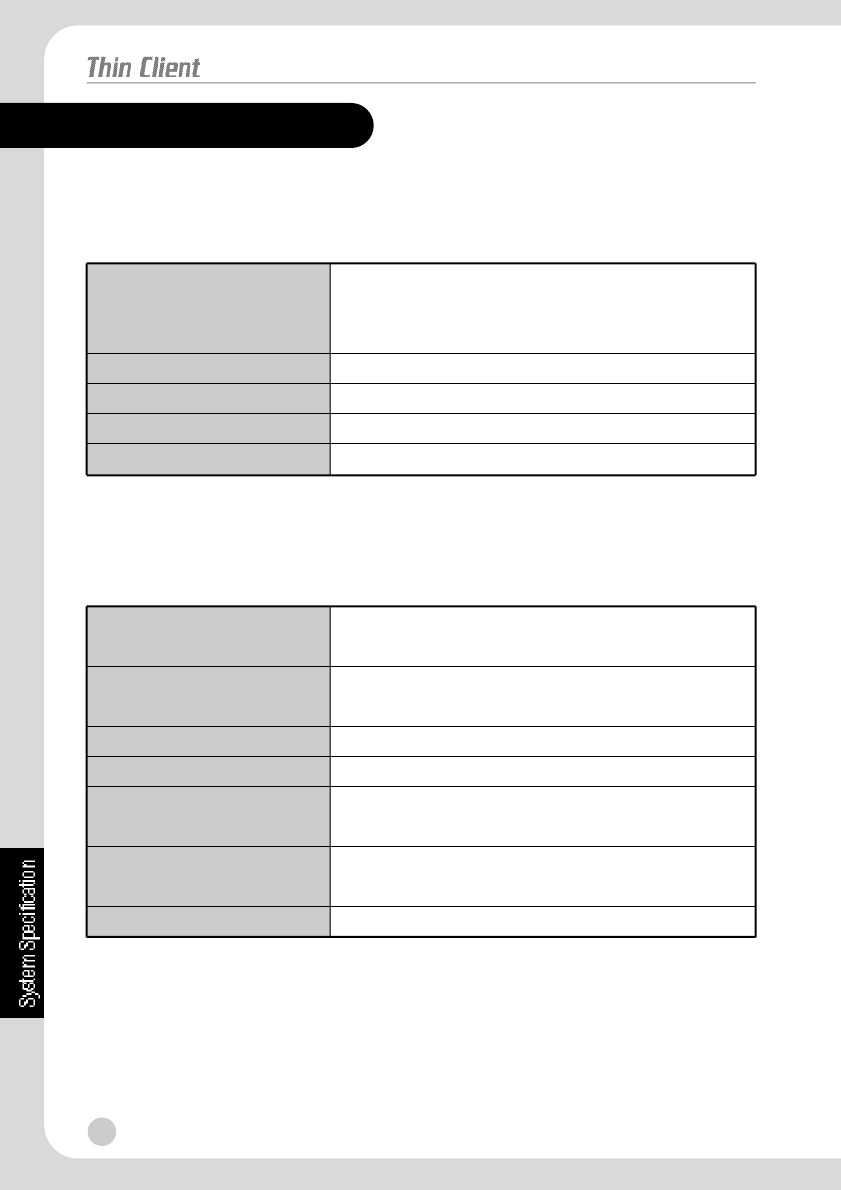
5. System Specification
The specification of W150 is specified as below :
ßèHardware specification
ßèCommunication and Input/Output Specification
Intel Strong ARM 32bit
RISC Processor
206 MHz
8MB FLASH
16MB SDRAM
16-bit Stereo
1024 x 768 16bit True Colors
CPU
Flash memory
RAM memory
Audio
Vided
Ethernet 10 Base T
TCP/IP with DNS, DHCP, and PPP
Microsoft RDP
Ctrix ICA
1 x DB-9 RS232C
Serial Port
2 x USB
P o r t
Earphone Jack
Microphone In
Keyboard and Mouse Port
(PS/2 Keyboard and Mouse included)
12V DC In
Networking Protocol
Communication protocol
Serial Port
USB Port
Audio Port
Keyboard and Mouse Port
Power
W150-ENG-1µµ¿¤æ˜ 2001.11.1 1:28 AM ∆‰¿Ã¡ˆ25

26
W150-ENG-1µµ¿¤æ˜ 2001.11.1 1:28 AM ∆‰¿Ã¡ˆ26