Users Manual
XG
User Manual
Smart
S
mart Dual
Card Printer
YG
Copyright Notice
Users must respect the copyright laws applicable in their country. This manual must not be
photocopied, translated, reproduced or transmitted in whole or in part for any reason and
by the means that might be, albeit electronic or mechanical, without the express, written
authorization of the company I&A System card printer.
All information contained herein may be subject to modification without prior notice.
I&A System card printer accepts no liability for any possible errors herein, nor for any
accidental damage or damage caused through the dissemination or the use of this manual.
Trademarks
Smart is a trademark and I&A System is a registered trademark of I&A System card printer.
Windows is registered trademarks of Microsoft Corp. All other trademarks or registered
trademarks are marks of their respective holders. Smart Design is a trademark of I&A
System.
Return Materials Authorization
In order to make a warranty claim you must contact an I&A System Reseller. You will be
responsible for packaging the printer for shipment and the costs of shipping and insurance
of the printer from the point of use of the printer to the I&A System Reseller. The I&A
System Reseller will bear the costs of shipping and insuring the printer from the repair
location to the address from which the printer was shipped.
Before returning any equipment for in-warranty or out-of warranty repair, contact an I&A
System Reseller or an I&A System Service Center for a Return Materials Authorization
(RMA) number. Repack the equipment in the original packing material and mark the RMA
number clearly on the outside of the box. For more information about RMA or I&A System
warranty statements, refer to the Warranty booklet on the quick install guide.
ZG
TABLE OF CONTENTS
1. Introduction
1.1 Printer Outside Features
1.2 Printer Inside Features
1.3 Ribbon Cartridge Features
1.4 LCD Panel Display and Button Operation
2. Installing the Printer
2.1 Loading a Ribbon
2.2 Loading Cards
2.3 Installation the Printer Driver
2.4 Test Printing
2.5 Changing a Ribbon and Cleaning Roller
3. Checking and changing the Printer Properties
3.1 Checking the Printer Properties
3.2 Changing the Printing Setting
3.3 Changing the Printer Properties
4. Troubleshooting
4.1 Card Transfer
4.2 Printing Quality
4.3 Magnetic Stripe Encoder
4.4 General Operation
5. Printer Specification
------------------------------------------------------------------------ 6
-------------------------------------------------------------------------- 7
---------------------------------------------------------------------- 8
------------------------------------------------- 9
---------------------------------------------------------------------------------- 10
-------------------------------------------------------------------------------------- 12
------------------------------------------------------------------ 14
------------------------------------------------------------------------------------------ 17
--------------------------------------------------- 18
--------------------------------------------------------------- 19
-------------------------------------------------------------------- 20
----------------------------------------------------------------- 21
---------------------------------------------------------------------------------------- 23
-------------------------------------------------------------------------------------- 24
------------------------------------------------------------------------ 25
--------------------------------------------------------------------------------- 27
----------------------------------------------------------------------------- 27
[G
TABLE OF FIGURES
<Figure 1> Printer Front/Side Features
<Figure 2> Printer Rear Feature
<Figure 3> Printer Inside
<Figure 4> Ribbon Cartridge
<Figure 5> Open Top Cover
<Figure 6> Take out the cartridge
<Figure 7> Preparation the ribbon
<Figure 8> Install the ribbon
<Figure 9> Install the cleaning roller
<Figure 10> Peel the protective rapper
<Figure 11> Install the ribbon cartridge
<Figure 12> Close Top Cover
<Figure 13> Adjust Card Thickness
<Figure 14> Holding the Cards
<Figure 15> Push the stack back and forth
<Figure 16> Restore the card stack
<Figure 17> Placing the cards and close the hopper cover
<Figure 18> Connect the Power Cord
<Figure 19> CD Loading
<Figure 20> Driver Install Guide
<Figure 21> Driver Installation
<Figure 22> Printer Turn ON
<Figure 23> No, not this time
<Figure 24> Install the software automatically
<Figure 25> Continue Anyway
<Figure 26> Finish
<Figure 27> I&A SMART Card Printer
<Figure 28> Printer Properties
<Figure 29> Printer Test Page
----------------------------------------------------------- 6
----------------------------------------------------------------- 6
------------------------------------------------------------------------------ 7
------------------------------------------------------------------------ 8
-----------------------------------------------------------------
---------------------------------------------------------------- 10
------------------------------------------------------------------------ 11
--------------------------------------------------------------------------- 10
10
--------------------------------------------------------- 11
------------------------------------------------------- 12
------------------------------------------------------------ 11
------------------------------------------------------------- 12
---------------------------------------------------------------------- 13
-------------------------------------------------------------- 13
-------------------------- 13
-------------------------------------------------- 13
---------------------------------------------------------------------- 12
------------------------------------------------------------------------------- 14
-------------------------------------------------------------------- 14
------------------------------------------------------------------------- 15
------------------------------------------------------------------------ 15
---------------------------------------------------------------------- 15
--------------------------------------------------------------------- 16
--------------------------------------------------------------------------------------- 16
---------------------------------------------------------------------- 17
----------------------------------------------------------------------- 17
----------------------------------------------------------- 16
---------------------------------------------- 15
---------------------------------------------------------------- 14
-------------------------------------------------------------------------- 17
\G
<Figure 30> Test Print O.K
<Figure 31> Ribbon Separation
<Figure 32> Checking the Printer Properties
<Figure 33> Printing Setting
<Figure 34> Layout
<Figure 35> Paper/Ribbon/Quality
<Figure 36> Side/Media
<Figure 37> Sharing Printer
<Figure 38> Port
<Figure 39> Advanced
<Figure 40> Color
<Figure 41> Print Quality Trouble Example 1
<Figure 42> Print Quality Trouble Example 2
<Figure 43> Print Quality Trouble Example 3
<Figure 44> Print Quality Trouble Example 4
<Figure 45> Print Quality Trouble Example 5
---------------------------------------------------------------------- 18
------------------------------------------------------------------------- 20
20
-------------------------------------------------------------------------------- 21
------------------------------------------------------------------------- 21
---------------------------------------------------------------- 20
------------------------------------------------ 19
--------------------------------------------------------------------------------- 22
22
24
24
------------------------------------------------ 24
------------------------------------------------ 25
24
22
------------------------------------------------
------------------------------------------------
------------------------------------------------
----------------------------------------------------------------------------------------
------------------------------------------------------------------------------------------
--------------------------------------------------------------------------------------
]G
1. Introduction
Thank you for choosing the I&A System Smart Card Printer. This manual helps you effectively
and professionally for the start-up and operation of your new Card Printer.
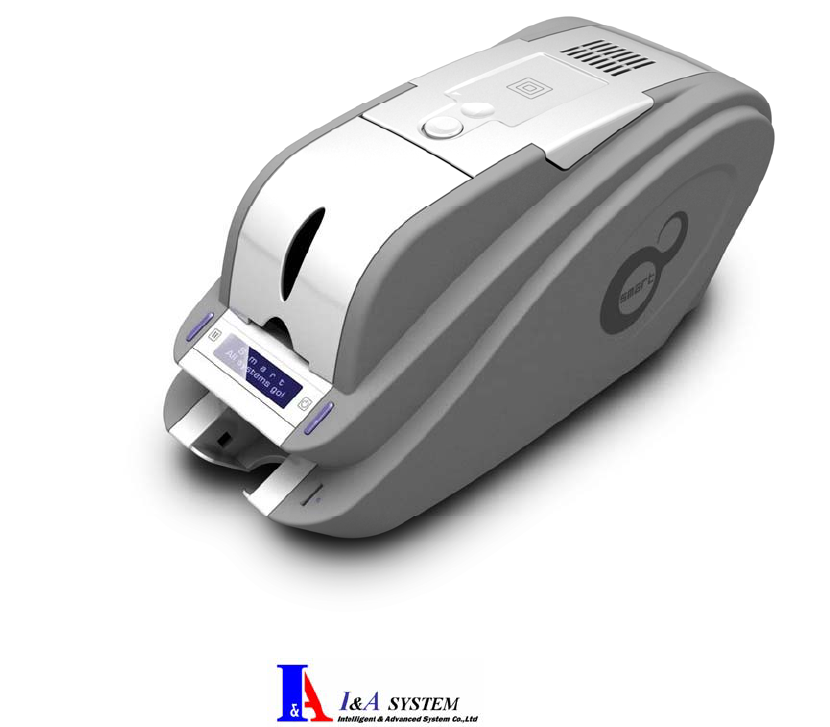
1.1 Printer Outside Features
This Smart Card Printer takes a power via the adaptor provided with the printer. Using
USB port, it communicates with user’s PC. For the user’s convenience, the printer
process status can be seen through LCD and most of the operations can be controlled
by two LED buttons.
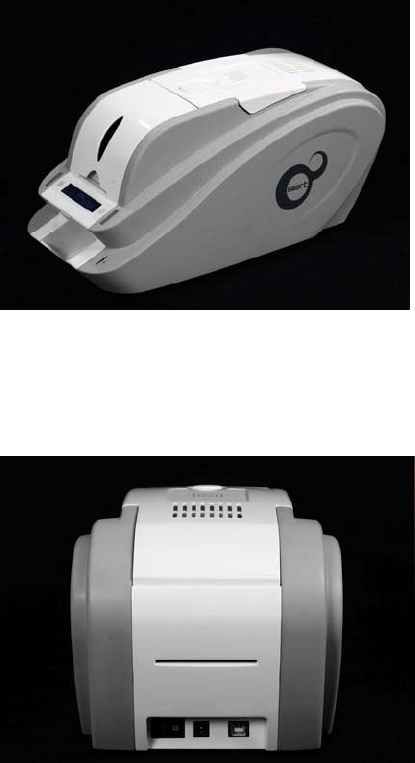
The following shows the external functional features found on your Smart Printer.
A
B
C
D
E
F
G
HG
Power Switch
Power Connector
USB Port
Rear Card Outlet
(If necessary)
Top Cover Open Button
External Contactless IC Encoding
Position
Hopper (Input Hopper)
LED buttons
LCD (Show the process status)
Magnetic/Contact IC/Contactless IC
Encoder are installed inside
External Contact IC Encoder
(SIM Type)
G
Stacker (Output Hopper)
I
J
K
LG
G
<Figure 1> Printer Front/Side Features
<Figure 2> Printer Rear Feature
A B
C
D
E
F
G
IJK
H
L
^G
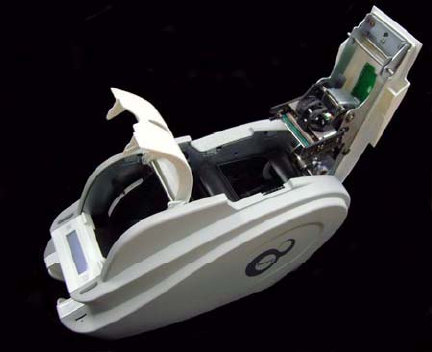
1.2 Printer Inside Features
Smart Printer adopts a semi-permanent Ribbon cartridge.
The following shows the internal functional features found on your Smart Printer.
1.2.1 Thermal Printer Head
This enables the cards to be printed.
(Caution!
Do not contact the surface of the printer head with fingers or a sharp metal object to
avoid degrading print quality or damaging printer head permanently.)
1.2.2 Hopper(Card Input Hopper)
Load the cards for printing.
1.2.3 Stacker(Card Output Hopper)
Collect the printed and/or encoded cards.
1.2.4 Card Thickness Control lever
Adjust the cards thickness.
1.2.5 Manual Card Output Wheel
When a card is jammed, the card can be out using this wheel by manually.
(Information!
Most of the card jam error can be solved by controlling the front LED buttons. So use
this wheel when the problem is not solved by using the front LED buttons.)
Thermal Printer Head
Ribbon Cartridge
Card Thickness Control lever
Hopper
Stacker(Output Hopper)
External Contactless IC Antenna
Manual Card Output Wheel
A
B
C
D
E
F
G
G
<Figure 3> Printer Inside Features
A
B
C
D
E
F
G
_G
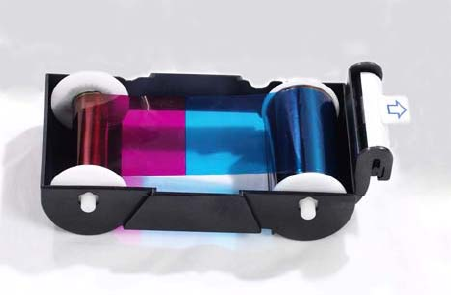
1.3 Ribbon Cartridge Features
1.3.1 Ribbon Cartridge
Install a Ribbon and a disposable cleaning roller provided with the Ribbon.
(Important!
This semi-permanent ribbon cartridge is a component of the printer. Printer does not
operate if it is broken or damaged. In this case, please contact printer reseller.)
1.3.2 Ribbon
Ribbon for printing.
1.3.3 Disposable Cleaning Roller
It removes dust in the surface of card to improve print quality before the card is printed.
It should be changed together with the Ribbon.
(Caution! This disposable cleaning roller is provided with the Ribbon. If this is not changed,
print quality mighty be degraded.)
Ribbon Cartridge
Ribbon
Disposable Cleaning Roller
A
B
C
<Figure 4> Ribbon Cartridge
A
B
C

`G
1.4 LCD Panel Display and Button Operation
Smart Printer shows the real-time process status to user. Please refer to the below
LCD panel display and button operation.
LED Buttons
No LCD Message Left Press Right Press Printer Status
1 S M A R T
System Ready
Printer Setting
Information
(only for A/S)
Software
Power ON/OFF System Stand By
2Ver X.XX…
Initialize… Initializing
3S M A R T
Printing! Printing
4S M A R T
Mag R/W
Magnetic
Read/Write
5S M A R T
Out of Ribbon No Ribbon
6S M A R T
Out of Card No Card
7S M A R T
Top Cover Open
Move
transportation
roller to left
Move
transportation
roller to right
Top Cover open
8Ribbon Not Found
<Replay Cancel> Replay Cancel &
initialize
Fail to find a proper
color
9Card In Error
<Replay Cancel> Replay Cancel &
initialize
Fail to the card
loading
10 Reposition Error
<Replay Cancel> Replay Cancel &
initialize
Fail to the card
transporting
11 Head U/D Error
<Replay Cancel> Replay Cancel &
initialize
Fail to the print
head up and down
12 Card Out Error
<Replay Cancel> Replay Cancel &
initialize Fail to the card out
13 Mag R/W Error
<Replay Cancel> Replay Cancel &
initialize
Fail to the magnetic
Read/Write
* LED ON / LED BLINKING
ƒ SMART System Ready : System is ready to print. Press left button to see the printer setting
information and press right button or Power ON/OFF by software.
ƒ Ver X.XX… Initialize… : Under checking the printer’s version and initializing.
ƒ SMART Printing! : Printing.
ƒ SMART Mag R/W : Reading or writing the data on Magnetic Stripe.
ƒ SMART Out of Ribbon : No Ribbon in the printer or Ribbon is used all. Check the Ribbon!
ƒ SMART Out of Card : No Cards in the hopper. Check the Cards on the hopper!
ƒ SMART Case Open : Top Cover is open. Please close the Top Cover.
ƒ Ribbon Not found : Ribbon search is failed. Press left button to replay or press right button to cancel.
ƒ Card In Error : Card insertion is failed. Check the card on the hopper! Press left button to replay
or press right button to cancel.
ƒ Reposition Error : Card is not moved to the proper position. Press left button to replay or press right
button to cancel.
ƒ Head U/D Error : Printer head is not moved to the proper position. Press left button to replay or
press right button to cancel.
ƒ Card Out Error : Card is not outputted. Press left button to replay or press right button to cancel.
ƒ Mag R/W Error : Reading or writing the data is failed. Press left button to replay or press right
button to cancel.
XWG
2. Installing the Printer
2.1 Loading a Ribbon
Before print, prepare the related items such as a card, a ribbon and a cleaning roller.
In this section, we invite you to know the proper method to install the Ribbon and
cleaning roller to the printer.
2.1.1 Make the printer power OFF.
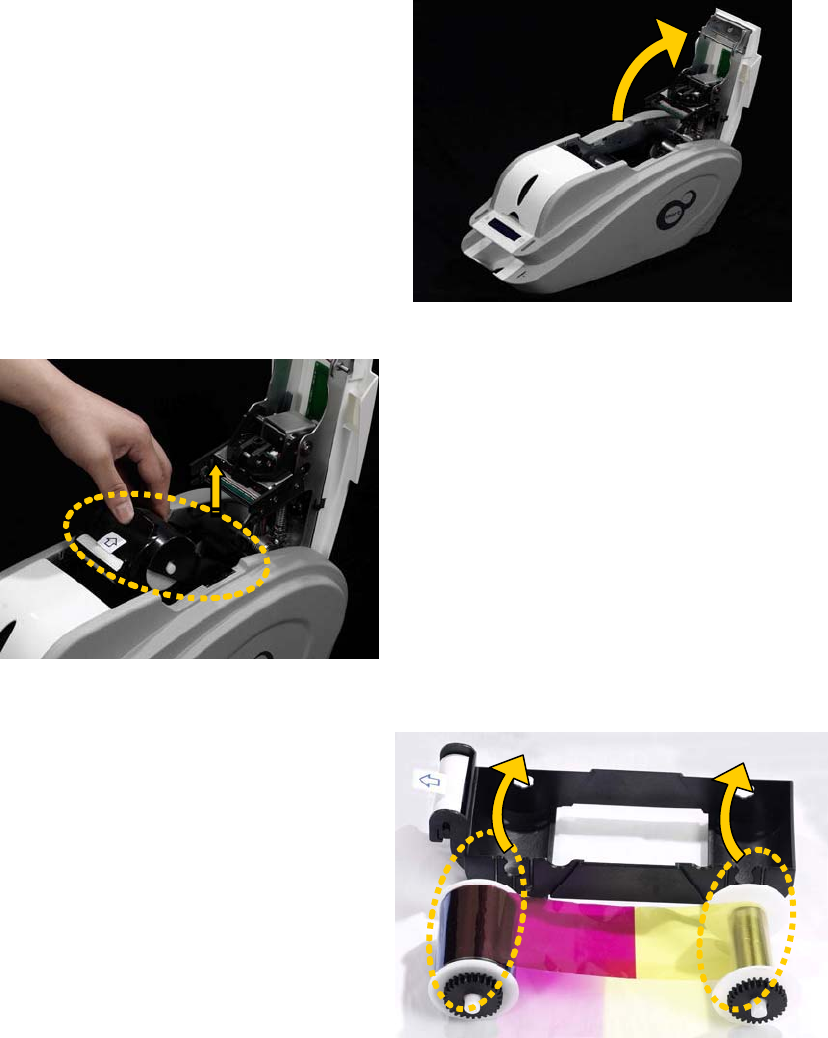
2.1.2 Open the printer top cover
by pressing the top cover
open button.
2.1.4. Prepare the ribbon before
inserting it into the cartridge.
Refer to the illustration on
the inside of the cartridge.
2.1.3 Take out the ribbon cartridge.
<Figure 5> Open Top Cover
<Figure 6> Take out the cartridge
<Figure 7> Prepare the ribbon
XXG
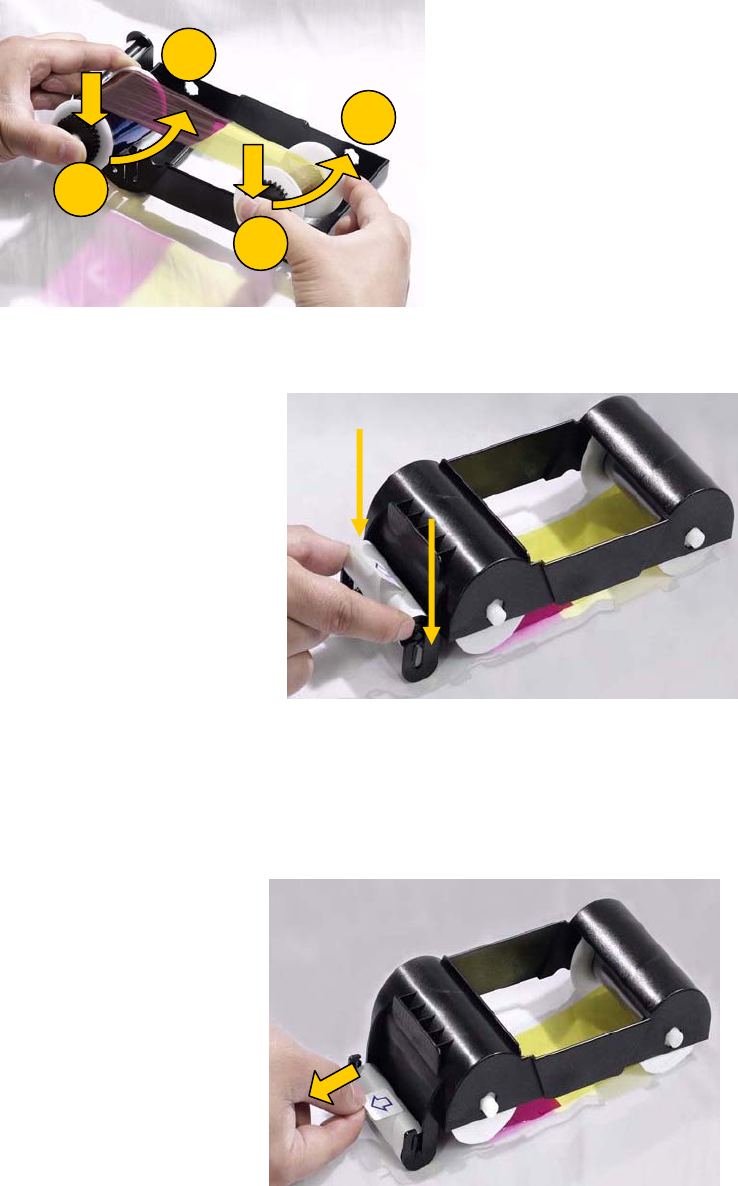
2.1.5. Insert the supply side of the ribbon to no.1 hole and press the opposite
(no.2) until it clicks. Insert the take-up side of the ribbon same method
to no.3 and no.4. And fasten the ribbon.
(Caution! If the ribbon is not fastened, a rolling up error might happen.)
2.1.6. Install the disposable cleaning
roller to the ribbon cartridge.
2.1.7. Peel the protective wrapper from the cleaning roller.
To avoid contamination, always hold the cleaning roller. Be careful of touching, dust and
contamination because it is adhesive.
(Caution! Do not use without peeling off
the protective wrapper.
The cleaning roller do not perform its
function.)
ᶤ
<Figure 8> Install the ribbon
<Figure 10> Peel the protective wrapper
1
2
3
4
<Figure 9> Install the cleaning roller
XYG
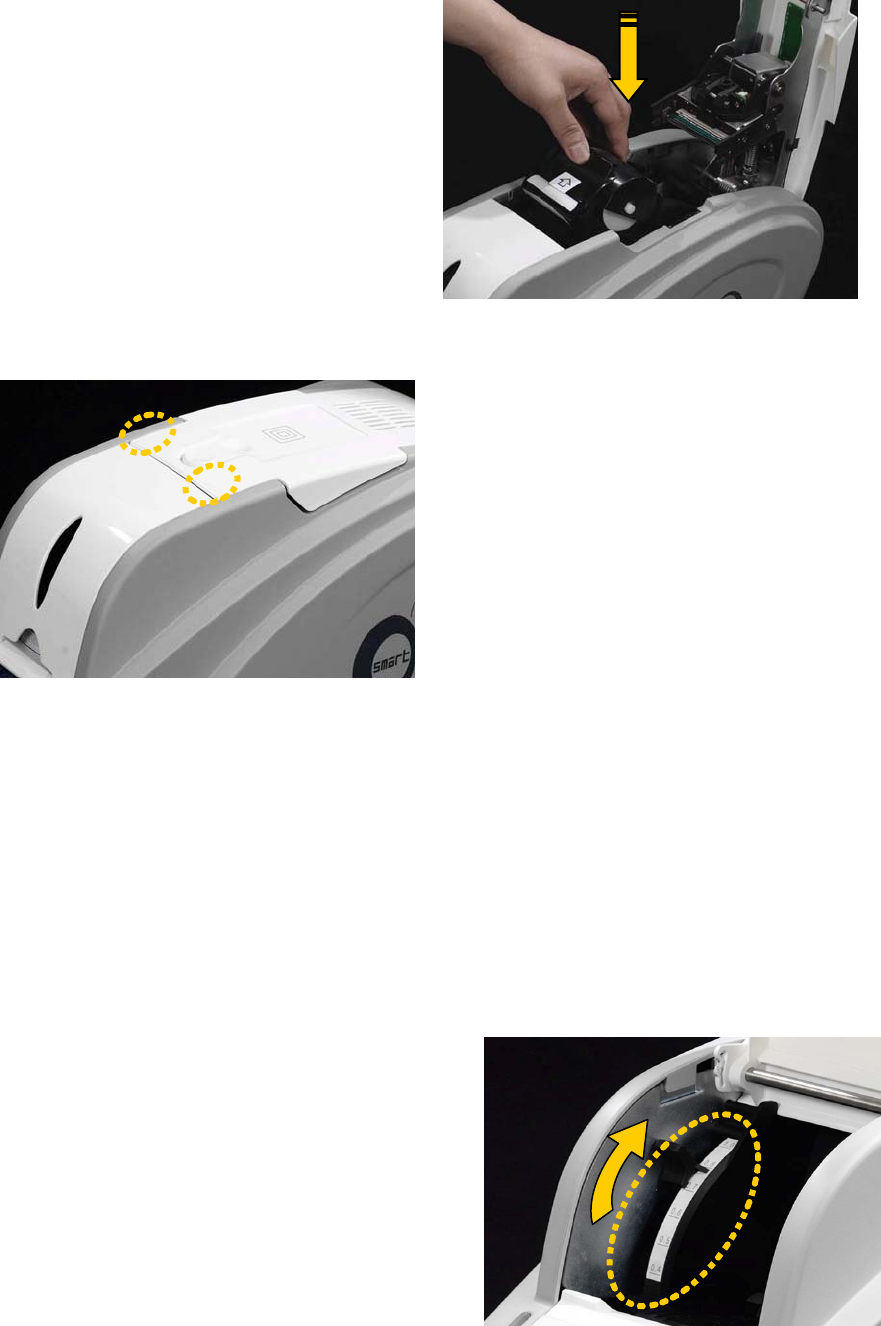
2.1.8. Install the ribbon cartridge to
the printer after install
the ribbon and cleaning roller
to the cartridge.
2.1.9. Close the top cover until it
clicks.
If it is not closed, check
the installation state of
the ribbon cartridge.
2.2. Loading Cards
This section shows how to load plastic cards into the Smart Printer.
2.2.1. If the card hopper cover is closed, open it.
2.2.2. Adjust the card thickness with
control lever.
(Caution! If the adjustment is not correct, it will
make some errors. Use the type of cards
appearing in the specification in this manual.
Always keep cards surface clean.)
<Figure 11> Install the ribbon cartridge
<Figure 12> Close Top Cover
<Figure 13> Adjust the card thickness
XZG
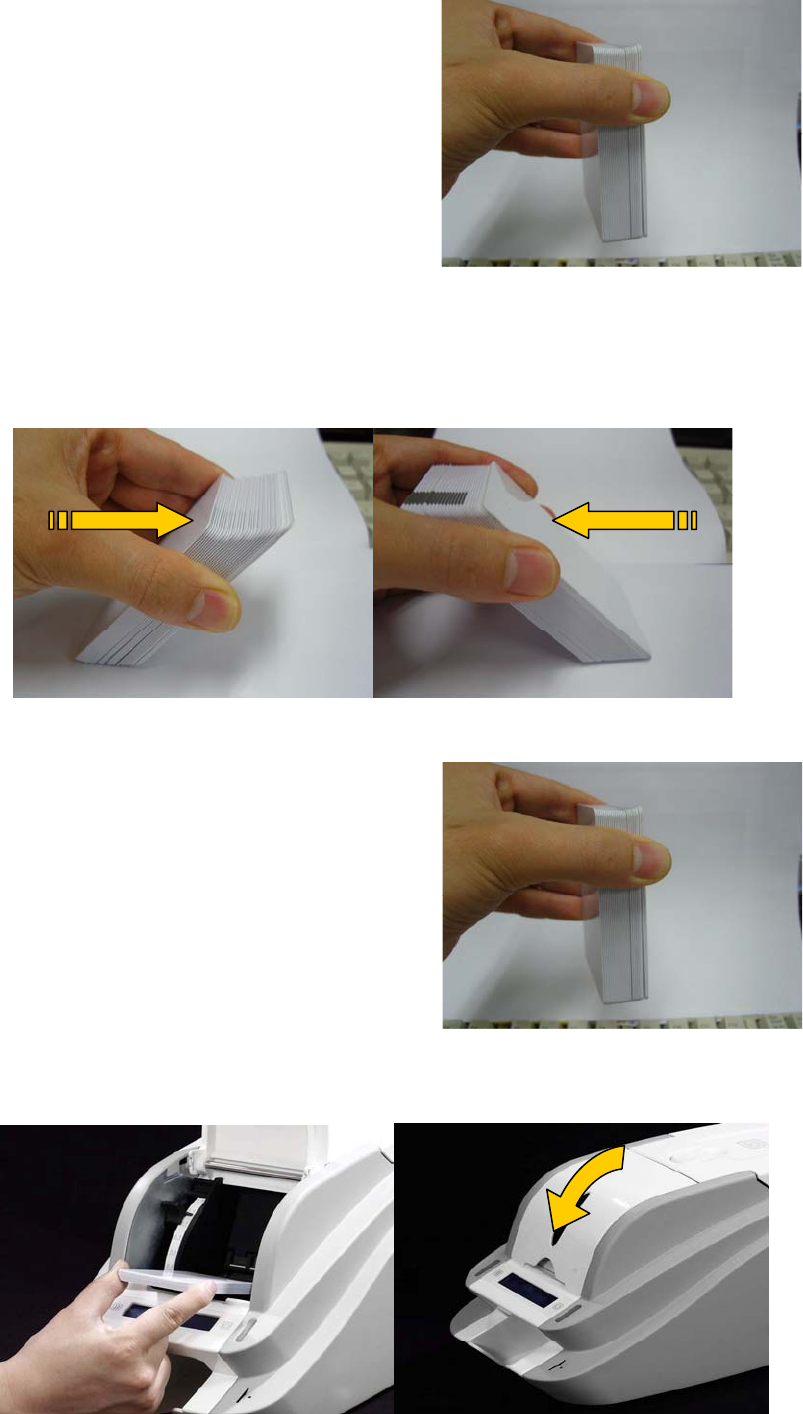
2.2.3. Hold the cards by sides like
picture
(Caution! Do not bend the cards and
do not touch the surface of the cards)
2.2.4. Push the stack back and forth to an angle of about 45° vertically.
(Note : Static charge makes cards stuck with significant adhesive force. These cards
must be physically separated from each other before inserted into the feeder.
If not separated, feeding or printing problems may occur.)
2.2.5. Restore the card stack to its
original condition.
2.2.6. Place the card to the input hopper and close the hopper cover.
<Figure 14> Holding the cards
<Figure 15> Push the stack back and forth
<Figure 16> Restore the card stack
<Figure 17> Placing the cards and close the hopper cover
X[G
2.3. Installing the Printer Driver
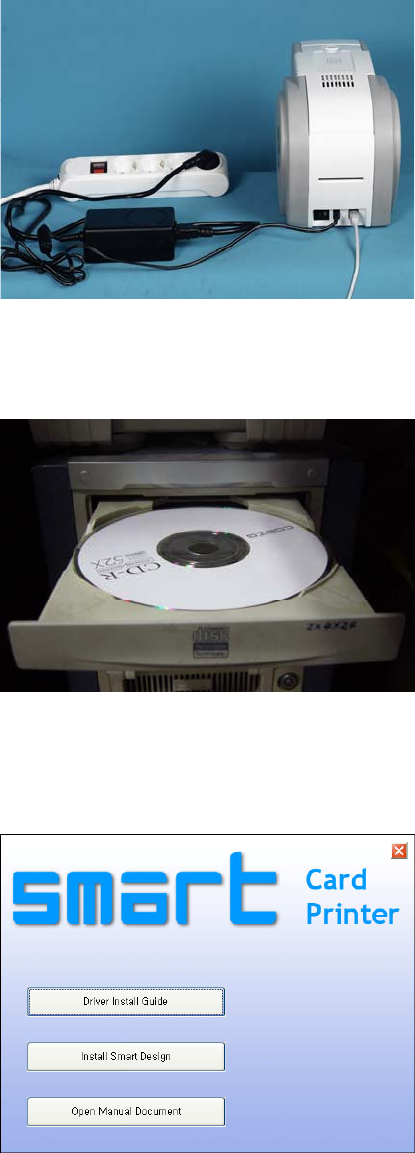
2.3.1. Check the printer’s power OFF.
2.3.2. Connect the power cord and USB
cable to the printer.
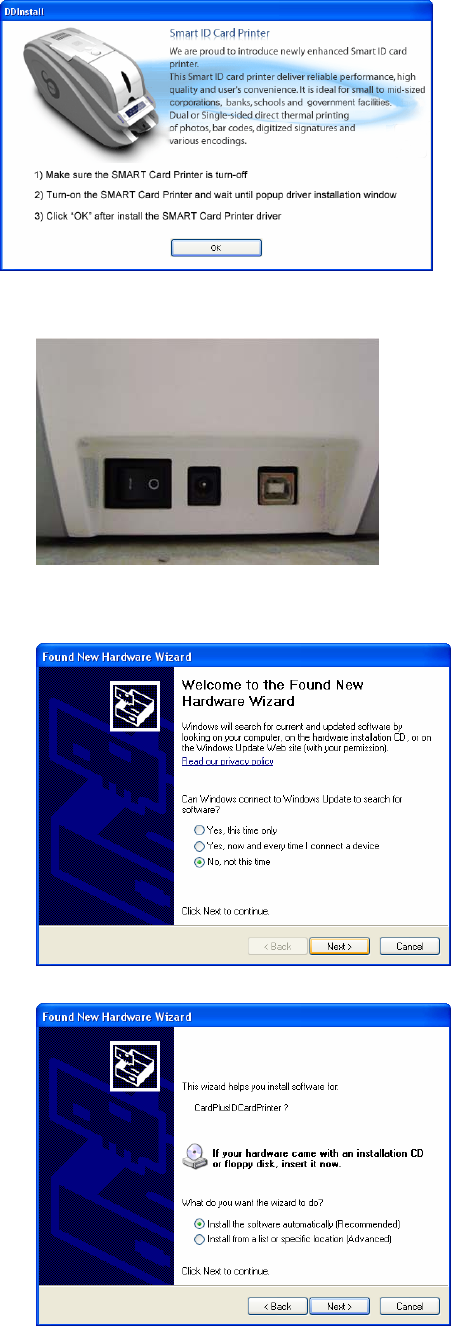
2.3.3. Insert CD provided with the printer.
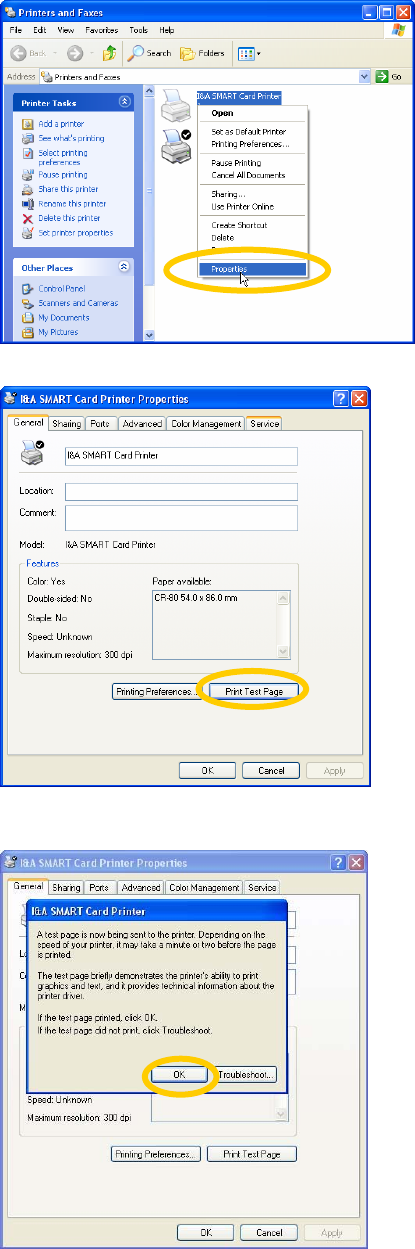
2.3.4. Click “Driver Install Guide”
<Figure 18> Connect the power cord
<Figure 20> Driver Install Guide
<Figure 19> CD loading
X\G
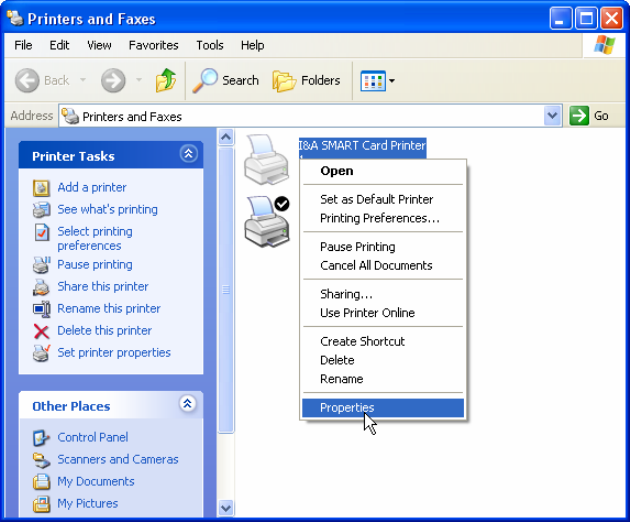
2.3.5. Check and follow
the driver installation guide.
2.3.6. Turn On the printer.
2.3.7. Select “No, not this time”
and click “ Next”.
2.3.8. Select “Install the software
automatically” and click “Next”.
<Figure 21> Driver Installation
<Figure 22> Printer Turn ON
<Figure 23> No, not this time
<Figure 24> Install the software automatically

X]G
2.3.9. Click “Continue Anyway” in
Hardware Installation.
2.3.10. Click “Finish” in Completing
the Found New Hardware Wizard.
2.3.11. Check “I&A SMART Card
Printer
º
is generated in Printers
and Faxes.
<Figure 25> Continue Anyway
<Figure 26> Finish
<Figure 27> I&A SMART Card Printer
X^G
2.4. Test Printing
In this step, you can check whether the printer driver installation has been finished
successfully.
2.4.1. In “Printer and Fax” window,
click right button on ‘I&A SMART
Card Printer’ icon, then select
“Properties”.
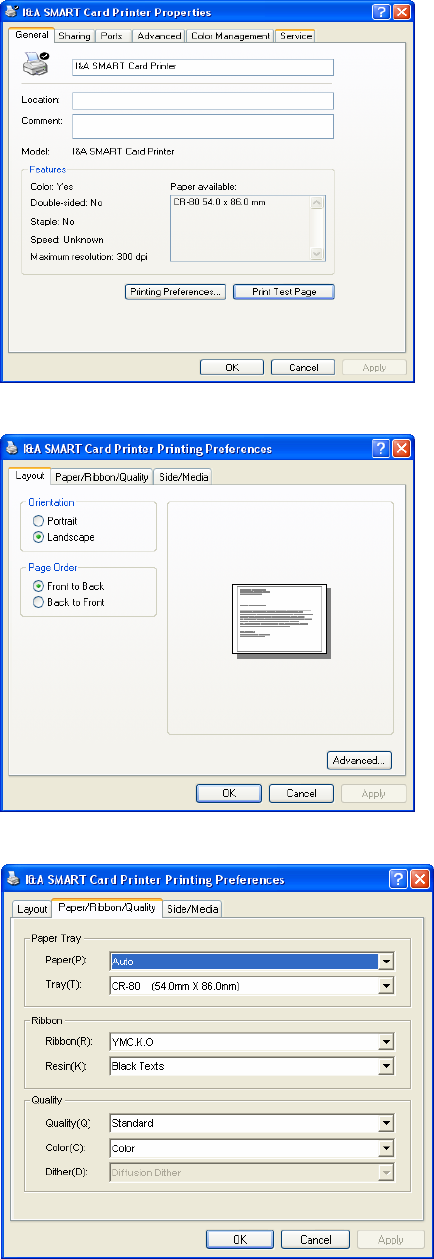
2.4.2. After selecting “General” tab
in “I&A SMART Card Printer
properties” window, click “Print
Test Page” button.
2.4.3. Printer will start printing, and
on the screen it will be asked
whether printing was successful.
(If the printing is abnormal or printer error occurs,
you may execute test printing again after resolving
the problem with the assistance of “Trouble
Shooting” section.)
<Fi
g
ure 28> Printer Pro
p
erties
<Fi
g
ure 29> Print Test Pa
g
e
<Fi
g
ure 30> Test Print O.K

X_G
2.5. Changing a Ribbon and a Cleaning Roller
When you change ribbon, you have to change cleaning roller, too.
(Caution! Without changing disposable cleaning roller, the printing quality is not
guaranteed.)
2.5.1. Turn off the printer power.
2.5.2. Open the top cover, and then take
out the ribbon cartridge.
2.5.3. Separate bar-1 from the cartridge,
then bar-2. Lift up the ribbon bars in
order of 3 and 4.
2.5.4. Remove the used ribbon. Set up the new ribbon and cleaning roller
together, with the reference of 2.1 “Ribbon Setting”.
4
3
2
<Fi
g
ure 31> Ribbon Se
p
aration
1
X`G
3. Checking and changing the Printer
Properties
3.1. Checking the Printer Properties
To check the Smart Printer Properties, go to “Control Panel”, click right button on “I&A
SMART Card Printer” in Printers and Faxes. Then select “Properties”.
When you select “Properties” in “I&A SMART Card Printer”, a window, you can check
and change the properties, will be created as <Figure 32>.
<Fi
g
ure 32> Checkin
g
the Printer Pro
p
erties
G
YWG
3.2. Changing the Printer Setting
In “General” tab of <Figure 33>, you can see the printer model and specification.
3.2.1 Basic Printing Setting
There are 3 tabs of Layout,
Paper/Ribbon/Quality, and
Side/Media.
(You can set the options for
printing in the window of
<Figure 33>.)
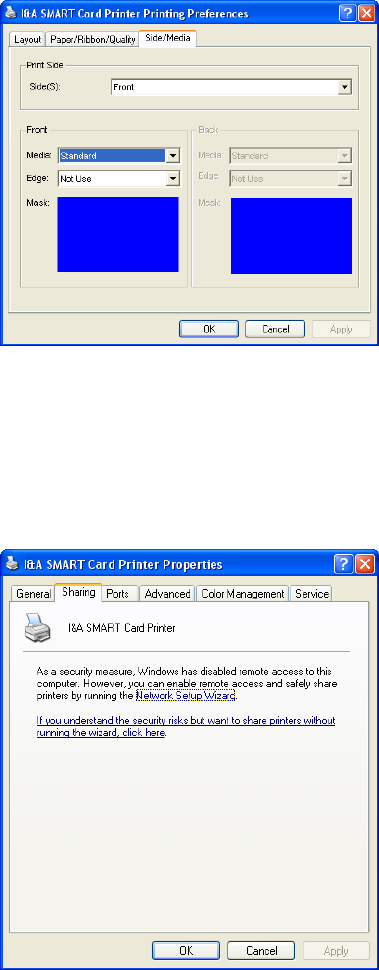
.2.1.1 Layout tab
- You can select either horizontal or vertical
printing direction. To apply your selection,
click “OK” button.
(Caution! Default value is recommended in
advanced option. If you want to change
the value, please contact I&A System
Reseller.)
3.2.1.2 Paper / Ribbon / Quality tab
You can set the type of paper, ribbon,
and quality as <Figure 35>.
- Paper Tray
Select tray and card type option.
SMART has only one hopper and supports
only CR-80 type card. You need not to change
default value in this option.
- Ribbon
You can see the type of ribbon. SMART
identifies ribbon type automatically with RF Tag.
You do not need select the ribbon type.
- Resin
<Fi
g
ure 35> Pa
p
er/Ribbon/Qualit
y
<Fi
g
ure 33> Printin
g
Settin
g
G
<Fi
g
ure 34> La
y
out
G
YXG
You can set the method to extract resin black when the printing is executed by other design
programs. If you use Smart Design, you don’t need to select this option. It will be set
automatically.
- Quality
Print quality setting - There are 2 modes, Standard and High.
High: Printing speed will be slow down.
Color: You can select color or black & white print.
Caution! “Color” option is available only with color ribbon.
Dither: There are 3 possible selections, Threshold, Random, and Diffusion Dither.
(Select “Diffusion Dither” for high quality.)
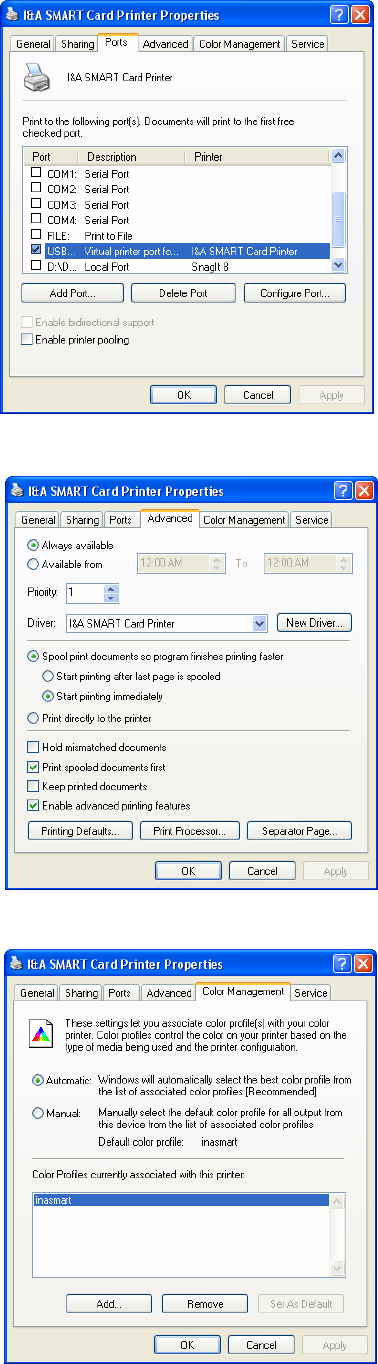
3.2.1.3 Side/Media tab
You can set the printing side and
printing mask.
Print Side
You can select one side printing or both
Sides printing.
Front / Back
The previously defined mask (standard,
smartcard, magnetic, etc) can be
applied to front or back side.
3.3. Changing the Printer Properties
3.3.1 Share tab
“Share” option allows printer to share
through network as <Figure 37>.
Default value is “Not Share”.
Ἤ
<Fi
g
ure 37> Sharin
g
Printe
r
<Fi
g
ure 36> Side/Media
YYG
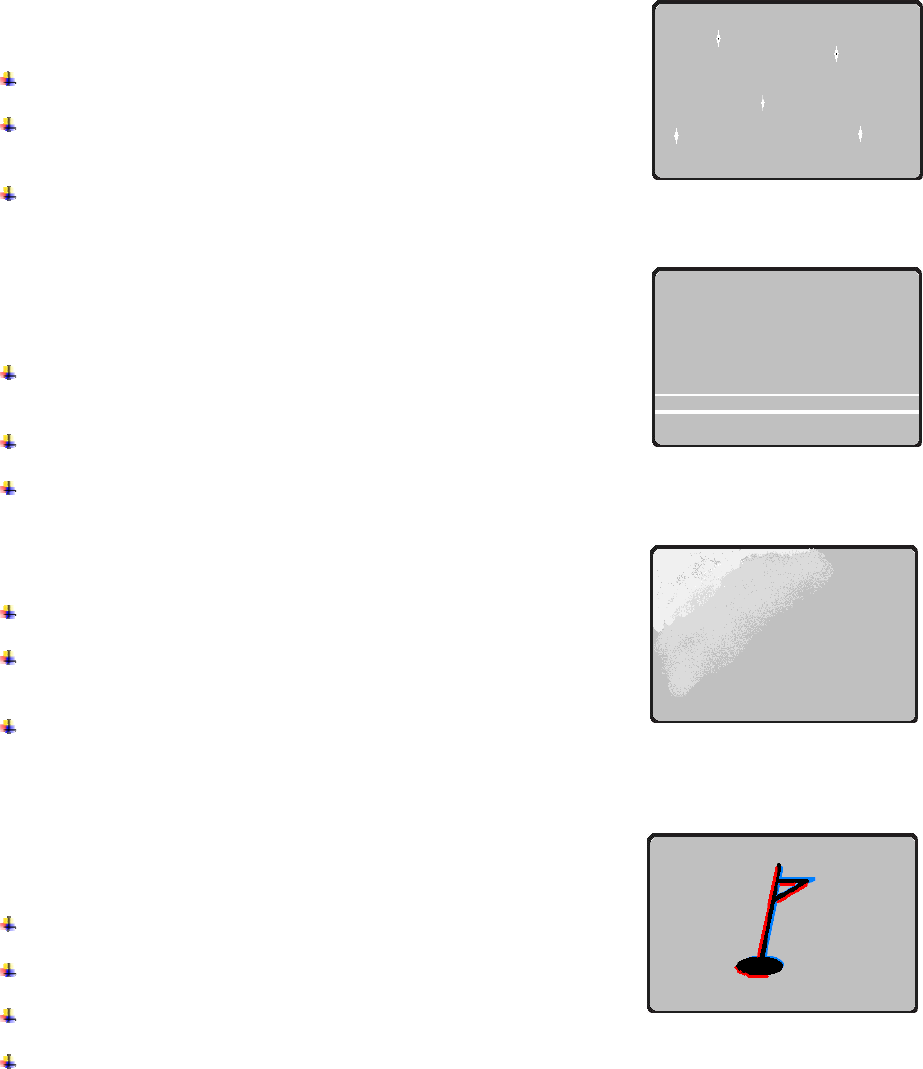
3.3.2 Port tab
Port tab shows the port connecting
with SMART. SMART has connection
with USB Virtual printer port as
<Figure 38> because SMART uses
USB to connect with PC.
(Caution! This port is selected
automatically. It is recommended to
maintain default value.)
3.3.3 Advanced tab
It is for “Time option” setting, “Priority
order”, “Spool”, and etc are available in
“Advanced” tab. “Advanced” setting
follows MS Windows standard.
If you want to change the setting,
refer to the Window manual.
(It is recommended to maintain
default value.)
3.3.4 Color Management tab
In “Color management” tab, you can
select color management profile fit to
the printer.
SMART uses color profile to express
optimal color. The default profile is
‘inasmart’.
(It is recommended to maintain
default value.)
<Fi
g
ure 40> Colo
r
<Fi
g
ure 39> Advanced
<Fi
g
ure 38> Ports

YZG
4. Troubleshooting
In this section, you would get useful solutions about some possible problems
while using printer.
4.1. Card Transfer
4.1.1. Card can’t enter into the printer from card hopper.
If the card can’t get into the printer at all or insert problems occur frequently, check the
followings.
Non-standard cards or bad cards:
Change the cards.
When the card thickness control lever is set not for current card but for other card in
different size:
Move the lever to fit the current card.
Bad card array:
Array the cards again and put them in the hopper as section 2.4 in this manual.
Wet cards or cards having static:
Remove the moisture or static.
4.1.2. Transfer error occurs when ribbon is stuck to the transfer roller or to
the printing roller.
Open the top cover and remove the card with front switch or manual transfer wheel. Check
the followings, if transfer related problems occur frequently.
Non-standard cards or bad cards:
Change the cards.
When the transfer roller or printing roller is stained with dirt
Remove the dirt with the cleaning kit.
Wrong printing position setting:
Please contact I&A System Reseller.
When operating temperature and humidity is out of the acceptable operating limit of the
printer:
Adjust the condition to the printer.
4.1.3. An error occurs during card transfer.
Open the top cover and remove the card with front switch or manual transfer wheel. Check
the followings, if transfer related problems occur frequently. First of all, check the error
message on the LCD screen.
Non-standard cards or bad cards:
Change the cards.
Inappropriate printer setting:
Please contact I&A System Reseller.
When the printer roller is stained with dirt:
Remove the dirt with the cleaning kit.
When the surface of the card is stained with dirt:
After checking the card, change it to another card.
Y[G
4.2. Print quality
4.2.1. Small dots appear: Some parts of the card are
not printed or are printed with wrong colors.
When the surface of the card is stained with dirt:
After checking the card, change it to another card.
When the cleaning roller is stained with dirt:
Check the cleaning roller. If there is much dust, change the roller to
the new one.
Much dust in the printer:
Clean the inside of the printer with the cleaning kit.
4.2.2. Horizontal lines appear, because the areas are
not printed.
Inaccurate ribbon cartridge installation:
Check the ribbon cartridge installation whether the ribbon has
wrinkles.
When the printer head is stained with dirt:
Clean the printer head.
Damaged printer head surface:
Please contact I&A System Reseller for replacement.
4.2.3. The print is not clear, or is uneven.
Uneven or bad card surface:
Change the card.
Too high or low value of the depth of color:
Please contact I&A System Reseller. The default value of the depth
of color for your printer needs to be changed.
When the printer head is stained with dirt:
Clean the printer head.
4.2.4. The color of the printed image strays from its
place slightly.
Non-standard card:
Change to the standard card.
Uneven or bad card surface:
Change the card.
When the transfer roller or printing roller is stained with dirt:
Remove the dirt with the cleaning kit.
Worn-out printer:
Please contact I&A System Reseller.
<Figure 41> Print Quality Trouble
Example1
<Figure 42> Print Quality Trouble
Example2
<Figure 43> Print Quality Trouble
Example3
<Figure 44> Print Quality Trouble
Example4

Y\G
4.2.5. The printer prints unplanned color at the edge,
or the printed color is quite different from the
original image.
Non-standard card:
Change to the standard card.
Uneven or bad card surface:
Change the card.
When the transfer roller or printing roller is stained
with dirt:
Remove the dirt with the cleaning kit.
Worn-out printer:
Please contact I&A System Reseller.
4.3. Magnetic Stripe Encoder
4.3.1. An error occurs in magnetic stripe encoder.
To replay, press the left LED button.
When the magnetic head is stained with dirt:
Remove the dirt with the cleaning kit.
When magnetic data is not transferred or transfer error occurs:
Check the setting of the program and the driver whether the data fits the standard of the track.
When inserted card is not magnetic card, or inserting direction is wrong:
Change the card or the direction.
Bad magnetic stripes on the card:
Change the card.
4.4. General Operation
4.4.1. Ribbon is torn while printing.
Open the top cover and take out the cartridge. After putting the broken pieces on together,
install the cartridge again. Check the followings if this kind of problem occurs frequently.
Non-standard card, Uneven card surface, etc:
Change the card.
Too high value of the depth of color:
Please contact I&A System Reseller. The default value of the depth of color for your printer
needs to be changed.
4.4.2. LCD screen displays the error message “Ribbon Not Found”.
To replay, press the left LED button. Check the followings if this kind of problem occurs
frequently.
Non-standard ribbon:
Change to the standard ribbon.
Ribbon is consumed.
Printing is not possible if ribbon is used up. Change the ribbon.
Broken ribbon:
Refer to 4.4.1.
4.4.3. Printer does not operate though the printing data has been transferred.
Check the followings.
Printer power off:
Check the power. Turn on the printer power.
Check the printer adaptor whether it is connected with a socket and the printer.
<Figure 45> Print Quality Trouble
Example5

Y]G
Bad power adaptor:
Please contact I&A System Reseller for replacement of the adaptor.
When the value of the printer driver is not “Online” but “Offline”:
Change the setting to “Online”.
When the USB cable for printer transfer is off or the connection is bad:
Check the connection of the cable between PC and the printer.
Make the USB cable connection again.
Bad USB cable for printer transfer:
Change the USB cable.
If the selected printer is different model rather than SMART:
Select SMART to print.
Wrong port setting of the printer driver:
Check the port setting of the printer driver whether it is USB port or not.
No ribbon in the printer or printer in error mode:
Install ribbon in the printer or resolve the error.
Too long power or transfer cable (more than 1.5M):
Use the cable provided with the printer.
When USB transfer port of PC is down:
Restart your PC.
Y^G
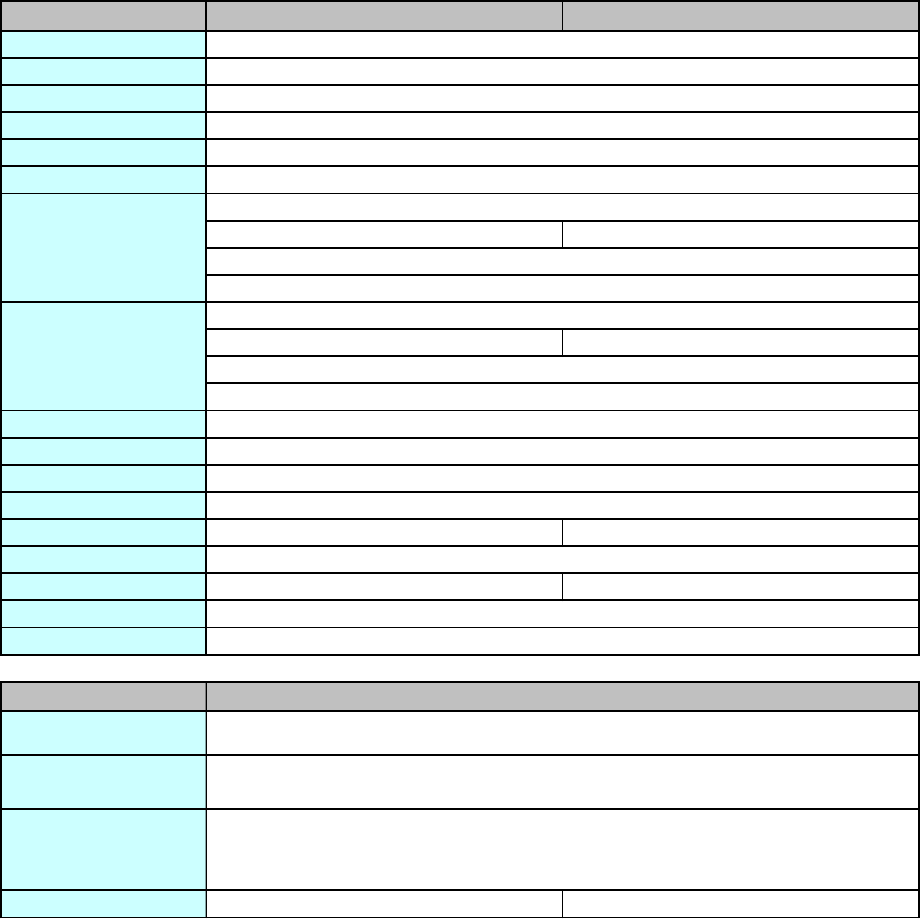
5. Printer Specification
Product Specification Smart Smart Dual
Card Type
Printing Method
Card Format
Card Thickness
Resolution
Memory
- Color (YMCKOK) : max 120 cards / hour
- Color (YMCKOK) : 200 cards / roll
Hopper & Stacker
Interface
Display
Power
Dimension 170mm(W) x 195mm(H) x 420mm(D) 170mm(W) x 195mm(H) x 510mm(D)
Operating Environment
Weight 4.5 Kg 5.5 Kg
Agency Listing
Printer Driver
Option
Magnetic Stripe
Encoding Module
Two Contactless
Encoding
(Internal & External)
Rotator Option Default
300 dpi
PVC, Polyester Cards with polished PVC finish
Dye-Sublimation / Resin Thermal Transfers / Edge - to - Edge
ISO CR-80 (54mm x 86mm / 2.12" x 3.38")
0.38mm (15mil) ~ 1.0mm (40mil)
32MB
Color (YMCKO) : max 144 cards / hour
Black Overlay (KO) : max 360 cards / hour
Mono (Black) : max 720 cards / hour
Printing Speed
Color (YMCKO) : 250 cards / roll
Black Overlay (KO) : 600 cards / roll
Mono : 1,200 cards / roll (Black, Gold, Silver)
Ribbon Capacity
Hopper : 90 cards, Stacker : 40 cards
USB
2 Lines LCD & LED
Free Voltage (110/240V AC), 50 ~ 60 Hz
Temperature : -20 ~ 55, Humidity : 20 ~ 95%
MIC, CE, UL, FCC
Windows 2000 / 2003 / XP
ISO7811 (Track ዜ,ዝ,ዞ Read / Write), JISዝ, HiCo / LoCo
ISO7816 (ID-1)
SIM Type - ISO7816 (ID-000)
ISO14443 (Type A / B), ISO15693, MIFARE
IC (Contact) Encoding
* Specifications are subject to change with or without notice.G
Y_G
FCC warning
This equipment generates uses and can radiate radio frequency energy and, if
not installed and used in accordance with the instructions, may cause harmful
interference to radio communications. However, there is no guarantee that
interference will not occur in a particular installation.
If this equipment does cause harmful interference to radio or television reception
which can be determined by turning the equipment off and on, the user is
encouraged to try to correct the interference by one or more of the following
measures.
zReorient or relocate the receiving antenna.
zIncrease the separation between the equipment and receiver.
zConnect the equipment into an outlet on a circuit different from that to
which the receiver is connected.
zConsult the dealer or an experienced radio, TV technical for help.
zOnly shielded interface cable should be used.
Finally, any changes or modifications to the equipment by the user not expressly
approved by the grantee or manufacturer could void the users’ authority to
operate such equipment.
CE warning
! Changes or modifications not expressly approved by the party responsible for
compliance could void the user's authority to operate the equipment.
EN Test Regulation Version.
1) EN 300 330-1 V1.5.1:2006.04
2) EN 301 489-1 V1.6.1:2005.09
3) EN 301 489-3 V1.4.1:2002.08