INTO TECH REALDISPLAY DVR BD User Manual Part 1
Intotech Inc. DVR BD Users Manual Part 1
Contents
- 1. Users Manual Part 1
- 2. Users Manual Part 2
Users Manual Part 1

User Manual
SmartDVR Formula v2.0
Intotech Inc.

GGGGGGGGGGGGGGGGGGGGGGGGGGGGGGGSmartDVR Formula 2.0G
-2-G
Safety Notice:
zMake sure switching the power off before you install the DVR
board
zThere is possibility of electric shock inside of the DVR, please
avoid opening the unit if you are not qualified service personnel
zWhile the DVR is under removing, storing or using, please avoid
any vibration or strike
zDo not store under the direct sunlight or near by heating
zAvoid humid, dusty or smoky environments
zAvoid extremly hot or cold areas
zThis equipment should not be exposed to water or other liquids
zInstall the DVR in a well-ventilated area
zAvoid excessive electronic or magnetic fields

GGGGGGGGGGGGGGGGGGGGGGGGGGGGGGGSmartDVR Formula 2.0G
-3-G
Limited Warranty
This product is warranted against manufacturing defects for the period of one year.
The warranty period commences on the date of purchase from the authorized
reseller/retailer.
You original purchase invoice, showing the date of purchase of the product is your proof
of the date of purchase.
During the warranty period, defective parts will be repaired or replaced. There will be no
charge for labor or pats during the one-year warranty period from the date of purchase.
Any shipping or other cost such as customs incurred costs, etc…. is customers’
responsibility.
This warranty does not cover any failure resulting in loss to SW, data, lost profits, lost
saving any incidental damages or other economic consequential damages due to
accident, abuse, misuse, and negligence.
Technical Support and Service
For warranty service and assistance, it is recommended that you contact the place of
purchase to arrange for return and/or repair the product.

GGGGGGGGGGGGGGGGGGGGGGGGGGGGGGGSmartDVR Formula 2.0G
-4-G
Table of Contents
Chapter 1 Introduction Page
1-1. General Guidelines 6
1-2. System Requirements and Description 6
1-3. Compatible HW Device 7
Chapter 2 Installation
2-1. Hardware Installation -8-
2-1-1. DVR Board Installation -9-
2-1-2. Extension Board Installation -11-
2-1-3. Pan/Tilt/Zoom Installation -13-
2-1-4 Audio Installation -17-
2-2. Software Installation -19-
2-2-1 Installation Procedure -19-
2-2-2. Install DVR Server -20-
2-2-3 Apache Web Server Installation -24-
2-2-4 WebClient Installation -30-
2-2-4. Uninstall DVR Server -32-

GGGGGGGGGGGGGGGGGGGGGGGGGGGGGGGSmartDVR Formula 2.0G
-5-G
Chapter 3 User Manual for DVR Server
Preview of DVR Server v2.0 Screen Mode
Monitoring screen Mode of DVR Server
Search screen mode of DVR Server
3-1. Main features and functions -33-
3-2. Monitoring Screen Mode -35-
DVR System Configuration -38-
1) General -38-
2) Channel -40-
3) Store -42-
4) Network -44-
5) Schedule -47-
6) Maintenance -49-
7) Event -50-
8) Receiver -53-
9) VideoOut -54-
10) User Management -55-
3-3. Search Mode -57-
Print Image -58-
How to use Watermarking -60-
Search -64-
Chapter 4 Warranty
Warranty -66-

GGGGGGGGGGGGGGGGGGGGGGGGGGGGGGGSmartDVR Formula 2.0G
-6-G
Chapter 1: Introduction
Thank you for purchasing DVR. This manual will provide detailed instructions on how to install and
program DVR to your specific application. Please read this manual carefully prior to install and
programming the DVR.
1-1. General Guidelines
Chapter 1: System Requirements and Compatible H/W information
Chapter 2: DVR Hardware, Software Installation
Chapter 3: How to use DVR Server program
Chapter 4: Warranty
1-2. DVR System Requirements
System Description
Digital Surveillance System is a PC based monitoring system. It exceeds the capabilities of the
traditional analog switchers, multiplexers, and time-lapse VCRs. The system is able to connect
up to 16 cameras with each at the high frame rate, records high-quality digital video based on
motions. The system offers digital recording, remote camera viewing access, video archiving,
and multi-camera display. The system supports PTZ camera.
PC
TG OS : Windows 2000 (Require DirectX 8.1 or higher) and Windows XP
Please install 8.1 version of DirectX before install DVR Server Program
on Server PC for Windows 2000 Only
TG CPU : Intel Pentium 4 2.4/ Cel 1.7 or higher
TG RAM : 256MB or higher
TG Network : 10 /100Mbps LAN, Modem, xDSL
G
Chapter 1
GGGGGGGGGGGGGGGGGGGGGGGGGGGGGGGSmartDVR Formula 2.0G
-7-G
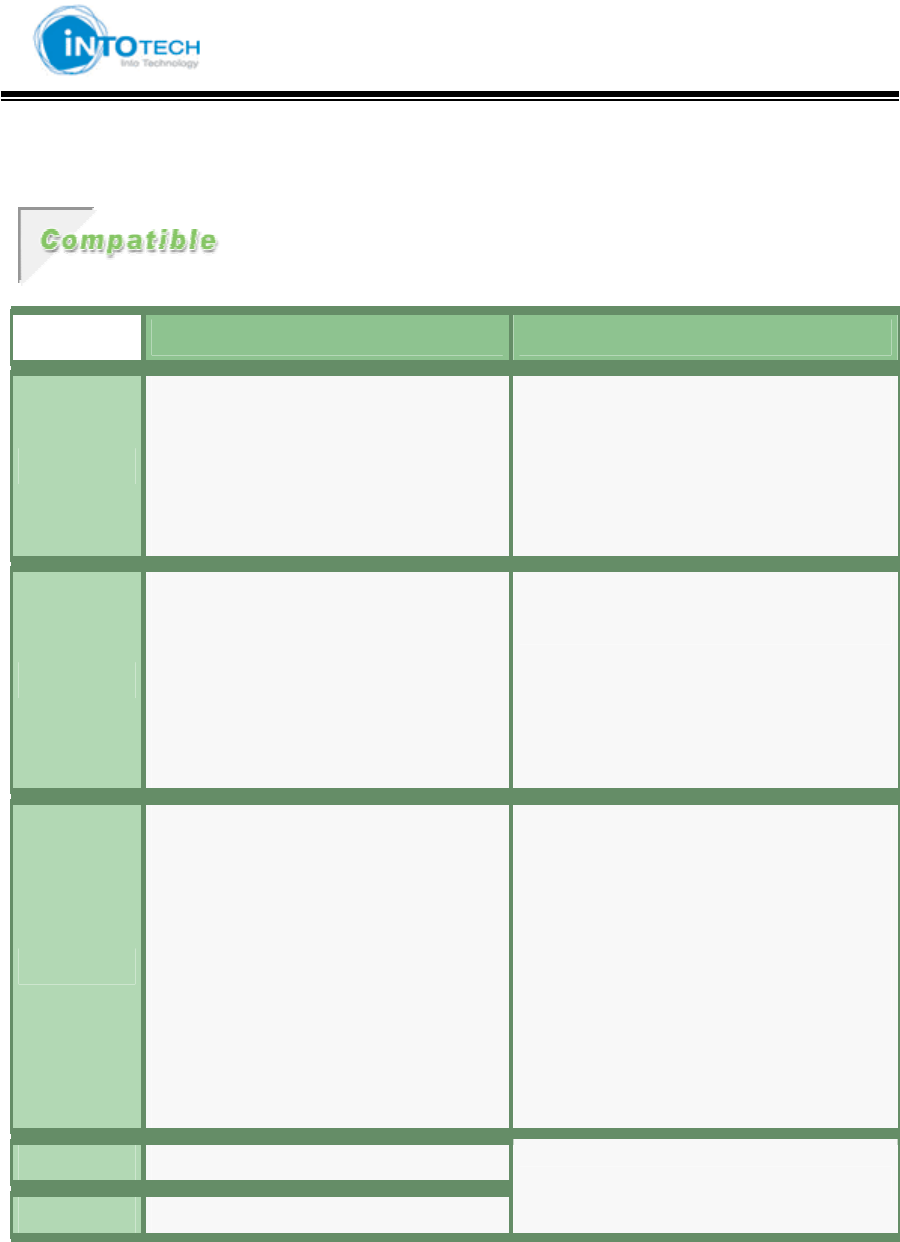
1-3. Compatible HW Device
Compatible Incompatible
CPU
Intel Pentium Process (x86, 1.7GHz or
higher)
- Intel Celeron 1.7GHz or higher
- Intel Pentium IV
- Lower than Intel Pentium Process
1.7GHZ
- Other than x86
Main Board
With one or more PCI slot, supporting Intel
Pentium processor
- Intel 84x Chipset
- Intel 85x Chipset
- Other than Intel Chipset Boards
Graphic Card
With 8MB or higher memory, Supporting
16Bit Color and YuY2 DirectX Mode (8.0 or
higher)
- ATI Expert 2000 32MB SDRAM
- ATI Radeon System
- nVidia Riva TNT2 System
- nVidia Geforce System
- Intel 845G/GL Graphics controller
(OnBoard).
- Intel 81x Graphics controller(OnBoard)
or Intel i740
- VIA Chipset(OnBoard) Graphics
controller.
- SIS Chipset(OnBoard) Graphics
controller.
Sound Card All PCI & OnBoard Type
HDD HDD 5400RPM or higher

GGGGGGGGGGGGGGGGGGGGGGGGGGGGGGGSmartDVR Formula 2.0G
-8-G
Chapter 2: Installation
2-1 Hardware Installation
Caution: Static electricity can damage electronic circuitry. To avoid static
discharge, touch a grounded metal object (i.e. your PC case) or wear a
grounding strap connected to a ground source.
Make sure Power and cables are connected properly otherwise it may cause
damage to the equipment (not cover under warranty). Always turn off the
PC power before connecting or disconnecting any jumper or cable on the
drive.
-Next Page-
Chapter 2
GGGGGGGGGGGGGGGGGGGGGGGGGGGGGGGSmartDVR Formula 2.0G
-9-G
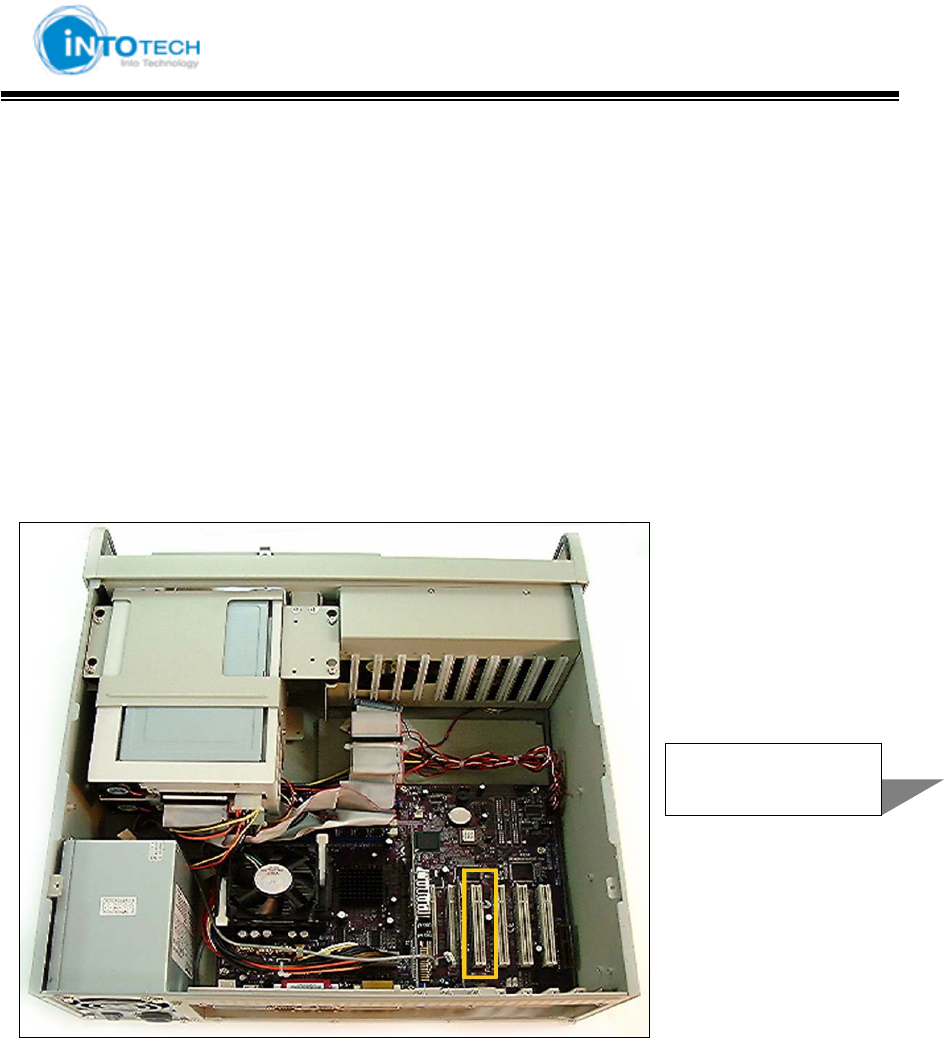
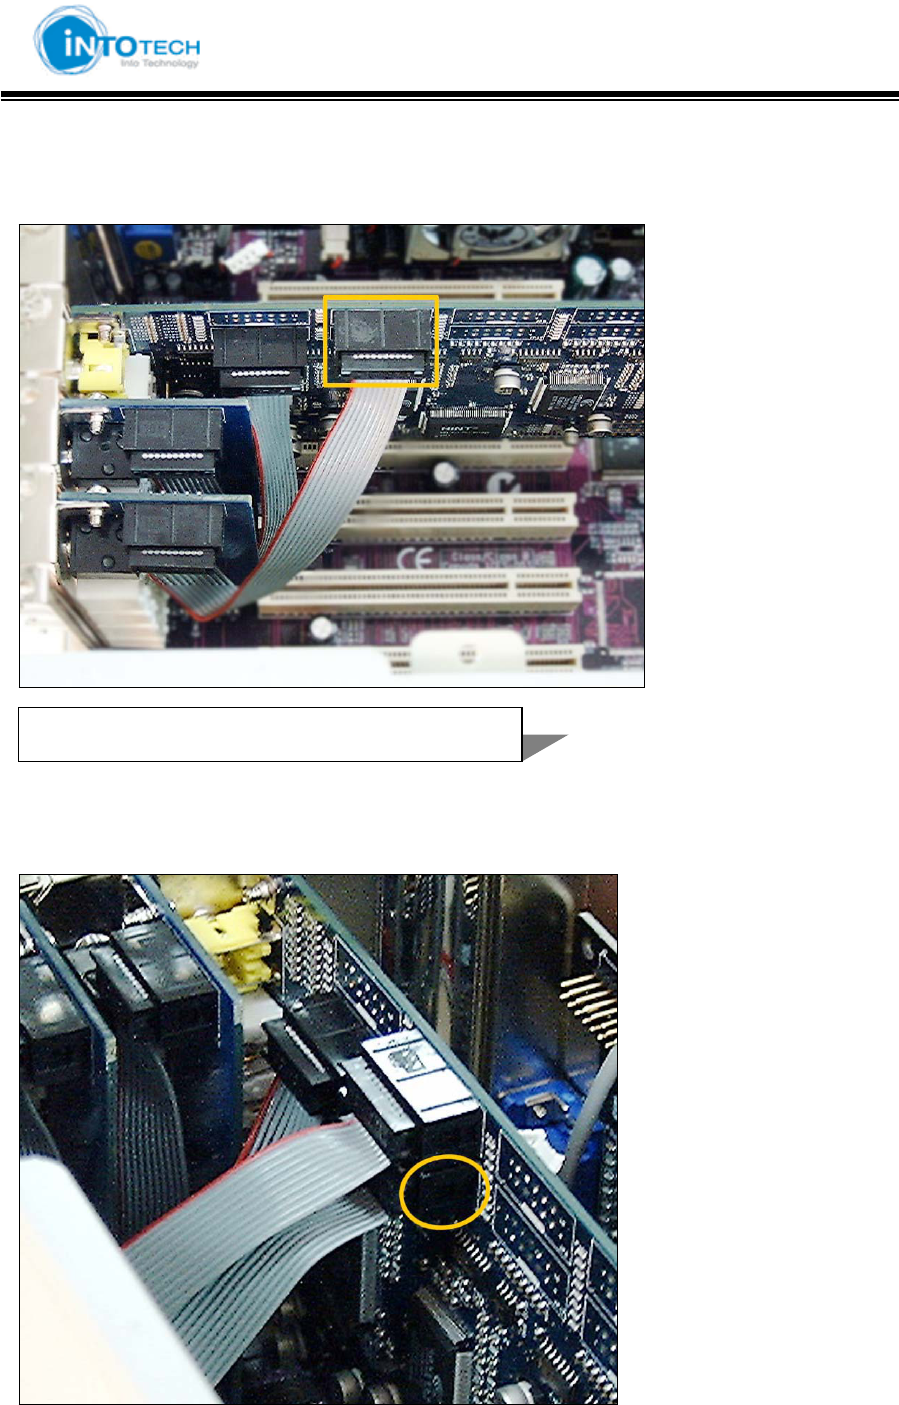
2-1-1. DVR Board Installation
1. Prepare your computer for installation.
: Before working on your computer, make sure all electrical cords are unplugged.
2. Remove the system unit cover.
: You can easily find how to remove the system unit cover if you look carefully at the back of
the system
.
3. Locate the PCI bus slot. Make sure this slot is unobstructed.
: You need empty PCI slot as many as the boards including DVR and channel boards.
4. Place the board directly over PCI slot and insert one end of the card down into the slot
firmly but gently. Make sure that the metal contacts on the bottom of the host adapter are
securely seated in the slot.
1
ཛ
PCI slot
G
GGGGGGGGGGGGGGGGGGGGGGGGGGGGGGGSmartDVR Formula 2.0G
-10-G
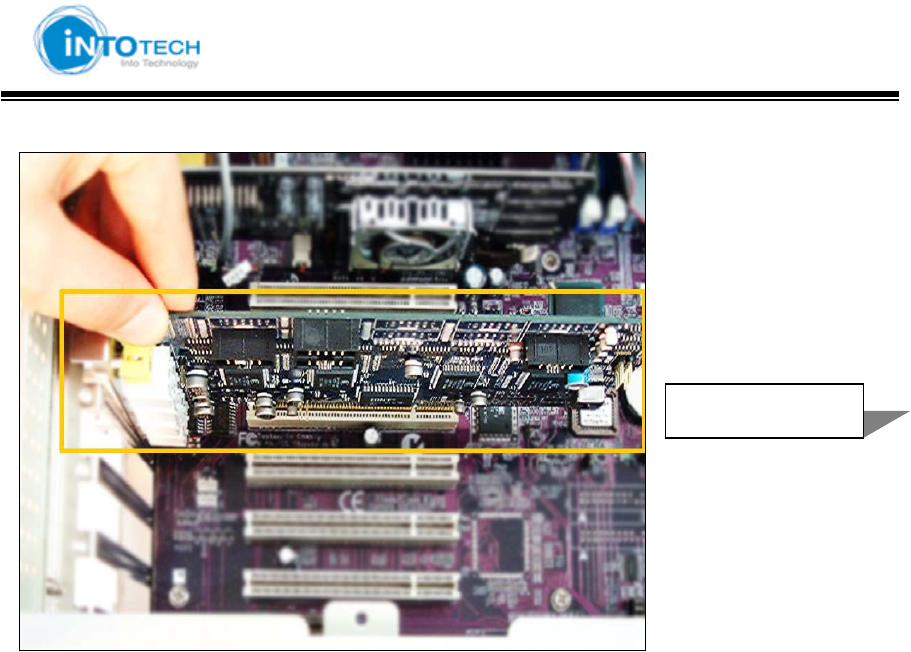
5. Fasten the bracket screw.
6.
Connect channel board to 5~8ch parallel connector on DVR board
Position of ‘channel parallel connector’ might be different up to DVR model.
Please refer to ‘2.1 DVR board is drawing’ for parallel connector position.
All the optional channel boards and channel board cables are same and alternative.
1
ཛ
DVR board
GGGGGGGGGGGGGGGGGGGGGGGGGGGGGGGSmartDVR Formula 2.0G
-11-G
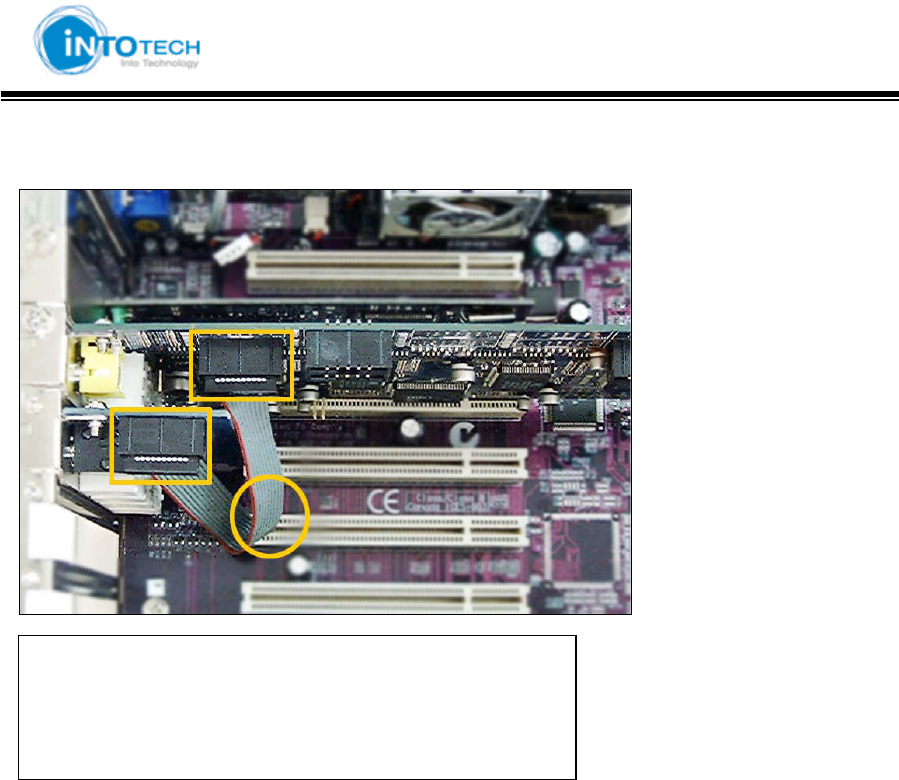
2-1-2. Extension board Installation
12
3
XaGChannel Cable
2: Parallel Connector on channel board
3: 5~8ch Parallel Connector on DVR board.
GGGGGGGGGGGGGGGGGGGGGGGGGGGGGGGSmartDVR Formula 2.0G
-12-G
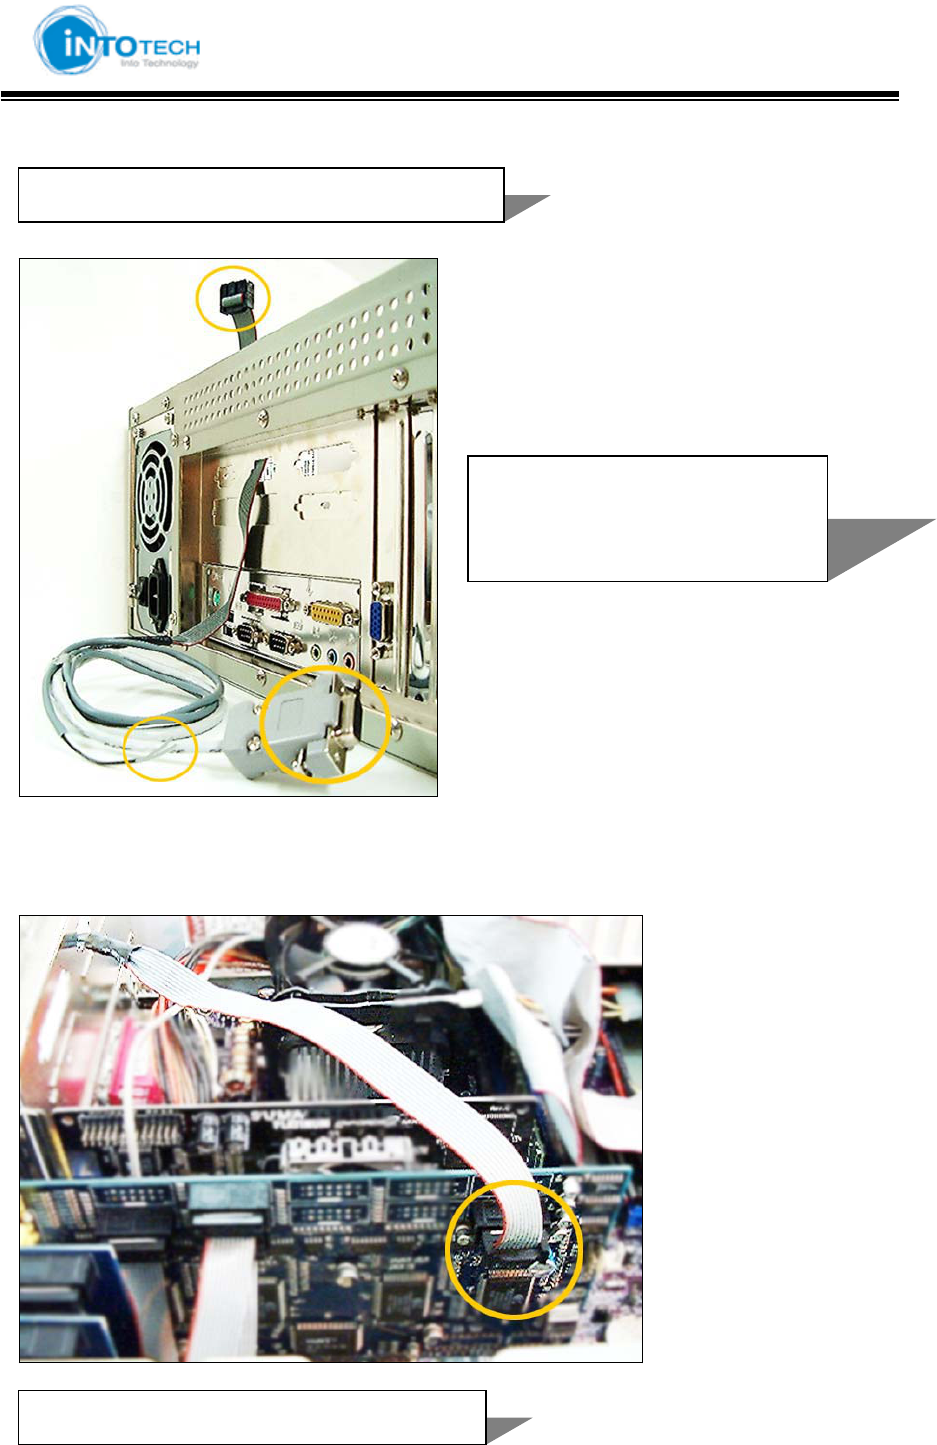
7. Connect channel board to ‘9~12ch parallel connector on DVR board’ and insert the
channel into the PCI slot.
8. Connect channel board to ‘13~16ch parallel connector on DVR board’ and insert the
channel into the PCI slot.
1: 9~12ch parallel connector on DVR board
1
GGGGGGGGGGGGGGGGGGGGGGGGGGGGGGGSmartDVR Formula 2.0G
-13-G
2-1-3. PTZ installation
]
A. PTZ Cable Connection.
1. Insert the plug of PTC cable into the PC case through proper hole.
2. Insert the plug of PTC cable into the ‘PTZ parallel connector on DVR board’.
Position of ‘PTZ parallel connector’ might be different up to DVR model. Please refer to ‘2.1
DVR board drawing’ for parallel connector position.
1: 13~16ch parallel connector on DVR
2
3
1
1: PTZ parallel connector on DVR board
ཛG
Plug of PTZ cable
ཛྷG
485 cable of PTZ cable
G
ཝG
Serial Port of PTZ cable
G
GGGGGGGGGGGGGGGGGGGGGGGGGGGGGGGSmartDVR Formula 2.0G
-14-G
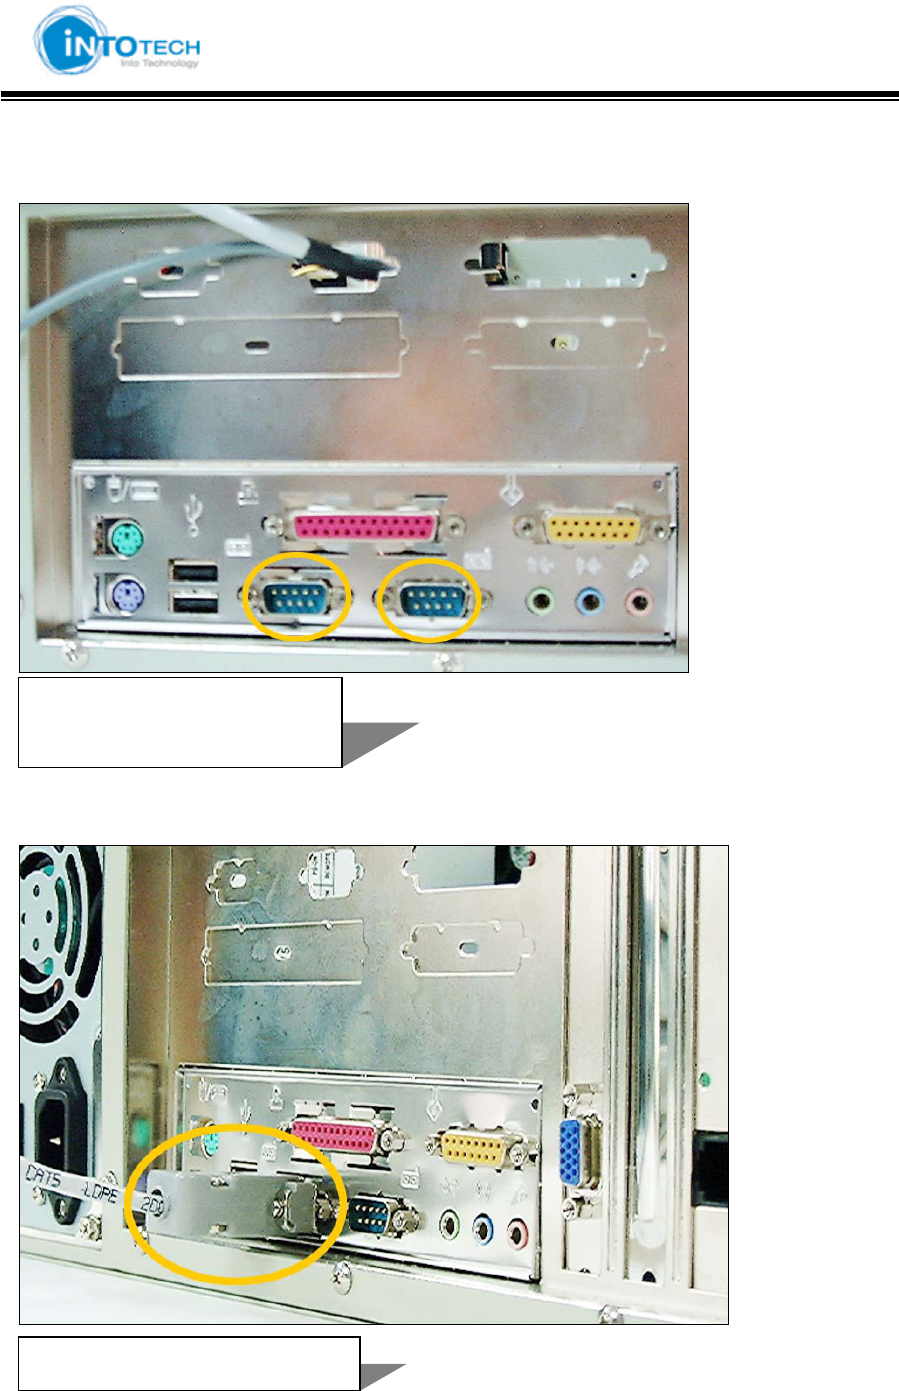
3. Locate the empty serial comport on rear side of PC.
4. Insert the serial port of PTZ cable into empty serial port of PC
.
1 2
1:
Serial Comport 1 or 3
2: Serial Comport 2 or 4
G
1
1:
Serial port of PTZ cable
GGGGGGGGGGGGGGGGGGGGGGGGGGGGGGGSmartDVR Formula 2.0G
-15-G
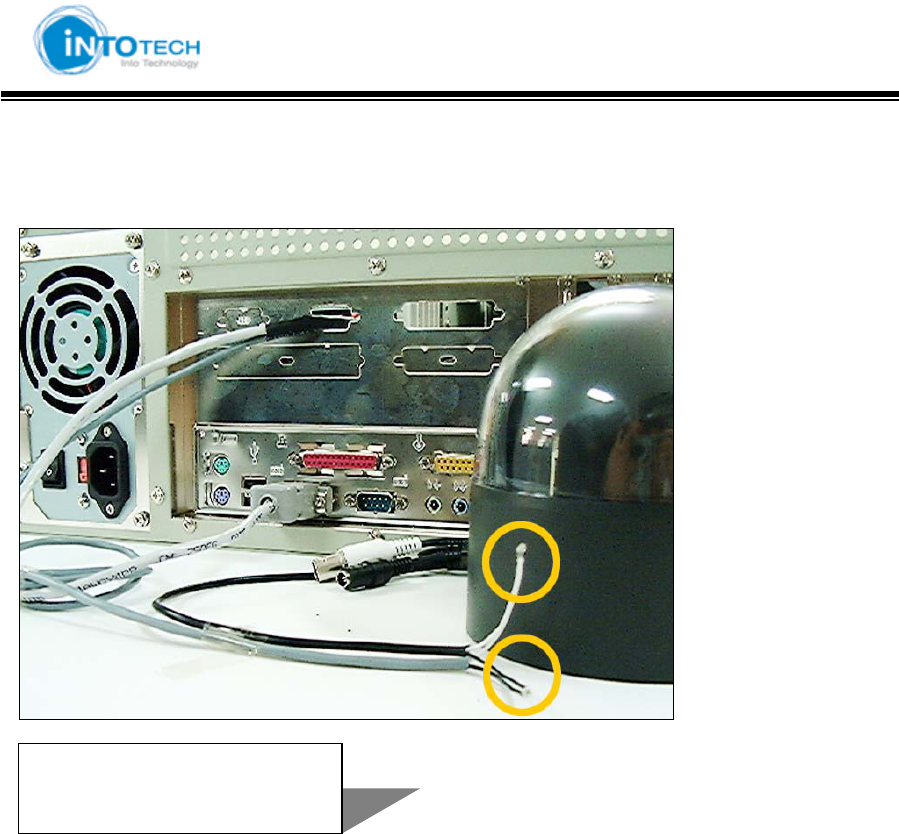
5. Connect 485+ cable of PTZ cable with 485+ cable of PTZ camera and 485- cable of PTZ cable
with 485- cable of PTZ camera. And, insulate them with insulating tape.
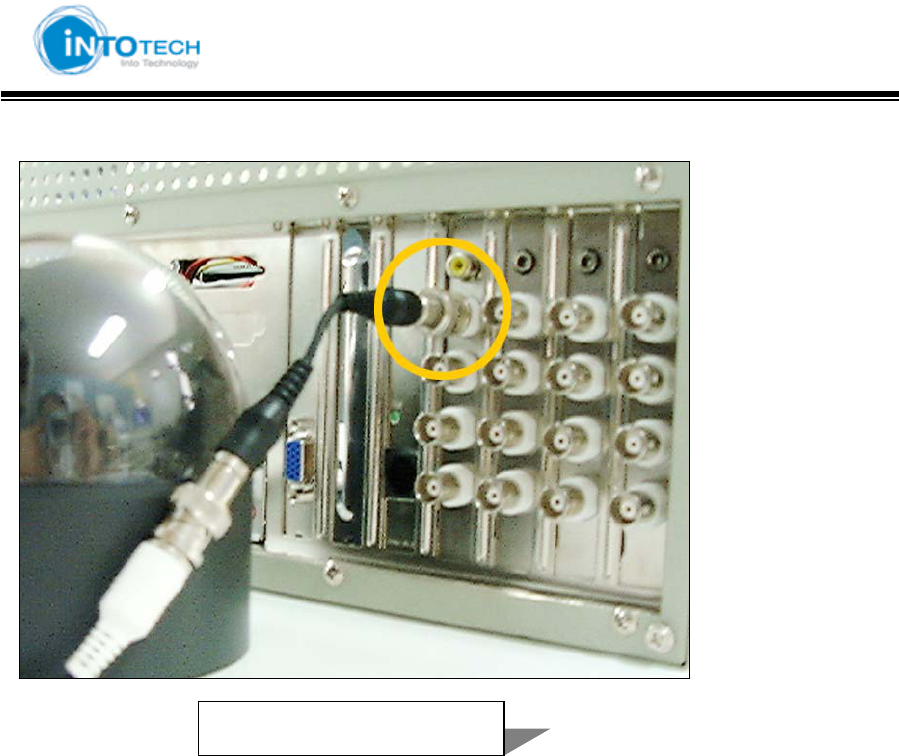
6. Connect video signal cable of PTZ camera with BNC jack on DVR.
7. Address of PTZ camera should be identical to DVR channel. In the Fig 4.11, the address
of PTZ camera should be set as ‘1’, because camera is connected to No.1 channel.
- Next Page -
1
2
XG
: 485+ cable connection
YG
: 485- cable connection
G
GGGGGGGGGGGGGGGGGGGGGGGGGGGGGGGSmartDVR Formula 2.0G
-16-G
8. Connect the adaptor with PTZ camera.
1
1: BNC Jack of Channel
GGGGGGGGGGGGGGGGGGGGGGGGGGGGGGGSmartDVR Formula 2.0G
-17-G
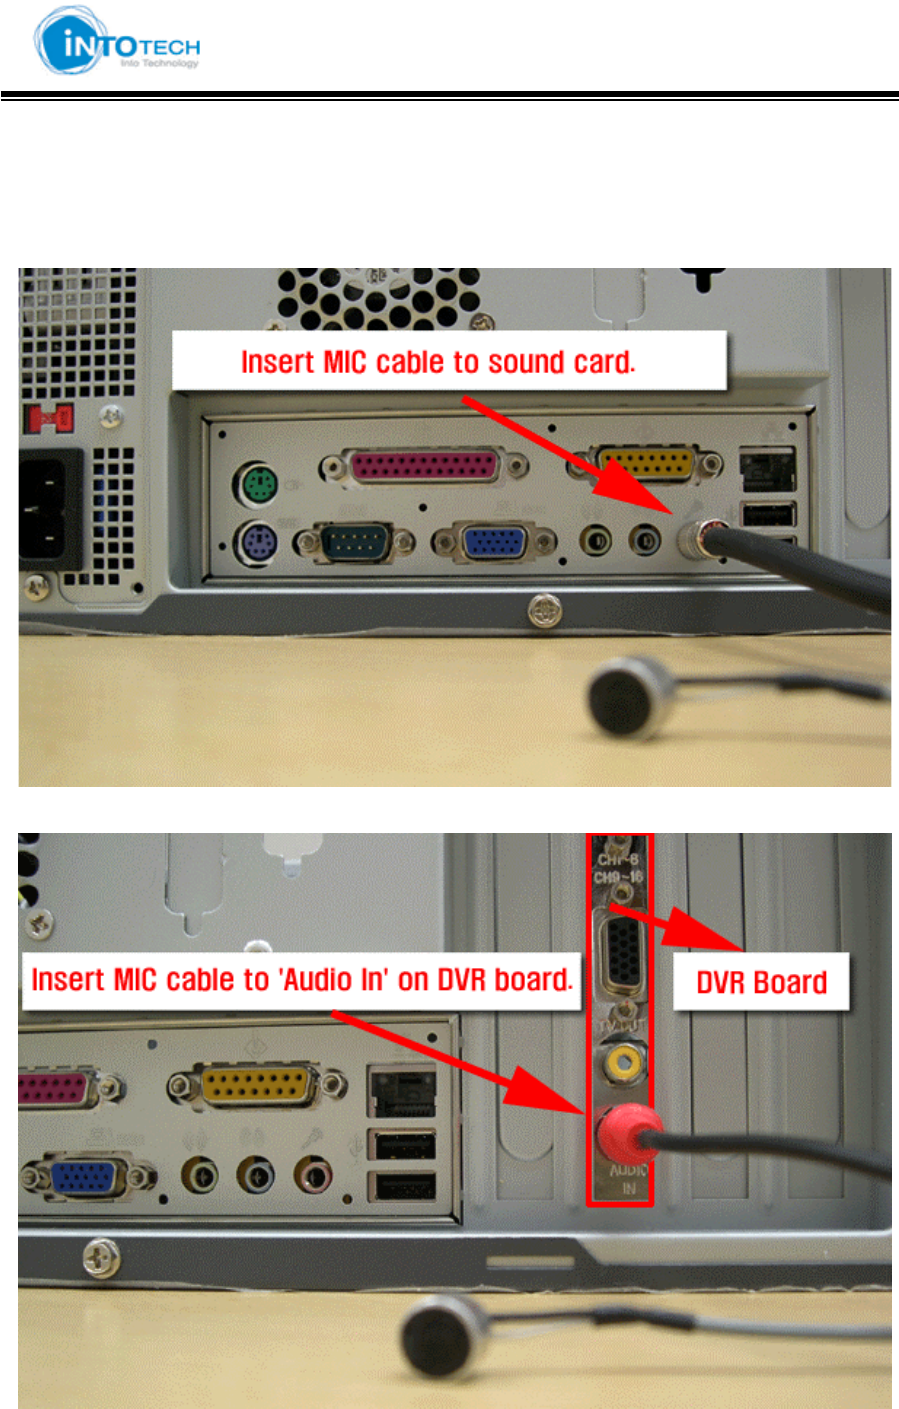
2-1-4. Audio installation
1. Insert MIC to sound card OR DVR board.
<The following description is of 1CH Audio example.>
MIC is inserted to PC Mainboard. (Standard color red hole)
OR Insert MIC to DVR Board.

GGGGGGGGGGGGGGGGGGGGGGGGGGGGGGGSmartDVR Formula 2.0G
-18-G
2. Insert Speaker to Sound Card of motherboard. (standard Green color hole)
GGGGGGGGGGGGGGGGGGGGGGGGGGGGGGGSmartDVR Formula 2.0G
-19-G
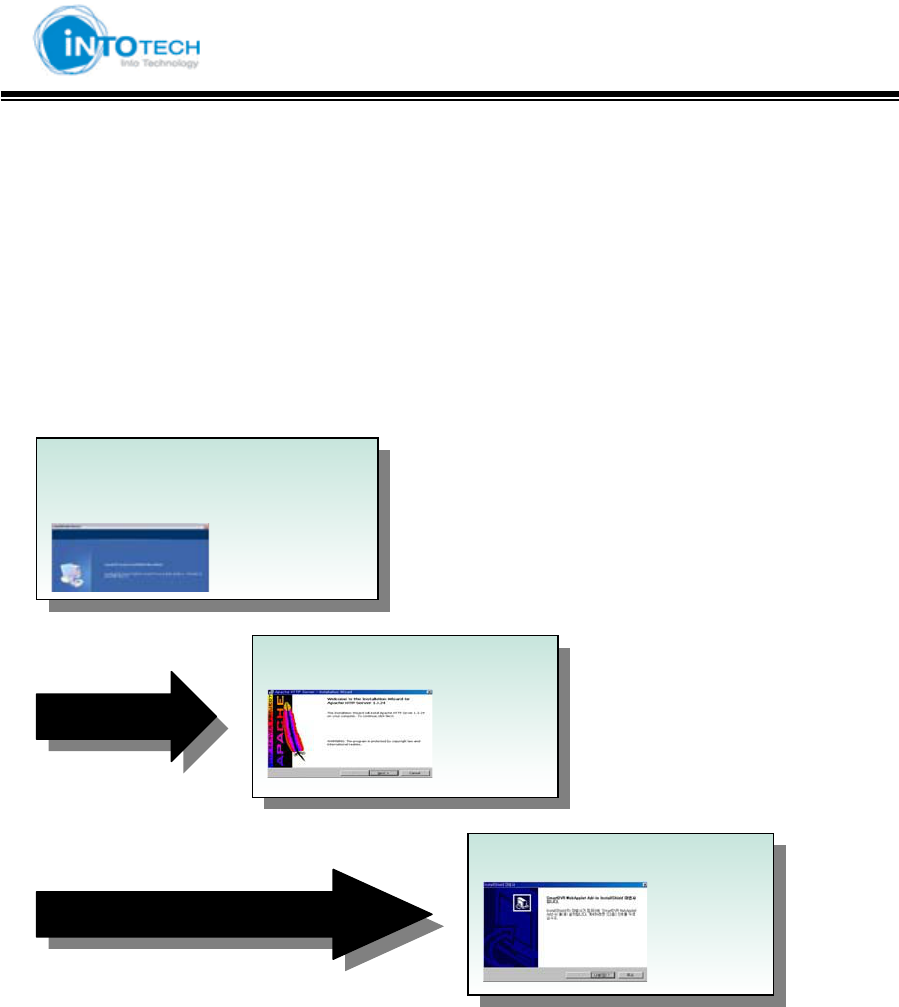
2-2 DVR Server Software Installation
Select one application to install at a time
2-2-1. Preview Installation Procedure
Attention: If an older version of SW has been already installed on your computer, you should
uninstall the older version first.
1. Install SmartDVR Formula
SW
Y. Install Apache HTTP SWG
G
Z. Install WebClient SWG
G
GGGGGGGGGGGGGGGGGGGGGGGGGGGGGGGSmartDVR Formula 2.0G
-20-G
2-2-2. Install DVR Server Software (Important)
Run the Setup.exe ( ) file.
InstallShield Wizard is executed. Press the [Next] button
- Next Page –
Installation
Procedure
1. Install SmartDVR Formula SW
2. Install Apache HTTP SW
3. Install WebClient Formula SW
GGGGGGGGGGGGGGGGGGGGGGGGGGGGGGGSmartDVR Formula 2.0G
-21-G
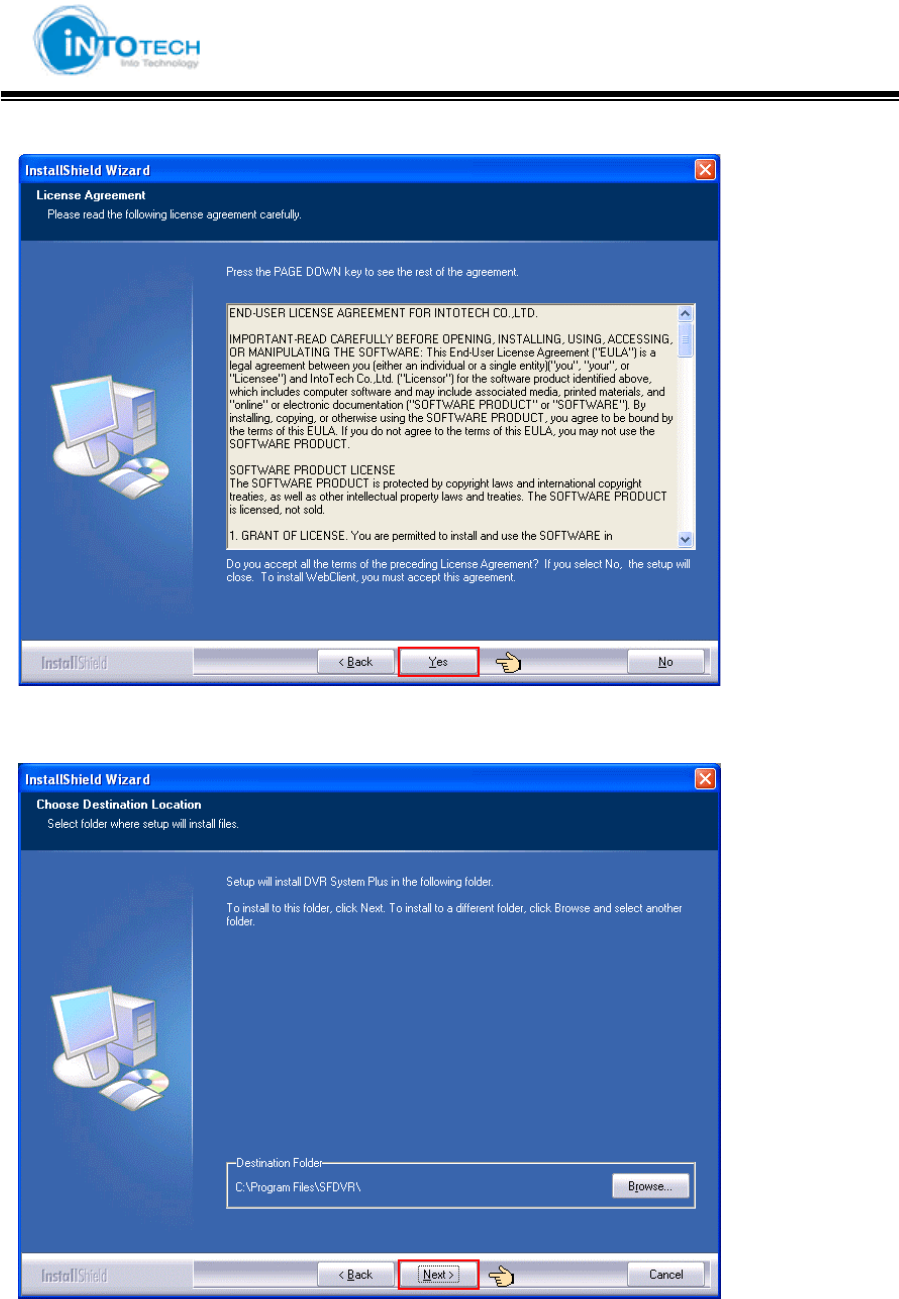
3. If you accept all the terms of the License Agreement, Press the [Yes] button
4. Select the folder of destination and Press the [Next] button.

GGGGGGGGGGGGGGGGGGGGGGGGGGGGGGGSmartDVR Formula 2.0G
-22-G
5. Press the [Finish] button to complete installation.
6. Driver Auto installer for Windows XP.
7. Press the [Yes] button to complete Auto Driver Installation
Reboot system for stable operation
GGGGGGGGGGGGGGGGGGGGGGGGGGGGGGGSmartDVR Formula 2.0G
-23-G
2-2-3. Apache Web Server Installation
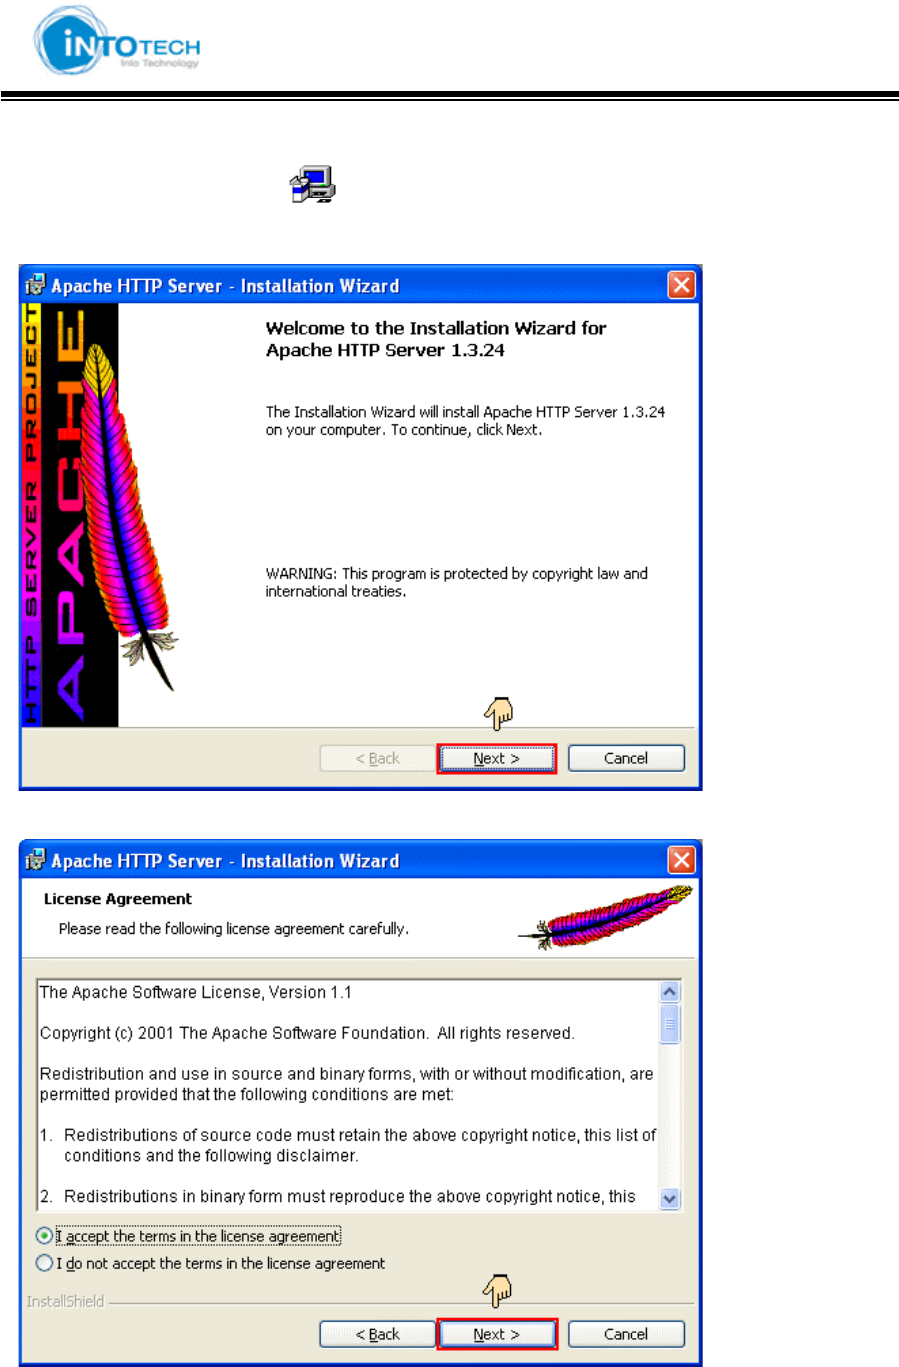
1. Run Apache Web Server[ ] program.
2. The screen will display as following: Click [Next] button.
3. Read the license agreement. If you agree click [I accept…] and click [Next] button.
GGGGGGGGGGGGGGGGGGGGGGGGGGGGGGGSmartDVR Formula 2.0G
-24-G
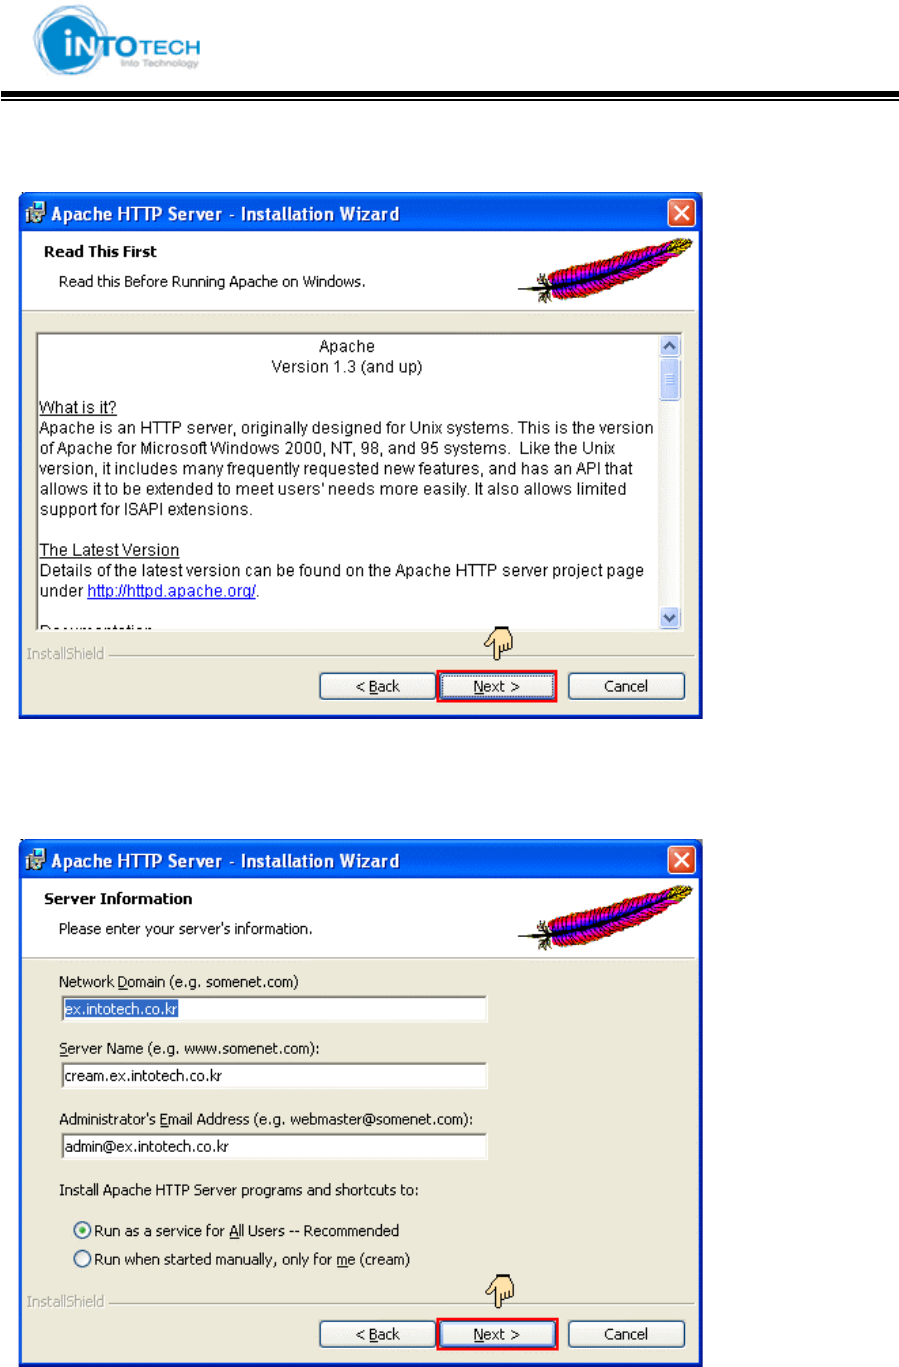
4. Confirm Apache Server information and click [Next] button.
5. Insert Network Domain, Server Name, Administrator’s Email Address.
(For formality purpose only. Insert any address.)
Select [Run as a service for All Users – Recommended]. Click [Next] button.
GGGGGGGGGGGGGGGGGGGGGGGGGGGGGGGSmartDVR Formula 2.0G
-25-G
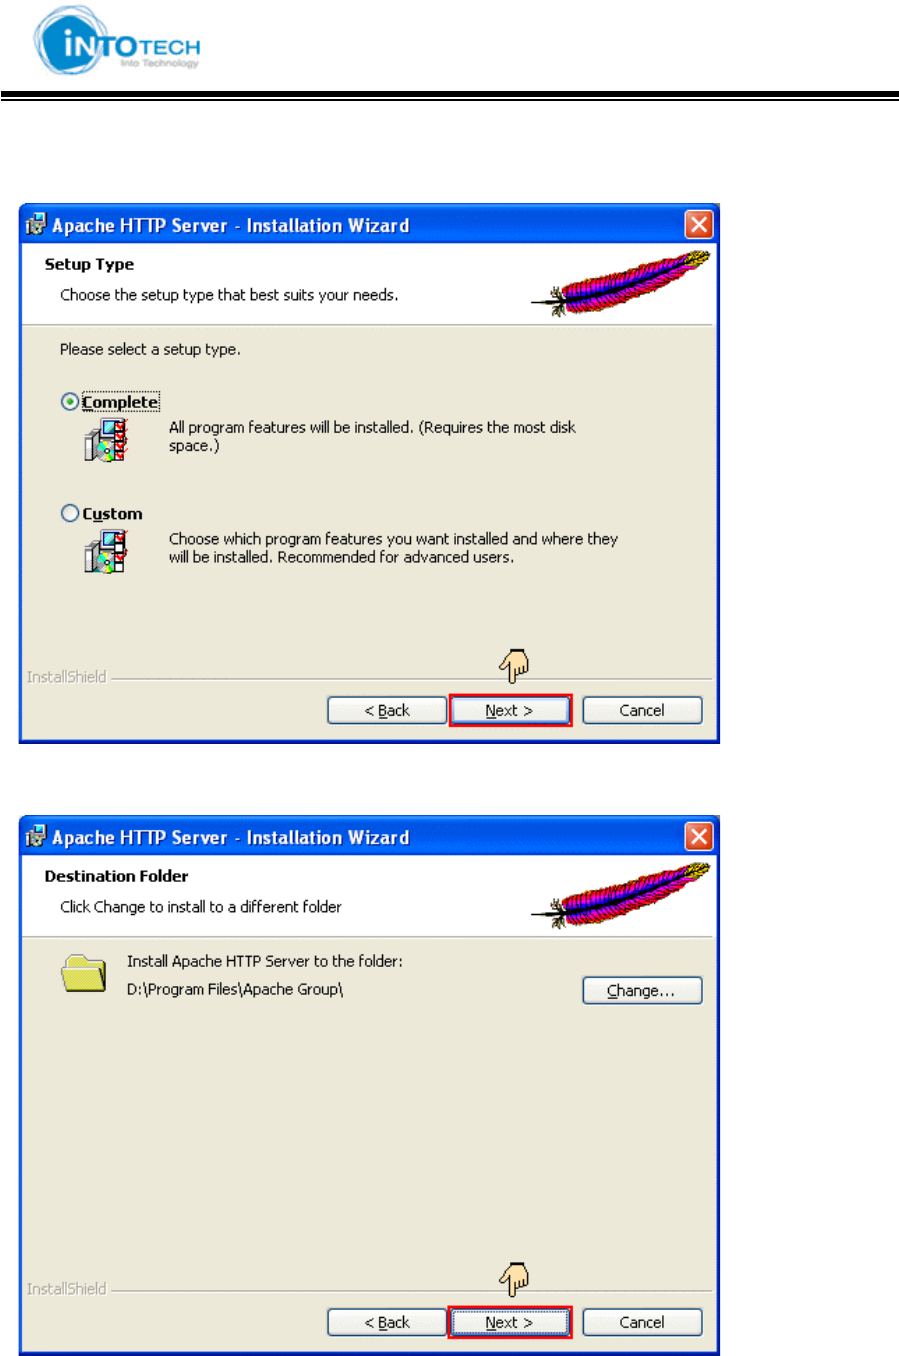
6.Select [Complete] for Setup Type. Click [Next] button.
7. Click [Next] button. Attention: Do not change directory.
GGGGGGGGGGGGGGGGGGGGGGGGGGGGGGGSmartDVR Formula 2.0G
-26-G
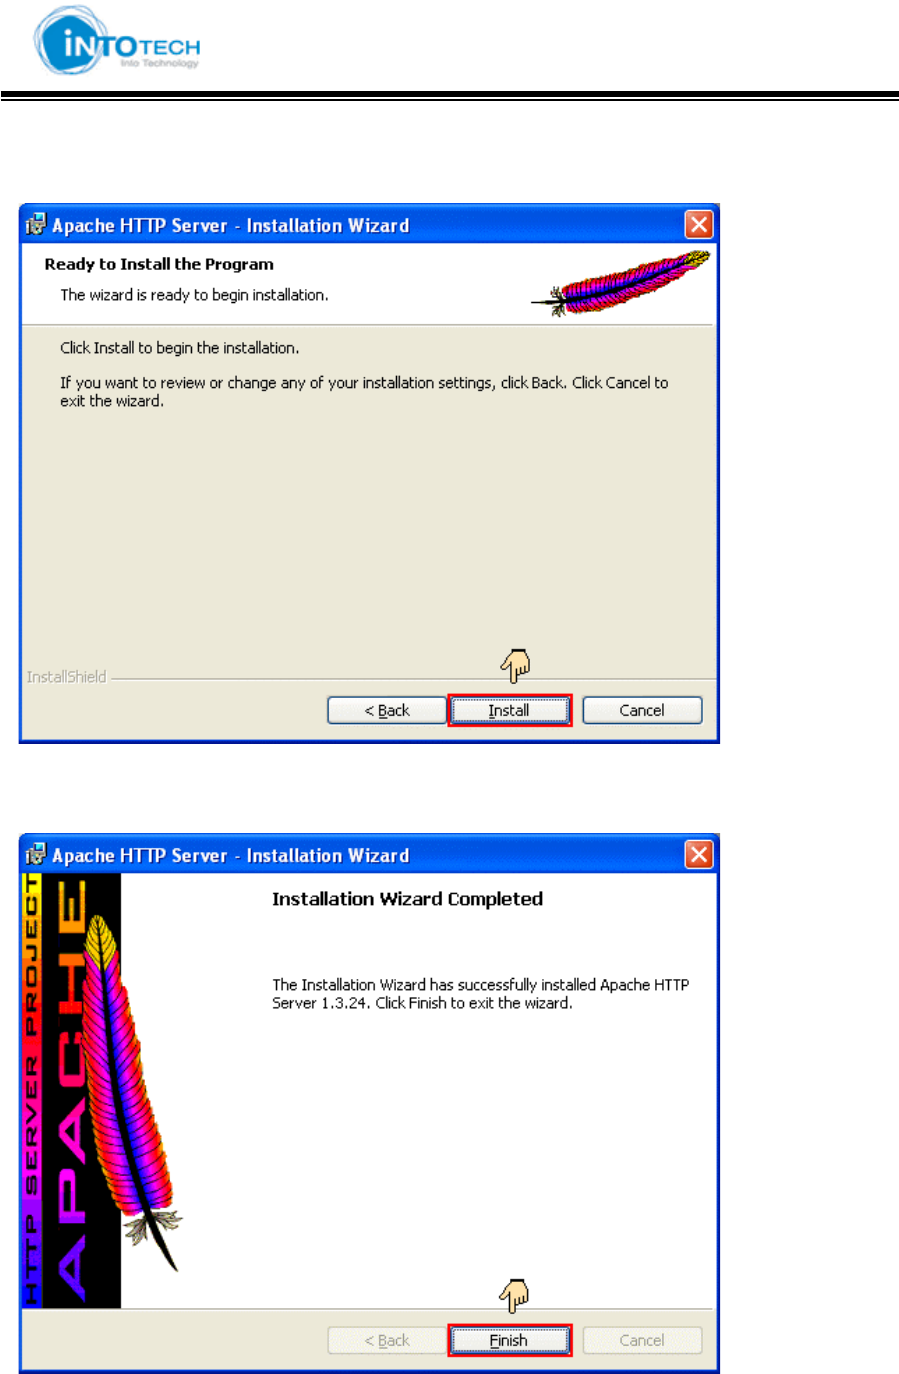
8. Click [Install] button and start installation.
9. Click [Finish] button when completion of installation program.
GGGGGGGGGGGGGGGGGGGGGGGGGGGGGGGSmartDVR Formula 2.0G
-27-G
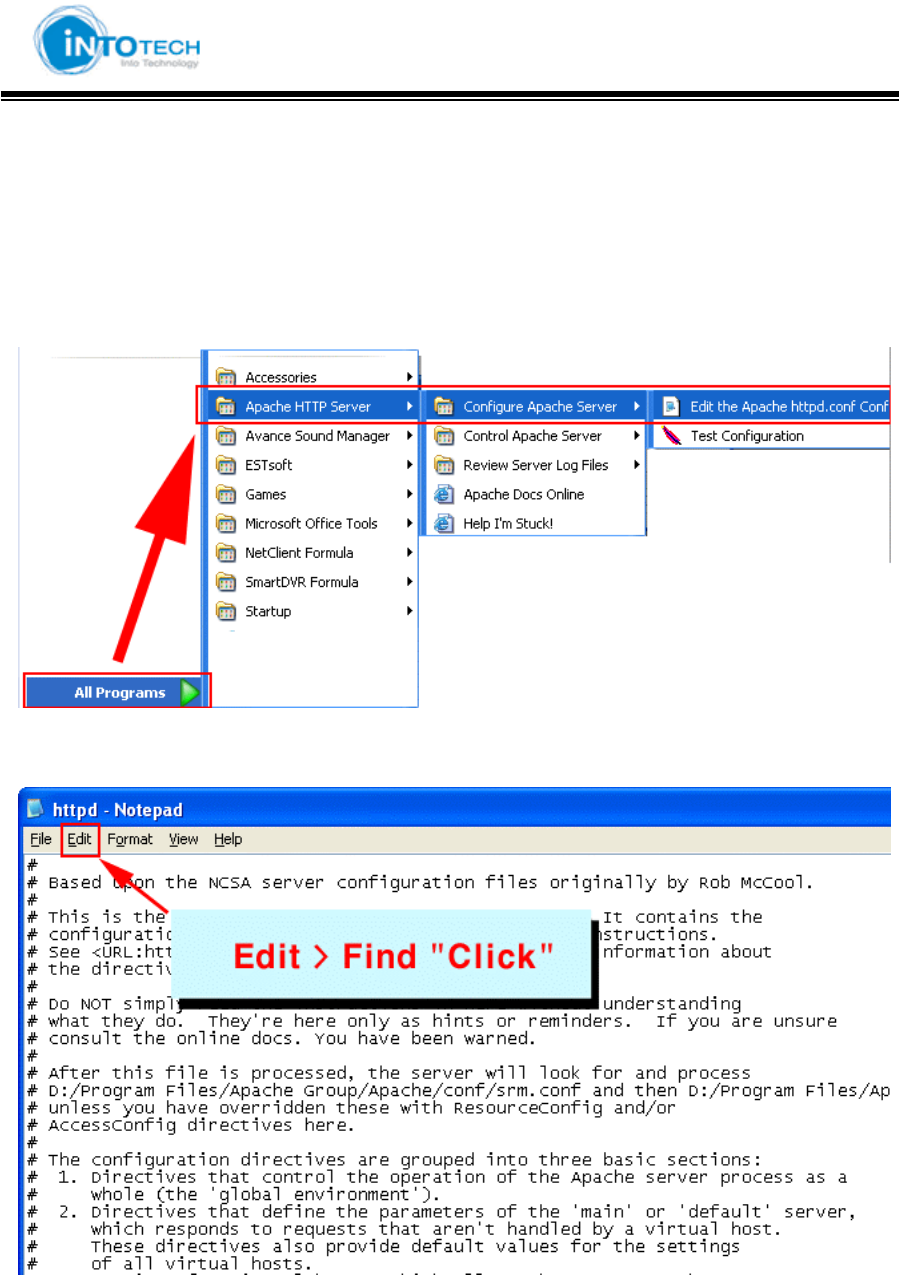
10. Change the port of Apache HTTP Server.
(Windows – Start - Program – Apache Http Server
– Select Configure Apache Server – Edit the Apache Http conf…
11. The screen will display as following: Select Edit – Find.
GGGGGGGGGGGGGGGGGGGGGGGGGGGGGGGSmartDVR Formula 2.0G
-28-G
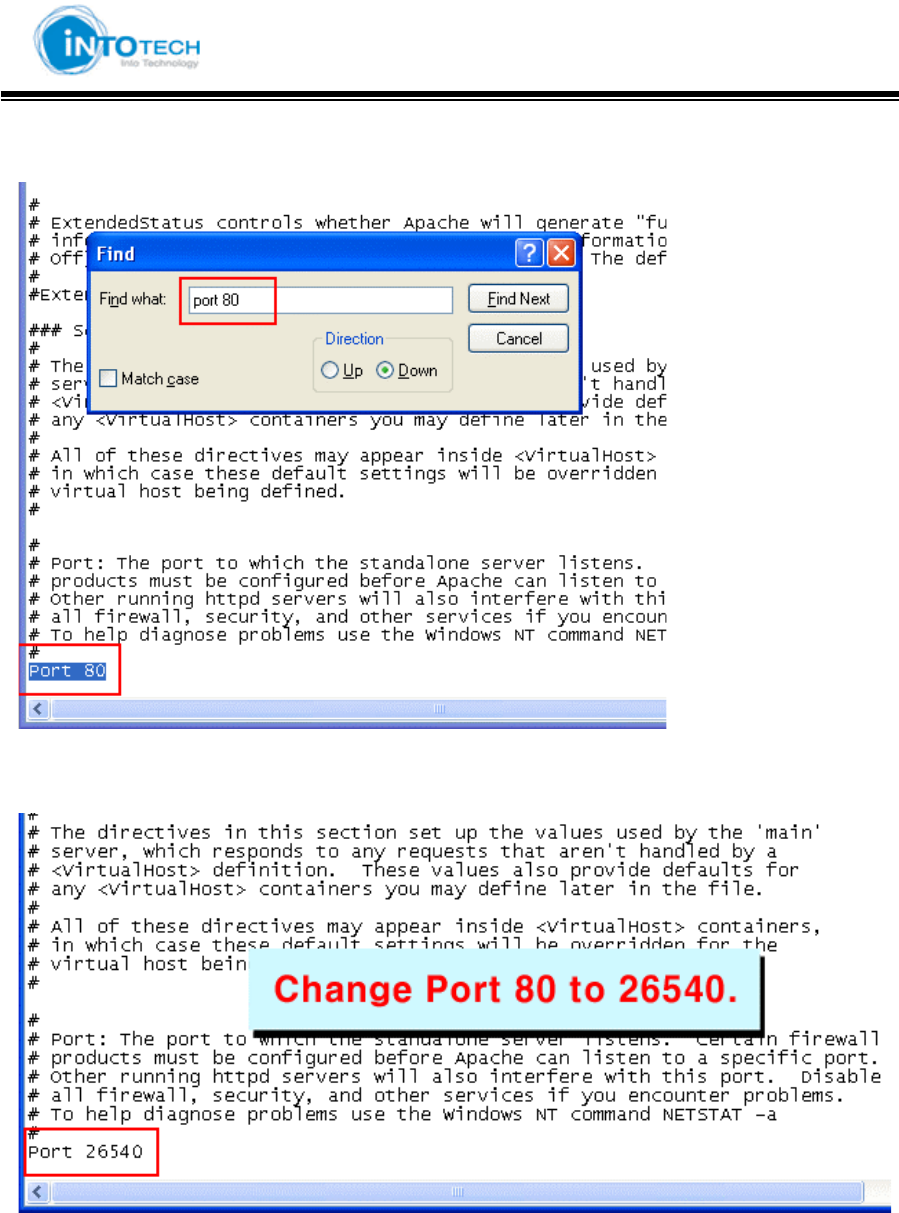
12. Insert “port 80” and press enter. Port 80 will view as following:
13. Change Port 80 to Port 26540 and save Notepad.
14. Exit Notepad after Save.
z Attention: Must add port number after IP address to view in Internet Web Browser.
z Ex) http://211.104.32.107:26540
GGGGGGGGGGGGGGGGGGGGGGGGGGGGGGGSmartDVR Formula 2.0G
-29-G
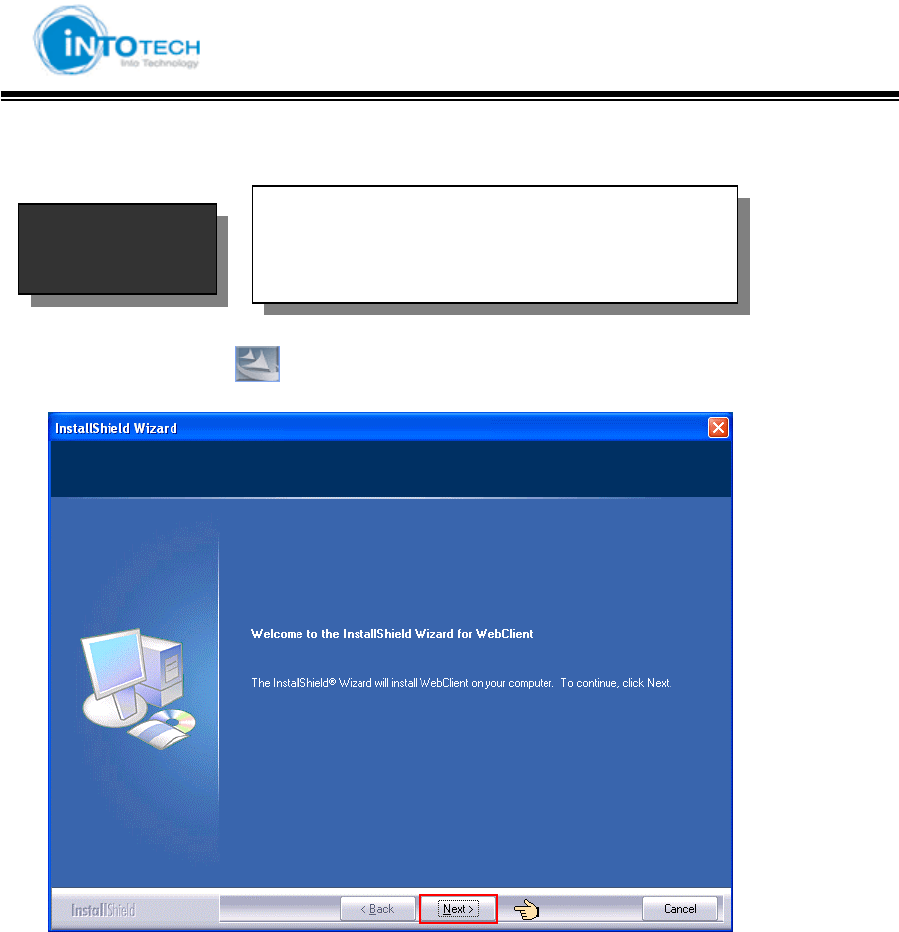
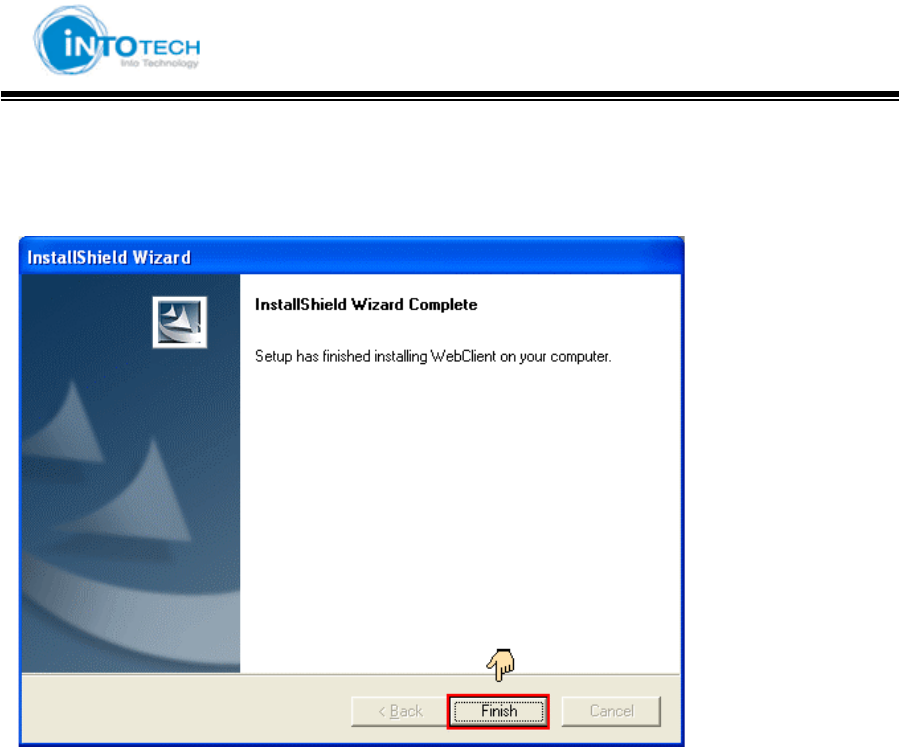
2-2-4.Web Client Formula Installation
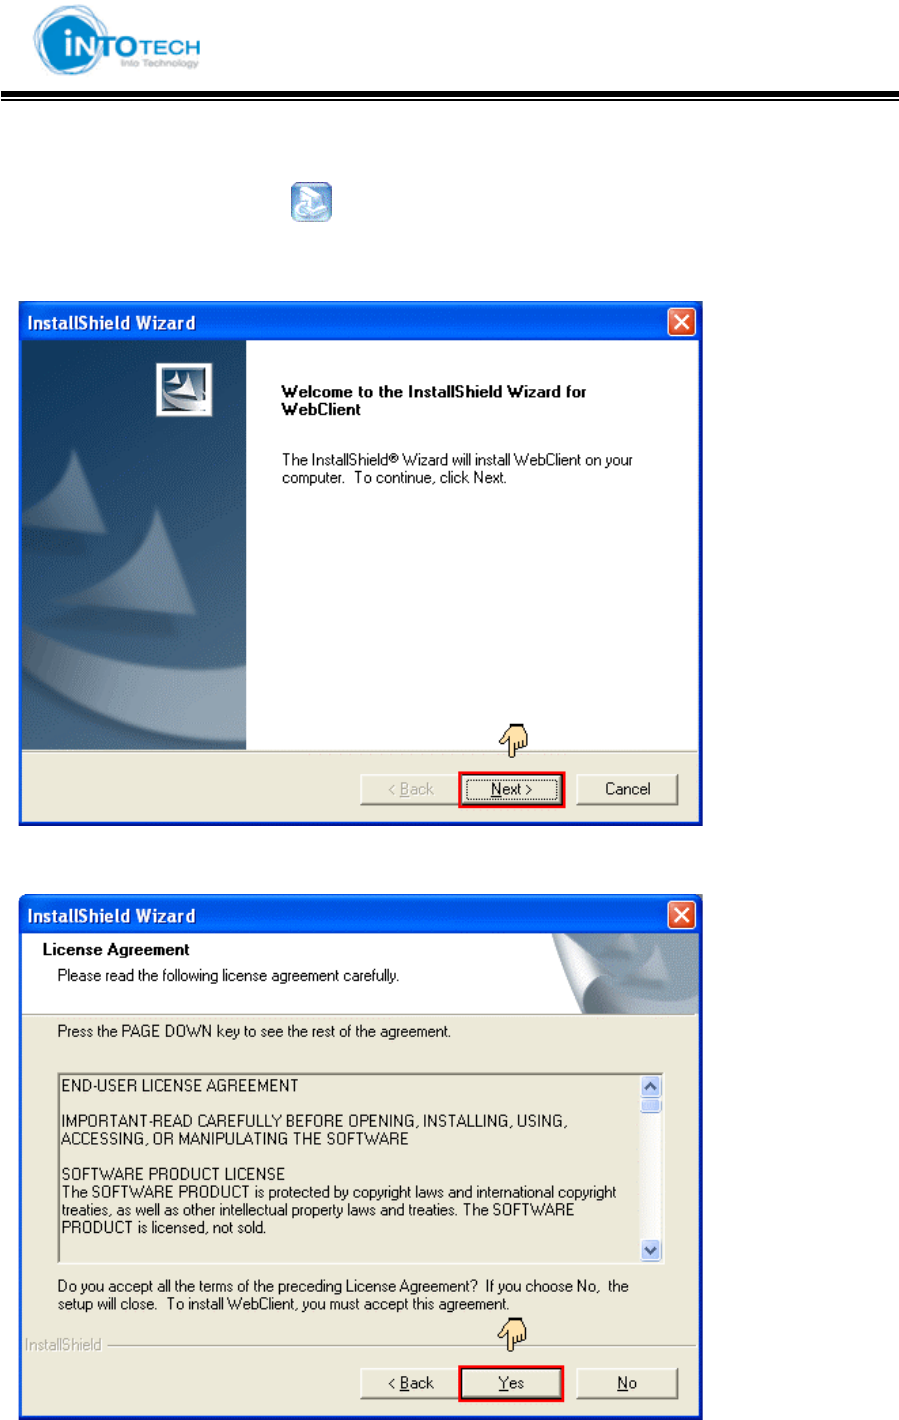
1. Run Web Client Formula ( ) file.
2. The InstallShield Wizard will display as following: Click [Next] button.
3. Read License Agreement carefully. When accept of agreement click [Yes] button.
GGGGGGGGGGGGGGGGGGGGGGGGGGGGGGGSmartDVR Formula 2.0G
-30-G
4. Click [Finish] after completion of installation.