Iconnect 572 802.11a/b/g/n Long-Range USB Adapter Dual-Band 2.4/5 GHz User Manual
Iconnect 802.11a/b/g/n Long-Range USB Adapter Dual-Band 2.4/5 GHz
Iconnect >
Contents
- 1. User Manual
- 2. Users Manual
User Manual

IEEE 802.11n Wireless Series
Long-Range USB Adapter
User Manual
Ver sion : 2 . 0
Dat e: January 13, 2009
January 13, 2009 / Ver sion: 2.0 i
FCC Certifications
Federal Communication Commission Interference Statement
This equipment has been tested and found to comply with the limits for a Class B digital device,
pursuant to Part 15 of the FCC Rules. These limits are designed to provide reasonable protection
against harmful interference in a residential installation. This equipment generates, uses and can
radiate radio frequency energy and, if not installed and used in accordance with the instructions,
may cause harmful interference to radio communications. However, there is no guarantee that
interference will not occur in a particular installation. If this equipment does cause harmful
interference to radio or television reception, which can be determined by turning the equipment off
and on, the user is encouraged to try to correct the interference by one of the following measures:
-Reorient or relocate the receiving antenna.
-Increase the separation between the equipment and receiver.
-Connect the equipment into an outlet on a circuit different from that to which the receiver is
connected.
-Consult the dealer or an experienced radio/TV technician for help.
This device complies with Part 15 of the FCC Rules. Operation is subject to the following two
conditions: (1) This device may not cause harmful interference, and (2) this device must accept any
interference received, including interference that may cause undesired operation.
FCC Caution: Any changes or modifications not expressly approved by the party responsible for
compliance could void the user's authority to operate this equipment.
IMPORTANT NOTE:
FCC Radiation Exposure Statement:
This equipment complies with FCC radiation exposure limits set forth for an uncontrolled
environment. This equipment should be installed and operated with minimum distance 20cm
between the radiator & your body.
This transmitter must not be co-located or operating in conjunction with any other antenna or
transmitter.

January 13, 2009 / Ver sion: 2.0 ii
CE Mark Warning
This equipment complies with the requirements relating to electromagnetic compatibility, EN 55022
Class B for ITE, the essential protection requirement of Council Directive 89/336/EEC on the
approximation of the laws of the Member States relating to electromagnetic compatibility.
Company has an on-going policy of upgrading its products and it may be possible that information
in this document is not up-to-date. Please check with your local distributors for the latest
information. No part of this document can be copied or reproduced in any form without written
consent from the company.
Trademarks:
All trade names and trademarks are the properties of their respective companies.
Copyright © 2009, All Rights Reserved.
January 13, 2009 / Ver sion: 2.0 iii
TABLE OF CON TEN TS
OVERVIEW ..........................................................1
UNPACKING INFORMATION ................................................................................................. 1
INTRODUCTION TO THE IEEE 802.11N WIRELESS USB ADAPTER ........................................ 1
KEY FEATURES ................................................................................................................ 2
IN STALLATION GUIDE ........................................2
SOFTWARE INSTALLATION ................................................................................................. 2
MANAGEM ENT GUIDE.........................................5
MAKING A BASIC NETWORK CONNECTION .......................................................................... 5
Select a configuration tool .......................................................................................... 5
To connect with Microsoft Zero Configuration tool...................................................... 5
To connect with 802.11n Wireless LAN Utility ............................................................ 7
INTRODUCTION TO THE 802.11N WIRELESS LAN UTILITY .................................................... 8
Interfaces.................................................................................................................... 8
Link Status Information ............................................................................................... 9
Profile ....................................................................................................................... 10
Network .................................................................................................................... 19
Advanced.................................................................................................................. 20
Statistics ................................................................................................................... 21
WMM ........................................................................................................................ 22
WPS ......................................................................................................................... 24
CCX .......................................................................................................................... 35
Radio On/Off............................................................................................................. 35
AP MODE MANAGEMENT GUIDE FOR WINDOWS 2000/XP/VISTA......................................... 36
Config ....................................................................................................................... 38
Security Setting ........................................................................................................ 40
Access Control ......................................................................................................... 41
MAC Table................................................................................................................ 42
Event Log ................................................................................................................. 43
Statistics ................................................................................................................... 44
January 13, 2009 / Ver sion: 2.0 1
Overview
T hank you for purchasing t his product . Re ad this cha pte r to know a bout your
IEEE 8 02 .1 1n Wirele ss USB Ada pte r.
Unpacking Information
Before gett ing started, please verify that your package includes t he follow ing item s:
1. I EEE 802.11n Wireless USB Adapter.
2. One Utilit y/ Manual CD.
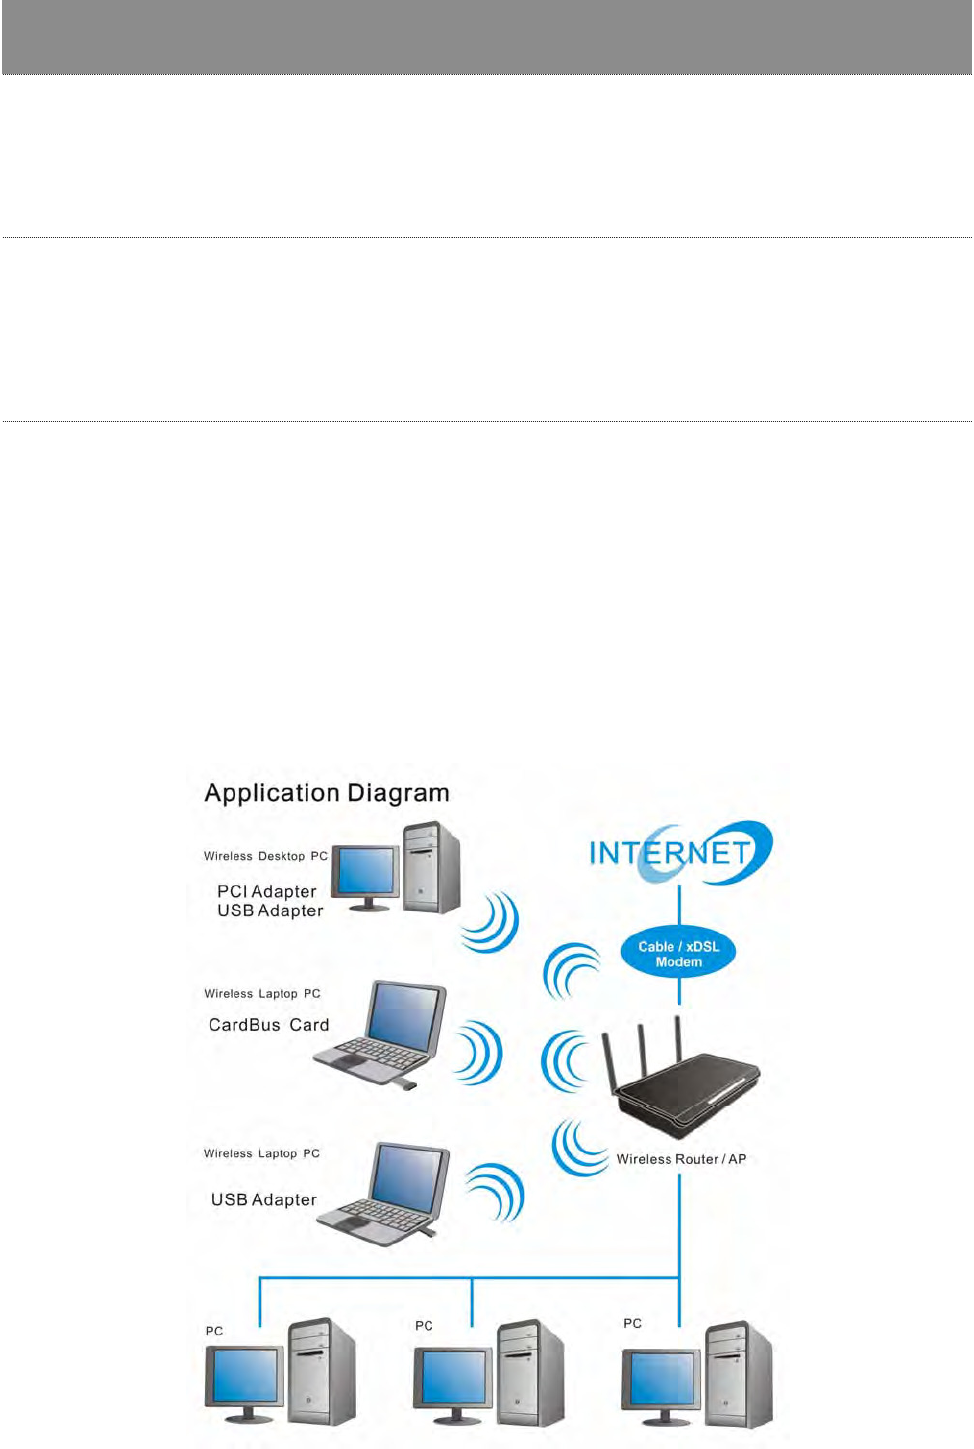
Introduction to the IEEE 802.11n Wireless USB Adapter
The I EEE 802.11n Wireless USB adapter provides users to launch I EEE 802.11n wireless net work
at 150 Mbps in t he 2.4GHz ( AWUS036NH/ AWUS036NEH) or 2.4GHz&5.2GHz&5.8GHz ( AWUS051NH)
band, which is also com pat ible wit h I EEE 802.11b/ g and I EEE 802.11a/ b/ g wireless devices at
11/ 54 Mbps. You can configure t his adapt er wit h ad- hoc m ode to connect t o ot her 2.4GHz
( AWUS036NH/ AWUS036NEH) or 2.4GHz&5.2GHz&5.8GHz ( AWUS051NH) wireless com put ers or
wit h I nfrast ructure m ode t o connect t o a wireless AP or router for accessing t o I nt ernet . This adapt er
includes a convenient Utilit y for scanning available net works and saving preferred networks t hat
users usually connect ed with. Security encryption can also be configured by t his ut ilit y.
January 13, 2009 / Ver sion: 2.0 2
Key Features
y Com plies w it h I EEE 802.11n wireless standards y Supports wir eless dat a encrypt ion with
64/ 128- bit WEP, WPA, WPA2, TKI P, AES
y 2.4GHz ( AWUS036NH / AWUS036NEH)
frequency band, MI MO
y 2.4GHz&5.2GHz&5.8GHz ( AWUS051NH) frequency
band, MI MO
y Support s QoS: WMM, WMM- PS
y Com plies wit h USB 2.0 y Supports m ult iple BSSI D
y High speed transfer dat a rat e up to 150 Mbps
y Support s auto- installation
y Support s driver for Windows 2000, XP 32/ 64,
Vist a 32/ 64, Windows 7, Linux ( 2.4.x/ 2.6.x) , and
Mac ( 10.3.x/ 10.4.x/ 10.5.x/ 10.6.x) Power PC &
PC
Inst allation Guide
Software Installation
N ot e :
y For Linux or Mac driver installat ion guide, please refer to the instruction in
/ Drive r/ Linux/ README or / Dr iver/ Ma c/ READM E in the CD- Rom .
y The following driver installat ion guide uses Windows XP as t he presum ed operat ion system .
The procedures and screens in Windows 2000 and Vist a are fam iliar with Windows XP.
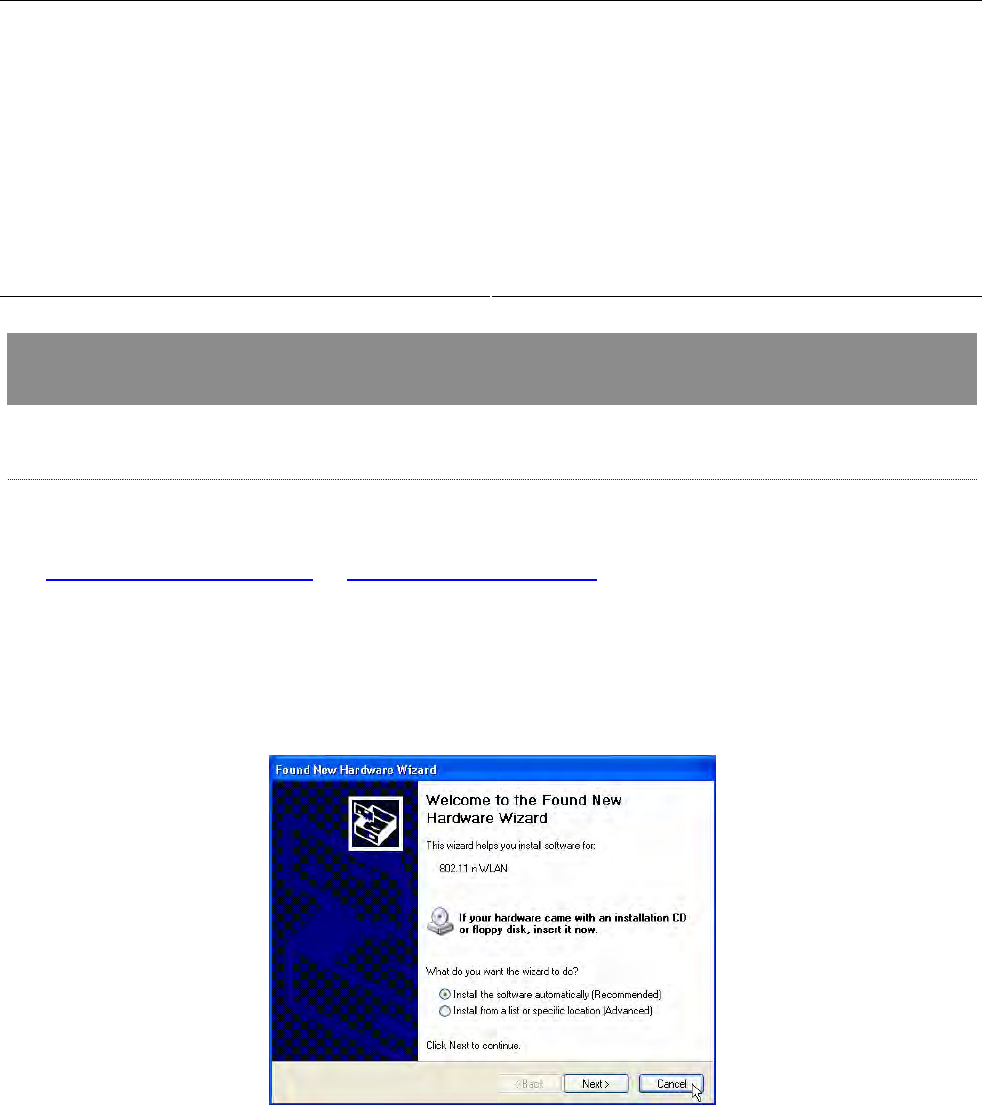
1. The system finds the new ly installed device aut om at ically. Click Cancel t o close this window.
2. I nsert the CD- Rom t hat cam e wit h t his product t o your CD-Rom drive. The m enu window pops
up aut om at ically. Please click t he D r iver but ton of this product.
N ot e : I f t he CD- Rom fails to aut o- run, please click on My Com put er > your CD- Rom drive
> ( folder of t his produ ct ) > D r iver t hen double- click t he Se tup icon to start t his m enu.

January 13, 2009 / Ver sion: 2.0 3
3. Select if you are going t o inst all t he driver and wireless ut ility; or install t he driver only.
4. Select if you are going t o configure your wireless net work with t his device or w ith Microsoft
Zero Configuration t ool.
N ot e : This can be changed after inst alling t his soft ware.
January 13, 2009 / Ver sion: 2.0 4
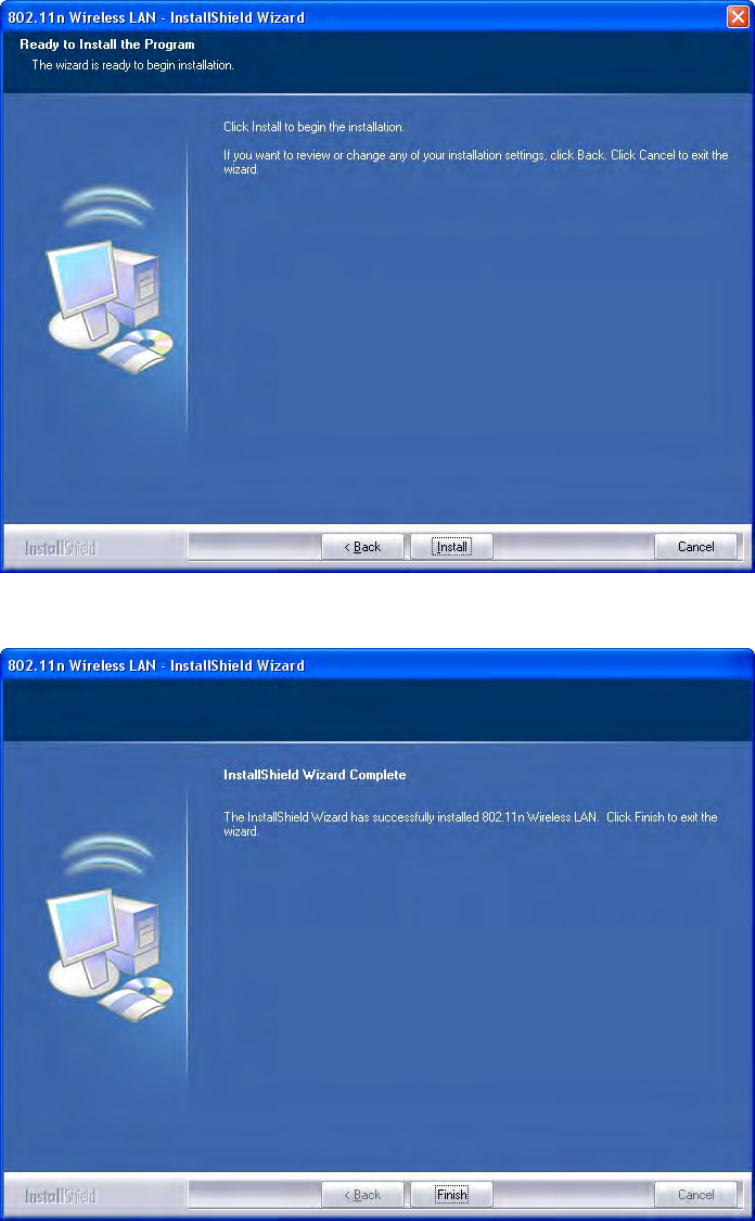
5. Click t he I n st a ll butt on t o start inst alling.
6. Click t he Finish but ton t o com plet e installat ion.
January 13, 2009 / Ver sion: 2.0 5
Mana gem e nt Guide
Rea d t his cha pte r t o unde rst and t he m ana gem ent inte rfac e of t he devic e a nd
how t o m ana ge the devic e.
Making a Basic Network Connection
Select a configuration tool
I n t he following inst ruct ion for m aking a network connect ion, we use t he Ut ilit y w e provide to
configure your wireless net work sett ings.
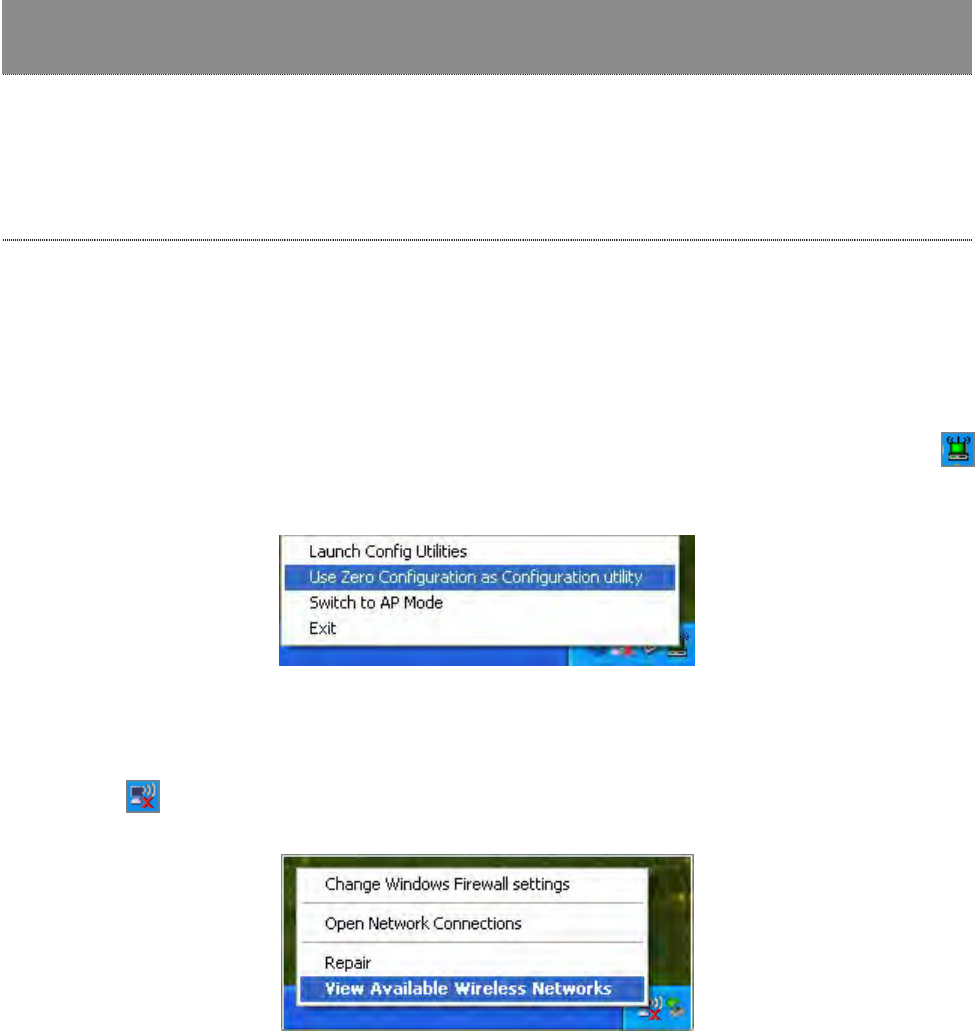
N ot e : You could use either t he software we provide or Microsoft Zero Configuration t ool to
configure t his adapt er. To switch between the two configurat ion tools, please right click on t he …..
icon on system tray t o select.
To connect with Microsoft Zero Configuration tool
Aft er specifying the Microsoft Zero Configuration t ool to configure your wireless network, right
click on t he icon on system t ray. Select View Available W ir e less N etw or k s t o specify your
wireless net work.
January 13, 2009 / Ver sion: 2.0 6
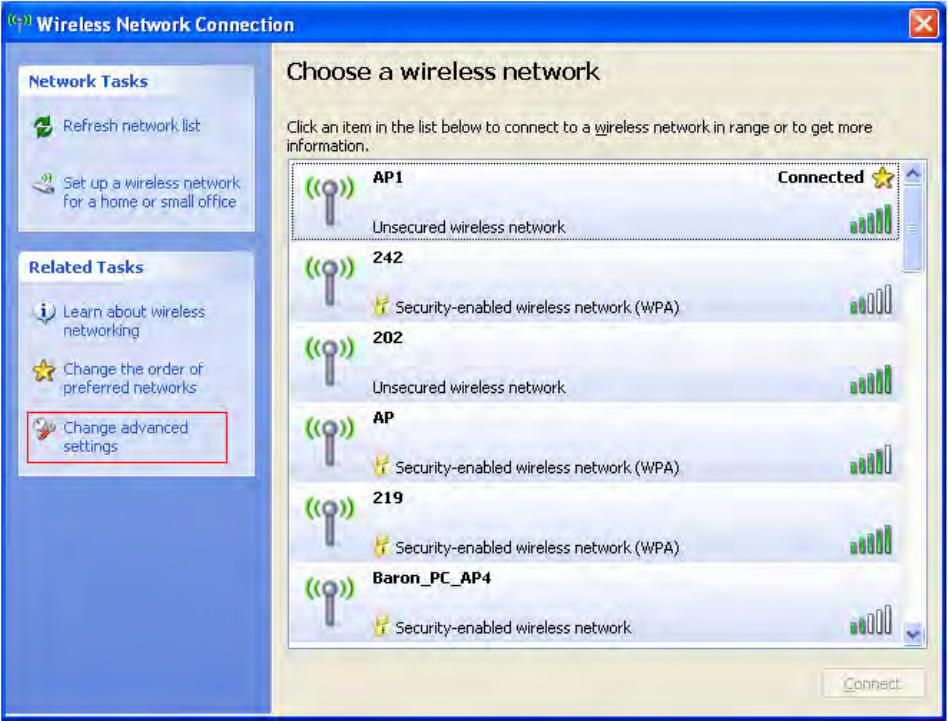
The t ool shows t he available w ireless net works. Select your dem anding net work to connect w ith.
To connect t o a wireless network with m ore security set tings, please click Cha n ge a dvan ce d
se t t in gs t o be com pat ible with your wireless network securit y sett ings.
January 13, 2009 / Ver sion: 2.0 7
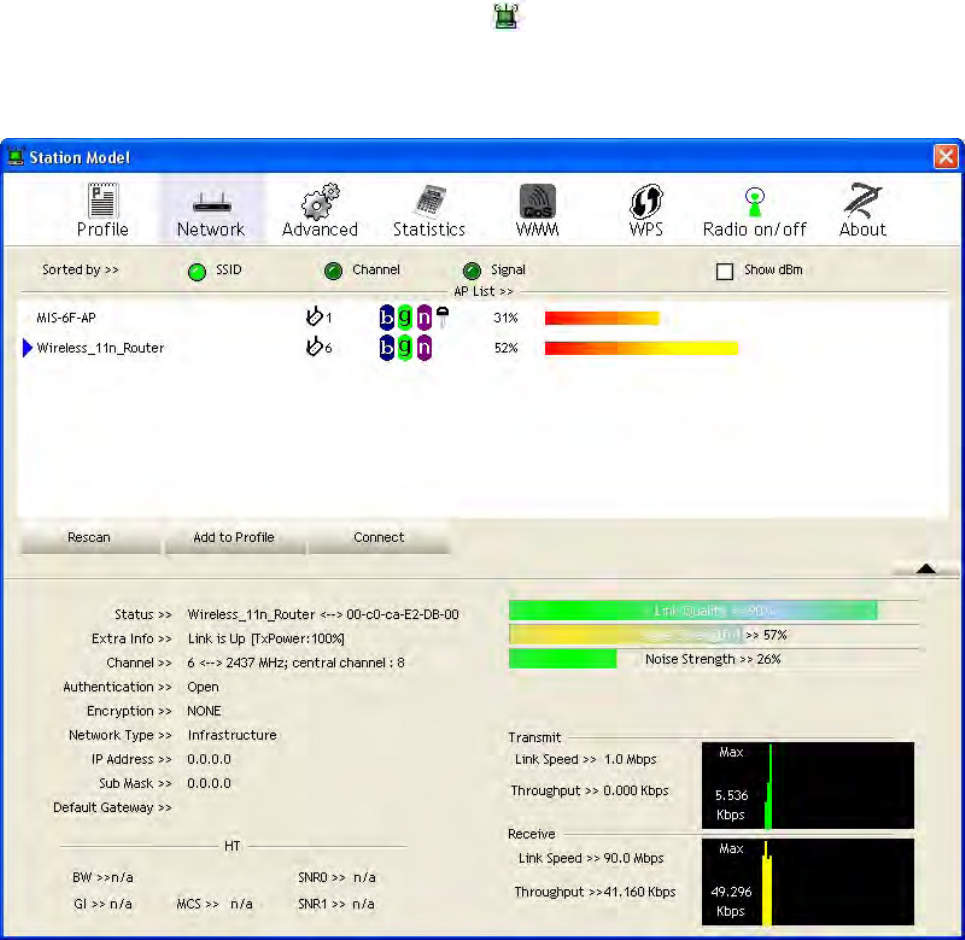
To connect with 802.11n Wireless LAN Utility
We provide t his Ut ilit y for users to connect t o a w ireless network easily. I t provides m ore
inform at ion and configurat ion for t his adapt er. As default , t he Ut ility is start ed aut om at ically upon
st arting your com put er and connect s t o a connect able wireless net work w it h best signal strengt h
and wit h no security set ting. Right click on the icon in t he system ray and select Launch
Config utilit ies if t he Ut ilit y does not start . Please refer t o t he following chapt ers t o get
inform at ion regarding t o t he funct ions of this Utilit y.
January 13, 2009 / Ver sion: 2.0 8
Introduction to the 802.11n Wireless LAN Utility
N ot e : The Ut ilit y in Linux and Mac are different from t he following.
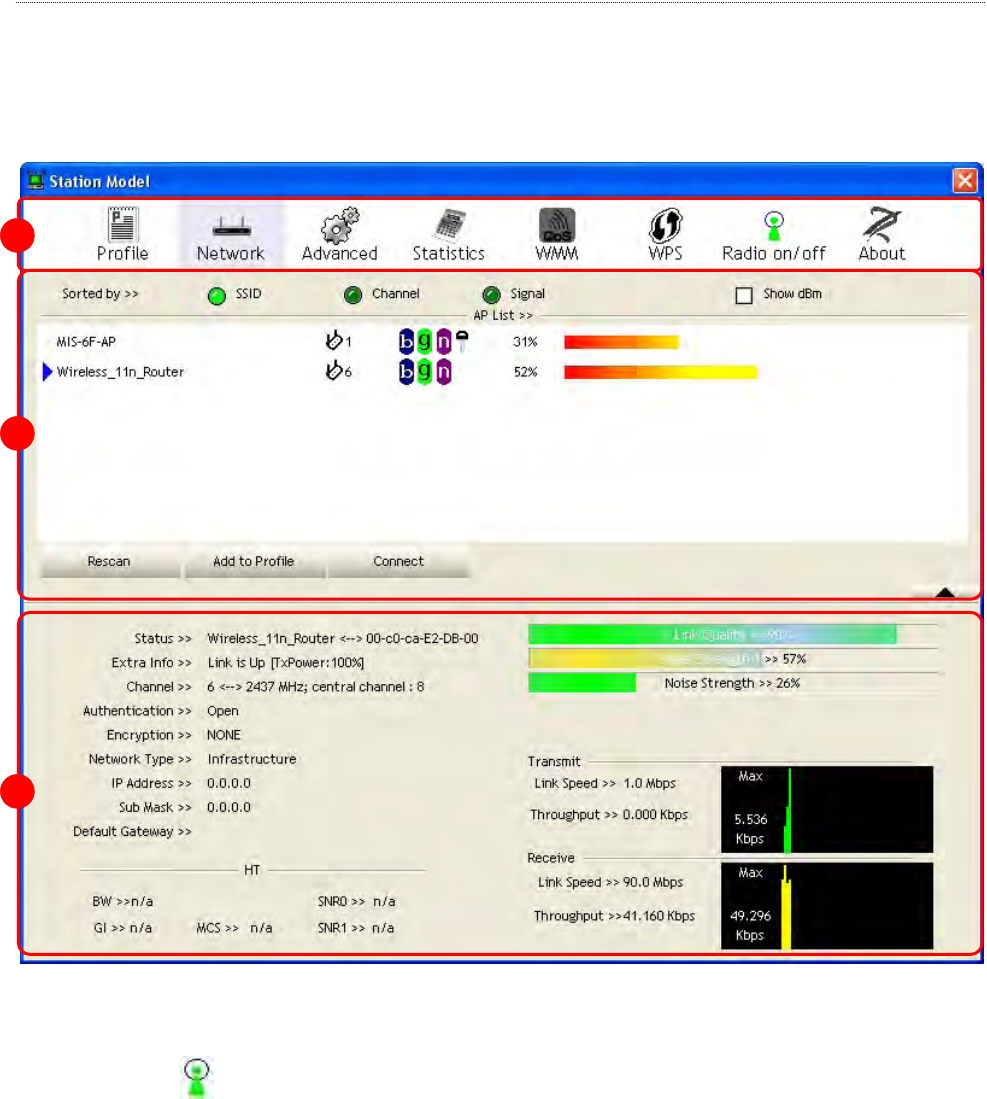
Interfaces
This Ut ilit y is basically consisted of three part s:
1 . Fu nct ional Bu t t ons: on t op of t he window. You can click each but ton t o access each
configuration window.
N ot e : Click t o enable/ disable w ireless connect ion stat us.
2 . Configur a tion Colum n: Cent er of t he Ut ilit y window. Make your changes for each function in
this part .
3 . Lin k St at us I nform at ion : bot t om of t he ut ilit y w indow. Shows the connection stat us and
system inform ation.
1
2
3
January 13, 2009 / Ver sion: 2.0 9
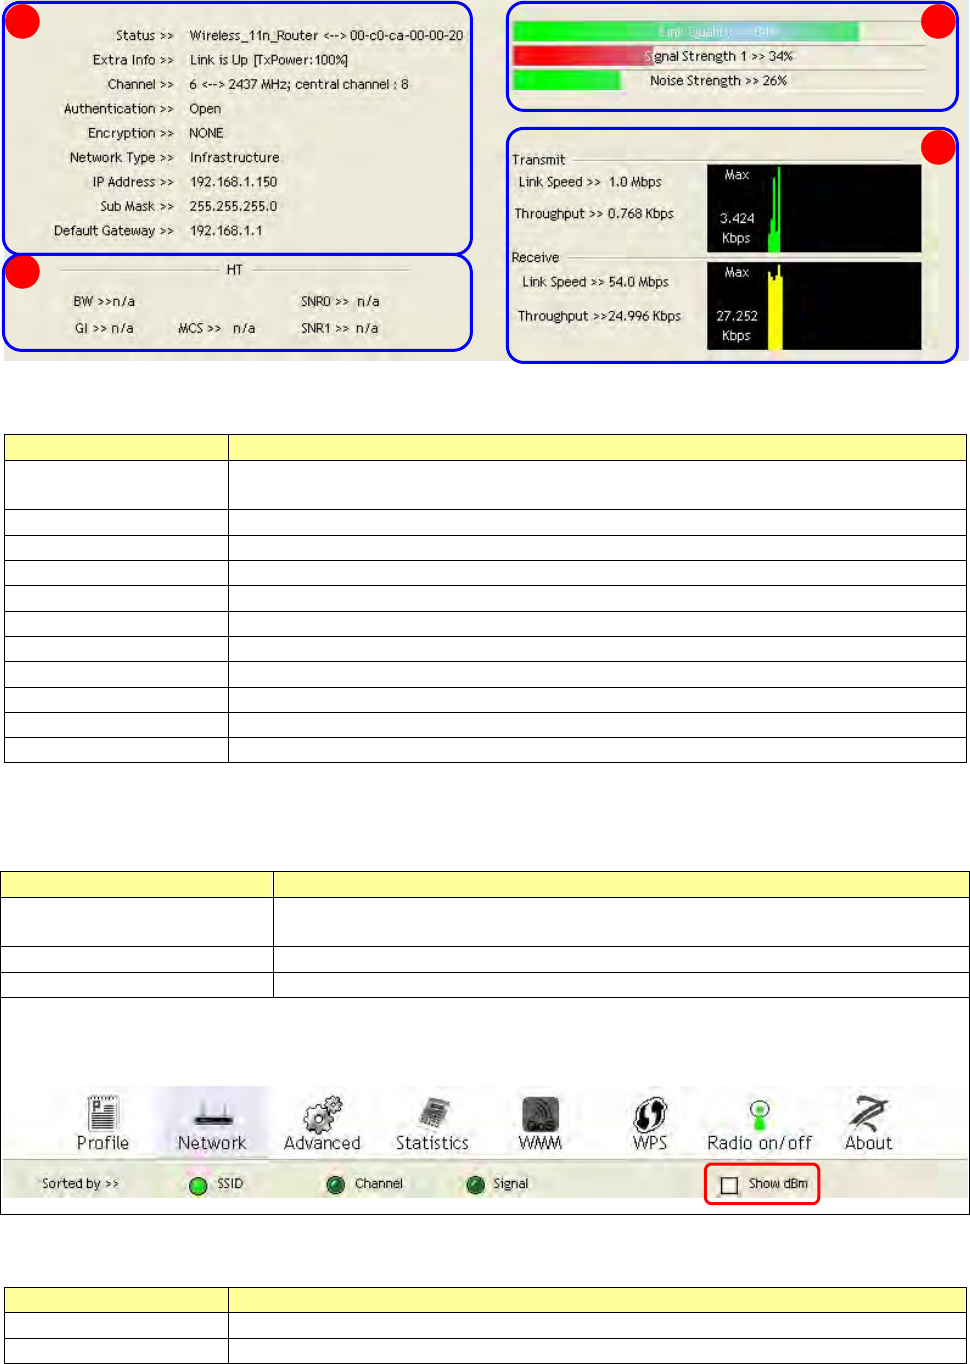
Link Status Information
A. N et w ork I nfor m a tion:
I tem s I n for m a t ion
St a t us Show the connecting stat us. Also shows t he SSI D while connect ing to a
valid network.
Ex t r a I nfo Display link st at us in use.
Channel Display current channel in use.
Au t he n t ica tion Aut henticat ion m ode in use.
En cryp t ion Encrypt ion type in use.
N e tw ork Type Network t ype in use.
I P Address I P address of current connection.
Sub M a sk Subnet m ask of current connect ion.
Default Gat ew ay Default gat eway of current connect ion.
Link Speed Show current transm it rate and receive rate.
Throu ghput Display transm it and receive throughput in Mbps.
B. H T: Display current HT stat us in use, cont aining BW, GI , MCS, SNR0, and SNR1 value.
C. Lin k Qua lit y and St rengt h Ba r :
I tem s I n for m a t ion
Link Qua lit y Display connection qualit y based on signal strength and TX/ RX packet
error rate.
Signal St re ngt h 1 Receive signal st rengt h 1.
N oise St rengt h Display noise signal st rengt h.
User can choose t o display Signal and Noise Strength as percentage or dBm form at by m ark the
dBm checkbox.
D. St a tist ics:
I tem s I nfor m a t ion
Link Speed Show current transm it rate and receive rate.
Thr oughpu t Display t ransm it and receive throughput in Mbps.
A
B
C
D
January 13, 2009 / Ver sion: 2.0 10
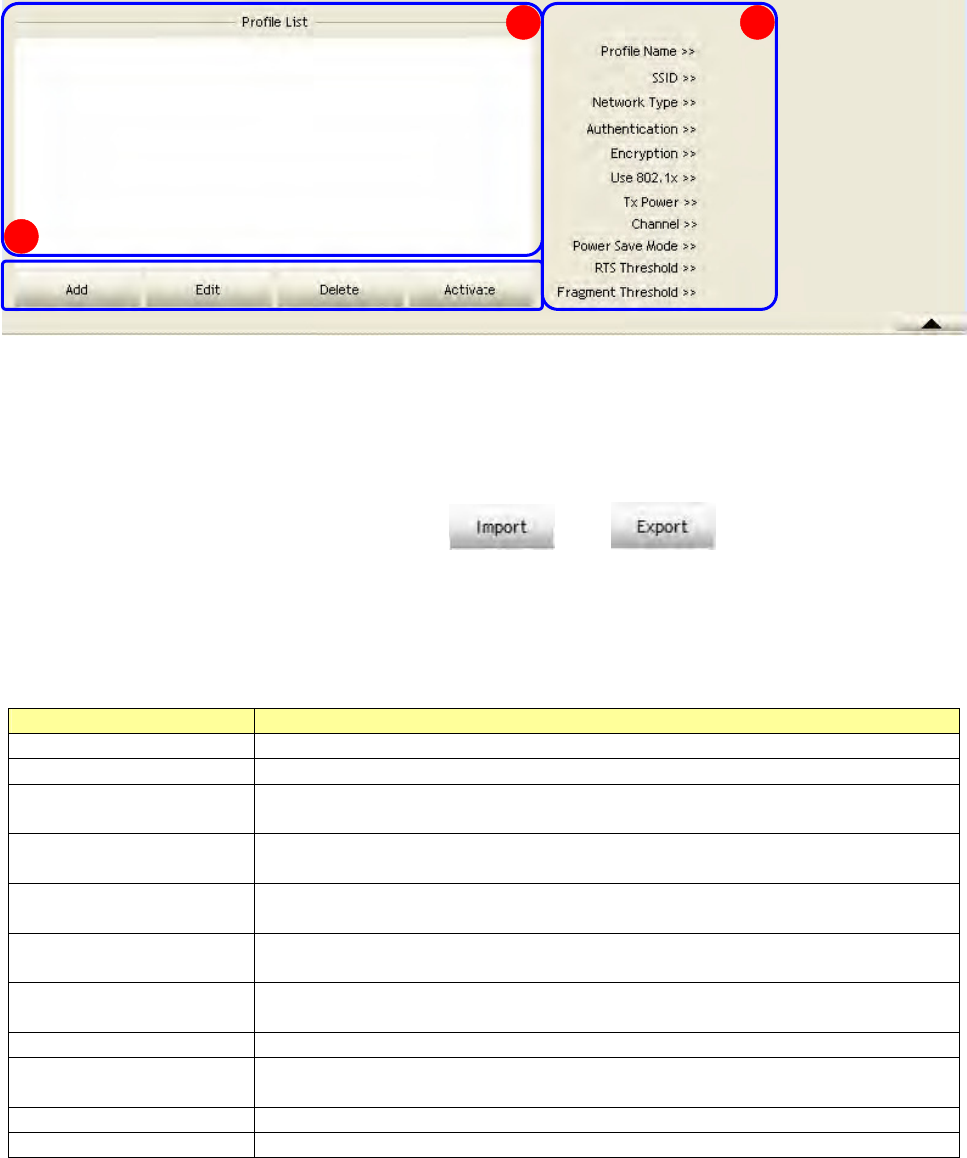
Profile
This profile page allows users to save different wireless set tings, which helps users to get access
to wireless net works at hom e, office or ot her wireless net work environm ent s quickly.
A. Pr ofile List : The list shows all the profiles you have added before.
B. But t ons: You can click on these but tons to add a new profile, edit , delet e or activat e an old
profile.
N ot e : For Vist a user, t here are ext ra and but tons in this feat ure.
Click on t hese butt ons to im port or export t he select ed profile.
C. Profile I nform at ion: While you select a profile in the profile list, you can see t he profile
inform at ion shows on here.
I tem s I nfor m a t ion
Profile N am e The nam e of t he selected profile.
SSI D The SSI D of t he wireless syst em .
N e tw ork Type Shows I nfrast ruct ure / Ad- hoc t o indicate the network type of t he
selected profile.
Au t he n t ica tion Shows t he aut henticat ion m ode in use. There are tot al 8 m odes: Open,
Shared, LEAP, WPA, WPA-PSK, WPA2, WPA2- PSK and WPA- NONE.
En cryp t ion Shows t he encryption m ode in use. There are tot al 4 m odes: None,
WEP, TKI P and AES.
Use 8 0 2 .1 x Shows Yes/ No t o indicate whet her the select ed profile use t he 802.1x
feat ure or not .
Tx Pow er Shows t he t ransm it power in use. There are tot al 7 types: Aut o, 100% ,
75% , 50% , 25% , 10% and Low.
Channel Shows t he channel in use ( 1~ 14) for Ad- Hoc m ode.
Pow er Save M ode Shows t he power save m ode in use. Two select ions: CAM ( Constant ly
Awake Mode) and PSM ( Pow er Saving Mode) .
RTS Threshold Shows t he RTS t hreshold value in use.
Fragm e n t Threshold Shows t he fragm ent t hreshold in use.
A
B
C
January 13, 2009 / Ver sion: 2.0 11
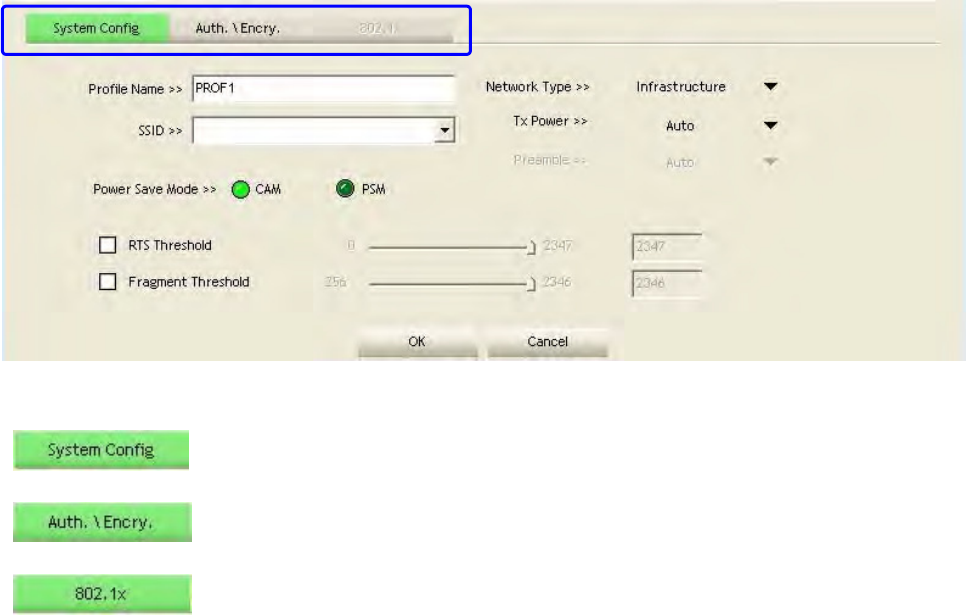
To add a new profile:
1. Click t he Add but ton. The add profile window pops up.
N ot e : you could also add a new profile quickly by selecting an available net w ork in t he
N e t w or k function t hen click t he Add t o Profile but ton.
2. There are t hree tabs on t he window:
Set tings for: Profile Nam e, SSI D, Network Type, Tx Power, Pream ble,
Power Save Mode, RTS Threshold, and Fragm ent Threshold.
Set tings for: Aut hent ication, Encrypt ion, Preshared Key, and WEP Key.
Set tings for: EAP Met hod, Tunnel Authent ication, and Session
Resum pt ion. For different EAP Method, you also have to configure
different require of I D/ Password, Client Cert ificate, or Server
Cert ificat e.
Please follow the st eps below t o fill in t he inform at ion gradually.
← Click on t hese t a bs
January 13, 2009 / Ver sion: 2.0 12
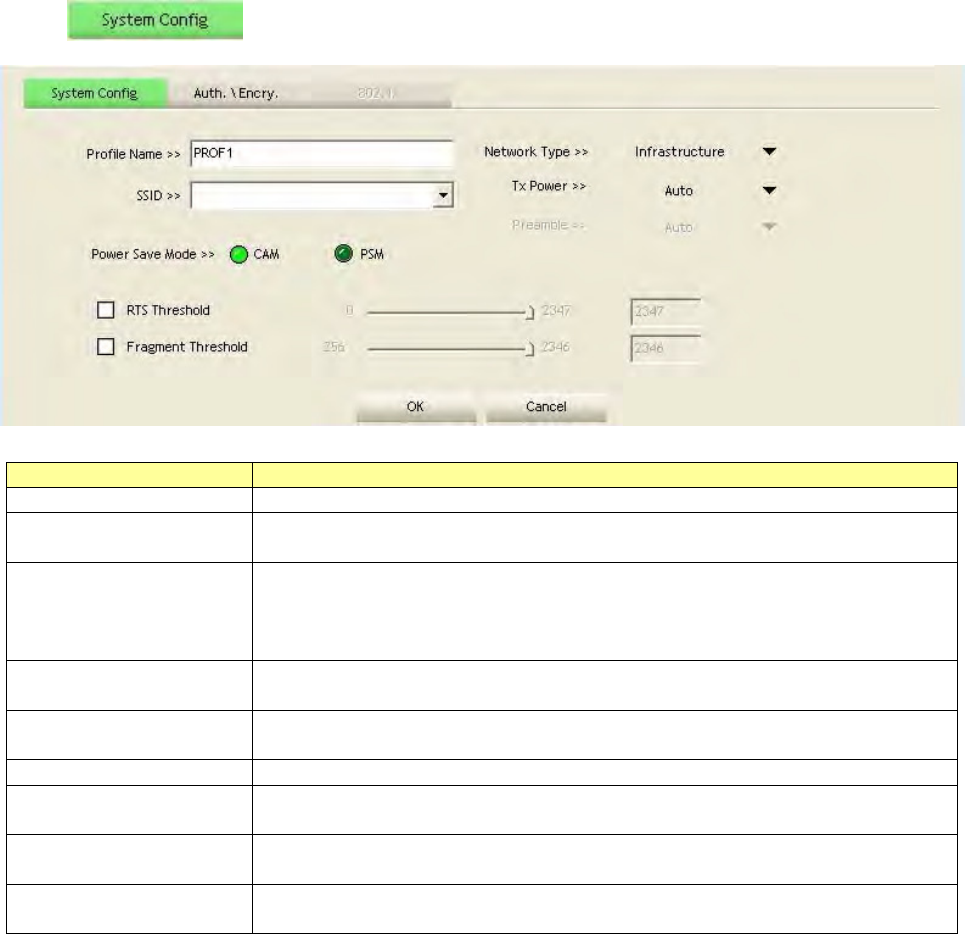
3. I n sect ion, fill in inform at ion for t his profile:
I tem s I n for m a t ion
Profile N am e Choose a nam e for t his profile, or use default nam e defined by system .
SSI D Fill in the int ended SSI D nam e or use the drop list t o select from
available APs.
N e tw ork Type
There are t wo types, infrastructure and 802.11 Ad- hoc m odes. Under
Ad- hoc m ode, you could also choose t he pream ble type; t he available
pream ble t y pe includes aut o and long. I n addit ion t o t hat , the channel
field will be available for set up in Ad- hoc m ode.
Tx Pow er Transm it power, t he am ount of power used by a radio t ransceiver t o
send the signal out.
Pream ble Two selections: Aut o, and Long Pream ble. This can only be set up in
Ad –hoc m ode.
Channel Channel in use for Ad-Hoc m ode.
Pow er Save M ode Choose from CAM ( Constant ly Awake Mode) or PSM ( Power Saving
Mode) .
RTS Threshold For adjust ing t he RTS t hreshold num ber by sliding t he bar or key in t he
value directly. The default value is 2347.
Fragm e n t Threshold Adj ust the Fragm ent t hreshold num ber by sliding t he bar or key in t he
value directly. The default value is 2346.
January 13, 2009 / Ver sion: 2.0 13
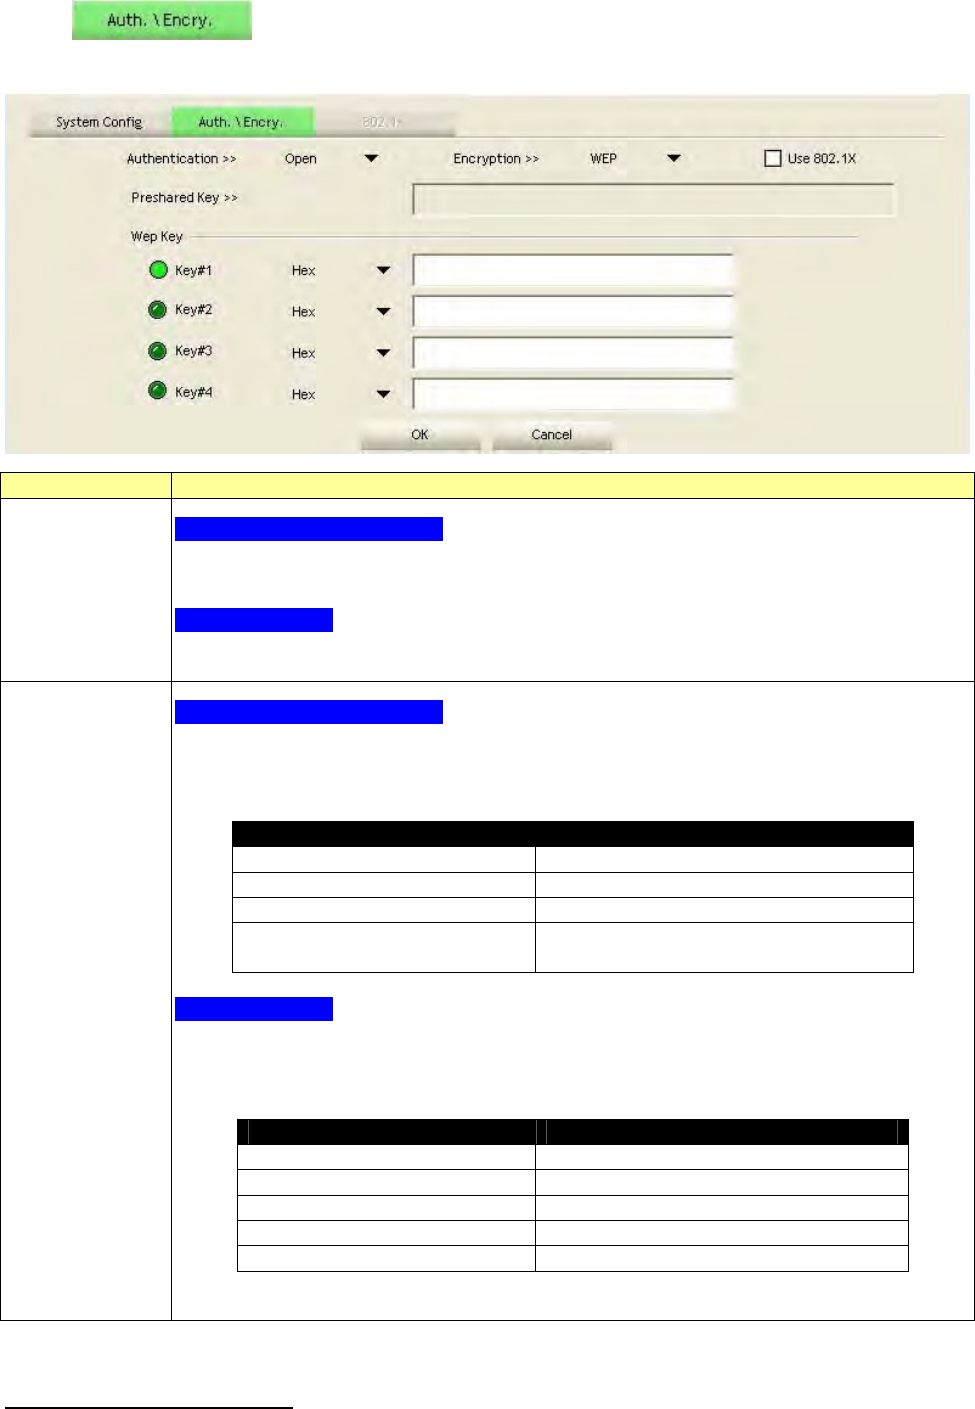
4. I n sect ion, select an encrypt ion type and fill in t he corresponding wireless
net work inform ation:
I tem s I n for m a t ion
Au t he n t ica t ion
Type
For W indow s 2 0 0 0 Use r
There are 7 t ypes supported: Open, Shared, LEAP, WPA, WPA- PSK, WPA2,
WPA2- PSK, and WPA-NONE1. Please select a type from t he drop down list .
For Vista User
There are 7 t ypes support ed: Open, Shared, WPA, WPA-PSK, WPA2, WPA2- PSK,
and CCKM. Please select a t ype from t he drop down list.
En cryp t ion
Type
For W indow s 2 0 0 0 Use r
There are 4 t ypes support ed: None, WEP, TKI P and AES.
The available encryption selection will differ from t he aut hent icat ion t ype you
have chosen, t he result is shown below:
Au t he n t ica t ion Availa ble Encrypt ion Select ion
Open NONE, WEP
Shared WEP
LEAP ( no selection)
WPA/ WPA2/ WPA-PSK
WPA2- PSK/ WPA- NONE
TKI P, AES
For Vista User
There are 6 t ypes support ed: None, WEP, TKI P, AES, TKI P ( MFP) and AES ( MFP) .
The available encrypt ion select ion will differ from t he authenticat ion t ype you
have chosen, t he result is shown below:
Au t he n t ica t ion Availa ble Encrypt ion Select ion
Open NONE, WEP
Shared WEP
WPA/ WPA-PSK/ WPA2-PSK TKI P, AES
WPA2 TKI P, AES, TKI P( MFP) , AES( MFP)
CCKM WEP, TKI P, AES
1 WPA- NONE is only available in Ad- hoc m ode.

January 13, 2009 / Ver sion: 2.0 14
Use 8 0 2 .1 x
This checkbox appears while t he environm ent is set t o an Open aut henticat ion
with WEP encrypt ion. Mark the checkbox t o m ake the sect ion
available. The sect ion is also available in WPA and WPA2
aut henticat ion t ypes.
Preshar e d Ke y
This is the shared secret between AP and STA. For WPA- PSK, WPA2-PSK and
WPA- NONE aut henticat ion m ode, t his field m ust be filled wit h characters longer
t han 8 and less t han 32 lengt hs. The follow ing dialog appears if you have input
invalid values.
W EP Ke y
Only available when using WEP encrypt ion algorit hm . The key m ust m at ch AP's
key. Select Hex1 or ASCI I 2 to set up t he key value. The follow ing dialog appears
if you have input invalid values.
1 Hex adecim al digit s consist of t he num bers 0- 9 and t he let t ers A- F.
2 ASCI I ( Am er ican Standard Code for I nform at ion I nt erchange) is a code for represent ing English let ters as num bers
from 0- 127.
January 13, 2009 / Ver sion: 2.0 15
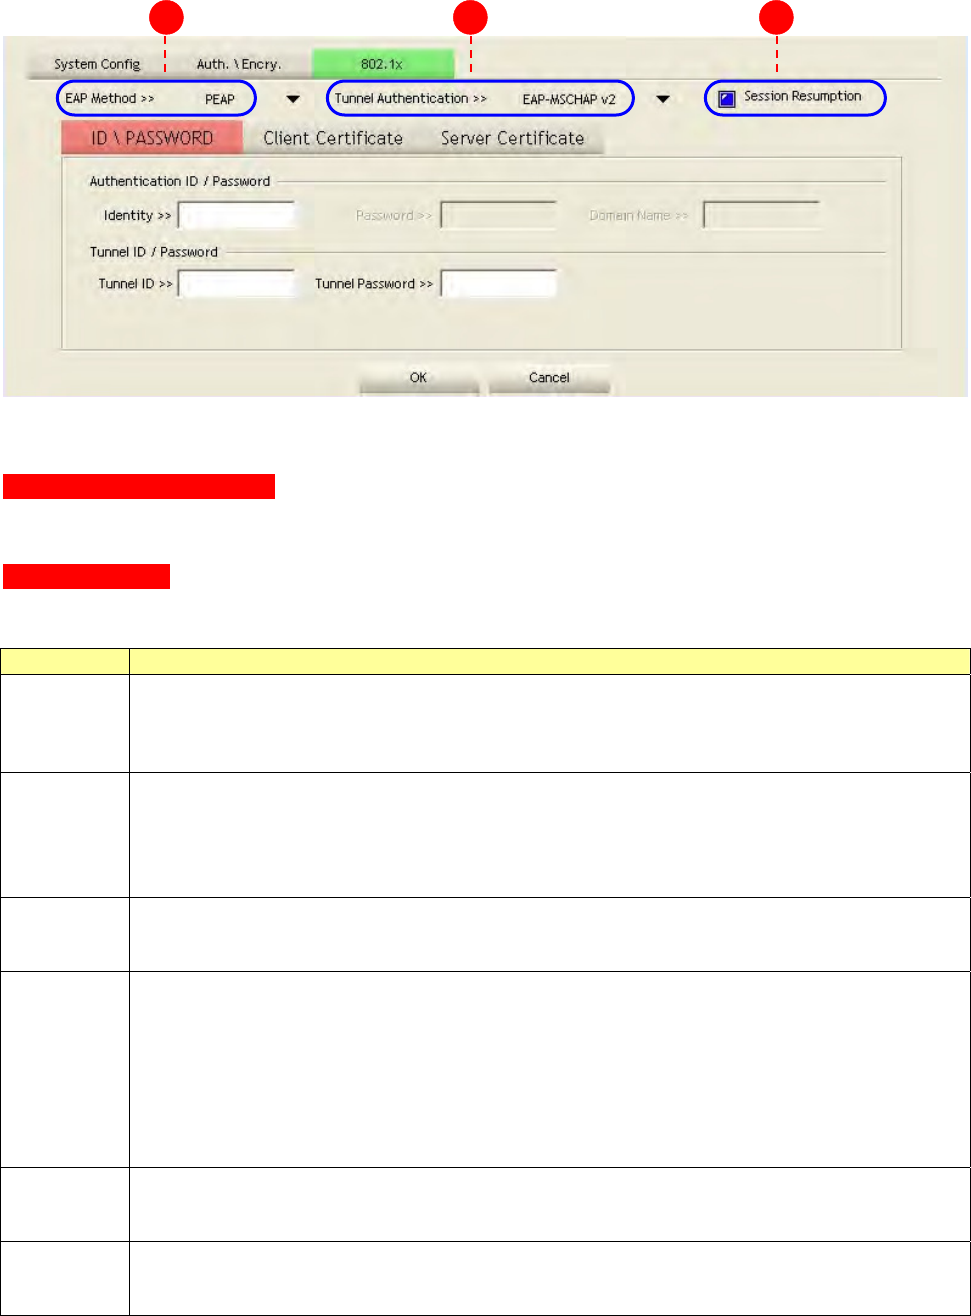
5. Specify the 802.1x inform at ion if you are using t he 802.1X cert ificat ion m ethod.
Users that do not use this function or connect ing to an open-wireless network please skip t his
part.
A. EAP M e t hod:
For W indow s 2 0 0 0 User: There are t ot al 5 m odes: PEAP, TLS/ Sm art Card, TTLS, EAP- FAST, and
MD5- Challenge.
For Vista User: There are t otal 4 m odes: PEAP, TLS/ Sm art Card, EAP- FAST, and LEAP.
Please select an EAP m ethod from t he drop down list .
I tem s I n for m a t ion
PEAP
Prot ect Extensible Aut hent icat ion Prot ocol. PEAP t ransport securely authent icates
data by using t unneling bet ween PEAP clients and an aut henticat ion server. PEAP can
aut hent icate wireless LAN client s using only server- side cert ificates, t hus sim plifying
the im plem ent ation and adm inistrat ion of a secure wireless LAN.
TLS/ Sm a r t
Card
Transport Layer Security. Provides for cert ificat e-based and m ut ual authenticat ion of
t he client and t he net work. I t relies on client- side and server-side cert ificates to
perform aut hent icat ion and can be used t o dynam ically generat e user-based and
session- based WEP keys t o secure subsequent com m unications bet ween the WLAN
client and t he access point .
TTLS
Tu n n e l e d Tr a n s p o r t L a y e r S e c u r i t y. Th is securit y m et hod provides for
cert ificat e- based, m ut ual aut hent ication of t he client and net work t hrough an
encrypt ed channel. Unlike EAP-TLS, EAP-TTLS requires only server- side cert ificates.
EAP- FAST
Flexible Aut hent icat ion via Secure Tunneling. I t was developed by Cisco. I nst ead of
using a cert ificat e, m utual authent ication is achieved by m eans of a PAC ( Pr ot ect ed
Access Credential) which can be m anaged dynam ically by t he aut hent ication server.
The PAC can be supplied ( dist ribut ed one t im e) t o the client either m anually or
aut om at ically. Manually, it is delivered to the client via disk or a secured net work
distribut ion m et hod. Autom atically, it is supplied as an in- band, over the air,
distribut ion. For tunnel aut henticat ion, only support " Generic Token Card"
aut hentication.
MD 5 -
Challe nge
Message Digest Challenge. Challenge is an EAP authent icat ion t ype t hat provides
base-level EAP support. I t provides for only one- way authentication - t here is no
m ut ual aut hent icat ion of wireless client and the net work.
LEAP
Light Extensible Authent ication Protocol is an EAP aut henticat ion type used prim arily
by Cisco Aironet WLANs. I t encrypt s dat a transm issions using dynam ically generated
WEP keys, and supports m ut ual aut hent icat ion.
A
B C
January 13, 2009 / Ver sion: 2.0 16
B. Tunnel Aut he n t ica tion: The t unnel authenticat ion will differ from t he EAP m et hod you
have chosen, t he result is shown below:
For W indow s 2 0 0 0 User:
EAP M et hod Tunnel Authe n t ica tion
PEAP EAP- MSCHAP v2 , EAP-TLS/ Sm art Card, Generic Token Card
TLS/ Sm art Card ( no selection)
TTLS CHP, MS- CHAP, MS- CHAP-V2, PAP, EAP- MD5
EAP- FAST Generic Token Card
MD5-Challenge ( no selection)
For Vista User:
EAP M et hod Tunnel Authe n t ica tion
PEAP EAP- MSCHAP v2 , EAP-TLS/ Sm art Card, Generic Token Card
TLS/ Sm art Card ( no selection)
EAP- FAST ( no selection)
LEAP ( no
selection)
C. Se ssion Resum pt ion : Mark t o enable t his function or unm ark it to disable.
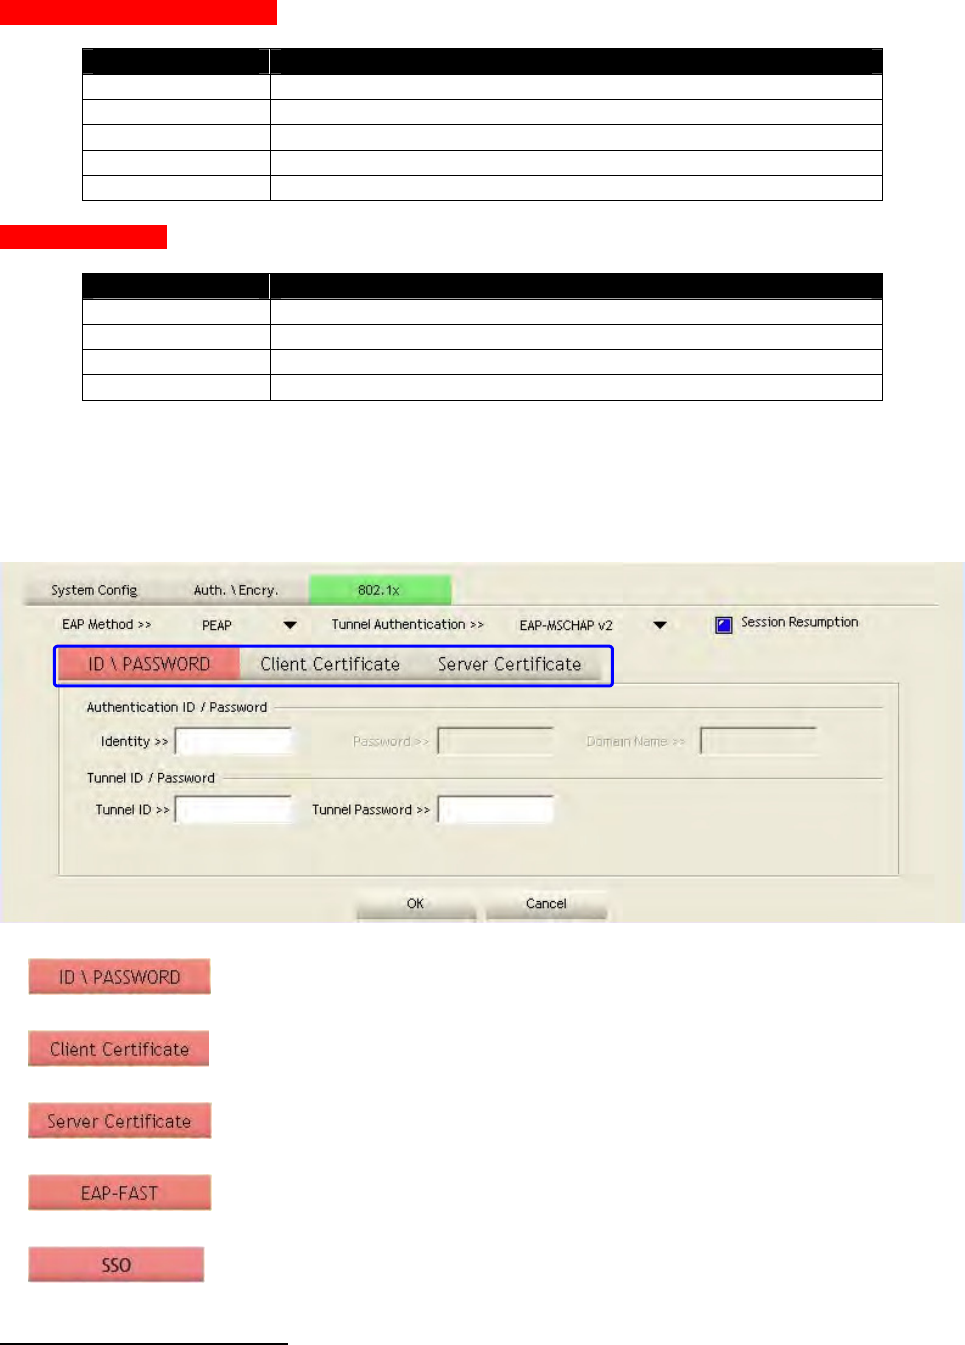
Aft er doing t he above settings, please click on the t abs below. There are several t abs on the
window, please fill in t he inform at ion gradually.
Set tings for: Authent icat ion I D/ Password, Tunnel I D/ Password and
Password Mode1.
Set tings for using t he Client Cert ificat e function or not .
Set tings for using t he Server Cert ificate funct ion or not .
Set ting for EAP- FAST m ethod.
Set tings for Single Sign On. N ot e : This tab only appears in Vista
system .
1 Password m ode is only available in EAP- FAST m et hod.
← Click on t hese t a bs
January 13, 2009 / Ver sion: 2.0 17
ID \ PASSWORD
I tem s I nform at ion
Au t he n t ica tion I D / Pa ssw ord The ident ity, password and dom ain nam e for server. Only
"EAP- FAST" and "LEAP" aut henticat ion can be keyed in
dom ain nam e. Blank space can be keyed in dom ain nam e.
Tunne l I D / Pa ssw or d I dent ity and Passw ord for server.
Passw ord M ode Select the power save m ode.
For W indow s 2 0 0 0 User
There are t wo select ions: Soft Token and St atic Password.
For Vista User
There are four selections: Soft Token, St atic Password,
Windows Logon and Prom pt User.
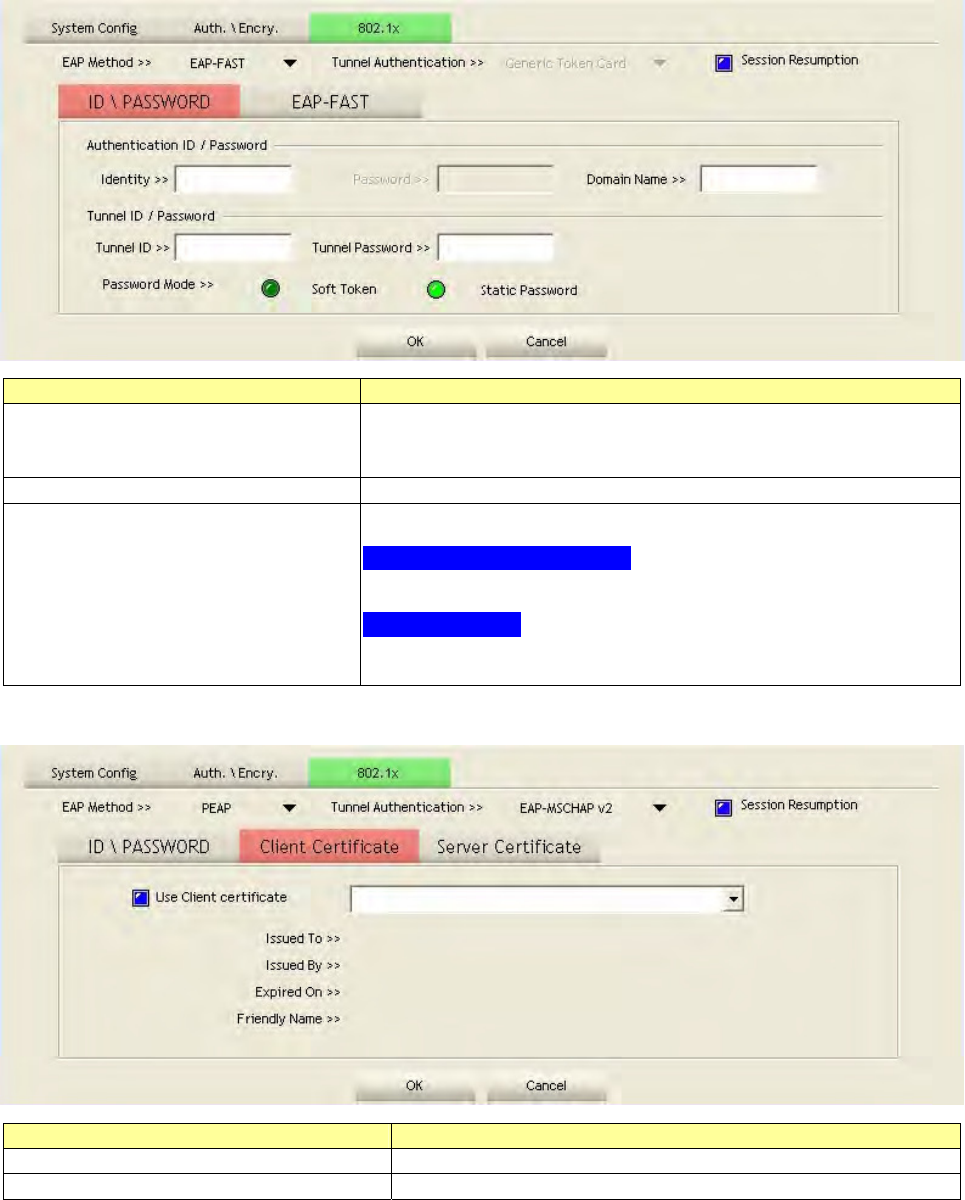
Client Certificate
I tem s I n for m a t ion
Use Client cer t ificat e Client cert ificate for server authent ication.
Use m y sm a rt card Client cert ificate for server authent ication.

January 13, 2009 / Ver sion: 2.0 18
Server Certificate
I tem s I n for m a t ion
Use Ce rt ificat e cha in Mark t he checkbox t o enable using cert ificat ion chain.
Allow in t im idat e cert ifica tes Mark to allow int im idat es certificat ion.
Server nam e Enter an aut hent ication sever root .
EAP Fast
I tem s I n for m a t ion
Allow una ut hent icat ed
pr ov ision m ode
During t he PAC can be provisioned ( dist ribut ed one t im e) to
t he client aut om at ically. I t only support ed " Allow
unaut henticat ed provision m ode" and use " EAP- MSCHAP v2"
aut henticat ion t o aut hent icat e now. I t causes to cont inue wit h
the est ablishm ent of t he inner t unnel even t hough it is m ade
with an unknown server. Mark t o enable unaut henticat ed
provision m ode.
Use prot ect ed
aut he n t ica tion
cr ed en t ia l
Use protected aut hent ication credential: Using PAC, the
cert ificat e can be provided t o t he client m anually via disk or a
secured net work dist ribution m et hod. Mark t o use protected
aut henticat ion credential.
January 13, 2009 / Ver sion: 2.0 19
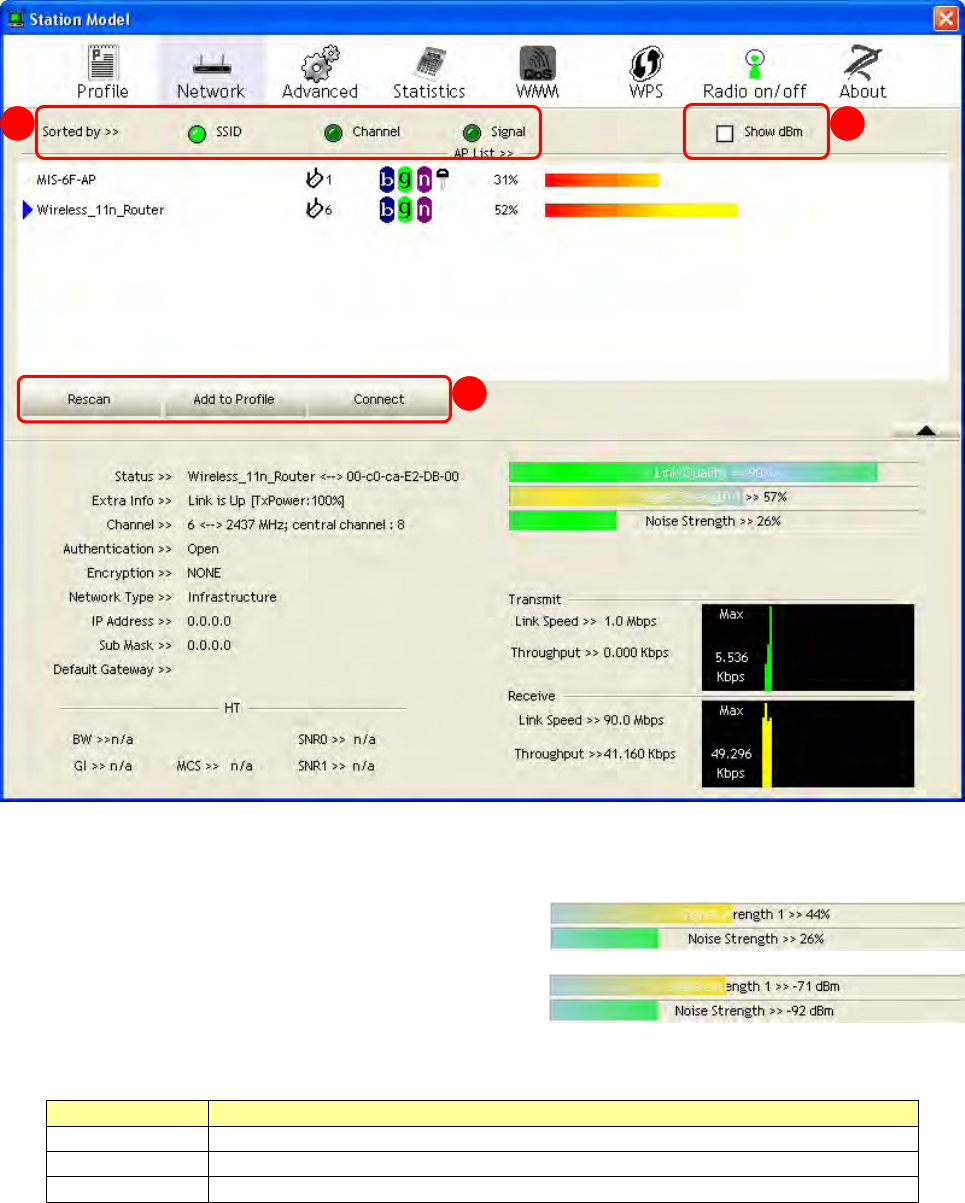
Network
This network lists the available wireless net w orks. The Ut ilit y connects t o a wireless net w ork with
best signal st rengt h aut om at ically. You can change t he connecting network by clicking on the
net work nam e and click t he Con ne ct butt on. To see detail inform at ion of each network, please
double click on each it em t o pop up t he inform ation w indow.
A. Sort e d by: Click each butt on t o sort t he list ing net w orks by SSI D, channel and Signal
st rengt h.
B. Show dBm : Mark t he checkbox t o show the
signal and noise st rengt h in dBm , unm ark to
show in percentage.
C. But t ons: You can click on t hese but tons t o add a
new profile, edit, delet e or activat e an old profile.
I tem s I n for m a t ion
Re sca n To rescan available wireless net works.
Connect To connect t o a designat ed net work.
Add t o Pr ofile To add a network to profile aft er selecting a net work.
A
B
C
January 13, 2009 / Ver sion: 2.0 20
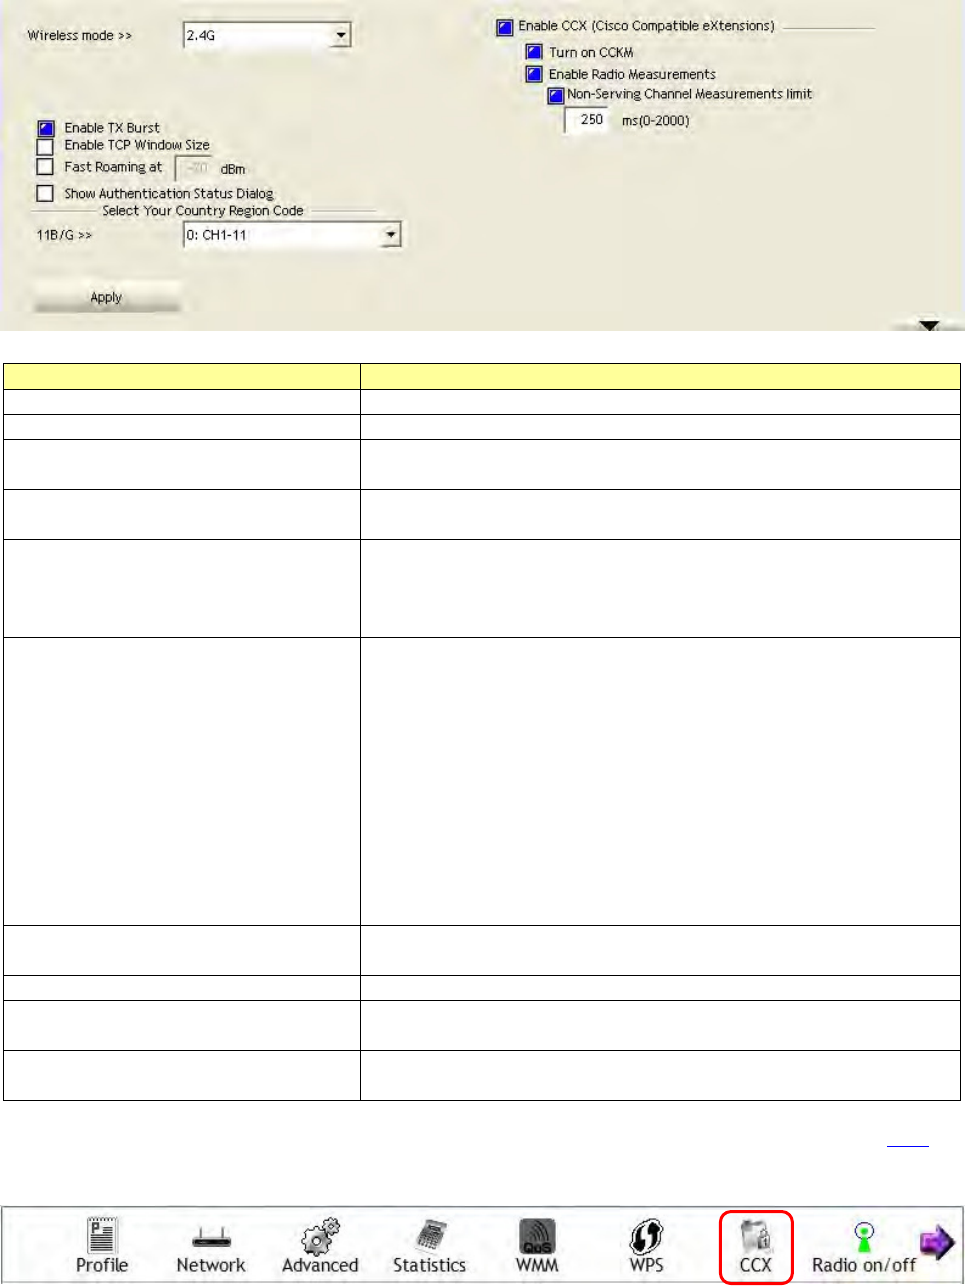
Advanced
This page provides advanced configurations t o this adapt er. Please refer t o t he follow ing chart for
definit ions of each it em .
I tem s I nfor m a t ion
W ireless m ode Select wireless m ode. 2.4G/ 5.2G&5.8G is support ed.
Ena ble TX Bur st Select to enable connecting to a TX Burst supported device.
Ena ble TCP W indow Size Mark t he checkbox t o enable TCP window size, which help
enhance t hroughput .
Fast Roa m ing a t _ _ dBm Mark the checkbox t o enable fast roam ing. Specify t he
transm it power for fast roam ing.
Show Aut he n t icat ion St atus
Dialog
Mark the checkbox to show “Aut henticat ion Stat us Dialog”
while connect ing to an AP with aut hent icat ion.
Aut henticat ion Stat us Dialog displays t he process about
802.1 x authenticat ions.
Select Your Coun t ry Re gion
Code
Eight count ries t o choose. Channel list :
1 ~ 11 channels (North America)
1 ~ 13 channels (General Europe)
1 ~ 14 channels (Japan)
IEEE802.11a
4 Channels (Japan)
19 Channels (Europe)
13 Channels (USA)
Ena ble CCX ( Cisco Com pat ible
ext ensions)
Select t o enable CCX. This funct ion can only be applied
when connect ing t o a Cisco com pat ible device.
Turn on CCKM Mark to enable CCKM.
Ena ble Ra dio M easur e m e nt s Mark to enable channel m easurem ent every 0~ 2000
m illiseconds.
N on- Servin g Channel
Me a sur e m e n t s lim it
Mark to revise t he channel m easurem ent.
N ote : For Vist a user, click on the CCX butt on t o do m ore configurat ion. Please refer to CCX for
m ore inform at ion.
January 13, 2009 / Ver sion: 2.0 21
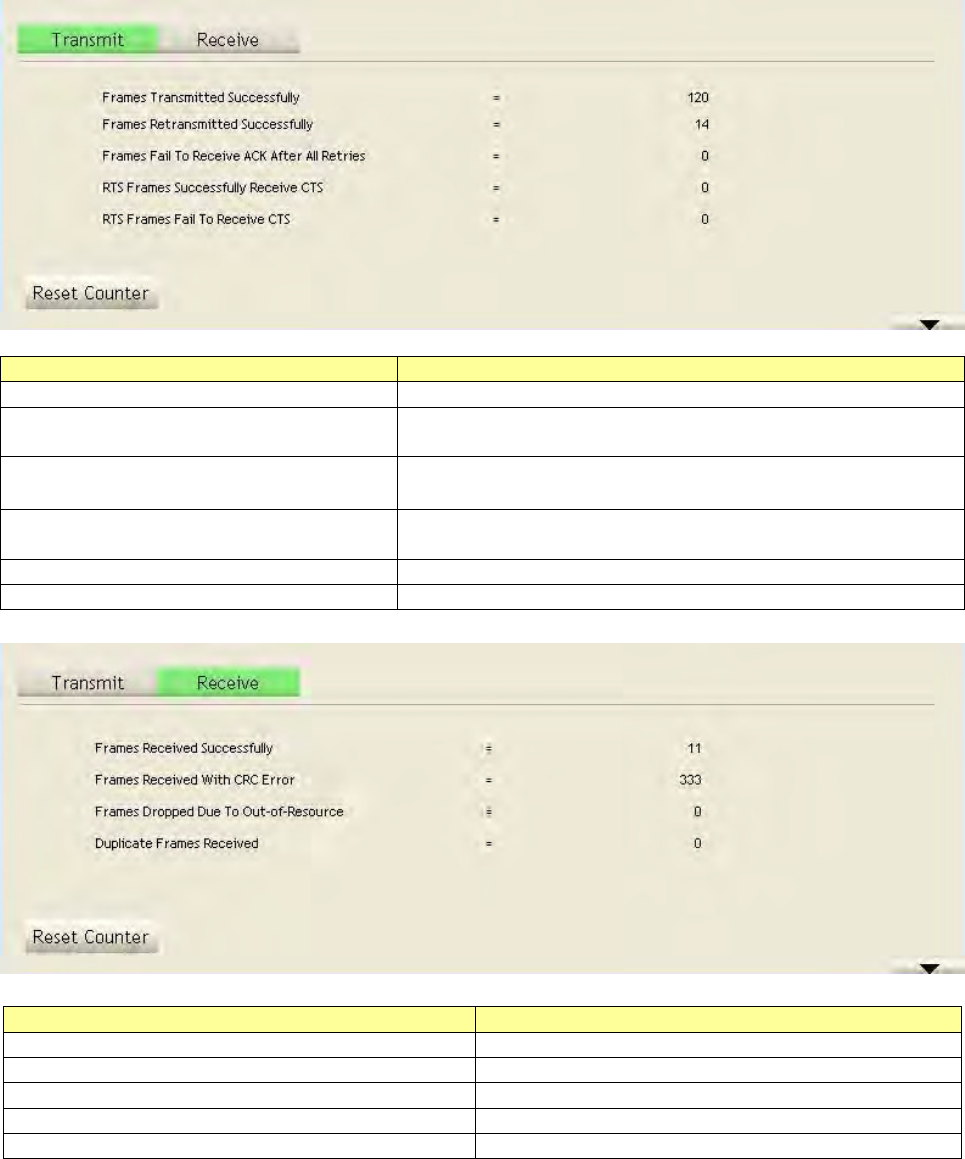
Statistics
St atist ics page displays t he detail count er inform at ion based on 802.11 MI B count ers. This page
translat es t he MI B count ers int o a form at easier for user t o understand.
I tem s I nfor m a t ion
Fram es Transm itt ed Successfully Fram es successfully sent.
Fram e s Ret r a nsm it t ed
Successfully
Successfully ret ransm itt ed fram es num bers.
Fram es Fail To Re ceive ACK Aft er
All Re t ries
Fram es failed t ransm it aft er hit ting ret ry lim it .
RTS Fr a m e s Successfully Receive
CTS
Successfully receive CTS aft er sending RTS fram e.
RTS Fr a m e s Fa il To Re ce ive CTS Failed to receive CTS aft er sending RTS.
Re set Coun t er Reset count ers to zero.
I tem s I n for m a t ion
Fra m e s Received Succe ssfully Fram es received successfully.
Fram es Receive d W it h CRC Er r or Fram es received wit h CRC error.
Fram es Dropped D ue To Out- of- Resource Fram es dropped due t o resource issue.
Duplicat e Fr a m e s Received Duplicat e received fram es.
Re set Coun t er Reset count ers to zero.
January 13, 2009 / Ver sion: 2.0 22
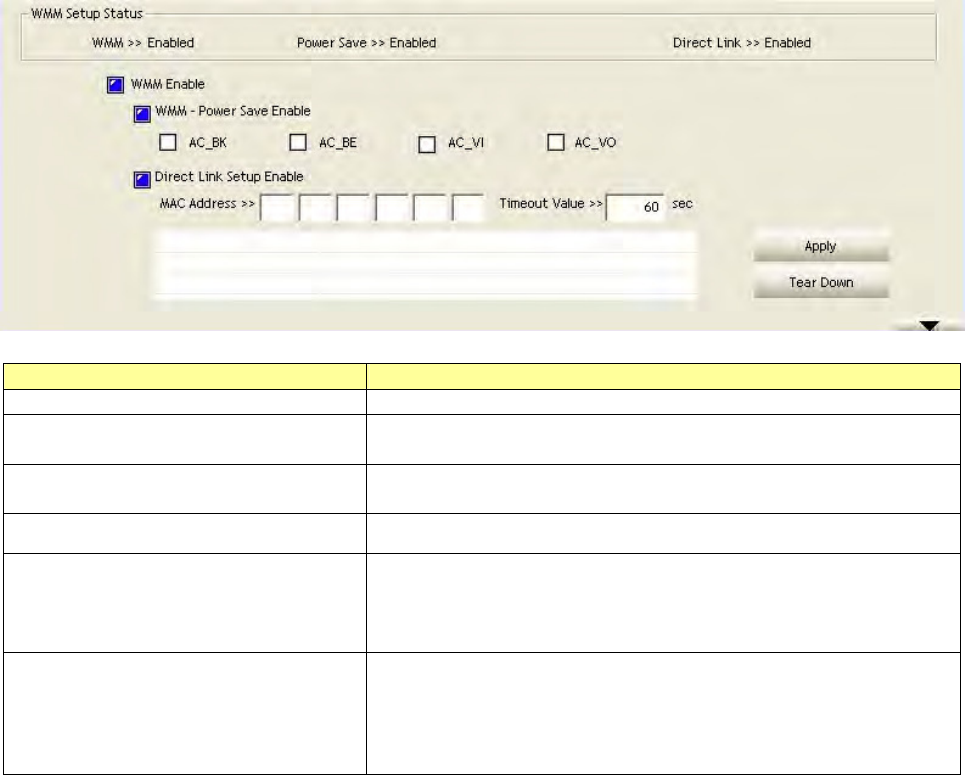
WMM
Th is p ag e al l ow s u ser s t o act iv a t e t h e W MM f u n ct i o n f or t h i s d ev i ce. Pl e a se n o t e t hat t h i s f u n ct io n
only works w hile connecting t o a WMM com pat ible device.
I tem s I n for m a t ion
W M M Enable Enable Wi- Fi Mult i- Media.
W M M - Pow e r Sa ve Ena ble Enable WMM Power Save. Please enable WMM before
configuring this funct ion.
Direct Link Se tup Ena ble Enable DLS ( Direct Link Set up) . Please enable WMM before
configuring this funct ion.
MAC Addre ss Fill in the blanks of Direct Link wit h MAC Address of STA.
Tim e out Value Tim e of aut om at ically disconnect aft er som e seconds. The
value is int eger. The int eger m ust be between 0~ 65535. I t
represent s that it always connect s if t he value is zero.
Default value of Tim eout Value is 60 seconds.
Apply / Tear D ow n After fill in the "MAC Address" and "Tim eout Value" , click
"Apply" but ton to save your configurat ion. The result will
appear in the following " DLS Stat us" blanks. To rem ove
t he configurat ion, please select t he configurat ion in the
blanks and t hen click " Tear Down" but t on.
January 13, 2009 / Ver sion: 2.0 23
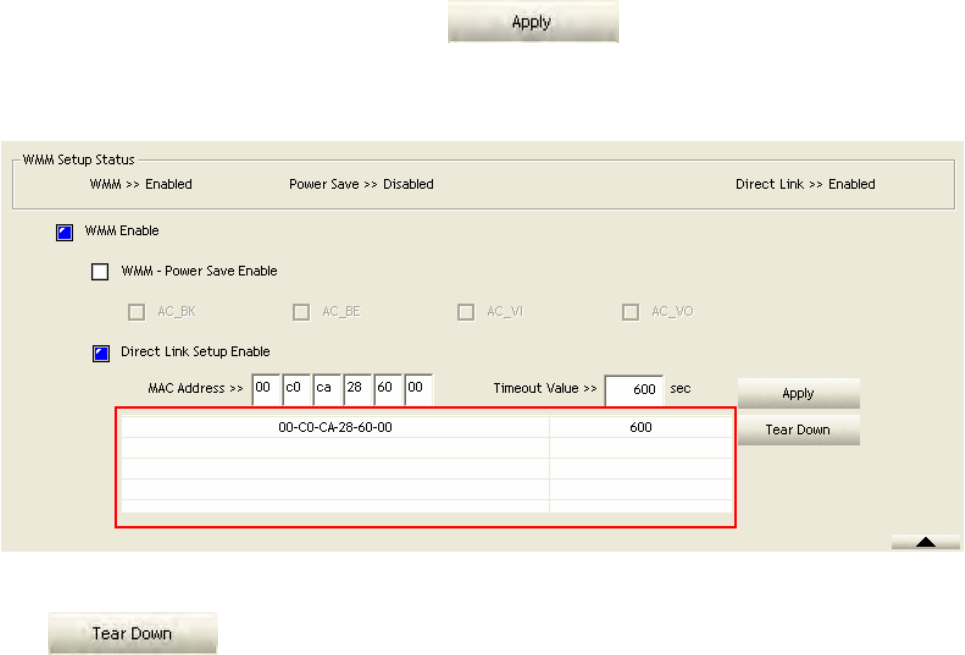
St e ps t o e n a ble Direct Link Set u p fu n ct ion :
1. Click t he " Direct Link Set up Enable" checkbox.
2. Change to "Net work" function. Add an AP t hat supports DLS features t o t he Profile.
3. Fill in the blanks of Direct Link wit h MAC Address of STA. The STA m ust conform to t hese two
condit ion s:
y Connect wit h an AP that support s DLS feat ures.
y Ensure that DLS is enabled
4. Fill in t he Tim eout Value and t hen click .
5. Aft er configuring the DLS successfully, the MAC address and Tim eout Value are displayed in
t he "DLS St atus" .
6. I f you want t o disconnect Direct Link Setup, select the list in “ DLS St atus” and t hen click on t he
butt on.
DLS Sta t us
January 13, 2009 / Ver sion: 2.0 24
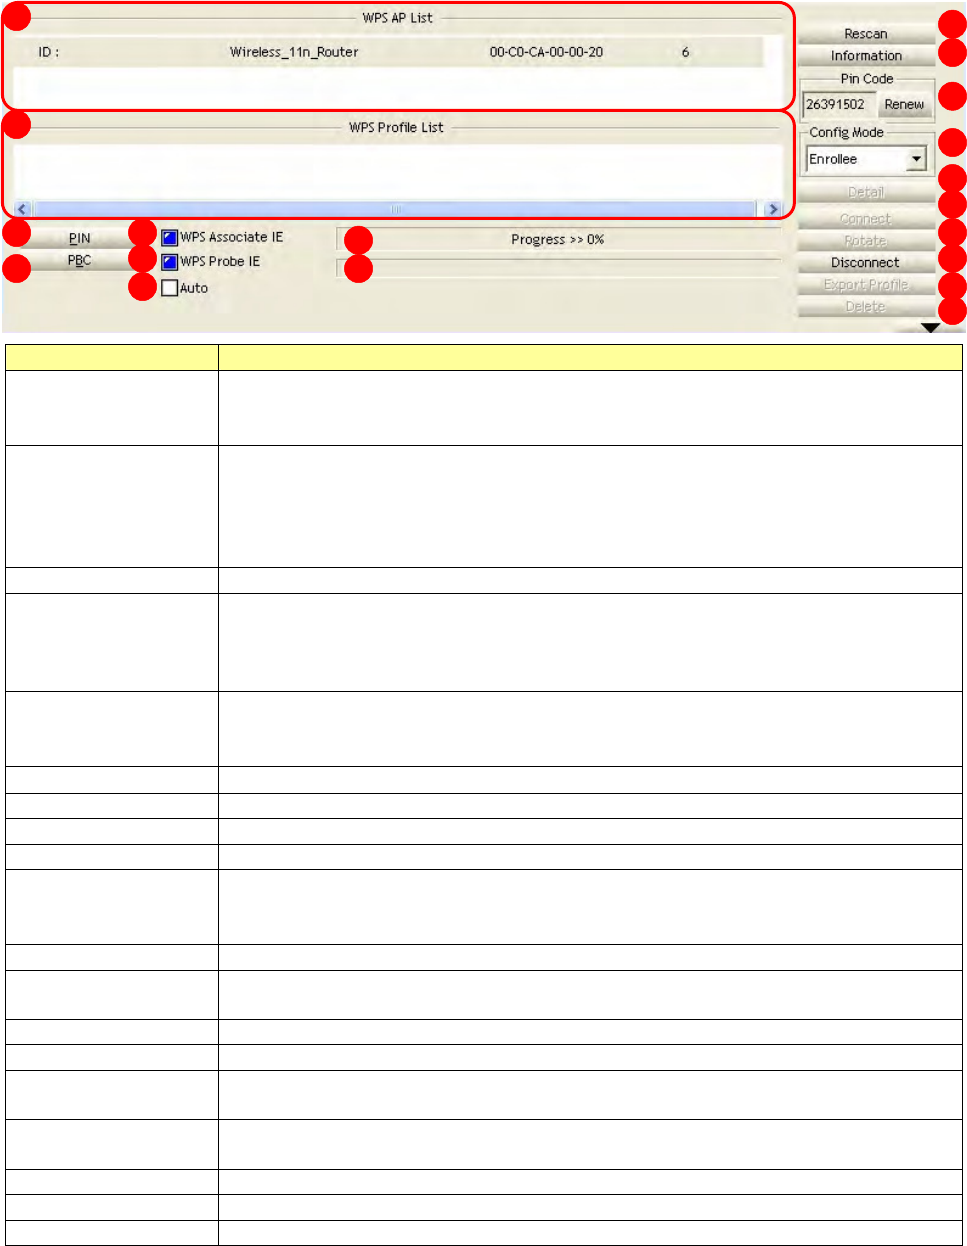
WPS
The prim ary goal of Wi- Fi Prot ect ed Set up ( Wi- Fi Sim ple Configurat ion) is t o sim plify t he security
set up and m anagem ent of Wi- Fi networks. This adapter supports t he configurat ion set up using
PI N configurat ion m ethod or PBC configurat ion m et hod through an internal or ext ernal Regist rar.
I tem s I n for m a t ion
1 . W PS AP List Display the inform at ion of surrounding APs with WPS I E from last scan
result . List inform at ion includes SSI D, BSSI D, Channel, I D ( Device
Password I D) , and Securit y- Enabled.
2 . W PS Profile
List
Display all of credent ials got from the Regist rar. List inform at ion includes
SSI D, MAC Address, Aut henticat ion and Encrypt ion Type. I f STA Enrollee,
credent ials are creat ed as soon as each WPS success. I f STA Regist rar,
Ut ility creat es a new credent ial wit h WPA2- PSK/ AES/ 64Hex- Key and
doesn't change until nex t sw it ching t o STA Registrar.
3 . Rescan Click t o rescan the wireless networks.
4 . I n for m a t ion Display t he inform at ion about WPS I E on t he selected network. List
inform ation includes Aut henticat ion Type, Encryption Type, Config
Met hods, Device Password I D, Selected Registrar, St ate, Version, AP Set up
Locked, UUI D- E and RF Bands.
5 . Pin Code 8- digit num bers. I t is required t o ent er PI N Code int o Registrar using PI N
m ethod. Each Network card has only one PI N Code of Enrollee. Click on t he
Renew button to renew t he PI N code.
6 . Config Mode Enrollee or an ext ernal Registrar.
7 . Deta il I nform at ion about Securit y and Key in t he credential.
8 . Connect Com m and to connect t o t he select ed network inside credent ials.
9 . Rot a te Com m and to connect to t he next net work inside credent ials.
10. D isconnect Stop WPS act ion and disconnect t his act ive link. And then select t he last
profile at t he Profile Page of Utilit y if exist s. I f t here is an em pt y profile
page, t he driver w ill select any non- securit y AP.
11. Export Profile Click t he " Export Profile" but ton will export t he WPS profile.
12. Delete Delet e an existing credent ial. And t hen select t he next credent ial if exist. I f
there is an em pty credent ial, t he driver will select any non- securit y AP.
13. PI N St art to add t o Registrar using PI N configurat ion m et hod.
14. PBC St art to add t o AP using PBC configuration m ethod.
15. W PS
associate I E
Send t he associat ion request wit h WPS I E during WPS setup. I t is optional
for STA.
16. W PS probe I E Send t he probe request wit h WPS IE during WPS setup. It is optional for
STA.
17. Auto Select t he AP aut om at ically.
18. Progress Bar Display rat e of progress from Start t o Connect ed st at us.
19. St a t us Bar Display currently WPS Stat us.
1
2
1 3
1 4
1 5
1 6
1 7
3
4
5
6
7
8
9
1 0
1 1
1 2
1 8
1 9
January 13, 2009 / Ver sion: 2.0 25
The following descript ion divides int o four part s:
A. W PS I nfor m a tion on AP
B. Exam ple of Adding t o Re gistr a r Using PI N Met hod
C. Exam ple of Adding t o Re gist r a r Using PI N Me t hod
D. Exam ple of Configuring a N e tw ork / AP Using PI N or PBC Me t hod

January 13, 2009 / Ver sion: 2.0 26
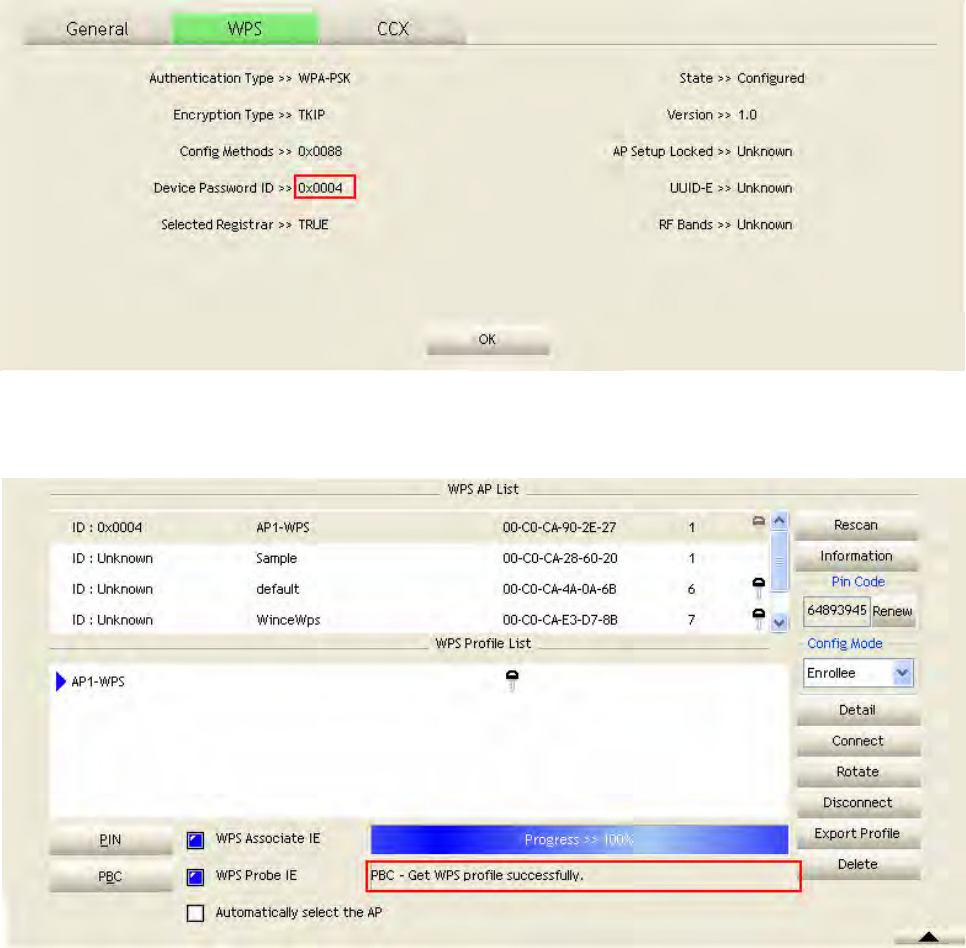
A. W PS I nfor m a tion on AP: On Network AP list, double click on t he AP t hen you can see the
inform ation appears below.
I tem s I n for m a t ion
Au t he n t ica tion Type There are three authent ication m odes supported by t his ut ility. They are
open, Shared, WPA-PSK and WPA system .
En cryp t ion Type For open and shared aut henticat ion m ode, t he selection of encryption
type are None and WEP. For WPA, WPA2, WPA- PSK and WPA2- PSK
aut henticat ion m ode, t he encryption t ype support s both TKI P and AES.
Config Met hods Correspond to the m et hods the AP supports as an Enrollee for adding
ext ernal Regist rars. (a bitwise OR of values)
Device Passw ord I D I ndicates the m et hod or identifies t he specific password that the selected
Registrar intends t o use. APs in PBC m ode m ust indicate 0x0004 wit hin
two- m inut e Walk Tim e.
Selecte d Re gist r a r Indicates if t he user has recently activated a Registrar t o add an Enrollee.
The values are "TRUE" and "FALSE".
St a t e The current configuration st at e on AP. The values are "Unconfigured"
and "Configured".
Version WPS specified version.
AP Set up Lock ed I ndicat es if t he AP has ent ered a setup locked stat e.
UUI D- E The universally unique ident ifier ( UUI D) elem ent generated by the
Enrollee. This is a 16 byt e value.
RF Ba nds I ndicat es all t he RF bands available on t he AP. A dual- band AP m ust
provide it . The values are "2.4GHz/ 5.8GHz" and "5GHz" .
January 13, 2009 / Ver sion: 2.0 27
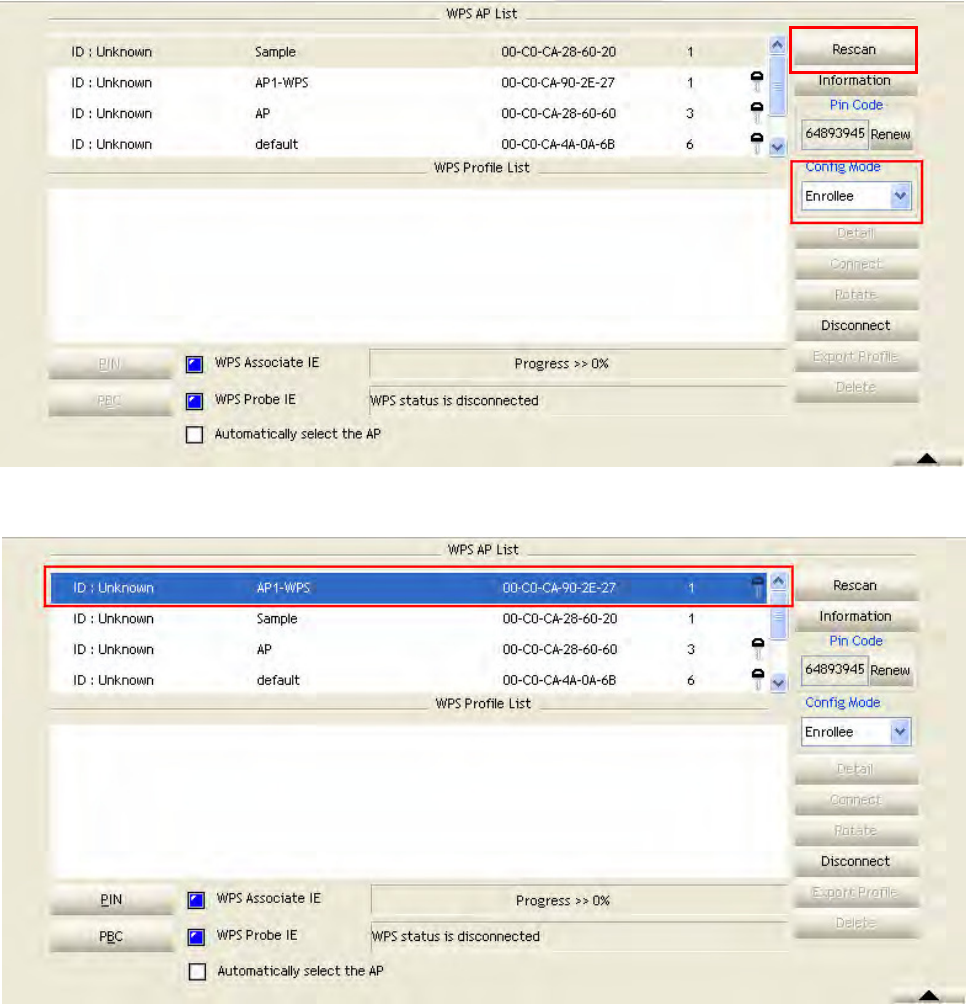
B. Exam ple of Adding t o Re gistr a r Using PI N Met hod
The user obtains a device password ( PI N Code) from t he STA and ent ers the password into the
Regist rar. Both t he Enrollee and t he Regist rar use PI N Config m ethod for the configurat ion set up.
Please follow t he step below.
1. Select "Enrollee" from t he Config Mode drop- down list .
2. Click " Rescan" t o updat e available WPS APs.
3. Select an AP ( SSI D/ BSSI D) t hat STA will j oin t o.
January 13, 2009 / Ver sion: 2.0 28
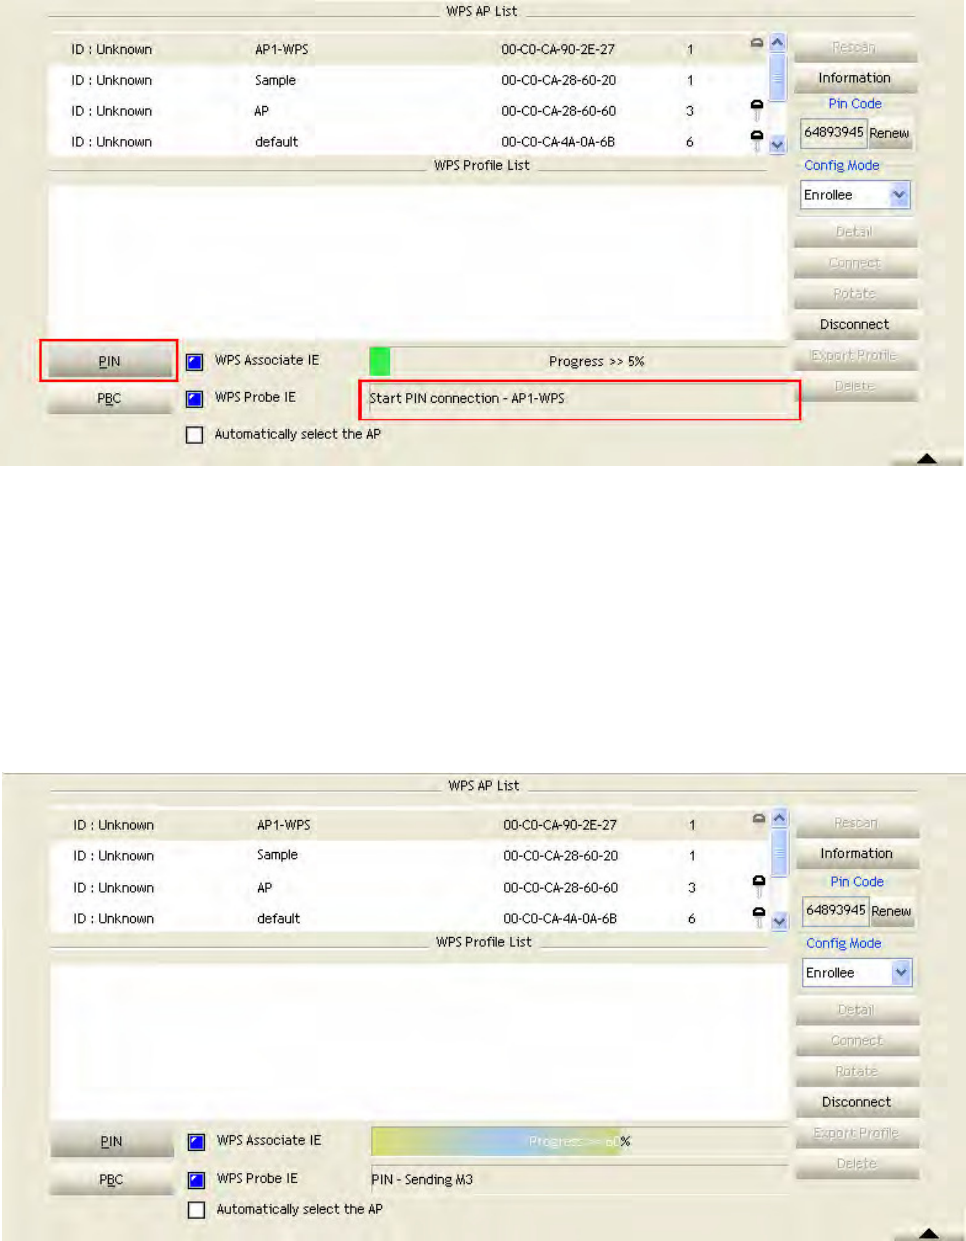
4. Click " PI N" t o ent er t he PI N.
5. Ent er t he PI N Code of t he STA int o t he Registrar when prom pt ed by t he Regist rar.
N ot e :
y Allow of an exchange between Step 4 and Step 5.
y I f you use Microsoft Window Connect ion Now as an Ext ernal Regist rar, you m ust start
PI N connection at STA first. Aft er t hat , search out your WPS Device nam e and MAC
address at Microsoft Regist rar. Add a new device and ent er PI N Code of STA at Microsoft
Regist rar when prom pted.
6. The result should appear as the im age below.

January 13, 2009 / Ver sion: 2.0 29
7. Configure one or m ore credent ials. Then connect successfully.
8. Click " Det ail." You can see the figure below.
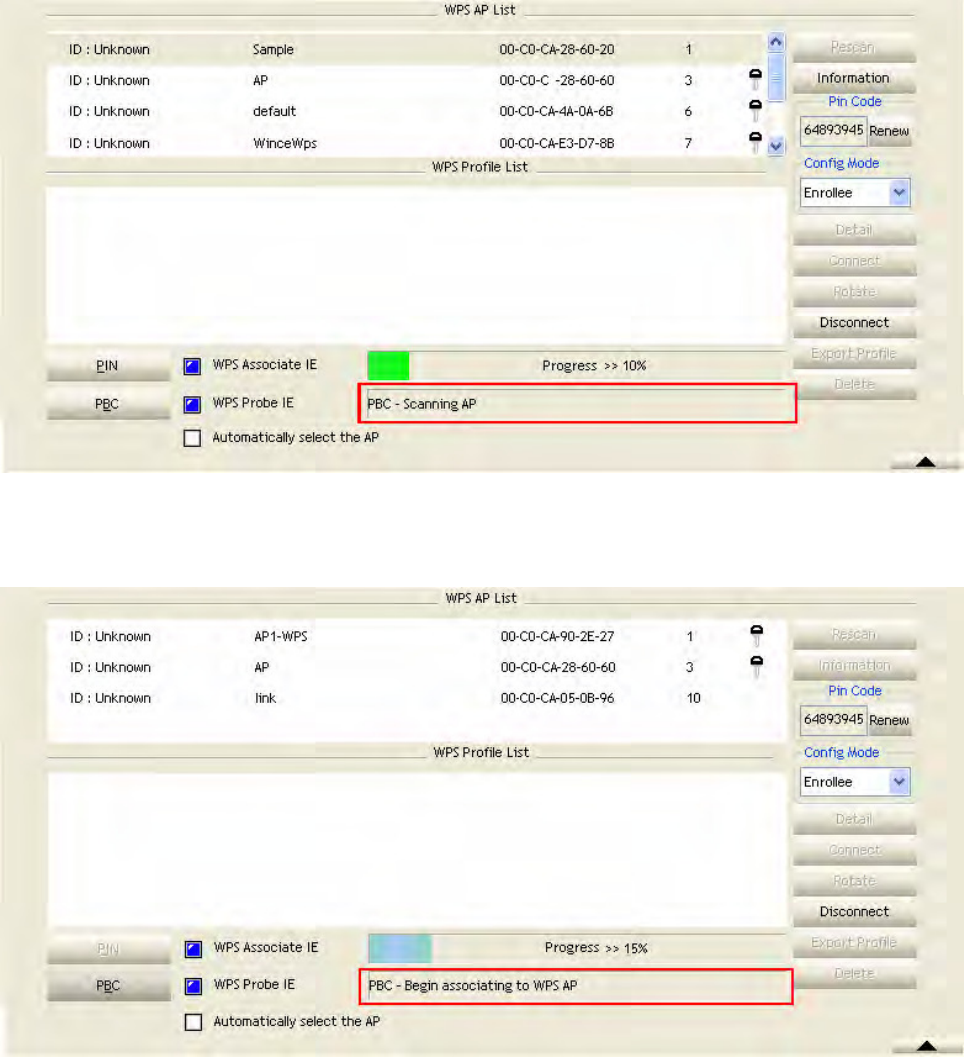
C. Exam ple of Adding t o the Regist rar Using t he PBC M e t hod
The PBC m ethod requires t he user t o press a PBC but ton on both t he Enrollee and t he Regist rar
wit hin a t w o- m inute int erval called t he Walk Tim e. I f there is only one Regist rar in PBC m ode, t he
PBC m ode select ed is obt ain ed f r om I D 0 x 0 00 4, and is f ou n d af t er a com p let e scan . Th e En r ollee
can t hen im m ediat ely begin running t he Registrat ion Prot ocol.
I f t he Enrollee discovers m ore t han one Regist rar in PBC m ode, it MUST abort it s connect ion
at t em pt at t his scan and cont inue searching unt il t he two- m inut e tim eout .
N ot e : Before you press PBC on STA and candidate AP. Mak e su r e all APs ar en ' t PBC m od e or APs
using PBC m ode have left t heir Walk Tim e. The user can configure WPS profiles with eit her PI N
m ethod or PBC m et hod.
Please follow t he steps below.
January 13, 2009 / Ver sion: 2.0 30
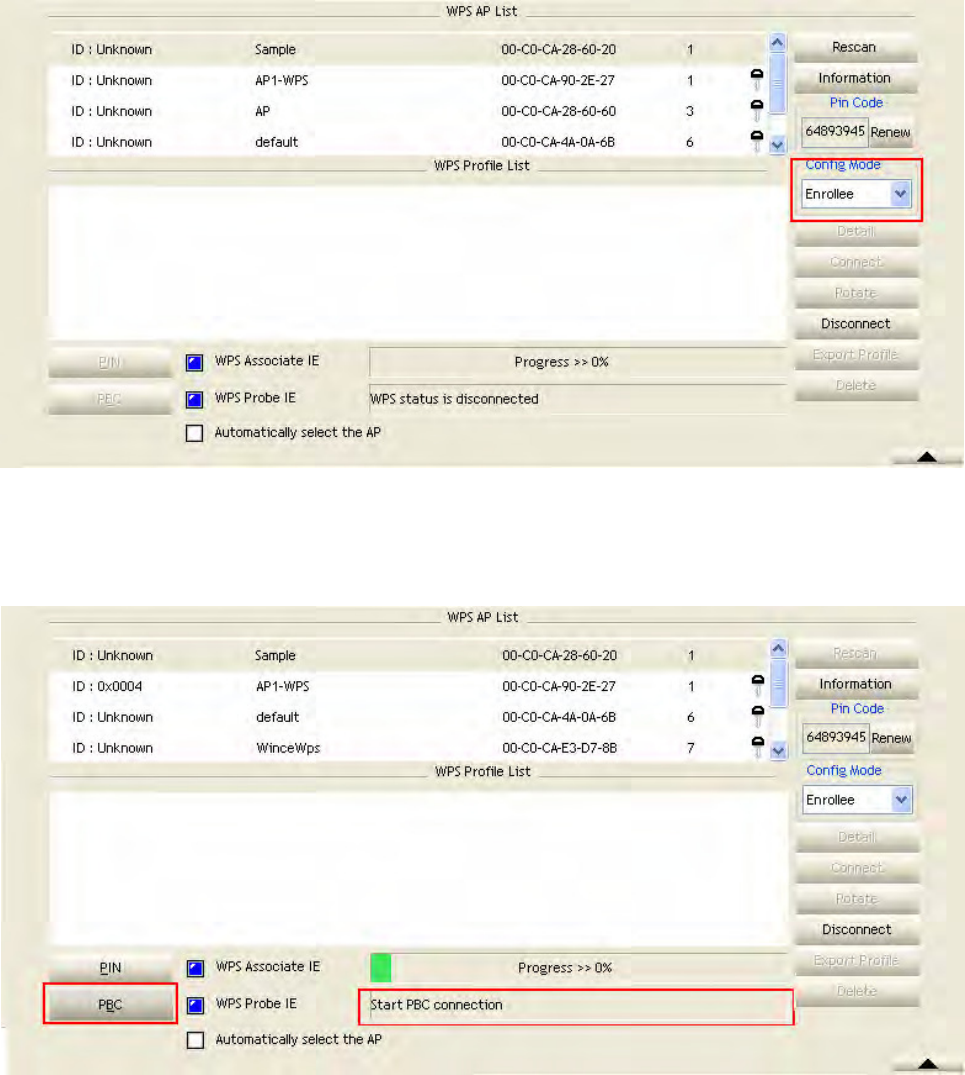
1. Select " Enrollee" from t he Config Mode drop- down list.
2. Click PBC to st art the PBC connection.
3. Push the PBC on AP.
N ot e : Allow tim e for an exchange between Step 2 and St ep 3.
January 13, 2009 / Ver sion: 2.0 31
4. The progress bar as shown in t he figure below indicates that scanning progress.
5. When one AP is found, j oin it.
January 13, 2009 / Ver sion: 2.0 32
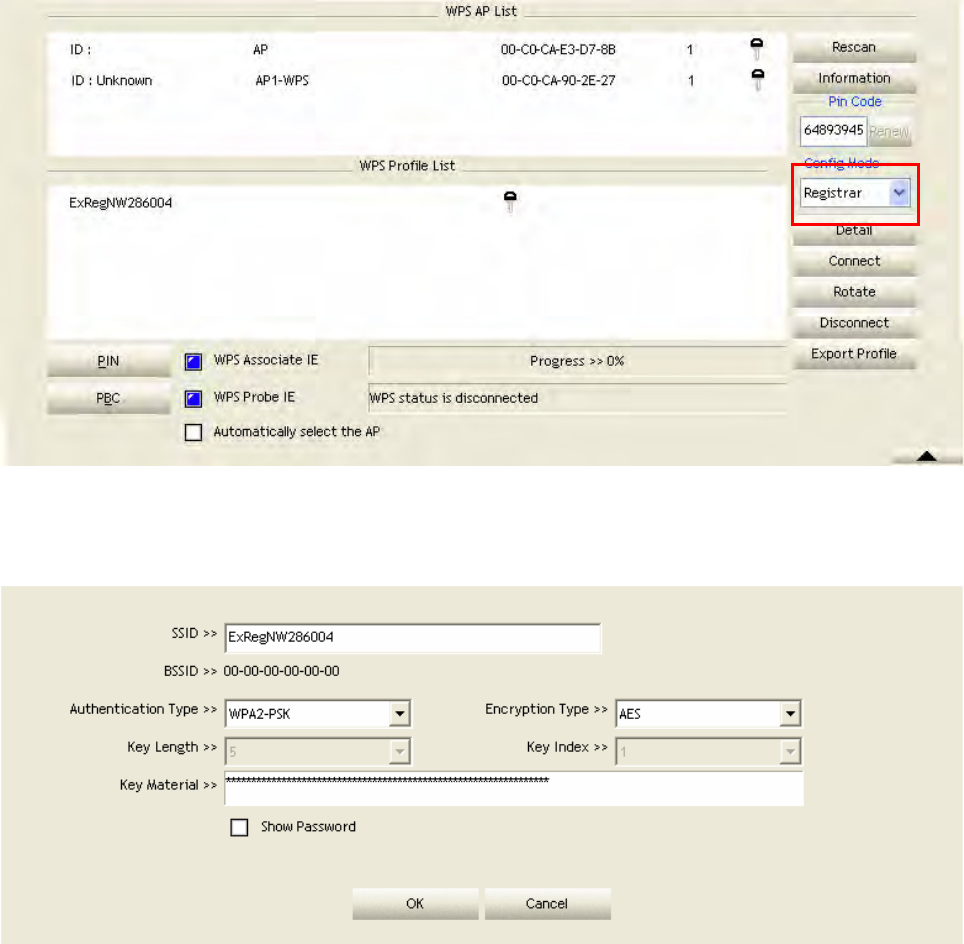
6. Check WPS I nform ation on t he available WPS APs.
7. Configure and receive one or m ore credential( s).Then connect successfully. The result will be
displayed as it is in t he figure below.
January 13, 2009 / Ver sion: 2.0 33
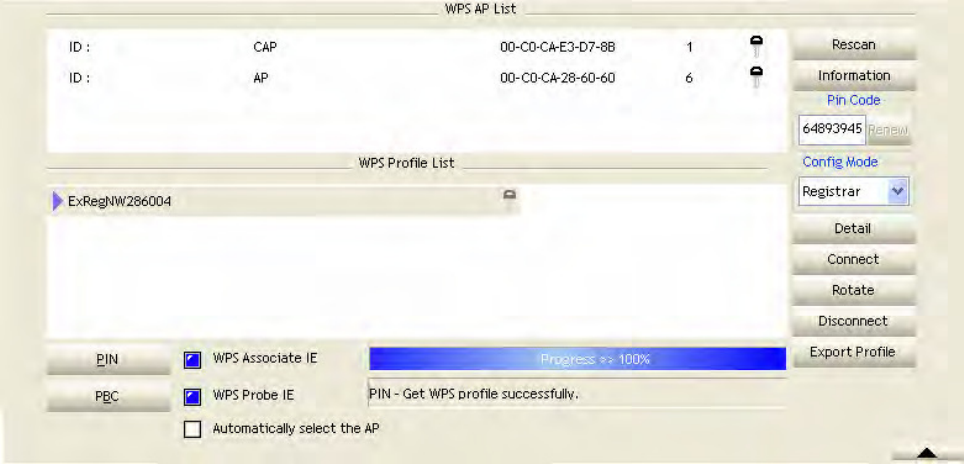
D. Exam ple of Configuring a N e tw ork / AP Using PI N or PBC Me t hod
1. Select "Registrar" from t he Config Mode drop- down list .
2. Ent er t he det ails of t he credent ial and change configurations (SSI D, Aut henticat ion,
Encryption and Key) m anually if needed.
3. I f t he PI N configuration is set up, ent er t he PI N sent from t he Enrollee.
4. St art PI N or PBC. The following procedures are as sim ilar as section PI N Enrollee Setup or
PBC Enrollee Setup.
January 13, 2009 / Ver sion: 2.0 34
5. I f your AP Enrollee has been configured before the WPS process, the credential you set in
advance will be updat ed t o the AP it self. Ot herwise, after a successful registrat ion, t he AP
Enrollee will be re- configured wit h the new param et ers, and t he STA Regist rar will connect t o
the AP Enrollee wit h these new param et ers.

January 13, 2009 / Ver sion: 2.0 35
CCX
This page is available for Vist a user only . I t provides CCX configurat ions t o t his adapt er. Please
refer to t he following chart for definit ions of each item .
I tem s I n for m a t ion
Ena ble CCX ( Cisco Com pat ible
ext ensions)
Select t o enable CCX. This funct ion can only be applied
when connect ing t o a Cisco com pat ible device.
Turn on CCKM Mark to enable CCKM.
Ena ble Ra dio M easur e m e nt s Mark to enable channel m easurem ent every 0~ 2000
m illiseconds.
N on - Se rving Cha nnel
Me a sur e m e n t s lim it
Mark to revise t he channel m easurem ent.
N e tw ork EAP Enable the NetwrokEAP authenticat ion algorit hm .
Ena ble RF Roa m ing Enable RF roam ing funct ion
Ena ble CAC ( Tole r a nce ) Enable t he call adm ission cont rol
CAC There are four selections: ADDTS ( Directly send TS) , DELTS,
and RESET. Select an item from t he drop down list and then
click on the but t on.
Diagnosis Select a profile which the user want s t o diagnose, and t hen
click on t he Diagnose but t on t o perform the
test.
Radio On/Off
Click on t he but ton t o enable/ disable wireless connection stat us.
Connect ed:
Disconnect ed:
January 13, 2009 / Ver sion: 2.0 36
AP mode management guide for Windows 2000/XP/Vista
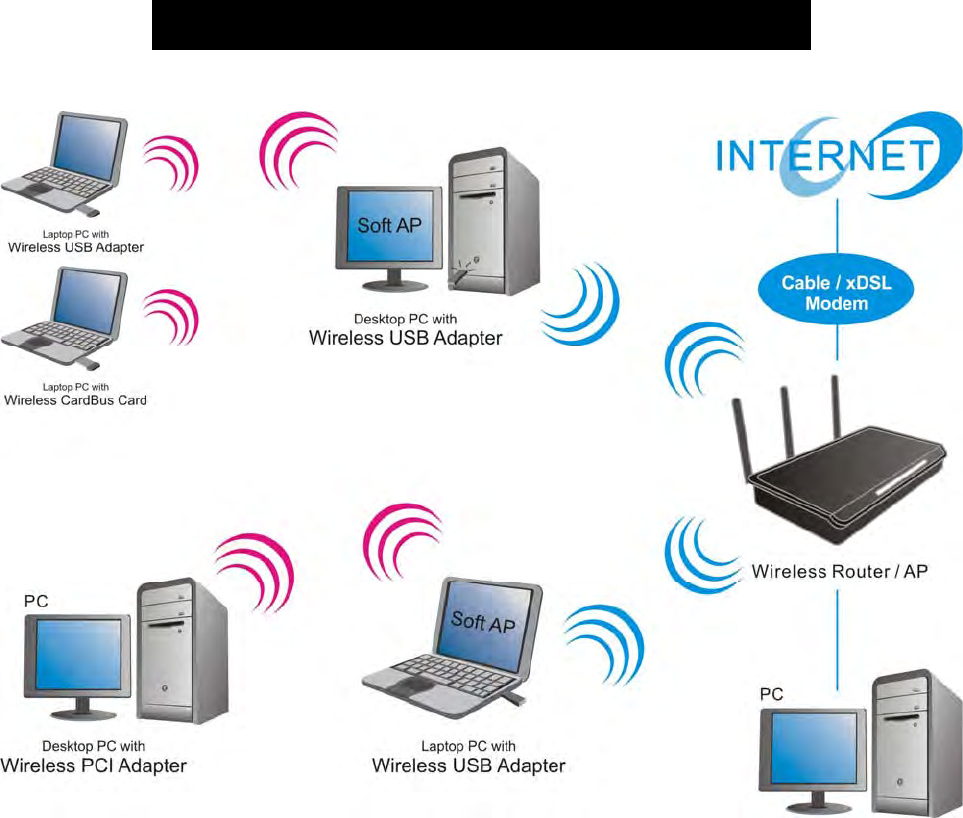
I f you wish t o share t he I nt ernet access with t he wireless st at ions in your environm ent , you can
configure this wireless adapt er as a soft ware access point ( Soft AP) . I n t his m ode, t his wireless
adapt er becom es the wireless access point t hat provides local area net work and I nt ernet access
for your wireless stat ions.
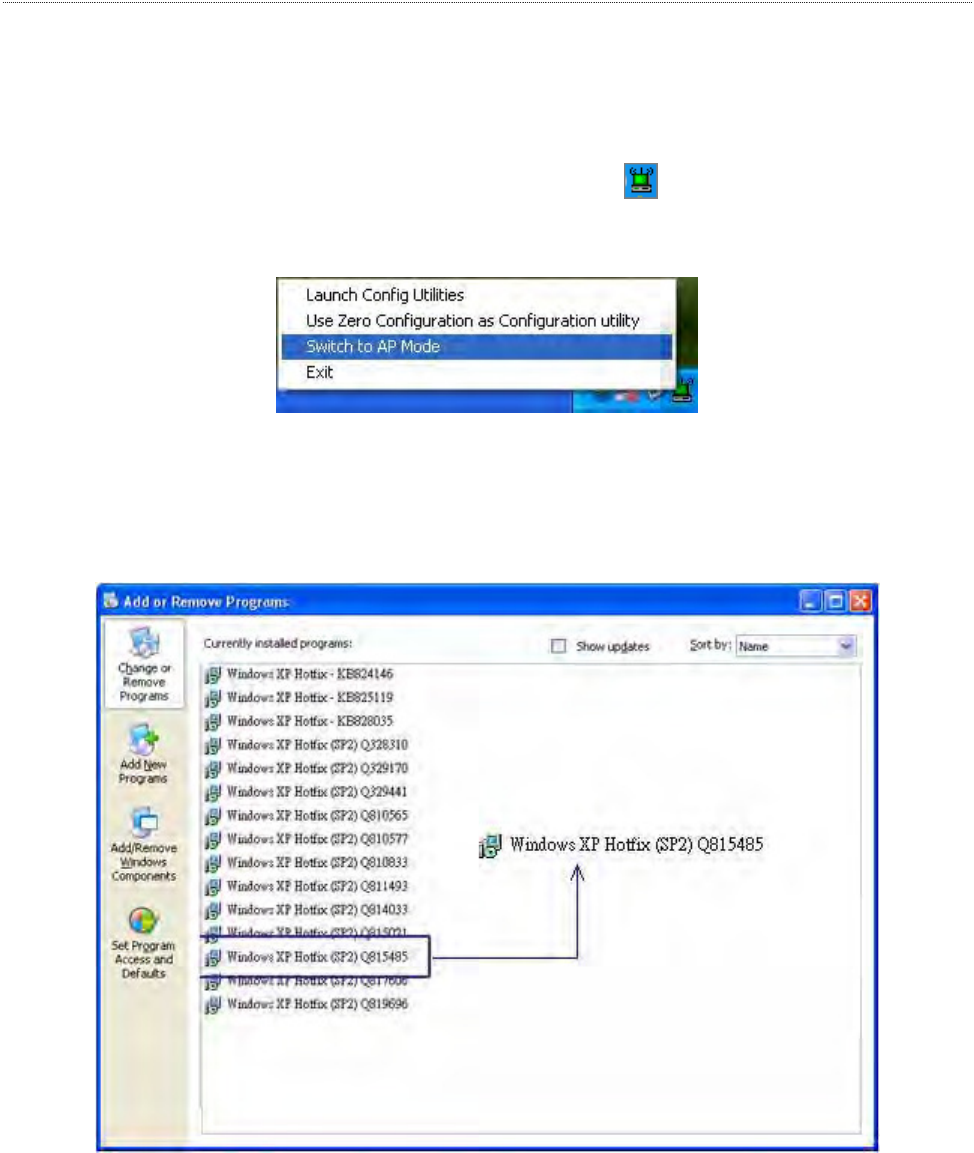
To use t his adapt er as an access point , please right click the icon on syst em tray and
select Sw it ch t o AP m ode. Please refer to the following int roduction and inform ation about this
AP- m ode ut ilit y.
N ot e : I n windows XP, it provides WPA support at hot fix Q815485. However; you have t o m ake
sure t hat hotfix Q815485 (require XP SP1 installed) has been installed in your system before you
can start using WPA feat ures. You can check t he inst allat ion of hot fix in add/ rem ove soft ware
page under cont rol panel.
January 13, 2009 / Ver sion: 2.0 37
Software Access Point (Soft AP) Application
January 13, 2009 / Ver sion: 2.0 38
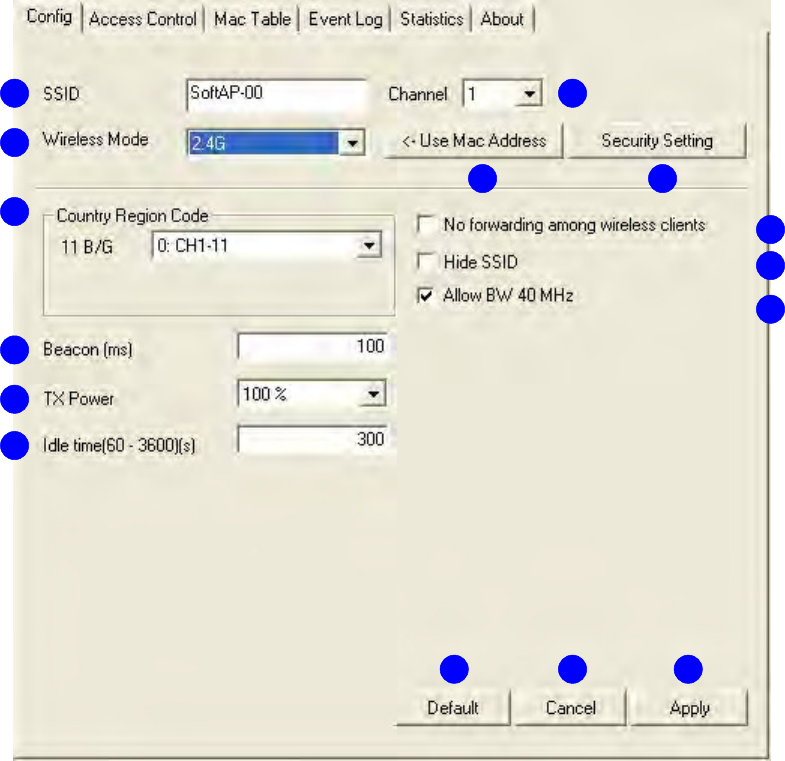
Config
This page provides overall configurat ion to t his adapt er. Please find t he following item s for
ident ification t o each field.
1 . SSI D: AP nam e of user t ype. User also can select [ Use Mac Address] t o display it .
2 . W ire le ss M ode: Select wireless m ode. Only 2.4G is support ed.
1
2
3
4
5
6
7
89
10
11
12
13 15 14
January 13, 2009 / Ver sion: 2.0 39
3 . Count ry Region Code : eight count ries to choose. Count ry channel list:
Classification Range
0: FCC ( Canada) CH1 ~ CH11
1: ETSI CH1 ~ CH13
2: SPAI N CH10 ~ CH11
3: FRANCE CH10 ~ CH13
4: MKK CH14 ~ CH14
5: MKKI (TELEC) CH1 ~ CH14
6: I SRAEL CH3 ~ CH9
7: I SRAEL CH5 ~ CH13
N ot e : Count ry Region code is not support for Vist a.
4 . Bea con ( m s) : The tim e bet ween two beacons. Syst em default is 100 m s.
5 . TX Pow e r : Manually force the AP t ransm its power. System default is 100% .
6 . I dle Tim e: Manually force the I dle Tim e using selected value. Default is 300.
7 . Cha n ne l: Manually force the AP using t he channel. Syst em default is channel 1.
8 . Use Mac Address: Use MAC address of used wireless card t o b e AP n am e. Sy st em d ef au l t is
APX ( X is last num ber of Mac Address) .
9 . Se curit y Se t t ing: Authenticat ion m ode and encryption algorithm used within the AP. System
default is no aut hent icat ion and encryption.
10. No forw arding a m ong w ire le ss clie n t s: I f t here is no beacon am ong t he wireless clients,
they can’t share inform ation wit h each ot her.
11. Hide SSI D : Prev en t t h is AP fr om r ecogn ized in w ir eless n et w or k. This is disabled as def ault .
12. Allow BW 4 0 MH z: Allow BW40 MHz capabilit y.
13. De fa ult : Use system default value.
14. Cance l: Cancel t he above changes.
15. Apply: Apply the above changes.
January 13, 2009 / Ver sion: 2.0 40
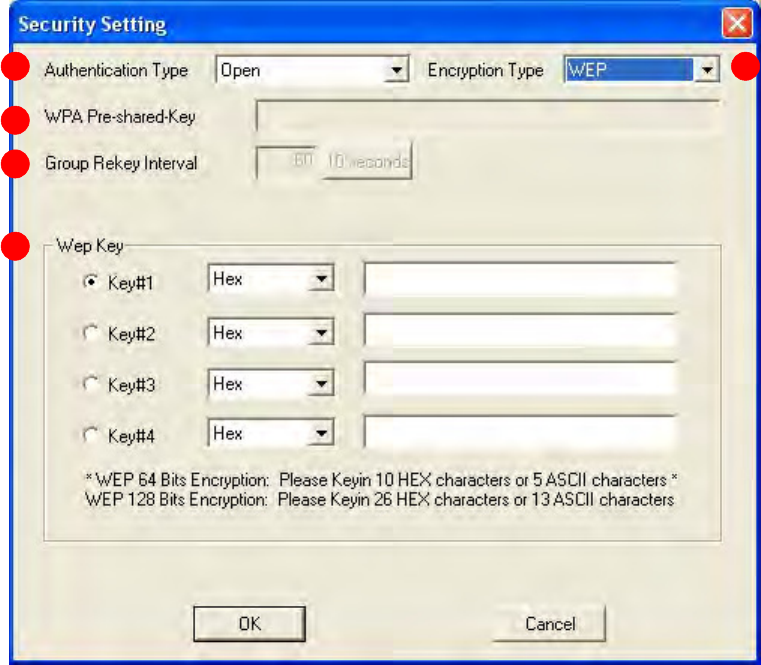
Security Setting
This page pops up aft er clicking t he Secur it y Se t t ing butt on. Please follow t he inst ructions
below:
1 . Au t hent icat ion Type: Select to be open, shared, WPA- PSK, WPA2-PSK, or WPA
PSK/ WPA2-PSK system .
2 . Encryption Type : Select an encryption t ype from the drop list .
3 . W PA Pr e - share d Key: A shared string bet ween AP and STA. For WPA-PSK
aut henticat ion m ode, t his field m ust be filled wit h character longer t han 8 and less
than 32 lengths.
4 . Group Re k ey I n t erval: Only valid when using WPA- PSK encrypt ion algorithm .
The key will change com pliance with seconds or beacon t hat user set .
5 . W EP Key: Only valid w hen using WEP encry pt ion algorithm . The key m ust m at ch
the key on AP. There are several form at s t o ent er the keys.
a. Hexadecim al (40bit s) : 10 Hex characters.
b. Hexadecim al ( 128bits): 32Hex charact ers.
c. ASCI I ( 40bit s) : 5 ASCI I characters.
d. ASCI I ( 128bit s) : 13 ASCI I characters.
1 2
3
4
5
January 13, 2009 / Ver sion: 2.0 41
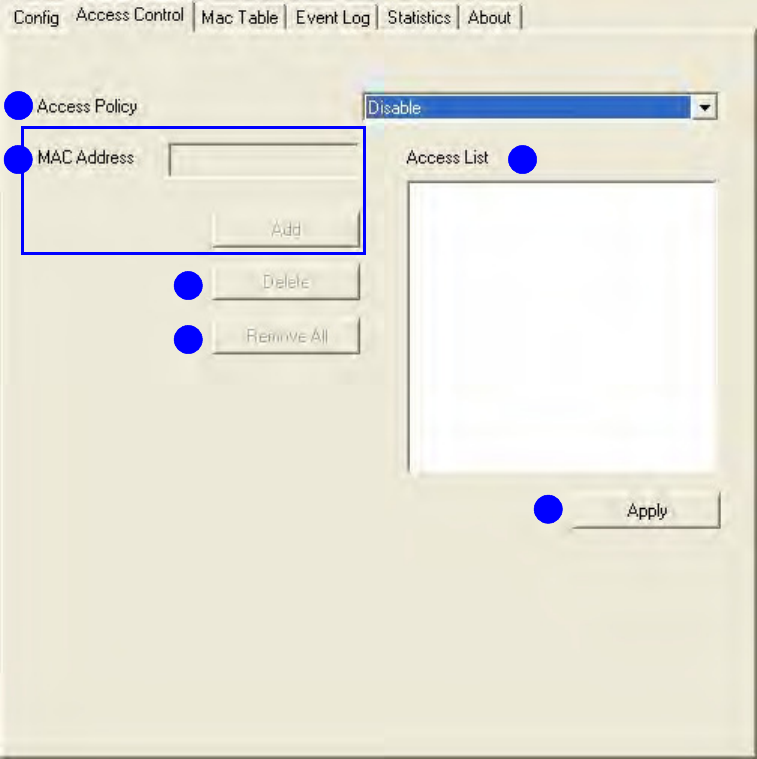
Access Control
This function filters users t o use this device by designat ing MAC address. Please refer t o the
following chart for int roduct ion.
1 . Access Policy: Choose a m et hod to process access cont rol from t he drop list to det erm ine
the MAC addresses that you designat ed are allowed to access t he AP or not .
2 . M AC Addr ess: Add allowed ( or denied) MAC addresses t o the MAC address list.
3 . Access List : Display all Mac Addresses t hat you designated.
4 . De le t e: Delet e Mac addresses t hat you selected.
5 . Rem ove All: Rem ove all Mac address in [ Access List] .
6 . Apply: Apply changes.
1
2 3
4
5
6
January 13, 2009 / Ver sion: 2.0 42
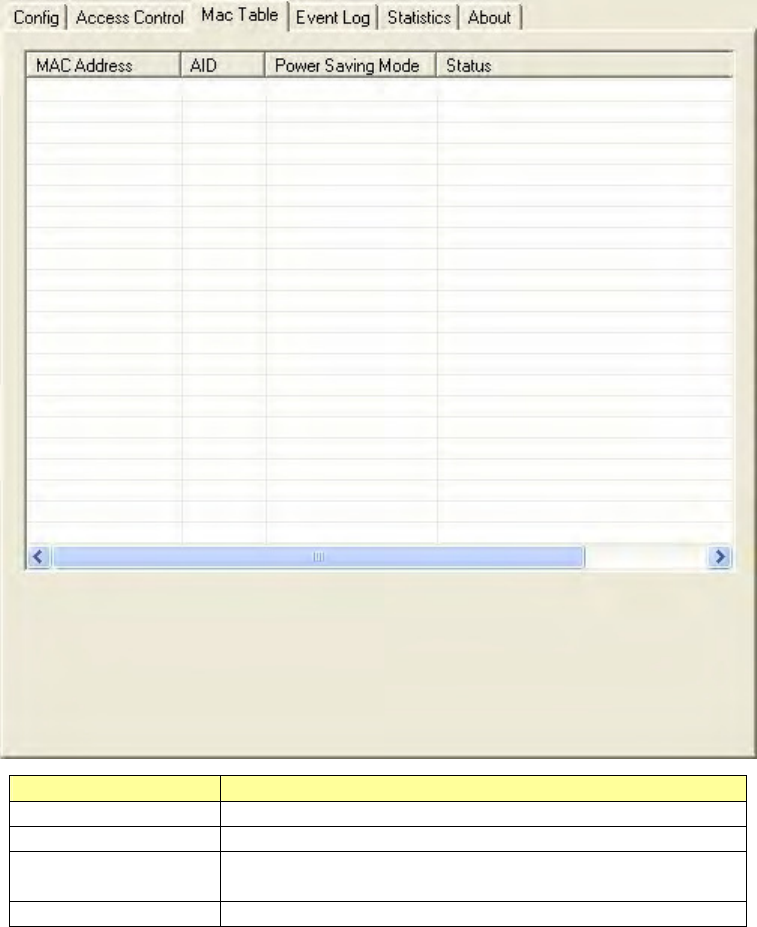
MAC Table
This page displays t he stat ion det ail inform at ion of current connection.
I tem s I n for m a t ion
MAC Addre ss The station MAC address of current connect ion.
AI D Raise value by current connection.
Pow er Saving
Mode
Check if t he connected stat ion support s power
saving.
St a t us The connection stat us.
January 13, 2009 / Ver sion: 2.0 43
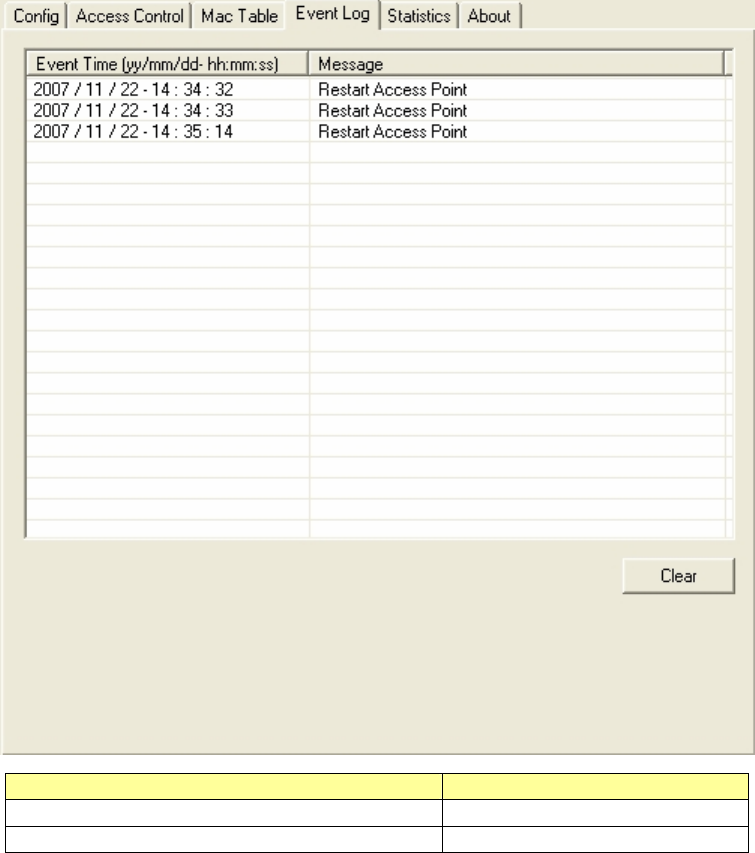
Event Log
Record Soft AP all event t im e and m essage.
I tem s I n for m a t ion
Event Tim e ( yy/ m m / dd- hh:m m :ss) Record event t im e.
Me ssa ge All event m essages.
January 13, 2009 / Ver sion: 2.0 44
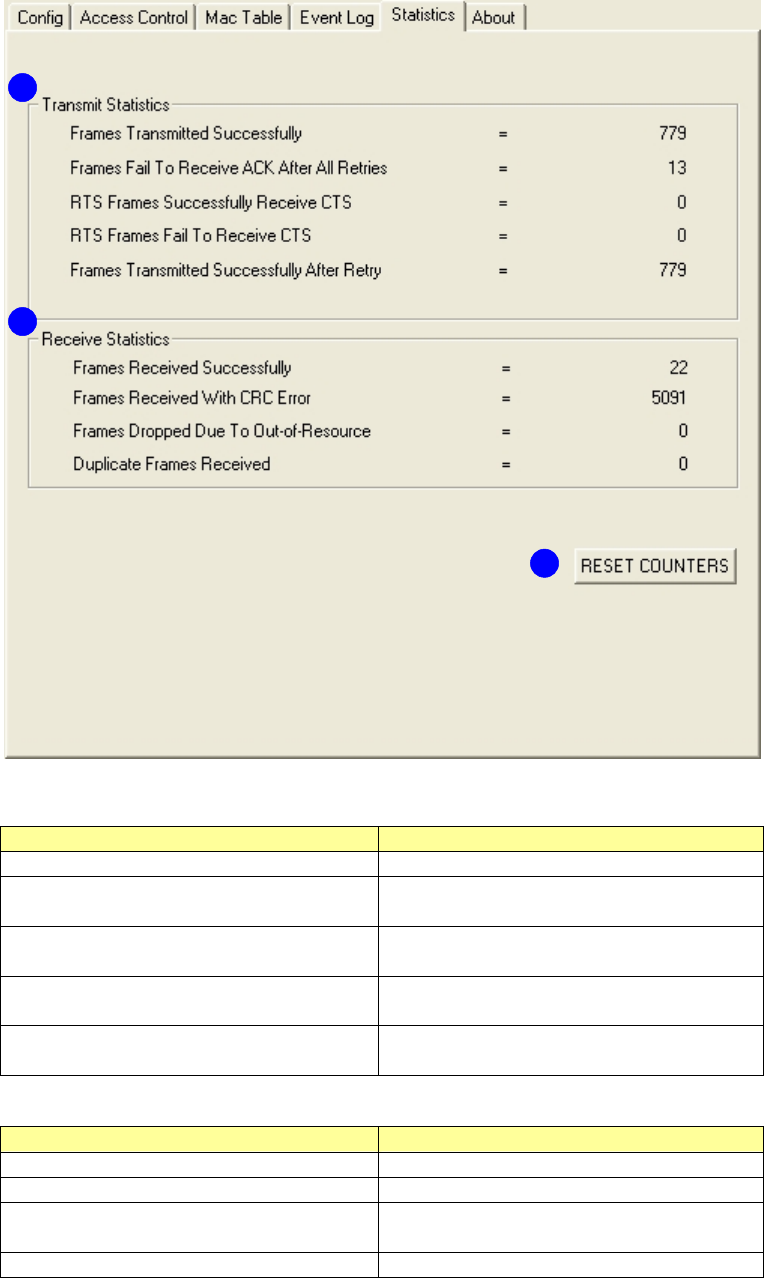
Statistics
St at istics page displays the detail count er inform at ion based on 802.11 MI B count ers.
1 . Tr a nsm it St at ist ics
I tem s I n for m a t ion
Fram es Transm itt ed Successfully Fram es t hat successfully sent.
Fra m e s Fa il To Re ce ive ACK Aft e r
All Re t ries
Fram es t hat failed to t ransm it aft er
hitt ing ret ry lim it .
RTS Fr am e s Successfu lly Receive
CTS
Counts of CTS t hat successfully
received aft er sending RTS fram e.
RTS Fr a m e s Fa il To Re ce ive CTS Count s of CTS t hat fail t o be received
aft er sending RTS fram e.
Fram es Ret r ansm it te d
Successfully
Successfully ret ransm itt ed fram es
num bers.
2 . Receive St at ist ics
I tem s I n for m a t ion
Fra m e s Received Succe ssfully Fram es received successfully.
Fram es Receive d W ith CRC Er r or Fram es received wit h CRC error.
Fram es D roppe d Due To
Out - of- Resource
Fram es dropped due t o resource
issue.
Duplicat e Fr a m e s Received Duplicat e received fram es.
3 . Reset Counter s: Reset count ers to zero.
1
2
3