InFocus PBP PBP User Manual IN3902LB IN3904LB RG EN
InFocus Corporation PBP IN3902LB IN3904LB RG EN
InFocus >
Contents
User Guide part 3 of 3
40
3Start a web browser on your computer.
4Enter the projector's IP address or host name (preceded by http://) into
the web browser's address bar. Example: If the IP address is
192.168.1.10, enter http://192.168.1.10 into the browser's address bar.
5The Log In to Projector Control page will be shown in the browser.
6Select Access type: Basic User or Administrator.
7Click Log In.
Navigating Projector Web Pages
The left side of every page shows a navigation bar. Click the links in the
navigation bar to go to different projector web pages.
NOTE: If a Basic User is logged in, no links are shown.
The top of the navigation bar shows the projector name, model, and serial
number.
The web pages also include the following options:
•Log Off: Logs off and returns to the Log In page (see above).
•Refresh: Reloads the page with current status.
•Defaults: Displays default (factory settings) values (to save these values
click Apply).
•Apply: Saves the values that are currently shown on the page.
Projector Controls Page (All users)
This page lets you control the same settings that are available via the projec-
tor's main menu and remote control. The Controls tab includes basic remote
control functions; other tabs correspond to the projector's menus. NOTE: If a
Basic User is logged in, only the Controls, Basic Picture, and Advanced Pic-
ture tabs are shown.
In each tab, the current value of each setting is shown in blue color.
NOTE: Unlike other pages, changes you make to Projector Control settings
are applied immediately.
•To change an on/off setting (e.g. Power): Click the corresponding On or
Off button.
•To change a multi-value setting (e.g. Sharpness): Select a value from the
drop-down menu.
•To change a numeric setting (e.g. Brightness): Click the corresponding +
or - button, or select a value from the drop-down menu.
•To perform a command (e.g. Auto Image): Click the corresponding Exe-
cute button.
Network Settings Page (administrators only)
This page lets you view and change the projector's network settings. Con-
sult with your network administrator before making any changes on this
page; incorrect network configuration of the projector may cause problems
on your network.
Projector Name: The name of the projector shown in the projector's web
pages.
IP Address: These settings control the projector's network configuration.
Enter the appropriate settings required for your specific network.
Advanced Network Settings: Click this link to show advanced settings:
802.1x Authentication: If your network requires 802.1x authentication, enter
the user name and password that the projector should use, and select the
authentication type.
SNMP: If your network uses SNMP, enter necessary SNMP information
here.
Command and Control Pass-Through: This setting allows you to send and
receive projector commands over the network. For command codes, see the
Appendix or visit the InFocus website at: www.infocus.com/support.
41
Event Notifications Page (administrators only)
This page lets you configure the projector to automatically send email when
specific events occur.
E-Mail Settings tab: In the Account Used… section, enter the information
needed for your projector to connect to an email sending (SMTP) server.
Then in the Recipient E-Mail Addresses section, enter the email addresses of
people who will receive emails, and for each address, select whether that
address receives reminders and/or warnings and errors (enter only one
address per line). After you have completed this page, click Send Test to
make sure that email is correctly set up.
Reminders tab: Select which types of reminders to send. For most reminders,
you can adjust the frequency or date/duration associated with the
reminder.
Warnings & Errors tab: Select which warnings and errors to send.
Date/Time Settings Page (administrators only)
This page lets you configure the projector to read the time and date from an
SNTP server on your network. NOTE: The projector does not have a built-in
clock. If the projector is unable to access the SNTP server, or no SNTP server
is defined, functions that rely on the time and date may not work correctly.
Current Date and Time: Shows the current date and time read from the SNTP
server.
Synchronize the system clock…: Select how often the projector should check
the SNTP server to get the time and date. Between checks, the projector will
keep track of the amount of time elapsed, allowing it to maintain the correct
time and date.
SNTP Server: The address of the time and date server on your network.
Time Zone: The projector's time zone (if you are in a different time zone
from the projector, make sure this is the time zone of the region where the
projector is located).
Set Now: Click this to immediately set the time and date based on the above
information.
Daylight Savings Settings: Click this link to show daylight savings settings:
Start: Select when daylight savings starts.
End: Select when daylight savings ends.
Automatically adjust…: Check this to have the projector automatically update
time and date when daylight savings starts and ends.
Scheduled Tasks Page (administrators only)
This page lets you configure the projector to perform tasks automatically on
specific days and times. You can set up a maximum of three different sched-
uled tasks; each tab corresponds to a task. Each scheduled task can perform
different commands on different days and times. Each tab contains the fol-
lowing items:
On/Off: Select whether or not this scheduled task will run on the days and
times shown.
Description: Explanation of what the task does.
Run Every: Select the days of the week when the scheduled task should run.
At Time(s): Select the times of day when the scheduled task should run (the
task will run at the indicated times on every one of the days checked above).
Command Sequence and Available Commands: The Command Sequence list on
the left shows commands currently performed by the scheduled task (each
task can include up to 20 commands). The Available Commands list on the
right shows all commands that can be added to a scheduled task.
<< Add: Adds the command selected in the Available Commands list to the
Command Sequence list.
>> Remove: Removes the command selected in the Command Sequence list.
Move Up: Moves up the command selected in the Command Sequence list.
Move Down: Moves down the command selected in the Command Sequence
box list.
Clear All: Erases all commands in the Command Sequence list.
42
Custom: Click this link to show custom command entry options. With
custom commands, you can perform additional commands not shown in
the Available Commands list. The RS-232 command codes are available in
the Appendix and on our website at www.infocus.com/support. NOTE:
Custom commands you enter here should be in write format (do not
include '?'), and should use '<' and '>' instead of '(' and ')'. Example: to turn
on the ceiling mount setting, use the custom command <CEL1>.
User Access and Security Page (administrators only)
This page lets you configure security options for the projector, including log
in passwords and projector access restrictions.
Web Access - Administrator tab: Select whether or not Administrators must
enter a password to log into the projector's web pages. If a password is
required, click create or change password to update the administrator
password.
Web Access - Basic User tab: Select whether or not Basic Users must enter a
password to log into the projector's web pages. If a password is required,
click create or change password to update the basic user password.
Projector PIN tab: Allows you to turn projector PIN protection on or off, or
change the PIN. When PIN protection is on, the current PIN must be
entered when the projector is powered on, otherwise the projector will not
operate. NOTE: PIN protection only applies to projector operation via the
projector's keypad and remote control; it does not affect the projector's web
pages.
System Log Page (administrators only)
This page shows a log of the 100 most recent projector events.
Erase Log…: Click this to erase all events in the log.
Network Utilities Page (administrators only)
This page lets you perform various network-related projector tasks.
Save and Load Projector Configuration: These functions save and load all
network-related projector settings into/from a file stored on your
computer. This lets you quickly 'clone' network settings from one projector
to other projectors.
Upgrade Projector Network Firmware: Upgrades the firmware for the
projector's network and LitePort features (this firmware is separate from the
regular projector firmware).
Restart Projector Network Subsystem: Restarts the projector network
subsystem; does not change any projector settings.
Network Subsystem Factory Reset: Returns all network and LitePort settings
to default values and then restarts the projector network subsystem.
Troubleshooting Network Functions
• If network status is shown as Not Connected in the projector's Network
menu, or the projector does not display its IP address, check the cable
or the network configuration.
• If your web browser displays Page Not Found or a similar error when
you try to access the projector's web pages, verify that the
projector is connected to the network (select the Network item in the
projector's Setup menu and verify that Network Status shows as
Connected); if there is no connection refer to the troubleshooting item
above for more help.
• Make sure the Standby Power Save setting in the projector’s Setup
menu is set to Normal (if it is set to Maximum, the projector web pages
will only be available when the projector is powered on).
• If scheduled tasks are not performed, check if the SNTP is set up
correctly and is online. Also check if the Command sequence is correct.
• If automatic emails are not sent, check if SMTP is set up correctly and is
online.
To manually restart the projector network subsystem: Use the projector's
remote control or keypad to select the Network item in the projector's Setup
menu. Then scroll down and select either Restart Network (to restart the
network subsystem without changing any settings), or Network Factory
Reset (to return all network settings back to default values, and then restart
the network subsystem). If the manual restart procedure does not work: To
force the network subsystem to restart, disconnect the projector from AC
power, wait 10 seconds, then reconnect AC power.
43
Using LitePort
LitePort displays a slide show of JPEG images stored on a USB flash drive
connected to the projector. This feature is eliminates the need for a
computer source and can be integrated with common wall plates and
conference room input/output panels.
Image File Types
LitePort displays image files in JPEG format only (file extensions .JPEG and
.JPG). Other file types including PDF, BMP, TIFF, PNG, GIF, etc. are
ignored.
Viewing a Slide Show
To view your pictures as a slide show, follow these steps:
1Connect a USB flash drive to your computer and copy JPEG files from
your computer to the USB flash drive.
2Turn on your projector if needed.
3Remove the USB flash drive from your computer and plug it into the
LitePort connector on the rear of the projector.
4The projector will start a slide show of the images found (if you see
image thumbnails instead, see To Start the Slide Show section below).
5To go to the next image in the slide show, press the Down or Right
arrow button on the projector keypad or remote. To go to the previous
image, press the Up or Left arrow button.
Controlling LitePort
When you plug a USB flash drive into the projector's LitePort connector, the
projector will scan the drive and then either start a slide show or show
image thumbnails.
To stop the slide show and view thumbnails: Press the Select button during the
slide show. In Thumbnails view, the name of the current folder, the current
image number, and the total number of images in that folder are shown at
the bottom of the screen. While viewing thumbnails, press the arrow
buttons to scroll through the thumbnails, or press Select when an image is
highlighted to start the slide show, or press Select when a folder is
highlighted to open that folder.
To start the slide show: While viewing thumbnails, press the arrow buttons
to highlight a thumbnail, then press the Select button to start the slide show
at the highlighted image.
To change the image during the slide show: Press the Down or Right button to
go to the next image, or press the Up or Left arrow button to go to the
previous image (the slide show may also advance automatically depending
on the value of the Next Slide setting; see the LitePort Menu section below
for details).
To change to a different folder: While viewing thumbnails, press the arrow
buttons to highlight the desired folder icon, then press the Select button (to
go to the higher-level folder, select the folder icon labeled "Up").
To change LitePort settings: Press the Menu button during the slide show, or
while viewing thumbnails (see the LitePort Menu section below for details).
Using the LitePort Menu
To show the LitePort menu, press the Menu button on the keypad or remote
during the slide show, or while viewing thumbnails. To highlight a menu
item, press arrow buttons. Then to do the action or change the setting, press
Select. To remove the menu, press the Menu button again.
Rotate Picture: Rotates the current image by 90 degrees clockwise (rotation is
temporary; the image returns to its original orientation when the USB flash
drive is removed from the projector or when the projector is turned off).
Stop/Start Slideshow: Stops the slide show, or starts it at the selected
thumbnail (when the menu is not visible, you can also stop or start the slide
show by pressing the Select button).
Go to Projector Main Menu: Removes the LitePort menu and displays the
projector's main menu, where you can adjust the picture or change other
projector settings.
44
(For remaining items below, highlight the setting, then press Select one or
more times to change the setting value.)
Auto Start: Select On to have the player start the slide show when the USB
flash drive is first connected. Select Off to have the player display
thumbnails when the USB flash drive is first connected.
Show All Folders: Select On to have the slide show display all images in all
folders. Select Off to have the slide show display images only from the
current folder.
Fill Screen: Select On to have the slide show expand small images to fill the
screen. Select Off to have the slide show display small images at their
original size.
Next Slide: Select Manual to disable automatic slide advance in the slide
show. Select other values to make the slide show advance to the next image
automatically (regardless of this setting, manual advance is always
available by pressing the arrow buttons).
Effect: Select Off to have no transition effect when changing between images
during the slideshow. Select Random to use a different random effect for
each transition. Select other values to use a specific effect.
Show Info: Select On to show the name of the current file and folder, the
current image number, and the total number of images in the slide show at
the bottom of the screen. Select Off to hide this information.
Displaying PowerPoint Slides
Follow the steps below to display PowerPoint slides using LitePort (these
instructions apply to PowerPoint 2007 in Windows; for other presentation
programs refer to the program's instructions or help file for the steps
needed to save a presentation as separate JPEG files):
1Connect the USB flash drive to your computer.
2Open your PowerPoint document.
3This step is optional but improves image quality: Click the Design tab
near the top of the PowerPoint document window, then click Page Setup.
Click the Slides sized for drop-down menu and select Custom. Change
both Width and Height to double their previous values, then click OK.
4Click the Office button in the upper left corner of the PowerPoint
document window.
5Point to Save As, then click Other Formats.
6In the Save As dialog box, click the Save as type drop-down menu. Scroll
through the menu and select JPEG File Interchange Format.
7Make sure the contents of your USB flash drive are visible in the Save As
dialog box before you continue - to view your USB flash drive in the
Save As dialog box, first click My Computer, then double-click the USB
flash drive's icon (make sure you do both of these in the Save As dialog
box, not on your computer's desktop).
8Click Save. PowerPoint will ask if you want to export every slide or only
the current slide; click Every Slide. PowerPoint will save each slide in
your presentation as a separate JPEG file. These files are saved in a new
folder that has the same name as the original document.
9Remove the USB flash drive from your computer and plug it into the
projector's LitePort connector.
10 On the projector, navigate to the folder created in step 8 and then start
the slide show (for instructions on navigating and controlling the slide
show, see the Controlling LitePort section above).
NOTE: PowerPoint embedded videos, transition effects, and animations are
not included when saving as JPEG. However, you can select a LitePort
slideshow transition effect by changing the Effect in the LitePort menu.
45
Troubleshooting LitePort
• If images load slowly: Make sure you are using a newer USB 2.0-
compatible (high speed) USB flash drive. Larger image file sizes may
also slow down the player; to reduce file size, use an image editing
program on your computer to resize images smaller; for the best
balance between image quality and speed, resize images to be 1024
pixels wide.
• If no images are found, or some images are not shown, or you only see
folder thumbnails but no images: Make sure that images are JPEG file
type (file extensions .JPEG and .JPG); other file types are not supported
and will be ignored.
• If you see a blank screen, or a logo, or the wrong input source
(computer, video, etc.) instead of your images: Keep pressing the
Source button on the keypad or remote until the LitePort message is
displayed (if you still don't see any images, make sure the USB flash
drive is correctly and completely plugged into the projector's LitePort
connector).
• If nothing happens when you connect your USB flash drive, and you
cannot select the LitePort input source as described above: Check the
format of your USB storage device. LitePort only supports USB storage
devices formatted as FAT32. Devices formatted as NTFS, and non-
storage devices (such as cameras) are not supported.
If images saved by PowerPoint are low quality: Make sure to do step 3
when following the steps in the Displaying PowerPoint Slides section
above.
46
Maintenance
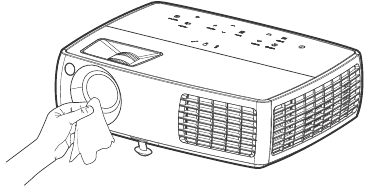
Cleaning the lens
1Apply a non-abrasive camera lens cleaner to a soft, dry cloth.
• Avoid using an excessive amount of cleaner, and don’t apply the
cleaner directly to the lens. Abrasive cleaners, solvents or other harsh
chemicals might scratch the lens.
2Lightly wipe the cleaning cloth over the lens in a circular motion.
WARNINGS:
• Turn the projector off and unplug power cord before cleaning any
part of the projector.
• Do not open any cover on the projector, except the lamp cover.
• Do not attempt to service this product yourself as opening and
removing covers may expose you to dangerous voltage and other
hazards. Refer all servicing to qualified service personnel.
47
Replacing the projection lamp
The lamp hours used timer in the Projector Info menu counts the number of
hours the lamp has been in use. Twenty hours before the lamp life expires,
the message “Change lamp” appears on the screen at startup.
•NOTE: You can order new lamps from www.infocus.com (in select
areas), your retailer or your dealer. Only genuine InFocus lamps are
tested for use in this projector. InFocus is not liable for the
performance, safety or certification of any other lamps. The use of other
lamps violates the projector warranty and voids all certification marks
on this projector.
WARNINGS:
• To avoid burns, allow the projector to cool for at least 60 minutes before
you replace the lamp.
• Only genuine InFocus lamps are tested with this projector. Use of other
lamps may cause electrical shock and fire.
• Unplug the power cord before replacing the lamp.
• Do not drop the lamp module. The glass may shatter and cause injury.
• Do not touch the glass lamp screen. Fingerprints can obscure projection
sharpness.
• Be extremely careful when removing the lamp housing. In the unlikely
event that the lamp ruptures, small glass fragments may be generated.
The lamp module is designed to contain most of these fragments, but
use caution when removing it. Before replacing a ruptured lamp, clean
the lamp compartment and dispose of cleaning materials. Wash hands
after lamp replacement. If replacing the lamp while the projector is
ceiling-mounted, wear protective eyewear.
• Hg - Lamp contains mercury. Manage in accordance with local disposal
laws. See www.lamprecycle.org.
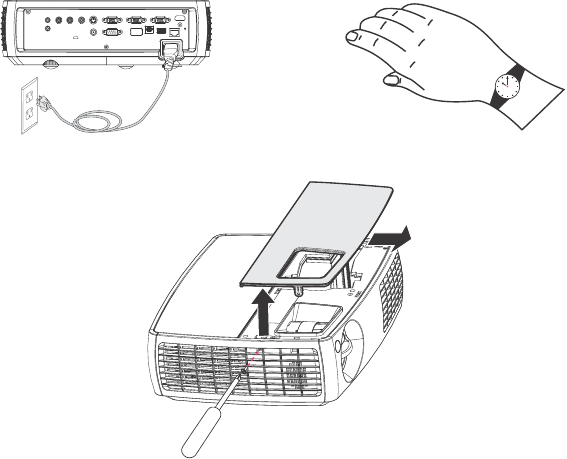
1Turn off the projector and unplug the power cord.
2Wait 60 minutes to allow the projector to cool thoroughly.
3Remove the lamp door by (a) removing the screw on the side of the
lamp door, (b) sliding the door forward, and (c) lifting the door off.
turn off and unplug
projector
wait 60 minutes
(a)
(b)
(c)
48
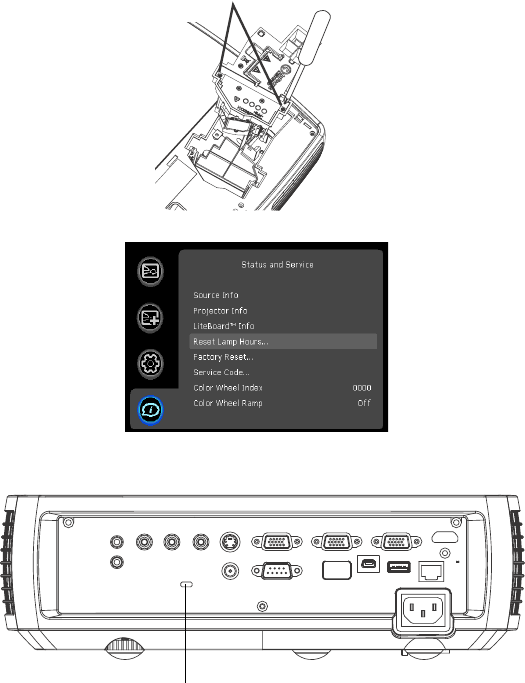
4Loosen the captive screw that attaches the lamp housing to the
projector. Carefully remove the lamp housing. Dispose of the lamp in an
environmentally proper manner.
5Install the new lamp housing and tighten the screw.
6Re-attach the lamp connector to the projector.
7Replace the lamp door by sliding it into place.
8Plug in the power cord and press the Power button to turn the projector
back on.
9To reset the lamp hour timer, navigate to the Status and Service menu and
select Reset Lamp Hours. See page 38 for details.
Using the security lock
The projector has a security lock for use with a PC Guardian Cable Lock
System. Refer to the information that came with the lock for instructions on
how to use it.
loosen screw
security lock
49
INDEX
Numerics
16x9 vs 4x3 12
5 volt DC output 4
A
AC Power On 30
Advanced menu 29
Apply Preset 28
Aspect Ratio 12, 28, 30
Audio In Computer connector 9
Audio In connector 13
Audio Out connector 23
Auto Image 30
Auto Off Time 30
Auto Source 30
B
Blank Key 30
Blank Screen 30
Brightness 28
BrilliantColor 29
C
cable box 12
Ceiling Mount 30
Cleaning the lens 33
Closed Captions 30
Color Space 29
Color Temperature 29
Computer In connector 9
Connecting
external speakers 23
computer 9
video device 12
Connector on Projector 7, 8
Connector panel 4
contacting InFocus 21
Contrast 28
Custom Key 30
Custom key 25
customer service contact information 21
Customizing the projector 26
D
DVDs 28
F
Factory Reset 32
focus 11
Force wide 29
Freeze Screen 30
G
Gamma 29
H
HDMI 1.3 connection 13
HDMI DDC 30
HDTV 6, 28
Horizontal 29
I
Image
Size 5
Optimization 25
K
Key Click 30
keypad buttons 24
Keystone 28
keystone, adjusting 11
L
Lamp hours, resetting 35
Lamp Low Power 30
Language 30
laptop video port activation 10
LEDs 14
leveling foot 11
LitePort 4, 9, 24, 37, 38, 39, 40
M
Maintaining the projector 33
Menu button 27
menu usage 27
Monitor Out connector 9
Mute 30
N
Network 10, 34, 35, 36, 37
50
O
Optimizing images 25
Optimizing video 26
Overscan 29, 30
P
Phase 29
Picture menu 28
Power connector 9
power cord 9
Power Sounds 30
Power-up Source 30
Presentation features 25
Projection distance 5
Projector
Connector panel 4
Customization 26
Image Size 5
keypad buttons 24
Maintenance 33
menus 27
offset 5
Registering 3
security lock 33
Status indicator panel 14
connecting computers 9
connecting video devices 12
positioning 5
setting up 5
shutting down 14
troubleshooting problems 14
Projector Info 30
R
Rear 31
Registering your projector 3
remote control 22
Reset 32
Resetting the projector 32
RS-232 4
S
Safety Considerations 2
Screen Aspect 12
Screen Save 14, 30
Screen triggers 4
Search Screen 31
security lock 33
Service 32
Service Code 32
Sharpness 28
shutting down the projector 14
Source 30
Source Info 30
speakers, connecting external 23
Status indicator panel 14
S-video connector 13
Sync Threshold 29
T
Tint 28
Tracking 29
troubleshooting 14
Troubleshooting Network Functions 37
TV tuner 12
U
USB 4, 9
V
Vertical 29
video optimizing 26
Video Standard 30
Volume button 23
W
warranty 21
White Peaking 29
Z
zoom 11