Inovonics Wireless 3B6AVBST ANALOG VOICE BASE STATION User Manual User Instructions
Inovonics Wireless Corporation ANALOG VOICE BASE STATION User Instructions
Install Lit

1
QSR Performance Solutions Drive Thru System - Operating Instructions
Batteries and Battery Charger
• Be sure batteries are charged
• Batteries take 2 to 3 hours to charge
• A charge battery will last 8 to 10 hours
• When the battery voltage becomes too low, a short warble tone, occurring at five–second intervals is heard in the
headset. After 2 minutes the headset will shut off.
• Batteries only fit into charge one way, the correct way
• Charging indicator on charger will light red while battery is charging
• Charging indicator on charger will change from red to green when battery is fully charge
• Batteries should be left in charger even after they are fully charged
• Batteries should be removed from belt-pack and stored in charger when belt-pack is not being used
• Batteries not being used should stored in the charger
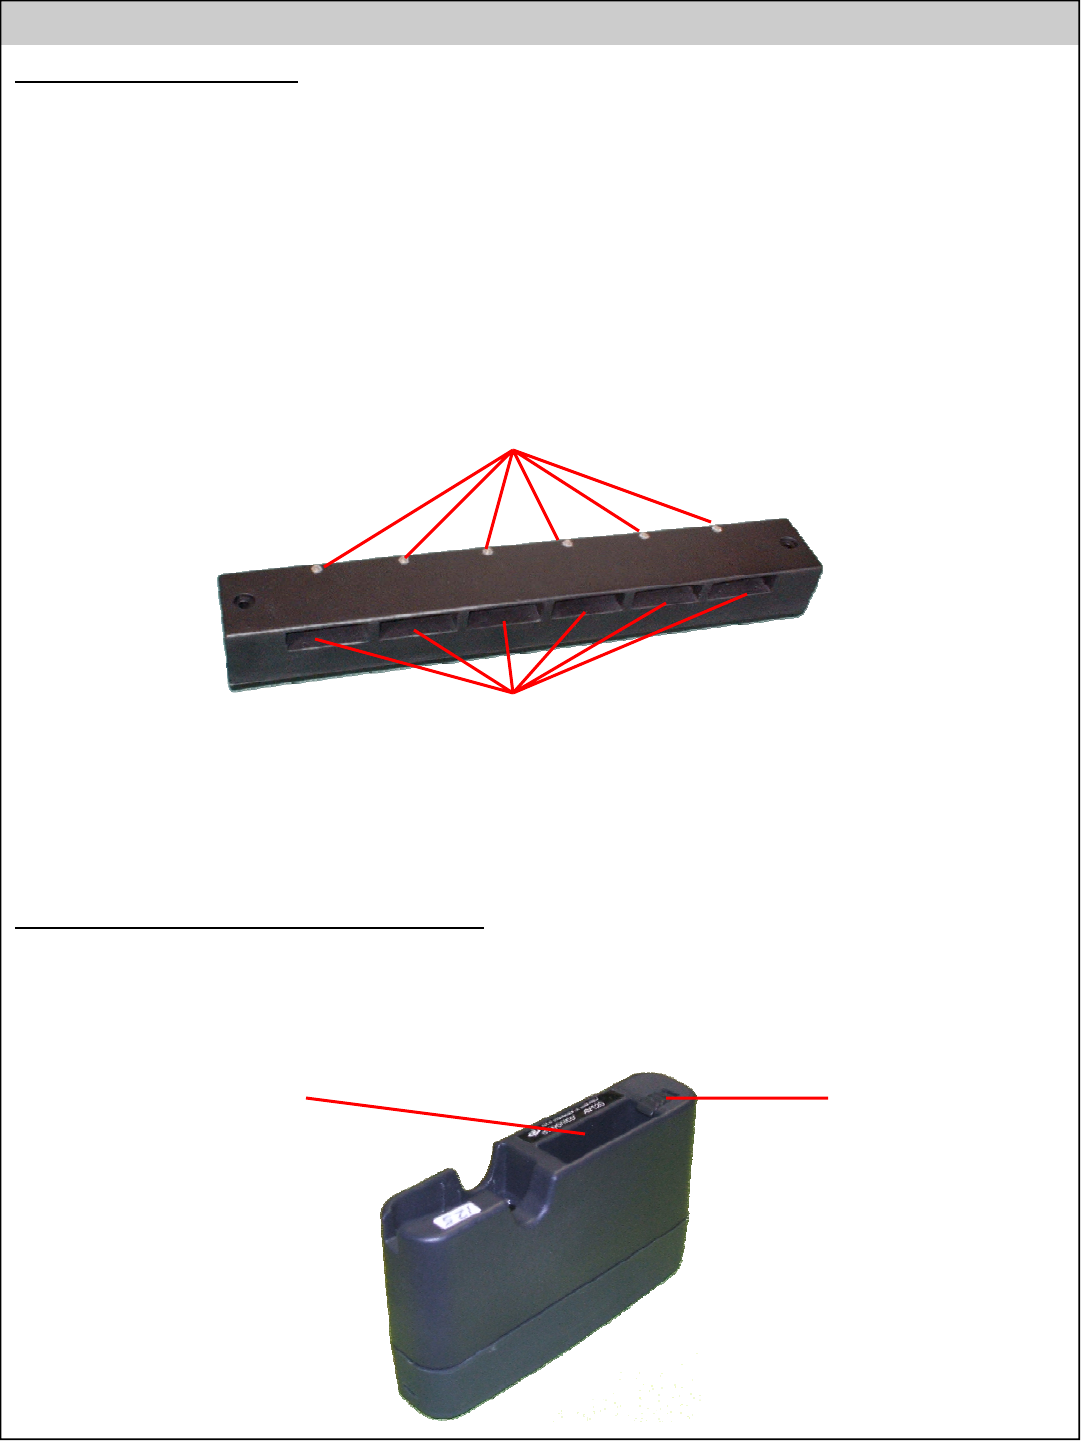
Charging Indicators
Charging Ports for
Batteries
Battery Charger
Installing and Removing Batteries from Belt-Pack
• Insert battery into battery compartment on belt-pack so it locks into place
• Battery will only fully insert into battery compartment the correct way
• To remove battery, slide battery release away from battery
Battery
Compartment Battery
Release

2
QSR Performance Solutions Drive Thru System - Operating Instructions
Connecting Headset to Belt-Pack
• The 2 prong headset connector plugs into the bottom of the belt-pack
Headset
Jack
Programming the Belt-Packs
• Belt-packs must me programmed to the base station before they will operate properly
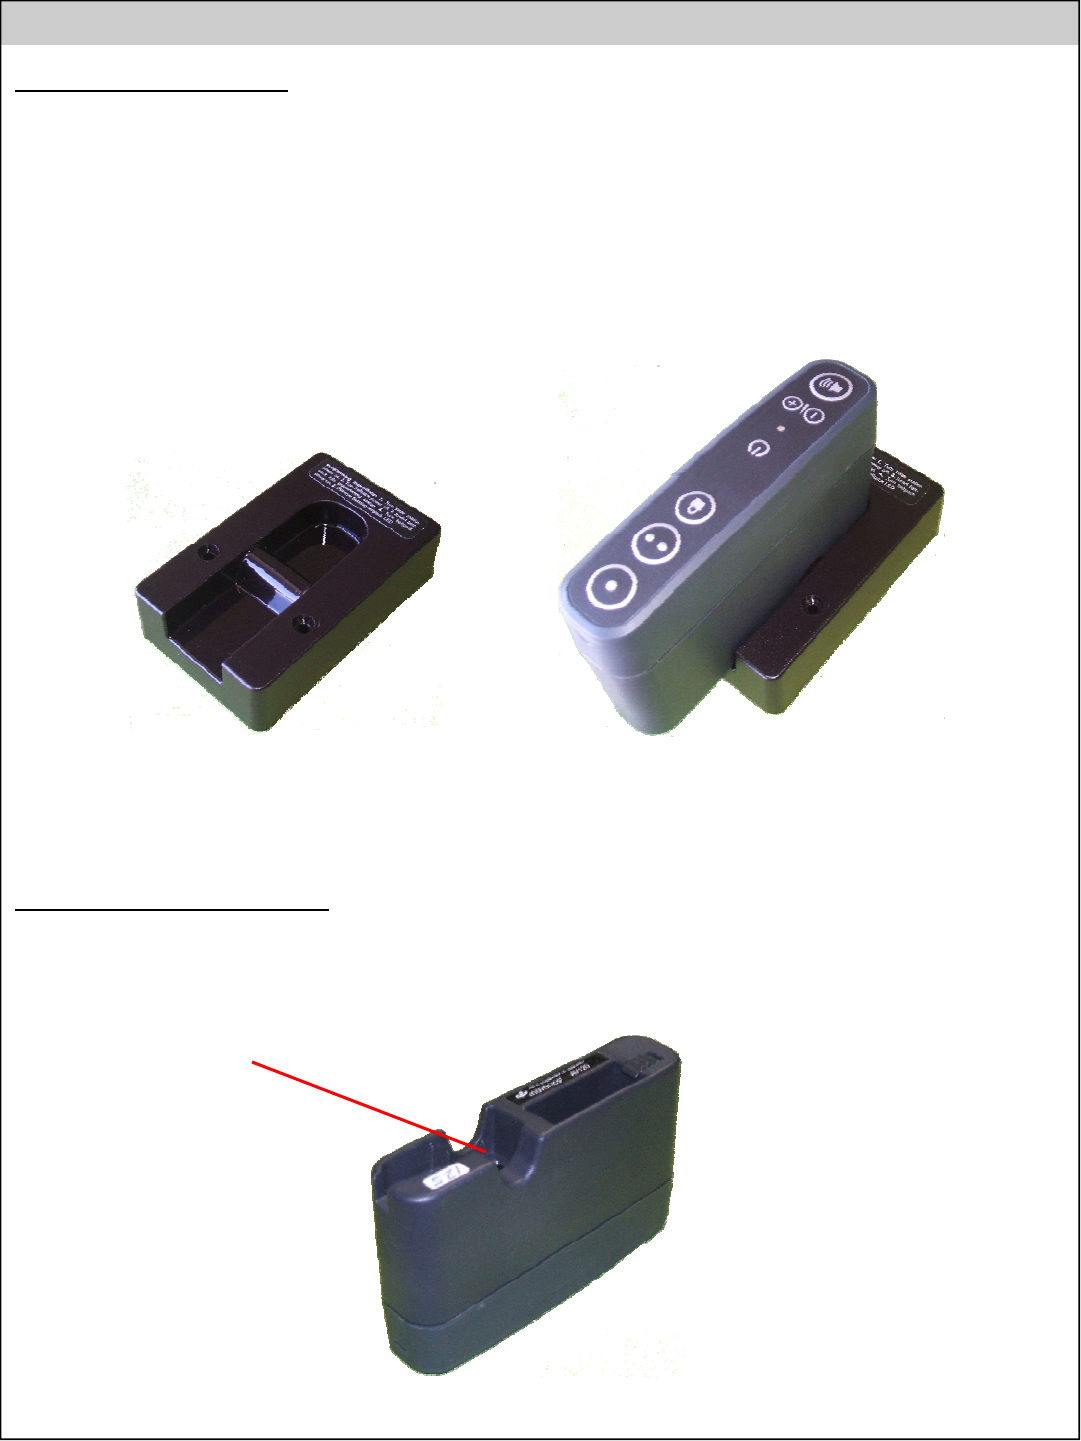
• Programming station should already be plugged into base station
• Make sure power indicator on base station is lit
• Insert battery in belt-pack
• Make sure belt-pack power is turned OFF
• Insert belt-pack into programming station
• Turn belt-pack power ON
• Power indicator on belt-pack will flash green during programming (about 5 seconds)
Programming Station Belt-Pack in Programming Station

3
QSR Performance Solutions Drive Thru System - Operating Instructions
Taking Orders
• Belt-pack should be in pouch and clipped to belt or waist-band on pants
• Headset cable should be clipped near waist and near collar
• Headset should be worn on head
• The headband is adjustable
• Make sure power indicator on belt-pack is lit green
• When a car arrives at the menu-board, fast double beep will be heard every 3 seconds
• Press the talk button on the belt-pack to talk to the customer
For information on all of the features of the belt-pack, see the last page of these instructions.
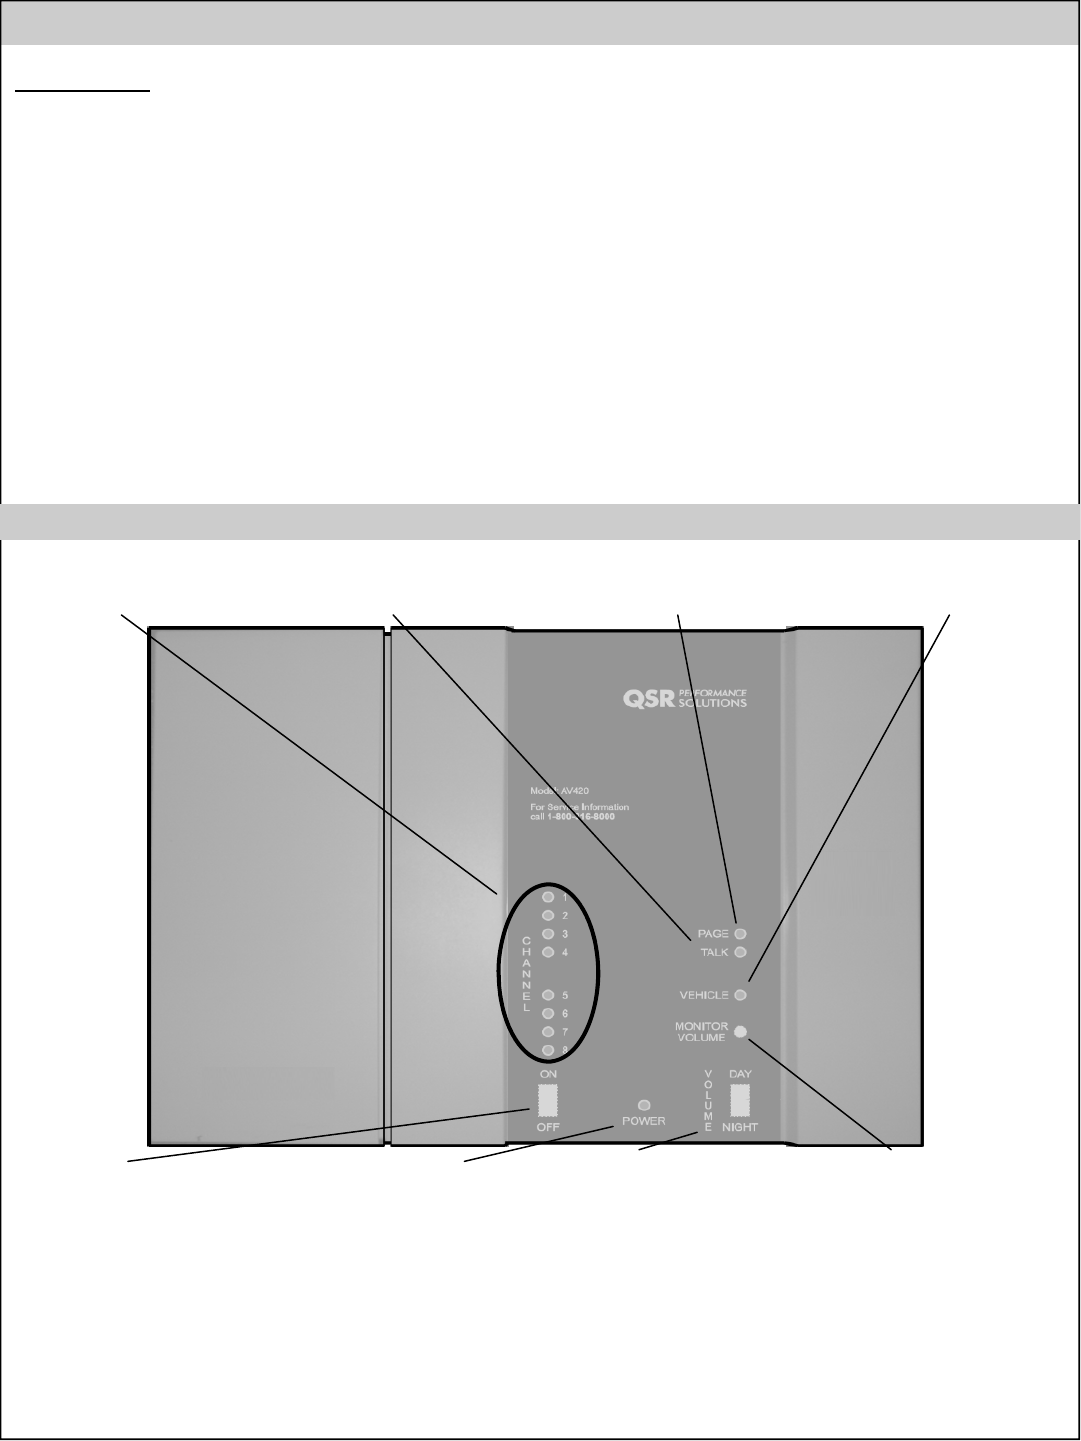
QSR Performance Solutions Drive Thru System - Base Station Front Cover Indicators & Controls
Channel Indicators Page Indicator Talk Indicator
Power Switch
Used to turn power to Power Indicator
Lights when Day / Night Volume
Switch Grill Monitor
Vehicle Indica-

4
QSR Performance Solutions Drive Thru - Belt-Pack
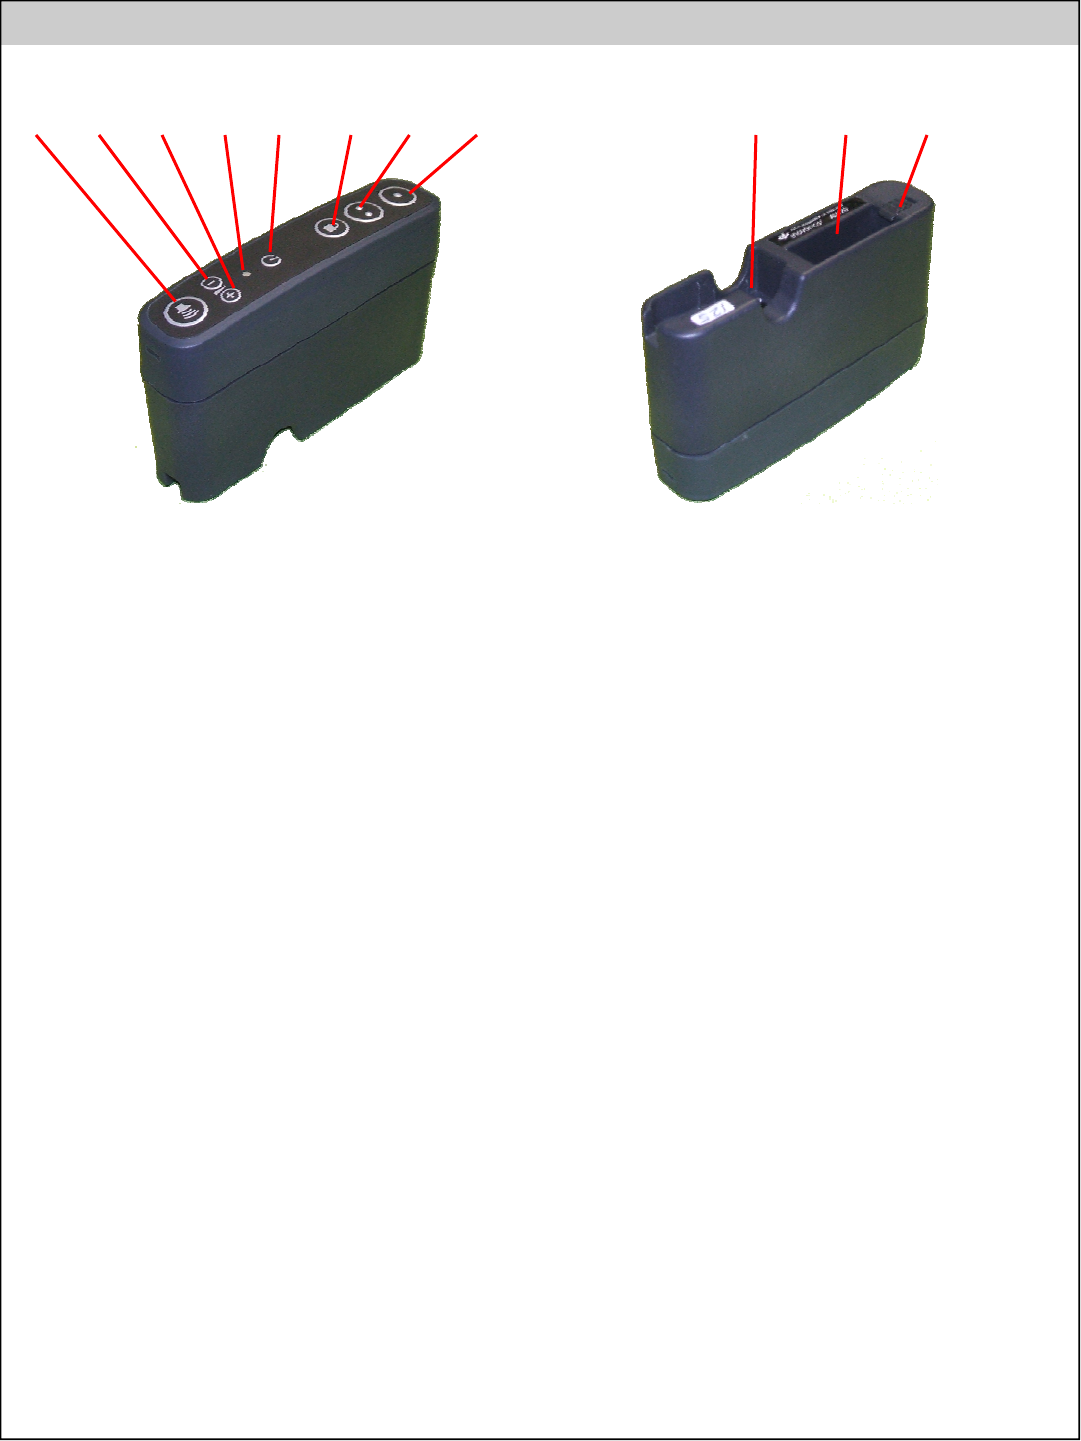
1 2 3 4 5 6 7 8 9 10 11
Bottom View
7. Talk 2
• Has the exact same function as Talk 1 when used with a single lane
system
• On Dual and Cross Lane systems Talk 2 will be programmed to
communicate with Lane 2
8. Talk 1
• Activates communication to outside speaker
• Will also be heard by other headsets and possibly grill speaker
(depending on system configuration)
• Can be used to test incoming and outgoing audio even when no car
is present
• On half-duplex systems, press to talk and release to listen
• On full-duplex systems incoming audio will be heard even while Talk
1 is pressed
• On Dual and Cross Lane systems Talk 1 will be programmed to
communicate with Lane 1
9. Headset Jack
• The 2 prong headset connector plugs in here
10. Battery Compartment
• Battery goes here
11. Battery Release
• Slide back to release battery from compartment
1. Page
• Press to talk to the other headsets without being heard at the
speaker post
• Belt-packs can be programmed for Page Monitor Mode, they will
only hear communication from other belt-packs that are using the
Page button and will not hear communication to or from the speaker
post
• To program a belt-pack for Page Monitor Mode, hold Page button
down while powering the headset on.
• To exit Page Monitor Mode turn the belt-pack off and back on
2. Volume Down
• Listening volume can be adjusted in 7 steps from the lowest to high-
est setting. When the belt-pack is powered on, the listening level will
be near mid-level and can be adjusted 3 steps up or 4 steps down.
A short tone will be heard each time the volume is adjusted. A long
tone is heard when the lowest or highest level is reached.
3. Volume Up
• Turns up incoming audio from speaker post. See previous section
for details
4. Power LED
• Green when belt-pack is powered on
• Red when talk-lock is in use
• Flashes green during channel programming
5. Power On / Off
• Press to turn power to belt-pack on or off
6. Talk Lock
• Used with a full-duplex system, press to activate hands-free com-
munication
• When car arrives at speaker post, press to activate. Communication
will automatically deactivate when car leaves speaker post and
automatically reactivate when next car arrives
• Press Talk 1 or Page to deactivate Talk Lock
• Only 1 belt-pack at a time can use Talk Lock and no other headsets
can talk to the speaker post
• Disabled or enabled by holding Talk Lock button down when the
headset is being powered up