Intermec Technologies 700C-SMC45 Pen-notepad computer with Radio Interfaces User Manual back let85x11
Intermec Technologies Corporation Pen-notepad computer with Radio Interfaces back let85x11
Contents
User manual pt 1
User’s Manual
700 Series Color
Mobile Computer

700 Series Color
Mobile Computer
User’s Manual
ii
SNOTICE The information contained herein is proprietary and is provided solely for the purpose of allowing
customers to operate and service Intermec manufactured equipment and is not to be released,
reproduced, or used for any other purpose without written permission of Intermec.
DisclaimerofWarranties.Thesamplesourcecodeincludedinthisdocumentispresentedfor
reference only. The code does not necessarily represent complete, tested programs. The code is
provided “ASISWITHALLFAULTS.”ALLWARRANTIESAREEXPRESSLY
DISCLAIMED, INCLUDING THE IMPLIED WARRANTIES OF MERCHANTABILITY
AND FITNESS FOR A PARTICULAR PURPOSE.
We welcome your comments concerning this publication. Although every effort has been made to
keep it free of errors, some may occur. When reporting a specific problem, please describe it
briefly and include the book title and part number, as well as the paragraph or figure number and
thepagenumber.
Send your comments to:
Intermec Technologies Corporation
Publications Department
550 Second Street SE
Cedar Rapids, IA 52401
ANTARES, INTERMEC, NORAND, NOR*WARE, PEN*KEY, ROUTEPOWER,
TRAKKER, and TRAKKER ANTARES are registered trademarks and ArciTech, ENTERPRISE
WIRELESS LAN, i-gistics, INCA, Mobile Framework, MobileLAN, TE 2000, UAP, and
UNIVERSAL ACCESS POINT are trademarks of Intermec Technologies Corporation.
2002 Intermec Technologies Corporation. All rights reserved.
Acknowledgments
ActiveSync,ActiveX,Microsoft,MS,MS-DOS,Outlook,Pocket Outlook,Pocket PC,Windows,
Windows NT,andtheWindows logo are registered trademarks and MSDN,SQL Server,Visual
Basic,Visual C++,andWindows for Pen are trademarks of Microsoft Corporation in the United
States and/or other countries. Microsoft products are licensed to OEMs by Microsoft Licensing,
Inc., a wholly owned subsidiary of Microsoft Corporation.
Bluetooth is a trademark of Bluetooth SIG, Inc., U.S.A.
CDMA2000 is a trademark of the Telecommunications Industry Association (TIA).
GSM is a registered trademark of the GSM Association.
Microclean II is a registered trademark of Foresight International.
MultiMediaCard is a trademark of Infineon Technologies AG, Germany, and is licensed to
MMCA (MultiMediaCard Association).
SanDisk is a trademark of SanDisk Corporation.
Siemens is a registered trademark of Siemens AG. Siemens product names are either trademarks or
registered trademarks of Siemens or Siemens AG.
This product includes software developed by the OpenSSL Project for use in the OpenSSL
Toolkit. (http://www.openssl.org/)
This product includes cryptographic software written by Eric Young (eay@cryptsoft.com)
Contents
iii700 Series Color Mobile Computer User’s Manual
Contents
Before You Begin xv....................................................................
Warranty Information xv...................................................
Safety Summary xv........................................................
Warnings, Cautions, and Notes xvi...........................................
About This Manual xvi....................................................
Format Conventions for Input From a Keyboard or Keypad xvii......................
Related Publications xviii...................................................
Global Services and Support xviii.............................................
Web Support xviii........................................................
Introduction
About the 700 Series Color Mobile Computer 2...............................................
...........................................................
...................................................
........................................
........................................
Battery 2................................................................
Low Battery Shutdown 3.......................................
System Status Maintained 4....................................
CAB Files Within 700C Software Tools CD 4...................................
Modem Support 4.........................................................
Network Support 4........................................................
Removeable Card Support 5.................................................
CompactFlash Cards 5........................................
SecureDigital Cards 5.........................................
MultiMediaCards 5...........................................
Software Build Version 5....................................................
What’ s New 6.........................................................................
1
Contents
iv 700 Series Color Mobile Computer User’s Manual
Pocket PC 2002
Introduction 8.........................................................................
Premium versus Professional Editions 8......................................................
Where to Find Information 10............................................................
Basic Skills 11.........................................................................
Buttons and Stylus 11......................................................
Today Screen 11..........................................................
Programs 13.............................................................
Navigation Bar and Command Bar 14.........................................
Pop-up Menus 15.........................................................
Notifications 15..........................................................
Enter Information on Your 700 Series Computer 16...............................
Typing With the Soft Keyboard 17...............................
Using Block Recognizer 17.....................................
Using Letter Recognizer 18.....................................
Using Transcriber 18..........................................
Selecting Typed Text 18........................................
Writing on the Screen 19....................................................
Selecting the Writing 19.......................................
Converting Writing to Text 20..................................
Drawing on the Screen 22...................................................
Creating a Drawing 22........................................
Selecting a Drawing 22........................................
Recording a Message 23....................................................
Creating a Recording 23.......................................
Using My Text 24.........................................................
Finding and Organizing Information 25........................................
Customizing Your 700 Series Computer 26......................................
Adjusting Settings 26.........................................
Adding or Removing Programs 26................................
Microsoft ActiveSync 29.................................................................
Microsoft Pocket Outlook 31.............................................................
Calendar: Scheduling Appointments and Meetings 31.............................
Creating an Appointment 32....................................
Using the Summary Screen 33..................................
Creating Meeting Requests 33...................................
Scheduling a Meeting 33.......................................
Contacts: Tracking Friends and Colleagues 34...................................
Creating a Contact 34.........................................
Finding a Contact 35.........................................
Using the Summary Screen 36..................................
Tasks: Keeping a To Do List 37...............................................
Creating a Task 38...........................................
Using the Summary Screen 39..................................
Notes: Capturing Thoughts and Ideas 40.......................................
Creating a Note 41...........................................
2
Contents
v700 Series Color Mobile Computer User’s Manual
Inbox: Sending and Receiving E-mail Messages 42................................
Synchronizing E-mail Messages 42...............................
Connecting Directly to an E-mail Server 42........................
Using the Message List 43......................................
Composing Messages 45.......................................
Managing E-mail Messages and Folders 46.........................
Folder Behavior With a Direct Connection to an E-mail Server 46.......
Companion Programs 47................................................................
Pocket Word 47...........................................................
Creating a Document 47.......................................
Typing Mode 49.............................................
Writing Mode 50............................................
Drawing Mode 51............................................
Recording Mode 51...........................................
Pocket Excel 52...........................................................
Creating a Workbook 52.......................................
Tips for Working in Pocket Excel 53..............................
MSN Messenger 53........................................................
Setting Up 54...............................................
Working with Contacts 54.....................................
Chatting with Contacts 55.....................................
Windows Media Player for Pocket PC 57.......................................
Microsoft Reader 58.......................................................
Getting Books on Your 700 Series Computer 58.....................
Using the Library 59..........................................
Reading a Book 60...........................................
Using Reader Features 61......................................
Removing a Book 61..........................................
Pocket Internet Explorer 62...............................................................
The Mobile Favorites Folder 62...............................................
Favorite Links 62..........................................................
Mobile Favorites 62........................................................
Using AvantGo Channels 64.................................................
Using Pocket Internet Explorer 65.............................................
Viewing Mobile Favorites and Channels 66........................
Browsing the Internet 66.......................................
Getting Connected 67...................................................................
Transferring Items Using Infrared 67...........................................
Sending Information 67.......................................
Receiving Information 67......................................
Connecting to an Internet Service Provider 68...................................
Creating a Modem Connection to an ISP 68.......................
Creating an Ethernet Connection to an ISP 69......................
Connecting to Work 70.....................................................
Creating a Modem Connection to Work 70........................
Creating an Ethernet Connection to Work 71.......................
Ending a Connection 72....................................................
Connecting Directly to an E-mail Server 72.....................................
Setting Up an E-mail Service 73..............................................
Contents
vi 700 Series Color Mobile Computer User’s Manual
Installing Applications
Packaging an Application 76..............................................................
Installing Applications 76................................................................
Using Microsoft ActiveSync 77...............................................
Using the FTP Server 78....................................................
Using the Application Manager in Unit Manager 78...............................
Using a Storage Card 78....................................................
Copying to a CompactFlash Card 78.............................
Copying to a SecureDigital Storage Card 79........................
Updating the System Software 79..........................................................
Application Migration 80................................................................
Cabinet File Installation 82...............................................................
Network Support
CORE 84............................................................................
Network Adapters 85...................................................................
Ethernet Communications 86................................................
802.11b Communications 87................................................
Profiles 87..................................................
Import/Export 96............................................
Scan List 97.................................................
Network Selection APIs 98.....................................
Function Summary 101.......................................
802.11b Radio CORE Module 107..............................
WWAN Radio Options 110.................................................
GSM/GPRS 110.............................................
CDMA/1xRTT SB555 110....................................
WAN Radio CORE Module 111................................
AT Command Interface 115....................................
Wireless Printing 120......................................................
Documentation 120..........................................
Bluealps CORE Module 120....................................
AutoIP/DHCP 122.....................................................................
SNMP Configuration 123................................................................
The Focus was “Simple” 123.................................................
Using SNMP 123.........................................................
Retrieval of Management Information 124......................................
An Early Approach to Getting More than One Item at a Time 124...................
Conclusion 124...........................................................
SNMP Configuration on the 700 Series Computer 125............................
Management Information Base 125..............................
Object Identifiers 126.........................................
Configuring with SNMP 126...................................
3
4
Contents
vii700 Series Color Mobile Computer User’s Manual
Printer Support
Printing ASCII 128.....................................................................
Directly to a Port 128......................................................
Directly to a Generic Serial Port 128...........................................
IrDA Printer Driver 128.................................................................
NPCP Printer Driver 129................................................................
About NPCP 129.........................................................
NPCP Driver Installation and Removal 129.....................................
Opening the NPCP Driver 130..............................................
Closing the NPCP Driver 130...............................................
Reading from the NPCP Driver 130...........................................
Writing to the NPCP Driver 130.............................................
NPCP Driver I/O Controls 131..............................................
NPCP Printer Communications 132...........................................
Sample Code 132.........................................................
NPCP Error Codes 133....................................................
O’ Neil Printer Driver 134...............................................................
DTR Driver Installation and Removal 134......................................
Opening the DTR Driver 135...............................................
Closing the DTR Driver 135................................................
Writing to the DTR Driver 135..............................................
DTR Printer Communications 135............................................
Scanner Support
Scanner Control and Data Transfer 138.....................................................
Automatic Data Collection COM Interfaces 138..............................................
Multiple ADC COM Object Support 139......................................
How to Create and Use the ADC COM Interfaces 140............................
Read-Ahead Bar Code Data Access 140............................
Grid Data Filtering 141........................................
Filter Expression Values 142....................................
Editing Expression Values 144..................................
ADC Connection 145.........................................
2D Imager Overview 146...................................................
Data Collection Features 146...................................
Image Acquisition Features 147..................................
Create and Delete ADC COM Object Functions 149.............................
ITCDeviceOpen 149.........................................
ITCDeviceClose 150..........................................
5
6
Contents
viii 700 Series Color Mobile Computer User’s Manual
IADC Functions 151......................................................
IADC::CancelReadRequest 152.................................
IADC::Initialize 153..........................................
IADC::QueryAttribute 154....................................
IADC::QueryData 155........................................
IADC::Read 156.............................................
IADC::SetAttribute 157.......................................
IBarCodeReaderControl Functions 159........................................
IBarCodeReaderControl::CancelReadRequest 160...................
IBarCodeReaderControl::ControlLED 161.........................
IBarCodeReaderControl::Initialize 162............................
IBarCodeReaderControl::IssueBeep 163...........................
IBarCodeReaderControl::QueryAttribute 164.......................
IBarCodeReaderControl::Read 165...............................
IBarCodeReaderControl::SetAttribute 167.........................
IBarCodeReaderControl::TriggerScanner 171.......................
IS9CConfig Functions 172..................................................
IS9CConfig::GetCodabar 173...................................
IS9CConfig::SetCodabar 174...................................
Codabar Default Settings 175...................................
Codabar Enumerations 175....................................
IS9CConfig::GetCode39 176...................................
IS9CConfig::SetCode39 177....................................
Code 39 Default Settings 177...................................
Code 39 Enumerations 178....................................
IS9CConfig::GetCode93 179...................................
IS9CConfig::SetCode93 179....................................
Code 93 Default Settings 179...................................
Code 93 Enumerations 180....................................
IS9CConfig::GetCode128 180..................................
IS9CConfig::SetCode128 181...................................
Code 128/EAN 128 Default Settings 181..........................
Code 128 Enumerations 182...................................
IS9CConfig::GetI2of5 183.....................................
IS9CConfig::SetI2of5 184......................................
Interleaved 2 of 5 Default Settings 184............................
Interleaved 2 of 5 Enumerations 185..............................
IS9CConfig::GetMatrix2of5 185................................
IS9CConfig::SetMatrix2of5 186.................................
Matrix 2 of 5 Default Settings 186...............................
Matrix 2 of 5 Enumerations 186.................................
IS9CConfig::GetMSI 187......................................
IS9CConfig::SetMSI 187......................................
MSI Default Settings 187......................................
MSI Enumerations 188........................................
IS9CConfig::GetPDF417 188..................................
IS9CConfig::SetPDF417 189...................................
PDF 417 Default Settings 190..................................
PDF 417 Enumerations 190....................................
IS9CConfig::GetPlessey 192....................................
IS9CConfig::SetPlessey 192....................................
Plessey Default Settings 193....................................
Plessey Enumerations 193......................................
IS9CConfig::GetStandard2of5 194...............................
IS9CConfig::SetStandard2of5 195...............................
Contents
ix700 Series Color Mobile Computer User’s Manual
Standard 2 of 5 Default Settings 196..............................
Standard 2 of 5 Enumerations 196...............................
IS9CConfig::GetTelepen 197...................................
IS9CConfig::SetTelepen 197....................................
Telepen Default Settings 197....................................
Telepen Enumerations 198.....................................
IS9CConfig::GetUpcEan 198...................................
IS9CConfig::SetUpcEan 200...................................
UPC/EAN Default Settings 201.................................
UPC/EAN Enumerations 201...................................
IS9CConfig2 Functions 204.................................................
IS9CConfig2::GetCode11 205..................................
IS9CConfig2::SetCode11 205...................................
Code 11 Default Settings 206...................................
Code 11 Enumerations 206....................................
IS9CConfig2::GetCustomSymIds 207............................
IS9CConfig2::SetCustomSymIds 208.............................
Custom Identifier Assignments 209..............................
Custom Identifier Default Settings 210............................
Custom Identifier Example 210.................................
IS9CConfig2::GetGlobalAmble 211..............................
IS9CConfig2::SetGlobalAmble 212..............................
Postamble and Preamble Defaults 212.............................
IS9CConfig2::GetPDF417Ext 213...............................
IS9CConfig2::SetPDF417Ext 213...............................
PDF 417 Extended: Micro PDF 417 Default Settings 214.............
IS9CConfig2::GetSymIdXmit 214...............................
IS9CConfig2::SetSymIdXmit 214................................
Symbology ID Transmission Option 215..........................
IS9CConfig3 Functions 216.................................................
ISCP Commands 216.........................................
ISCP::GetConfig 217.........................................
ISCP::SetConfig 218..........................................
AIM Symbology ID Defaults 219.............................................
IImage Interface 221....................................................................
IImage::ReadSigCapBuffer 221...............................................
IImage::ReadSigCapFile 224.................................................
IImage::ReadImage 225....................................................
IImage::CancelReadImage 226...............................................
IImage::Start 226.........................................................
IImage::Stop 227..........................................................
IImage::Open 227.........................................................
IImage::Close 228.........................................................
Data Collection Configuration 229.........................................................
Contents
x 700 Series Color Mobile Computer User’s Manual
Tethered Scanner 230...................................................................
Enabling and Disabling 230.................................................
Changing Comm Settings 231...............................................
Tethered Scanner 231.........................................
Sabre 1551E or 1553 Tethered Scanner 232........................
Welch Allyn 1470 Imager Settings 232............................
Error Message 232.........................................................
Scanner Cabling 232...................................................
Limitations and Capabilities 233..........................................
Programming
Creating CAB Files 236.................................................................
Creating Device-Specific CAB Files 236........................................
Creating an .INF File 236......................................
Sample .INF File 245.........................................
Using Installation Functions in SETUP.DLL 248.................................
After the CAB File Extraction 248............................................
Creating CAB Files with CAB Wizard 249......................................
Troubleshooting the CAB Wizard 250.........................................
FTP Server 251........................................................................
Configurable Parameters Via the Registry Editor 252..............................
BlockSize 252...............................................
DeviceName 253.............................................
DeviceURL 253.............................................
IDNATarget 254.............................................
ManifestName 254...........................................
PauseAtStartup 255...........................................
Root 255...................................................
Transferring Files Over TCP/IP Networks 256...................................
Stopping the FTP Server from Your Application 260...............................
Autostart FTP 260........................................................
Full Screen 262........................................................................
Kernel I/O Controls 264.................................................................
IOCTL_HAL_GET_DEVICE_INFO 264.....................................
IOCTL_HAL_ITC_READ_PARM 265.......................................
IOCTL_HAL_ITC_WRITE_SYSPARM 270...................................
IOCTL_HAL_GET_DEVICEID 272.........................................
IOCTL_HAL_GET_OAL_VERINFO 273.....................................
IOCTL_HAL_GET_BOOTLOADER_VERINFO 274...........................
IOCTL_HAL_WARMBOOT 275............................................
IOCTL_HAL_COLDBOOT 275............................................
IOCTL_HAL_GET_RESET_INFO 276.......................................
IOCTL_HAL_GET_BOOT_DEVICE 277.....................................
IOCTL_HAL_REBOOT 278...............................................
IOCTL_PROCESSOR_INFORMATION 279..................................
IOCTL_GET_CPU_ID 280................................................
7
Contents
xi700 Series Color Mobile Computer User’s Manual
Reboot Functions 280...................................................................
IOCTL_HAL_REBOOT 280...............................................
IOCTL_HAL_COLDBOOT 280............................................
IOCTL_HAL_WARMBOOT 280............................................
Remapping the Keypad 281..............................................................
Unshifted Plane 281.......................................................
Gold Plane 281...........................................................
Alpha Plane 281..........................................................
Key Values 282...........................................................
How Key Values Are Stored in Registry 282.....................................
Change Notification 283....................................................
Advanced Keypad Remapping 283............................................
Scan Codes 283...........................................................
Sample View of Registry Keys 284............................................
Control Panel Applets
Configuration Parameters 286.............................................................
Changing a Parameter Setting 286............................................
About Configuration Parameters 287..........................................
Data Collection Control Panel Applet 288...................................................
Symbologies 289..........................................................
Code 39 290................................................
Standard 2 of 5 291...........................................
Codabar 292................................................
UPC/EAN 293..............................................
Code 93 294................................................
Code 128 295...............................................
Plessey 298.................................................
MSI 299...................................................
PDF 417 300...............................................
Interleaved 2 of 5 303.........................................
Matrix 2 of 5 304............................................
Telepen 305.................................................
Code 11 306................................................
QR Code 307...............................................
Data Matrix 308.............................................
Symbology Options 309....................................................
Symbology ID 309...........................................
Prefix 315..................................................
Suffix 316..................................................
Beeper/LED 317..........................................................
Beeper Volume 318...........................................
Beeper Frequency 320.........................................
Good Read Beeps 321.........................................
Good Read Beep Duration 322..................................
Imager 323..............................................................
Aimer LED duration 323......................................
Image Dimension 324.........................................
A
Contents
xii 700 Series Color Mobile Computer User’s Manual
Virtual Wedge 325........................................................
Virtual Wedge 325...........................................
Preamble 326...............................................
Postamble 327...............................................
Grid 328...................................................
Code Page 329..............................................
SNMP Control Panel Applet 330..........................................................
Security 331.............................................................
Read Only Community 331....................................
Read/Write Community 332....................................
Read Encryption 333.........................................
Write Encryption 334.........................................
Encryption Key 335..........................................
Tr a p s 336...............................................................
Authentication 336...........................................
Threshold 337...............................................
Identification 338.........................................................
Contact 338................................................
Name 339..................................................
Location 340................................................
Unit Information Control Panel Applet 341..................................................
Versions 342.............................................................
Battery Status 343.........................................................
CAB Files 344............................................................
Unit Manager
Data Collection 348....................................................................
Symbologies 348..........................................................
Symbology ID 349........................................................
Beeper/LED 349..........................................................
Imager 350..............................................................
Virtual Wedge 350........................................................
SNMP 350...........................................................................
Security 350.............................................................
Tr a p s 351...............................................................
Identification 351.........................................................
Unit 352.............................................................................
Date/Time 352...........................................................
Backlight Timeout 353.....................................................
Key Clicks 354...........................................................
Automatic Shutoff 355.....................................................
Volume 356..............................................................
Using Reader Commands 357.............................................................
Change Configuration 357..................................................
Set Time and Date 358.....................................................
B
Contents
xiii700 Series Color Mobile Computer User’s Manual
Bar Codes
Bar Code Symbologies 360...............................................................
UPC 362................................................................
EAN 362................................................................
Codabar 362.............................................................
Code 11 363.............................................................
Code 39 363.............................................................
Encoded Code 39 (Concatenation) 363........................................
Encoded Code 39 (Full ASCII) 363...........................................
Code 93 364.............................................................
Code 128 364............................................................
I 2 of 5 (Interleaved) 366...................................................
S2of5(Standard2of5) 366................................................
Plessey 367..............................................................
MSI Code (Variant of Plessey) 367............................................
Bar Code Labels 368....................................................................
Audio Volume 368........................................................
Automatic Shutoff 369.....................................................
Backlight Timeout 369.....................................................
Key Clicks 370...........................................................
Virtual Wedge Grid, Preamble, Postamble 371...................................
Grid 371...................................................
Preamble 371...............................................
Postamble 371...............................................
IIndex
Classes and Functions 374...............................................................
General Index 377......................................................................
Files Index 398........................................................................
C
Contents
xiv 700 Series Color Mobile Computer User’s Manual

Before You Begin
xv700 Series Color Mobile Computer User’s Manual
Before You Begin
This section introduces you to standard warranty provisions, safety
precautions, warnings and cautions, document formatting conventions,
and sources of additional product information. A documentation roadmap
is also provided to guide you in finding the appropriate information.
Warranty Information
To receive a copy of the standard warranty provision for this product, con-
tact your local Intermec support services organization. In the U.S. call
1-800-755-5505, and in Canada call 1-800-668-7043. If you live outside
of the U.S. or Canada, you can find your local Intermec support services
organization on the Intermec Web site at www.intermec.com.
Note: Opening this product may void the warranty. The internal workings
of this product can only be accessed by Intermec service personnel. Radio
replacements and upgrades require Intermec service personnel.
Safety Summary
Your safety is extremely important. Follow these guidelines:
SRead and follow all warnings and cautions in this book before handling
and operating Intermec equipment. You can be seriously injured, and
equipment and data can be damaged if you do no follow the safety
warnings and cautions.
SDo not repair or adjust energized equipment alone under any circum-
stances. Someone capable of providing first aid must always be present
foryoursafety.
SAlways obtain first aid or medical attention immediately after an injury.
Never neglect an injury, no matter how slight it seems.
SBegin resuscitation immediately if someone is injured and stops breath-
ing. Any delay could result in death. To work on or near high voltage,
you should be familiar with approved industrial first aid methods.
SNever work on energized equipment unless authorized by a responsible
authority. Energized electrical equipment is dangerous. Electrical shock
from energized equipment can cause death. If you must perform autho-
rized emergency work on energized equipment, be sure that you comply
strictly with approved safety regulations.

Before You Begin
xvi 700 Series Color Mobile Computer User’s Manual
Warnings, Cautions, and Notes
The warnings, cautions, and notes in this manual use this format:
A warning alerts you of an operating procedure, practice, condition, or
statement that must be strictly observed to avoid death or serious injury
to the persons working on the equipment.
Attention Danger: Un avertissement vous avertit d’une procédure de
fonctionnement, d’une méthode, d’un état ou d’un rapport qui doit être
strictement respecté pour éviter l’occurrence de mort ou de blessures
graves aux personnes manupulant l’équipement.
A caution alerts you to an operating procedure, practice, condition, or
statement that must be strictly observed to prevent equipment damage or
destruction, or corruption or loss of data.
Attention: Une précaution vous avertit d’une procédure de
fonctionnement, d’une méthode, d’un état ou d’un rapport qui doit être
strictement respecté pour empêcher l’endommagement ou la destruction
de l’équipement, ou l’altération ou la perte de données.
Note: Notes are statements that either provide extra information about a
topic or contain special instructions for handling a particular condition or
set of circumstances.
About This Manual
The 700 Series Color Mobile Computer User’ s Manual provides you with
information about the features of the 700 Series Color Mobile Computer
and how to configure, troubleshoot, and support it. You must be familiar
with your host PC, your network, and your other Intermec equipment.
SChapter 1 — Introduction
Introduces the 700 Series Color Mobile Computer.
SChapter 2 — Pocket PC 2002
Introduces the Pocket PC 2002 operating system from Microsoft Cor-
poration, and explains how to use its Outlook, ActiveSync, Internet Ex-
plorer, and other companion programs.
SChapter 3 — Installing Applications
Provides methods to install applications and CAB files, also covers ap-
plication migration.
SChapter 4 — Network Support
Introduces the CORE application, network adapters such as Ethernet,
802.11b radios, GSM/GPRS or CDMA/1xRTT embedded radio mod-
ules, and wireless printing equipped with a Bluetooth module, SNMP
configuration, and Network Selection APIs.
SChapter 5 — Printer Support
Provides information on printing ASCII to either a port or to a generic
serial port, and on working with IrDA, NPCP, and O’ Neil printer driv-
ers.

Before You Begin
xvii700 Series Color Mobile Computer User’s Manual
SChapter 6 — Scanner Support
Provides Automatic Data Collection COM and IImage interfaces and
lists settings via Data Collection parameters.
SChapter 7 — Programming
Programming information that includes creating CAB files, the FTP
Server, Full Screen, Kernel I/O Control Functions, Reboot Functions,
and remapping the keypad.
SAppendix A — Control Panel Applets
Contains detailed information about the Data Collection, SNMP, and
Unit Information control panel applets.
SAppendix B — Unit Manager
Describes how to configure some parameters via the Unit Manager ap-
plication and includes reader commands.
SAppendix C — Bar Codes
Describes some of the more common bar code symbologies and includes
bar code labels that can be scanned to configure your 700 Series Com-
puter.
Format Conventions for Input From a Keyboard or Keypad
This table describes the formatting conventions for input from PC or host
computer keyboards and device keypads.
Format Conventions
Convention Description
Special text Shows the command as you should enter it into the device.
Italic text Indicates a variable that you must replace the parameter with a value.
Bold text Indicates the keys you must press on a PC or host computer key-
board. For example, “press Enter” means you press the key labeled
“Enter” on the PC or host computer keyboard.
where This word introduces a list of parameters and explains the values you
can specify for them.
Before You Begin
xviii 700 Series Color Mobile Computer User’s Manual
Related Publications
To order printed versions of the Intermec manuals, contact your local In-
termec representative or distributor. Following are related Intermec
manuals, CD-ROMs, and part numbers (P/N). For other versions and
languages, consult your Intermec sales representative.
S700 Series Color Mobile Computer Quick Start Guide
(P/N: 962-054-053)
S700 Color Recovery CD PPC 2002 Professional Edition WWE
(P/N: 235-100-001 Kit)
S700 Color Recovery CD PPC 2002 Premium Edition WWE
(P/N: 235-101-001 Kit)
S700 Series Color Software Tools CD (P/N: 235-099-001)
SWindows 95 and Windows CE Configuration Utilities Reference Manual
(P/N: 978-054-010)
Global Services and Support
Select any of the following services available from Intermec Technologies
Corporation:
SFactory Repair and On-site Repair
To request a return authorization number for one of our authorized ser-
vice centers, or to request an on-site repair technician, call
1-800-755-5505, then select option 1.
STechnical Support
For technical support on your Intermec product, call 1-800-755-5505,
then select option 2.
SService Contract Status
To inquire about an existing contract, or to renew a contract, call
1-800-755-5505, then select option 3.
SSchedule Site Surveys or Installations
To schedule a site survey, or to request a product or system installation,
call 1-800-755-5505, then select option 4.
Web Support
Visit our Web site at http://www.intermec.com to download many of our
current manuals in PDF format.
Visit our technical knowledge base (Knowledge Central) at
http://intermec.custhelp.com to review technical information or to request
technical help for all Intermec products.

1700 Series Color Mobile Computer User’s Manual
Introduction
1
This chapter introduces the 700 Series Color (700C) Mobile Computer,
developed by Intermec Technologies Corporation to enhance wireless con-
nectivity needs.

IntroductionChapter —1
2 700 Series Color Mobile Computer User’s Manual
About the 700 Series Color Mobile Computer
Battery
The 700 Series Computer comes equipped with a nominal 14.4
Watt-hour, 7.2V (two 2000 mAh cells), replaceable Lithium-Ion (LiIon)
battery. To view the status of this battery from the 700 Series Computer,
tap Start →Settings →the System tab →the Power icon to view the
current status of both the main battery and the backup battery. Tap ok to
exit this information.
Introduction—Chapter 1
3700 Series Color Mobile Computer User’s Manual
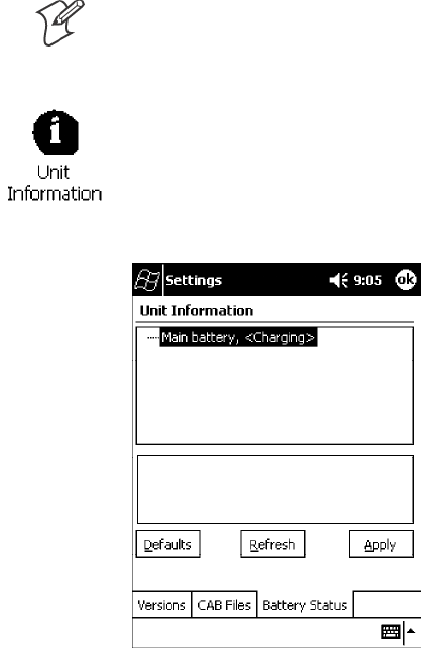
Note: The Unit Information control panel applet is only available in the
700 Series Computer if Intermec Content is enabled, the Plus region is
enabled and installed, and a laser scanner is installed.
You can also view the battery status for the 700 Series Computer by
accessing the Unit Information control panel applet. Tap the Unit
Information icon, then tap the Battery Status tab to view the current
status. Tap ok to exit this information.
Low Battery Shutdown
If your computer shuts down because of low battery conditions, your com-
puter will not operate. This is done to ensure that data is protected. Al-
though the battery will protect the data against loss for several hours, you
should connect your computer to a power source when you first detect a
low battery condition.
Your computer contains an internal super capacitor, a temporary power
storage device, that protects data for up to ten minutes. This is to give you
time to replace the main battery pack before that data is lost. Be sure to put
the computer in a suspend mode before doing so.
The battery power fail level is set so that after the system shuts down in a
low battery condition, there is still sufficient charge to allow the unit to
remain configured, keep proper time, and maintain DRAM (Dynamic
Random Access Memory) for at least 72 hours at room temperature if the
main battery remains in the mobile computer. The configuration and time
are lost if:
SThe battery discharges beyond this level.
SThe battery is removed when the computer is not in suspend mode.
SA cold reset is performed on the computer.
IntroductionChapter —1
4 700 Series Color Mobile Computer User’s Manual
System Status Maintained
System status is maintained in “suspend” when the main battery is re-
moved:
S10 minutes for 64 MB low-power chips
S5 minutes for 128 MB low-power chips
CAB Files Within 700C Software Tools CD
If you leave the default destination while you install the “\700 Color
Mgmt Tools” directory onto your desktop PC, then “C:\Intermec\Inter-
mec 700 Color Mgmt Tools\Cab Files” will be the default directory. There
are folders within the “\Cab Files” directory that contain demos and pro-
gram files. See the 700 Series Color Software Tools CD User’ s Manual for
more information about these files.
Modem Support
Modem PC Cards are not supported by the 700 Series Computer. Howev-
er, modem options do include the following:
SSwitchable dock that includes a built-in modem and a serial port be-
tween which an application can switch.
SMini-Landline Modem that can be tethered to the port on the bottom
of the 700 Series Computer.
SOther external modems that may be connected to the bottom of the
700 Series Computer or to the dock.
Network Support
Radio CompactFlash Cards cannot be installed by a user. The 700 Series
Computer must be serviced to install or replace radios. See Chapter 4,
“Network Support” for more information.
S802.11b radio
SIntegrated GSM/GPRS radio
SCDPM/1xRTT radio
SWireless printing equipped with a Bluetooth qualified module by Socket
Communications

Introduction—Chapter 1
5700 Series Color Mobile Computer User’s Manual
Removeable Card Support
To access either the CompactFlash (CF) or SecureDigital (SD) card slot,
locate the access door at the top of the 700 Series Computer, remove its
two screws, then remove the door.
CompactFlash Cards
Support is limited to one CompactFlash (CF) Storage Card in the 700 Se-
ries Computer, either for storage or for the 802.11b radio.
SecureDigital Cards
Support is limited to one SecureDigital (SD) Storage Card in the 700 Se-
ries Computer for storage.
MultiMediaCards
MultiMediaCards (MMCs) are not supported in the 700 Series Comput-
ers because current technology shows that SD cards will quickly surpass
MMC cards in storage capacity.
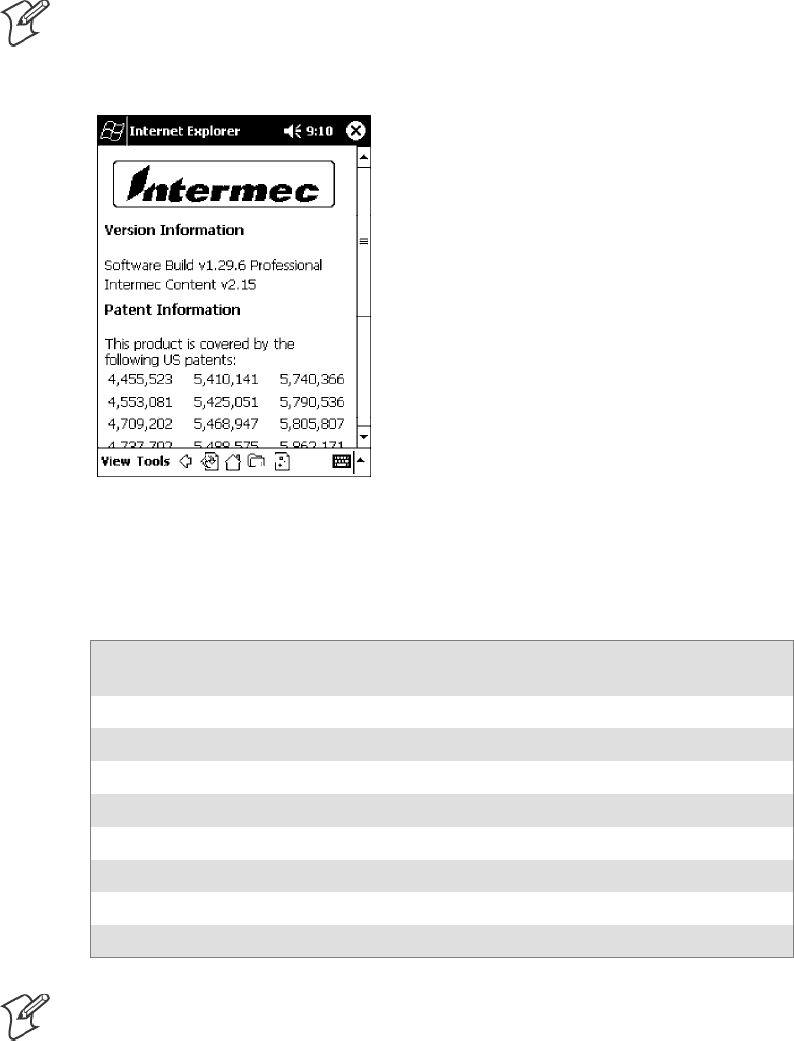
Software Build Version
To check to see if your 700 Series Computer has the latest build, select
Start →Internet Explorer →the Intermec logo.
The latest software build version is displayed beneath the Patent Informa-
tion title. This information will be useful should you need customer assis-
tance.
Note: The Unit Information control panel applet is only available in the
700 Series Computer if Intermec Content is enabled, the Plus region is
enabled and installed, and a laser scanner is installed.
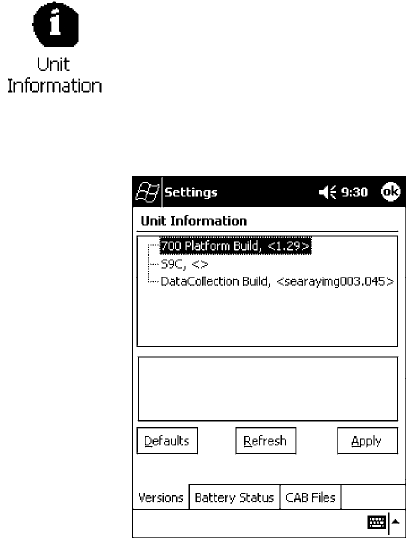
IntroductionChapter —1
6 700 Series Color Mobile Computer User’s Manual
You can also view the latest software build version on your 700 Series
Computer by accessing the Unit Information control panel applet. Select
Start →Settings →the System tab →the Unit Information icon →the
Versions tab to view the current build version on your 700 Series
Computer.
What’s New
The newest functionality is available in software build versions 1.30 or
greater. The following changes have occurred since the last release of this
manual:
SApplied new publications standards to this manual.
SAdapted instructions using Ethernet connections to fit Intermec require-
ments in Chapter 2, “Pocket PC 2002.”
SMoved “Updating System Software” and “EFlash” information to the Re-
covery CD User’ s Manual from Chapter 3, “Installing Applications.”
SRemoved several 802.11 APIs not related to the 700 Series Color Com-
puter from Chapter 4, “Network Support.”
SAdded the Siemens MC45 radio module to Chapter 4, “Network Sup-
port.”
SAdded tethered scanner information to Chapter 6, “Scanner Support.”
SAdded CAB extraction information and FTP Server parameters to
Chapter 7, “Programming.”
SAdded imager option information via the Data Collection control panel
applet to Appendix A, “Control Panel Applets.”Note that this is for 700
Series Computers using an imager.

7700 Series Color Mobile Computer User’s Manual
Pocket PC 2002
2
This chapter introduces the Pocket PC 2002 operating system from
Microsoft Corporation.

Pocket PC 2002Chapter —2
8 700 Series Color Mobile Computer User’s Manual
Introduction
Congratulations on purchasing a Pocket PC. Due to the size and capabili-
ties of this 700 Series Color Mobile Computer, you can keep your most
important business and personal information up-to-date and close at hand.
Microsoft ActiveSync increases the power of your 700 Series Computer by
allowing you to synchronize the information on your desktop or laptop
computer with your 700 Series Computer. Picture yourself in the follow-
ing situations:
SA Calendar reminder alerts you that it is time to catch the bus. You grab
your 700 Color Pocket PC Mobile Computer and catch the bus just in
time. Because ActiveSync keeps the information on your 700 Series
Computer up-to-date, you leisurely review your task list, make notes
about the new books and CDs you want to buy, and read and respond
to e-mail messages. When you get back to the office, ActiveSync trans-
fers any task changes you made, your notes, and your e-mail message
responses to your desktop computer. For more information on Active-
Sync, see “Microsoft ActiveSync” on page 29.
SWhile walking with a colleague, your 700 Color Pocket PC Mobile
Computer rings. You look at the caller ID and see it is your manager
who is calling. She asks if you two are free this afternoon for an emer-
gency meeting. While your colleague fumbles through his paper orga-
nizer, you press a button on your 700 Series Computer and instantly see
a list of today’ s appointments and meetings. You are quickly able to tell
your manager your available times, and make a note of the new meeting
while on the call. You hang up, send an e-mail with a schedule request
for the three of you at the desired location. For more information on
scheduling appointments and meetings, see “Microsoft Pocket Outlook”
on page 31.
SYou are meeting your friends tonight for dinner and a movie. You
download the latest movie information from the Internet to your desk-
top computer and then synchronize it with your 700 Series Computer.
At dinner, you pull out your 700 Color Pocket PC Mobile Computer
and review your movie options with your friends. For more information
on downloading Web pages to your 700 Series Computer, see “Pocket
Internet Explorer” on page 62.
Premium versus Professional Editions
Your 700 Series Computer will have either the Premium Edition or the
Professional Edition of Pocket PC 2002. Do the following to determine
which edition of Pocket PC 2002 is on your unit.
1Select Start →Internet Explorer →the Intermec logo.
Pocket PC 2002—Chapter 2
9700 Series Color Mobile Computer User’s Manual
2Note the “Software Build” information displayed beneath the Version
Information title.
Note: If you have an older software build, your unit may say either
“PREM” (which indicates the Premium Edition) or “PRO” (which indicates
the Professional Edition).
3Tap t he Close icon in the top right corner to exit the Internet Explorer.
Below is a list of components for each edition of Pocket PC 2002:
Component
Premium
Edition
Professional
Edition
Microsoft ActiveSync Client (page 29) XX
Microsoft Pocket Outlook (page 31) X X
Pocket Word (page 47) XX
Pocket Excel (page 52) X X
MSN Messenger (page 53) X
Windows Media Player for Pocket PC (page 57) XRAM
Microsoft Reader (page 58) XRAM
Pocket Internet Explorer (page 62) X X
Note: Components marked with “RAM” are provided on a Companion
CD for download into RAM rather than burned into Flash ROM.

Pocket PC 2002Chapter —2
10 700 Series Color Mobile Computer User’s Manual
Where to Find Information
This chapter describes your 700 Series Computer hardware, provides an
overview of the programs on your 700 Series Computer, and explains how
to connect your 700 Series Computer to a desktop computer, a network,
or the Internet. For instructions on setting up your 700 Series Computer
and installing ActiveSync, see the Quick Start Card. The following is a
guide to more information to assist you use your 700 Series Computer.
For information on: See this source:
Programs on your mobile computer. This chapter and mobile computer Help. To view Help,
tap Start →Help.
Additional programs that can be installed on the mobile
computer.
The Pocket PC Companion CD.
Connecting to and synchronizing with a desktop com-
puter.
The Quick Start Card or AutoSync Help on your desktop
computer. To view Help, click Help →Microsoft Acti-
veSync Help.
Last-minute updates and detailed technical information. The Read Me files, located in the Microsoft ActiveSync
folder on the desktop computer and on the Pocket PC
Companion CD.
Up-to-date information on your Pocket PC. http://www.microsoft.com/mobile/pocketpc
Pocket PC and many of the technologies supported by the 700 Series
Computer are not from Intermec Technologies. Many of the utilities and
features on a Pocket PC device come directly from Microsoft without any
modification from Intermec Technologies. There may be certain Micro-
soft-specific issues that Intermec Technologies would not be able to sup-
port, so you will have to contact Microsoft Corporation. Use these URLs
to determine your Microsoft support options:
Shttp://msdn.microsoft.com/support/
Shttp://support.microsoft.com/
Snews://news.microsoft.com (a free support option)
Pocket PC 2002—Chapter 2
11700 Series Color Mobile Computer User’s Manual
Basic Skills
Learning to use your 700 Series Computer is easy. This describes the basic
concepts of using and customizing your 700 Series Computer.
Buttons and Stylus
Your 700 Series Computer has hardware buttons that control actions and
scroll functions, and a stylus for selecting items and entering information.
On the 700 Series Computer, the stylus replaces the mouse.
STap:
Touch the screen once with the stylus to open items and select options.
SDrag:
Hold the stylus on the screen and drag across the screen to select text
and images. Drag in a list to select multiple items.
STap and hold:
Tap and hold the stylus on an item to see a list of actions available for
that item. On the pop-up menu that appears, tap the action to be per-
formed.
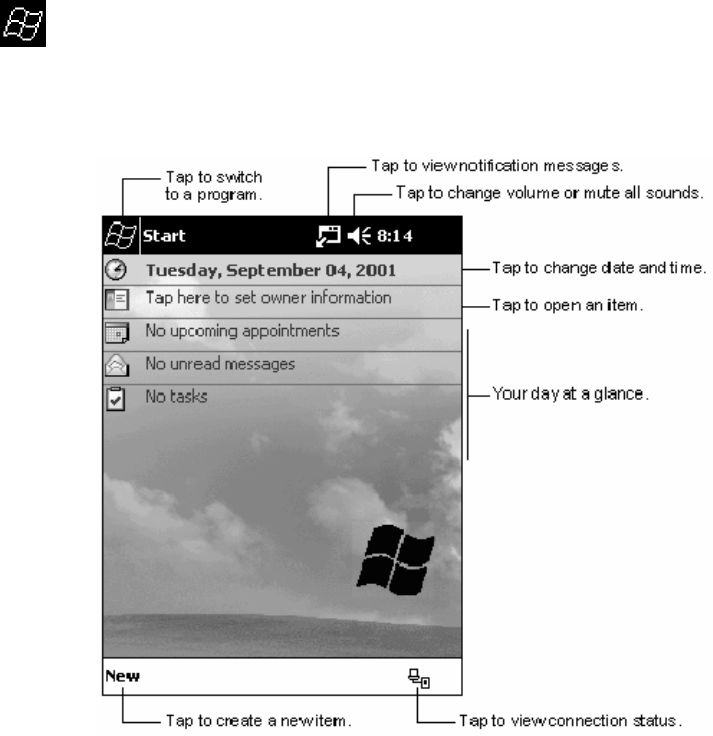
Today Screen
When you turn on your 700 Series Computer for the first time each day
(or after four hours of inactivity), you will see the Today screen. You can
also display it by tapping the Start flag (shown left) and then Today.On
the Today screen, you can see at a glance important information for the
day.

Pocket PC 2002Chapter —2
12 700 Series Color Mobile Computer User’s Manual
Following are some of the status icons you may see:
Status Icon Meaning:
Turns all sounds on and off.
Backup battery is low.
Main batteries are charging.
Main batteries are low.
Main batteries are very low.
Main batteries are full.
Connection is active.
Synchronization is beginning or ending.
Synchronization is occurring.
Notification or one or more instant messages received.
Notification of one or more e-mail messages received.
If more notification icons need to be displayed than there is
room to display them, the Notification icon (shown left) will
display. Tap the icon to view all notification icons.

Pocket PC 2002—Chapter 2
13700 Series Color Mobile Computer User’s Manual
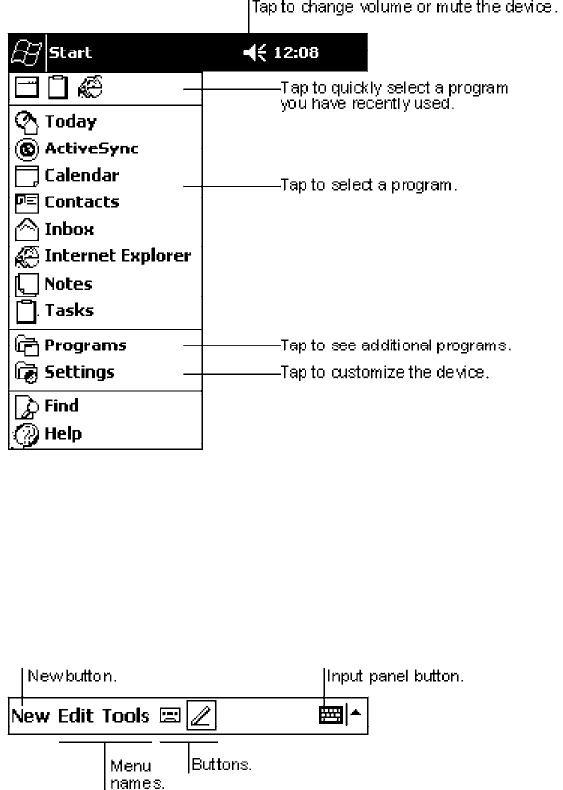
Programs
You can switch from one program to another by selecting it from the Start
menu. (You can customize which programs you see on this menu. For
information, see “Adjusting Settings” on page 26.) To access some
programs, tap Start →Programs, and then the program name.
You can also switch to some programs by pressing a program button. Your
700 Series Computer has one or more program buttons located on the
front or side of the computer. The icons on the buttons identify the pro-
grams to which they switch.
Note: Some programs have abbreviated labels for check boxes and drop-
down menus. To see the full spelling of an abbreviated label, tap and hold
the stylus on the label. Drag the stylus off the label so that the command is
not carried out.
The following is a partial list of programs that are on your 700 Series
Computer. Look on the Pocket PC Companion CD for additional pro-
grams that you can install onto your 700 Series Computer.
ActiveSync
Synchronize information between your 700 Series Computer and desktop
computer.
Calendar
Keep track of your appointments and create meeting requests.
Contacts
Keep track of your friends and colleagues.
Inbox
Send and receive e-mail messages.
Pocket Internet Explorer
Browse Web and WAP (Wireless Application Protocol) sites, and download
new programs and files from the Internet.
Notes
Create handwritten or typed notes, drawings, and recordings.
Tasks
Keep track of your tasks.
Pocket Excel
Create new workbooks or view and edit Excel workbooks created on your
desktop computer.
MSN Messenger
Send and receive instant messages with your MSN Messenger contacts.
Pocket Word
Create new documents or view and edit Word documents created on your
desktop computer.
Pocket PC 2002Chapter —2
14 700 Series Color Mobile Computer User’s Manual
Navigation Bar and Command Bar
The navigation bar is located at the top of the screen. It displays the active
program and current time, and allows you to switch to programs and close
screens.
Use the command bar at the bottom of the screen to perform tasks in pro-
grams. The command bar includes menu names, buttons, and the Input
Panel button. To create a new item in the current program, tap New.To
see the name of a button, tap and hold the stylus on the button. Drag the
stylus off the button so that the command is not carried out.
Pocket PC 2002—Chapter 2
15700 Series Color Mobile Computer User’s Manual
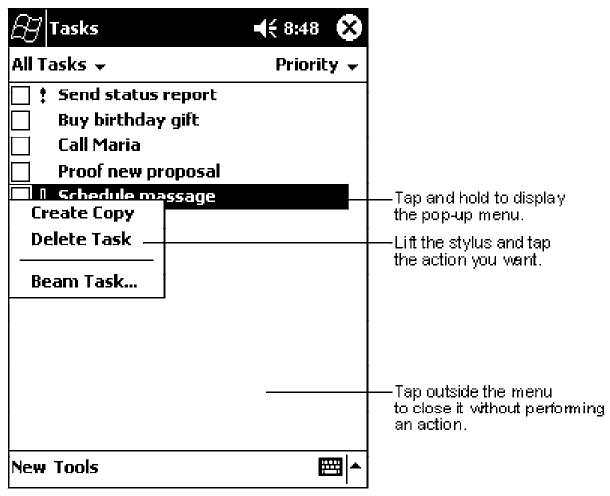
Pop-up Menus
With pop-up menus, you can quickly choose an action for an item. For
example, you can use the pop-up menu in the contact list to quickly delete
a contact, make a copy of a contact, or send an e-mail message to a con-
tact. The actions in the pop-up menus vary from program to program. To
access a pop-up menu, tap and hold the stylus on the item name that you
want to perform the action on. When the menu appears, lift the stylus,
and tap the action you want to perform. Or tap anywhere outside the
menu to close the menu without performing an action.
Notifications
Your 700 Series Computer reminds you in a variety of ways when you
have something to do. For example, if you have set up an appointment in
Calendar, a task with a due date in Tasks, or an alarm in Clock, you will be
notified in any of the following ways:
SA message box appears on the screen.
SA sound, which you can specify, is played.
SA light flashes on your 700 Series Computer.
SA vibrator resonates from the 700 Series Computer.
To choose reminder types and sounds for your 700 Series Computer, tap
Start →Settings →the Personal tab →Sounds & Notifications. The
options you choose here apply throughout the 700 Series Computer.
Pocket PC 2002Chapter —2
16 700 Series Color Mobile Computer User’s Manual
Enter Information on Your 700 Series Computer
You have several options for entering new information:
SUse the input panel to enter typed text, either by using the soft key-
board or other input method.
SWrite directly on the screen.
SDraw pictures on the screen.
SSpeak into your 700 Series Computer microphone to record a message.
SUse Microsoft ActiveSync to synchronize or copy information from
your desktop computer to your 700 Series Computer. For more infor-
mation on ActiveSync, see ActiveSync Help on your desktop computer.
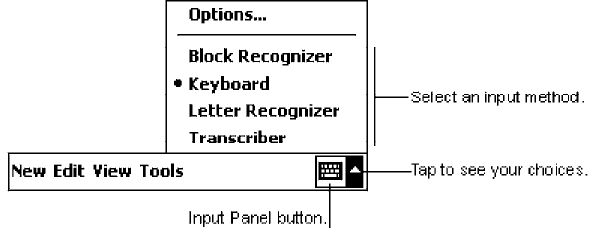
Use the input panel to enter information in any program on your 700
Series Computer. You can either type using the soft keyboard or write
using Block Recognizer,Letter Recognizer,orTranscriber. In either case,
the characters appear as typed text on the screen.
To show or hide the input panel, tap the Input Panel button. Tap the
arrow next to the Input Panel button to see your choices.
Pocket PC 2002—Chapter 2
17700 Series Color Mobile Computer User’s Manual
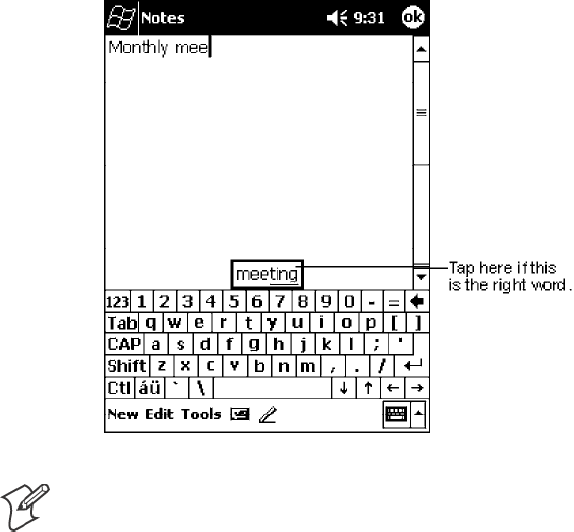
When you use the input panel, your 700 Series Computer anticipates the
word you are typing or writing and displays it above the input panel.
When you tap the displayed word, it is inserted into your text at the
insertion point. The more you use your 700 Series Computer, the more
words it learns to anticipate.
Note: To change word suggestion options, such as the number of words
suggested at one time, tap Start →Settings →the Personal tab →Input
→the Word Completion tab.
Typing With the Soft Keyboard
1Tap the arrow next to the Input Panel button, and then Keyboard.
2On the soft keyboard that is displayed, tap the keys with your stylus.
Using Block Recognizer
With Block Recognizer, you can input character strokes using the stylus
that are similar to those used on other 700 Series Computers.
1Tap the arrow next to the Input Panel button, then Block Recognizer.
2Write a letter in the box.
When you write a letter, it is converted to typed text that appears on the
screen. For specific instructions on using Block Recognizer, with Block
Recognizer open, tap the question mark next to the writing area.
Pocket PC 2002Chapter —2
18 700 Series Color Mobile Computer User’s Manual
Using Letter Recognizer
With Letter Recognizer, you can write letters using the stylus just as you
would on paper.
1Tap the arrow next to the Input Panel button, then Letter Recognizer.
2Write a letter in the box.
When you write a letter, it is converted to typed text that appears on the
screen. For specific instructions on using Letter Recognizer, with Letter
Recognizer open, tap the question mark next to the writing area.
Using Transcriber
With Transcriber, you can write anywhere on the screen using the stylus
just as you would on paper. Unlike Letter Recognizer and Block Recogniz-
er, you can write a sentence or more of information. Then, pause and let
Transcriber change the written characters to typed characters.
1Tap the arrow next to the Input Panel button, and then Transcriber.
2Write anywhere on the screen.
For specific instructions on using Transcriber, with Transcriber open, tap
the question mark in the lower right hand corner of the screen.
Selecting Typed Text
If you want to edit or format typed text, you must select it first.
SDrag the stylus across the text you want to select.
You can cut, copy, and paste text by tapping and holding the selected
words and then tapping an editing command on the pop-up menu, or by
tapping the command on the Edit menu.
Pocket PC 2002—Chapter 2
19700 Series Color Mobile Computer User’s Manual
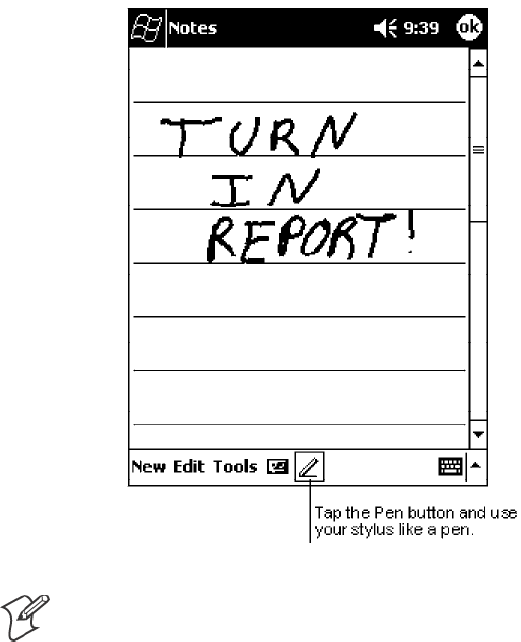
Writing on the Screen
In any program that accepts writing, such as the Notes program, and in
the Notes tab in Calendar, Contacts, and Tasks, you can use your stylus to
write directly on the screen. Write the way you do on paper. You can edit
and format what you have written and convert the information to text at a
later time.
STap t he Pen button to switch to writing mode. This action displays lines
on the screen to help you write.
Note: Some programs that accept writing may not have the Pen button.
See the documentation for that program to find out how to switch to writ-
ing mode.
Selecting the Writing
If you want to edit or format writing, you must select it first.
1Tap and hold the stylus next to the text you want to select until the in-
sertion point appears.
2Without lifting, drag the stylus across the text you want to select.
If you accidentally write on the screen, tap Tools →Undo and try again.
You can also select text by tapping the Pen button to deselect it and then
dragging the stylus across the screen.
You can cut, copy, and paste written text in the same way you work with
typed text: tap and hold the selected words and then tap an editing com-
mand on the pop-up menu, or tap the command on the Edit menu.
Pocket PC 2002Chapter —2
20 700 Series Color Mobile Computer User’s Manual
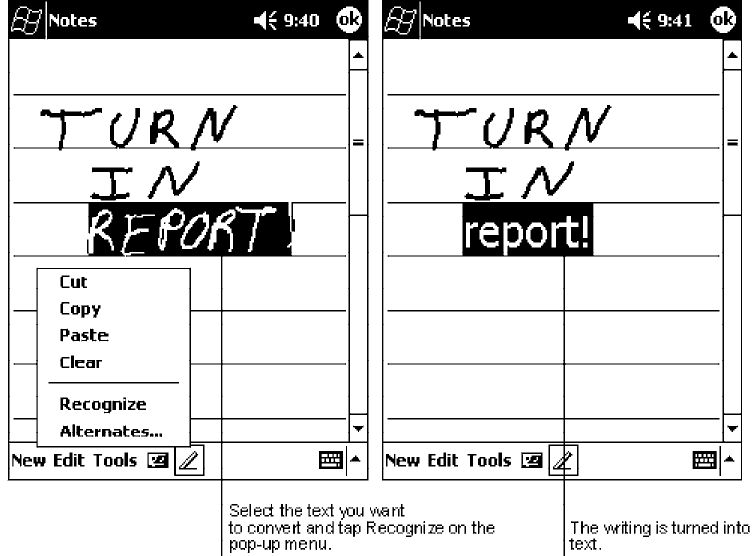
Converting Writing to Text
STap Tools →Recognize.
If you want to convert only certain words, select them before tapping Rec-
ognize on the Tools menu (or tap and hold the selected words and then tap
Recognize on the pop-up menu). If a word is not recognized, it is left as
writing.
Pocket PC 2002—Chapter 2
21700 Series Color Mobile Computer User’s Manual
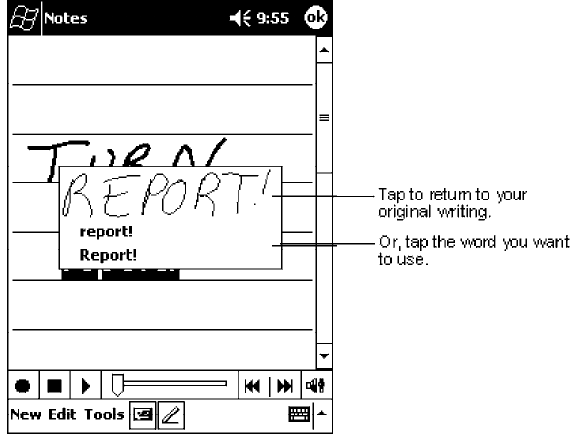
If the conversion is incorrect, you can select different words from a list of
alternates or return to the original writing. To do so, tap and hold the in-
correct word (tap one word at a time). On the pop-up menu, tap Alterna-
tes. A menu with a list of alternate words appears. Tap the word you want
to use, or tap the writing at the top of the menu to return to the original
writing.
Tips for getting good recognition:
SWrite neatly.
SWrite on the lines and draw descenders below the line. Write the cross
of the “t” and apostrophes below the top line so that they are not con-
fused with the word above. Write periods and commas above the line.
SFor better recognition, try increasing the zoom level to 300% using the
Tools menu.
SWrite the letters of a word closely and leave big gaps between words so
that the 700 Series Computer can easily tell where words begin and end.
SHyphenated words, foreign words that use special characters such as ac-
cents, and some punctuation cannot be converted.
SIf you add writing to a word to change it (such as changing a “3” to an
“8”) after you attempt to recognize the word, the writing you add will
not be included if you attempt to recognize the writing again.
Pocket PC 2002Chapter —2
22 700 Series Color Mobile Computer User’s Manual
Drawing on the Screen
You can draw on the screen in the same way that you write on the screen.
The difference between writing and drawing on the screen is how you se-
lect items and how they can be edited. For example, selected drawings can
be resized, while writing cannot.
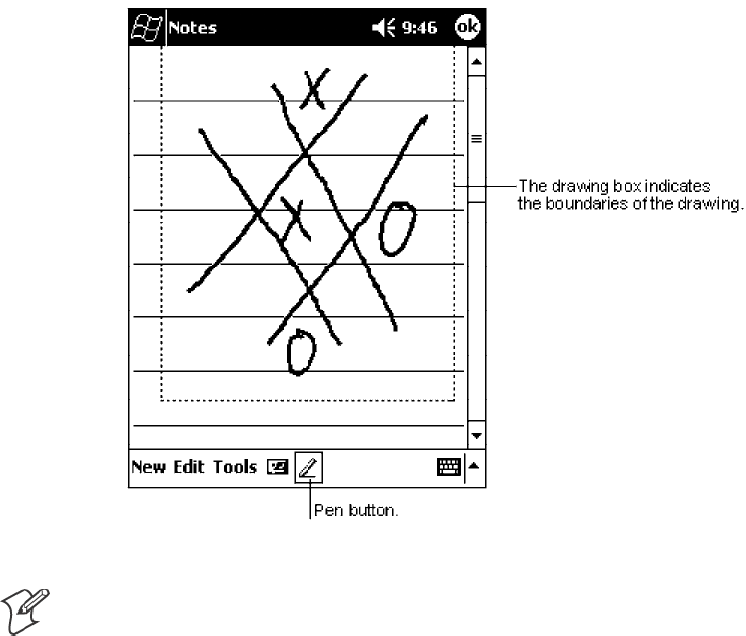
Creating a Drawing
SCross three ruled lines on your first stroke. A drawing box appears. Sub-
sequent strokes in or touching the drawing box become part of the dra-
wing. Drawings that do not cross three ruled lines will be treated as
writing.
Note: You may want to change the zoom level so that you can more easily
work on or view your drawing. Tap Tools and then a zoom level.
Selecting a Drawing
If you want to edit or format a drawing, you must select it first.
STap and hold the stylus on the drawing until the selection handle ap-
pears. To select multiple drawings, deselect the Pen button and then
drag to select the drawings you want.
You can cut, copy, and paste selected drawings by tapping and holding the
selected drawing and then tapping an editing command on the pop-up
menu, or by tapping the command on the Edit menu. To resize a drawing,
make sure the Pen button is not selected, and drag a selection handle.
Pocket PC 2002—Chapter 2
23700 Series Color Mobile Computer User’s Manual
Recording a Message
In any program where you can write or draw on the screen, you can also
quickly capture thoughts, reminders, and phone numbers by recording a
message. In Calendar, Tasks, and Contacts, you can include a recording in
the Notes tab. In the Notes program, you can create a stand-alone record-
ing or include a recording in a written note. If you want to include the re-
cording in a note, open the note first. In the Inbox program, you can add a
recording to an e-mail message.
Creating a Recording
1Hold your computer’ s microphone near your mouth or source of
sound.
2Press and hold the Record hardware button on your 700 Series Com-
puter until you hear a beep.
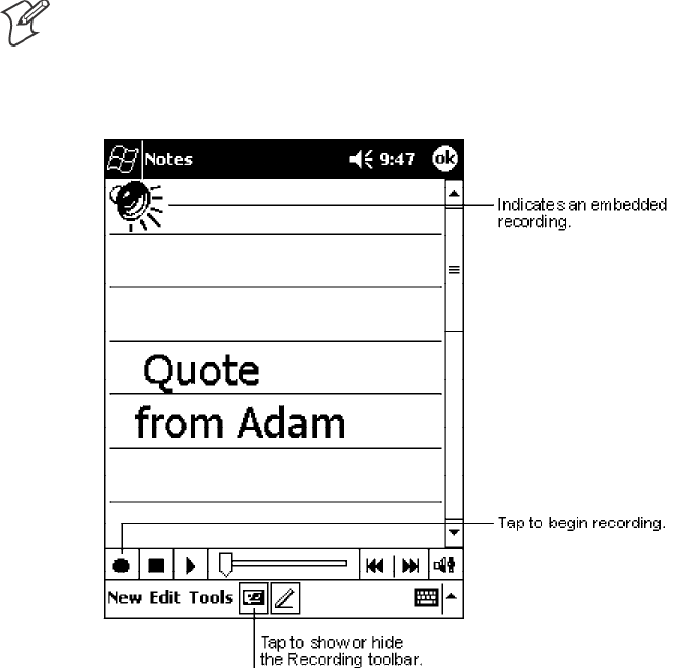
3While holding down the Record button, make your recording.
4To stop recording, release the Record button. Two beeps will sound.
The new recording appears in the note list or as an embedded icon.
Note: You can also make a recording by tapping the Record button on the
Recording toolbar.
To play a recording, tap it in the list or tap its icon in the note.
Pocket PC 2002Chapter —2
24 700 Series Color Mobile Computer User’s Manual
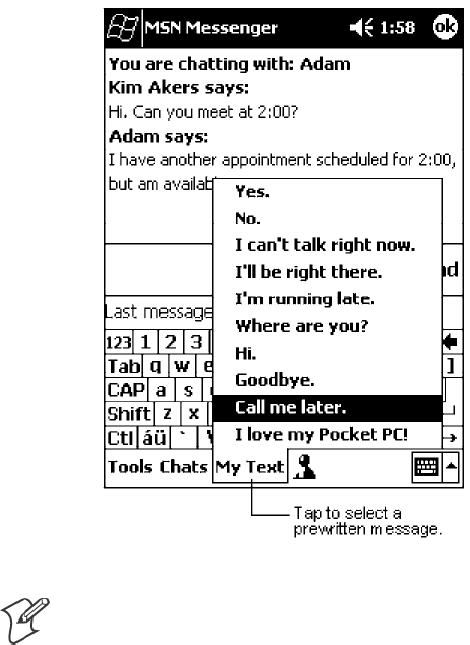
Using My Text
When using Inbox or MSN Messenger, use My Text to quickly insert pre-
set or frequently used messages into the text entry area. To insert a mes-
sage, tap My Text and tap a message.
Note: You can add text after inserting a My Text message before sending
it.
To edit a My Text message, in the Tools menu, tap Edit →My Text Mes-
sages. Select the message you wish to edit and make desired changes.
Pocket PC 2002—Chapter 2
25700 Series Color Mobile Computer User’s Manual
Finding and Organizing Information
The Find feature on your 700 Series Computer helps you quickly locate
information.
Tap Start →Find. Enter the text you want to find, select a data type, and
then tap Go to initiate the search.
Note: To quickly find information that is taking up storage space on your
700 Series Computer, select Larger than 64 KB in Type.
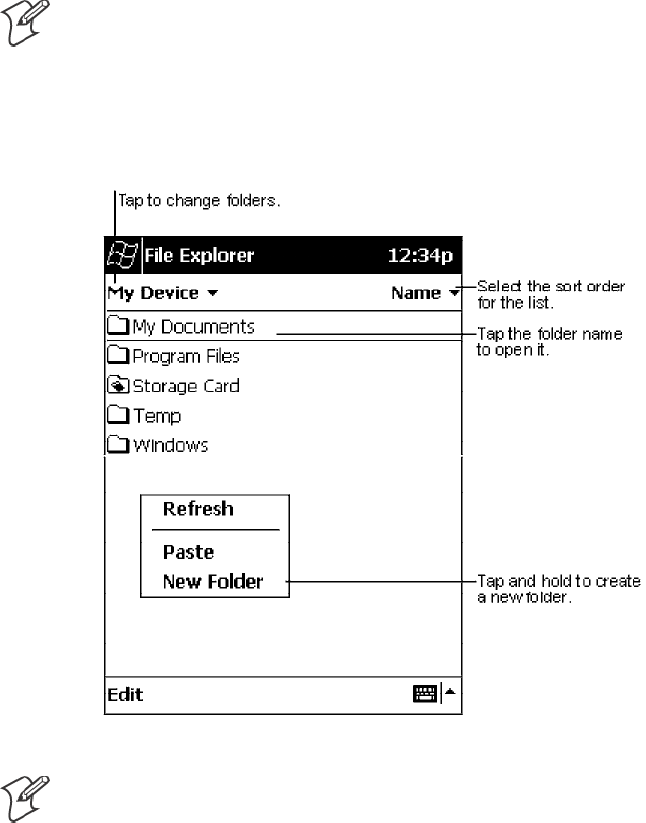
You can also use the File Explorer to find files on your 700 Series Comput-
er and to organize these files into folders. Tap Start →Programs →File
Explorer.
Note: You can move files in File Explorer by tapping and holding the item
you want to move, and then tapping Cut or Copy and Paste on the pop-
up menu.
Pocket PC 2002Chapter —2
26 700 Series Color Mobile Computer User’s Manual
Customizing Your 700 Series Computer
You can customize your 700 Series Computer by adjusting settings and
installing additional software.
Adjusting Settings
You can adjust settings to suit the way you work. To see available options,
tap Start →Settings →either the Personal tab or the System tab located at
the bottom of the screen. You might want to adjust the following:
SClock:
To change the time or to set alarms.
SMenus:
To customize what appears on the Start menu, and to enable a pop-up
menu from the New button.
SOwner Information:
To enter your contact information.
SPassword:
To limit access to your 700 Series Computer.
SPower:
To maximize battery life.
SToday:
To customize the look and information displayed on the Today screen.
Adding or Removing Programs
Programs added to your 700 Series Computer at the factory are stored in
ROM (Read Only Memory). You cannot remove this software, and you
will never accidentally lose ROM contents. ROM programs can be up-
dated using special installation programs with a *.XIP extension. All other
programs and data files added to your 700 Series Computer after factory
installation are stored in RAM (Random Access Memory).
You can install any program created for your 700 Series Computer, as long
as your 700 Series Computer has enough memory. The most popular place
to find software for your 700 Series Computer is on the Pocket PC Web
site (http://www.microsoft.com/mobile/pocketpc).
Adding Programs Using ActiveSync
You will need to install the appropriate software for your 700 Series Com-
puter on your desktop computer before installing it on your 700 Series
Computer.
1Determine your 700 Series Computer and processor type so that you
know which version of the software to install. Tap Start →Settings →
the System tab →About →the Version tab, then make a note of the
information in Processor.
2Download the program to your desktop computer (or insert the CD or
disk that contains the program into your desktop computer). You may
see a single *.XIP, *.EXE, or *.ZIP file, a SETUP.EXE file, or several
versions of files for different 700 Series Computer types and processors.
Be sure to select the program designed for the Pocket PC and your 700
Series Computer processor type.
Pocket PC 2002—Chapter 2
27700 Series Color Mobile Computer User’s Manual
3Read any installation instructions, Read Me files, or documentation that
comes with the program. Many programs provide special installation
instructions.
4Connect your 700 Series Computer and desktop computer.
5Double-click the *.EXE file.
SIf the file is an installer, the installation wizard will begin. Follow the
directions on the screen. Once the software has been installed on your
desktop computer, the installer will automatically transfer the soft-
ware to your 700 Series Computer.
SIf the file is not an installer, you will see an error message stating that
the program is valid but it is designed for a different type of comput-
er. You will need to move this file to your 700 Series Computer. If
you cannot find any installation instructions for the program in the
Read Me file or documentation, use ActiveSync Explore to copy the
program file to the Program Files folder on your 700 Series Comput-
er. For more information on copying files using ActiveSync, see Acti-
veSync Help.
Once installation is complete, tap Start →Programs, and then the pro-
gram icon to switch to it.
Adding a Program Directly from the Internet
1Determine your 700 Series Computer and processor type so that you
know which version of the software to install. Tap Start →Settings →
the System tab →About →the Version tab, then make a note of the
information in Processor.
2Download the program to your 700 Series Computer straight from the
Internet using Pocket Internet Explorer. You may see a single *.XIP,
*.EXE, or *.ZIP file, a SETUP.EXE file, or several versions of files for
different 700 Series Computer types and processors. Be sure to select the
program designed for the Pocket PC and your 700 Series Computer
processor type.
3Read any installation instructions, Read Me files, or documentation that
comes with the program. Many programs provide installation instruc-
tions.
4Tap the file, such as a *.XIP or *.EXE file. The installation wizard will
begin. Follow the directions on the screen.
Pocket PC 2002Chapter —2
28 700 Series Color Mobile Computer User’s Manual
Adding a Program to the Start Menu
Tap Start →Settings →Menus →the Start Menu tab, and then the check
box for the program. If you do not see the program listed, you can either
use File Explorer on the 700 Series Computer to move the program to the
Start Menu folder, or use ActiveSync on the desktop computer to create a
shortcut to the program and place the shortcut in the Start Menu folder.
SUsing File Explorer on the 700 Series Computer:
Tap Start →Programs →File Explorer, and locate the program (tap the
folder list, labeled My Documents by default, and then My Device to
see a list of all folders on the 700 Series Computer). Tap and hold the
program and tap Cut on the pop-up menu. Open the Start Menu fold-
er located in the Windows folder, tap and hold a blank area of the win-
dow, and tap Paste on the pop-up menu. The program will now appear
on the Start menu. For more information on using File Explorer, see
“Finding and Organizing Information” on page 25.
SUsing ActiveSync on the desktop computer:
Use the Explorer in ActiveSync to explore your 700 Series Computer
files and locate the program. Right-click the program, and then click
Create Shortcut. Move the shortcut to the Start Menu folder in the
Windows folder. The shortcut now appears on the Start menu. For
more information, see ActiveSync Help.
Removing Programs
STap Start →Settings →the System tab →Remove Programs.
If the program does not appear in the list of installed programs, use File
Explorer on your 700 Series Computer to locate the program, tap and hold
the program, and then tap Delete on the pop-up menu.

Pocket PC 2002—Chapter 2
29700 Series Color Mobile Computer User’s Manual
Microsoft ActiveSync
Visit the following Microsoft Web site for the latest in updates, technical
information, and samples:
Shttp://www.microsoft.com/mobile/pocketpc/downloads/activesync.asp
Using Microsoft ActiveSync, you can synchronize the information on your
desktop computer with the information on your 700 Series Computer.
Synchronization compares the data on your 700 Series Computer with
your desktop computer and updates both computers with the most recent
information. For example:
SKeep Pocket Outlook data up-to-date by synchronizing your 700 Series
Computer with Microsoft Outlook data on your desktop computer.
SSynchronize Microsoft Word and Microsoft Excel files between your
700 Series Computer and desktop computer. Your files are automatically
converted to the correct format
Note: By default, ActiveSync does not automatically synchronize all types
of information. Use ActiveSync options to turn synchronization on and off
for specific information types.
With ActiveSync, you can also:
SBack up and restore your 700 Series Computer data.
SCopy (rather than synchronize) files between your 700 Series Computer
and desktop computer.
SControl when synchronization occurs by selecting a synchronization
mode. For example, you can synchronize continually while connected to
your desktop computer or only when you choose the synchronize com-
mand.
SSelect which information types are synchronized and control how much
data is synchronized. For example, you can choose how many weeks of
past appointments you want synchronized.
Before you begin synchronization, install ActiveSync on your desktop
computer from the Pocket PC Companion CD. For more information on
installing ActiveSync, see your Quick Start card. ActiveSync is already
installed on your 700 Series Computer.
After installation is complete, the ActiveSync Setup Wizard helps you con-
nect your 700 Series Computer to your desktop computer, set up a part-
nership so you can synchronize information between your 700 Series
Computer and your desktop computer, and customize your synchroniza-
tion settings. Your first synchronization process will automatically begin
when you finish using the wizard.
After your first synchronization, take a look at Calendar, Contacts, and
Tasks on your 700 Series Computer. You will notice that information you
have stored in Microsoft Outlook on your desktop computer has been
copied to your 700 Series Computer, and you did not have to type a word.
Disconnect your 700 Series Computer from your computer and you are
ready to go!
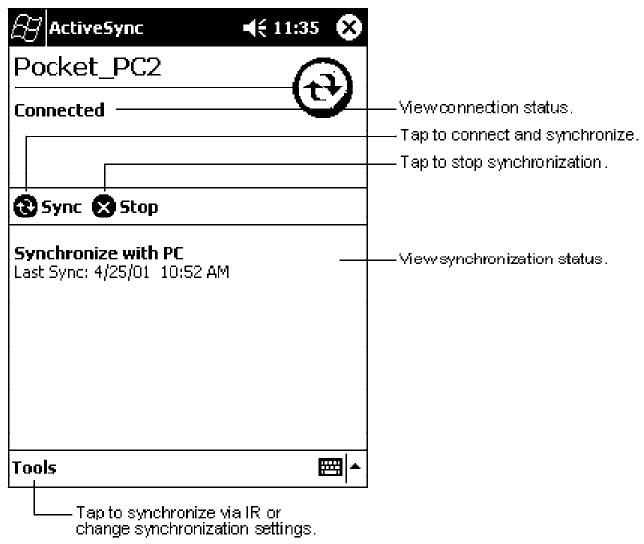
Pocket PC 2002Chapter —2
30 700 Series Color Mobile Computer User’s Manual
Once you have set up ActiveSync and completed the first synchronization
process, you can initiate synchronization from your 700 Series Computer.
To switch to ActiveSync on your 700 Series Computer, tap Start →
ActiveSync. Note that if you have a wireless LAN card, you can
synchronize remotely from your 700 Series Computer.
For information about using ActiveSync on your desktop computer, start
ActiveSync on your desktop computer, and then see ActiveSync Help.
For more information about ActiveSync on your 700 Series Computer,
switch to ActiveSync, then tap Start →Help.
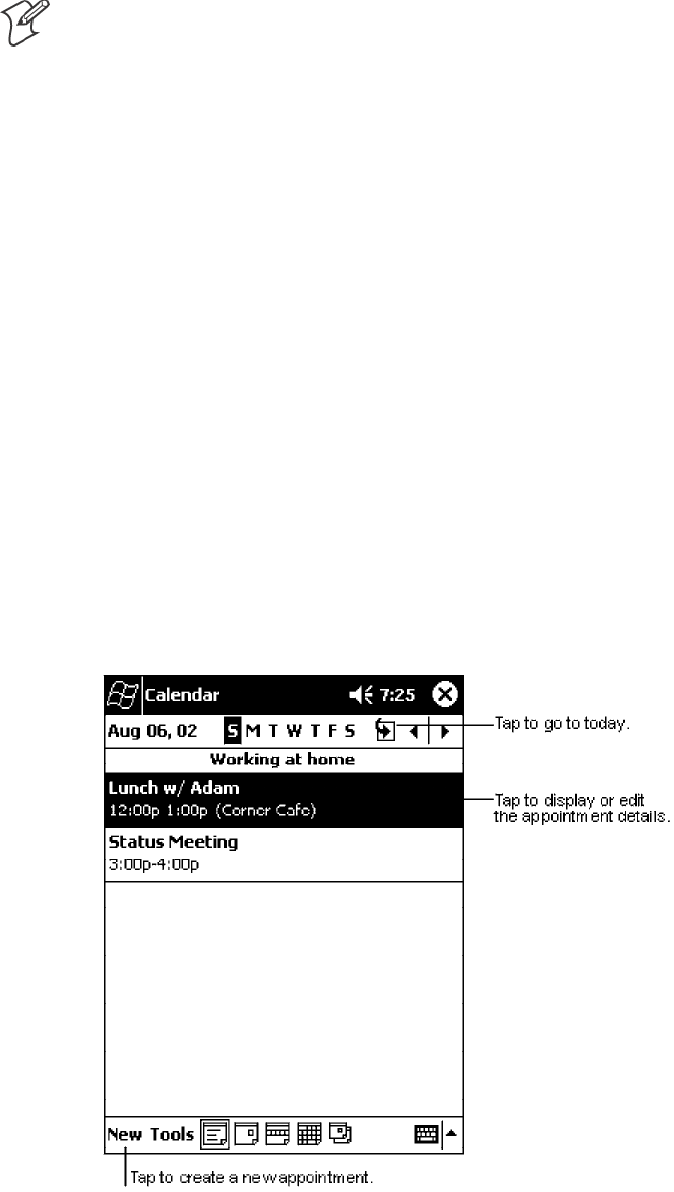
Pocket PC 2002—Chapter 2
31700 Series Color Mobile Computer User’s Manual
Microsoft Pocket Outlook
Note: The Professional Edition of Microsoft Pocket Outlook does not in-
clude a spell checker.
Microsoft Pocket Outlook includes Calendar, Contacts, Tasks, Inbox, and
Notes. You can use these programs individually or together. For example,
e-mail addresses stored in Contacts can be used to address e-mail messages
in Inbox.
Using ActiveSync, you can synchronize information in Microsoft Outlook
or Microsoft Exchange on your desktop computer with your 700 Series
Computer. You can also synchronize this information directly with a
Microsoft Exchange server. Each time you synchronize, ActiveSync
compares the changes you made on your 700 Series Computer and desk-
top computer or server and updates both computers with the latest in-
formation. For information on using ActiveSync, see ActiveSync Help on
the desktop computer.
You can switch to any of these programs by tapping them on the Start
menu.
Calendar: Scheduling Appointments and Meetings
Use Calendar to schedule appointments, including meetings and other
events. You can check your appointments in one of several views (Agenda,
Day, Week, Month, and Year) and easily switch views by using the View
menu.
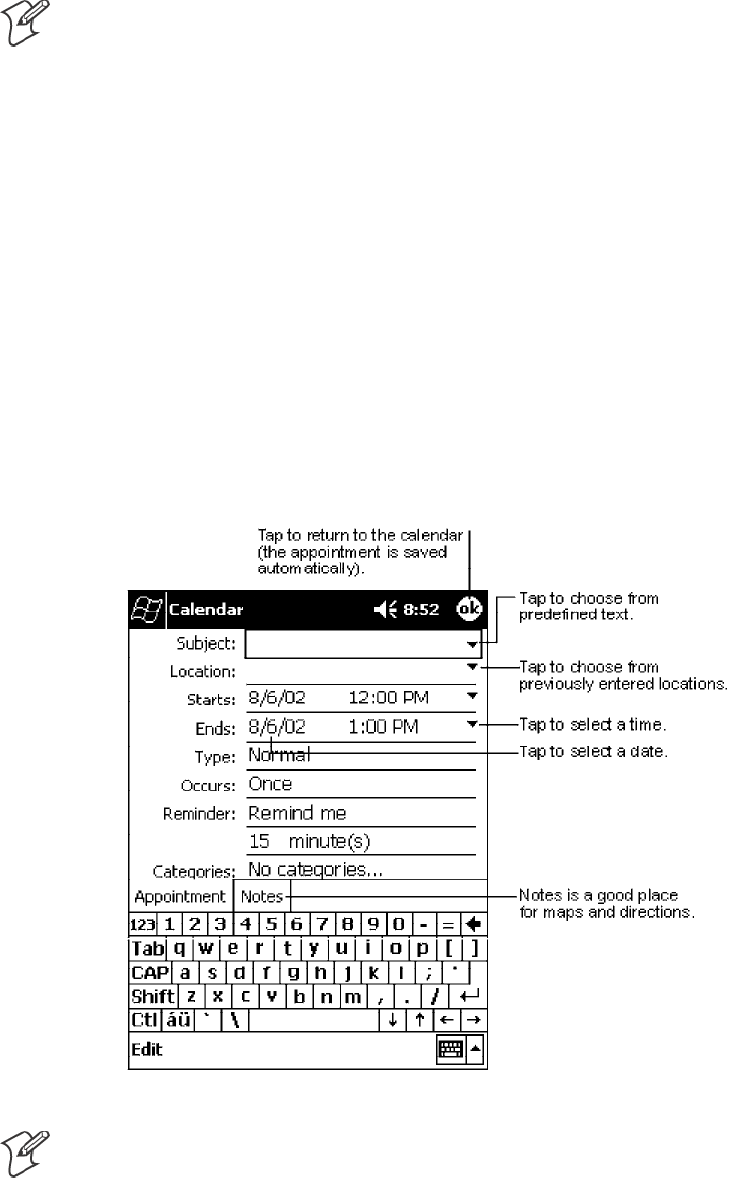
Pocket PC 2002Chapter —2
32 700 Series Color Mobile Computer User’s Manual
Note: You can customize the Calendar display, such as changing the first
day of the week, by tapping Options on the Tools menu.
Creating an Appointment
1If you are in Day or Week view, tap the desired date and time for the
appointment.
2Tap New.
3Using the input panel, enter a description and a location. Tap first to
select the field.
4If needed, tap the date and time to change them.
5Enter other desired information. You will need to hide the input panel
to see all available fields.
6To add notes, tap the Notes tab. You can enter text, draw, or create a
recording. For more information on creating notes, see “Notes: Capturing
Thoughts and Ideas” on page 40.
7When finished, tap OK to return to the calendar.
Note:IfyouselectRemind me in an appointment, your 700 Series Com-
puter will remind you according to the options set in Start →Settings →
the Personal tab →Sounds & Reminders.

Pocket PC 2002—Chapter 2
33700 Series Color Mobile Computer User’s Manual
Using the Summary Screen
When you tap an appointment in Calendar, a summary screen is displayed.
To change the appointment, tap Edit.
Creating Meeting Requests
You can use Calendar to set up meetings with users of Outlook or Pocket
Outlook. The meeting request will be created automatically and sent either
when you synchronize Inbox or when you connect to your e-mail server.
Indicate how you want meeting requests sent by tapping Tools →
Options. If you send and receive e-mail messages through ActiveSync,
select ActiveSync.
Scheduling a Meeting
1Create an appointment.
2In the appointment details, hide the input panel, and then tap
Attendees.
3From the list of e-mail addresses you have entered in Contacts, select the
meeting attendees.
The meeting notice is created automatically and placed in the Outbox
folder.
For more information on sending and receiving meeting requests, see Cal-
endar Help and Inbox Help on the 700 Series Computer.
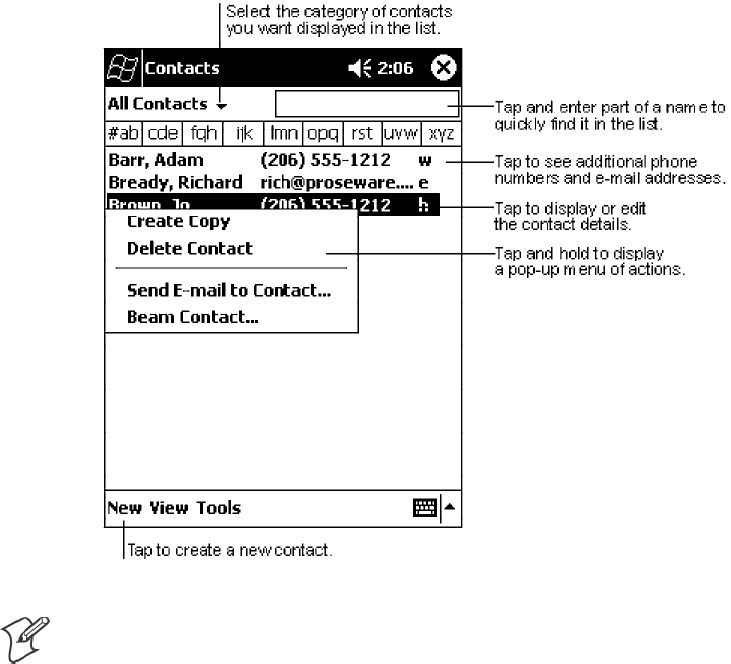
Pocket PC 2002Chapter —2
34 700 Series Color Mobile Computer User’s Manual
Contacts: Tracking Friends and Colleagues
Contacts maintains a list of your friends and colleagues so that you can
easily find the information you are looking for, whether you are at home
or on the road. Using the 700 Series Computer infrared (IR) port, you can
quickly share Contacts information with other 700 Series Computer users.
Note: To change the way information is displayed in the list, tap Tools →
Options.
Creating a Contact
1Tap New.
2Using the input panel, enter a name and other contact information. You
will need to scroll down to see all available fields.
3To assign the contact to a category, scroll to and tap Categories and se-
lect a category from the list. In the contact list, you can display contacts
by category.
4To add notes, tap the Notes tab. You can enter text, draw, or create a
recording. For more information on creating notes, see “Notes: Capturing
Thoughts and Ideas” on page 40.
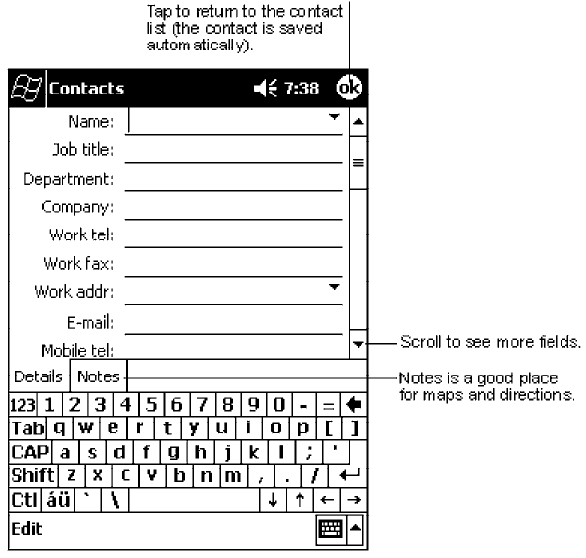
Pocket PC 2002—Chapter 2
35700 Series Color Mobile Computer User’s Manual
5When finished, tap OK to return to the contact list.
Finding a Contact
There are four ways to find a contact:
SIn the contact list, enter a contact name in the box under the navigation
bar. To show all contacts again, clear text from the box or tap the button
to the right of the box.
SIn the contact list, tap the category list (labeled All Contacts by default)
and select the type of contact that you want displayed. To show all con-
tacts again, select All Contacts. To view a contact not assigned to a cate-
gory, select None.
STo view the names of companies your contacts work for, in the contact
list, tap View →By Company. The number of contacts that work for
that company will be displayed to the right of the company name.
STap Start →Find, enter the contact name, select Contacts for the type,
and then tap Go.

Pocket PC 2002Chapter —2
36 700 Series Color Mobile Computer User’s Manual
Using the Summary Screen
When you tap a contact in the contact list, a summary screen is displayed.
To change the contact information, tap Edit.
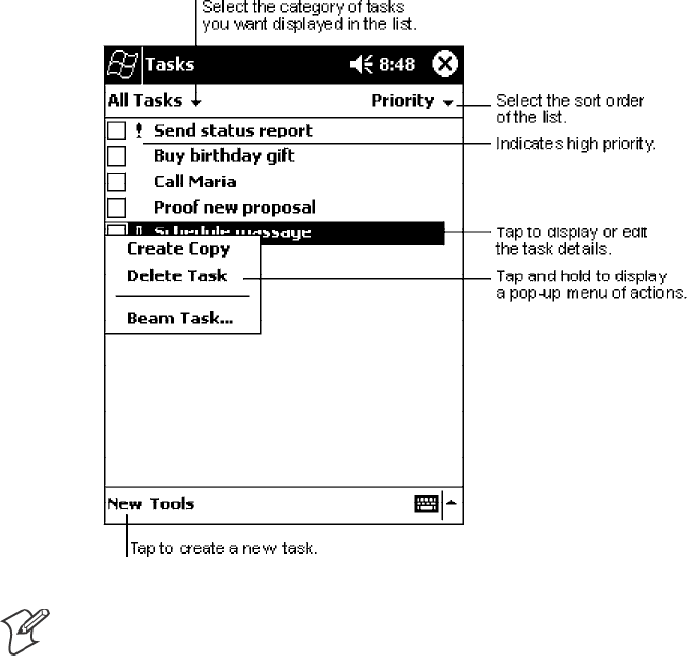
Pocket PC 2002—Chapter 2
37700 Series Color Mobile Computer User’s Manual
Tasks: Keeping a To Do List
Use Tasks to keep track of what you have to do.
Note: To change the way information is displayed in the list, tap Tools →
Options.
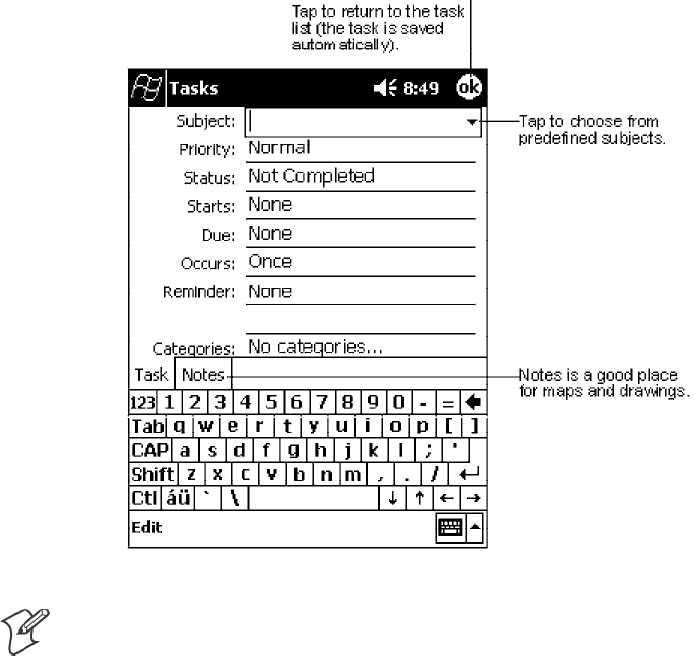
Pocket PC 2002Chapter —2
38 700 Series Color Mobile Computer User’s Manual
Creating a Task
1Tap New.
2Using the input panel, enter a description.
3You can enter a start date and due date or enter other information by
first tapping the field. If the input panel is open, you will need to hide it
to see all available fields.
4To assign the task to a category, tap Categories and select a category
from the list. In the task list, you can display tasks by category.
5To add notes, tap the Notes tab. You can enter text, draw, or create a
recording. For more information on creating notes, see “Notes: Capturing
Thoughts and Ideas” on page 40.
6When finished, tap OK to return to the task list.
Note: To quickly create a task with only a subject, tap Entry Bar on the
Tools menu. Then, tap Tap here to add a new task and enter your task
information.
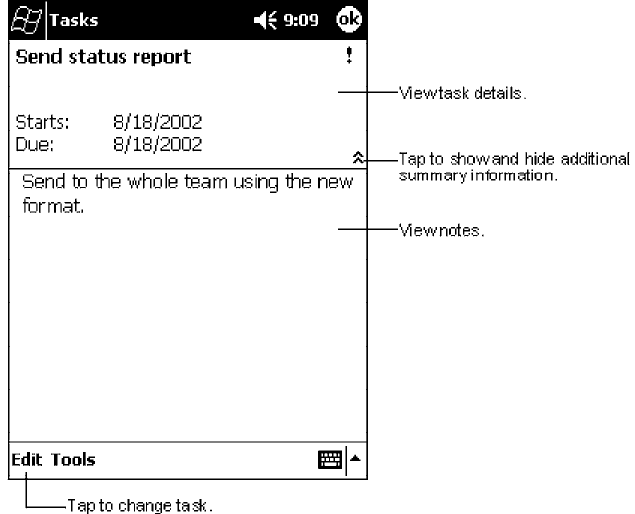
Pocket PC 2002—Chapter 2
39700 Series Color Mobile Computer User’s Manual
Using the Summary Screen
When you tap a task in the task list, a summary screen is displayed. To
change the task, tap Edit.
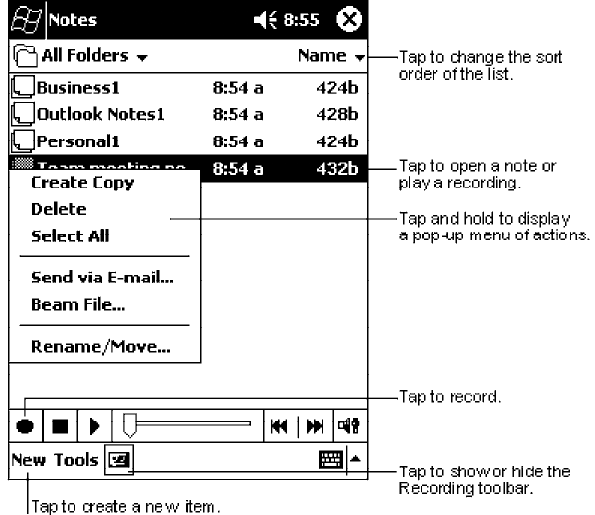
Pocket PC 2002Chapter —2
40 700 Series Color Mobile Computer User’s Manual
Notes: Capturing Thoughts and Ideas
Quickly capture thoughts, reminders, ideas, drawings, and phone numbers
with Notes. You can create a written note or a recording. You can also in-
clude a recording in a note. If a note is open when you create the record-
ing, it will be included in the note as an icon. If the note list is displayed, it
will be created as a stand-alone recording.
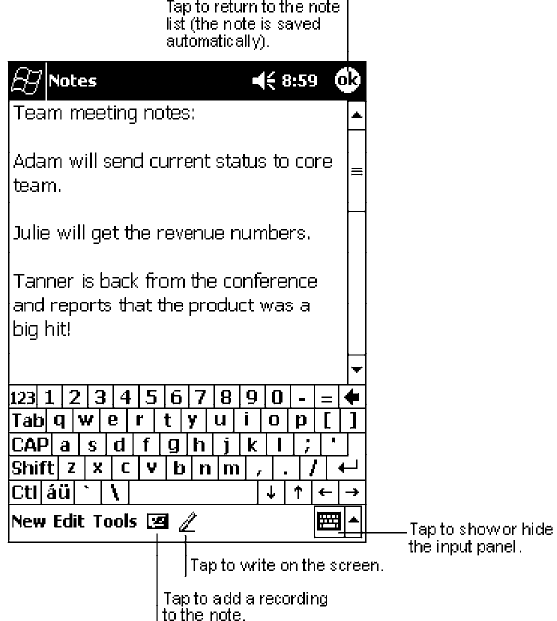
Pocket PC 2002—Chapter 2
41700 Series Color Mobile Computer User’s Manual
Creating a Note
1Tap New.
2Create your note by writing, drawing, typing, and recording. For more
information about using the input panel, writing and drawing on the
screen, and creating recordings, see “Basic Skills” on page 11.
Pocket PC 2002Chapter —2
42 700 Series Color Mobile Computer User’s Manual
Inbox: Sending and Receiving E-mail Messages
Use Inbox to send and receive e-mail messages in either of these ways:
SSynchronize e-mail messages with Microsoft Exchange or Microsoft
Outlook on your desktop computer.
SSend and receive e-mail messages by connecting directly to an e-mail
server through an Internet Service Provider (ISP) or a network.
Synchronizing E-mail Messages
E-mail messages can be synchronized as part of the general synchronization
process. You will need to enable Inbox synchronization in ActiveSync. For
information on enabling Inbox synchronization, see ActiveSync Help on the
desktop computer. During synchronization:
SMessages are copied from the mail folders of Exchange or Outlook on
your desktop computer to the ActiveSync folder in Inbox on your 700
Series Computer. By default, you will receive messages from the past
three days only, the first 100 lines of each message, and file attachments
of less than 100 KB in size.
SE-mail messages in the Outbox folder on your 700 Series Computer are
transferred to Exchange or Outlook, and then sent from those pro-
grams.
SE-mail messages in subfolders must be selected in ActiveSync on your
desktop computer in order to be transferred.
Connecting Directly to an E-mail Server
In addition to synchronizing e-mail messages with your desktop computer,
you can send and receive e-mail messages by connecting to an e-mail server
using a modem or network card connected to your 700 Series Computer.
You will need to set up a remote connection to a network or an ISP, and a
connection to your e-mail server. For more information, see “Getting Con-
nected” on page 67.
When you connect to the e-mail server, new messages are downloaded to
the 700 Series Computer Inbox folder, messages in the 700 Series Com-
puter Outbox folder are sent, and messages that have been deleted on the
e-mail server are removed from the 700 Series Computer Inbox folder.
Messages that you receive directly from an e-mail server are linked to your
e-mail server rather than your desktop computer. When you delete a mes-
sage on your 700 Series Computer, it is also deleted from the e-mail server
the next time you connect based on the settings selected in ActiveSync.
You can work online or offline. When working online, you read and re-
spond to messages while connected to the e-mail server. Messages are sent
as soon as you tap Send, which saves space on your 700 Series Computer.
When working offline, once you have downloaded new message headers or
partial messages, you can disconnect from the e-mail server and then de-
cide which messages to download completely. The next time you connect,
Inbox downloads the complete messages you have marked for retrieval and
sends the messages you have composed.
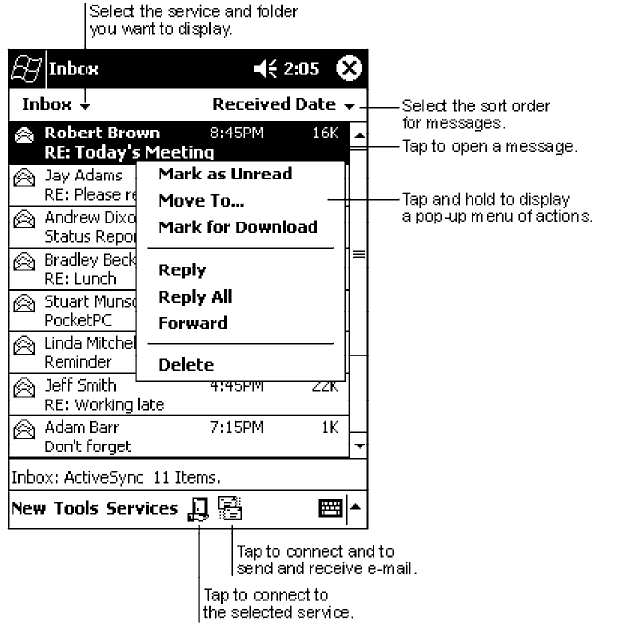
Pocket PC 2002—Chapter 2
43700 Series Color Mobile Computer User’s Manual
Using the Message List
Messages you receive are displayed in the message list. By default, the most
recently received messages are displayed first in the list.
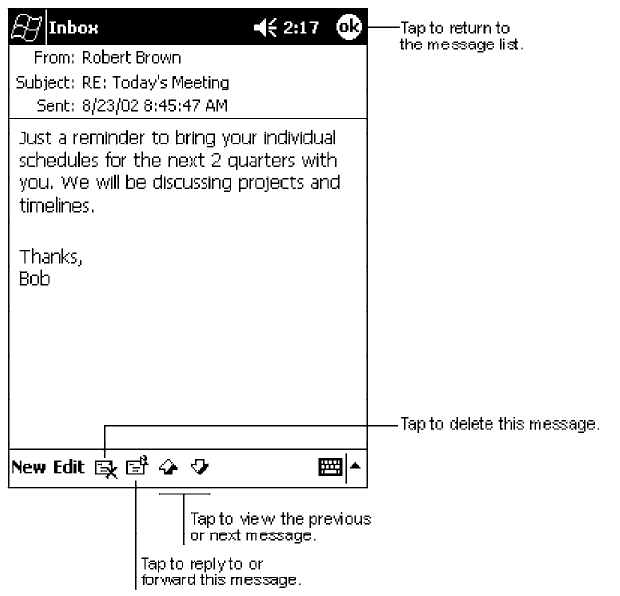
Pocket PC 2002Chapter —2
44 700 Series Color Mobile Computer User’s Manual
When you receive a message, tap it to open it. Unread messages are dis-
played in bold.
When you connect to your e-mail server or synchronize with your desktop
computer, by default, you will receive messages from the last five days
only, the first 100 lines of each new message, and file attachments of less
than 100 KB in size. The original messages remain on the e-mail server or
your desktop computer.
You can mark the messages that you want to retrieve in full during your
next synchronization or e-mail server connection. In the message list, tap
and hold the message you want to retrieve. On the pop-up menu, tap
Mark for Download. The icons in the Inbox message list give you visual
indications of message status.
You specify your downloading preferences when you set up the service or
select your synchronization options. You can change them at any time:
SChange options for Inbox synchronization using ActiveSync options.
For more information, see ActiveSync Help.
SChange options for direct e-mail server connections in Inbox on your
700 Series Computer. Tap Tools →Options →the Service tab, then
tap the service you want to change. Tap and hold the service and select
Delete to remove a service.
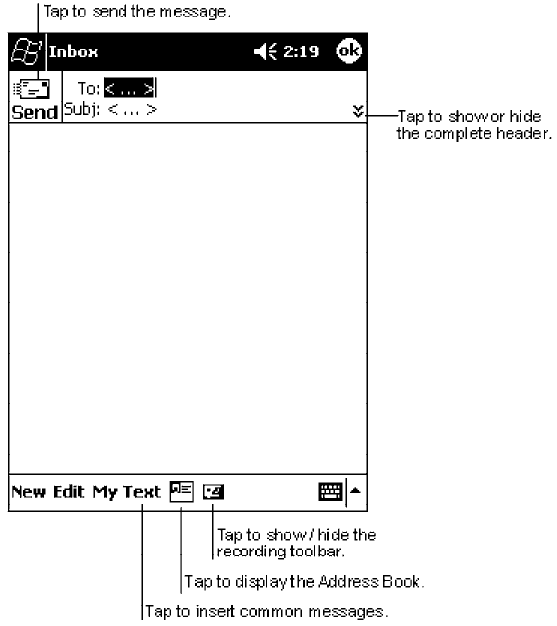
Pocket PC 2002—Chapter 2
45700 Series Color Mobile Computer User’s Manual
Composing Messages
To compose a message:
1Tap New.
2In the To field, enter an e-mail or SMS address of one or more recipi-
ents, separating them with a semicolon, or select a name from the con-
tact list by tapping the Address Book button. All e-mail addresses en-
tered in the e-mail fields in Contacts appear in the Address Book.
3Compose your message. To enter preset or frequently used messages, tap
My Text and select a message.
4Tap Send when you have finished the message. If you are working of-
fline, the message is moved to the Outbox folder and will be sent the
next time you connect.
If you are sending an SMS message and want to know if it was received,
tap Edit →Options →Request SMS text message delivery notification
before sending the message.
Pocket PC 2002Chapter —2
46 700 Series Color Mobile Computer User’s Manual
Managing E-mail Messages and Folders
By default, messages are displayed in one of five folders for each service
you have created: Inbox, Deleted Items, Drafts, Outbox, and Sent Items.
The Deleted Items folder contains messages that have been deleted on the
700 Series Computer. The behavior of the Deleted and Sent Items folders
depends on the options you have chosen. In the message list, tap Tools →
Options →the Message tab, then select your options.
If you want to organize messages into additional folders, tap Tools →
Manage Folders to create new folders. To move a message to another fold-
er, in the message list, tap and hold the message and then tap Move to on
the pop-up menu.
Folder Behavior With a Direct Connection to an E-mail Server
The behavior of the folders you create depends on whether you are using
ActiveSync, SMS, POP3, or IMAP4.
SIf you use ActiveSync:
E-mail messages in the Inbox folder in Outlook will automatically be
synchronized with your 700 Series Computer. You can select to syn-
chronize additional folders by designating them for ActiveSync. The
folders you create and the messages you move will then be mirrored on
the server. For example, if you move two messages from the Inbox fold-
er to a folder named Family, and you have designated Family for syn-
chronization, the server creates a copy of the Family folder and copies
the messages into that folder. You can then read the messages while away
from your desktop computer.
SIf you use SMS:
Messages are stored in the Inbox folder.
SIf you use POP3:
and you move e-mail messages to a folder you created, the link is broken
between the messages on the 700 Series Computer and their copies on
the mail server. The next time you connect, the mail server will see that
the messages are missing from the 700 Series Computer Inbox and de-
lete them from the server. This prevents you from having duplicate cop-
ies of a message, but it also means that you will no longer have access to
messages that you move to folders created from anywhere except the
700 Series Computer.
SIf you use IMAP4:
The folders you create and the e-mail messages you move are mirrored
on the server. Therefore, messages are available to you anytime you con-
nect to your mail server, whether it is from your 700 Series Computer
or desktop computer. This synchronization of folders occurs whenever
you connect to your mail server, create new folders, or rename/delete
folders when connected.
Pocket PC 2002—Chapter 2
47700 Series Color Mobile Computer User’s Manual
Companion Programs
The companion programs consist of Microsoft Pocket Word, Microsoft
Pocket Excel, Windows Media Player for Pocket PC, and Microsoft
Reader. To switch to a companion program on your 700 Series Computer,
tap Start →Programs, then tap the program name.
Pocket Word
Pocket Word works with Microsoft Word on your desktop computer to
give you easy access to copies of your documents. You can create new doc-
uments on your 700 Series Computer, or you can copy documents from
your desktop computer to your 700 Series Computer. Synchronize docu-
ments between your desktop computer and your 700 Series Computer so
that you have the most up-to-date content in both locations.
Creating a Document
Use Pocket Word to create documents, such as letters, meeting minutes,
and trip reports. To create a new file, tap Start →Programs →Pocket
Word →New. A blank document appears. Or, if you have selected a tem-
plate for new documents in the Options dialog box, that template appears
with appropriate text and formatting already provided. You can open only
one document at a time; when you open a second document, you will be
asked to save the first. You can save a document you create or edit in a va-
riety of formats, including Word (.DOC), Pocket Word (.PSW), Rich Text
Format (.RTF), and Plain Text (.TXT).
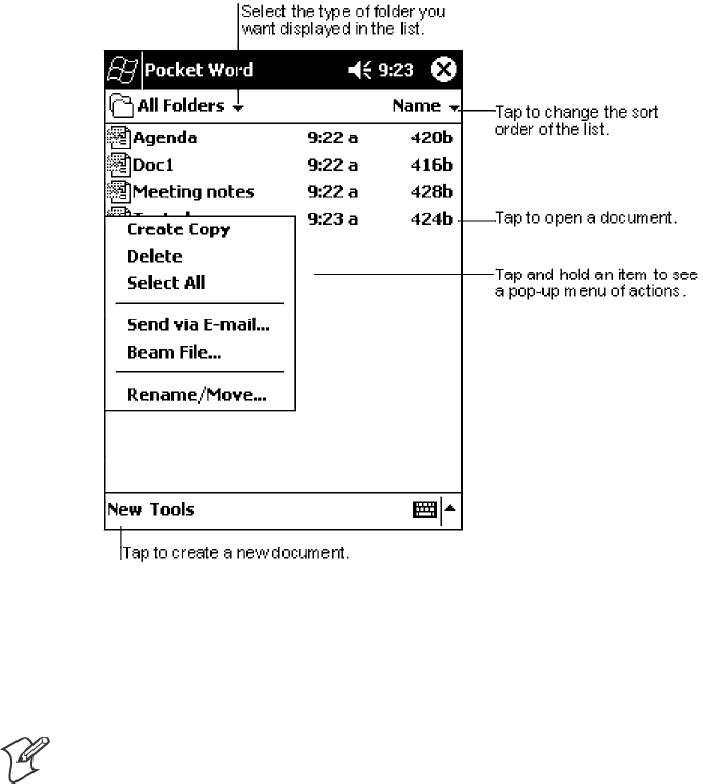
Pocket PC 2002Chapter —2
48 700 Series Color Mobile Computer User’s Manual
Pocket Word contains a list of the files stored on your 700 Series Comput-
er. Tap a file in the list to open it. To delete, make copies of, and send files,
tap and hold a file in the list. Then, select the appropriate action on the
pop-up menu.
You can enter information in Pocket Word in one of four modes (typing,
writing, drawing, and recording), which are displayed on the View menu.
Each mode has its own toolbar, which you can show and hide by tapping
the Show/Hide Toolbar button on the command bar.
Note: You can change the zoom magnification by tapping View →Zoom,
then select the percentage you want. Select a higher percentage to enter
text and a lower one to see more of your document.
If you are opening a Word document created on a desktop computer, select
Wrap to Window on the View menu so that you can see the entire
document.
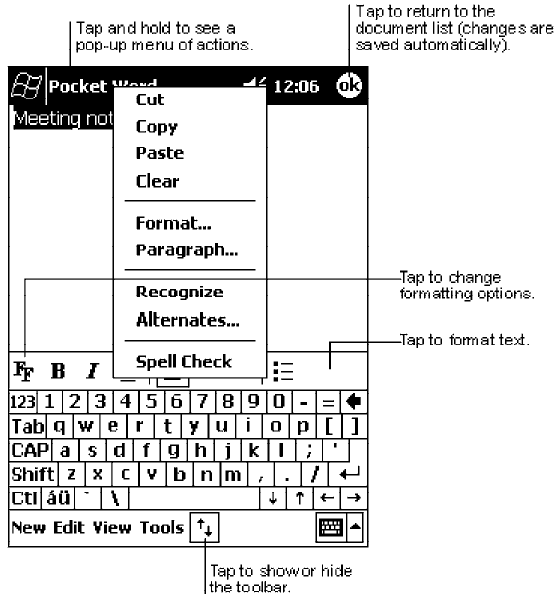
Pocket PC 2002—Chapter 2
49700 Series Color Mobile Computer User’s Manual
Typing Mode
Using the input panel, enter typed text into the document. For more infor-
mation on entering typed text, see “Basic Skills” on page 11.
To format existing text and to edit text, first select the text. You can select
text as you do in a Word document, using your stylus instead of the mouse
to drag through the text you want to select. You can search a document to
find text by tapping Edit →Find/Replace.
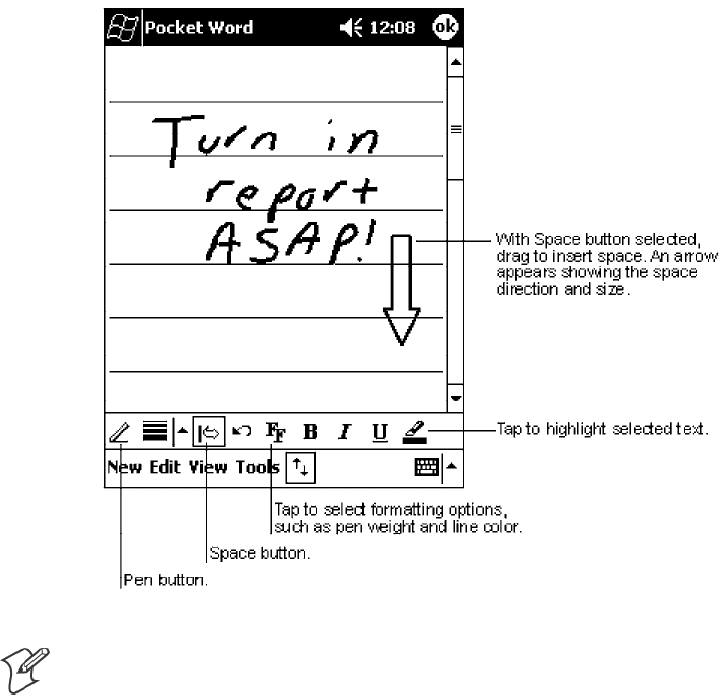
Pocket PC 2002Chapter —2
50 700 Series Color Mobile Computer User’s Manual
Writing Mode
In writing mode, use your stylus to write directly on the screen. Ruled
lines are displayed as a guide, and the zoom magnification is greater than
in typing mode to allow you to write more easily. For more information on
writing and selecting writing, see “Basic Skills” on page 11.
Note: If you cross three ruled lines in a single stylus stroke, the writing
becomes a drawing, and can be edited and manipulated as described in
“Drawing Mode” on the next page.
Written words are converted to graphics (metafiles) when a Pocket Word
document is converted to a Word document on your desktop computer.
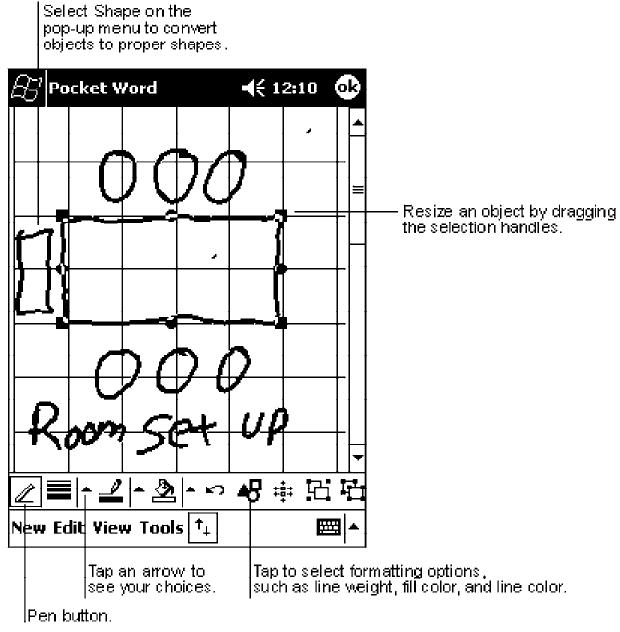
Pocket PC 2002—Chapter 2
51700 Series Color Mobile Computer User’s Manual
Drawing Mode
In drawing mode, use your stylus to draw on the screen. Grid lines appear
as a guide. When you lift your stylus off the screen after the first stroke,
you will see a drawing box indicating the boundaries of the drawing. Every
subsequent stroke within or touching the drawing box becomes part of the
drawing. For more information on drawing and selecting drawings, see
“Basic Skills” on page 11.
Recording Mode
In recording mode, embed a recording into your document. Recordings are
saved as .WAV files. For more information on recording, see “Basic Skills”
on page 11.
For more information on using Pocket Word, tap Start →Help.
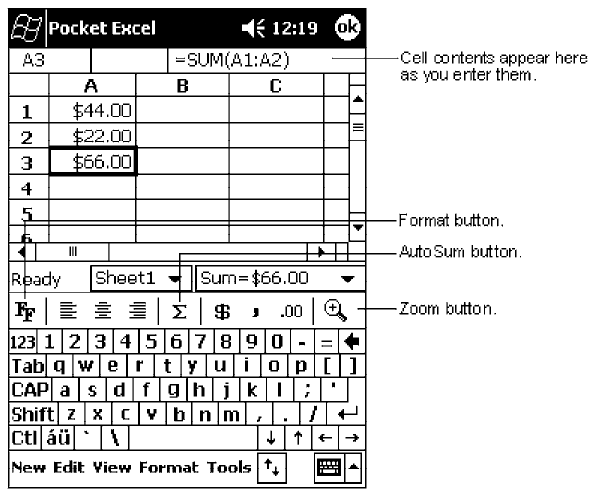
Pocket PC 2002Chapter —2
52 700 Series Color Mobile Computer User’s Manual
Pocket Excel
Pocket Excel works with Microsoft Excel on your desktop computer to
give you easy access to copies of your workbooks. You can create new
workbooks on your 700 Series Computer, or you can copy workbooks
from your desktop computer to your 700 Series Computer. Synchronize
workbooks between your desktop computer and your 700 Series Comput-
er so that you have the most up-to-date content in both locations.
Creating a Workbook
Use Pocket Excel to create workbooks, such as expense reports and mileage
logs. To create a new file, tap Start →Programs →Pocket Excel →New.
A blank workbook appears. Or, if you have selected a template for new
workbooks in the Options dialog box, that template appears with
appropriate text and formatting already provided. You can open only one
workbook at a time; when you open a second workbook, you will be asked
to save the first. You can save a workbook you create or edit in a variety of
formats, including Pocket Excel (.PXL) and Excel (.XLS).
Pocket Excel contains a list of the files stored on your 700 Series Comput-
er. Tap a file in the list to open it. To delete, make copies of, and send files,
tap and hold a file in the list. Then select the appropriate action from the
pop-up menu.
Pocket Excel provides fundamental spreadsheet tools, such as formulas,
functions, sorting, and filtering. To display the toolbar, tap View →
Toolbar.

Pocket PC 2002—Chapter 2
53700 Series Color Mobile Computer User’s Manual
Note: If your workbook contains sensitive information, you can protect it
with a password. To do so, open the workbook, tap Edit →Password.Ev-
ery time you open the workbook, you will need to enter the password, so
choose one that is easy for you to remember but hard for others to guess.
Tips for Working in Pocket Excel
Note the following when working in large worksheets in Pocket Excel:
SView in full-screen mode to see as much of your worksheet as possible.
Tap View →Full Screen. To exit full-screen mode, tap Restore.
SShow and hide window elements. Tap View and then tap the elements
youwanttoshoworhide.
SFreeze panes on a worksheet. First select the cell where you want to
freeze panes. Tap View →Freeze Panes. You might want to freeze the
top and leftmost panes in a worksheet to keep row and column labels
visible as you scroll through a sheet.
SSplit panes to view different areas of a large worksheet. Tap View →
Split. Then drag the split bar to where you want it. To remove the split,
tap View →Remove Split.
SShow and hide rows and columns. To hide a hidden row or column, se-
lect a cell in the row or column you want to hide. Then tap Format ,
Row or Column →Hide. To show a hidden row or column, tap Tools
→Go To, and then type a reference that is in the hidden row or co-
lumn. Then tap Format →Row or Column →Unhide.
For more information on using Pocket Excel, tap Start →Help.
MSN Messenger
Note: MSN Messenger is only available on the Premium Edition of Pocket
PC 2002.
MSN Messenger on your 700 Series Computer is an instant messaging
program that lets you:
SSee who is online.
SSend and receive instant messages.
SHave instant message conversations with groups of contacts.
To use MSN Messenger, you must have a Microsoft Passport account or a
Microsoft Exchange e-mail account. You must have a Passport to use MSN
Messenger Service. If you have a Hotmail or MSN account, you already
have a Passport. Once you have obtained either a Microsoft Passport or a
Microsoft Exchange account, you are ready to set up your account.
SSign up for a Microsoft Passport account at http://www.passport.com.
SGet a free Microsoft Hotmail e-mail address at http://www.hotmail.com.
To switch to MSN Messenger, tap Start →Programs →MSN Messenger.
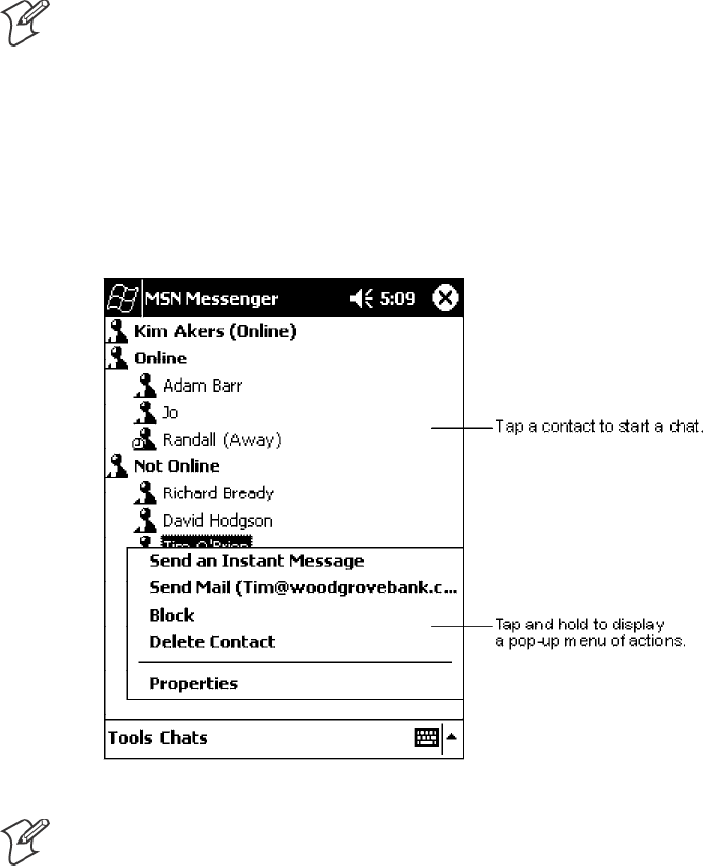
Pocket PC 2002Chapter —2
54 700 Series Color Mobile Computer User’s Manual
Setting Up
Before you can connect, you must enter Passport or Exchange account in-
formation. To set up an account and sign in:
1In the Tools menu, tap Options.
2In the Accounts tab, enter your Passport or Exchange account informa-
tion.
3To sign in, tap the sign-in screen and enter your e-mail address and pass-
word.
Note: If you already use MSN Messenger on your desktop computer, your
contacts will show up on your 700 Series Computer without being added
again.
Working with Contacts
The MSN Messenger window shows all of your messenger contacts at a
glance, divided into Online and Not Online categories. From this view,
while connected, you can chat, send e-mail, block the contact from chat-
ting with you, or delete contacts from your list using the pop-up menu.
Note: To see others online without being seen, in the Tools menu, tap My
Status →Appear Offline.
If you block a contact, you will appear offline but will remain on the
blocked contact’ s list. To unblock a contact, tap and hold the contact, then
tap Unblock on the pop-up menu.
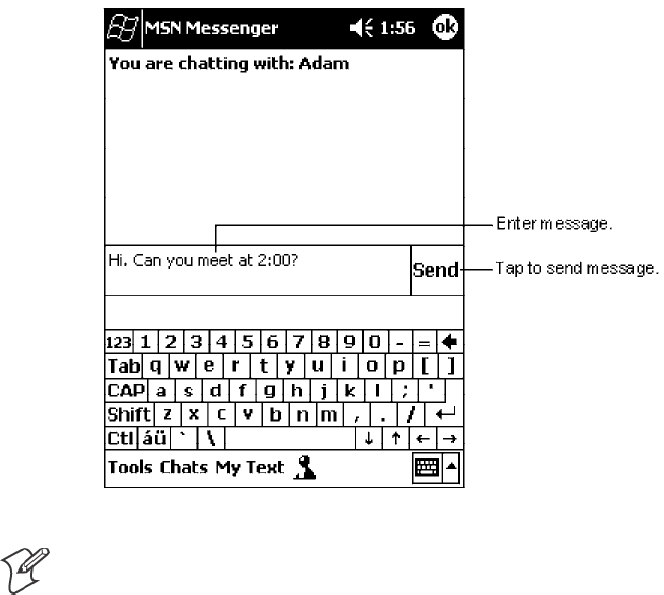
Pocket PC 2002—Chapter 2
55700 Series Color Mobile Computer User’s Manual
Chatting with Contacts
Tap a contact name to open a chat window. Enter your message in the text
entry area at the bottom of the screen, or tap My Text to enter a preset
message, and tap Send. To invite another contact to a multi-user chat, in
the Tools menu, tap Invite and tap the contact you want to invite.
Note: To switch back to the main window without closing a chat, tap the
Contacts button. To revert back to your chat window, tap Chats and select
the person whom you were chatting with.
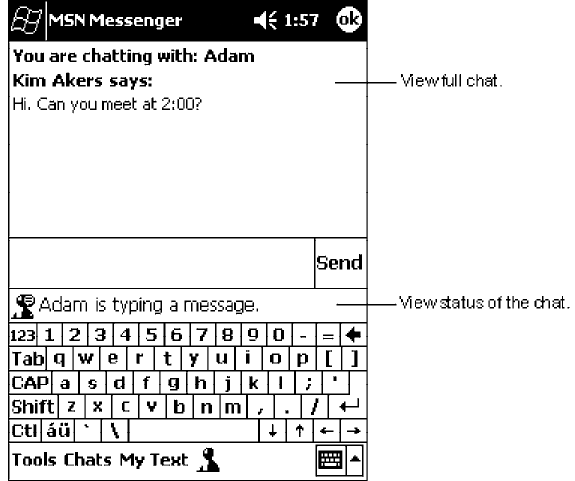
Pocket PC 2002Chapter —2
56 700 Series Color Mobile Computer User’s Manual
To know if the contact you are chatting with is responding, look for the
message under the text entry area.
For more information on using MSN Messenger, tap Start →Help.
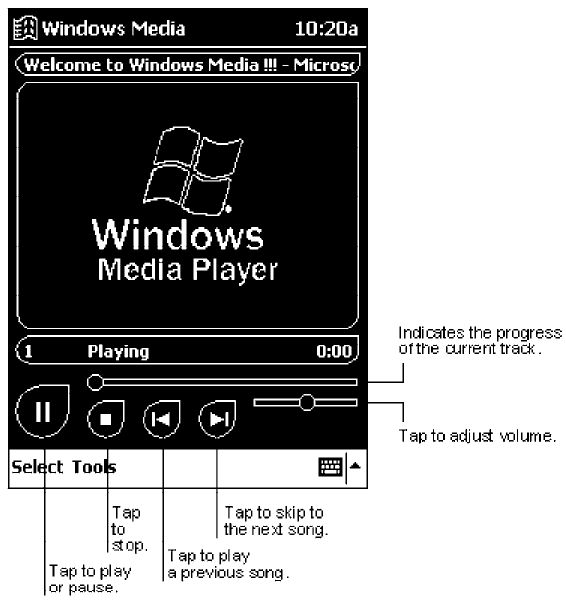
Pocket PC 2002—Chapter 2
57700 Series Color Mobile Computer User’s Manual
Windows Media Player for Pocket PC
Use Microsoft Windows Media Player for Pocket PC to play digital audio
and video files that are stored on your 700 Series Computer or on a net-
work. To switch to Windows Media Player for Pocket PC, tap Start →
Programs →Windows Media.
Use Microsoft Windows Media Player on your desktop computer to copy
digital audio and video files to your Pocket PC. You can play Windows
Media and MP3 files on your Pocket PC.
For more information about using Windows Media Player for Pocket PC,
tap Start →Help.
Pocket PC 2002Chapter —2
58 700 Series Color Mobile Computer User’s Manual
Microsoft Reader
Use Microsoft Reader to read eBooks on your 700 Series Computer.
Download books to your desktop computer from your favorite eBook Web
site. Then, use ActiveSync to copy the book files to your activated 700 Se-
ries Computer. The books appear in the Reader Library, where you can tap
them in the list to open them. Each book consists of a cover page, an op-
tional table of contents, and the pages of the book. You can:
SPage through the book by using the Up/Down control on your 700 Se-
ries Computer or by tapping the page number on each page.
SAnnotate the book with highlighting, bookmarks, notes, and drawings.
SSearch for text and look up definitions for words.
The Guidebook contains all the information you will need to use the soft-
ware. To open the Guidebook, tap Help on the Reader command bar. Or,
on a book page, tap and hold on the book title, and then tap Help on the
pop-up menu. To switch to Microsoft Reader, tap Start →Programs →
Microsoft Reader.
Getting Books on Your 700 Series Computer
You can download book files from the Web. Just visit your favorite eBook
retailer and follow the instructions to download the book files.
Sample books and a dictionary are also included in the MSReader folder in
the Extras folder on the Pocket PC Companion CD.
Use ActiveSync to download the files from your desktop computer to your
activated mobile computer as described in the Read Me file in the
MSReader folder.
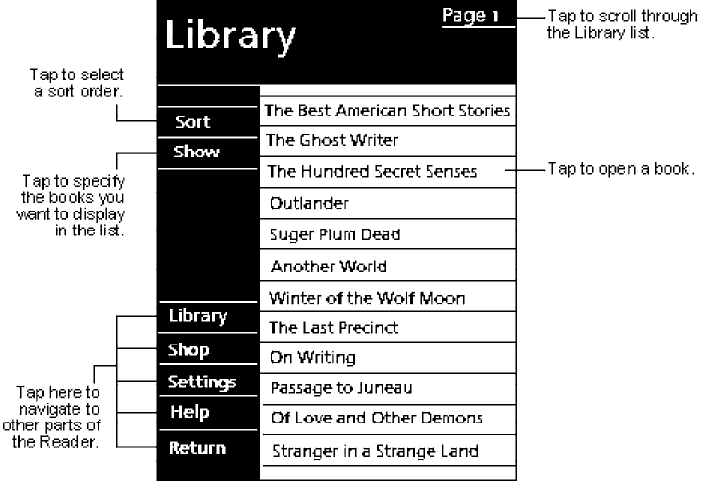
Pocket PC 2002—Chapter 2
59700 Series Color Mobile Computer User’s Manual
Using the Library
The Library is your Reader home page; it displays a list of all books stored
on your 700 Series Computer or storage card. To open the Library:
1On the Reader command bar, tap Library.
2On a book page, tap the book title, then tap Library on the pop-up
menu.
3To open a book, tap its title in the Library list.
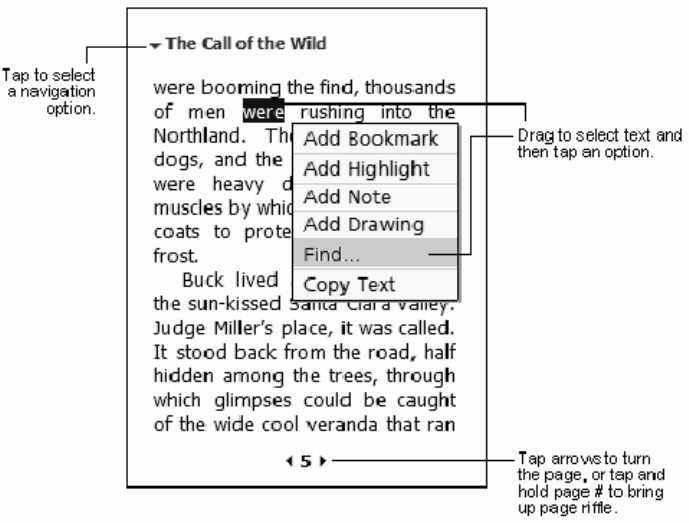
Pocket PC 2002Chapter —2
60 700 Series Color Mobile Computer User’s Manual
Reading a Book
Each book consists of a cover page, an optional table of contents, and the
pages of the book. Navigation options are listed in the bottom portion of
the cover page.
The first time you open a book, you will probably want to go to the first
page or to the table of contents, if there is one. Subsequently, whenever
you open the book, you will be automatically taken to the last page read.
In addition to the text, each book page includes a page number and book
title.
You can also page through a book by using the Up/Down control on your
700 Series Computer.
Pocket PC 2002—Chapter 2
61700 Series Color Mobile Computer User’s Manual
Using Reader Features
Reading a book electronically gives you several options not available with
paper books. These options are available from any book page.
Select text by dragging across the text on the page. Then, tap an option on
the pop-up menu, as described here:
SSearching for Text
Find text in a book by tapping Find on the pop-up menu. Enter the
word you want to search for, and tap the desired Find option. Reader
highlights found text on the page. To close Find, tap outside the box.
To return to your original page, tap the title and then tap Return on the
pop-up menu.
SCopying Text
You can copy text from books that support this feature into any pro-
gram that accepts text. On a book page, select the text you want to copy.
Then, tap Copy Text on the pop-up menu. The text can be pasted into
the program of your choice.
SAdding Bookmarks
When you add a bookmark to a book, a color-coded bookmark icon
appears in the right margin. You can add multiple bookmarks to a book.
Then, from anywhere in the book, tap the bookmark icon to go to the
bookmarked page.
SHighlighting Text
When you highlight text, it appears with a colored background.
SAttaching Notes to Text
When you attach a note to text, you enter the text in a notepad that ap-
pears on top of the book page. A Note icon will display in the left mar-
gin. To show or hide the note, tap the icon.
SAdding Drawings
When you add a drawing, a Drawing icon appears in the bottom-left
corner of the page, and drawing tools appear across the bottom of the
page. Draw by dragging your stylus.
SAnnotations Index
To see a list of a book’ s annotations, including bookmarks, highlights,
text notes, and drawings, tap Annotations Index on the book’ s cover
page. You can tap an entry in the list to go to the annotated page.
Removing a Book
When you finish reading a book, you can delete it to conserve space on
your 700 Series Computer. If a copy of the book is stored on your desktop
computer, you can download it again at any time.
To remove a book from your 700 Series Computer, tap and hold the title
in the Library list, and then tap Delete on the pop-up menu.

Pocket PC 2002Chapter —2
62 700 Series Color Mobile Computer User’s Manual
Pocket Internet Explorer
Note: The Professional Edition of Pocket Internet Explorer does not sup-
port WAP pages.
Use Microsoft Pocket Internet Explorer to view Web or WAP pages in ei-
ther of these ways:
SDuring synchronization with your desktop computer, download your
favorite links and mobile favorites that are stored in the Mobile Favor-
ites subfolder in Internet Explorer on the desktop computer.
SConnect to an ISP or network and browse the Web. To do this, you will
need to create the connection first, as described in “Getting Connected”
on page 67.
When connected to an ISP or network, you can also download files and
programs from the Internet or intranet.
To switch to Pocket Internet Explorer, tap Start →Internet Explorer.
The Mobile Favorites Folder
Only items stored in the Mobile Favorites subfolder in the Favorites folder
in Internet Explorer on your desktop computer will be synchronized with
your 700 Series Computer. This folder was created automatically when
you installed ActiveSync.
Favorite Links
During synchronization, the list of favorite links in the Mobile Favorites
folder on your desktop computer is synchronized with Pocket Internet Ex-
plorer on your 700 Series Computer. Both computers are updated with
changes made to either list each time you synchronize. Unless you mark
the favorite link as a mobile favorite, only the link will be downloaded to
your 700 Series Computer, and you will need to connect to your ISP or
network to view the content. For more information on synchronization,
see ActiveSync Help on the desktop computer.
Mobile Favorites
If you are using Microsoft Internet Explorer 5.0 or later on your desktop
computer, you can download mobile favorites to your 700 Series Comput-
er. Synchronizing mobile favorites downloads Web content to your 700
Series Computer so that you can view pages while you are disconnected
from your ISP and desktop computer.
Use the Internet Explorer plug-in installed with ActiveSync to create mo-
bile favorites quickly. To create a mobile favorite:
1In Internet Explorer on your desktop computer, click Tools →Create
Mobile Favorite.
2To change the link name, enter a new name in the Name box.
3Optionally, in Update, select a desired update schedule.

Pocket PC 2002—Chapter 2
63700 Series Color Mobile Computer User’s Manual
4Click OK. Internet Explorer downloads the latest version of the page to
your desktop computer.
5If you want to download the pages that are linked to the mobile favorite
you just created, in Internet Explorer on the desktop computer,
right-click the mobile favorite just created and then click Properties.In
the Download tab, specify the number of links deep you want to
download. To conserve 700 Series Computer memory, go only one level
deep.
6Synchronize your 700 Series Computer and desktop computer. Mobile
favorites that are stored in the Mobile Favorites folder in Internet Ex-
plorer are downloaded to your 700 Series Computer.
Note: If you did not specify an update schedule in step 3 above, you will
need to manually download content to keep the information updated on
your desktop computer and 700 Series Computer. Before synchronizing
with your 700 Series Computer, in Internet Explorer on your desktop
computer, click Tools →Synchronize. You will see the last time content
was downloaded to the desktop computer, and you can manually download
content if needed.
You can add a button to the Internet Explorer toolbar for creating mobile
favorites. In Internet Explorer on your desktop computer, click View →
Toolbars →Customize.
Mobile favorites take up storage memory on your 700 Series Computer.
To minimize the amount of memory used:
SIn the settings for the Favorites information, type in ActiveSync options,
turn off pictures and sounds, or stop some mobile favorites from being
downloaded to the 700 Series Computer. For more information, see Ac-
tiveSync Help.
SLimit the number of downloaded linked pages. In Internet Explorer on
the desktop computer, right-click the mobile favorite you want to
change and then Properties.IntheDownload tab, specify “0” or “1” for
the number of linked pages you want to download.
Pocket PC 2002Chapter —2
64 700 Series Color Mobile Computer User’s Manual
Using AvantGo Channels
AvantGo is a free interactive service that gives you access to personalized
content and thousands of popular Web sites. You subscribe to AvantGo
channels directly from your 700 Series Computer. Then, you synchronize
your 700 Series Computer and desktop computer, or connect to the Inter-
net to download the content. For more information, visit the AvantGo
Web site. To sign up for AvantGo:
1In ActiveSync options on the desktop computer, turn on synchroniza-
tion for the AvantGo information type.
2In Pocket Internet Explorer on your 700 Series Computer, tap the Fa-
vorites button to display your list of favorites.
3Tap t he AvantGo Channels link.
4Tap t he Activate button.
5Follow the directions on the screen. You will need to synchronize your
700 Series Computer with your desktop computer and then tap the My
Channels button to complete the AvantGo setup.
When synchronization is complete, tap the AvantGo Channels link in
your list of favorites to see a few of the most popular channels. To add or
remove channels, tap the Add or Remove link.
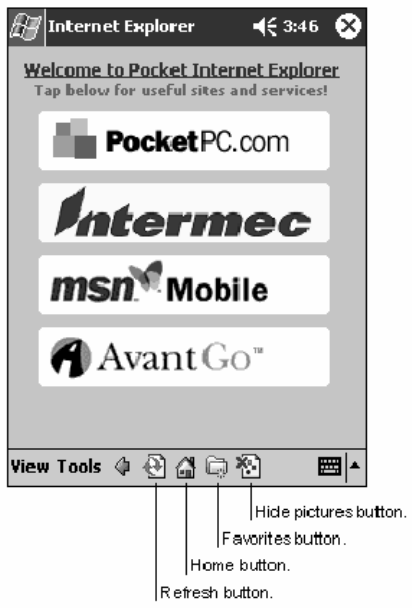
Pocket PC 2002—Chapter 2
65700 Series Color Mobile Computer User’s Manual
Using Pocket Internet Explorer
You can use Pocket Internet Explorer to browse mobile favorites and chan-
nels that have been downloaded to your 700 Series Computer without
connecting to the Internet. You can also connect to the Internet through
an ISP or a network connection and browse the Web.
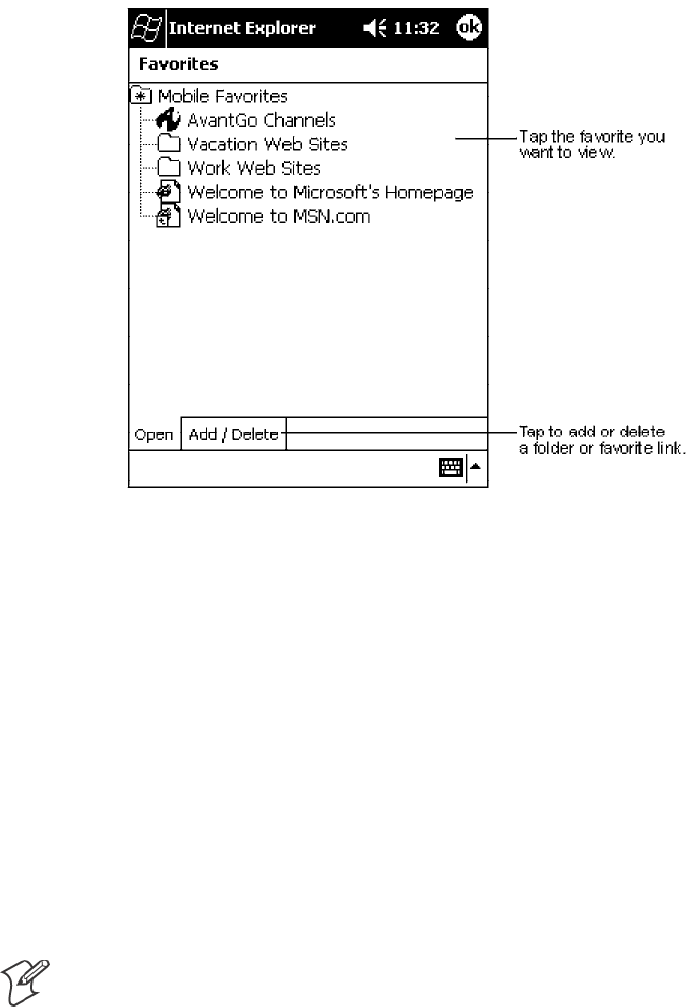
Pocket PC 2002Chapter —2
66 700 Series Color Mobile Computer User’s Manual
Viewing Mobile Favorites and Channels
1Tap t he Favorites button to display your list of favorites.
2Tap the page you want to view.
You will see the page that was downloaded the last time you synchronized
with your desktop computer. If the page is not on your 700 Series Com-
puter, the favorite will be dimmed. You will need to synchronize with your
desktop computer again to download the page to your 700 Series Comput-
er, or connect to the Internet to view the page.
Browsing the Internet
1Set up a connection to your ISP or corporate network using Connec-
tions, as described in “Getting Connected” on page 67.
2To connect and start browsing, do one of the following:
STap t he Favorites button, and then tap the favorite you want to view.
STap View →Address Bar. In the address bar that appears at the top
of the screen, enter the Web address you want to visit and then tap
Go. Tap the arrow to choose from previously entered addresses.
Note: To add a favorite link while using the 700 Series Computer, go to
the page you want to add, tap and hold on the page, and tap Add to
Favorites.

Pocket PC 2002—Chapter 2
67700 Series Color Mobile Computer User’s Manual
Getting Connected
You can use your 700 Series Computer to exchange information with oth-
er 700 Series Computers as well as your desktop computer, a network, or
the Internet. You have the following connection options:
SUse the infrared (IR) port on your 700 Series Computer to send and
receive files between two 700 Series Computers. If this is the method
you want to use, see “Transferring Items Using Infrared”below.
SConnect to your ISP. Once connected, you can send and receive e-mail
messages by using Inbox and view Web or WAP pages by using Pocket
Internet Explorer. The communication software for creating an ISP con-
nection is already installed on your 700 Series Computer. Your service
provider will provide software needed to install other services, such as
paging and fax services. If this is the method you want to use, see “Con-
necting to an Internet Service Provider” on page 68.
SConnect to the network at your company or organization where you
work. Once connected, you can send and receive e-mail messages by
using Inbox, view Web or WAP pages by using Pocket Internet Explorer,
and synchronize with your desktop computer. If this is the method you
want to use, see “Connecting to Work” on page 70.
SConnect to your desktop computer to synchronize remotely. Once con-
nected, you can synchronize information such as your Pocket Outlook
information. If this is the method you want to use, see ActiveSync Help
on your desktop computer or Connections Help on the 700 Series
Computer.
Transferring Items Using Infrared
Using infrared (IR), you can send and receive information, such as con-
tacts and appointments, between two 700 Series Computers.
Sending Information
1Switch to the program where you created the item you want to send and
locate the item in the list.
2Align the IR ports so that they are unobstructed and within a close
range.
3Tap and hold the item, and tap Beam Item on the pop-up menu.
Note: You can also send items, but not folders, from File Explorer. Tap
and hold the item you want to send, and then tap Beam File on the pop-
up menu.
Receiving Information
1Align the IR ports so that they are unobstructed and within a close
range.
2Have the owner of the other 700 Series Computer send the information
to you. Your 700 Series Computer will automatically receive it.
Pocket PC 2002Chapter —2
68 700 Series Color Mobile Computer User’s Manual
Connecting to an Internet Service Provider
You can connect to your ISP, and use the connection to send and receive
e-mail messages and view Web or WAP pages. You can connect to your
ISP in one of two ways:
SCreate a modem connection. If this is the method you want to use, see
“Creating a Modem Connection to an ISP”below.
SUse an Ethernet card and a net tap to connect to the network. If this is
the method you want to use, see “Creating an Ethernet Connection to an
ISP” on page 69.
Creating a Modem Connection to an ISP
1Obtain the following information from your ISP. Some ISPs require in-
formation in front of the user name, such as MSN/username.
SISP dial-up access telephone number
SUser name
SPassword
STCP/IP settings
2If your 700 Series Computer does not have a built-in modem, install a
modem card, or use or use a NULL modem cable and appropriate
adapters to connect an external modem to your 700 Series Computer
through the serial port.
3Tap Start →Settings →the Connections tab →Connections.Under
The Internet settings, select Internet Settings →Modify.
4In the Modem tab, tap New.
5Enter a name for the connection, such as “ISP Connection.”
6In Select a modem list, select your modem type. If your modem type
does not appear, try reinserting the modem card. If you are using an ex-
ternal modem that is connected to your 700 Series Computer with a
cable, select “Hayes Compatible on COM1.”
7You should not need to change any settings in Advanced.MostISPs
now use a dynamically-assigned address. If the ISP you are connecting
to does not use a dynamically-assigned address, tap Advanced →the
TCP/IP tab, then enter the address. When finished, tap OK →Next.
8Enter the access phone number, and tap Next.
9Select other desired options, and tap Finish.
10 In the Dialing Locations tab, specify your current location and phone
type (most phone lines are tone). These settings will apply to all connec-
tions you create.
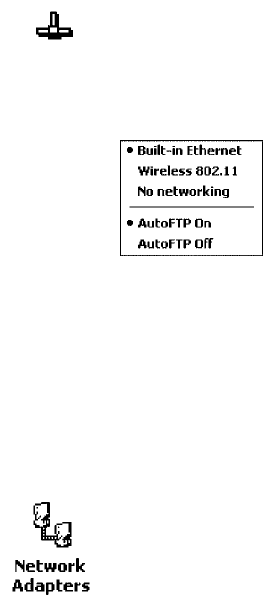
Pocket PC 2002—Chapter 2
69700 Series Color Mobile Computer User’s Manual
To start the connection, simply start using one of the following programs.
Your 700 Series Computer will automatically begin connecting. Once con-
nected, you can:
SSend and receive e-mail messages by using Inbox. Before you can use
Inbox, you need to provide the information it needs to communicate
with the e-mail server. For specific instructions, see “Connecting Directly
to an E-mail Server” on page 72.
SVisit Web and WAP pages by using Pocket Internet Explorer. For more
information, see “Pocket Internet Explorer” on page 62.
SSend and receive instant messages with MSN Messenger. For more in-
formation, see “MSN Messenger” on page 53.
Creating an Ethernet Connection to an ISP
1You do not need to create a new connection on your 700 Series Com-
puter. Instead, you must purchase a dock to enable on-board Ethernet
or purchase a CompactFlash Ethernet card that is compatible with your
700 Series Computer.
2Obtain the following information from your ISP:
SUser name
SPassword
SDomain name
3Insert the Ethernet card into your 700 Series Computer. For instruc-
tions on inserting and using the Ethernet card, see the owner’ s manual.
If using an on-board Ethernet, place your 700 Series Computer in a dock,
tap Start →Today, then look in the System Tray for the Ethernet icon
(shown left). If not there, then tap the antenna icon for the NDISTRAY
pop-up menu and select Built-in Ethernet from the menu.
4The first time you insert the card, Network Settings will appear
automatically so that you can configure the Ethernet card. Most
networks use DHCP, so you should not have to change these settings
unless your network administrator instructs you to do so. Tap OK.(Ifit
does not appear or to change settings later, tap Start →Settings →the
Connections tab →Network, tap the adapter you want to change, and
then tap Properties.)
SIf using an on-board Ethernet, then select Start →Settings →the
Connections tab →Network Adapters. Select “NE2000 Compatible
Ethernet Driver” from the list of adapters installed, then tap Proper-
ties to configure the Ethernet driver.
Pocket PC 2002Chapter —2
70 700 Series Color Mobile Computer User’s Manual
5Connect the Ethernet card or dock to the network by using a network
cable. For information, see your owner’ s manual.
6Tap Start →Settings →the Connections tab →Connections.From
the My network card connects to list, select “Internet.”
To start the connection, simply start using one of the programs listed in
the preceding section. Once connected, you can perform the same activi-
ties as listed in the preceding section.
Connecting to Work
If you have access to a network at work, you can send e-mail messages,
view intranet pages, synchronize your 700 Series Computer, and possibly
access the Internet. You can connect to work in one of two ways:
SCreate a modem connection by using a RAS (Remote Access Server) ac-
count. Before you can create this modem connection, your network ad-
ministrator will need to set up a RAS account for you. If this is the
method you want to use, see “Creating a Modem Connection to Work”
below. Your network administrator may also give you VPN settings.
SUse an Ethernet card and a net tap to connect to the network. If this is
the method you want to use, see “Creating an Ethernet Connection to
Work” on page 71.
Creating a Modem Connection to Work
1Get the following information from your network administrator:
SDial-up access telephone number
SUser name
SPassword
SDomain name
STCP/IP settings
2If your 700 Series Computer does not have a built-in modem, install a
modem card.
3Tap Start →Settings →the Connections tab →Connections.Under
The Internet settings, select Internet Settings and tap Modify.
4In the Modem tab, tap New.
5Enter a name for the connection, such as “Company Connection.”
6In the Select a modem list, select your modem type. If your modem
type does not appear, try reinserting the modem card. If you are using
an external modem that is connected to your 700 Series Computer with
a cable, select “Hayes Compatible on COM1.”
7You should not need to change any settings in Advanced. Most servers
now use a dynamically-assigned address. If the server you are connecting
to does not use a dynamically-assigned address, tap Advanced →the
TCP/IP tab and then enter the address. When finished, tap OK →
Next.
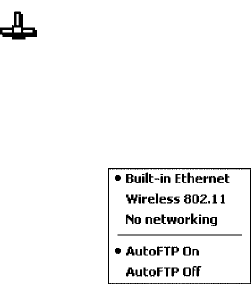
Pocket PC 2002—Chapter 2
71700 Series Color Mobile Computer User’s Manual
8Enter the access phone number, and tap Next.
9Select other desired options, and tap Finish.
10 In the Dialing Locations tab, specify your current location and phone
type (most phone lines are tone). These settings will apply to all connec-
tions you create.
To start the connection, start using one of the following programs. Your
700 Series Computer will automatically begin connecting. Once con-
nected, you can:
SSend and receive e-mail messages by using Inbox. Before you can use
Inbox, you need to provide the information it needs to communicate
with the e-mail server. For specific instructions, see “Connecting Directly
to an E-mail Server” on page 72.
SVisit Internet or intranet Web or WAP pages via Pocket Internet Explor-
er.
SSend and receive instant messages with MSN Messenger. For more in-
formation, see “MSN Messenger” on page 53.
SSynchronize. For more information, see ActiveSync Help on the desktop
computer.
Creating an Ethernet Connection to Work
1You do not need to create a new connection on your 700 Series Com-
puter. Instead, you must purchase a dock to enable on-board Ethernet
or purchase a CompactFlash Ethernet card that is compatible with your
700 Series Computer.
2Obtain the following information from your ISP:
SUser name
SPassword
SDomain name
3Insert the Ethernet card into your 700 Series Computer. For instruc-
tions on inserting and using the Ethernet card, see the owner’ s manual.
SIf using an on-board Ethernet, place your 700 Series Computer in a
dock, tap Start →Today, then look in the System Tray for the Ether-
net icon (shown left). If not there, then tap the antenna icon for the
NDISTRAY pop-up menu and select Built-in Ethernet from the
menu.

Pocket PC 2002Chapter —2
72 700 Series Color Mobile Computer User’s Manual
4The first time you insert the card, Network Settings will appear
automatically so that you can configure the Ethernet card. Most
networks use DHCP, so you should not have to change these settings
unless your network administrator instructs you to do so. Tap OK.(Ifit
does not appear or to change settings later, tap Start →Settings →the
Connections tab →Network, tap the adapter you want to change, and
then tap Properties.)
SIf using an on-board Ethernet, then select Start →Settings →the
Connections tab →Network Adapters. Select “NE2000 Compatible
Ethernet Driver” from the list of adapters installed, then tap Proper-
ties to configure the Ethernet driver.
5Connect the Ethernet card or dock to the network by using a network
cable. For information, see your owner’ s manual.
6To synchronize your 700 Series Computer, tap Start →ActiveSync.In
the Tools menu, tap Options.→the PC tab, select Include PC when
synchronizing remotely and connect to, and select your computer’ s
name. Remote synchronization with a desktop computer will work only
if a partnership is set up with that computer through ActiveSync and
ActiveSync is set to allow remote connections. Other restrictions apply.
For more information, see ActiveSync Help on the desktop computer.
To start the connection, simply start using one of the programs listed in
the preceding section. Once connected, you can perform the same activi-
ties as listed in the preceding section.
Ending a Connection
To disconnect, do one of the following:
SWhen connected via dial-up or VPN, tap the Connection icon (shown
left) on your navigation bar, and then tap End.
SWhen connected via cable or cradle, detach your 700 Series Computer
from the cable or cradle.
SWhen connected via Infrared, move the 700 Series Computer away
from the PC.
SWhen connected via a network (Ethernet) card, remove the card from
your 700 Series Computer.
Connecting Directly to an E-mail Server
You can set up a connection to an e-mail server so that you can send and
receive e-mail messages by using a modem or network connection and In-
box on your 700 Series Computer.
Note: The ISP or network must use a POP3 or IMAP4 e-mail server and
an SMTP gateway.
You can use multiple e-mail services to receive your messages. For each e-
mail service you intend to use, first set up and name the e-mail service. If
you use the same service to connect to different mailboxes, set up and
name each mailbox connection.
Pocket PC 2002—Chapter 2
73700 Series Color Mobile Computer User’s Manual
Setting Up an E-mail Service
SIn Inbox on your 700 Series Computer, tap Services →New Service.
Follow the directions in the New Service wizard.
For an explanation of a screen, tap Start →Help. When finished, to con-
nect to your e-mail server, tap Services →Connect. For more information
on using the Inbox program, see “Inbox: Sending and Receiving E-mail Mes-
sages” on page 42.
Pocket PC 2002Chapter —2
74 700 Series Color Mobile Computer User’s Manual