Intermec Technologies DRCB DRCB User Manual CN2 Handheld Computer User s Manual
Intermec Technologies Corporation DRCB CN2 Handheld Computer User s Manual
Contents
Users Manual 2 of 3

CN2 Handheld Computer User’s Manual 1
Using the CN2 Handheld
Computer
Use this chapter to familiarize yourself with the CN2 handheld
computer. In this chapter you will find these sections:
• Introducing the CN2 Handheld Computer
• Using the Battery
• Using the Keypad
• Using the Touch Screen
• Understanding the Screen Icons
• Understanding the Status Lights
• Understanding the Beeps
• Running Multiple Applications on the CN2
• Scanning Bar Codes
• Increasing File Storage With the Optional SD Card
• Using the Optional USB Keyboard
1
Chapter 1 — Using the CN2 Handheld Computer
2 CN2 Handheld Computer User’s Manual
Introducing the CN2 Handheld Computer
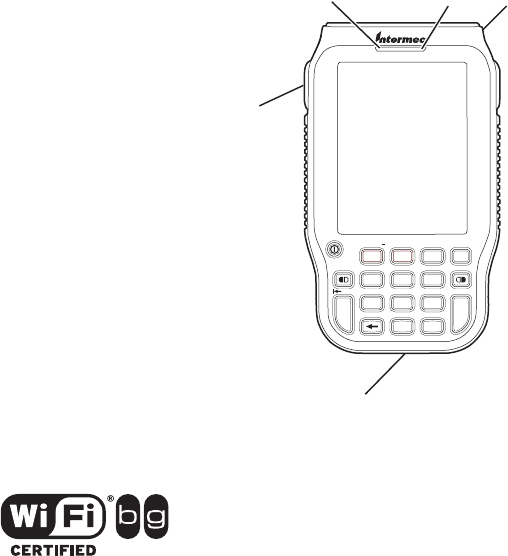
The Intermec CN2 handheld computer is an ergonomically-
designed handheld computer built on the Microsoft® Windows®
CE .NET operating system. It is a semi-rugged, lightweight
computer that runs client/server applications and browser-based
applications.
Stylus (not
visible from
front)
Side Scan
button
(2 places)
Good
Read light
USB/Serial port
Battery light
CN2
T
A
B
0
.
79
13
46
8
2
5
ESC
E
N
T
E
R
F1 F3 LockF2
F4 F6F5
F7 F9F8
F12F10 F11
DEF CapsABC
GHI MNOJKL
PQRS WXYZTUV
Space Alt
CN2 Handheld Computer With Numeric Keypad
The CN2 handheld computer with an IEEE 802.11b/g radio
installed is Wi-Fi® certified for interoperability with other
802.11b/g wireless LAN devices.
What’s New in This Release?
This release of CN2 includes these new features:
• You can use Task Manager (page 22).
• You can customize the behavior of the keypad (page 41).
• Funk Security is the default security choice (page 52).

Chapter 1 — Using the CN2 Handheld Computer
CN2 Handheld Computer User’s Manual 3
• You can double-tap the or icon in the taskbar to
view information about your wireless network regardless of
your security choice (page 68).
• You can allow FTP transfers to and from the CN2 (page 70).
• You can make sure that your applications are reinstalled after
a cold boot (page 90).
• You can run LED and keypad diagnostic tests (page 102).
CN2 Features, Applications, and Accessories
The CN2 includes these features and applications:
Features Installed Applications
802.11b/g radio (optional) CE Internet Explorer 6
1D linear imager (optional) CE Media Player
CCX v1.0 certification Inbox
IPv6 support ScanDemo (optional)
.NET Compact Framework Transcriber
64MB flash/128MB RAM memory Wavelink Avalanche Enabler
400 MHz Intel® XScale™ processor WordPad
18-key numeric keypad or
10-key scroll keypad
Quarter VGA color display with
touch screen
For a complete list of accessories, see “Accessories for the CN2”
on page 115.
Identifying the Optional Features Installed in Your CN2
Before you continue learning to use your CN2, you need to
determine which optional features are installed in your CN2:
• 802.11b/g radio
• Numeric or scroll keypad
• 1D linear imager

Chapter 1 — Using the CN2 Handheld Computer
4 CN2 Handheld Computer User’s Manual
Does Your CN2 Contain an 802.11b/g Radio?
How to Determine Description In This Manual
Look at the Configuration
Number (CN) on the label inside
the battery compartment. For
help removing the battery door
and the battery, see page 8.
If the CN ends in 8xx, your CN2
contains a radio. For example,
CN2A21E10N2804.
You have a wireless CN2,
which can communicate in
a wireless network.
For details about wireless
communications, see
“Configuring 802.11b/g
Radio Communications”
on page 47.
If the CN ends in 000, your CN2
does not contain a radio. For
example, CN2A11E10N2000.
You have a batch CN2,
which requires a modem
dock or communications
dock to communicate with
a network.
For details about batch
communications, see
“Configuring USB
Communications” on
page 46.
Does Your CN2 Contain a Numeric or Scroll Keypad?
How to Determine Description In This Manual
The numeric keypad has 18
keys.
You can type numbers and
letters, and you can access
function keys (such as F1).
For details, see “Using the
Numeric Keypad” on
page 11.
The scroll keypad has 10 keys. You can use the arrow keys to
move through applications,
and you can access function
keys (such as F1).
For details, see “Using the
Scroll Keypad” on page
13.
Does Your CN2 Scan Bar Codes?
How to Determine Description In This Manual
The top of the CN2 contains a
clear scanner window.
You can scan bar codes with
your CN2.
For details, see “Scanning
Bar Codes” on page 25.
The top of the CN2 does not
contain a clear scanner
window.
You cannot scan bar codes
with your CN2.
Ignore all references to
scanning bar codes in this
manual.

Chapter 1 — Using the CN2 Handheld Computer
CN2 Handheld Computer User’s Manual 5
Using the Battery
The CN2 uses a lithium-ion battery as its main power source.
You must fully charge the main battery before you can use the
CN2.
While you change the battery, the backup battery maintains the
computer’s status, memory, and real-time clock for at least 5
minutes.
The lithium-ion battery pack that is used in this device
may present a fire or chemical burn hazard if it is mistreated.
Do not disassemble it, heat it above 100°C (212°F), or
incinerate it.
Avertissement: Le paquet de piles d’ions de lithium qui est
utilisé dans cet appareil peut presenter un risque de feu ou
un risque chimique de brûlure s’il est maltraité. Il ne faut
pas le désassembler, le réchauffer à une température plus
élevée que 100°C (212°F) ou l’incinérer.
Warnung: Der Lithiumionen-Akku, der in diesem Gerät
verwendet wird, kann eine Brandgefahr oder chemische
Brandgefahr darstellen, falls ee missbräuchlich verwendet
wird. Nicht zerlegen, über 100°C (212°F) erwärmen oder
verbrennen.
Removing the main battery when the backup battery low or
critically low icon appears on the status bar may cause your
CN2 to cold boot and you may lose data.
Attention: Si vous enlevez la batterie principale quand
l’icône de batterie de secours dans la barre de statut indique
bas ou bas critique, cela peut causer une botte froide à votre
CN2 et vous risquez de perdre des données.
Vorsicht: Das Entfernen des Hauptakkus bei schwacher
Reservebatterie oder wenn das Symbol für „leeren Akku“ in
der Statusleiste eingeblendet ist, kann einen Kaltstart des
Modells CN2 auslösen und zu Datenverlusten führen.
Chapter 1 — Using the CN2 Handheld Computer
6 CN2 Handheld Computer User’s Manual
If you fail to replace the battery immediately, you may lose
important data or applications.
Attention: Si la batterie n’est pas remplacée immédiatement,
des données ou applications importantes risquent d’être
perdues.
Vorsicht: Falls der Akku nicht unverzüglich ausgetauscht
wird, können importierte Daten oder Anwendungen
verloren gehen.
Dispose of used battery packs promptly. Keep away from
children. Contact your local Intermec sales representative for
replacement batteries.
Several factors determine the life of your battery, such as extreme
temperatures and your usage.
Installing and Charging the Battery
Make sure you fully charge the battery before you use your
CN2. To charge the battery, you need to install it in the CN2.
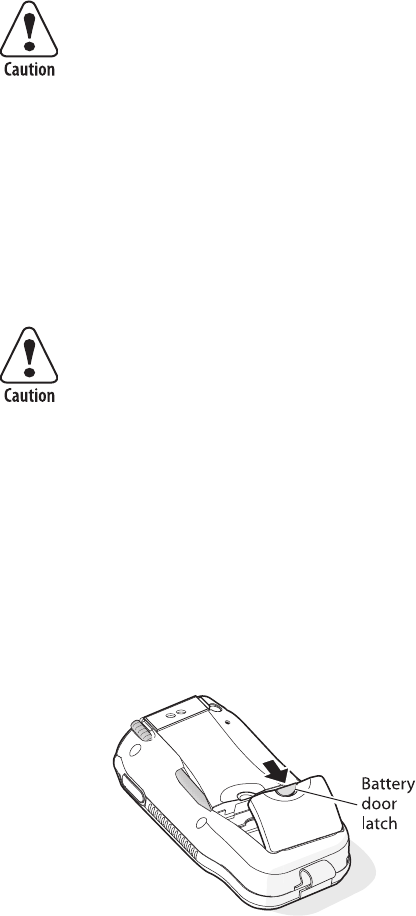
To install and charge the battery
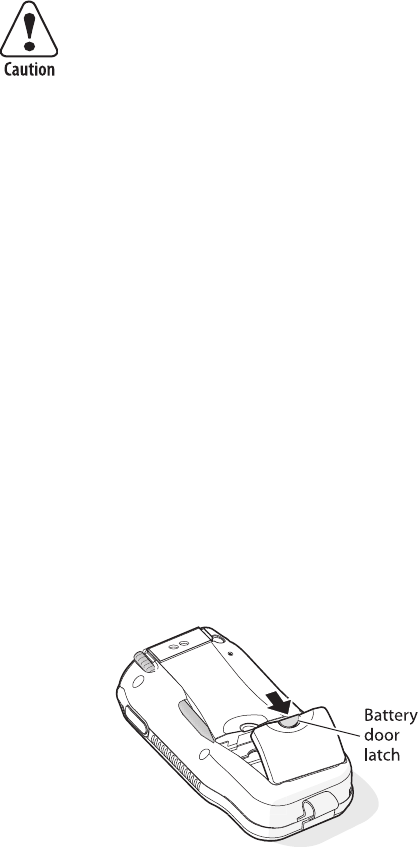
1 Push down on the battery door latch, and pull up on the
battery door.
2 Remove the battery door and set it aside.
3 Align the battery contacts, and insert the battery in the
battery compartment. Press down on the battery until it clicks
into place.
Chapter 1 — Using the CN2 Handheld Computer
CN2 Handheld Computer User’s Manual 7
Battery
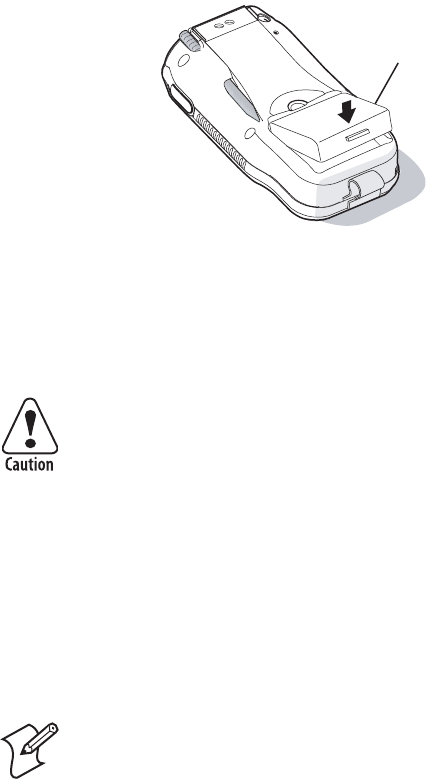
4 Replace the battery door.
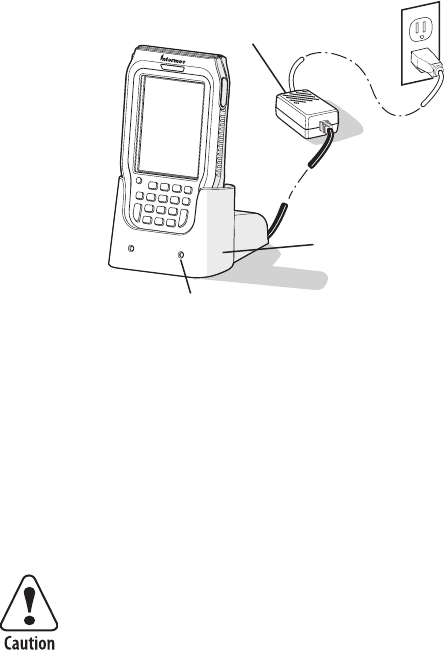
5 Connect the AC power supply (P/N 074246) to the power
connector on the back of the CN2 communications dock
(P/N 225-696-001), and then connect the power cord to the
AC power supply.
You must use only the Intermec power supply approved
for use with the CN2. Using any other power supply will
damage the CN2.
Attention: Vous devez utiliser seulement le bloc
d’alimentation Intermec désigné pour le CN2.
L’utilisation d’autre blocs d’alimentation endommagera le
CN2.
Vorsicht: Mit dem Modell CN2 darf nur der dazu
genehmigte Intermec-Netzteil verwendet werden. Die
Verwendung eines anderen Netzteils wird das Modell
CN2 beschädigen.
Note: For help installing and using the communications
dock, see the CN2 Communications Dock Quick Start Guide
(P/N 930-061-001), which shipped with the dock.
Chapter 1 — Using the CN2 Handheld Computer
8 CN2 Handheld Computer User’s Manual
AC power
supply
Communications
dock
Power
light
CN2
6 Connect the power cord to an AC power outlet. The green
Power light on the communications dock turns on.
7 Place the CN2 in the communications dock. The battery is
fully charged in approximately 4 hours.
Removing the Battery
Follow these instructions to remove the battery from the CN2.
Only use the stylus to remove the battery. If you use any
other tool or method to remove the battery, you may damage
the battery or the CN2.
Attention: Utilisez uniquement le stylet pour retirer la pile.
Si vous utilisez un autre instrument ou une autre méthode
pour le faire, vous risquez d’endommager la pile ou le CN2.
Vorsicht: Der Akku darf nur mit Hilfe des Stifts entfernt
werden. Wenn ein anderes Werkzeug bzw. eine andere
Methode zum Herausnehmen des Akkus benutzt wird, kann
der Akku oder das Modell CN2 beschädigt werden.
Chapter 1 — Using the CN2 Handheld Computer
CN2 Handheld Computer User’s Manual 9
Removing the main battery when the backup battery low or
critically low icon appears on the status bar may cause your
CN2 to cold boot and you may lose data.
Attention: Si vous enlevez la batterie principale quand
l'icône de batterie de secours dans la barre de statut indique
bas ou bas critique, cela peut causer une botte froide à votre
CN2 et vous risquez de perdre des données.
Vorsicht: Das Entfernen des Hauptakkus bei schwacher
Reservebatterie oder wenn das Symbol für „leeren Akku“ in
der Statusleiste eingeblendet ist, kann einen Kaltstart des
Modells CN2 auslösen und zu Datenverlusten führen.
If you fail to replace the battery immediately, you may lose
important data or applications.
Attention: Si la batterie n’est pas remplacée immédiatement,
des données ou applications importantes risquent d’être
perdues.
Vorsicht: Falls der Akku nicht unverzüglich ausgetauscht
wird, können importierte Daten oder Anwendungen
verloren gehen.
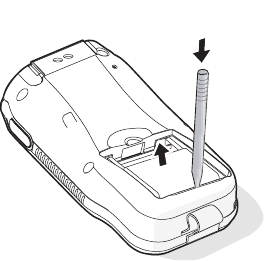
To remove the battery
1 Push down on the battery door latch, and pull up on the
battery door.
2 Remove the battery door and set it aside.
3 Insert the stylus between the battery and the CN2 case, and
press straight down until the battery is released.
Chapter 1 — Using the CN2 Handheld Computer
10 CN2 Handheld Computer User’s Manual
4 Lift the battery out of the battery compartment.
Maximizing Battery Life
There are several things that you can do to maximize the life of
your fully charged battery.
• Set the Backlight Timeout to 10 seconds.
• Verify that Radio Power Management is enabled (Fast PSP).
Enabling radio power management allows your radio to
switch between awake and sleep modes based on network
traffic.
• Verify that each setting under Power Management has a value
of 1 minute for a combined automatic shutoff time of 3
minutes.
You can use Intermec Settings to easily make all of these
configuration changes. For help, see “Configuring the CN2
Locally With Intermec Settings” on page 36.
Checking the Battery Status
The easiest way to tell the status of your battery is to look at the
battery icon on the taskbar of your CN2. For help locating the
taskbar, see the illustration on page 15.
Chapter 1 — Using the CN2 Handheld Computer
CN2 Handheld Computer User’s Manual 11
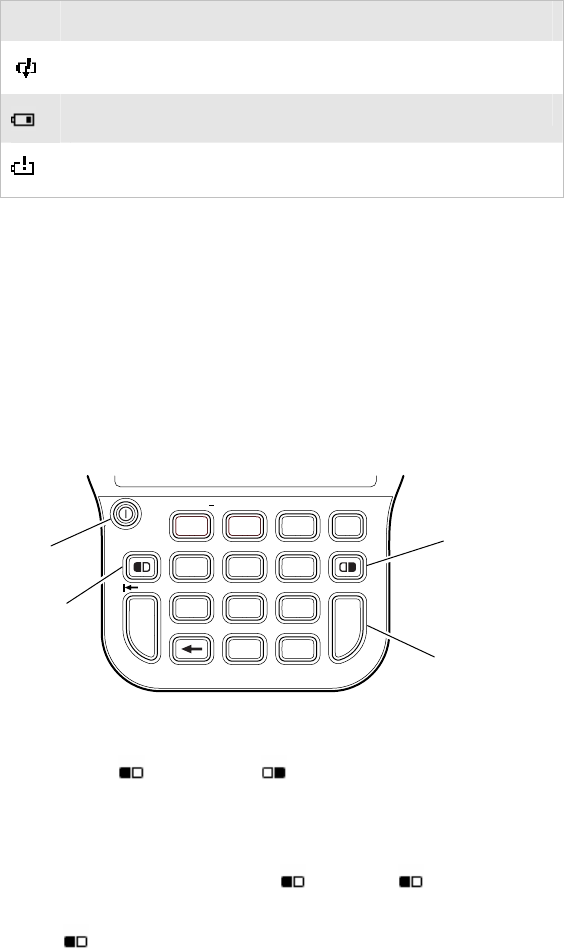
Battery Icon Status
Icon Status
The battery is charging.
The battery is low. You need to charge the battery soon.
The battery is critically low. You need to charge the battery
now.
Using the Keypad
The CN2 has either an 18-key numeric keypad or a 10-key
scroll keypad.
Using the Numeric Keypad
You enter all of the characters and functions printed on the keys
just like you would on a standard keyboard.
T
A
B
0
.
79
13
46
8
2
5
ESC
E
N
T
E
R
F1 F3 LockF2
F4 F6F5
F7 F9F8
F12F10 F11
DEF CapsABC
GHI MNOJKL
PQRS WXYZTUV
Space Alt
Green
key
Enter
key
Power
key
Orange
key
CN2 18-Key Numeric Keypad
The Orange ( ) and Green ( ) keys let you access the
additional functions printed on the keypad overlay.
To access functions printed in orange on the keypad overlay
1 Press and release the Orange ( ) key. The icon appears
in the taskbar and Orange mode is enabled.
The icon remains on until you press another key or press
the Orange key again.
Chapter 1 — Using the CN2 Handheld Computer
12 CN2 Handheld Computer User’s Manual
2 Press and release the key below the function printed in
orange. For example, press the 5 key to access the F5
function, which refreshes the selected folder or desktop. The
icon turns off.
To access characters printed in green on the keypad overlay
1 Press and release the Green ( ) key. The icon appears in
the taskbar and Green mode is locked.
The icon remains on until you press again.
2 Press and release the key below the character printed in green.
For example, press the 2 key twice to type a lowercase b
character.
3 Press and release to disable Green mode. The icon
turns off.
To type uppercase characters
1 Press and release the Green ( ) key. The icon appears in
the taskbar and Green mode is locked.
2 Press and release the ESC key. The Caps Lock ( ) icon
appears in the taskbar.
3 Type a few uppercase characters. For example, to type BYE,
follow these steps:
a Press the 2 key twice to type B.
b Press the 9 key three times to type Y.
c Press the 3 key twice to type E.
4 Press and release the ESC key. The icon turns off.
5 Press and release to disable Green mode. The icon
turns off.
To delete characters
1 Make sure neither nor appear in the taskbar.
2 Press the Backspace ( A ) key.
Chapter 1 — Using the CN2 Handheld Computer
CN2 Handheld Computer User’s Manual 13
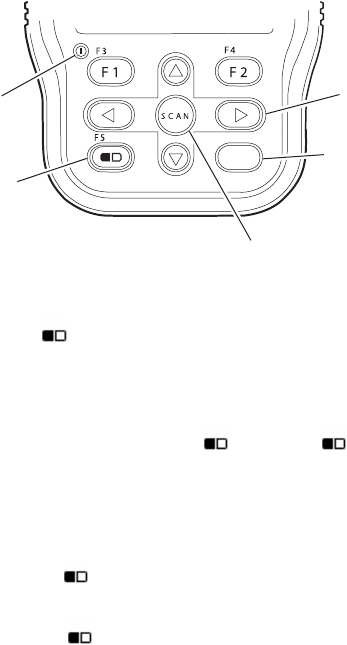
Using the Scroll Keypad
You enter all of the characters and functions printed on the keys
just like you would on a standard keyboard.
ENTER
ESC
Power key
Orange key
Arrow keys
(4 places)
Enter key
Scan button
CN2 10-Key Scroll Keypad
The Orange ( ) key lets you access the additional functions
printed on the keypad overlay.
To access functions printed on the keypad overlay
1 Press and release the Orange ( ) key. The icon appears
in the taskbar and Orange mode is enabled.
2 Press and release the key below the function printed on the
keypad overlay. For example, press the Orange key again to
access the F5 function, which refreshes the selected folder or
desktop. The icon turns off.
If you do not press another key within 3 seconds of pressing the
Orange key, the icon turns off and Orange mode is disabled.

Chapter 1 — Using the CN2 Handheld Computer
14 CN2 Handheld Computer User’s Manual
Using the Power Key
The Power key is the round yellow key in the upper left corner
of both keypads.
Actions You Can Perform With the Power Key
Action Do This Description
To turn on the
CN2
Press and release the
Power key.
Your CN2 resumes where it was when you
turned it off. If you are using WPA or 802.1x
security, the computer may need to
reauthenticate before it starts your application.
To turn off the
CN2
Press the Power key
for 2 to 3 seconds
and then release it.
Your CN2 enters Suspend mode. In Suspend
mode, the CN2 continues to supply power to
all memory, but turns off power to most
hardware. This power-saving feature is
designed to prolong battery life.
To toggle the
backlight
Press the Power key
for 5 to 6 seconds
and then release it.
The CN2 backlight toggles (turns on or off)
but the CN2 continues running.
To warm boot the
CN2
Press the Power key
for 10 seconds and
then release it.
(After 5 seconds, the
backlight toggles
(turns on or off).
Keep holding the
Power key for
another 5 seconds
until the backlight
flashes.)
For details, see “Warm Booting the CN2” on
page 104.
Note: If your CN2 does not resume after you press the Power
key, your battery may be too low to supply power. Replace or
charge the battery. If replacing or charging the battery does not
solve the problem, see “Booting the CN2” on page 104.
Chapter 1 — Using the CN2 Handheld Computer
CN2 Handheld Computer User’s Manual 15
Using the Touch Screen
The CN2 has a color touch-screen display. The screen is 240 x
320 pixels. The desktop is 240 x 300 pixels and the taskbar is
240 x 20 pixels. In addition, the screen supports Unicode
characters, user-programmable fonts, and bitmap graphics.
CN2 Start Screen
Using the Touch Screen and Stylus
Your CN2 has a stylus for selecting items and entering
information. Use the stylus in place of a mouse.
Functions You Can Perform With the Stylus
Action Description
Tap Touch the screen once with the stylus to select items.
Double-tap Touch the screen twice with the stylus to open items.
Drag Hold the stylus on the screen and drag across the
screen to select text and images.
Tap and
hold
Tap and hold the stylus on an item to see a list of
actions available for that item. On the pop-up menu
that appears, tap the action you want to perform.
T
askbar
Desktop

Chapter 1 — Using the CN2 Handheld Computer
16 CN2 Handheld Computer User’s Manual
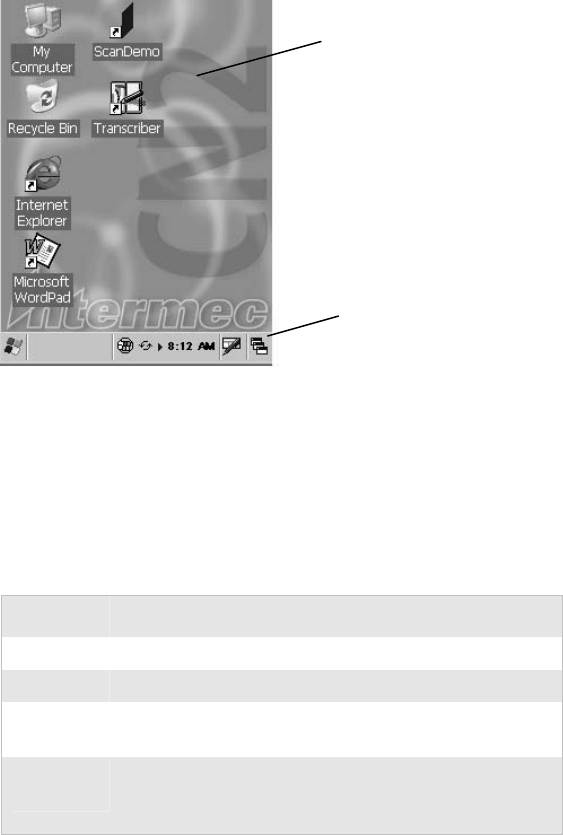
Understanding the Desktop
The Start screen has two distinct areas: the desktop and the
taskbar. The desktop displays shortcuts to some of the
applications installed on the CN2. The first time you turn on
the CN2, the taskbar displays the Start menu icon, the time, the
keyboard icon, and the desktop icon.
Most of the default shortcuts on the desktop are standard
Windows CE applications. However, Intermec provides
shortcuts to two additional applications:
• ScanDemo is a simple application you can use to verify that
your imager is working correctly. (This application is installed
only if your CN2 has a scanner.)
• Transcriber enables you to write on the screen with your
stylus, and then it converts your writing to text.
Using ScanDemo
ScanDemo is an application that enables the CN2 to read bar
code labels and display the information encoded on the label
along with the symbology used to encode it.
To open ScanDemo
1 Double-tap the ScanDemo shortcut on the desktop. The
ScanDemo application opens.
2 Scan a bar code label. For information on how to scan a bar
code label, see “Scanning Bar Codes” on page 25. The
information you scanned along with the symbology used to
encode it appears on the screen.
Chapter 1 — Using the CN2 Handheld Computer
CN2 Handheld Computer User’s Manual 17
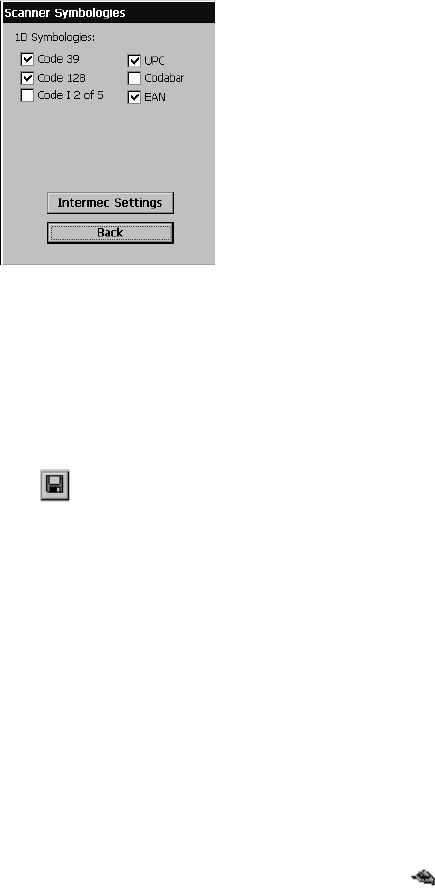
To enable or disable symbologies
1 From the ScanDemo window, tap the Symbologies button
to see the symbologies that are enabled.
2 Select or clear the symbologies you want to use and tap Back.
3 If you want to configure symbology parameters, tap Intermec
Settings. Intermec Settings appears on your screen.
4 From the Intermec Settings application, go to Scanners
Symbologies > Internal Scanner > Symbologies.
5 Select a symbology and modify its parameters.
6 Tap to save your settings and tap X to exit Intermec
Settings. The Scanner Symbologies window appears.
7 Tap Back.
8 Scan bar code labels.
Using Transcriber
In a program that accepts writing, such as Microsoft WordPad,
you can use your stylus to write directly on the screen. Write the
way you do on paper (print or cursive) and the Transcriber
program converts your writing to text.
To turn on Transcriber
• Double-tap the Transcriber shortcut on the desktop or go to
Start > Programs > Transcriber.
The Transcriber Intro box appears and an icon ( ) appears
in the taskbar with a dark gray background.

Chapter 1 — Using the CN2 Handheld Computer
18 CN2 Handheld Computer User’s Manual
To turn off Transcriber
• Tap the Transcriber icon in the taskbar.
The background of the Transcriber icon turns light gray to
match the taskbar and using the stylus does not produce a
line on your desktop.
To close Transcriber
1 Tap and hold the Transcriber icon in the taskbar until the
menu appears.
2 Tap Close Transcriber.
To select text
1 Tap and hold the stylus next to the text you want to select
until the insertion point appears.
2 Without lifting, drag the stylus across the text you want to
select.
To get help for Transcriber
1 Tap and hold the Transcriber icon in the taskbar until the
menu appears.
2 Tap Help. The help system for Transcriber appears on the
screen.
Calibrating the Screen
If the screen does not respond when you tap it with the stylus,
you may need to recalibrate the screen.
To calibrate the screen on a CN2 with the numeric keypad
1 Press and hold the Orange ( ) key and then press Enter.
Release both keys. The calibration screen appears.
2 Follow the instructions to calibrate the screen.
To calibrate the screen on a CN2 with the scroll keypad
1 Press and hold the Orange ( ) key and then press U.
Release both keys. The calibration screen appears.
2 Follow the instructions to calibrate the screen.
Chapter 1 — Using the CN2 Handheld Computer
CN2 Handheld Computer User’s Manual 19
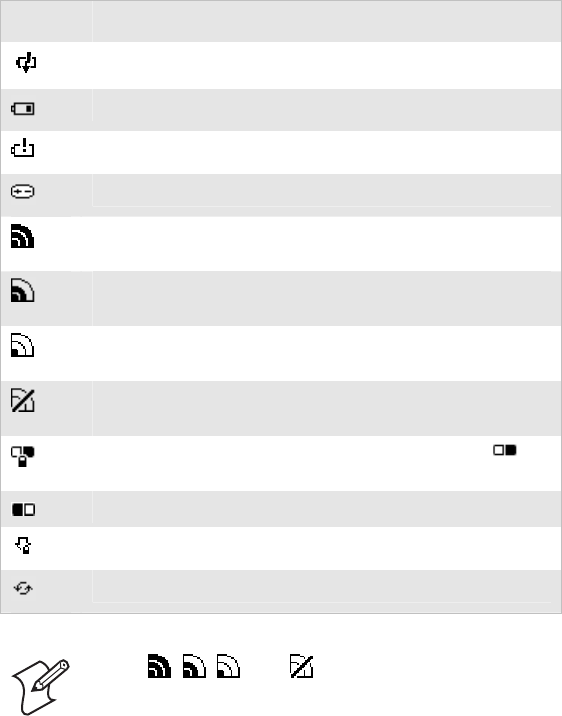
Understanding the Screen Icons
The screen icons on the taskbar show you battery status,
network connections, applications, and special keys or functions
you are using.
Standard Microsoft icons are not included in this table.
CN2 Screen Icons
Icon Description
Battery is charging.
Battery is low. Charge the battery soon.
Battery is critically low. Charge the battery now.
Backup battery is low. Charge the battery now.
The CN2 is authenticated with a strong connection to the
access point.
The CN2 is authenticated with a good connection to the
access point.
The CN2 is authenticated with a weak connection to the
access point. Try moving closer to an access point.
No connection to the access point. For help, see “Problems
with Wireless Connectivity” on page 98.
Green mode is enabled and locked. You must press
again to disable Green mode.
Orange mode is enabled.
Caps Lock feature on the input panel is enabled.
The CN2 is connected using ActiveSync.
Note: , , , and are all versions of the
Network Connection icon. Each version indicates a
different network connection state.

Chapter 1 — Using the CN2 Handheld Computer
20 CN2 Handheld Computer User’s Manual
Only two screen icons are visible at one time. You can tap the
right arrow or left arrow to view additional icons, which are on
but not visible.
Tap the Right Arrow: The CE Remote Display icon and the ActiveSync icon
are visible on the taskbar. Tap the right arrow to view additional icons.
Tap the Left Arrow: The Network Connection icon and the Battery Charging
icon are visible on the taskbar. Tap the left arrow to view additional icons.
Understanding the Status Lights
The status lights on the CN2 turn on to indicate the status of
the battery or a successful decode of a bar code.
Good Read
light
Battery
light
CN2
CN2 Status Lights: This illustration shows the location of the Battery and
Good Read lights.
The next table describes the status lights.
T
ap the right arrow to view
more icons on the right.
T
ap the left arrow to view
more icons on the left.

Chapter 1 — Using the CN2 Handheld Computer
CN2 Handheld Computer User’s Manual 21
Understanding the CN2 Status Lights
Light Color Description
Good Read Green This light turns on when the CN2
successfully decodes a bar code.
Red This light turns on when you press one of
the Side Scan buttons or the Scan button
on the scroll keypad.
Battery Green When the CN2 is connected to a power
source, this light turns on to indicate that
the battery is fully charged.
Orange When the CN2 is connected to a power
source, this light turns on if you cannot
charge the battery. The temperature may
not be within the charging range, or the
battery may be damaged.
Red When the CN2 is connected to a power
source, this light turns on to indicate that
the battery is charging.
Understanding the Beeps
The CN2 uses beeps to provide you with audio feedback when it
performs some functions. For example, you hear a beep each
time you scan a valid bar code.
Understanding the CN2 Beeps
Beep Sequence What It Means
High beep, low beep You entered valid data or a valid command,
the CN2 decoded a label, or the CN2
decoded the last row of a two-dimensional
bar code.
Error beep You entered or scanned an invalid
command. Try entering or scanning the
command again.
Click You pressed a key.

Chapter 1 — Using the CN2 Handheld Computer
22 CN2 Handheld Computer User’s Manual
You can change the beeper volume for your needs and
environment. You can set the beeper volume to Off, Low
(quiet), Medium, High (loud), and Very high (very loud). The
default setting is Very high.
To change the beeper volume
1 Tap the Start icon and tap Intermec Settings. The Intermec
Settings application appears.
2 Tap Device Settings > Beeper > Volume.
3 Select a volume level.
4 Tap to save your settings and tap X to exit Intermec
Settings.
Running Multiple Applications on the CN2
You can simultaneously run several applications on your CN2.
For example, you can check e-mail in your Inbox, view a web
site in Internet Explorer, and open a couple of documents in
WordPad. The last application that you open is the current task,
the one that is currently active on the screen.
The CN2 gives you two ways to manage multiple tasks:
• You can use the Task Manager to view, switch between, and
end tasks. For details, see the next section.
• You can use the Active Applications List to view and switch
between active tasks. For details, see page 24.
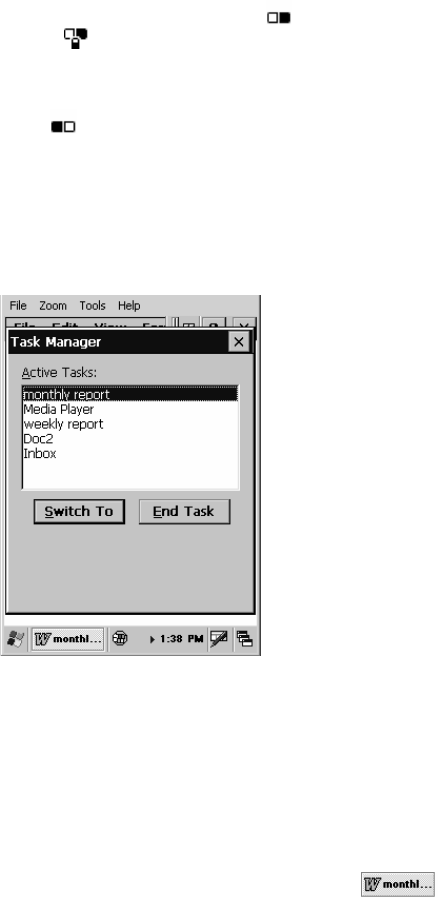
Using Task Manager to Manage Multiple Active Tasks
You can use Task Manager on the CN2 to view all the active
tasks, to switch to another active task, and to end a task. Task
Manager is especially helpful on the CN2 for switching between
several running tasks.
To start Task Manager on a CN2 with the numeric keypad
• Press Alt-TAB by following this key sequence:
a Press . The icon appears in the taskbar and Green
mode is locked.
Chapter 1 — Using the CN2 Handheld Computer
CN2 Handheld Computer User’s Manual 23
b Press and hold 0.
c Press and hold TAB.
d Release both keys. The Task Manager screen appears.
e (Optional) Press and release to disable Green mode.
The icon turns off.
To start Task Manager on a CN2 with the scroll keypad
• Hold while you press and release D. The Task Manager
screen appears.
To use Task Manager
1 Press one of the keypad shortcuts described in the previous
procedures to make the Task Manager screen appear.
2 (Optional) View the list of active tasks. The tasks listed in the
Active Tasks box are currently running on the CN2.
3 (Optional) Identify the current task. For example, in the
screen shown in Step 1, you can tell that editing the
WordPad file called monthly report is the current task
because:
• monthly report is highlighted in the Active Tasks box.
• the WordPad logo and partial filename appear in
the taskbar.
Chapter 1 — Using the CN2 Handheld Computer
24 CN2 Handheld Computer User’s Manual
4 (Optional) Switch to another active task using one of these
methods:
• Double-tap the task in the Active Tasks box. The Task
Manager screen closes, and the selected task becomes the
current task.
• Tap the task in the Active Tasks box and tap the Switch
To button. The Task Manager screen closes, and the
selected task becomes the current task.
5 (Optional) End a task by tapping the task in the Active Tasks
box and tapping the End Task button. The selected task
ends, the Task Manager screen closes, and you return to the
current task.
6 You need to tap X to exit Task Manager only if you do not
switch to or end a task.
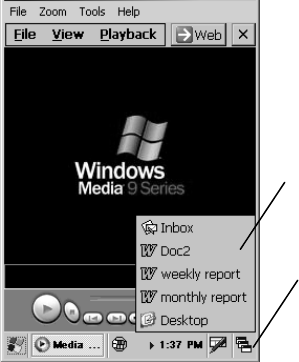
Using the Active Applications List To Manage Multiple Active Tasks
You access the active applications list by tapping the Active
Applications icon at the right end of the taskbar. A list of active
tasks appears. The current task is not included on the list.
Active Applications List: Tap the Active Applications icon to view the list of
active tasks. The current task is Media Player. The current task is not included
on the list.
Active Applications List
Active Applications icon

Chapter 1 — Using the CN2 Handheld Computer
CN2 Handheld Computer User’s Manual 25
You can perform these functions:
• To switch to another active task, tap the task in the list.
• To switch to the desktop, tap Desktop in the list.
• To return to the current task, tap the logo in the taskbar;
in this example, tap the Media player logo .
Scanning Bar Codes
Use the scanner to scan and enter bar code data. The CN2
supports the scanning of 1D linear bar codes.
When you unpack the CN2, all the supported bar code
symbologies are enabled:
• Codabar
• Code 39
• Code 128
• Interleaved 2 of 5
• UPC/EAN
• MSI
Use Intermec Settings to enable and disable symbologies.
For help using Intermec Settings, see “Configuring the CN2
Locally With Intermec Settings” on page 36.
To scan a bar code label with the CN2
1 Press the Power key to turn on the CN2.
2 Point the scanner window at the bar code label and hold the
computer at a slight angle 15 to 25 cm (6 to 10 in) from the
label.

Chapter 1 — Using the CN2 Handheld Computer
26 CN2 Handheld Computer User’s Manual
CN2
Good
Read light
Side Scan
buttons
ESC
3
6
2
E
N
T
E
R
0
.
9
1
4
8
5
T
A
B
7
CN2
Scan
button
Good
Read light
Side Scan
buttons
F2
F1
SCAN
ENTER
3 Press one of the Side Scan buttons or the Scan button on the
scroll keypad and center the red beam so that it falls across all
bars in the bar code label.
Use this test bar code:
Code 39 Test Bar Code
*123456*
*123456*
4 Release the Side Scan button or Scan button.
Increasing File Storage With the Optional SD Card
You can use a SanDisk secure digital (SD) card to increase file
storage and install applications and files. The SD card slot is
located under the CN2 battery.
Note: The CN2 currently supports SanDisk SD cards only.
Intermec cannot guarantee that other SD cards will work with
the CN2.
The following procedures explain how to:
• insert an SD card.
• access the files on an SD card.
• remove an SD card.
For help using an SD card to install applications and files, see
“Installing Applications Using the Optional SD Card” on
page 89.
Chapter 1 — Using the CN2 Handheld Computer
CN2 Handheld Computer User’s Manual 27
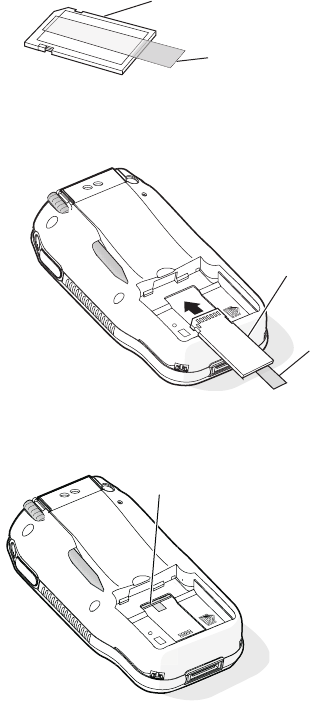
To insert the SD card
1 Before inserting the SD card, you must attach one of the
pull-tabs that ships with the CN2. An SD card without a
pull-tab can be very difficult to remove.
SD Card
Tab
2 Align the SD card as shown in the next illustration, and insert
the SD card into the slot.
SD card
Tab
3 Push the card into the slot until it is fully inserted.
Fully inserted
SD card
4 Align the battery contacts as shown in the next illustration,
and insert the battery in the battery compartment. Press
down on the battery until it clicks into place.
Chapter 1 — Using the CN2 Handheld Computer
28 CN2 Handheld Computer User’s Manual
Battery
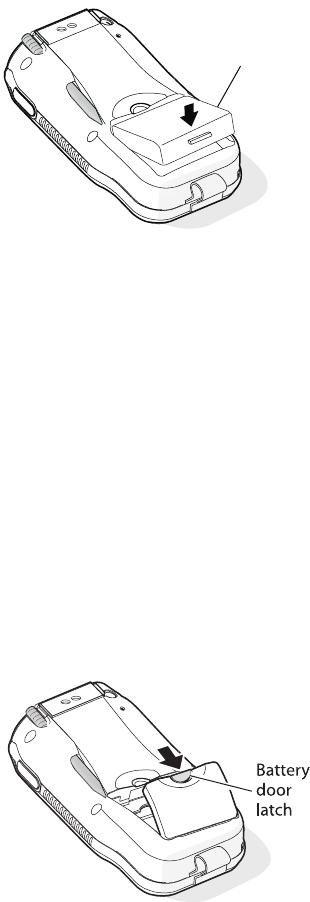
5 Install the battery door.
To access files stored on the SD card
• If you have an SD card inserted in your CN2, it appears as
the SDMMC Disk folder. To access this folder, double-tap
the My Computer icon on the desktop and then double-tap
the SDMMC Disk folder. You can copy files to and from this
folder just as you would any other folder on the CN2.
To remove the SD card
1 Press and hold the Power key for 2 to 3 seconds, and then
release the Power key to turn off the CN2.
2 Place the CN2 face-down on a clean, flat, stable surface.
3 Push down on the battery door latch, and pull up on the
battery door.
4 Remove the battery door and set it aside.
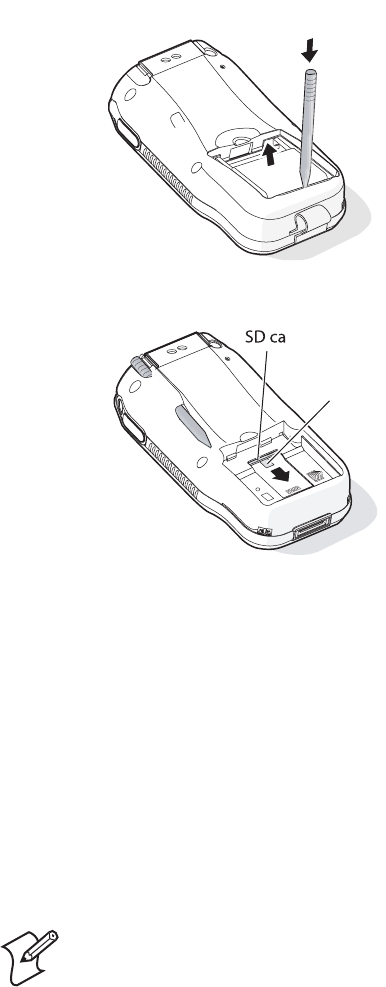
5 Insert the stylus between the battery and the CN2 case, and
press straight down until the battery is released.
Chapter 1 — Using the CN2 Handheld Computer
CN2 Handheld Computer User’s Manual 29
6 Remove the battery and set it aside.
r
d
Tab
7 Pull the tab toward the bottom on the CN2 to remove the
SD card.
Using the Optional USB Keyboard
If you prefer the convenience of using a keyboard with the CN2,
you can attach a USB keyboard to the optional modem dock.
You need these items:
• CN2 modem dock (P/N 075499)
• CN2 power supply (P/N 074246)
• Dell Model SK-8115 USB keyboard
or Logitech Model Y-BF37 USB keyboard
Note: The CN2 supports only the Dell Model SK-8115 and
Logitech Model Y-BF37 USB keyboards. Intermec cannot
guarantee that other USB keyboards will work with the CN2.
Chapter 1 — Using the CN2 Handheld Computer
30 CN2 Handheld Computer User’s Manual
To attach the USB keyboard
1 Read the CN2 Modem Dock Quick Start Guide
(P/N 075481).
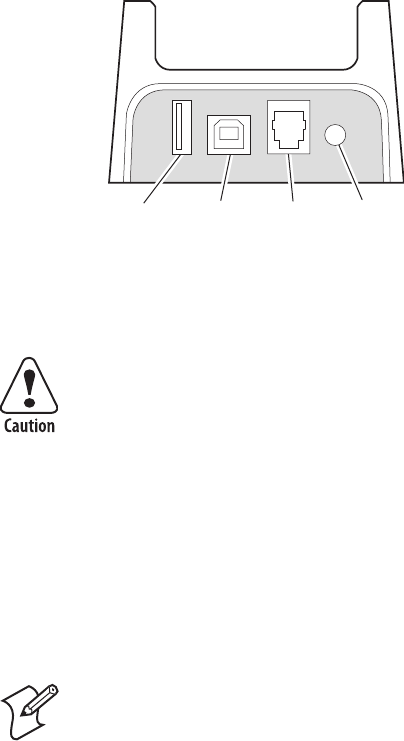
2 Connect the USB keyboard to the keyboard port on the
modem dock.
USB
port
Power
port
Phone
port
Keyboard
port
3 Connect the AC power supply (P/N 074246) to the power
port on the modem dock. Then connect the AC power
supply to an AC power source.
You must use only the Intermec power supply approved
for use with the CN2. Using any other power supply
will damage the CN2.
Attention: Vous devez utiliser seulement le bloc
d’alimentation Intermec désigné pour le CN2.
L’utilisation d’autre blocs d’alimentation endommagera
le CN2.
Vorsicht: Mit dem Modell CN2 darf nur der dazu
genehmigte Intermec-Netzteil verwendet werden. Die
Verwendung eines anderen Netzteils wird das Modell
CN2 beschädigen.
Note: If you cannot connect the modem dock to an AC
power source, you can configure the CN2 to use its battery
to power the USB keyboard. In Step 4c, set USB Host
Power to Always On. However, you will have to charge
the CN2 battery more often.
Chapter 1 — Using the CN2 Handheld Computer
CN2 Handheld Computer User’s Manual 31
4 Configure the CN2 to provide power to the keyboard:
a Tap Start > Settings > Control Panel.
b Double-tap the Utilities icon.
c Set USB Host Power to On When Powered.
d Tap OK to close the Utilities window.
e Tap X to close the Control Panel window.
5 Place the CN2 into the modem dock.
6 Open an application like WordPad and begin typing. If the
characters you type do not appear on screen, see page 95 for
troubleshooting ideas.
To use the USB keyboard
• Type just as you would on a standard keyboard. You may use
standard Windows keyboard shortcuts, such as Ctrl-S to save
a file.
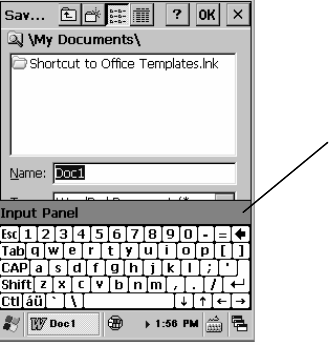
• When you tap some input fields, the Software Input Panel (or
soft keyboard) appears on your CN2 screen. You can ignore
this soft keyboard and continue typing on the USB keyboard.
Soft Keyboard: The soft keyboard automatically appears when you tap
File > Save in a WordPad document even if there is a USB keyboard
connected to the CN2.
Soft keyboard
Chapter 1 — Using the CN2 Handheld Computer
32 CN2 Handheld Computer User’s Manual