Intermec Px4I Users Manual 1 960625 01 UG EC (IPL)
PX4i to the manual 7ff15c3a-daec-4803-84c4-e416617636ba
2015-02-02
: Intermec Intermec-Px4I-Users-Manual-432933 intermec-px4i-users-manual-432933 intermec pdf
Open the PDF directly: View PDF ![]() .
.
Page Count: 136 [warning: Documents this large are best viewed by clicking the View PDF Link!]
- Disclaimer
- Copyright Information
- Trademarks
- Document Change Record
- Contents
- Before You Begin
- 1 Introduction
- 2 Installation
- 3 Starting Up
- 4 Media Load
- 5 Thermal Transfer Printing
- 6 Setting Up the Printer
- 7 Setup Mode
- 8 Options
- 9 Troubleshooting
- 10 Maintenance
- 11 Adjustments
- Appendix A Technical Data
- Appendix B Media Specifications
- Appendix C Interfaces
- Appendix D Intermec Supplies

User’s Guide
EasyCoder PX4i
Bar Code Label
Printer
(IPL Version)

User’s Guide
EasyCoder PX4i
Bar Code Label
Printer
(IPL Version)

ii EasyCoder PX4i User’s Guide (IPL version)
Intermec Technologies Corporation
Corporate Headquarters
6001 36th Ave. W.
Everett, WA 98203
U.S.A.
www.intermec.com
The information contained herein is proprietary and is provided solely
for the purpose of allowing customers to operate and service Intermec-
manufactured equipment and is not to be released, reproduced, or used
for any other purpose without written permission of Intermec.
Information and specifi cations contained in this document are subject to
change without prior notice and do not represent a commitment on the
part of Intermec Technologies Corporation.
© 2004 by Intermec Technologies Corporation. All rights reserved.
The word Intermec, the Intermec logo, Norand, ArciTech, CrossBar,
Data Collection Browser, dcBrowser, Duratherm, EasyCoder, EasyLAN,
Enterprise Wireless LAN, EZBuilder, Fingerprint, i-gistics, INCA (under
license), InterDriver, Intermec Printer Network Manager, IRL, JANUS,
LabelShop, Mobile Framework, MobileLAN, Nor*Ware, Pen*Key,
Precision Print, PrintSet, RoutePower, TE 2000, Trakker Antares, UAP,
Universal Access Point, and Virtual Wedge are either trademarks or regis-
tered trademarks of Intermec Technologies Corporation.
Throughout this manual, trademarked names may be used. Rather than
put a trademark (™ or ®) symbol in every occurrence of a trademarked
name, we state that we are using the names only in an editorial fashion,
and to the benefi t of the trademark owner, with no intention of infringe-
ment.
There are U.S. and foreign patents pending.
Kimdura is a registered trademark of Kimberly Clark.
Microsoft is a registered trademark of Microsoft Corporation.
Valeron is a registered trademark of Valéron Strength Films, an ITW
Company.
Windows is a trademark of Microsoft Corporation.

Document Change Record
This page records changes to this document. The document was origi-
nally released as version -00.
Version Date Description of Change
-00 May 2004 For preproduction printers (Intermec internal use only)
-01 Sept. 2004 First offi cial release. Supports IPL v2.30.
EasyCoder PX4i User’s Guide (IPL version) iii
iv EasyCoder PX4i User’s Guide (IPL version)
EasyCoder PX4i User’s Guide (IPL version) v
Contents
Contents
Before You Begin ........................................................................... ix
Safety Summary .............................................................. ix
Safety Icons ..................................................................... x
Global Services and Support ........................................... xi
Warranty Information ...................................... xi
Web Support .................................................... xi
Telephone Support ........................................... xi
Who Should Read This Document .................. xi
Related Documents .......................................... xi
1 Introduction
Description of EasyCoder PX4i Printer ..........................................2
Safety Summary .............................................................................3
Product Identifi cation ....................................................................3
2 Installation
Unpacking the Printer ....................................................................6
Front View .....................................................................................7
Rear View ......................................................................................8
Media Compartment .....................................................................9
Print Mechanism ..........................................................................10
Connections .................................................................................11
Power ............................................................................11
Computer ...................................................................... 11
Controls and Indicators ...............................................................12
Indicator Lamps ............................................................12
Display ..........................................................................13
Keyboard .......................................................................13
Beeper ...........................................................................14
3 Starting Up
Switching On the Printer .............................................................16
4 Media Load
Tear-Off (Straight-through) .........................................................18
vi EasyCoder PX4i User’s Guide (IPL version)
Contents
Cut-Off ........................................................................................22
Peel-Off (Self-strip) ......................................................................27
Internal Batch Takeup (Roll-to-roll) .............................................32
External Supply (Fan-fold) ...........................................................38
5 Thermal Transfer Printing
Ribbon Load ................................................................................42
6 Setting Up the Printer
Description. .................................................................................48
Default Setup ...............................................................................49
Setup Parameters ..........................................................................50
Serial Communication ...................................................50
Baud Rate .......................................................50
Character Length ............................................50
Parity ...............................................................50
Stop Bits ..........................................................51
Protocol ..........................................................51
Test/Service ...................................................................53
Testprint ..........................................................53
Data Dump .....................................................54
Memory Reset .................................................54
Media ............................................................................55
Media Type ..................................................... 55
Paper Type .......................................................55
Label Length ...................................................55
Sensitivity (Media sensitivity number) .............55
Darkness .........................................................56
Label Rest Point .............................................. 56
Form Adj Dots X ............................................56
Form Adj Dots Y .............................................56
Ribbon Low ....................................................56
Paper Low .......................................................56
Confi guration ................................................................57
Emulation .......................................................57
Print Speed ......................................................57
Cutter (option) ................................................57
Label Taken Sensor (option) ............................57
Returning to Factory Default Setup ............................................. 58
EasyCoder PX4i User’s Guide (IPL version) vii
Contents
7 Setup Mode
Navigating in Setup Mode ...........................................................60
Setup Mode Overviews ................................................................62
8 Options
Introduction ................................................................................68
Liner/Batch Takeup Unit .............................................................69
Paper Cutter .................................................................................69
Fan-Fold Guides ..........................................................................70
Media Roll Retainer .....................................................................70
3-inch Adapter .............................................................................70
Label Taken Sensor ......................................................................70
Interface Boards ...........................................................................71
9 Troubleshooting
Intermec Readiness Indicator .......................................................74
Troubleshooting List ....................................................................77
10 Maintenance
Printhead Cleaning ......................................................................80
External Cleaning ........................................................................83
Cleaning the Label Stop Sensor ....................................................84
Printhead Replacement ................................................................85
Media Jams ..................................................................................88
11 Adjustments
Narrow Media ..............................................................................90
Printhead Pressure ........................................................................91
Label Stop Sensor .........................................................................92
viii EasyCoder PX4i User’s Guide (IPL version)
Contents
A Technical Specifi cations
Technical Data .............................................................................96
B Media Specifi cations
Media Roll Size ..........................................................................100
Media ........................................................................................101
Non-Adhesive Strip .....................................................101
Self-Adhesive Strip .......................................................102
Self-Adhesive Labels .....................................................103
Tickets with Gap .........................................................105
Tickets with Black Mark ..............................................107
C Interfaces
RS-232 Interface ........................................................................110
USB Interface ............................................................................111
Optional Interfaces ....................................................................112
D Intermec Supplies
Setting the Media Sensitivity Number .......................................116
EasyCoder PX4i User’s Guide (IPL version) ix
Before You Begin
Before You Begin
This section provides you with safety information, technical support
information, and sources for additional product information.
Safety Summary
Your safety is extremely important. Read and follow all warnings and
cautions in this document before handling and operating Intermec
equipment. You can be seriously injured, and equipment and data can be
damaged if you do not follow the safety warnings and cautions.
Do not repair or adjust alone
Do not repair or adjust energized equipment alone under any circum-
stances. Someone capable of providing fi rst aid must always be present
for your safety.
First aid
Always obtain fi rst aid or medical attention immediately after an injury.
Never neglect an injury, no matter how slight it seems.
Resuscitation
Begin resuscitation immediately if someone is injured and stops breath-
ing. Any delay could result in death. To work on or near high voltage,
you should be familiar with approved industrial fi rst aid methods.
Energized equipment
Never work on energized equipment unless authorized by a responsible
authority. Energized electrical equipment is dangerous. Electrical shock
from energized equipment can cause death. If you must perform autho-
rized emergency work on energized equipment, be sure that you comply
strictly with approved safety regulations.

x EasyCoder PX4i User’s Guide (IPL version)
Before You Begin
Safety Icons
This section explains how to identify and understand dangers, warnings,
cautions, and notes that are in this document. You may also see icons
that tell you when to follow ESD procedures.
A warning alerts you of an operating procedure, practice,
condition, or statement that must be strictly observed to
avoid death or serious injury to the persons working on the
equipment.
A caution alerts you to an operating procedure, practice,
condition, or statement that must be strictly observed to
prevent equipment damage or destruction, or corruption or
loss of data.
This icon appears at the beginning of any procedure in this
manual that could cause you to touch components (such as
printed circuit boards) that are susceptible to damage from
electrostatic discharge (ESD). When you see this icon, you
must follow standard ESD guidelines to avoid damaging
the equipment you are servicing.
Note: Notes either provide extra information about a topic or
contain special instructions for handling a particular condition
or set of circumstances.

EasyCoder PX4i User’s Guide (IPL version) xi
Before You Begin
Global Services and Support
Warranty Information
To understand the warranty for your Intermec product, visit the
Intermec web site at http://www.intermec.com and click Service &
Support. The Intermec Global Sales & Service page appears. From the
Service & Support menu, move your pointer over Support, and then
click Warranty.
Web Support
Visit the Intermec web site at http://www.intermec.com to download
our current documents in PDF format. To order printed versions of the
Intermec manuals, contact your local Intermec representative or distribu-
tor.
Visit the Intermec technical knowledge base (Knowledge Central) at
http://intermec.custhelp.com to review technical information or to
request technical support for your Intermec product.
Telephone Support
Contact your local Intermec representative. To search for your local rep-
resentative, from the Intermec web site, click Contact.
Who Should Read This Document?
This User’s Guide provides you with information about the features of
the EasyCoder PX4i printer and how to install, confi gure, operate, main-
tain, and troubleshoot it.
Related Documents
The Intermec web site at http://www.intermec.com contains our current
documents that you can download in PDF format. To order printed ver-
sions of the Intermec manuals, contact your local Intermec representative
or distributor.
xii EasyCoder PX4i User’s Guide (IPL version)
Before You Begin

EasyCoder PX4i User’s Guide (IPL version) 1
1 Introduction
This chapter introduces the EasyCoder PX4i printer.
The chapter covers the following topics:
• Description of EasyCoder PX4i
• Safety summary
• Product identifi cation
2 EasyCoder PX4i User’s Guide (IPL version)
Chapter 1 — Introduction
Description of EasyCoder PX4i Printer
The EasyCoder PX4i is a high-volume thermal transfer printer with a
printhead resolution of 8 dots/mm = 203.2 dots/inch and a maximum
print width of 112 mm (4.5 inches).
The EasyCoder PX4i offers a large number of useful features, such as:
• High speed printing up to 300 mm/sec. (12 inches/sec.)
• Flash memory SIMMs for fi rmware, fonts, and bar codes
• Built-in CompactFlash memory card adapter
• Built-in RS-232 and USB interfaces
• Provision for one or two extra interface boards including wired or
wireless EasyLAN connections and parallel interface
• Keyboard and display with backlight
• Support for network monitoring through optional software tools
A large number of factory-installed or fi eld-installable options are avail-
able, so the printer can be confi gured for a wide range of applications.
See Chapter 8 and Appendix A for more information.
The printer is designed to work with the Intermec InterDriver and
Intermec LabelShop. The InterDriver allows you to print labels from
standard MS Windows applications, for example Microsoft Offi ce.
Intermec LabelShop is a series of label-design programs that work under
various versions of MS Windows.
The EasyCoder PX4i supports the Intermec Programming Language
(IPL) v2.30. A version of EasyCoder PX4i, that supports Intermec Fin-
gerprint v8.30, is described in a special User’s Guide.
EasyCoder PX4i User’s Guide (IPL version) 3
Chapter 1 — Introduction
Safety Summary
Intermec assumes no responsibility regarding the CE Directive if the
printer is handled, modifi ed, or installed in any way other than that
described in Intermec’s manuals.
• Read this manual carefully before connecting the printer.
• Moving parts are exposed when the side doors are open, so ensure that
the doors are closed before you operate the printer.
• Do not remove the left-hand cover. Dangerous voltage!
• Do not remove the bottom plate. Dangerous voltage!
• Do not put your fi ngers inside the print mechanism when the power
is on.
• Place the printer on an even surface which can support its weight of
approximately 13 kg (28.5 pounds) plus supplies.
• Do not spray the printer with water. If you are using a hose to clean
the premises in an industrial environment, remove the printer or pro-
tect it carefully from spray and moisture.
• Carefully read the warning text on the envelope before using a clean-
ing card.
Product Identifi cation
The machine label is attached to the printer’s rear plate and contains
information on type, model, and serial number as well as AC voltage. It
also contains various signs of approval.
4 EasyCoder PX4i User’s Guide (IPL version)
Chapter 1 — Introduction

EasyCoder PX4i User’s Guide (IPL version) 5
2 Installation
This chapter explains how to unpack and install the
EasyCoder PX4i and also describes the printer’s vari-
ous parts in detail. It covers the following topics:
• Unpacking the printer
• Parts on the printer’s front
• Parts on the printer’s rear plate
• Parts in the media compartment
• Parts in the print mechanism
• Connecting the printer
• Using the controls and understanding the indica-
tors
6 EasyCoder PX4i User’s Guide (IPL version)
Chapter 2 — Installation
Unpacking the Printer
Before you install the printer, examine the package for possible damage
or missing parts:
• Open the box and lift the printer out.
• Check that the printer has not been visibly damaged during transpor-
tation. Keep the packing materials in case you need to move or reship
the printer.
• Check the label on the printer’s rear plate, which gives the voltage, the
part number, and the serial number.
• Check that any options you ordered are included.
• Check that all the accessories are included. As standard, the box con-
tains:
- Intermec EasyCoder PX4i printer
- Adapter for 3-inch media roll core
- Power cord
- Quality check card
- Cleaning card
- This User’s Guide
- Compact disk (CD) with supporting software, additional manuals,
and product information.
• Check that the type of power cord is appropriate for the local stan-
dard. The printer works within 90 to 265 VAC, 50 to 60 Hz.
If the printer has been damaged in any way during transportation, com-
plain to the carrier immediately.
If the delivery is incorrect or any parts are missing, report it immediately
to the distributor.
&BTZ$PEFS19J
EasyCoder PX4i User’s Guide (IPL version) 7
Chapter 2 — Installation
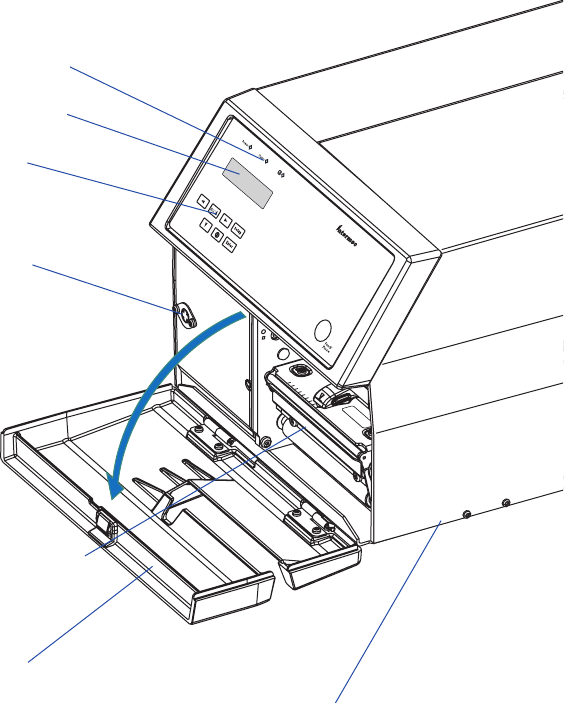
Front View
At the front of the printer are the display window, the indicator lamps,
and the keyboard. These features allow the operator to control and set up
the printer manually.
The front door is held by a snap-lock. Open the front door to view the
various parts on the printer’s front.
Refer to Chapter 8 “Options” for information on possible optional
devices fi tted on the printer’s front.
Side door
Indicator lamps
Display window
Keyboard
Front door
Print mechanism
Connector
for optional
cutter
8 EasyCoder PX4i User’s Guide (IPL version)
Chapter 2 — Installation
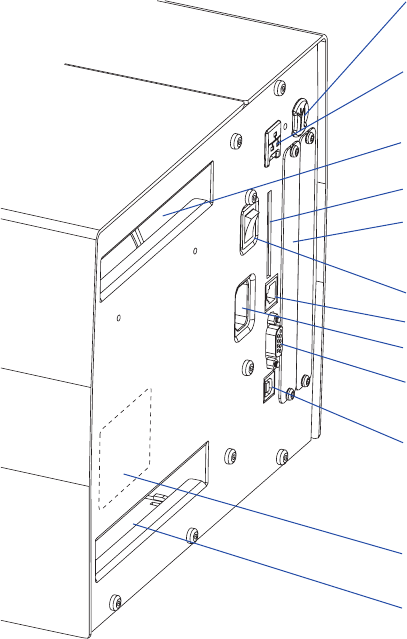
Rear View
The rear plate contains the On/Off switch, the AC power cord socket,
and various interface connectors and slots.
On/Off Switch
AC Power cord socket
Memory card slot
Machine label
RS-232 serial interface
Provision for IEEE 1284
interface board (option)
(not used)
USB interface
Provision for EasyLAN
Wireless antenna
(option)
Provision for EasyLAN
Ethernet connection
(option)
Intake slot for external
media supply
Intake slot for external
media supply
&BTZ$PEFS19J
EasyCoder PX4i User’s Guide (IPL version) 9
Chapter 2 — Installation
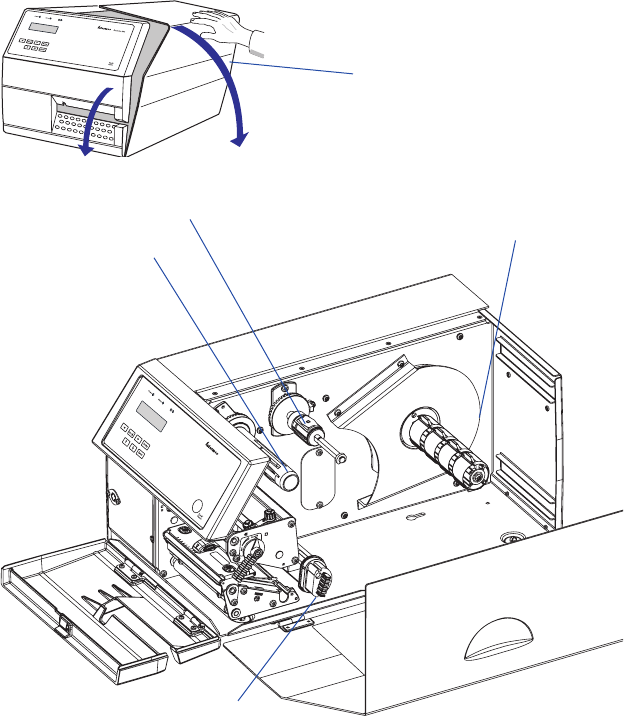
Media Compartment
The media compartment is covered by the side door which can be
opened 180° downwards to provide full access for media and ribbon
load. The door is held in closed position by a magnetic lock. It can be
completely removed by pushing it rearwards.
The media can be supplied from a rotating hub or from an external
supply of fan folds behind the printer. Also see Chapter 8, “Options.”
Media supply
roll hub
Side door
Ribbon rewind hub
Slack absorber
Ribbon supply hub

10 EasyCoder PX4i User’s Guide (IPL version)
Chapter 2 — Installation
Print Mechanism
The print mechanism features a high-performance thermal printhead
with quick-mount fi ttings to facilitate replacement.
Label stop sensor
position adjustment
screw
Thermal printhead
Tear bar
Pressure
arm
Printhead lift
lever
Edge
guide
Printhead
pressure
adjustment
knob
Pressure arm
locking knob
Upper label stop sensor
guide (removable)
Lower label stop sensor guide
(removable)
EasyCoder PX4i User’s Guide (IPL version) 11
Chapter 2 — Installation
Connections
Power
1 Place the printer on a level surface, near an AC outlet. You should be
able to access the printer to load supplies and to remove the printout.
2 Check that the printer is switched off.
3 Connect the power cord from the socket on the rear plate to an elec-
trical outlet (90 to 265 VAC).
Computer
The EasyCoder PX4i is fi tted with one 9-pin D-style subminiature
(DB9) socket for the RS-232 serial interface port and one class B connec-
tor for the USB interface port (see Appendix C).
RS-232 Serial Interface
Before you can use the serial interface, you may need to set up the com-
munication parameters, such as baud rate, parity, etc. as described in
Chapter 6, “Setting Up the Printer.”
USB Interface
The printer supports USB v1.1. There is no communication setup for
USB. For more information, refer to Appendix C.
Optional Interface and Network Boards
Several types are available (see Chapter 8, “Options”). Refer to Chapter
6, Chapter 7, and Appendix C for connection and setup instructions.
The printer can be set to scan all communication ports. When it detects
incoming data on a port, the printer automatically switches to use that
port for both input and output. Press the <i> key to get information on
the active communication channels.
Switch off both PC and printer before connecting them together.
12 EasyCoder PX4i User’s Guide (IPL version)
Chapter 2 — Installation
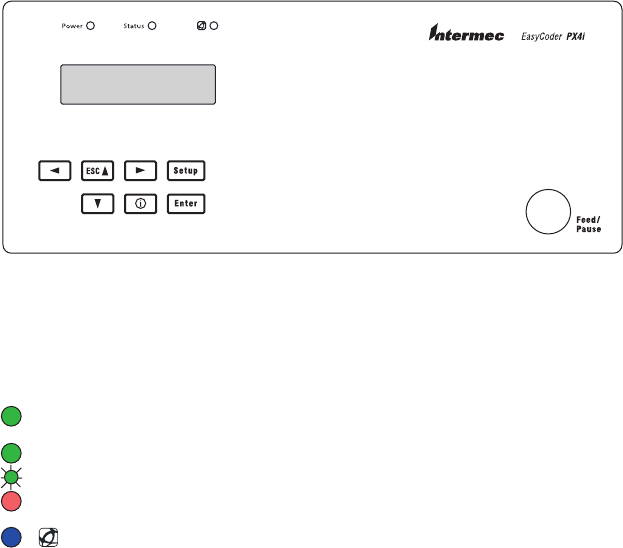
Controls and Indicators
The EasyCoder PX4i has several ways of communicating directly with its
operator: three colored indicator lamps, a display window, a membrane-
switch keyboard with 8 keys and buttons on the printer’s front, and a
beeper.
Indicator Lamps
The indicators are colored LEDs (Light Emitting Diodes) and are used
for the following purposes:
Power (solid green) indicates that the power is on.
Status (solid green) indicates that the printer is ready for use.
Status (fl ashing green) indicates that the printer is communicating.
Status (solid red) indicates an error condition (see Chapter 9).
Intermec Readiness Indicator (blue; on, blink, or off).
Represented by a blue light on Intermec handheld computers, access
points, and printers, the Intermec Readiness Indicator is part of an
exclusive monitoring system from Intermec. The Intermec Readiness
Indicator helps users quickly determine the readiness of the Intermec
device individually and as part of a solution. The Intermec Readiness
Indicator has three different states: On, Blinking, and Off. When the
Indicator is off, the device is not ready to operate individually or as
part of a solution. When the Indicator is blinking, the device may be
initializing, waiting for external resources, or in need of user atten-
tion. And when the Indicator is On, the device is ready for use as
part of a solution. Also see Chapter 9.

EasyCoder PX4i User’s Guide (IPL version) 13
Chapter 2 — Installation
Display
The display window contains an LCD (Liquid Crystal Display) with
background illumination and two lines of text, each with 16 characters.
It shows a message when certain errors occur and guides the operator
through upgrading, startup, and setup. The following errors are reported:
Error Displayed message
Empty/Paused PAUSE
Out of media PAPER OUT
Out of ribbon RIBBON OUT
Printhead lifted PRINT HEAD UP/PRESS FEED
Cutter error OPEN&SHUT CUTTER
Ribbon fi tted RIBBON FITTED
Paper fault PAPER FAULT
Power supply error PSU ERROR
Power supply too hot PSU OVER TEMP
Printhead too hot PRINTHEAD HOT
Keyboard
The keyboard is of the membrane-switch type and has 7 keys. The key-
board is supplemented by a large “Feed/Pause” button. Some keys have
hard-coded functions in the startup and setup modes.
Feed/Pause a print job. Repeat last printed label.
Enter the Setup Mode (see Chapter 7).
Display error messages and communication channel information.
Scroll between various types of information after pressing the <i>
key. Possible error messages and information on active communi-
cation channels are shown in a loop.
Keyboard Color Code
Yellow Operation of the printer (operator level)
Green Setup or service (site or service technician level)
White Data input to printer (operator or technician level)
Feed/Pause button
14 EasyCoder PX4i User’s Guide (IPL version)
Chapter 2 — Installation
Beeper
The beeper acknowledges that a key has been pressed. Optionally, an
audible alarm can be enabled using an IPL command. It will start beep-
ing at paper out and ribbon our and will continue beeping until the start
of reload.

EasyCoder PX4i User’s Guide (IPL version) 15
3 Starting Up
This chapter explains how to start up the printer after
installation or after having been switched off.

16 EasyCoder PX4i User’s Guide (IPL version)
Chapter 3 — Starting Up
Switching On the Printer
Before switching on the printer, make the necessary connections, and
check that the printhead is engaged.
Switch on the power using the On/Off switch on the rear plate. The
“Power” control lamp on the front panel lights up when the power is on.
Wait for a few moments, while the printer loads the program and runs
some self-diagnostic tests:
Starting
After a short time, the printer is initialized. The progress of the initializa-
tion is indicated by an increasing number of colons on the lower line in
the display:
Initializing
:::
When the initialization is completed, a label is fed out. The following
message appears, indicating that the printer is ready for operation.
IPL 2.30
The message indicates the IPL version number.

EasyCoder PX4i User’s Guide (IPL version) 17
4 Media Load
This chapter explains how to load the printer with
media, that is labels, tickets, tags, or strips, for the fol-
lowing modes of operation:
• Tear-Off (straight-through)
• Cut-Off (requires optional cutter)
• Peel-Off (self-strip), requires optional integral self-
strip unit with liner takeup
• Internal Batch Takeup, requires optional integral
self-strip unit with liner takeup and rewind guide
• External Supply (fan-folds), fan-fold guide avail-
able as option

18 EasyCoder PX4i User’s Guide (IPL version)
Chapter 4 — Media Load
Tear-Off (Straight-through)
The EasyCoder PX4i can print on labels, tickets, tags, and continuous
stock in various forms. This section describes the case when the media
is torn off manually against the printer’s tear bar. This method is also
known as “straight-through printing.”
Tear-off can be used for:
• Non-adhesive continuous stock
• Self-adhesive continuous stock with liner
• Self-adhesive labels with liner
• Tickets with gaps, with or without perforations
• Tickets with black marks, with or without perforations
An optional label taken sensor can hold the printing of the next copy
in the batch until the present copy has been removed, see Chapter 8,
“Options.”
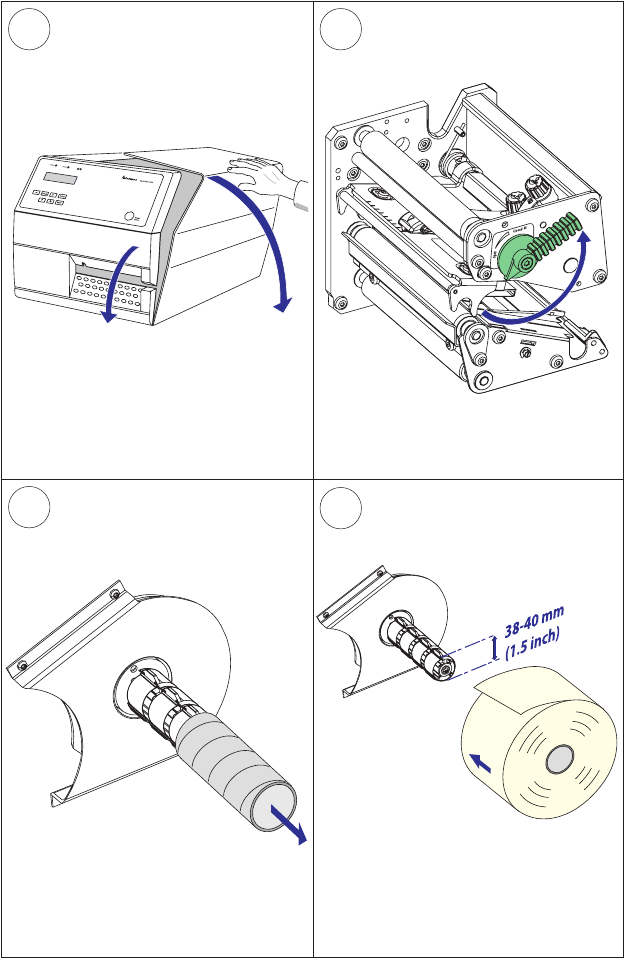
Note: Save the label indicating the sensitivity number attached
to the media roll. You will need this number to set the media
sensitivity, see Appendix D.
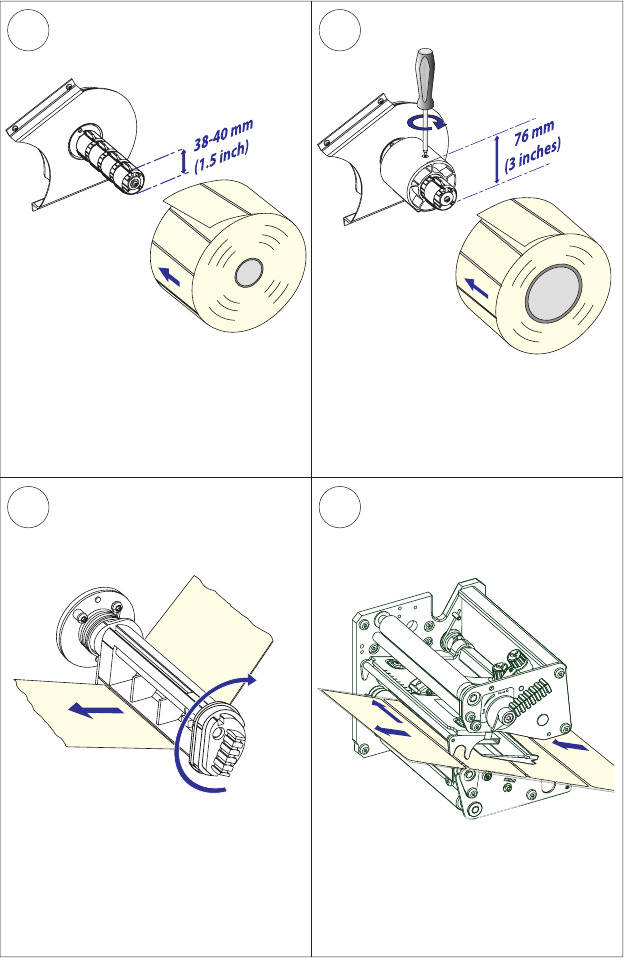
2
3
1
4a
EasyCoder PX4i User’s Guide (IPL version) 19
Chapter 4 — Media Load
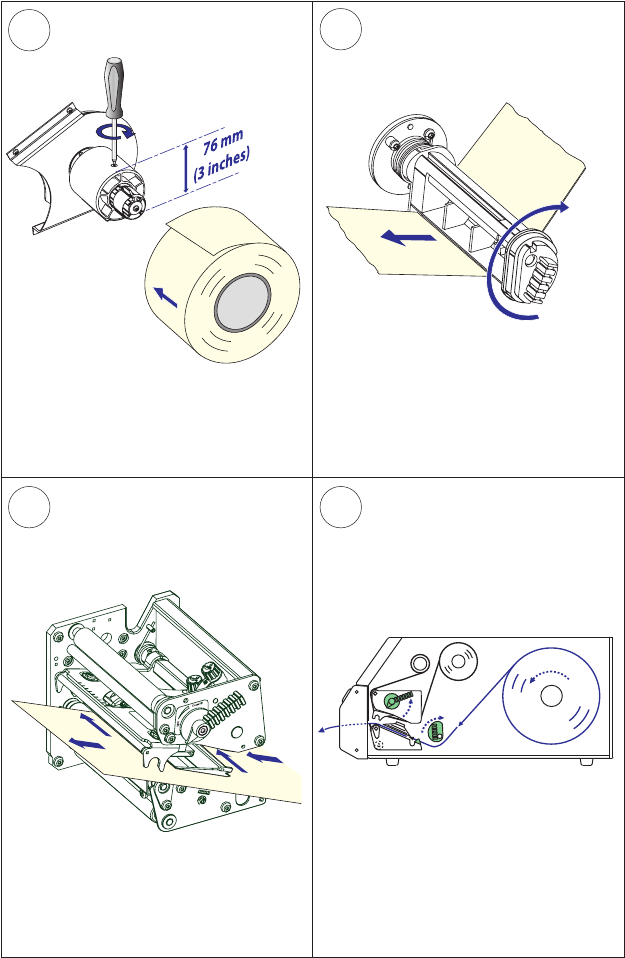
Open the front and side doors.
Turn the printhead lift lever counter-
clockwise to raise the printhead.
Remove any empty core from the media
supply hub.
Fit a new roll of media on the media
supply hub and push the roll inwards as
far as it will go.
Tear-Off , cont.
7
5
6
4b
20 EasyCoder PX4i User’s Guide (IPL version)
Chapter 4 — Media Load
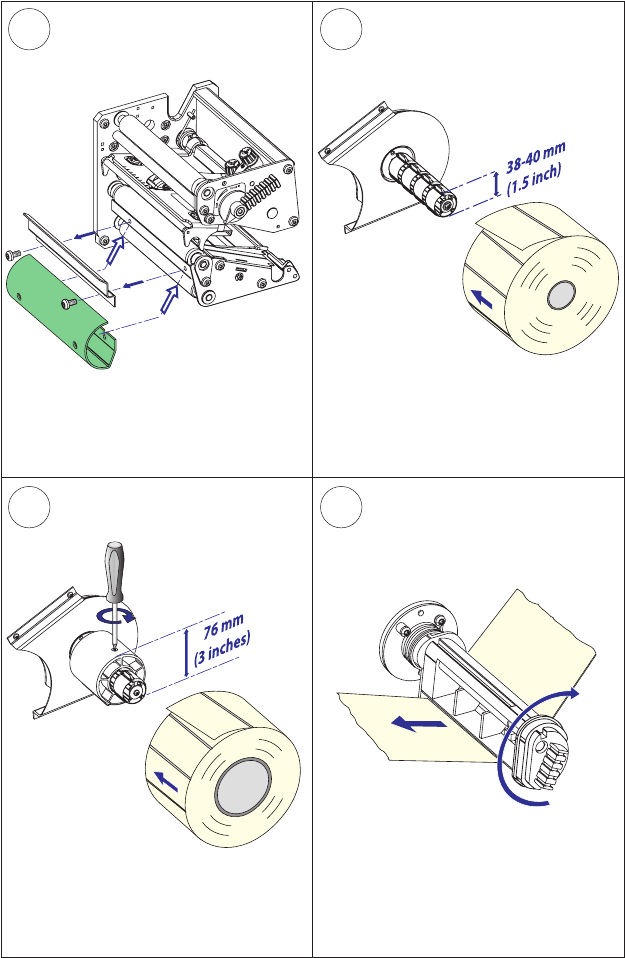
Tear-Off , cont.
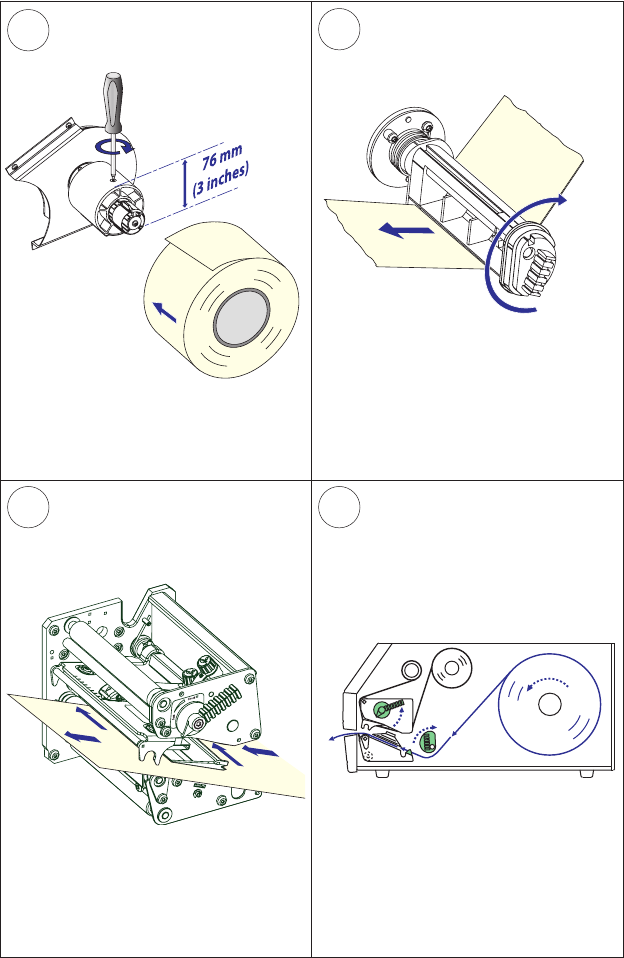
In case of a media roll with a 76 mm
(3-inch) core, fi rst fi t an adapter on the
media supply hub.
Route the media underneath the slack
absorber and forward towards the print
mechanism. The slack absorber can be
rotated for better access and snap-
locked in open positon.
Route the media through the print unit
and push it inwards as far as it will go. This diagram shows the media path.
&EED
0AUSE
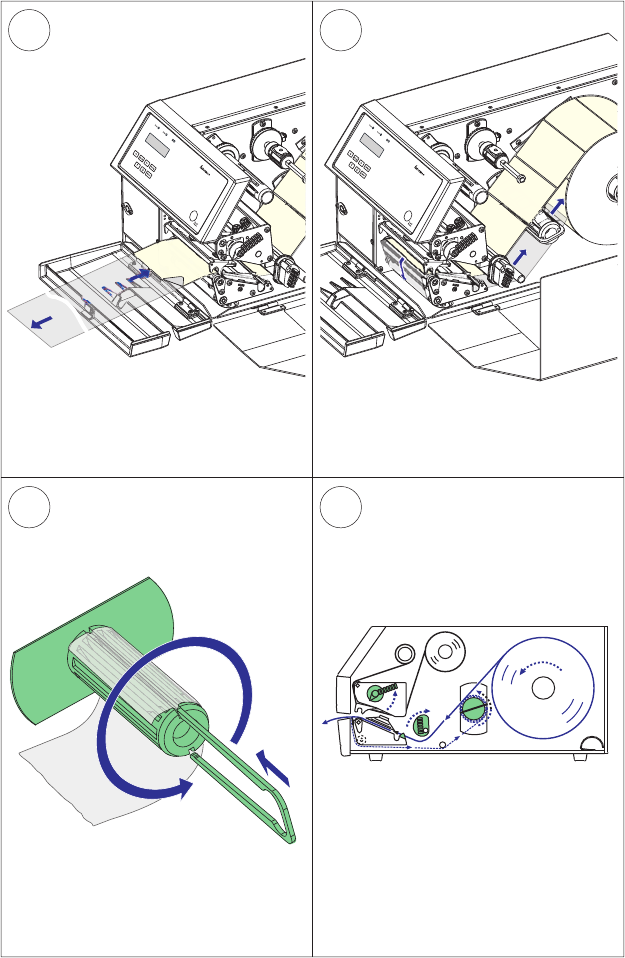
8 9
10 11
EasyCoder PX4i User’s Guide (IPL version) 21
Chapter 4 — Media Load
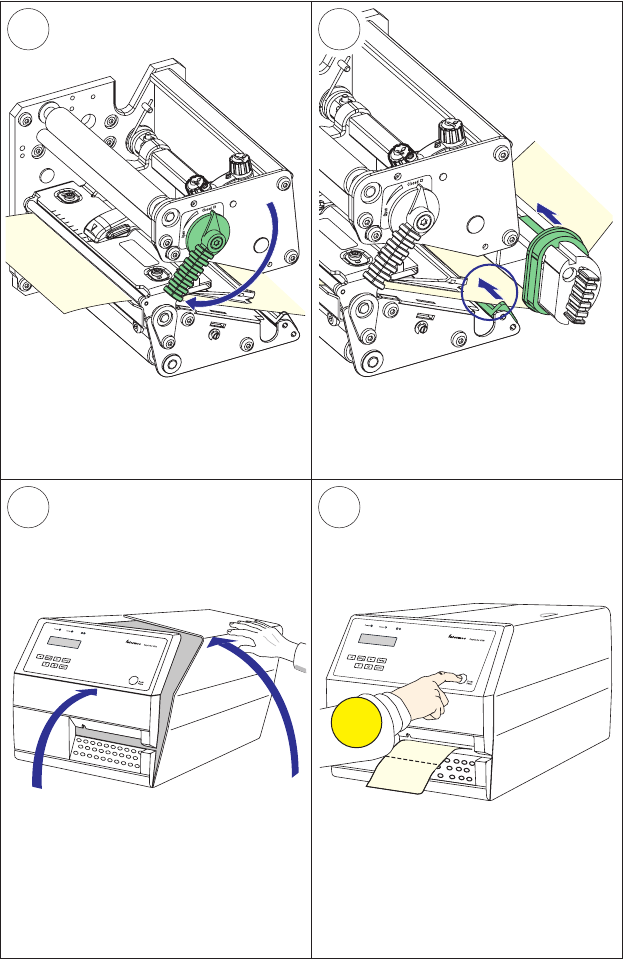
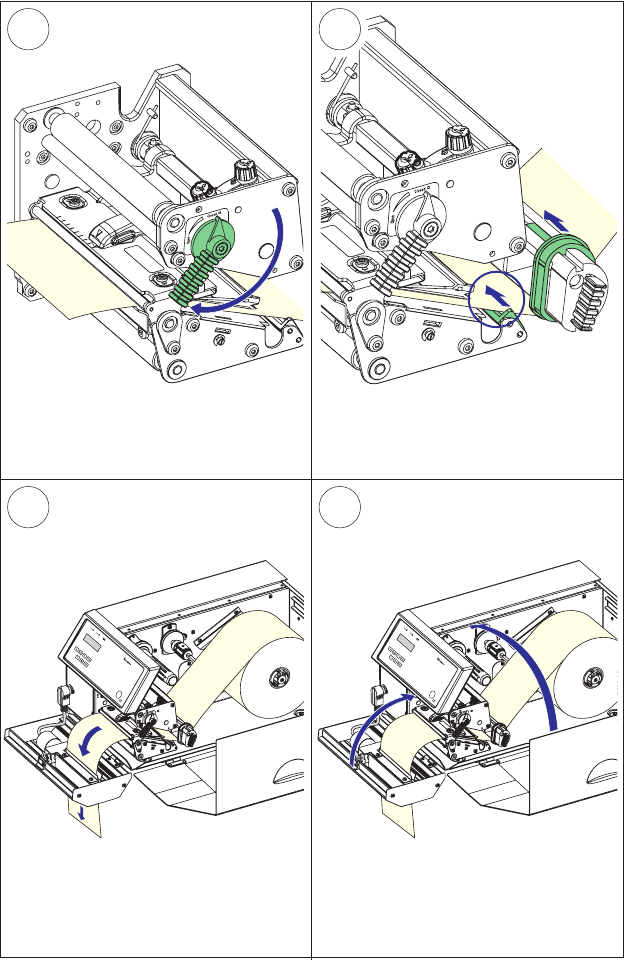
Adjust the position of the green edge
guides so the media is guided with a
minimum of play.
Close the front and side doors.
Tear-Off , cont.
Turn the printhead lift lever to ”Closed”
position.
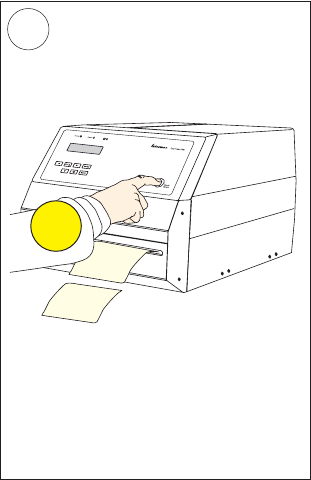
Press the Feed/Pause key to advance the
media and adjust the media feed. Tear
off the media by grabbing the outer
edge and pull downwards.

22 EasyCoder PX4i User’s Guide (IPL version)
Chapter 4 — Media Load
Cut-Off
The EasyCoder PX4i can print on labels, tickets, tags, and continuous
stock in various forms. This section describes the case when the media is
to be cut off by an automatic paper cutter (option).
Cut-off can be used for:
• Non-adhesive continuous stock
• Self-adhesive labels with liner (cut only liner between labels)
The cutter is designed to cut through paper-based media with a thickness
between 60 and 175 µm, which roughly corresponds to a paper weight
of 60 to 175 grams/m2 (basis weight 40 to 120 lb.). The cutter should
not be used to cut through labels, because the adhesive will stick to the
shears, which can damage the cutter.
The optional label taken sensor cannot be used with the cutter.
The rotating cutting blade can be accidently activated while
the cutter is open. To avoid any risk of injury to fi ngers,
always switch off the power before loading media and/or
ribbon in a cutter-equipped printer.
Note: Save the label indicating the sensitivity number attached
to the media roll. You will need this number to set the media
sensitivity, see Appendix D.
&BTZ$PEFS19J
2
3
1
4a
EasyCoder PX4i User’s Guide (IPL version) 23
Chapter 4 — Media Load
Switch off the power. Open the cutter
and the side door.
Turn the printhead lift lever counter-
clockwise to raise the printhead.
Cut-Off , cont.
Remove any empty core from the media
supply hub.
Fit a new roll of media on the media
supply hub and push the roll inwards as
far as it will go.
7
5
6
4b
24 EasyCoder PX4i User’s Guide (IPL version)
Chapter 4 — Media Load
In case of a media roll with a 76 mm
(3-inch) core, fi rst fi t an adapter on the
media supply hub.
Route the media through the print unit
and push it inwards as far as it will go.
Cut-Off , cont.
Route the media underneath the slack
absorber and forward towards the print
mechanism. The slack absorber can be
rotated for better access and snap-
locked in open positon.
This diagram shows the media path.
&BTZ$PEFS19J
&BTZ$PEFS19J
9
10
8
11
EasyCoder PX4i User’s Guide (IPL version) 25
Chapter 4 — Media Load
Cut-Off , cont.
Adjust the position of the green edge
guides so the media is guided with a
minimum of play.
Route the media through the cutter
between the two guide plates.
Close the cutter unit while pulling at the
end of the media. Close the side door
and switch on the power.
Turn the printhead lift lever to ”Closed”
position.
&EED
0AUSE
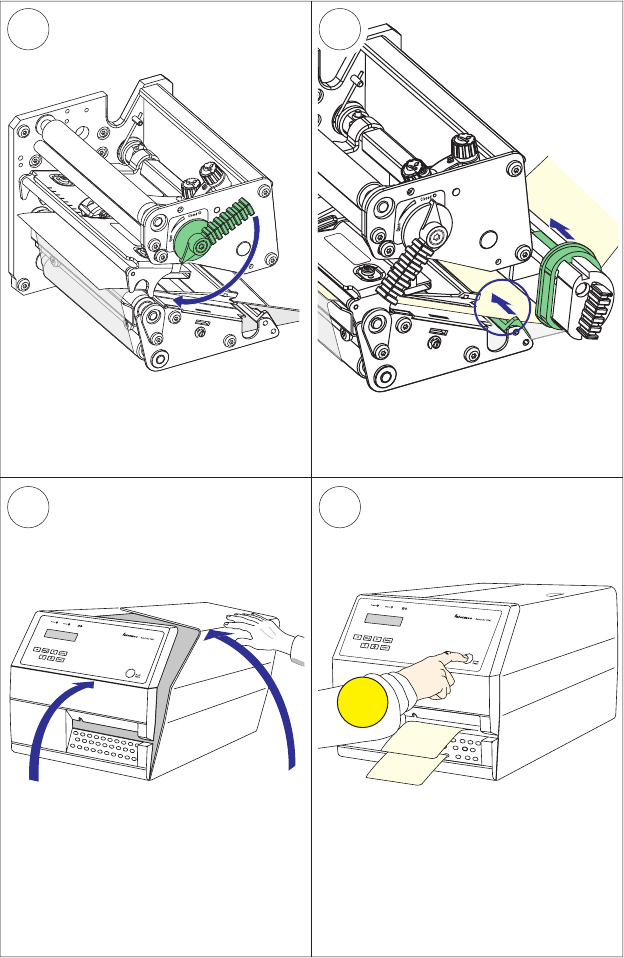
12
26 EasyCoder PX4i User’s Guide (IPL version)
Chapter 4 — Media Load
Cut-Off , cont.
Press the Feed/Pause key to advance the
media and adjust the media feed.

EasyCoder PX4i User’s Guide (IPL version) 27
Chapter 4 — Media Load
Peel-Off (Self-strip)
The EasyCoder PX4i can print on labels, tickets, tags, and continuous
stock in various forms.
This section describes the case when self-adhesive labels are separated
from the liner immediately after printing, which requires an optional
internal liner/batch takeup unit, see Chapter 8, “Options.” This is also
known as “Self-strip” operation.
Peel-off can only be used for:
• Self-adhesive labels with liner
An optional label-taken sensor can hold the printing of the next label
in a batch until the present label has been removed, see Chapter 9,
“Options.”
Note: Peel-off operation sets high demands on the media in
regard of label stiffness, release characteristics of the adhesive
and liner, resistance against electrostatic charging etc., so the
labels will be dispensed properly. Consult your media supplier
or test the media to ascertain that it is suitable for your applica-
tion.
Note: Save the label indicating the sensitivity number attached
to the media roll. You will need this number to set the media
sensitivity, see Appendix D.
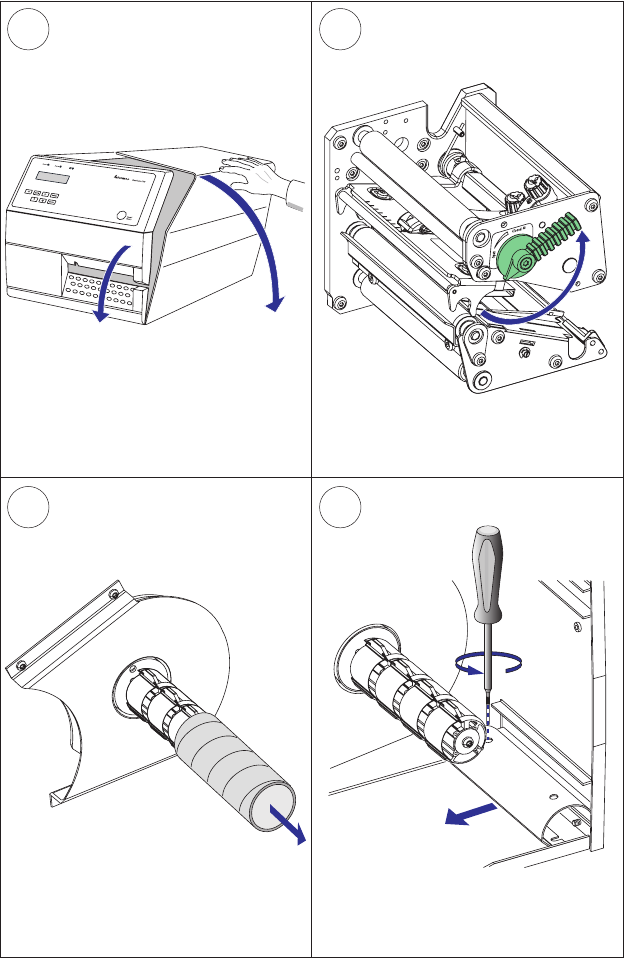
3
2
4
1
28 EasyCoder PX4i User’s Guide (IPL version)
Chapter 4 — Media Load
Open the front and side doors.
Turn the printhead lift lever counter-
clockwise to raise the printhead.
Pull out the green clip (1) on the liner
takeup hub and dispose of any wound-
up liner (2).
Peel-Off , cont.
Remove any empty core from the media
supply hub.
76
5a 5b
EasyCoder PX4i User’s Guide (IPL version) 29
Chapter 4 — Media Load
Peel-Off , cont.
In case of a media roll with a 76 mm
(3-inch) core, fi rst fi t an adapter on the
media supply hub.
Fit a new roll of media on the media
supply hub and push the roll inwards as
far as it will go.
Route the media underneath the slack
absorber and forward towards the print
mechanism. The slack absorber can be
rotated for better access and snap-
locked in open positon.
Route the media through the print unit
and push it inwards as far as it will go.
&BTZ$PEFS19J
CMIN
&BTZ$PEFS19J
1110
8 9
30 EasyCoder PX4i User’s Guide (IPL version)
Chapter 4 — Media Load
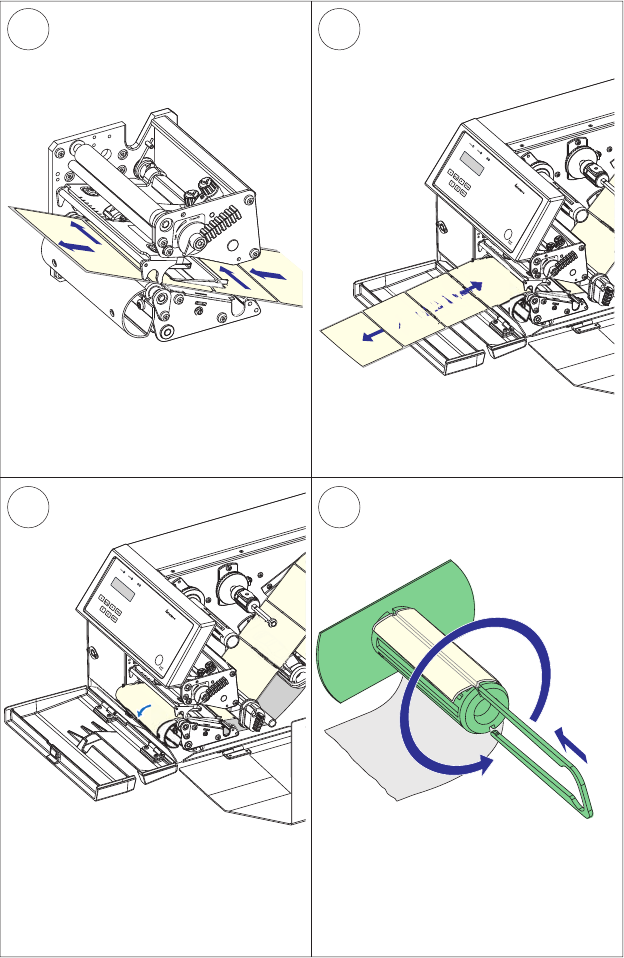
Peel-Off , cont.
Route the liner around the tear bar and
back under the print unit.
Pull out approximately 40 cm (15 in) of
labels and remove the labels from the
liner.
Secure the liner to the takeup hub with
the clip (1) and rotate the hub (2) so the
media becomes tight.
This diagram shows the media and liner
paths.
&EED
0AUSE
12
15
13
14
EasyCoder PX4i User’s Guide (IPL version) 31
Chapter 4 — Media Load
Peel-Off , cont.
Press the Feed/Pause key to advance the
media and adjust the media feed.Close the front and side doors.
Turn the printhead lift lever to ”Closed”
position.
Adjust the position of the green edge
guides so the media is guided with a
minimum of play.

32 EasyCoder PX4i User’s Guide (IPL version)
Chapter 4 — Media Load
Internal Batch Takeup (Roll-to-roll)
The EasyCoder PX4i can print on labels, tickets, tags, and continuous
stock in various forms. This chapter describes the case when printed
labels fi tted on liner (backing paper) or pre-perforated tickets and tags
are wound up inside the printer. The roll of printed labels, tickets, or tags
can then be removed and be handled manually. This requires an optional
internal liner/batch takeup unit.
The takeup hub can accommodate 30 to 40% of a full-size media roll.
Internal batch takeup can be used for:
• Self-adhesive labels fi tted on liner
• Pre-perforated tickets with gaps
• Pre-perforated tickets with marks
Note: Save the label indicating the sensitivity number attached
to the media roll. You will need this number to set the media
sensitivity, see Appendix D.
3 4
1 2
EasyCoder PX4i User’s Guide (IPL version) 33
Chapter 4 — Media Load
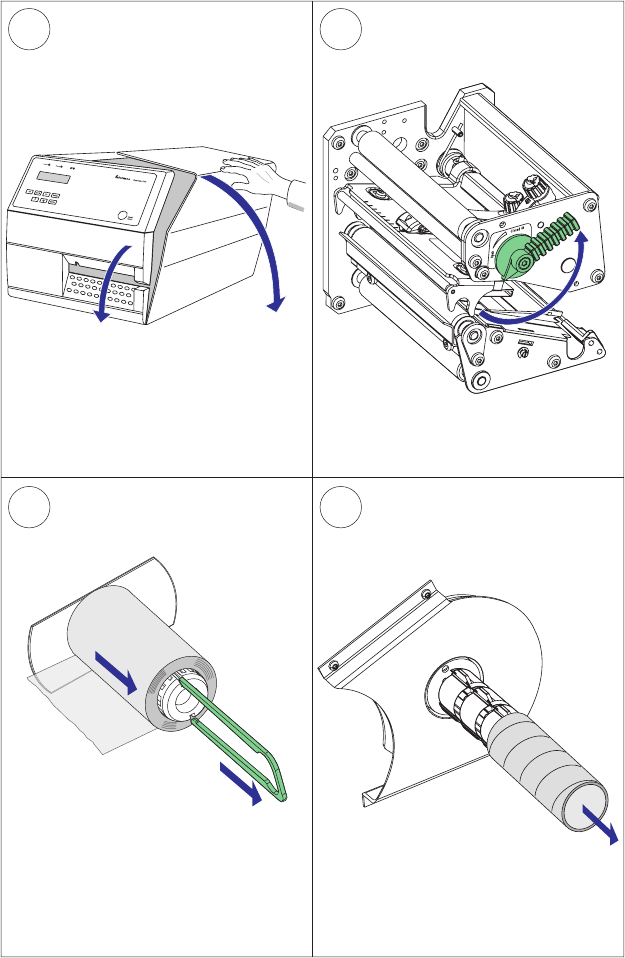
Open the front and side doors.
Turn the printhead lift lever counter-
clockwise to raise the printhead.
Remove any empty core from the media
supply hub.
Loosen the single screw that holds the
guide plate at the rear of the media
compartment.
Internal Batch Takeup, cont.
6b 7
5 6a
34 EasyCoder PX4i User’s Guide (IPL version)
Chapter 4 — Media Load
Remove the tear bar from the print unit
and replace it with the guide plate.
In case of a media roll with a 76 mm
(3-inch) core, fi rst fi t an adapter on the
media supply hub.
Fit a new roll of media on the media
supply hub and push the roll inwards as
far as it will go.
Route the media underneath the slack
absorber and forward towards the print
mechanism. The slack absorber can be
rotated for better access and snap-
locked in open positon.
Internal Batch Takeup, cont.
&BTZ$PEFS19J
CMIN
&BTZ$PEFS19J
10 11
8 9
EasyCoder PX4i User’s Guide (IPL version) 35
Chapter 4 — Media Load
Route the media through the print unit
and push it inwards as far as it will go.
Pull out approximately 40 cm (15 in) of
labels.
Route the labels around the guide plate
and back under the print unit to the
takeup hub.
Wind up some of the media on the
takeup hub (1) and secure it with the
clip (2).
Internal Batch Takeup, cont.
&BTZ$PEFS19J
14 15
12 13
36 EasyCoder PX4i User’s Guide (IPL version)
Chapter 4 — Media Load
This diagram shows the media path.
Turn the printhead lift lever to “Closed”
position.
Adjust the position of the green edge
guides so the media is guided with a
minimum of play.
Close the side door but keep the front
door open.
Internal Batch Takeup, cont.
&BTZ$PEFS19J
&EED
0AUSE
16
EasyCoder PX4i User’s Guide (IPL version) 37
Chapter 4 — Media Load
Press the Feed/Pause key to advance the
media and adjust the media feed.
Internal Batch Takeup, cont.

38 EasyCoder PX4i User’s Guide (IPL version)
Chapter 4 — Media Load
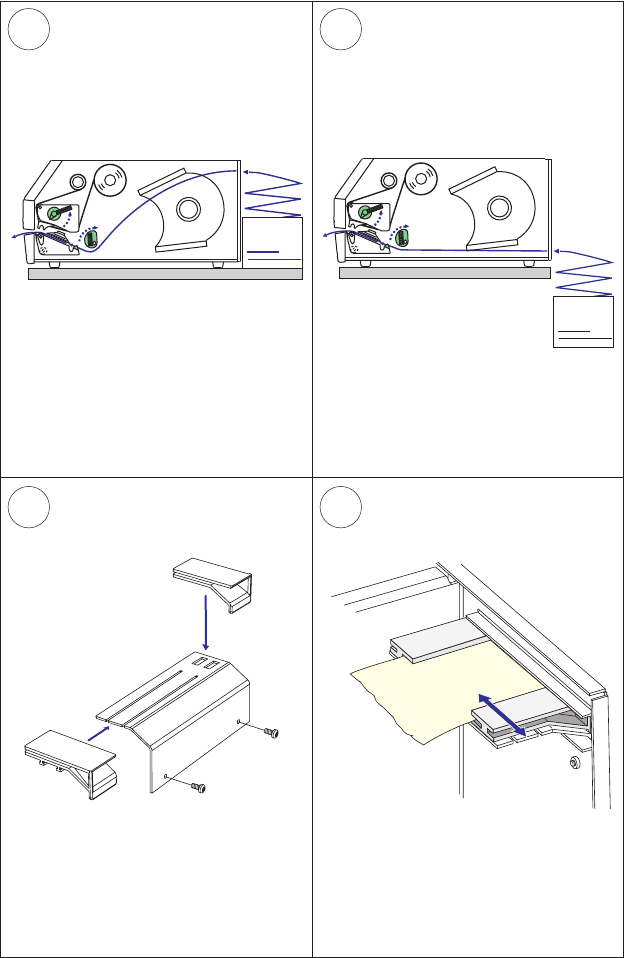
External Supply (Fan-fold)
This chapter describes the case when an external media supply is used,
for example a stack of fan-fold tickets or an external media roll.
It is possible to simply let the media enter the printer through either
of the two slots in the rear plate. However, we recommend to fi t the
optional Intermec Fan-Fold Kit, which provides better guidance of the
media using adjustable guides. The kit can be fi tted to either the upper
or the lower slot in the rear plate.
When using an external media supply, take care to protect the media
from dust, dirt, and other foreign particles, that can impair the printout
quality or cause unnecessary wear to the printhead.
Depending on brand and quality, all direct thermal media are more or
less sensitive to heat, direct sunlight, moisture, oil, plasticizers, fat, and
other substances. Protect it accordingly.
External supply can be used for:
• Tear-off operation
• Cut-off operation
• Peel-off operation (upper slot only)
• Internal batch takeup operation
Note: Save the label indicating the sensitivity number attached
to the media roll. You will need this number to set the media
sensitivity, see Appendix D.
3 4
1 2
EasyCoder PX4i User’s Guide (IPL version) 39
Chapter 4 — Media Load
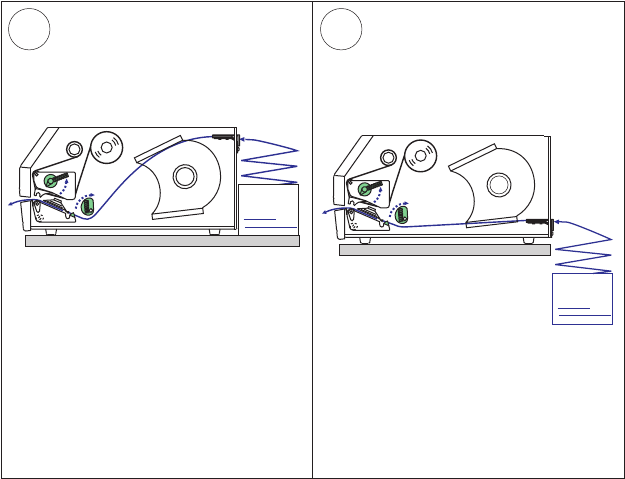
External Supply (Fan-fold), cont.
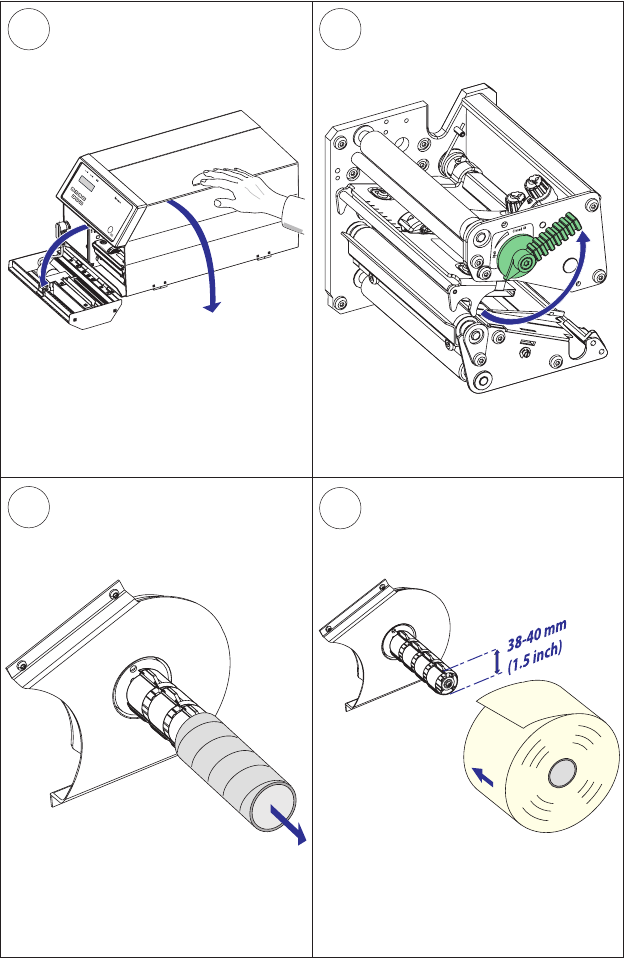
Use the upper slot in the rear plate
when the supply is at the same level
as the printer and when using peel-off
operation.
Use the lower slot in the rear plate when
the supply is placed lower than the
printer.
As an option, the printer can be fi tted
with a set of fan-fold guides in either
slot.
The outer guide is adjustable for various
media widths ( min. 40 mm/1.58 in).
5 6
40 EasyCoder PX4i User’s Guide (IPL version)
Chapter 4 — Media Load
External Supply (Fan-fold), cont.
Fit the fan-fold guide in the upper slot
when the supply is at the same level
as the printer and when using peel-off
operation.
Fit the fan-fold guide in the lower slot
when the supply is placed lower than
the printer.

EasyCoder PX4i User’s Guide (IPL version) 41
5 Thermal Transfer
Printing
This chapter explains how to load the printer with
ribbon for thermal transfer printing.

42 EasyCoder PX4i User’s Guide (IPL version)
Chapter 5 — Thermal Transfer Printing
Ribbon Load
The EasyCoder PX4i can print on labels, tickets, tags, and continuous
stock using either direct thermal printing on special heat-sensitive media
or thermal transfer printing using a special ink-coated ribbon.
Thermal transfer printing makes it possible to use a wide range of receiv-
ing face materials and gives a durable printout less vulnerable to fat,
chemicals, heat, sunlight etc. than direct thermal printing. Make sure to
select a type of ribbon that matches the type of receiving face material
and to set up the printer accordingly.
The EasyCoder PX4i can use transfer ribbon rolls wound with the ink-
coated side facing either outward or inward. Illustrations in this manual
show the ink-coated side facing inward.
Even if ribbon usually is loaded in connection with media replenishment,
no loaded media are shown in the illustrations in this chapter in order to
give a clearer view of the ribbon path. Refer to Chapter 4 for media load
instructions.
Most transfer ribbons do not smear at room temperature.
Note: Save the label indicating the sensitivity number attached
to the media roll. You will need this number to set the media
sensitivity, see Appendix D.
&BTZ$PEFS19J
&BTZ$PEFS19J
2
43
1
EasyCoder PX4i User’s Guide (IPL version) 43
Chapter 5 — Thermal Transfer Printing
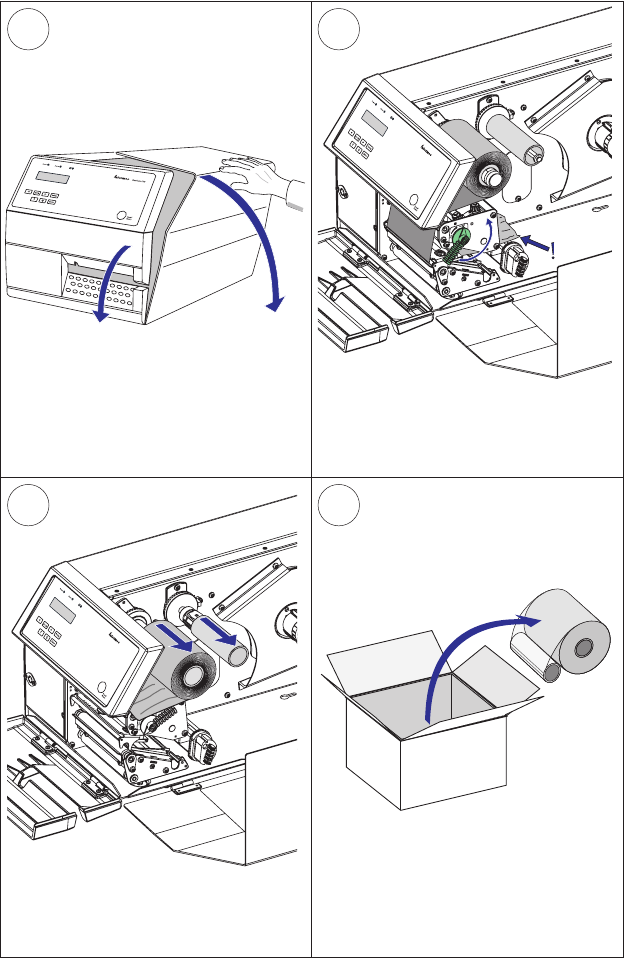
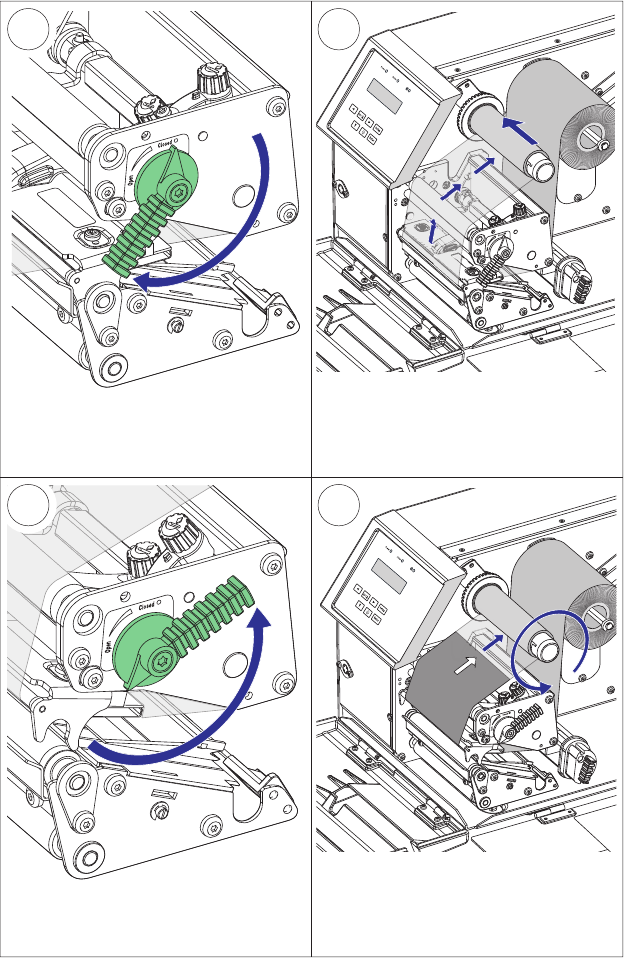
Open the front and side doors.
Turn the printhead lift lever clockwise to
raise the printhead.
Unpack a roll of original Intermec
thermal transfer ribbon.
In case of ribbon reload, remove any
used ribbon and empty ribbon core.
Ribbon Load, cont.
&BTZ$PEFS19J
5c
5a
6
5b
44 EasyCoder PX4i User’s Guide (IPL version)
Chapter 5 — Thermal Transfer Printing
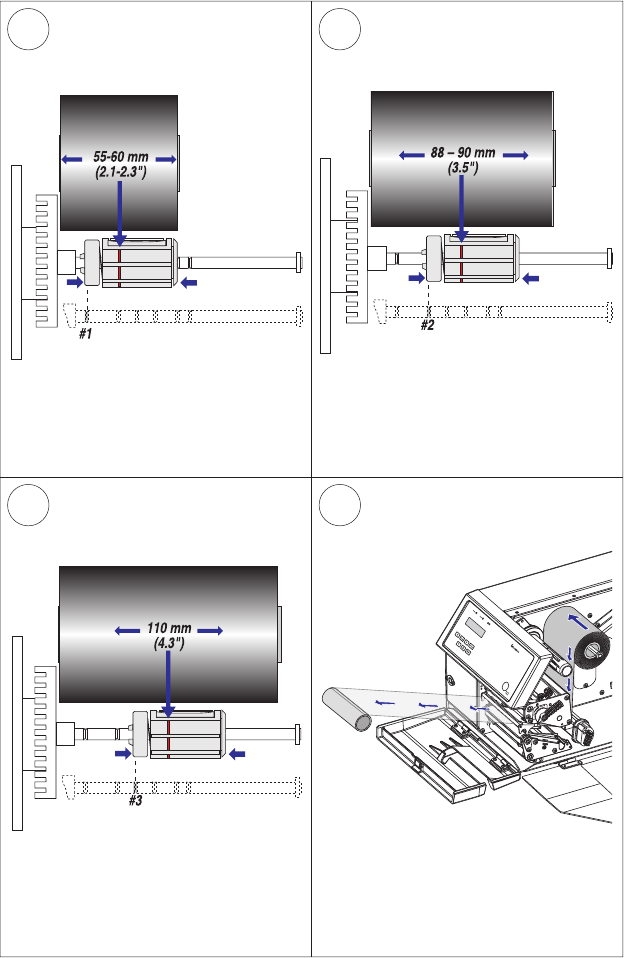
Ribbon Load, cont.
In case of ribbon 55 to 60 mm (2.16 to
2.3 inches) wide, compress the ribbon
supply bobbin and move it so it snaps
into the fi rst (innermost) groove.
In case of 88 to 90 mm (3.5 inches)
ribbon width, compress the ribbon
supply bobbin and move it so it snaps
into the second groove.
Press the ribbon roll onto the ribbon
supply bobbin (1) and route the ribbon
through the print unit. Pull out 20 cm (8
inches) of ribbon.
In case of 110 mm (4.3 inches) ribbon
width, compress the ribbon supply
bobbin and move it so it snaps into the
third groove.
9
7
10
8
EasyCoder PX4i User’s Guide (IPL version) 45
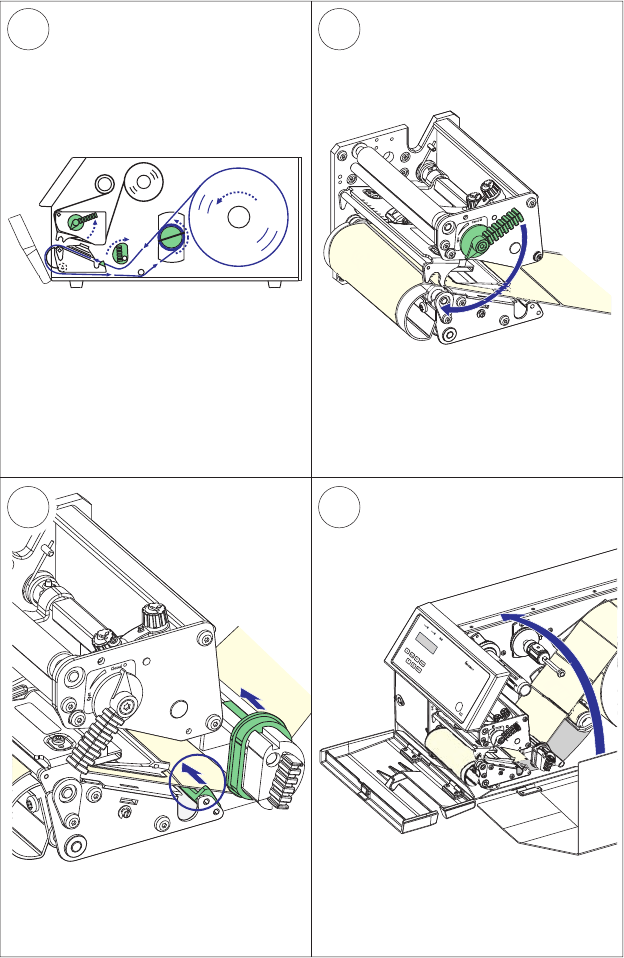
Chapter 5 — Thermal Transfer Printing
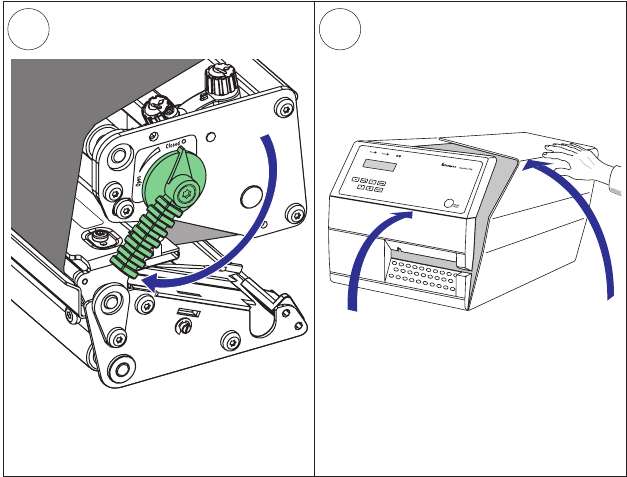
Without releasing the ribbon, turn the
printhead lift lever to “Closed” position
to lock the ribbon.
Turn the printhead lift lever to ”Open”
position.
Wind up the ribbon until all of the
transparent leader has passed the
printhead and the ribbon becomes
tight.
Ribbon Load, cont.
Press the cardboard core at the front
end of the ribbon onto the rewind hub.
During printing, the rewind hub will
rotate counterclockwise.
11 12
46 EasyCoder PX4i User’s Guide (IPL version)
Chapter 5 — Thermal Transfer Printing
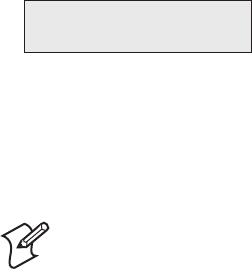
Close the front and side door.
Turn the printhead lift lever to “Closed”
position.
Ribbon Load, cont.

EasyCoder PX4i User’s Guide (IPL version) 47
6 Setting Up the Printer
This chapter describes the various parameters that are
used in the Setup Mode (see Chapter 7) or in the vari-
ous application programs to confi gure the printer for
the user’s specifi c requirements. It covers the following
topics:
• Description
• Default setup
• Setup Parameters in regard of communication, test/
service, media, and confi guration.
When measures are specifi ed as “dots”, the actual
length in millimeters or inches depends on the
printhead density. Convert as follows:
8 dots/mm (203.2 dots/inch) printhead:
1 dots = 0.125 mm = 0.0049 inches (4.9 mils)
48 EasyCoder PX4i User’s Guide (IPL version)
Chapter 6 — Setting Up the Printer
Description
The setup controls the printer in regard of serial communication, test
and service operations, and specifi es which types of media and ribbon are
loaded in the printer.
Check the list below to see if the printer’s default setup matches your
requirements. If not, you will have to change the setup. To enter the
Setup Mode, press the <Setup> key on the printer’s built-in keyboard and
follow the instructions in Chapter 7, “Setup Mode.”

EasyCoder PX4i User’s Guide (IPL version) 49
Chapter 6 — Setting Up the Printer
Default Setup
The printer’s default setup is listed below (no options included):
Ser-Com
Baud rate 9600 bps
Data bits 8 bits
Parity None
Stop bits 1 bit
Protocol XON/XOFF
Test/Service
Testprint not applicable
Data dump No
Memory reset not applicable
LSS Test not applicable
Media
Media type Gap
Paper type DT
Label length dots 1200 dots
Sensitivity 420
Darkness 0%
Label rest point 0 dots
Form adj dots X 0 dots
Form adj dots Y 0 dots
Ribbon low 0 mm
Paper low 0 mm
Confi guration
Power up emulation None
Print speed 5 in/sec
Cutter Not installed
Label taken sensor Not installed

50 EasyCoder PX4i User’s Guide (IPL version)
Chapter 6 — Setting Up the Printer
Setup Parameters
Serial Communication
The serial communication parameters control the communication
between the printer and the connected computer or other devices on the
serial port.
Note: The serial communication parameters have no effect on
parallel or EasyLAN communications.
Make sure the printer’s communication parameters match the setup of
the connected device or vice versa. If the setup of the printer and the
setup of the host do not match, the response from the printer to host will
be garbled.
Baud Rate
The baud rate is the transmission speed in bits per second. There are 8
options:
• 1200
• 2400
• 4800
• 9600 (default)
• 19200
• 38400
• 57600
• 115200
Data Bits
Data bits specifi es the number of bits that will defi ne a character.
• 7 Characters ASCII 000 to 127 decimal
• 8 Characters ASCII 000 to 255 decimal (default)
Parity
The parity decides how the fi rmware will check for transmission errors.
There are four options:
• None (default)
• Even
• Odd
• Space
EasyCoder PX4i User’s Guide (IPL version) 51
Chapter 6 — Setting Up the Printer
Stop Bits
The number of stop bits specifi es how many bits will defi ne the end of a
character. There are two options:
• 1 (default)
• 2
Protocol
XON/XOFF (default)
In the XON/XOFF protocol, data fl ow control is achieved by using
XON (DC1) and XOFF (DC3) characters. Message blocks are not
required to be bracketed by the Start of Text (STX) and End of Text
(ETX) characters. However, at power up or after a reset all characters
except ENQ or VT will be ignored until an STX is detected. The mes-
sage length in this protocol is unrestricted. That is, the printer processes
information as it is being downloaded and stops when there is no more
information.
XON/XOFF protocol conforms to generally accepted industry standards.
No end-of-message response is sent to the host other than XOFF. An
XON will be sent on power up.
Since DC1 and DC3 are used for data fl ow control, the printer status
characters are different than those of the Standard Protocol. If the host
ignores the printer’s XOFF, the printer will resend an XOFF after receiv-
ing every 15 characters from the host.
Condition Character
Buffer already full GS
Printhead raised US
Ribbon fault US
No label stock EM
Buffer now full DC4
Printhead hot SI
Label at strip pin FS
Label skipping DC2
Printing DC2
52 EasyCoder PX4i User’s Guide (IPL version)
Chapter 6 — Setting Up the Printer
Intermec Standard Protocol
The Intermec Printer Standard Protocol is a half-duplex protocol. All
data transmissions to the printer consist of status inquiry (ENQ), status
dump (VT), or message blocks. Each message block starts with the Start
of Text (STX) character and ends with the End of Text (ETX) character.
Each message block must be 255 characters or less, including the STX
and ETX characters. The printer responds to each status inquiry or
message block with the printer status. The host should check the printer
status before downloading a message block to the printer. ENQ causes
the printer to transmit its highest priority status, while VT instructs the
printer to transmit all status that applies in the order of their priority.
The possible printer status in descending priorities are
Condition Character
Buffer already full GS
Printhead raised US
Ribbon fault US
No label stock EM
Buffer now full DC3
Printhead hot SI
Label at strip pin FS
Label skipping DC1
Ready DC1
Printing DC1
EasyCoder PX4i User’s Guide (IPL version) 53
Chapter 6 — Setting Up the Printer
Test/Service
Testprint
This part of the Setup Mode allows you to print various types of test
labels. Go to the desired option and press <Enter>. The printer will start
printing the test label or labels. Press the <Feed/Pause> button to hold
the printing temporarily. To resume printing, press the <Feed/Pause>
button again. The following options are available:
Confi guration
Select between software (SW), hardware (HW), and network.
The Software Confi guration Label contains:
• Current confi guration parameters stored in the printer’s memory
• Defi ned pages
• Defi ned formats
• Defi ned graphics
• Defi ned fonts
• Any installed printer options
The Hardware Confi guration Label contains:
• Printer memory information
• Printer mileage
• Printhead settings
• Firmware checksum, program, and version number
The Network Confi guration Label contains:
• WINS Name
• MAC Address
• IP Selection
• IP Address
• Netmask
• Default Router
• Name Server
• Mail Server
• Primary WINS Server
• Secondary WINS Server
• Network Statistics
54 EasyCoder PX4i User’s Guide (IPL version)
Chapter 6 — Setting Up the Printer
Test Labels
This option has two choices, Pitch and Print Quality.
• The Pitch label contains an even pattern of small dots that reveals
failing printhead dots and variations of printout darkness because of
uneven printhead pressure or bad energy regulation to the printhead.
• The Print Quality label contains number of bar codes with different
characteristics and useful information on printer model, program ver-
sion, print speed, and media sensitivity setup.
Format
The Format Label contains a single format that you can use to evaluate
the print quality of a particular format. This option prints labels for all
the formats stored in the printer’s memory.
Page
The Page Label tests the ability of the printer to receive and print single
or multiple pages of label data that is sent from the host. This option
prints labels for all the pages stored in the printer’s memory.
UDC
The UDC Label tests the ability of the printer to receive and print single
or multiple user-defi ned characters (bitmap graphics) that are sent from
the host. This option prints labels for all the UDCs stored in the printer’s
memory.
Font
The Font Label contains all the characters in a single font. This option
prints labels for all the user-defi ned fonts (UDF) stored in the printer’s
memory.
Data Dump
If data dump is enabled by selecting the “Yes” option, the printer prints
all data and protocol characters received on the serial port. An ASCII and
hexadecimal representation of each character is printed.
Memory Reset
There are two options. The memory will be reset to factory default
as soon as an option has been selected and <Enter> is pressed. Select
between “All”, which resets the entire memory and “Confi guration”
which just resets the confi guration part of the memory.
LSS Test
Refer to Chapter 11 “Label Stop Sensor" for description.
EasyCoder PX4i User’s Guide (IPL version) 55
Chapter 6 — Setting Up the Printer
Media
The media parameters tell the fi rmware the characteristics of the media
that will be used, so the printout will be positioned correctly and get the
best quality possible.
Media Type
The Media Type parameters control how the label stop sensor (LSS) and
the media feed work. There are three media type options:
• Gap is used for adhesive labels mounted on liner (backing paper) or
continuous paper stock with detection slots. Default.
• Mark is used for labels, tickets, or strip provided with black marks at
the back.
• Continuous is used for continuous stock without any detection slots
or black marks.
Paper Type
The Paper Type parameters control how the transfer ribbon mechanism
and the ribbon sensor work. There are two paper type options:
• DT (Direct Thermal) is used for heat-sensitive media without any
need for a thermal transfer ribbon. Default.
• TTR (Thermal Transfer) is used for non heat-sensitive receiving face
materials in combination with a thermal transfer ribbon.
Label Length Dots
The Label Length setup specifi es the length in dots of each copy along
the media feed direction (X-coordinate). This is used for “label-out”
detection.
Sensitivity (Media Sensitivity Number)
This setup parameter specifi es the characteristics of the direct thermal
media or combination of receiving face material and thermal trans-
fer ribbon, so the printer’s fi rmware can optimize the heating of the
printhead and the print speed. Standard supplies from Intermec are
labeled with a 3-digit media sensitivity number (see Appendix D) which
is used to specify the media grade. The media sensitivity number can also
be changed using PrintSet, third-party software, or an IPL command
(<SI>gn[,m]). Default is 420 for direct thermal printing and 567 for
thermal transfer printing.
56 EasyCoder PX4i User’s Guide (IPL version)
Chapter 6 — Setting Up the Printer
Darkness
Use this parameter to make minor adjustments of the blackness in
the printout, for example to adapt the printer to variations in quality
between different batches of the same media quality. The value can be set
within the range -10% to +10% where -10 is the lightest and 10 is the
darkest. Default value is 0%.
Label Rest Point
Specifi es where labels stop for removal. Use this for peel-off (self-strip)
applications. Allowed range is -30 (furthest back) to 30 (furthest for-
ward). Default is 0. Also available as an IPL command (<SI>fn).
Form Adj Dots X
Specifi es where the X-position of the origin should be placed on the
label. Allowed range is -30 (closest to the leading edge) to 30 (furthest
from the leading edge). Default is 0.
Form Adj Dots Y
Specifi es where the Y-position of the origin should be placed on the label.
Allowed range is -30 (closest to the center section) to 30 (furthest from
the center section). Default is 0.
Ribbon Low
Specifi es the value in millimeters of the ribbon supply roll for the ribbon
sensor. When the diameter of remaining ribbon supply roll reaches the
set value, an SNMP trap is sent to the printer’s home page, provided the
printer has an optional EasyLAN connection. Range: 0-80 with preset
values at an interval of 5. A value larger than 80 sets the ribbon sensor to
0. Default value: 0.
The ribbon low sensor can also be set using an IPL command:
<STX><SI>kn<ETX>
Paper Low
Specifi es the diameter in millimeters of the media supply roll for the
paper sensor. When the diameter of remaining media supply reaches the
set value, an SNMP trap is sent to the printer’s home page, provided the
printer has an optional EasyLAN connection. Range: 0-150 with preset
values at an interval of 10. A value larger than 150 sets the paper sensor
to 0. Default value: 0.
The ribbon low sensor can also be set using an IPL command:
<STX><SI>jn<ETX>
EasyCoder PX4i User’s Guide (IPL version) 57
Chapter 6 — Setting Up the Printer
Confi guration
Power Up Emulation
The emulation mode lets you print bar code labels that were originally
designed on an 86XX printer in multiples of 10 or 15 mil. When the
printer is working in emulation mode, not all IPL commands are sup-
ported. For a complete list of commands available during emulation
mode, see the latest version of the IPL Programming, Reference Manual
(P/N 066396-XXX).
To return from emulation mode, select emulation “none” (default).
Print Speed
You can select the print speed from 4 in./sec. (100 mm/sec.) to 12
in./sec. (300 mm/sec.) with an interval of 1 in./sec. The higher the
print speed, the more wear on the printhead, so do not use a higher
print speed than necessary. Some direct thermal media or ribbon/media
combinations may not allow the highest alternatives without the printout
quality being adversely affected.
Cutter (option)
By default, “Not Installed” is displayed. If a cutter is installed, you must
manually indicate that condition to the fi rmware by selecting either
“Enable” or “Disable.” Once you have done that, you can also use IPL
commands to enable or disable the cutter:
<STX>R<ETX> enter print/confi guration mode
<STX>SIc0<ETX> Disable cutter
<STX>SIc1<ETX> Enable cutter
Label Taken Sensor (option)
To make the printer work in self-strip mode, that is, waiting for a label to
be removed before the next label is printed, the self-strip mode must be
enabled. This can also be done by executing the following commands:
<STX>R<ETX> enter print/confi guration mode
<STX><SI>t0<ETX> Disable self-strip
<STX><SI>t1<ETX> Enable self-strip
If the label taken sensor does not work properly, the sensitivity can be
calibrated in the Setup Mode. Select “LTS Calibration” and follow the
instructions in the display. Make sure that no direct sunlight or interior
lighting interferes with the label taken sensor.
58 EasyCoder PX4i User’s Guide (IPL version)
Chapter 6 — Setting Up the Printer
Returning to Factory Default Setup
There are three ways to return to the factory default setup of the printer:
A Insert a special CompactFlash memory card and restart the printer.
B Use the Memory Reset option in the Test/Service part of the Setup
Mode.
C Use the printer’s built-in keyboard as described below:
1 Lift the printhead.
2 Switch on the power to the printer and press the <i> key and wait
until the printer beeps.
3 Swiftly press the following keys:
<d> t <c/Esc> t <c/Esc> t <e>
4 The following message will be displayed:
Factory Default?
Enter=Yes ESC=No
5 Within 10 seconds, press <Enter> to reset the printer to factory
default. The parameters will be reset and the printer will continue the
normal startup.
If you press <c/Esc> or wait until the 10 seconds time-out has passed,
the normal startup will continue without any reset being performed.
Note: The factory default will remove all fi les used to store
settings. It will not reset settings that already has been read
when the fi les are removed. This means that EasyLAN Wireless
settings (SSID, keys, etc.) will retain their values from the pre-
vious start. However, the next reboot will reset them to factory
default.

EasyCoder PX4i User’s Guide (IPL version) 59
7 Setup Mode
This chapter describes how to navigate in the setup
mode, and provides overviews of the Setup Mode.

60 EasyCoder PX4i User’s Guide (IPL version)
Chapter 7 — Setup Mode
Navigating in Setup Mode
Enter the Setup Mode by pressing the <Setup> key on the printer’s front
panel. While going through the setup procedure, you are guided by texts
in the printer’s display. You can navigate between setup menus, acknowl-
edge displayed values, select or enter new values, etc. by using the keys
on the printer’s keyboard.
Move up one level and escape without changing the setting.
Move one step back on the same level.
Exit the Setup Mode. Can be used anywhere in Setup Mode.
Acknowledge and move to next menu.
Move down one level.
Move forward on the same level.
SETUP:
SER-COM
SETUP:
CONFIGURATION
SETUP:
MEDIA
SETUP:
TEST/SERVICE
SETUP:
NETWORK
Option
Starting point
EasyCoder PX4i User’s Guide (IPL version) 61
Chapter 7 — Setup Mode
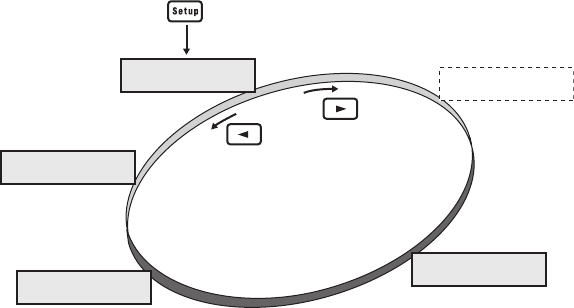
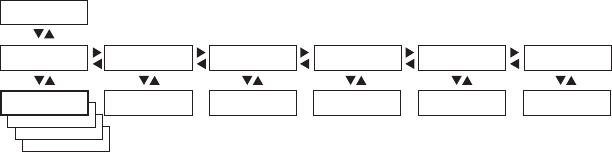
The Setup Mode is organized as an endless loop, from which you can
select a number of sub-categories. At startup, the fi rmware determines if
an EasyLAN interface board is installed in the printer. If so, the Network
setup menus are shown in the Setup Mode.
The diagram below shows the options in the main loop. Detailed over-
views are shown on the pages that follow.

BAUDRATE;
4800
BAUDRATE;
2400
BAUDRATE;
1200
BAUDRATE;
115200
BAUDRATE;
57500
BAUDRATE;
38400
BAUDRATE;
19200
PARITY:
SPACE
PARITY:
ODD
PARITY:
EVEN
CHAR LENGTH
7
STOP BITS:
2
SETUP:
SER-COM
SER-COM:
BAUDRATE
SER-COM:
DATA BITS
SER-COM:
PARITY
SER-COM:
STOP BITS
SER-COM:
PROTOCOL
BAUDRATE:
9600
DATA BITS:
8
PARITY:
NONE
STOP BITS:
1ENQ/ACK:
STANDARD
PROTOCOL:
XON/XOFF
Continued on
the next page
Scroll forward
Scroll back
Scroll forward
Scroll back
Scroll forward
Scroll back
Scroll forward
Scroll back
62 EasyCoder PX4i User’s Guide (IPL version)
Chapter 7 — Setup Mode
Setup Mode; Serial Communication
(IPL v2.30)
Legend:
Dotted boxes and lines indicate options.
Thick boxes indicate default options.
Values inside brackets indicate default settings.
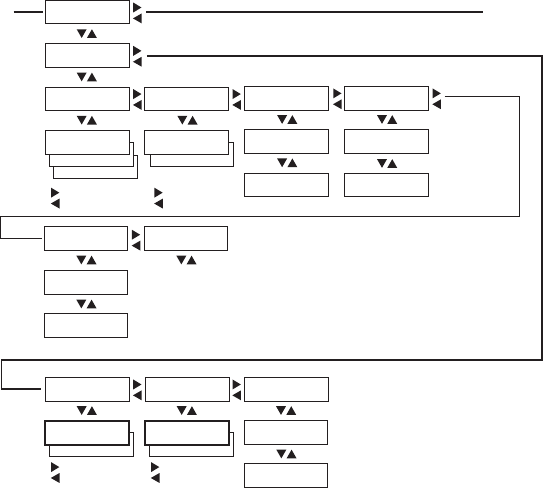
PARITY:
BOOTP
PARITY:
DHCP
PARITY:
MANUAL
SETUP:
NETWORK
NETWORK:
IP SELECTION
NETWORK:
IP ADDRESS
NETWORK:
NETMASK
NETWORK:
DEFAULT ROUTER
NETWORK:
NAMESERVER
IP SELECTION:
DHCP+BOOTP
IP ADDRESS:
0.0.0.0
NETMASK:
0.0.0.0
DEFAULT ROUTER:
0.0.0.0
NAMESERVER:
0.0.0.0
NETWORK:
MAC ADDRESS
MAC ADDRESS:
nnnnnnnnnnnn
Read-only Read-only Read-only Read-only Read-only
These menus will only be displayed when an optional EasyLAN interface board is installed.
EasyCoder PX4i User’s Guide (IPL version) 63
Chapter 7 — Setup Mode
Setup Mode; Network (option)
(IPL v2.30)
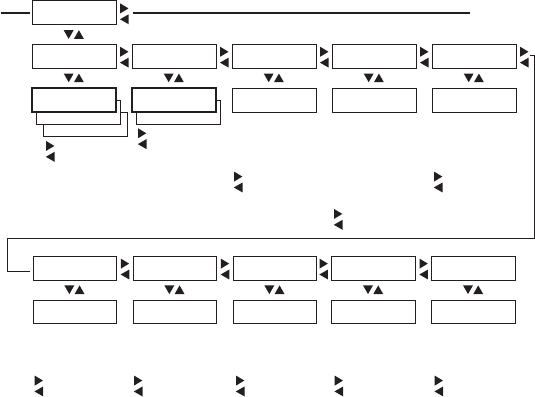
TEST LABELS:
PRINT QUALITY
CONFIG:
NETWORK
CONFIG:
HW
SETUP:
TEST/SERVICE
TEST/SERVICE:
TESTPRINT
TESTPRINT:
CONFIG
TESTPRINT:
FORMAT
CONFIG:
SW
FORMAT:
ALL
ALL:
PRINT FORMATS
TESTPRINT:
TEST LABELS
TEST LABELS:
PITCH
TESTPRINT:
PAGE
PAGE:
ALL
ALL:
PRINT PAGES
TESTPRINT:
UDC
UDC:
ALL
ALL:
PRINT UDC
TESTPRINT:
FONT
Continued from
the previous page
Continued on
the next page
Scroll forward
Scroll back
Scroll forward
Scroll back
CONFIG:
YES
TEST/SERVICE:
DATA DUMP
DATA DUMP:
NO
Scroll forward
Scroll back
CONFIG:
CONFIGURATION
TEST/SERVICE:
MEMORY RESET
MEMORY RESET:
ALL
Scroll forward
Scroll back
TEST/SERVICE:
LSS TEST
LSS TEST:
LSS AUTO
LSS AUTO:
64 EasyCoder PX4i User’s Guide (IPL version)
Chapter 7 — Setup Mode
Setup Mode; Test/Service
(IPL v2.30)
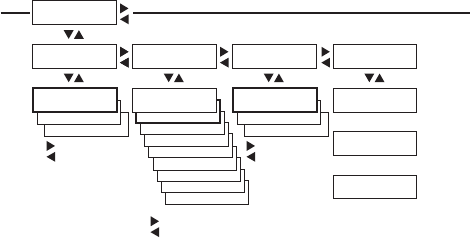
CONFIG:
CONTINUOUS
CONFIG:
MARK
SETUP:
MEDIA
MEDIA :
MEDIA TYPE
MEDIA TYPE:
GAP
MEDIA :
PAPER TYPE
Continued from
the previous page
Continued on
the next page
Scroll forward
Scroll back
CONFIG:
TTR
PAPER TYPE:
DT
MEDIA :
LBL LENGTH DOTS
LBL LENGTH DOTS:
1200
Scroll forward
Scroll back
Scroll forward
Scroll back
Scroll forward
Scroll back
MEDIA :
SENSITIVITY
SENSITIVITY:
420
Scroll forward
Scroll back
MEDIA :
DARKNESS
DARKNESS:
0
Scroll forward
Scroll back
MEDIA :
LBL REST POINT
LBL REST POINT:
0
MEDIA :
FORM ADJ DOTS X
FORM ADJ DOTS X:
0
MEDIA :
FORM ADJ DOTS Y
FORM ADJ DOTS Y:
0
100/200/400/800/
1200/1600/2000/
2500/3000/3600/
4200/4800
120/130/140/160/170/
180/222/226/236/238/
366/369/420/440/450/
460/470/480/513/527/
533/563/565/567/623/
627/633/647/673/677/
687/720/854/864
0/1/2/3/4/5/6/7/8/
9/10/-10/-9/-8/-7/
-6/-5/-4/-3/-2/-1
0/2/4/6/8/10/15/20/25/
30/-30/-25/-20/-15/-10/
-8/-6/-4/-2
Scroll forward
Scroll back
0/2/4/6/8/10/15/20/25/
30/-30/-25/-20/-15/-10/
-8/-6/-4/-2
Scroll forward
Scroll back
0/2/4/6/8/10/15/20/25/
30/-30/-25/-20/-15/-10/
-8/-6/-4/-2
MEDIA :
RIBBON LOW
RIBBON LOW:
0
Scroll forward
Scroll back
0/5/10/15/20/25/30/35/
40/45/50/55/60/65/70/
75/80
MEDIA :
PAPER LOW
PAPER LOW:
0
Scroll forward
Scroll back
0/10/20/30/40/50/60/70/
80/90/100/110/120/130/
140/150
EasyCoder PX4i User’s Guide (IPL version) 65
Chapter 7 — Setup Mode
Setup Mode; Media
(IPL v2.30)
PRINT SPPED:
12 IN/SEC
PRINT SPPED:
11 IN/SEC
PRINT SPPED:
10 IN/SEC
PRINT SPPED:
9 IN/SEC
PRINT SPPED:
8 IN/SEC
PRINT SPPED:
7 IN/SEC
PRINT SPPED:
6 IN/SEC
PRINT SPPED:
5 IN/SEC
SETUP:
CONFIGURATION
CONFIGURATION:
LTS CALIBRATION
LTS CALIBRATION:
PRESS <ENTER>
REMOVE LABEL AND
PRESS ENTER
CONFIGURATION:
PWRUP EMULATION
Continued from
the previous page
Return to
the start of
the loop
CONFIG:
DISABLE
CONFIG:
ENABLE
CUTTER:
NOT INSTALLED
Scroll forward
Scroll back
Labels are fed out
SENSITIVITY 9
OUT OF 8-14
<Enter>
Read only,
press<Enter>
CONFIG:
86XX-15MIL
CONFIG:
86XX-10MIL
PWRUP EMULATION:
NONE
Scroll forward
Scroll back
CONFIGURATION:
PRINT SPEED
PRINT SPEED:
4 IN/SEC
Scroll forward
Scroll back
CONFIGURATION:
CUTTER
66 EasyCoder PX4i User’s Guide (IPL version)
Chapter 7 — Setup Mode
Setup Mode; Confi guration
(IPL v2.30)

EasyCoder PX4i User’s Guide (IPL version) 67
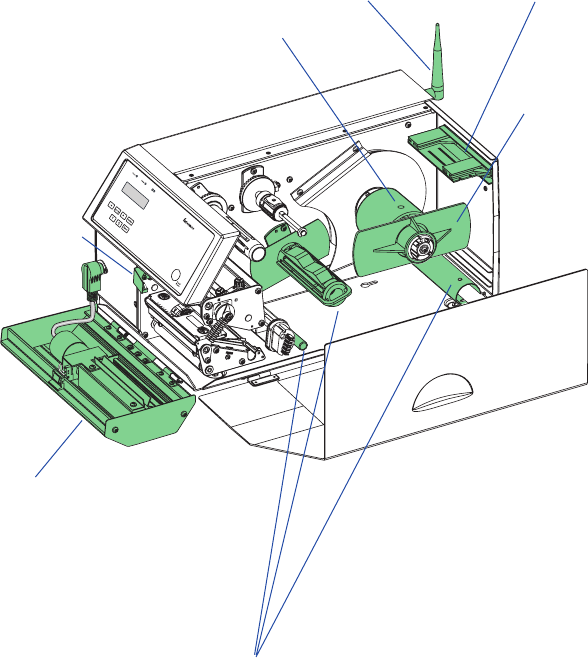
8 Options
This chapter describes the options available for the
EasyCoder PX4i printer. The options can be factory
installed, fi eld-installed by an authorized service tech-
nician, or in some cases installed by the operator.
&BTZ$PEFS19J
68 EasyCoder PX4i User’s Guide (IPL version)
Chapter 8 — Options
Introduction
The EasyCoder PX4i provides a high degree of fl exibility because it has
a modular design. By adding options to the basic printer, the EasyCoder
PX4i can be adapted for a variety of applications. Some options should
be installed by an authorized service technician or are only available as
factory-installed options.
Paper
cutter
Label taken
sensor
Liner/batch
takeup
Fan-fold
guides
3-inch
adapter
(included)
Media roll
retainer
EasyLAN Wireless
antenna

EasyCoder PX4i User’s Guide (IPL version) 69
Chapter 8 — Options
Liner/Batch Takeup Kit
This is a factory-installed option only and is used to separate labels from
the liner and wind up the spent liner inside the printer’s media com-
partment. Labels, tickets, tags, etc. can be wound up inside the media
compartment after printing by fi tting a special guide to the front of the
print unit.
The kit consists of a stepper motor that drives the liner drive roller in the
print unit (fi tted as standard) and a takeup hub in the media compart-
ment. A guide shaft is fi tted to the center section immediately behind the
slack absorber. A guide plate is fi tted at the rear of the media compart-
ment and can be used to replace the standard tear bar on the print unit
for batch takeup operation.
Operation and media load are described in the sections “Peel-Off ” and
“Internal Batch Takeup” of Chapter 4, “Media Load.”
Paper Cutter
The EasyCoder PX4i can easily be fi tted with an optional paper cutter,
provided the printer is not also equipped with a label taken sensor (LTS.)
The cutter unit replaces the front door using the same hinges. It is con-
nected by a single cable to the DIN-connector on the printer’s front. The
paper cutter is available both as a factory-installed option and as a opera-
tor-installable kit.
The paper cutter is intended to cut through continuous non-adhesive
paper-based media or through the liner between labels. It must not cut
through any adhesive, which would stick to the cutting parts and rapidly
render the cutter inoperable–possibly also causing damage to the electric
motor. Maximum thickness for normal paper-based materials is 175 µm
(≈175 grams/m2).
The paper cutter increases the printer’s total weight by approx. 1.0 kg
(2.2 pounds) and its length by 28 mm (1.1 inches).
The paper cutter can be tilted forward in order to facilitate cleaning and
media load. For media load instructions, see section “Cut-Off” in Chap-
ter 4, “Media Load.”
Should you inadvertently have cut through self-adhesive labels, you will
have to clean the cutting parts. Tilt down the cutter and clean using a
piece of tissue moistened with isopropyl alcohol.

70 EasyCoder PX4i User’s Guide (IPL version)
Chapter 8 — Options
The cutting edge will rotate when the power is switched on
and when the printer is re-booted. Always keep the cutter
in closed position during operation. Switch off the power
or disconnect the cutter before cleaning. Keep your fi ngers
away from cutting parts!
Note: The cutter must be enabled in the Confi guration part of
the Setup Mode, see Chapters 6 and 7.
Fan-Fold Guides
The fan fold guides provide a more exact guiding of the media, when the
supply is placed outside the media compartment, for example a stack of
fan-folded tickets. The guides come as an operator-installable kit with
installation instructions. The guides can be fi tted in the upper or lower
slot in the rear plate.
Instructions for loading the media is included in the section “External
Supply” in Chapter 4, “Media Load.”
Media Roll Retainer
The media roll retainer is intended for applications where the media may
become misaligned on the media supply hub. The plastic wing-shaped
retainer is simply pressed onto the media supply hub outside the media
roll. Operator-installed, no tools are required.
3-inch Adapter
The 3-inch/76 mm adapter is included in the package and makes it
possible to use media rolls with 3 inch/76 mm inner diameter cardboard
cores.
The adapter is pressed onto the media supply hub and is held in place
by a screw. When fi tting the adapters, make sure that the screw hits a
rounded plastic surface, not a metal leaf spring. Illustrations of how to
load the media using the adapter can be found in Chapter 4.
EasyCoder PX4i User’s Guide (IPL version) 71
Chapter 8 — Options
Label Taken Sensor
The Label Taken Sensor (LTS) is a photoelectric sensor fi tted to the
center section inside the front door. It allows the printer’s fi rmware to
detect if the latest printed label, ticket, tag etc. has been removed before
printing another copy.
The label taken sensor is usually factory-fi tted, but is also available as a
kit for installation by an authorized service technician. It cannot be fi tted
in combination with a paper cutter.
Interface Boards
A number of interface boards are available for use with the EasyCoder
PX4i printer. The interface boards are either factory-fi tted or can easily
be fi tted by an authorized service technician.
The EasyCoder PX4i can accommodate one EasyLAN interface board
plus one other interface board.
EasyLAN boards:
• EasyLAN Ethernet interface
• EasyLAN Wireless interface
Other communication boards:
• Parallel Interface Board (IEEE 1284)
72 EasyCoder PX4i User’s Guide (IPL version)
Chapter 8 — Options

EasyCoder PX4i User’s Guide (IPL version) 73
9 Troubleshooting
This chapter describes how the Intermec Readiness
Indicators work. It also lists various possible cases of
inferior printout quality, describes possible causes, and
suggests remedies.
74 EasyCoder PX4i User’s Guide (IPL version)
Chapter 9 — Troubleshooting
Intermec Readiness Indicator
The readiness of the printer, individually or as a part of a solution, is
indicated by the blue Intermec Readiness Indicator (IRI).
If the IRI blinks or is switched off, the printer is not ready. Further infor-
mation can be obtained in the display window by pressing the <i> key. In
case of several errors or similar conditions occurring simultaneously, only
the most signifi cant error is displayed. Once this error has been cleared,
next remaining error is displayed.
Provided the printer is connected to a network, all conditions that pre-
vents printing are reported to the Easy ADC Console. The Easy ADC
Console is a PC-based software which allows a supervisor to monitor all
connected devices that have an Intermec Readiness Indicator, including
handheld computers, access points, and printers.

EasyCoder PX4i User’s Guide (IPL version) 75
Chapter 9 — Troubleshooting
Display Messages and LED Indications
Error/Event IRI Error Message Comment
Operational On No error
Out of paper Blink PAPER OUT
Out of transfer ribbon Blink RIBBON OUT
Transfer ribbon is installed Blink RIBBON FITTED
Head lifted Blink PRINTHEAD UP
Cutter error1 Blink OPEN&SHUT
CUTTER
Cutter error2 Blink OPEN&SHUT
CUTTER
Cutter error3 Blink OPEN&SHUT
CUTTER
Lss too high Blink PAPER FAULT
Lss too low Blink PAPER FAULT
Testfeed not done Blink PAPER FAULT
Press feed not done Blink PRESS FEED
Pause mode entered Blink PAUSED
Setup mode entered Blink Incl. interactive setup
IP link error Blink See note 1, 2, and 3
IP confi guration error Blink See note 1, 3, and 4
Printhead not found Off NO PRINTHEAD
Rebooted Off
Initializing Off Set at startup until
operational
Printer crash Off See note 3 and 5
Printer turned off Off
Maintenance Off Set when upgrading
Power supply Over tem-
perature
Off PSU OVER TEMP
Printhead hot Off PRINTHEAD
HOT
See note 6
76 EasyCoder PX4i User’s Guide (IPL version)
Chapter 9 — Troubleshooting
Note 1: This is only applicable for printers equipped with an EasyLAN interface.
Note 2: A printer that is equipped with an EasyLAN interface, but is not connected to
a network, will have a blinking IRI. To avoid this, the user can set “IP SELECTION” to
“MANUAL” and “IP ADDRESS” to “0.0.0.0”. This will indicate that the user does not
regard the lack of network connection as an error.
Note 3: No trap can be sent when this error/event occurs.
Note 4: This error indicates that the printer has not received an IP address. It is only
applicable for printers with IP SELECTION set to DHCP and/or BOOTP.
Note 5: At most, but not all, printer crashes, the console is reset. This will make the IRI
go off.
Note 6: If the printhead temperature raises above 100°C (212°F), an error occurs and
the printing will be paused until the printhead has cooled off. Meanwhile, the printer is
able to receive commands and data until the buffer is fi lled. The printing is automatically
resumed when the printhead temperature has reached 85°C (185°F).

EasyCoder PX4i User’s Guide (IPL version) 77
Chapter 9 — Troubleshooting
Symptom Possible Cause Remedy Refer to
Overall weak print-
out
Wrong media grade Change parameter Chapter 6,
Appendix D
Contrast value too
low
Change parameter Chapter 6
Printhead pressure
too low
Adjust Chapter 11
Worn printhead Replace printhead Chapter 10
Wrong printhead
voltage
Replace CPU board
Call Service
Printout weaker on
one side
Uneven printhead
pressure
Adjust arm align-
ment
Chapter 11
Weak spots Foreign particles on
media
Clean or replace Chapters 4 & 5
Media/ribbon don’t
match
Change to matching
media
Chapter 6
Poor media or
ribbon quality
Select a better brand
of media/ribbon
Appendix D
Worn printhead Replace printhead Chapter 10
Worn platen roller Check/replace
Call Service
Overall dark print-
out
Wrong media grade Change parameter Chapter 6,
Appendix D
Contrast value too
high
Change parameter Chapter 6
Printhead pressure
too high
Adjust Chapter 11
Wrong printhead
voltage
Replace CPU board
Call Service
Excessive bleeding Wrong media grade Change parameter Chapter 6,
Appendix D
Contrast value too
high
Change parameter Chapter 6
Printhead pressure
too high
Adjust Chapter 11
Faulty energy
control
Replace CPU board
Call Service
Dark lines along
media path
Foreign objects on
printhead
Clean printhead Chapter 10

78 EasyCoder PX4i User’s Guide (IPL version)
Chapter 9 — Troubleshooting
White vertical lines Printhead dirty Clean printhead Chapter 10
Missing printhead
dots
Replace printhead Chapter 10
Large part of dot line
missing
Failing printhead Replace printhead Chapter 11
Failing strobe signal Check CPU-board
Call Service
Printout missing
along inner edge
Bad media align-
ment
Adjust Chapter 4
Small core & supply
post in upper pos.
Move post to lower
pos.
Chapter 2
X-start parameter
value too low
Increase Chapter 6
Transfer ribbon
breaks
Ribbon not fi tted
correctly
Reload ribbon Chapter 5
Wrong media grade Change parameter,
then clean printhead
Chapter 6,
Chapter 10
Bad energy control Adjust
Call Service
Transfer ribbon
wrinkles
Faulty ribbon break
shaft adjustment
Adjust Chapter 11
Incorrect edge guide
adjustment
Adjust Chapter 4
Too strong
printhead pressure
Adjust Chapter 11
No thermal transfer
printout
Ink-coated side does
not face media
Reload ribbon Chapter 5
Media feed not
working properly
Changed media
characteristics
Press the Print
button
Chapter 4
Wrong label rest
dots parameter
Check/change Chapter 6
Wrong Media Type
parameter
Check/change Chapter 6
Wrong LSS position Check/change Chapter 11
Dirty sensors Clean Chapter 10
Faulty sensors Replace
Call Service
Compressed text or
bar code
Too high print
speed for large
media roll
Lower print speed Chapter 6

EasyCoder PX4i User’s Guide (IPL version) 79
10 Maintenance
This chapter describes how the operator can maintain
the printer. Regular maintenance is important for the
printout quality and for the life of the printhead. The
chapter covers the following topics:
• Printhead cleaning
• External cleaning
• Cleaning the label stop sensor
• Printhead replacement
• Media jams
When cleaning or replacing the
printhead, take ample precautions to
avoid electrostatic discharges.
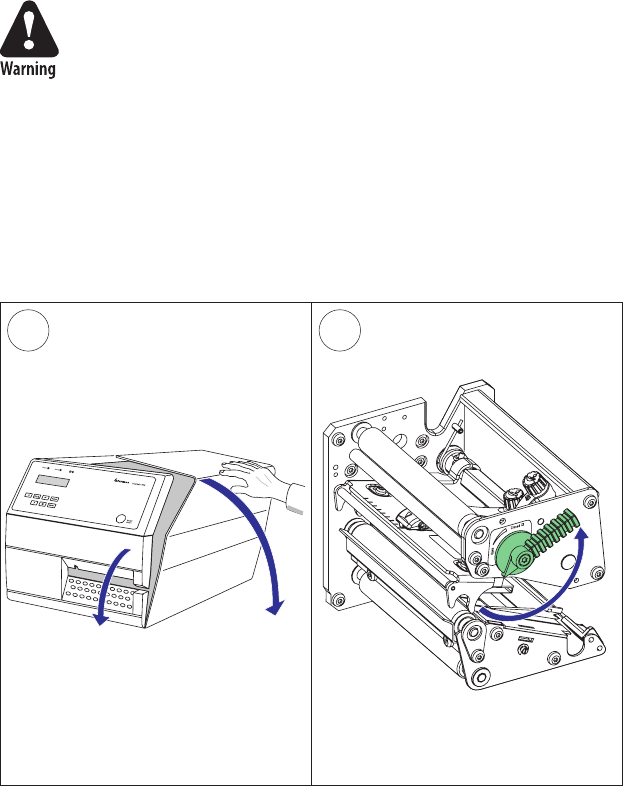
1 2
80 EasyCoder PX4i User’s Guide (IPL version)
Chapter 10 — Maintenance
Printhead Cleaning
Cleaning the printhead on a regular basis is important for the life of the
printhead and for the printout quality. You should clean the printhead
each time you replace the media. This section describes how to clean
the printhead using cleaning cards. If additional cleaning is required, for
example removing adhesive residue from the platen roller or tear bar, use
a cotton swab moistened with isopropyl alcohol.
Isopropyl alcohol [(CH
3)2CHOH; CAS 67-63-0] is a highly
fl ammable, moderately toxic, and mildly irritating sub-
stance.
Open the front and side doors.
Turn the printhead lift lever counter-
clockwise to raise the printhead.
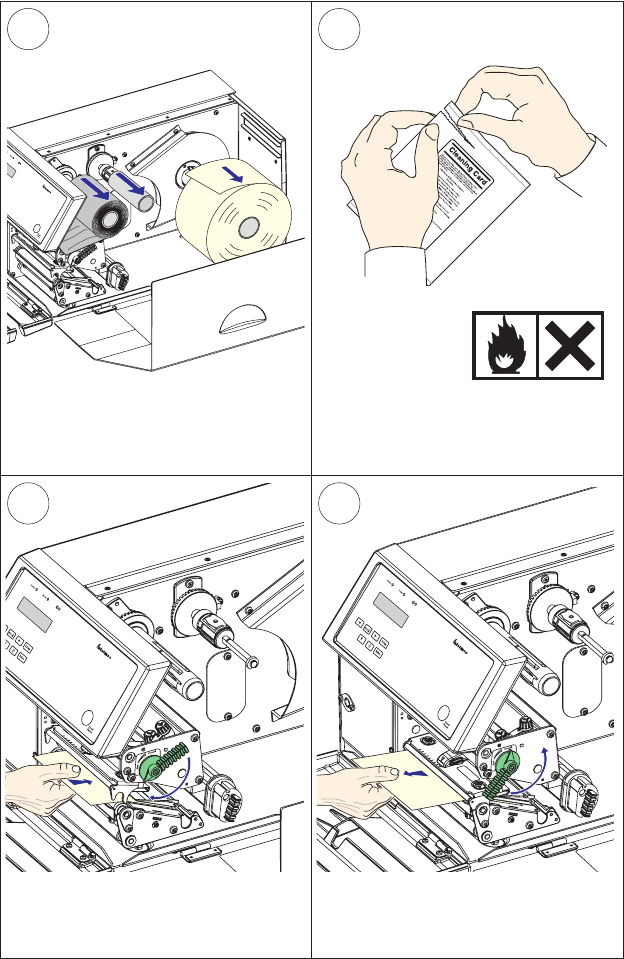
&BTZ$PEFS19J
&BTZ$PEFS19J
&BTZ$PEFS19J
DN
JO
34
56
EasyCoder PX4i User’s Guide (IPL version) 81
Chapter 10 — Maintenance
Printhead Cleaning, cont.
Remove any media and transfer ribbon.
Open the cleaning card envelope and
pull out the cleaning card. Read the
warning text.
Pull out the cleaning card (1) and raise
the printhead (2).
Insert most of the cleaning card under
the printhead (1). Engage the printhead
(2).
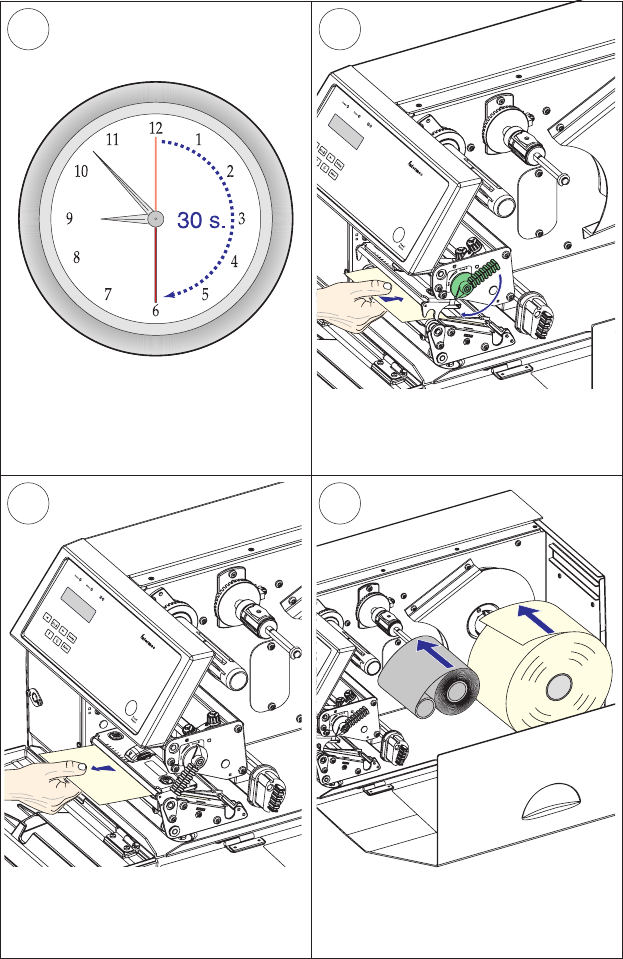
&BTZ$PEFS19J
&BTZ$PEFS19J
DN
JO
$
PEFS19J
9
8
10
7
82 EasyCoder PX4i User’s Guide (IPL version)
Chapter 10 — Maintenance
Printhead Cleaning, cont.
Wait for approx. 30 seconds to allow the
cleaning fl uid to dissolve the residue.
Insert most of the cleaning card under
the printhead again (1). Engage the
printhead (2).
Pull out the cleaning card. If necessary,
repeat the process with a fresh cleaning
card.
Allow the cleaned parts to dry before
loading any media and ribbon.
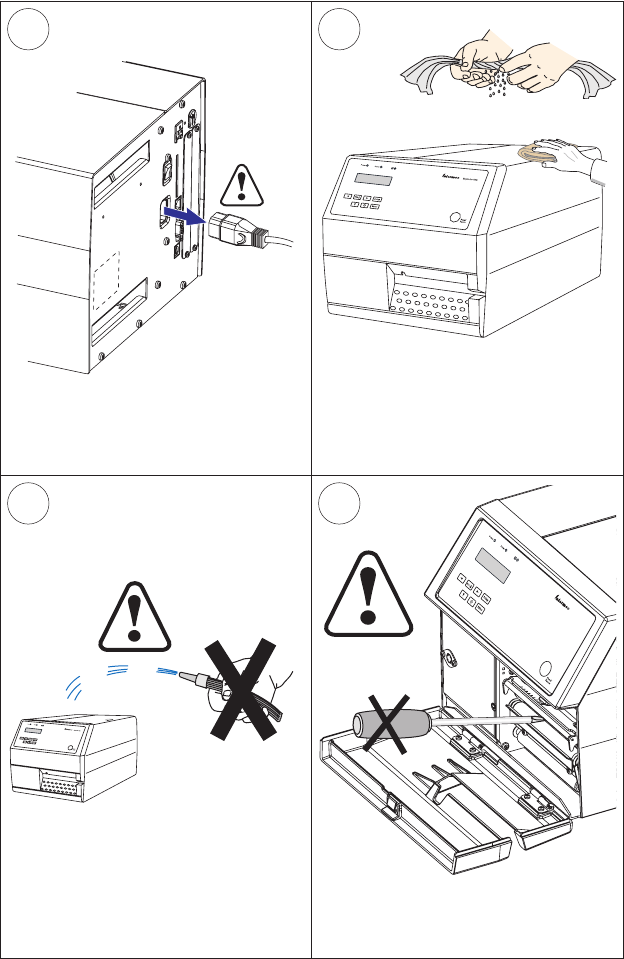
&BTZ$PEFS19J
1
3
2
4
EasyCoder PX4i User’s Guide (IPL version) 83
Chapter 10 — Maintenance
External Cleaning
Always remove the power cord before
cleaning!
Wipe external surfaces with a soft cloth
slightly moistened with water or a mild
detergent.
Never use any sharp tools for removing
stuck labels. The printhead and rollers
are delicate.
Never spray the printer. Protect it from
water when cleaning the premises.
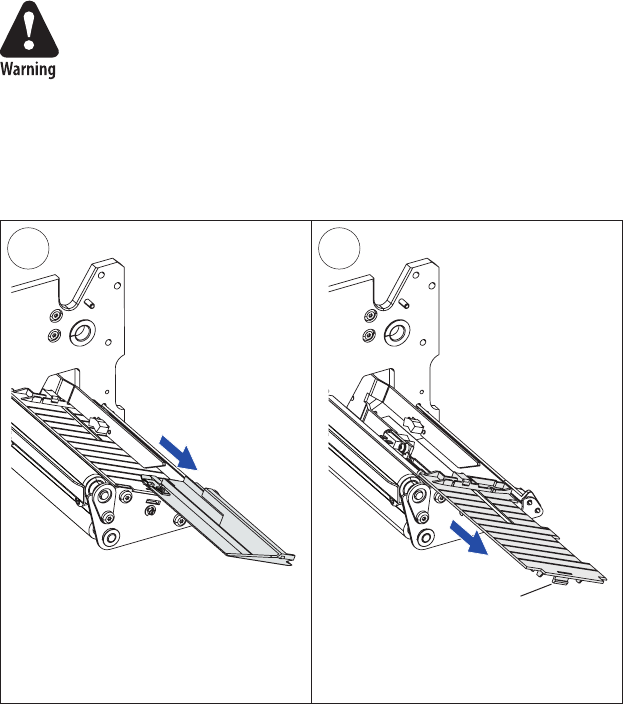
1 2
84 EasyCoder PX4i User’s Guide (IPL version)
Chapter 10 — Maintenance
Cleaning the Label Stop Sensor
The label stop sensor, which controls the media feed, is partially enclosed
by two plastic guides. The guides have slots where the light between the
upper and lower part of the label stop sensor can pass. The guides must
be kept free from stuck labels and other objects that can block the light.
If the printer starts to feed out labels in an unexpected way, remove
the two guides as described below and check for dust on the sensors or
anything that may block the beam of light. If necessary, clean the guides
using a cleaning card or a soft cloth soaked with isopropyl alcohol. Do
not use any other type of chemicals.
Isopropyl alcohol [(CH
3)2CHOH; CAS 67-63-0] is a highly
fl ammable, moderately toxic, and mildly irritating sub-
stance.
Pull the upper guide straight out. (Upper
part of print unit omitted for better
view.)
Press the snap-lock, lift the outer end
of the lower guide and pull it out. After
cleaning, reassemble in reverse order.
Snap-lock
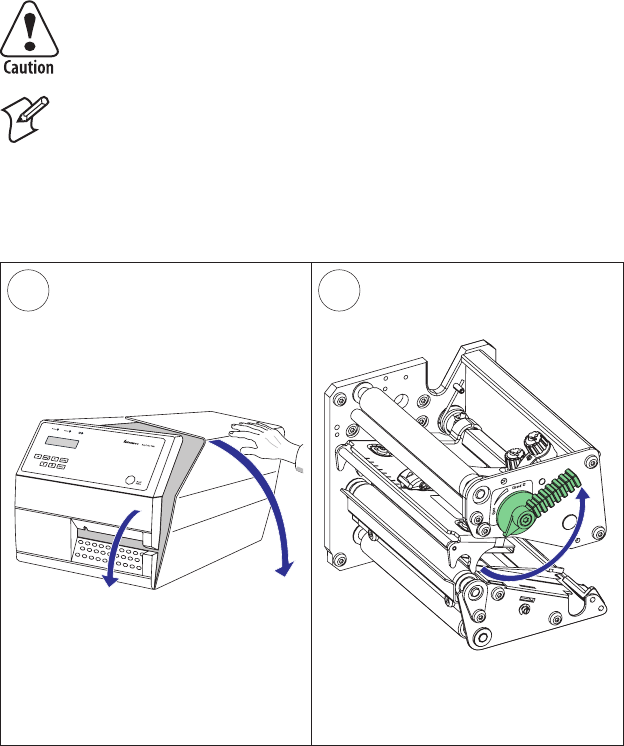
1 2
EasyCoder PX4i User’s Guide (IPL version) 85
Chapter 10 — Maintenance
Printhead Replacement
The printhead is subject to wear both from the direct thermal media or
transfer ribbon and from the rapid heating and cooling process during
printing. Thus, the printhead will require periodic replacement.
Time between printhead replacements depends on the print images, the
type of direct thermal media or ribbon in use, the amount of energy to
the printhead, the print speed, the ambient temperature, and several
other factors.
While replacing the printhead, the power must be off. The
fi rmware will not detect the new printhead resistance and
density until the printer has been restarted.
Note: Check that the density of the new printhead matches
the printhead you are replacing. However, you can switch
between densities at will, but be advised that the printout will
be affected accordingly.
Open the front and side doors.
Turn the printhead lift lever counter-
clockwise to raise the printhead.
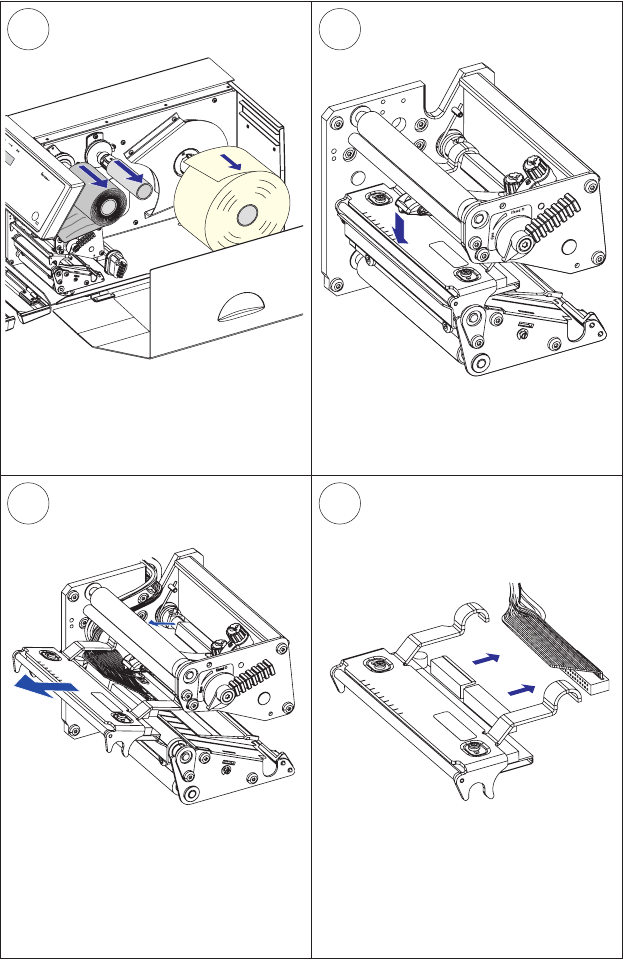
&BTZ$PEFS19J
34
6
5
86 EasyCoder PX4i User’s Guide (IPL version)
Chapter 10 — Maintenance
Printhead Replacement, cont.
Remove any media and transfer ribbon.
Pull the printhead bracket away from
the magnet in the pressure arm.
Disconnect the hooked printhead
bracket fi ngers from the shaft and pull
out the printhead as far as the cables
allow.
Disconnect the cables from the print-
head. Note the snap-lock on the inner
connector. Pull at the connectors—not
at the cables!
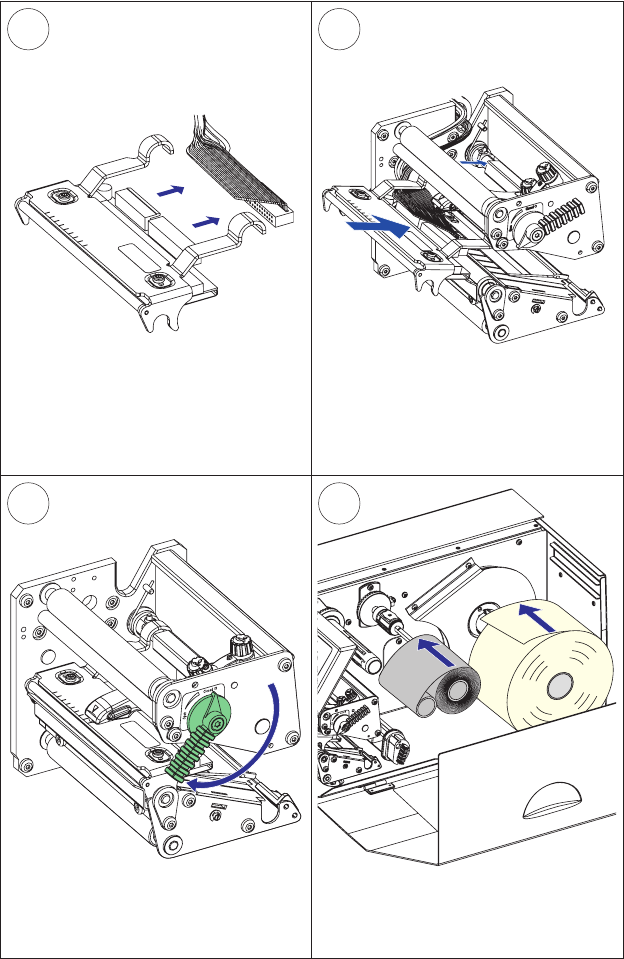
$
PEFS19J
9
87
10
EasyCoder PX4i User’s Guide (IPL version) 87
Chapter 10 — Maintenance
Connect the two cables to the replace-
ment printhead.
Fit the hooks of the printhead bracket
fi ngers onto the headlift shaft. Make
sure that the cables do not prevent the
bracket fi ngers from being properly
seated on the headlift shaft.
Load a new supply of media and ribbon,
as described earlier in this manual.
Close the printhead so the magnet
engages the printhead bracket.
Printhead Replacement, cont.

88 EasyCoder PX4i User’s Guide (IPL version)
Chapter 10 — Maintenance
Media Jams
Should a media jam occur in the print mechanism, proceed this way to
clear it:
• Always switch off the power before starting to clear the jammed
media.
• Raise the printhead and pull out the media.
• If the media has been wound up or has stuck on the platen roller, care-
fully remove it by hand without using any sharp tools that can damage
the delicate platen roller or printhead. Avoid rotating the platen roller.
If you must pull away the media by force causing the platen
roller to rotate, it is very important that the power has been
off for a minute or more. If not, the electronics can be dam-
aged beyond repair.
• Cut off any damaged or wrinkled part.
• Check if there is any adhesive somewhere in the print mechanism,
clean using a cleaning card or cotton swab soaked in isopropyl alcohol.
Isopropyl alcohol [(CH-3)2CHOH; CAS 67-63-0] is a
highly fl ammable, moderately toxic, and mildly irritating
substance.
• Reload the media as described in Chapter 4.
• Switch on the power.
• Readjust the media feed by raising and closing the printhead and then
pressing the <Feed/Pause> key.

EasyCoder PX4i User’s Guide (IPL version) 89
11 Adjustments
This chapter describes how the operator can adjust
the printer. The chapter covers the following topics:
• Narrow media adjustment
• Printhead pressure adjustment
• Label stop sensor adjustment
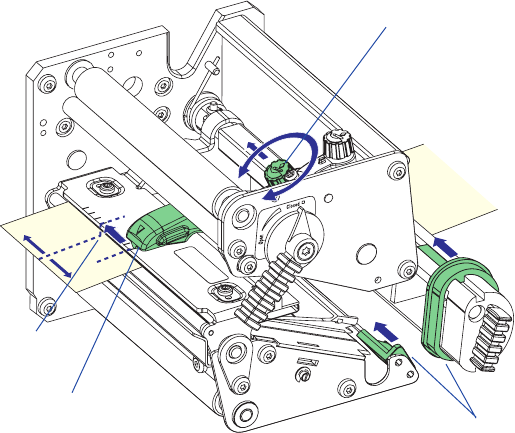
90 EasyCoder PX4i User’s Guide (IPL version)
Chapter 11 — Adjustments
Narrow Media
The printer is factory-adjusted for full size media width. When using
media less than full width, it is recommended that you adjust the pres-
sure arm so it becomes centered on the media. Thereby, an even pressure
across the media is obtained.
A poorly adjusted pressure arm may be detected by a weaker printout on
either side of the media path.
To adjust the pressure arm, proceed as follows:
• Remove the ribbon, if any.
• Loosen the knob that holds the pressure arm. Move the arm inwards
or outwards until the arrow on the tip of the arm becomes centered
with the media stock.
While moving the arm, push at the part where the knob is situated,
not at the tip. If the arm is hard to move, lift the printhead and pull
the printhead bracket free from the magnet in the arm.
• After having centered the arm, lock it by tightening the knob.
• Adjust the edge guides.
• Reload the ribbon, if any.
Center of
media
Pressure arm
Knob
Edge guides

EasyCoder PX4i User’s Guide (IPL version) 91
Chapter 11 — Adjustments
Printhead Pressure
The pressure of the thermal printhead against the ribbon or direct
thermal media is factory adjusted. However, the use of thicker or thinner
media than normal could require the printhead pressure to be readjusted.
Turn the adjustment knob clockwise for increased pressure, or counter-
clockwise for less pressure. Print a few labels, preferably test labels (see
Chapter 6, “Setting Up the Printer”), and check the printout. Increased
pressure generally gives a darker printout and vice versa. Repeat until the
desired result is obtained.
To fi nd the basic setting, turn the knob counterclockwise until there is
no pressure left. Test with a piece of media under the printhead. You
should be able to pull it out without more than just a little resistance.
Then turn the knob four full turns clockwise. Fine-adjust using the trial-
and-error method.
Do not use a higher printhead pressure than necessary,
because it may increase the wear of the printhead and
shorten its life.
Knob
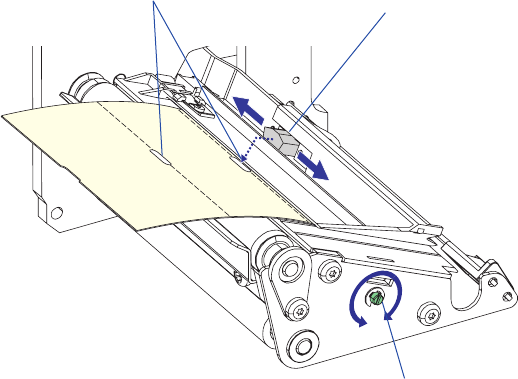
/54 ).
92 EasyCoder PX4i User’s Guide (IPL version)
Chapter 11 — Adjustments
Label Stop Sensor
The label stop sensor (LSS) is a photoelectric sensor that controls the
printer’s media feed by detecting gaps between labels or slots or black
marks in continuous stock, depending on the printer’s setup in regard of
media type (see Chapter 6, “Setting Up the Printer”). The LSS should be
aligned with the gaps, slots, or black marks. If using irregularly shaped
labels, align the LSS with the front tips of the labels.
The label stop/black mark sensor (LSS) can be moved laterally within a
range of 0 to 50 mm (0 to 1.96 inches) from the inner edge of the media
path. There is a screw running through the outer lower gable. Turning
the screw clockwise will move the LSS inwards and vice versa. The posi-
tion of the LSS in relation to the media is best checked by looking head
on into the print unit when the printhead is raised. Align the centerpoint
of the V-shaped upper sensor with the center of the slots or marks to be
detected.
The linear markings on the lower guide plate can also be used for posi-
tioning of the LSS because they are spaced with an interval of exactly 1
cm (0.39 inches.) This method is especially useful for black marks (mea-
sure the lateral position of the black marks with a ruler before loading the
media).
Upper part of LSS
Detection slots
Adjustment screw
Upper part of print unit removed to improve visibility.

EasyCoder PX4i User’s Guide (IPL version) 93
Chapter 11 — Adjustments
In the Test/Service part of the Setup Mode, you can test the label stop
sensor if you have a detection problem.
The menu only provides indications from the label stop sensor unit.
The testing menu can determine if the sensor unit is not physically in
position, is blocked by dust or stuck labels, or is defective in some way.
Furthermore, this is an aid if media has detection complications.
Note: There is no way to adjust the LSS-function; the menus
only indicate values obtained from the LSS.
• Check that the printer is set up for the type of media loaded in your
printer (Setup Mode→Media→Media type→Gap, Mark, or Continu-
ous.
• Lift and lower the printhead, then press the <Feed/Pause> key.
• Make sure that there is a label—not a gap or mark—at the LSS.
• Check that the media is routed as close to the center section as the
guides allow.
• Enter the Setup Mode (see Chapter 7) and go to Setup Mode→Tes t /
Service→LSS Test→LSS Auto.
• The menu should look like this with the cursor placed in the center:
LSS Auto
• Gap detection:
Lift the printhead and pull out the media slowly. When the LSS
detects a gap or a detection slot, the cursor moves to the right.
LSS Auto
• Mark detection:
Lift the printhead and pull out the media slowly. When the LSS
detects a black mark, the cursor moves to the left.
LSS Auto
• It is possible to refresh the centered cursor position by pressing the
<d> key.
94 EasyCoder PX4i User’s Guide (IPL version)
Chapter 11 — Adjustments
• If the cursor behaves as described above, the LSS is working and is
properly aligned with the gaps, slots, or black marks.
• If the cursor does not react on a gap, slot, or black mark, check this:
- Is the LSS laterally aligned with the slots or black marks?
- Are both the upper and lower part of the LSS aligned with each
other?
- Is the transfer ribbon properly loaded so it does not interfere with
the LSS? (See Chapter 5.)
- Are the label stop sensors free from dust and are the guides free
from stuck labels or other objects that may interfere with the light
that goes from one part of the LSS to the other? If not, clean as
described in Chapter 10.
- Does the media have some kind of preprint that can disturb the
detection?
- Is there too little difference between the black marks and the sur-
rounding areas?
- Does the liner have too little transparency?
- Does the LSS work with another type of media? (Remember to
change the Media Type setup, lift and lower the printhead, and
then press the <Feed/Pause> key.)

EasyCoder PX4i User’s Guide (IPL version) 95
A Technical Data
This appendix lists the technical data for the printer.
Please note that Intermec reserves the right to change
without prior notice and that this information does
not represent a commitment on the part of Intermec.

96 EasyCoder PX4i User’s Guide (IPL version)
Appendix A — Technical Data
Printing
Print Technique Direct Thermal and Thermal Transfer
Printhead Resolution 8 dots/mm (203.2 dpi)
Print Speed (variable) 100 to 300 mm/sec.
(≈ 4 to 12 in./sec.)
Print Width (max) 112 mm (4.41 in.)
110 mm (4.33 in.)
DT
TTR
Print Length (max) 32767 dots = 409.5 cm (161.25 in.)1
Media Width (min/max) 25 to 120 mm (1 to 4.72 in.)
Media Roll Diameter (max) 213 mm (8.38 in.)
205 mm (8.07 in.)
Tear-off
Peel-off
Media Roll Core Diameter 38 to 40 mm (1.5 in.) or
76 mm (3 in.) with adapter fi tted
Ribbon Width (min/max) 55 to 110 mm (2.17 to 4.33 in.)
Ribbon Roll Diameter
(outer), max.
80 mm (3.15 in.) ≈ 450 m (1476
ft) of ribbon
Ribbon Roll Core Dia-
meter (inner)
25 mm (1.00 inches)
Print Directions 4
Modes of Operation
Tear-Off (Straight-through) Yes
Cut-Off Option With cutter
Peel-Off (Self-strip) Option With rewinder
Internal Batch Takeup Option With rewinder
Firmware
Operating System IPL v2.30
Smooth Fonts 13 scalable + 21 simulated bitmap
Resident bar codes 44
Physical Measures
Dimensions (W × L × H) 275 × 482 × 238 mm
(10.8 × 19.0 × 9.4 in)
Weight (excluding media) 12.85 kg (28.4 pounds)
Ambient Operating Tem-
perature
+5°C to +40°C (+41°F to +104°F)
Storage Temperature -20°C to +70°C (-4°F to +152°F)
Humidity 10 to 90% non-condensing

EasyCoder PX4i User’s Guide (IPL version) 97
Appendix A — Technical Data
Electronics
Microprocessor 32 bit RISC
On-board Flash SIMMs 2 sockets for 4MB or 8MB each Std. 1 × 4MB
On-board SDRAM SIMM 1 socket for 16MB Std. 16MB
Power Supply
AC Voltage 90 to 265 VAC, 45 to 65 Hz
PFC Regulation IEC 61000-3-2
Power Consumption Minimum 20W; Continuous print-
ing, average 125W; Peak 400W.
Sensors
Label Gap/Black Mark/
Out of Media
Yes Variable posi-
tion
Printhead Lifted Yes
Ribbon End/Ribbon Low Yes
Paper Sensor Yes
Controls
Indicator Lamps 3
Display 2 × 16 character LCD Background
light
Keyboard 7 keys membrane-switch type
Feed/Pause button 1
Beeper Yes
Data Interfaces
Serial 1 × RS-232 + 1 × USB
Connection for Optional
Interface Boards
1 + 1 1 for EasyLAN
1 for other
boards
Cutter Interface 1
Memory Card Adapter 1 CompactFlash
cards

98 EasyCoder PX4i User’s Guide (IPL version)
Appendix A — Technical Data
Accessories and Options
Integral Self-strip Unit with
Liner Takeup
Option2,3 For peel-off and
batch takeup
Media Roll Retainer Option4
Fan-fold Guide Option4
Cutter Option4
Label Taken Sensor Option2,3
Parallel Interface Board Option2,3 IEEE 1284
EasyLAN Ethernet Inter-
face
Option2,3
EasyLAN Wireless Inter-
face
Option2,3
CompactFlash Cards for
various purposes
Option48MB-1GB
1/. The max. print length is also restricted by the amount of free SDRAM memory.
2/. Factory installed option
3/. Field-installable kit. Installation should be performed by a service technician.
4/. Operator-installable option.

EasyCoder PX4i User’s Guide (IPL version) 99
B Media Specifi cations
This appendix specifi es the physical measures for vari-
ous types of media.
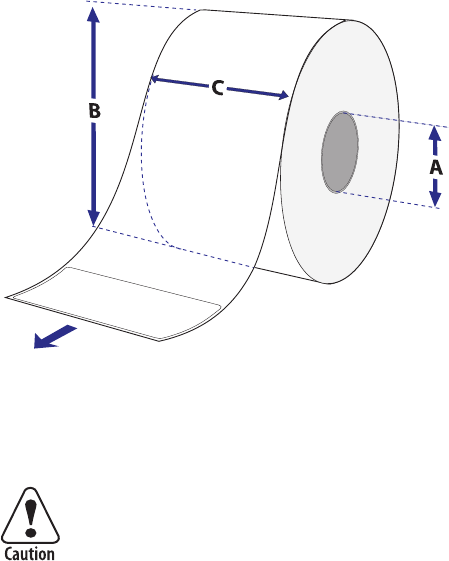
100 EasyCoder PX4i User’s Guide (IPL version)
Appendix B — Media Specifi cations
Media Roll Size
Core
Diameter (A), standard: 38-40 mm (1.5 inches)
Diameter (A), with adapter: 76.2 mm (3 inches)
Width: Must not protrude outside the media.
The media must be wound up on the core in such a way
that the printer can pull the end free.
Roll
Max. diameter (B), tear-off and cut-off: 213 mm (8.38 inches)
Max. diameter (B), peel-off and batch takeup: 205 mm (8.07 inches)
Max. width (C): 120 mm (4.72 inches)
Min. width (C): 25 mm (1.00 inches)
The recommended media thickness is 60 to 170µm (2.4 to 6.7 mils).
Thicker media may be used, but print quality will be reduced. The
stiffness is also important and must be balanced against thickness to
maintain print quality.
Media rolls to be loaded inside the printer should be wound with the
printable side facing outwards.
The media supply must not be exposed to dust, sand, grit, etc. Any hard
particles, however small, can damage the printhead.

EasyCoder PX4i User’s Guide (IPL version) 101
Appendix B — Media Specifi cations
Media
Non-Adhesive Strip
⇐ a ⇒ Media Width
Maximum: 120 mm (4.72 inches)
Minimum: 25 mm (1.00 inches)
Media Type Setup
• Continuous
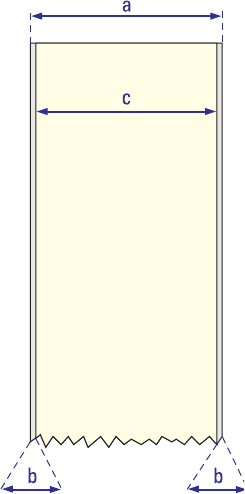
102 EasyCoder PX4i User’s Guide (IPL version)
Appendix B — Media Specifi cations
Self-Adhesive Strip
⇐ a ⇒ Media Width (including liner)
Maximum: 120 mm (4.72 inches)
Minimum: 25 mm (1.00 inches)
⇐ b ⇒ Liner
The liner must not extend more than a total of 1.6 mm (0.06 inches)
outside the face material and should protrude equally on both sides.
⇐ c ⇒ Media Width (excluding liner)
Maximum: 118.4 mm (4.66 inches)
Minimum: 23.8 mm (0.94 inches)
Media Type Setup
• Continuous
EasyCoder PX4i User’s Guide (IPL version) 103
Appendix B — Media Specifi cations
Self-Adhesive Labels
⇐ a ⇒ Media Width (including liner)
Maximum: 120 mm (4.72 inches)
Minimum: 25 mm (1.00 inches)
⇐ b ⇒ Liner
The backing paper must not extend more than a total of 1.6 mm (0.06
inches) outside the labels and should protrude equally on both side. Rec-
ommended minimum transparency: 40% (DIN 53147).
⇐ c ⇒ Label Width (excluding liner)
Maximum: 118.4 mm (4.66 inches)
Minimum: 23.8 mm (0.94 inches)
⇐ d ⇒ Label Length
Maximum: 6,143 mm (241 inches)
provided there is a suffi cient amount of free SDRAM memory
Minimum (without LTS): 8.0 mm (0.32 inches)
Minimum (with LTS): 12.0 mm (0.47 inches)
⇐ e ⇒ Label Gap
Maximum: 25.0 mm (0.98 inches)
Recommended: 3.0 mm (0.12 inches)
Minimum: 1.27 mm (0.05 inches)
The Label Stop Sensor must be able to detect the extreme front edges of
the labels.
Opacity
The difference between in opacity between label plus liner and liner only
should be ≥ 19% units.
Maximum liner opacity is 72%.
Media Type Setup
• Gap
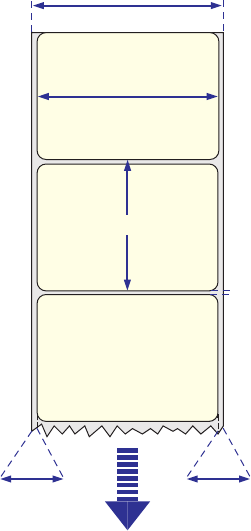
B
C
D
F
C
E
104 EasyCoder PX4i User’s Guide (IPL version)
Appendix B — Media Specifi cations
Feed direction

EasyCoder PX4i User’s Guide (IPL version) 105
Appendix B — Media Specifi cations
Tickets with Gaps
⇐ a ⇒ Media Width
Maximum: 120 mm (4.72 inches)
Minimum: 25 mm (1.00 inches)
⇐ b ⇒ Copy Length
Maximum: 6,143 mm (241 inches)
provided there is a suffi cient amount of free SDRAM memory
Minimum (without LTS): 8.0 mm (0.32 inches)
Minimum (with LTS): 12.0 mm (0.47 inches)
⇐ c ⇒ LSS Detection Position
Variable, see Chapter 11.
⇐ d ⇒ Detection Slit Length
The length of the detection slit (excluding corner radii) must be mini-
mum 2.5 mm (0.10 inches) on either side of the LSS detection position
(e).
⇐ e ⇒ Detection Slit Height
Maximum: 25.0 mm (0.98 inches)
Recommended: 1.6 mm (0.06 inches)
Minimum: 1.27 mm (0.05 inches)
Opacity
Max opacity difference: 48%
Media Type Setup
• Gap
Note: Do not allow any perforation to break the edge of the
media as this may cause the media to split and jam the printer.
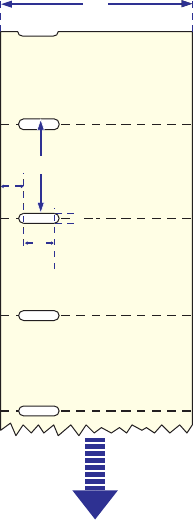
B
C
F
E
D
106 EasyCoder PX4i User’s Guide (IPL version)
Appendix B — Media Specifi cations
Feed direction

EasyCoder PX4i User’s Guide (IPL version) 107
Appendix B — Media Specifi cations
Tickets with Black Mark
⇐ a ⇒ Media Width
Maximum: 120 mm (4.72 inches)
Minimum: 25 mm (1.00 inches)
⇐ b ⇒ Copy Length
Maximum: 6,143 mm (241 inches)
provided there is a suffi cient amount of free SDRAM memory
Minimum: 20.0 mm (0.8 inches)
⇐ c ⇒ LSS Detection Position
Variable, see Chapter 11.
⇐ d ⇒ Black Mark Width
Maximum: Full media width
Recommended: 10.0 mm (0.39 inches)
Minimum: 5.0 mm (0.20 inches)
⇐ e ⇒ Black Mark Length
Maximum: 25.0 mm (0.98 inches)
Recommended: 3.2 mm (0.13 inches)
Minimum: 1.27 mm (0.05 inches)
⇐ f ⇒ Black Mark Y-Position
It is recommended that you place the black mark as close to the front
edge of the ticket as possible. The black mark can be placed either on the
top or at the back of the media.
Black Mark Characteristics
Maximum refl ectance: 15%, 940 nm
Difference between mark and media: 55%
Media Type Setup
• Ticket (w mark)
Note: Do not allow any perforations to break the edge of the
media as this may cause the media to split and jam the printer.

B
D
F
EG
C
108 EasyCoder PX4i User’s Guide (IPL version)
Appendix B — Media Specifi cations
Feed direction

EasyCoder PX4i User’s Guide (IPL version) 109
C Interfaces
This appendix describes the interface connectors
found on the printer’s rear plate. It covers the follow-
ing topics:
• RS-232 interface
• USB interface
• Optional interfaces
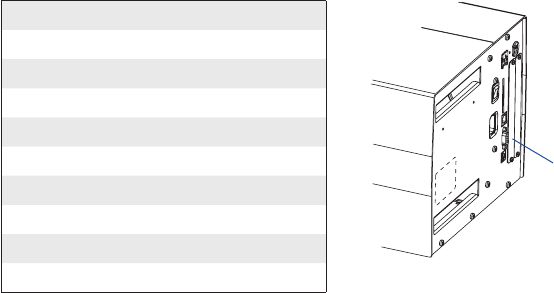
110 EasyCoder PX4i User’s Guide (IPL version)
Appendix C — Interfaces
RS-232 Interface
Protocol
Default setup:
Baud rate: 9600
Char. length 8 bits
Parity: None
Stop bits: 1
RTS/CTS Disabled
ENQ/ACK: Disabled
XON/XOFF: Disabled (both ways)
New Line: CR/LF
To change the RS-232 interface settings, see Chapter 6, “Setting Up the
Printer.”
Signals on printer’s serial port:
DB-9 Signal Meaning
1 External +5V DC*
2 TXD Transmit data
3 RXD Receive data
4 DSR Data set ready
5 GND Ground
6 DTR Data terminal ready
7 CTS Clear to send
8 RTS Request to send
9 – Not used
*/. The external +5V is limited to 500 mA and is automatically switched
off at overload.
Interface Cable
Computer end: Depends on computer model
Printer end: DB-9 plug
RS-232
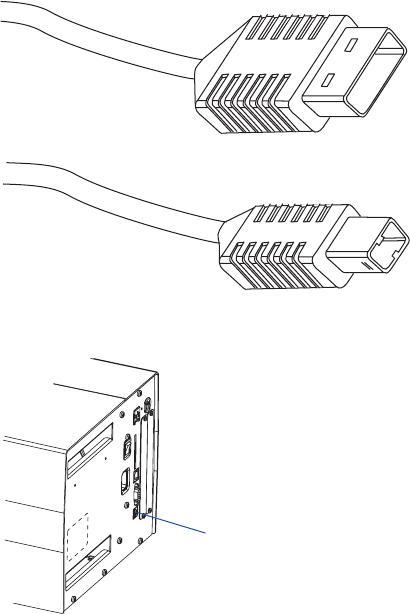
EasyCoder PX4i User’s Guide (IPL version) 111
Appendix C — Interfaces
USB Interface
This printer supports USB v1.1 (also called USB 2.0 full speed). To use
the USB interface for printing from a PC, you need a special Intermec
USB printer driver installed in your PC.
The printer is a so called “self-powered device.” We recommend that you
only connect one printer to each USB port on the host, either directly or
via a hub. Other devices, like a keyboard and a mouse, can be connected
to the same hub. If you need to connect more than one Intermec USB
printer to a host, you should use different USB ports.
Using a USB Class A/B cable, connect the Class A plug to your PC or
hub and the Class B plug to your printer.
The USB interface is essentially a one-way communication interface.
There is no communication setup for the USB port.
USB Class B connector.
Connect to USB receptacle
on the printer’s rear plate.
USB
USB Class A connector.
Connect to PC or hub.
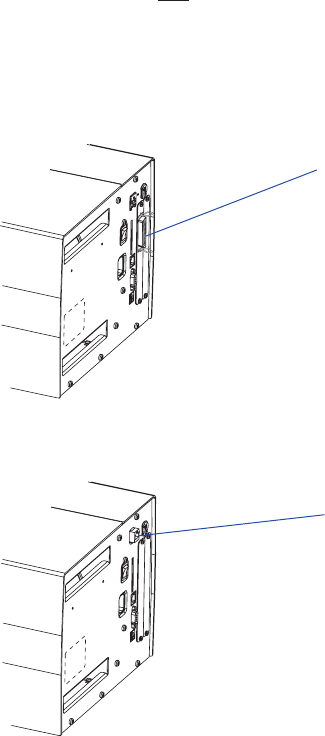
112 EasyCoder PX4i User’s Guide (IPL version)
Appendix C — Interfaces
EasyLAN Ethernet Interface
Optional Interfaces
The printer can optionally be fi tted with an IEEE 1284 Parallel Interface
Board at the right-hand side of the printer’s rear plate.
Regardless of if any Parallel Interface Board is installed, the printer can
also be fi tted with one of the following EasyLAN interface boards for
connection to a Local Area Network (LAN):
• EasyLAN Ethernet Interface
• EasyLAN Wireless Interface
IEEE 1284 Parallel Interface Board
Parallel interface
connector
RJ-45 connector
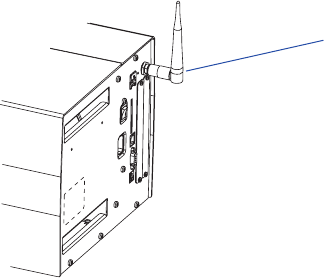
EasyCoder PX4i User’s Guide (IPL version) 113
Appendix C — Interfaces
EasyLAN antenna
EasyLAN Wireless Interface
For information on how to set up, operate, confi gure, and troubleshoot
an EasyLAN interface, please refer to the following manuals that are
included in .pdf format on the attached CD-ROM:
• EasyLAN Interface Kit, Installation Instructions
• EasyLAN Wireless Interface Kit, Installation Instructions
• EasyLAN, User’s Guide
• EasyLAN Network Setup, User’s Guide
114 EasyCoder PX4i User’s Guide (IPL version)
Appendix C — Interfaces

EasyCoder PX4i User’s Guide (IPL version) 115
D Intermec Supplies
This appendix describes how to set up the printer for
various types of direct thermal media or combinations
of thermal transfer ribbons and receiving face materi-
als marketed by Intermec.
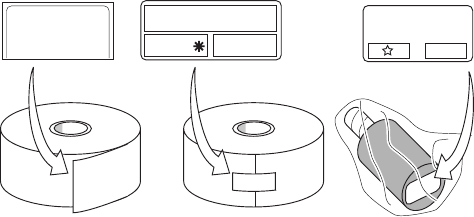
120066102605140
120066102605140
INTERMEC MEDIA PRODUCTS
SENSITIVITY LABEL
56
Intermec
SENSITIVITY NUMBER
57
116 EasyCoder PX4i User’s Guide (IPL version)
Appendix D — Intermec Supplies
Setting the Media Sensitivity Number
Media sensitivity is important because you use it to optimize print qual-
ity and print speed. The three-digit sensitivity specifi es the amount of
heat required by the printhead to image a label. The amount of heat that
each roll of media or ribbon requires is unique due to different chemis-
tries and manufacturing processes.
Intermec has developed heating schedules (the amount of heat required
to image a label) to produce the highest possible print quality for
Intermec media and ribbon combinations on Intermec printers. Look for
the three-digit media sensitivity number on:
• The side of the media roll. Use the last three digits (140 in the exam-
ple below) of the 15-digit number stamped on the roll for the media
sensitivity number.
• A small label attached to the roll of media.
Use this three-digit number to optimize print quality and print speed
on your printer. You can achieve the best print quality on the printer by
using Intermec ribbon and media products.
The default printer setting for direct thermal media is 420. For thermal
transfer media, the default setting is 567. Use the information on the
packaging that you saved when loading media and ribbon to determine
the correct sensitivity number.
Use the Setup Mode (see “Sensitivity” in Chapter 6-7), PrintSet, your
third-party software, or the Intermec printer language (IPL) command
set to change the media sensitivity number. For help on how to set the
media sensitivity number using the printer command set, see the DOS
example on the following page.

EasyCoder PX4i User’s Guide (IPL version) 117
Appendix D — Intermec Supplies
The sensitivity number on each roll of thermal transfer media or ribbon
has an asterisk (*) in place of one of the digits. To optimize the sensitiv-
ity number for thermal transfer media, you combine the digits as in this
example.
Media or Ribbon Sensitivity
Rating
Description
Thermal transfer media 56* The asterisk for the third digit is reserved to
identify the ribbon’s sensitivity number.
Thermal transfer ribbon 5*7 The asterisk for the second digit is reserved
to identify the media’s sensitivity number.
567 Optimum sensitivity rating
To set the sensitivity rating for direct thermal media, use the three-digit
sensitivity rating located on the roll of media or listed later in this chap-
ter.
Use DOS to set the media sensitivity number on a PC like this:
1. At the DOS prompt, type the following command and press Enter:
MODE COM1 96,E,7,1,N
2. Type the following command lines and press Enter:
COPY CON COM1
<STX><SI>g1,567<ETX>^Z
where:
<SI>g1,567 sets the media sensitivity number to 567.

118 EasyCoder PX4i User’s Guide (IPL version)
Appendix D — Intermec Supplies
Direct Thermal Media Sensitivity Settings
Sensitivity Level Setting Direct Thermal Media
700 Series High Sensitivity 720 Duratherm Lightning Plus
400 Series Medium Sensitivity 480 Duratherm Lightning IR Tag
470 Duratherm Lightning
460 Thermal Top IR
450 Duratherm Lightning IR
440 Thermal Eco
420 Duratherm Lightning-2
100 Series Low Sensitivity 180 Duratherm II
170 European Top Board
160 Duratherm II Tag
140 Thermal Top
130 Duratherm II-2
120 Thermal Eco Board

EasyCoder PX4i User’s Guide (IPL version) 119
Appendix D — Intermec Supplies
Thermal Transfer Media and Ribbon Sensitivity Settings
Sensitivity Level Setting Media/Ribbon Stock
800 Series High Sensitivity
(Paper)
864 TTR Uncoated/GP02
600 Series Medium Sensitivity
(Plastic)
687 Duratran Valeron/TMX2200
677 Duratran II Syntran/TMX2200
673 Duratran II Syntran/TMX1500
633 Polyethylene/HP05
627 Duratran Kimdura/TMX2200
623 Duratran Kimdura/TMX1500
500 Series Medium Sensitivity
(Paper)
567 Duratran II Labels/TMX2200
565 TTR Premium Board/HP05
563 Duratran II Labels/TMX1500
533 TTR Premium Board/HP05
527 Duratran II Tag 5 & 7mil/TMX2200
523 Duratran II Tag 5 & 7mil/TMX1500
513 TTR Coated/HP05
300 Series Low Sensitivity
(Plastic)
369 TTR High Gloss Polyester/HR03
366 Duratran II Gloss Polyester/TMX3200
200 Series Low Sensitivity
(Kapton)
236 Gloss White Kapton/TMX3200
226 Matte White Kapton/TMX3200
120 EasyCoder PX4i User’s Guide (IPL version)
Appendix D — Intermec Supplies

Intermec Technologies Corporation
Corporate Headquarters
6001 36th Avenue West
Everett, WA 98203
U.S.A.
tel 425.348.2600
fax 425.355.9551
www.intermec.com
*1-960625-01*
EasyCoder PX4i User’s Guide (IPL version)
*1-960625-01*
