Contents
- 1. Users Manual 1
- 2. Users Manual 2
- 3. Users Manual 3
- 4. Users Manual 4
Users Manual 1
H-19 Series Manual

2
Contents
Chapter 1. Knowing Your Device 9
1.1 Introduction 10
1.2 Accessories 14
1.3 Installing SIM Card and Battery 16
1.4 Battery Information 19
1.5 Mini-SD Cards 22
Chapter 2. Basic Operations 23
2.1 Getting Started 24
2.2 Input Methods 28
2.3 Today Screen Components 35
2.4 The Start Menu 37
2.5 Using Calendar 42
2.6 Using Notes 51
2.7 Using Tasks 60
Charter 3. Phone Features 67
3.1 Making a Call 68
3.2 Configuring the Phone 75
3.3 In-Call Options 81
3.4 SIM Manager 84
3.5 Blocking Unwanted Phone Calls 85

3
Chapter 4. Synchronizing Information 88
4.1 Installing and setting up ActiveSync 90
4.2 Synchronizing Information 91
4.3 Changing Settings for an Information Type 93
4.4 Synchronizing with Exchange Server 93
4.5 Synchronizing via Bluetooth 94
Chapter 5. Bluetooth Connections 95
5.1 Bluetooth Modes 96
5.2 Bluetooth Partnership (Bonding) 98
5.3 Beaming Information (Bluetooth) 100
Chapter 6. Transferring Files To and From Your Device 103
6.1 Using ActiveSync 104
6.2 Transferring from Memory Cards 105
6.3 Using Bluetooth 106
6.4 Transferring to a PC or Other Devices 106
Chapter 7. Connecting to the Internet 107
7.1 Setting up Internet connections 108
7.2 Using Internet Explorer Mobile 113
7.3 Using Wireless Manager 120
7.4 Using a Wi-Fi Connection 123

4
Chapter 8. Messaging & Contacts 129
8.1 Text Messaging 130
8.2 Multimedia Messaging Service 133
8.3 E-mail 136
8.4 Using Contacts 141
Chapter 9. Using Barcode Reader 145
9.1 Setting Barcode Reader 146
9.2 Scanning and Reading Barcode labels 156
Chapter 10. Other Applications 159
10.1 Backing up/Recovering 160
10.2 Managing Memory 164
10.3 Windows Live Messenger 165
10.4 Windows Media 169
10.5 Office Mobile 172
10.6 Phone Profile 176
10.7 Formatting Storage Card and DiskOnChip 179
10.8 Setting up GPS 180
Appendix 183
A.1 Regulatory Notices 184
A.2 PC Requirement to Run ActiveSync 4.5 192
A.3 Specifications 193

5
CAUTION : This information is subject to change without prior notice.
Copyright©2010 Opticon. All Rights Reserved.
This manual may not, in whole or in part, be copied, photocopied, reproduced, translated or
converted to any electronic or machine readable form without prior written consent of Opticon.
Warranty
Unless otherwise agreed in a written contract, all Opticon products are warranted against defects
in materials and workmanship for two years after purchase. Opticon will repair or, at its option,
replace products that are defective in materials or workmanship with proper use during the
warranty period. Opticon is not liable for damages caused by modifications made by a customer.
In such cases, standard repair charges will apply. If a product is returned under warranty and no
defect is found, standard repair charges will apply. Opticon assumes no liability for any direct,
indirect, consequential or incidental damages arising out of use or inability to use both the
hardware and software, even if Opticon has been informed about the possibility of such damages.
Packaging
The packing materials are recyclable. We recommend that you save all packing material to use if
you need to transport your scanner or send it for service. Damage caused by improper packaging
during shipment is not covered by the warranty.
IMPORTANT SAFETY INFORMATION
Please read the following information carefully before you start using this Opticon device to avoid
any damages caused by improper usage:

6
•The device is not charged when you take it out of the box. The battery should be charged for at
least 8 hours before first use. Do not remove the battery while charging.
• Do not use batteries which have not been specified by the manufacturer and qualified with the
system per the standard of IEEE-Std-1725-2006, as this may present a risk of fire, explosion,
leakage or other hazard.
• Do not charge the battery with an unspecified AC Adapter, as this may cause damage to both
the device and the battery.
• When discarding the batteries, dispose of them in a proper manner, according to the battery
manufacturer’s instructions and your local laws.
• Power off the device and remove the battery before inserting a SIM card. Make sure the SIM
card snaps correctly into the SIM socket.
• Do not open the device housing or tamper with the device, as it will void your warranty.
• Do not apply excessive force on this product, as it may cause damage to the screen or the
internal component.
• Do not use the device at gas or refueling stations, chemical plants, and places containing
explosives or flammable materials. Observe local guidelines.
• Use only manufacturer specified stylus. Do not scratch the screen with sharp objects.
• Do not clean the screen with chemical detergents. Only use cloths specifically designed for
cleaning liquid displays or a soft cloth moisturized with water drops, to wipe the device screen.
• Do not expose the device to direct sunlight or leave the device in a humid environment for
extended periods of time as this may cause damage to the device and battery.
• Do not immerse the device in water.
• The device may interfere with the navigation and/or communication systems on aircraft. The use
of the device on an aircraft is prohibited by laws in most countries. Observe local guidelines.
• This product may cause medical equipment to malfunction. The use of this device is forbidden
in most hospitals and medical clinics. Observe local guidelines.

7
• Use hands-free devices if you need to use the telephony services while driving a vehicle.
Observe local guidelines.
• Do not disassemble or open crunch, bend or deform, puncture or shred the battery.
• Do not modify or remanufacture, attempt to insert foreign objects into the battery, immerse or
expose to water or other liquids, expose to fire, explosion or other hazard.
• Only use the battery for the system for which it is specified.
• Only use the battery with a charging system that has been qualified with the system per the
IEEE-Std-1725-200x standard. Use of an unqualified battery or charger may present a risk of
fire, explosion, leakage, or other hazard.
• Do not short circuit the battery or allow metallic conductive objects to contact battery terminals.
• Replace the battery only with another battery that has been qualified with the system per
this standard, IEEE-Std-1725-200x. Use of an unqualified battery may present a risk of fire,
explosion, leakage or other hazard.
• Promptly dispose of used batteries in accordance with local regulations.
• Battery usage by children should be supervised.
• Avoid dropping the phone or battery. If the phone or battery is dropped, especially on a hard
surface, and the user suspects damage, take it to a service center for inspection.
• Improper battery use may result in a fire, explosion or other hazard.
• This product shall only be connected to other products that bear the USB-IF logo or have
completed the USB-IF compliance program.
8
Safety of Laser Products
International Standards Laser Class 2
Precautions about the Laser Device
This product using laser complies with JIS C6802: 2005 Class 2, IEC60825-1+A2: 2001 Class
2 and 21CFR 1040.10 and 1040.11 except for deviations pursuant to Laser Notice No.50, dated
June 24, 2007.
Class 2 Laser devices are not considered to be hazardous when used for their intended purpose.
Use of controls, adjustment of procedures other than those specified herein may result in
hazardous laser light exposure.
The user should not view directly into the light beam with optical instruments, it may pose an eye
hazard.
Trademarks
Trademarks used are the property of their respective owners.
Opticon is a registered trademark. Microsoft, MS-DOS, Windows, Windows NT, Windows
Server, Windows Mobile, ActiveSync, Excel, Internet Explorer, Windows Live Messenger, Outlook,
PowerPoint, and Word are either registered trademarks or trademarks of Microsoft Corporation in
the United States and/or other countries.

Chapter 1.
Knowing Your Device
1.1 Introduction
1.2 Accessories
1.3 Installing SIM Card and Battery
1.4 Battery Information
1.5 Mini-SD Cards
10
Chapter 1. Knowing Your Device
1.1 Introduction
Views of the Device
1
3
4
5
6
7
8
10
11
12
13 14
2
15 16
17 18
19 20
23
24
25
26
27
28
29
31
32
9
21 22
30
11
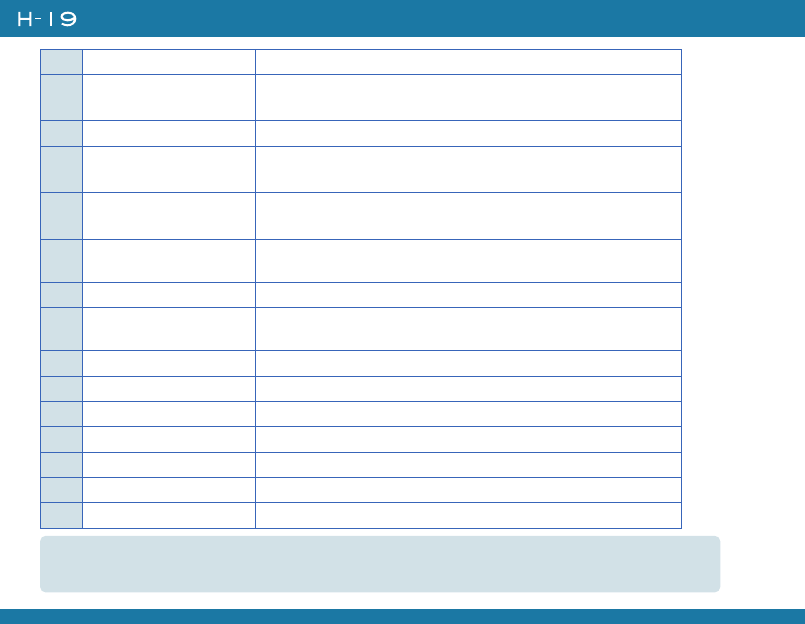
1Stylus Write, draw, or make selections on the touch screen.
2Scan key (left) Press the key to scan and decode bar code/2D code.
3Record key Press and hold this key to record a voice note.
4Volume up Press the Volume up button to turn up the PDA receiver volume.
5Volume down Press the Volume down button to turn down the PDA receiver volume.
6Reset button* Press the Reset button with stylus to soft-reset your device.
7Scanner Point the reading window of the scanner in the direction of bar code/
2D code.
8Wi-Fi/Bluetooth LED Indicates Wi-Fi/ Bluetooth Status.
9Telephone receiver Listen to a phone call here.
10 GSM/Battery LED Indicates GSM/Battery LED.
11 Power button Power on or off the device.
12 Display 2.8-inch TFT LCD with touch screen.
13 Soft key (left) Performs the command shown in the label above the button.
14 Soft key (right) Performs the command shown in the label above the button.
15 Fn key Helps you to perform special functions by using the keypad. For more
information on how to use the Fn key, refer to "ch2.2 Input Methods".
16 Backspace Press this key to erase the letter on the left side of the cursor.
17 Talk key Press this key to dial or answer a call.
12
Chapter 1. Knowing Your Device
18 End key End a call or close Phone application.
19 5-way navigation
key
Press the multi directional control up, down, left, or right to move
through menus; carry out the selection by pressing the center button.
20 Numeric keypad Enter numbers or letters by the numeric keypad.
21 Connect pins Connect the connect pins of the device and the cradle (if any) for
recharging the battery.
22 Microphone Speak into the microphone when talking on the device or recording a
voice note.
23 Eyelet for wrist strap
(1) Fix a wrist strap here.
24 Scan key (right) Press the key to scan and decode bar code/ 2D code.
25 Eyelet for wrist strap
(2) Fix a wrist strap here.
26 Mini-SD card slot Insert a mini-SD card to expand device memory.
27 Mini USB connector Mini USB connector for PC sync and battery charging.
28 Earphone Jack Connect a 2.5 mm Earphone.
29 Speaker Listen to audio media or listen to a phone call hands-free.
30 Screw hole Fasten the provided strap set here with screws.
31 Cover latch Slide both of the cover latches to remove the battery cover.
32 Battery cover Uncover it to place battery and SIM card.
*If you press the Reset button when your device is in use, the unsaved data and settings may be
lost.
13
Clean boot Your Device
You can execute a system cold boot to format both user store and DiskOnChip on your device.
To prompt the instruction for cold boot, press the Reset button, and then press and hold the Power
button immediately until the cold boot screen appears. You can then choose one of the following
steps:
• Pressing the left key of the 5-way navigation key to format user store.
• Pressing the right key of the 5-way navigation key to format DiskOnChip.
• Press the up key of the 5-way navigation key to format both user store and DiskOnChip.
• Press any other key to exit.
The Stylus
• Use the stylus to tap a selection, to drag-and-drop an item, to write, or to draw on the touch
screen.
• Tap and hold the stylus on the screen, the icon is displayed and then a pop-up submenu is
displayed.
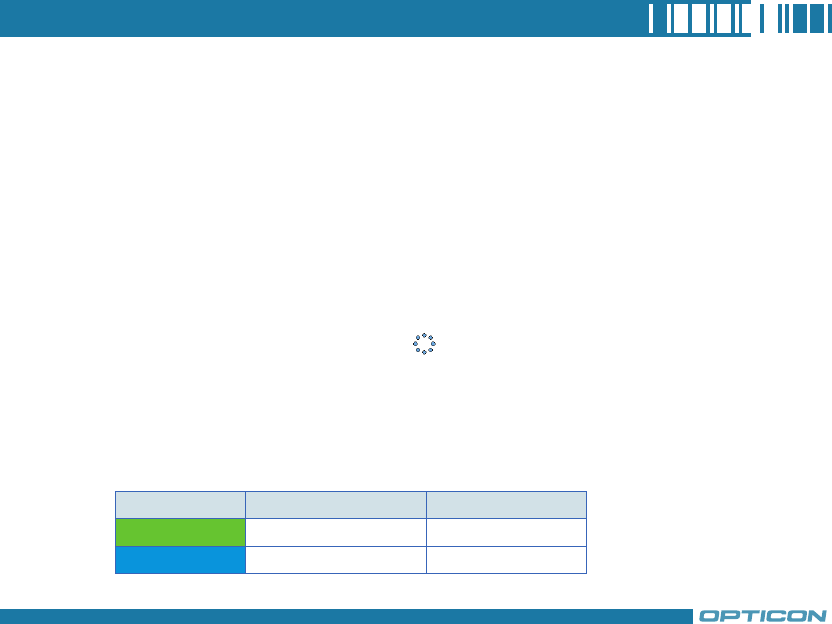
Notification LEDs
The device has 2 notification LEDs: the left is Wi-Fi/Bluetooth LED and the right is GSM/Battery
LED.
Bluetooth/Wi-Fi LED tells you about the device’s Bluetooth/Wi-Fi status:
Green and blue blink alternately while both Bluetooth and Wi-Fi are on.
Color Bluetooth on Wi-Fi on
Green Off Blink
Blue Blink Off
14
Chapter 1. Knowing Your Device
GSM/Battery LED lets you know that you have unanswered calls or tells you about the device’s
GSM/battery status:
1.2 Accessories
Color Missed Call/ Low
Power
GSM on
(battery full)
GSM on (battery
low) Charging
Red Blink Off Blink Off
Orange Off Off Off Constantly on
Green Off Blink Off Off
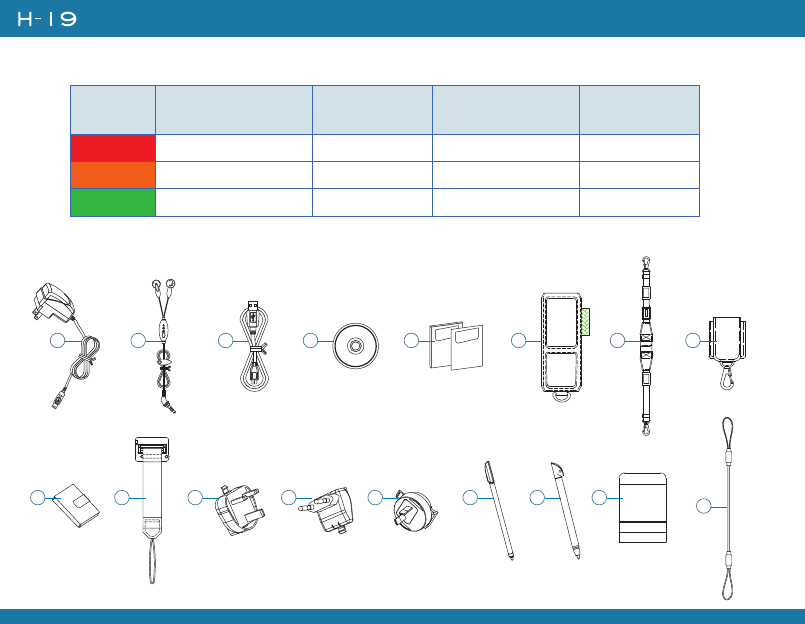
Manual
QSG
18
9 10 11 12 13 14 15 16 17
2 3 4 5 6 7
15
1 AC adapter Recharge the device battery.
2 Stereo headset Listen to a phone conversation hands-free.
3USB cable Connect the device to a PC.
4 Getting started CD Windows MobileTM Getting Started Disc.
5User manual/Quick guide Provide instructions of device functions.
6 Pouch Protect the device.
7 Neck strap Fasten the neck strap with the pouch’s metal clasp to make your device easier to
carry.
8Belt clip Fasten the belt clip with your belt and the pouch’s metal clasp to make your de-
vice easier to carry.
9Battery Rechargeable Li-ion polymer battery.
10 Strap set Attach the thin cord of the strap set to the eyelet on the bottom of your device,
and then fasten the metal plate to the back of your device*.
11 UK plug Fit the AC adapter for use in United Kingdom.
12 EU plug Fit the AC adapter for use in Europe.
13 AU plug Fit the AC adapter for use in Australia.
14 Stylus Write, draw, or make selections on the touch screen.
15 Additional stylus A big size stylus which makes you easier to write on the touch screen with it.
16 Stylus holder Wrap this stylus holder around the strap set in order to fasten it, and then place
the additional stylus in the hole of the stylus holder.
17 Stylus string In case the additional stylus looses from the stylus holder, attach this stylus string
to the eyelet of additional stylus and the eyelet (2) ** of your device.
* To fasten the metal plate, affix it to the back of your device, and secure it in place by driving the two
provided screws into the screw holes on the back of your device.
** Please see chapter 1.1 for the position of eyelet (2).
16
Chapter 1. Knowing Your Device
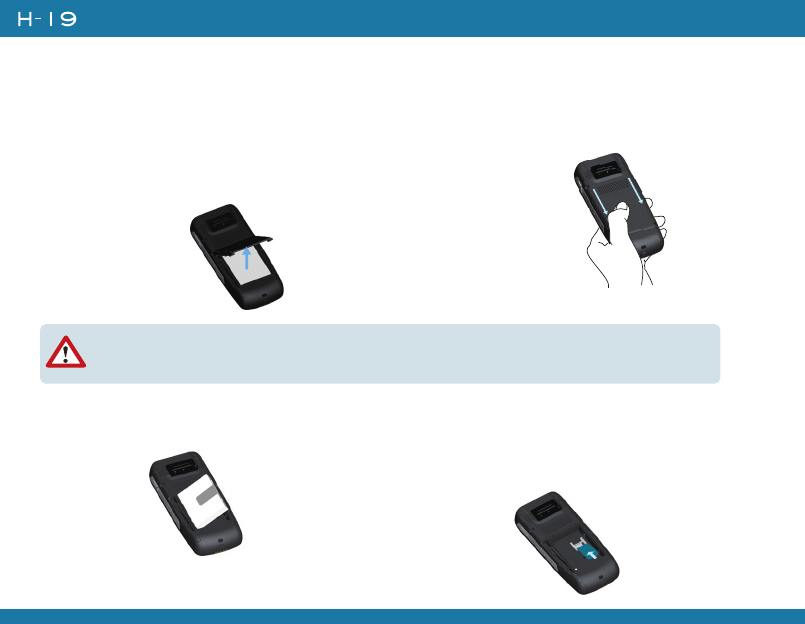
1.3 Installing SIM Card and Battery
Removing the Battery Cover and Installing the SIM Card
If you want to use phone features, you must install a valid SIM card.
1. Press the battery cover downward and slide one of the cover latches down at the same time.
2. Repeat the same steps to unlock another cover latch.
3. Lift the battery cover as the diagram shown below.
Please do not remove the battery cover when your device is in use; otherwise, the device
power will be shut off automatically and unsaved data may be lost.
4. Pull the plastic ribbon to remove the
battery.
5. Place the SIM card in the SIM card slot
with the gold contacts facing down. The
SIM card’s cut-off corner should match
the cut-off corner in the SIM card slot.
Press
Unlock
the latch
Unlock
the latch
17
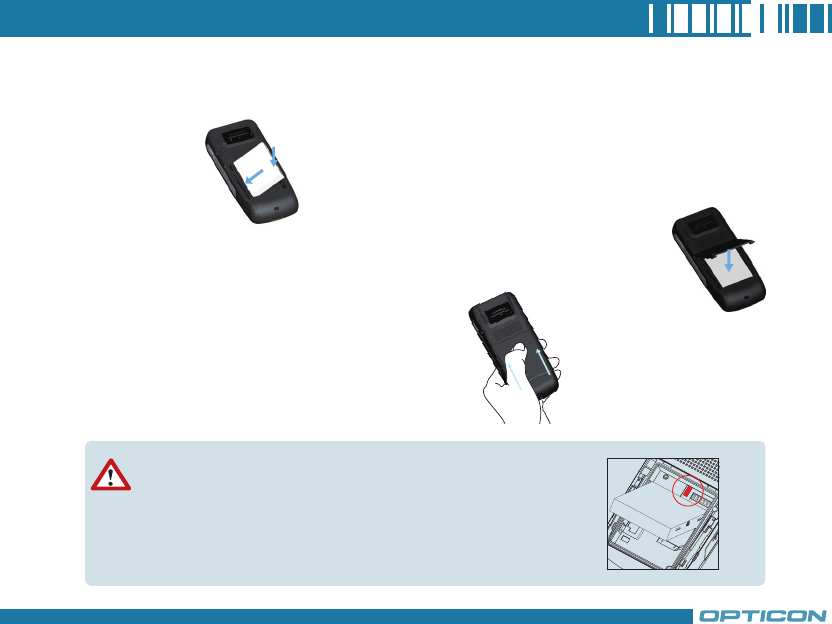
1. Press the battery down forcefully into the battery slot.
2. Angle the battery cover as shown in the diagram and close the battery cover.
3. Press the battery cover downward and slide one of the cover latches up at the
same time.
4. Repeat the same steps to lock another latch.
Installing the Battery and the Battery Cover
1
2
Please avoid placing the battery as the direction shown in the
figure. This may damage the battery switch (the part circled in
red) in the battery slot.
Press
Lock
the latch
Lock the
latch
18
Chapter 1. Knowing Your Device
1.Please re-install the battery within 5 minutes or unsaved data may be
lost.
2.Please do not close the battery cover while the main battery is not
installed as this may cause loss of data.
3.All wireless communications will be turned off in backup mode.
4.It is recommended to follow normal power-off procedure to remove the battery, see
"Chapter 2.1 Powering On/Off the Device"
5. Please do not connect your device to a PC with a USB cable or charge the battery while
your device is in backup mode as this may cause loss of data.
6. An alarm set in your device will be turned off when the device is in backup mode.
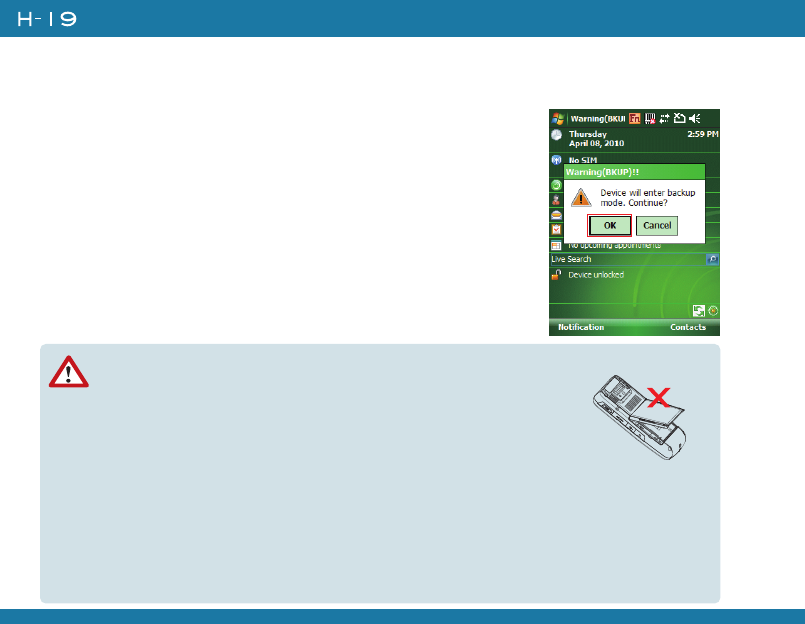
Replacing the Battery to Keep Your Unsaved Data:
When the main battery is low, you can quickly replace the battery by doing the following:
1. Before replacing the main battery, hold the Fn key and press
Power button at the same time for 3 seconds.
2. A message box pops up on the screen, asking for confirmation to
turn the device into backup mode. Select "OK". (If select "Cancel",
the device will go back to normal.)
3. A few seconds later, the screen backlight goes off. After the screen
is dim, it is safe to replace the battery.
4. After closing and locking the battery cover, short-press the Power
button to recover your device system to the previous state.
19
1.4 Battery Information
Battery performance depends on many factors, including your wireless service provider’s network
configuration, signal strength, the temperature of the environment in which you operate your device,
the features and/or settings you select and use, items attached to your device’s connecting ports, and
your voice, data, and other program usage patterns.
Battery life estimates (approximations):
• Talk time: 4 hours
• Standby time: 150 hours
Reducing Risk of Fire or Burns
• Do not attempt to open, disassemble, or service the battery pack.
• Do not crush, puncture, short external contacts, or dispose of in fire or water.
• Do not expose to temperatures above 60˚C (140˚F).
• Replace only with the battery pack designated for this product.
• Recycle or dispose of used battery as stipulated by local regulations.
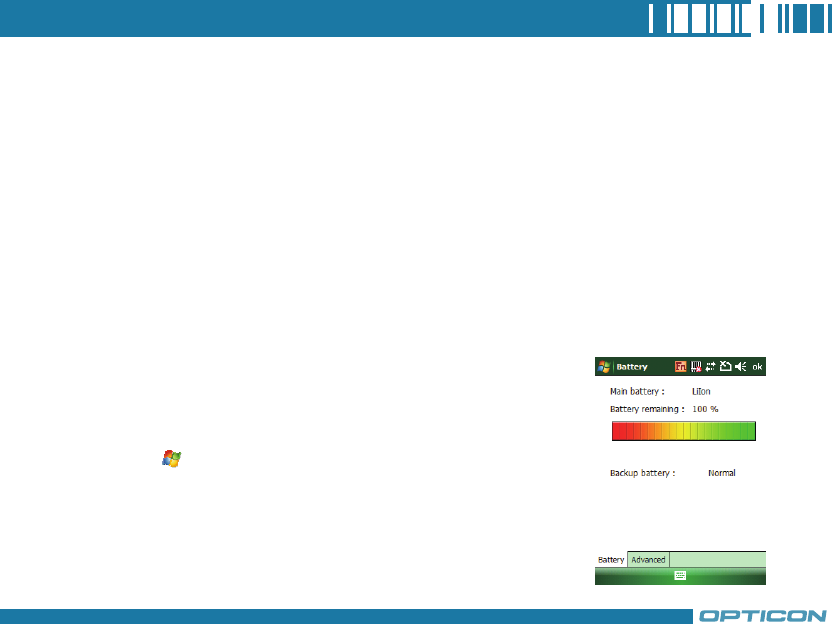
Checking the Battery Power
• Tap > Settings > System tab > Power. You can check the
battery power of both the main battery and the backup battery.
20
Chapter 1. Knowing Your Device
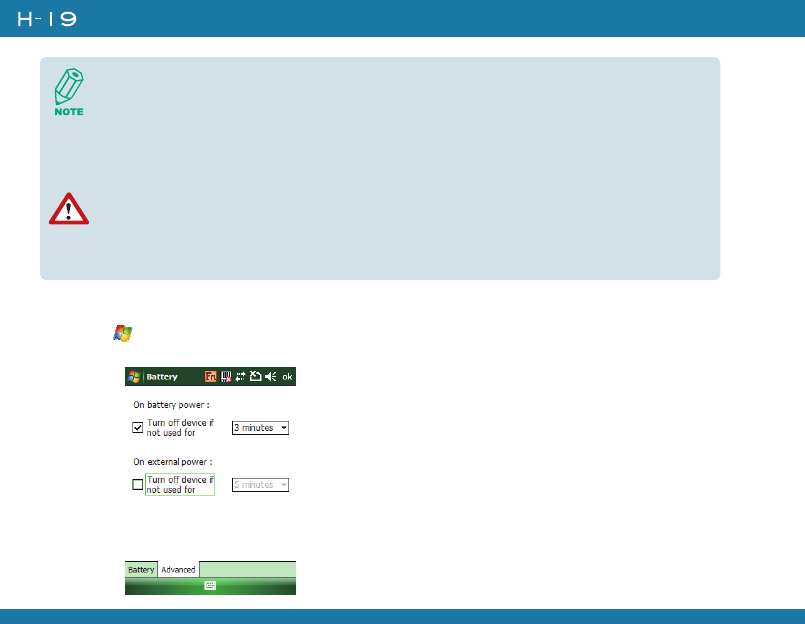
Optimizing the Power Performance
• Tap > Settings > System tab > Power > Advanced, and adjust the time for turning off
the device if it is not in use.
The backup battery powers a real-time clock (RTC) which keeps track of the time even when
your device is turned off. When the backup battery power is normal or full, it can keep
accurate real time for five minutes even if the main battery is removed and for up to 168
hours while the main battery is low.
The device contains a rechargeable Li-ion polymer battery completely discharged and
should be charged for at least 8 hours before first use. Use only manufacturer-specified
original batteries. Damages caused by using batteries not specified by manufacturer are not
covered under warranty.
21
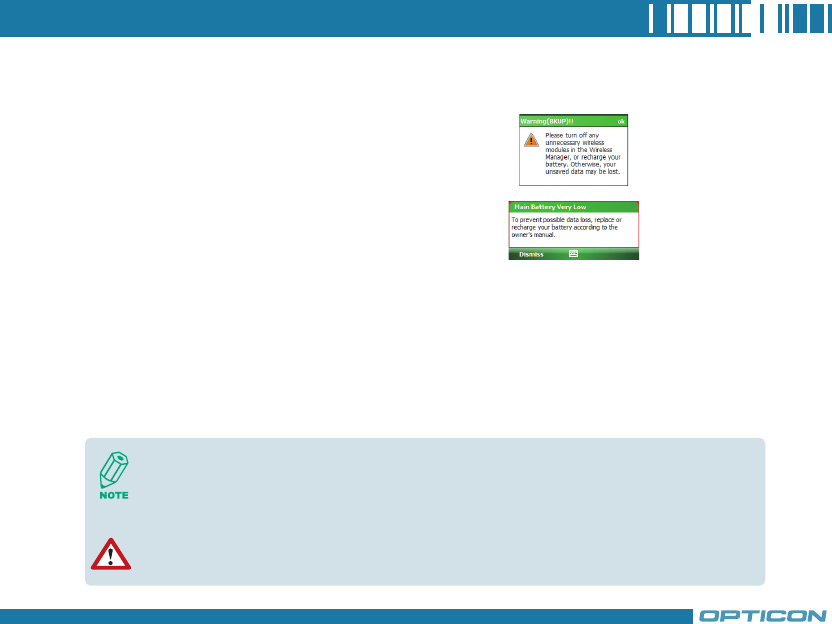
Managing a Low Battery
When the low-battery warning appears, tap OK or Dismiss to close the warning and do the
following:
Charging the Battery
1. To charge the battery, place the battery into the battery slot correctly. See previous section for
how to install the battery.
2. Do one of the following:
• Connect the device with the AC adapter and plug the AC adapter into a power outlet.
• Connect the device to a PC with the USB cable.
• Place the device in a specific cradle for H-19 (the cradle is optional) and connect the cradle
to an electrical outlet or a USB port on your PC.
To charge the device with the USB cable, you must connect the device to a functioning USB
port on a PC that is powered on.
Do not operate your device to temperatures above 40˚C (72˚F) while charging the battery.
Do not leave the battery in a place above 60˚C (140˚F).
• Start charging or replace your battery.
• Turn off any unnecessary wireless module or
turn off the device.
22
Chapter 1. Knowing Your Device
1.5 Mini-SD Cards
Mini-SD is one of the most popular formats for mobile devices. Your device contains a mini-SD card
slot in which you can expand the device’s memory up to 2GB. Mini-SD provides functions such as
built-in security for copyrighted content along with great performance for storing music, video, and
photographs. Please note that mini HCSD (High Capacity SD) is not supported by this device.
Inserting a Mini-SD Card into the Device
Lift the mini SD card slot cover and insert the mini SD card with the logo side down and push into
place until it clicks down and is held in place.
Removing a Mini-SD Card from the Device
1. Gently press the mini-SD card inward (you may feel some resistance) and the card will eject
itself.
2. Take out the mini-SD card from the card slot by hand.
Mini-SD cards can only be inserted in one direction. Inserting the card in the wrong
direction by force can cause damage to the card and the card slot.

Chapter 2.
Basic Operations
2.1 Getting Started
2.2 Input Methods
2.3 Today Screen Components
2.4 The Start Menu
2.5 Using Calendar
2.6 Using Notes
2.7 Using Tasks
24
Chapter 2. Basic Operations
2.1 Getting Started
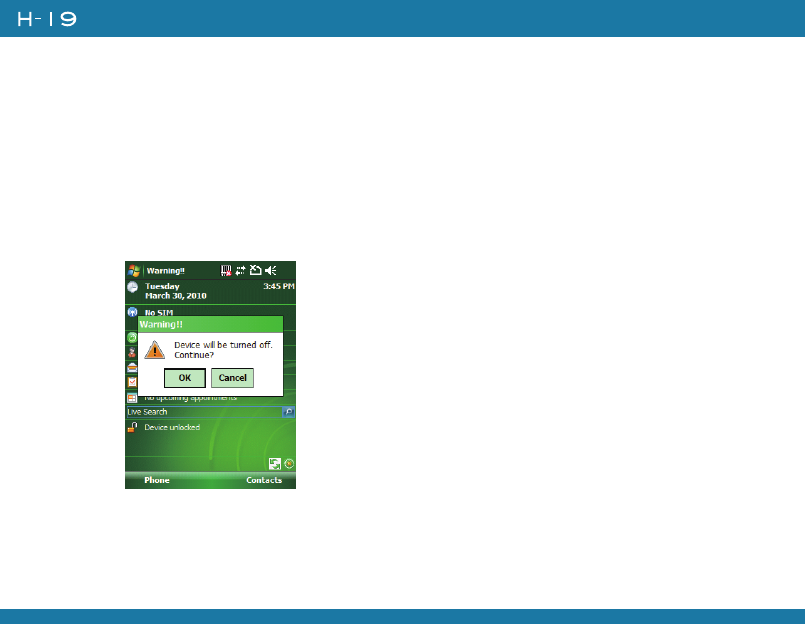
Powering On/Off the Device
Press the POWER button to turn on the device. The POWER button is located on the top of
the front side of the device. When you power on the device for the first time, you are asked to
calibrate the device. Please refer to the “Calibrating your device” section in this chapter for
calibration steps. Press the POWER button again to switch the device to sleep mode. You can still
receive phone calls and messages when the device is operating in sleep mode. To power off the
device completely, press and hold the POWER button for 3 seconds and the system will prompt
you to power off the device.
Calibrating Your Device
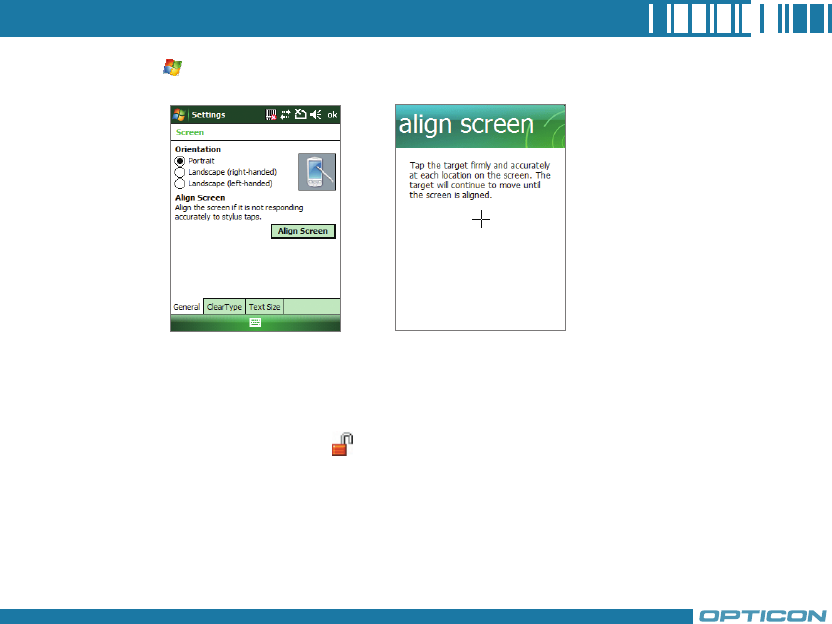
Calibrating the device ensures the tapped item is activated. To calibrate your device, tap the
center of the cross with the stylus as the cross moves around the screen. If you would like to re-
calibrate the device, follow the steps below:
25
1. Tap > Settings > System tab > Screen.
2. Tap the Align Screen button and follow the on-screen instructions.
Locking/Unlocking the Device
Locking the device turns off keyboard and touch screen functionality. This is a helpful feature if,
for example, the device is turned on and in your pocket, and you want to prevent accidental key
presses.
• To lock the device, tap on the icon on the Today Screen. Once the device is locked, the left
soft key label changes to Unlock.

26
Chapter 2. Basic Operations
To unlock the device, tap the Unlock button on the Today screen first,
a screen as below will show. Press * to unlock the device, or tap the
Unlock button on the screen.
You can still receive calls and make emergency calls when the keypad is locked.
You can lock/unlock the device by
pressing the Fn key and Record
key, refer to chapter 2.2 for more
information.
27
Setting Buttons
To change functions for specific buttons in your device:
• Tap > Settings > Buttons > Program Buttons tab. Select a button (Button 1, Button 2
or Button 3) and assign a new program to replace the default one.
• Button 1: Record button.
• Button 2: Fn + .
• Button 3: Fn + .
To change Up/Down control and repeat rate:
• Tap > Settings > Buttons > Up/Down Control tab. Drag the slider on the screen to
customize the way your Up/Down control repeats.
To change button locking setting:
• Tap > Settings > Buttons > Keypad Lock tab. Choose to lock all buttons or not when
your device is in sleep mode.
Changing the Backlight Settings
1. Tap > Settings > System tab > Backlight.
2. You can customize the following settings:
• Backlight settings while your device is using battery power.
• Backlight settings while your device is using external power.
• Brightness of backlight.
28
Chapter 2. Basic Operations
2.2 Input Methods
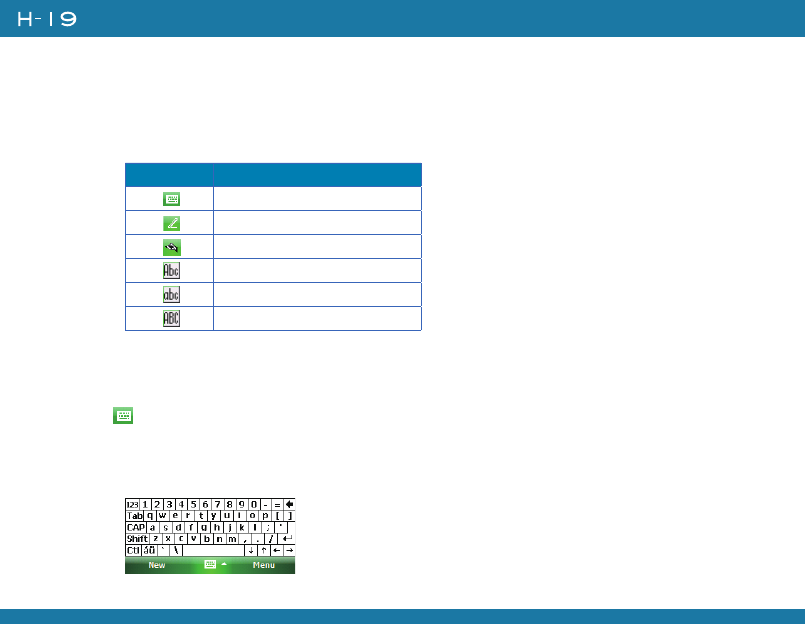
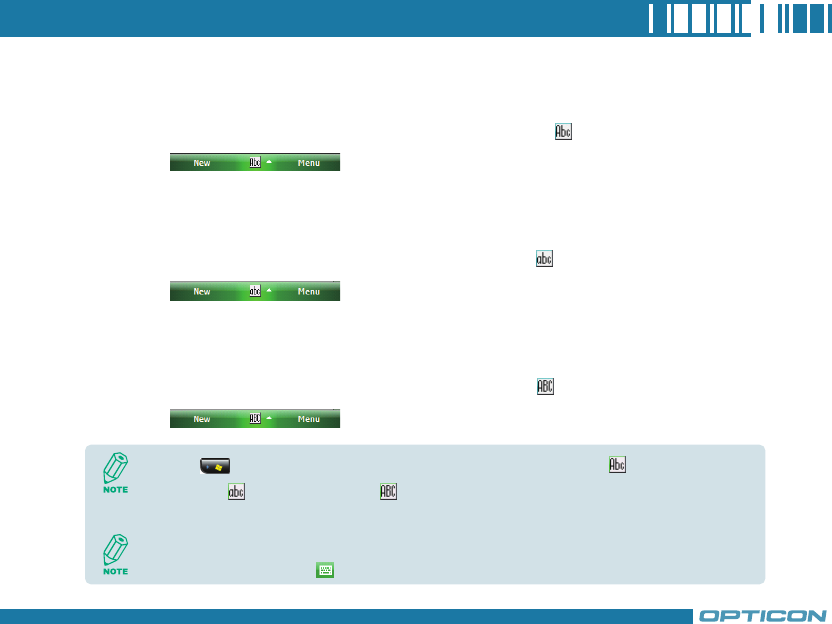
The device contains 7 different input modes: Keyboard, Letter Recognizer, Block Recognizer,
Transcriber, Initial capital, Lowercase and Uppercase. You can enter texts and numbers by using the
keypad or the touch screen.
Using the Touch Screen
Keyboard
• Tap to launch the on-screen keyboard. If on-screen Keyboard is not the selected input
method, tap the input method selector arrow (the upward arrow next to the input method icon)
and select Keyboard.
• To enter text, tap the keys on the on-screen keyboard.
Icon Input Modes
Keyboard
Letter/Block Recognizer
Transcriber
Initial capital
Lowercase
Uppercase
29
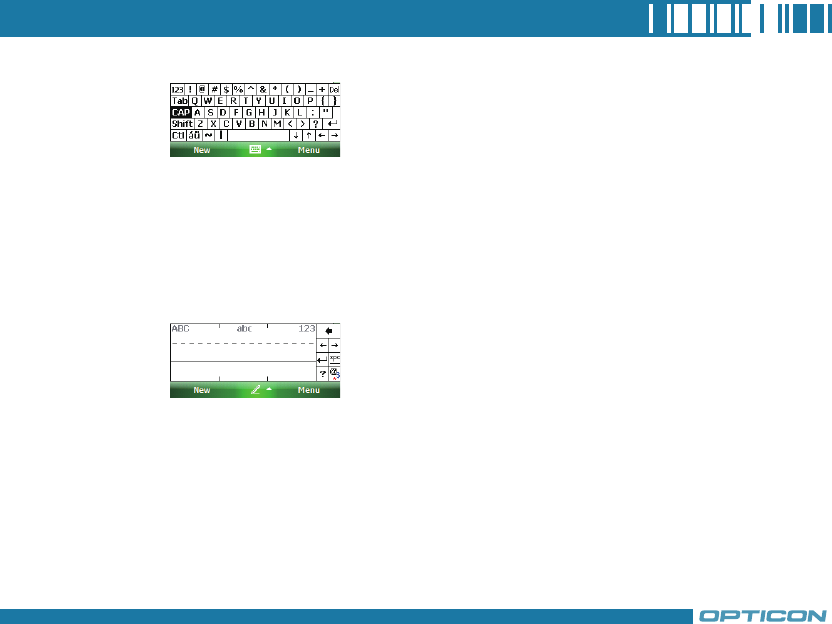
• Tap the CAP key on the on-screen keyboard to enter capital letters and/or symbols.
Letter Recognizer
Letter Recognizer recognizes one letter, number, or symbol at a time.
• To launch Letter Recognizer, tap the input method selector arrow (the upward arrow next to the
input method icon) and select Letter Recognizer.
• Write uppercase letters in the left recognition area (the ABC box).
• Write lowercase letters in the middle recognition area (the abc box).
• Write numbers and symbols in the right recognition area (the 123 box).
Block Recognizer
Block Recognizer recognizes letters written in one stroke.
• To launch Block Recognizer, tap the input method selector arrow (the upward arrow next to the
input method icon) and select Block Recognizer.
• Write lowercase letters in the text recognition area (the abc box).
• Write numbers in the numeric recognition area (the 123 box).
• To input symbols, tap any recognition area, text or numeric, once and write symbols.

30
Chapter 2. Basic Operations
Transcriber
Transcriber recognizes handwritings in cursive and/or print. It uses the full screen as its recognition
area. It interprets the movement of the stylus on the screen as you write.
• To launch Transcriber, tap the input method selector arrow (the upward arrow next to the input
method icon) and select Transcriber.
• Write anywhere on the screen.
Using the Keypad
To enter texts by using the keypad, press a number key repeatedly until desired character appears.
If the next letter you want is located on the same key, wait until the cursor appears and blinks
more than twice, then enter the letter. For corresponding letters/numbers/symbols of each key,
please see the table at the end of this section.
Tap in Letter or Block Recognizer to see a demo on how to write recognizable characters.
The Transcriber comes with a detailed help. Tap if you need further assistance.
31
Initial capital
To capitalize the first letter of every sentence you enter by using the keypad, do the following:
• Tap the input method selector arrow (the upward arrow next to the input method icon) and
select Initial capital. You can see the input icon is changed to .
Lowercase
To enter lowercase letters constantly by using the keypad, do the following:
• Tap the input method selector arrow (the upward arrow next to the input method icon) and
select Lowercase. You can see the input icon is changed to .
Uppercase
To enter uppercase letters constantly by using the keypad, do the following:
• Tap the input method selector arrow (the upward arrow next to the input method icon) and
select Uppercase. You can see the input icon is changed to .
Press *( ) to quickly switch input modes between Initial capital ( ),
Lowercase ( ) and Uppercase ( ).
To quickly switch keypad input modes (Initial capital, Lowercase and Uppercase) and on-
screen Keyboard modes ( ), press and hold * for two seconds.
32
Chapter 2. Basic Operations
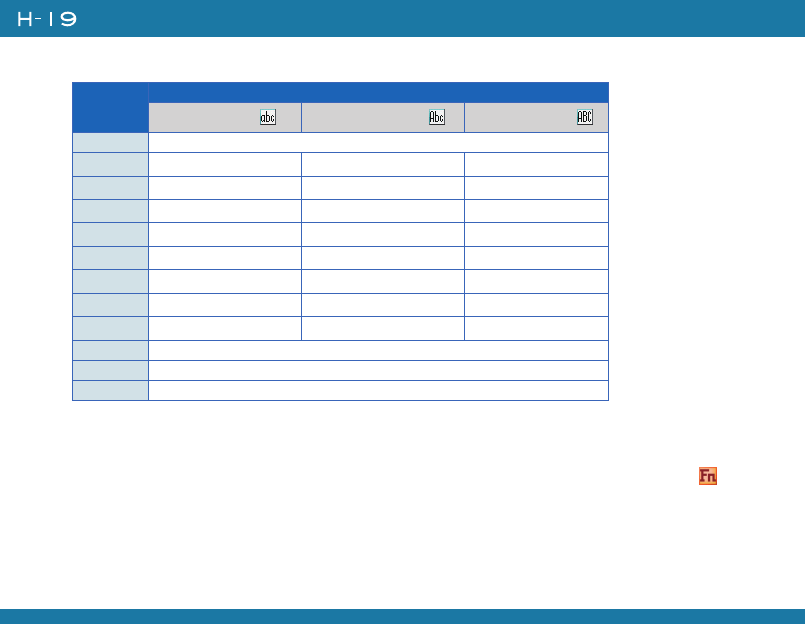
Corresponding letters/numbers/symbols for each numeric key:
Numeric
keys
Input mode
Lowercase mode Initial capital mode Uppercase mode
1. , ? ! ' @ ` - _ ( ) : ; & / \ % # * 1
2abc2 ABC2 ABC2
3def3 DEF3 DEF3
4ghi4 GHI4 GHI4
5jkl5 JKL5 JKL5
6mno6 MNO6 MNO6
7pqrs7 PQRS7 PQRS7
8tuv8 TUV8 TUV8
9wxyz9 WXZY9 WXZY9
*Caps lock / Shift
0+ 0
#Space
Tips of Using the Function Key
The Fn key helps you to execute certain actions quickly such as input mode switching and
backlight turning on. To perform these functions by using the Fn key, press it and check if an
icon appears on the screen, and then press another key to execute the following actions:
• Fn + 1: switch to Numeric mode, you can enter numbers 0 to 9 and * and # constantly by
using the keypad.
• Fn + 2: switch to Lowercase mode.
33
• Fn + 3: switch to Initial capital mode.
• Fn + 4: switch to Uppercase mode.
• Fn + Action key (the central button of the 5-way navigation key): perform Enter.
• Fn + * ( ): this is set to open Start menu by default (Programable Button 2). Refer to
chapter 2.1 if you want to change it.
• Fn + # ( ): this is set to perform OK/Close by default (Programable Button 3). Refer to
chapter 2.1 if you want to change it.
• Fn + Record key (on the left side of your device): lock/unlock the device. Press the Fn key and
the Record key at the same time to lock your device; press the Fn key twice and then the Record
key to unlock your device
• Fn + 0: enter symbols. Please refer to the next section for details.
Entering Symbols
To enter special symbols and accented letters (e.g. à, Ç, ®…etc.), do the following:
1. After pressing a character (e.g. E), press the Fn key and then the numeric key 0 once to show
an accented type of this character (È).
2. To show another accent type, press and hold the Fn key and then press the numeric key 0
repeatedly until desired type is displayed (e.g. press numeric 0 three times to show Ê).
34
Chapter 2. Basic Operations
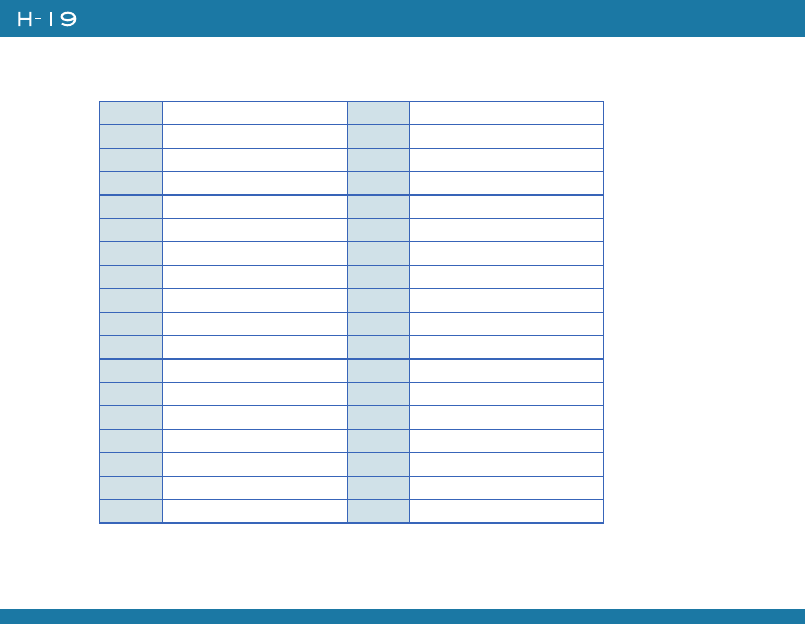
aà á â ä å æ ã ą ă iì í î ï ĩ ij
AÀ Á Â Ä Å Æ Ã Ą Ă IÌ Í Î Ï Ĩ IJ
cç ć ĉ © lł
CÇ Ć Ĉ © LŁ
dðnñ
DĐNÑ
eè é ê ë ę oò ó ô õ ö ő ø œ
EÈ É Ê Ë Ę OÒ Ó Ô Õ Ö Ő Ø Œ
pþ ¶ yý
PÞ ¶ YÝ
r®zź ż
R®ZŹ Ż
sß ş š 0º
Sß Ş Š 1¹
tţ2² ½
TŢ3³
uù ú û ü ű ũ µ 4¼ ¾
UÙ Ú Û Ü Ű Ũ µ 8⅛ ⅜ ⅝ ⅞
Corresponding letters/symbols for each character:
35
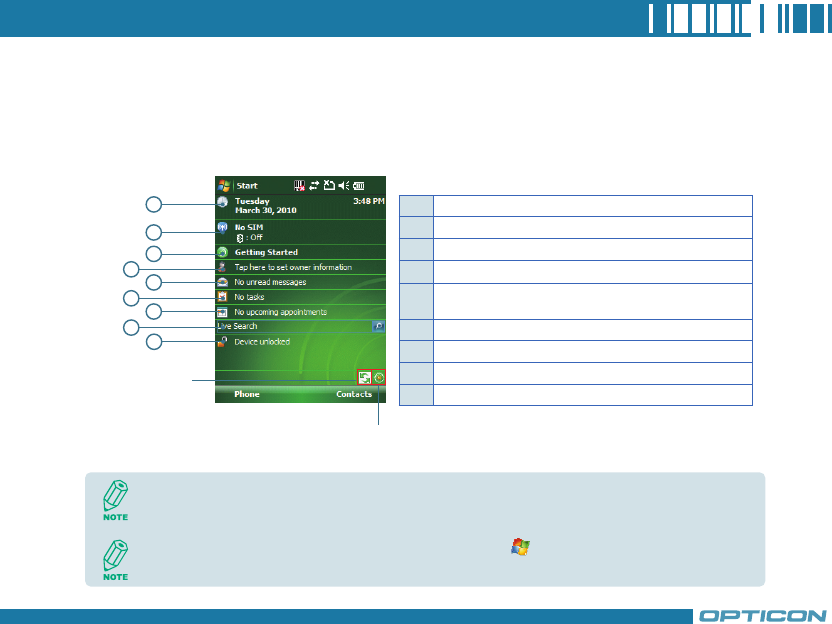
2.3 Today Screen Components
Today Screen
The Today Screen is usually the first screen that appears when you turn on the device for the first
time each day. It displays a summary of information for the day, shows you the system status and
contains a list of shortcuts to programs. The Today screen looks like this:
1Date and time
2Wireless status (GSM, Wi-Fi, and Bluetooth)
3Quick reminders about how to do basic tasks
4Owner information
5Unread messages including text messages, MMS
messages, and e-mails
6Active tasks
7Upcoming appointments
8Live Search
9Device lock status
1
9
2
3
45
67
8
You can also access the Today screen by selecting Today from the Start menu.
To change the items showed in the Today screen, tap > Settings > Today > Items
tab.
Tap here to rotate
the screen
Tap here to trigger the
Wireless Manager
36
Chapter 2. Basic Operations
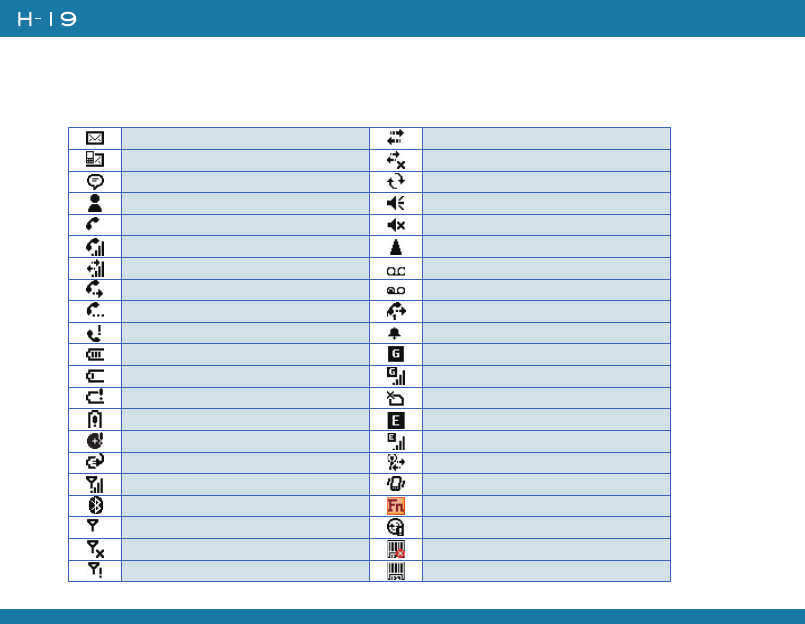
Icon Indicators
Status indicators appear at the top of the screen and on the Today screen. The following table lists
common status indicators and their meanings.
New e-mail PC Connection is active
New voice mail or text message (SMS) Connection is not active
New notications Synchronization in progress
New instant message Ringer on
Voice call Ringer off
Voice call in progress Roaming
Data call in progress No Voice mail
Calls are forwarded Voice mail Lines 1
Call on hold Call Forwarding Lines 1
Missed call Alarm
Battery level 1 GPRS available
Battery level 2 GRPS in use
Low battery No SIM card installed
Extremely low battery EDGE available
Backup battery low EDGE in use
Battery charging Wi-Fi connection in progress
Signal strength Ringer in vibration mode
Bluetooth bonding in progress Function key on
No signal Synchronization error
Flight mode Barcode reader off
No service Barcode reader on
37
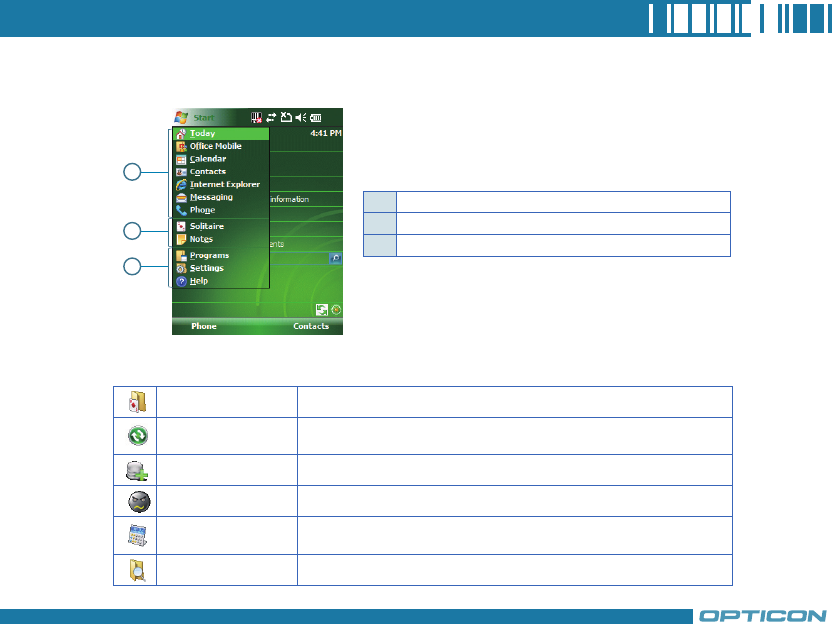
2.4 The Start Menu
The Start menu is divided into 3 groups as described in the following:
List of All Programs
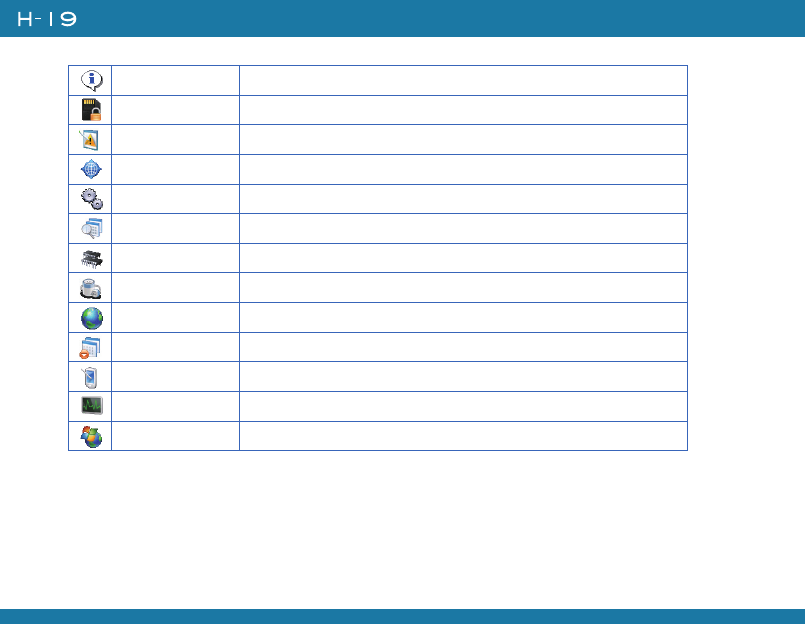
The following table lists icons of the programs that are already installed on your device.
1
2
3
1Commonly used items
2Recently accessed applications
3List of all programs, device settings, and system help
Games Windows Mobile comes with 2 games: Bubble Breaker and Solitaire.
ActiveSync Synchronizes information between your device and a PC. See “Chapter 4. Synchronizing
Information” for details.
Backup Manager Lets you backup and recover your data. See “10.1 Backing up/Recovering” for details.
Blacklist Lets you set up a list of phone numbers to block.
Calculator Performs basic arithmetic and calculations such as addition, subtraction, multiplication,
and division.
File Explorer Lets you organize and manage the files on your device.

38
Chapter 2. Basic Operations
FormatDisk Lets you format an inserted mini-SD card and DiskOnChip in your device
Getting Started Brief introductions and shortcuts of commonly used items.
Internet Sharing Lets you use your device as an external modem for a PC, connecting through an USB
port and Bluetooth.
Live Search Access Windows Live Search.
Messenger Lets you send and receive instant messages with your Windows Live Messenger contacts.
Notes See “2.6 Notes” for details.
Phone Profile Lets you set different profiles for the device in different situations. See “10.6 Phone
Profile” for details.
Pictures & Video Collects, organizes, and sorts picture and video files in the My Pictures folder on your
device or on a storage card.
Remote Desktop Mobile Create a connection between the device and a Windows Terminal Server.
Search Searches the data stored in your device.
SIM Manager Lets you manager your SIM card. See “3.4 SIM Manager” for details.
Sim Toolkit A software toolkit that comes with the SIM card. The application name and the
functionality of this toolkit depends on your SIM card provider.
Task Manager Manage currently running programs.
Tasks Keeps track of your tasks. See “2.7 Using Tasks” for details.
Windows Live A network integration service which allows you to access and manage various Internet
services such as Windows Live Spaces, Windows Live Messenger, Live Search…etc.
Windows Media Use it to play music and video.
39
Buttons Configures the device’s buttons.
Input Input method configurations.
Lock Set a password to unlock the device.
Menus Configure the Start menu.
Owner Information Enter information about the owner of the device.
Phone Configure the Phone features. See “Chapter 3 Phone Features” for details.
Sounds &
Notifications Configure program and event sounds.
Today Configure the Today screen items and theme.
List of All Settings
Personal
About Windows Mobile information and device name.
Backlight Configures the display backlight.
Barcode Settings Change settings of barcode scanner.
Certificates Manages personal and root certificates.
Clock & Alarms Sets time and alarms.
Customer Feedback Allows you to send information about how you use Windows Mobile software to Microsoft.
System
40
Chapter 2. Basic Operations
Device Info Display the device software and hardware version.
Encryption Encrypt files placed on storage cards.
Error Reporting Enable or disable Microsoft product error reporting.
External GPS Helps you to set up an external GPS device on your device
Factory Reset Lets you reset all settings to manufacturer default.
Managed Programs List programs that have been installed remotely by your system administrator.
Memory Memory and process management.
Power Power management settings.
Regional Settings Configure the device’s locale.
Remove Programs Remove an installed application.
Screen Lets you align the screen. See “Calibrating Your Device” of Chapter 2 for details.
Task Manager Helps you to manage currently running programs.
Windows Update Lets you download Windows Mobile updates such as critical security fixes.
41
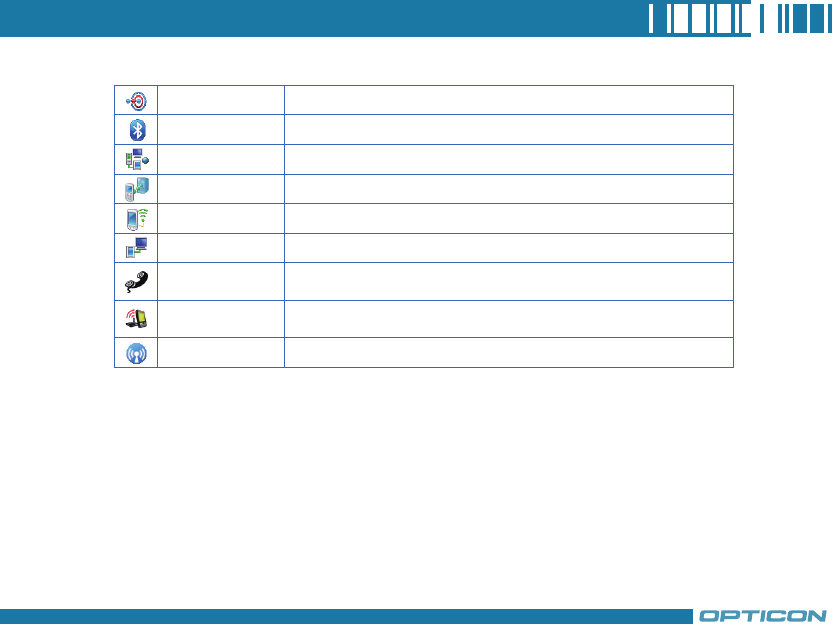
Beam Turn on/off the beam feature.
Bluetooth Configure Bluetooth settings. See “Chapter 5 Bluetooth Connections” for detail.
Connections Configure the device’s connections.
Domain Enroll Allows you to connect the device with company resources.
Network Cards Configure Network adapter.
USB to PC Enable/Disable advanced network functionality.
WAN Conf Helps you to change authentication schemes for GPRS setting (MS-CHAP, CHAP and PAP).
Please contact your service provider for information on which scheme to select.
Wi-Fi Network
Manager Display detail information of Wi-Fi Network including signal strength, IP information...etc.
Wireless Manager Turn on/off wireless and phone features with the Wireless Manager.
Connections
42
Chapter 2. Basic Operations
2.5 Using Calendar
Use Calendar to schedule appointments, including meetings and other events. Your appointments for
the day can be displayed on the Today screen. If you use Outlook on your PC, you can synchronize
appointments between your device and PC. You can also set Calendar to remind you of appointments
with a sound or flashing light, for example.
You can look at your appointments in several different views (Day, Week, Month, Year and Agenda).
To see detailed appointment information in any view, tap the appointment. For information about
changing the Calendar view, see Change views in Calendar.
Scheduling an Appointment
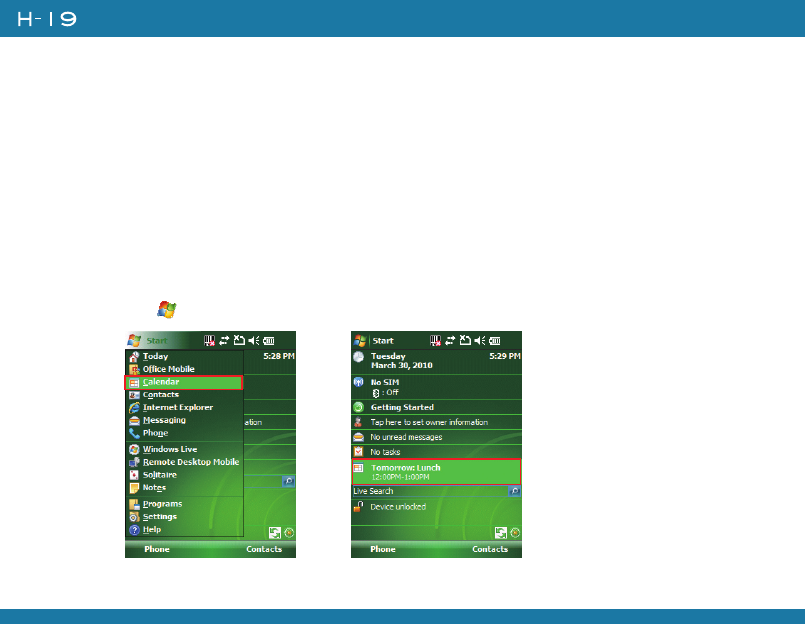
1. Either tap > Calendar or tap the appointment reminder on the Today Screen.
43
2. Tap Menu > New Appointment.
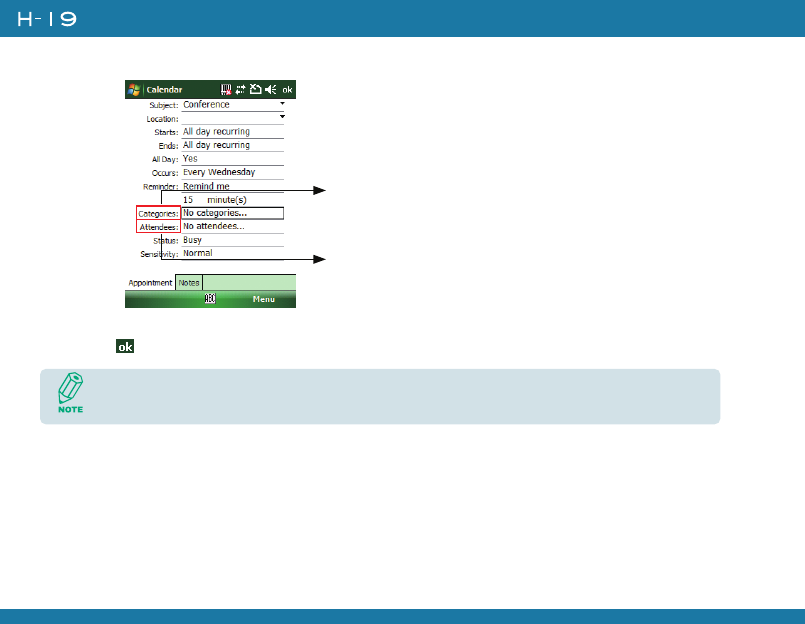
3. Enter information about the appointment.
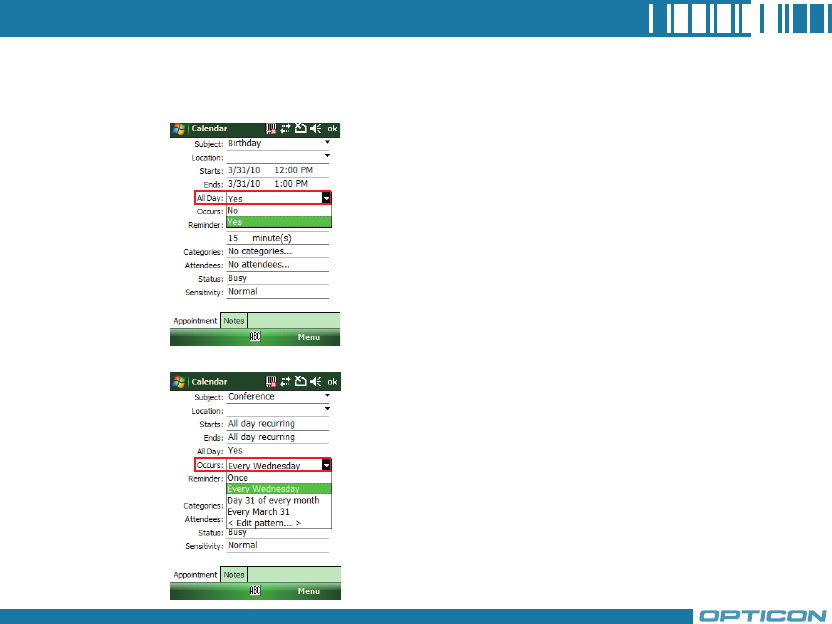
4. To schedule an all-day event, under All Day, select Yes.
5. To make the appointment recurring, tap on how often it should recur in the Occurs drop-down box.
44
Chapter 2. Basic Operations
6. Select categories and attendees.
7. Tap Notes tab to add details to the appointment if needed.
8. Tap .
All-day events do not occupy blocks of time in Calendar; instead, they appear in banners at
the top of the calendar.
Categories:
Business,Holiday,
Personal, Seasonal.
Add attendees
to the meeting.
45
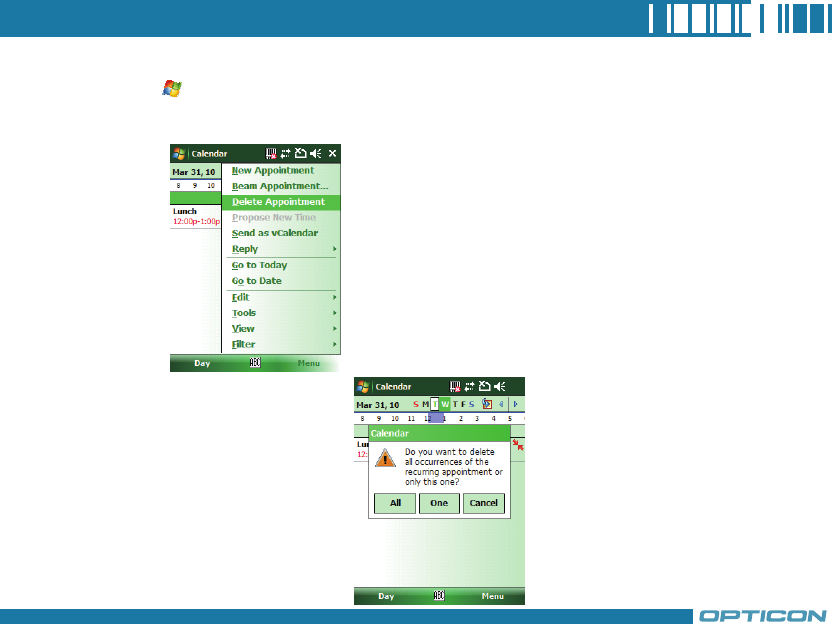
Deleting an Appointment
1. Tap > Calendar.
2. In Agenda view, select the appointment to delete.
3. Tap Menu > Delete Appointment.
4. If the appointment is recurring,
tap AII to delete the series,
or tap One to delete only the
current occurrence.
46
Chapter 2. Basic Operations
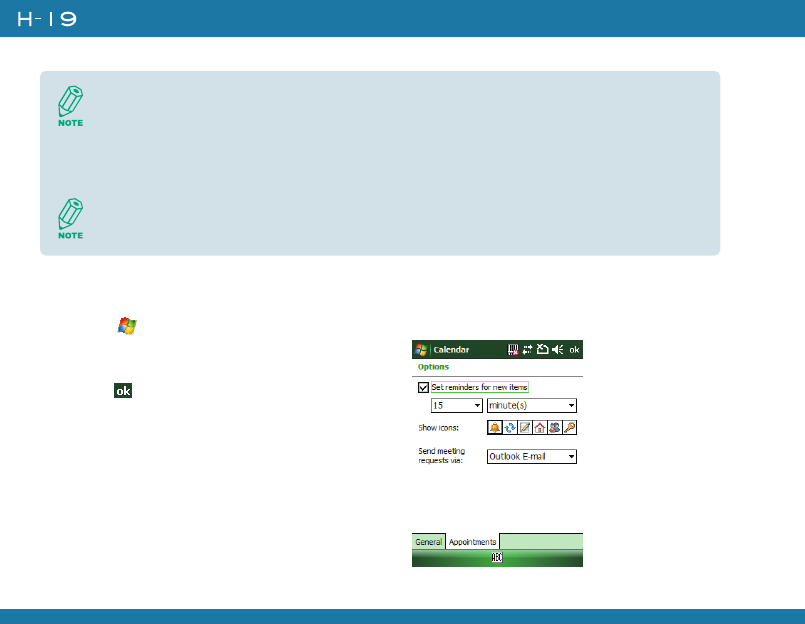
Changing the Reminder Time
By default, the reminder time is set 15 minutes prior to an appointment.
1. Tap > Calendar.
2. Tap Menu > Tools > Options.
3. Tap Appointment tab and change the time.
4. Tap .
When you delete an appointment in Calendar on your device, it is also deleted on your PC
the next time you synchronize. If the appointment has not been synchronized with a PC, it
will be deleted only form the device.
Calendar items can be deleted only from Agenda view or from an open calendar
appointment. To delete from other views, open the appointment, and Tap Menu > Delete.
47
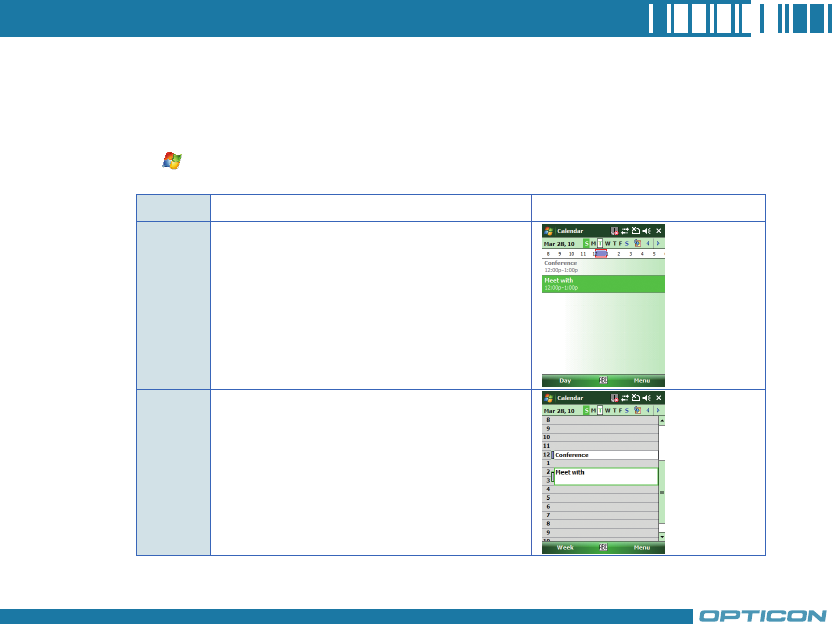
Changing Calendar Views
You can look at your appointments in Agenda, Day, Week, Month or Year view. To see detailed
appointment information in any view, tap the appointment. To see a list of available actions for an
appointment, tap and hold the appointment.
1. Tap > Calendar.
2. Tap Menu > View and select the view you want.
View See Screen
Agenda Your current day's activities at a glance.
Upcoming appointments are bold; past ap-
pointments are dimmed.
Day Your schedule for a single day in a day-
planner layout. Free and busy times in time
slots of 1/2 hour or 1 hour.
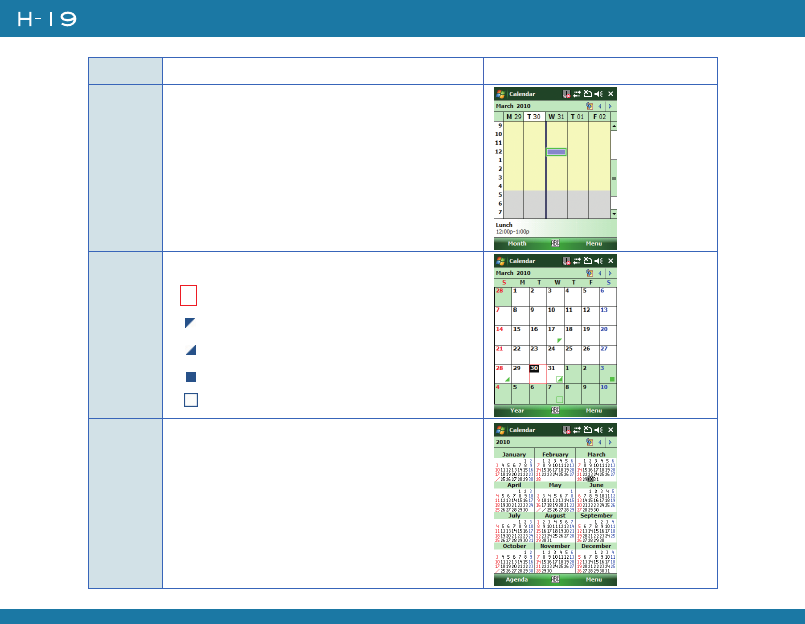
48
Chapter 2. Basic Operations
View See Screen
Week Your schedule for the whole week.
Month Your free and booked days for a month:
: Current day
: morning appointment
: afternoon appointment
: morning and afternoon appointments
: all-day event with time not marked free
Year A calendar for the entire year.
49
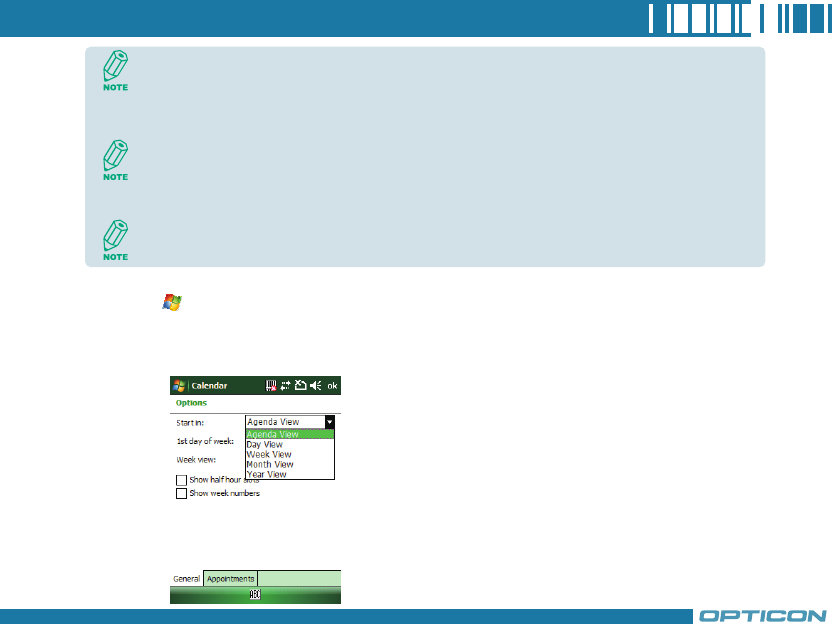
Changing the Display of the Work Week
1. Tap > Calendar.
2. Tap Menu > Tools > Options and do one of the flowing:
• To assign a default view, in Start in, select Agenda View, Day View, Week View,
Month View or Year View.
In Month view, a date will appear in red when the Holiday category is assigned to any
appointment for that day.
You can also change the view by tapping Agenda, Day, Week, Month, or Year on the menu
bar.
To quickly see your appointments for the current day, tap Start > Today.
50
Chapter 2. Basic Operations
• To specify the first day of the week, in 1st day of week, tap Sunday or Monday.
• To specify the number of days you want to appear in a week, in Week view, tap 5-day
week, 6-day week, or 7-day week.
3. Tap .
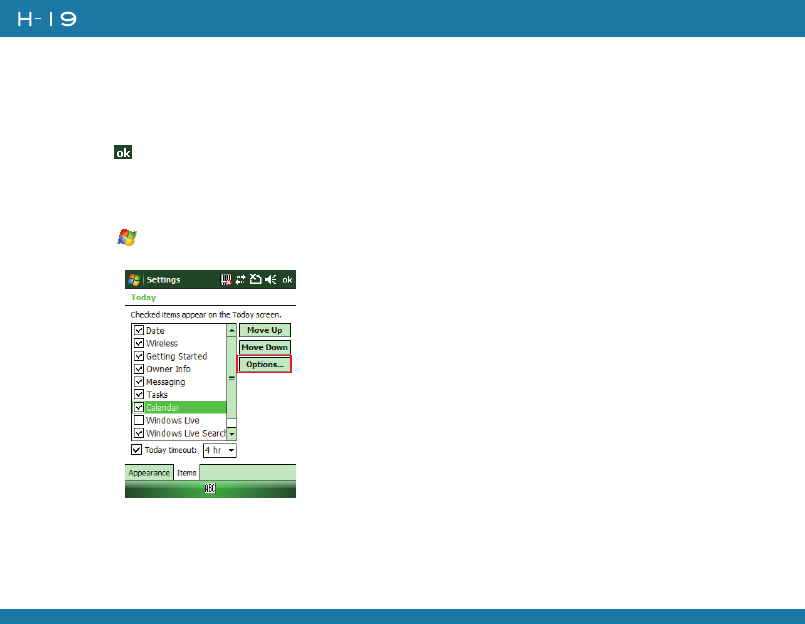
Setting Options for Displaying Appointment on the Today Screen
You can specify the kind of appointment that show on the Today screen.
1. Tap > Settings > Personal tab > Today > Items tab.
2. Select Calendar, and then tap Options.
3. Do any of the following:
• Select Next appointment to show only the next appointment in your schedule.
• Select Upcoming appointment to show multiple appointments.
• Select the Display all day events check box to show all-day event.