JADAK a business unit of Novanta MERCURY5 RFID Reader User Manual Manual Part 3
Trimble Navigation Limited RFID Reader Manual Part 3
Contents
- 1. Manual
- 2. Manual Part 1
- 3. Manual Part 2
- 4. Manual Part 3
- 5. Manual Part 4
Manual Part 3
Mercury4/5 RFID Reader
; These instructions assume you are using
Windows XP. For other operating systems,
consult your network administrator.
› From the Start bar, select Start w Control Panel.
› Double click the Network Connections icon.
› Disable your PC’s wireless connection, if this exists.
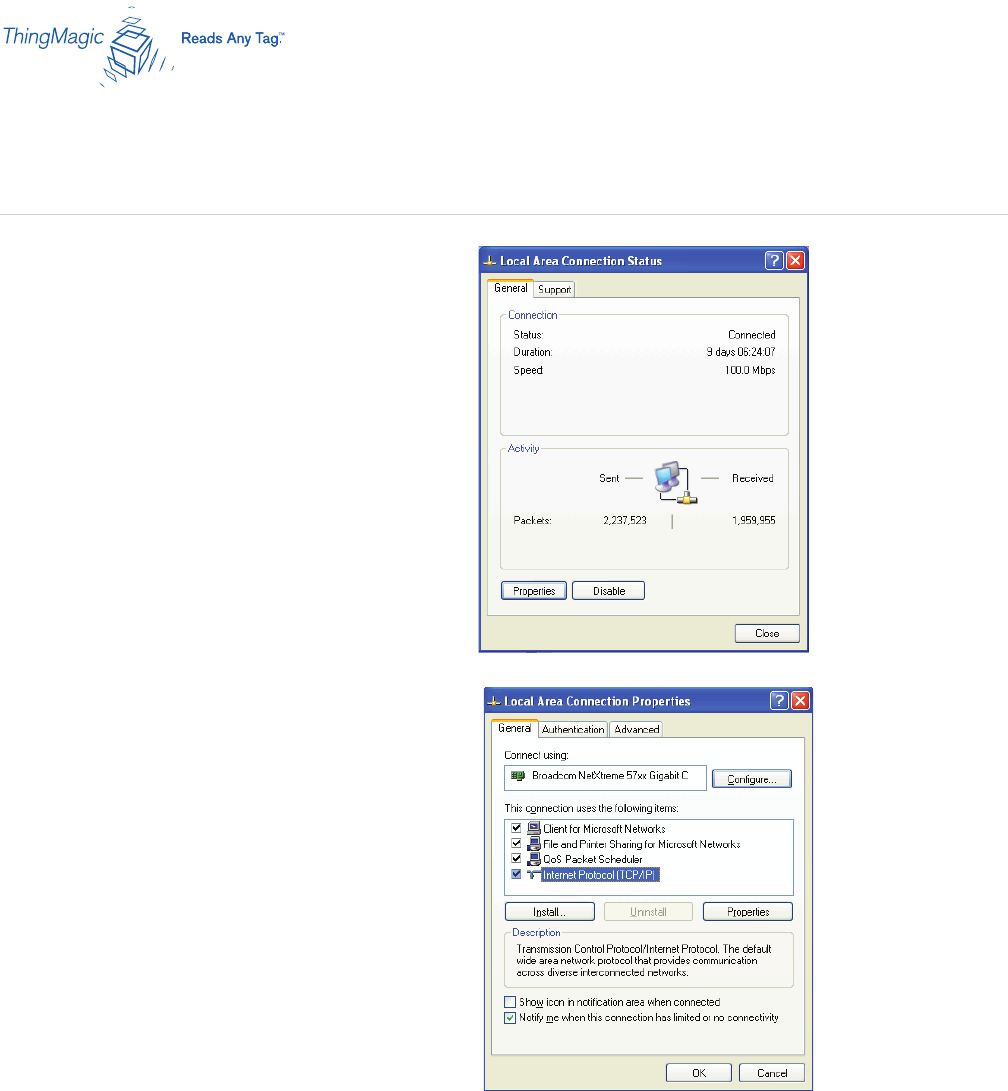
› Double click the Local Area Connection icon.
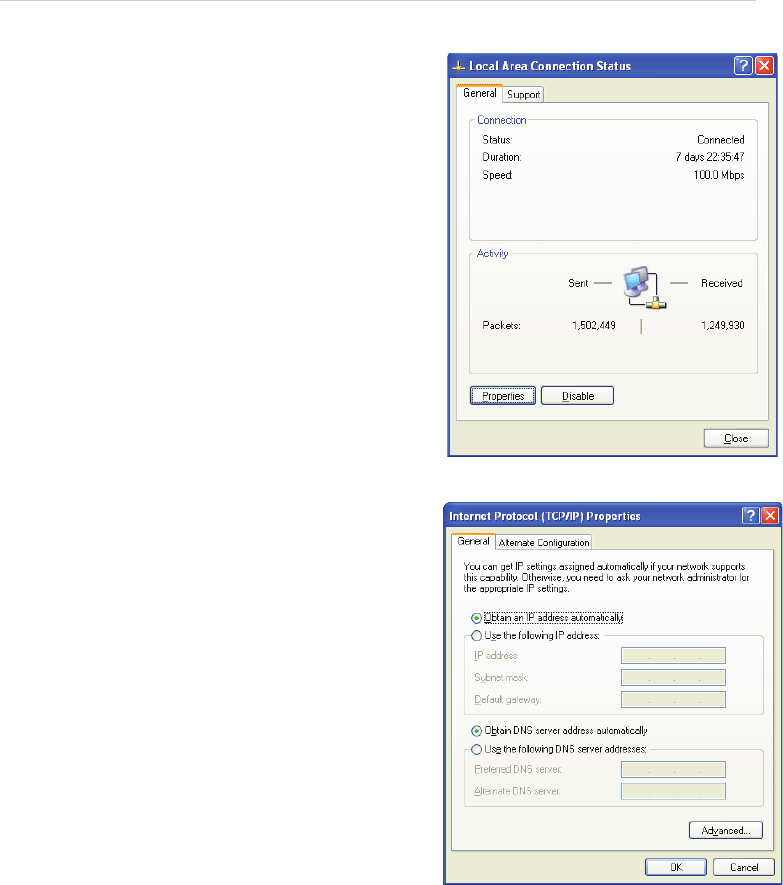
The local area Connection Status window appears.
› Click the Properties button.
› Scroll down to the bottom of the list and select the
Internet Protocol (TCP/IP) item.
› Click on the Properties button.
The Internet Protocol (TCP/IP) Properties window
appears. (see below).
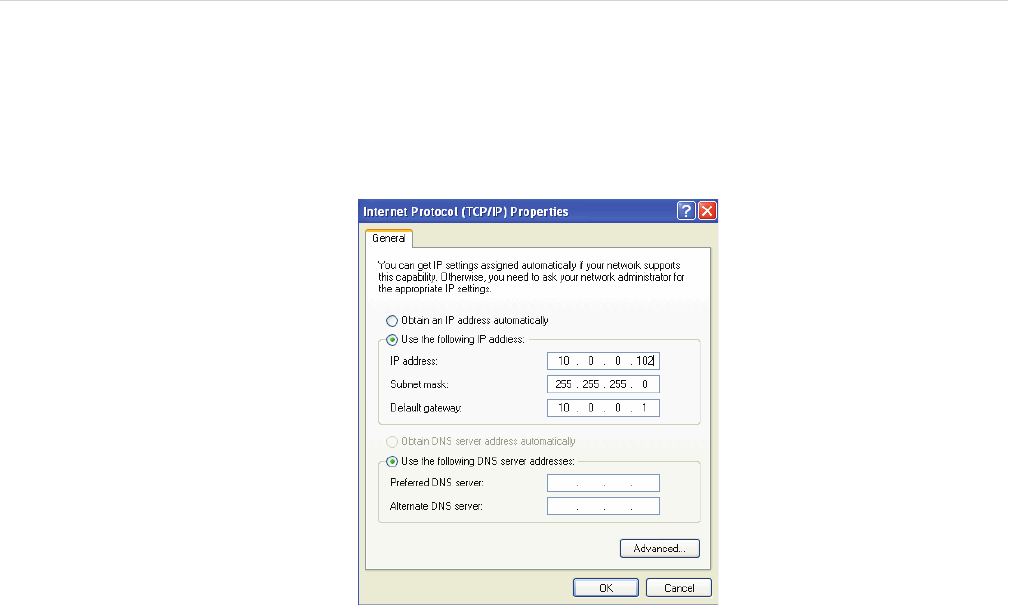
Set Your Computer’s Network Properties
6
Mercury4/5 RFID Reader 7
› Select the radio button “Use the following IP address” to enter your PC’s static
network settings:
IP address: 10.0.0.102
Subnet mask: 255.255.255.0
Default gateway: 10.0.0.1
› Click the OK button to save and exit the Internet Protocol Properties window.
› Click the Close button at the Local Area Connection Properties window.
Several moments will pass as the PC saves its new network settings.
Mercury4/5 RFID Reader
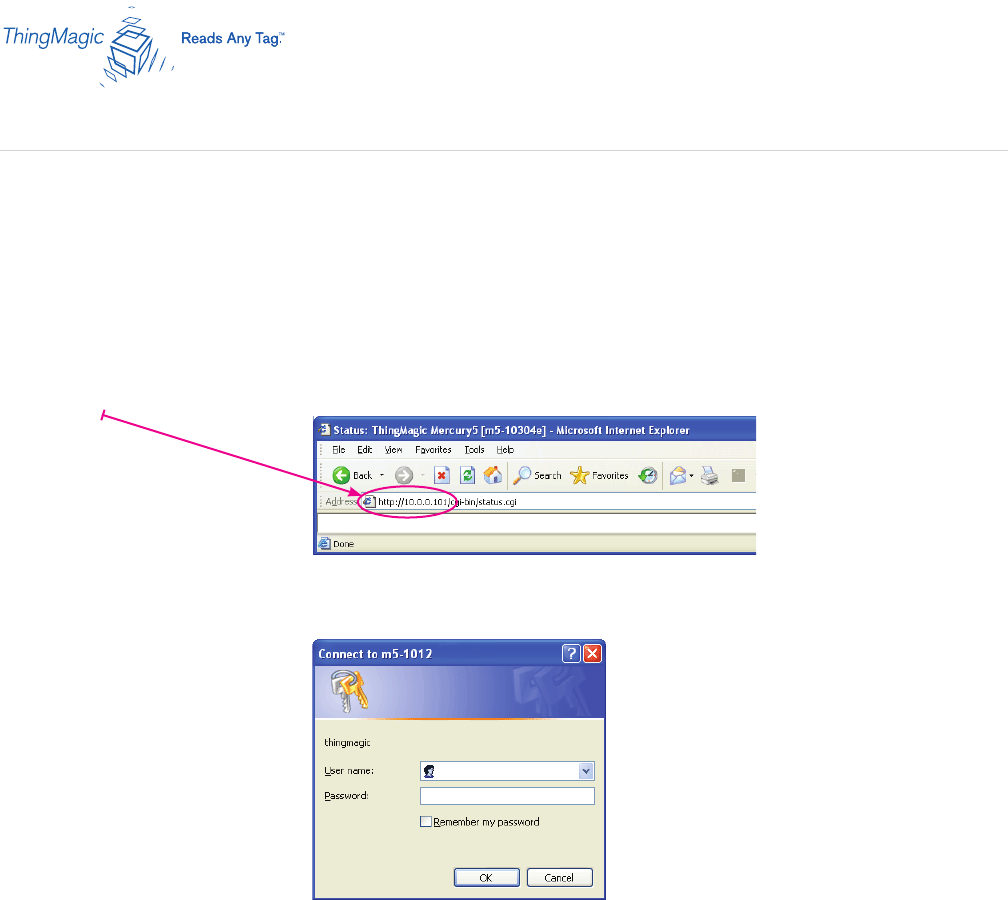
; These illustrations are taken from Internet Explorer. However, you can use any browser to connect
to the reader.
; 10.0.0.101 : The reader’s default IP address is 10.0.0.101 Use this address when connecting
directly to the reader with a crossover Ethernet cable.
› Launch your web browser and log on to the reader by entering its IP address in the address bar:
http://10.0.0.101 and press Enter:
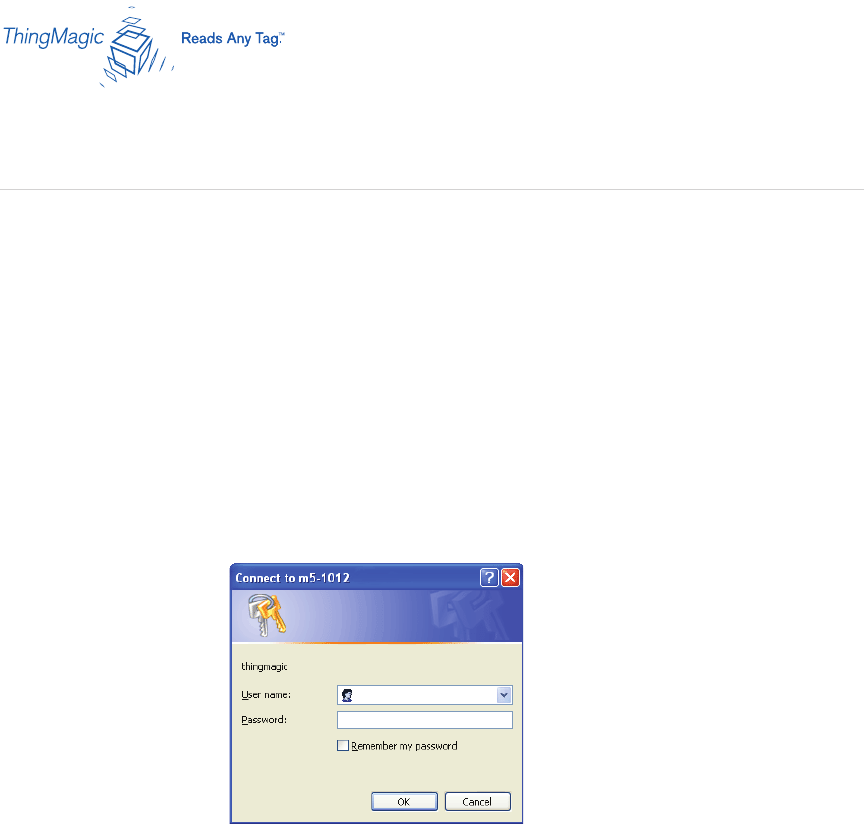
The reader’s logon dialog screen appears:
; web /radio : The reader’s default User name is: web and its password is: radio – all lowercase.
› Enter web in the User name eld and radio in the Password eld and click OK.
The reader’s Status page appears.
Log on to the Reader
8
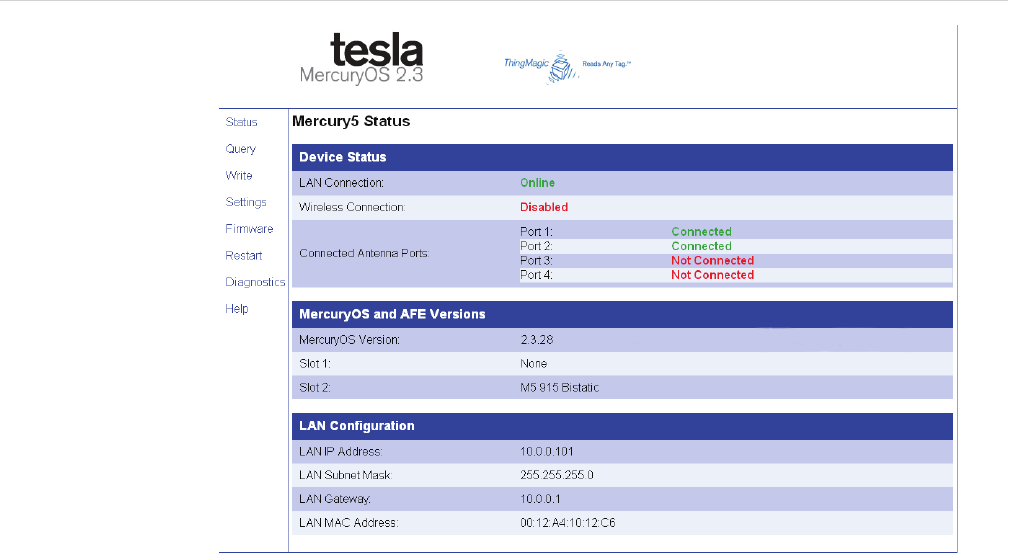
Mercury4/5 RFID Reader
› Check to see that all antenna ports are connected. Green = Connected.
› Note the reader’s MAC address. This will be important for networking.
Congratulations! You’ve successfully set up the reader for single-user operation.
; Next Steps.
› To connect the reader to a network and log in remotely, turn to page 10 – the next
section of this manual: Networking the Reader.
› To start reading tags and using the reader’s web interface, turn to page 17 – Reader
Operations. It guides you through all reader functions available using the reader’s
built-in web server: reading and writing tags, changing settings, loading rmware and
rebooting the reader in safemode.
9

Mercury4/5 RFID Reader
You can set up the reader to use either manual IP addressing or DHCP. By default,
the reader has automatic addressing enabled: it boots up looking for a DHCP server.
DHCP can be used to automatically assign the reader’s IP address, subnet mask,
default gateway, NTP Server, DNS server and hostname. If the reader does not get a
DHCP-assigned IP address during its initial boot sequence, it defaults to the static IP
address of 10.0.0.101, but will periodically check to see if a DHCP server is available.
The following sections detail how to set up your PC and reader for automatic DHCP
conguration, as well as manually conguring the reader without a DHCP server and
using the ZeroConf protocol – Bonjour™ – for subnet reader discovery without a
DHCP server.
; Power Up Network. Whether you use DHCP or static network addressing,
make sure the network is connected before powering up the reader. In the event
the reader does not get a lease from a DHCP server, it will fall back to its static IP
address of 10.0.0.101, subnet mask 255.255.255.0 and gateway 10.0.0.1.
; Use Shielded UTP-Cat5 Cabling with Network. To connect the reader to a
network hub or switch, you will need enough network cable to run from the reader
to your network connection. While most switches and network hubs can detect and
compensate for crossover cables, we recommend using shielded UTP-Cat5 straight
through Ethernet patch cabling.
› Connect one end of the Ethernet cabling to the reader and the other end to the
Ethernet switch or hub.
› Check that all antennas are securely connected, and power up your reader.
› Connect your computer to the same network as the reader using normal Ethernet
cabling.
Networking the Reader
Background
10
Hardware Set Up
Mercury4/5 RFID Reader
To enable automatic assigning of your PC’s IP address by DHCP:
› From the Start bar, select Start w Control Panel.
› Double click the Network Connections icon.
› Disable your PC’s wireless connection, if this
exists.
› Double click the Local Area Connection icon.
The local area Connection Status window appears.
› Click the Properties button.
› Scroll down to the bottom of the list and select
the Internet Protocol (TCP/IP) item.
› Click on the Properties button.
The Internet Protocol (TCP/IP) Properties window
appears.
› Select the radio button “Obtain an IP address
automatically”
› Click the OK button to save and exit the Internet
Protocol Properties window.
› Click the OK button at the Local Area
Connection Properties window.
› Click the Close button at the Local Area
Connection Status window.
Several moments will pass as the PC saves its new
network settings.
Enable Your Computer for DHCP Networking
11

Mercury4/5 RFID Reader
2 Automatic Hostname: m5-xxxxxx. By default at startup, the reader generates an
‘automatic hostname’ by appending the last three bytes of its MAC address to its
hostname, such as m5-6b3043. Please note that your network needs to have properly
congured DNS servers if you wish to connect to the reader via its hostname. Usually
when using DHCP, the DHCP server will add the hostname to the DNS server’s database.
2 MAC Address. The reader’s MAC address can be found on a white label attached next
to the Ethernet port. You can also nd the reader’s MAC address on the Status page. The
rst 6 bytes are ThingMagic’s manufacturer’s code; the last 6 bytes are specic to the
reader and the ones to use for automatic hostname addressing.
› Obtain the reader’s MAC address, then launch your web browser and log on to the reader
by entering its automatic hostname in the address bar:
For M4: http://m4-xxxxxx (the last 6 digits of the reader’s MAC address) and press Enter.
For M5: http://m5-xxxxxx.
The reader’s logon dialog screen appears.
› Enter web and radio for User name and Password elds and click OK.
The reader’s Status page appears.
› Check to see that all the Antenna ports are connected. Green = Connected.
Networking the Reader: Automatic Hostname
Using the Reader’s Automatic Hostname
12
Mercury4/5 RFID Reader 13
Mercury4/5 RFID Reader
14
Networking the Reader: Using Bonjour
Another way of nding readers on a network is to use the Zeroconf protocol, which Apple calls
BonjourTM (formerly called Rendezvous). Bonjour works on networks without any DHCP server.
Apple provides a downloadable Bonjour plug-in for Windows Internet Explorer at their web site:
http://www.apple.com/macosx/features/bonjour/.
Once you have installed Bonjour, reboot your PC and launch your copy of Internet Explorer.
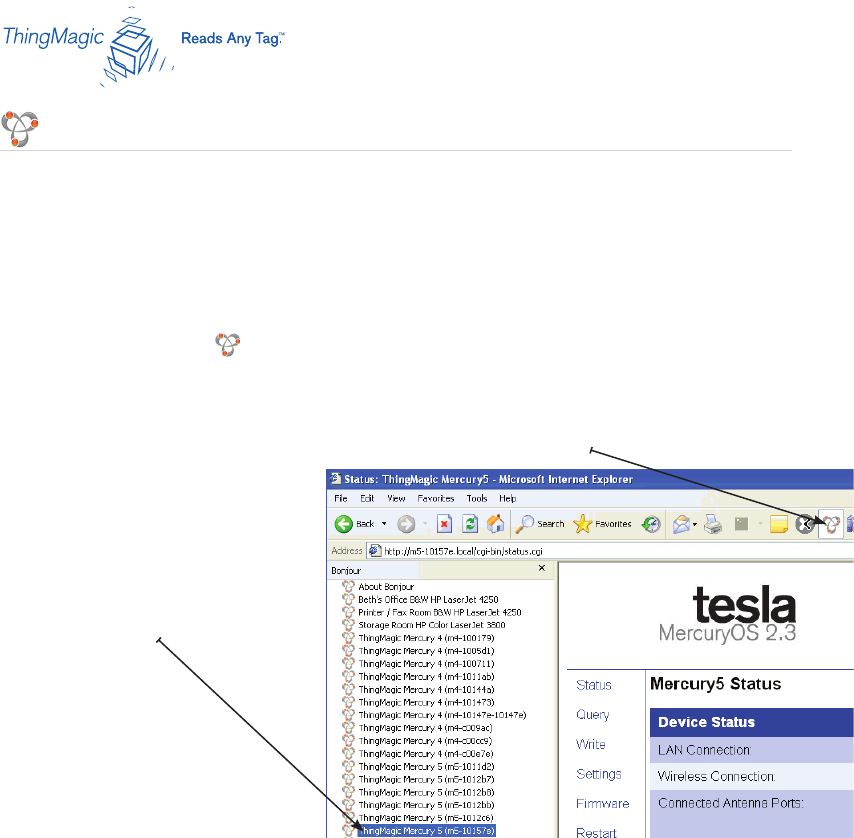
The Bonjour button icon will appear on the top menu bar of the browser.
To access Bonjour-enabled readers available on your subnet:
1 Click on the Bonjour icon in the top menu bar of Internet Explorer.
As a result, Bonjour opens a device
panel column on the left side of the
browser with the names of all active
Bonjour devices available.
2 Double-click on the name of the
reader of interest.
This will load the login dialog to
connect to the reader.
3 Type in the factory-default name
and password: web / radio and
click the OK button.
This will take you to the status page of the reader of interest.
This listing is periodically refreshed so that new Bonjour-enabled devices will appear as they
come on line. Note that each ThingMagic reader is referenced by the domain name – ThingMagic
– then the hostname – Mercury4 and Mercury5, then an automatic name m4- or m5- followed by
the last six digits of the device’s MAC address, such as m4-10148c.

Mercury4/5 RFID Reader
During initial installation, the reader must be properly congured to use the correct RF
power to comply with FCC regulations.
The maximum RF power is determined from antenna gain and antenna cable loss using
the formula: Pmax = 36 dBm - Antenna Gain + Cable Loss
DO NOT increase the power beyond this level.
For example, if the antenna has a maximum gain of 6 dBi, and the cable has a minimum
loss of 0.6 dB, the maximum RF power that may be set is (36- 6 + 0.6) = 30.6 dBm.
; Case Study.
Using ThingMagic shielded 25’ coaxial antenna cables TM-M5CAB-TT-P25 type
LMR-195 and ThingMagic Dual Antenna TM-ANT-NA-2CX.
Total 25’ cable insertion loss = 3.1 dB.
Antenna gain = 7.0 dB
Pmax = 36 dBm - 7.0 dB + 3.1 dB = 32.1 dB maximum reader RF power.
Cable Loss Values for LMR-195 Shielded Coaxial Cable
Consult Appendix A: Antenna Information for further information on cable loss
and antenna gain values for other congurations.
Setting the Reader’s Maximum RF Power
Background
Cable Length Insertion Loss
6 ft 0.9 dB
20 ft 2.5 dB
25 ft 3.1 dB
15
Mercury4/5 RFID Reader
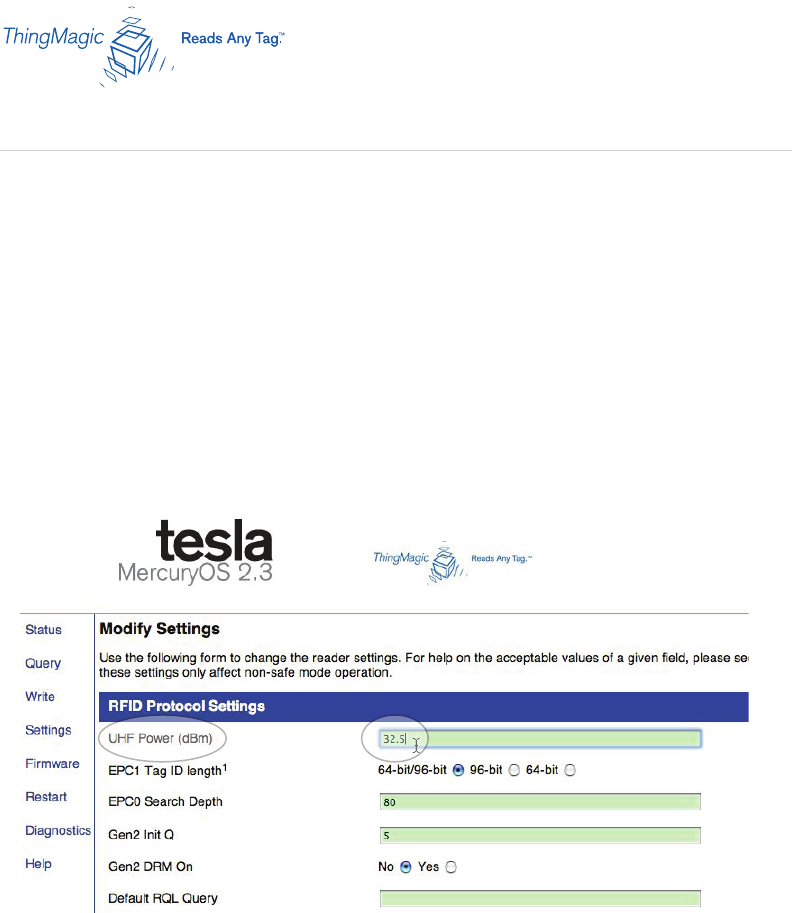
Using the Browser to Set Maximum RF Power
The Reader RF Power can be set using the Modify Settings Page of the browser-
based interface. Note that in no case may the power be set higher than 32.5 dBm.
› Log on to the reader using your browser. The reader’s Status page appears.
› Click on the Settings tab. The rst eld on the Settings page is UHF Power dBm
– the maximum RF power. Its factory default value is 32.5 dBm.
› Enter the maximum setting based on your cable type, length and antenna type. › ›
› Scroll down to the bottom of the Settings page, and click Save changes button to
save the settings.
The Status page will reload automatically after the settings been saved.
; If the Status page does not appear after a few moments, manually recycle the power
on the reader. After repowering, load the settings page again and check the new
maximum RF power setting.
16

Mercury4/5 RFID Reader
Using the Browser-Based Interface
The Mercury4/5 Reader browser-based interface communicates
directly with the RFID reader. It includes several tools that enable you
to monitor reader performance, change reader settings, and upgrade
reader rmware.
A navigation menu provides access to the following pages:
Status Displays current operational settings.
Query Allows the user to perform anti-collision
RFID tag searches and to specify the
constraints used in the search.
Write Allows the user to write tags; this is only
applicable to tags that are writeable.
Settings Allows the user to modify network settings.
Firmware This page can be used to upgrade the tag
reader with new rmware images supplied
by ThingMagic.
Restart Allows the user to restart the reader
via a “warm boot.”
Diagnostics This page provides the current operating
settings of the reader.
Help This page provides information that is
helpful in operating the tag reader.
The browser-based interface can be run from any PC on the network.
17
Reader Operation
Mercury4/5 RFID Reader
18
; Follow instructions for setting up (p. 2) and networking (p.10) your reader in
the previous sections of this manual.
1. Start a Java-enabled web browser from any network-enabled PC.
2. Type the IP address or hostname of the reader to which you want to communicate
in the Address eld of the browser or use Apple’s Bonjour™ protocol to browse to it.
3. A log-on dialog appears. Enter the factory-installed name: web
and the password: radio (all lower-case).
A navigation menu and the reader’s Status page appear in the browser.
Log on to Reader
Mercury4/5 RFID Reader 19
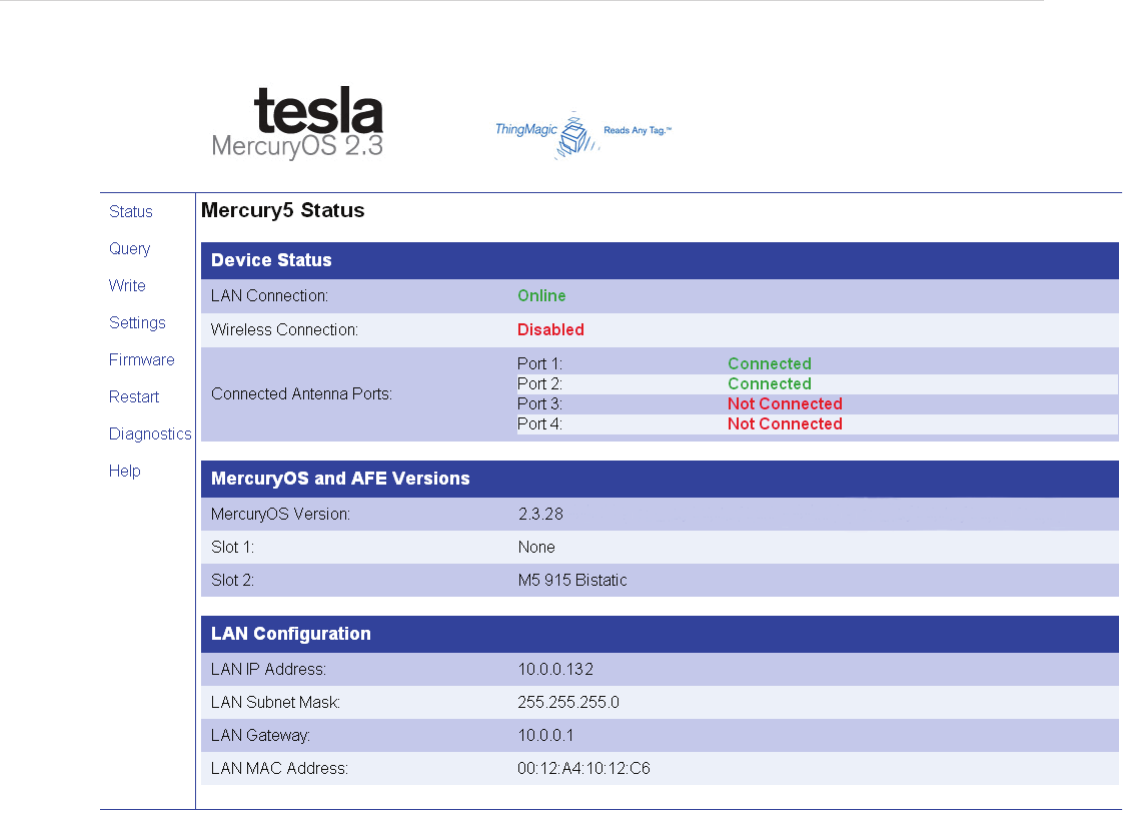
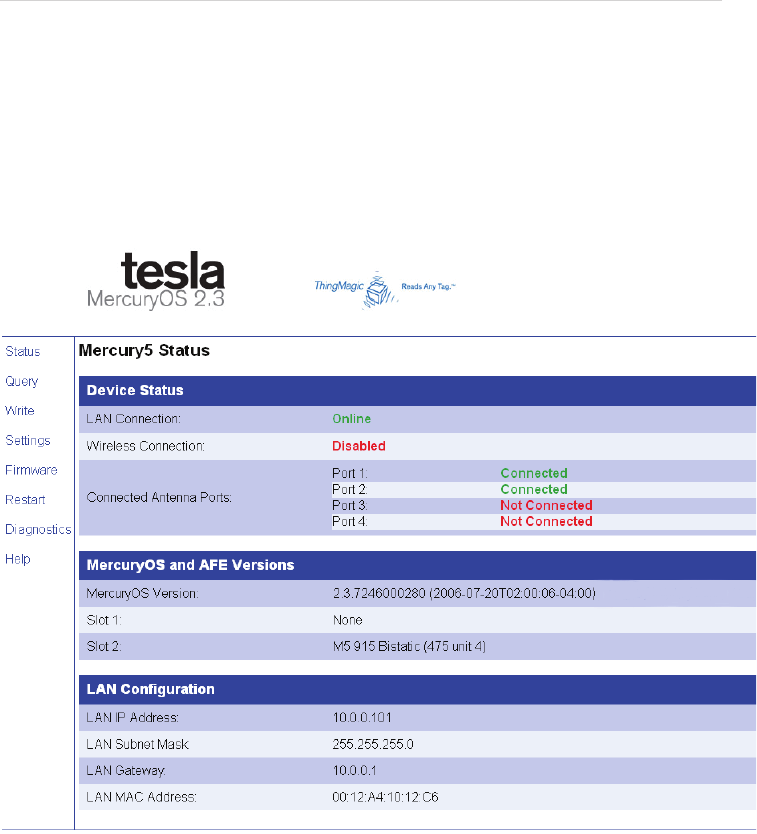
The Mercury4/5 Status page indicates the connected antennas, software version
and LAN conguration of the reader.
IMPORTANT: Check to see that at least one antenna port is connected before
performing any tag queries or tag write operations.
2 The reader’s IP address and its MAC address are important numbers to
have on hand.
Status Page
Mercury4/5 RFID Reader
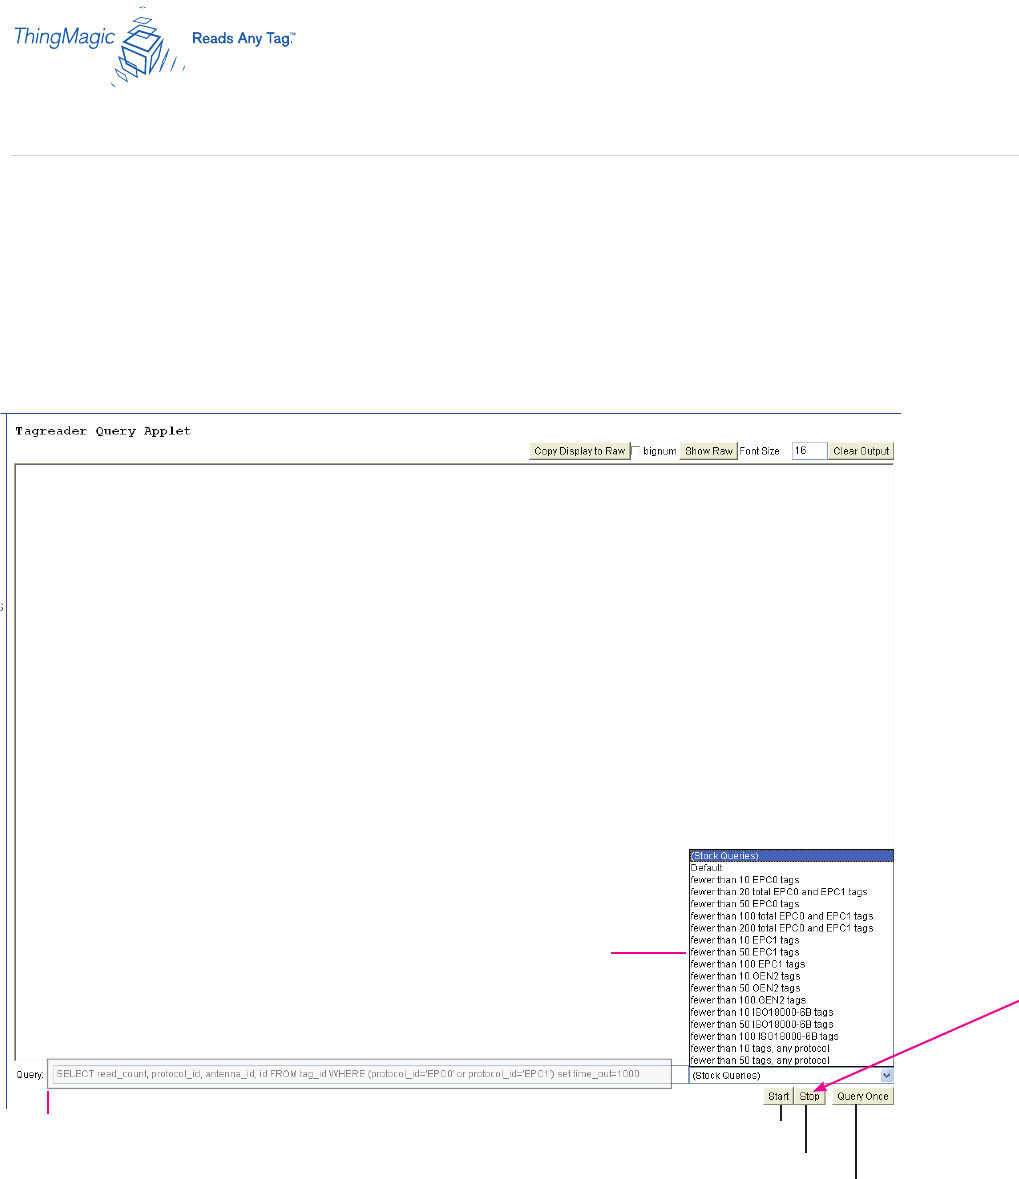
The Query page is mainly used to set up and run anti-collision searches quickly. It gives you immedi-
ate feedback on tag reads, which can be useful for verifying initial performance and for debugging.
› Click the Query link in the navigation menu.
Wait a few moments until the Java applet nishes loading, and prepare some tags for testing.
The screen will be blank except for the controls. You’ re now ready to read tags.
2 If the Query page does not load and you do not see the Java logo, you may need to install the
Java Runtime Environment for Windows and restart your PC.
Query Page: Read Tags
20 Query once initiates a single search cycle
Start continuous search
Stop continuous search
Query eld: Select a query from pull-down list
Built-in query
pull-down list:
Mercury4/5 RFID Reader
To read tags from the Query page:
1. Position one or more tags a few feet in front of one of the antennas connected to the
reader.
2. Select an appropriate built-in query from the pull-down list.
• If you are using GEN2 tags, for instance, select “fewer than 10 GEN2 tags” from the list.
• If you are using other types of tags, select an appropriate query.
• If you don’t know what type of tags you have, select “fewer than 10 tags, any protocol”.
Using “any protocol” will slow the search somewhat since the reader will spend time
looking for tag types which may not be in the eld.
3. Click the Start button at the bottom right to begin continuously reading tags.
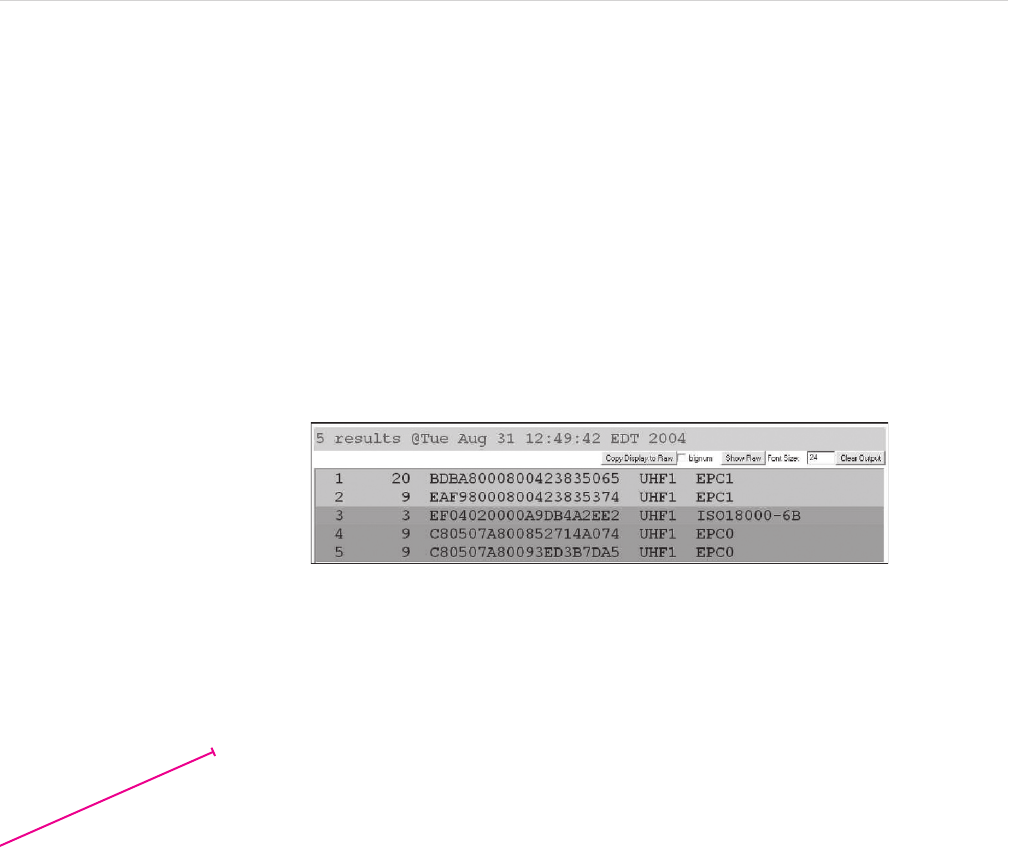
Tag data is displayed. Each row in this example shows sequential tag number, number of
times tag was read, tag data, antenna, and protocol.
4. Click Stop to stop the tag search.
; IMPORTANT: Click the Stop button before exiting. You MUST stop the query
before exiting the query page or the reader will continue to transmit RF energy on its
antennas.
Next Steps: We’ll look more closely at using the Query eld, the pull-down list and
understanding the tag information the Query page provides.
21