JULONG EDUCATIONAL TECHNOLOGY TB3124RDV WIRELESS TABLET User Manual
JULONG EDUCATIONAL TECHNOLOGY CO., LTD. WIRELESS TABLET Users Manual
Users Manual
1
Important Note
z Keep the IPBOARD(JL-)Tablet (TB3124RDV(T/8)) away from the equipment with strong magnetic
filed!
z Keep out of direct sunlight.
Important Note
z Only can be written on or controlled with Julong’s specialized electronic pens.
z Make sure IPBOARD(JL-) Tablet(TB3124RDV(T/8))is properly connected to the transceiver, and
the driver is correctly installed.
General Note
z IPBOARD(JL-) Tablet(TB3124RDV(T/8)) should be charged for about 2.5 hours before first-use.
Please charge it when in low battery. IPBOARD(JL-)Tablet(TB3124RDV(T/8)) can keep normal
operation continuously for about 10 hours (The charger indicator is red while charging, and it turns
green after full charged.)
z Do not scratch the surface or frame of the tablet with sharp or hard objects.

2
Content
Important Note..........................................................................................................................................1
Content......................................................................................................................................................2
Ⅰ Introduction.........................................................................................................................................3
1 Brief Introduction...................................................................................................................................3
Ⅱ Unpacking IPBOARD(JL-)Tablet (TB3124RDV(T/8)) ...................................................................4
1 IPBOARD(JL-) Tablet (TB3124RDV(T/8)) Set .................................................................................4
2 Standard Accessories..............................................................................................................................6
Ⅲ Installation of IPBOARD Vote Edition...............................................................................................7
Ⅳ Run the Software ..............................................................................................................................14
1 Start IPBOARD Vote Edition driver.......................................................................................................14
2 Start IPBOARD Vote Edition ................................................................................................................14
3 Start voting manage system...................................................................................................................14
Ⅴ Features of IPBOARD(JL-)Tablet (TB3124RDV(T/8))................................................................16
1 Functions of the icons on the teacher’s tablet and student’s tablet .............................................................16
2 Introduction of two assignments by teachers...........................................................................................18
3 Set Questions.......................................................................................................................................18
4 Combined with IPBOARD(JL-)Tablet (TB3124RDV(T/8)) to answer questions interactively...............19
Ⅵ Description of Function Keys..........................................................................................................22
1 The Function keys on Teacher’ s tablet................................................................................................22
2 The Function Keys on Student’s tablet ................................................................................................23
Ⅶ Performance Specifications ............................................................................................................24
3
Ⅰ Introduction
1 Brief Introduction
IPBOARD(JL-)Tablet (TB3124RDV(T/8)) enables students to participate more actively in class than
ever before, and it is the smart way to provide in-class immediate assessment for users. It is bringing a
revolution to the education filed.
One-to-multi wireless tablet (JL- TB3124RDV(T/8)) support has been added to IPBOARD Vote Edition.
Using the related software or buttons, teachers can designate a student to write on the tablet, as well as
conducting application of the software or restricting student’s writing permission. It allows students to
answer questions in the form of full sentences, numbers, symbols, etc.; in addition, teachers can conduct test
with the buttons on the tablet in the course of answering, such as switching questions, checking the correct
answer, tracking students’ performance and viewing answer statistic, etc.
Each student has the chance to express opinions through student terminal, moreover, teachers can get the
feedback of students’ in-class performance timely by using the tablet.

4
Ⅱ Unpacking IPBOARD(JL-)Tablet (TB3124RDV(T/8))
1 IPBOARD(JL-)Tablet (TB3124RDV(T/8)) Set
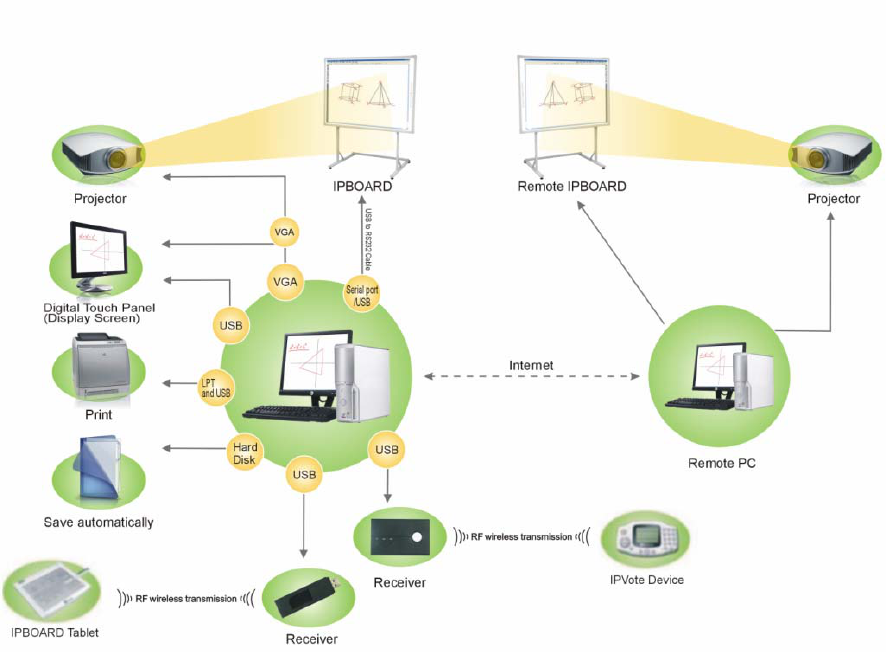
The interactive system of IPBOARD(JL-)Tablet consists of IPBOARD Vote Edition, IPBOARD(JL-)
Tablet (TB3124RDV(T/8)), transceiver and electronic pens. And there are two types of IPBOARD(JL-)
Tablet (TB3124RDV(T/8)): IPBOARD(JL-)Tablet for teachers (teacher’s tablet) and IPBOARD(JL-)
Tablet for students (student’s tablet).
Front face of 1-to-16 IPBOARD(JL-)Tablet for teachers
(The models of IPBOARD(JL-)Tablet: 1/8 (T8), 1/16 (T16), 1/24 (T24), 1/32 (T32), 1/48 (T48). The
image is for reference only, subject to the delivered goods.)
Sleep&W
ake Key
LCD
Screen
Writing&Controlling
Area
LCD
Screen
Sleep&W
ake Key
Voting
Area
5
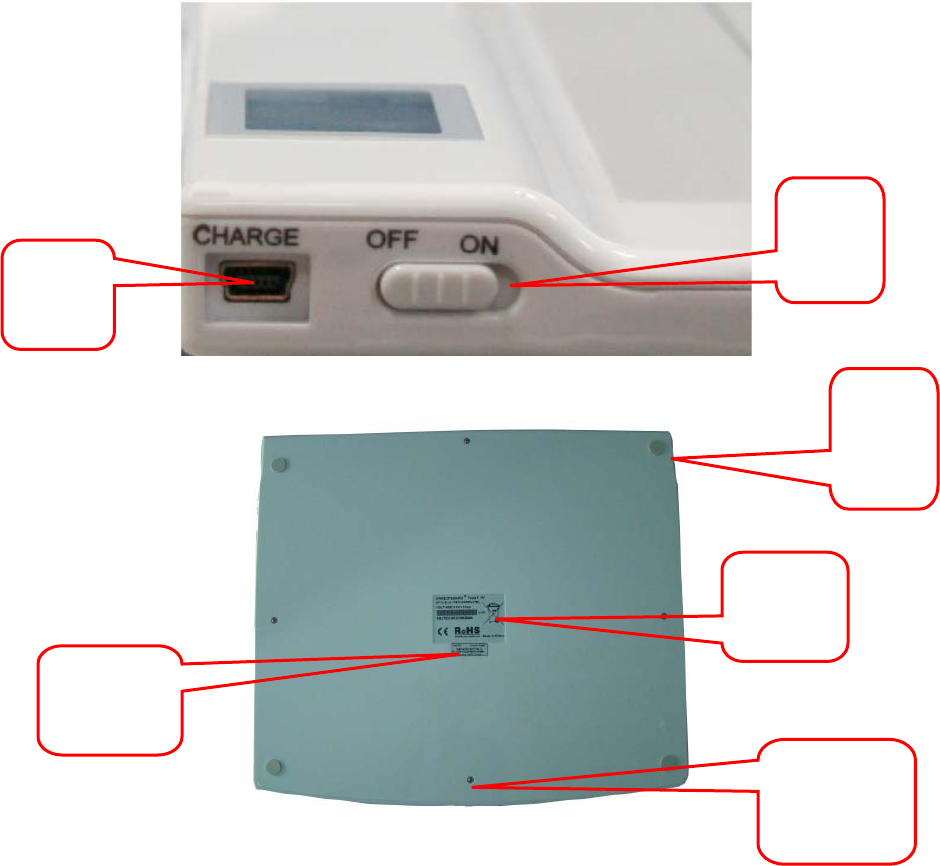
IPBOARD(JL-)Tablet for students
Profile
Back face
¾ If the tablet network conflicts with the nearby wireless device, users can modify the ID number to
solve such problem.
¾ Device ID is corresponding to the student’s number, which can be used to identify different terminals.
In addition, the Device ID of teacher’s tablet is a fixed value of 999.
Charge
Interface
Power
Switch
Pad
ROHS
Identifier
Screw
Stopper
NetID、
DeviceID
6
2 Standard Accessories
Standard Accessories include:
Description Quantity Purpose Figure
Specialized Electronic
Pen for IPBOARD
(JL-)Tablet
(TB3124RDV(T/8))
2 The pens specially
designed for
IPBOARD(JL-),
with AAA batteries
of 1.5V
Transceiver 1 Ensure that the
computer connect
with IPBOARD
(JL-)Tablet
(TB3124RDV(T/8))
IPBOARD
(
JL-
)
Vote
Edition Install Disc
1 IPBOARD(JL-)
Tablet
(TB3124RDV(T/8))
driver and
application
IPBOARD
(
JL-
)
Tablet
(TB3124RDV(T/8))
Manual
1 Operation
introduction
Charger 1 To charge
IPBOARD(JL-)
Tablet
(TB3124RDV(T/8))
7
Ⅲ Installation of IPBOARD Vote Edition
3.1 Insert IPBOARD Vote Edition Software disc
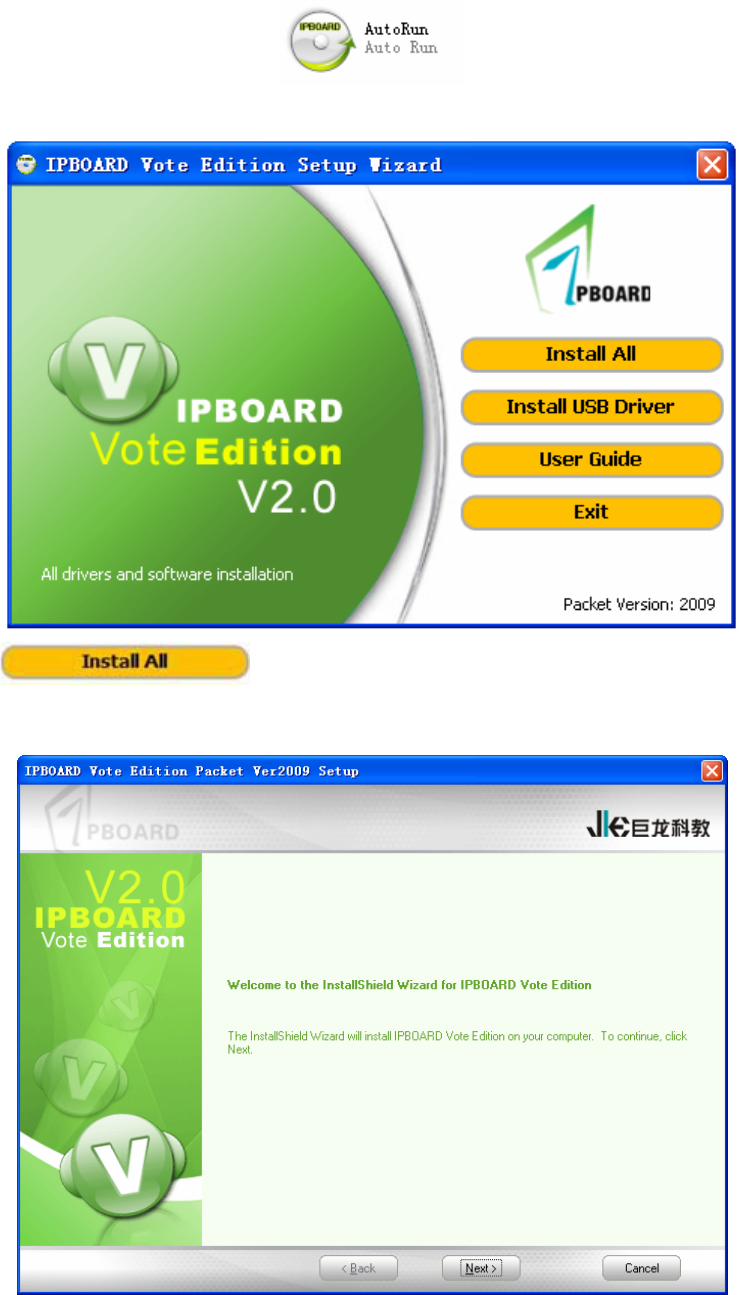
3.2 Click the program icon
3.3 Proceed to setup wizard window
3.4 Click to install IPBOARD Vote Edition and drivers.
3.5 Start the installation
8
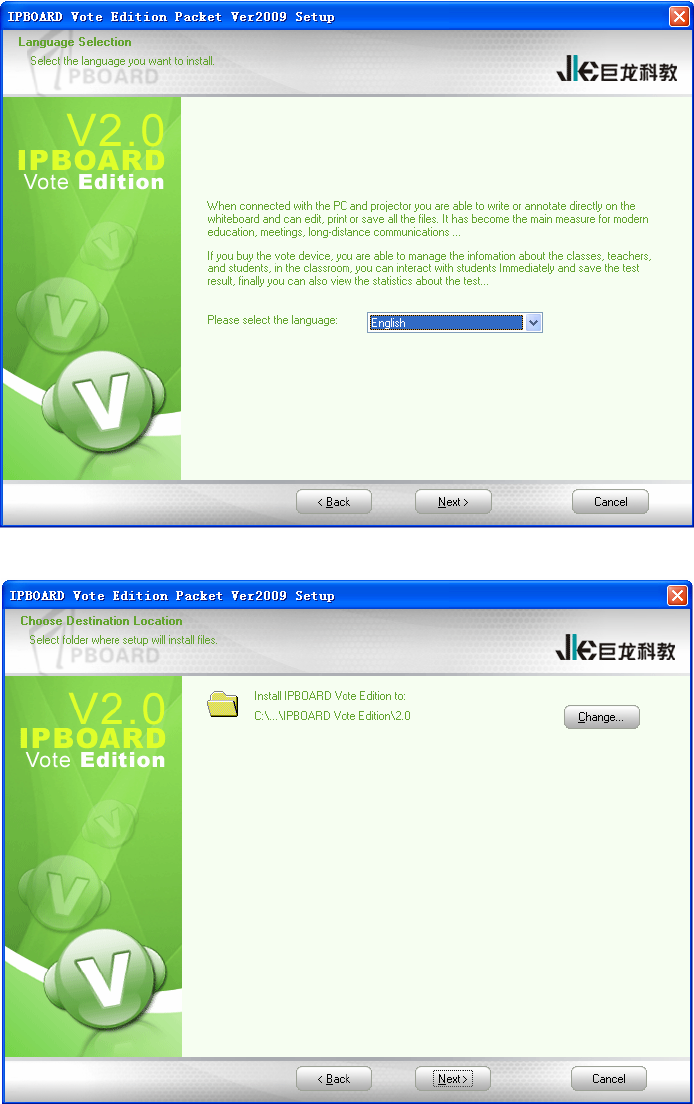
3.6 Select the language you want to install.
3.7 Choose destination location.
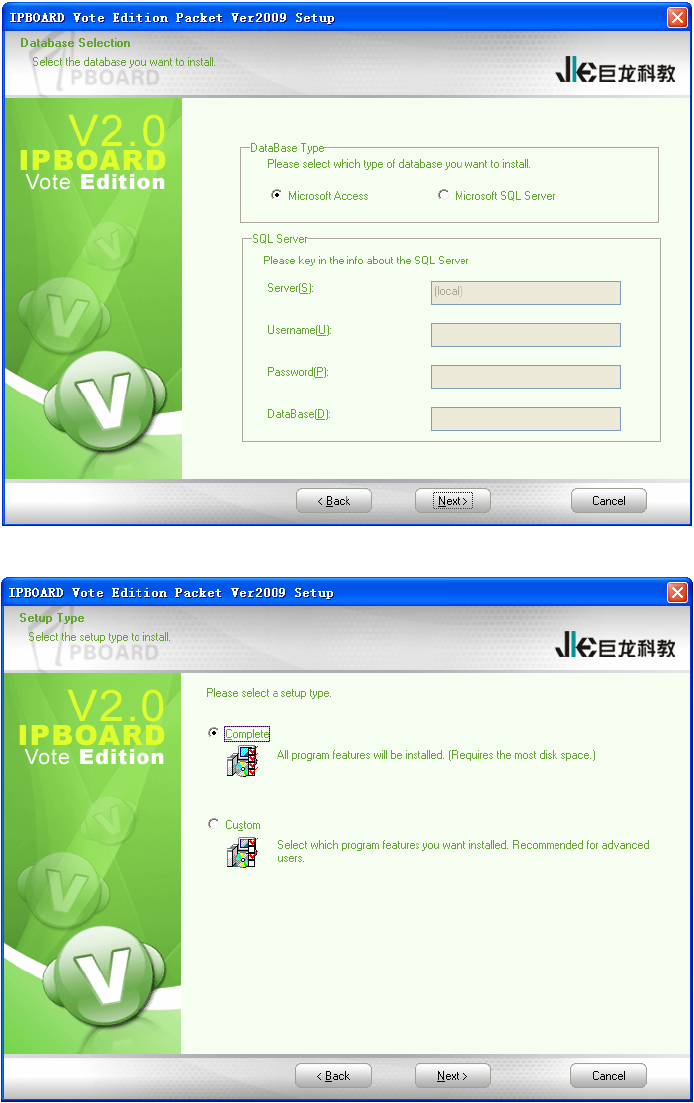
3.8 Select the database you want to install
9
3.9 Select the setup type.
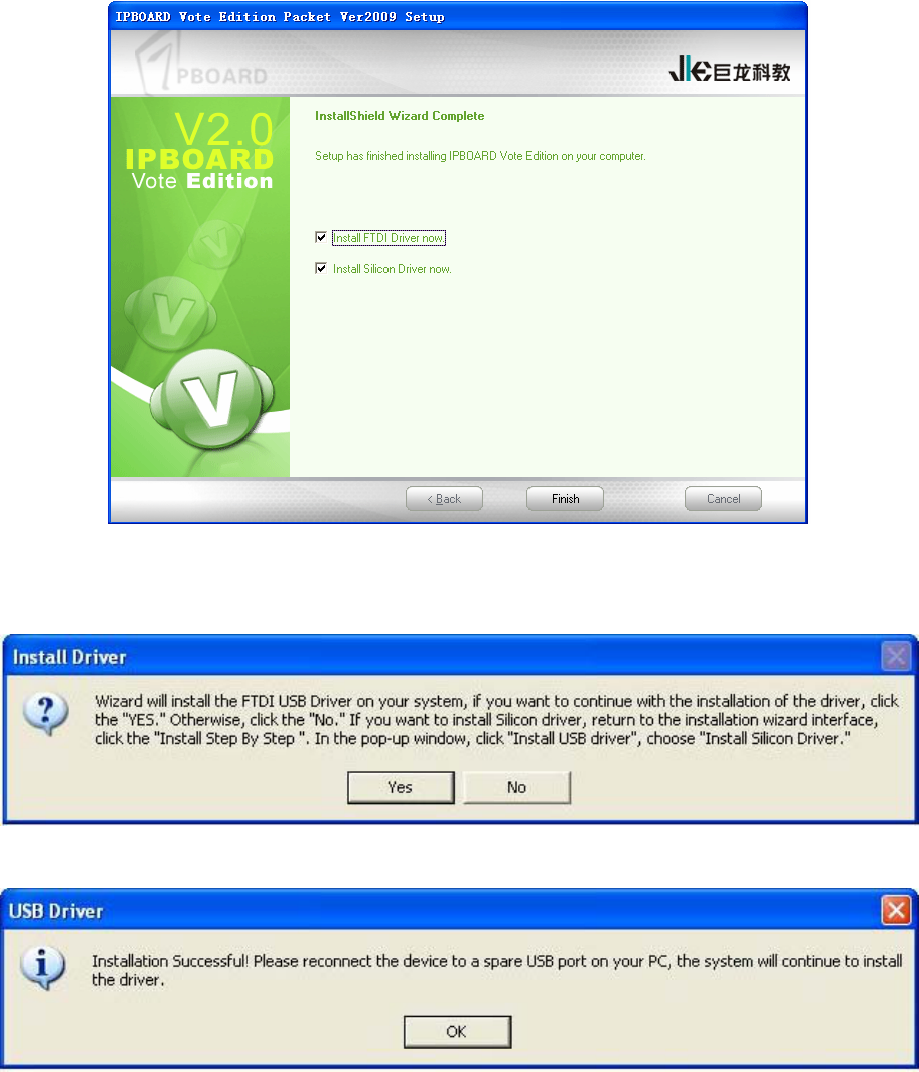
3.10 Complete installation.
10
3.11 The USB driver installation prompt will be displayed after software installation. FTDI USB driver will
be installed by default firstly; and then the Silicon driver for IPBOARD(JL-)Tablet (TB3124RDV(T/8)) can
be installed subsequently.
3.12 Complete the installation of FTDI driver
3.13 Then Silicon driver setup dialog will pop up.
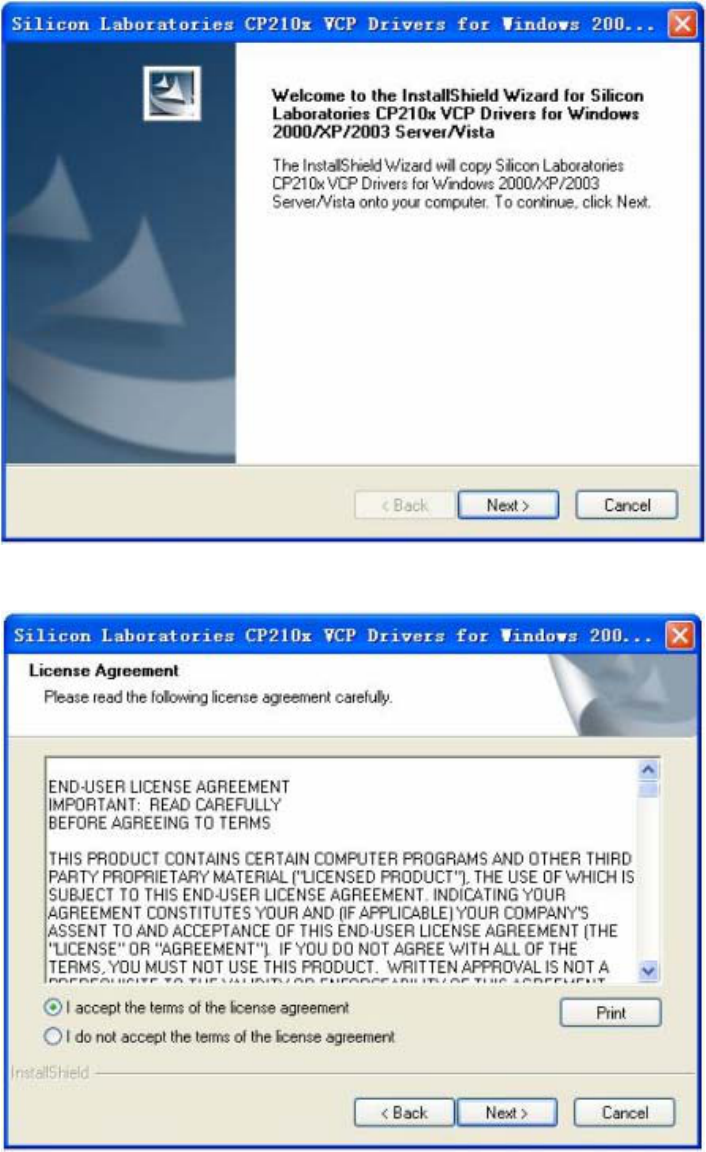
11
3.14 Choose destination location.
12
3.15 Start the installation
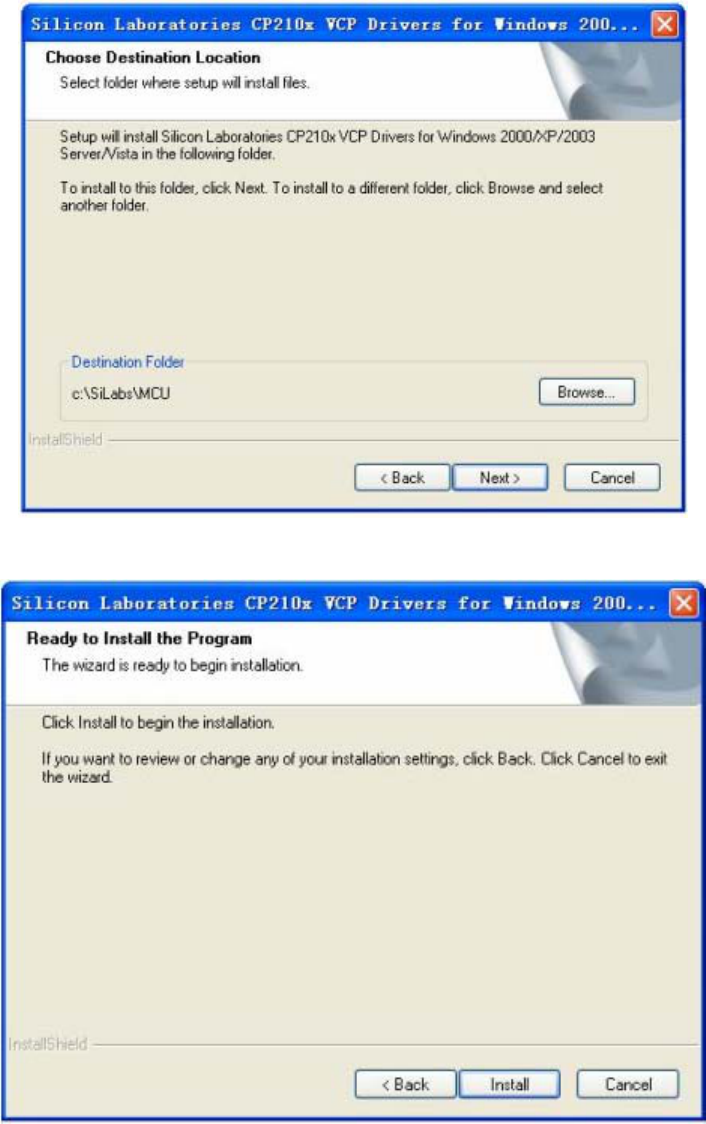
3.16 Complete the installation of Silicon driver
13
Click Finish, and the dialog as shown below pops up:
Click and then plug-in the transceiver to complete the installation.
14
Ⅳ Run the Software
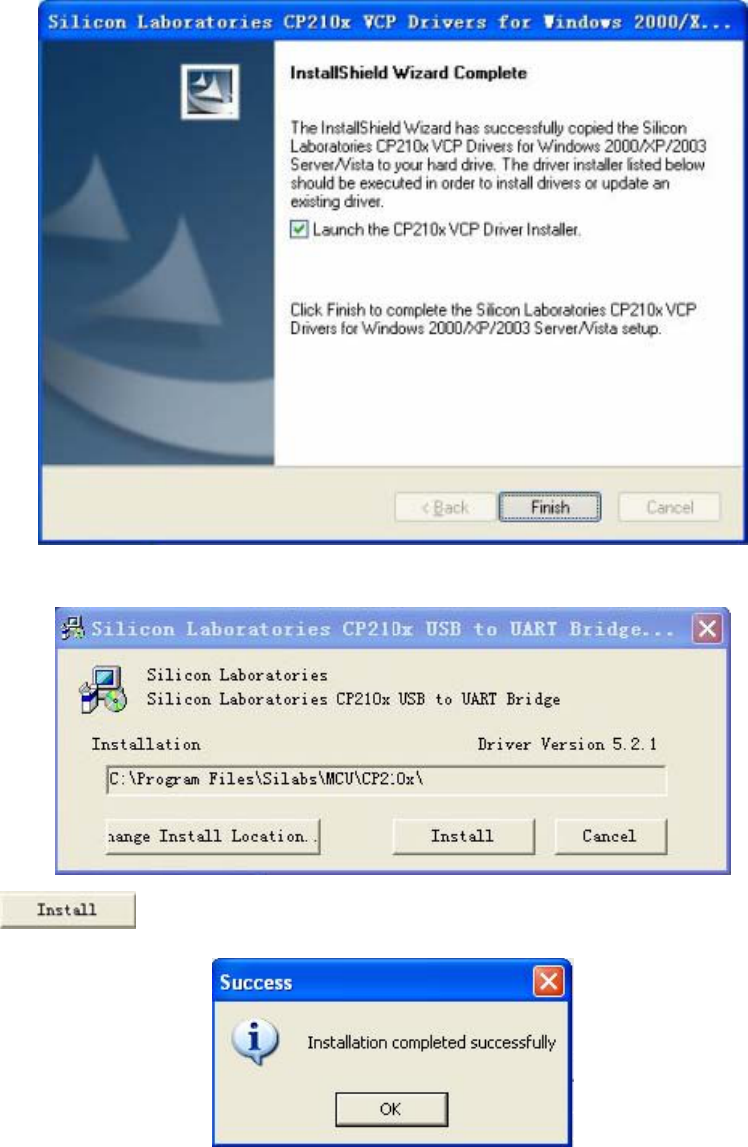
1 Start IPBOARD Vote Edition driver
Click 〝Start 〞 → 〝All programs 〞 →
→ → to run IPBOARD Vote Edition driver.
Then a tray icon will be displayed in status bar on lower-right corner of the desktop.
If it shows 〝Communication with IPBOARD(JL-)Tablet(TB3124RDV(T/8))failed
〞, please make sure that the transceiver is successfully connected, IPBOARD(JL-)
Vote Edition and USB driver have been correctly installed. And then click IPBOARD
(JL-) Driver on the desktop.
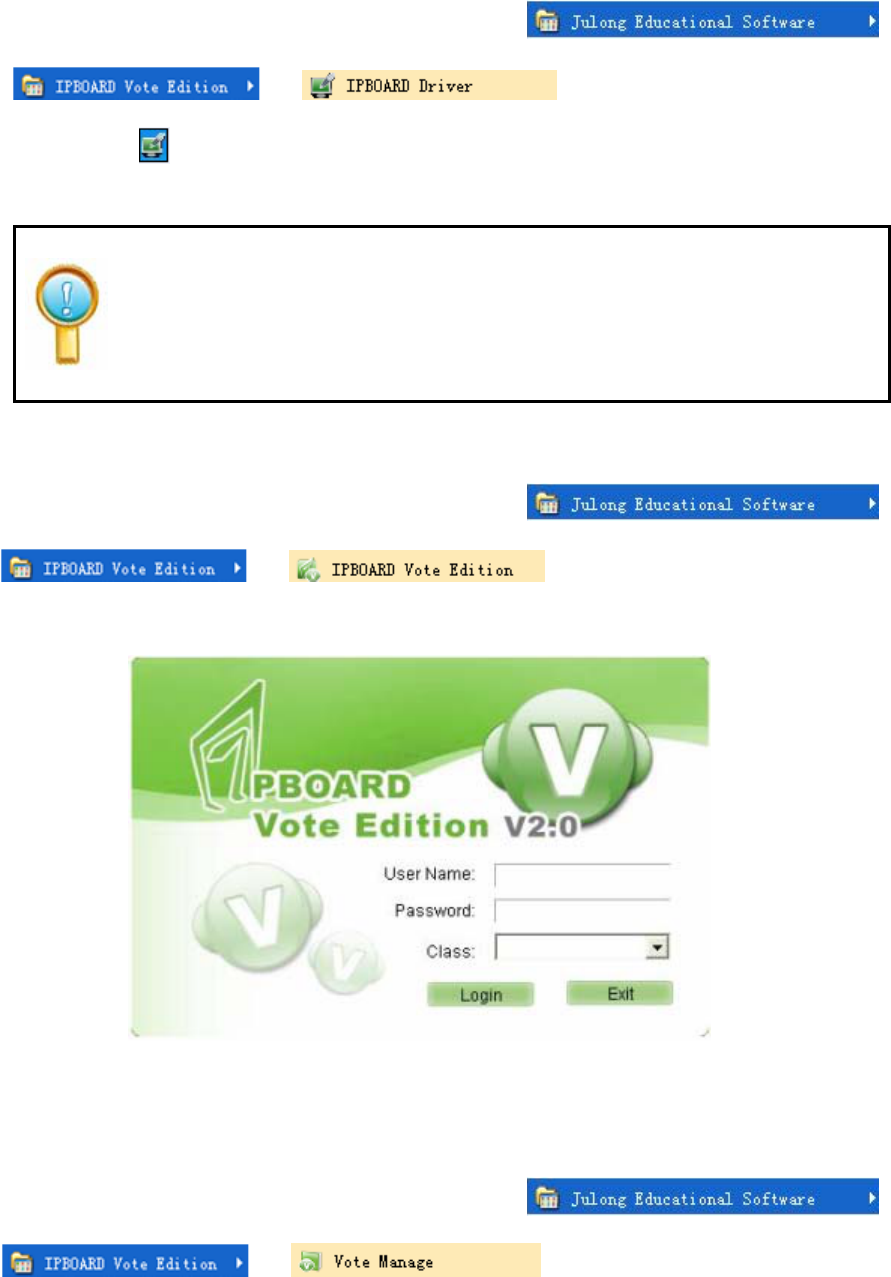
2 Start IPBOARD Vote Edition
1) Click 〝Start 〞 → 〝All programs 〞→
→ →, then a login window will pop up as
shown below:
2) Users can click Login to access IPBOARD Vote Edition directly.
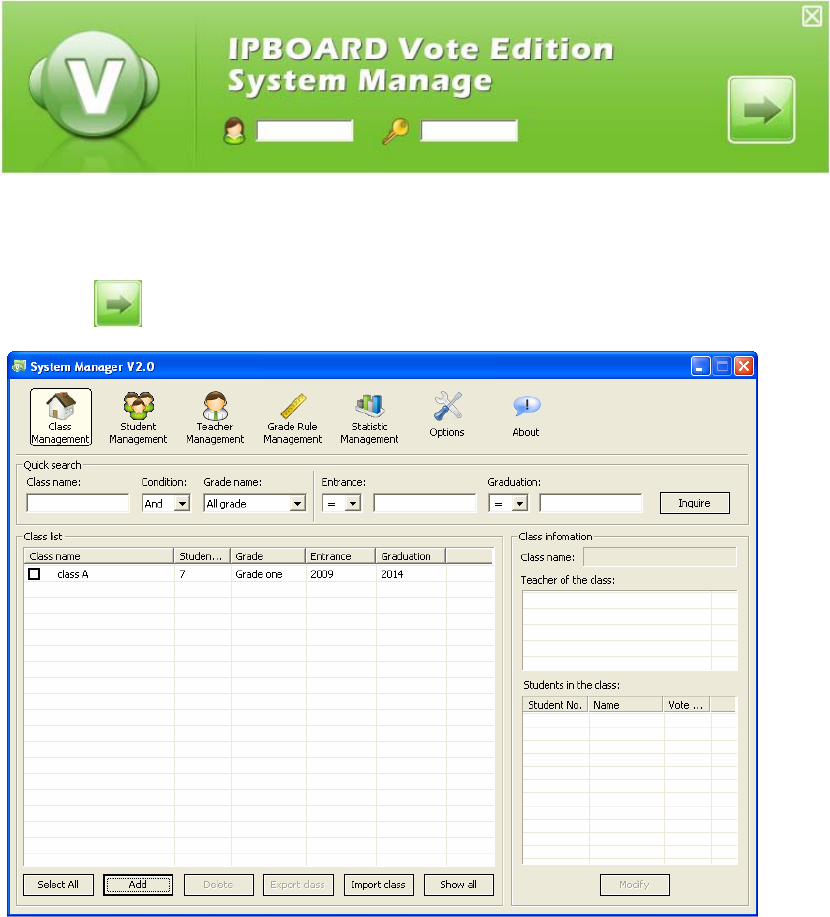
3 Start voting manage system
1) Click 〝Start 〞 → 〝All programs 〞→
→ →, then a dialog will pop up as shown
below:
15
Key in the administrator account to access the voting manage system. The default administrator account is
Administrator and the password: julong.
2) Click to enter the system manage window, as shown below:
3)For adding, modifying or setting the information in ‘Class Management’, ‘Student Management’, 〝
Teacher Management’, ‘Grade Management’, ‘Statistics Management’ and ‘System Management’, please
see the help text of IPBOARD Vote Edition for details.
16
Ⅴ Features of IPBOARD(JL-)Tablet (TB3124RDV(T/8))
Please see the help text of IPBOARD Vote Edition for more details about the introduction of each voting
tool.
IPBOARD(JL-)Tablet (TB3124RDV(T/8)) should be charged for about 2.5 hours
before first-use. The charger indicator is red while charging, and it turns green after
full charged.
Sleep button: it is used for reducing power consumption, so as to extend the
operation hours. IPBOARD(JL-)Tablet(TB3124RDV(T/8)) will access to sleep
mode after 9 minutes suspension of operation. And users can press the button to
wake up IPBOARD(JL-)Tablet. The LCD screen will turn grey in sleep mode.
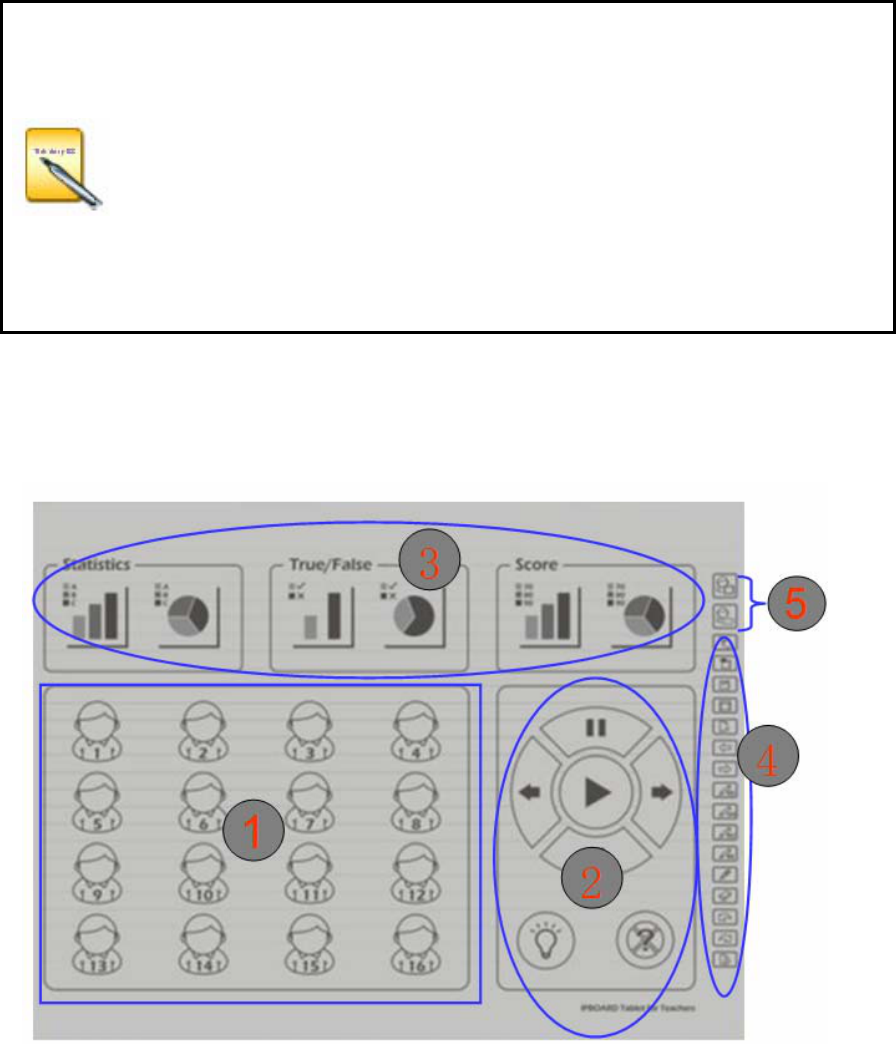
1 Functions of the icons on the teacher’s tablet and student’s tablet
1.1 Icons on the IPBOARD(JL-)Tablet for Teachers
1-to-16 IPBOARD(JL-)Tablet for teachers
(The image is for references only, subject to the delivered goods.)
IPBOARD(JL-)Tablet for Teachers consists of five zones:
Zone ①: It is the students’ seating area; each student icon is corresponding to a specified student, which
allows teachers to guide the operation of an appointed student easily.
17
Zone ②: there are four buttons -- Test Controller , Show Answer , Cancel Question
. Teachers can export test controller and conduct the test (such as switching to the previous or next
question, starting, suspending, or stopping answering, etc.) easily by using Test Controller.
Zone ③: It is the statistics area. It includes three buttons -- ‘Answer Distributing Statistics’
, ‘True/False’ and ‘Score’ .
Zone ④: Writing icons are well distributed in this area, which is similar to that of JL-9000B Interactive
whiteboard. Users are allowed to switch mode and write by clicking these icons directly.
Zone ⑤: It includes two buttons – ‘Allow student to write’ and ‘Allow student to answer’ ,
which enable teachers to assign any student to write and answer questions.
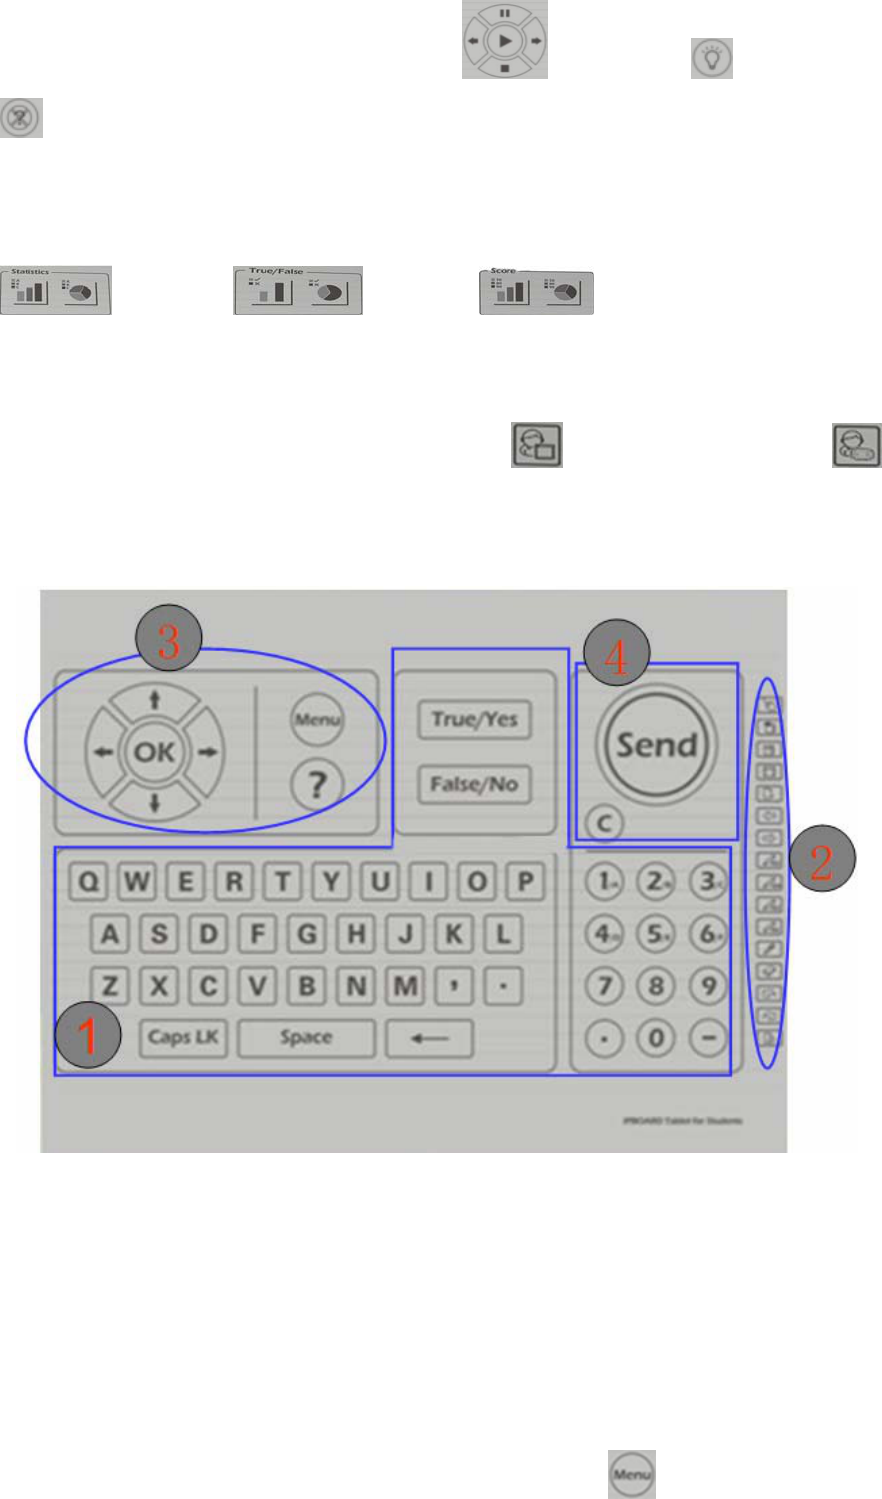
1.2 Icons on the IPBOARD(JL-)Tablet for Students
IPBOARD(JL-)Tablet for Students consists of four zones:
Zone ①: it is designed to enable students to answer questions of different types (about 8 types). Using
letter keys, number keys and other auxiliary keys (blank key, interpunction keys, etc.), students can answer
various questions (such as True/False, Yes/No, multiple choice, multiple answer, blank-filling, etc.) easily.
Zone ②: Writing icons are well distributed in this area, which is similar to that of JL-9000B Interactive
whiteboard. Users are allowed to switch mode and write by clicking these icons directly.
Zone ③: It includes question button, confirm button, menu button and other auxiliary keys
18
(including up, down, left and right keys, which can be used for updating the product later on.)
Zone ④: It includes two buttons --- and .
2 Introduction of two assignments by teachers
The IPBOARD(JL-)Tablet for teachers has two special buttons: ‘Allow student to write’ and ‘Allow
student to answer’, which can be used to assign students to write on the tablet and answer questions
respectively.
2.1 Assign students to write
Click on the teacher’s tablet, and next click the number of the assigned student (eg.
NO. 6), then click , and then the student is allowed to write. Through such operation, teachers can
restrict the writing permission of NO. 6 student and assign another student to wirte (only one student
available at a time).
2.2 Assign students to answer questions
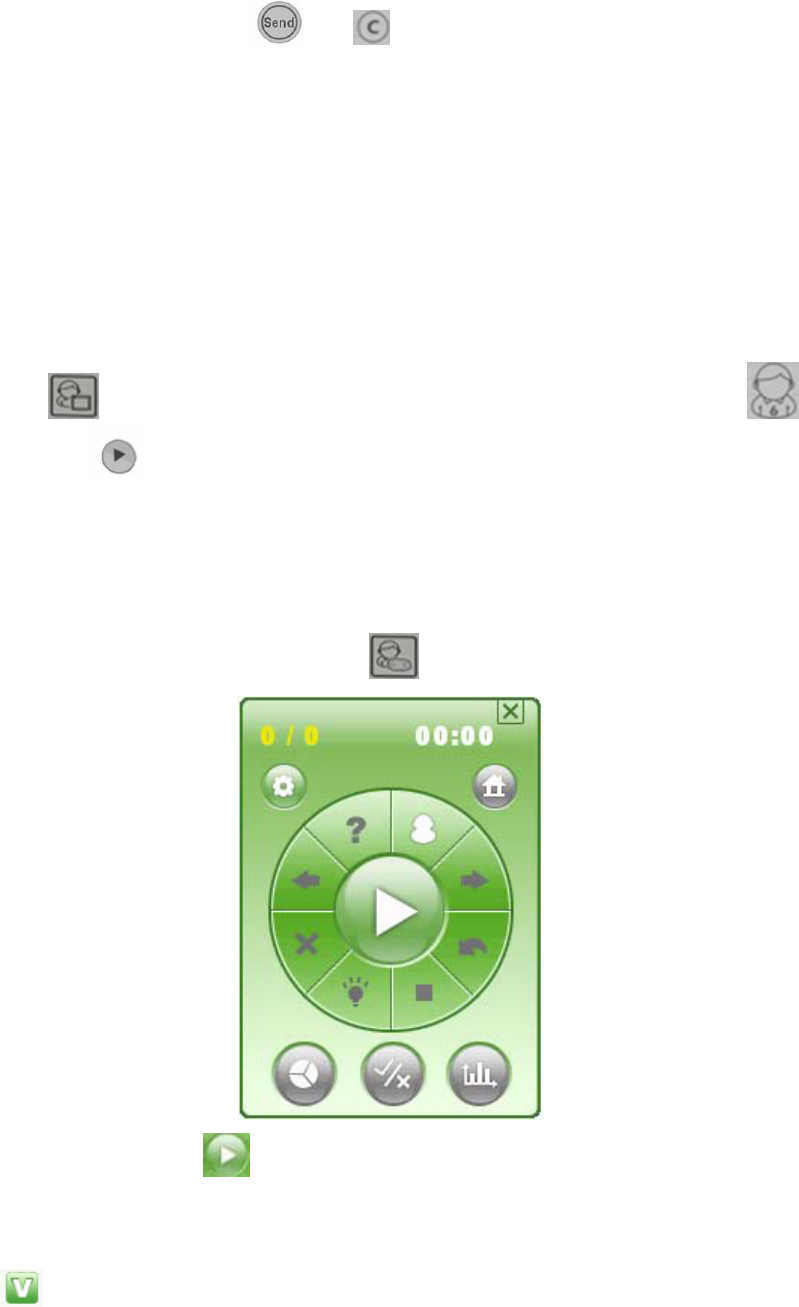
If student’s tablet is unwritable after clicking , the Test Controller as shown below will pop up:
Then the teacher can click to enable students to answer questions.
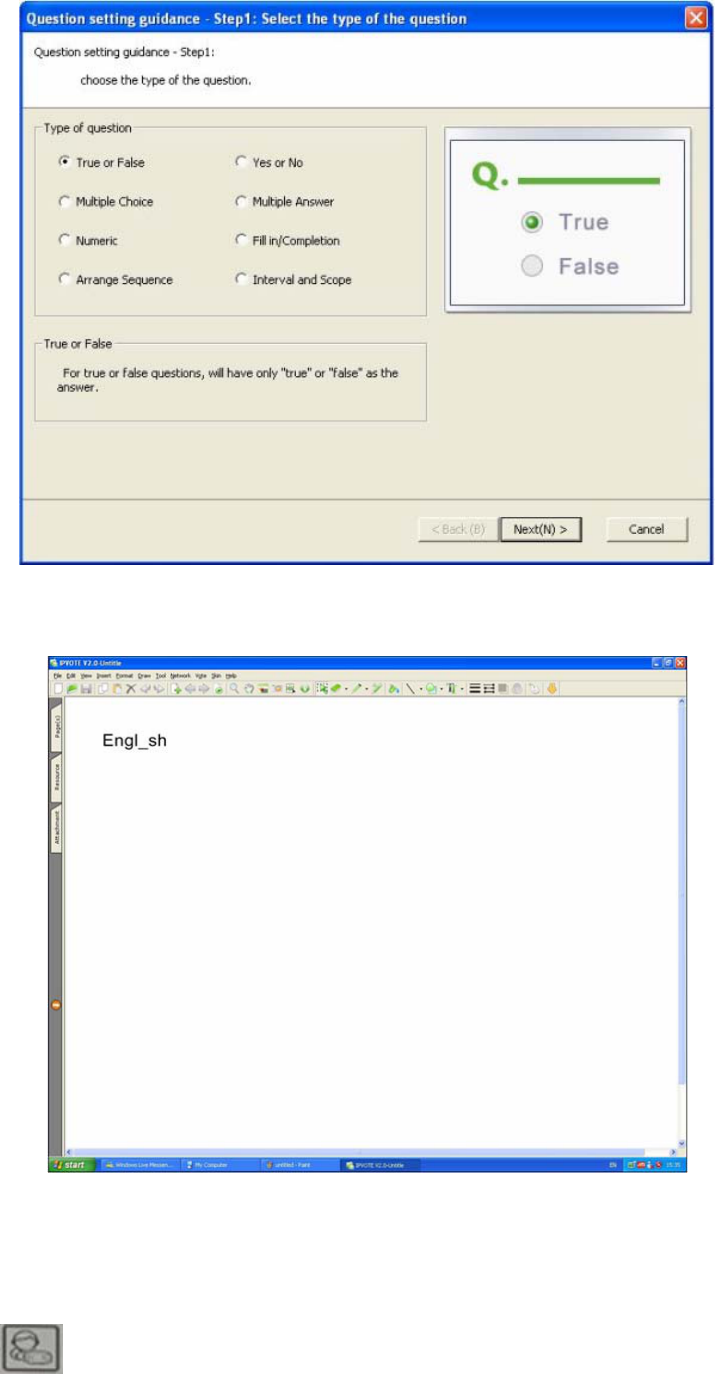
3 Set Questions
Click in the menu bar to vote. 8 different types of questions have been added in the IPBOARD Vote
Edition, as shown below:
19
4 Combined with IPBOARD(JL-)Tab le t ( TB3124RDV(T/8)) to answer questions interactively
Blank-filling
(Eight types of questions are available, and here take blank-filling as an example.)
4.1 Switch on IPBOARD(JL-)Tablet (TB3124RDV(T/8)) for teachers and students respectively, and
then click on right side of the teacher’s tablet, the dialog as shown below pops up:
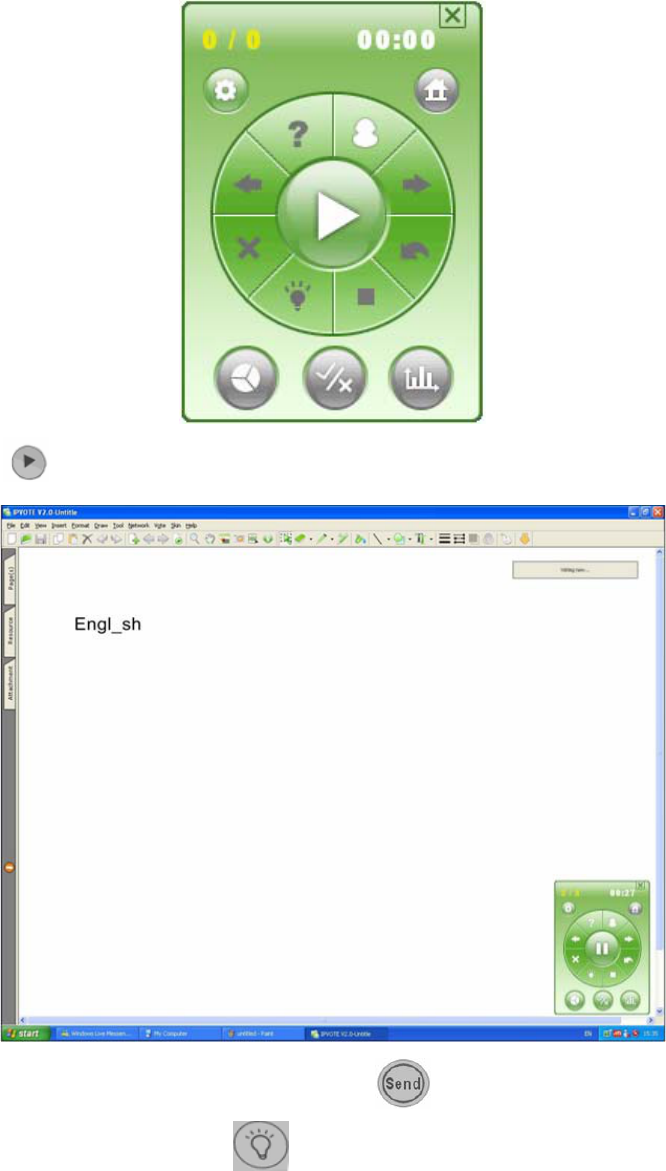
20
4.2 Click on teacher’s tablet, and then students are allowed to answer questions.
4.3 Key in answers on the student’s tablet. Then click to submit the answers.
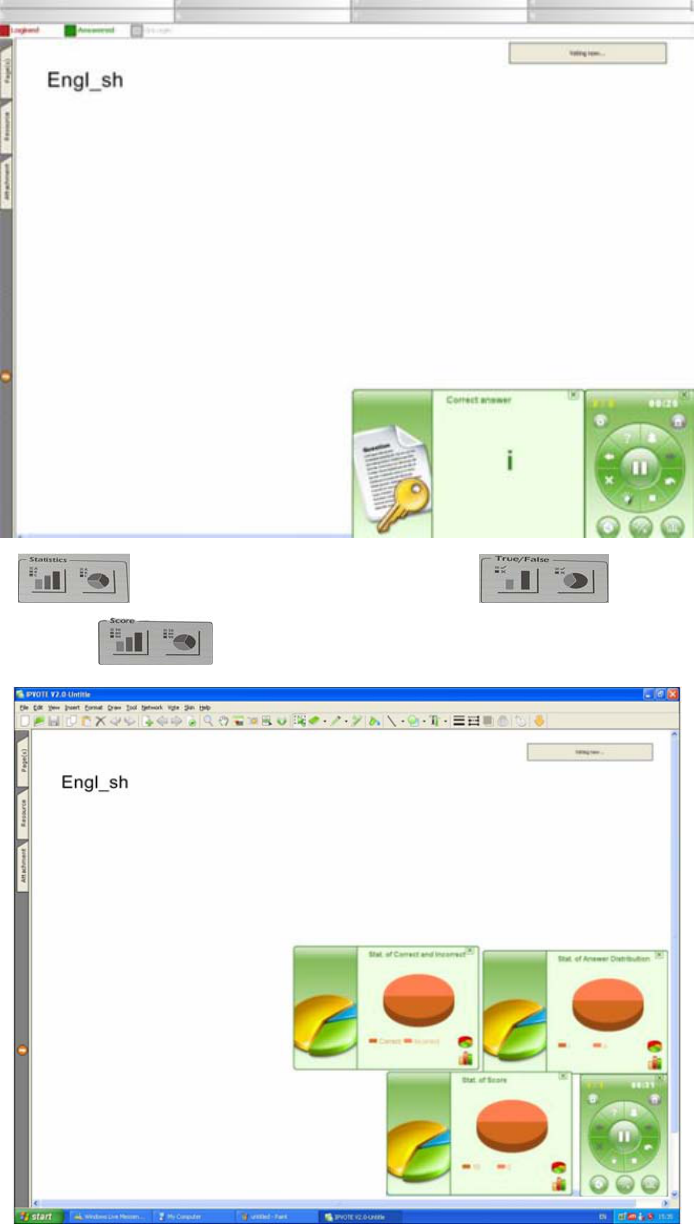
4.4 After answering questions, click on teachers’ tablet to check the correct answers, as shown
below:
21
4.5 Click to check the answer trend of test; click to check the true/false
percentage of test; click to view the score statistic report, as shown below:
22
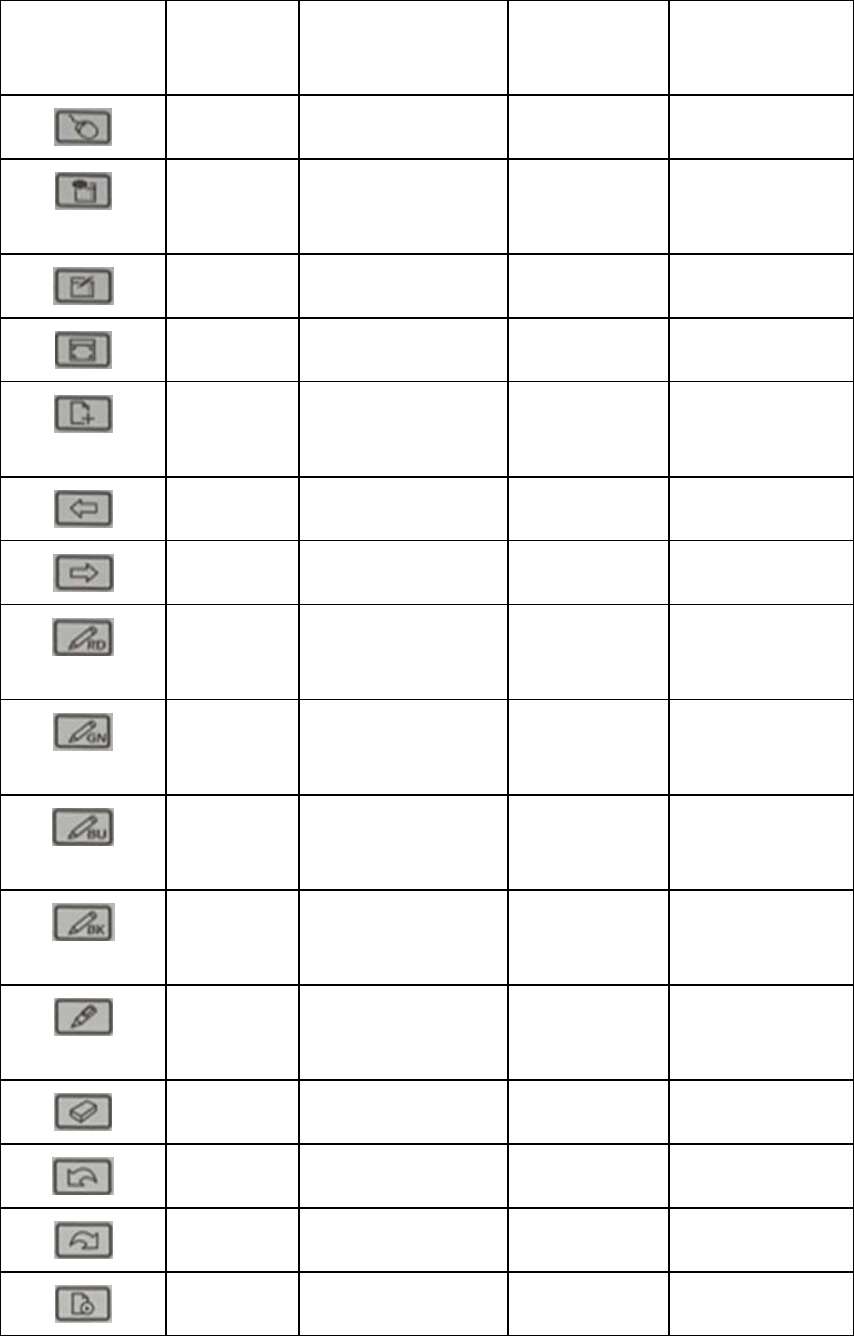
Ⅵ Description of Function Keys
1 The Function keys on Teacher’ s tablet
Function Keys
on the teacher’s
tablet
Definition Control Mode Window Mode Annotation
Mode
Allow student to
write
It allows students to operate
in control mode.
It allows student to
write.
It allows
student to write
Allow student to
answer Test Controller Test Controller Test Controller
Control Mode No Effect Switch to control
mode
Switch to
control mode
Annotation Mode Switch to annotation mode Switch to annotation
mode No Effect
Window Mode Switch to Window Mode No Effect Switch to
window mode
Full Screen Mode Switch to full screen mode Switch to full screen
mode
Switch to Full
screen mode
Create a blank
page
Switch to annotation mode
and create a blank page Create a blank page Create a blank
page
Page Up No Effect Page Up Page Up
Page Down No Effect Page Down Page Down
Red Normal Pen Switch to annotation mode
and use red normal pen Red Normal Pen Red Normal
Pen
Green Normal Pen Switch to annotation mode
and use green normal pen Green Normal Pen Green Normal
Pen
Blue Normal Pen Switch to annotation mode
and use blue normal pen Blue Normal Pen Blue Normal
Pen
Black-normal Pen Switch to annotation mode
and use black normal pen Black-normal Pen Black-normal
Pen
Transparent Pen Switch to annotation mode
and use transparent pen Transparent Pen Transparent Pen
Eraser No Effect Eraser Eraser
Undo No Effect Undo Undo
Redo No Effect Redo Redo
Replay No Effect Replay Replay
23
2 The Function Keys on Student’s tablet
Function keys
on the student’s
tablet
Definition Control Mode Window Mode Annotation Mode
Control
Mode No Effect Switch to
Control Mode
Switch to Control
Mode
Annotation
Mode
Switch to Annotation
Mode
Switch to
Annotation
Mode
No Effect
Window
Mode
Switch to Window
Mode No Effect Switch to Window
Mode
Full Screen
Mode
Switch to Full Screen
Mode
Switch to Full
Screen Mode
Switch to Full
Screen Mode
Create a
blank page
Switch to Full Screen
Mode and Create a
blank page
Create a blank
page
Create a blank
page
Page Up No Effect Page Up Page Up
Page Down No Effect Page Down Page Down
Red Normal
Pen
Switch to annotation
mode and use red
normal pen
Red Normal
Pen Red Normal Pen
Green
Normal Pen
Switch to annotation
mode and use green
normal pen
Green Normal
Pen Green Normal Pen
Blue Normal
Pen
Switch to annotation
mode and use blue
normal pen
Blue Normal
Pen Blue Normal Pen
Black
Normal Pen
Switch to annotation
mode and use black
normal pen
Black Normal
Pen Black Normal Pen
Transparent
Pen
Switch to annotation
mode and use
transparent pen
Transparent Pen Transparent Pen
Eraser No Effect Eraser Eraser
Undo No Effect Undo Undo
Redo No Effect Redo Redo
Replay No Effect Replay Replay

24
Ⅶ Performance Specifications
CONTENT SPECIFICATION
ASPECT RATIO 4:3
PHYSICAL SPECIFICATION
DIMENSION 370.0MM X 320.0MM
ACTIVE WRITING AREA 304.5MM X 230.5MM
THICKNESS MIN.: 3.5MM MAX.: 19.0MM
NET WEIGHT 980G (INCLUDING BATTERY)
TECHNICAL SPECIFICATION
OPERATION PRINCIPLE ELECTROMAGNETIC INDUCTION
ORIENTATION DEFAULTED ORIENTATION
RESOLUTION 100 L/CM (254 L/INCH)
TRACING SPEED 6M/S
READING SPEED 180PPS
READING HEIGHT 5MM (0.20 INCH)
PRECISION ±0.1MM
TILTING ANGLE OF
ELECTRONIC PEN
± 60 DEGREE
WORKING VOLTAGE DC 3.6V, NI-MH RECHARGEABLE BATTERY
WORKING ELECTRICITY <100 MA
POWER <0.4W
WORKING
ENVIRONMENT
TEMPERATURE: -10℃~50℃ RELATIVE HUMIDITY: 30%~80%
NON-CONDENSING
STORAGE
ENVIRONMENT
TEMPERATURE: -25℃~70℃ RELATIVE HUMIDITY: 10%~90%
NON-CONDENSING
TRANSMISSION
TECHNOLOGY
2.4G RF WIRELESS TRANSMISSION (CONFORMING TO IEEE802.15.4
STANDARD)
CLUSTER GROUP ONE-TO-MULTI (1-TO-8, 1-TO-16, 1-TO-24, 1-TO-32, 1-TO-48)
TRANSMITTING SPEED 57600BPS
DATA TRANSMISSION
RANGE ≤20M (WITH OBSTACLE), ≤120M (WITHOUT OBSTACLE)
LCD DISPLAY 128 X 64 DOT (WITH BACKLIGHT)
OPERATION SYSTEM WINDOWS XP,WINDOWS VISTA
SPECIFICATIONS OF ACCESSORIES
WRITING PEN ACTIVE E-PEN (WITH AAA-BATTERY)
DIMENSION 135MM X 14MM
WEIGHT 40G (INCLUDING BATTERY)
CHARGER 600mA INPUT:100-250V 50/60Hz OUTPUT:3.0-9V
This device complies with part 15 of the FCC rules. Operation is subject to the
following two conditions: (1) this device may not cause harmful interference,
and (2) this device must accept any interference received, including
interference that may cause undesired operation.
NOTE: The manufacturer is not responsible for any radio or TV interference
caused by unauthorized modifications to this equipment. Such modifications
could void the user’s authority to operate the equipment.
NOTE: This equipment has been tested and found to comply with the limits for
a Class B digital device, pursuant to part 15 of the FCC Rules. These limits
are designed to provide reasonable protection against harmful interference in
a residential installation. This equipment generates uses and can radiate
radio frequency energy and, if not installed and used in accordance with the
instructions, may cause harmful interference to radio communications.
However, there is no guarantee that interference will not occur in a particular
installation.
If this equipment does cause harmful interference to radio or television
reception, which can be determined by turning the equipment off and on, the
user is encouraged to try to correct the interference by one or more of the
following measures:
- Reorient or relocate the receiving antenna.
- Increase the separation between the equipment and receiver.
-Connect the equipment into an outlet on a circuit different from that to which
the receiver is connected.
-Consult the dealer or an experienced radio/TV technician for help.