Jasboom Smart Technology JAS200F01 CCTV CAMERA User Manual 2017 11 28
Jasboom Smart Technology Limited CCTV CAMERA 2017 11 28
User Manual
in "App Store". Do not open the App. Just quit
"App Store" and Go to Main screen.
IOS
in "Google Play". Do not open the App. Just quit
"Google Play" and Go to Main screen.
Andr oid
12
1. AP mode: You must start from this
mode for the first time installation
of your camera.
2
(1) Download and Install the App "JASBOOM"
(2) Connect power to the camera and wait. You
will hear "System is starting" --> "System setup is
completed" --> "Access Point establishing" --> "
Access Point established".
(3) Go to Settings of your smartphone --> open
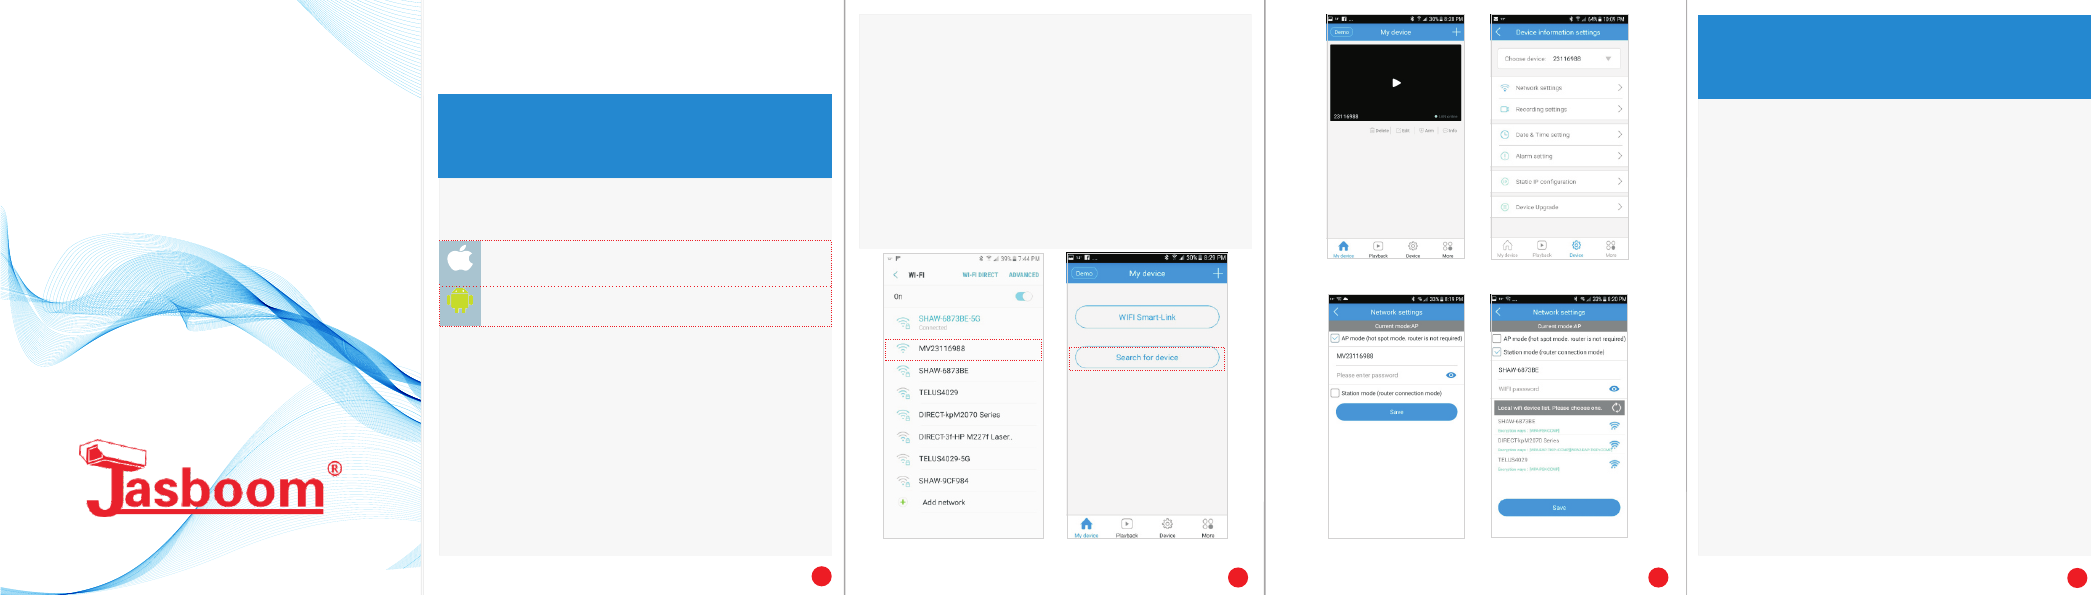
Wi-Fi list --> connect to the camera's hotspot (MV and
device ID number such as MV12345678) (figure 1).
Once it is connected, please go back to Main screen.
** If you already installed a camera and this is your
second camera using the same App, please skip
Steps (4) & (5) and go to Step (6) **
(5) Select Search for device (figure 2). Go to Step (7).
(6) Start the App (JASBOOM) on Main screen
--> Please tap + on top right position --> select
Add networked device --> select LAN search
(7) Once the connection is successful, a screen will be
shown (figure 3). Now you can watch live video.
* Some functions are not supported by AP mode.
Please use Station mode for full functions.
(figure 1) (figure 2)
2
3
The camera supports two modes. One is AP
(Access Point) mode (router is not required)
which is default mode and the other is Station
mode (router is required).
(4) Start the App (JASBOOM) on Main screen -->
Select your Area
(figure 3) (figure 4)
(figure 5) (figure 6)
* If the App is already installed, go to Step (2).
4
2. Station mode: Router is required.
Make sure your router is working
well.
(1) Make sure you are on AP mode and can watch
live video (figure 3).
(2) Select Device on bottom of the screen and
choose a device (ID number of the camera) from the
list (figure 4).
(3) Select Network settings. You will see AP mode
is ticked (figure 5). Tick Station mode. Now you will
see the list of local Wi-Fi devices (figure 6).
(4) Select the name of your router (you must select
2.4GHz if it shows 2.4GHz and 5GHz for dual band
router), enter Wi-Fi password of your router and
press Save button (this button could be hidden
under keypad).
(5) You will see "Configuration change successful"
message. Please select No (selected router will be
automatically connected).
(6) You will hear "Wi-Fi connecting" --> "Wi-Fi
connected". Press My device.
(7) Once the connection is successful, a screen will
be shown (figure 3). Now you can watch live video.
Quick
Installation
Guide

4. How to restore to factory's default
setting?
FCC Statements
IC Statements
Make sure that power is connected. Press Reset
button of the camera for more than 5 seconds.
You will hear "Restore factory's default setting" --> "
Access Point establishing" --> "Access Point
established".
3. How to change Station mode to
AP mode?
(1) Make sure you are on Station mode and can
watch live video (figure 3).
(2) Select Device on bottom of the screen and
choose a device (ID number of the camera) from the
list (figure 4).
(3) Select Network settings. You will see Station
mode is ticked (figure 6). Tick AP mode and leave
blank on password (no password) (figure 5).
(4) Press Save button (this button could be hidden
under keypad).
(5) You will see "Configuration change successful"
message. Please select Yes. It will go to Settings of
your smartphone --> open Wi-Fi list --> connect to
the camera’s hotspot (MV and device ID number
such as MV12345678) (figure 1). And also you will
hear "Access Point establishing"--> "Access Point
established" (there could be time delay.)
(6) Please go back to the App screen. Press My device.
(7) Once the connection is successful, a screen will
be shown (figure 3). Now you can watch live video.
56
This device complies with Industry Canada licence-exempt
RSS standard(s). Operation is subject to the following two
conditions: (1) this device may not cause interference, and
(2) this device must accept any interference, including
interference that may cause undesired operation of the
device.
equivalent isotropically radiated power (e.i.r.p.) is
not more than that necessary for successful communication.
that the
FCC RF exposure statements
This Transmitter must not be co‐located or operating in
conjunction with any other antenna or transmitter.
This equipment complies with FCC RF radiation exposure
limits set forth for an uncontrolled environment. This
equipment should be installed and operated with a minimum
distance of 20 centimeters between the radiator and your
body or nearby persons.
IC Radiation Exposure Statement:
This equipment complies with IC radiation exposure limits
set forth for an uncontrolled environment. This equipment
should be installed and operated with minimum distance
20cm between the radiator & your body.
Déclaration d’exposition aux radiations:
Cet équipement est conforme aux limites d’exposition aux
rayonnements IC établies pour un environnement non
contrôlé. Cet équipement doit être installé et utilisé avec
un minimum de 20 cm de distance entre la source de
rayonnement et votre corps.
Conformément à la réglementation d'Industrie Canada, le
présent émetteur radio peut fonctionner avec une antenne
d'un type et d'un gain maximal (ou inf érieur) approuvé pour
l'émetteur par Industrie Canada. Dans le but de réduire les
risques de brouillage radioélectrique à l'intention des autres
utilisateurs, il faut choisir le type d'antenne et son gain de
sorte que la puissance isotrope rayonn ée équivalente
(p.i.r.e.) ne dépasse pas l'intensité nécessaire à
l'établissement d'une communication satisfaisante.
Le présent appareil est conforme aux CNR d'Industrie
Canada applicables aux appareils radio exempts de licence.
L'exploitation est autoris é e aux deux conditions
suivantes : (1) l'appareil ne doit pas produire de brouillage,
et (2) l'utilisateur de l'appareil doit accepter tout brouillage
radioélectrique subi,même si le brouillage est susceptible
d'en compromettre le fonctionnement.
Under Industry Canada regulations, this radio transmitter
may only operate using an antenna of a type and maximum
(or lesser) gain approved for the transmitter by Industry
Canada. To reduce potential radio interference to other
users, the antenna type and its gain should be so chosen
FWarning: Changes or modifications to this unit not
expressly approved by the party responsible for compliance
could void the user's authority to operate the equipment.
NOTE: This equipment has been tested and found to comply
with the limits for a Class B digital device, pursuant to Part
15 of the FCC Rules. These limits are designed to provide
reasonable protection against harmful interference in a
residential installation. This equipment generates, uses
and can radiate radio frequency energy and, if not installed
and used in accordance with the instructions, may cause
harmful interference to radio communications.However,
there is no guarantee that interference will not occur in a
particular installation. If this equipment does cause harmful
interference to radio or television reception, which can be
determined by turning the equipment off and on, the user is
encouraged to try to correct the interference by one or more
of the following measures:
1.Reorient or relocate the receiving antenna.
2.Increase the separation between the equipment and
receiver.
3.Connect the equipment into an outlet on a circuit different
from that to which the receiver is connected.
Consult the dealer or an experienced radio/TV technician for
help.
This device complies with Part 15 of the FCC Rules.
Operation is subject to the following two conditions :
(1) this device may not cause harmful interference, and
(2) this device must accept any interference received,
including interference that may cause undesired operation.