Jingneng Telecom Technology Co HK250 Cordless Telephone Base and Handset User Manual HK250 O M
Shenzhen Jingneng Telecom Technology Co Ltd Cordless Telephone Base and Handset HK250 O M
Contents
- 1. Users Manual Part 1
- 2. Users Manual Part 2
- 3. Users Manual Part 3
- 4. Users Manual Part 4
Users Manual Part 3
15
BASIC OPERATION (CONTINUED)
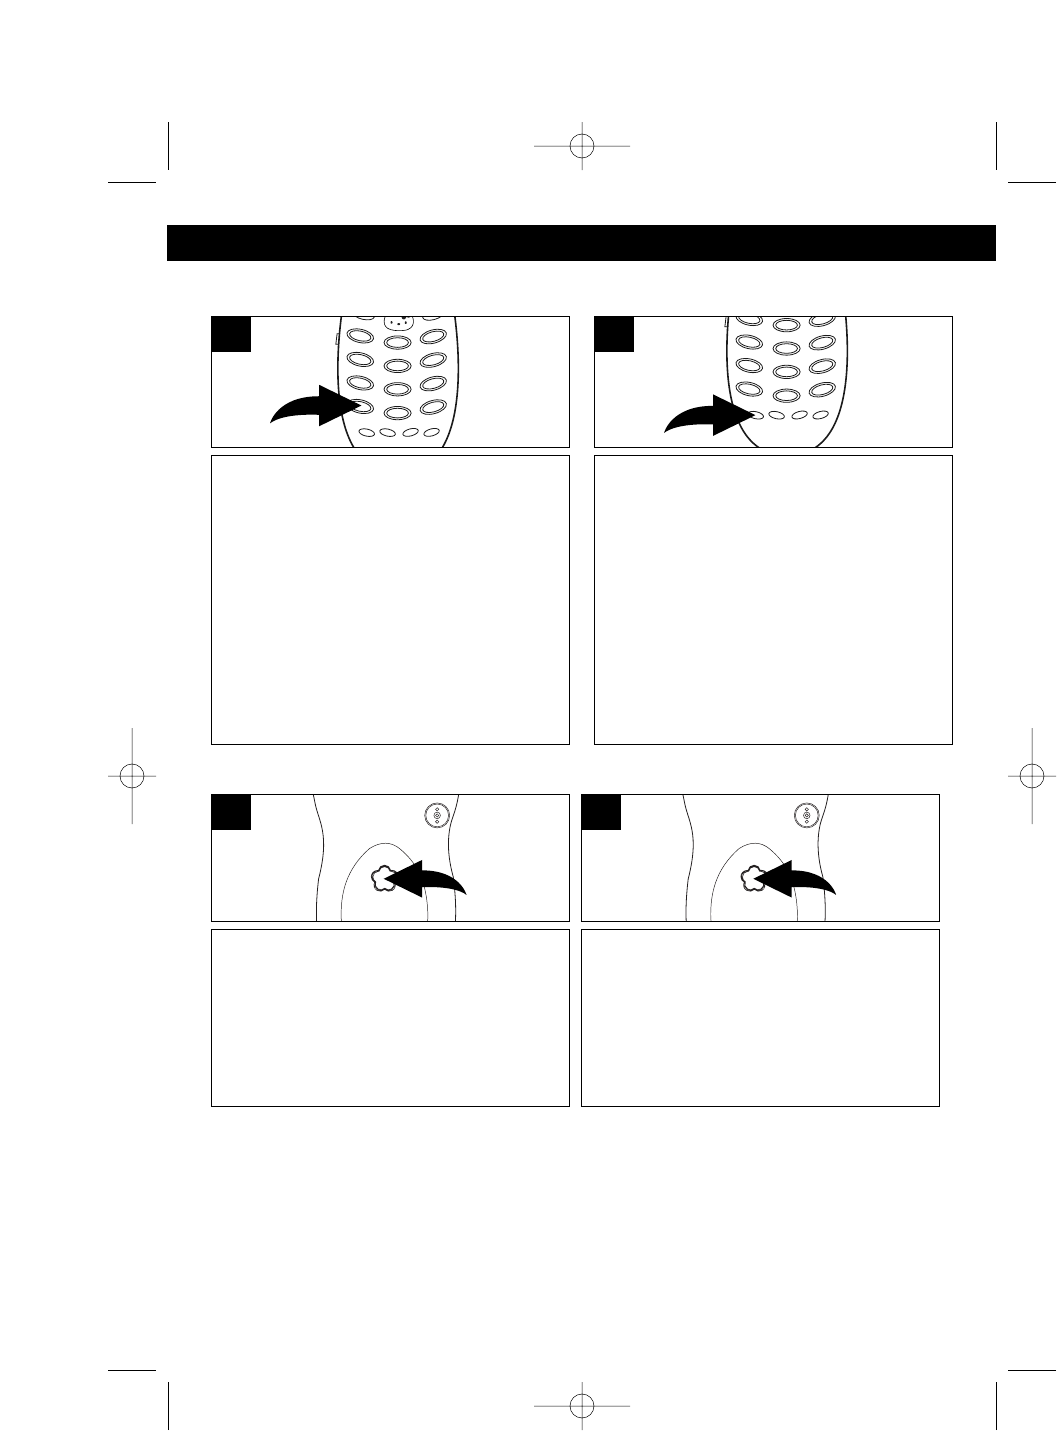
PAGING THE HANDSET
Press the PAGE button on the base to
locate the handset when not in use;
the handset will ring with three short
beeps and the TALK button will blink.
“Page” will blink in the display on the
LCD during paging.
1
FINDING THE HANDSET
Press and hold the PAGE button on
the base for more than three seconds
to locate the handset when not in use;
the handset will ring for 30 seconds
repeating sequences of three short
beeps. Press the TALK button to end
the page function.
1
USING THE TONE BUTTON
If you are in a Pulse dialing area you
may still take advantage of touch-tone
services after dialing to respond to
touch-tone prompts. To do this, press
the */TONE/➛button to temporarily
change the dialing mode from Pulse to
Tone after dialing in the Pulse mode.
This will enable Pulse users to access
touch-tone services. It will revert back
to Pulse after hanging up.
1
CALL WAITING
If you subscribe to Call Waiting through
your local phone company, and you
receive another phone call, the phone
will alert you with a beep and the display
will show the name and number. Simply
press the FLASH button to answer the
new call. Press the FLASH button again
to return to the original call. Call Waiting
Caller ID also needs to be subscribed to
in order to see the new caller’s
name/number on the display if you are
already on the phone.
1
NOTE:
When an incoming call is received while paging and the RINGER switch is set to
the ON position, the Page mode will be terminated and the incoming ringer will
start.
HK250.O/M.QXD 8/30/02 1:19 PM Page 15

16
BASIC OPERATION (CONTINUED)
MESSAGE WAITING FUNCTION
When a caller has recorded a message on a personal message service, “ ” will
appear in the display and will disappear when you retrieve your message.
This feature is only for subscribers of a voice mail message waiting service.
DIGITAL SECURITY SYSTEM
The security code prevents your cordless telephone conversation from being
accessed by a phone on a different line. Once the handset battery is fully charged,
the handset will automatically select the code from a total of over 65,000
combinations. The code is changed every time the handset is placed in the cradle.
If you experience difficulty with placing or receiving calls, a lost security code may
be the cause of the problem. When this occurs, the handset can no longer
communicate with the base. Reset by placing the handset on the base for 5-10
seconds. If that does not work, unplug the AC adaptor from the wall outlet.
Disconnect the handset battery for 5-10 seconds, then reconnect. Place the
handset back on the base and then replug the AC adaptor.
HK250.O/M.QXD 8/30/02 1:19 PM Page 16
17
BASIC OPERATION (CONTINUED)
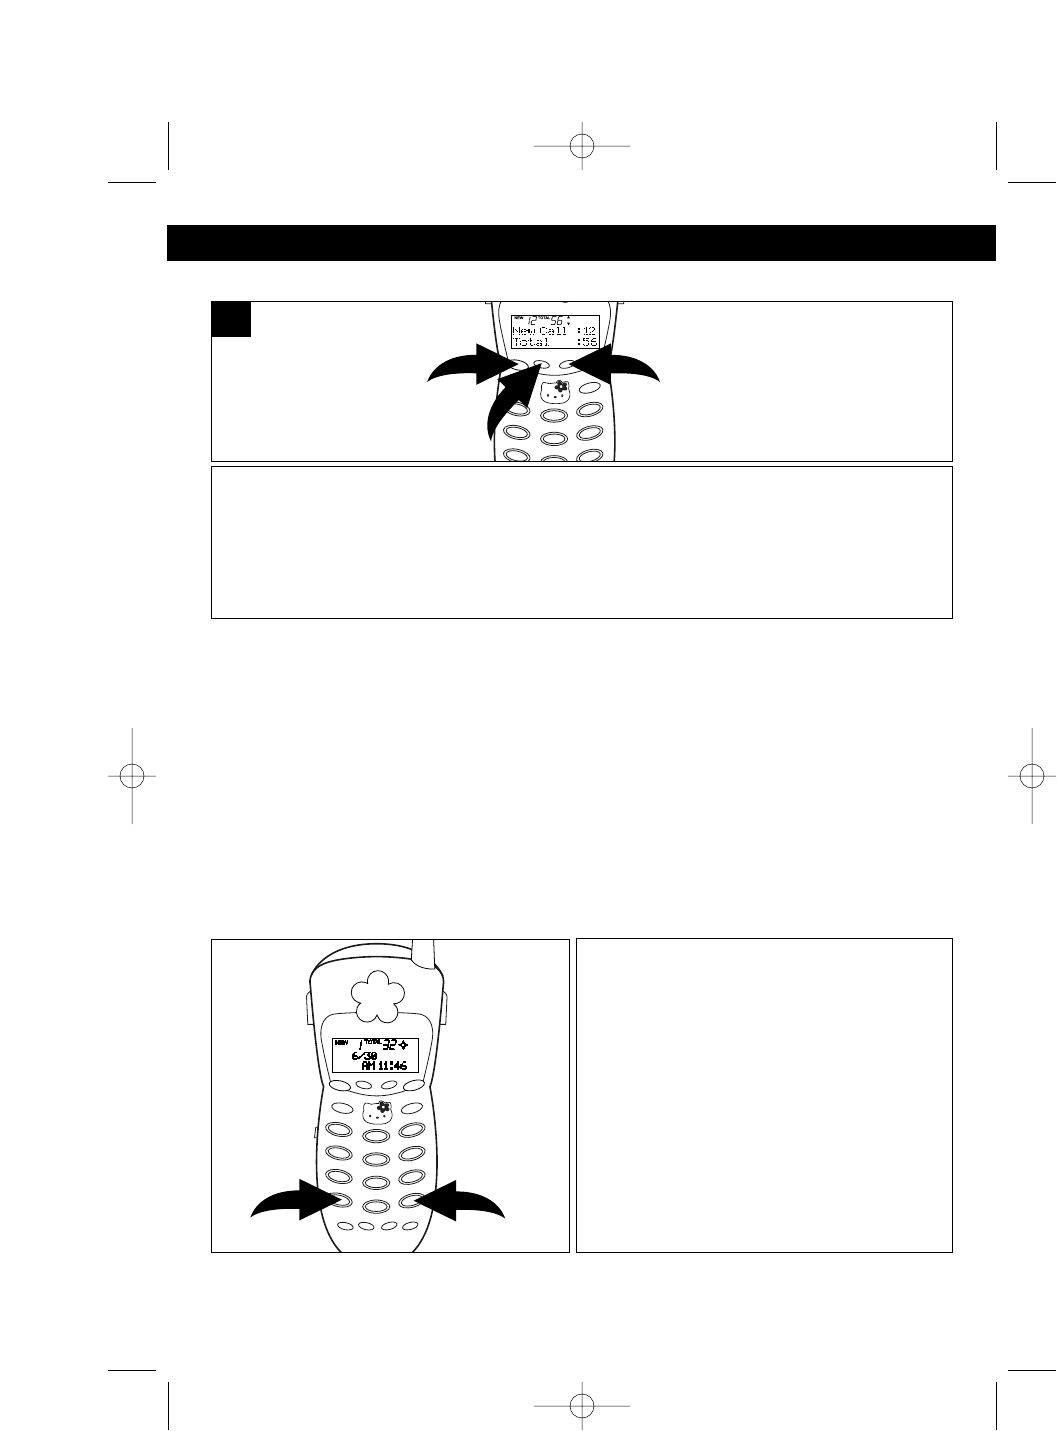
CHECKING THE CALLER ID LOG
To scroll through the calls, press the CID button ❶; the New Calls and the Total
Calls will appear in the display. Press the REVIEW/VOLUME button ❷ to go
through the calls from the first call received to the last. Press the REVIEW/
VOLUME ❷button ❸ to go through the calls from the last call received to the first.
Press the CID button ❶ again when done.
2
1
3
1
NOTES:
• The NEW indicator will blink until all new caller ID information has been reviewed.
• The REP indicator will appear in the display if you have received multiple new calls
from the same number.
VIEWING LONG TELEPHONE NUMBERS/NAMES AND
CHECKING THE DATE AND TIME
Due to display size limitations, a telephone number longer than 10 digits or a name
more than 12 characters long cannot be viewed at one time. For the same reason,
the received date and time cannot be displayed with the name and number. View
long names/numbers as follows:
Press the ❿button ❶ once or the ➛
button ❷ three times to display the full
number of the call received.
Press the ❿button ❶ twice or the ➛
button ❷ twice to display the full name of
the call received.
Press the ❿button ❶ three times or the
➛button ❷ once to display the date and
time of the call received.
1
2
HK250.O/M.QXD 8/30/02 1:19 PM Page 17
18
BASIC OPERATION (CONTINUED)
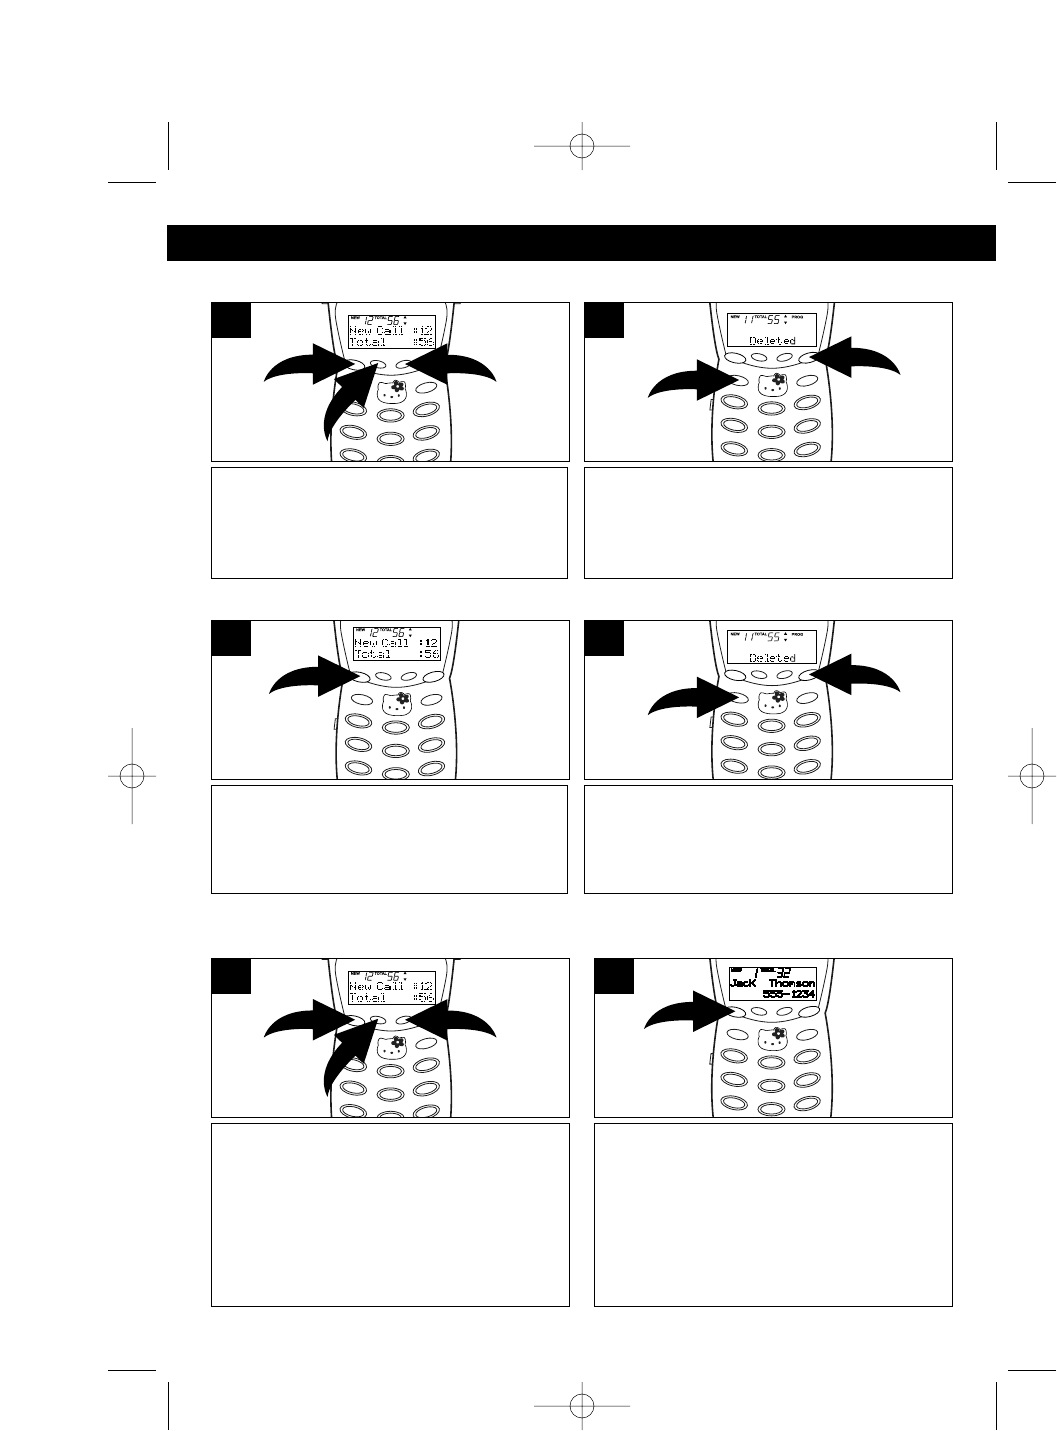
DIALING A NUMBER IN THE CALLER ID DISPLAY
You can automatically call a number from the caller ID log as follows:
Scroll through the calls to select a
number to dial by pressing the CID
button ❶and then scroll by pressing
the REVIEW/VOLUME /❷buttons
❷.
2
1
2
1
Press the CID button again to dial the
number.
2
DELETING ONE NAME/NUMBER FROM THE CALLER ID LOG
Scroll through the calls to select a
number to delete by pressing the CID
button ❶and then scroll by pressing the
REVIEW/VOLUME /❷buttons ❷.
2
1
2
1
Press the PROG button ❶ then press
the ERASE button ❷ ; “DELETED” will
appear in the display and a confirmation
tone will be heard.
1
2
2
DELETING ALL NAME(S)/NUMBER(S) FROM THE CALLER ID LOG
Press the CID button.
1
Press the PROG button ❶ then press
the ERASE button ❷; “DELETED” will
appear in the display and a confirmation
tone will be heard.
1
2
2
HK250.O/M.QXD 8/30/02 1:19 PM Page 18
19
BASIC OPERATION (CONTINUED)
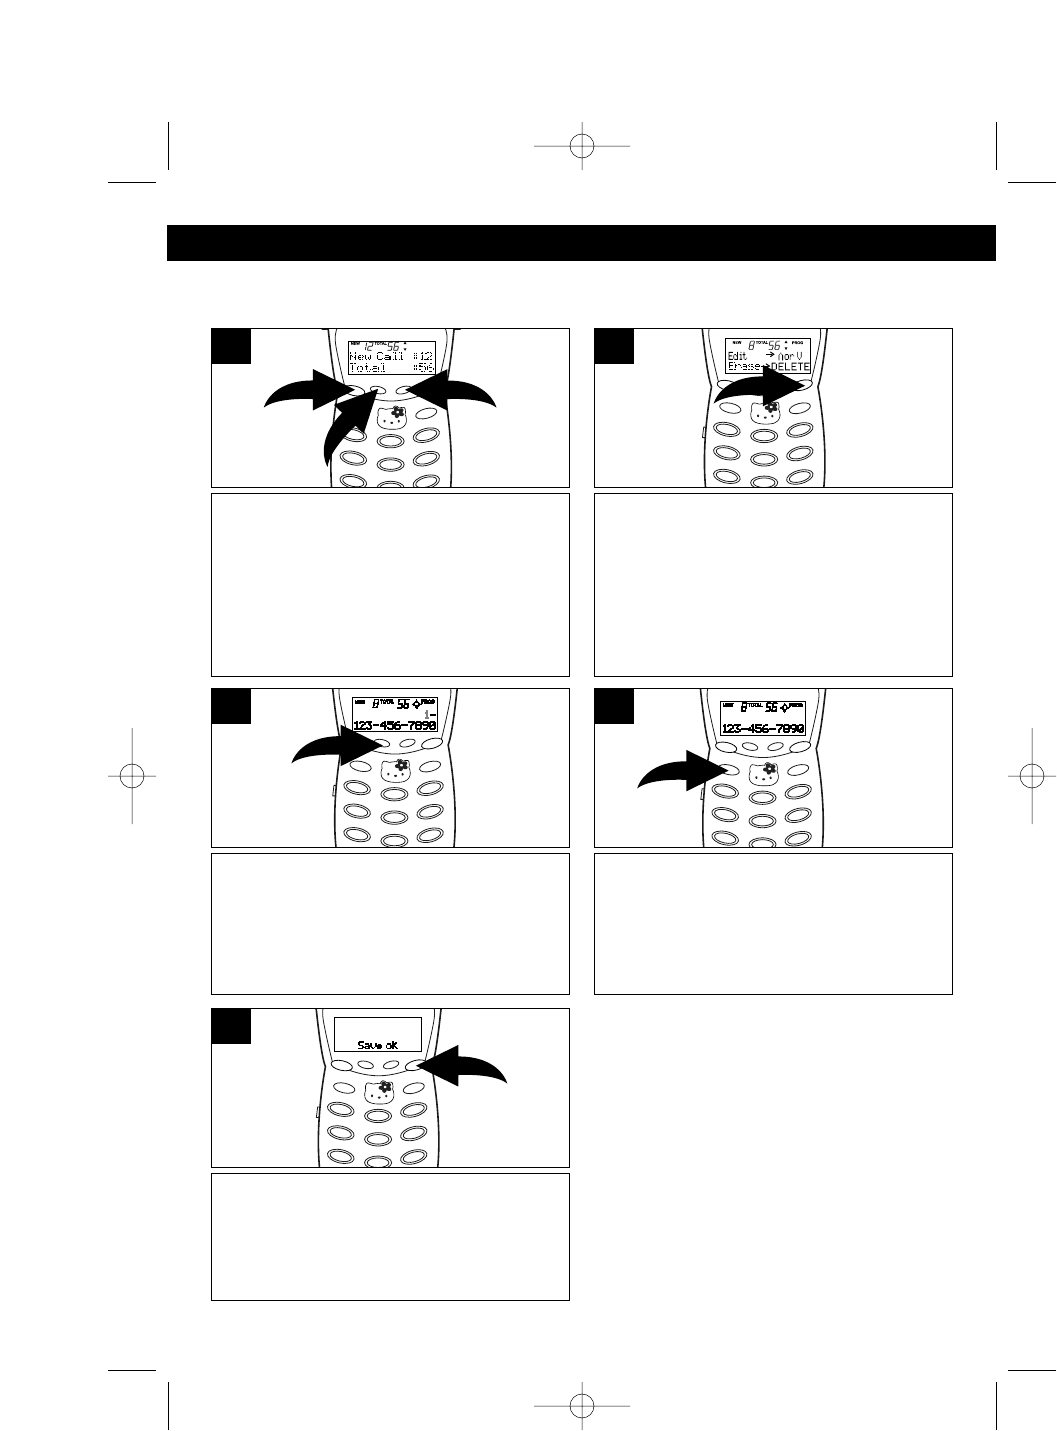
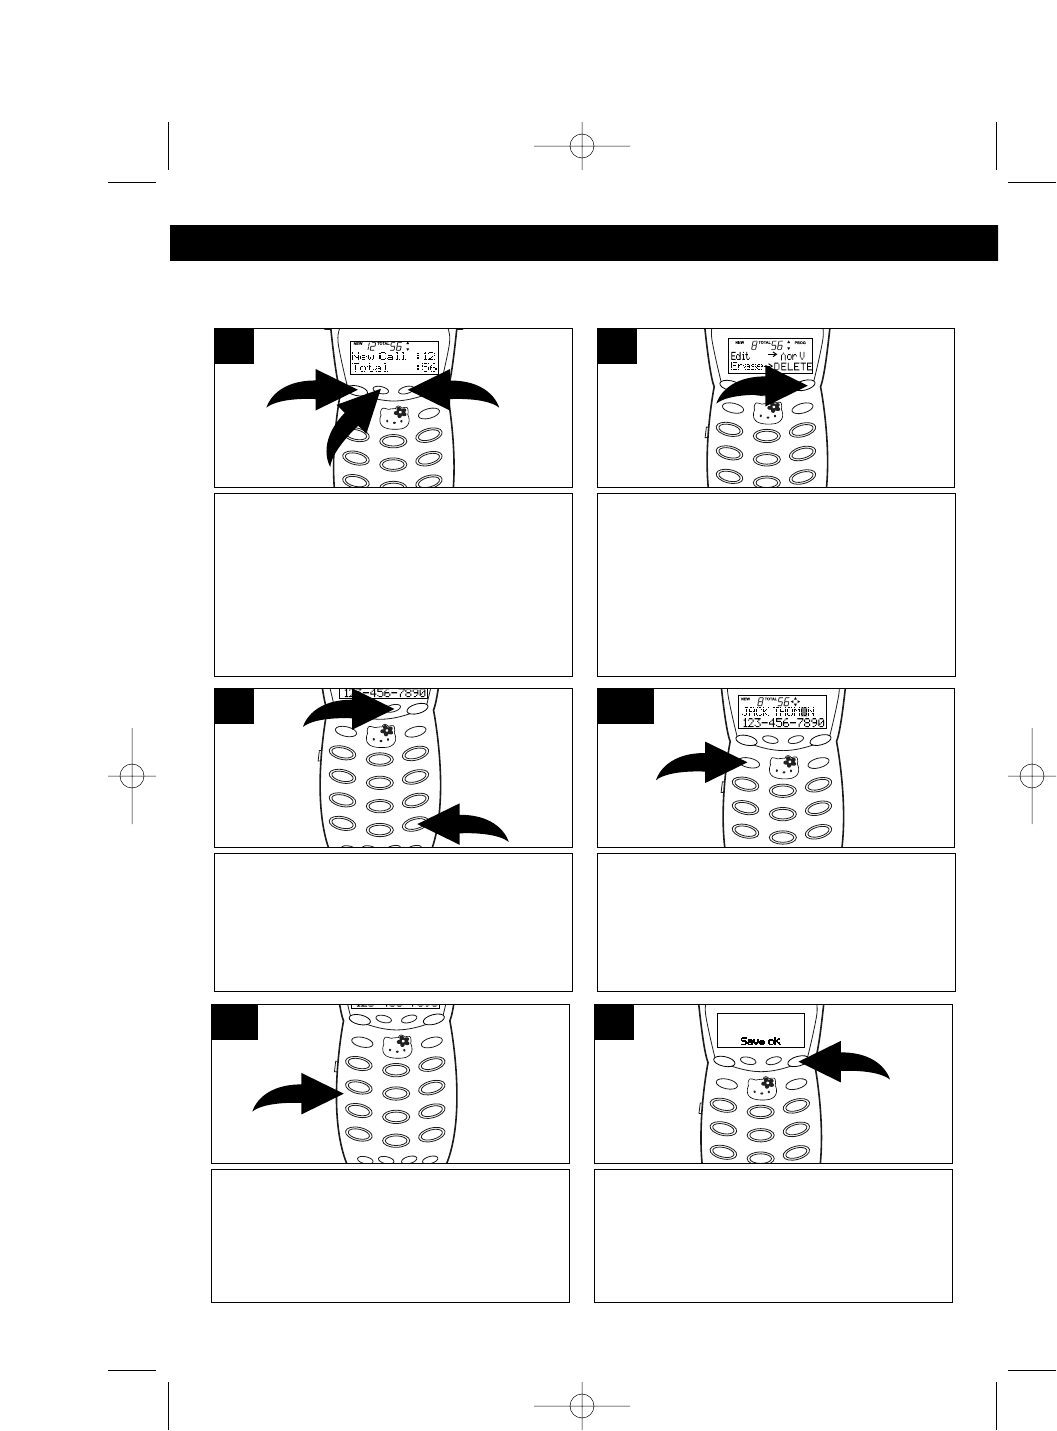
EDITING TELEPHONE NUMBERS
You can edit a phone number in the caller ID as follows:
Scroll through the calls to select a
number to edit by pressing the CID
button ❶and then scroll by pressing
the REVIEW/VOLUME /❷buttons
❷.
2
1
2
1
Press the PROG button to select the
menu.
2
Press the REVIEW/VOLUME ❷
button to go to the number; the first “1”
will start blinking.
3
Press the PROG button again to store
the new number; “Save ok” will appear
in the display for three seconds and a
confirmation tone will be heard.
5
Press the ERASE button; the “1” will be
deleted and the second digit will start
blinking. Press a desired number to
insert and it will be inserted before the
first digit.
4
HK250.O/M.QXD 8/30/02 1:19 PM Page 19
20
BASIC OPERATION (CONTINUED)
EDITING CALLER NAMES
You can edit a name in the caller ID as follows:
Scroll through the calls to select a
name to edit by pressing the CID
button ❶and then scroll by pressing
the REVIEW/VOLUME /❷buttons
❷.
2
1
2
1
Press the PROG button to select the
menu.
2
Press the REVIEW/VOLUME
button ❶ to start character editing.
Press the ❿button ❷ repeatedly to
move the cursor to the desired
character to edit.
2
1
3
TO CHANGE THE CHARACTER:
Press the key button to change to a
different character (see chart on page
22).
4b
Press the PROG button again to store
the new name; “Save ok” will appear in
the display for three seconds and a
confirmation tone will be heard.
5
TO ERASE THE CHARACTER: Press
the ERASE button; the next character
will move one step to the left. Press a
desired letter to insert and it will be
inserted before the first character.
4a
HK250.O/M.QXD 8/30/02 1:19 PM Page 20
21
BASIC OPERATION (CONTINUED)
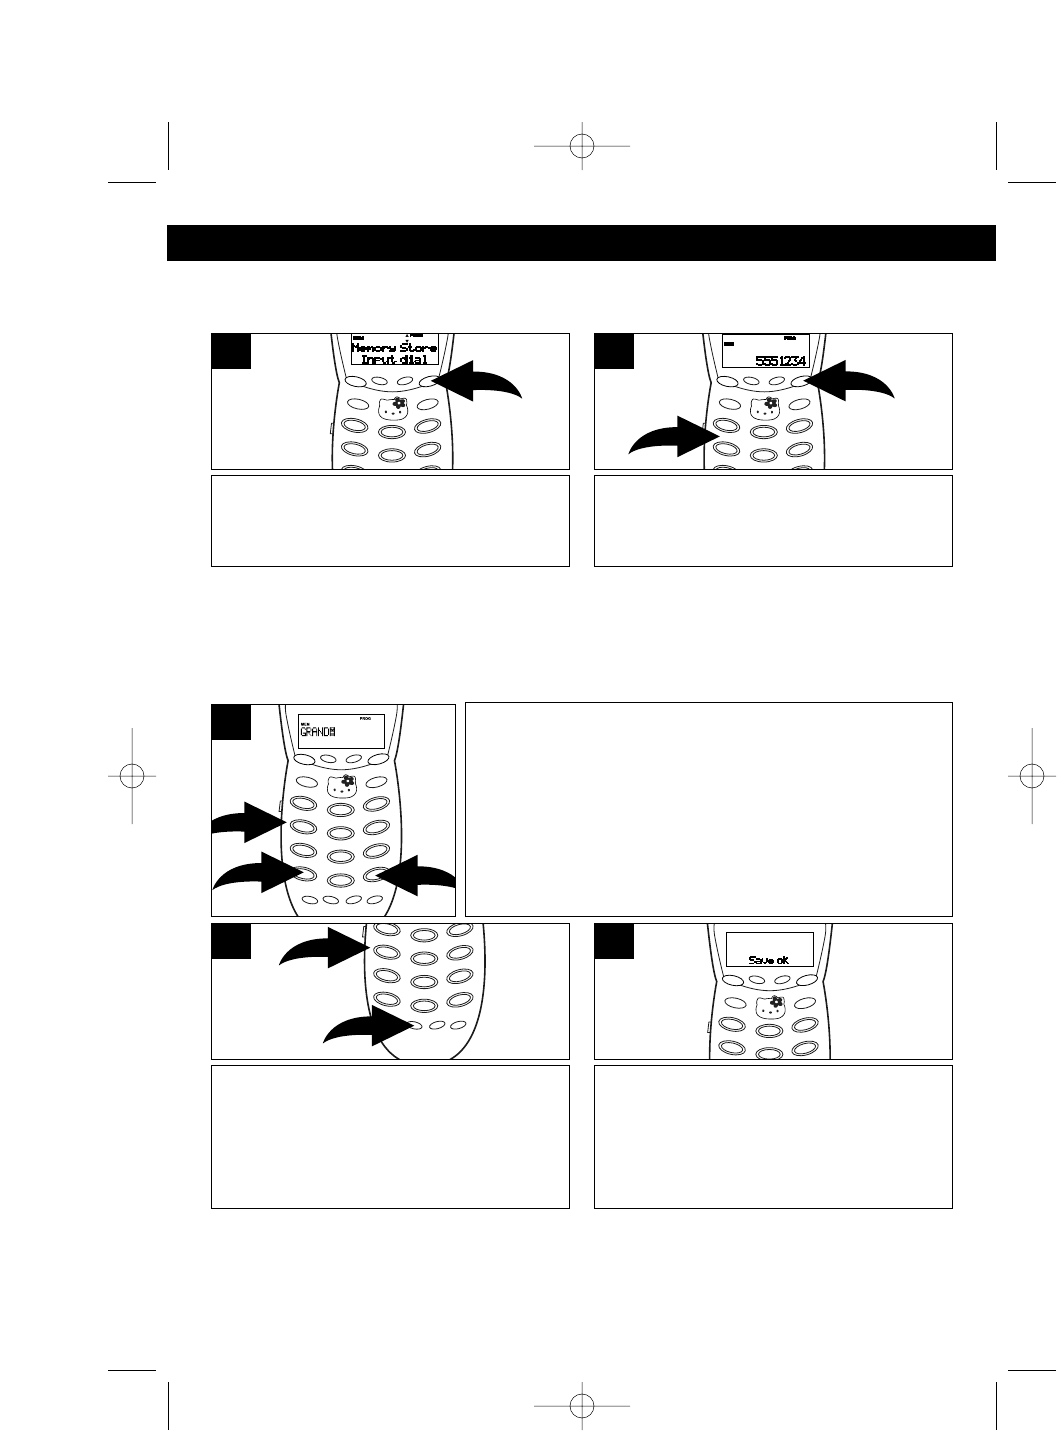
STORING NAMES AND TELEPHONE NUMBERS
The memory can store up to 20 name/telephone numbers.
Press the PROG button while in the
Standby mode.
1
Using the Key buttons (0-9, *, #) ❶,
enter the telephone number, then
press the PROG button ❷again.
2
1
2
NOTES:
• If a 17th digit is entered, the Store mode will be terminated with an error tone.
• If you misdial, press the ERASE button to clear the last digit.
• If desired, pause can be inserted between digits by using the PAUSE button.
When a pause is entered, “P” will be displayed.
NOTES:
• If the data is stored in a location where data has already been stored, the old
data will be overwritten.
See the Character Map Chart on the top of the next
page and using the Key buttons (0-9,*,#) ❶, enter the
name. Press the ➛❷ or ❿❸ button to move the cursor
to the right or the left after entering each character. For
example, press the 4 button ❶ once to enter a “G”, then
press the ❿button ❸. Press the 7 button ❶ three times
to enter the second character, “R”. Repeat this step until
all letters have been entered (up to 16).
3
2
1
3
Press the MEMO button ❶. Enter two
digits (01-20) using the Key buttons ❷
to assign the desired memory location
to store the data. “0” must be added for
memory locations 1 - 9.
1
2
4
One second after step 4, “Save ok” will
appear in the display for three seconds
and a confirmation tone will be heard.
5
HK250.O/M.QXD 8/30/02 1:19 PM Page 21