Jorjin Technologies WG7831DELF Wireless Module User Manual PowerPoint
Jorjin Technologies Inc. Wireless Module PowerPoint
Contents
- 1. User Manual
- 2. User manual
User manual

Quanta Intraoral Camera
Q-tube-I User Manual
version 0.8
Document number: Q6T418-01

DOCUMENT REVISION HISTORY
Version Date Status Author Comments
0.1 2016.1.22 P Monica Shyu
Katrina Wu Creation
0.2 2016.2.23 U Monica Shyu Update P.9 Sleep mode & Charging Battery status
P.7 Caution P.12 充電指示燈敘述刪除
0.3 2016.2.24 U Chain Hsu Integration and review
0.4 2016.3.8 U Katrina Wu
Chain Hsu
P. 3 Manufacturer name, trademark, address, phone
P. 4 目錄
P. 5 預期用途: 註明並非由病人操作
P. 6 Packaging
P. 7 鏡頭改成可用酒精消毒
P. 12 只可在非病人環境中充電
P. 13 初始連線的開啟Q-Tube電源改成將Q-Tube重新開機
P. 14 初始連線時開啟Smart Device BT即可,不須在BT列表上點選
Q-Tube
P. 16 無線加密機制須為WPA/WPA2 且SSID < 20字才可連線
P. 27 操作與儲存的大氣壓力/海拔
P. 29 使用符號說明
P. 30 31 網路通訊軟硬體風險聲明與管理
P. 32 電磁相容性表格(TBD by Chain)
P. 33-36 維護與廢棄物處置
Remove model name的”暫定”
0.5 2016.3.9 U Chain Hsu P. 27 產品規格中操作/儲存的大氣壓力範圍
P. 29 符號說明
0.6 2016.3.21 U Katrina Wu P. 7 警告中加入請勿直視照明燈光
0.7 2016.4.28 U Katrina Wu 封面加上文件編號 更新Model name
P. 37-39 新增CE/FCC相關警語 P. 40-45 新增EMC宣告
0.8 2016.5.6 U Katrina Wu P. 35-39 更新CE/FCC相關警語 P. 40-45 更新EMC宣告
2
© 2016 by Quanta Computer Inc. All rights
are reserved. No one is permitted to
reproduce or duplicate, in any form, this
manual or any part thereof without
permission from Quanta Computer Inc.
Quanta Computer Inc. assumes no
responsibility for any injury, or for any
illegal or improper use of the product, that
may result from failure to use this product
in accordance with the instructions,
cautions, warnings, or indications for use
published in this manual.
Software in this product is copyright of
Quanta Computer Inc. and its vendors. All
rights are reserved. The software may not
be copied, decompiled, reverse-
engineered, disassembled or otherwise
reduced to human-perceivable form.
This is not a sale of the software or any
copy of the software; all rights, title, and
ownership of the software remain with
Quanta Computer Inc. and/or its vendors.
CAUTION Changes or modifications not
expressly approved by Quanta Computer
Inc. will void the purchaser’s authority to
operate the equipment and its warranty.
3
QUANTA COMPUTER INC.
Address: 211, Wen Hwa 2nd Rd., Guishan Dist.,
Tao Yuan City 33377, Taiwan
Phone: +886-3-327-2345

Table
Introduction
Intended Use
Packaging
Warning & Caution
Product Operation
Appearance
Indicator Lights
Power Management
Pairing Q-tube-I with Smart Device
Patient ID
Photo & Video
Settings
Troubleshooting
Product Specification
Hardware Specification
Application Software Specification
Used Symbol Description
Maintenance
Cleaning & Disinfecting the Camera
Cleaning the Camera
Disinfecting the Camera
Inspecting the Camera for Damage
Protective Sleeve for the Camera
Disposal of Waste
Warranty & Service
Manufacturer’s Declaration
FCC Statement
CE marking
CE RF Exposure Compliance
EMC Declaration Tables
1 4

The Quanta Intraoral Camera Q-tube-I is intended for chairside use by licensed dentists
during oral health examinations, not for patients. It provides magnified digital color images
of intraoral or extra oral anatomy via the tablet. Both still and video images can be captured
and stored. The device allows practitioners to view the interior of the oral cavity and assist in
the assessment of the overall oral health of the patient. The Quanta Intraoral Camera Q-
tube-I also provides a tool for communicating treatment requirements or results by allowing
practitioner and patient to view areas of concern together, before and after procedures.
Intended Use
Introduction
5

(*)Note : AC Charger specifications
Model: MIL050200U
AC Input: 100-240V~, 50~60Hz
DC Output: +5V 2A max
Packaging
The Quanta Intraoral Camera Q-tube-I consists of a wireless digital intraoral camera, software application, a
charge cable and docking station.
Item Description Quantity
1 Q-tube-I (Intraoral Camera) 1
2 AC charger(*) 1
3 Charging dock 1
4 Protective sleeve 30
6

Warning & Caution
Please make sure to familiarize all operating personnel with the general safety information in this summary.
Specific warnings and cautions are also found throughout this manual. Such specific warnings and cautions
may not appear here in this summary.
Warning
A warning statement in this manual identifies a
condition or practice which if not corrected or
discontinued immediately, could lead to injury,
illness, or death.
•Do not use Quanta Intraoral Camera Q-
tube-I in the presence of flammable
anesthetics.
•This instrument is not intended to be used
in the eye. Do not stare at them in order to
avoid any ocular risk.
•The camera must be barrier protected with
the protective sheath before use.
•This product has no user replaceable parts.
Refer all service to qualified personnel.
•Do not stare at the light on Q-tube-I when
it is illuminating. Otherwise it may damage
your eyesight.
Caution
A caution statement in this manual identifies condition or
practice, which if not corrected or discontinued
immediately, could lead to equipment failure, equipment
damage, or data loss.
•Thoroughly read this manual to ensure patient safety
and obtain optimum performance .
•Do not attempt to disinfect the Quanta Intraoral
Camera Q-tube-I using ethylene oxide gas, steam,
glutaraldehyde products or any other gas or liquid
disinfectant except alcohol.
•Do not use the Quanta Intraoral Camera Q-tube-I if
you notice any signs of damage to the components of
the system. Contact customer service for assistance.
•Do not apply chemicals, or water to the lens. Any
liquids or solution entering the optical assembly will
damage internal components.
•Before each use, the outer surface of Quanta
Intraoral Camera Q-tube-I which is intended to be
inserted into a PATIENT should be checked to ensure
there are no unintended rough surfaces, sharp edges
or protrusions which may Cause a SAFETY HAZARD.
7
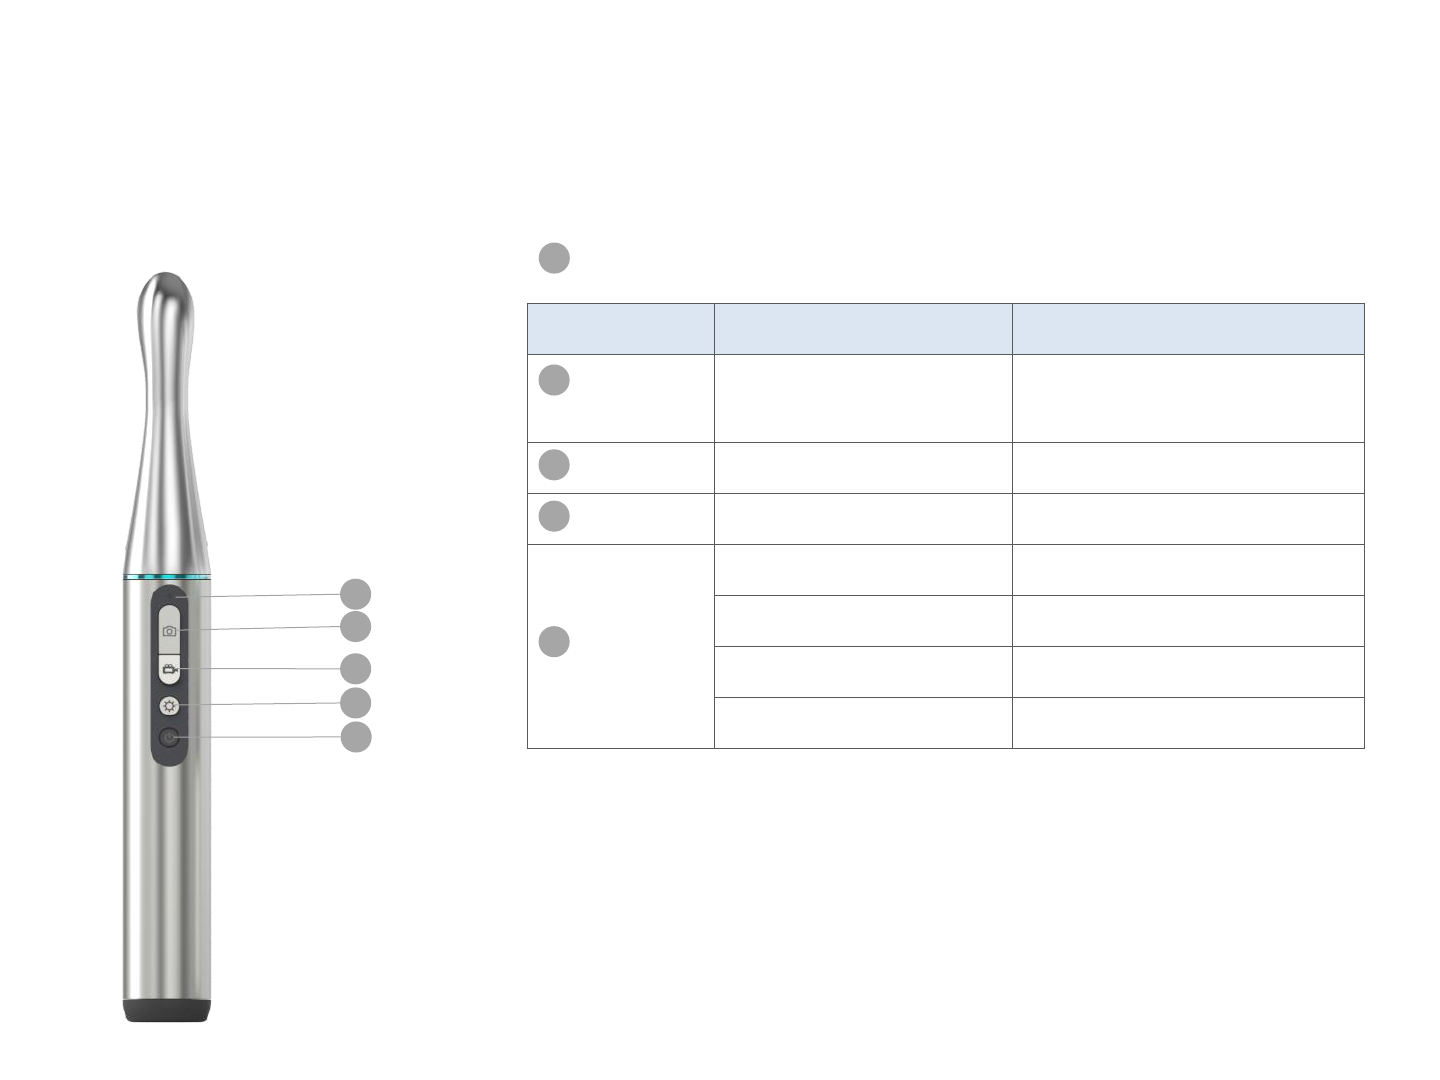
Appearance
Button Function Operation
photo Take a photo (incl.
during video mode)
Quick press
Record Take a video Quick press
Brightness
Adjust brightness Quick press (5 levels)
Power
Turn on Press and hold (5 seconds)
Turn off Press and hold (5 seconds)
Wake from sleep mode
Quick press
Return to previous page
Quick press at preview page
Indicator Lights
1
2
4
5
3
1
2
4
5
3
Automatic sleep mode after 2 minutes of idle time
Automatic shutdown after 3 hours of idle time
8
Product Operation

9
Indicator Lights
Sufficient Low Battery
Turning On
Ready for use
Sleep mode
Bluetooth/Wi
-
Fi
Connecting
常亮
閃爍
呼吸
Blinking
Solid
Charging
Battery
Low battery
Charging
Fully charged
When Q-tube-I battery is low and not
connected to the docking station, no
indicator light will turn on and the
device will not turn on.
10
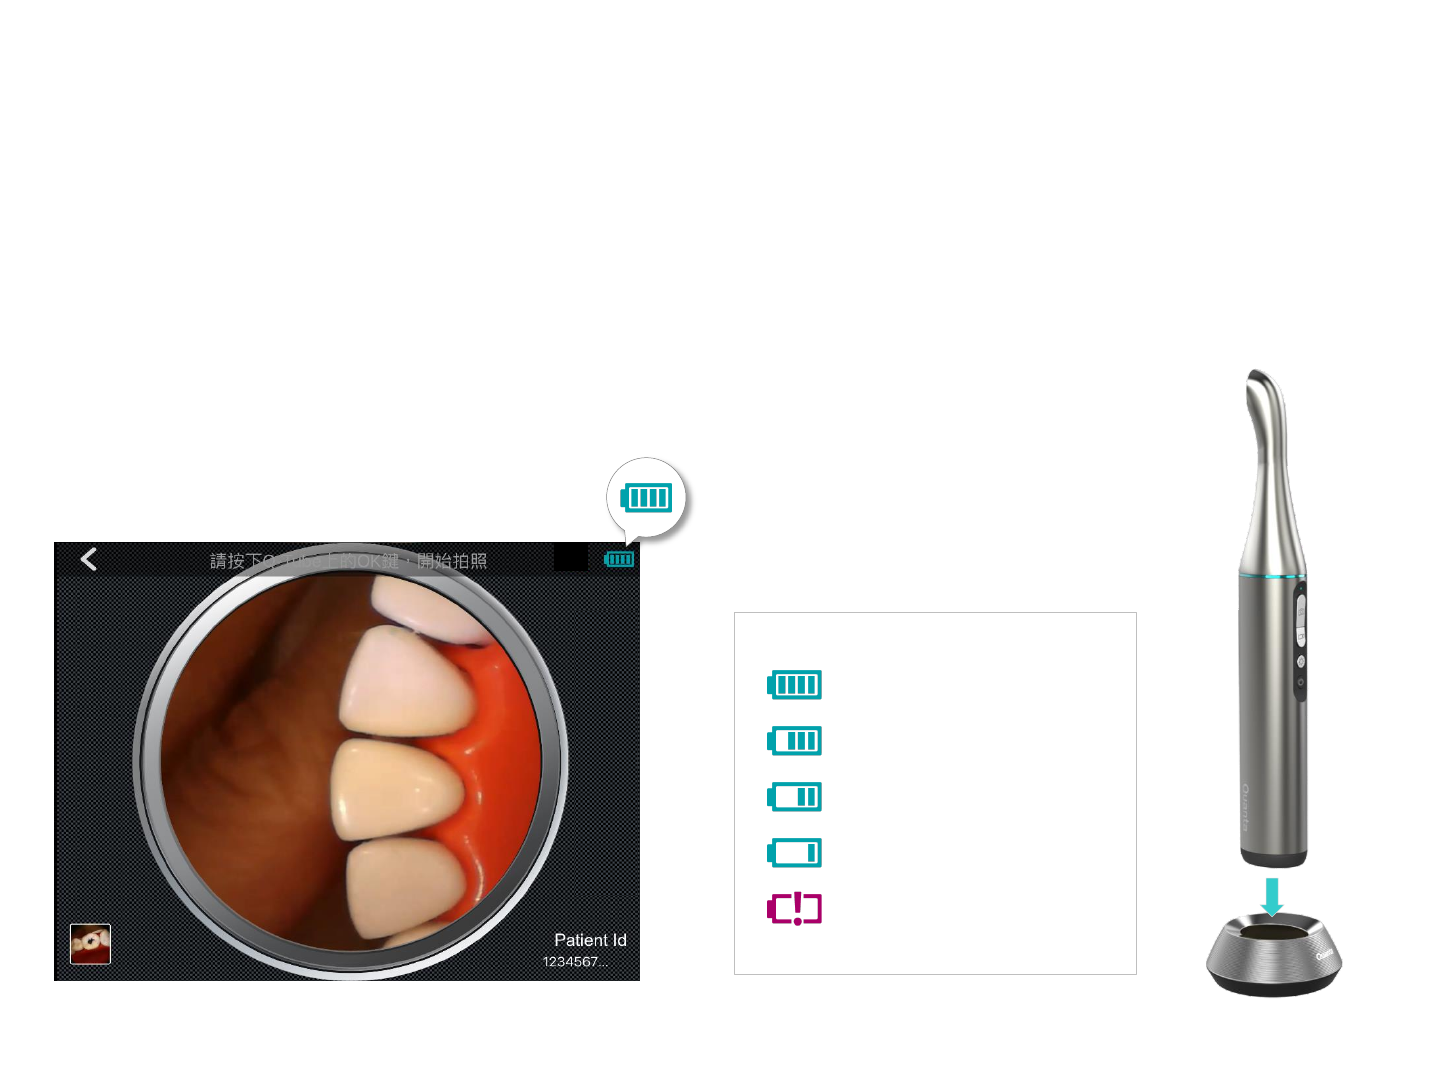
Power Display
Fully charged
75% battery remaining
50% battery remaining
25% battery remaining
No charge
Battery status is shown at the upper right corner of
the Image Capture screen in the Q-Tube App. When
the battery is low, connect Q-tube-I to the docking
station to charge.
Power Management
The battery of Q-tube-I is sufficient.

11
Turning On
1. Press and hold the power button for 5 seconds
to turn on Q-tube-I (solid blue indicator light)
2. Q-tube-I is ready to use when the indicator light
turns solid green
Turning Off
1. Press and hold the power button for 5 seconds
to turn off Q-tube-I
2. Q-tube-I is shut down when the indicator light
turns off
Auto Sleep Mode/Auto Shutdown
Q-tube-I uses a non-removable battery. For efficient
battery management, Q-tube-I automatically enters
sleep mode after 2 minutes of idle time (solid yellow
indicator light) and automatically turns off after 3
hours of idle time (indicator light turns off).
* If Q-tube-I is unpaired, it will automatically enter
sleep mode after 20 minutes of idle time. This
changes to 2 minutes after the first pairing.
Waking Up
Wake up Q-tube-I from sleep mode by pressing the
power button (solid green indicator light).
Sleep mode is indicated on the preview screen
1. If Q-tube-I has never paired with smart device,
please press the button.
2. Pressing the button can leaving the preview page.
12
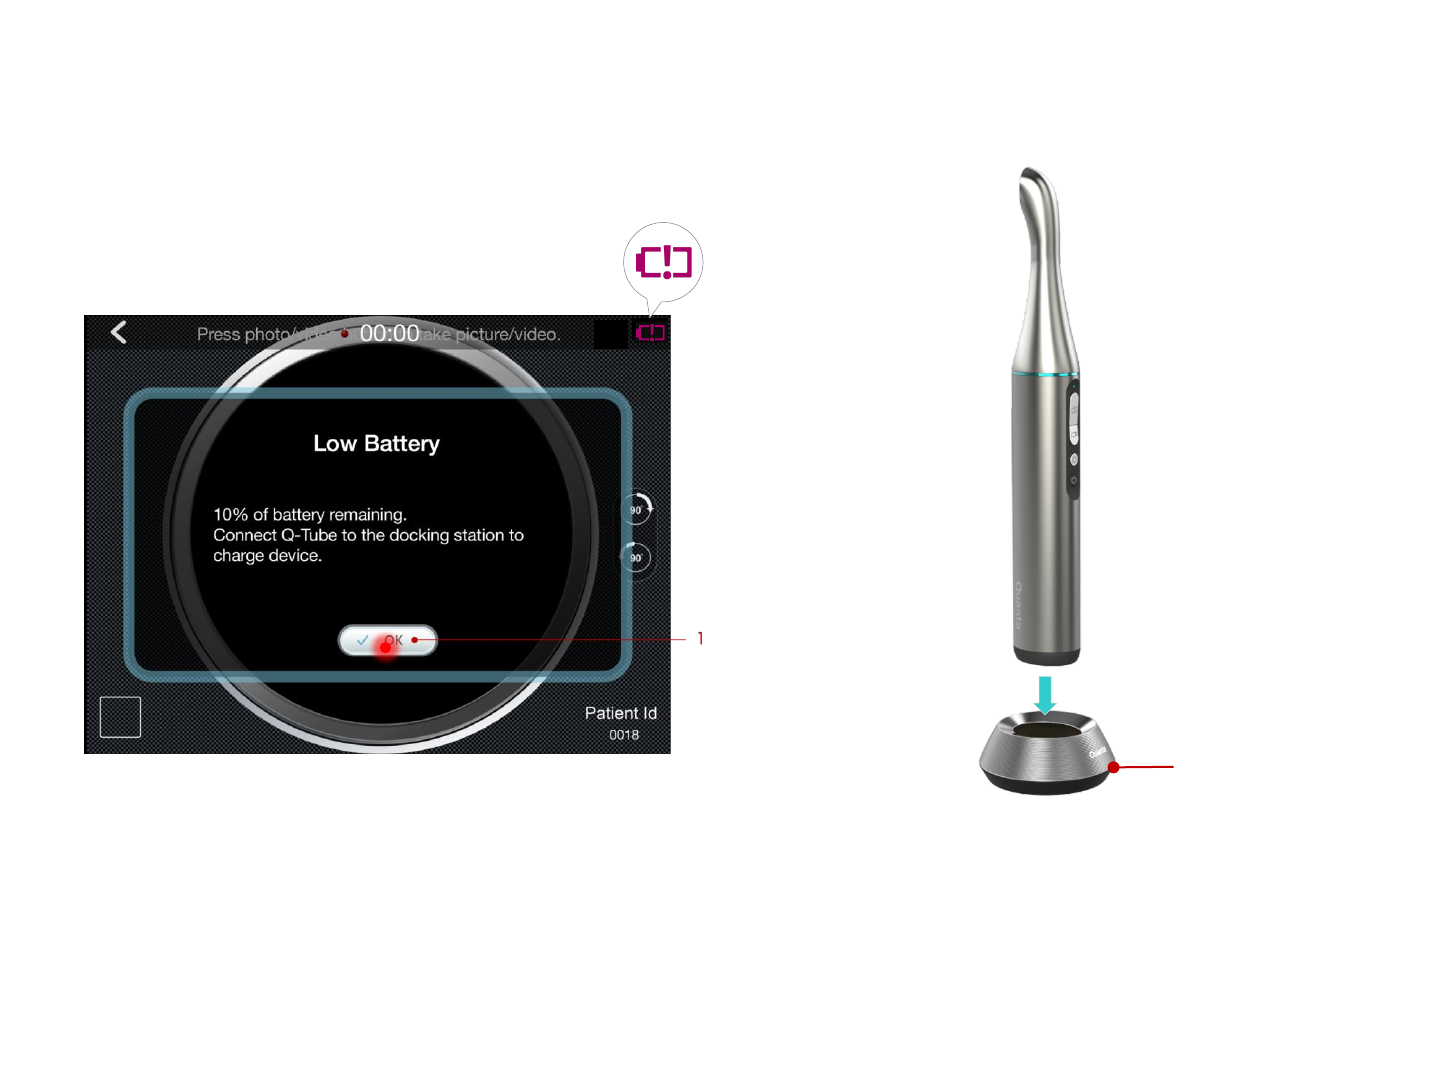
Charging the Battery
1. Place Q-tube-I in the charging station and
connect the power supply.
Low Battery Notification
1. The battery indicator light blinks red when less
than 20% charge remains. Battery status is
shown at the upper right corner of the Image
Capture screen in the Q-Tube App.
2. Charge Q-tube-I as soon as possible.
1. Press here to close notification.
1
1. Indicator lights on docking station
CAUTION
Charging Q-tube-I is intended for environment without
any patient. Please ensure that no patient is around the
environment Q-tube-I is charged in.
13
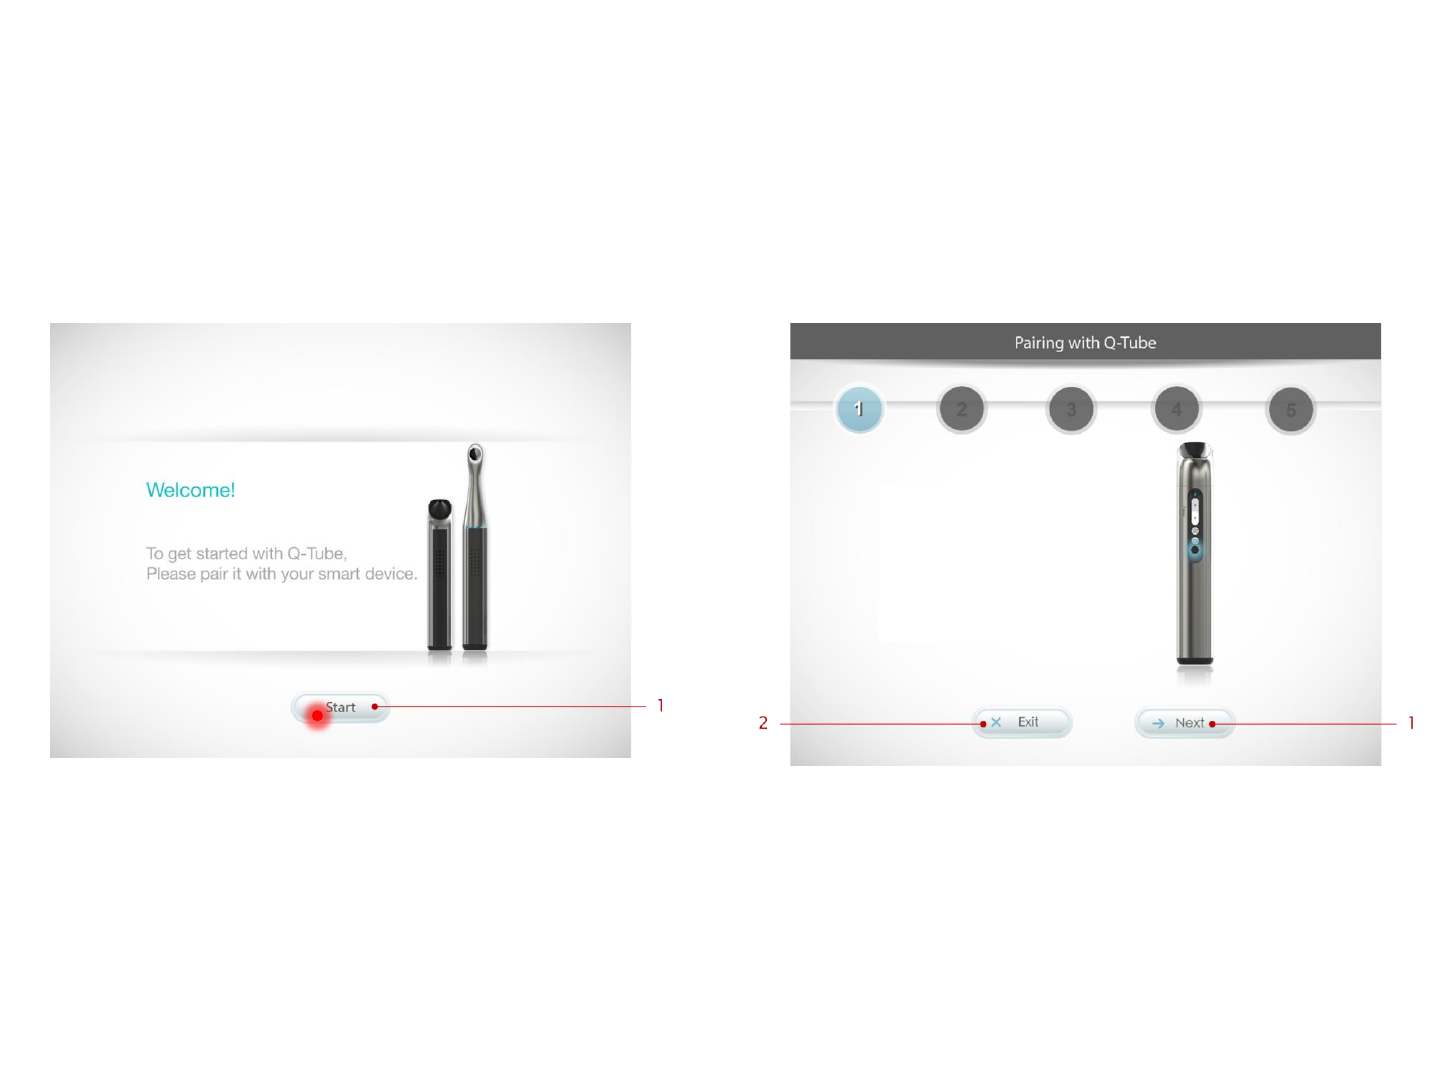
Getting Started
The welcome page appears the first time you
install the Q-Tube App. Press Start to pair Q-
tube-I with your smart device.
Step 1. Restarting Q-tube-I
Press power button on Q-tube-I 5 seconds to turn
off, and press power button 5 seconds to turn on.
1. After restarting Q-tube-I, please press here to enter
next step of pairing setting.
2. Press here to cancel the pairing flow.
1. Press here to start pairing Q-tube-I with smart
device.
Pairing Q-tube-I with Smart Device
Restart Q-Tube
Press power button on Q-Tube
Intraoral Camera 5 seconds to
turn off, and press power button
5 seconds to turn on.
14
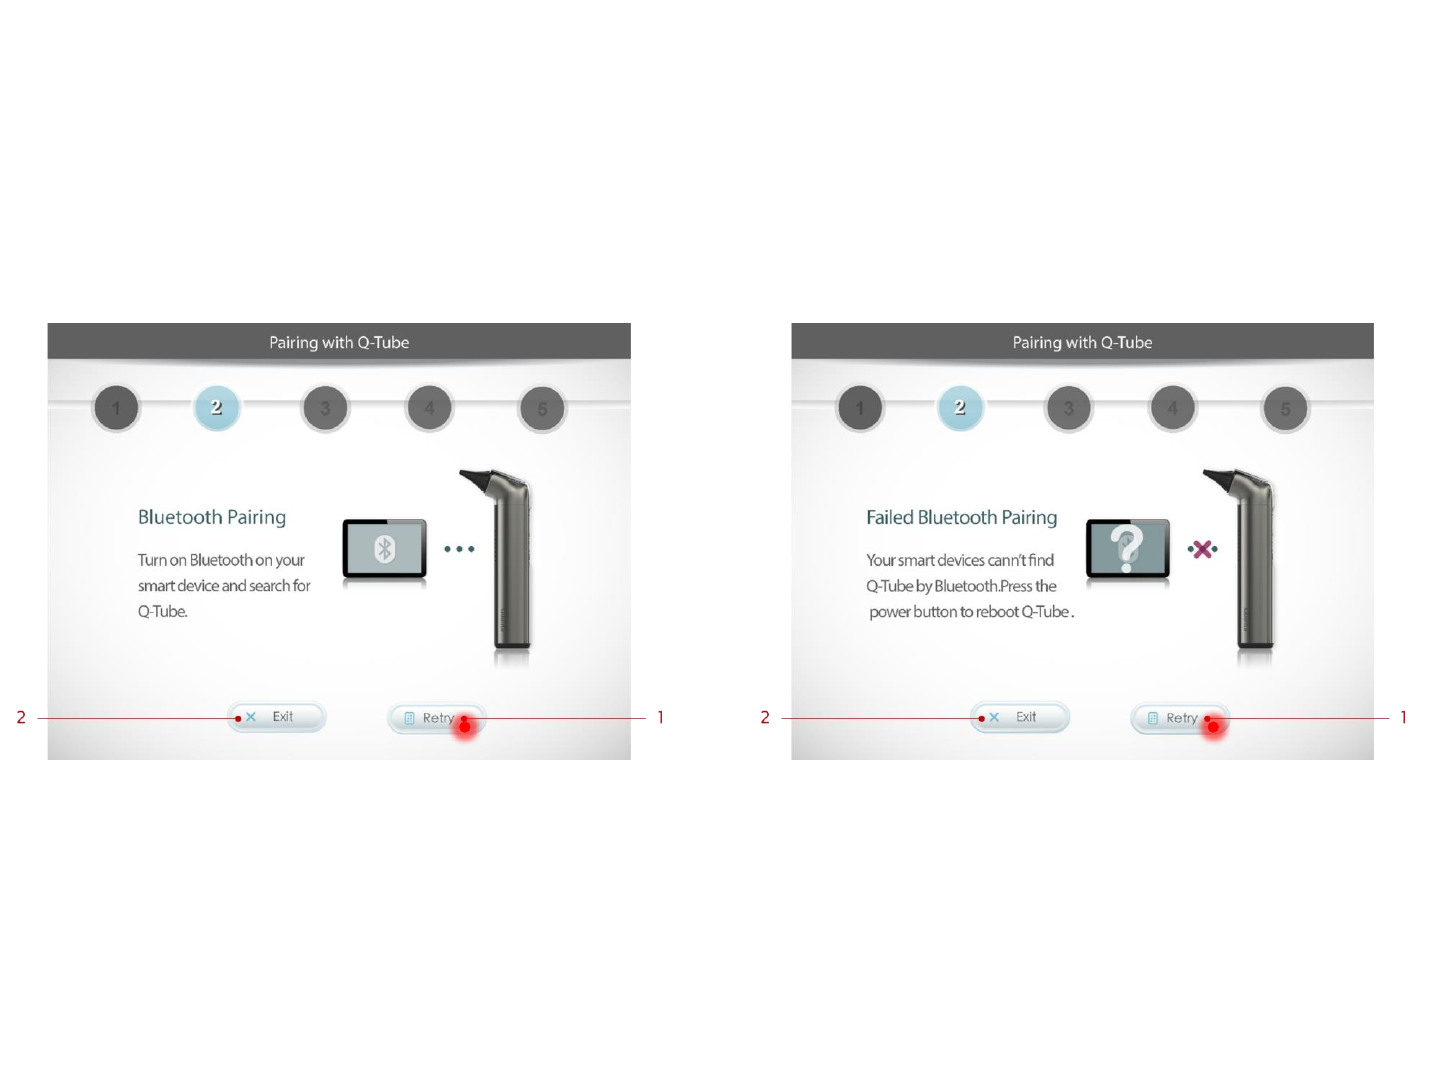
Step 2. Turn on Bluetooth on your
smart device
Turn on Bluetooth on your smart device; then
press Next
[Error Message] Smart device
Bluetooth is off
Ensure that Bluetooth is on and press Retry
1. After restarting Q-tube-I and confirm Bluetooth on
smart device is turn on, press here to enter next
step of pairing setting.
2. Press here to cancel the pairing flow.
1. Turn on Bluetooth on smart device and press here
to enter next step of pairing setting.
2. Press here to cancel the pairing flow.
15
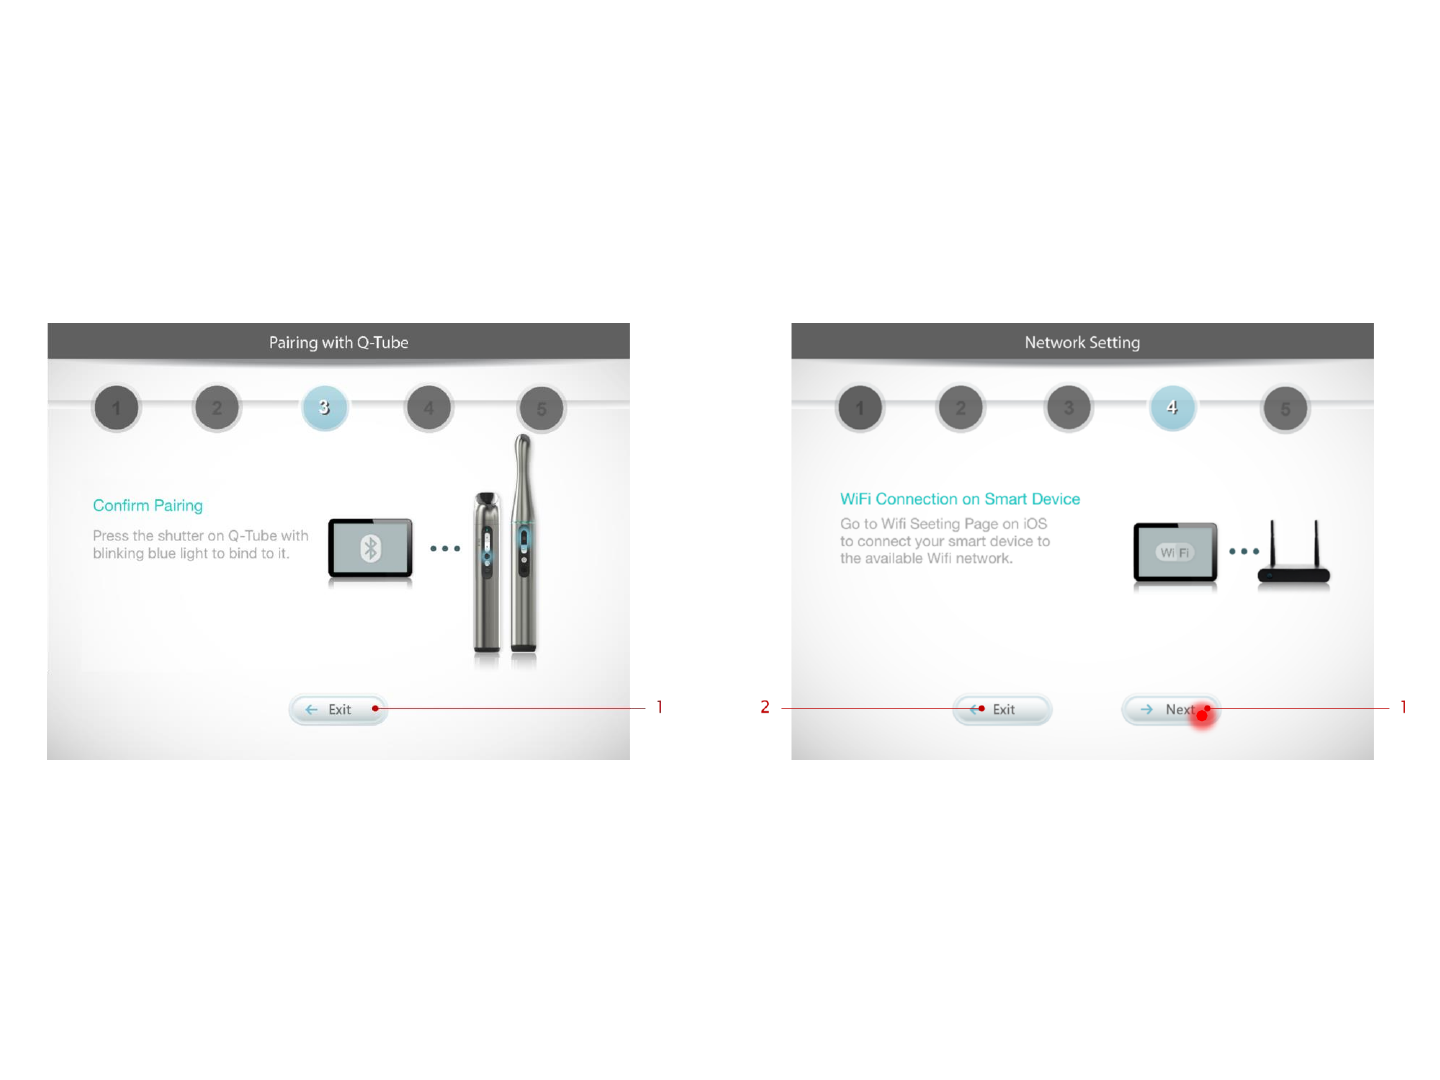
Step 3. Confirm Q-tube-I pairing
When the indicator light on your Q-tube-I blinks
blue, press the photo button to confirm pairing
Step 4. Connect smart device to Wi-Fi
Connect your smart device to an available Wi-Fi
network; then press Next (iOS) or Settings
(Android)
1. Connect your smart device to the available Wi-Fi
network; then press here to enter next step of
pairing setting.
2. Press here to cancel the pairing flow.
1. Press here to cancel the pairing flow.
16
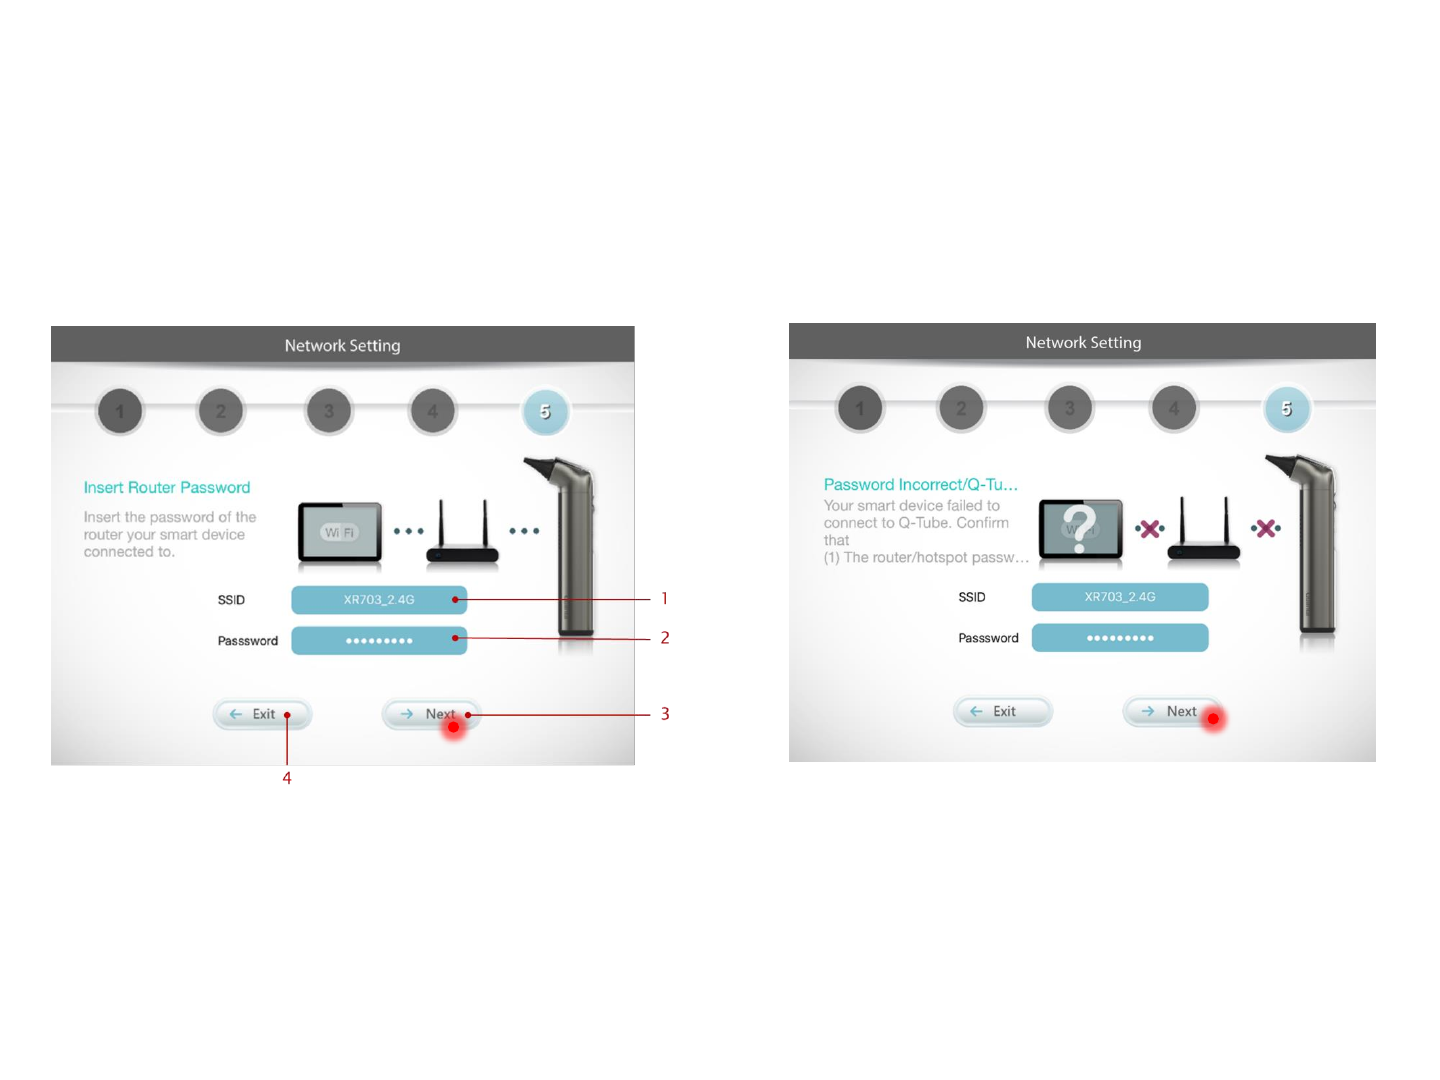
Step 5. Enter router password
Enter the password for the router your smart device
is connected to; then press Next
[Error Message] Password Incorrect
Confirm that the password of Wi-Fi is correct;
then press Next.
1. Insert the SSID (with 20-character limit) of the Wi-Fi
router your smart device connected to.
2. Insert the password of the Wi-Fi router your smart
device connected to.
3. After inserting the SSID & password of the Wi-Fi
router, press here to submit.
4. Press here to cancel the pairing flow.
* Only Wi-Fi network with WPA/WPA2 encryption is
accessible by Q-Tube App.
17
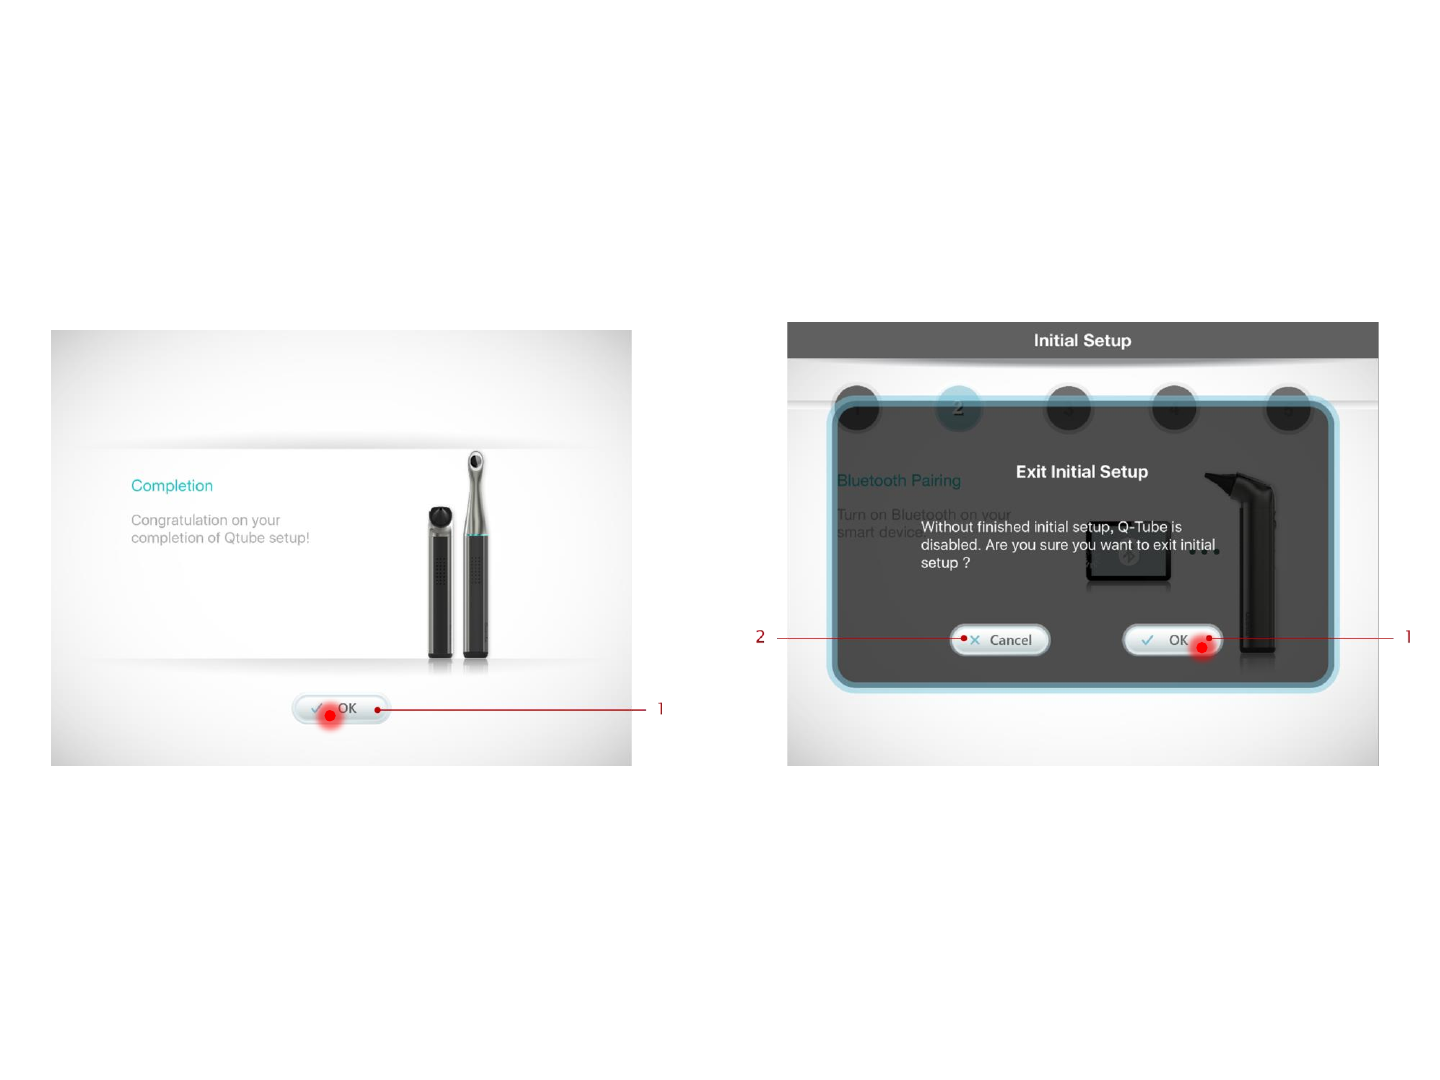
Pairing Complete
Pairing is completed. Press OK to start using the
Q-Tube App.
Cancel Pairing
To cancel pairing the device, press Exit at any time
during Step 1-5 and press OK to confirm
1. To cancel pairing settings between Q-tube-I & smart
device, press here to cancel the pairing flow.
2. Press here to return to the pairing flow.
1. Press here to complete the pairing settings
between Q-tube-I & smart device.
18
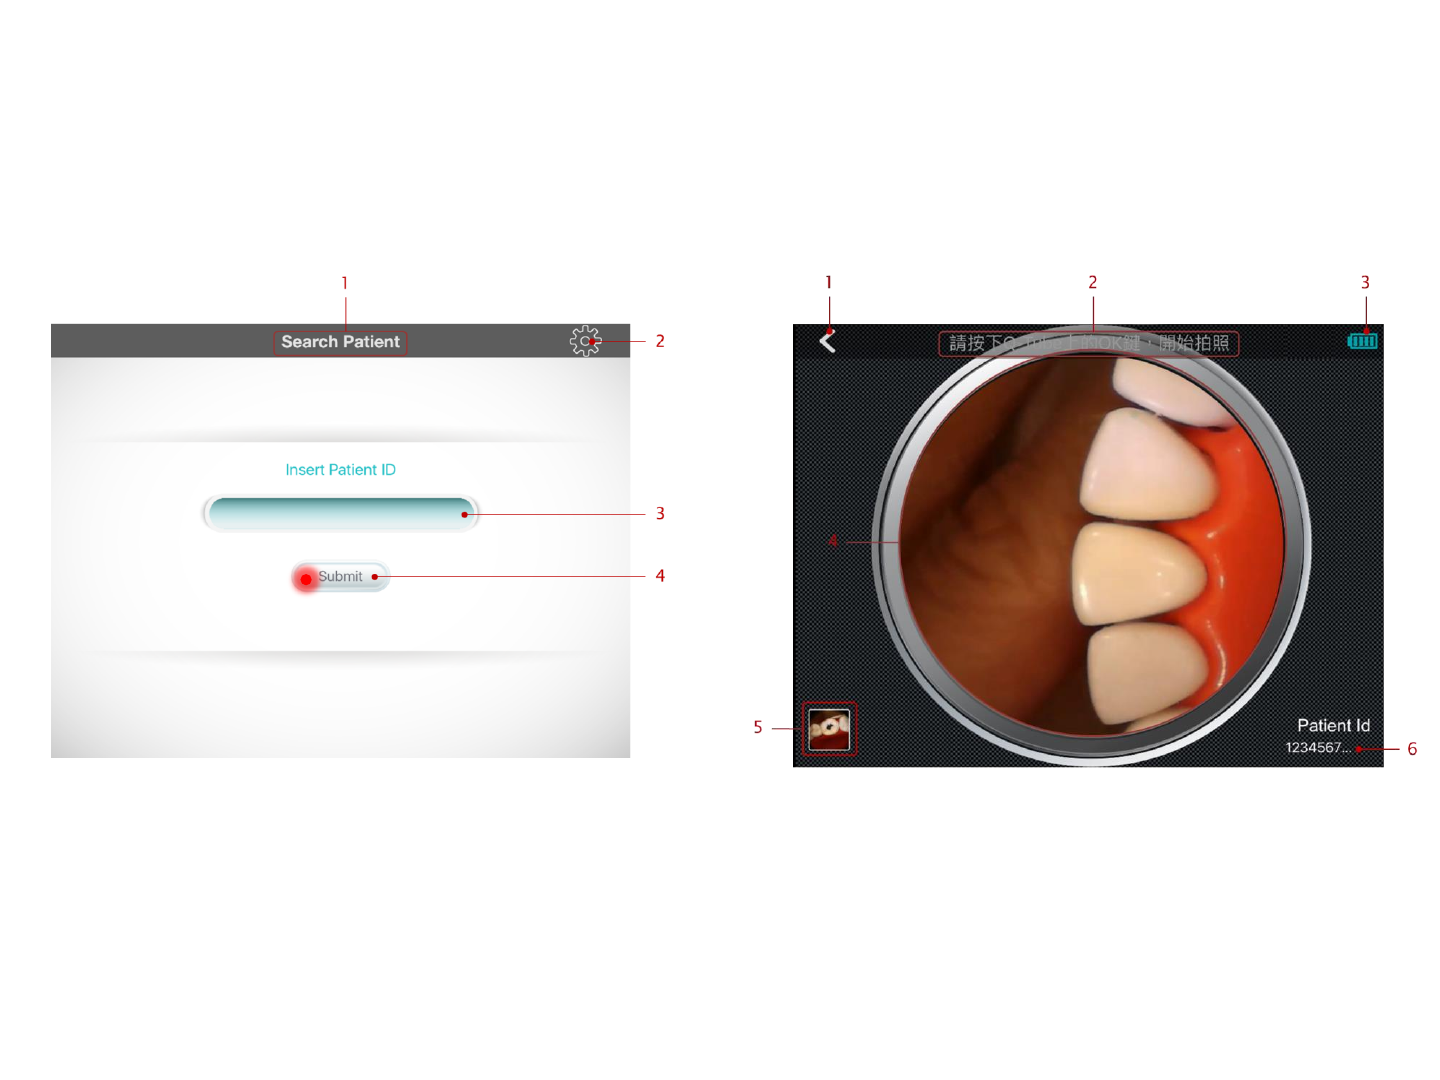
Enter Patient ID
Enter the medical record number for the patient
(must be 12 characters in length containing
letters or numbers); then press Submit
Patient ID
Photo
Press the photo button to take a photo.
1. Back button: press here to return to previous page
2. Indicated the operation related to preview page.
Press the photo button on Q-tube-I to take a
picture.
3. The remaining battery of Q-tube-I
4. Real-time video streaming view
5. The thumbnail image of the newest photo and
video. Press here to view photos & videos.
6. The id of the examined patient.
1. Page Title: indicates the function of this page.
2. Press here to go to device management page and
view the Q-tube-I device information pairing with
smart device.
3. Insert the patient id to be searched here.
4. After inserting the patient id to be searched, press
here to submit.
Photo & Video
19
Preview Photo/Video
Step 1. Press on the thumbnail image in the lower
left corner of the screen to preview Photo/Video.
1. Back button: press here to return to previous page
2. Display how long it has recorded when recording video.
3. The remaining battery of Q-tube-I
4. Real-time video streaming view
5. The thumbnail image of the newest photo and video.
Press here to view photos & videos.
6. The id of the examined patient.
Video
Press the record button on Q-tube-I to start/stop
recording
20
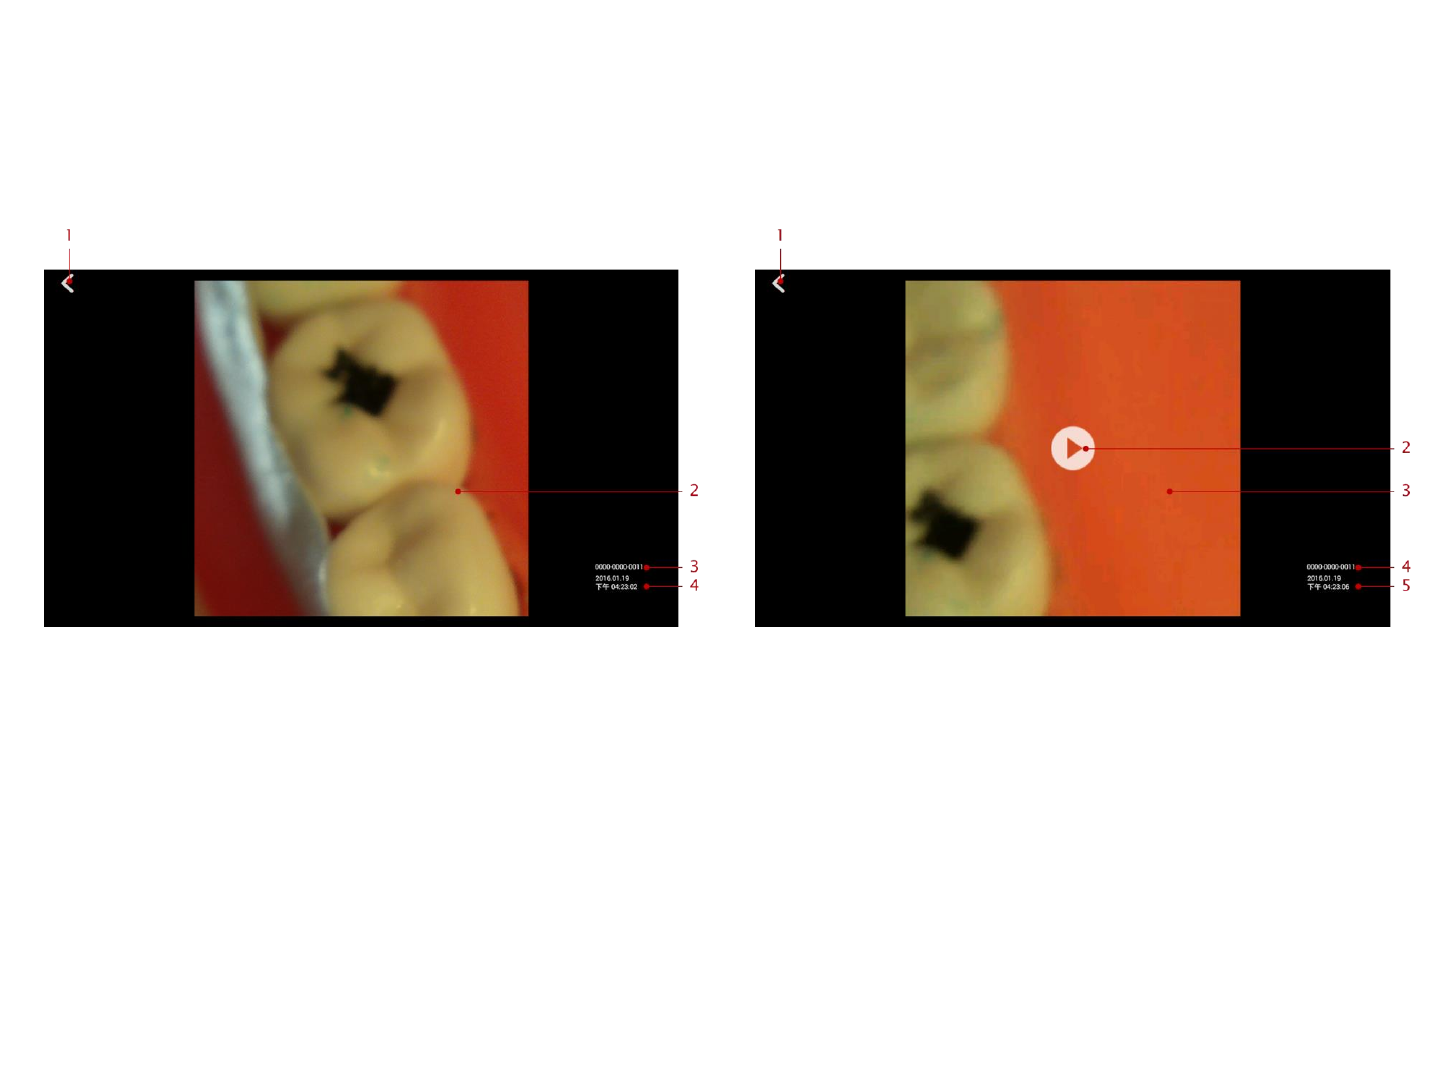
View a Photo View a Video
1. Back button: press here to return to previous page
2. The photo obtained from Q-tube-I. View the
next/last photo or video by sliding to left/right.
3. Patient id: indicates the patient the photo belongs to.
4. The taken time of the photo.
1. Back button: press here to return to previous page
2. Play button: press here to play video
3. The video obtained from Q-tube-I. View the
next/last photo or video by sliding to left/right.
4. Patient id: indicates the patient the video belongs to.
5. The taken time of the video.
21
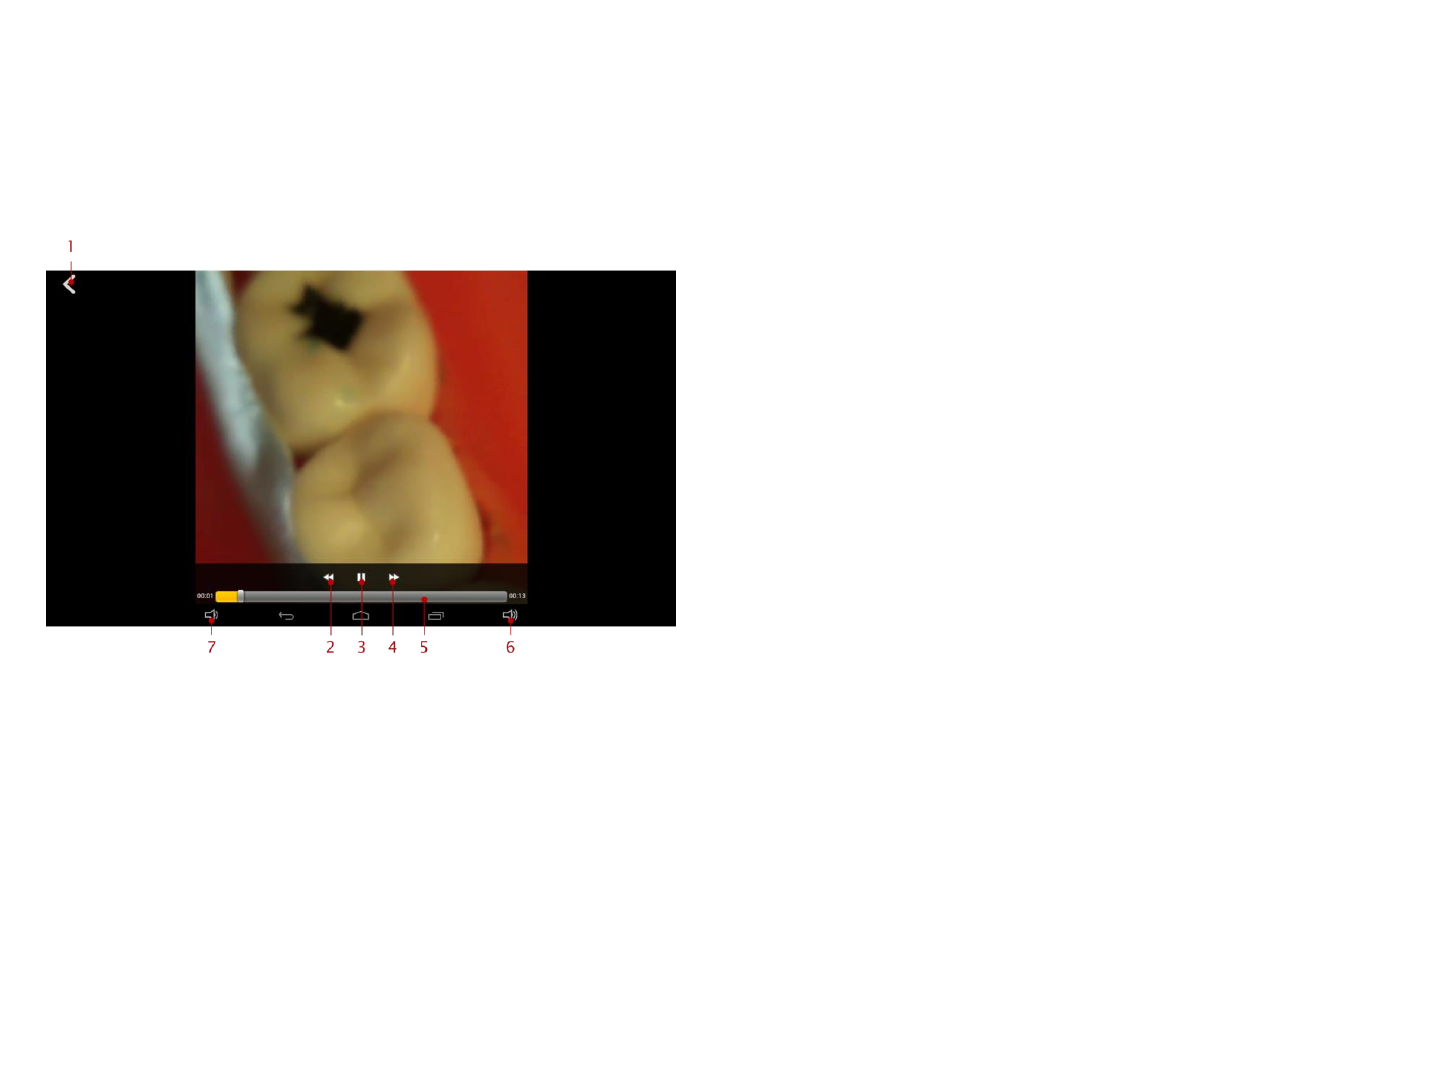
Video Playing
1. Back button: press here to return to previous page
2. Turn-back button: turn back the video
3. Pause button: pause the playing video
4. Fast-forward button: fast-forward the video
5. Video progress bar: click to go to the specified progress
6. Volume up button: click to increase the system volume
7. Mute button: click to mute the system volume
22
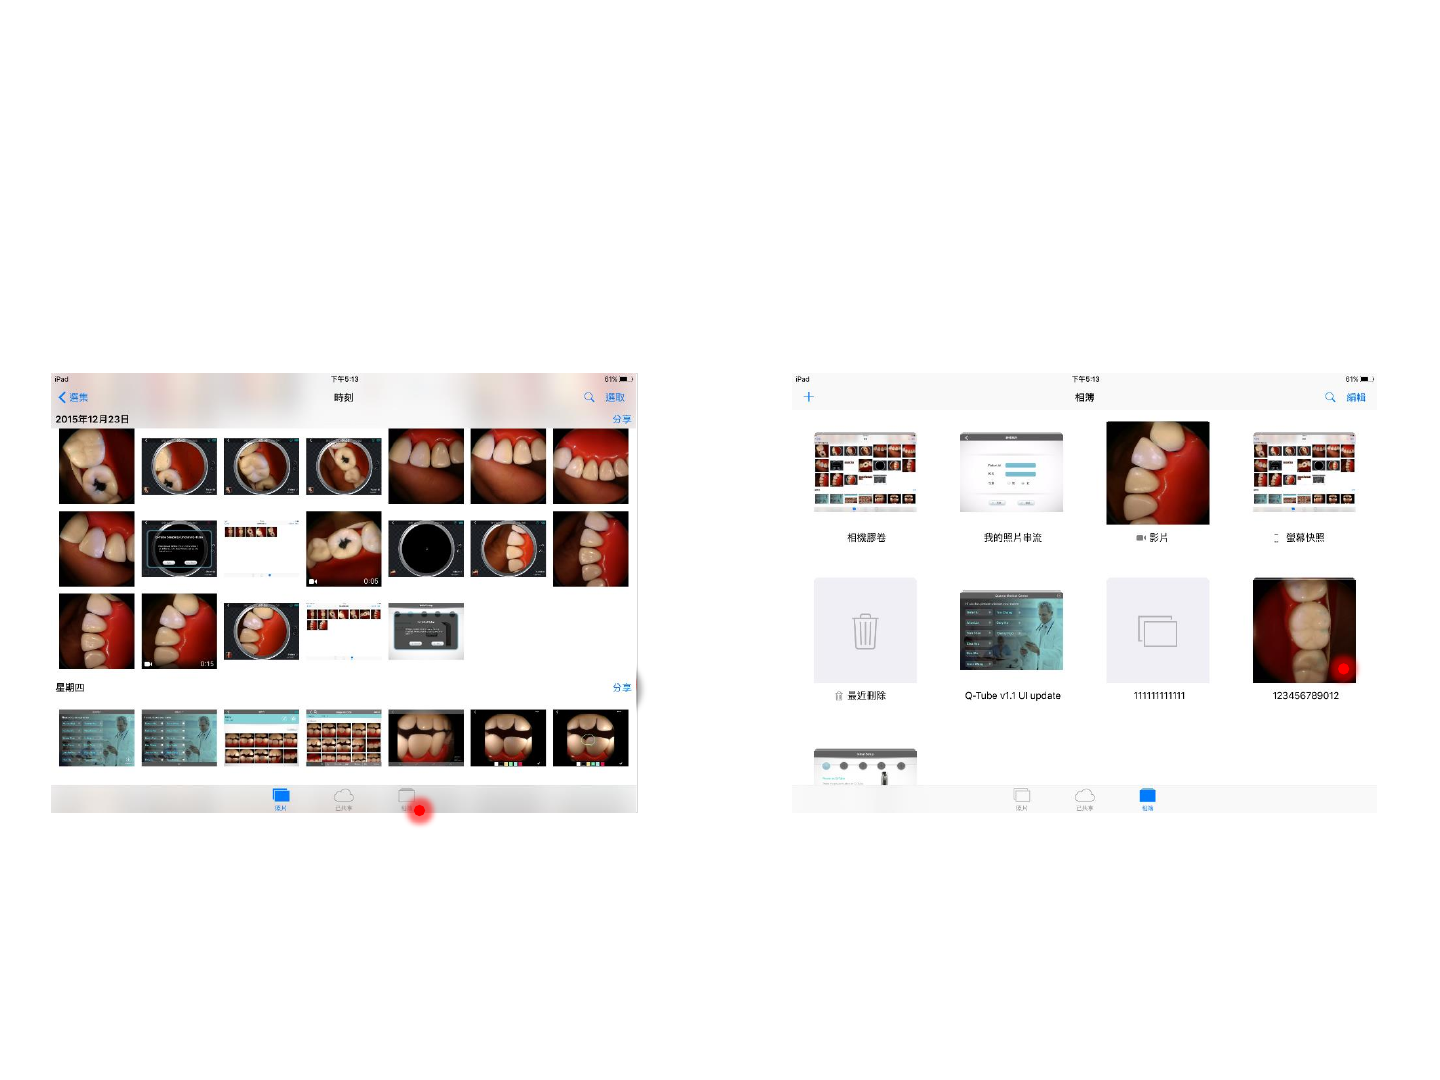
Step 2. Select the folder corresponding to the
patient ID, for example, 123456789012
Access Photos/Videos (iOS version)
Step 1. Press Photo Album at the bottom of the
screen
23
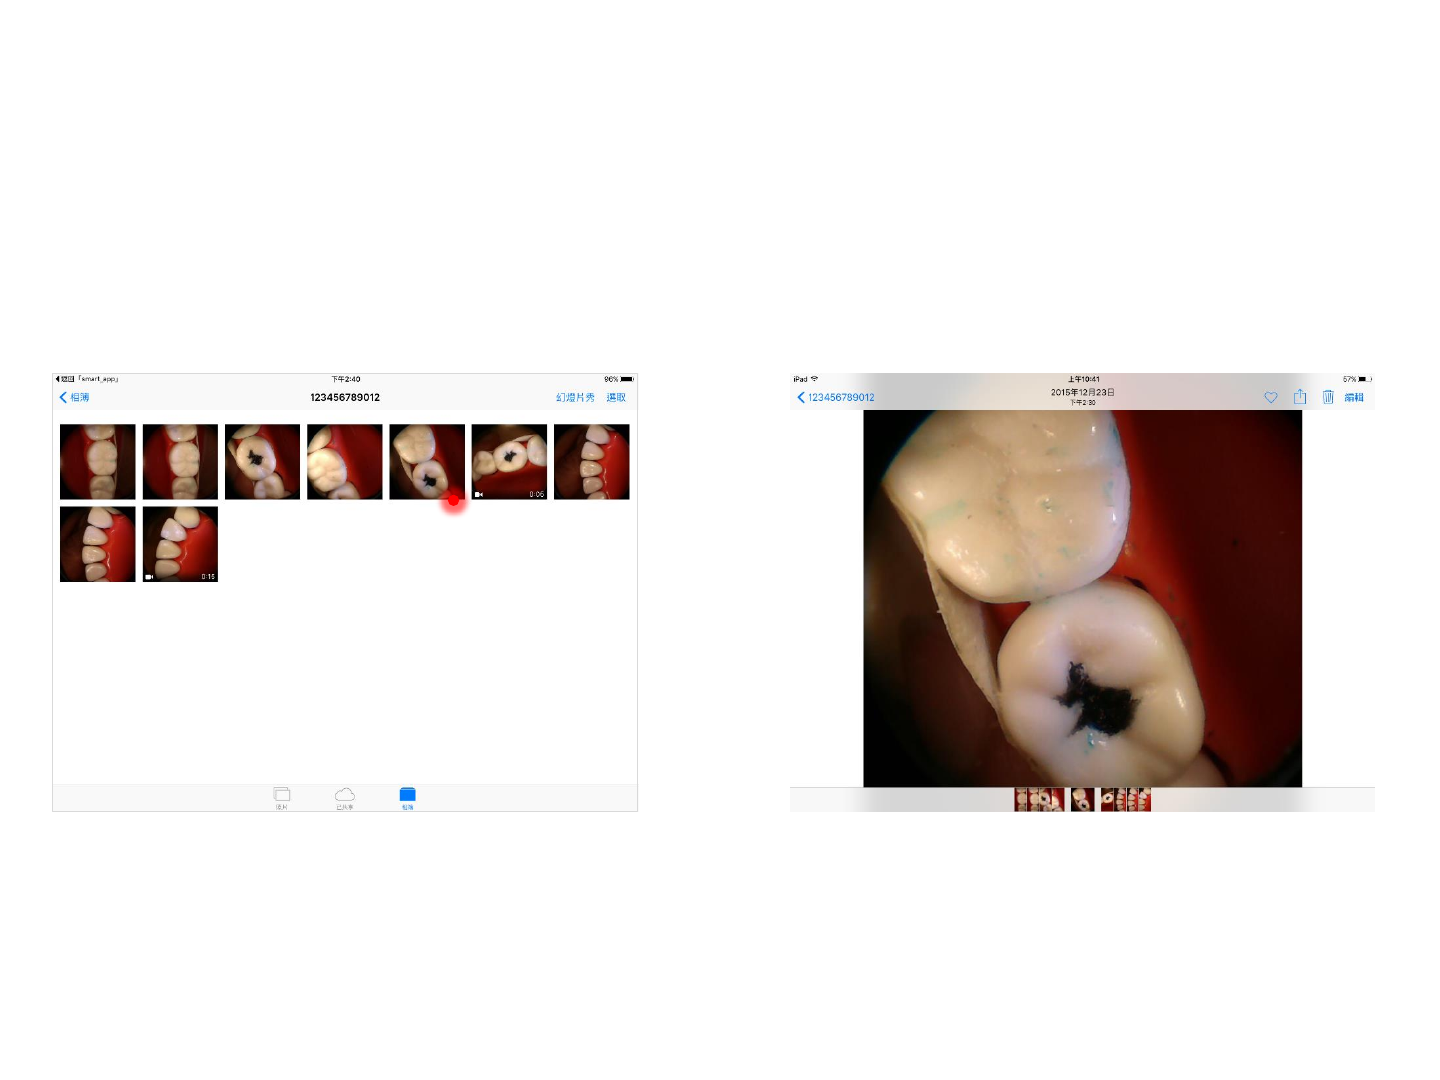
Step 3. Select a photo/video for an enlarged view Step 4. Built-in photo/video management functions
can be used for enlarged photos/videos
24
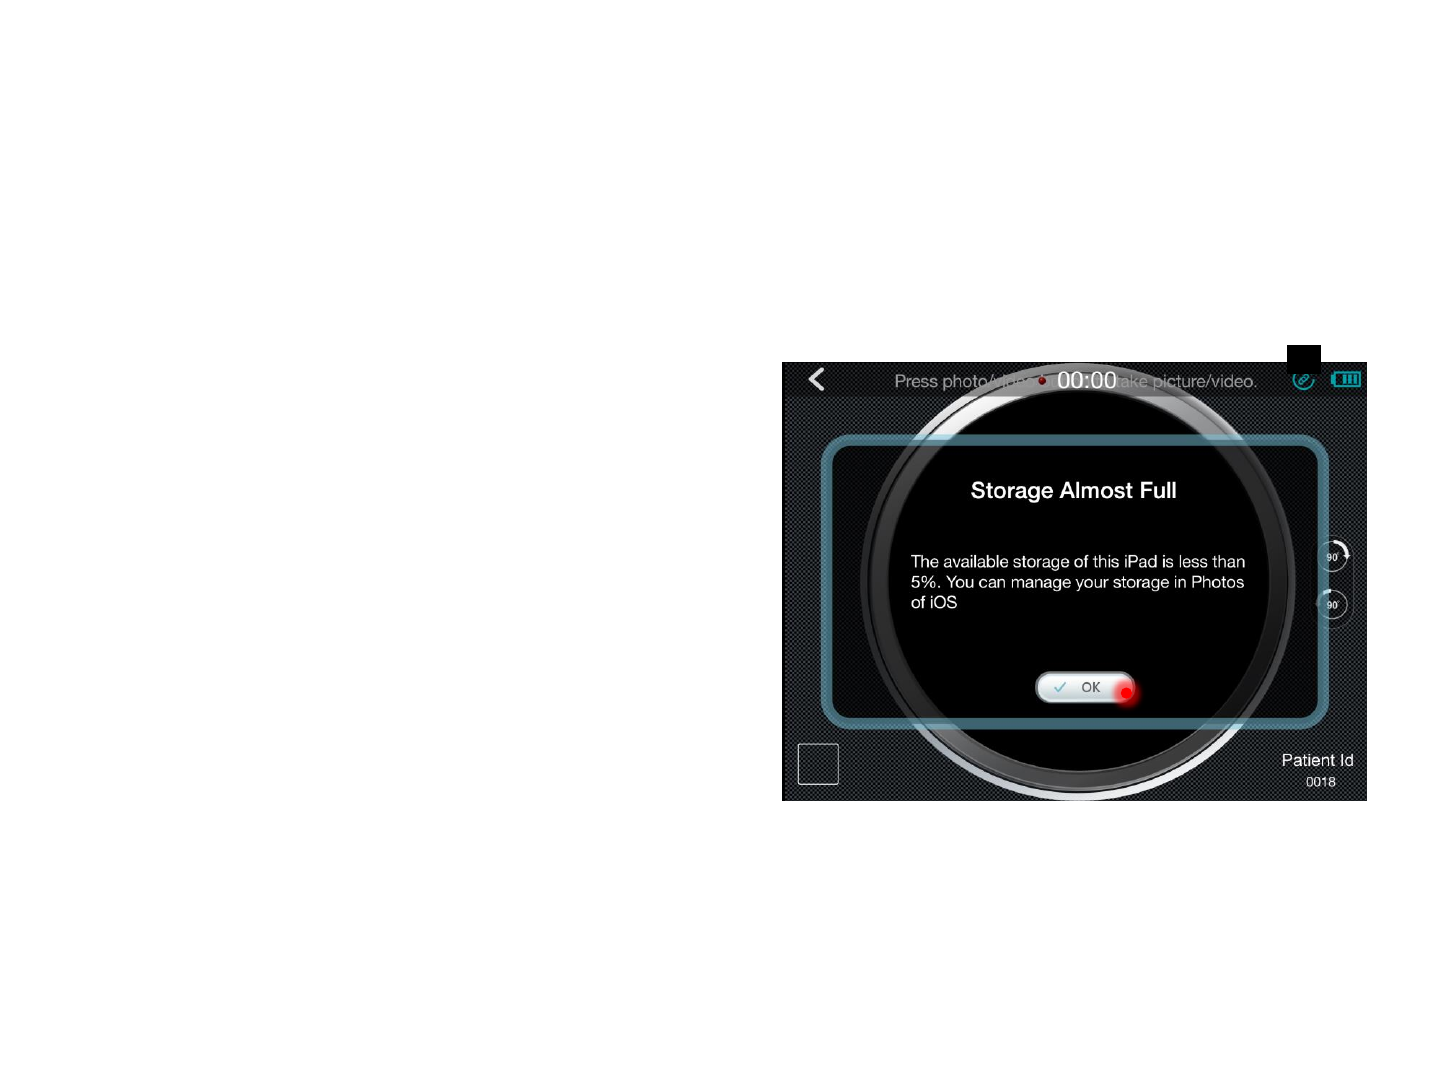
Low Storage Space Notification
A low storage space notification is shown when
available storage space on the smart device is
less than 5%; press OK to open the Photo Album
to delete files
Please open the file management application
on smart device, and go to DCIM > Q-tube-I
folder to search for specified patient id. You can
find all photos & videos of the patient.
e.g., to find the patient whose id is 1234-5678-
9012, please go to DCIM > Q-tube-I > 0000-
1234-0000 to view all photos & videos of the
patient.
Access Photo/Video (iOS version)
25
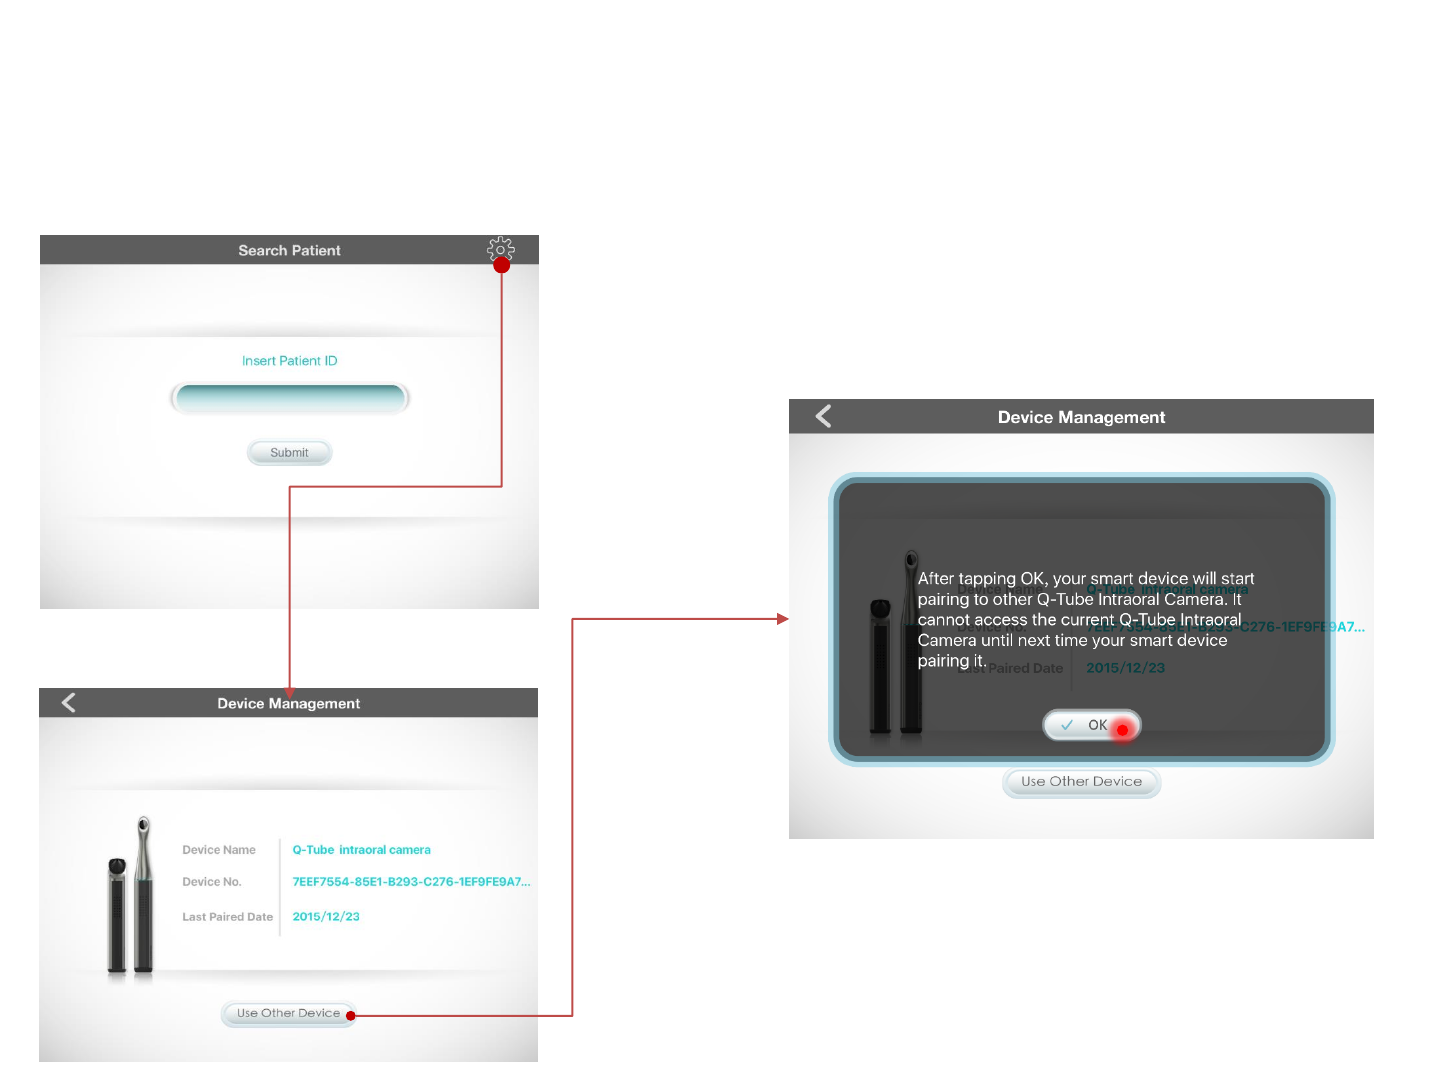
View Paired Device
On the Enter Patient ID page, press the Settings
icon in the upper right corner
to see information about the device paired with
the Q-Tube App
Change Paired Device
To change the device paired with the Q-Tube App,
press Use Other Device and press OK to confirm
Settings

Troubleshooting
Problem Solution
Q-tube-I does not turn
on/off or operate normally
•The battery may be too low (indicator light is solid red and Q-tube-I does
not turn on after connecting Q-tube-I to the docking station). Turn on Q-
tube-I after the battery is fully charged.
•If the problem is still not solved, simultaneously press the brightness and
power buttons to force shut down Q-tube-I. Then press the power button
again to turn it on.
26

Product Specification
Item Specification
Dimension
Otoscope
175.1(L) x 28(W) x 34.5(D) mm
Docking station 66.1mm(Diameter) x 27mm(H)
Weight
Otoscope 164g +/- 15g
Docking station 30 +/- 5g
Sensor OV5648, 1/4 Inch 5MP CMOS
Focus 0~35mm (From the small hole of Otoscope specula)
Magnification (Pixel/mm) About 80x
Lighting 4 LED, CRI > 85
Battery 2600mAh, the battery is not replaceable
Power consumption Active: 2.7W / Suspend: 0.3W
Continuous operation time About 2-3 hours
Standby time About 30 hours
White balance Manual
Exposure Automatic
Environment
Operating temperature 0~ 35 ℃
Transportation and storage
temperature -30 ~ 65 ℃
Operating Relative humidity 0 ~ 85 % RH
Transportation and storage
Relative Humidity 0 ~ 85 % RH
Operating Atmospheric pressure 700-1013 hPa
Transportation and Storage
Atmospheric Pressure 700-1013 hPa
Hardware Specification
27

Item Specification
System Requirement
OS Android 5.0 / iOS 9.1
Communication interface Wi-Fi and BT 4.0
Communication
Bluetooth BT 4.0
Wi-Fi IEEE 802.11b/g/n
Remote Control Mechanism RPC
Streaming Encryption WPA2/WPA
Image Capability
Resolution Up to 640x640
SNR 36 dB
Photo Format JPEG
Video H.264, fps up to 15, average bit rate ~400kbps
Application Software Specification
28
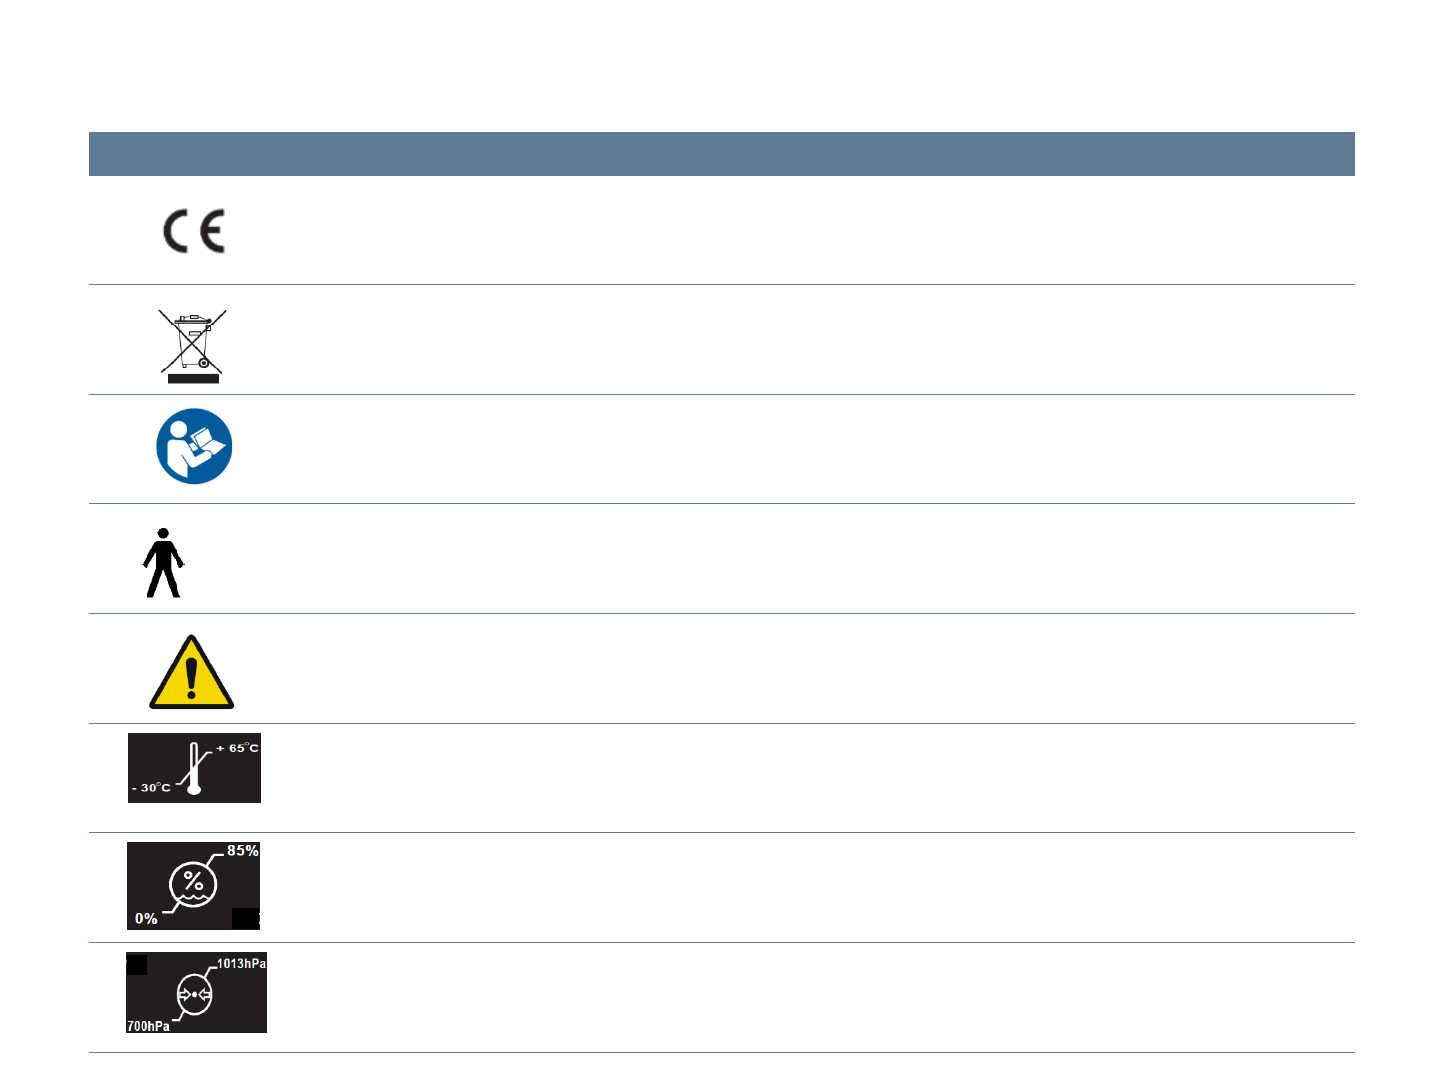
Symbol Description
The CE symbol ensures that the product herein specified meets the provisions of European Council Directive
93/42 EEC concerning medical devices.
Correct Disposal of This Product
(Waste Electrical & Electronic Equipment)
Please refer to user manual before you use this product
Applied part
Caution : Please refer to the written instructions of this manual
Storage and transportation conditions: -30 ~ 65 ℃
Transportation and storage Relative Humidity: 0 ~ 85 % RH
Transportation and Storage Atmospheric Pressure: 700-1013 hPa
Used Symbol Description
=type B

Cleaning & Disinfecting the Camera
•Before applying cleaning or disinfecting solution
•disconnect the camera from power and the USB cable from the USB port.
•Do not soak the camera.
•Always dry completely after cleaning or disinfecting.
To clean: Use a lint-free cloth to apply a solution of mild soap and water.
To disinfect: Use a lint-free cloth to apply isopropyl alcohol (70%).
30
Maintenance
Perform the following maintenance activities on your camera and accessories regularly.
The camera is not delivered in disinfected condition. To ensure maximum hygienic
safety for the patient, carefully follow the instructions to disinfect the camera before
use.
Cleaning the Camera
If the camera is visibly contaminated with blood or body fluids, you must clean the
camera before disinfecting it. To clean the camera, follow these steps:
•Dampen (not soak) a lint-free cloth with lukewarm water.
•Remove the blood or body fluids with the dampened lint-free cloth.
•Wipe with isopropyl alcohol (70%) between patients.

31
Disinfecting the Camera
Before each patient, the camera must be thoroughly disinfected.
To adequately disinfect the camera, follow the disinfectant manufacturer’s
instructions for the appropriate contact time.
To disinfect the camera, follow these steps:
1. Remove the protective sleeve.
2. Remove all visible soil (If the camera is visibly soiled, it must be thoroughly
cleaned prior to disinfecting.)
3. Dampen (not soak) a lint-free cloth with isopropyl alcohol (70%).
4. Wipe all surfaces of the camera thoroughly.
5. Allow to dry in the open air.
Inspecting the Camera for Damage
Inspect the camera for signs of deterioration, such as the buttons. If damage is noted,
do not use the camera and contact your representative.

32
Protective Sleeve for the Camera
The protective sleeve covers the camera and provides a sanitary shield for the
patient.
1. Make sure the window is clean by wiping it with a moist lint-free cloth or lens
tissue for at least one minute with each patient.
2. Use a new protective sleeve with each patient. Always discard the protective
sheath after each use.
3. Adjust the protective sheath if necessary. The end should be tight to prevent
fogging or blurring of the image.
4. Only use the protective sheaths designed specifically for this camera.
5. For additional protective sleeves, contact the protective sleeves manufacturer.

Disposal of Waste
Within the EU
Do not dispose of this product as unsorted municipal refuse. Submit for
separate collection as specified by Directive 2002/96/EC of the European
Parliament and the Council of the European Union on Waste Electronic and
Electrical Equipment (WEEE). If this product is contaminated, this directive
does not apply. For more specific disposal information contact Customer
Service.
33
Outside the EU
When the product and its components reach end of life, recycle the
product according to national, state, and local regulations.
For information on disposal/recycling options in the European Union, see the
European Portable Battery Association (EPBA) at
http://www.epbaeurope.net/.

Warranty & Service
Limited Hardware Warranty (through distributors & resellers)
Quanta hardware products come with a 1-year limited hardware warranty. The
warranty is extended through Quanta authorized representatives and resellers.
If you have a warranty claim, please contact the store, distributor, or website
through which the product was purchased.
34

35
•Any changes not following User Manual to the it-network could cause Q-tube-I
and Q-Tube App not able to work normally.
•Changes to the it-network include:
•changes in network configuration
•connection of additional items
•disconnection of Q-tube-I and your smart device.
•operating system of smart device is updated or upgraded to a not
supported version, which is specified in application software
specification of user manual.
•Please use this device with fine WIFI connection and do not use it in static
environment.
•If the poor quality of the network connection, or accidentally under static
environment, the Q-Tube App will pop up a prompt window, and pause preview
screen, you can wait for the automatic connection or restart.
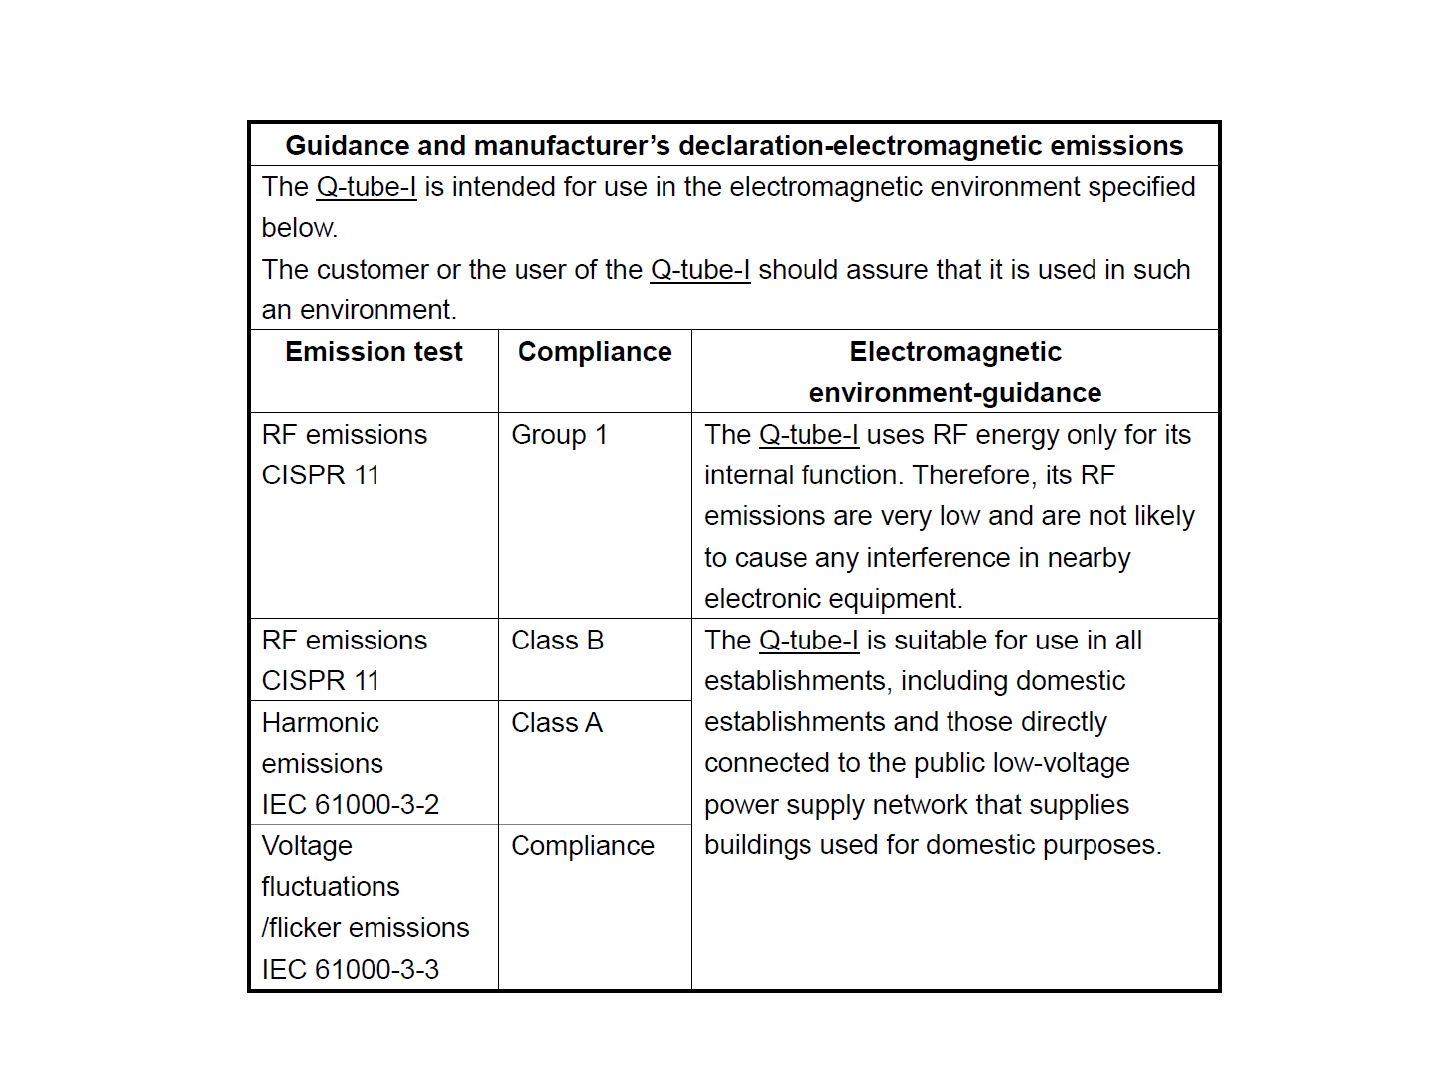
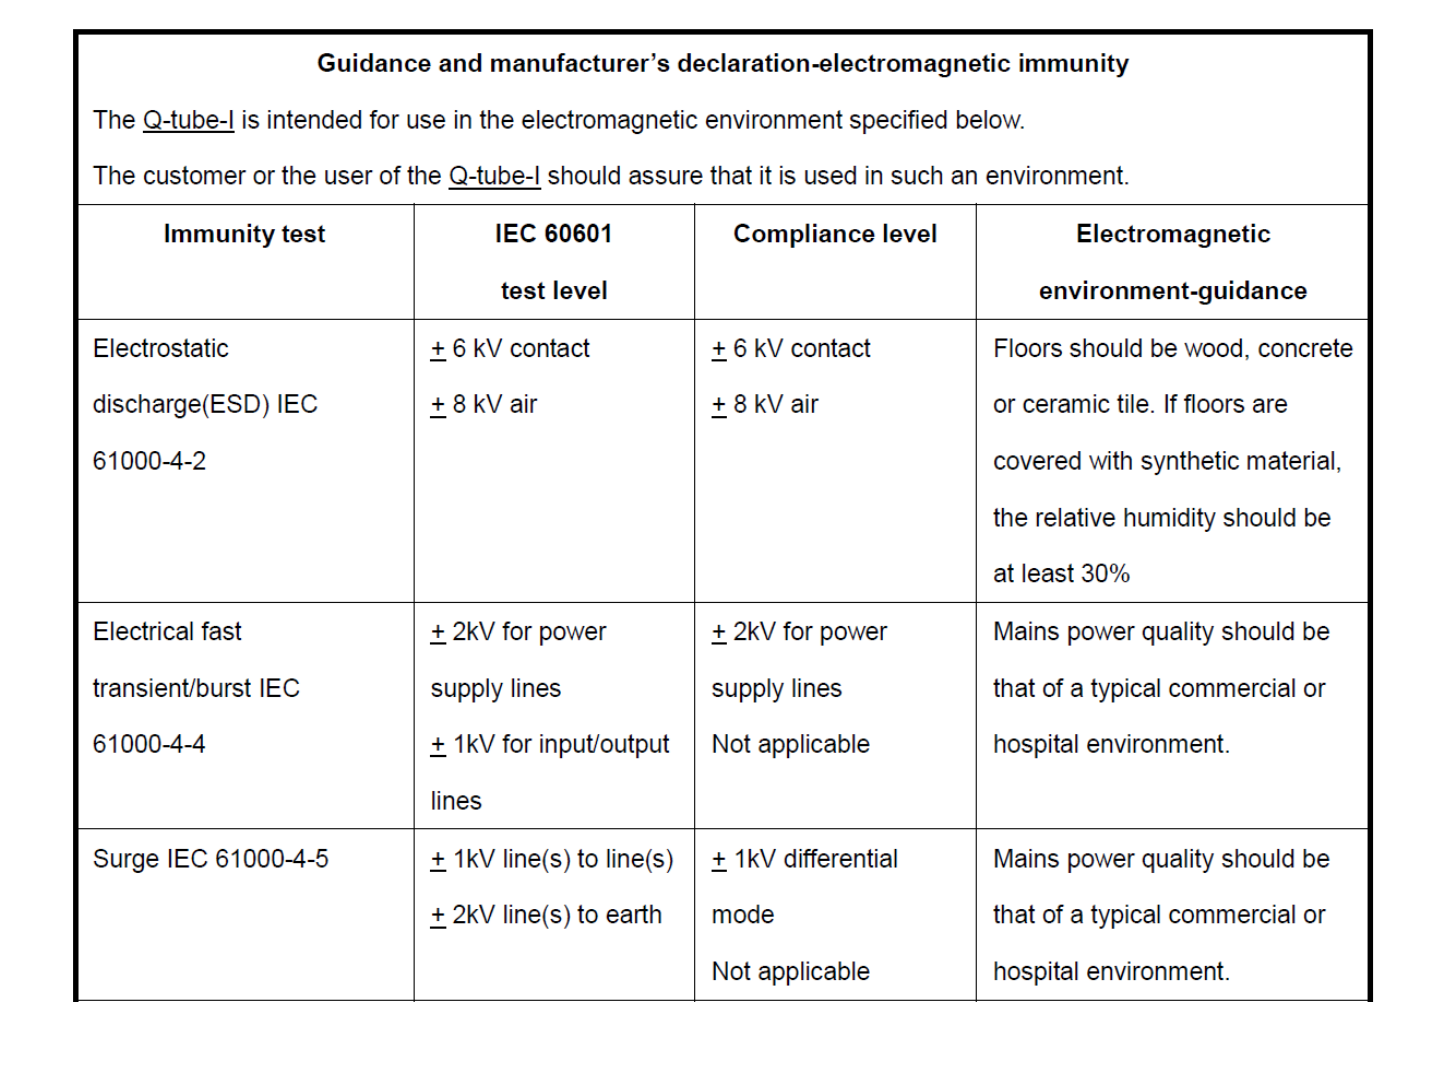
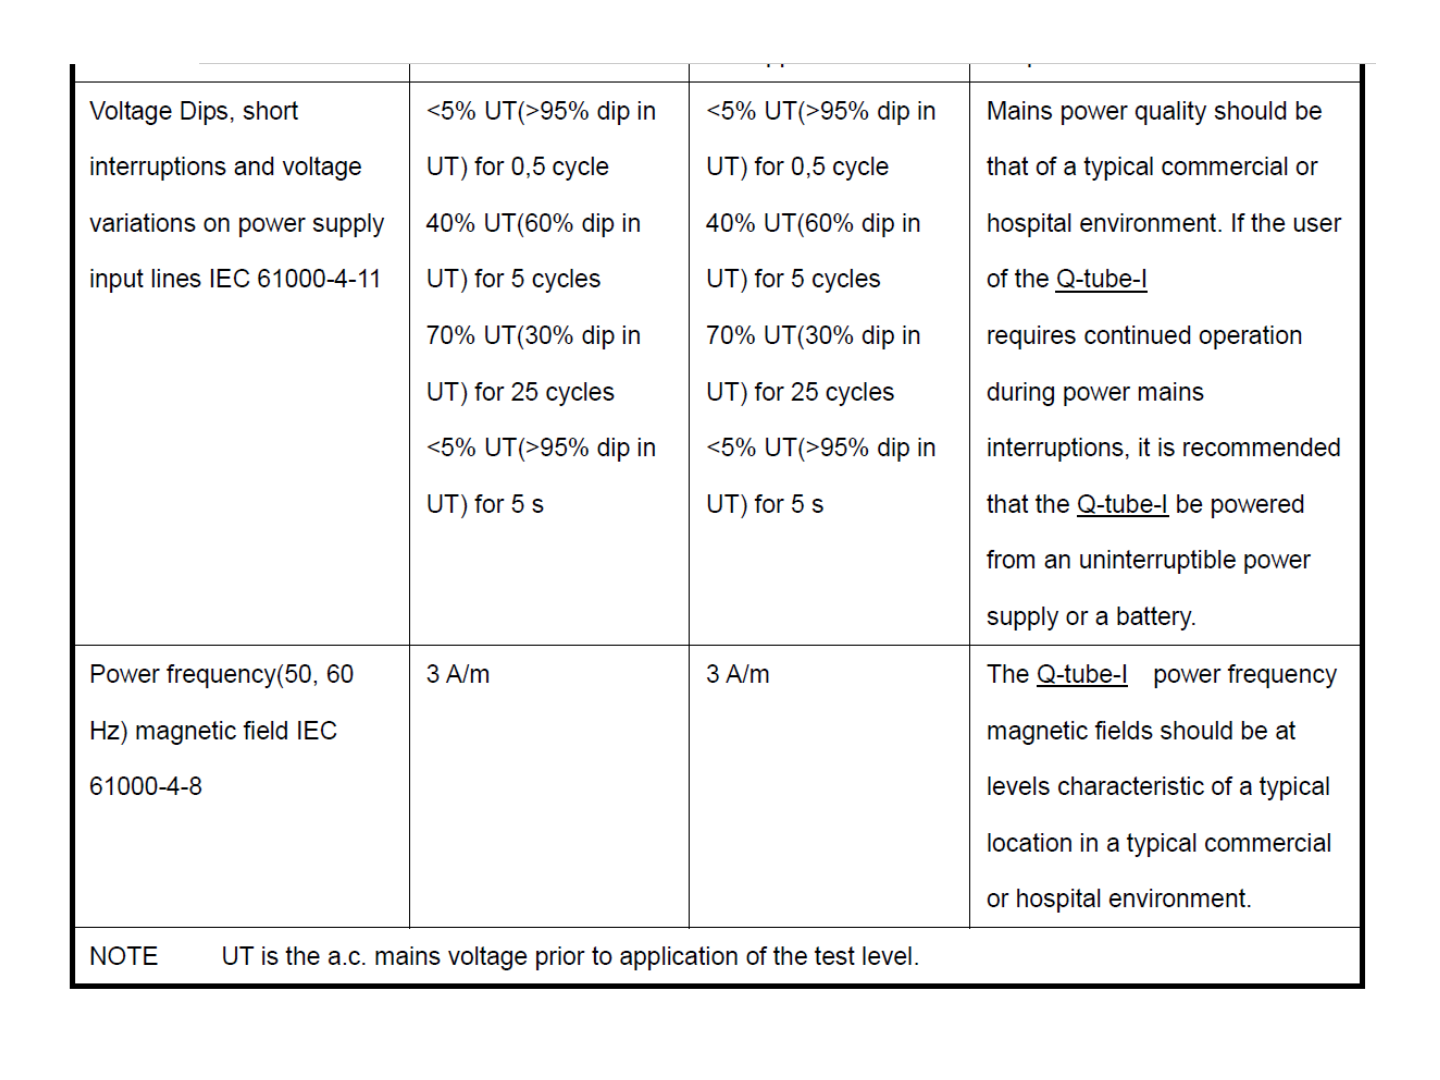
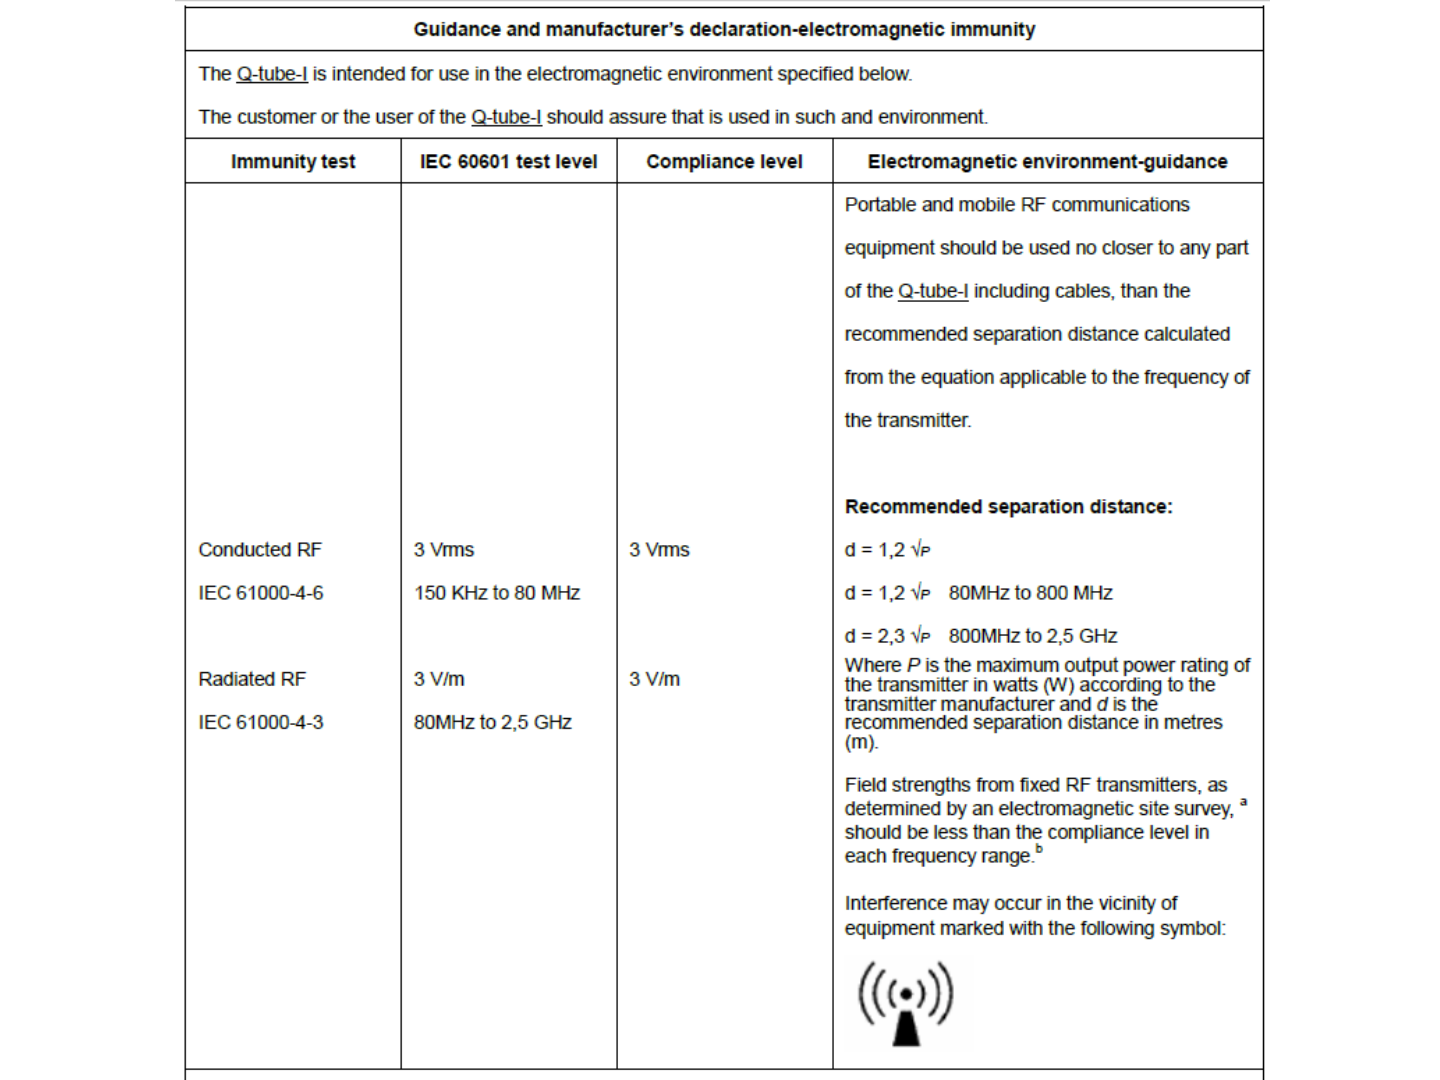
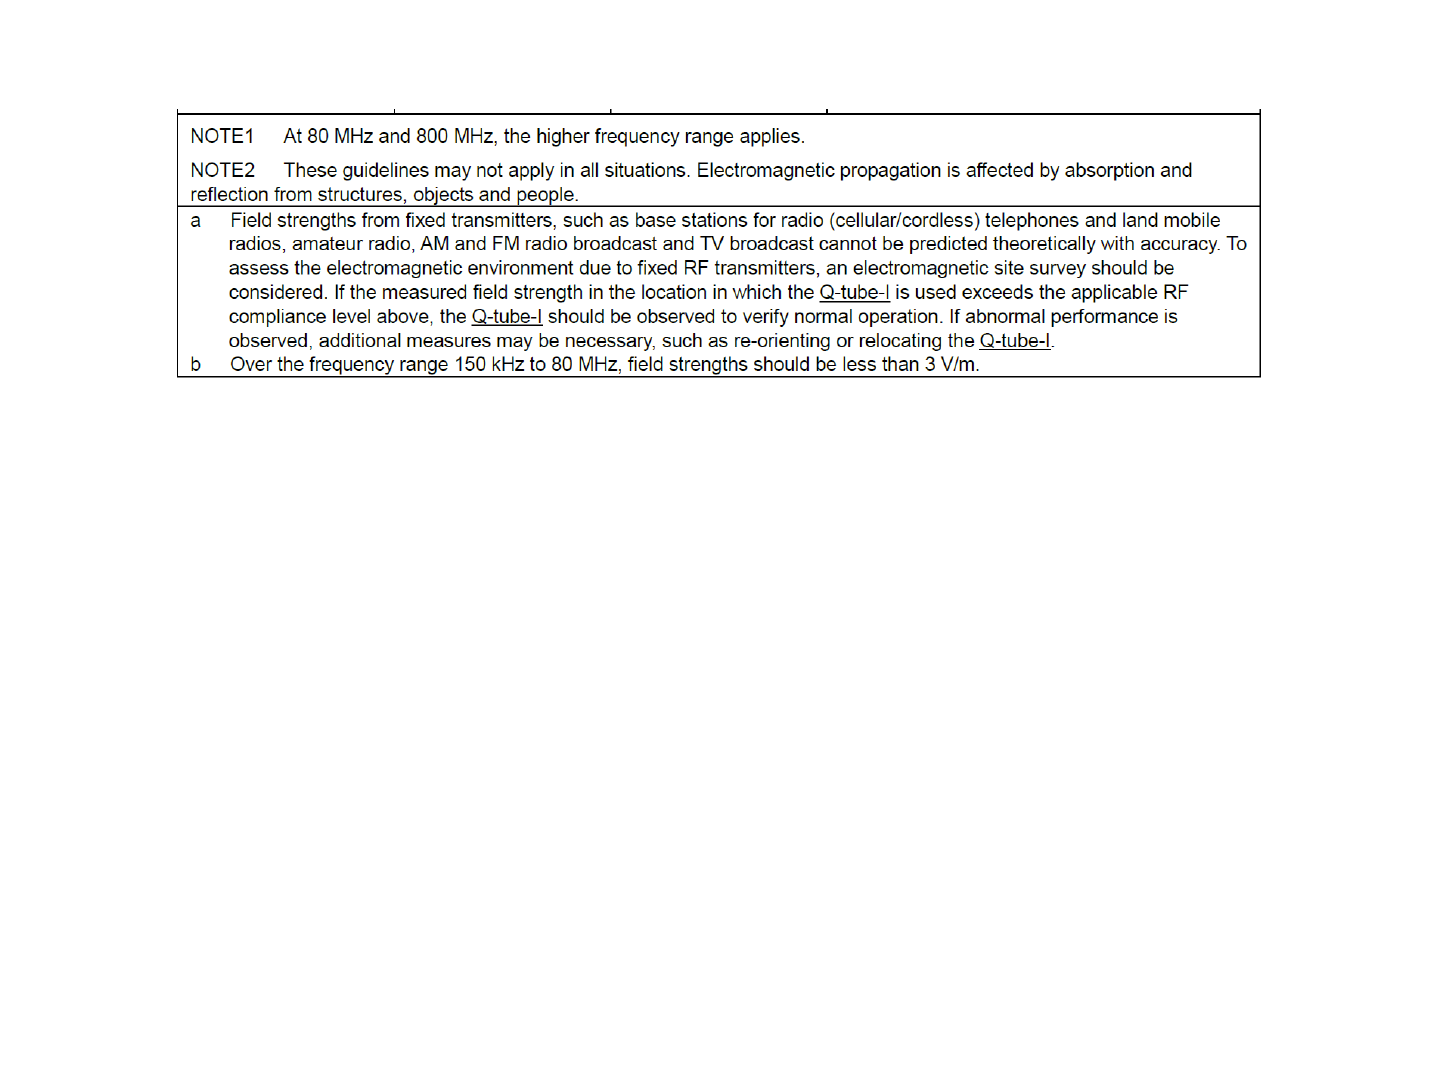
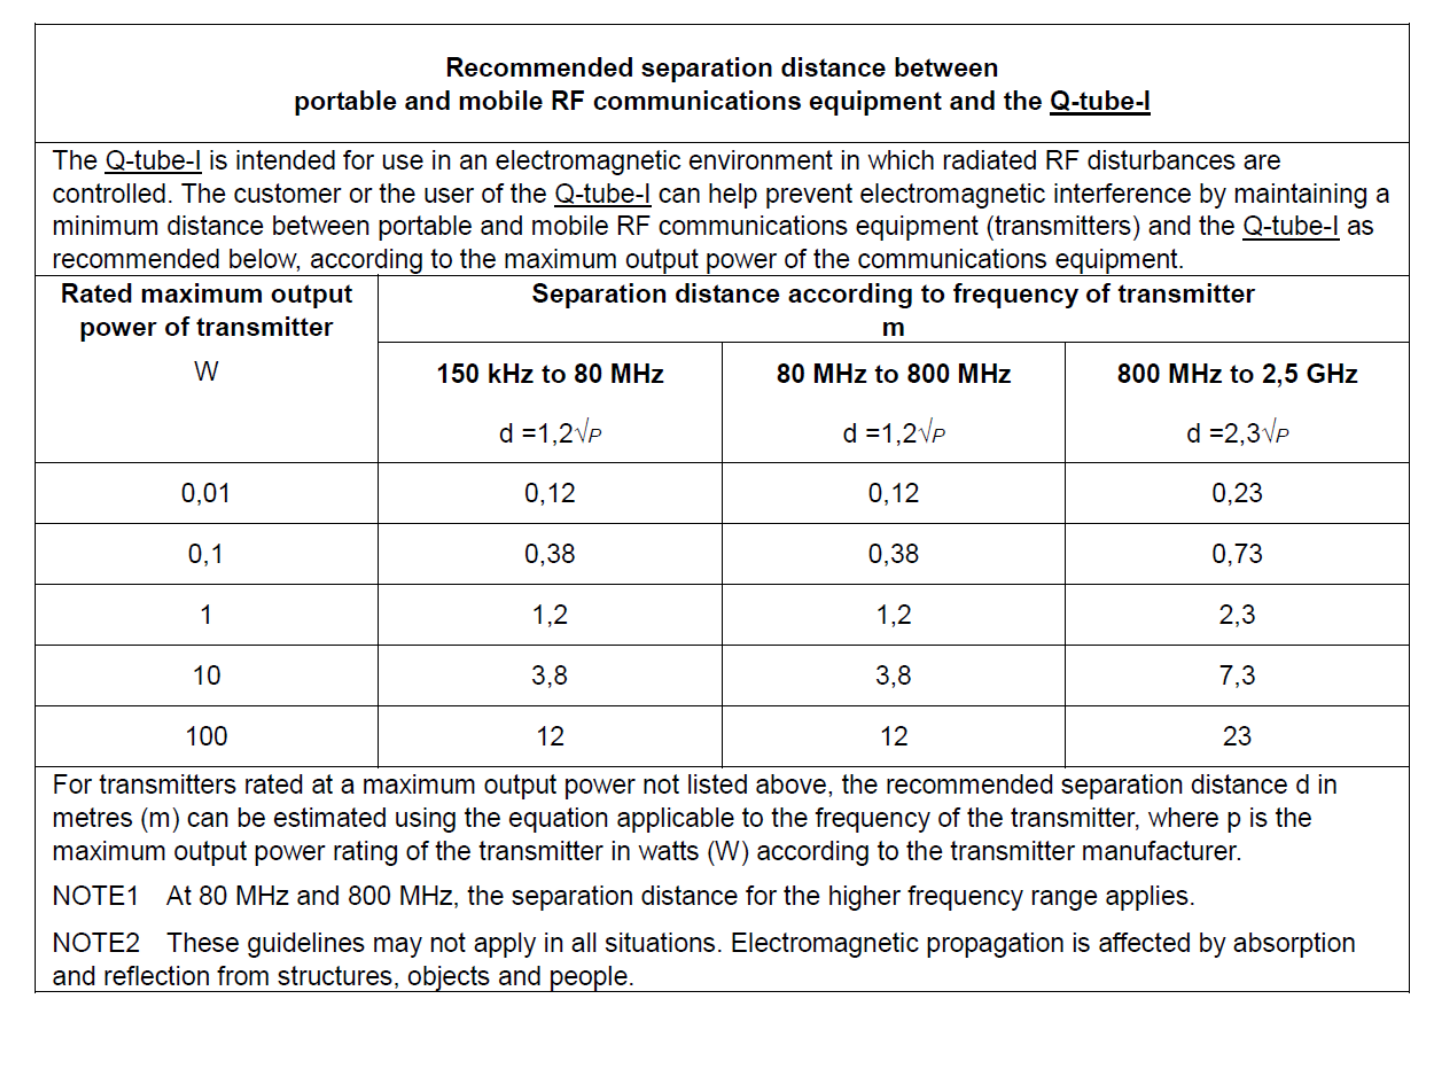
Manufacturer’s Declaration

36
•This camera, classified as Medical Electrical Equipment, requires special
precautions regarding EMC and must be installed and put into service according to
the EMC information provided in the accompanying product documentation.
Portable and mobile RF communications equipment can effect Medical Electrical
Equipment.
•This camera complies with EMC requirements when used with the cables and
accessories supplied with the product. The use of accessories and cables other
than those sold by Quanta Computer Inc. and specified as replacement parts for
internal components, may result in increased emissions or decreased immunity of
this camera.
•This camera should not be used adjacent to or stacked with other equipment. If
adjacent or stacked use is necessary, this camera should be observed to verify
normal operation in the configuration in which it will be used.

37
Federal Communications Commission (FCC) Statement
15.19
This device complies with Part 15 of the FCC Rules.
Operation is subject to the following two conditions:
1) this device may not cause harmful interference and
2) this device must accept any interference received, including interference that may
cause undesired operation of the device.
15.21
You are cautioned that changes or modifications not expressly approved by the part
responsible for compliance could void the user’s authority to operate the equipment.
15.105(b)
This equipment has been tested and found to comply with the limits for a Class B
digital device, pursuant to part 15 of the FCC rules. These limits are designed to
provide reasonable protection against harmful interference in a residential
installation. This equipment generates, uses and can radiate radio frequency energy
and, if not installed and used in accordance with the instructions, may cause harmful
interference to radio communications. However, there is no guarantee that
interference will not occur in a particular installation.

38
If this equipment does cause harmful interference to radio or television reception,
which can be determined by turning the equipment off and on, the user is
encouraged to try to correct the interference by one or more of the following
measures:
-Reorient or relocate the receiving antenna.
-Increase the separation between the equipment and receiver.
-Connect the equipment into an outlet on a circuit different from that to which the
receiver is connected.
-Consult the dealer or an experienced radio/TV technician for help.
For body worn operation, this device has been tested and meets FCC RF exposure
guidelines when used with an accessory that contains no metal and that positions the
handset a minimum of 5 mm from the body. Use of other accessories may not ensure
compliance with FCC RF exposure guidelines
The highest FCC SAR values:
• 0.412 W/Kg (1g) (Body)

39
CE marking
This equipment complies with the requirements of Directive 1999/5/EC of the
European Parliament and Commission from 9 March, 1999 governing Radio and
Telecommunications Equipment and mutual recognition of conformity.
The device complies with the following harmonized European
EN 301489-1 V1.9.2 / EN 301489-17 V2.2.1 / EN 300328 V1.9.1
EN 50566: 2013 / EN 62209-2:2010 / EN 62479: 2010
CE RF Exposure Compliance
This device meets the EU requirements (1999/519/EC) on the
limitation of exposure of the general public to electromagnetic
fields by way of health protection.
For body-worn operation, this device has been tested and meets the ICNIRP
guidelines and the European Standard EN 62209-2, for use with dedicated
accessories. SAR is measured with this device at a separation of 5 mm to the body,
while transmitting at the highest certified output power level in all frequency bands
of this device. Use of other accessories which contain metals may not ensure
compliance with ICNIRP exposure guidelines.
The highest CE SAR values for the device is 0.575 W/Kg (10g) (Body)
40
EMC Declaration Table
41
42
43
44
45