Kenxen Electronic IP01 IP-CAM User Manual ip01
Kenxen Electronic (SZ) Limited. IP-CAM ip01
User Manual
Cloud Camera
User Manual
1. Introduction
IP01 Cloud Camera is designed for middle, small enterprise & normal
family use and it can monitor your environment in 24 hours every day.
night time. It supports Wireless connection and it is convenient to setup
& operate.
• 802.11n Wireless Standard;
• Motion & sound detection;
• Wireless connection and no need for network wire connection;
• High quality level 720P CMOS sensor;
• Send snapshot or video to cloud server;
environment.
Dimensions 124 X 80 X 35mm
Weight 208 g
Audio Linear input/output two-way voice intercom
Audio compression PCM or ADPCM
Video compression H.264
Working frequency 50Hz / 60Hz
Video Format 720p / 512kbps , WVGA / 256kbps, WQVGA
/ 128kbps
Exposure balance Automatic
White balance Automatic
Infrared mode Automatic
Night vision 8 infrared lights, infrared irradiation
distance: 3-4meters
Supported protocol TCP/IP
Wireless standard WIFI(IEEE802.11b/g/n)
Support IP
addresses
Dynamic IP are supported
Operating
temperature
0° ~ 40°C
Operating humidity 10% ~ 85% (non-condensing)
Storage
temperature
-10°C ~ 60°
Storage humidity 10% ~ 85%(non-condensing)
Operation system Microsoft Windows 2000/XP, Vista,
Windows7, Windows8,Mac OS, Linux
Alarm detection Motion detection support
Noise Detection
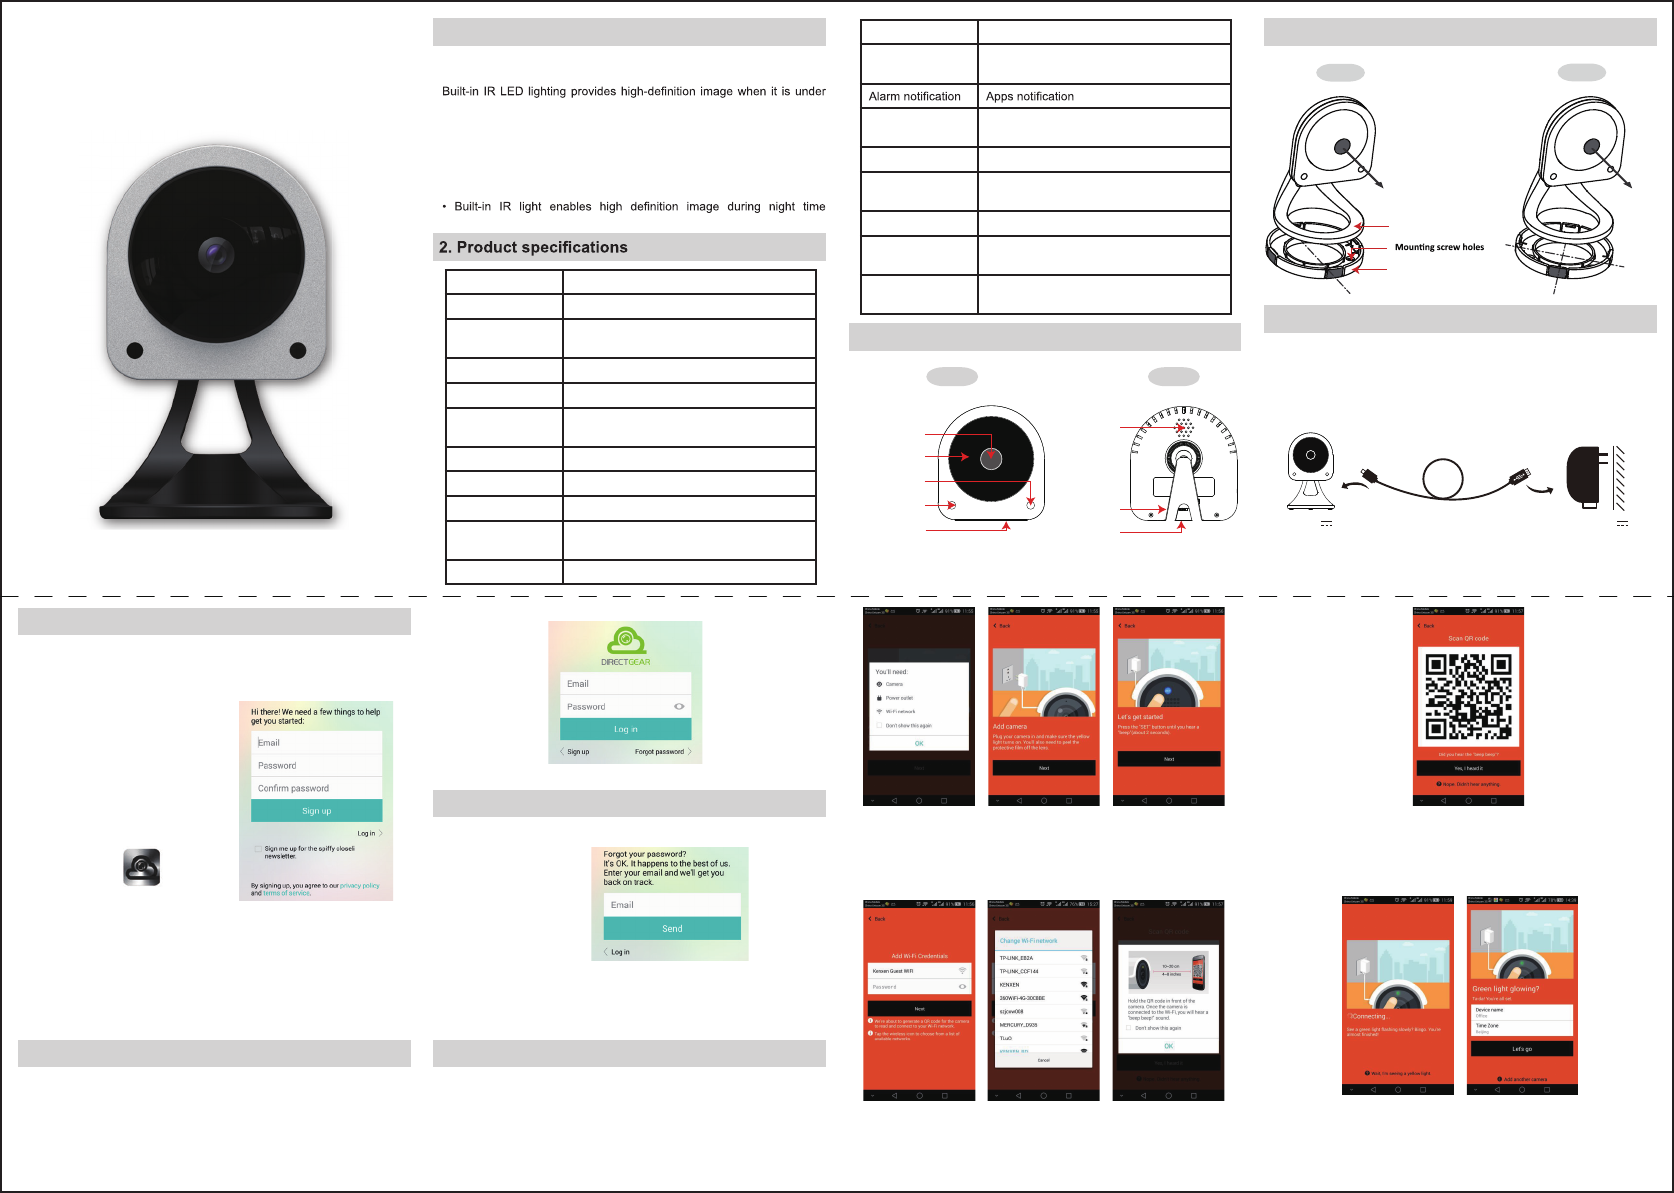
3. Introduction on appearance
Front Back
USB port
Microphone
Wi-Fi indicator
IR light
Camera
IR Sensor
Speaker
Reset
4. Ways to assemble wall mount
Right
Base
Wall mount
Wrong
5. Before setup
a) Connect your mobile to your Wi-Fi router
b) Connect the USB cable to the IP camera and the USB power adaptor,
plug in the power adaptor into the power socket
c) Wait for around 30 second for device startup, there is a flash green light
at the right on the IP camera
Output: 5V 1AInput: 5V 1A
6. Start up and register
a) Click the “DirectGear” on the screen
b) You will see the “DIRECTGEAR” logo shown
c) The first time you start, the Sign up screen will show
d) Type in an e-mail address and password into the relate field.
Retype the password for double confirm
e) Click the “Sign up” button to register
f) You will received an e-mail for the registration, click the link on the
e-mail to confirm
a) The first time login, it prompt for e-mail address and password
b) Click “Log in” after finish type in
a) If forgot the password, select the lower right corner “Forgot password”
at the “Log in”
b) Type in the e-mail address
c) Click “Send” and system will send an e-mail to your mailbox to reset
your password
a) After login, the first screen will show which said “Your account is lonely.
It needs a camera. Add on by tapping below.”
b) Click the “Add camera”
c) The add camera welcome screen will show
d) You need your mobile connect to the same Wi-Fi network.
Then click “OK”
e) Follow the instruction on the screen, then click “Next”
f ) Press the “Reset” button at the back of the IP camera for at least two
seconds until you hear a “beep” sound. Then click “Next” on the screen
i) It will scan the QR code on the mobile screen. Usually take 2~5 seconds.
After you hear the “beep beep” sound, you can click the “Yes, I heard it”
button.
j) It will automatic configure the IP camera, it need takes around 20 to 30
seconds.
k) After finished, it will show two fields which you can change the device
name and time zone. Click “Let’s go” after finish modify. Now the
camera is ready.
g) It will prompt to select the Wi-Fi network and input the password. Press
“Next” when finished.
h) Read the instruction on the screen. It asks you hold the mobile in front
of the camera between 10cm~20cm after click the “OK”.
DIRECTGEAR
7. The login
8. Forgot password
9. Add camera
11. Camera settings
(IP camera needs to connected state)
a) Preferences of the camera
i. Camera name: users can change the name or choose a default name
ii. Location: choose the Greenwich mean time
b) Camera
i. Camera: enable or disable the camera
ii. Camera off at: Scheduling the camera on/off time
c) Cloud recording (need enable the cloud service)
i. Recording: enable or disable the cloud recording
ii. Recording off at: Scheduling the recording on/off time
d) Services
i. Closeli plan: Your cloud service plan status. If expired, you can select
the plan here and it will forward to the online billing website
e) General settings
i. Notification settings
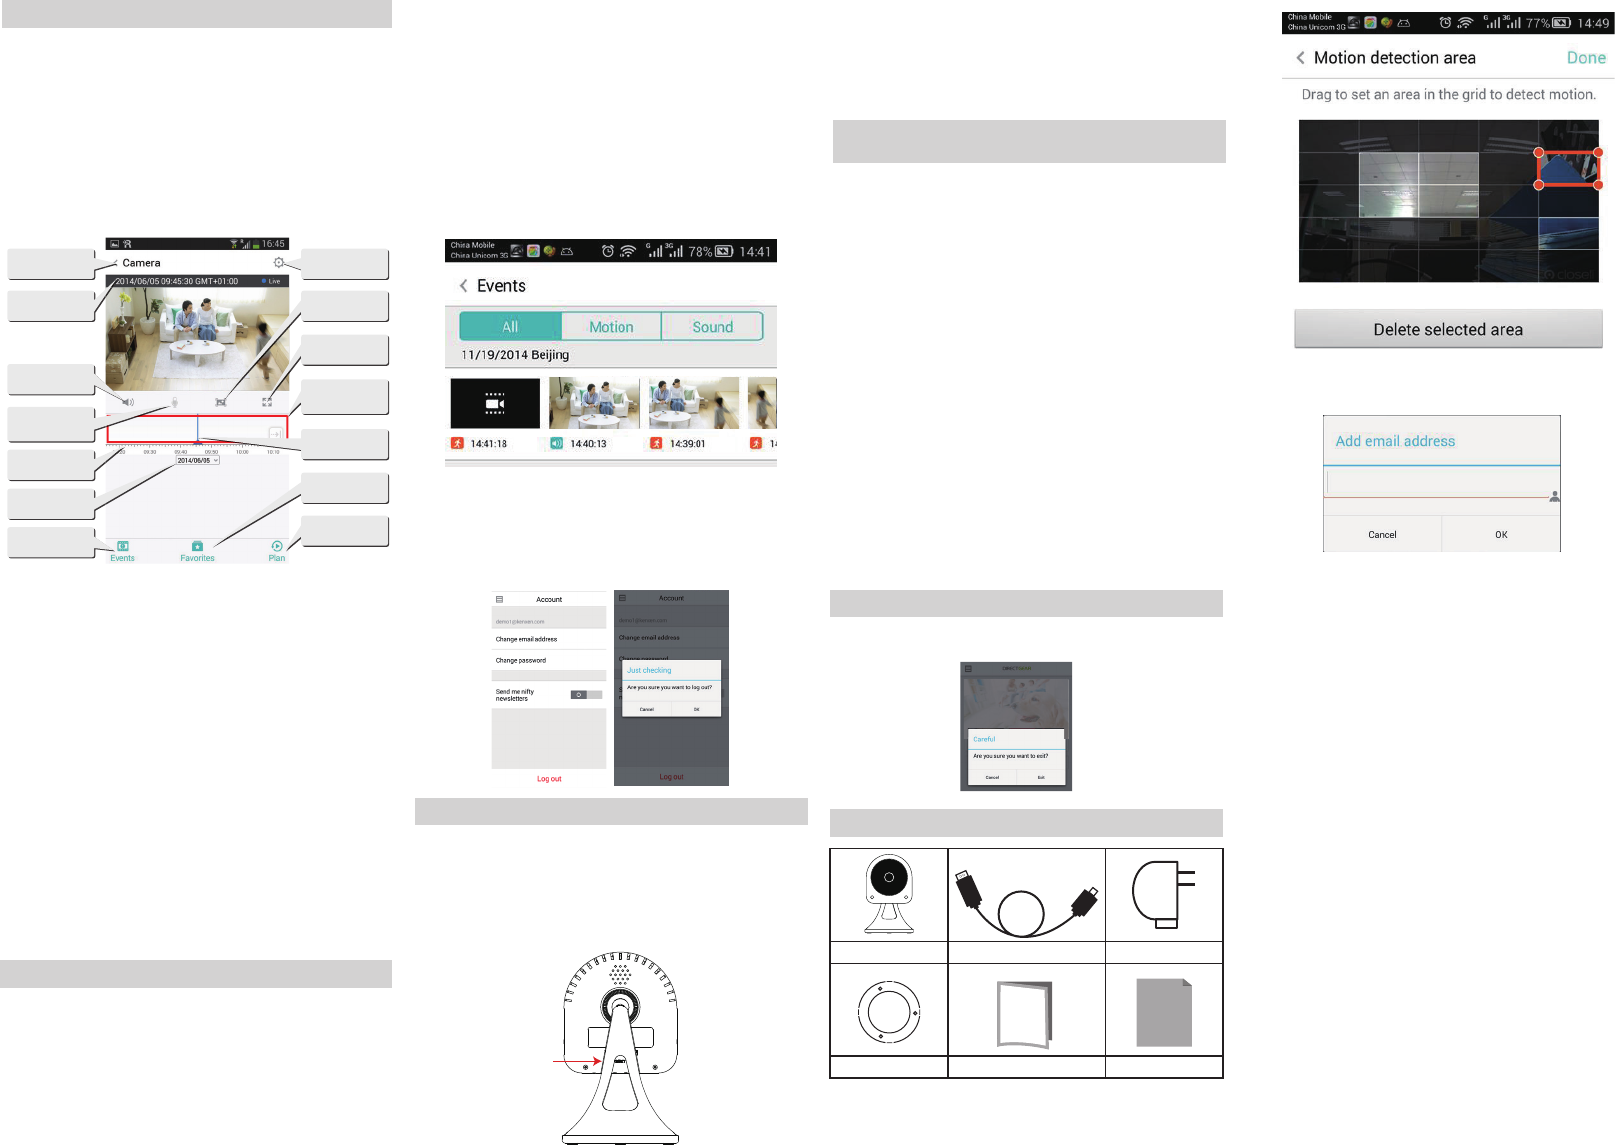
● Motion detection: Enable/disable motion detection
● Motion area settings: Drag to set an area in the grid to detect motion
To exit the app, click the mobile “Back” button and it will ask you “Are you
sure you want to exit?” Select “Exit” to quit.
Warning: Changes or modifications to this unit not expressly approved
by the party responsible for compliance could void the user’s
authority to operate the equipment.
NOTE: This equipment has been tested and found to comply with the
limits for a Class B digital device, pursuant to Part 15 of the FCC
Rules. These limits are designed to provide reasonable
protection against harmful interference in a residential installation.
This equipment generates, uses and can radiate radio frequency
energy and, if not installed and used in accordance with the
instructions, may cause harmful interference to radio
communications.
However, there is no guarantee that interference will not occur in a
particular installation. If this equipment does cause harmful interference
to radio or television reception, which can be determined by turning the
equipment off and on, the user is encouraged to try to correct the
interference by one or more of the following measures:
Reorient or relocate the receiving antenna.
Increase the separation between the equipment and receiver.
Connect the equipment into an outlet on a circuit different from that to
which the receiver is connected.
Consult the dealer or an experienced radio/TV technician for help.
For MPE (Fixed or Mobile Device)
“FCC RF Radiation Exposure Statement Caution: To maintain compliance
with the FCC’s RF exposure guidelines, place the product at least 20cm
from nearby persons.”
10. My Cameras (main screen)
12. Account
a) After add the camera, the main screen will appear a camera screen.
b) If you can’t find it, you can slide the screen down to refresh the cameras
in your account. And you can also change the display preview window
format.
c) Press the upper left corner the “Left arrow” button, a sub menu appears.
i. My Cameras: the main screen for select the cameras which register in
this account
ii. Account: change e-mail address, password enable/disable newsletters
and log out
iii. About: Information of current version, legal notice and license
agreement
d) Click the camera picture to view the camera streaming as below.
i. Screen capture: It will store at the “DirectGear” folder in your mobile
ii. Microphone on/off: After enable it, an orange microphone icon will
appear. Click it and speak on the mobile, the IP camera speaker will
have your voice.
iii. Playback (cloud service only):
You can slide the “Playback” time to the left and it will playback the
previous video from the cloud service.
For more easy to choose the time for playback the video, you can
click the left hand side “zoom” to enlarge time bar.
To view real time video, click the “right arrow” button on the time bar.
iv. Events (cloud service only): Click on it and you can choose the
previous recorded video for playback. It will separate as motion and
sound events.
v. Favorites (cloud service only):
● Choose and playback the saved video from the cloud service
● Select a start time at time and events area
● Click the cut icon.
● The save to favorites screen will show
● Sound detection: Enable/disable sound detection
● Stop Notifications: Add schedule for alerts off
● Email notifications: Send notifications to email address
ii. Detection sensitivity
● Sound sensitivity: you can select Bam, Default and Whisper
● Motion sensitivity: you can select Crash, Default and Tiptoe
a) Change email address: You can change the login e-mail address to a
new one
b) Change password: You can change your password
c) Log out: log out this account and back to the log in screen
13. Reset the IP camera
a) If your IP camera change to another Wi-Fi network, you should reset
the IP camera
b) To reset it, use a pencil or pen to press the “Reset button” at the
lower left corner at the back of the IP camera. Press until a “beep”
sound (around 2 seconds). The flash green light will blank. Wait until
it flash again and repeat the “Add camera” steps.
iii. Video quality: User can choose High, Medium and Low video quality
iv. Camera microphone:
● Camera microphone: Enable/disable sound to be detected and
recorded
● Turn camera microphone off at: Scheduling the microphone on/off
time
f ) Hardware
i. Rotate image 180o: Enable to upside down the video screen
g) Details
i. Wi-Fi network: You can change connect to another Wi-Fi network
ii. Camera details: Device name, Time zone, Firmware, Device ID and
Mac address
h) Remove Camera
This will remove the camera from your account. Warning:
(All associated recordings will be deleted and non-reversible).
If you want add this camera to another account, you must remove the
camera.
Camera name
Date and time
Sound on/off
Time
Events
Day
Microphone
on/off
Camera settings
Full screen
display
Playback time
Plan
Favorites
Screen capture
Time and events
area
● You can change the title name and duration.
● Click upper right corner “Save” to complete
● It will appear at the Favorites folder, to playback, just click it.
● To download the video to your mobile, click “Save” in the playback
screen of the video
vi. Plan (cloud service only): Your account existing cloud service plan
14. Exit
15. Package Contents
Reset
IP Cloud Camera USB cable A/C adaptor
Wall mount User manual Quick install guide
This device complies with Part 15 of the FCC Rules. Operation is subject to the following two conditions:
(1) this device may not cause harmful interference, and
(2) this device must accept any interference received,
including interference that may cause undesired operation.