Kinpo Electronics SP70A SMART-PHONE User Manual S600 indb
Kinpo Electronics Inc SMART-PHONE S600 indb
Contents
USERS MANUAL 6 OF 7
9-3 S600 User Manual
VideoCam
Taking Continuous Pictures
VideoCam allows you to take nine continuous pictures. By default, VideoCam takes one single picture.
Therefore, you need to change the setting first.
1. After you start VideoCam, tap on the screen.
2. Tap Camera.
3. In Shooting Mode, select Continuous Shooting and tap OK.
4. Take pictures according to the procedure described in the “Taking a Picture” section earlier in this
chapter.
After the pictures are captured, the screen displays the thumbnail view of these continuous pictures.
The time interval for the continuous pictures is 0.7 second.
• The Camera mode indicator glows in yellow when you using the Camera feature.
• You cannot use the Record key in the Camera mode.
• You cannot use the Camera and DV features at the same time.
9.2 Using the DV
The VideoCam program also allows you to record videos.
1. Press the Camera/DV key on the side of the Pocket PC Phone, or tap → Programs → VideoCam,
to enter the Camera mode.
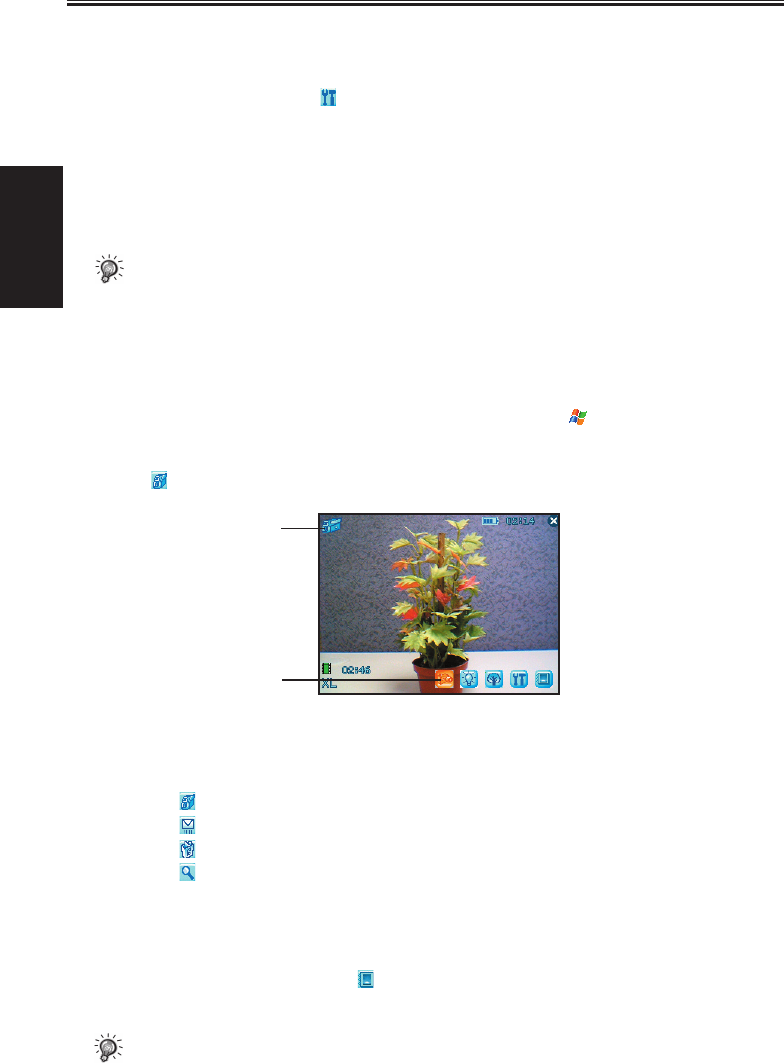
2. By default, the screen is displayed in the landscape mode.
Tap to switch to the DV mode. You can use one hand to hold the Pocket PC Phone’s bottom for
easy operations. Be careful not to let your fingers cover the camera lens.
3. Frame the subject to be photographed in the viewing window. When it is ready, press the Camera/DV
key on the side of the Pocket PC Phone to start recording. Press the Camera/DV key again to stop
recording.
The Pocket PC will preview the first picture of the video on the screen shortly. You can:
• Tap to save the video and continue recording.
• Tap to send the video in an e-mail.
• Tap to delete the video.
• Tap to switch to MyAlbum.
(You can also press the Left/Right key to switch between the four icons.)
By default, the new video is stored in the My Pocket PC\FLASH\My Album folder of the Pocket PC in
five seconds. The video is stored in the MPEG4/3GP format, and its filename starts with DV00001 and
goes on in the ascending order until the Pocket PC is out of storage space.
4. To view the video you recorded, tap to switch to MyAlbum. (See Chapter 10 for information on
MyAlbum.)
• The DV mode indicator glows in orange when you using the DV feature.
• If you answer a call in the DV mode, then the video will be saved and VideoCam closed. If you
reject the call, the screen will remain the same.
DV mode
Switches to Camera mode
S600 User Manual 9-4
VideoCam
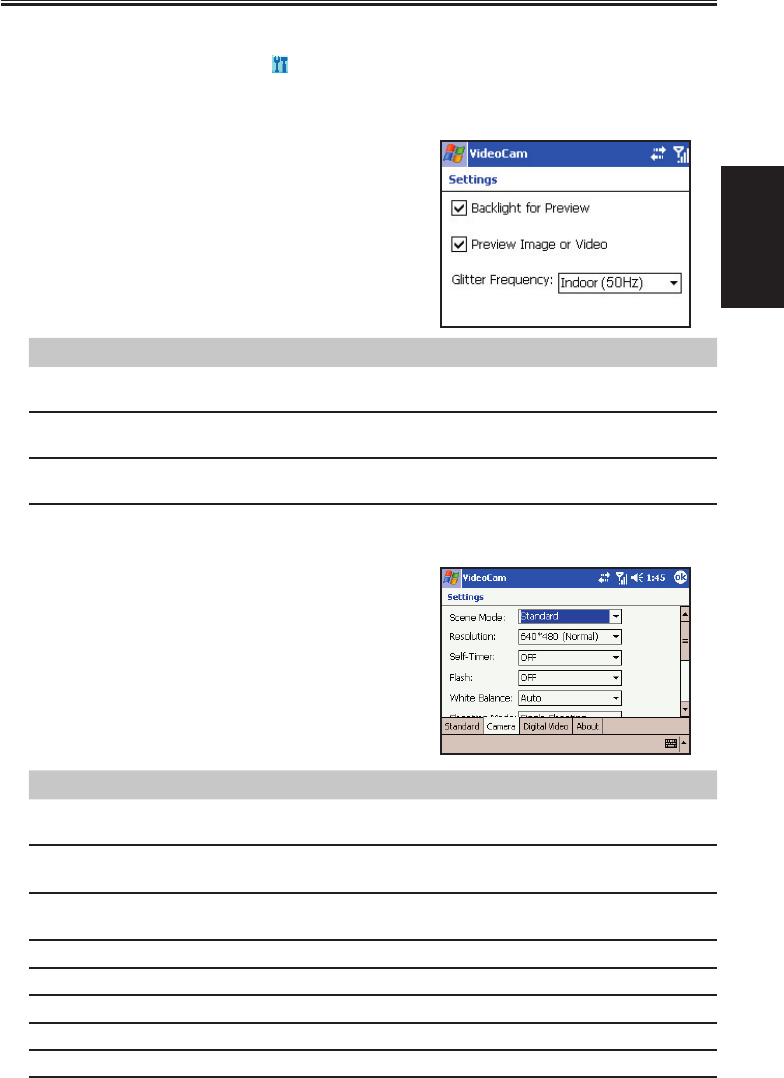
9.3 Changing VideoCam Settings
In the Camera/DV mode, you can tap on the screen to access the setting items.
Standard Settings
On the Setting screen, tap Standard.
Item Description
Backlight for
Preview
Sets whether to turn on the backlight for picture/video preview.
Preview Image or
Video
Sets whether to keep the preview for five seconds before the next shooting.
Glitter Frequency While using VideoCam, please setup Glitter Frequency according to your
environment for improving the preview quality of the VideoCam.
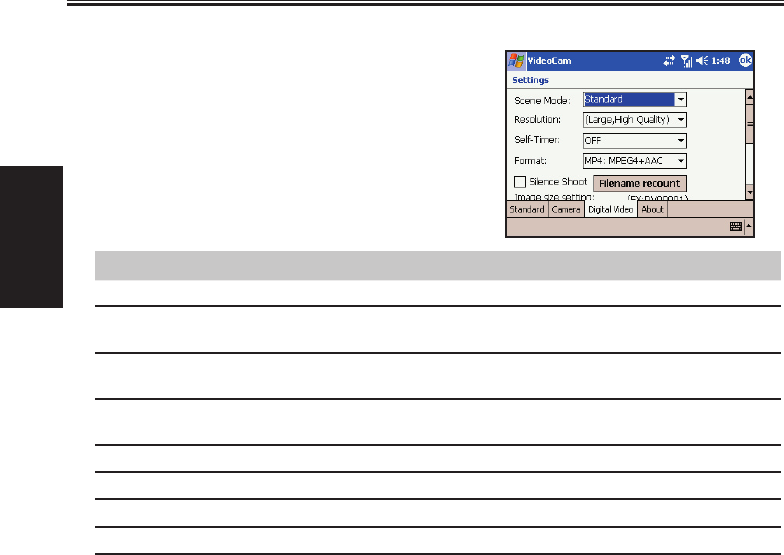
Camera Settings
On the Setting screen, tap Camera.
Item Description
Scene Mode Selects the desired scene mode: Standard, Nightshot, Portrait, Grayscale,
Sepia, or Document.
Resolution
Selects the desired image resolution: 1280*1024 (High), 640*480 (Normal),
320*240 (Basic), or 176*144 (Compact).
Self-Timer Sets the time lag between releasing the shutter and shooting the picture. The
options are 5 sec, 10 sec or 15 sec.
Flash Turns on or off the flash.
White Balance Changes the setting for white balance.
Shooting Mode Selects the single or continuous shooting.
Filename recount Resets the filename counter, starting from DSC00001.
Folder Selects the storage location for the picture.
9-5 S600 User Manual
VideoCam
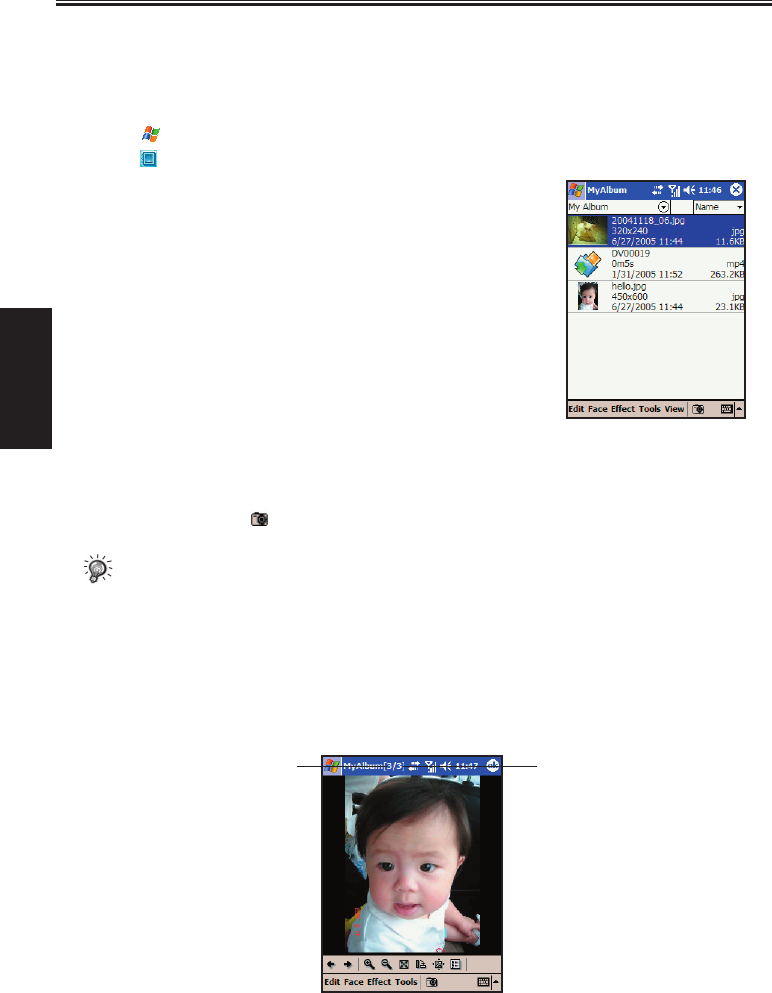
Digital Video Settings
On the Setting screen, tap Digital Video.
Item Description
Scene Mode Selects the desired scene mode: Standard, Nightshot, Grayscale or Sepia.
Resolution
Selects the desired image resolution: Large, High Quality; Large, Long Time;
Small, High Quality; Small, Long Time.
Self-Timer Sets the time lag between releasing the shutter and shooting the picture. The
options are 5 sec, 10 sec or 15 sec.
Format Selects the desired video format: MP4:MPEG4+ACC, MP4:MPEG4+AMR,
3GP:MPEG4+AMR, or 3GP:H.263+AMR.
Silent Shooting Allows you to record only images without sounds.
Filename recount Resets the filename counter, starting from DV00001.
Image size setting Allows you to set the size limit for recorded videos.
Folder Selects the storage location for the videos.

Chapter 10
Using MyAlbum
10.1 Starting MyAlbum
10.2 Opening a Picture or Video
10.3 Editing Pictures
10.4 Using the FaceMagic Feature
10.5 Using Effects
10.6 Tools Options
10.7 View Modes
10-2 S600 User Manual
Using MyAlbum
10.1 Starting MyAlbum
The MyAlbum program is very useful for viewing picture and video files. The supported formats include:
.bmp, .png, .wpng, .jpeg, .gif, .3gp and .mpeg4.
To start MyAlbum, you can:
Tap → Programs → MyAlbum.
Tap in the Camera/DV mode.
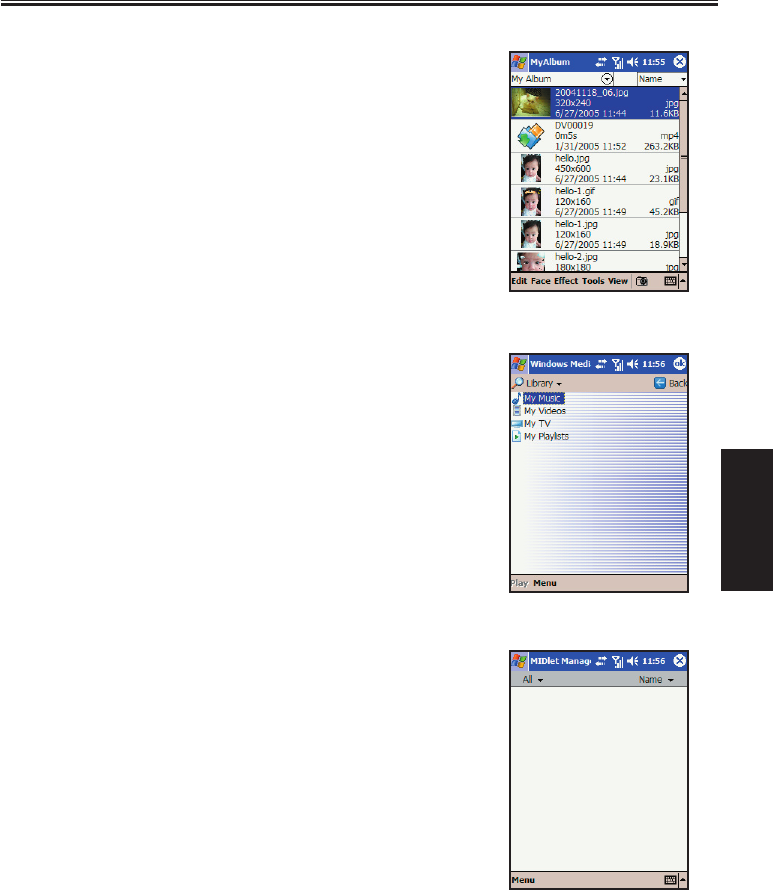
The startup screen of MyAlbum displays the file list.
The top of the screen displays the name of the current folder (the default setting is the My Pocket PC\
FLASH\My Album folder) and the sorting method (the default setting is Name). The middle of the screen
displays the information about the picture: the preview of the pictures on the left; the filename, resolution,
saving time, file format and file size on the right.
In this mode, you can tap on the command bar to switch to the Camera/DV mode.
• You can tap the options on the command bar for advanced features. See the later sections in the
chapter.
10.2 Opening a Picture or Video
To have a closer view of a picture or video, tap the specific thumbnail view in the Report mode of
MyAlbum.
Below is the screen of an opened picture:
Total number of files
Number of current file
S600 User Manual 10-3
Using MyAlbum
In this mode, you can:
Press the Left/Right key to browse for the previous/next file of the current folder, press the Up/Down
key to zoom in/out of the image.
Tap to zoom in on the picture.
Tap to zoom out on the picture.
Tap to zoom the picture to best fit the screen.
Tap to rotate the picture at 90 degrees.
Tap to switch to full screen.
Tap to return to the Report mode.
• You can tap the options on the command bar for advanced features. See the later sections in the
chapter.
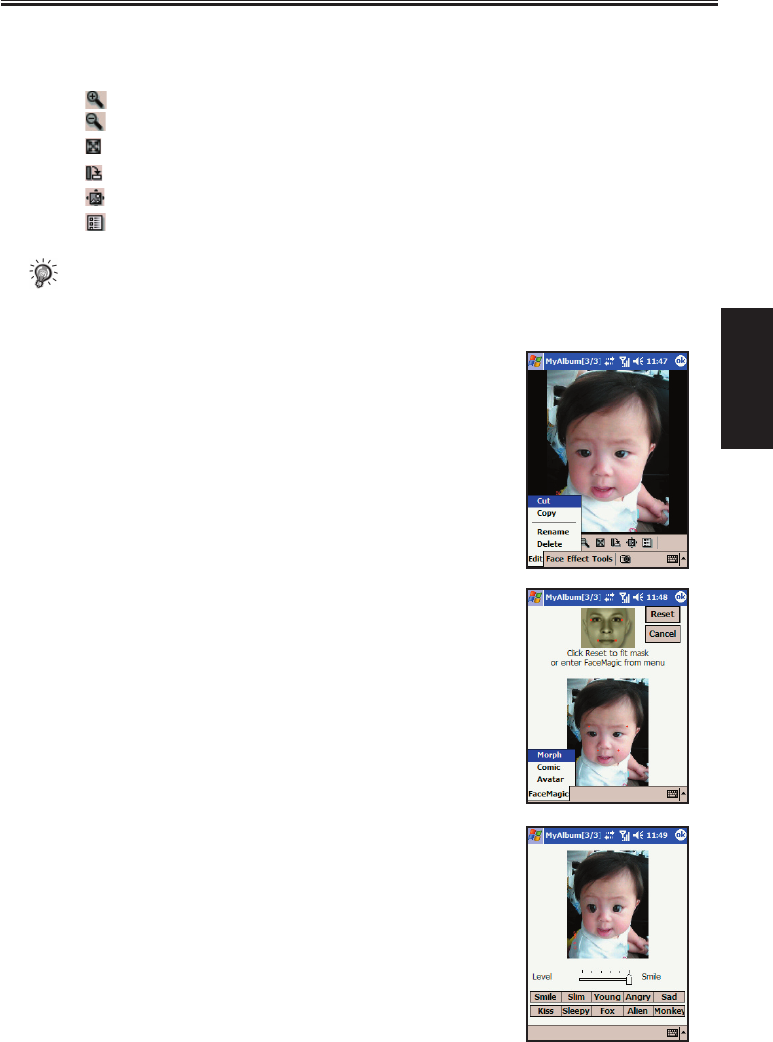
10.3 Editing Pictures
Tap Edit on the command bar to cut, copy, paste, rename or delete
the selected or opened file.
10.4 Using the FaceMagic Feature
Tap Face → FaceMagic on the command bar allows you to create
special changes on the person’s expression. On the positioning
screen, tap Reset, and follow the screen tips to perform positioning
on the person’s face.
After positioning, tap FaceMagic → Morph (as an example). The
screen displays the expression items and the adjustment bar for you
to customize and create special effects.
You can also tap FaceMagic → Comic or Avatar for more special
expression effects.
10-4 S600 User Manual
Using MyAlbum
10.5 Using Effects
Tap Effect on the command bar to create special effects on the selected or opened picture. The picture with
effects will be saved as a new file with “-1” added to the filename.
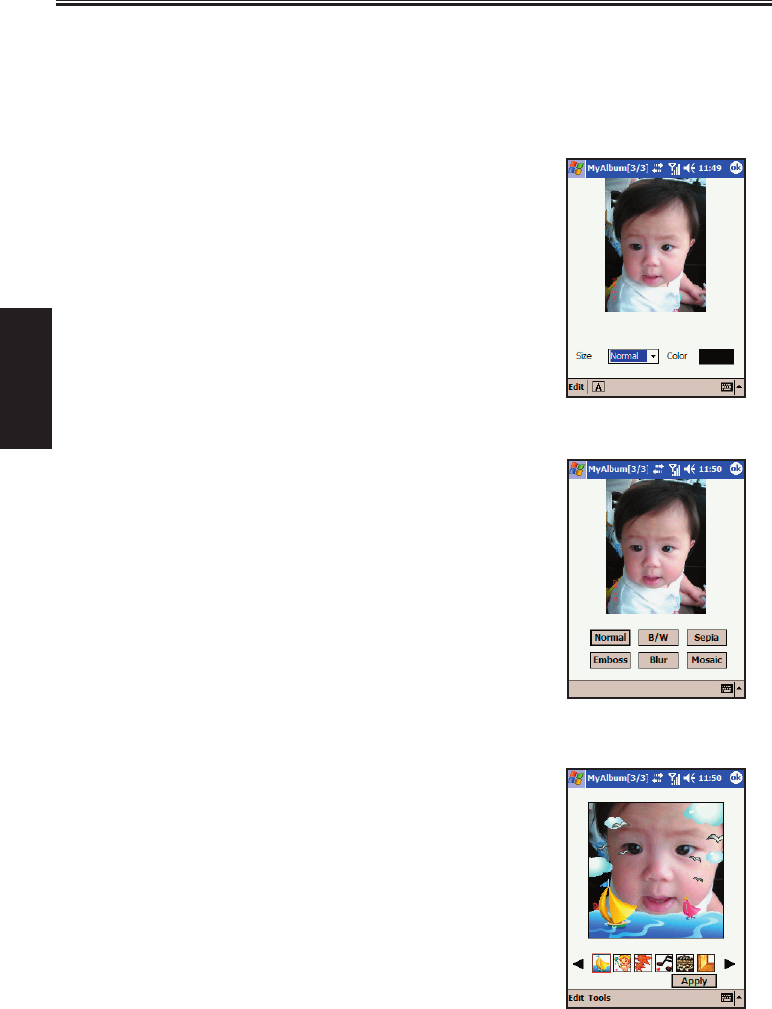
Painting
1. Tap Effect → Painting.
2. You can paint on the picture.
Or, tap A to add text on the picture. Tap the screen, and a editing
cursor will appear. You can start to enter the texts and change the
text’s font, font size and color.
3. Press the OK key or tap OK to save the changes as a new file.
Effect
1. Tap Effect → Effect.
2. Tap the desired effect: Normal, Black/White, Sepia, Emboss,
Blue or Mosaic.
3. Press the OK key or tap OK to save the changes as a new file.
Selecting Normal will not save the picture as a new file.
Frame
1. Tap Effect → Frame.
2. Tap the desired picture frame from the option bar at the bottom
of the screen. The screen will display the applied picture for
viewing immediately. You can tap the arrows on both sides of
the option bar for more frame options.
3. Press the OK key or tap OK to save the changes as a new file.
S600 User Manual 10-5
Using MyAlbum
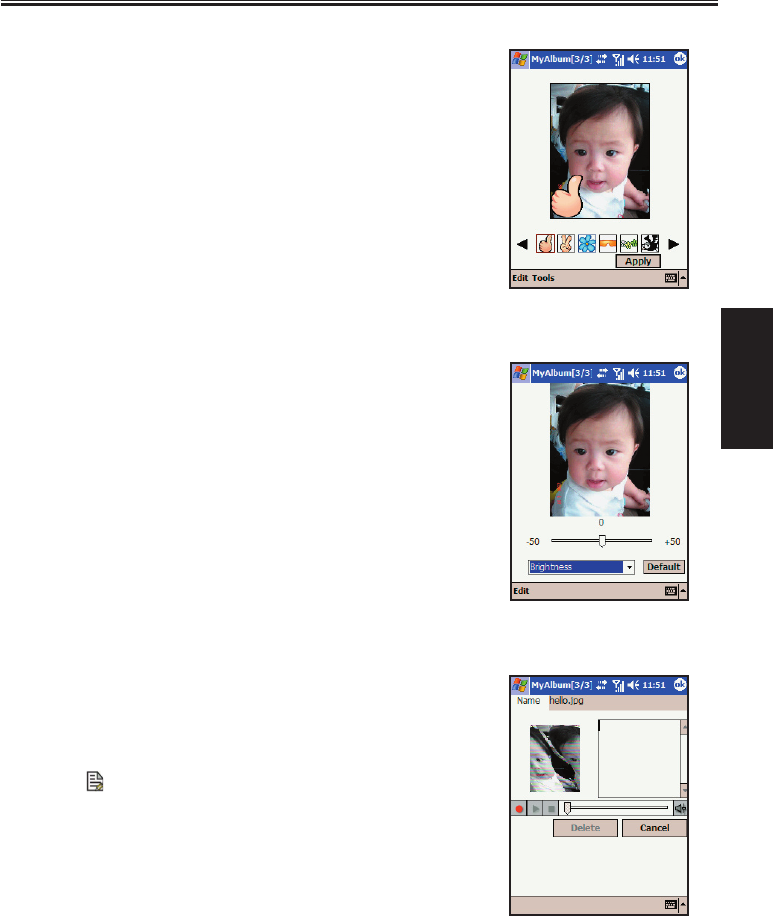
Stamp
1. Tap Effect → Stamp.
2. Tap the desired stamp from the option bar at the bottom of the
screen. The screen will display the applied picture for viewing
immediately. You can tap the arrows on both sides of the option
bar for more stamp options.
3. Press the OK key or tap OK to save the changes as a new file.
Adjustment
1. Tap Effect → Adjustment.
2. Tap the list to select the item for adjustment: Brightness,
Contrast, Saturation, Smart Color, Portrait, Landscape and
Document.
3. Adjust the value by tapping and draging on the adjustment bar.
Tap Edit → Apply to apply the change.
Tap Default restores the default values.
4. Tap OK to save the changes.
Note
1. Tap Effect → Note.
2. You can enter note text in the box, or tap the recording button to
create a recording as a note. The added text or recording will be
saved as a stand-alone file.
3. Tap OK to save the note.
4. The in the list mode indicates that a note has been added to
the picture.

10-6 S600 User Manual
Using MyAlbum
10.6 Tools Options
Tap Tools on the command bar to:
MMS
Send an MMS message including the selected picture.
E-Mail
Send an email message including the selected picture.
IR
Uses the infrared to beam information.
Wallpaper
Sets the selected picture as the theme picture on the Today screen.
10.7 View Modes
MyAlbum provides four view modes for viewing picture and video files.
Large mode
Middle mode
Small mode
Report mode (default mode)

Chapter 11
Media Content
11.1 Starting Media Content
11.2 Media Content Items
11-2 S600 User Manual
Media Content
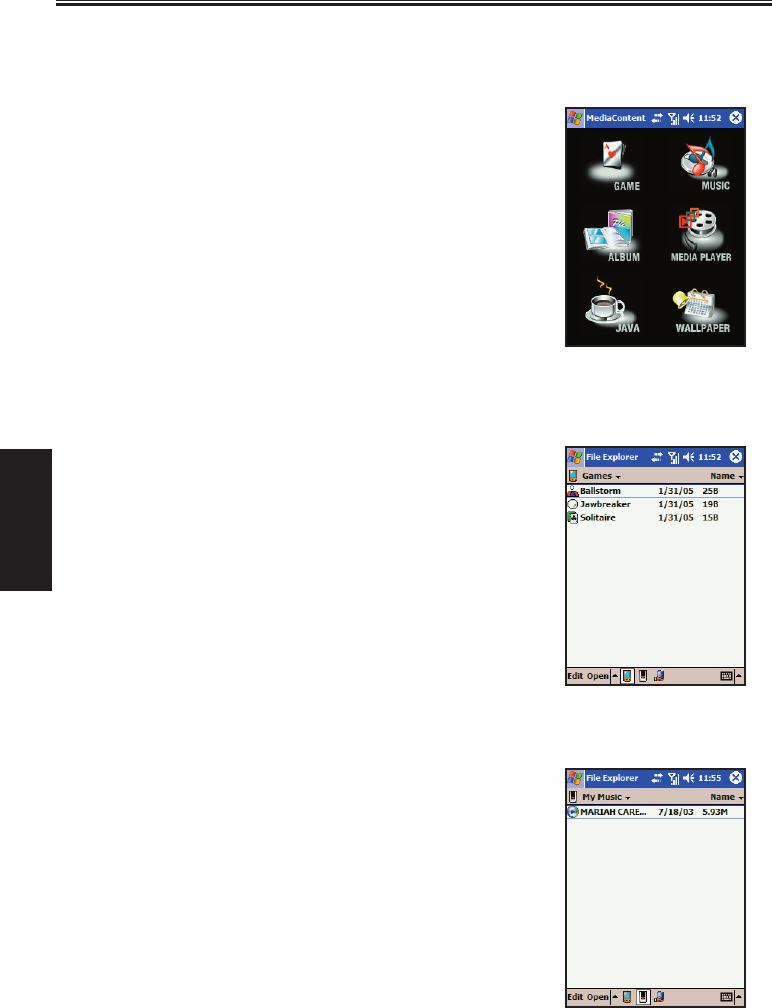
11.1 Starting Media Content
A Media hot key is located on your Pocket PC Phone. Press this key to access Media Content for games,
music, Album, Windows Media Player, Java program and wallpaper setting function.
The main page of Media Content is shown to the right.
11.2 Media Content Items
GAME
On the main page of Media Content, tap GAME to quickly access
the game list.
Tap the desired item to start playing the game.
For information on games, see Section 12.12.
MUSIC
On the main page of Media Content, tap MUSIC to quickly access
the contents in the My Pocket PC\FLASH\My Music folder.
Tap the desired item for playback. Your Pocket PC Phone will use
Windows Media Player to play the selected item.
For information on Windows Media Player, see Section 12.5.
S600 User Manual 11-3
Media Content
ALBUM
On the main page of Media Content, tap ALBUM to quickly start
MyAlbum.
For information on MyAlbum, see Chapter 10.
MEDIA PLAYER
On the main page of Media Content, tap MEDIA PLAYER to
quickly start Windows Media Player.
For information on Windows Media Player, see Section 12.5.
JAVA
On the main page of Media Content, tap JAVA to quickly start the
Java program.
For information on Java, see Section 12.7.
11-4 S600 User Manual
Media Content
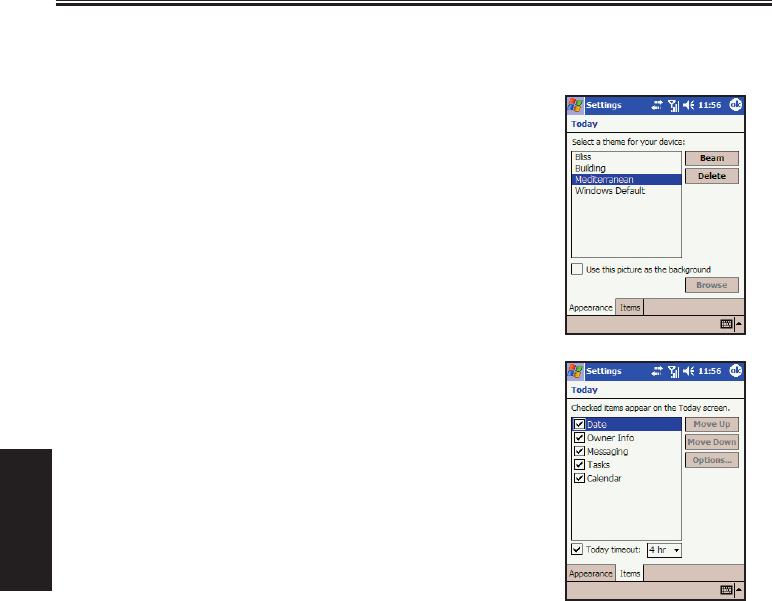
WALLPAPER
On the main page of Media Content, tap WALLPAPER to quickly
access the setting items of the Today screen.
Tap Appearance to change the theme picture of the Today
screen.
Tap Items to set the items to be diaplayed on the Today
screen. You can also set the time for the Pocket PC Phone
to automatically return to the Today screen after a period of
inactivity (3 hours by default).
For information on Settings, see Chapter 6.

Chapter 12
More Programs
12.1 Microsoft ActiveSync
12.2 Pocket Word
12.3 Pocket Excel
12.4 MSN Messenger
12.5 Windows Media Player
12.6 Pictures
12.7 JAV
A
12.8 File Explorer
12.9 Calculator
12.10 Pocket MSN
12.11 IE Favorites
12.12 Games
12-2 S600 User Manual
More Programs
12.1 Microsoft ActiveSync
With Microsoft ActiveSync on both your desktop computer and Pocket PC Phone, you can exchange
information between a desktop computer or server and your Pocket PC Phone. To synchronize your Pocket
PC Phone with your desktop computer, you must install ActiveSync on the desktop computer. Using
ActiveSync, you can:
Synchronize information between your Pocket PC Phone and desktop computer or server so that you
have the latest information in all locations.
Change synchronization settings and synchronization schedule.
Copy files between your Pocket PC Phone and desktop computer.
Back up and restore device information.
Add/remove programs to/from your Pocket PC Phone.
Installing Microsoft ActiveSync
An Microsoft Companion CD is supplied with your Pocket PC Phone. You need to use the CD to install
ActiveSync on the desktop computer before perfoming synchronization.
Follow this procedure:
1. Turn on the desktop computer.
2. Insert the Companion CD into the CD-ROM drive of the desktop computer.
3. On the first screen, click the arrow to enter the main screen and click Start Here.
4. On the next screen, click Install ActiveSync 3.x on the left column.
5. On the next screen, click Install to start installation.
6. When prompted, connect one end of the USB cable to the converter, and then connect the converter to
the USB port on the bottom of your Pocket PC Phone.
7. Connect the other end of the USB cable to the USB port of the desktop computer.
8. The Add New Hardware Wizard should automatically install the USB driver. (If you need to specify
the location of the driver, click Browse and select the CD-ROM drive containing the Companion CD.)
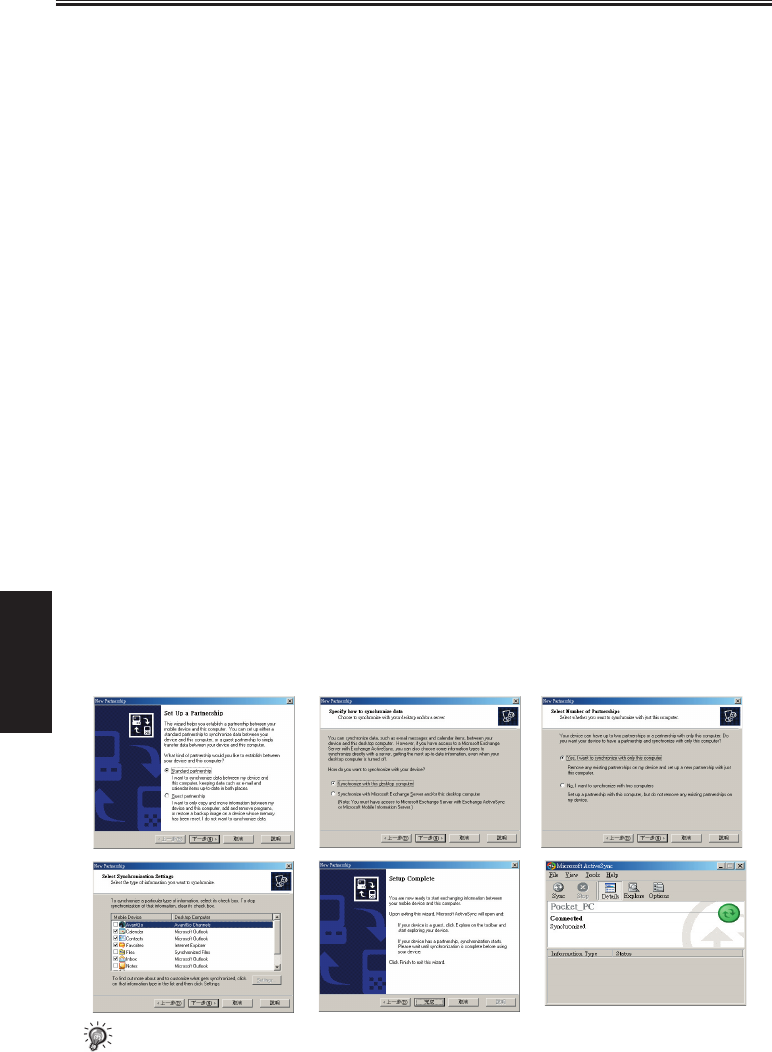
9. Follow the on-screen instructions to establish a partnership between your Pocket PC Phone and your
desktop computer. Select the types of information for synchronization. After your first synchroniza-
tion, the data you have stored on your desktop computer such as Calendar, Contacts and Tasks are
copied to your Pocket PC Phone.
→ → →
→ →
• If you do not establish a standard partnership with the desktop computer, then you cannot
perform synchronization between two devices, and you will need to select a desired partnership
every time you connect to the desktop computer.
S600 User Manual 12-3
More Programs
Connecting to Your Desktop Computer
You can connect your Pocket PC Phone to a desktop computer in several ways:
Use the USB cable or an optional cradle.
Use the IR port in place of using a cable. (For complete instructions on connecting to your desktop
computer by infrared, see the ActiveSync Help on your desktop computer.)
Use a network or dial-up connection.
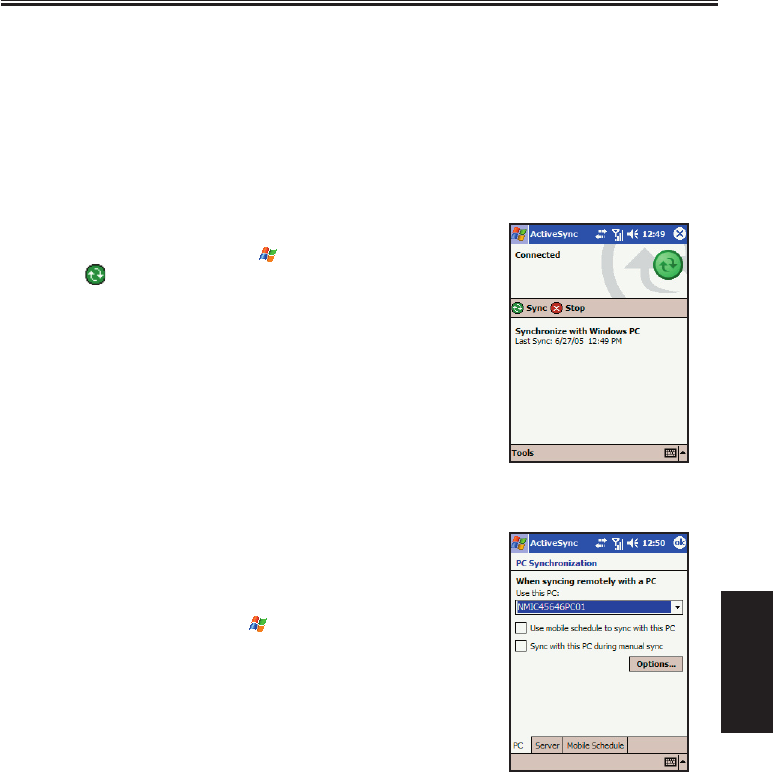
Synchronizing with Your Desktop Computer
1. Connect your Pocket PC Phone to your desktop computer.
2. On your Pocket PC Phone, tap → ActiveSync.
3. Tap to start synchronization.
Setting up Remote Synchronization
Synchronizing Remotely with a Desktop Computer
1. Make sure that the desktop computer is powered on.
2. Connect to the corporate network. (See Chapter 13 for more
information.)
3. On the Pocket PC Phone, tap → ActiveSync.
4. Tap Tools → Options → PC.
5. In When syncing remotely with a PC, select your computer
name in the Use this PC list.
6. Select one or both of the items: Use mobile schedule to sync
with this PC and Sync with this PC during manual sync.
7. Tap OK.

12-4 S600 User Manual
More Programs
Synchronizing Remotely with a Server
1. Make sure that the server is powered on.
2. Connect to the Internet. (See Chapter 13 for more information.)
3. On the Pocket PC Phone, tap → ActiveSync.
4. Tap Tools → Options → Server.
5. Select the types of information, such as Calendar, Contacts, or
Inbox, that you want to synchronize with the server.
6. To change synchronization settings, such as the amount
synchronized, select the type of information and tap Settings.
Note that there are no synchronization settings for Contacts.
7. In Sync with this server, enter the name of the Microsoft
Exchange server to which you want to connect.
8. Tap Options → Connection.
9. Enter your user name, password, and domain name. If you want to perform automatic synchronization,
select Save password.
10. Tap OK.
Synchronizing Automatically
With ActiveSync, you can schedule automatic synchronization between your Pocket PC Phone and a server
every time when an item arrives or is changed at the server. Your Pocket PC Phone is informed of that
event and synchronizes automatically to retrieve those items, making your device always up-to-date.
Using ActiveSync, you can schedule synchronization of your device on two separate schedules.
Use the peak times schedule to synchronize during working hours or other times when you have higher
mail volumes.
Use the off-peak schedule to synchronize during times when you have lower mail volumes.
When you are roaming, you can synchronize manually to reduce roaming charges, or you can
synchronize using the mobile schedules.
To set up the schedule for automatic synchronization:
1. Make sure not to connect your Pocket PC Phone to the desktop
computer.
2. On the Pocket PC Phone, tap → ActiveSync.
3. Tap Tools → Options → Mobile Schedule.
4. To synchronize periodically during peak times, select the
frequency of synchronization in the Peak times list.
To synchronize periodically during off-peak times, select the
frequency of synchronization in the Off-peak times list.
To synchronize while roaming, select a frequency in the
Roaming list.
5. To set the days and hours for peak times, tap Peak Times.
6. Tap OK.