Kongsberg Seatex AS AIS300 Automatic Identification System User Manual display
Kongsberg Seatex AS Automatic Identification System display
Contents
- 1. user manual
- 2. user manual display
user manual display

Instruction manual
Multi Function Display

MultiFunctionDisplay
Instructionmanual
DISP-D-MFD_INSTR/2.0
April2016©KongsbergSeatexAS

Documenthistory
Documentnumber:DISP-D-MFD_INSTR/Revision2.0
Rev.1.0June2015Firstversion.
Rev.2.0April2016AddedinformationforSeaPosproduct.
Copyright
©KongsbergSeatexAS
Allrightsreserved.Nopartofthisworkcoveredbythecopyrighthereonmaybereproducedorotherwise
copiedwithoutpriorpermissionfromKongsbergSeatexAS.
Note
TheinformationcontainedinthisdocumentremainsthesolepropertyofKongsbergSeatexAS.Nopartof
thisdocumentmaybecopiedorreproducedinanyformorbyanymeans,andtheinformationcontained
withinitisnottobecommunicatedtoathirdparty,withoutthepriorwrittenconsentofKongsberg
SeatexAS.
KongsbergSeatexASendeavourstoensurethatallinformationinthisdocumentiscorrectandfairly
stated,butdoesnotacceptliabilityforanyerrorsoromissions.
Warning
Theequipmenttowhichthismanualappliesmustonlybeusedforthepurposeforwhichitwas
designed.Improperuseormaintenancemaycausedamagetotheequipmentand/orinjurytopersonnel.
Theusermustbefamiliarwiththecontentsoftheappropriatemanualsbeforeattemptingtooperate
orworkontheequipment.
KongsbergSeatexdisclaimsanyresponsibilityfordamageorinjurycausedbyimproperinstallation,
useormaintenanceoftheequipment.
Comments
Toassistusinmakingimprovementstotheproductandtothismanual,wewelcomecommentsand
constructivecriticism.
e-mail:km.seatex@km.kongsberg.com
KonsbergSeatexAS
www.kongsberg.com

Instructionmanual
Tableofcontents
ABOUTTHISMANUAL.......................................................5
MULTIFUNCTIONDISPLAY...............................................6
Displaydescription...................................................................................................6
Systemdiagram........................................................................................................6
Scopeofsupply........................................................................................................7
Standardpartsdelivered................................................................................7
Optionalitems..............................................................................................7
Softwareandhardwareversions...............................................................................8
Supportinformation.................................................................................................8
INSTALLINGTHEDISPLAY................................................9
Mountingthedisplayinapanel...............................................................................9
Mountingthedisplayinthebracket.......................................................................10
Connectingthedisplay...........................................................................................11
Updatingthesoftware............................................................................................11
GETTINGSTARTED..........................................................13
Poweron/offprocedures.........................................................................................13
Poweringonthedisplay..............................................................................13
Rebootingthedisplay..................................................................................13
Poweringoffthedisplay..............................................................................13
Userinteractionprinciples......................................................................................14
Presentationoverview............................................................................................14
Displayorganisation...................................................................................14
Icons..........................................................................................................14
Changingthekeyboardlayout.....................................................................15
Adjustingthedisplaybrightness..................................................................16
ResettingthedisplaybrightnessforAIS.......................................................16
Checkingthedisplayproductandsoftwareversion...............................................16
MFDFORAIS300............................................................17
DisplayorganisationAIS.......................................................................................17
Displaysettings......................................................................................................18
SettingthedisplayIPaddressforAIS..........................................................18
Displayviews.........................................................................................................18
Targetlistview...........................................................................................19
Ownvesselview.........................................................................................20
AIScongurationview...............................................................................22
ConguringtheAISUnit.......................................................................................23
SettingtheAISUnitIPaddress...................................................................23
Creatinganewregion.................................................................................24
DISP-D-MFD_INSTR/2.03

MultiFunctionDisplay
Editingaregion..........................................................................................25
Operationalprocedures...........................................................................................25
Checkingandacknowledgingalarms............................................................25
Checkingsentandreceivedmessages...........................................................26
Creatinganewmessage..............................................................................28
Runningacommunicationtest.....................................................................29
Displayingreceivedrequests.......................................................................30
MFDFORAIS300BF........................................................32
ConguringtheAIS300BF...................................................................................32
MFDFORSEAPOS............................................................36
DisplayorganisationSeaPos..................................................................................36
Displaysettings......................................................................................................37
SettingthedisplayIPaddressforSeaPos......................................................37
Displayviews.........................................................................................................37
Positionview..............................................................................................37
Satellitesview............................................................................................38
Referencestationsview...............................................................................39
GPSinformationview.................................................................................40
SeaPoscongurationview...........................................................................40
ConguringtheSeaPosunit...................................................................................41
SettingNMEAdataoutputmessagesonhostinterface..................................41
SettingNMEAdataoutputmessagesonserialinterface................................42
Settingexternalpositioninput.....................................................................43
EnabletrackingofSBASsatellites...............................................................44
EnablinguseofexternalDGPSsource.........................................................44
Settingalerts...............................................................................................45
Settingalarmandwarninglimits..................................................................46
Settingvelocitylter...................................................................................47
Settingheightaiding...................................................................................48
ConguringtheIALAreceiver....................................................................49
SettingIALAoutput...................................................................................50
RestartingtheGPSreceiver.........................................................................51
Operationalprocedures...........................................................................................51
TECHNICALSPECIFICATIONS.........................................52
Weightandoutlinedimensions..............................................................................52
Powerspecications...............................................................................................52
Environmentalspecications.................................................................................52
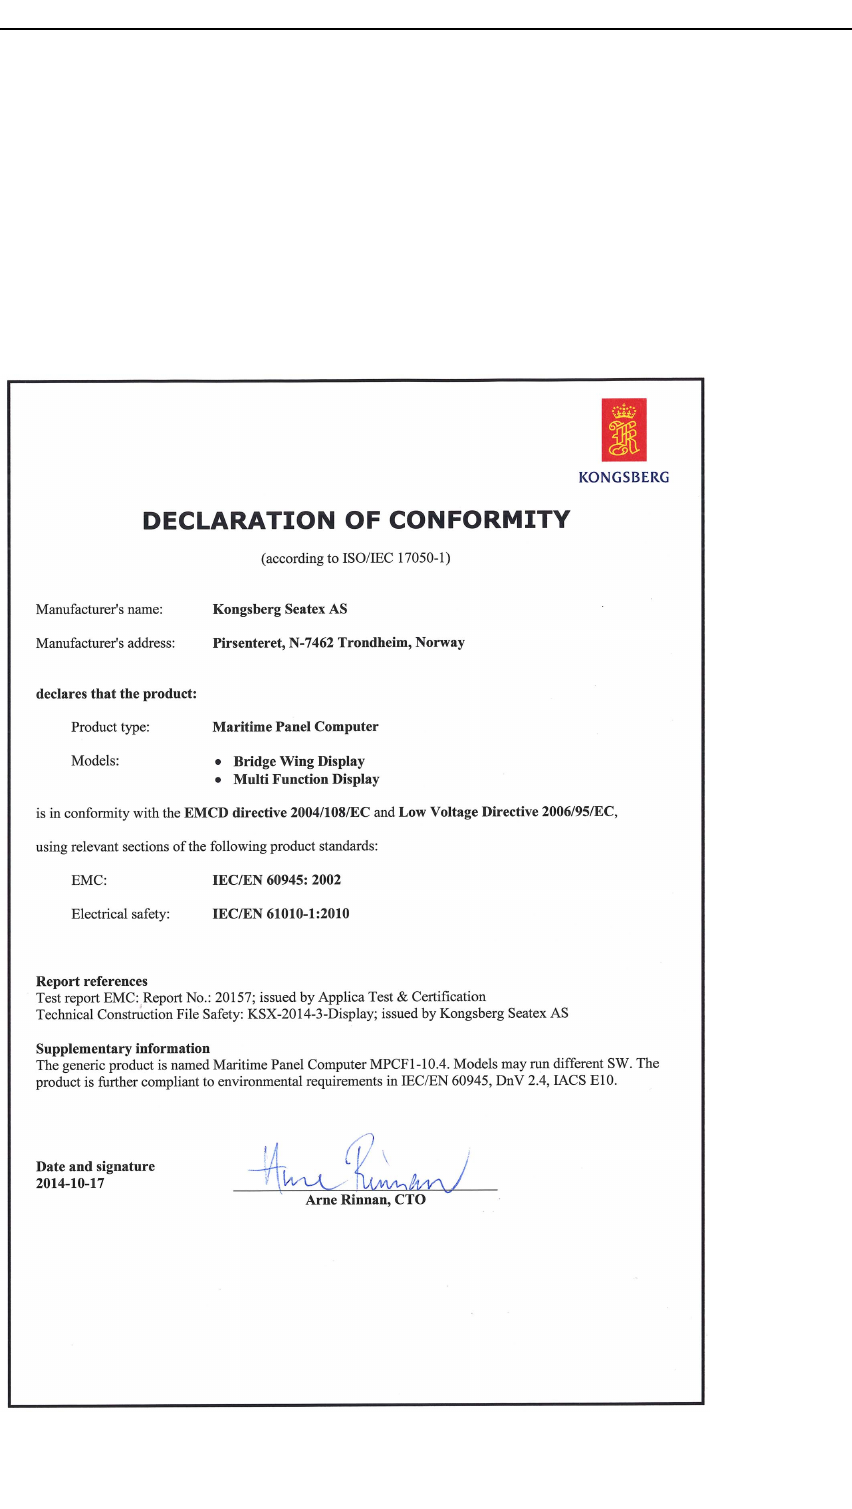
Conformitydeclaration...........................................................................................53
DRAWINGS.....................................................................54
Glossary..................................................................................................................58
4DISP-D-MFD_INSTR/2.0

Aboutthismanual
Aboutthismanual
Purpose
Thisinstructionmanualprovidesyouwiththenecessaryinformationtoinstall,congure
andoperatetheMultiFunctionDisplay.
Targetaudience
Thismanualisintendedforinstallationpersonnel,navigatorsandotherpersonnel
workingonthebridge.
Softwareandhardwareversions
Thesystemisdeliveredwithsoftwareversion1.00.xxandhardwareversion1.
Licenseinformation
TheMultiFunctionDisplayisnotalicensedproduct.
Maintenancepurposes
Thisinstructionmanualisalsointendedasreferencematerialforthemaintenance
personnel.Keepthismanualforlateruse.
DISP-D-MFD_INSTR/2.05
MultiFunctionDisplay
MultiFunctionDisplay
Displaydescription
TheMultiFunctionDisplayisanavigation
displayusedforvisualizationand
congurationoftheconnectednavigation
sensorsand/orequipment.
Itisatouchdisplaywhichisquickto
installandeasytooperate.Communication
withthedisplayisviaLAN(localarea
network).Thedisplaycanbemounted
ushoronabracket.Therequiredsoftware
ispre-installed.
Thedisplaycanbeusedtogetherwith
theAIS300,AIS300BFand/orSeaPos
products.
Systemdiagram
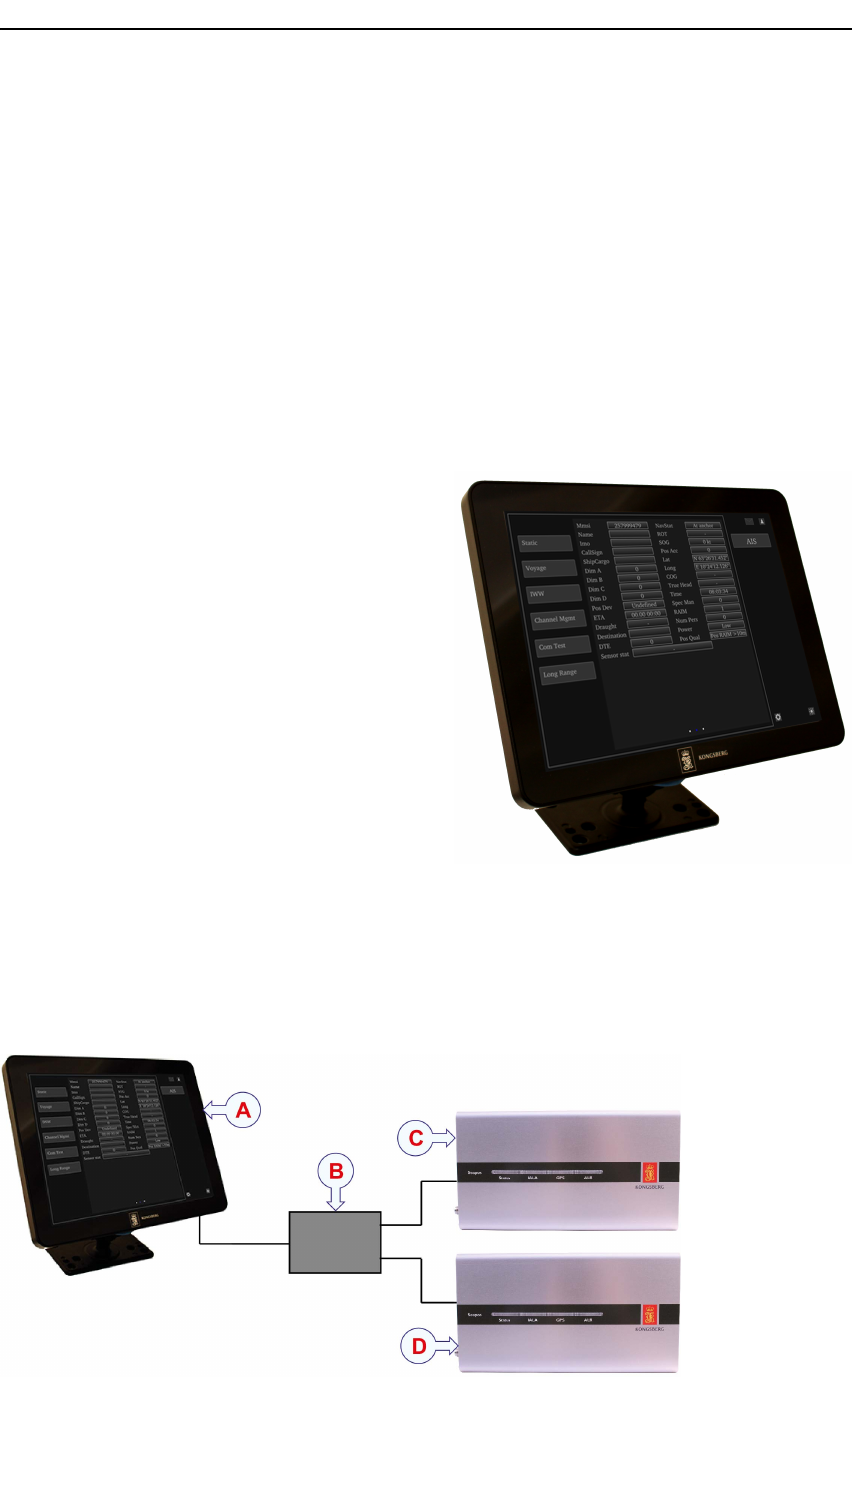
AbasicsystemdiagramfortheMultiFunctionDisplay.
AMultiFunctionDisplay
6DISP-D-MFD_INSTR/2.0

MultiFunctionDisplay
BEthernetswitch(ifyouhavetwoormoresystems)
CAIS/AISBFunit
DSeaPosunit
UseaswitchfortheEthernetcableifyouhavemorethanonesystemconnectedto
thedisplay.
Scopeofsupply
PleaseobservethestandardandoptionalitemsprovidedwiththeMultiFunctionDisplay
delivery.
Standardpartsdelivered
•1eaMultiFunctionDisplay(MaritimePanelComputer,10,4")
PartnumberDISP-E-MFD
•1eaInstructionmanual,MFD
PartnumberDISP-D-MFD_INSTR
Optionalitems
Units
•Powersupply,24VDC/1.75A
PartnumberG072-13
•Mountingbracket,10,4”display
PartnumberDISP-M-BRACKET
Cables
•Powercable,AC,EU
PartnumberG071-80
•PhoenixpatchpanelRJ-45CA T5e
Partnumber95.937
•Ethernetcable,Cat6,3m
PartnumberG072–43_3m
DISP-D-MFD_INSTR/2.07

MultiFunctionDisplay
Softwareandhardwareversions
SystemdeliveredwithSoftwareversion,1.00.xxHardwareversion,1
Revisiontable
DateSoftwareversionHardwareversion
Supportinformation
•Companyname:KongsbergSeatexAS
•Address:Havnegata9,7010Trondheim,Norway
•Switchboard:+4773545500
•Telefax:+4773515020
•Dutyphone:+4733032407(24hours)
•E-mailaddress:km.support.seatex@km.kongsberg.com
•Website:http://www.km.kongsberg.com/seatex
8DISP-D-MFD_INSTR/2.0

Installingthedisplay
Installingthedisplay
Thischapterdescribeshowtoinstallthedisplayinapanelorbracketandhowtoconnect
thedisplay.
Mountingthedisplayinapanel
Tomountthedisplayinapanelyoumustmakeasuitableholeinthepanelsurface.
Note
Beforeyoustartcutting,makesurethereisnothingbehindthesurfaceyouwanttocut
through.
Prerequisites
Weassumethatyouareequippedwithastandardsetoftools.Thistoolsetmustcomprise
thenormaltoolsforelectronicandelectromechanicaltasks,suchasscrewdrivers,
pliers,spanners,acablestripperetc.Eachtoolmustbeprovidedinvarioussizes.We
recommendthatalltoolsaredemagnetizedtoprotectyourequipment.
Unlessstatedotherwise,allmountingequipment(suchasbolts,nuts,washers,screws
etc.)referredtowithinthisdocumentistobesuppliedbythecustomerortheshipyard.
Context
Thedisplaymustbelocatedonthebridge.
Procedure
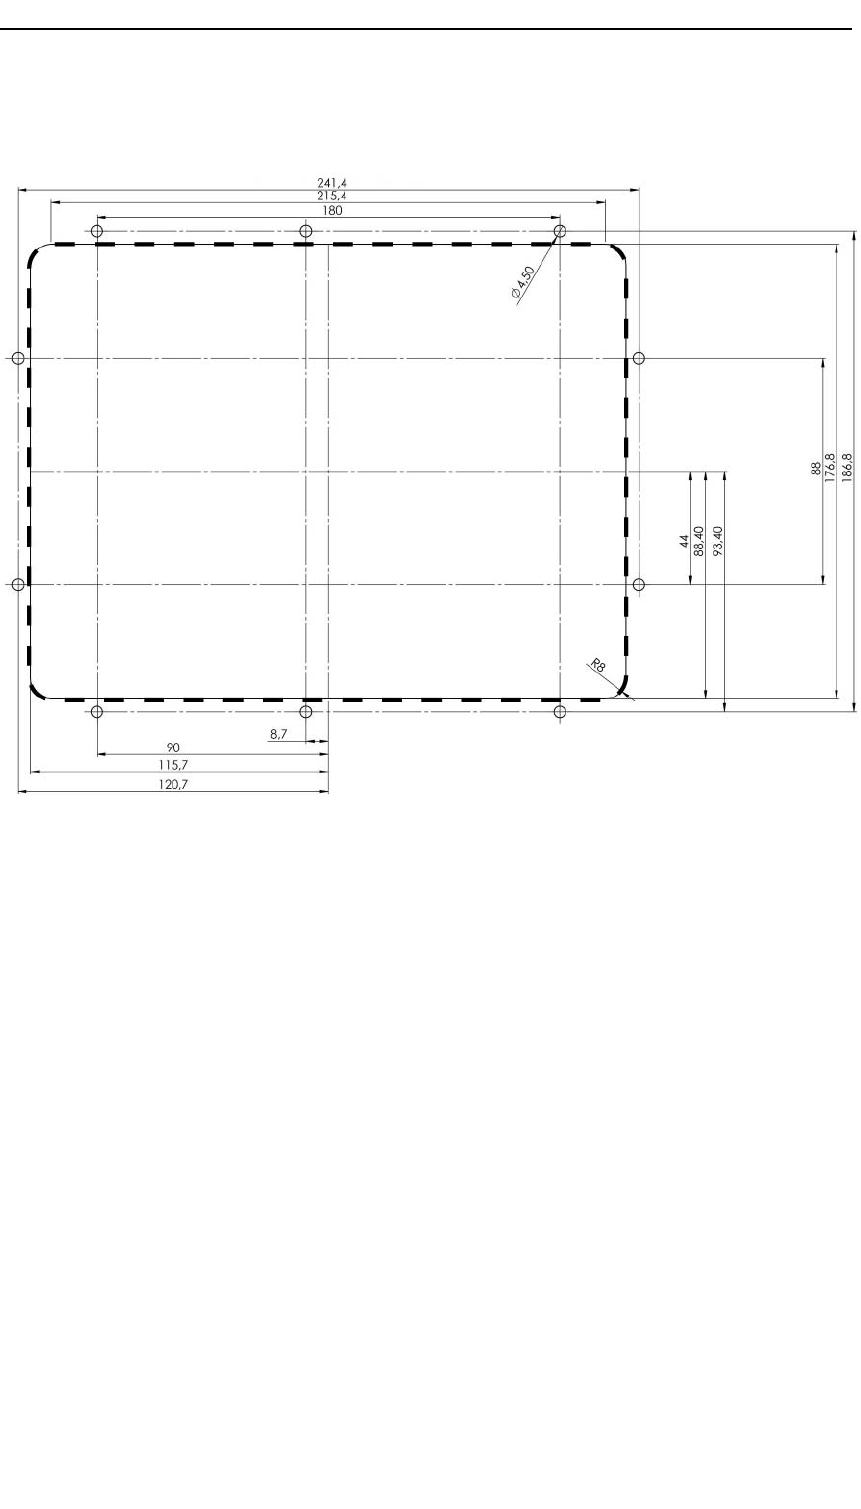
1Cutaholeintheconsole,wallorsimilarsurfacewherethedisplayistobemounted.
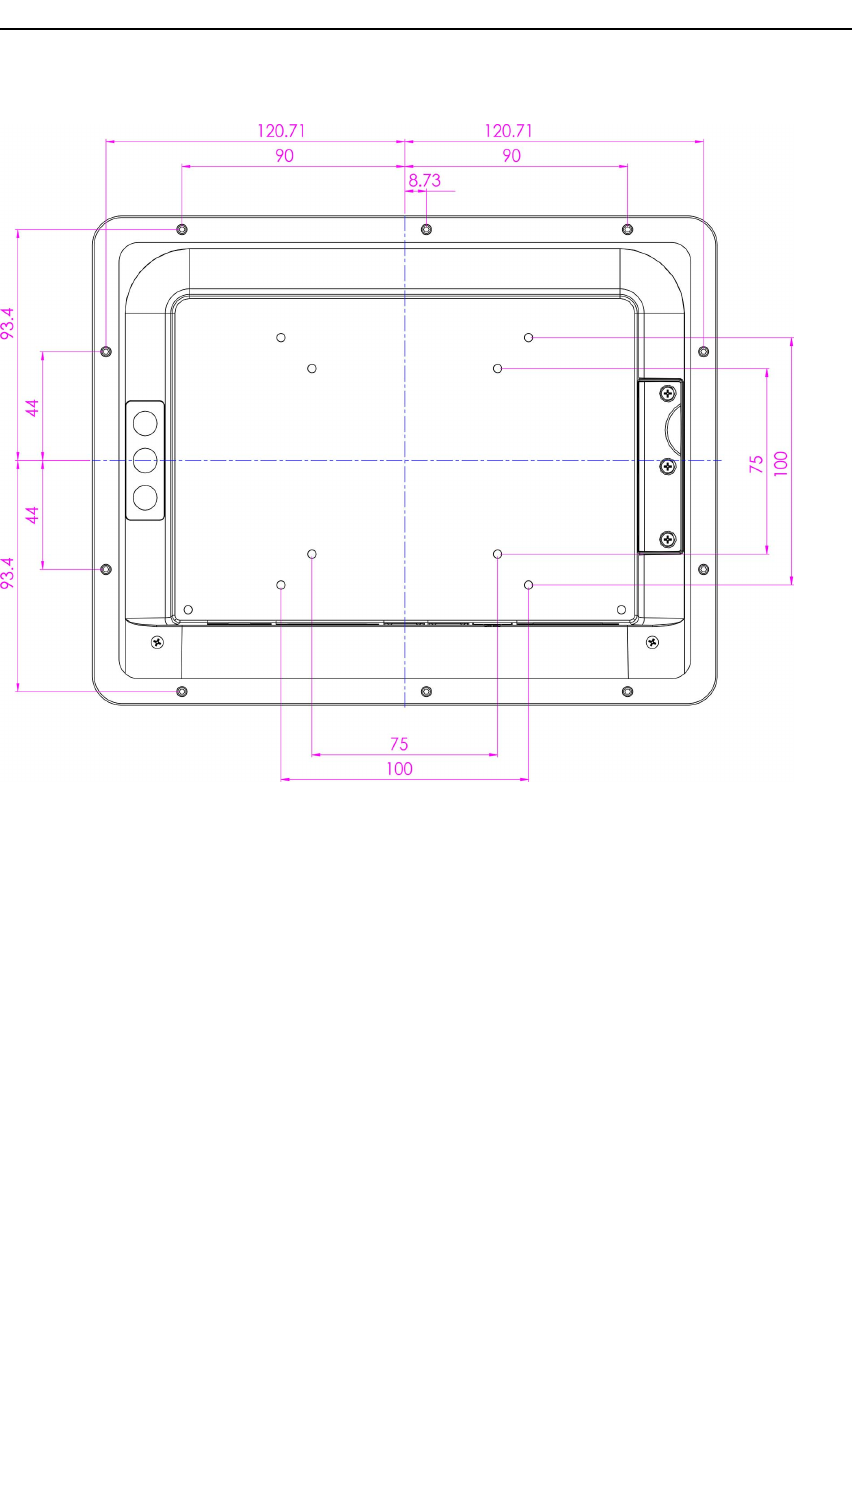
Observethecutoutdrawingprovidedwiththedisplay(inmm).
Asanalternative,youcanusetherubbergaskettomarkthehole.Cutthehole
accordingtotheinnermeasurementsofthegasket.
2Markanddrill10holesaccordingtothedrawingorthegasket.
3Placetherubbergasketoverthehole.
4MountthedisplayintheholeandsecurewithM4screwsandwashersprovided.
DISP-D-MFD_INSTR/2.09

MultiFunctionDisplay
Result
Oncethedisplayhasbeenmounted,youcanproceedwiththecabling.
Relatedtopics
•Drawingsonpage54
Mountingthedisplayinthebracket
Usethemountingbrackettoinstallthedisplayonadesktop,ceilingorsimilarsurface.
Themountingbracketconsistsofthreesections:thetwoidenticalbaseplatesandthe
centresection.
Prerequisites
Weassumethatyouareequippedwithastandardsetoftools.Thistoolsetmustcomprise
thenormaltoolsforelectronicandelectromechanicaltasks,suchasscrewdrivers,
pliers,spanners,acablestripperetc.Eachtoolmustbeprovidedinvarioussizes.We
recommendthatalltoolsaredemagnetizedtoprotectyourequipment.
Unlessstatedotherwise,allmountingequipment(suchasbolts,nuts,washers,screws
etc.)referredtowithinthisdocumentistobesuppliedbythecustomerortheshipyard.
Context
Thedisplaymustbelocatedonthebridge.
Procedure
1Placeoneofthemountingbracketbaseplatesontheceiling,desktoporsimilar
surfacewherethemountingbracketistobemounted.
2Markthescrewholes.
3Removethebaseplateanddrillholesforthescrews.
4Placethebaseplateovertheholesandsecurewithscrewsandwashers.
5Attachthedisplaytotheotherbaseplateusingthefourscrewssuppliedwiththe
bracket.4screwsandplasticwashers.
6Assemblethecentresectiontothebaseplates.
Result
Oncethedisplayhasbeenmounted,youcanproceedwiththecabling.
Relatedtopics
•Drawingsonpage54
10DISP-D-MFD_INSTR/2.0

Installingthedisplay
Connectingthedisplay
ThedisplaymustbeplacedwithinthreemetresoftheDCcable.
Prerequisites
Amultimeterinordertomeasurevoltage,currentandresistance.
Procedure
1Connectanetwork(Ethernet)cabletothe
LAN1portunderneaththedisplay.
2Connecttheotherendofthenetworkcable
totheLANportontheKongsbergUnitortoanetworkswitch/routerwherethe
KongsbergUnitalsoisconnected.
3Connectthepowercablewiththeappropriatepoweradapter,ifneeded,tosupply
powertothedisplay.
Result
Thedisplayisnowreadyforuse.
DefaultIPaddresses
ThedisplayandtheunitsaresetupwithadefaultIPaddress:
•Display:10.0.21.62
•AISunit:10.0.21.60
•SeaPosunit:10.0.21.64
Youcanchangetheseaddressestosuityoursystem.
Relatedtopics
•SettingtheAISUnitIPaddressonpage23
•SettingthedisplayIPaddressforAISonpage18
•SettingthedisplayIPaddressforSeaPosonpage37
Updatingthesoftware
Toinstallthenewestfeaturesandbugxes,youshouldupdatethedisplaywheneveran
updateisavailable.ContactKongsbergSeatexAScustomersupporttoreceivenew
software.
Procedure
1AddtheupdatepackageletoanemptyUSBstick.
DISP-D-MFD_INSTR/2.011

MultiFunctionDisplay
Note
Thepackageneedstobeaccompaniedbythemd5checksumlewhichveriesthe
authenticityofthesoftwareupdatepackage.
2InserttheUSBstickwiththeupdatepackageintothedisplayUSBport.TheUpdate
dialogboxappears.
3TapUpdatetostarttheupdateprocess.Thiswillleavethedisplayinoperablefora
fewseconds,andthenthesoftwarewillrestart.
Thesoftwareupdateisnowcompletedandanyconsecutivedialogboxescanbe
dismissed.
12DISP-D-MFD_INSTR/2.0

Gettingstarted
Gettingstarted
ThischapterdescribeshowtogetstartedwiththeoperationoftheMultiFunction
Display.
Poweron/offprocedures
Poweringonthedisplay
ProvidepowertothedisplaybeforeyoucanstarttooperatetheMultiFunctionDisplay.
Procedure
1Connectthepowercablewiththeappropriatepoweradapter,ifneeded,tosupply
powertothedisplay.
2Thedisplaywillshowaboot-screen,thengoblankfor15to20secondsbeforethe
displayapplicationstartsup.
Rebootingthedisplay
Youmayneedtorestartthedisplaytorecoverfromanerrorortore-initializethedisplay.
Procedure
1EntertheCongurationview→Systemsettings.
2TaptheDevicecontrolsubmenuitem.
3TaptheRebootbuttontorebootthedisplaydevice.
Poweringoffthedisplay
Disconnectpowertothedisplaywhenitisnotinuse.
Procedure
1Removethepowercable.
2Thedisplayisnowoff.
DISP-D-MFD_INSTR/2.013

MultiFunctionDisplay
Userinteractionprinciples
Howthedisplayworksfortheuser.
Thisisatouch-display.Selectionisdonebytappingthescreenwithyournger.To
scrolllistsorviews,swipeyourngeracrossthescreen,draggingthevisiblecontents
upordownorsideways.
TaptheSystembuttoninthecontrolareatotherighttotogglebetweentheviewsandto
exittheviewswhichdonothaveadedicatedExitbutton,.
Editingintextboxes
Akeyboardisprovidedwhereyouarepromptedtoentertext.
Conrmingchanges
Whenyouhavechangedavalueyouarepromptedtoconrmthischangewithasave
command.
Passwordprotection
Somecongurationdialogsarepasswordprotected.Thedefaultpasswordis1234.
Decimalmark
Apoint"."isusedasadecimalmark.
Presentationoverview
Displayorganisation
Howthedisplayisorganiseddependsonthesystemforwhichitisused.Refertothe
sectionsforthespecicproducttoseethedisplayorganisationforthatparticularsystem.
Relatedtopics
•DisplayorganisationAISonpage17
•DisplayorganisationSeaPosonpage36
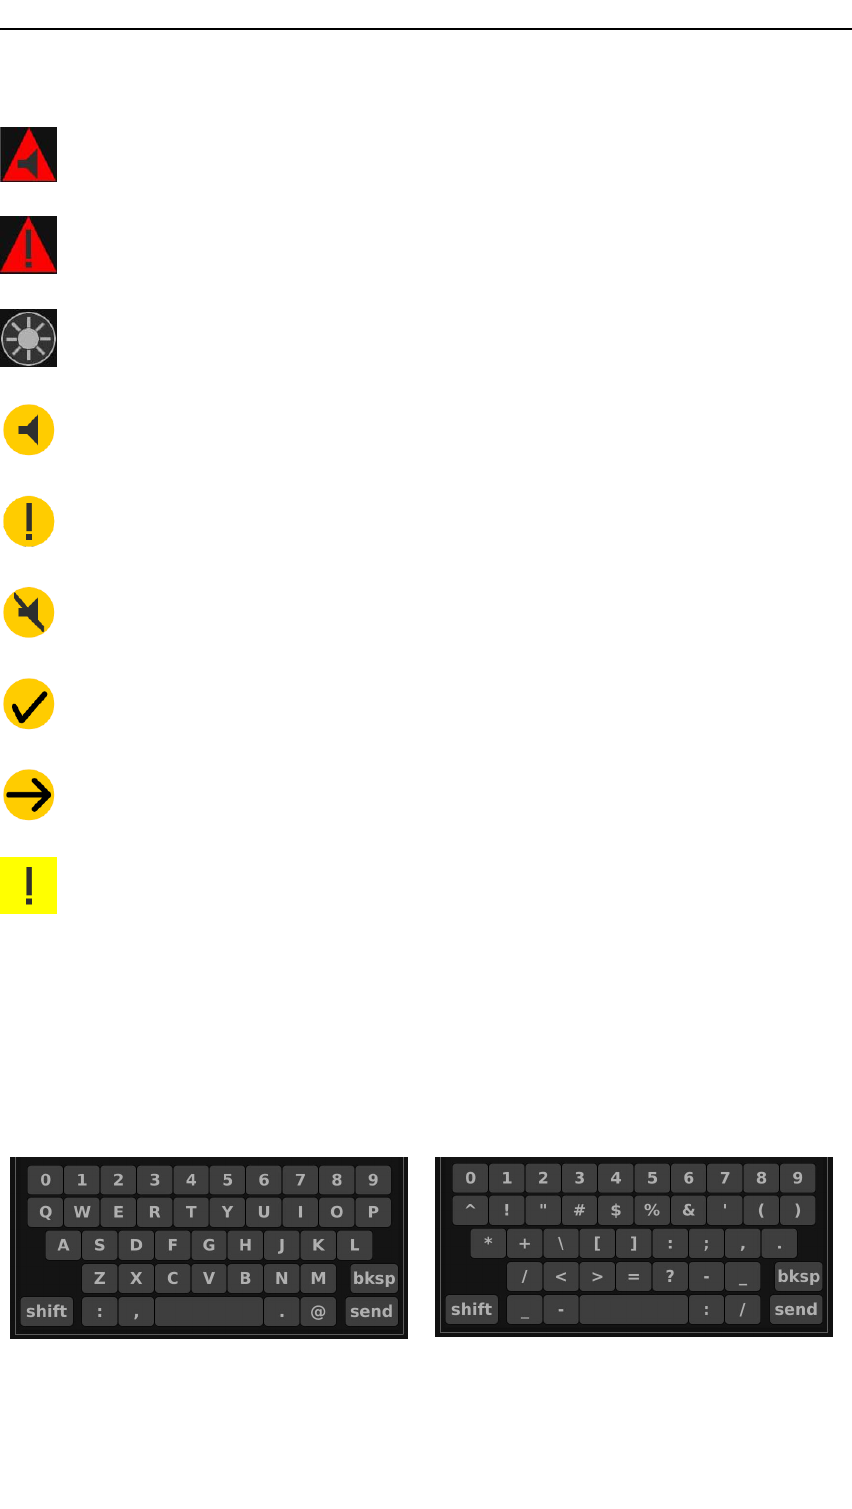
Icons
Thefollowingiconsappearinthedisplay.Someiconsmaynotappearforallsystems.
Messageicon
Newmessageicon.
14DISP-D-MFD_INSTR/2.0
Gettingstarted
Newalarmicon.Theiconisonlypresentifthereisanactivealarm.
Acknowledgedalarmicon.Theiconisonlypresentifthereisanactivealarm.
Brightnessicon.
Newwarning.
Acknowledgedwarning.
Silencedwarning.
Rectiedunacknowledgedwarning.
Activewarningwithtransferredresponsibility.
Caution.
Changingthekeyboardlayout
Thekeyboardappearsautomaticallywhenyouarepromptedtoentertextinabox.For
specialcharactersyoucanchangethekeyboardlayoutbytappingtheshiftbutton.Tap
shiftagaintoreturntonormalcharacters.
DISP-D-MFD_INSTR/2.015
MultiFunctionDisplay
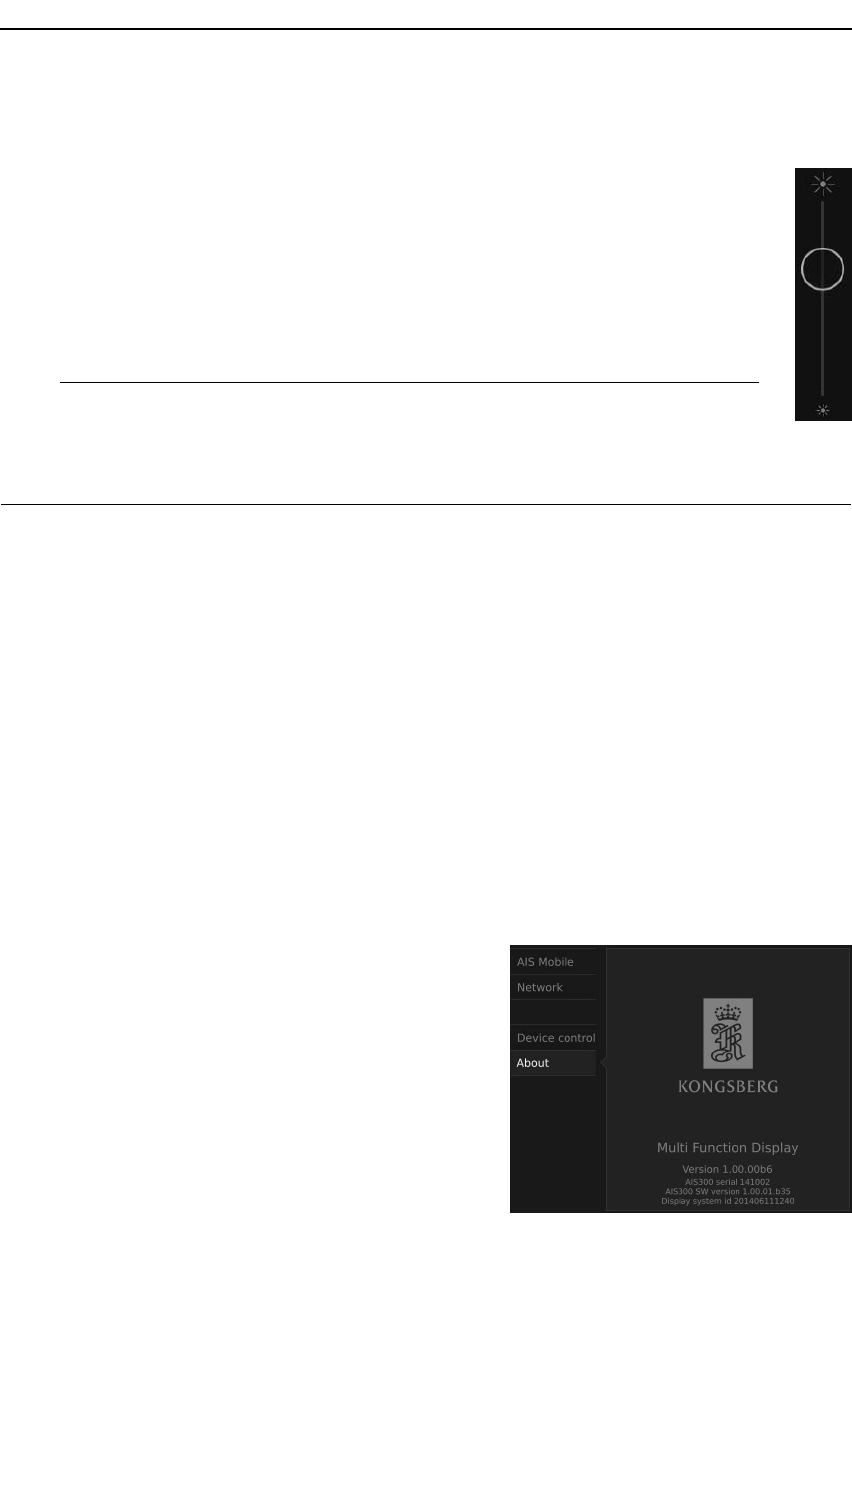
Adjustingthedisplaybrightness
Youcanadjustthebrightnessofthedisplaytosuityourcurrentlightconditions.
Procedure
1TaptheBrightnessiconatthebottomofthecontrolareatoactivatethe
brightnessslider.
2Dragthesliderupanddowntoadjustthebrightness.
Note
Incaseaccidentallydecreasingthebrightnesstoanunreadableblackscreen,
thebrightnesscanbeincreasedbytappingandholdinginthecentrepart
ofthecontrolarea.
ResettingthedisplaybrightnessforAIS
Youcanresetthebrightnesstothedefaultsettingwhichis50%.
Procedure
1EntertheOwnvesselview.
2TaptheDefBrightnesssubmenuitem.
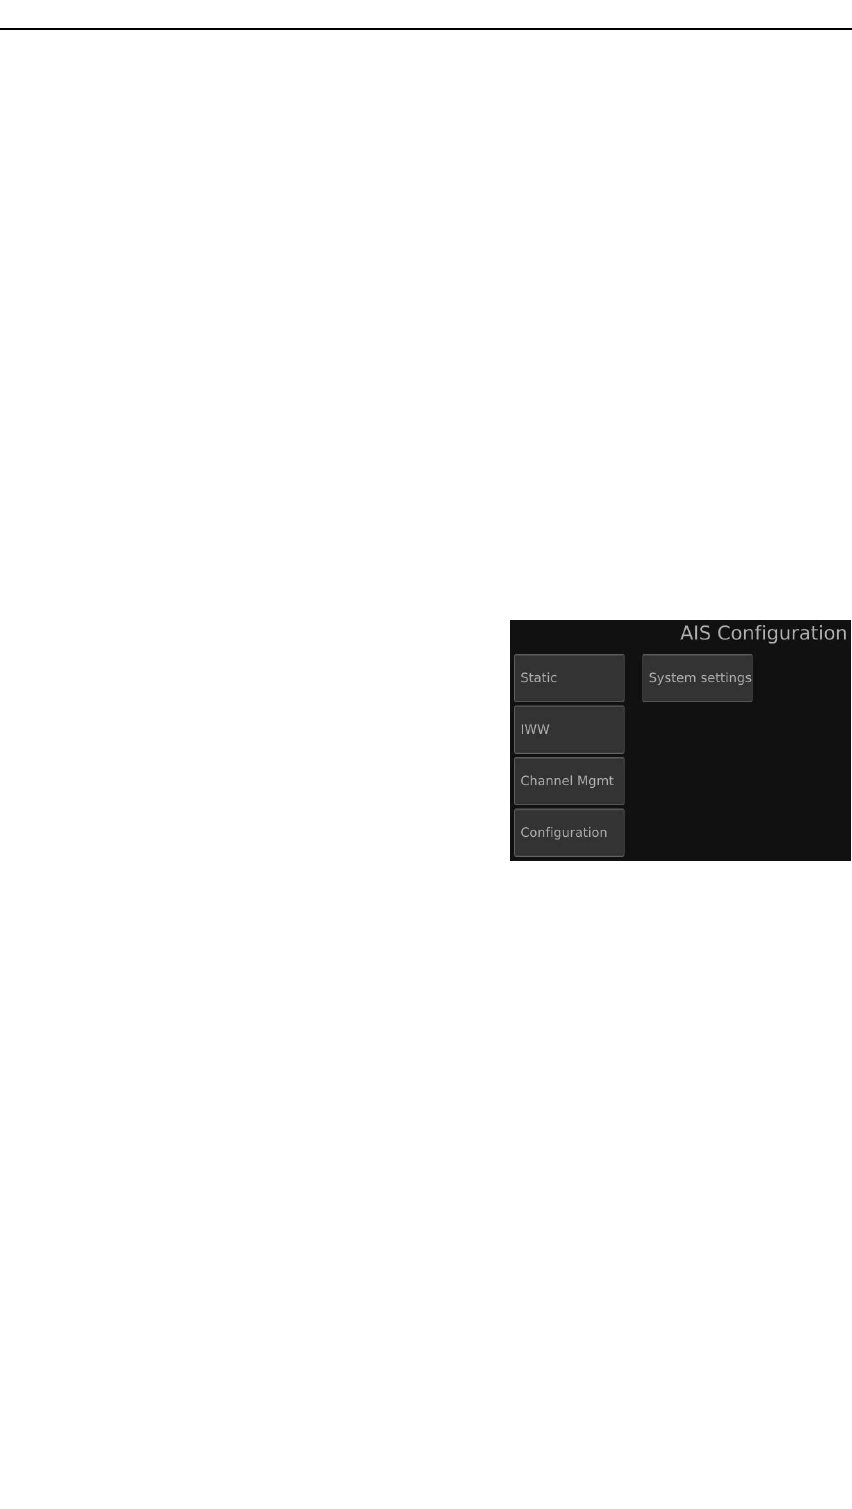
Checkingthedisplayproductandsoftware
version
Forsoftwareupdatesorcontactwithcustomer
supportitisusefultoknowtheproductand/or
thesoftwareversionofthedisplay.
Procedure
1EntertheCongurationview
2TaptheSystemsettingsbutton
3TaptheAboutsubmenuitemtocheckthe
displayproductandsoftwareversion.
16DISP-D-MFD_INSTR/2.0
MultiFunctionDisplay
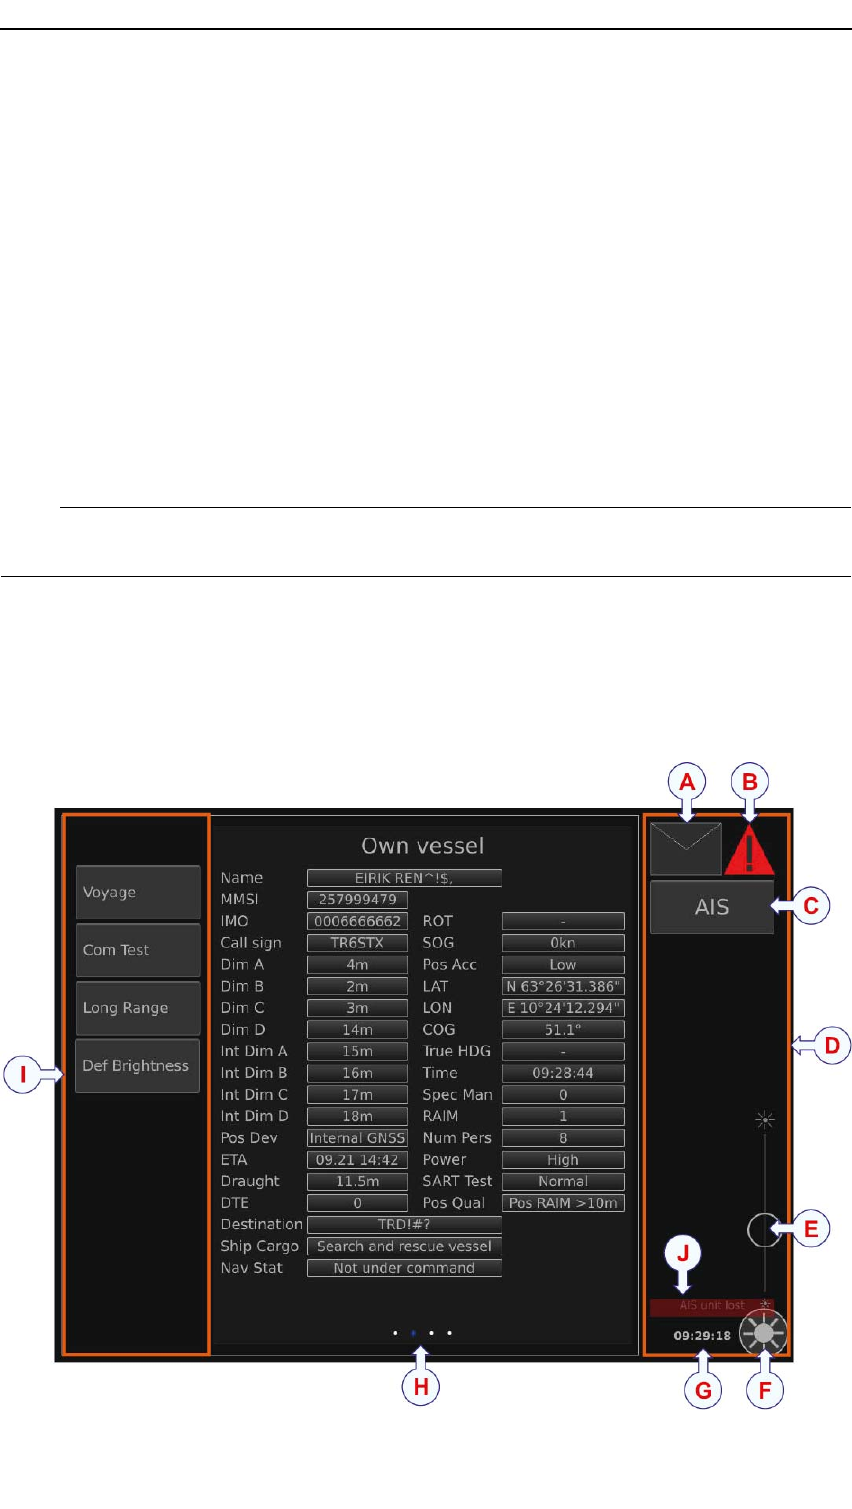
AMessageicon
BAlarmicon
CSystembutton
DControlarea
EBrightnessslider
FBrightnessicon
GClockshowingUTCtime
HPageindicator
ISubmenuitems
JNoconnectionmessage
Displaysettings
TheCongurationviewholdsthesystemsetting
parameters.
EntertheCongurationview→Systemsettings
tosetupthedisplayforoperationaluse.
SettingthedisplayIPaddressfor
AIS
SettheInternetProtocol(IP)addressforthe
displaytobeabletocommunicateonthenetwork.
Procedure
1EntertheCongurationview
2TaptheSystemsettingsbutton
3TaptheNetworksubmenuitemtoactivatetheIPcongurationpage.
4TypetheIPaddressforthedisplay.
5TapSavewhennished.
Displayviews
Thedisplayhasthreemainviews:
•Targetlistview
•Ownvesselview
•AIScongurationview
18DISP-D-MFD_INSTR/2.0
MFDforAIS300
TheOwnvesselviewholdstheoperationalparametersandtheAIScongurationview
holdsthesystemcongurationparameters.
TaptheSystembuttoninthecontrolareatotherighttotogglebetweentheviewsandto
exittheviewswhichdonothaveadedicatedExitbutton,.
Targetlistview
TheinitialscreenistheTargetlist.
Thenumberoftargetsisdisplayedafterthedialogboxheading.Theclockatthebottom
oftheContolareashowsUTCtimeandworksasanaliveindicator.
TaparowinthelisttoopentheDetailsdialogboxwhichdisplaysdetailsaboutthetarget.
DISP-D-MFD_INSTR/2.019
MultiFunctionDisplay
Ownvesselview
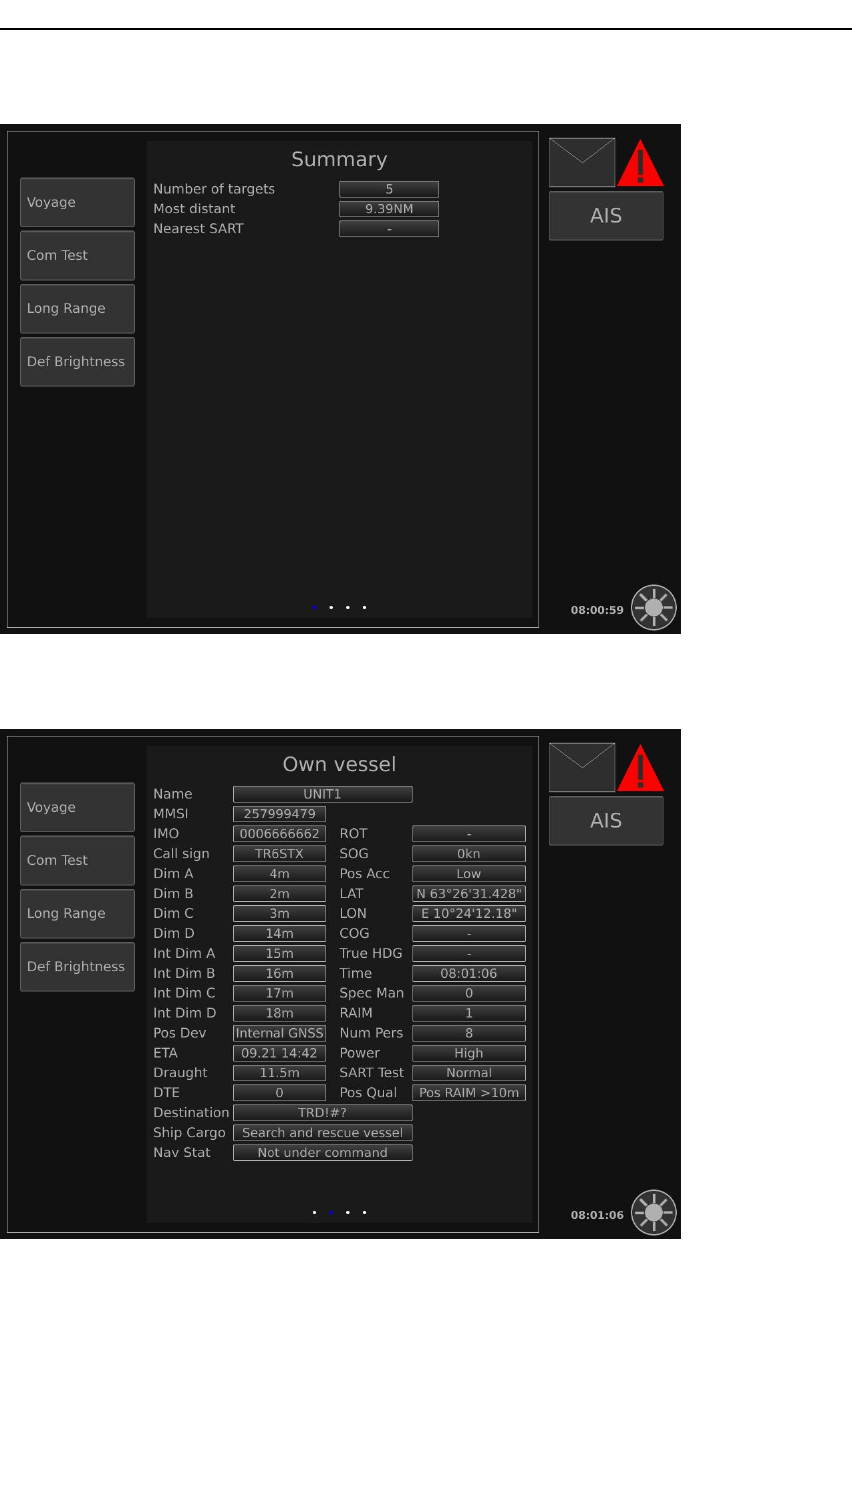
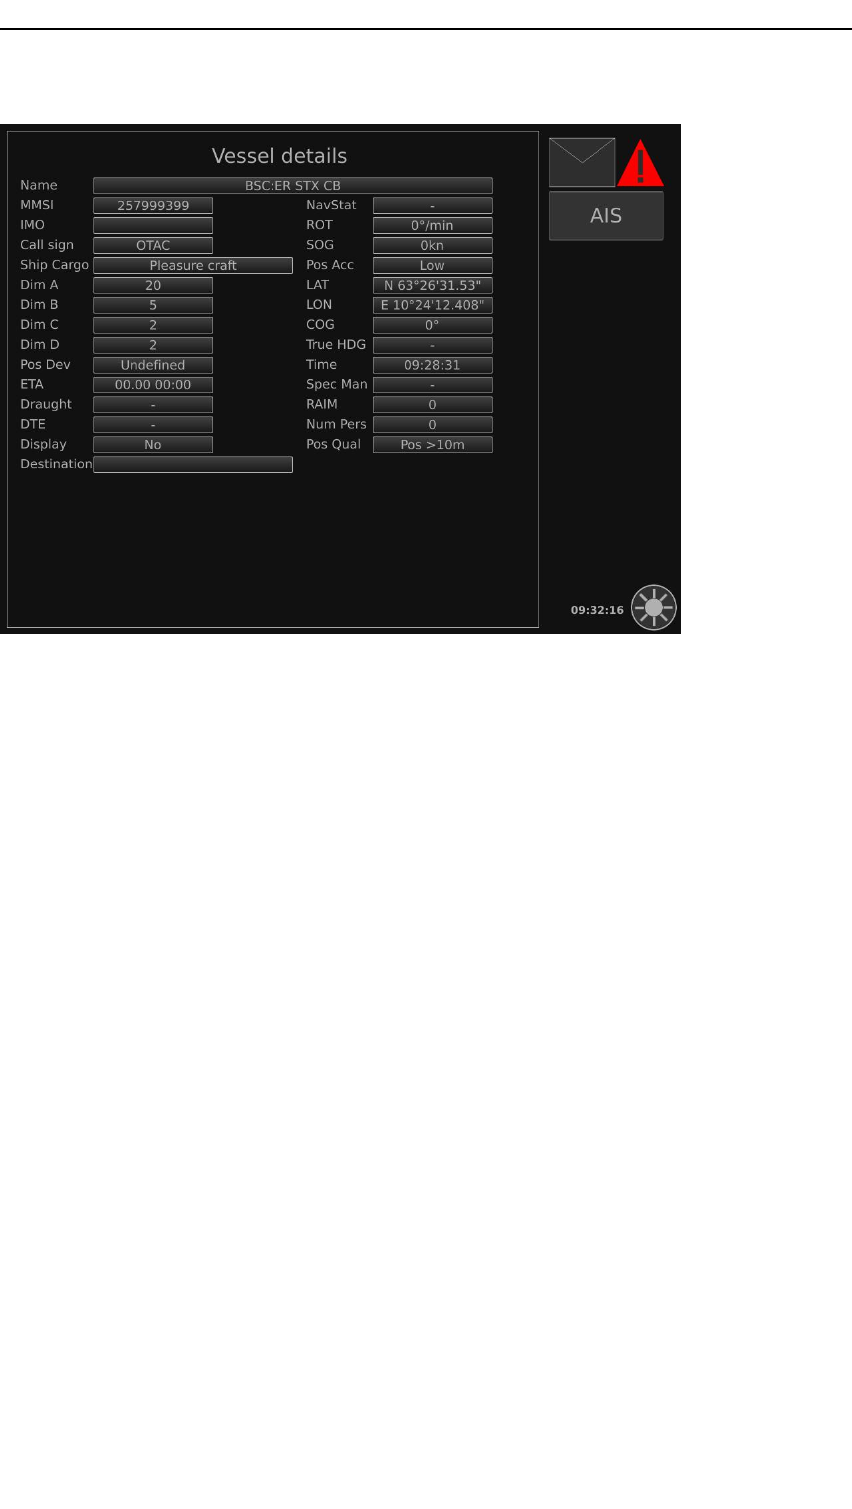
TheOwnvesselviewhasfourpages.Swipetothelefttoickthepages.Thepage
indicatoratthebottomindicateswhichpageyouareon.
TheleftpartoftheOwnvesselviewholdsthesubmenuitemsfortheoperational
parameters:V oyage,ComTest,LongRangeandDefBrigthness.
Therstpage,Summary,containsstatusinformation:numberoftargets,whichtargetis
furthestawayandthenearestsearchandrescuetransponder.
20DISP-D-MFD_INSTR/2.0
MultiFunctionDisplay
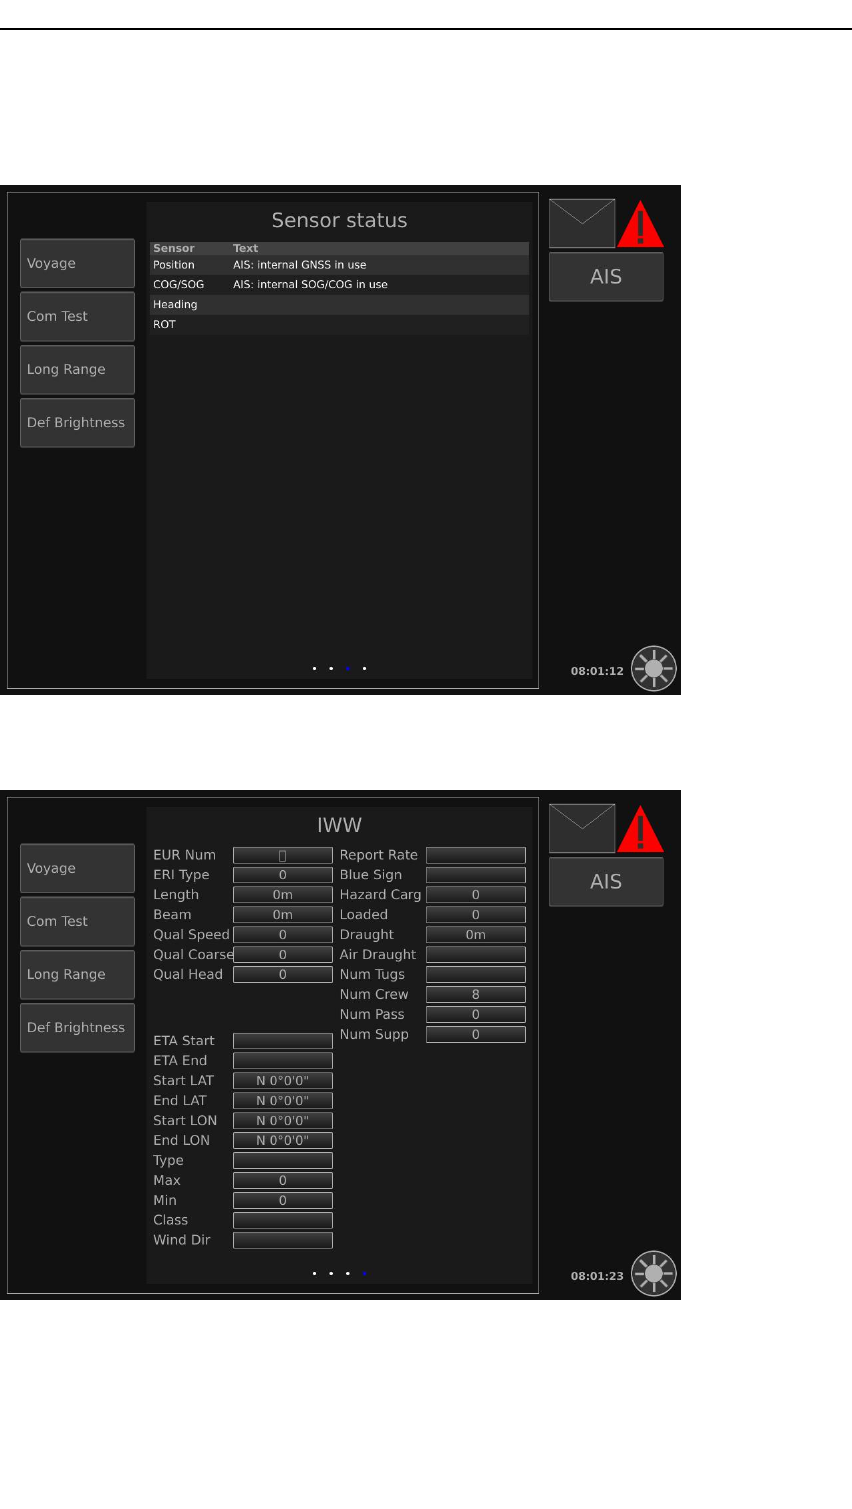
Thethirdpage,Sensorstatus,showsthesensorstatus.
ThefourthpageisonlyrelevantforIWW(InlandWaterway).
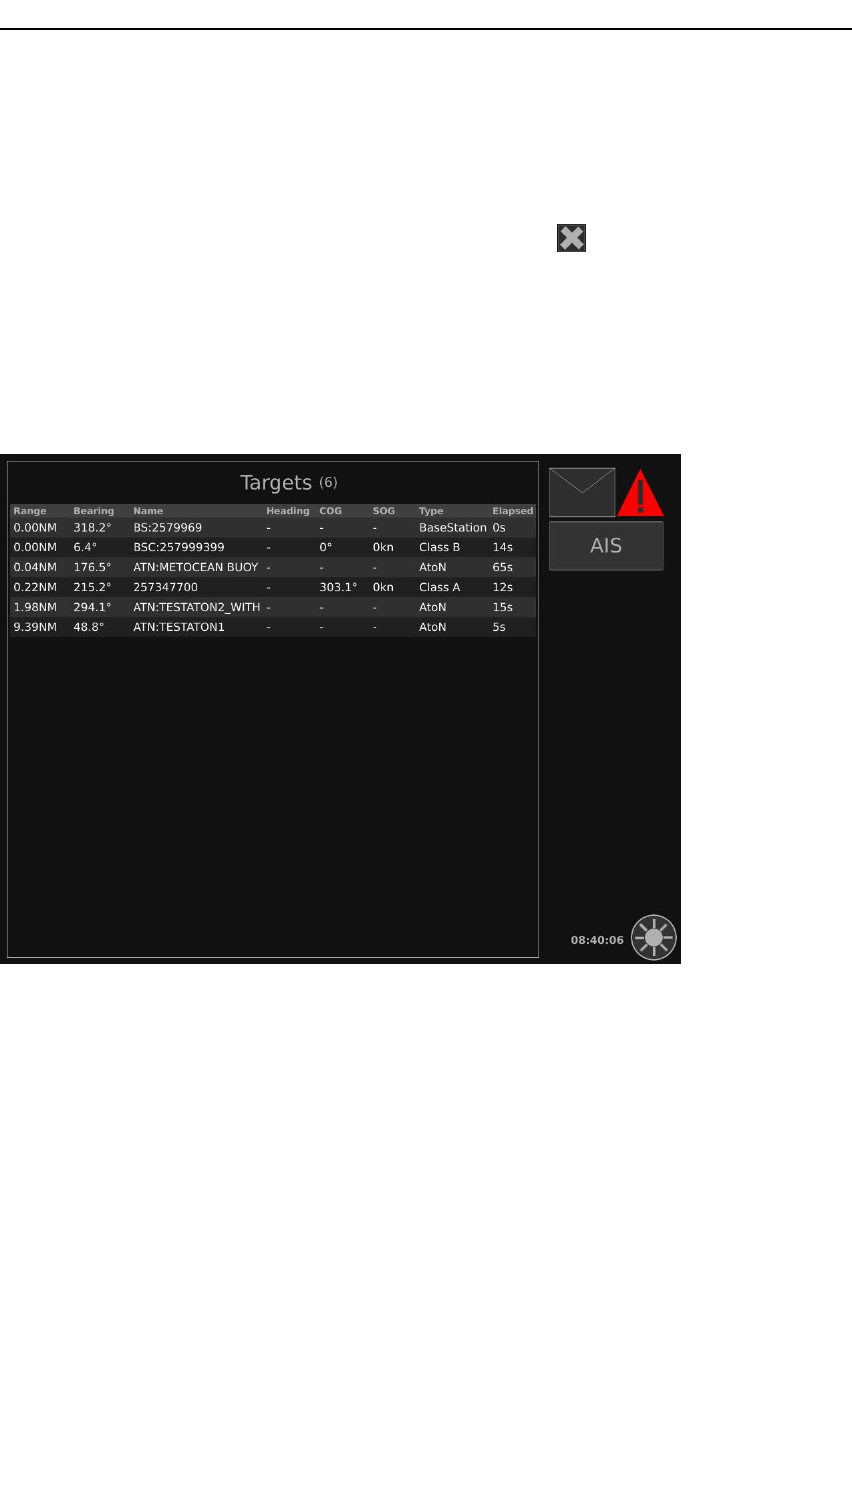
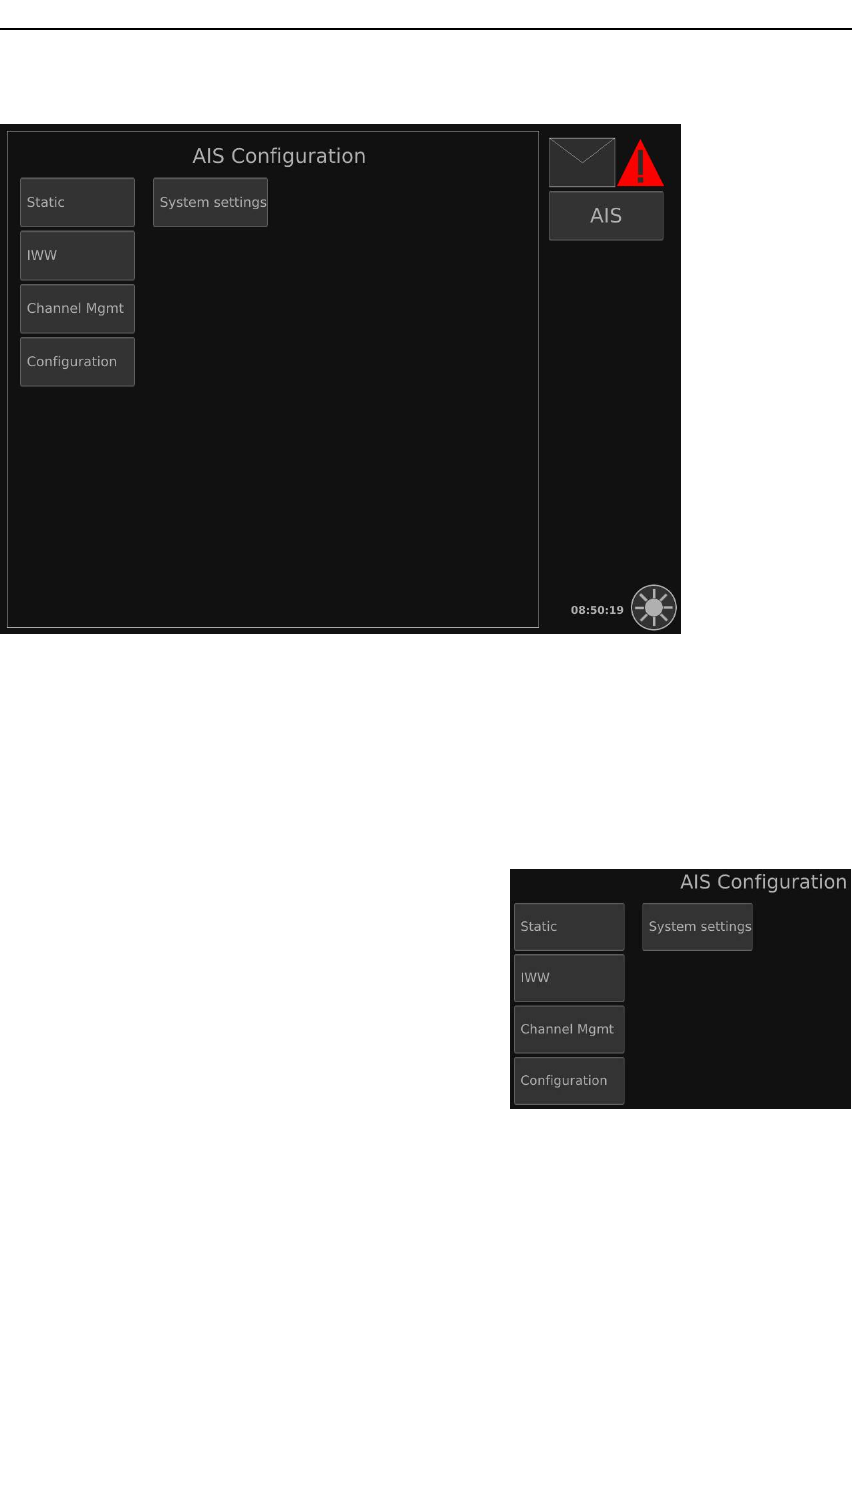
AIScongurationview
TheAIScongurationviewholdsthesystemsettingandcongurationparameters.
22DISP-D-MFD_INSTR/2.0
MFDforAIS300
Relatedtopics
•ConguringtheAISUnitonpage23
ConguringtheAISUnit
ThissectiondescribeshowtoconguretheAIS
Unit.
TheAIScongurationviewholdssubmenu
itemsforcongurationoftheAISUnit.Some
ofthesearepasswordprotectedwiththedefault
password1234.Tapasubmenuitemtoopen
acorrespondingpagewherethevaluescanbe
edited.
TapSavetosavethechanges.Forsomeparameters,adrop-downlistofvalidvaluesis
usedinsteadonatextinputbox.
Apoint"."isusedasadecimalmark.
SettingtheAISUnitIPaddress
SettheInternetProtocol(IP)addressfortheunittobeabletocommunicateonthe
network.
DISP-D-MFD_INSTR/2.023
MultiFunctionDisplay
Procedure
1EntertheCongurationview
2TaptheSystemsettingsbutton
3TaptheAISMobilesubmenuitemtoactivatetheIP(internetprotocol)conguration
page.
4TypetheIPaddressfortheUnit.
5TapSavewhennished.
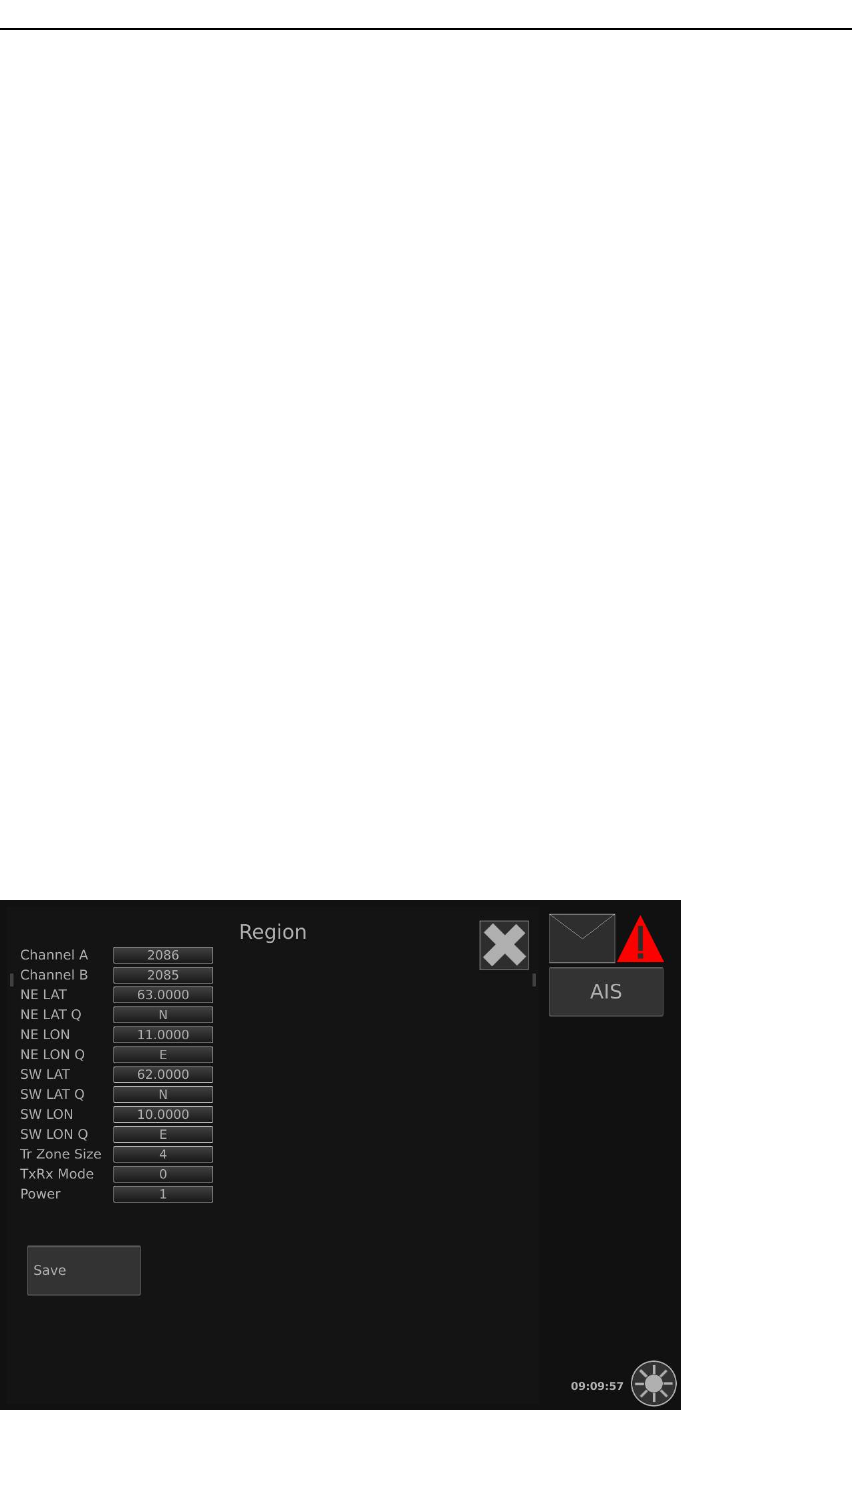
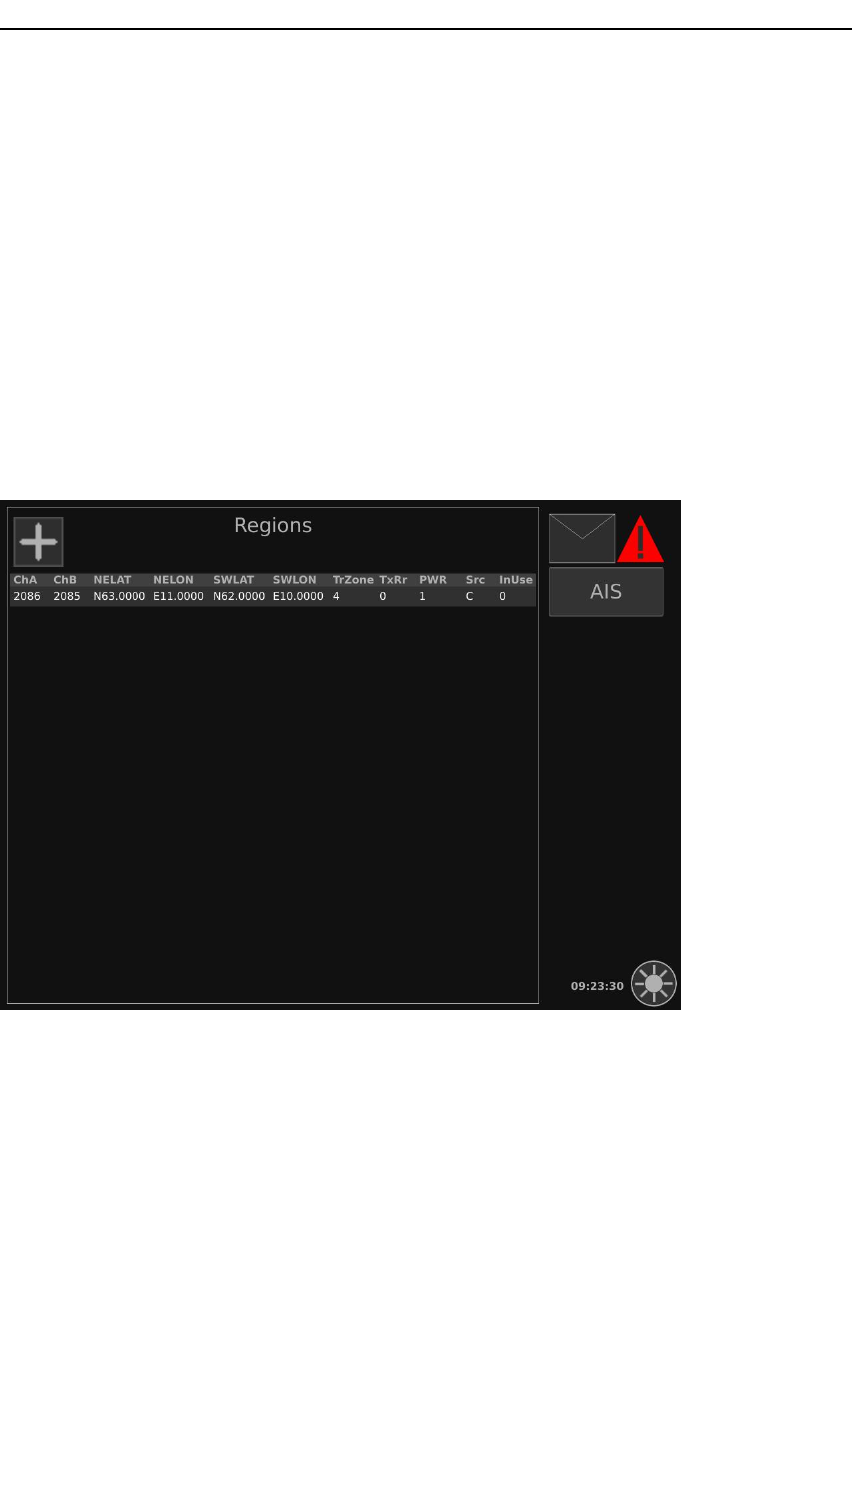
Creatinganewregion
CreateanewregionifparameterswhichdeviatefromstandardAISparametersshall
beused.Normally,theregionwillbereceivedautomaticallyfromanAISbasestation
buttheusercancreatesuchanareamanually.Suchaparametercouldforexample
belowpower.
Procedure
1EntertheAIScongurationview.
2TaptheChannelMgmtsubmenuitemtoopentheRegionspage.
3Taptheplussigninthetopleftcornertoenterthevaluesforanewregion.
4Tapeachparametervaluetoeditthevaluefromaneditdialogbox.
5TapSavewhennished.ThiswilltransmittheregiondatatotheAISUnit.
RefreshtheChannelmanagementlistbytappingtheAISbuttonandthentheChannel
Mgmtbutton,toseeifthenewregionhasbeenapplied.
24DISP-D-MFD_INSTR/2.0
MFDforAIS300
Editingaregion
Theareacanbeeditediftheareaismoved,increasedand/ordecreased.
Procedure
1EntertheAIScongurationview.
2TaptheChannelMgmtsubmenuitemtoopentheRegionspage.
Thispageholdsalistoftheregions.
3Taptherowfortheregionyouwanttoedit.TheRegiondialogboxappears.
4Tapeachparametervalueinthedialogboxtoeditthevaluefromaneditdialogbox.
5TapSavewhennished.
Operationalprocedures
Thissectioncontainsseveraloperationalproceduresexplaininghowyoucanusethe
informationinthedisplay.
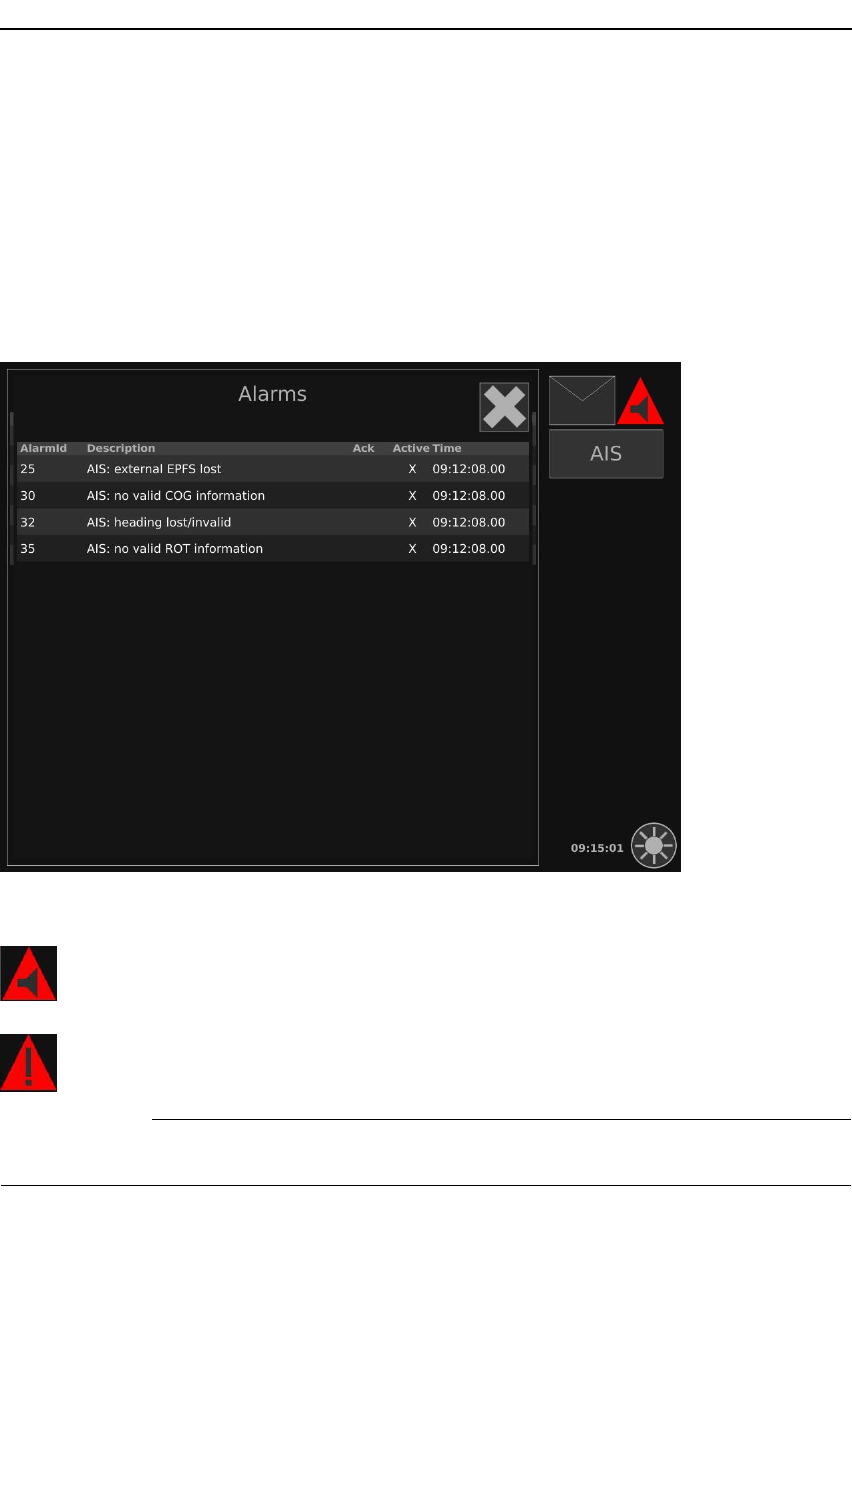
Checkingandacknowledgingalarms
Ifthesystemexperiencesdeviationsfromnormaloperation,thesystemwillrespond
withanalarm.Youcanviewandacknowledgethealarms.Eventhoughyouhave
acknowledgedanalarmitwillbepresentinthealarmlistuntilthesituationwhichcaused
thealarmtoberaisedhasbeenremoved.
DISP-D-MFD_INSTR/2.025
MultiFunctionDisplay
Procedure
1TaptheAlarmiconatthetopofthecontrolareatoopentheAlarmspage.
Thispageholdsalistoftheactivealarms.
2Toacknowledgeanalarm,taptherowwiththealarmyouwanttoacknowledge.A
dialogboxappears,promptingyoutoacknowledgethealarm.Thealarmwillbe
presentinthelistaslongasitisactive.
3TaptheClosebuttontoclosetheAlarmspage.
Alarmicons
TheNewalarmiconindicatesthatyouhavenewalarmsinthealarmlist.
TheAcknowledgedalarmiconindicatesthatyouhaveacknowledgedthenew
alarms.
Note
Thealarmiconsareonlypresentifthereisanalarmsituation.
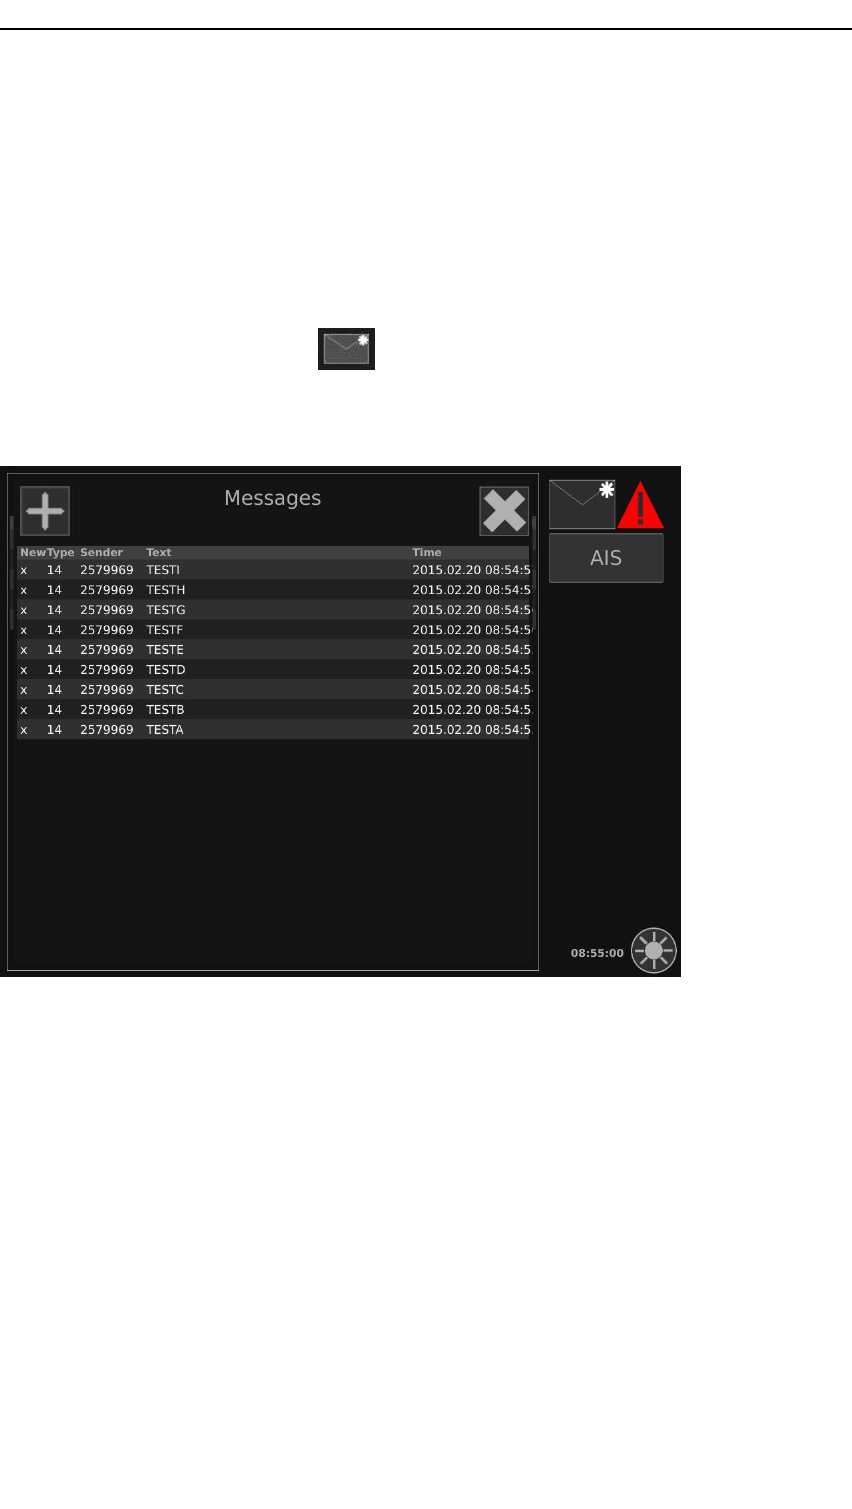
Checkingsentandreceivedmessages
Messagesareusedtocommunicatevariousinformationbetweenvesselsandbetween
vesselsandonshoreinstallations.
Procedure
1TaptheMessagesiconatthetopofthecontrolareatoopentheMessagespage.
26DISP-D-MFD_INSTR/2.0
MFDforAIS300
Thispageholdsalistofsentandreceivedmessages.
2Taparowinthemessagelist.Adialogboxwiththefullcontentsofthemessage
appears.
3DeletethemessagebytappingtheDiscardbutton.
4ClosethedialogboxbytappingtheClosebutton.Themessagewillstillappearin
themessagelist.
AnasteriskontheMessageicon,indicatesunreadmessages.
IntheMessagespage,anXinfrontofarowindicatesanunreadmessage.Arowwithout
anXindicatesthatamessagehasbeenread.
DISP-D-MFD_INSTR/2.027
MultiFunctionDisplay
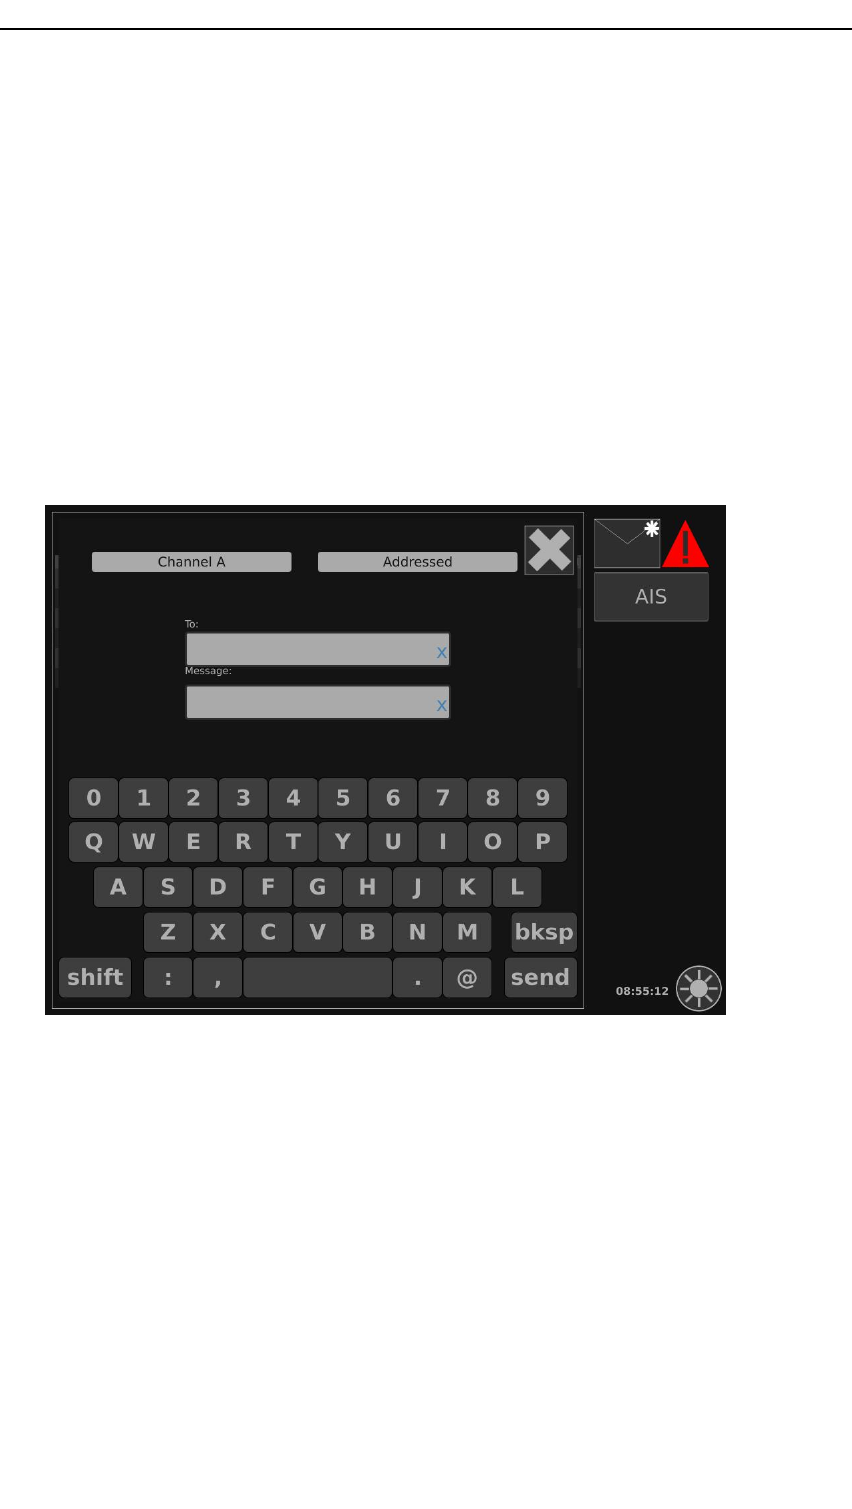
Creatinganewmessage
Messagesareusedtocommunicatevariousinformationbetweenvesselsandbetween
vesselsandonshoreinstallations.YouneedtheMMSInumberofthereceivingvessel
tosendanaddressedmessage.
Procedure
1TaptheMessagesiconatthetopofthecontrolareatoopentheMessagespage.
2Taptheplusbuttononthetoplefttocreateanewmessage.
3Selectchannel,selecttypeofmessage,typerecipient(foraddressedmessages)
andtypethemessagecontent.
4TapSendwhennished.
5Whenthemessageissent,areceiptwiththetransmissionstatuswillappearonthe
screen.Broadcastsent,AddressedmessagedeliveredorFailedtosendmessage.Tap
OKtoclosethereceipt.
28DISP-D-MFD_INSTR/2.0
MFDforAIS300
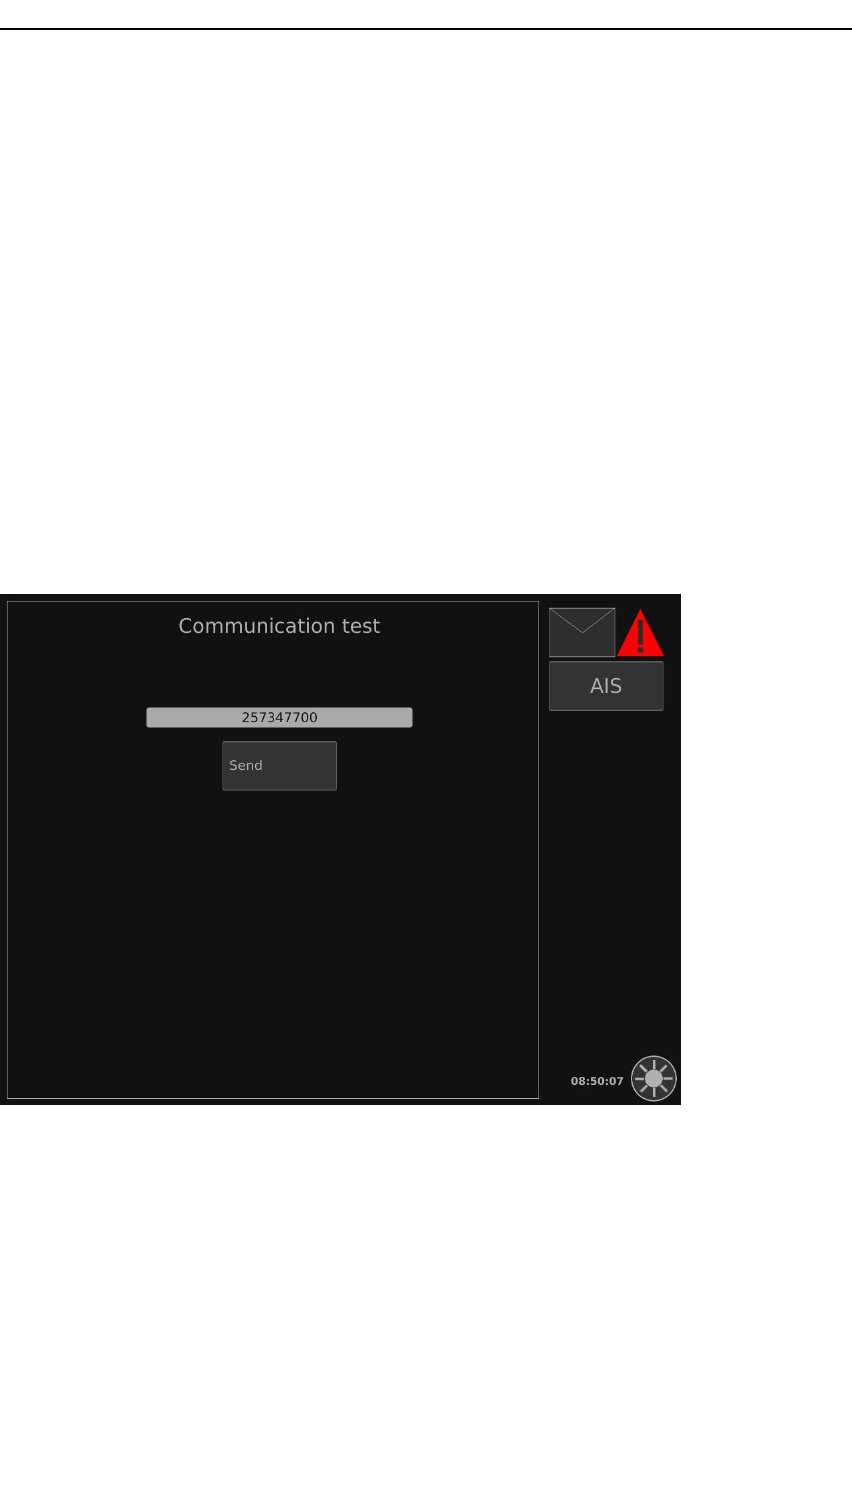
Runningacommunicationtest
Itisabuilt-intestfunctionintheVHFradiointheAISUnit.Usethisfunctiontocheck
thatothervesselsreceiveyourtransmission.Itisrecommendedtousethisprocedurein
connectionwiththeinstallation.
Procedure
1TaptheComTestsubmenuitemintheOwnvesselviewtoopentheCommunication
testpage.
Adrop-downlistofvalidtargetsispresentedaswellasaSendbuttonforinitiatinga
test.
2Selectthetargetforwhichyouwanttorunatestfromthedrop-downlist.
3TaptheSendbutton.
Ifaresponseisreceived,thisisindicatedonthesamescreenwithatextsaying
Responsereceivedsuccessfully.
DISP-D-MFD_INSTR/2.029
MultiFunctionDisplay
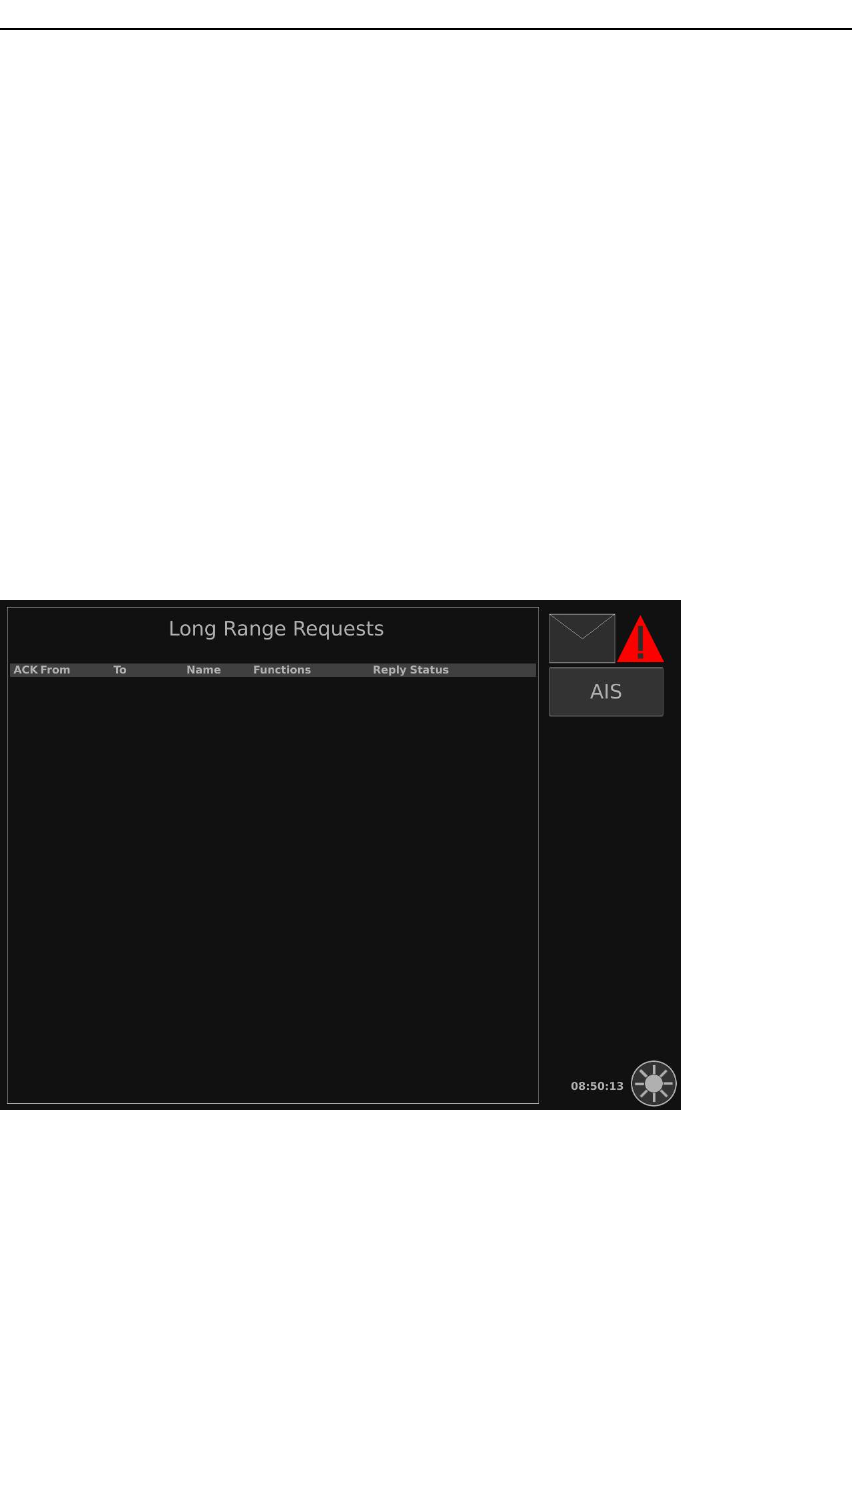
Displayingreceivedrequests
Iflong-rangerequestsarereceived,adialogboxwillappearonthescreenalertingyou
thataLongRangerequesthasbeenreceivedtogetherwiththeMMSI(MaritimeMobile
ServiceIdentity)numberoftherequestor.
Procedure
1TaptheLongRangesubmenuitemintheOwnvesselviewtoopentheLongRange
Requestspage.
Alistofallreceivedrequestsappears.
2Taparowtoshowthedetailsoftherequest.Adialogboxwiththerequestdetails
appears.
3ChosetoacknowledgetherequestbytappingtheOKbutton,ortoremovethe
requestbytappingtheDiscardbutton.
Allrequestsareremovedafter24hours.
4TapClosetoclosethedialogboxandreturntotheLongrangerequestslist.
Longrangerequestreplymode
YoucandeterminewhethertheAISUnit’sreplymodetothelongrangerequestsshall
beautomaticormanual.
Procedure
1EntertheOwnvesselview.
2TaptheVoyagesubmenuitem.
3TapLRmode.
30DISP-D-MFD_INSTR/2.0

MultiFunctionDisplay
MFDforAIS300BF
AIS300BF(BlueForce)providesanencryptionlayerontopofthestandardAIS
functions.AIS300BFisbasedonthesamehardwareasAIS300.ThespecicAIS
300BFdisplayviewwiththecorrespondingdialogboxesisdescribedinthefollowing
section.
TheuserinterfaceandoperationalproceduresarethesameforAIS300BFasforAIS300.
Relatedtopics
•MFDforAIS300onpage17
ConguringtheAIS300BF
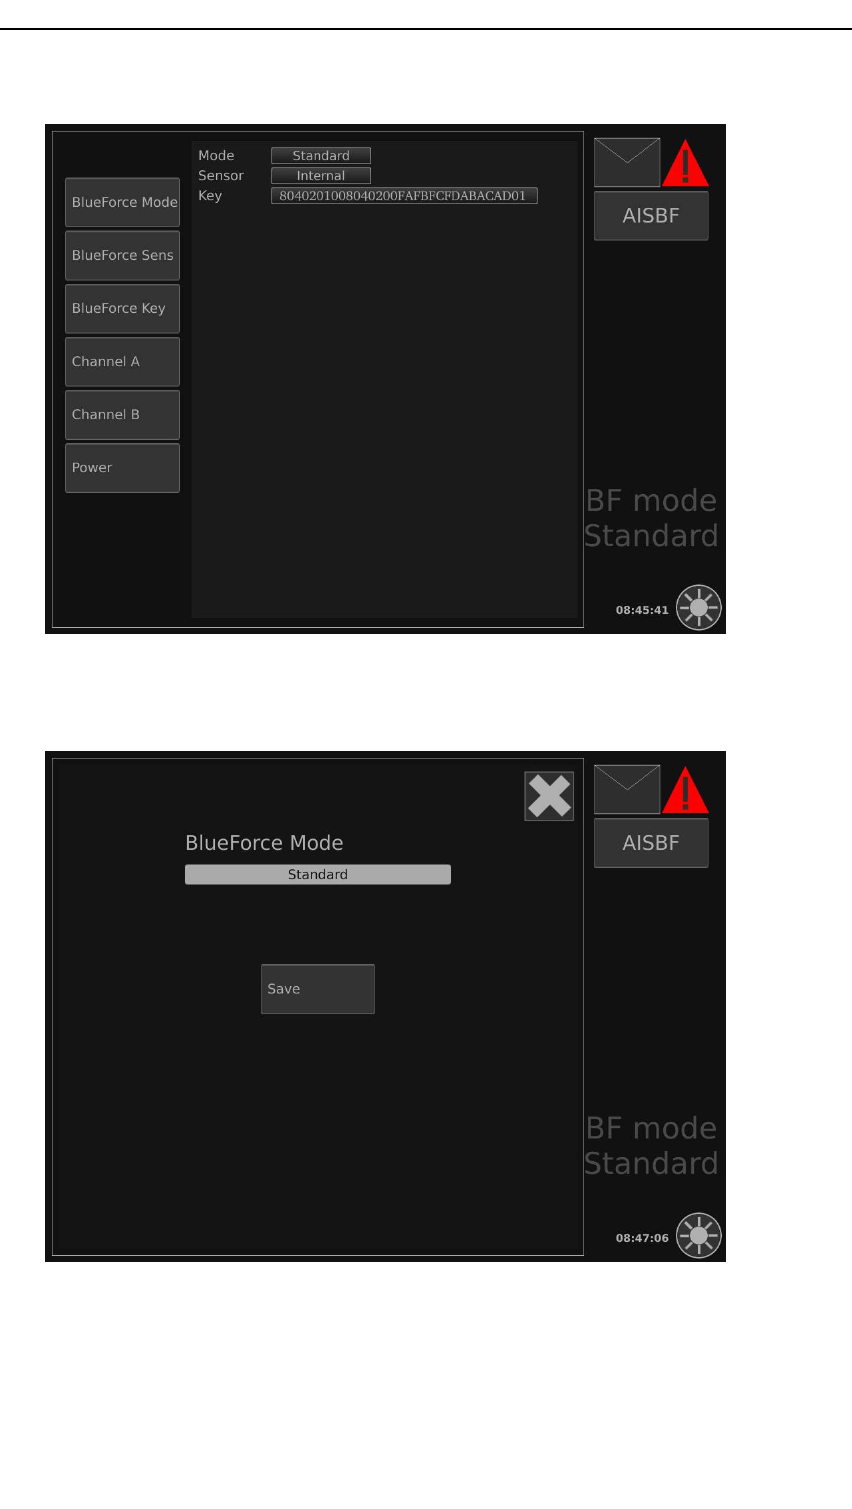
TobeabletousetheBlueForcemodeyoumustsetupyourAISsystemwiththe
parameterswhicharespecictothisfunctionality.
Procedure
1TaptheSystembuttonontheright.
TheMode,SensorandKeyparametersappear.
2TaptheBlueForceModesubmenuitemtochangethemode.
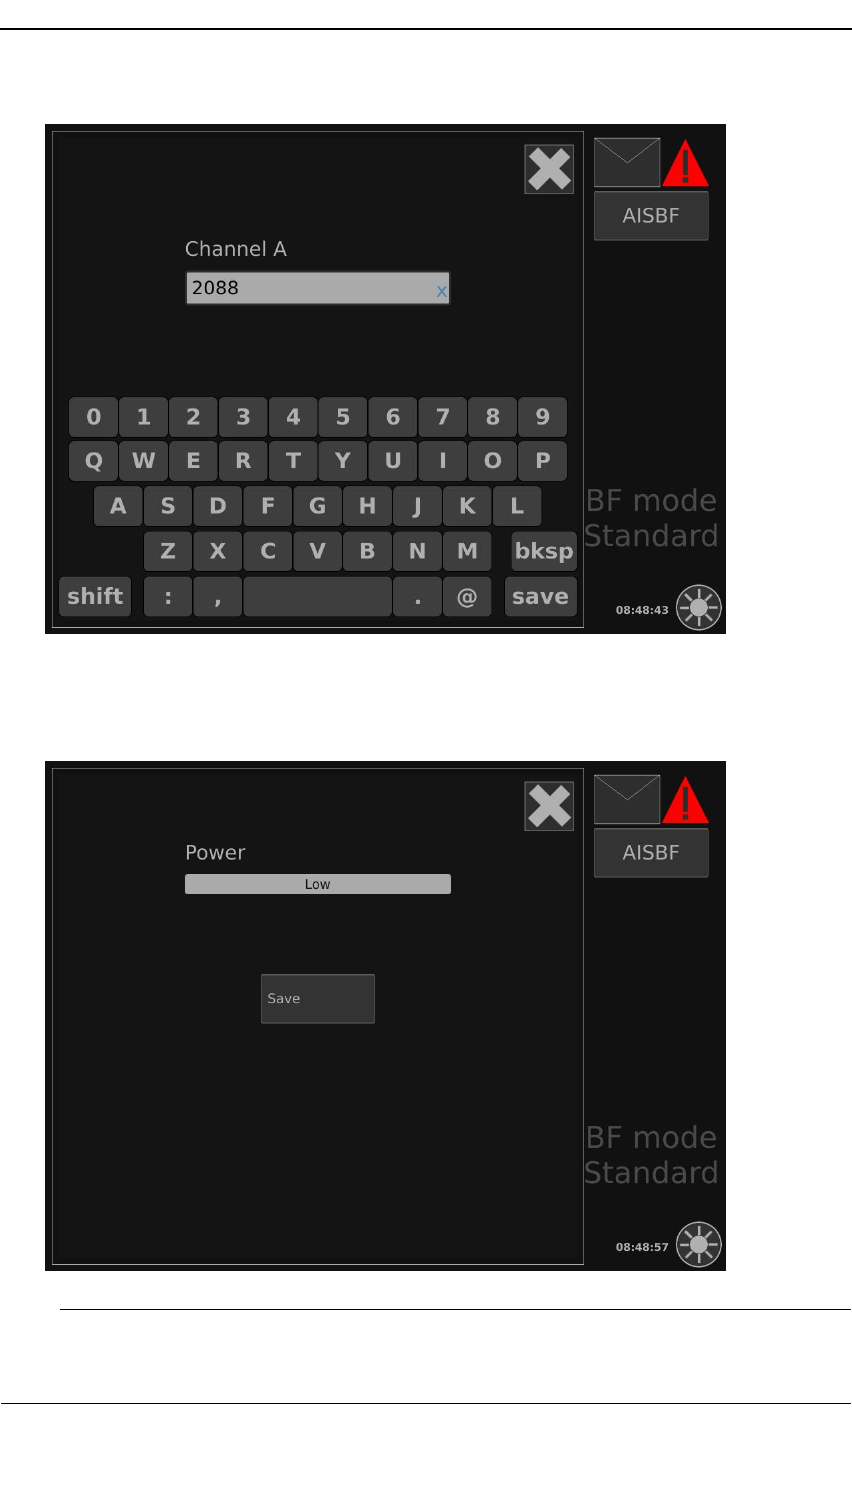
SelectbetweenStandard,ReceiveonlyorSecureinthemodeselectionlist.
32DISP-D-MFD_INSTR/2.0
MFDforAIS300BF
3TaptheboxbelowtheBlueForceModetextandthemodeselectionlistappears.
TapwantedmodeandtaptheSavebuttontosavetheselection.
Themodeischangedandthemodeisshowninthelowerrightcornerofthedisplay.
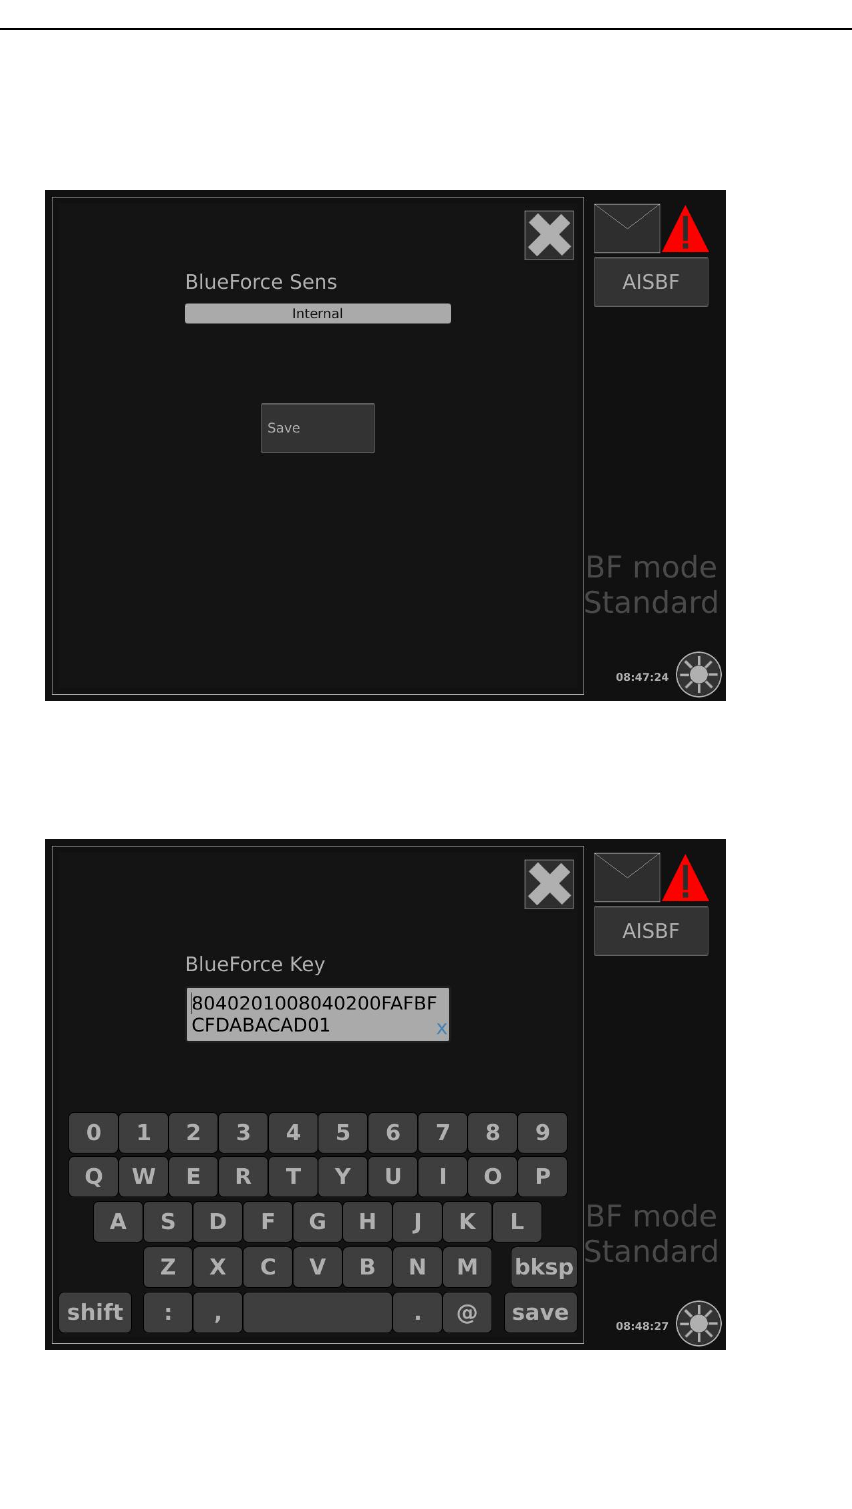
4TaptheBlueForceSensorsubmenuitemtochangebetweeninternalandexternal
sensor.
5TaptheboxbelowtheBlueForceSensortextandthesensorselectionlistappears.
Tapthewantedsensor,ExternalorInternal,andtaptheSavebuttontosavethe
selection.
DISP-D-MFD_INSTR/2.033
MultiFunctionDisplay
InternalistheGPSreceiverinsidetheAISandExternalistheship’sGPSreceiver
usedfornavigation.Thetransmittedpositionwillcomefromtheselectedreceiver.
6TaptheBlueForceKeysubmenuitemtochangetheencryptionkey.Usethe
keyboardtochangethekeyandtaptheSavebuttontosavethenewkey.
ThelengthofthekeywilldependontheencryptionkeyoftheAIS300BF.Number
ofcharacters:128-bit=32.
7TaptheChannelAorChannelBsubmenuitemstosetadifferentchannelfromthe
standardchannelAandchannelB.TaptheSavebuttonwhenthechannelisset.
34DISP-D-MFD_INSTR/2.0
MultiFunctionDisplay
MFDforSeaPos
ThischapterprovidesyouwithinformationonhowtocongureandoperatetheMulti
FunctionDisplayfortheSeaPos300productseries.
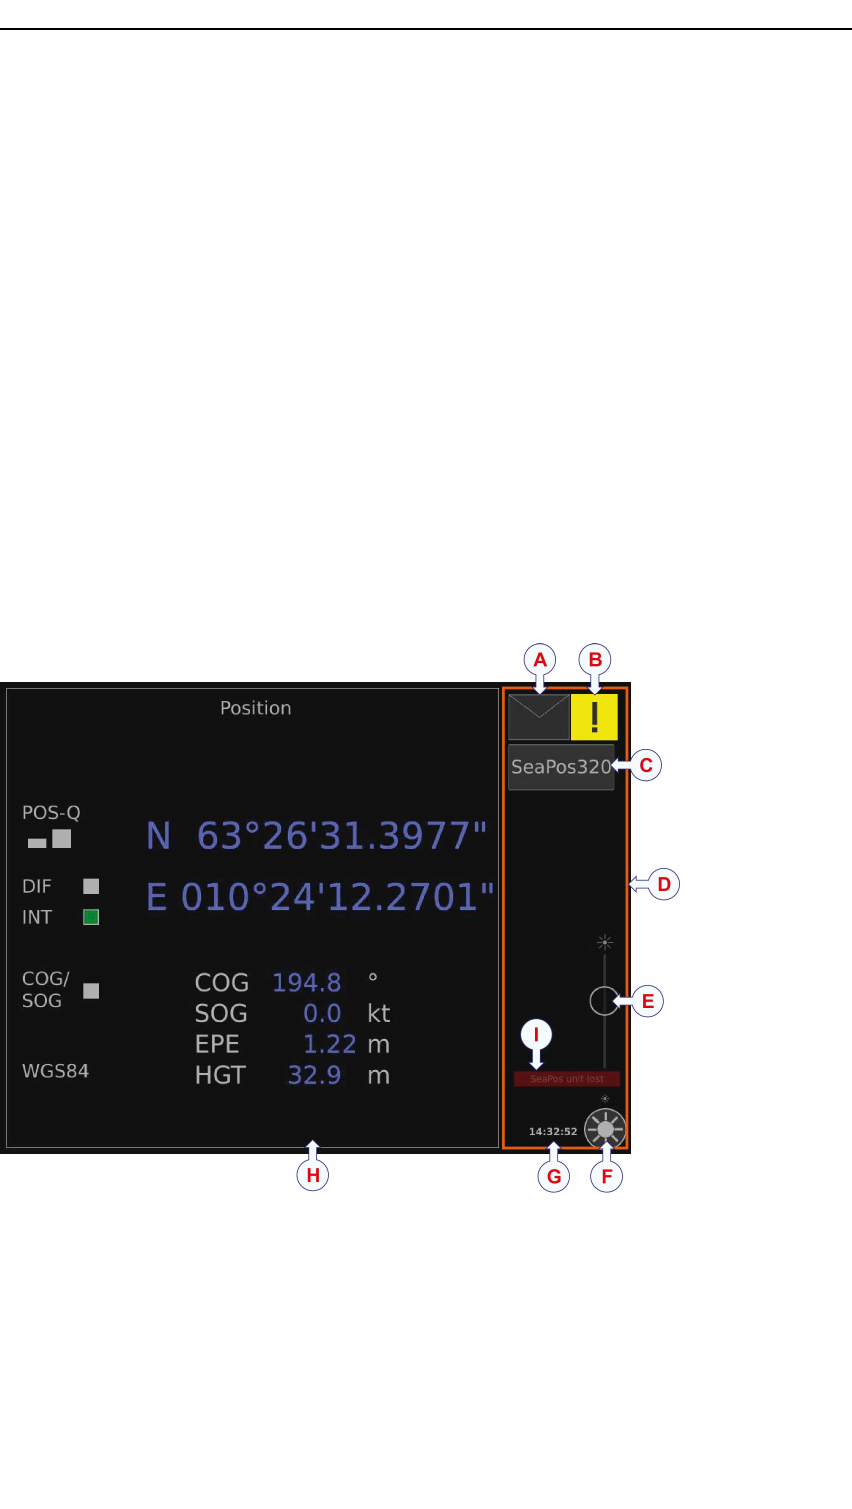
DisplayorganisationSeaPos
Theillustrationshowshowthedisplayisorganised.
AMessageicon
BWarningicon
CSystembutton
DControlarea
EBrightnessslider
FBrightnessicon
36DISP-D-MFD_INSTR/2.0

MFDforSeaPos
GClockshowingUTCtime
HInformationwindow
INoconnectionmessage
Displaysettings
TheCongurationviewholdsthesystemsettingparameters.
EntertheCongurationview→SeaPosIPtosetupthedisplayforoperationaluse.
SettingthedisplayIPaddressforSeaPos
SettheInternetProtocol(IP)addressforthedisplaytobeabletocommunicateonthe
network.
Procedure
1EntertheCongurationview
2TaptheSeaPosIPbutton
3TypetheIPaddressforthedisplay.
4TapSavewhennished.
Displayviews
Thedisplayhasvemainviews:
•Positionview
•Satellitesview
•Referencestationsview
•GPSinformationview
•Congurationview
TheSeaPosCongurationviewholdsthecongurationparameters.Theotherviewsare
forinformationpurposesonlyandrequirenoactionfromtheuser.
TaptheSystembuttoninthecontrolareatotherighttotogglebetweentheviewsandto
exittheviewswhichdonothaveadedicatedExitbutton,.
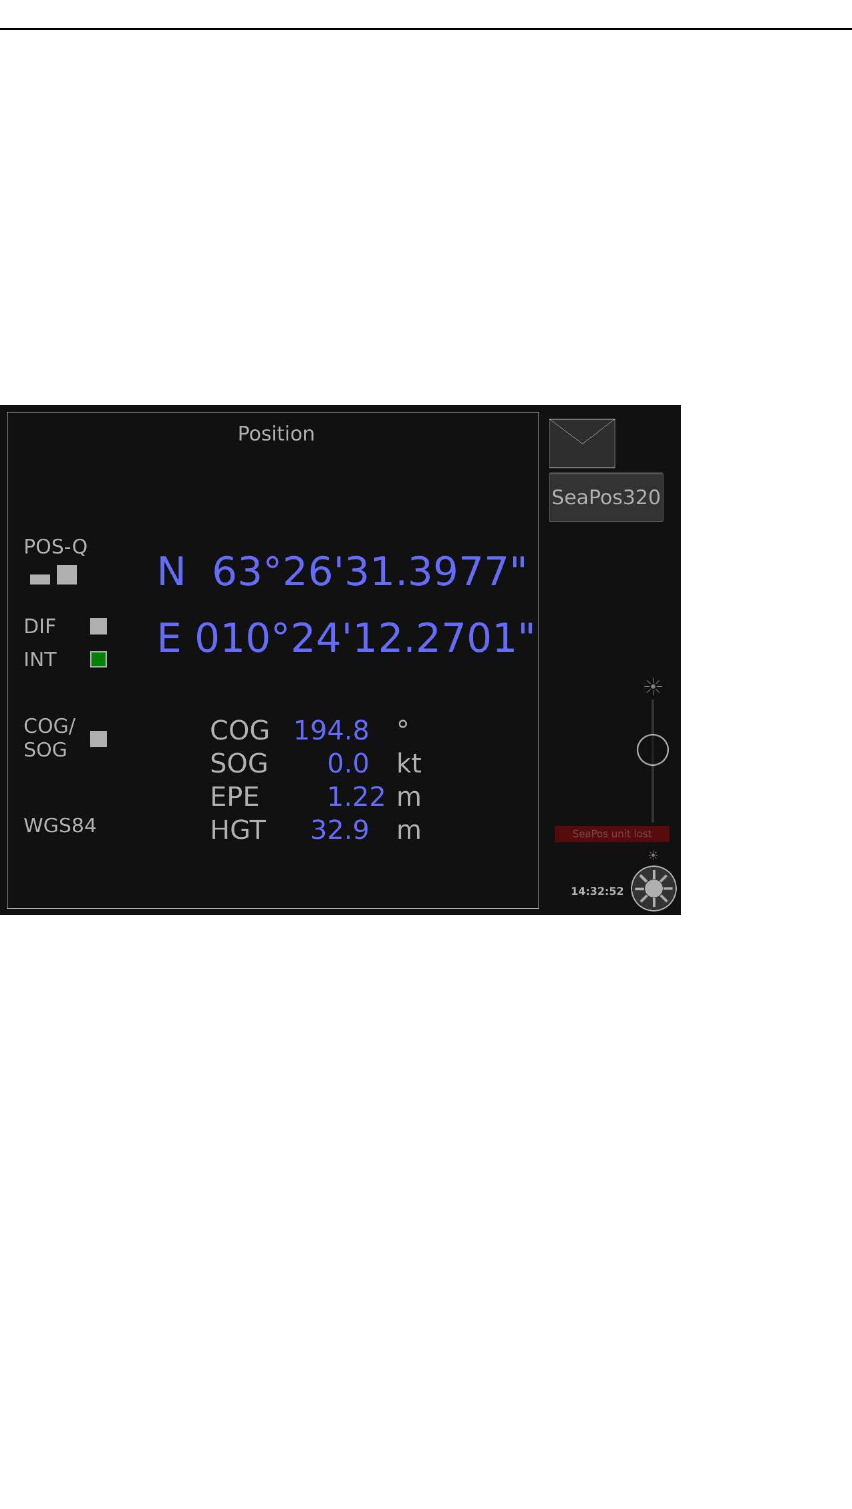
Positionview
ThePositionviewshowsthepositionresolvedbytheGPSreceiver.Italsodisplays
courseoverground,speedoverground,estimatedpositionerrorandheightinformation.
Theleftsideholdsvariousstatusandpositionindicators.
DISP-D-MFD_INSTR/2.037
MultiFunctionDisplay
•ThePOS-QqualityindicatorhighlightsnobarsifthereisnoGPSxisavailable,one
barfornormalGPSandtwobarsfordifferentialx.
•TheDIFindicatorwillalsobelitifthereisareferencestationusedinthex.
•TheINTintegritystatusindicatorisredforunsafe,yellowforcautionandgreen
forsafe.
•TheCOG/SOGindicatorislitifcourseovergroundand/orspeedovergroundis
present.
•Thedatumusedisdisplayedatthebottom.
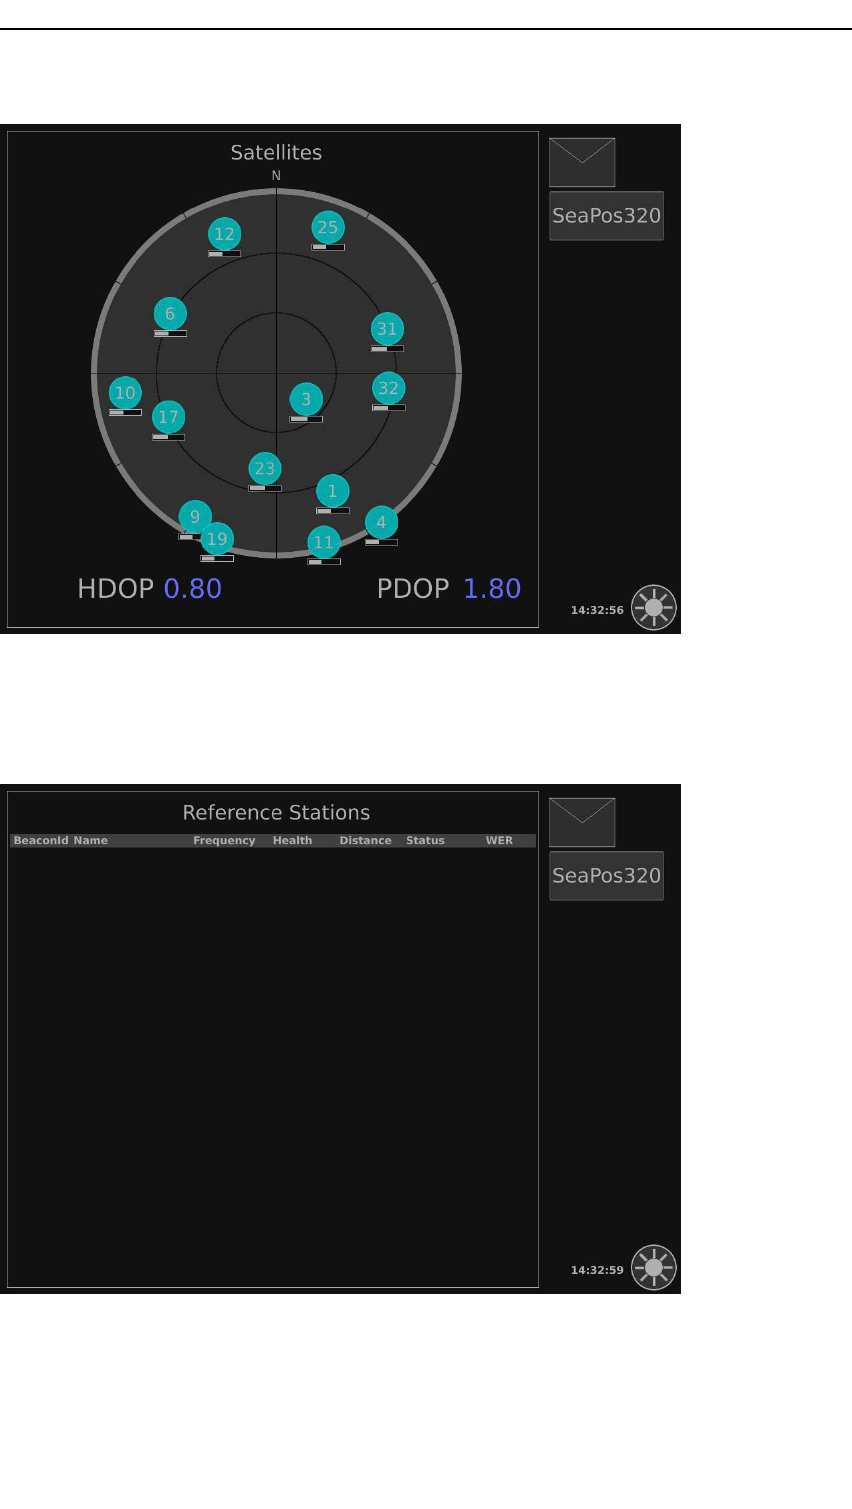
Satellitesview
TheSatellitesdisplaysthelocationofthesatellitesinthesky.Underneatheachsatellite
thereisanindicatorforsignal-to-noiseratio.ItalsodisplaysHDOPandPDOPvalues.
38DISP-D-MFD_INSTR/2.0
MultiFunctionDisplay
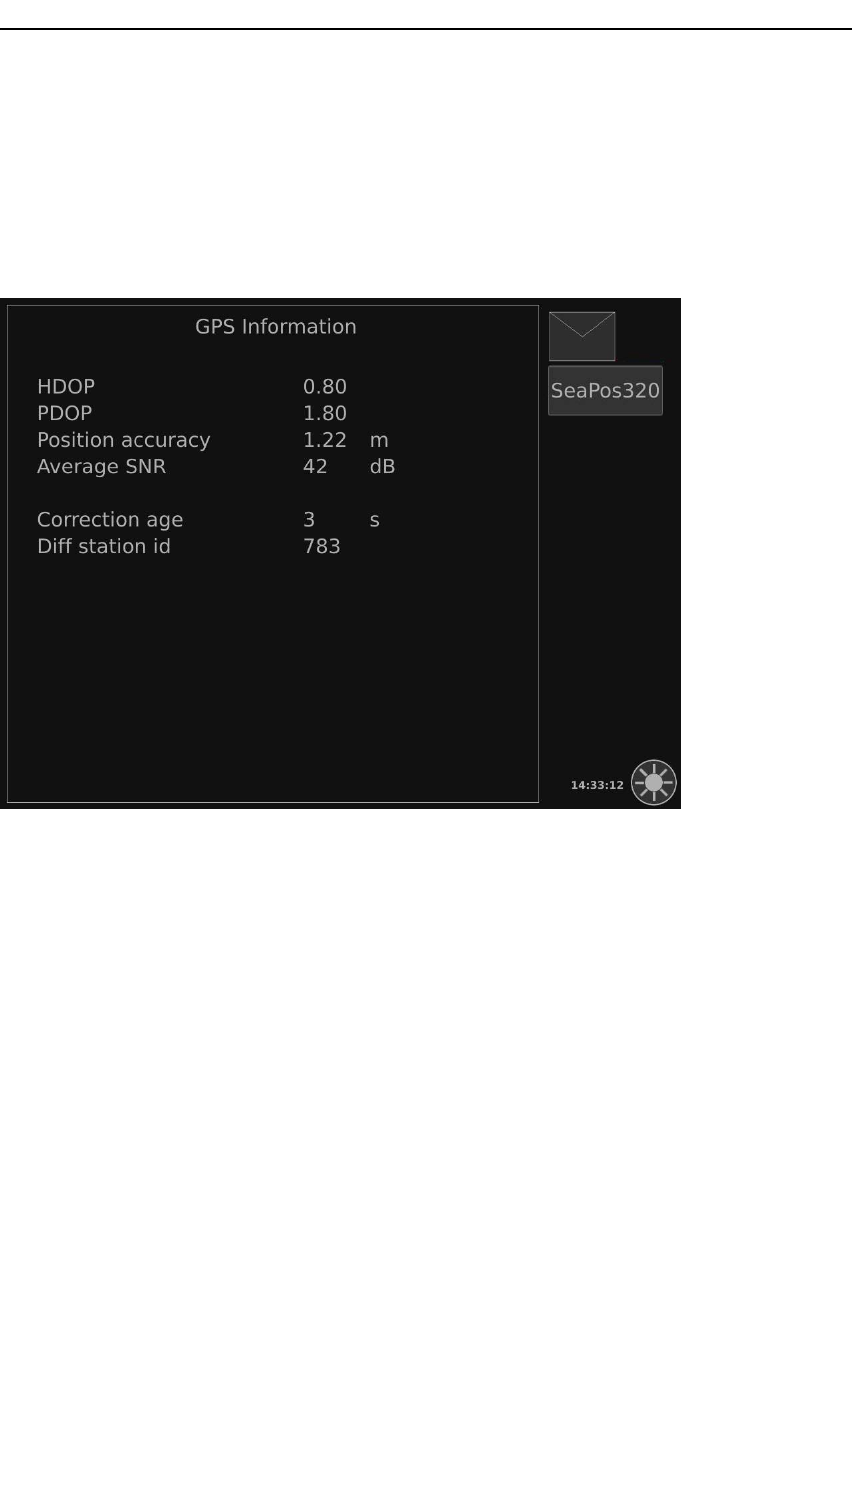
GPSinformationview
TheGPSinformationview,showsvaluesforHDOP,PDOP ,positionaccuracyand
averagesatellitesignal-to-noiseratio.
IftheIALAreceiverisabletoreceivedatafromareferencestation,andthisisusedin
thepositionx,thecorrectionageandreferencestationID,arealsodisplayed.
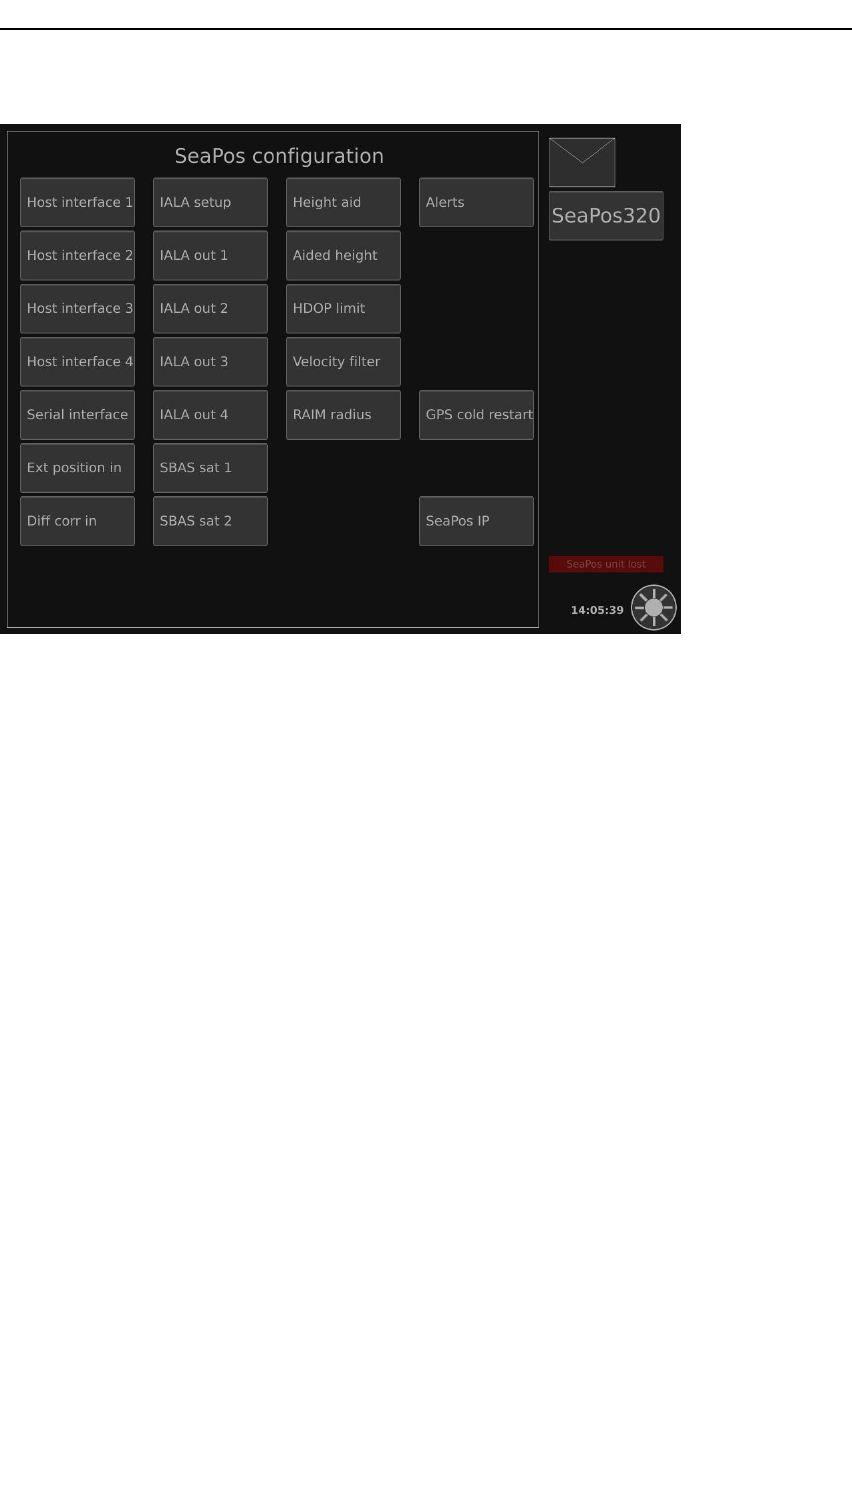
SeaPoscongurationview
TheSeaPosCongurationviewholdsthesystemsettingsandcongurationparameters.
40DISP-D-MFD_INSTR/2.0
MFDforSeaPos
ConguringtheSeaPosunit
TheSeaPosunitispre-conguredanddoesnotrequireanycongurationtobeoperable.
Shouldyou,however,needspecicsettingstheSeaPoscongurationviewholdssubmenu
itemsforcongurationoftheSeaPosUnit.Someofthesearepasswordprotectedwith
thedefaultpassword1234.Tapasubmenuitemtoopenacorrespondingpagewhere
thevaluescanbeedited.
TapSavetosavethechanges.Forsomeparameters,adrop-downlistofvalidvalues
isusedinsteadonatextinputboxandforothersyoucanmakeaselectionwithradio
buttons.
Apoint"."isusedasadecimalmark.
SettingNMEAdataoutputmessagesonhostinterface
ThehostinterfacesandtheserialinterfaceareavailableforoutputofNMEAdata.These
canbeconguredbyselectingmessagetypes,connectiontypeandmessageinterval.
Procedure
1EntertheCongurationview.
2TaptheHostinterfacesubmenuitemtoopentheHostinterfacedialogbox.
3Enableandselectconnectiontype.
4TypetheIPaddressandthePortnumber(dependingonconnectiontypeselected).
5Typeoutputinterval[seconds].
DISP-D-MFD_INSTR/2.041
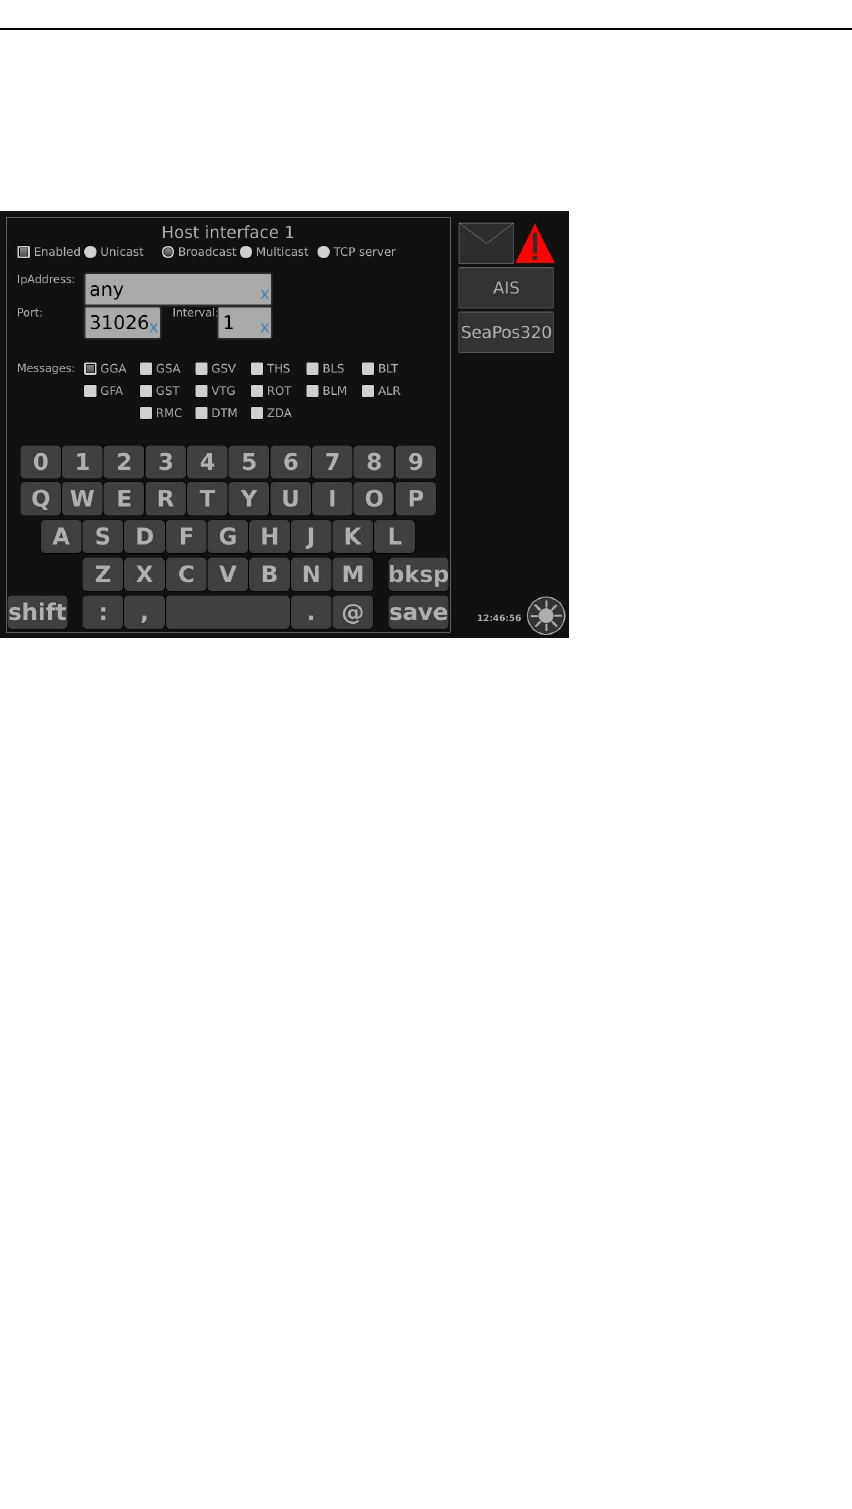
MultiFunctionDisplay
6SelectNMEAmessagetype.
7TapSavewhennished.
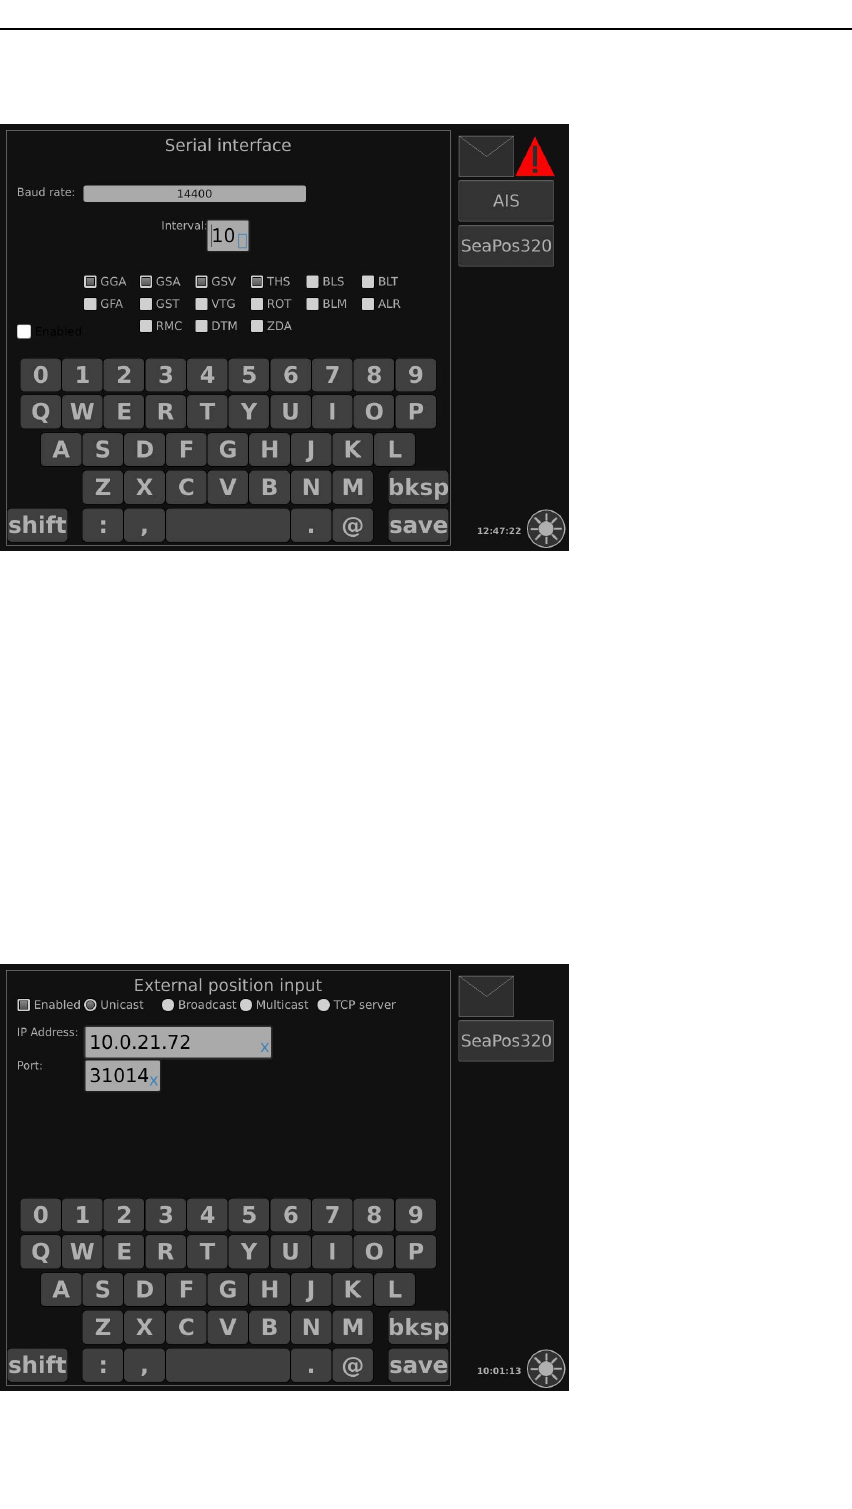
SettingNMEAdataoutputmessagesonserialinterface
ThehostinterfacesandtheserialinterfaceareavailableforoutputofNMEAdata.These
canbeconguredbyselectingmessagetypes,connectiontypeandmessageinterval.
Procedure
1EntertheCongurationview.
2TaptheSerialinterfacesubmenuitemtoopentheSerialinterfacedialogbox.
3Enableserialinterface.
4Selectthewantedbaudrate.
5Typethewantedinterval[seconds].
6SelectNMEAmessagetype.
7TapSavewhennished.
42DISP-D-MFD_INSTR/2.0
MFDforSeaPos
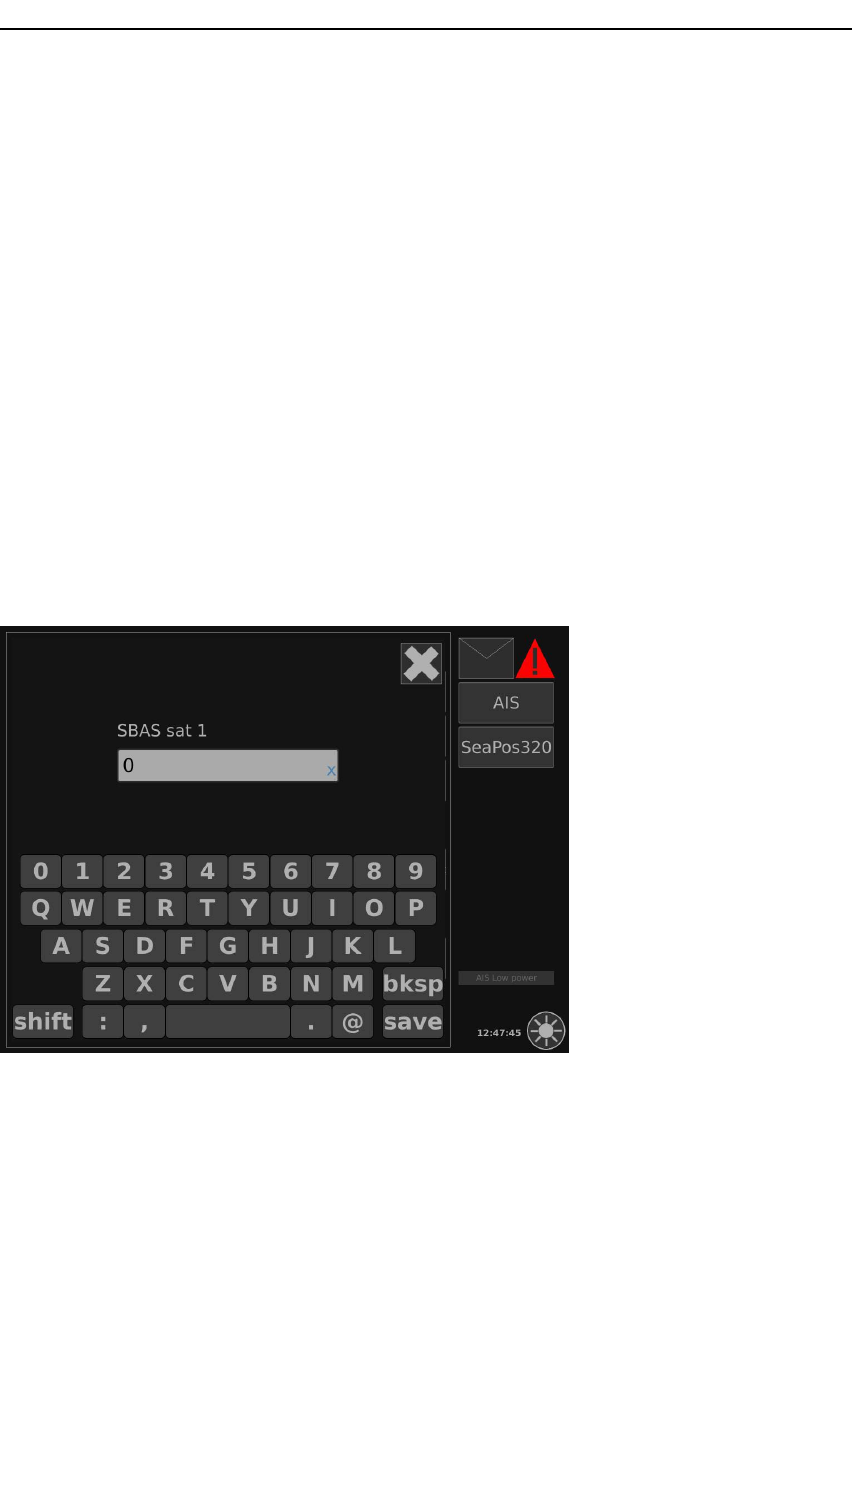
Settingexternalpositioninput
Ifanexternalpositioningsensorisconnectedtothesystemyoumustenablereceptionof
theexternalpositiondata.
Procedure
1EntertheCongurationview.
2TaptheExtpositioninsubmenuitemtoopentheExternalpositioninputdialogbox.
3Enableexternalpositioninputandselectconnectiontype.
4TypeIPaddressandportnumber(dependingonconnectiontypeselected).
5TapSavewhennished.
DISP-D-MFD_INSTR/2.043
MultiFunctionDisplay
EnabletrackingofSBASsatellites
ThedefaultvalueforSBASsatellitesis0,whichmeansAutomaticmodewherethe
systemwilltracktheavailablesatellites.Dependingonthevessellocationyoucan
setthesystemtotrackspecicSBASsatellitesbytypingthesatelliteIDnumber.To
turnofftracking,setbothsatellitesto-1.
•0=auto
•-1=notracking
Procedure
1EntertheCongurationview.
2TaptheSBASSat1submenuitemtoopentheSBASSat1dialogbox.
3Typethespecicsatellite’sIDnumber.
4TapSavewhennished.
5RepeatthesameforSBASSat2.
6TapSavewhennished.
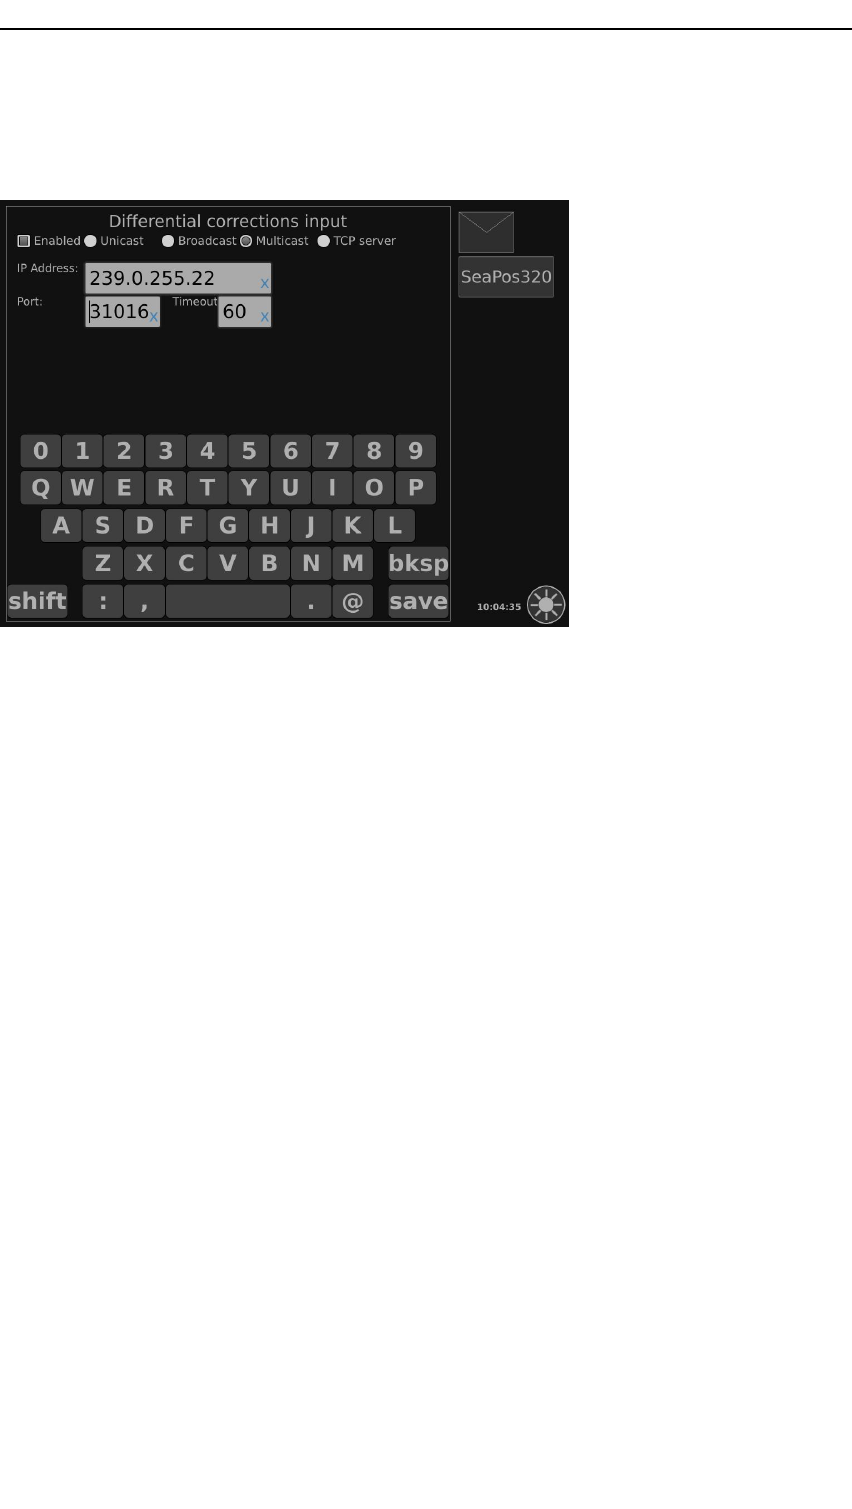
EnablinguseofexternalDGPSsource
IfyouwanttouseanexternalDGPSsource,enablethenetworksettingtoreceive
RTCMversion2.3data.
Procedure
1EntertheCongurationview.
2TaptheDiffcorrinsubmenuitemtoopentheDifferentialcorrectionsinputdialog
box.
3EnableuseofexternalDGPSsourceandselectconnectiontype.
4TypetheinputIPaddressandportnumber(dependingonconnectiontypeselected).
44DISP-D-MFD_INSTR/2.0
MFDforSeaPos
5Typetimeoutvalue[seconds].Defaultis60seconds.
6TapSavewhennished.
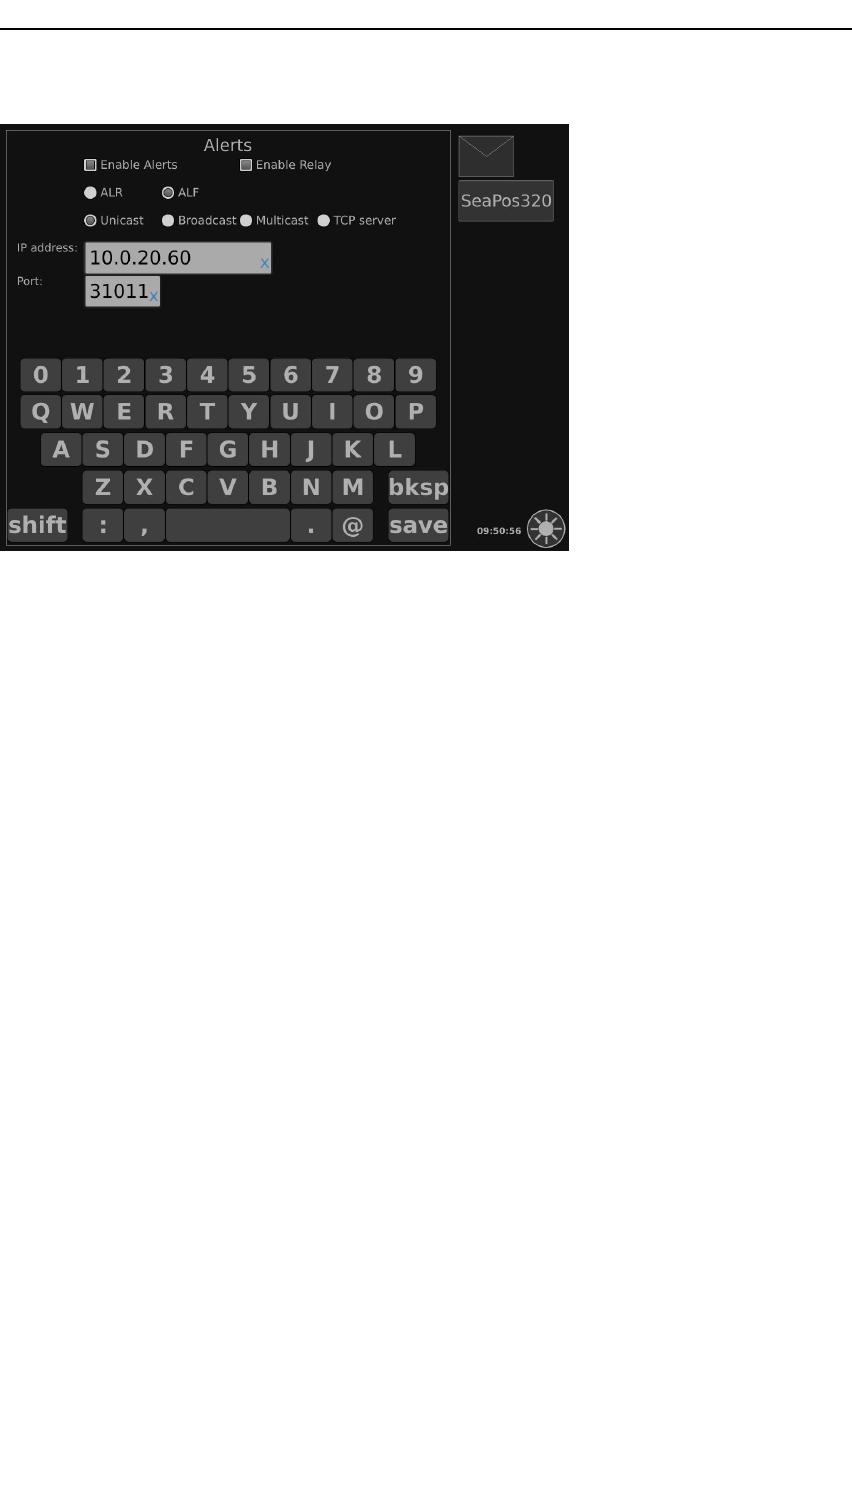
Settingalerts
Alertscanbeconguredtobesentonaspecicport,andtotriggerarelay.
Thealertsaredisplayedwithayellowiconinthedisplay.Presstheicontoseethe
alertcontents.
Cautionsandwarnings
•HDOPexceeded.
•Norawdata/noGPSdata.
•Nopositionsolution.
•Nolinkdata.
•NoDGPSposition.
Procedure
1EntertheCongurationview.
2TaptheAlertssubmenuitemtoopentheAlertsdialogbox.
3EnableAlertsand/orRelay.
4Selectalarmmode:ALRorALF.
ALR:selectthismodeifyouareusinglegacyalarmmode.
ALF:selectthismodeifyouareusingBAM.
5Selectconnectiontype.
6TypetheIPaddressandportnumber(dependingonconnectiontypeselected).
7TapSavewhennished.
DISP-D-MFD_INSTR/2.045
MultiFunctionDisplay
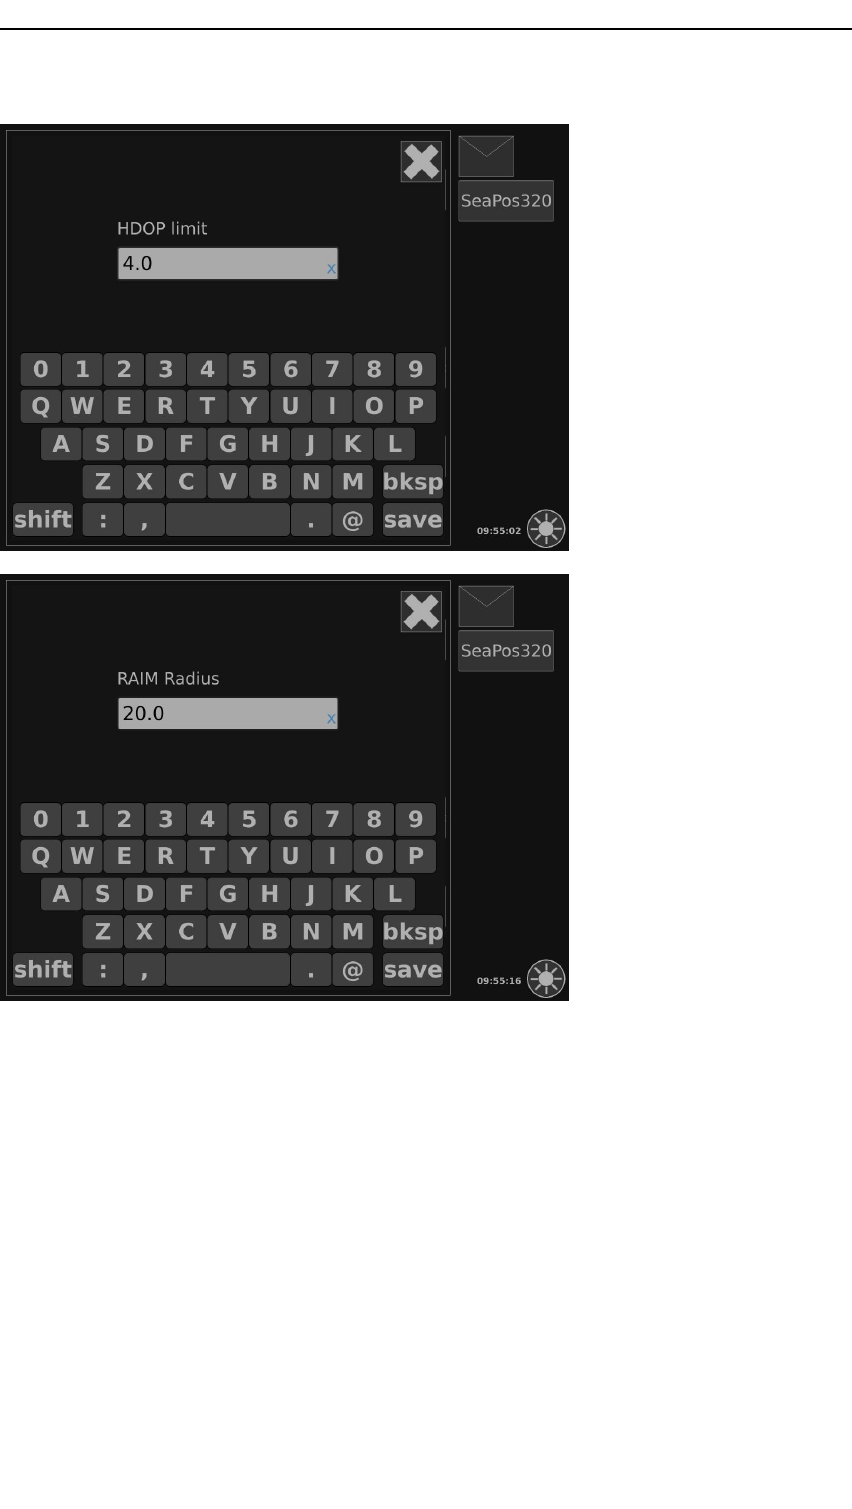
Settingalarmandwarninglimits
HDOPlimitandRAIMradiussetalarmandwarninglimits.
Procedure
1EntertheCongurationview.
2TaptheHDOPlimitsubmenuitemtoopentheHDOPlimitdialogboxand/orthe
RAIMradiussubmenuitemtoopentheRAIMradiusdialogbox.
3EnterthewantedHDOPlimitvalue.
TheHDOPlimitdefaultvalueis4.0.
4EnterthewantedRAIMradiusvalue.
TheRAIMradiusdefaultvalueis20.0metres.
5TapSavewhennished.
46DISP-D-MFD_INSTR/2.0
MFDforSeaPos
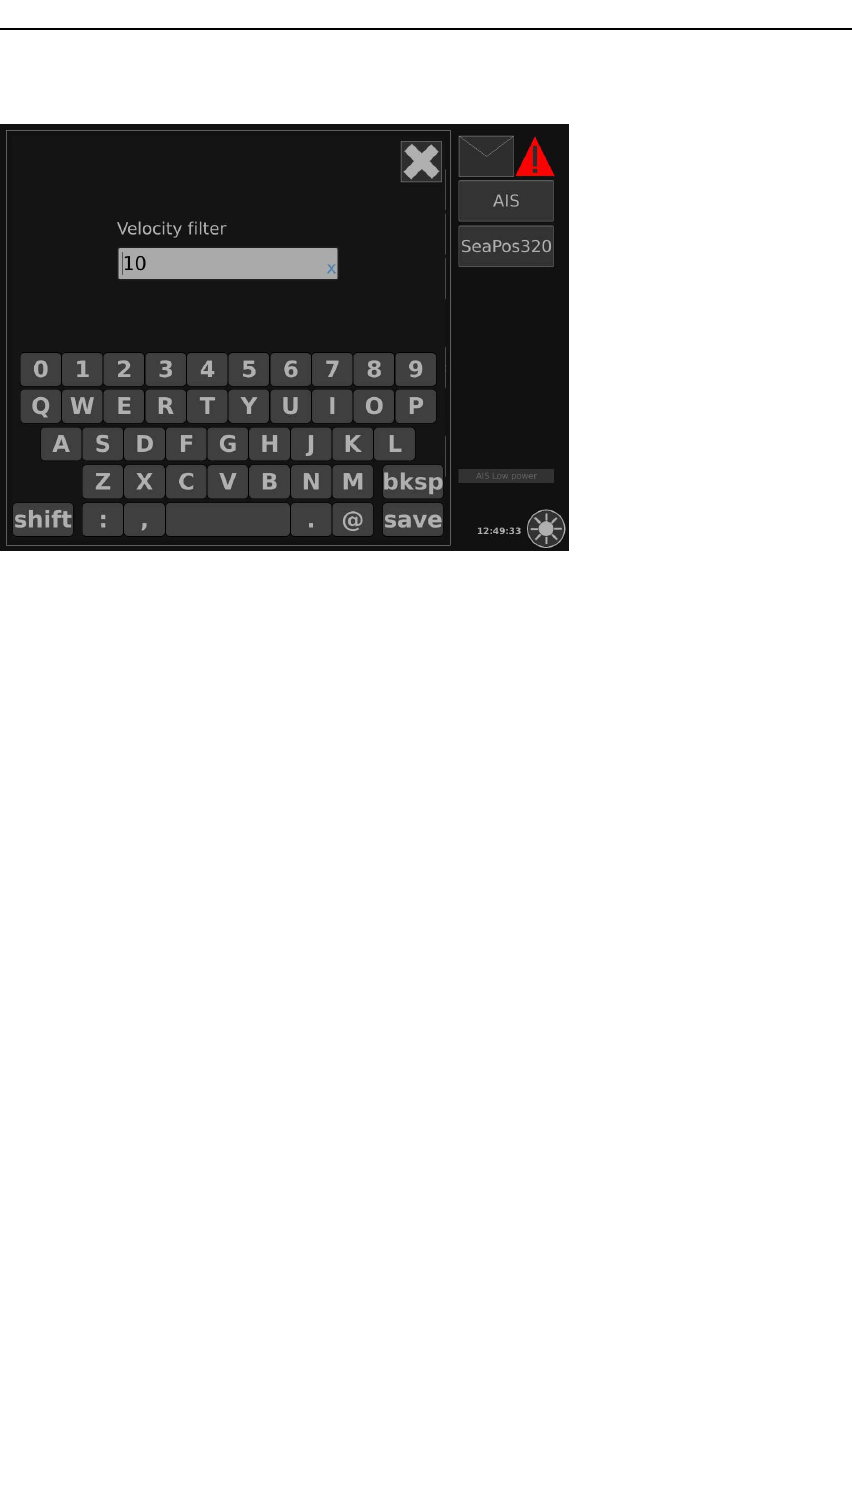
Settingvelocitylter
Thedurationoftheltersampleperiodusedforvelocitycalculations.
Procedure
1EntertheCongurationview.
2TaptheVelocityltersubmenuitemtoopentheVelocitylterdialogbox.
3Enterthewantedvelocityltervalue.
Thevelocitylterdefaultvalueis10seconds.V aluesfrom0to99.
4TapSavewhennished.
DISP-D-MFD_INSTR/2.047
MultiFunctionDisplay
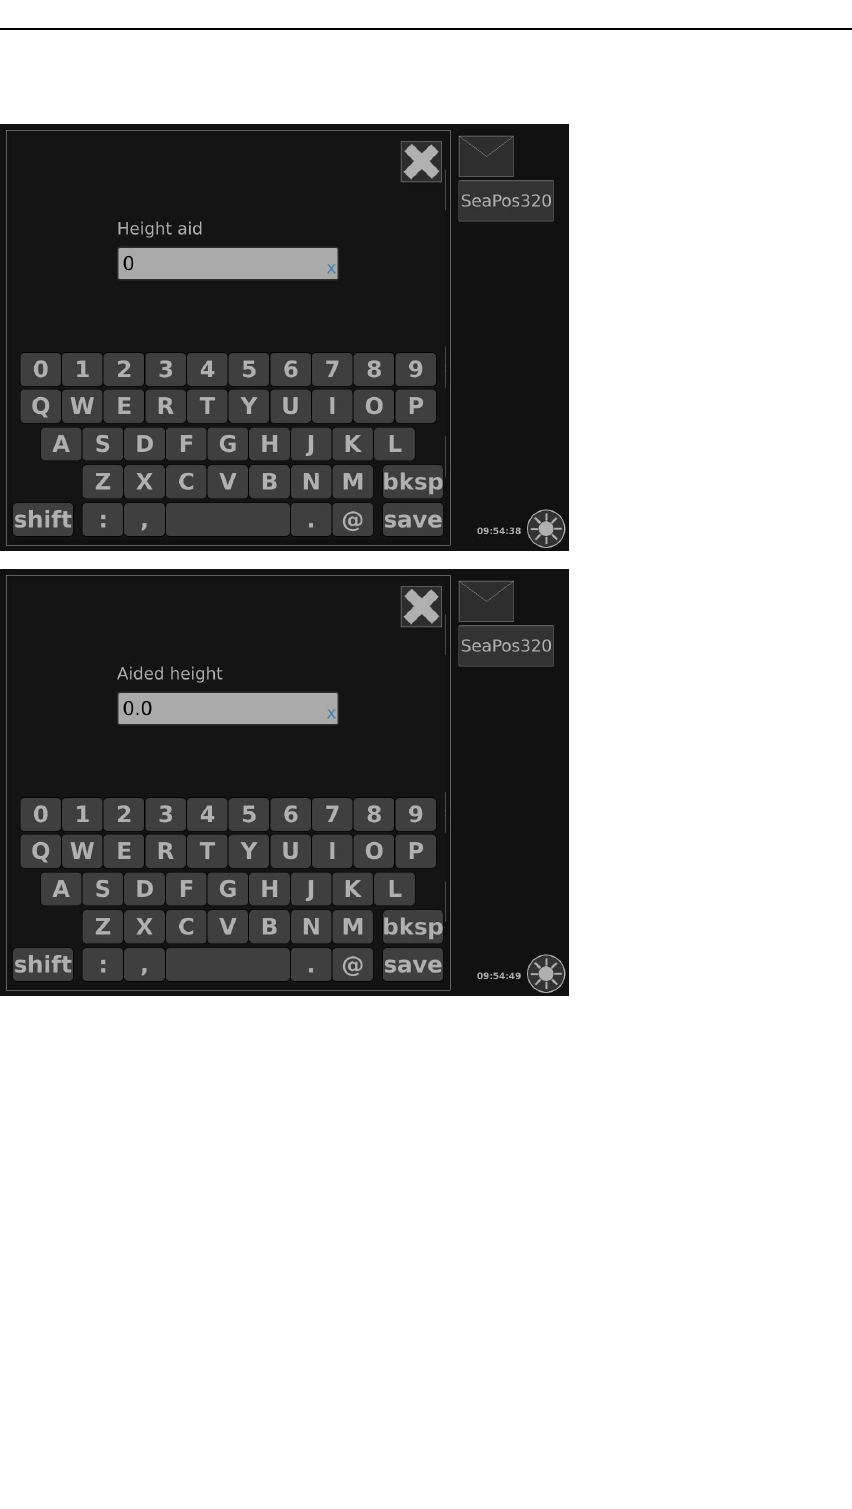
Settingheightaiding
Heightaidingisusedtoeasethecalculationofthepositionx.
Theheightaiddefaultvalueis2.
•0=off
•1=theheightaidvaluesetintheAidedheightdialogbox
•2=auto
Whentheheightaidingissetto2=auto,theautomaticlteredheightaidingusesthe
valuesetintheAidedheightdialogboxasinitialheight.
Procedure
1EntertheCongurationview.
2TaptheHeightaidsubmenuitemtoopentheHeightaiddialogbox.
3Typethewantedheightaidvalue.
0isdefaultvalue.Requiresnofurtheraction.
1requiresaidedheightinmetres.
4TaptheAidedheightsubmenuitemtoopentheAidedheightdialogbox.
5Typetheaidedheightvalueinmetres.
6TapSavewhennished.
48DISP-D-MFD_INSTR/2.0
MFDforSeaPos
ConguringtheIALAreceiver
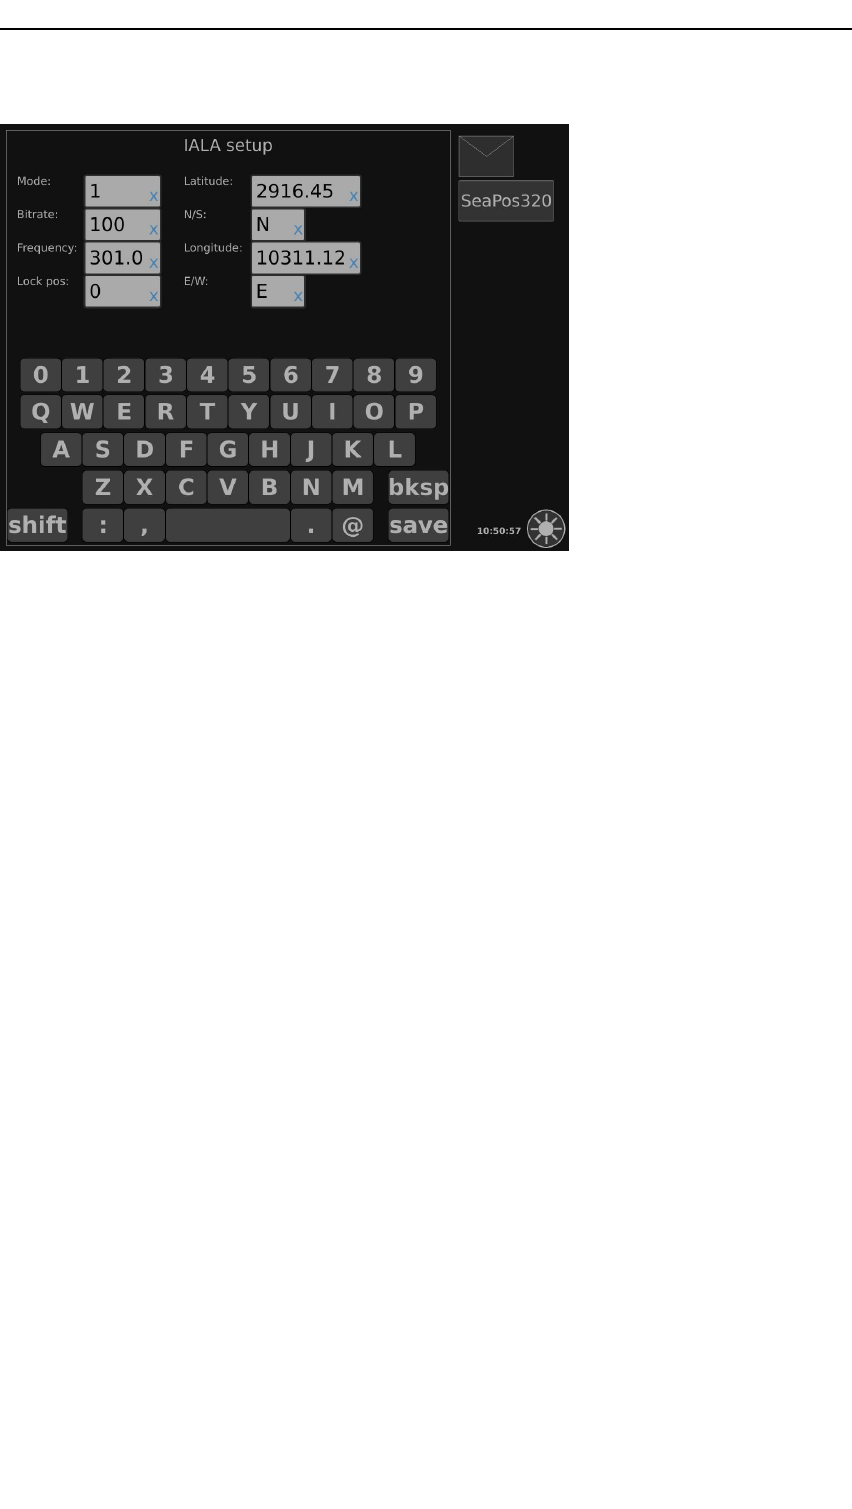
TheIALAreceivercardcanbeconguredbysettingthesearchmode.TheIALAsearch
modedefaultvalueis1,whichmeansthatthesearchforIALAbaconreceiversisdone
automatically.
•0=off
•1=auto
•2=manualfrequency/autobitrate
•3=manual
•4=database
ForManualmode,thebitratecanalsobecongured.TheIALAbitratevaluesare50,
100or200.
DISP-D-MFD_INSTR/2.049
MultiFunctionDisplay
Procedure
1EntertheCongurationview.
2TaptheIALAsetupsubmenuitemtoopentheIALAsetupdialogbox.
3Typethewantedsearchmodevalue,between0and4.
4Ifyouhavesearchmode3,typethebitratevalue:50,100or200.
5Ifyouhavesearchmode2or3,typereceiverfrequency.
6Lockpositioncanbesetto0or1.Defaultis0.
Ifyouhavesetlockpositionto1,thereceiverwillbelockedtoaspecicposition.
Entertheparametersforthisposition.
7Typethelatitudeforthereceiver.
8TypeNorthorSouthdirection.
9Typethelongitudeforthereceiver.
10TypeEastorWestdirection.
11TapSavewhennished.
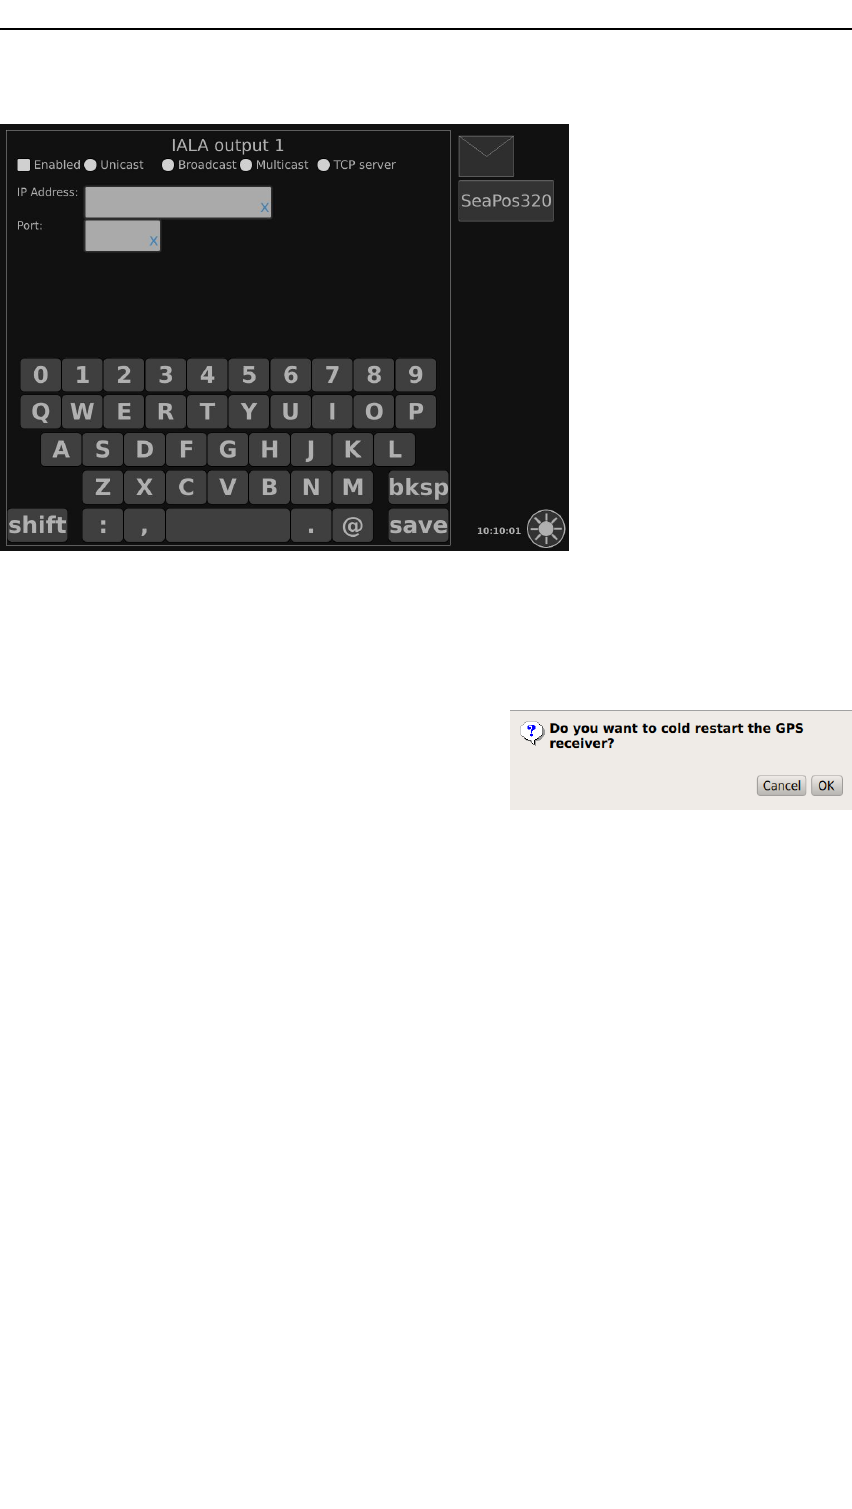
SettingIALAoutput
YoucansetupfourchannelsfordistributionofRTCMcorrections.
Procedure
1EntertheCongurationview.
2TaptheIALAoutsubmenuitemtoopentheIALAoutputdialogbox.
3EnableIALAoutputandselectconnectiontype.
4TypetheoutputIPaddressandportnumber(dependingonconnectiontypeselected).
5TapSavewhennished.
50DISP-D-MFD_INSTR/2.0
MFDforSeaPos
RestartingtheGPSreceiver
Ifyouexperiencenodatareceptionorreceptionofinconsistentdataitisadvisableto
restarttheGPSreceiver.
Procedure
1EntertheCongurationview.
2TaptheGPScoldrestartsubmenuitem.
ThemessageDoyouwanttocold
starttheGPSreceiver?appears.
3TapOKtoinitiatetherestart.
TheGPSreceiverwillrestartafterafewseconds.
Operationalprocedures
TheSeaPossystemrequiresnooperationalinteractionfromtheuser.Itisforinformation
purposesonly.
DISP-D-MFD_INSTR/2.051

MultiFunctionDisplay
Technicalspecications
Thischapterprovidesthetechnicalspecicationsandrequirementsrelatedtothemulti
functiondisplay.
Weightandoutlinedimensions
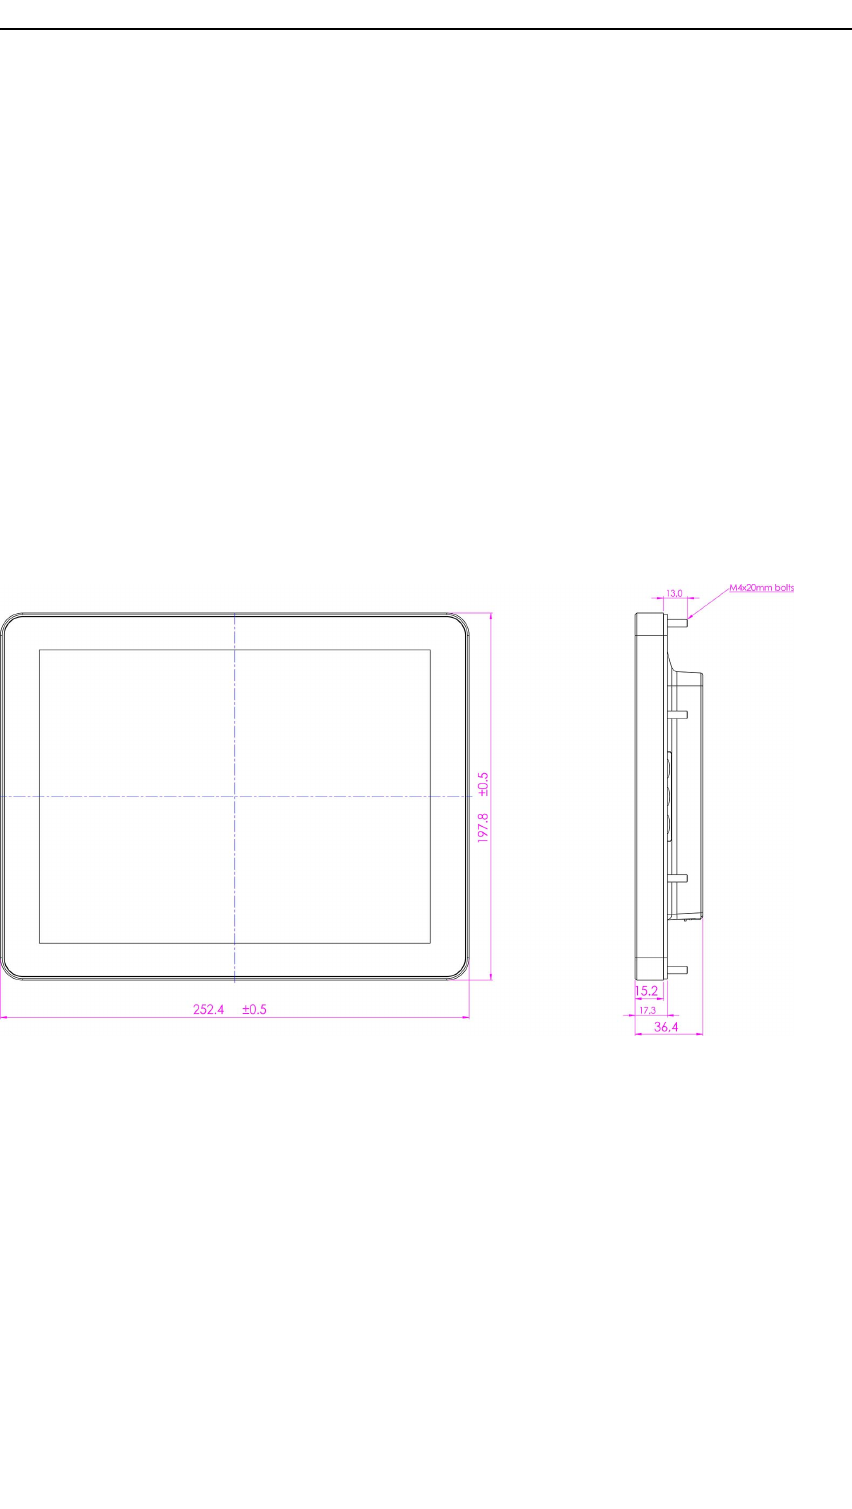
TypeMPCF1–10.4“
Width252.4mm
Height197.8mm
Depth36.4mm
Weight1.6kg
Powerspecications
TypeMPCF1–10.4“
V oltage18to32VDC
Powerconsumption11W@24V(50%brightness)
14W@24V(100%brightness)
Environmentalspecications
TypeMPCF1–10.4“
EnclosurematerialDiecastandpaintedaluminium
EnclosureprotectionsIP56asconsoleorushmount,IP22asVESAmount
Operatingtemperaturerange[1]–10to+55°C
1.Continuouslyrunningatveryhightemperatureswillreducecomputerlifetime.Recommended
operatingtemperatureis+25°C.
52DISP-D-MFD_INSTR/2.0
MultiFunctionDisplay
Drawings
Thischapterprovidesdrawingsofthemultifunctiondisplay.
Dimensions
Dimensionsandscrewplacementareillustrated.MountingholesforaVESAbracket
areshown.
54DISP-D-MFD_INSTR/2.0
MultiFunctionDisplay
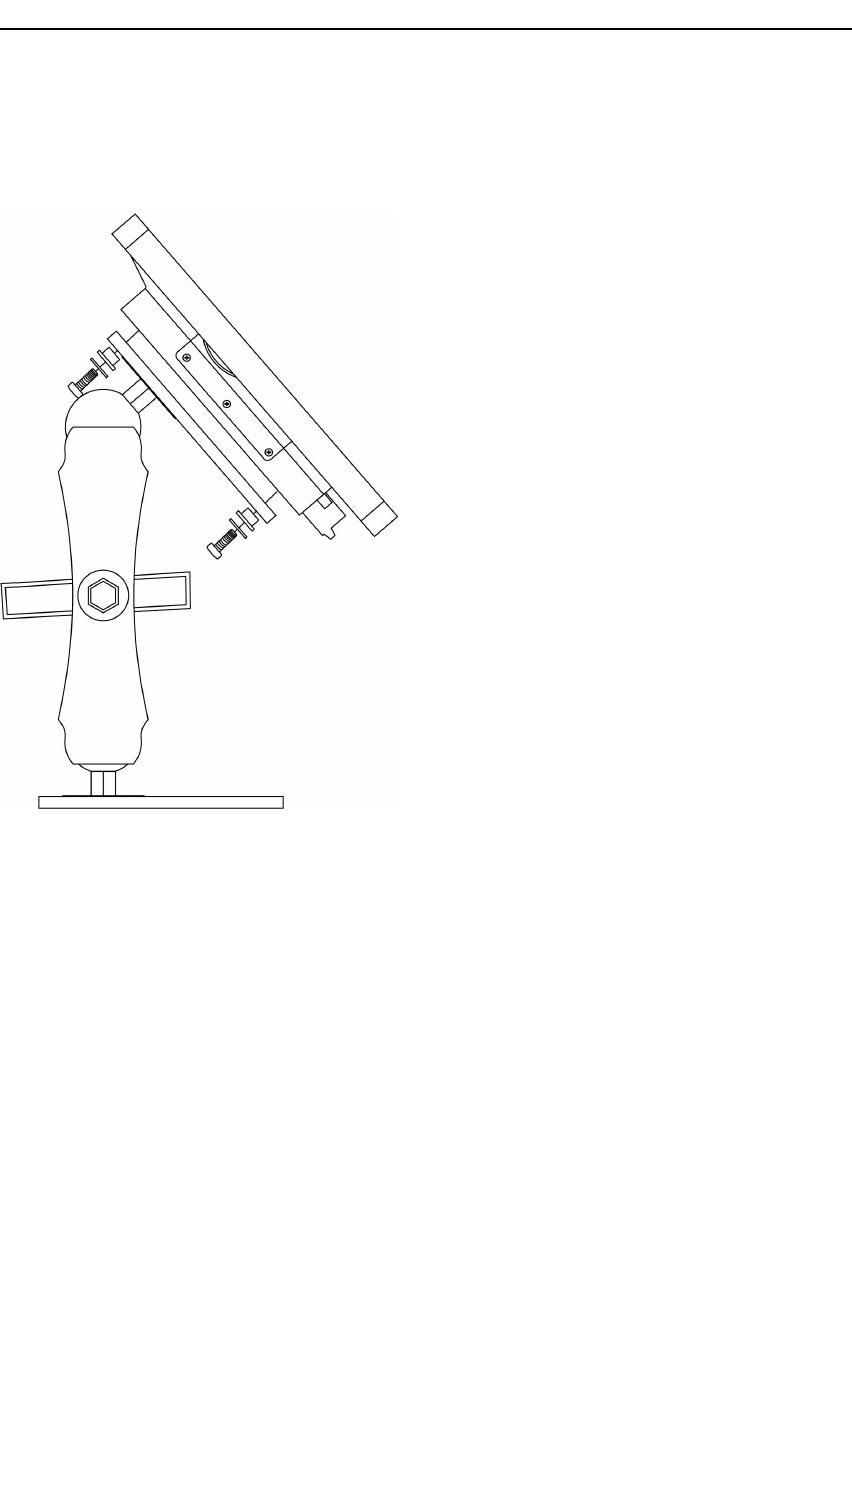
Bracket
ThegureshowsthestandardVESAbracket.
56DISP-D-MFD_INSTR/2.0

MultiFunctionDisplay
Glossary
Abbreviations
ACAlternatingcurrent
AISAutomaticIdenticationSystem
BFBlueForce
DCDirectcurrent
GPSGlobalpositioningsystem
IPIngressprotection
IPInternetprotocol
IWWInlandWaterway
LANLocalareanetwork
MFDMultiFunctionDisplay
MMSIMaritimeMobileServiceIdentity
UTCUniversalTimeCoordinated.Thisistheofcialtimeintheworld
andhasreplacedGMT(GreenwichMeanTime)astheofcial
time.
VV oltage
WWatt
58DISP-D-MFD_INSTR/2.0

Index
A
aboutthismanual,5
AC,58
adjustingdisplay
brightness,16
AIS,58
AIS300,17
AIS300BF,32
AIS300BF,conguration,32
AIScongurationview,22
AISUnit,conguration,
20,22
AISUnit,howtocongure,23
AIS,displayorganisation,17
alarmlimits,howtoset,46
alarms,howto
acknowledge,25
alarms,howtocheck,25
alerts,howtosetup,45
B
BF,58
BlueForce,32
BlueForcemode,howto
congure,32
bracket,56
bracketmounting,10
brightnessdisplay,howto
adjusting,16
brightnessfordisplay,how
toreset,16
C
changingkeyboardlayout,15
channelmanagementlist,24
checkingand
acknowledgingalarms,25
checkingsentandreceived
messages,26
communicationtest,how
torun,29
congurationview,
SeaPos,40
conguration,AIS300BF,32
conguration,AISUnit,
20,22
conguration,BlueForce,32
conguringIALAreceiver,49
conguringtheAISUnit,23
conguringthehost
interface,41
conguringtheSeaPos
unit,41
conguringtheserial
interface,42
conrmchanges,14
conformitydeclaration,53
connectingthedisplay,11
contactdetails,8
creatingnewmessage,28
creatingnewregion,24
D
DC,58
declarationofconformity,53
description,MultiFunction
Display,6
dimensions,display,54
displaydimensions,54
displayicons,14
displaylocation,9–10
displayorganisation,14
displayorganisation,AIS,17
displayorganisation,
SeaPos,36
displayproductversion,16
displaysettings,18
displaysoftwareversion,16
displayviewsAIS300,18
displayviews,SeaPos,37
display,bracketmounting,10
display,dimensions,52
display,environmental,52
display,howtoconnect,11
display,howtoinstall,9
display,howtomountin
panel,9
display,howtopoweroff,13
display,howtopoweron,13
display,howtoreboot,13
display,power,52
display,weight,52
displayingreceived
requests,30
drawings,54
E
editintextbox,14
editingaregion,25
enablingtrackingofSBAS
satellites,44
enablinguseofexternal
DGPSsource,44
environmental,display,52
externalDGPSsource,
howtoenable,44
externalpositioninput,
howtoset,43
G
gettingstarted,13
glossary,58
GPS,58
GPSinformationview,
SeaPos,40
GPSreceiver,howto
restart,51
H
hardwareversion,8
hardwareversions,5
heightaiding,howtoset,48
hostinterface,howto
congure,41
howto,acknowledge
alarms,25
howto,adjustdisplay
brightness,16
howto,changethe
keyboardlayout,15
howto,checkalarms,25
howto,checkdisplay
productversion,16
howto,checkdisplay
softwareversion,16
howto,checkreceived
messages,26
howto,checksent
messages,26
howto,congureAISUnit,23
howto,congureIALA
receiver,49
howto,congurethe
SeaPosunit,41
howto,connectthe
display,11
howto,createanew
message,28
howto,createnewregion,24
howto,displayreceived
requests,30
howto,editaregion,25
howto,enabletrackingof
SBASsatellites,44
howto,enableuseof
externalDGPSsource,44
howto,installthedisplay,9
howto,mountthedisplay
inapanel,9
howto,mountthedisplay
inbracket,10
howto,mountthedisplay
inthebracket,10
howto,poweroffthe
display,13
howto,poweronthe
display,13
howto,rebootthedisplay,13
DISP-D-MFD_INSTR/2.059

MultiFunctionDisplay
howto,resetdisplay
brightness,16
howto,restarttheGPS
receiver,51
howto,runa
communicationtest,
29
howto,setAISunitIP
address,23
howto,setalarmlimits,46
howto,setBlueForce
mode,32
howto,setdisplayIP
address,18
howto,setexternal
positioninput,43
howto,setheightaiding,48
howto,setIALAoutput,50
howto,setlongrange
requeststoautomaticor
manual,30
howto,setNMEAoutput
onhostinterface,41
howto,setNMEAoutput
onserialinterface,42
howto,setSeaPosdisplay
IPaddress,37
howto,setupalerts,45
howto,setvelocitylter,47
howto,setwarninglimits,46
howto,updatesoftware,11
I
IALAoutput,howtoset,50
IALAreceiver,howto
congure,49
installingthedisplay,9
IP,58
IPaddressAISUnit,how
toset,23
IPaddressdisplay,howto
set,18
IPaddressforSeaPos
display,howtoset,37
IWW,58
IWWdata,22
K
keyboardlayout,15
L
LAN,58
layoutkeyboard,howto
change,15
licenses,5
location,display,9–10
longrangrequest,reply
mode,30
longrangrequests,30
M
maintenance,5
manual,purpose,5
manual,targetaudience,5
messages,howtocreate
newmessage,28
messages,received,26
messages,sent,26
MFD,58
MMSI,58
mountingbracket,display,10
mountingthedisplayina
panel,9
mountingthedisplayin
bracket,10
mountingthedisplayinthe
bracket,10
MultiFunctionDisplay
description,6
N
newregion,howtocreate,24
O
operation,SeaPosunit,51
operationalprocedures,25
optionalparts,7
ownvesselview,20
Ownvesselview,23
P
panelmounting,9
partslist,7
parts,optional,7
parts,standard,7
password,14
positionview,SeaPos,37
poweroffdisplay,13
powerondisplay,13
power,display,52
presentationoverview,14
productversion,16
R
rebootingdisplay,13
receivedrequests,howto
display,30
referencestationsview,
SeaPos,39
region,howtoedit,25
replymode,longrang
request,30
resettingdisplay
brightness,16
restartingtheGPSreceiver,51
runningacommunication
test,29
S
satellitesview,SeaPos,38
scopeofsupply,7
SeaPosunit,howto
congure,41
SeaPosunit,operational
procedures,51
SeaPos,conguration
view,40
SeaPos,display
organisation,36
SeaPos,GPSinformation
view,40
SeaPos,positionview,37
SeaPos,referencestations
view,39
SeaPos,satellitesview,38
sensorstatus,22
serialinterface,howto
congure,42
settingAISUnitIPaddress,23
settingalarmlimits,46
settingalerts,45
settingdisplayIPaddress,18
settingexternalposition
input,43
settingheightaiding,48
settingIALAoutput,50
settingSeaPosdisplayIP
address,37
settingvelocitylter,47
settingwarninglimits,46
settings,display,18
softwareversion,8,16
softwareversions,5
software,howtoupdate,11
specications,52
staticandvoyagerelated
data,21
staticdata,21
supportinformation,8
systemdiagram,6
systemsettings,18
T
targetlist,19
targetlistview,19
technicalspecications,52
toolsandequipment,9–10
60DISP-D-MFD_INSTR/2.0

Index
trackingofSBASsatellites,
howtoenable,44
U
updatingsoftware,11
userinteraction,14
UTC,58
V
V,58
velocitylter,howtoset,47
view,AISconguration
view,22
view,GPSinformation
view,40
view,ownvesselview,20
view,Positionview,37
view,Referencestation
view,39
view,Satellitesview,38
view,SeaPos
Congurationview,
40
view,targetlistview,19
views,displayAIS300,18
views,SeaPosdisplay,37
voyagedata,21
W
W,58
warninglimits,howtoset,46
DISP-D-MFD_INSTR/2.061
©2016KongsbergSeatex
© Kongsberg Seatex AS
