Korea Data Systems Co CT1702 17” LCD TV Monitor User Manual 1 intro1 1904
Korea Data Systems Co Ltd 17” LCD TV Monitor 1 intro1 1904
UserManual.wiki
>
Korea Data Systems Co
>
CT1702 User Manual
>
Users manual 2
Contents
1.
Users manual1
2.
Users manual 2
Users manual 2
Navigation menu
Upload a User Manual
Namespaces
Wiki Guide
HTML
PDF
Info
Views
User Manual
Discussion / Help
Navigation


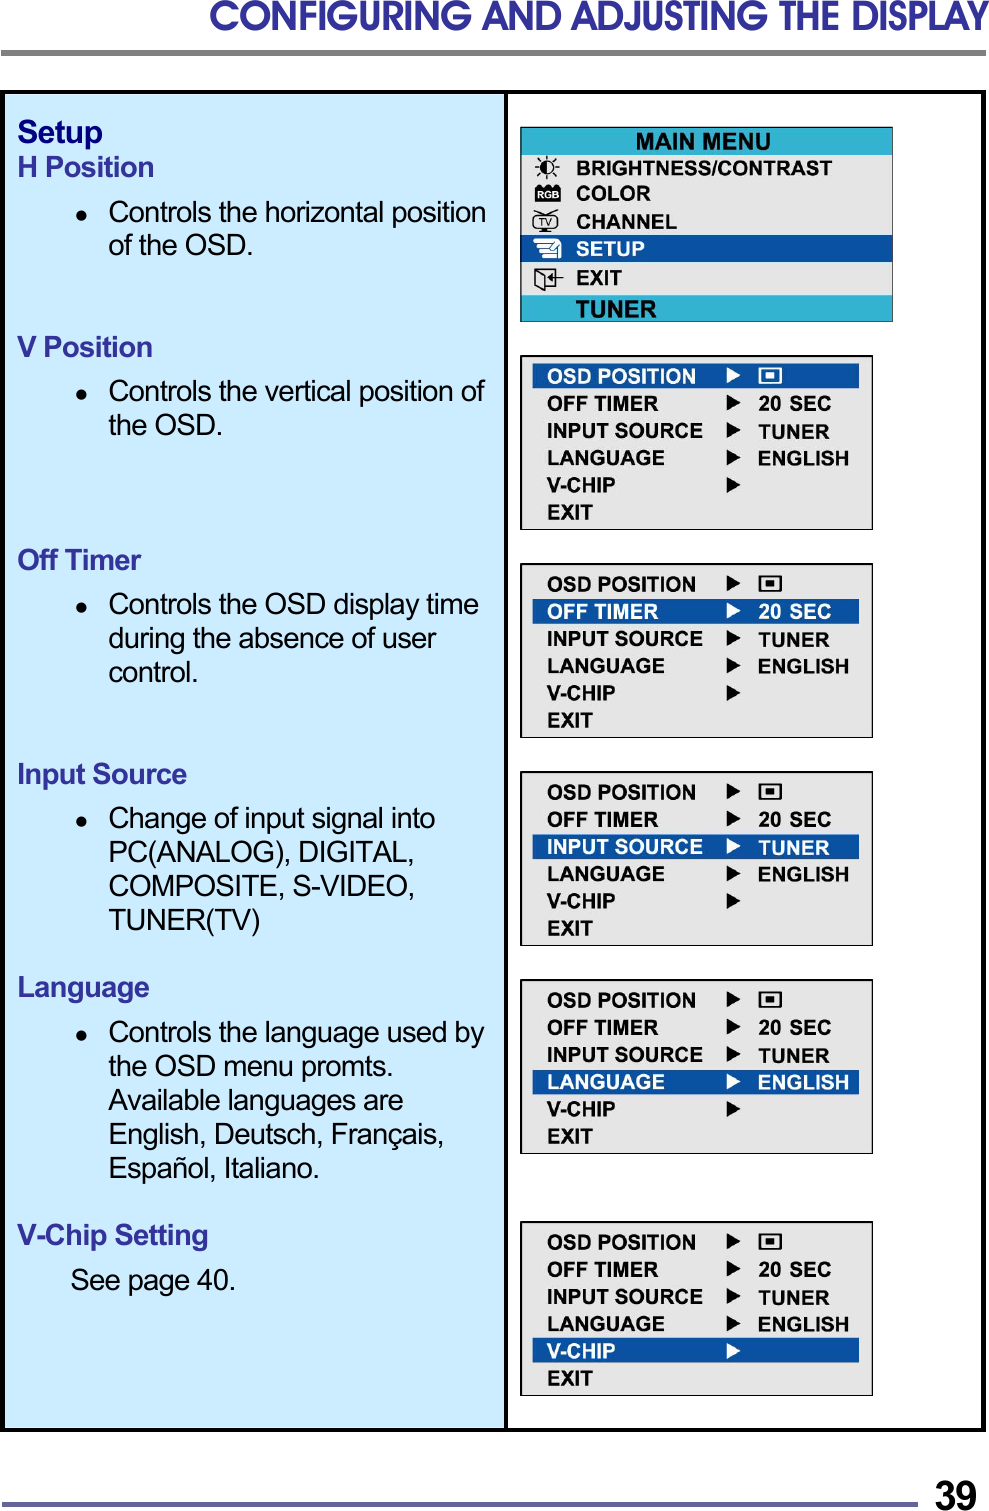
![CONFIGURING AND ADJUSTING THE DISPLAY 414. Setting up MPAA rating Mode E. Use Up/Down/Left/Right arrow buttons to move around the matrix and press Menu button to change the value from "U" to "B" or "B" to "U" F. MPAA : Motion Picture Association (of) America [movie rating organization] G U General Guidance PG U Parental Guidance Suggested PG-13 U Parental Strongly Cautioned R U Restricted Under 17 Requires NC-17 U No Children Under 17 Admitted X U Adult Only NR U Not Rated 5. Entering a new pin number A. Use numeric keys enter a new pin number. Pin number confirm menu appears. B. Again, use numeric keys to enter the pin number you entered at the previous step. If the two pin numbers do not match, "INCORRECT PIN" message will be displayed for 3 seconds. 6. Blocking Screen A. If the incoming signal’s rating is higher than the one specified, the screen will be blanked and "EXCESSIVE RATING" message will be appeared. NOTE : When the screen is blocked by V-Chip, and if you want to change V-Chip setting, press Exit button on the remote control or on the front cabinet of the monitor to bring up OSD Menu](https://usermanual.wiki/Korea-Data-Systems-Co/CT1702.Users-manual-2/User-Guide-382816-Page-18.png)
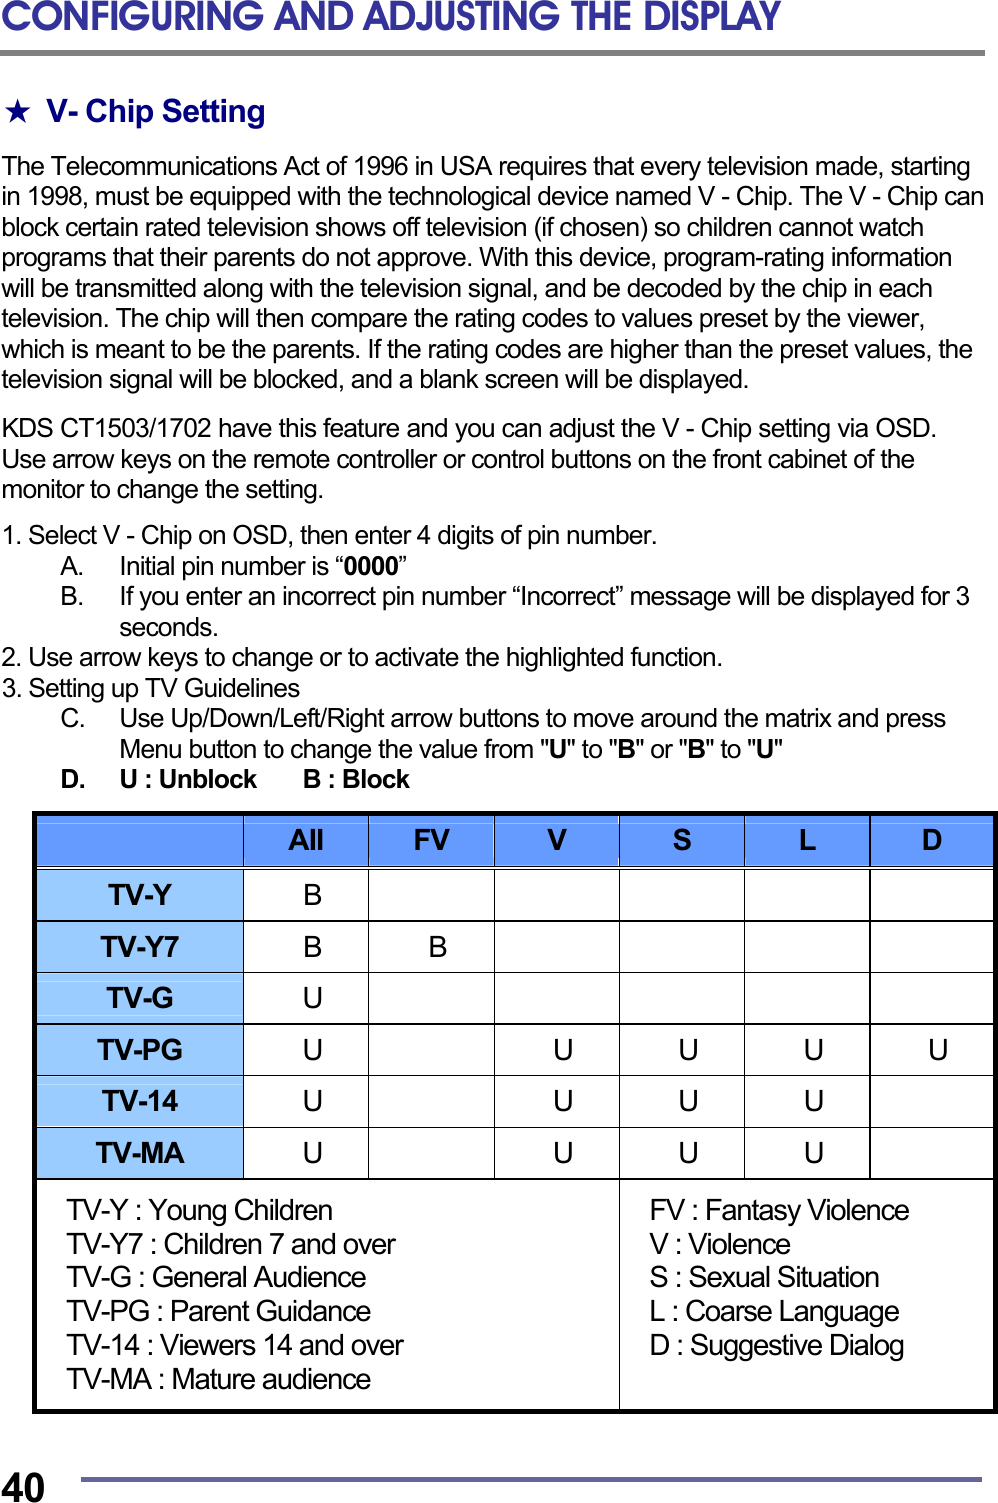
![APPENDIX 45CT1702 Specifications (Type:G0H) Type 17" (43.18Cm) Viewable Diagonal TFT Type Pixel Pitch 0.264 mm (H) x 0.264 mm (V) Viewable Angle (CR ≥ 5) Horizontal : ± 80˚ (Left/Right), TN Wide Angle Vertical : +50˚ / -70˚ (Up/Down) LCD Viewable Size Glass Surface Anti-Glare, Hard-Coating (3H) Contrast Ratio 500:1 (Typical) Response Time 20ms (6ms [Rising] + 14ms [Falling]) Display Mode Normally White Brightness 270 cd/ m2 (Max) INPUT VGA RGB Analog, H/V Separate (TTL), Digital Input : DVI-D Fh : 31 to 82 KHz Fv : 56 to 75 Hz Input Resolution From VGA up to 1280 x 1024 at 60Hz I/O Connectors VGA 15-pin D-sub, DC Power-in Stereo Audio-In/Out Power AC 110~240V, 50/60Hz Input (Built-in Adapter) 12V, 2.5A Max DC Output User Controls Brightness, Contrast, Color, Color Temperature, Auto-Adjustment, Clock, Phase, H/V Position, 5 OSD LanguagesDisplayable color 16.7 M (Full Color) Displayable Area 337.92mm (H) x 270.336mm (V) Operation 0˚C ~ 40˚C (32˚F ~ 104˚F) Temperature Storage -20˚C ~ 60˚C (-4˚F ~ 140˚F) Dimensions Physical 424.0mm (W) x 404.0mm (H) x 165.0mm (D) Net 4.4Kg (9.70lbs) Weight Gross 6.6Kg (14.55lbs) Regulations MIC, UL/cUL, CE, FCC-B, VCCI, CB, EPA Energy StarPlug and Play VESA DDC 2B Power Management VESA DPMS Compatible “Note : Design and Specification are subject to change without notice. Weight and Dimensions shown are approximate”](https://usermanual.wiki/Korea-Data-Systems-Co/CT1702.Users-manual-2/User-Guide-382816-Page-22.png)
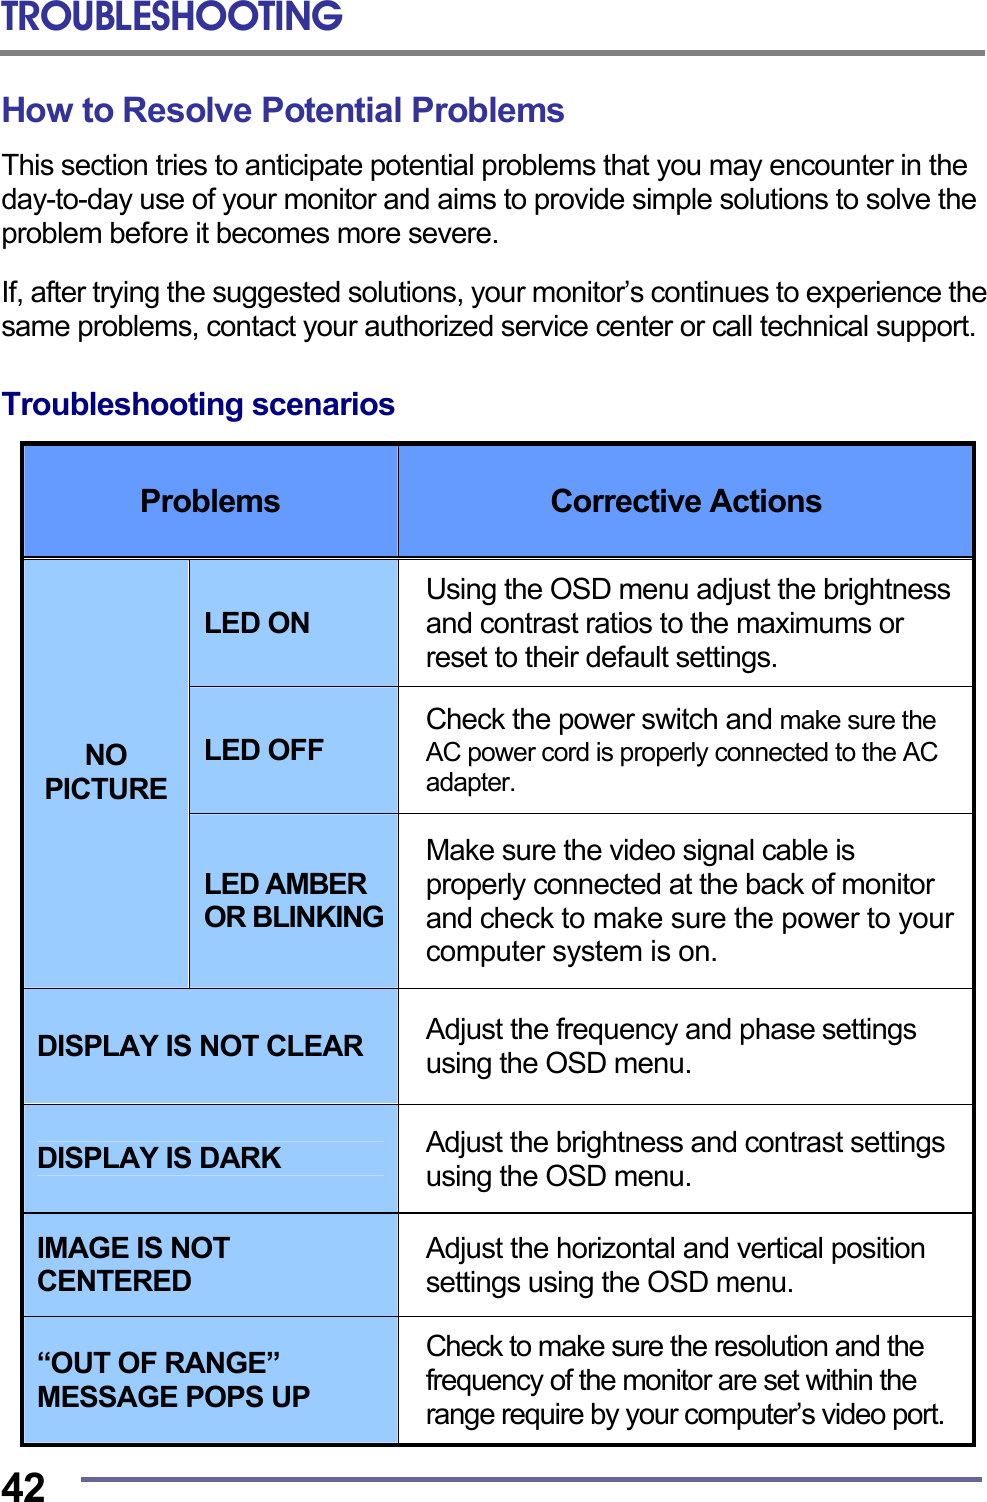
![APPENDIX 46 CT1702 Specifications (Type : G0S) Type 17" (43.18Cm) Viewable Diagonal TFT Type Pixel Pitch 0.264 mm (H) x 0.264 mm (V) Viewable Angle (CR ≥ 5) Horizontal : ± 85˚ (Left/Right), TN Wide Angle Vertical : +70˚ / -65˚ (Up/Down) LCD Viewable Size Glass Surface Anti-Glare, Hard-Coating (3H) Contrast Ratio 350:1 (Typical) Response Time 25ms (5ms [Rising] + 20ms [Falling]) Display Mode Normally White Brightness 260 cd/ m2 (Max) INPUT VGA RGB Analog, H/V Separate (TTL), Digital Input : DVI-D Fh : 31 to 82 KHz Fv : 56 to 75 Hz Input Resolution From VGA up to 1280 x 1024 at 60Hz I/O Connectors VGA 15-pin D-sub, DC Power-in Stereo Audio-In/Out Power AC 110~240V, 50/60Hz Input (Built-in Adapter) 12V, 2.5A Max DC Output User Controls Brightness, Contrast, Color, Color Temperature, Auto-Adjustment, Clock, Phase, H/V Position, 5 OSD LanguagesDisplayable color 16.2 M (Full Color) Displayable Area 337.92mm (H) x 270.336mm (V) Operation 0˚C ~ 40˚C (32˚F ~ 104˚F) Temperature Storage -20˚C ~ 60˚C (-4˚F ~ 140˚F) Dimensions Physical 424.0mm (W) x 404.0mm (H) x 165.0mm (D) Net 4.1Kg (9.04lbs) Weight Gross 6.3Kg (13.89lbs) Regulations MIC, UL/cUL, CE, FCC-B, VCCI, CB, EPA Energy StarPlug and Play VESA DDC 2B Power Management VESA DPMS Compatible “ Note : Design and Specification are subject to change without notice. Weight and Dimensions shown are approximate”](https://usermanual.wiki/Korea-Data-Systems-Co/CT1702.Users-manual-2/User-Guide-382816-Page-23.png)
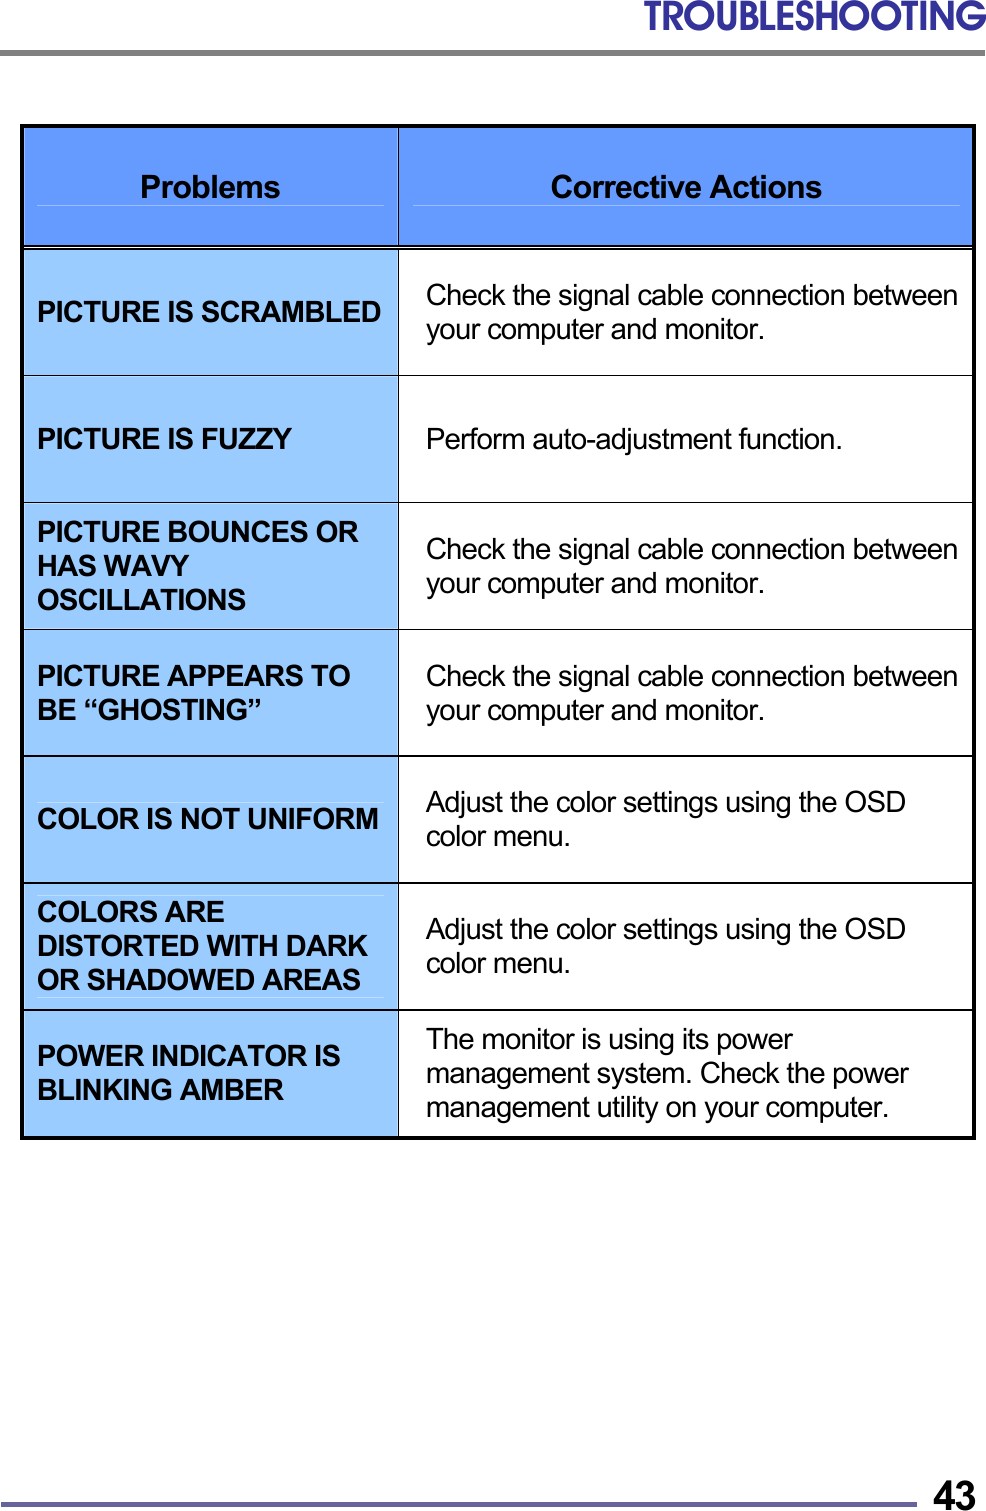
![APPENDIX 47CT1702 Specifications (Type : G1H) Type 17" (43.18Cm) Viewable Diagonal TFT Type Pixel Pitch 0.264 mm (H) x 0.264 mm (V) Viewable Angle (CR ≥ 5) Horizontal : ± 85˚ (Left/Right), TN Wide Angle Vertical : ± 75˚ (Up/Down) LCD Viewable Size Glass Surface Anti-Glare, Hard-Coating (3H) Contrast Ratio 430:1 (Typical) Response Time 20ms (5ms [Rising] + 15ms [Falling]) Display Mode Normally White Brightness 270 cd/ m2 (Max) INPUT VGA RGB Analog, H/V Separate (TTL), Digital Input : DVI-D Fh : 31 to 82 KHz Fv : 56 to 75 Hz Input Resolution From VGA up to 1280 x 1024 at 60Hz I/O Connectors VGA 15-pin D-sub, DC Power-in Stereo Audio-In/Out Power AC 110~240V, 50/60Hz Input (Built-in Adapter) 12V, 2.5A Max DC Output User Controls Brightness, Contrast, Color, Color Temperature, Auto-Adjustment, Clock, Phase, H/V Position, 5 OSD LanguagesDisplayable color 16.2 M (Full Color) Displayable Area 337.92mm (H) x 270.336mm (V) Operation 0˚C ~ 40˚C (32˚F ~ 104˚F) Temperature Storage -20˚C ~ 60˚C (-4˚F ~ 140˚F) Dimensions Physical 424.0mm (W) x 404.0mm (H) x 165.0mm (D) Net 4.4Kg (9.70lbs) Weight Gross 6.6Kg (14.55lbs) Regulations MIC, UL/cUL, CE, FCC-B, VCCI, CB, EPA Energy StarPlug and Play VESA DDC 2B Power Management VESA DPMS Compatible “Note : Design and Specification are subject to change without notice. Weight and Dimensions shown are approximate”](https://usermanual.wiki/Korea-Data-Systems-Co/CT1702.Users-manual-2/User-Guide-382816-Page-24.png)