Kyocera IUD19AA Desktop User Terminal of Wireless Internet System User Manual CONTENTS
Kyocera Corporation Desktop User Terminal of Wireless Internet System CONTENTS
Kyocera >
Contents
- 1. User Manual 1
- 2. User Manual 2
User Manual 2
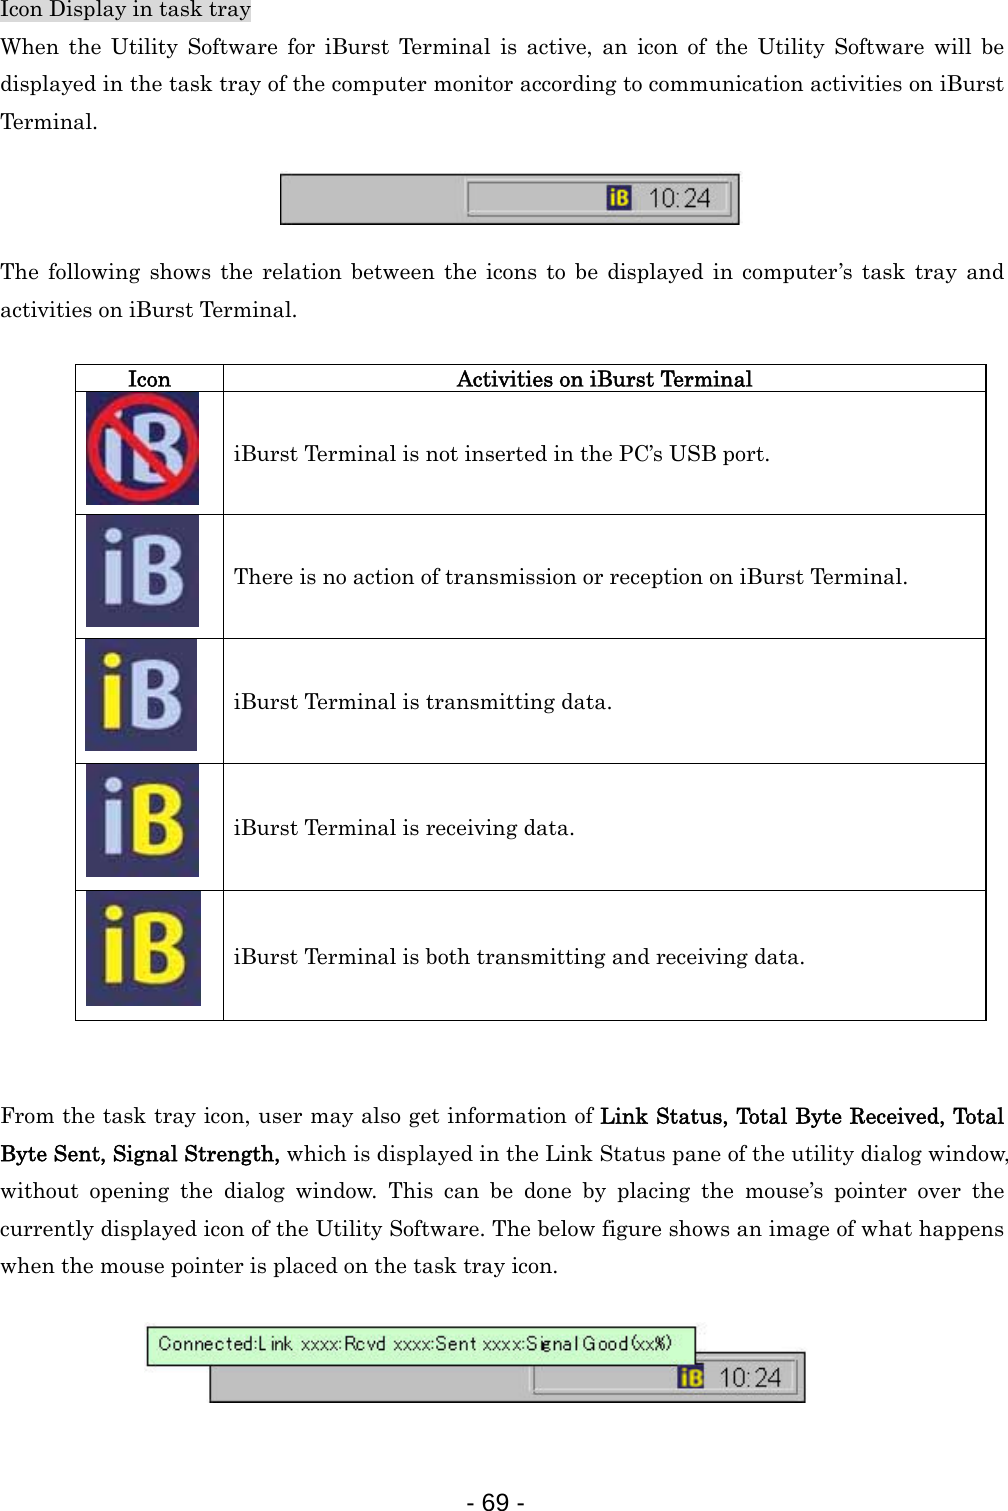
![5 Click the [Continue] button. 6 The following dialog window will appear, click the [Agree] button. 7 Select a destination disk, then click the [Continue] button. - 51 -](https://usermanual.wiki/Kyocera/IUD19AA.User-Manual-2/User-Guide-442621-Page-1.png)
![8 Click the [Install] button after appearing dialog window as shown below. 9 Click the [Continue installation] button. 10 When the installing process finishes, the dialog window shown below will appear. Click the [Restart] button in the dialog window. - 52 -](https://usermanual.wiki/Kyocera/IUD19AA.User-Manual-2/User-Guide-442621-Page-2.png)
![Connection Establishment Connection Establishment for Windows XP As Windows XP operating system supports PPPoE protocol, we don’t use connection application for iBurst to configure network connection. 1 Click the [Start] button, followed by selecting [Control Panel] as shown below. 2 Click [Network and Internet Connections] in the [Control Panel] display. 3 Next, click [Set up or Change your Internet connection]. - 53 -](https://usermanual.wiki/Kyocera/IUD19AA.User-Manual-2/User-Guide-442621-Page-3.png)
![4 When the [Internet Properties] dialog window appears, click the [Setup] button. 5 [New Connection Wizard] will begin and the dialog window as shown below will appear. Click the [Next >] button in the dialog window. 6 Select [Connect to the Internet] and click the [Next >] button. - 54 -](https://usermanual.wiki/Kyocera/IUD19AA.User-Manual-2/User-Guide-442621-Page-4.png)
![7 Select [Set up my connection manually] and click the [Next >] button. 8 Select [Connect using a broadband connection that requires a user name and password] and click the [Next >] button. 9 Fill in [ISP Name] edit box with an ISP Name, followed by clicking the [Next >] button. Note that any ISP name is acceptable. - 55 -](https://usermanual.wiki/Kyocera/IUD19AA.User-Manual-2/User-Guide-442621-Page-5.png)
![10 Enter user name and password and make sure that the [Make this the default Internet connection] check box is checked. Click the [Next >] button. 11 Click the [Finish] button. 12 When the [Network and Internet Connection] window pane appears again, click [Set up change your Internet Connection]. - 56 -](https://usermanual.wiki/Kyocera/IUD19AA.User-Manual-2/User-Guide-442621-Page-6.png)
![13 When the [Internet Properties] dialog window appears and the [Connections] pane is displayed, confirm the connection name and make sure that the [Always dial my default connection] radio button is checked, followed by clicking the [Apply] button. Then, click the [OK] button to close the dialog window. 14 At this point, the connection configuration is complete. When you call Internet Explorer program, [Dial-up Connection Wizard] will begin and the [Dial-up Connection] dialog window as shown below will appear. Click the [Connect] button to connect to the network. 15 When the connection establishment process is complete, a message indicating completion of the connection will appear at the task tray as shown below. - 57 -](https://usermanual.wiki/Kyocera/IUD19AA.User-Manual-2/User-Guide-442621-Page-7.png)
![Connection Establishment for Windows 2000/Me/98SE For Windows 2000、Windows Me and Windows 98SE,a connection application for iBurst is used. 1 Double click the shortcut on the computer's desktop which was created by iBurst connection application. 2 Enter user name and password and Click the [Connect] button. 3 While connecting to network, the following connection status window is displayed. Note : On Windows 98SE, if a wrong user name or password is entered, User Logon window shown below may appear. In this case, please enter user name and password again, and then click the OK button. 4 If connection is successful, connection icon will be displayed at the task tray. - 58 -](https://usermanual.wiki/Kyocera/IUD19AA.User-Manual-2/User-Guide-442621-Page-8.png)
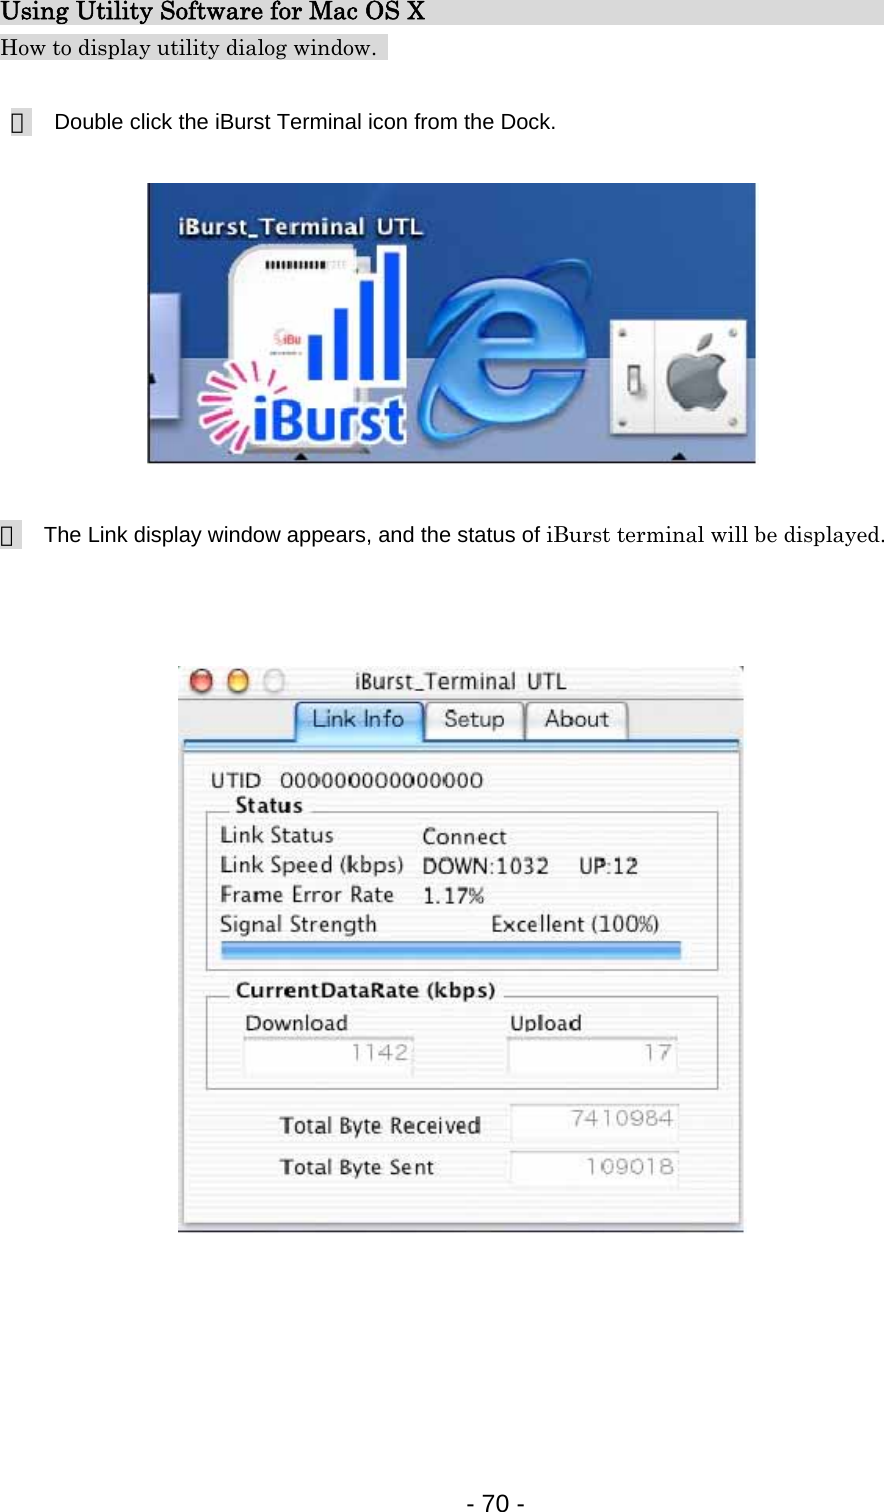
![Connection Establishment for Mac OS X As Mac OS X operating system supports PPPoE protocol, we don’t use connection application for iBurst to configure network connection. 1 Select [System Preferences…] on the Apple menu. 2 Double click [Network] in the [System Preferences] window. - 59 -](https://usermanual.wiki/Kyocera/IUD19AA.User-Manual-2/User-Guide-442621-Page-9.png)
![3 Click on drop down [Show] menu, and select [Ethernet Adaptor (enX)] in the [Network] window. ・Click on the PPPoE tab. ・Check off Connect using PPPoE. ・Enter Account Name as provided by your ISP. ・Enter Password as provided by your ISP. ・Check off [Save password] If you require the computer to remember your password. ・When you require the computer to connect or disconnect automatically, Click on [PPPoE Options…] 4 Under Session Options check the boxes when needed, then click on [OK]. - 60 -](https://usermanual.wiki/Kyocera/IUD19AA.User-Manual-2/User-Guide-442621-Page-10.png)
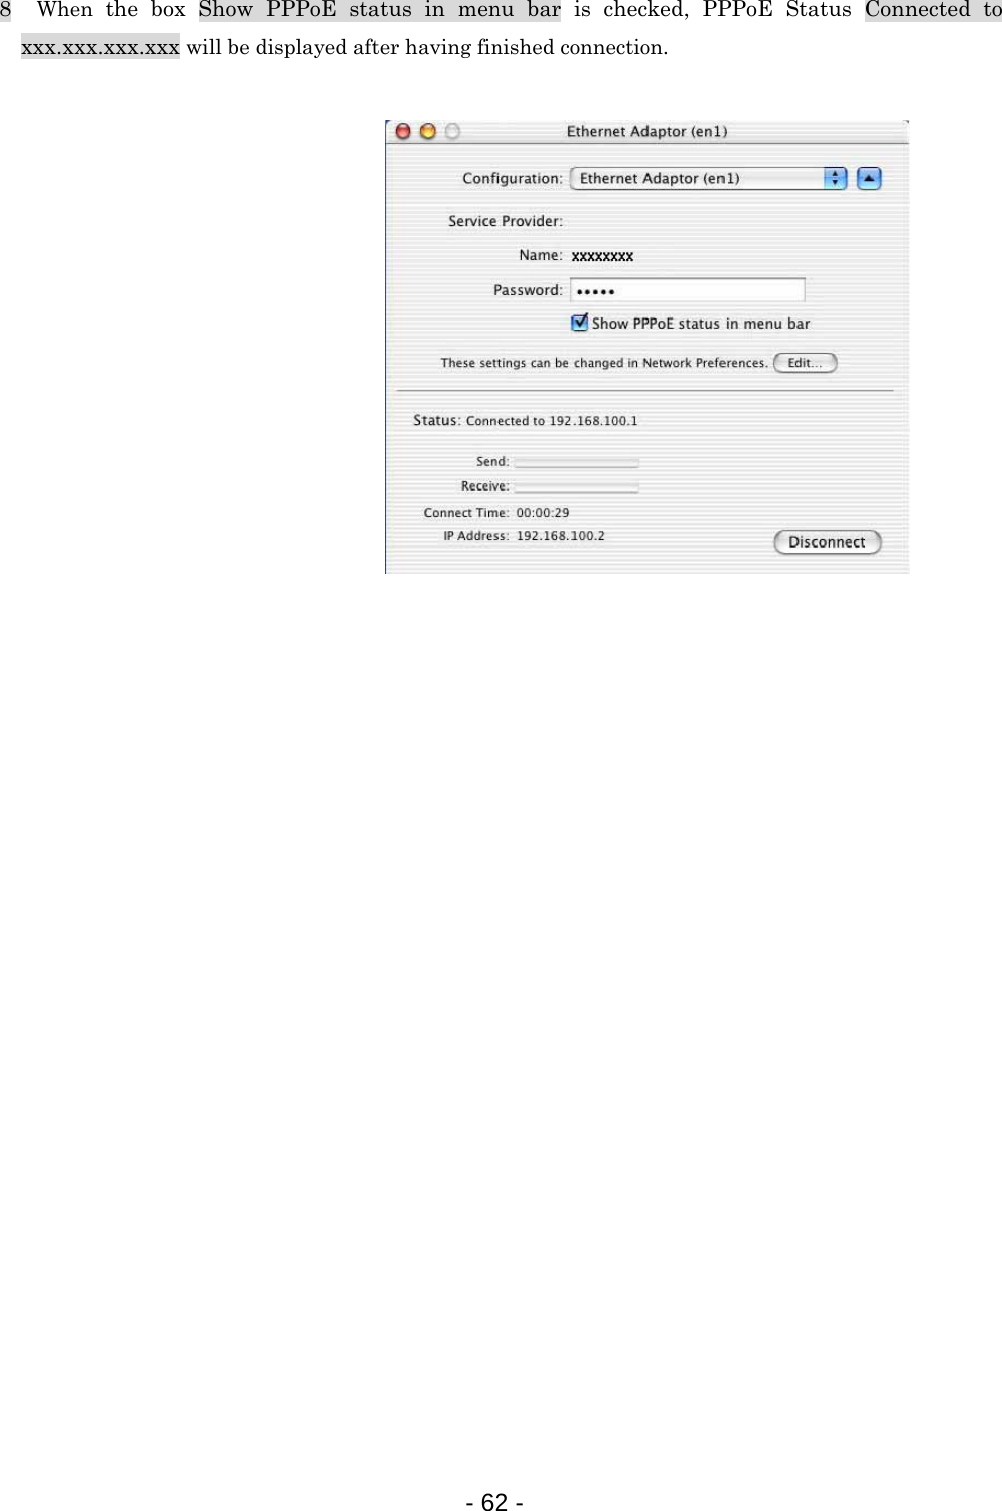
![5 Click the [Apply Now] button. 6 Click the <・・・> icon at top right of screen, select [Open Internet Connect…]. 7 Click on drop down Configuration menu, and select [Ethernet Adaptor (enX)]. The configuration of Ethernet adaptor (enX) will be displayed, click the [Connect] button. - 61 -](https://usermanual.wiki/Kyocera/IUD19AA.User-Manual-2/User-Guide-442621-Page-11.png)
![Using Utility Software Using Utility Software for Windows How to display utility dialog window 1 To open the utility dialog window, click the icon on the computer’s task tray. When the window opens, the [Link Info] pane will be displayed as shown below. 2 To close the utility dialog window, click the [OK] button or the [Cancel] button or the X mark at upper-right corner of the dialog window. - 64 -](https://usermanual.wiki/Kyocera/IUD19AA.User-Manual-2/User-Guide-442621-Page-14.png)
![Link Info Pane Link Info pane can be displayed in the main dialog window by clicking the [Link Info] tab. Generally, the elements in the Link Info pane give information about the communication link between iBurst Terminal and the access point to the network. (1) (2) (3) (4) (5) (6) (8) (7) The following describes each item of the Link Info pane. (1) UTID UTID is used as the identifier of iBurst User Terminal. (2) Link Status Link Status indicates connection state of the communication link between iBurst Terminal and the access point. Connected : The link is connected. No Connected : iBurst Terminal is inserted in the USB port but the link is not connected. No iBurst Terminal : There is no iBurst Terminal inserted in the PC’s USB port. (3) Link Speed Link Speed indicates speed of the link in both down and up direction. - 65 -](https://usermanual.wiki/Kyocera/IUD19AA.User-Manual-2/User-Guide-442621-Page-15.png)
![Setup Pane Setup pane can be displayed in the main dialog window by clicking the [Setup] tab. Setup pane is used to configure the display items in the Link Info pane. (6) (5) (4) (3) (2) (1) The following describes usage of each item of the above figure. (1) Check the [ON] radio buttons at the right hand side of the items you want to display in the Link Info pane. (2) Check the [OFF] radio buttons at the right hand side of the items you don’t want to display in the Link Info pane. (3) The configuration shown in the Display Setup subpane is activated by checking the [Apply] button. (4) The configuration in the Setup pane can be set to default (Default is the state in which all radio buttons on the right hand side of display items are set to “ON”.) by clicking the [Reset] button. (5) By clicking the [Ok] button, the current configuration will be activated and the dialog window will be closed. (6) By clicking the [Cancel] button, the dialog window will be closed but the current configuration won’t be activated. - 67 -](https://usermanual.wiki/Kyocera/IUD19AA.User-Manual-2/User-Guide-442621-Page-17.png)
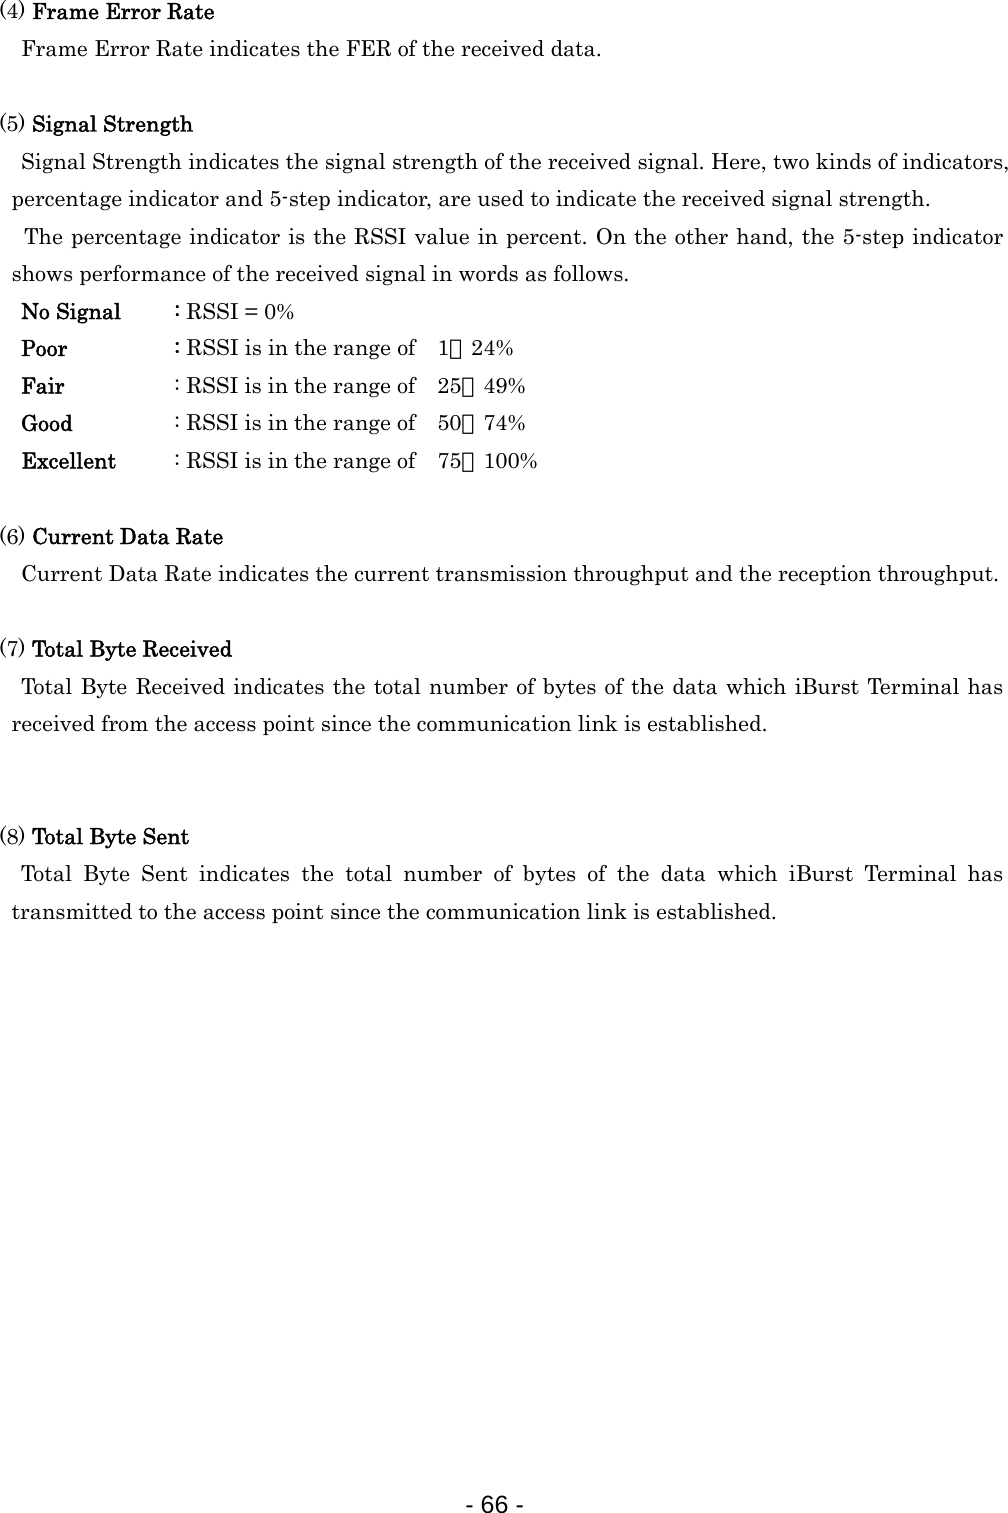
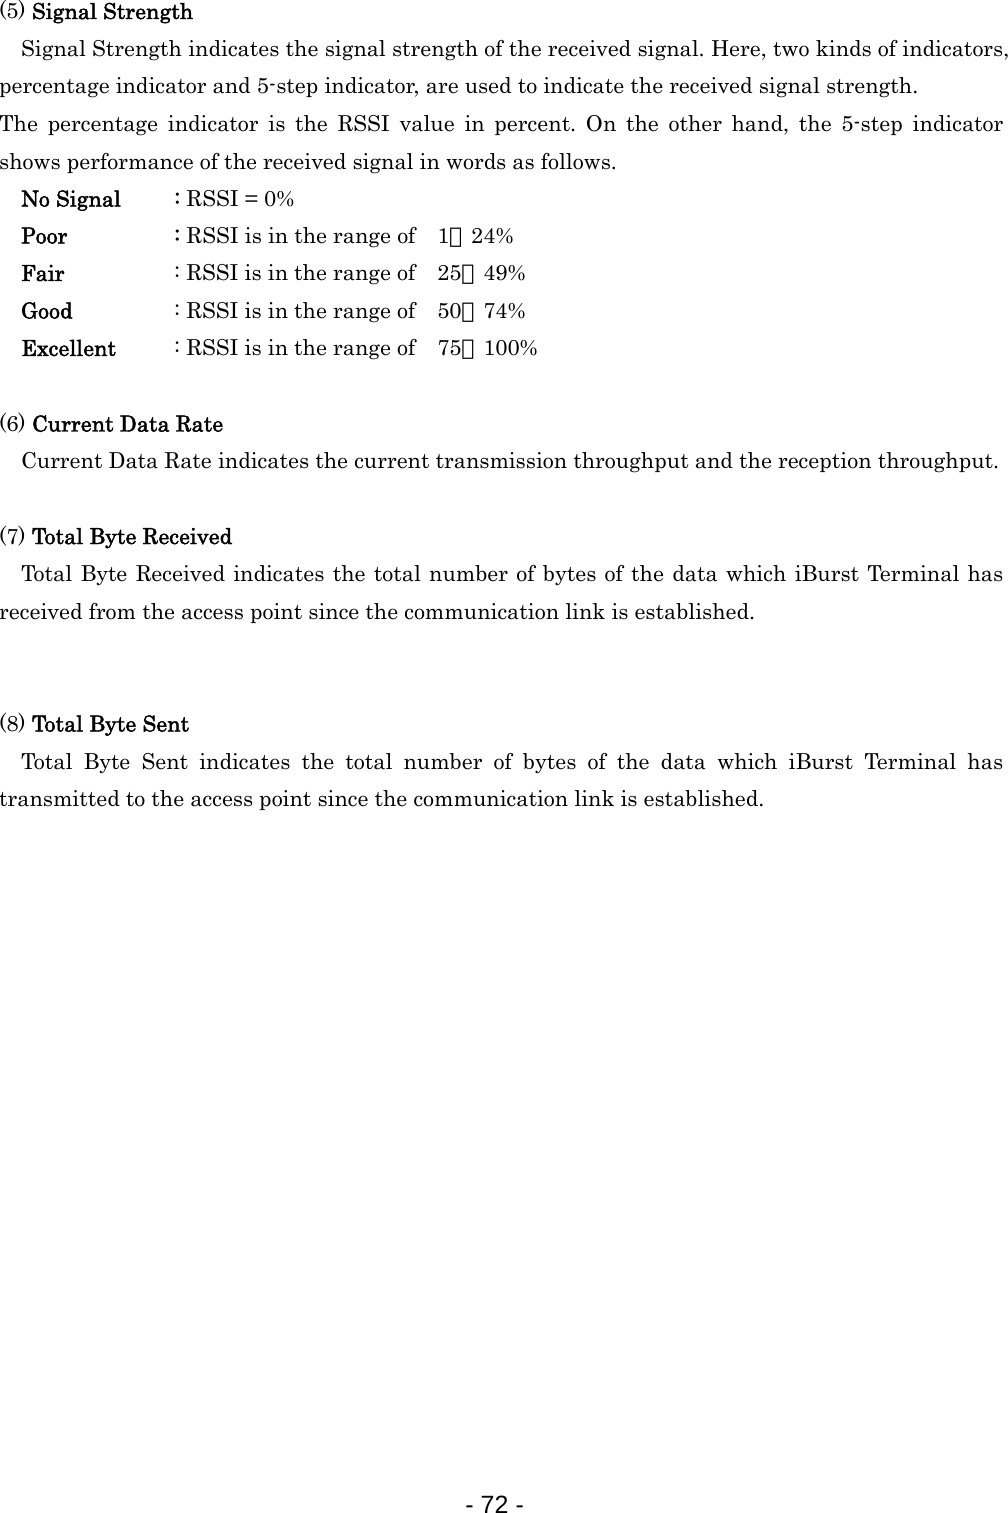
![Link Info Link Info pane can be displayed in the main dialog window by clicking the [Link Info] tab. Generally, the elements in the Link Info pane give information about the communication link between iBurst Terminal and the access point to the network. (8) (7) (6) (2) (3) (5) (4) (1) The following describes each item of the Link Info pane. (1) UTID UTID is used as the identifier of iBurst Terminal. (2) Link Status Link Status indicates connection state of the communication link between iBurst Terminal and the access point. Connected : The link is connected. No Connected : iBurst Terminal is inserted in the PC’s USB port but the link is not connected. No iBurst_Terminal : There is no iBurst Terminal inserted in the PC’s USB port. (3) Link Speed Link Speed indicates speed of the link in both down and up direction. (4) Frame Error Rate Frame Error Rate indicates the FER of the received data. - 71 -](https://usermanual.wiki/Kyocera/IUD19AA.User-Manual-2/User-Guide-442621-Page-21.png)
![Setup Pane Setup pane can be displayed in the main dialog window by clicking the [Setup] tab. Setup pane is used to configure the display items in the Link Info pane. (3) (1) (2) (4) (1) Check the [ON] radio buttons at the right hand side of the items you want to display in the Link Info pane. (2) Check the [OFF] radio buttons at the right hand side of the items you don’t want to display in the Link Info pane. (3) The configuration shown in the Display Setup subpane is activated by checking the [Apply] button. (4) The configuration in the Setup pane can be set to default (Default is the state in which all radio buttons on the right hand side of display items are set to “ON”.) by clicking the [Reset] button. - 73 -](https://usermanual.wiki/Kyocera/IUD19AA.User-Manual-2/User-Guide-442621-Page-23.png)
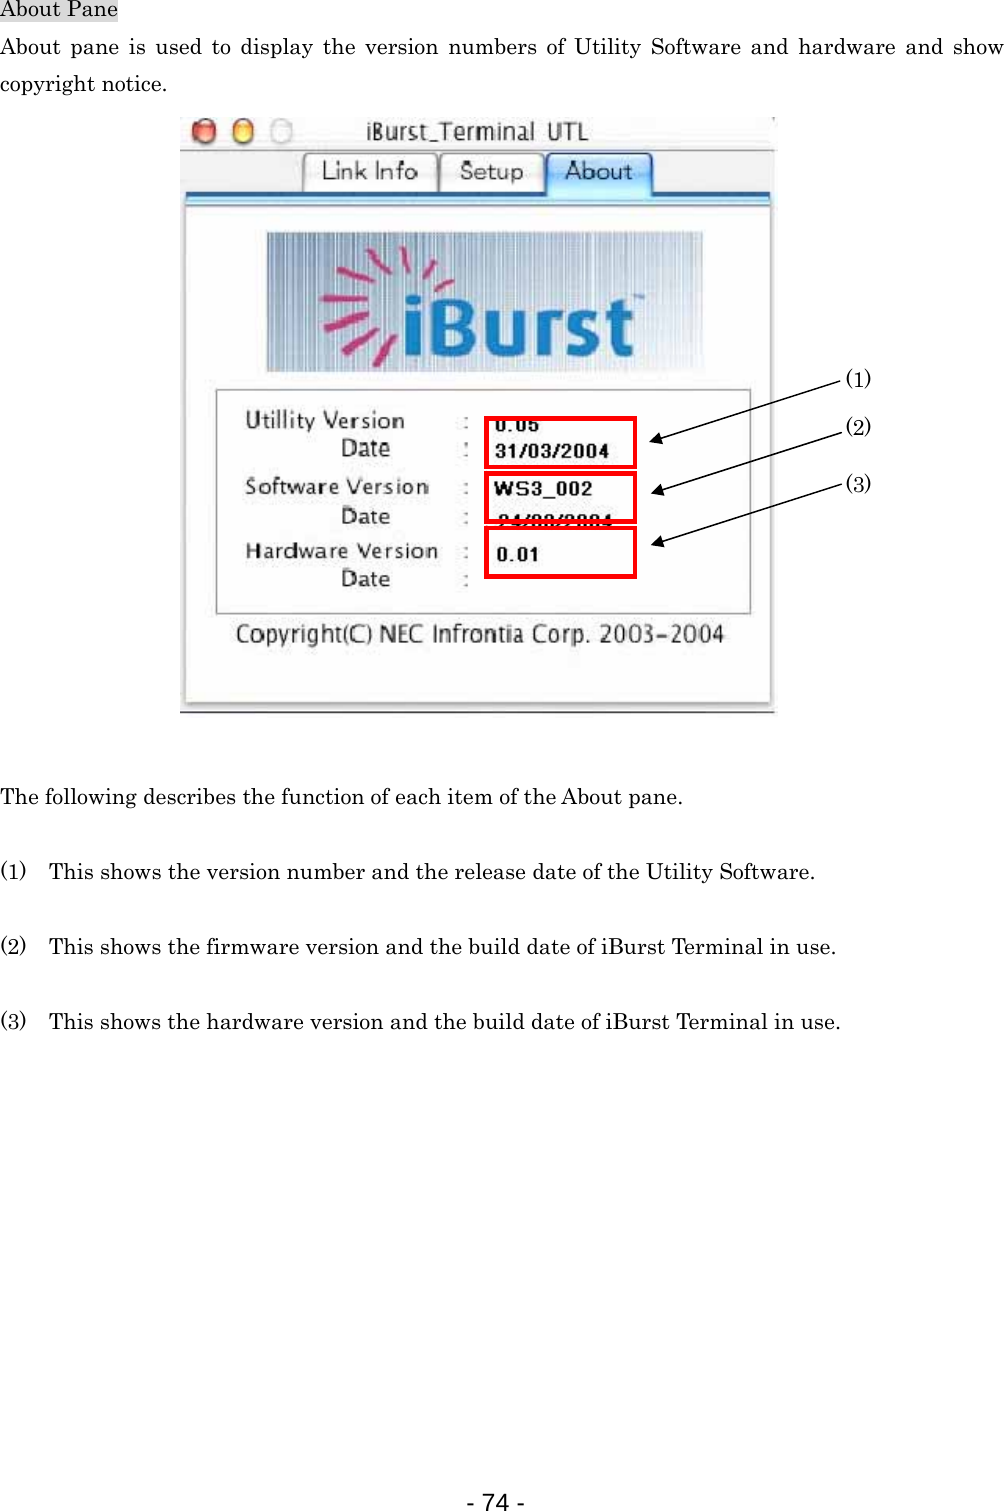
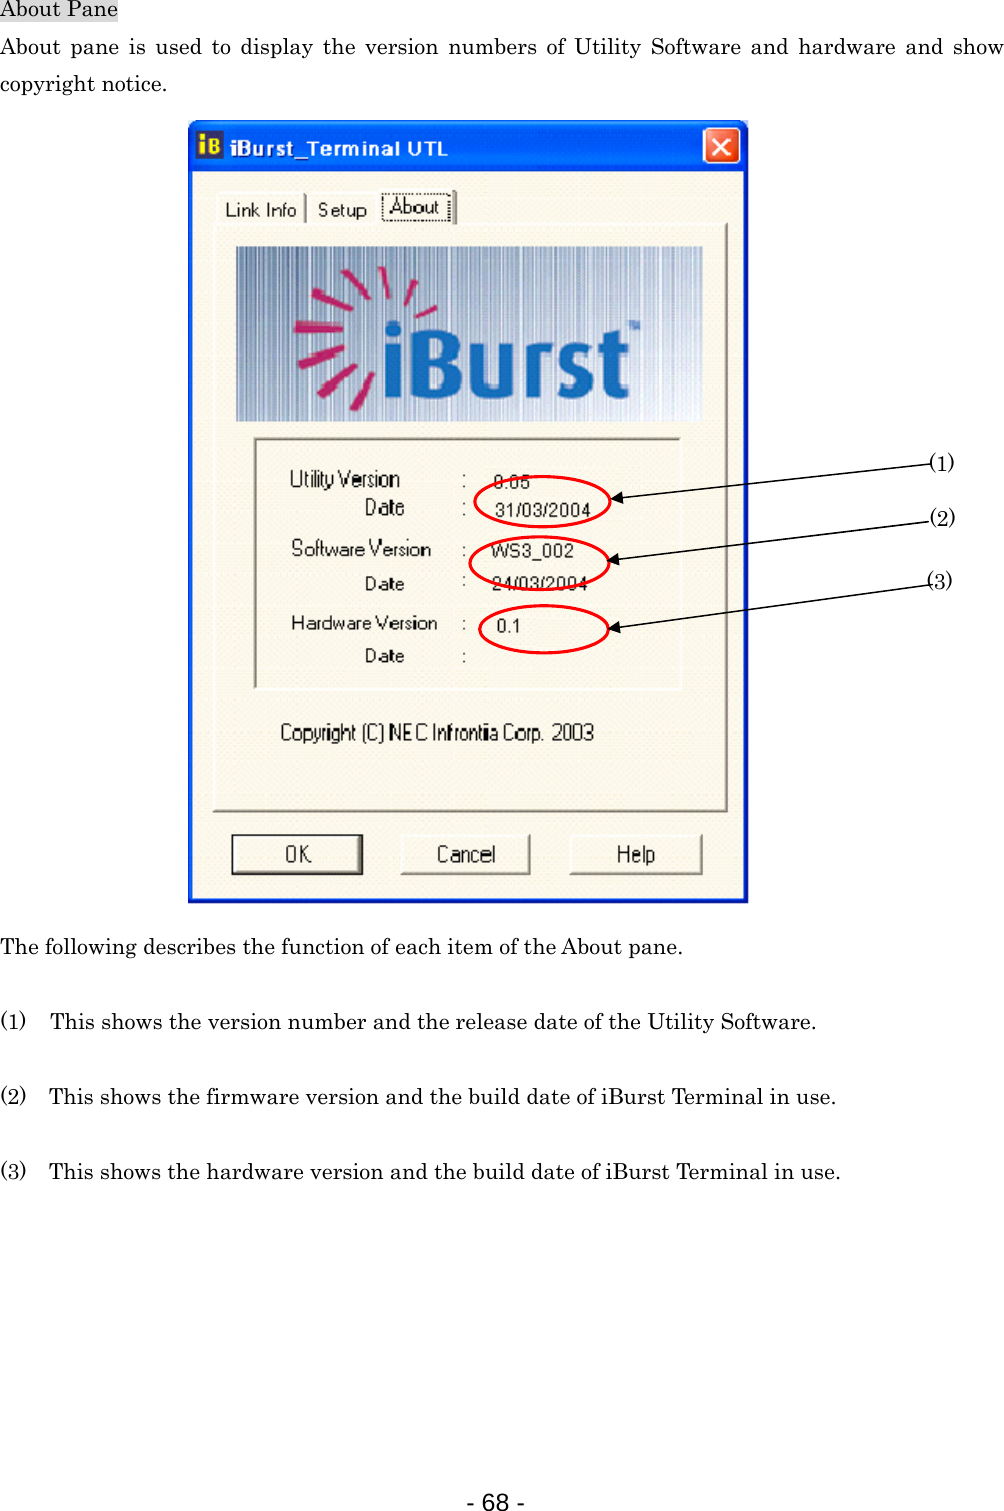
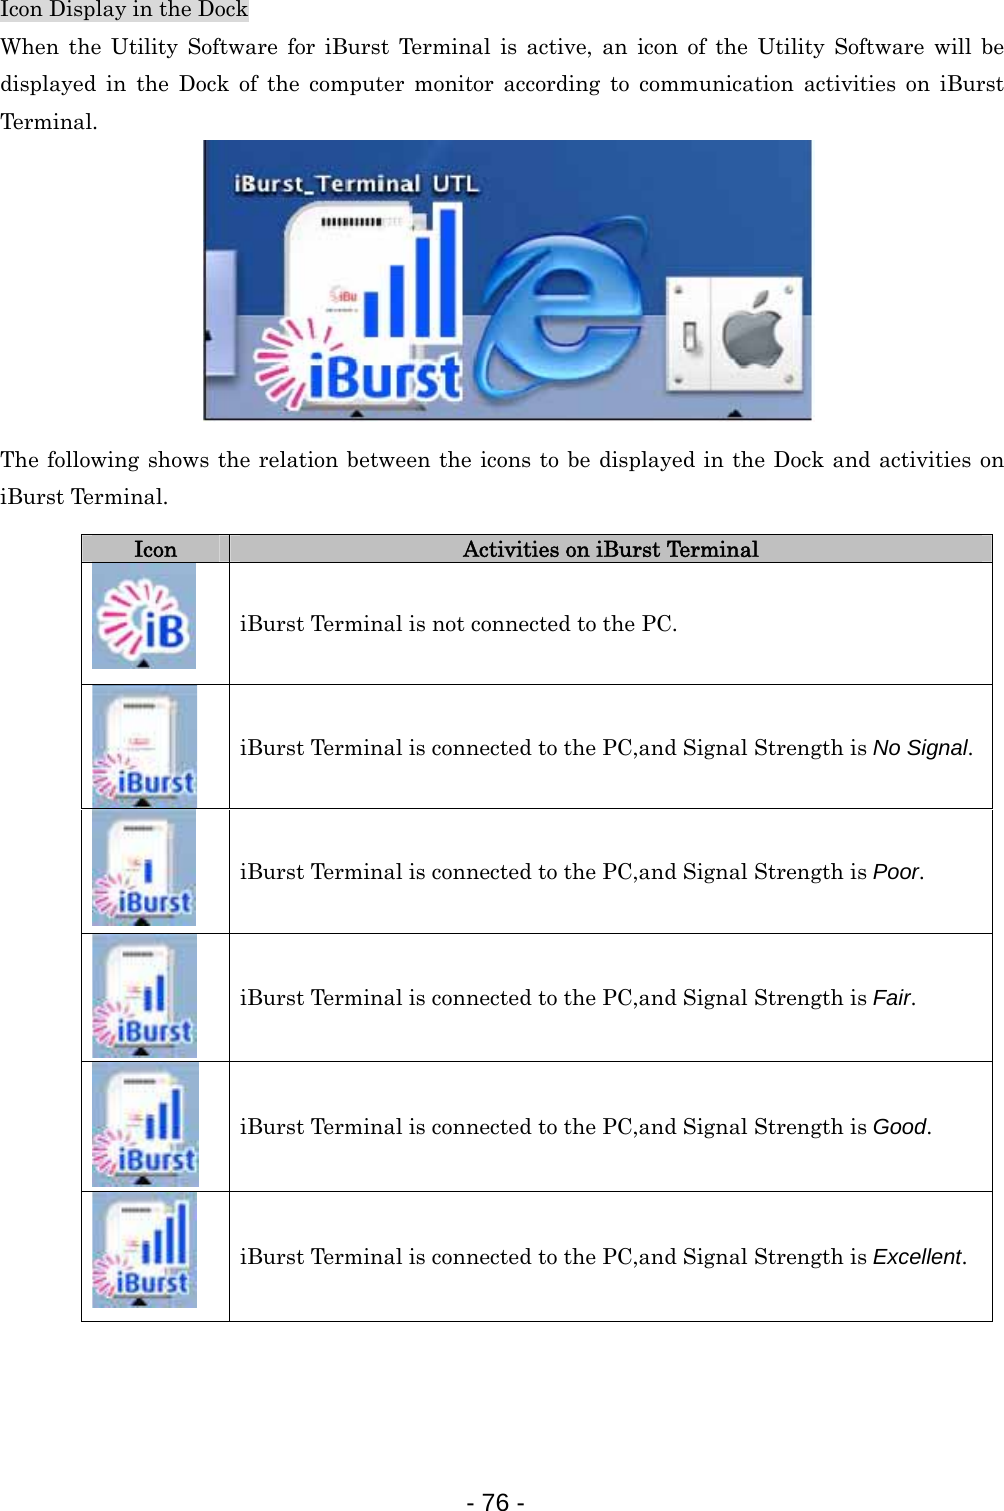
![Menu Bar It will be displayed when the iBurst utility starts. (1) iBurst_Terminal UTL menu The menu is used to quit iBurst Terminal utility or to perform other operations. (2) Display Setup menu The menu is used to select displaying or undisplaying status information in the [Link Info] window. The function is the same as that clicking the [Apply] button in the [Setup] window. The checked items will be displayed, and the unchecked items will not be displayed in the Link Info window. (3) Help menu The [Help] window will appear when help menu is selected. - 75 -](https://usermanual.wiki/Kyocera/IUD19AA.User-Manual-2/User-Guide-442621-Page-25.png)
![iBusrt Software Uninstallation Uninstallation for Windows XP/2000 1 Close all programs that are currently running. 2 Remove the iBurst Terminal from the computer. 3 Click the [Start] button, followed by selecting [Control Panel] as shown below. Click [Add or Remove Programs]. 4 Select [iBurst Terminal] software, and click the [Change/Remove] button. - 78 -](https://usermanual.wiki/Kyocera/IUD19AA.User-Manual-2/User-Guide-442621-Page-28.png)
![5 Click the [OK] button after appearing dialog window as shown below. 6 The following dialog window will appear, and select to delete or not to delete installation history files before uninstallation, then click the [Next >] button. 7 The following dialog window will appear, and uninstallation of software begins. - 79 -](https://usermanual.wiki/Kyocera/IUD19AA.User-Manual-2/User-Guide-442621-Page-29.png)
![8 Click the [Finish] button after appearing dialog window as shown below. - 80 -](https://usermanual.wiki/Kyocera/IUD19AA.User-Manual-2/User-Guide-442621-Page-30.png)
![Uninstallation for Windows Me/98SE 1 Close all programs that are currently running. 2 Remove the iBurst Terminal from the computer. 3 Click the [Start] button, followed by selecting [Control Panel] as shown below. Click [Add/Remove Programs]. 4 Select [iBurst Terminal] software,and click the [Add/Remove] button. - 81 -](https://usermanual.wiki/Kyocera/IUD19AA.User-Manual-2/User-Guide-442621-Page-31.png)
![5 Click the [OK] button after appearing dialog window as shown below. 6 The following dialog window will appear, and select to delete or not to delete installation history files before uninstallation, then click the [Next >] button. 7 The following dialog window will appear, and uninstallation of software begins. - 82 -](https://usermanual.wiki/Kyocera/IUD19AA.User-Manual-2/User-Guide-442621-Page-32.png)
![8 Click the [Finish] button after appearing dialog window as shown below. 9 Click the [Start] button, followed by selecting [Control Panel] as shown below. Click [System]. - 83 -](https://usermanual.wiki/Kyocera/IUD19AA.User-Manual-2/User-Guide-442621-Page-33.png)
![10 Select [iBurst Terminal Virtual MODEM] on Device Manager tab, then click the [Remove] button. 11 Click the [OK] button. - 84 -](https://usermanual.wiki/Kyocera/IUD19AA.User-Manual-2/User-Guide-442621-Page-34.png)
![12 Select [iBurst Terminal Virtual COM Port(COMx)] on Device Manager tab, then click the [Remove] button. 13 Click the [OK] button. - 85 -](https://usermanual.wiki/Kyocera/IUD19AA.User-Manual-2/User-Guide-442621-Page-35.png)
![14 Click the [Close] button. 15 Click the [Start] button, followed by selecting [Control Panel] as shown below. Click [Network]. - 86 -](https://usermanual.wiki/Kyocera/IUD19AA.User-Manual-2/User-Guide-442621-Page-36.png)
![16 Select [NDIS(PPPoE)Usermode I/O Protocol for iBurst Terminal-> xxxxxx] on Configuration tab, then click the [Remove] button.(Repeat the above steps if the other [NDIS(PPPoE)Usermode I/O Protocol for iBurst Terminal] components are installed.) 17 Click the [OK] button. - 87 -](https://usermanual.wiki/Kyocera/IUD19AA.User-Manual-2/User-Guide-442621-Page-37.png)
![18 The dialog window shown below will appear, click the [Yes] button, and restart your PC. - 88 -](https://usermanual.wiki/Kyocera/IUD19AA.User-Manual-2/User-Guide-442621-Page-38.png)
![Uninstallation for Mac OS X 1 Close all programs that are currently running. 2 Remove the iBurst Terminal from the computer. 3 Open the folder [Applications¥iBurst Terminal¥Uninstall], then double click the script file [uninst_iburst_terminal.command]. 4 The terminal window shown below will appear, enter user’s [password] and [Enter] key. - 89 -](https://usermanual.wiki/Kyocera/IUD19AA.User-Manual-2/User-Guide-442621-Page-39.png)
![5 Enter [y] or [n] key, and enter [Enter] key. 6 Enter [y] and [Enter] key to restart your computer. Note : You would have a problem for iBurst Terminal uninstallation, if you will change MAC Terminal property during uninstallation. Please do not change MAC Terminal property during uninstallation. - 90 -](https://usermanual.wiki/Kyocera/IUD19AA.User-Manual-2/User-Guide-442621-Page-40.png)